Transcripts
1. Introduction to Shutter Speed: Good day. My name is Warren Marshall. I'm a professional photographer and photographic educator from Newcastle, Australia. In this class, we're going to learn all about shutter speed. Shutter speed is one of the basic functions of our camera. It's one of the functions that controls their exposure. How bridle hair darker images. It's also a very creative option that we have in our photography. Good I, shutter speed to me is one of the most creative parts of photography. It's the thing that I get excited about. Light and shutter speed are the two basic things that I experiment with and I love to play around with. So shutter speed can be really creative. It has a primary and secondary consideration that we need to be careful of. Similar to our aperture. The primary consideration of our shutter speed is to get our exposure correct. Make our picture not too bright, not too dark. We're gonna talk about that a lot in this class. And that's one of the basic things that we have to get right when we're being a photographer, when we're shooting photographs. That's great. All right, Here we go. The secondary consideration of our shutter speed is the bit that's exciting. It's the bit that allows us to do really creative stuff with the, the fast shutter speeds or slow shutter speeds. And understanding how to do that and incorporating that with other features such as flesh or Astro photography or night photography, portraits, all of those sorts of things. Everything that we do in photography pretty much relies on correct shutter speed. Choosing the correct shutter speed for the situation that we've got. And a lot of the things that are outside the square, lot of the things that you haven't seen before or things that you might want to try that a really unusual, generally rely on shutter speeds in some way. So come along, have a look at this class. I'm sure you'll get a lot out of it. It may be the best class you ever do because shutter speed is such an integral part and a creative part of their photography process.
2. What is a Shutter?: Thanks for joining us in this class. What is a shutter? A shutter is a device that allows light to pass through. It closes light off and opens up to allow more light through. In the back of your camera, you have a shutter directly in front of your image sensor. And when you press your shutter release button, it opens up the shutter for a certain amount of time, and it allows light to go through onto your sensor to create your image. It's similar to this film camera. When we open the shutter on this film camera, we press the shutter button and you'll see shutter opens and closes. We can vary the amount of time that that shutter opens and closes by simply changing our shutter speed. The shutter speed that we use will determine how much light gets into our camera, onto our sensor and how bright your picture is. It's quite logical. The slower shutter speed, the more light gets onto that sensor, the brighter picture will be. The faster our shutter speed, the less light gets through onto the sensor, the darker a picture will be. So if we take a photograph and it appears too dark, we can simply slow down our shutter speed and that will make our picture brighter. Our aperture also has a bearing on this, but our shutter speed is one of the factors that control have brought our picture is with their digital cameras, there are various ways that we can control our shutter speed or change our shutter speed. Some cameras have a control wheel at the back or the top that you can simply turn and that will change your shutter speed. Are the cameras have various other ways to do it. You'll need to check your camera's manual to be able to tell you how to change the shutter speed. But it's generally the most basic change that you can make to your settings in your camera. I prefer to shoot in manual mode where I have full control over my shutter speed, my aperture, and other variants in my camera settings. But you may prefer to use one of the automatic settings. Your shutter speed is still a big part of exposing your image, whether your camera is controlling it, or whether you're controlling it yourself.
3. Changing Shutter Speeds: Your shutter speed is generally displayed on the back screen of your camera or on the top screen or in your viewfinder, depending on how you prefer to look at it. The shutter speed is generally a fraction of a second. So it could be one over 21, over a 100, one over 500, depending on the shutter speed that you have selected. Some cameras don't display the fraction. Some canvas simply display the denominator of the fraction, which may be 30, 50, a 100. You just need to assume that that is a fraction is one over 31 over 51 over a 100. Now, your shutter speed is generally one of the largest display settings on your screen. The shutter speed is on the left-hand side. The aperture is generally on the right-hand side with an f-number in front of it. And you can control it quite easily by turning your control wheel, your thumbnail or your finger wheel, or the way that your specific camera does it. Most cameras can use a shutter speed as fast as one hundred thousandth of a second, right down to a slow as thirty-seconds. Now the faster shutter speeds are generally displayed as a fraction. As I mentioned, one, I've write 1000, one over 4 thousand. The slower shutter speeds are designated with some quotation marks or some apostrophes. So those apostrophes mean full seconds. So you can go from 1 second right down to 30 seconds. Generally speaking, that's the longest date your shutter speed will go. There are a couple of other settings on a lot of cameras. Most cameras will have a bulb setting as well, which is generally pass thirty-seconds. Or some cameras display it on their exposure mode dial. There'll be a be sitting up here, which stands for bulb. But your bulb sitting is a setting where you can hold your finger on the shutter as long as you like, and then let it go. Your shutter will open when you hold your finger on and it will close when you let go. So you can control exactly how long that shutter speed is. Now it's generally only useful for multiple second exposures. I don't think you'd be able to hold your finger on the Bot button and do a one to a 100 through a one-one thousandth of a second exposure. It's generally multiples of one seconds. So if you want to shoot fireworks, for instance, and you want three bursts of fireworks in that shot. You don't know exactly how long that's going to take. So it's difficult to put a number into your shutter speed of four seconds or five seconds or 10 seconds because you're not sure how long it's going to take. So with your bulb setting, you can hold your finger on the button. Bom, bom, bom, the fireworks go off and then you take your finger off. So you can control how long that shutter is open for. It's also useful for a lot of other things that we'll go into a little bit later. Some cameras also have a time sitting, which is slightly different to your bulb setting. It's quite a handy setting to have. A time setting means that you can press your shutter and let go of it and your shadow will open. Then you come back later and press it again and it will close. So rather than have your finger on the shutter button for that period of time, you can just press the shutter, it will open and then press the shutter and it will close. So the time setting in the bulb setting a slightly different. Now, if you're doing super long exposures, you may want your shutter to be open for a couple of minutes, then either one of those settings will be fine. On the bulb setting, you could hold your finger on there for two minutes if you wanted to, but you're going to get a sore finger and you're going to be moving your camera around as well. So in that case, you would use a remote shutter release. So you would just set your camera to the bulb setting, press remote release. It will open up the shutter and then you can lock it. And as your shutter comes to an end, you can just press it again and it will close your bulb setting. So that's much easier than actually touching your camera to do it. Your camera's not going to move around. And it'll be easier than holding your finger on it for that period of time. So your shutter speeds vary between 100 thousand, which is the fastest on most cameras nowadays, right down to as many seconds as you want. You can hold it open for four or five minutes if you want to.
4. The Primary Purpose: The primary purpose of our shutter speed and changing our shutter speed is to get our exposure correct to make our image brighter or darker to suit the purposes that we want with the final result. So if we use a fast shutter speed, it generally makes every image a little bit darker because there's less light getting through to the sensor. So at your image appears darker. If we use a slower shutter speed, it tends to make our image brighter. So if we're at the park taking a photograph of something, the image is too dark. We can simply open up your shutter speed for a bit longer, which means a slower shutter speed. And that will make our image appear brighter because more light is getting through. It's very logical if you think about it. Now the language that you use in your head to describe this stuff will make it much easier. So when you're thinking about shutter speeds, think about faster or slower rather than higher or lower. Because we've got fractions to cope with here and full seconds. Plus it makes it a bit more difficult if you're using words that don't relate exactly to the motion of the shutter. So when you're thinking in your head, think about faster or slower shutter speeds because it's logical, a fast shutter speed will let less light in my picture darker. A slower shutter speed will let more light in and make your picture brighter. So we can vary how bright or how dark and pictures with their shutter speed. We can also do that with our aperture, as you've seen in some of our other classes. But our shutter speed is one of the major factors that determines the brightness of our photograph. Now we can control our shutter in a couple of different modes on your cameras. We can use our camera in manual mode, as I've mentioned previously, which is what I like to do. I'd like to be able to sit my aperture and shutter speed to give me the correct exposure that I want within the parameters that I'm looking to produce the image that I'm after. The second way that we can do it is by using shutter priority, which is supposedly a semi-automatic sitting with shutter priority, which is S or TV on your exposure mode, dial. On air saw TV, which is shutter priority. You can control the shutter speed and your camera controls the other functions of your exposure, your aperture, and sometimes your ISO as well. So you can control your shutter speed to 1 100th of a second, for instance. And then your camera will control the other functions to produce the exposure that the camera wants to do. Now, as I've mentioned previously in other classes, it doesn't always get it right, which is why I'm not a big fan of shutter priority. Because it's trying to produce something that the camera once rather than what I want. So I much prefer to be in full manual mode so I can control my shutter speed as well as my aperture. The other reason why I prefer to use manual setting with my exposure is because I do a lot of flash photography. And with flash photography, there are a couple of other issues that we need to think about do with their shutter speed. I'm limited with my shutter speed as to how fast I can have my shutter speed to synchronize with my flesh. For basic flash photography, I need to keep my shutter speed below 1 200th of a second because that's my flash synchronization speed. So if I'm in control of all of that Whitman manual exposure, then it makes it so much easier for me to control my flesh exposure and my ambient exposure. We'll be talking much more about flesh and the relationship between flesh and ambient light in another class.
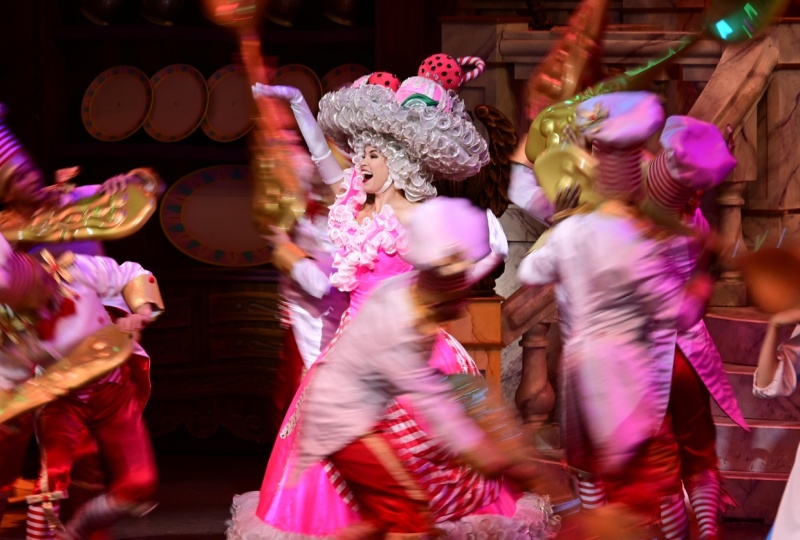
5. Let's Get Creative: So the primary consideration of our shutter speed is to get our exposure correct, or the way that we want it to be. The secondary consideration of our shutter speed is freezing or blurring of motion. Because the longer we have our shutter open for, the more chance we have of something moving within that frame to create a bit of blue in the photograph. Now this is a major issue with camera shake. If we don't want any blur now photograph, then using a shutter speed that's too slow can be a problem. Generally speaking, we need to keep our shutter speeds on the faster end of our scale. If we want a hand holding a camera, We're hand holding your camera at say, 2.5th, then it's very difficult to hold that camera still. We're going to end up with a blurry picture from the camera moving in our hands. And this same principle applies right up to about a 100th of a second or once you a 100th of a second. For most people, if we use a shutter speed that's faster than 1 100th or 1 200th of a second. Generally, we don't have so much of that camera shake showing in our photograph. But if we go down below that 1 100th or slower, then we're going to get camera shake now. Image and camera shake is the single biggest problem that people have with digital cameras today. So camera shake is that big issue and our shutter speed will help to keep your shutter speeds up to the higher level. Now we can use that blur with those longer shutter speeds in creative photography. We can use it in a number of different ways, which I'm going to talk about now. So the slower shutter speed, the more blur we have in our photograph, we can use blur in a number of different ways with their image. We can take advantage of that camera shake and move our camera during the exposure to give us an artistic top of a blur, top of movement in our image. Look really great. And you'll see some images accompanying me here where you can see that Blurb has been used in some images. I have moved my camera upwards using a shutter speed of maybe a tenth of a second or an eighth of a second to create those vertical blue lines. In other images, I've pan the camera sideways so that, that horizontal movement of the image of the camera creates the blue lines. Generally speaking, whatever the predominant angle of your subject is, is the way that tends to be the best to move your camera. So if I'm shooting a lot of vertical tree trunks, then our generally move my camera upwards. If I'm shooting horizontal waves on the beach, then I might move my camera horizontally. If I'm shooting angular poles or something like that or, or trees that are on an angle, I would move my camera parallel to them. Now it's quite a tricky technique to use because we're used to holding a shutter still when we're shooting and when I teach this to a lot of my students, so I find that they'll move their camera and then stop it when they push the shutter. So the technique is that you need to keep moving your camera and shoot as you move and continue with that movement as smooth as possible. Similarly, when you're panning, the idea is if, if I've got a cyclist going past and I want to pan with him to keep him sharp and to keep that background a bit blurry to give the impression that he's moving quickly. I need to pan with the cyclist so that I'm moving at the same speed is here. It's quite a skill to develop to be able to do that. And a lot of photographers do it really well, particularly race car photographers in sports photographers. So it's a learned skill and it takes a little while to be able to follow that, that image really precisely so that you keep that subject nice and sharp and your background quite blurry. And you'll see a couple of images here where that's been done. Now, also we can use in camera movement as just as a creative sort of a movement. We can pick a subject and move our camera around to give us an artistic representation of that image. We could hold a camera still for certain time and then move it towards the end of their exposure. Or we can just simply keep moving it as we go. So we get a series of lines or series of abstract lines with the colors of that particular scene within that image. And that can look really great as well. The slower shutter speed, the more blur and the more indistinct that subject will be, the faster shutter speed, more obvious that shape or that subject will be within our frame. Now I often use Flash for my photography as you know, and I like combining flash with this in camera movement. So if I use Flash, I can freeze my subject and then move my camera afterwards. So i've, I've got a shutter speed of maybe 1 second. I can take my picture, my flash fires, and then after that flesh flies, I can move my camera. And that gives me an image, a sharp image, and a blurred image behind it. So I can do various different things I can use to fleshes. I can have one flush at the beginning of the shutter, move my camera, and another flesh at the end. As you'll see in these shots. So that I've got two different poses and the lines, the movement lines between those two sharp images. There's a multitude of different ways that we can use our shutter speed to produce these kinds of images. When we're shooting at night, we can use flesh and blue are techniques as well. We can use a flesh to freeze your subject and then just move our camera a little bit so that those lines in the background are a little bit blurred and a little bit of movement. It gives a real different look to your image, as you can see from some of these shots. Let's go down years to place our picture that I didn't see. He had his hand around your waist and a smile on your face like the way you look at me. It's only eight months ago he was holding your hand slow dance in kids. And I don't know how to compete with that because you were friends who were kids and it's still feels like we just saw only met. Yeah, I was thinking that you've only felt this way for me. You always see me. I'm the only one you want to be with. So wagon I believe. Now the other end of the scale of our shutter speed is the faster shutter speeds. So they're going to freeze the motion because it's a very fast shutter speed. And there's no room for movement in that image when we take it, either camera movement or subject movements, so that subject is going to be portrayed as sharply as possible. So again, a lot of sports photographers use this technique to shoot at very fast shutter speeds to be able to freeze motion. Now, to do that, we need to have an adequate amount of light coming into our camera because that fast shutter speed is not going to give us a lot of light into our camera, onto our sensor. So we need to compensate by making our aperture larger or increasing our ISO. So that's the balance that we have. If we choose a particular shutter speed, we need to compensate our exposure by changing our aperture or our ISO to give us the correct exposure. So it's a combination of those two different things. Choosing the shutter speed is kind of get us what we want and then getting our exposure correct in that image. Now, long shutter speeds are, to me the really creative part of photography. I love using long shutter speeds. I love shooting at night. I love doing light painting. I love doing flesh and blurry images. I love just leaving that shutter open because it gives me the chance to capture a period in time rather than just an instant. Every photographer is different, but that's the sort of stuff that really interests me and that's the sort of stuff that I like to pursue. And when we're shooting in the dark, we can afford to use those slow shutter speeds because there's not a lot of light around. So with a normal camera, you can shoot it to seconds, five seconds, thirty-seconds if you want to, to be able to create images like this, that will make your shots look that little bit different. And cameras nowadays are amazing. We can capture beautiful images simply by using those long shutter speeds. Obviously with the stabilized camera, we need to use a tripod or a monopolar or some way to stabilize your camera throughout that exposure if we want a sharp image. But we can also use that Technique, as I mentioned before, there's a whole range of different things that allow us to be creative with their shutter speed.
6. Your Project: Your project for this class is to simply produce two images, one at a fast shutter speed, and the other one at a slow shutter speed. It doesn't need to be any particular value, but just think the faster interviewer shutter speeds will be anywhere from 1 100th up to one hundred thousandth of a second. The slower shutter speed would probably be multiple seconds. If you don't have a tripod to hold that camera's still, you can just rest it on a wall or a cupboard or anything that you can find that's going to keep your, your camera stable. You can also do some creative movement with our shutter speeds. There's long shutter speeds if you want to. But should two images upload them to our project section with a little bit of information about what you did and what you learned. And if you need to ask any questions, please do. I love getting back to people and answering questions. So anything that you're confused about or you're not sure about, please ask me and I'll get back to you as soon as I can.
7. Wrap Up: So to conclude, thank you for watching this class on shutter speed. Shutter speed is a really integral part of the art photography exercise. It's the thing that controls their exposure. One of the major things that control air exposure. It's something that allows us to be really creative as well. But we need to compensate if we're using a slow shutter speed, we may need to use a smaller aperture to get air exposure correct? If we're going the other way using a fast shutter speed, we may need to use a larger aperture or a higher ISO. So these things all work together. You know, I'm not a big fan of the exposure triangle, but aperture and shutter speed are the two basic things that are going to control air exposure. So use your shutter speed, play with it. The more you understand about it, the better the photography you will be. Thanks for watching. I'll see you in the next class.
 Warren Marshall, Passionate Photographer