Transcripts
1. Introduction Trailer: Name is Emil Sigas. I have been an environment
and material artist for about eight years now, and I will be your
instructor for this course. In this course, I will show you everything that you
need to know to create tlilable materials
that are perfect to be used in environments
for both games and film. When I decided to
create this course, I wanted to teach you
multiple different techniques on how to create materials just like we do in
the game industry. And that's what
we will be doing. We will be going over
on how to create procedural materials
in substance designer, how to create materials using both sea brush and substance, and on how to create
photogram try materials. Best of all, is
that I've included both beginner level
material workflows all the way up to intermediate
and advanced workflows, meaning that this course will have something
useful for everyone. We will first go over
on how to create a basic tiles material
using substance designer. We will cover some of
the substance interface, and I will show you in real time on how to quickly
create some tiles, art custom cracks, and create a proper base color
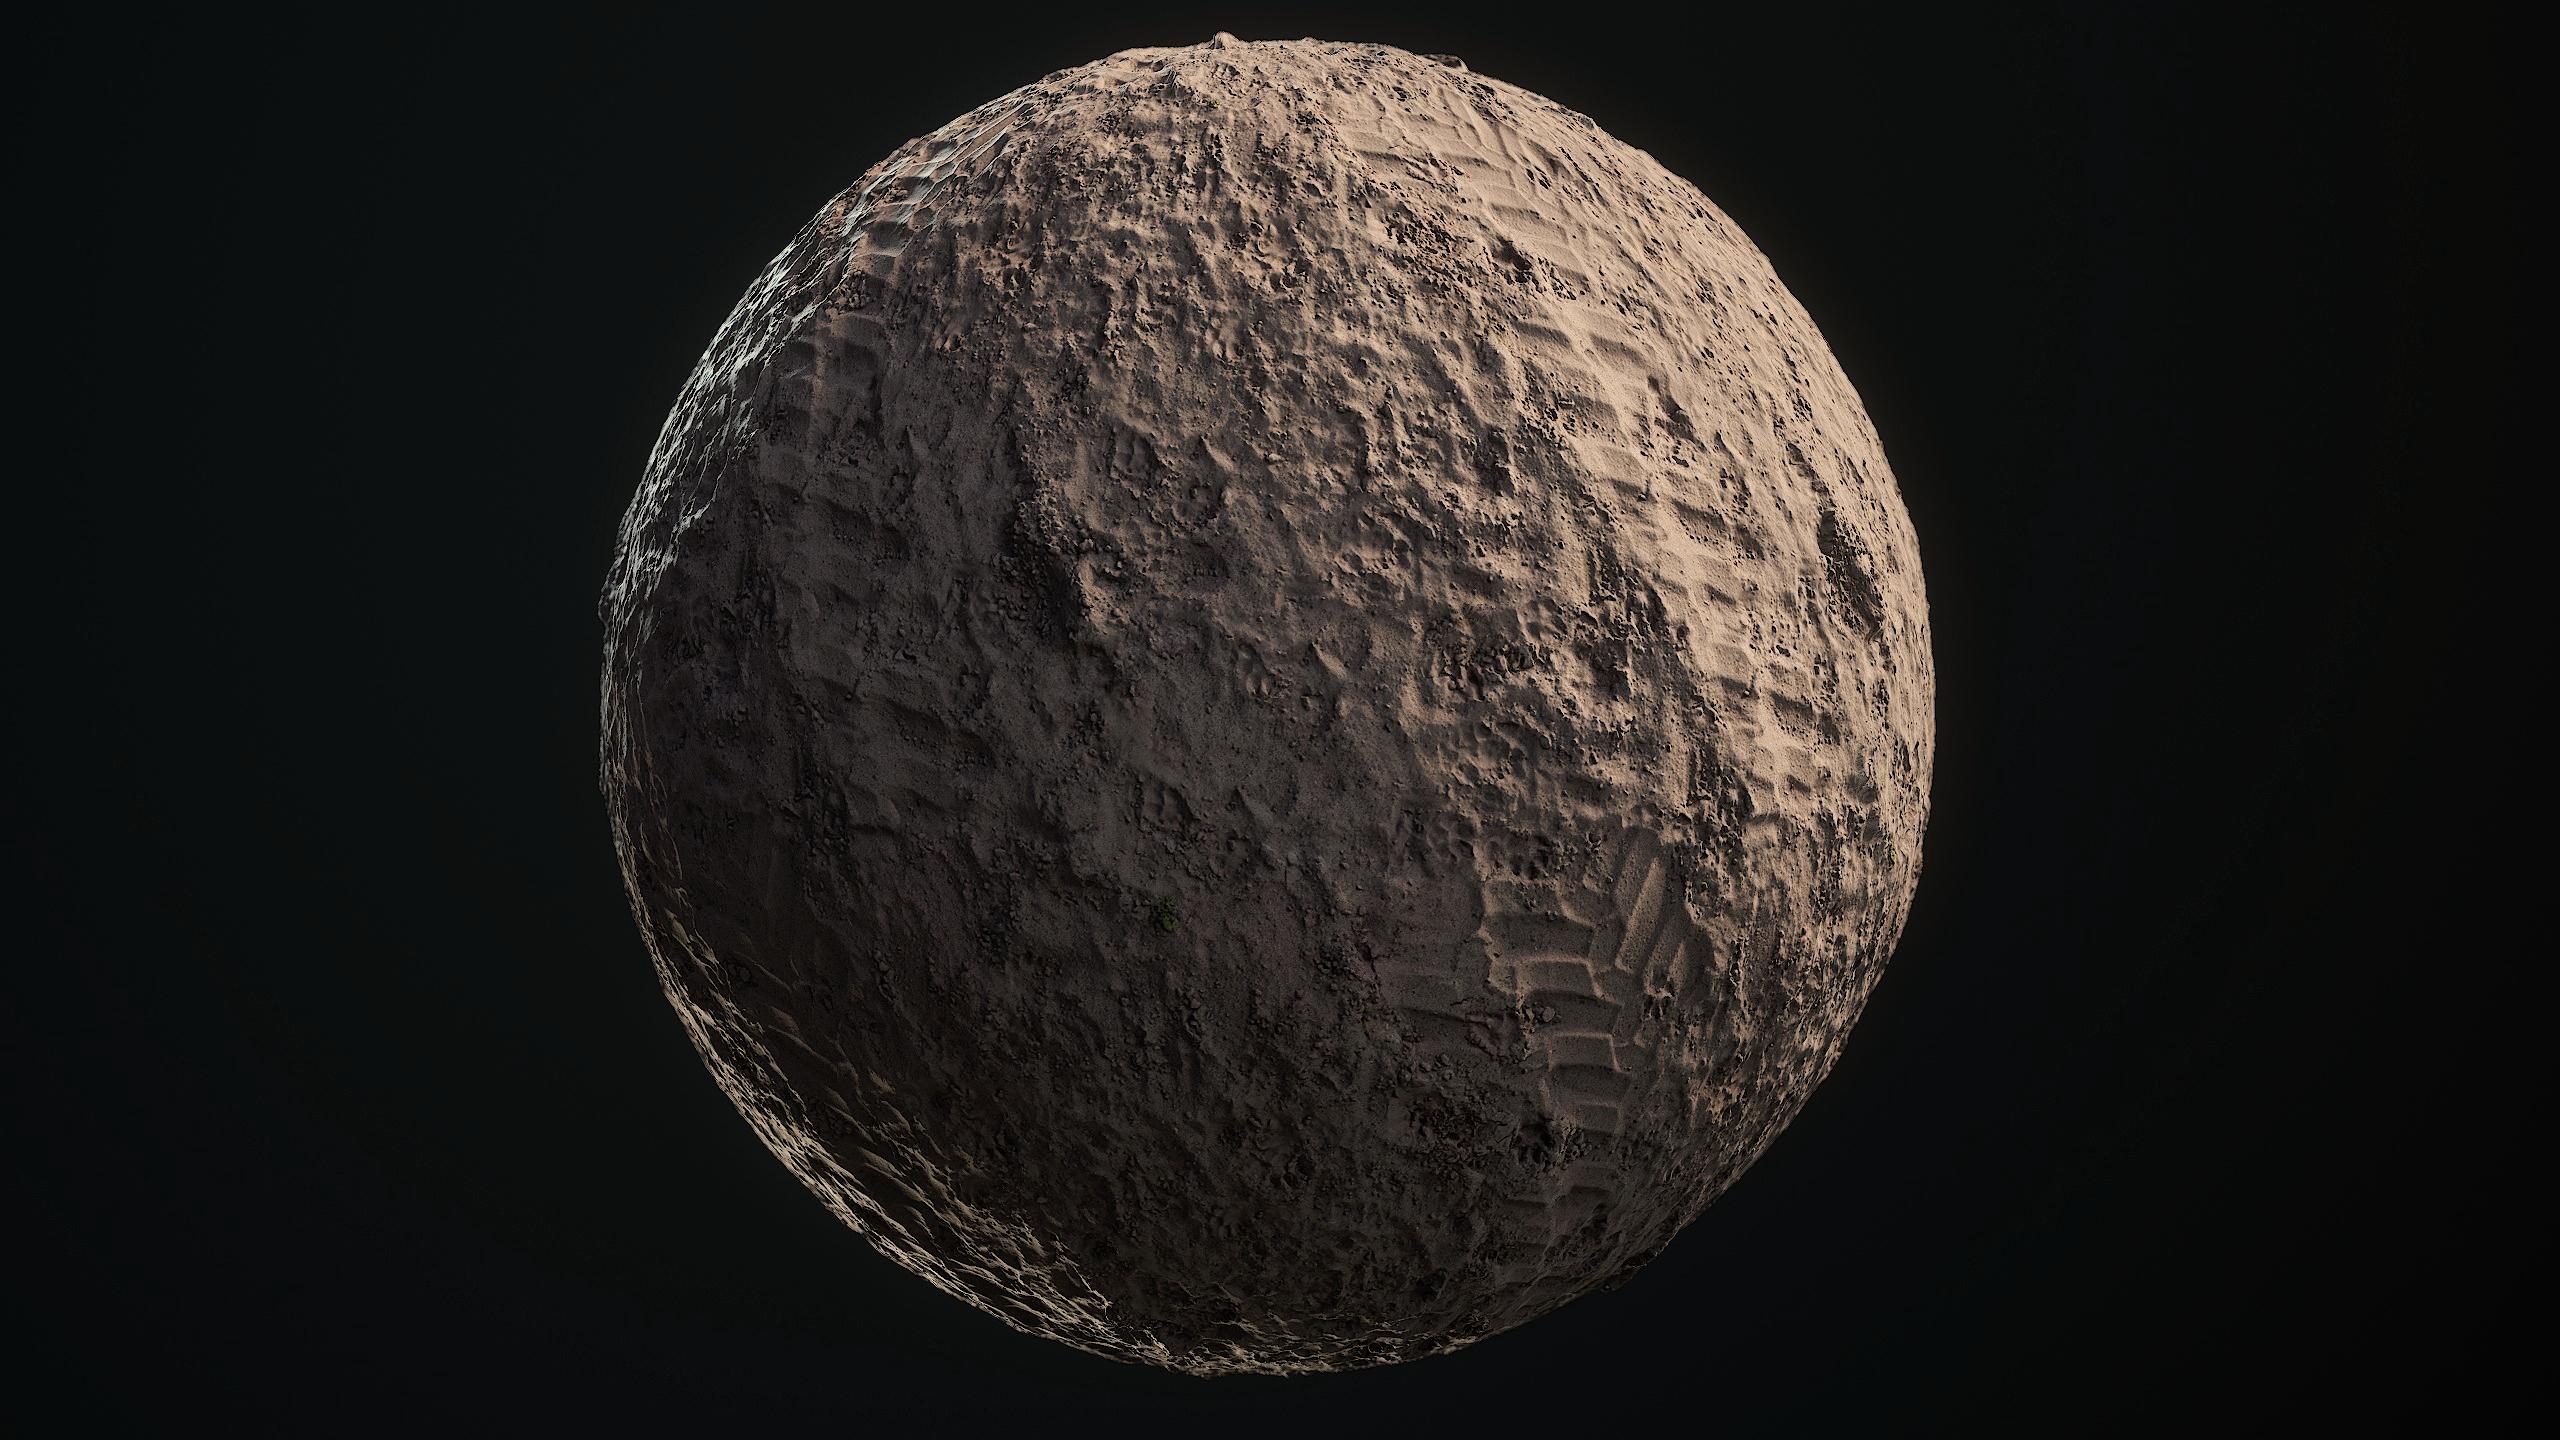
and roughness map. Then once we have covered that, we will go over on how to
create a more advanced, broken tarmac material, also using 100% substance designer. This material will be
a bit more advanced, but everything will
still be done in real time without
any time lapses. Some of the key points
in this material are on how to create
a stone generator, how to create a realistic
base color and roughness, and on how to render a
scene using Mm set TolbacF. In the end, we will have an amazing looking
material that is fully procedural and it has the flexibility to control
how broken a tarmac is, how many stone tears
scattered around, and many more settings. We will then move on to creating a material using Z brush
and substance designer. For this, we will be sculpting all the big shapes using ZBrush. This includes the
ground and the stones. I will also show
you how to place some foliage on your
material using Maya, and then we will bake our
material using MusetTolbag four and finalize it in substance designer until we have a material that
we can be proud of. Finally, for last two materials, we will be using
photogram try techniques. For this, I will actually
take you outside, and I will show you the
techniques I use to scan both a brigair material and the ground material using
a simple DSLR camera. We will then convert
these materials into a tree mesh using reality capture and then bake it down into a two detexture
using marmoset. I will show you how to
make these materials perfectly til using two
different techniques, one of which will be
in substance painter, and the other one will be
in substance designer. All of our materials will be rendered using MamsetTolbk four. But as a little bonus, I have also included an extra chapter where
I will show you how I create an environment in unreRngedFo using
these materials. This bonus chapter
will be done using a time labs as it is not the main focus of
this tutorial course. In the end, you will know
the techniques and workflows needed to create almost any type of environmental material. So that was a quick overview
of tutorial course. If you are interested in more environment
tutorial courses like on how to create props or
even entire environments, then I would recommend that
you look on our store page. I hope that you are excited for this tutorial course
and I hope to see you
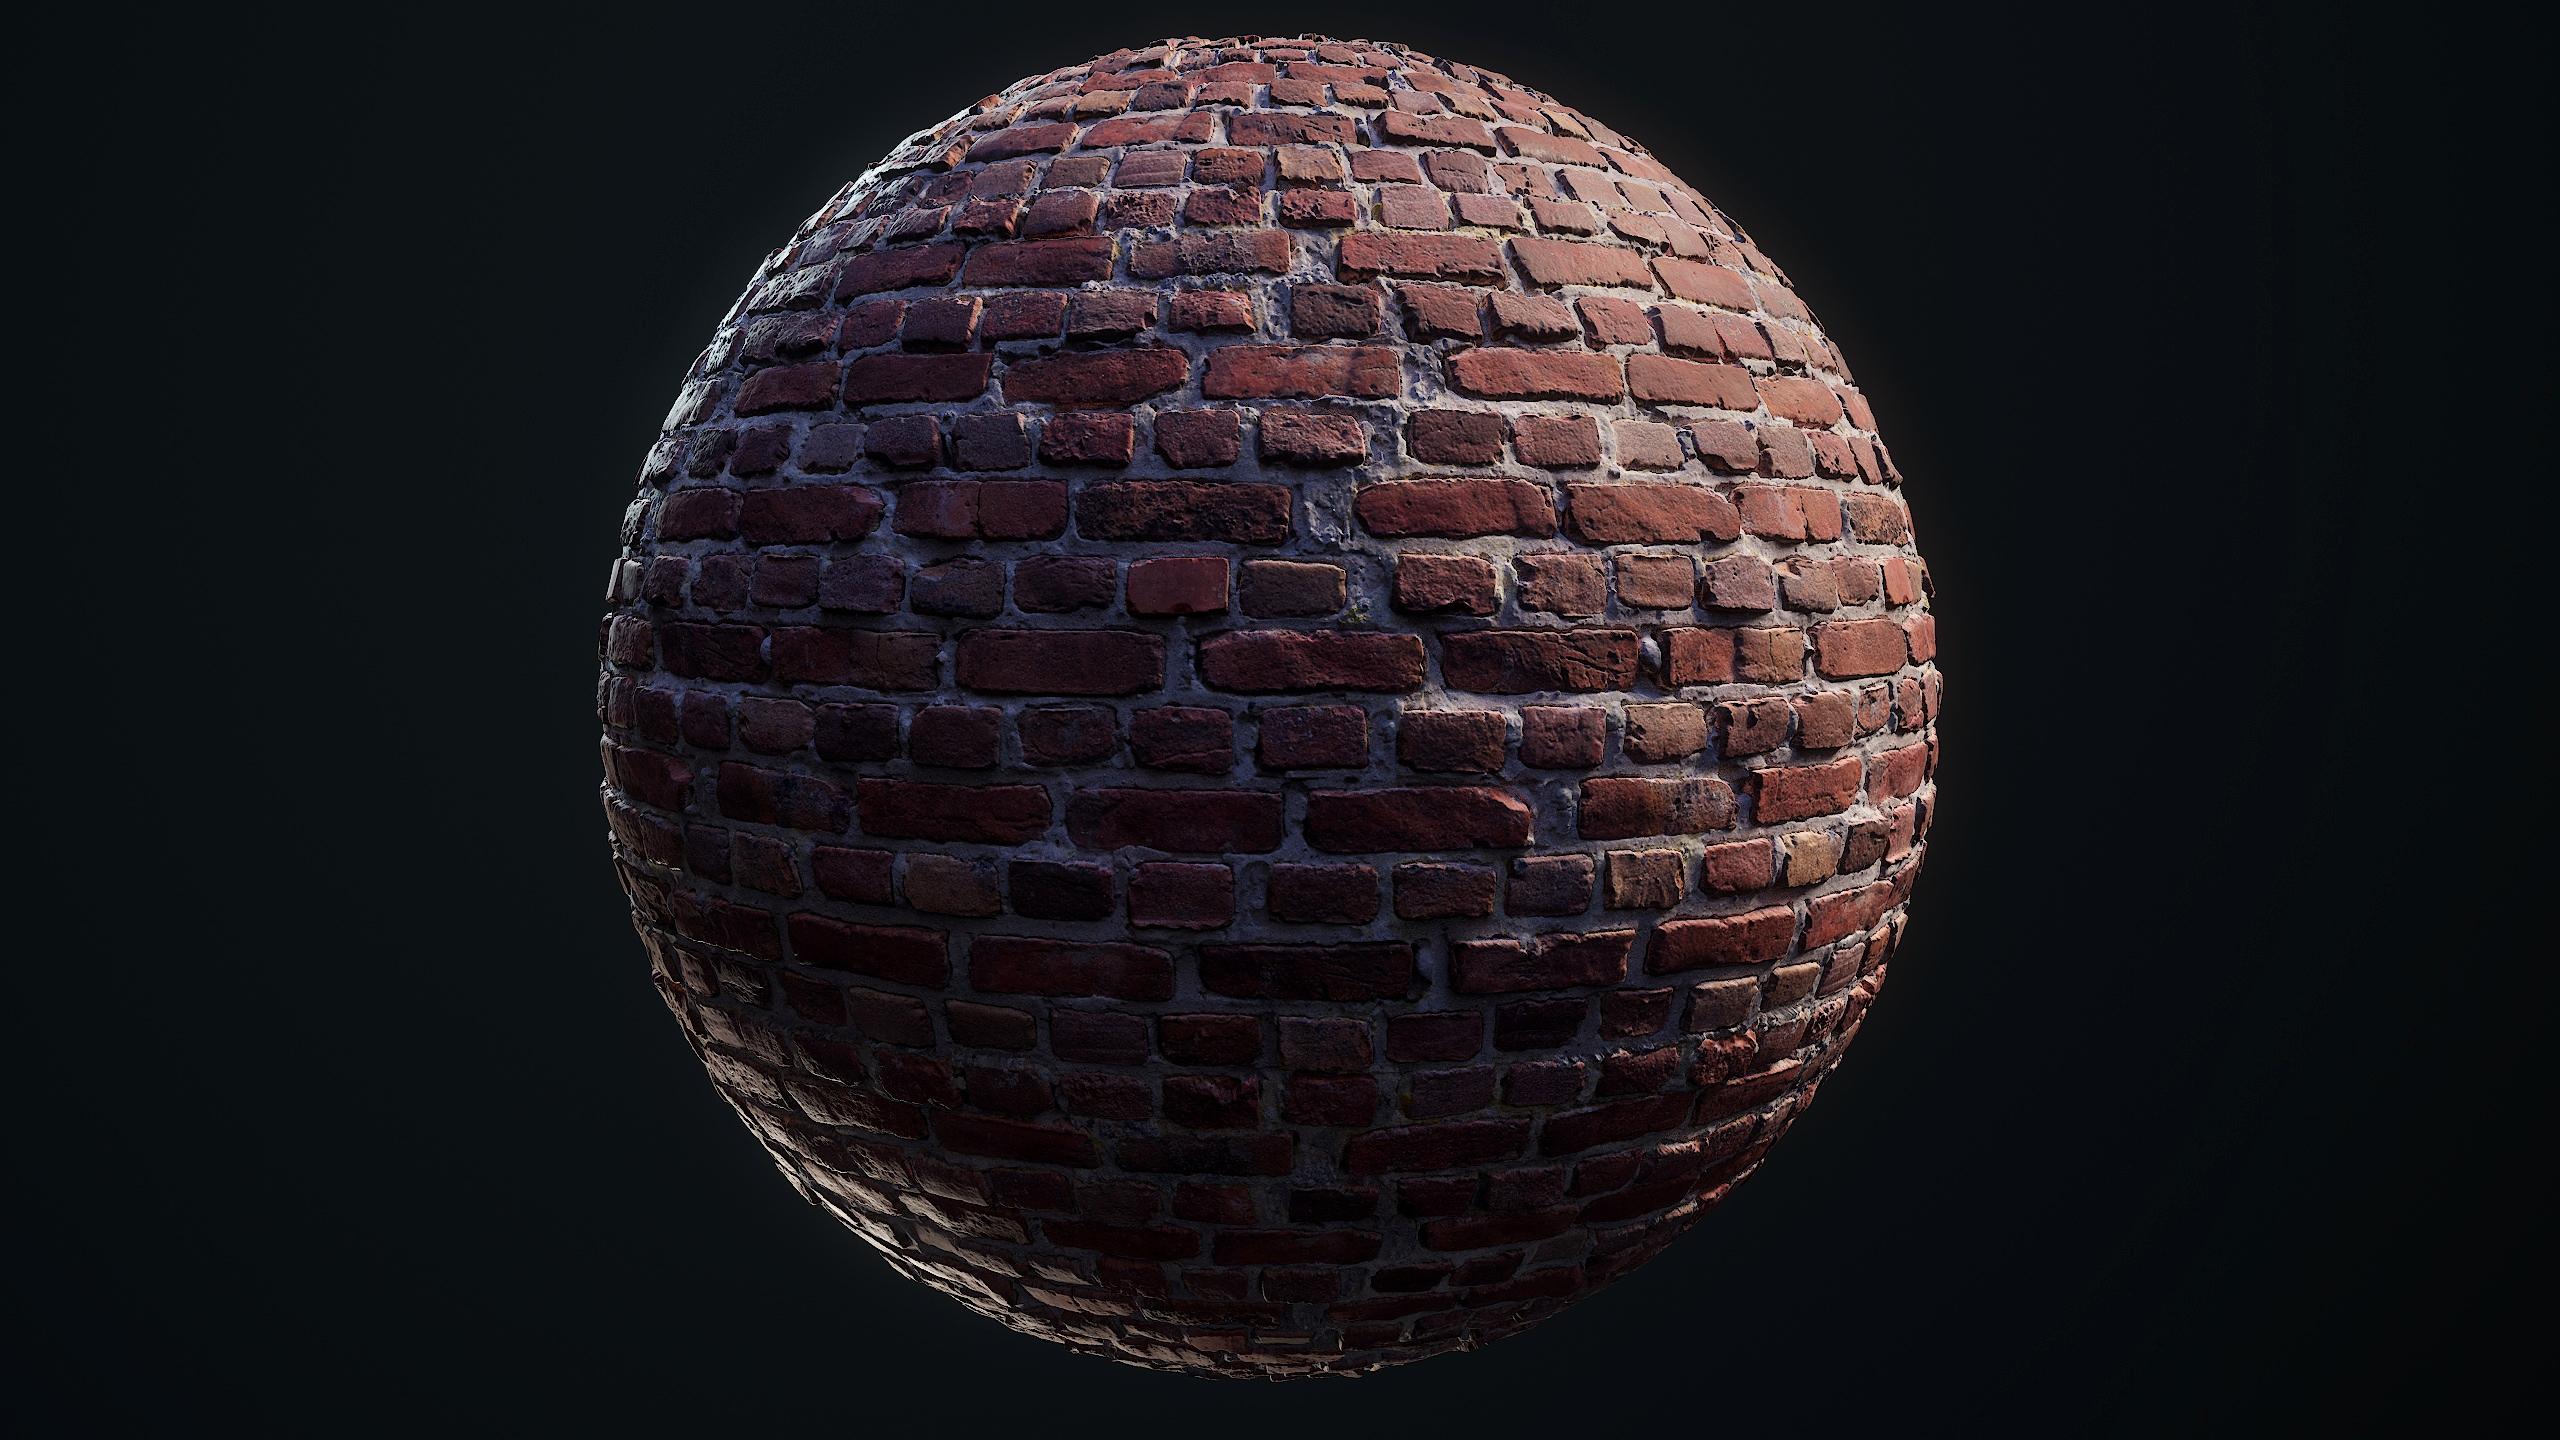
2. 01 Setting Up Substance Designer: Okay, so we are going to get started
with our first material. Now, this material will be a very basic substance
designer material. And the reason why it's basic
is because this one will also include an introduction to substance
designer, basically. Of course, substance designer, it's a very large program, so we will only go over the tools we need to create
something like this. But it's to get you started. And after that, we will do more advanced material in substance. Oh, what I have here is a
program called PureRef. It's basically an
image viewing program. So a lot of artists use
it. It's quite handy. You literally just
dragging your images, and then you can just like you can select them, scale them. But the cool thing
is that they will always stay the same resolution. So I can just keep zooming in. And these images that I
have supplied for you, I've taken them myself. So you can just use them.
They are part of my website, which is called reference.org. And basically, that website just provides free reference image. Yeah, I have some really nice, really high quality
images so that we can see how everything looks. And it's mostly like these three. That's what
we're going to do. So we are basically going to
just create these styles. Nice and basic, it's just going
to be some shape forming, adding some large
details like cracks, adding some very small sandiness in between and just breaking
up the edges a bit. And for the rest, I will also
show you already how to add some very basic stones, and I will just go over this. So before we dive into
substance design, I just want to go
over the material. As I said before, we are
going to go for large shapes. Now, there are very
small stones in here, but the tricky thing
with this is that we probably do not have
the resolution to actually make it
look this detailed up close because resolution is, of course, an important
thing in games. These kind of materials
would almost never really be above 2048 by 2048 in
terms of resolution. Now it does depend on the game. Like some games, you can even boost up the
settings and go to 40 96, which is just a
four K resolution. 2048 is just like a
two K resolution. 1024 is basically one K
resolution 512 is 0.5, and it goes on like that. So within games, you
are often 512-2048. So we need to focus on that. We need to make sure that we get the optimal resolution for this. And that's basically
the general idea. So I think we'll just jump right in and we can have a look. So what I did is I resetted
my entire layout over here. So this is probably
what you have. It will look like
this. However, I like to change my layout. So over here, we have
the library view. The library view basically contains all of the stuff
that we might need. Everything from noises to
filters to just there. Everything that you
would use inside the subsisizer is
pretty much in here. We have a treaty view. If you want to preview
your materials in treaty, you can use your treaty view. However, because this
is a material tutorial, I will actually be using Mom set Tolbag for the previewing. The reason I do that
is because I have much more control and get a much higher quality render out of Mom set Tolbag compared
to this twinVew. This twnVew over here is great. It's very handy to
preview your models. But it's a little bit limiting
in terms of final renders. So what I'm going to do is I'm actually going to just press X because I don't need it.
We have a two D view. Our two D view will
basically later on show our actual texture when
we have created a file. So all of these windows, you
can make them big and large. What I tend to do
is I tend to here, I tend to have my two D
view as like a square, and then my library is just
sitting here with everything on this. So that's
a two de view. Now we have over
here the explorer and basically the explorer is it has to do with saving
all of our files later on. When we create a file, we are able to save it here.
You will see that soon. But for now you can see me just dragging and dropping
this window, and I want to basically have it here at the top, like this. And then we have our
graph over here. The graph is one of the
most important ones because it will actually showcase us building
the material. That will be what
the graph will show. All those notes that
you have probably seen, that's why they will be here. So I'm just trying to
like there we go, see. So now I basically
get this view. So my graph at the top, library at the bottom left to the view explorer
and our parameters. Our parameters are basically our settings. It's
just settings. Yeah. So before I can really showcase you how
to use substance Ziner, the easiest thing for me to do is to first actually create a new file because then everything becomes
activated, basically. So if we go to file
and just go to new substance, we
get this window. So in this window, you will have a lot of
different templates. Now, it all depends
on what you need. Most of the time, if you are working in unreal
engine like us, even in unity, I would say you would go for PBR
metallic roughness, even in 20 modeling programs, almost everything supports
metallic and roughness. So you just want to create that, and that will basically make sure that we have a base
color, a normal map, a roughness map,
and a metallic map, and then additionally
a height map and an ambienoclusion map. So these settings
are very basic. All you will need to do is grab the metallic grauphness
which is your template. You will know if you need
to use a different one. And then the graph
name I'm going to call these tile Oops, tiles
underscore basic. That will just be our save name. Size mode, you just want
to keep it to absolute. Absolute just means
that it will stay at 20:48 by 2048 resolution, which is the one that I
was talking about, see, 512, ten, 24, 2048, 40 96. So we are going to
go for 2048 by 2048. We probably don't need a
higher resolution for this. It wouldn't really make sense. Now, what we can do, the power of substance
is that you can dynamically also
upscale and downscale your actual texture size without getting blurry
or looking bad. So what we can do
is at the very end, when we create our
portfolio renders, we can just very quickly set
our resolution to four K, so 40 96, just to get a little bit more of like
a crisp portfolio render. But you wouldn't
use that resolution in a game engine
most of the time. So you just want to
go ahead and press Okay. And here we go. So it will always
automatically open up our TD view over here.
We can just close it. If you want, we can just
quickly run through it. It is basically just
using your click Rotate. You can rotate, middle
mouse button you can bend around and just your scroll wheel you can zoom in. Now, since we're not
going to cover this, I will recommend
that you simply go to YouTube and on the
official algorithmic page, they will go over all
of these settings. Personally, because I
almost never used this, I wouldn't really want to show, I know how it works, but
I wouldn't be able to, like, perfectly tell you exactly what the setting
does and stuff like that. So I'm just going to close it, and I'm just going to focus
on all of these things. So you can see that
some stuff has changed. We now have a graph, which has a lot of notes
here at the top. These notes you can also
find over here, pretty much. So it's just like shortcuts. Now, you just use your
middle mouse button to move around and your scroll
wheel to zoom in and out. It's not a 20 program, so that's all the buttons
you need to move around. You can, of course,
make the smaller or bigger if you want.
That doesn't matter. I like to just have a nice
view of my two D view. So it will have automatically
created these notes, the base color normal roughness, et cetera, et cetera. Now, it has a base, literally has like a
plain color put in, but later on, these will be the notes that we'll use
to export that texture. So basically, in a nutshell, whatever we plug in here, that's what will be exported
as a texture file. In our case, that will
be a dot TGA file. So yeah, having that. Now, what we will be
using most of the time is because you have
all these graphs and all these things over here. But after you've used
substance for a while, you start to know the names. You start to remember what
everything is called. And when you do that, it's very powerful to use the space bar. If you use the space bar,
you can basically search. So first of all, when
you press space, it will show you all
of these inputs. They are the same
as here at the top. See? You can
recognize the icons. But for example, you can just
go, Okay, what do I need? I need a slope blur. So you just type in SLOP and
then it already knows, Okay, you want a slope blur
and you can just use your arrow keys to find
it and then press Enter. And there you go. So it's a
very quick way to navigate. So that's what I will be using most time. I will press space. So whenever you see this menu, you will know that I pressed
space bar basically. And then of course, I will
tell you what note I need, why I need it, stuff like that. I will go over all
that stuff. Let's see. So in order to actually
properly save a file, we want to go here to
the top in our explorer, right click and press Save. So I made this little folder. In our source files, we
have a saves folder, and in here, we have a
substance underscore basic. This is just because we're also going to make
an advanced one. So I'm just going to go
ahead and press Save. Done, it is now saved. It is all ready to go.
So now at this point, what you would often
do is you would start by building your material. Now, the way that
you want to build a material is you want to go from big details
to small details. And within that, you want to often first create a height map. Then you want to
create your norm map, and then it's up
to you to create your base color and
your roughness map and any other maps, basically. So we are also going
to do the same thing. We are going to
focus on a height map because there are tiles. It would be very cool
if I just give it like that little bit of extra
height in our final render, just to make it look extra nice compared to just relying
on a normal map. So what do we see here? Okay, so the tiles there
are very straightforward. They are basically just
all the same size, and they have a little bit
of, like, damaged etches. And if you look closely, you can see that they have
a little bit of tilting. It's easier to see here. See? Some tiles are slightly
higher than the other ones. This just simply happens. Over
time with all the walking, it just very slightly shifts. And that's basically
what we also want to do. And once we've done
that, we would, of course, focus on our cracks. So we have now set up
substance designer, and we are ready to
create our material. And that's what we will be
doing in the next chapter. We will start by creating
our height map for material.
3. 02 Creating Our Base Tile Shape: Okay, so let's get started with our material with our height
map. What do I want to do? I always just like
to move over here into a bit of a clean view, and I like to get started
here B the way that I worked, the graphs always go
from left to right and they become quite
long in my case. The first thing I want
to do is I want to create the actual shapes. Now our hight map works in whatever is black in
the height map is low. So black means zero. It means there's no height. White means that
there is 100% height, and then we have all the
gradients in between. Those are 255 different
gradients that we can use in order to fake as if we actually have height
in our material. So we're going to make that now. We are going to go to
our patterns over here, and here we already
have some very nice base patterns that
you can often use. And the cool thing
is there are actual patterns that are literally called tile generator
or the tile sampler. The tile sampler is a little
bit more complicated, but I don't think I
actually need it. I think I can just
get away with like a simple tile generator. So you click and write this in, and by the way, if you want, you can just press space
and type in tile generator, and just like that.
You also have it. So if we go ahead and just like preview r2d view,
this is what we get. Now, you can see that you have a lot of settings in
these parameters. They might be a little
bit overwhelming at first, but don't worry. It will get easy quite quickly. Oh, we have these tiles. Now we need to decide how many do we want to have
in our texture. Having bigger tiles means on the one hand that we can put in more detail in those tiles, but on the other hand, it
means that they can be repetitive because this
is a tilable texture. What I mean with
a tilable texture is if you go into
your two D view, if you press space,
this is what I mean, it is repeating. This texture. The ability to repeat this texture is very useful
because it means that you can reuse this texture
over and over and over again on very large
areas of three D space. The problem with that is, is that if we make our tiles very, very large and only have
a few details in them, we will be able to see
those details repeating over and over and over again,
and that is quite bad. So you don't really
want to do that within environment art because
it just looks bad. So I'm going to go probably four Let's Let's see. No eight. Three. Let's do four by four. So we type in the X and
Y amount four by four. Yeah, you know
what? I like that. I like four by
four. That's fine. So having that done, now what you can do is
we need to fix this. Right now it's really soft and that's not really how
these tiles look like. They do have a
tiny bit of, like, a round corner, but not as much. So what you can do with
this is you can go ahead and the pattern, you can just leave it to brick. If you want, you
can go for square. The squares are perfectly sharp. But what I like to do
is I like to go from my patron to brick because
it shows us some softness, and then I like to just set
my patron specific down. And what will happen
is that here, we can make it very sharp, but we still have that
little round corner that you can often
see in here, see? So we just want to try
and get that same effect. So you can just use your slider, and let's start with 0.02
over here in our value. And I'm just going
by feel over here. You want to make sure that
they are not touching, that the tiles are not
touching each other. Now, what else can you do? All of these settings, this
means if you just want to rotate your tiles,
but they're square. It doesn't matter if I
rotate them 90 degrees, it will still look the same. Scale is quite
cool. So the scale, although we don't
really need it, Oh, I should do it like this. We can just control
the scale in here. What we can also do is we
can set a random scaling. This will randomize the
scaling of your tiles. These tiles, you might feel the urge to randomize
the scaling, but these are manufactured
in a factory. This means that
they will only have a few millimeters of error in between them in
terms of, like, the scaling. That is not enough to actually see any difference in scaling. So you just want
to leave it off. We're just going to
go for realistic, even though it's very tempting to do this because this feels a little bit more gamy game ft. But yeah, we're just
going to leave that. Offset. Offset random
is nice, for example, if you want to create
bricks or if you want to change the offset
of your tiles. You can just basically
set an offset. And here, see? So you can just play around with your offset however you want. Once again, we don't need that. Their tiles, they're
very simple. Random rotation, it just
adds some rotation. Now, we can play
around with this, but I think our tiles are two. Here, we literally
go to like 0.00, not even that, 0.001. It's a Btrick you can try and get the tiniest bit of rotation
that you see over here, but I want to go even lower. 0.00, 05. Yeah, I'm just going to give it the tiniest bit of rotation, but I need to make sure that my tiles are not
touching because then the system later on breaks the system that
we are going to create. So as you can see right
now a height map, Black means that
it's plain level, white means that it stands out. But what if you want to
create that variation? Remember how I said, some of the tiles are slightly
higher than other tiles? Now to do that, we can
very simply go down here and we can set
our luminans random. And this will randomize the
gray scale of your tiles. Now if you set this quite low, what will happen is you can see that the darker tiles will be slightly dented in
in our final texture. So we can set this
to like 0.2, maybe. That might even be too
much, but we'll see. Let's start with 0.2 because
we can always go back. And here, that's what just give us this nice extra variation. And over here, you can do
a lot more settings like checker masks, other masks. So you can do a lot of masking in and out, but we
don't need that. So we got our tiles. Now that we have our tiles, now, the next thing that we
would probably want to do is we would just want to
break them up a little bit. We just want to go
ahead and, like, break up these
edges a little bit, and then we'll do the cracks. The way that we do
that is we very simply go in and we
want to press space. Now, there is a node,
and what you can see me doing is I first select my node, my tile generator, and
then I press space. There is a reason for this. The reason that I
do this is so that when I enter something. So we want to, in this case, go for like a slope blur, so slow blur gel. As soon as I press
Enter, it will automatically connect
to each other. If I wouldn't select this
node and type in slow blur, will happen is it we
would then need to go in, click and drag and connect. So it's just one
extra thing less. A sloperGray scale. Basically, the way
that we are going to use it is this node allows us to manipulate
our grayscale mask, basically, based
upon another mask. I'll show you what I mean, and then it makes it a
lot easier to understand. First things first, samples. We need to set this
all the way up. So we want to get
the highest quality, and that's basically
what the samples is. Intensity, let's start by
setting this all the way down. And now we basically
need to input a slope. In this case, a slope
will be a gray scale map. Now, I already know
which map I want because I've used it hundreds
and hundreds of times. So if you go to noises
and scroll down, there is a map called
the moisture noise. This will become one of your
favorite maps, basically. With this map, these
are all noises. They are grungesO we often
call them grunges also. They are very
heavy. They're just gray scale maps that
are random patrons. Now, what you can do here
is you can set a scale. If you want, this will
just tile your map. You can set a random seat, which will just randomize
your map over here. But you do need to remember not every map has this.
Okay, this one does. But let's say over here, if I pick a grunge map, sometimes they have
different settings. So these ones you can control the cracks and the balance
and stuff like that. So with this map, I want to go ahead and not really
do anything about it. I just want to drag
it into my slope. And if we go to our slope,
this is what will happen. If we zoom in and we
set our intensity up, you can see that it
will try to break up our actual gradients based
upon this map over here. But this does not
look very nice. The reason it doesn't look nice right now is because
it pushes out. It isn't cutting away. If you look here,
you can see that it's cutting away
from the shape. Right now, what it is doing is it is just moving
around the shape. That's where the modes come in. If you set your mode
from blur to minimum, minimum means that it
will ignore black. Maximum means that it
will ignore white. So minimum, you can see
that now it's starting to really cut out these
nice little shapes. So we are all of a
sudden starting to get these really nice little cuts. Now a cool thing if
you double click on your slope blur so that you
can see this view over here, and then only click once
on your moisture noise, what happens is that you will be able to change
the settings of your moisture noise while still previewing your previous map, which in this case,
is a slope blur. This is handy because
what I can do is I can go in my
moisture noise now, and let's say I
set the scale up, you can see that things change. The higher I set the scale, of course, I don't have
enough resolution, but yeah, you can see that like the
little cuts, they change. So stuff like that, it's
really nice to work with. Now, what I'm going to do is we have these cuts over here. I want to double click
on my slope blur and probably set the intensity
a little bit low to 0.02. There we go. So we just have these smart
cards. Another problem. These cuts are
everywhere right now, so you can see in here,
they are everywhere. They just keep going
and going and going. But in real life,
sometimes you have some quiet areas and then
sometimes you have some cuts. Then you have some quiet areas again, and then you
have some cuts. So it's very random
where the cuts are. Now the way that we can fix
that here is very simple. We can blend between
the one without cuts and the one with cuts. The way that we do that
is we breath space and we literally type in blend. Now, this blend, what you can
do is you can, for example, plug in the one with the
cuts in the background and plug in the tile
generator that doesn't have the cuts in the foreground. Now, what this blend is
allowing us to do is, well, it is also used as a blend mode, and the blend mode is very cool because it's just
like Photoshop. You just have multiplies, subtract, you have all of
these different modes. But the way that we are
going to use it is we are going to actually
use the opacity in this. The Opacity, you
can see as a mask. We are going to
basically have a mask and everything that is white in the mask will blend oneing. Everything that is black in the mask will blend
something else. And this is how
it's going to work. Let's say that we grab, for example, like
a grunge map 001. This is like a
cool looking mask. If you want, you can play
around with your random seat. Basically just get
something cool. Now I want to go in my balance, and I just want to
drop this down. The reason I'm doing
this is because everything that
will be white will show us I believe it depends on which
order we have it in. But yeah, everything
that will be white will show us our damages. So if we set our balance down
and our contrast higher, see, we can now have a little
bit more exact details. Now, if we plug
this into our past, this is what you will see. Sometimes you will
see some quacks. Over here like this will damage, and then sometimes
it should over here, I should just fade out
a little bit here. There's almost no
cracks here and here, it just nicely fades out. Then you can click on your grunge map once and you
can just play around with your balance if you want to make something look interesting. It's all up to you however
you want to use it. I would say don't go too
overboard with the damages, even though it might be
tempting, just don't. Oh, we got these
damages over here. Now, what we'll do in the
next chapter is we will go ahead and we will start
by creating our racks, which will just nicely
break up some of these surfaces the way that
you can see over here. And once you've done that,
we'll just add some tiny, tiny little stones in there, and then we can already
call this pretty much done. So let's well the
shape, at least. So let's continue with that.
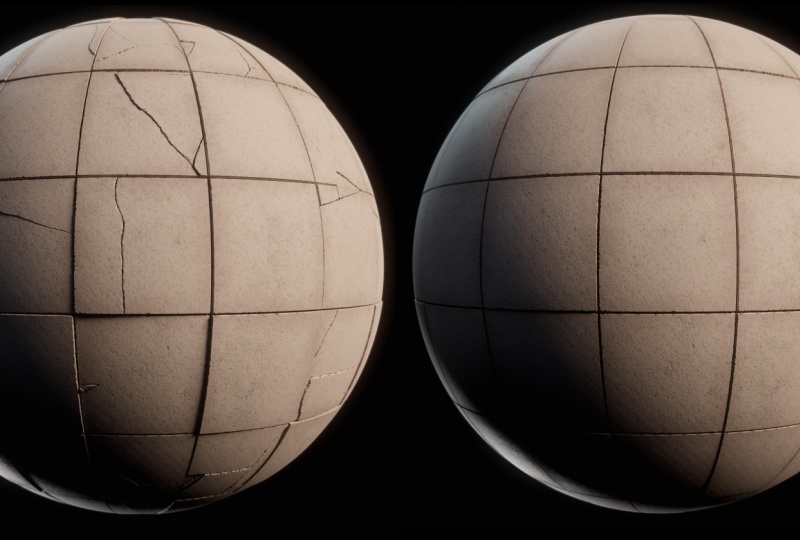
4. 03 Creating Our Cracks: Okay, so we are now going
to work on a cracks. So you can make cracks within substance in
many different ways. So I'm just going
to show you one of them that I
personally use often. A few things you focus on
cracks. These are tiles. These means that the
cracks will not just transition from one
tile to another tile, and definitely not in a
way that it would just, like, very slowly flow over. This seems to be something
that students often forget. And when they create cracks, the cracks just keep
going from tile to tile, but this wouldn't be realistic. The most realistic thing
that you can get is, for example, like over
here, we have, for example, something dropped
on the tile and it dropped exactly
like the split, which means that there is
a crack in the same area. But even in real life, you can see that these cracks, they are not linked together. So, yeah, that's something
to just keep an eye out. For the rest, the cracks,
the general shape of them is quite planar. Here, it's a little bit
of some bumps in it. So that's something
that I want to get, especially like over here. You can see quite
a bit of warping. But within the cracks, you can see that
there's also a lot of activity and damage
and everything going on. So those are a few of the key points that
I want to capture. So the way that we want
to do this, first of all, the thing that we need to do is we basically
need to create like I just call them
pixels, basically. They are just like very
small white squares. Now, normally, I have a very advanced generator
for this that I use, but I'm not going to do that
this time because it would just be way too difficult
for, like, a basic thing. Even I barely know how it works. I only made it once and I would be able to
easily replicate it. What I am going to get
is I'm going to get a tile sampler, yes. And then if you go ahead
and go to the patterns, just set this to be a square
so that we have squares. Now, we are going
to set the amount, the X and Y amount all
the way up to 64 for now. And then we basically
scroll down to size and just set the scale
all the way down, see? So we get pixels, basically. So yeah, you just
want to give it some very small white dots. Okay, seeing this,
what I know now is that I need to set the
X and Y amount lower. Let's try 25 by 25. And we basically just want
to scatter these around. The way that it works, wherever
there are more pixels, there will be more
cracks going on, and wherever there
are less pixels, the cracks will be bigger. So you can imagine that and
you will see it soon also. If we go, for example, to our randomized positions over here and you set the random X and Y position all the way up. And if we don't go
ahead and actually randomized rotation
doesn't matter. Now, this is still quite evenly scattered,
as you can see. So you can see that now all the cracks will be quite even. What I want to do now
is I just want to, like, take away a
bunch of these. There's a few ways
that you can do this. You can go ahead
and you can grab a random mask over here, and this will just randomly take out certain pieces as
you can see over here. There's another way you can do it, multiple ways, actually. You can use a tile sampler, which allows us to input a mask. Unfortunately, it doesn't
do that over here, but there is another way to
do this, so don't worry. So another way that
we can do this is we can go ahead and because
they are just pixels, we can simply blend
them out using a mask. Like that isn't
too big of a deal. It would be a bigger deal if they were very precise shapes. But let's say that for now, I would add a blend to this. In this blend, I basically want to go ahead
and I want to go to my noises and just grab something to blend
out a little bit. Actually, you know
what? Let's go for Grunge Map 001 again. Maybe we can even reuse
this. Probably not. Cool thing. You can just
press Contra C and Contra V, and that way you can
duplicate your notes. Let's say that I delete
this one because this way I don't need to change
all these settings. I can now go in here
and I can say, Okay, I want to make this
a little bit less of the white spots and
change the random seat. Changing the random seat
is a very easy way to make sure you don't see the same patterns in
the same location. Because right now if
we get the same cracks also in the same locations, it might sometimes
feel a little bit off. So we basically plug
this this time in the top and if we
go to our blend, we now need to use
a blending mode. If we set this to subtract, it will just subtract
all of the white spots. So you can see before, after. S, it is subtracting a
bunch of the white spots. It will be easier if we go
into our tile sampler and I set my random mask
lower over here. And now I can just
go in my blend. And if I don't click
on my grunge map, I can just play around
C with the amount. So now what happens here is that the cracks will be mostly
localized around these areas, which means that we
get this effect. Oh, that we get this effect. We get the effect that some of the tiles are completely fine, and then some of the tiles all of a sudden have cracks in them. And that's basically what
I wanted to capture. So let's actually
turn these into cracks because they're
just pixels right now. If we go into our blend, we simply want to go
ahead and we want to add a distance note. A distance note basically
allows us to push out certain shapes using a mask. Now, in this case, the way
that we are going to do it is we have over our mask, which is our pixels, and we want to also
plug this into our source input.
So we get this. Now, if we set our maximum
distance very high, so like 5,000, what will
happen is this happens. You can see that they will
now be pushed out so far. I can even show you.
So these pixels, you can see these pixels
are being pushed out, out out to a point that we get
this effect where they are just pushed out so far that they are just
bordering other pixels. And that's basically the goal. So when they border
other pixels, they will stop, basically. Now, one thing I'm
not a big fan of is that we got some of these weird little lines
that I'm not used to. Let's see if it happens because
you have a plug in this. Oh, it doesn't even oh, yeah, because there
are too many. Never mind that. Let's
just go ahead and let's see. We'll
see how it goes. Basically, I think what I
want to do is I want to go to my Grinch web and I want these playgrounds with
my balance to here, see? Make the cracks even bigger. So now, all these
stripes are basically going to be like a crack.
We got this stuff. Now let's go ahead and let's
go add a edge detect node. Now, there is a tricky
thing. The Edgec node doesn't always look as good. If it doesn't, I will show you a different node
that I use myself, but it's not included in the
base or substance designer. So the edge Dec
node is trying to detect these edges that
we have over here, and it will basically
masters out. If we set our edge
roundness all the way down, you can see like it's
happening a little bit better. And if we then set our
edge width over here, uh, yeah, you know
what? This might work. So with setting our
edge width over here, we just get all of these
thin little edges down here. So one thing I'm still not
happy about is these squares. These squares look a
little bit strange. What I could try to do is
I could try and go into my tile generator and give my pixels random rotations
just to see if that works. Okay, see, so that does break up the squares a
little bit better, doing random
rotations like this. For the rest, honestly, it's like you kind of need to hit the sweet spot with this. So we can also play around with our random mask to see if we can get some smaller or bigger
edges that are broken up. I don't want to go too small. Yeah, this kind of
stuff over here, it's a little bit tricky because there
aren't enough edges. There isn't really a
way to break it up. There are ways to break it
up, but they're too advanced. I don't want to go into that
kind of stuff right now. What I can also do is
I can also go into my tile generator and play
around with my random seat. And then, until we come
across something like this. So this one looks a lot better. So sometimes it's as simple
as just playing around with your random seat until
you get something you like. So let's say we got
this stuff over here. That's like a nice little base. Now, we still need
to make it look like actual cracks because
these cracks, they are like, bend. They have broken
pieces and everything, all that fancy stuff. But first, what I want
to do is I want to mask them out based
upon our tiles. So I basically want
to grab these tiles, and I want to create a mask, and based upon that mask, I can then nicely just
divide the cracks up. It would work
something like this. We would go ahead and
add a levels note. And we will plug in our blend. Now with this levels note, the only thing that you want
to do is because you want to make sure that this is
a perfectly white mask. I'm going to grab my
white slider and move it all the way up up until around here so that we
still get some of these details and then move your black slider
all the way down. So we get almost
like a black and white mask, something like this. The goal is that they do not touch that none of these
tiles are touching. Here, maybe I will make
it a little bit sharper. Here, try to fight like a sweet spot where
nothing is touching. It still looks like some of
these broken details in here, but we now just
basically have a mask. Now that we've done that,
we are going to use a node, and the node is called
a flood fill node. What a flood fill node
does, as you can see, is it will basically convert our mask to something
called a position map. A position map is basically general data of the
positions of our shape. We can use these positions and this data in order to
manipulate things. So type in if you press space
and type in flood fill, and then what you can see is all these nodes flood fill to position to random grayscale, to gradients, all
this kind of stuff. Um, this is an amazing note. It's really nice, but
what we need it for now is we just need it for flood
fill to random gray scale, which will give us a much stronger gray scale
compared to like this one, because this one
is way too soft. So we got this stuff. They are all randomized gray scales, and they are never the same type of grayness next to each other. Oh, except for this one,
that's unfortunate. But we'll see how
it goes. Now what we can do is there is a node, and that node can basically
select random grayscales. It is called a Oops. You do need to be in this
view and press space. It is called a
histogram select node. This, if you set your
contrast all the way up and you set your position
or actually set your range, you can play around with
your range and your position in order to randomize exactly where you want
your nodes to be. So the range is
basically how many of the gray scales you want to
include, let's say three. And then the
position, of course, three doesn't always, it depends on how the
gray scale looks. But let's say this.
This looks quite cool. They are not touching
each other, but they still are randomized. So we now have these tiles
basically masked out, and we have a slide that we
can simply in the future, change this however we want. Here, maybe I'll do
this. Four, why not? Looks cool. So all
we need to do now, as you might have
mentioned, is we need to go ahead and only show the
cracks on our white tiles. The way that we do that
is we simply add a blend. And then if we just
go ahead and plug in our histogram
select at the top, we can go and set our
blend mode to be art. Oh, sorry, subtract. No Art subtract. I technically was close. No. You know what
you can do when you are like me and sometimes
we get the blending mode, you can click on it and you can use your scroll wheel in order to figure out,
there we multiply. Of course, it's multiply. Sorry, that is really silly of me that I forgot
something like that. So basically multiply. And then what you can see here is that the quacks are working. You can start to see the
shape coming back out of it. The only place
where I do not like it is this one over here. These cracks, they do
not feel very realistic. They feel a little bit strange. This stuff, you might be
able to get away with, but I don't like it. What I'm going to do is
I'm just going to go ahead and playing around between my tile generator and my grunge map until I get
something I like, basically. I just go make this a bit. If it allows me to. Come on. There we go. Et's makes
this a bit bigger. So let's start with
our grunge map. What if we just play around
with the random seed of our grunge map until we get something looks a little
bit more interesting. Let's play around
with our balance. See, of course, I'm just using
the most basic version of this crack generator because else it might get a little
bit too complicated. So let's play around
with tie generator. But yeah, it does mean that I just need to play around with it to get it exactly
the way I want it to. You can also play
around actually with the X and Y amount if you want to reduce your
amount of cracks like this. Just try and get
something that is in the direction that
I like. And see. What if I make them
a lot smaller? What if I go in my tile
generator and for example, make my pixels a bit smaller? This will make it harder
for them to show up. If you make them bigger,
you get this stuff. So that's why I'm trying to
get them smaller so that they only just show some
of the cracks. Like this. Another
thing that can sometimes happen is when you
make your pixels this small, they might not always
be perfectly white. The way that you can
test this is you can add a oral levels or something
called an Auto levels. And this will just make
sure that they are pushed back into the
white completely. And it looks like Okay, so it looks like I am already
into the white. Cool thing. If you press backspace,
you can remove a node without actually
breaking the connection. So that's just a nice way to
just quickly remove a node. So we got this stuff. Let's see. So we got our distance, and we got our edge detect. Our distance over here, I feel like the grey scale is not doing exactly
what I want. Another thing that
you can do is you can also use your outer levels here. If you use your
outo levels here, you can see that it will try to break everything
up a little bit, which will make it easier
for the edge detect. But as I said before,
I'm not here, I'm not liking this
kind of stuff. So I need to let's
look at our blend. I need to keep
playing around with this until I get
the same settings. Now, normally I would
just do this off camera, but in this case, I will go
ahead and yeah, I'm close. I will just play around
with this on camera. Let's go into our Edge tag. Let's play around
with our random mask. These three I like. Can I maybe just get rid
of this bottom one? Okay. Oh, that's mean. Actually, you know what I can show you a way to get rid of it. Okay, I will show you a way. Let's say that you
want to get rid of this bottom one because
you don't really like it. A very handy way
that we can do that is the same technique
we've used before. We add a blend after
our histogram select. And then we add
something if you press space that is called
just a simple shape, and the shape is literally
like it says it's a pattern. So it can be a disc, it can be a square
whatever you want. We then set the scale
quite low like this. And then all we need to do is we need to add something
that is called a space transform and basically transform inside of
substance designer means that you can
move around shapes. So you can imagine if we
plug this into our blend, set our blending
mode to be subtract, I can simply click on my transform and then move
the shape on top over here. Now, the thing with the
shape is that when you move it, it will tile. See, I will just continue
tiling on like this. If you want to get rid of that, you can simply go into
tile mode over here. Click on this little button
and set this to be an absolute and then set
this to be no tiling. And once you do that,
it will no longer tile. So I can just place this here and I can now have
these cracks over here. I'm just going to call
that ready for now. So we just got these cracks. I might need to do some
balancing later on because even though this is a basic
tutorial or yeah, this is a basic one, I still want to make
it look very nice. So we got this stuff over here. I'm now just going to go
ahead and just click and drag and move our actual cracks a little
bit further back. The first thing that we
want to do now is we want to this wavy effect that
you can sometimes see. We want to do this
in two stages. The first stage is going to be large waves like you
can see over here, and the second one
is going to be smaller waves like you
can see over here. We do this using a node if you double click on
your edge detect, and the node is called
a directional warp. Now, like I said,
we are going to go for a big one and
then if you just add another
directional warp right away for the smaller waves. Now, it's basically
like a slope blur. You basically input a noise, and it will try
and in this case, warp around that noise. If we go down and grab a
purlin noise down here, this is basically just a
very soft little bumps. We can set the scale low. So these are for the
big ones and just plug this intra direction
warp intensity. Here, you can already see it
happening, before, after. At this point, you can set
your angle if you want, because these are
cracks, the angle doesn't matter too
much, actually. And then if you play around
with your purlin noise, you can set the
waves amount, see? So we want to set
this quite big. So let's go for eight. And then you can
also play around your intensity to set this
stronger or less strong. Now for the smaller ones, I'm just going to press Contra C and Contra Ville
by purlin noise. I'm going to make the size
a little bit smaller. Throw this in here, and here you can already see the waves
being a lot stronger. I always like to
set my warp angle a little bit
different compared to the previous one and then simply play around
with your intensity. He see to get some
extra waves like this. If you're looking
your tiles, this is what it basically will
look like, like this. Now that we've done that,
we just want to add some breakup and remember
we have this one. What we can do is we
can literally copy the slope grayscale and
just paste it here. And then in the
grayscale, plug in our See plug in our cracks. And because these are cracks, we can probably
get away with just having the damage everywhere. So as you can see,
now we just have these little cracks
sitting over here. So we got these cracks. I would say that there
are too many of them. I probably want to go
in my tile generator and see if I can just play around with my random
mask over here. There we go, see? To get
some of something like this. That's actually a lot better. Oh, that's a little bit unfortunate that we have
this one over here. The reason that is
unfortunate it feels very similar to that one. But
actually, you know what? With some warping, we can, if we just go to our
directional warp and just play around
with the intensity, before you know it, we can
make it look different. Oh, this actually
feels a lot like what I was going
for where we have, sometimes a corner cut off, sometimes a straight piece,
and sometimes we have, like pieces meeting each other. So it's actually
just a coincidence that it happens to look
exactly like a reference. But that's a nice
thing about substance. It surprises you
like this sometimes. So we got these
pieces over here. Now I will show you
one extra twig, and that is how to create
some extra bigger damages. Basically, the only thing
that you need to do for that is add another
slope blur gray scale. Remember, always set
samples all the way up, intensity all the way down, and the mode to be minimum. And you basically want
to go for purlin noise. Now, we can tie this
pearl noise over here, but it's most likely too big. We probably want to go
for parlis that is a lot smaller like 64 or
something in the scale. And what that will do is if I play around with my intensity, it will give us these
type of cracks. See? They are much larger. But if we set them at
quite a low level, I think I want to set my
pearl noise even higher. If you go into scale, just select it and sets to
like one to eight. Just type it in, and then
it can also type it in. So with this one,
intensity, 0.01. Yeah, let's do 0.0, maybe
a little bit higher. 0.02 maybe. Yeah, let's do 0.02. Now the next thing that
we want to do if we just move this up. We now need to blend between
these two. Very simple. It's just going to be a simple
blend with our damages, and then the one before our damages, just like
we've done before. And then, for example,
just grab grunge map 001. Drag it in here. The reason why we can do that
is because you can actually just reuse the same grunge
map into multiple areas. If you can do that, it's even better because all
of these modes, they cost us time to actually calculate because we need to calculate all
of these settings. So every thing costs at time, and grunge maps cost often quite a bit of time
compared to the rest. So it's good if you
can reuse, basically. But that's something
that will come into the advanced tutoril. So let's not worry about that. Let's first make something cool. So if we go into our blend,
we now got this stuff. We got these cracks over here,
which are looking great. The only thing I
would say now is that now that we
have these cracks, we need to go in and we need
to actually add them to a proper blend because right now they are added to
just like a plane. So if we go ahead
and add a blend, we can drag in our real blend, which is this one in here. And in the foreground, we can go ahead and we
can drag in our quacks, and then our mask
like this, see? And once you've done that, yes, I don't think we don't need sets to
multiply, I believe. Oh, yes, sorry, we do need
the sets to multiply. Don't forget such a
blend to multiply, and you can just
delete this one. This one was just for
preview. And there we go. So the graph x for basic tutor has become a little
bit bigger than expected, but I find that even though
it's a basic tutorial, it shouldn't suffer too much in quality, even
though we do that. So I hope that this was
still understandable. But what we have now is we
have cracks in our tiles. We have our actual tiles,
and we have damages. So at this point, I would
call my height map done, and I would move over
to my normal map. My norm map would have like
these little stones in here, and it would also show
the actual tiles. Now, I will go over it later on. But basically, the reason
I'm doing stones in my normal map is because
they are too small for my height map to really bother because they're
pretty much flat. So they're just going to
be like some random shapes that I scatter around. So let's go ahead and continue with that in our next chapter.
5. 04 Creating Our Normal Map: Okay, so we are now going to go ahead
and create a normal. So the way that we create a normal is we are basically going to convert our height
map to a normal map. Now, before we do that, I want to show you a
little trick on how you can work very
nice and cleanly. So these notes, what you
can do is you can go ahead and you can select
all of them like this. And then if you press right
click and add a frame, you can add this
nice little box. With this box, you
can easily just move around all of the
notes at the same time. And when you click
on the box, you can just go to the title and call this height
map, for example. Now at this point, let's
move on to non map. So to convert a hypemp to normp insight of substance
designer is very easy. All you need to do is press
space and type in normal. So when you do that, you
will get this normal note. Now, oh, I'm crashing. There we go. All you need to do with this is just plug
in your hypemp in here. And then you have basically
two norm map formats. So you have OpenGL and DirectX. Now, Unreal Engine uses DirectX while
MamsetTolbek uses OpenGL. I personally prefer
to use OpenGL. The reason I do that
is because right now, if I sets to OpenGL, this feels easier
to read to me on how it would look like compared to this because
everything is inverted. Pretty much the only difference
between Direct X and open GL is that the green channel of
your RGB is inverted. So over here, if I
said it's to OpenGL, you can now really
nicely see all of our damages and our
cracks and everything. Often in these type of cases, you can also see whenever
they are too much. Like, we have a few, too many damages here and there, which is something that we
can work on to improve. But we can do that later on. So we got these
pieces over here. Now, we were going to go
ahead and we were going to make some very quick
and flat stones, like you can see over here. And basically, I'm going to do this in like a super easy way, just like a very basic way. So because they don't
need that much detail, they are not full on stones. So if you go to Patron, I want to go ahead
and I want to grab a shape over here. There we go. And these stones, they
often are slightly around. So what I would
do is I would set my pattern to be
a disc like this, set the scale a little
bit lower that we have some space around
to work with because we basically need to manipulate
the shape to make it feel a little bit more
like an actual stone. We can do this in a few ways. The first way would be to
add a slope blur gray scale, and then plug in quite a large purl noise like
this one, for example. Set the samples all the way up, set the mode to minimum. And this time, you
want to actually set your intensity quite high. So now, this might
not look very nice, but if we go ahead and
we add a levels on top and just push the black slider over
levels to the right, you can see that it will
start like cut out, and it will start to give
us an interesting shape. Now, what I'm going to do
is, I'm just going to copy my pearl noise and paste it again because I want to
have a bit more control. So with this pearl
noise, I can play around with my scaling. You see? And like this, I
can very quickly just get a few of
these random shapes. So what I would basically do
is I would probably do this. I have my shape over here. I would duplicate
these three notes, three times, for example,
that's already enough. The stones are going
to be so small, you will not really be able
to see much of a difference. So we got this one let's go into purlinis and maybe play around with the
scale a bit more. And what you can, for
example, do is you can also play around
with the disorder. The disorder kind of changes the way your
purlin noise looks. So we can do like one of this. This feels like a little bit like a reference
if you look at it. And then the last one
that we have over here, what might be cool
to do is to actually create a cut in the same way as that we've done
here with our shape. So we would basically do this. We would add a blend, so I select the line and I add a blend node using my space. So I'm adding a
blend node between my shape and the
slope grayscale. I then go ahead
and I, let's say, duplicate this transform over here because we can reuse this. I duplicate this transform
and plug it into the top. Then I set this simply
to be subtract. And now I can just
quickly move this around. With the transform,
you can also scale. So I can scale this out. And I basically
just want to create a little cut like this. Now, when you create
a cut like this, by the time that we add a slope blur to this and the levels, it will hopefully become quite an interesting
looking shape. I just need to here
something like this, maybe play around to
the scale. Let's see. I just wanted to get something
that's a little bit long. I think something
like this will work. So we got this one,
this one, and this one. And don't forget we have
everything rotation within these pieces and
all that fancy stuff. So these three levels, if we just go ahead and select this, what you can do is you can nicely organize
this if you want. You can right click
At the Frame and call this Stones yeah, well, see, I'm just
going to call it stones. Call this stones. Now what we need to do is we need
to scatter these stones around so that we can then
place them on our actual ties. And the way that
we want to do that is if we go to patterns, there is a note which is called the shaped splatterer it is quite a large and maybe sometimes overwhelming
node to look at, but we only need some very
basic stuff from this. The first thing that
we need to do is set our pattern input number
to three because remember, we have one, two, and three. We then simply drag in
our patterns Pattern one, Pattern two, and patron tree. Now, what you can see is that
they are not fully white. This is because the shapes
splatter always tries to automatically change the gradients, but
we don't want that. So we want to scroll
all the way down to our height and just turn off the height scale
out to adjust. See? Now they're nice and white. Now it's just a
matter of setting the X and Y amount way up. We need to have
these wally small. Go to our scale, set the
scale random way up. Like that, for example,
position random, all the way, rotation
random all the way. We just want to completely
randomize this kind of stuff. So that's the general idea. Now, you can see here there are way more stones in here and
they are quite generic, but there are a lot more. So I'm going to go
in my X and Y amount and go for one to
eight by one to eight. Now, this becomes
really, really small. So what you then probably
want to do is just go into your scale and just set your scale a little bit higher. Like this. We can still play around with
like a scale random. So we get something
in this direction. Okay. Let's see.
Rotation random. What you can also
do is you can also play around your
height scale random, which is the same as
that luminosity slider that I showed you in
the tile generator. So we basically get this. We get a bunch of random
different stones, and this is why I mean why
I'm not too worried about the look of them because
when they become dismall, they are just pixels. They are just like
small random shapes. But the shapes will have different densities
and everything, and it will hopefully
look quite nice. So let's see, is
there anything else? I think that is
about it for now. Yeah, I think we can use this. So what you would do is you
would go ahead and you would add a normal to this. Sets the OpenGL, see?
And we get all of these. Now, we said it's
very, very low, so 0.05 in the intensity. But we get all of these
tiny little stones. So what I'm going to do now is I'm going to go ahead
and first of all, we need to make sure
that those stones do not show up in between
these cracks over here. The way that we do that
is we simply grab, I believe we created
a mask for this. There we go. We have this mask. We simply grab this
and throw this into our mask random slot of
our shaped splatter. Then if you scroll
all the way down, you over here have a mask
random map multiplier. And if you boost it up, it will just make sure that we do not have them in those cracks. We might want to make our mask a little bit bigger, I believe. Let's just duplicate
these levels. Placed over here and
just set because these are stones we just
set our there we go, see. Let's make our etches
a little bit bigger. Let's try that. Yeah, okay. Yeah, that should work. So here we start to see
the lines so you can start to see that the stones
stay away from those edges. I need to have a check and see
how far I need to push it, but I can only do that when
they are applied to this one. So we got these stones. Now, these stones
are only part of it. These stones are all
the big grey stones. But you can see that
below these stones, we also have noise, and we also want to capture
this noise, basically. Way that we would do this. So we have our normal map over here. Now, let's go ahead and let's grab another note. I'll
make it over here. And it's just going to
be some generic noise. What I would do is I would go in here and I
would, for example, grab a B&W spots two
often looks quite noisy. Let's add a normal map to this. Open the here, see this
looks quite noisy. Now, if we just add
levels in between, we can click on our normal
just with our levels. Playgrounds would like your
middle slider, get it, push the middle slider a little
bit to the right so that you get some strong
noise, some small noise. Now, if I see this, I
feel like I want to flip around my black
and white slider down here to have the
noise actually going inwards because it feels like all of this
noise goes inside. It doesn't really go on top. So we got this
generic random noise over here. I think
we can use that. Let's go ahead and
go into our normal. And in here, once again, we want to just go ahead
and add a mask for this. So if we go and art a blend, now, this is a normal map. So we need to art this
mask, where are you? This time, we can
probably use this one. Actually, let's duplicate this. Let's duplicate these
levels over here. The reason I want to
duplicate my levels is because I want to make
a little bit bigger, but I probably need to invert
this, but we'll see first. Plug this into your paste then if you press space
and add a normal color, this is just a plain
normal color in the top. Here you see? That's what I mean. I need to go into my levels and invert this. But the general idea is that the noise will not be
in between our cracks. They will just be on the tiles. And let's start combining.
So we have our normal. If we press normal combine, so space, normal combine,
we get this node. Now, this note, I always like to set it wide away
to high quality, and it basically just blends properly the normals together. So now you can see that
now we have these normals. Now, the first thing I can see is that I want
to probably set my intensity quite a bit lower because it's really strong. But here we go. See this is already starting
to look quite cool. Now on top of this, we can
add another normal combine. And plug in our little stones. These stones are mostly
for our base color, but they are still handy
to have in our normal map. It's just that I need to
go into my intensity. I need to make these
very subtle, 0.03 maybe. See, there are just going to be these very subtle little stones
sitting on top like that. You can also have them embedded, like you can see over here, but that's a little bit
more tricky to do. So I'm not going to go over
that in this basic because it takes quite a few more
new and complicated notes. But we will definitely cover that kind of stuff
in the next one. So we got this stuff. We got a nice looking
normal sitting here. Oh, yeah, in between.
We want to have probably some dirt or
something in between, just like some generic noise. The way that I can
do that is I can just add another normal combine. And this time, if we
just grab Clouds. No, not Cloud three. Oh, what shall I pick? So many choices. B&W spots one, maybe, because it has, like, the little bumps in it. And if I then add the normal, and set my B&W spots one like
the scaling, set it lower. There we go. That
should do the trick. It will be so difficult to
see that you don't need something very
specific. Same deal. Art the blend, arch your
non map color over here. And this time, what I
can do is I can just swap around these two outputs. So the plain color will be at the background and there's
noise at the foreground. This means that I can
use the exact same mask. See? So now the mask
will just only show up here and we throw that
into our normal combine. And don't forget
to set your normal combined to high quality. There we go, see. So
now we get some of that noise in there. And
that's basically it. We can go ahead and select this, right click Ara Frame and
call this normal map. So we have a very nice
looking height map. We have a very nice
looking norm map. At this point,
what we can do is, I like to just get rid
of all of these outputs. I never really use them. Now
we have a metallic output, but this is this concrete. It's not metallic, so I
can delete that one also. And I can already start by
dragging some stuff in. So our normal map slot over
here goes into our normal, our height map slot over
here goes into height, and we have an ambient
occlusion slot. This one is very easy. All you need to do is add
an ambient occlusion node. And another cool trick
if you hold control, you can click and you can
actually duplicate your output. So we are clicking and dragging our height to our air
ambien occlusion. At which point in our
Ambien occlusion, all we need to do really is
set our height depth quite a bit lower so that it's
actually showing not as black, but more like a nice
softness, 0.00, 0.005. Yeah, like that. So that's
already looking quite nice. And if you want to make this
go a little bit faster, this is handy if you
have very large graphs. You can just go
ahead and set the GPU optimization on here, see, and that we'll
just make use of your GPU in order to make
this go a lot faster. So you plug this
into your ambient clusion and there we go. Three of the five maps done. So in the next chapter, we will start by working on our base color and then
we'll work on our roughness. And then we can start
by just previewing this inside of MamosetTolbg. So let's go ahead and
continue with that.
6. 05 Creating Our Base Color And Roughness: Okay, so what we're going to do now is we are going to
work on our base color. So if we have a
look, the base color is actually very simple. It looks like it's going to
be just like a plain color. Then we'll have some extra
color for the stones, which will be
slightly randomized. And maybe also see if
we go to the close ups. Yeah, yeah, maybe some
extra Micol in between, like our dirt bums that
we have over here. Then we will top it off with just some generic dirt that is sitting mostly
around the corner. You can see over here and
we'll call the day after. And of course, yeah, we
have in between sand. So the way that we
are going to do this is we are going to go
ahead and we are going to start by adding a
like a uniform color. So if you press space and
type a uniform color, this is just a plain color. Now, the cool thing
is you can just grab this little checkbox, and you can actually grab
outside of your window. So what I am doing now is I'm simply grabbing
one of these colors. I just click somewhere here until I get something that is in the ballpark
of what I want. Go in here, maybe
say, like, Okay, I want to have a little bit darker or something like that. Doesn't really
matter. Just to get a generic orange looking color. You can copy over this value if you want to get the
exact same one as I have, but I'm not even sure if this is the one that I'm
going to end up with. I'm not going to
blend this. I'm going to show you another technique. If we go ahead and
add a gradient map, and gradient map, it
works very similar to other maps where it is
able to read gradients. But what it can do in
our case is it can read those gradients and then turn those gradients
into actual colors. If I go and where are my
stones, there we are. Here we have the stones that
have different gradients. I can simply go and plug
this into my gradient map. Now I need to direct this from something that is a little bit more
interesting in color. Hmm. I'm afraid that
that is too light. Maybe around here. Maybe
I drag around here. So what I will be doing
because I cannot do this on the same screen is
I'm just going to click and drag around this area. You can see that if
you pick grant editor and press pick gradient, you can see here you can
click and drag and it will just pick whatever colors
that are inside there. So if I click and drag
this across my stones, you can see that we
get this effect. We just get that all the stones are slightly different color, which will often give
us a nice effect. All we really need to do then is we simply need to
plug this in here, add a very quick
levels and plug in our actual stones down
here, boost your levels up. This is just make
sure that the stones because gradients don't
really work for colors, because it wouldn't
make sense to have a stone slightly orange, for example, the stones are they are discolor or
they are not discolor. So we plug this in here, and
then we get this effect. Base orange with
these pieces on top. Now, on top of this,
as I said before, we were going to add a
blend because we are going to add some
dirt in between. We can do this very simple. We can just add a
uniform color again. This time, let's make the color. Yeah, let's actually
make it almost black, like a very dark color. It doesn't matter
too much. You can even go for almost
black if you want. But the goal is that I go
to this mask over here. And I want to go ahead
and plug this into here. Now, right now it is
not in the correct way, we need to invert mask. I have showed you how
to do this with levels. However, what you can also do
is you can select the line, press space, and you
can type in invert, and then you get a
invert grade scale. Now an invert grade scale, once you've used it, you
don't really need it anymore. Like, I'm not going to go around and play around
with these settings. So if I don't want to have this note here, but I
still want to use it, I can press the button
D. So if I press D, so W ASD, so next to the S, you can go ahead and
you can dock it. And dock it basically means that it will be a small version. You can still go
into the settings just by double clicking on it, but it will not be
such a large version. So that's often quite nice if you never use it for
something, for example. So we got this stuff over here. We got now all the darkness. We can now go into our blend. And if we just play around
with our basic slider, we can turn this, like, lower or stronger,
whatever we want. Now, the last thing
that we need to sorry, last two things that we
need to do is actually, we want to probably
do that over here. Just add a very
quick uniform color, and let's add a blend
before our uniform color. This is going to be
like in between dirt. So we are just going to
make this like a brownish looking more darker
brownish looking color. And we are going to
blend this using R Wars this mask. It was this mask. However, I can remember
that we inverted it. There we go. Scrub these levels, let's plug this in here. See? So we got this. We lay your stones on top,
we lay your dirt on top. I feel like this might be
a little bit too dark. Let's make our makes it
a little bit lighter. And then finally, now
we're going to just add this type of dirt that
you can see over here. You can see that there's,
like, a little bit of dirt often
around the corners. Now, the way that
we are going to do that is we are going to go ahead and if we just grab our
tile generator over here, I should be able to use this. Let's see. Yeah, yeah, I
should be able to use it. I'm going to duplicate this, and I'm then going to
set my pattern from brick to pyramid so that
we get this effect. The reason I basically
need to do this is because we need to go ahead
and we need to have something to use as a gradient for our mask to recognize where
the corners are. So this is the way
that I'm going to. There are more
advanced techniques, but of course, this
is just the basics. So one thing to
keep in mind that these need to stay the same. There is something called
exposing inside of subsisigner. You can Google it or you
can stick around for the more advanced tutorial
for this because it is quite a bit of extra work that would allow me
to automatically update both of these notes at the same time if I happen to
actually change a setting. But for now, we have
this tile generator. And then we want to
add something called a ground dirt node. And this is what you
can see happening. If you play around with
your dirt height over here, you can see that the
ground dirt note, you can also play
around to your levels. We basically add dirt
around your occlusion. But in this case, it
asks for a position map, but it can also read
gradients as positions. So wherever there is
black, it will add it. And because this is a gradient that goes
from black to white, we have control over adding
this like more or less. All we need to do now is just drag this all the way over here. Add a quick bled note. Let's just duplicate
this uniform color over here and plug it into the top and just plug the
ground dirt into the base. Now it's all a
matter of just going to your uniform color and maybe making this a
little bit lighter. You can, for example, play
around to your paste and stuff like that just to get something a bit
more interesting. Yeah, let's not make it too
strong, something like this. Now, this might look very flat, but this is on purpose. We want to have this
stuff looking very flat. And the reason we
want to do that is because we want to go ahead and the way the PBR works, most of the detail comes from a norm map and our ambient
inclusion and height. It doesn't so much come
from our base color map. That used to be the case
way back years ago, but that's no longer a correct
technique of using it. So you want to try and keep your base color
quite flat looking. Now when I look at this, I just want to go in my blend, and I want to just tone
this down a little bit because I feel like they
are a little bit too strong. So I'm going to see
if I can get away, but just changing
my opacity down. And if not, then I will
show you a different trick. So basically, we got all
the stuff over here. I think the darkness over here
is also a bit too strong, so let's just reduce that so that we have
quite clean tiles. We then plug this
into the base color, and all we need now
is our roughness. Our roughness will
basically take care of our shine or just like the response of
light to our material. With roughness, if something is white, it looks very dull. If something is black,
it looks very shiny. So, of course, this is concrete, so we want to stick
to quite white. What I'm going to do is I'm going to go ahead and I'm going to arts like at, you know what we can probably
can we use this plant? Yes, we can just duplicate
this plant over here. And if I add a uniform color, I'm basically going to do this. I make this new uniform
color fairly white. I then duplicate
this uniform color and make this a
little bit darker. So this is, sorry, a
little bit whiter. So this is now just simply
like the tiles and the ground. What you want to do
with these is you want to turn them to
gray scale up here. The reason for this because a roughness map does
not need colors. A roughness map only
reads in gray scales, and gray scales are a
little bit cheaper to use. So we now have control
over base tiles and the in betweens. We then add another
blend and we say, Okay, I also want to go
ahead and I want to add I want to make my stones like a
little bit light or a little bit more shiny. So I just add or duplicate
another uniform color, make it a bit darker and use the same stone mask as
that we've used before. Okay, that might be a
bit too dark here, see? They will be slightly shinier
than the stones below. I'm then going to end it off
with just one single blend, and I'm just going to
use my ground dirt, and I think that should
already be enough. I don't need to also
add this one over here. And I want to go ahead
and set this to be art. So this will be arded on top, which means that it will
just make it very light. We simply play around
with our pastes, so this dirt will
be even duller. So around these edges, our
tiles will look even duller, and we then throw this
into our roughness. Now, this is a very
bare bones roughness, but it is a great
starting point to then later on play around with it and see if we can
make it look better. So I would right
click ter frame. Roughness, same over here.
Let's move this up here. Add the frame. Base color. And now that we've done
that, we are ready to start exporting our textures
and previewing them. If you want, you can
also add the frame over here and just call
these outputs. There we go. So I'm
going to save machine. The way that you can
export your texture is you can go down here one level. You can right click and you can press export outputs as bitmaps. Bitmaps just mean your
actual texture files. Once you've done that, it
will ask you for a location. What I like to Well, sorry, what I like to do is I like
to go to source files, create a textures folder, and in here, I like to make
a folder for every texture. So this one is going
to be simple tiles, for example, because we are also going to have a
more complicated one. Let's save our folder. Format TGA, I always
go for TGA myself. And for the rest, this
will be just the outputs. They are just all the outputs
that we have over here. And then the very cool
notes if you press automatic export
when outputs change, it means every time
we make a change, it will automatically export. And this is very handy when we are balancing out
our texture and are looking at it inside
of Mam set Tolbag. So I just export my
outputs like this. And now what I will do is I
will go into Mam set Tolbag. Now, for Mama set Tolbag, I will have already a
setup scene in this case, because this is, of
course, a basic texture. If you want to learn how
to set up the scene, I will do this in our
advanced substance texture. That's where I will
be setting it up. However, that might not be
as direct scene as the rest. With that, what I mean is that I will be setting it up throughout the Advanced toil if you want to know why the way exactly
how to set it up, without me also playing around with my textures in
between that time, I would recommend going
to my YouTube channel, which is Fast Track Tutorials, and over there, I
have an actual free YouTube video on how to create a very nice looking
MomsetTolbag, render scene. So for now, because we
are just previewing, I will just go ahead and load up the scene, and I
will show it to you. Here we go. So this is the
scene in substance sorry, in Mama set Tolbac. So I've just saved the scene under our saves and
substance basic. So this is like my little gift to you so that you
don't have to, like, set it up yourself. This is like a very
nice basic scene. It is basically
just like a sphere. It has some lights in here, and it just has, like, a nice camera set up. So it's easy to preview. But as I said before, because
this is a new program, I will not cover this in the
basics because I assume that most people that
are watching this are completely new to
substance designer, have only maybe spent
a few hours in it. So I will just go over this. We have now exported
our textures. If we go to our textures, simple tiles, here you can see all of our textures
nicely set up. Now what I'm going to do
is I'm just going to go ahead and go to let's see. There we go. Mom's a Tolbak. First of all, I want
to just quickly go to render and I'm just going
to turn off rate racing. The reason I'm doing
this because setting up a material is very
slow in rate racing, but of course, you might
not need to do this. I'm then going to
create a new material. I'm just going to press this
little plus sign up here to create a new material and
just call this tiles. Now you can see you have your norm map slot,
your albedo map, which is the same
as your base color, your roughness metallic. If we go down here, we
can go to occlusion, drop it down occlusion. We have an occlusion map,
and if we go up here, we can go to
displacement and height, and we have our height
map. Let's get started. Dragging your height,
tragging your normal, tracking your base color, tracking your roughness and
dragging your amin occlusion. Now that we have these notes, all that we sorry,
our metal ness. I'm doing this one.
This is metalness. So metalness needs to stay at zero because this is
not a metallic shape. This one needs to
be our oclusion Because remember, we
don't have metalness, so you can just leave
the metalnes to zero and you don't
need any maps. Okay, so that's
looking more logical. Now, I'm just going to go
ahead and drag this on here. And the first thing that
you will see is that our height map is
way too strong. So we need to go and
set our scale down. Let's set it to around here, you can see, it's
still quite slow. Let's do 0.007, for example. Now that you have done
that, let's have a look. So you can go up here to texture and you can
change the tiling, for example, to
two, if you want. If you want to showcase a
little bit more of your tiles. I think if I look at this, yeah, let's set
this to like two. Now, next to this, you can also play around
with your offsets, and this might be
nice if you want to just get a nice angle. For example, I want to
showcase some cracks. So what I can do is I
can really just, like, set my offsets in a way that I can see exactly those
cracks over here. See, so now you can
see these nice cracks, and this will just be
like a nice presentation. Now that I've done this,
now what I'm going to do is I'm going to turn
on rate racing again. This will be a little bit slow
for my computer because I don't have the most
powerful graphics card. Don't worry. I'm working on it. So for now, what I can
do is I can turn it on, and you can see that
that will actually improve the quality greatly. Now, if your aminoclusion
is a little bit too strong, for example, I feel like it's
a bit too strong right now. I can just go into
my amen occlusion and just tone this
down a little bit. So I'm setting this
to around 0.5. I don't know it's really
slow right now to render. I don't know exactly
why. Here we go. But the handy thing is
that you only need to set up these settings once,
and then it's all cooled. So down here, you
can see a slider. Whenever this is done, it will have been done with
rendering, because, of course, raid racing it needs a second to render
inside of Mamoset. So if we have a look at this, compared to this,
what do I see first? First thing I see
is that I want to tone down the strength
of my stones, and I want to bring out the
light color of the rest. So there is one thing I can do. I can go into my
light one and also push the brightness up like
a little bit over here. Okay, way too much. Let's set this to,
like, I don't know. Seven. Set Let's
set my strength to around seven. There we go. See, so that will just already make my lighting a
little bit stronger. So let's go into
substance designer. So first of all, this color. Let's make it a
little bit lighter and also a little bit
whiter like this. Our in between color
feels a bit dark, so let's also make this a
little bit lighter over here. Let's see. Then we
have our stones. Let's tonee those down
just by using our opacite. We have this dirt and this
dirt it's not very visible. So, you can see that it has automatically
updated already. So this dirt, maybe let's make
it a little bit stronger. And then over here, we have now this extra dirt around the corners that you
can see over here, which is looking quite good, maybe make it a little bit less, like a tiny bit. Wow, I made a really
high pitched noise right then. So let's do that. And maybe in our ground dirt, maybe let's set our dirt
height a little bit higher to make the dirt amount a little bit
more. So we got these things. Another thing that is nice about the scene is that I can
look at the sights and I can kind of have a feel for
how the reflection will look. And right now it
looks quite good. The only thing I
would say is I would go in here and just
set in my dirt. I want to set this a little bit higher so that we
have a little bit of, like, the stronger
dirt going on. And when we go in here,
you should see over here, you can see the difference
between the roughness. You can see it even
better in this area. So this is starting
to look quite nice. We got something
quite interesting. I'm just going to go
in my camera one. Let me just turn off
this little lock icon and maybe set my sharpening to be a little bit
stronger just to make it feel like a bit sharper. So here, you can
see the normal map is now doing quite a good job, and then when it
is done rendering, it will often, soften
out a little bit more. Let's set my sharpening
strength a little bit down. So I'm now just having
a look and let's see. I want to probably reduce
the normal map strength of our actual little
tiles over here and probably add more of
this generic noise norm map. I think that will look nice. So if I go to my where are you? Here, you. Let's go and
just set this one to 0.015. And let's see. Then over here, we also
add this generic noise. If we just go ahead for this
generic noise over here, go into our levels and just reduce your centre slider so
that we have more of that. So we get this. So here, now this generic noise is on
all the tiles pretty much. And we still got that nice little breakup going
on in between. See? So that's
looking quite good. Now that we have all this noise, I'm just going to go ahead
and I'm just going to reduce the actual noise itself using
my intensity in my normal. Here. So if I reduce
that a little bit more, see, so to make it a
little bit more subtle. Okay, I can now see that now that we have
added more of that noise, we have also added
automatically more of the blackness
in our base color. So that's basically it with
substance at this point. You just want to
go back and forth. To make sure and
then have a look, to make sure that everything
is just nicely balanced. And this sometimes
just takes a second to get it looking nice. So we got this stuff over here, which is looking quite good. Let's see. How is my norm map? Yeah, that's fine. I
probably want to make this dirt a little bit less strong so that it's
not as overwhelming. Here, you just want to get a little bit of dirt in between. So we got that Yeah, we got some of these corners, and we got these
cracks over here. I would say that if I can, I would like to make my cracks a little bit thinner.
I'm not sure. There is a method to do it, but once again, something a lot more complicated to do
inside of substance. So if I go in here and let's
go into my edge detect, my edge width is already it's
very lowest, as I can see. So does make it a
little bit tricky. Yeah, so this edge detect, there is another note
that I want to try out. And this note, I have placed
it into your Safe folder. This note you can also find
for free on substance share. If you just type in
Google substance Share. It is called the Fin
Edge detect note. So this one is often here, I can go a little
bit more precise if you drag it in here
compared to this one. So it tends to go here. We tend to be able to
set our edges even lower often like, see over here. So although, no,
yeah, that does work. You just need to go ahead and
then quickly, like, invert. It's to invert grayscal. Yeah, see here. So they are able to go a
little bit thinner. So if we do this, and just use this note,
it's very basic. Hopefully, if we now
look at the end, here, these now look a lot thinner
if I go to a very end. Here, see, they look a lot
thinner, so that's quite good. So let's have a look
and see how that looks. So if we now go into Mm set, that one is still quite strong. Maybe we need to just reduce the actual height
map a little bit. Or is it not updating? Oh, wait. Actually, it
might not have updated. The thing that we have
with rate racing is sometimes it has a little
bit difficulty updating. If it has that, it's only
with the height map, though. You just want to
go ahead and turn off and turn on rate racing, and then you can often see here. If I turn it off, There we go, I think. Let's turn on again. Yeah, so that did update, but we did lose one of those cool ones over there,
which you don't really like. So if we go in here, here you'll see, we lost a few. I'm not sure where
that we lost them, but we just want to go
into our fine edge tag. Let's make the edges a
little bit stronger. Let's go into our Nump.
Let's make them stronger. Here we go all the
way to your edge tag. Oh, that is too bad that they
do not show up like this. So at this point, what you can, of course,
do is you can just, play around with some
things like here, if we just go look
at the normal. We can still go. That's
the power of substance. I can now just go into my tile generator and, for example, go into my mask random
and reduce it until I get a few more cracks. Like you can see over
here, Here you see, so you can add
some extra quicks, and then what it will do is
it will automatically update, although I do need to turn off my displacement
and turn it on again. Here you go, just to
make it like update. So you can just go
ahead and you can find exactly what you
want within this, just like we've done last time. So I'm also going to do that, but I'm not sure if I want to spend too
much time on this. So if I do not get
it in a few minutes, I might just Yeah, what I might just do is I might just pass the
video until it's done. It's pretty straightforward.
It's just me playing around with my
random seats and just with my general
settings until I get exactly the kind
of pieces I like. So I will go ahead
and do that and then I will run
through the settings. Actually, this one
might be quite good. It's just example
for the example. So I might be able
to just do this. If I just turn off
my rate racing, and I need to turn on and off my displacement so
that it updates. And I just want to go ahead
and let's say I change my There we go. Let's do something like
this so that I can also see just like some
interesting cracks like this. Okay, so we got these
quacks now over here. If you want, you can
turn on rate racing. And while that is
being turned on, all I want to do now is
I want to go in here, and I just want to reduce
these quacks intensity by going into the blend where
we blend between the quacks. Tone that down a little bit
so that it's not as strong, and that should then also
translate into here we see, tone it down a bit, see, then the cracks just become
not as strong inside of our actual normal
map and height map. There we go. So let's
go ahead and save this. Hello, Emil from
the future here. I made a very small
mistake in our cracks, which was causing it to not look as optimal as
I want it to be. Basically, what I
had to change is it used to be that
it looked like this. These cracks, as you can see, they work fine, but they
do not look like this. The way that I made it look
like this is very simple. In my tile generator, I simply set the luminous
random all the way up so that we have slightly different
gradients within our pixels. And then I just went through
the blend like normal. And then I just added
a quick levels, which pushed the white levels all the way up so that
they are perfectly white. Doing that, I added
my tile generator over here to be sorry, my blend with the
gradients to be in our source input and the perfectly white pixels
in our mask input. And when you do that, you get slightly better looking cracks,
as you can see over here. So they work quite a bit better. Also, if I go here,
you can see it. So that's just something I quickly want to show
you. Sorry about that. That was my mistake.
So many notes, sometimes you tend to forget
one small little function. So I hope that
this clears things up and that it isn't
too confusing, and let's now go ahead and continue with the next chapter.
7. 06 Creating Our Stone Generator: Okay, so we have just finished the basic part of
our substance oil. Now what we're going to
do is we are going to work on our advanced material. And for that, I want to
create a tarmac ground. Now, it's not just going to be a basic plain tarmac ground. That's when the
advanced part comes in. So I want to get a
tarmac ground and I want to use the power of
substance of the procedurality, to have a slider so
that I can make it go from perfectly clean tarmac all the way to very
broken up tarmac. So, for example, when
the slider is just fine, it will look more
in the direction like you can see over here. But then we are going to
go ahead and break it up in the direction like this with all these little stones. The reason I want to
do this is because I have this idea in my head for the final scene that I
will be creating for presentation purposes,
to have a road. And on the road, we
will have the tarmac, and I can simply paint in
and out this broken tarmac. I want to try and capture that. So this is going to
actually be very easy. We will mostly just focus on
creating a broken tarmac. And because we will already have a mask that will mask out
where these areas are, where our clean tarmac is, what we can do with that
mask is we can just throw a slider on there to make sure that when the mask
is completely white, everything will be
completely clean. And then wherever
there is black, it will show up these pieces. So that's the general
idea for this. I have a bunch of
reference images. They all look very cool. So we will be using for
the broken pieces, we will go for
something like this. As you can see, it's not
just like a few stones. It's actually smaller
stones in between, and they are all
clustered together. Parts of them are
sunken into the ground, other ones are just
laying on top. So there's a lot of stuff going on here if you
will look at it. We will not go for the moss. The reason for that is
because these pictures, I took them myself. They are taken from
a bicycle path, and you can already
see they are white next to a forest area. That is why there is moss here. We will be creating
it on a road. And as you can see
over here, roads, they do not really have this
type of moss unless they are bordered to something like a forest area or like
plants or something, but ours will be bordered
next to a simple curb. So that's why it wouldn't
happen like that. So that is the general idea. I think we just need
to jump right in. I want to get started, first
of all, with our stones. Oh, I made this
picture not very good. It's really blurry. There we go. I want to get started, first
of all, with our stones, because I think that is like a very large feature because even these stones,
we also need them over here. For this, what I'm going to do is I'm first going
to create sort of like a stone generator that will just be able to
generate the stones, and we will do this
in a separate graph, and then we'll just
throw it all together. Now doing this one, normally, I use one that I've
made a long time ago, but that one is
way too advanced. Even I barely understand how
I made it because I followed a few tutorials to make it myself because it uses pixel
processes and AVX maps, but I'm still learning
those things myself. They are a little bit more
technical, I should say. I would recommend
looking on ArtStation. There are someone
called Ben Wilson, if you want to go
that technical in it. But for this, even though
it's an advanced substantoil, I don't want to spend 2 hours on one single stone generator, so we're just going
to go ahead and create a nice barebones
version of it. So don't worry. It will
still look good, of course. So basically, I'm just going to go ahead and create
a new substance. I created this one,
which is just like our empty scene that I
called Advanced tarmac. And this one I will call Stone Generator and
just press Okay. And let's close our TwiVew
because we don't need it. So for this one, I
don't need all of these outputs because we are not going to have a
it's not going to just be like a texti map
that we will output. We will actually create a node that we can
use in other graphs. So the first thing we
need to do is we need to start by generating
the stone shape. Now, for this, the
beginning part is very similar to our cracks. We want to go into patterns, but this time we want to go for a much more complicated one. We want to go for
the tile sampler. Yeah, so I need to make sure
that the patrons, sorry, the mask map input that we have at least a mask map input so that we
can control that. And maybe, it's just nice to have a few of
these inputs in general. So once again, these
are just pixels. So what we can do is we
can just go ahead and we can set them very high, so 64 by 64. And then you set
the scale very low. 0.1. There we go. So we just have these
random pixels over here. And now because we are
going to one scale, use a distance node, the way
that we scatter these round, that is where how big and
small the stones will be. So if I go in here,
set my scale to 0.0. Okay, that's too much.
0.05. There we go. 0.05, that is fine. Now position random. So yeah, you can change the
position random over here. That will create some clusters. But the nice thing
is with this node, we can actually just create
some clusters very well. But we are going to
expose all these sliders. Exposing the sliders
means that once we are basically going to
create a dot SPSAR file. You might have seen it before. This file, basically what we can do is we can drag this
file into other graphs, and whatever slider
we expose and exposure just means that we
ask the slider to show up. Whatever slider we expose, you will be able to
see that in the file. Now, at this point, I will mostly just focus on
creating the graph, and then it's better to just show you in practice
how this will look. So we got this stuff over here. I don't care about
rotation for now. All I care about is to go into my color and just throw it
like a color random over here. There we go, because that
was remember how I added that extra little
bit in the end of the basic tutorial about
how I forgot to do that. It's quite important because else it mess up
our distance note. So having this note, I'm now going to go ahead
and I'm going to add a distance to it over here. And this time, what you
want to do is delete this, throw this in the source input, and then in the mask input, we can just go ahead
and we can have a very simple levels,
and we push this out. Like this so that it's
all perfectly square. Trow it in here, and then our distance will look
something like this. So these are basically just
going to be like our stones. And what I'm planning to get is once we actually have
these smaller pieces, we can just, like, mask out some of these
stones, basically. So that will look
something like this. I'm just double checking. Okay. One thing not
to forget is set your distance really
high 5,000 or something, just to make sure that
other colors are flat. Now what we're going to
do is we're going to start working on the
first type of masking. This will be generic
masking out pieces. Now, normally, you would
just go in here and you would set your randomized
mask or something, like a mask random for this. However, we cannot do that
because then our stones would become crazy big
if we do that in here. See because the distance node, it will just try to push it out. Once you have the size that you like in your distance node, you want to go ahead and art a histogram select over here.
We've done this before. Actually, we've
done this before. Boost up your contrast. And now what we can do is here, you can play around
with your position. Your position will basically
be acting like your seed, just like a randomizer. Your range will be the one that will be used to
really decide like, Okay, these are all the stones that I do want or do not want. So you got this piece and
you want to blend it. Here, we just go in here and just blend together
our position map with our distance and set this to
be subtract. There we go. So now if we would go into here, I can just quickly check. Range, see, more stones, all the way to
only a few stones. So that's quite nice.
So we got that. Now what we need to
do is we need to add functionality to also
have the stones mask out based upon a very simple
like anything we input. In this case, what
we are going to temporarily input is
like a grunge map, but we are going to expose it so that we can input
whatever we want later on. Let's throw on a grunge
Bps 01, for example. Now, I'm going to
go in here and I'm going to maybe change
my random seat. I just need something
so that I can preview. Set your contrast
all the way up. And basically, the way that
the system is going to work that I want it to work is whenever there is a white pixel, it will leave the stone, and wherever there
is a black pixel, if the stone touches
a black pixel, it will simply just
get rid of it. So of course, it won't
be as precise as this. It's going to be
a little bit lax, but that's basically
the general idea. So, actually, before we do that, I'm getting a little
bit ahead of myself. I need to just drop in
a quick note in between here to actually convert this to stones because right
now they are just shapes, and we basically
just need to get Oh, wait, remember how we had
that fine adj detect. I most likely want
to use that one. So let me just quickly simple no Where did I place
that saves substance? There we go. The
fine djitect. Hello? Let's drag that in
here. There we go. Okay, so you just want
to plug this in here. Set your edges strength
pretty much all the way on. Actually, do I want to do that? Because no, I do not
want to do that. I want to set my edge strength. That's the tricky
thing. So I want to set my edge strength to make sure that we have all of
these separate shapes. However, sometimes it will cut in between the shapes
which I do not really like. So what I'm basically
going to do is we have our edge strength over
here, that is fine. Now what we need to do is we
need to dd levels over here. And I'm just going to go ahead and if we go to our levels, let's push this all
the way up so that it becomes completely
white wherever we want. Now, I just need to check.
Is this already good enough? Because else we would
need to overlay another fin anche tag just
to make sure that Okay, that looks spot on. So sometimes we will have,
like, a cut like this, but that shouldn't
really matter because there are plenty of tinstones. Only thing is, like, yeah,
this kind of stuff over here, it's if you set the black threshold to zero
point and we can do that. In that case, it's a
very minimal error. Out of all of these stones,
there's a very minimal error, so I can live with that. In your levels, just flip around your black and
white slider like this. And that will just make sure
that our stones are white. So now we can do,
proper masking out. So we got this stuff over here. At this point, we can
throw this in here and that shoot still mask out fine. Checking. Yes, so it properly
masks everything out. That is all correct. Okay. So now that we
have these stones. The reason we need
to do it like this is because we are going
to use flood fills. And as you might
have remembered, flood fills, they need masks. They cannot really get
away with gradients, as well as masks, basically. So we got this stuff over here. Now we are going to go ahead and there you are. Start
working with this. So we need a flood fill
to get started with, and there is a flood
fill to greascal yes, flood fill to gray scale. And basically what you
can do with that is you can give it a gray scale input. So we are basically going to control how we want our
gray scale to look, and based upon that,
we can mask it out. So if we nicely like, throw this up here, so you
can already see it happening. Flood fill to gray scale, and because this is a
very contrasty mask, if this wouldn't be as
contrasty, this would happen. So you can actually
this is quite cool. If you ever want to use this, it's great if you, for example, want to have pieces sunken
down at a very localized area. But if you set your
contrast all the way up, it's basically the same as using your mask map input and then throwing on
your slider over there, because I can now
very simply use my balance to add
more or less stones. That's the general
idea for this. So we got that
stuff ready to go. Oh, actually, we don't even need to. We can just
put it like this. For some reason, I thought
we were going to blend it. So we got these pieces. Now what we're going to
do is we are going to go ahead and we are
going to actually make these look like stones. We're going to do
this in a few stages. The first stage will
be that we are going to now add gradients
to these stones. And once we've done that, we
can very easily would like a levels decide how much
roundness we basically want. So for the first type, I need to get gradients in
the corners, basically. We can try a non uniform
blur gray scale, but what I'm worried
about is that the blurring will
not be as nice. So if you plug this in here, throw up your samples
and then your intensity. So it does blur, but it feels a little bit uneven in the way that it blurs. So let's keep it as an option. But often what I do it takes a few more notes
is a flood fill. Yeah, we need to add another
flood fill after this. So we need a flood fill. And
let's move it down here, and then just do a
flood fill to gradient. And because the gradient is
going to be like one angle, what we can say
is we can say up, right, down and
left, for example. So zero. Double click this 190
degrees for this one. Let's do 180 degrees for
this one, and -90 degrees. Now we have every single level, and then it's just a
matter of blending them together and then
overlaying them on top. So we got these blend,
blend and blend. So I'm just adding more blends that I can add all
of these pieces. And I believe it's going to be just like a simple multiply. Multiply and multiply.
Okay, so we got this. Now, it's a little bit dark, so let's twine art and outer
levels on top of this. There we go. Actually,
the out levels is a little bit too strong. That's interesting. Let's
add a normal levels, or you can add a
histogram select. I think we actually want to go for histogram select
in this case. The reason for that is
because normal levels, it's great if you don't
need to touch it. But if you want to expose it, you would need to expose all
of these sliders in order to just get this effect in
order to just get like, you can see already
how I'm going to make this a little
bit round later on. So instead, and I'm always
mistaken which one it is. Is it histogram scan? I believe No, it doesn't feel like a histogram
scan. Oh, yeah, yeah, i. And then the contra Yeah, okay, okay, Hicrum scan
should do the trig. Although I also think
like a histogram range would have done the
trick probably or not. Oh, no, sorry, not Hicrum range. I don't use the Hiscrm
notes too often myself. So I would look into it. But yeah, the Hiscrm scan is able to give us this effect
that we get over here. And now we can use our Contrast
slider to, for example, make it make the edges
very strong or not. So let's play around a little
bit more with my position. Let's set the position to 0.95. And then I contrast
sliders for now, let's leave it at 0.45. Okay, so we got this structure over here to create like
some general blur. Now, I also want to go
ahead and I want to add some how you say it pointiness it's hard to show
you this on the reference because this is still just like the technical pieces in order
to make them look good. So yeah, it's basically
just pointiness. Right now, they're all
very nice and even. So for the pointiness, basically what you want
to do is you want to go ahead and add a see,
we have our flat feel. Let's add an invert
grayscale note, I believe. Yeah, we need to invert it. And then we want to
add a distance note. But this distance note, we're not going to actually
plug anything in into a source input. Now, the maximum
distance I always forget what to do,
but we'll see. So let's add an infutGrayscale
first here, see. So where you do not do that, you get these points over here. And once you've done
that, we can add a outoevels like this here. I'm basically looking for this
pointiness. So let's see. We got this piece over here. Let's blend this together.
Using our points. And that's why we needed
to invert it because else it will pick the wong areas. So we blend this with points, and we art this
to be a multiply. Wow, that's really strong, but I believe that
we can just, see. So now we can just control, like how pointy we
want our stones to be. And if you want, you can even go ahead and we can
mask this stuff out, but that's something that
we'll work on later on. I first need to
get the bare bones before I can work on that. I believe your distance
in here can control Yeah, actually, it doesn't do much, so let's just leave it at ten. I was expecting it to control a little bit
more of the pointiness, but it looks like
that isn't the case. So, we got these two. We have
them now nicely overlaid. Now what we're going
to do is we are basically just going
to go ahead and we are going to mask out some
of the roundness. So we are going to
give it control over how round you
want things to be. And that will basically
happen like this. So at this point, do we
want an outer level? Yeah, actually, let's
do just outer levels because with these
kind of pieces, I like to keep them that
the levels are going 0-255. If we don't really
do that, yeah, we sometimes just get that
with such a generator, it goes broken, basically. Wow, I really cannot speak in this tutorial
for some reason. So I'm going to add a blend. And now I'm just going to control the roundness
of our stones because of these stones they don't sometimes they
have these points. Sometimes they have
these nice sharpt, but also sometimes
they just have some nice roundness going
on, like over here. So that's the next thing
that I want to work on. And after that, we'll
call this chapter done. So art a histogram scan. Push your position and
contrast all the way up. There we go. See this time, I didn't use the
levels just for you. So the Hirscrum scan, we push it all the way up, and then we add a very basic blur. Should we do blur high quality? Let's start with a blur. Let's do a blur high quality. Blur high quality is just
often, yeah, higher quality. So we just give it
like a little blur, like you can see over here. And this blur is just here
to make the fall off. Now if we go into our HGRm scan and just lower
down the contrast, well, yeah, it should be
able to mask. There we go. Actually, said
higher the contrast. Sorry, higher contrast,
lower down the position. And then we can control basically the roundness
of our stone. So we can say, like,
Okay, stone roundness. We then blur this might be
a bit too much, so blur it. And then in the blend,
we set this to be a um multiply? Yes, multiply. So the reason you want
to blurred is that the stones do not have
a super sharp cut off, but they just, like, nicely and softly mask out, as
you can see over here. So now, this position
map will basically control how sharp we
want the stones to be. So we can go all the way
from, like, little pebbles. To just like sharp corners,
like you see over here. But they will still be sharp in some areas, and that's
the nice thing. So this is where I'm
going to leave it off. As you can see, it's slowly
starting to look like stones. They are like nicely
clustered together. Yeah, we need to,
of course, keep working on the
variation and make sure that this looks not very procedural and
just very organic. So let's save your scene,
and let's continue with our stone generator
in the next chapter.
8. 07 Creating Our Stone Generator Part2: Okay, so what we're
going to continue with now is we are starting to
get some quite nice stones. The jacket edges over
here, I don't really like. Now, there is this
technique that we can use, which will also immediately, it's a bit difficult to explain. It's kind of like
soften things out. So if we go ahead and add a slope blur gray
scale over here, and then if we go
ahead and add a blur, high quality
grayscale at the top, what we can do is if
we just give this, like, a little bit
of, like, a blur, throw this into our
slope gray scale, set the samples all the
way up, intense it down, and then you get like here, you get this bit of
a soften effect. It's really intense. Let's see. Can I go for 0.005 or something? 0.001. Here, so basically just
gives us a soften effect, and it allows me to also push
things out a little bit. But the values are way
lower than I expected at 0.005. So it does work. You can see the difference
that they now become like these nice soft pebbles. But, yeah, I need to keep
in mind that the intensity, the clamp for this
with clamp, I mean, like how sensitive this seems to be very
sensitive right now. But, okay, so we got
these pieces over here. Now, we can already just
quickly add to normal maps and then throw this to
OpenGL. That is to twe. So, we are starting to get
some pretty decent stones. Now let's start by getting
into the variations of this. One variation that I
want to do is I want to have some of these stones
just simply being cut. And the way that I tend to
do that is I tend to add a flood fill, and I
believe at this point, we would need to turn
this back into a mask, or can we just use Let's see. Can we just use this one? I just need to
check because I am, of course, here, I'm pushing
things out a little bit. Yeah, you know what
that should be doable. If I go ahead and add this hcrm scan over
here to our flood fill. And the reason why I don't want to turn this one
into mask is because these edges are so close together that it
might give us arrows. So then add a flood fill
to gradient over here. So if we just at an
angle variation, we now basically have
random gradients, which means that we
can randomly cut off some of these
pieces over here. Now, another thing that
we need to do is we probably would need to
end up with some masking, but let's first of all, add
a quick blend. Like this. And these gradients,
as you've seen here, the masking doesn't
fit perfectly. So I would recommend just
adding a very quick blur, high quality gray skull after it and just give it
a little bit of, like, a blurring like this. And then throw that
onto your foreground. Now, if you set the blending
mode to be a mint darken, what will happen is this, you can see over here,
you can see that it will start to cut off some
of these stones. Here on the normp
you can really see. It starts to just nicely cut
off some of these stones. Now, one of the problems that
we do have in this case is that they are cut off everywhere and I do
not really like that. I do want to create
a quick mask. If I just go ahead
and go in here and I will probably you know what? We can probably use this one. Oh, no, sorry. Yeah, no,
no, we cannot use that one. We need to have a I have a
little brain freeze over here. Yeah, so we need to go
ahead and add a flood fill to a random gray
scale over here, flood fill a random grayscale and just throw in the same flood field that we've used before. And then we are going to go
ahead for a histogram select. Wow, I don't know why I have that brain freeze over there, but I can say, okay, only these pieces, I want to
have all of my smoothening. And now if I just go ahead and duplicate my blur behind this. So we soften this out and we
throw this into our blend. So now it should only happen on a few stones and
not on all of them. See? So now we get even more variation in
between those pieces. Okay, so we got that stuff done. Now, I do need to remember
that later on we also need to create masks for this so that we can cluster stones
together better. But let's at this point, continue on by I
think let's just start by adding some
general warping and some overall noise
on this, I believe. See. Yeah, I think that's
the next way to go. Let's add another plant. And for this plant, I basically
want to have actually, I want to grab our flood
fill to random grayscale. And I just want to throw on my blur. So I'm
basically doing this. I have my flood fill
to random grayscale. I blur it a little bit. And I throw this
into my blend and set my blend to be a multiply. And when I do that, if
I load down my opacity, I can have some of these
stones to basically be very strong and sticking out, while other ones are just kind of sitting a little
bit in background. This is mostly for a height
map because in a height map, it means that we will
have different heights in our stones. So that's
why this is handy. So I'm going to leave my opacity at around 0.4, in this case. There we go. And what
I'm going to do after this is I'm going
to add let's see. Let's add a quick
directional warp. Let's add a quick directional
warp and just throw in a few waves. So if we go for some
parlis over here, give it like a random angle, and you basically just want
to set your parlis scale quite high and just give it a little bit of like an intensity. I expected it to
be a bit stronger. It was my intensity to like
ten because if I said to ten, I can just easily move it down. Okay. So one thing that I do see, do you see
those lines here? I need to keep an
eye out on those, not that it's like
breaking the tiling. So I basically just
give a little bit of a warping around this and I
will be able to control that. And after that,
now for our noise, if we have a look, I think, actually, this is
the best image. Okay, so looking at this noise, most of the noise is
sitting on top and then it just cuts around the
edges a little bit. So let's start with the classic, which is going to be a
slope blur gray scale. And with the slope
blur gray scale, we want to throw in a
moisture noise over here. Just throw it into our slope. So that now if we set our
samples all the way up, intensity all the way down and just set our mode to minimum. Oh, it's really sensitive. 0.05. No, even less. I need to go very
careful with this. 0.01. Yeah, I just add some
generic noise to this. That's one. And then
on top of this, if I just add some
very base noise, if you add another blend, we can just grab something like let's go for a
where's fractual sum. Let's go for fractual sum one. Actually, let's do
fractual sum base. The reason I want
to grab the base is because this
one has controls, so I can set this like
to be a bit rougher. And if I now go ahead
and blend this together with something like B&W spots one to basically
create a bit more variation. So let's blend this
as a multiply. Just tone down your paste
a little bit and just throw it might still be too big. I might need to make this
smaller, but we'll see. So throw this into our blend. Set this to be a
multiply and just like tone down our obste. Let's go into normal
because I cannot really see this. Anywhere else. Okay, so yeah, so what I'm first going
to do is I'm going to add the transform in between
here and I'm going to set this transform to
minus two in order to just tie it twice and
make it even smaller. So that's one. And then
this slope blur is still too strong, actually. So 0.005. No, it's 0.008. There we go, to reduce it a little bit. We are also later on just
in our actual graph. We are going to add even
more details to this. But I first want
to just go ahead and start with
something like this. Okay, so we got these
stones over here, which would then be considered
like the big stones and then later on we can
add clusters to this. So they will have random cuts. They will have random angles. Now, I might want
to also just give the option to also have
random tilting in the stones, which we do after this blend. So we basically go
after this blend, and then we duplicate our flood filter gradient along with our blur over here. And then we just, like, change the angle variation a little bit so that our angle
is slightly different. And then I plug this basically the top and also set
this to be a multiply. So now I can control if I want stones to be slightly angled, as you can
see over here. This all works way better
in our height map. So don't worry once we actually preview
this in our height map, it will look a lot better because the norm map is mostly
a support in this case. So we got these pieces done. That is all fine. I still feel like the stones
are too perfect. I don't know if I maybe want to do something with a
multidirectional warp. So you have this warp,
which will just do some warping in one
single direction. However, we also have a oops, multidirectional warp
gray scale over here. And if we grab a noise for this, let's ty like a Clouds one noise just to
see how it looks. If you throw it in, yeah,
it's really strong. So you can basically set
your intensity here, and it will just basically
like warp these stones. You can set the mode,
and I'm going to set the mode a minimum
because I want to, like, kind of try, cut into these stones a little bit. And then you have
your direction. So one direction would
be like a normal warp, and then you can go all the
way up to four directions. So let's see what does chain do? Now, chain probably
doesn't work. Let's go from minimum. And let's actually
have a look and nom. So I can see some arrows here. That's why that's why I think minimum
doesn't work as well. Here see, you can
see these arrows. So the average or chain. Actually, you know what
chain might actually work. I've never used it before, but it actually looks kind of cool. So let's set this to like one, and let's just call
that today for now. Okay, so we got this stuff here. I'm just going to set my OSD. Oh, that is the
warping, isn't it? If I go to this slope, grace ground, set
the intensity off. Oh, no, wait, it's
still this slope blur. I know why it happens. It's because we have a lot of gradients now sitting in here, and the slope blur, it will
twice go around the edges, but it has a difficult
time doing so. So maybe I'm actually going
to get rid of it before. No, I don't want
to get rid of it. Then I'm just going
to set very low. 0.005, no, 0.003. Yeah, it looks a bit better. There we go. Okay, so we got some bass noises sitting in here, and we got these stones. Now we need to have a think
about how we are going to use all the functionality to
also cluster it here. The first thing I need to
do is I need to give it an option to also basically play stones and apply a mask where you do not want to have stones. This
is for later on. So now we're really going to
go ahead and we are going to start with the
exposing and everything. So before I forget, I need to do this mask because I'm always very forgetful
for this stuff. So if we go all the
way to the font, let's see where do
we mask out again, Wait, we do that
over here, don't we? So generic mask, and here we are starting to add
this mask over here. Now, what I basically
want to do is I want to be able to
have this king map, and then I want to
add a blend to it. And I want to add a note
which is called an input. And let's do an
input gray scale. So this input basically
allows us to later on apply whatever we want, we can just throw it in here and that will be added to this mask. So if I go ahead and call
this No Stone's mask, for example, and just
copy that identifier and also paste it into the label so that it will
show up correctly. And this doesn't
really matter. I just press art item and just
leave it like that. I want the artist on here, and I want to set this
to be art because I expect that let's see, is it masking out? Oh, sorry, I need to set
this to be subtract. Because I expect that we
input whatever is white. We do not want to have stones
generating on top of that. So if I set this to
subtract because this mask is the other
way around in this mask, everything that is black, we do not generate stones at top,
this should do the trick. So I will basically show you
how this will look later on so that you have a better
understanding of the exposing. So we got this stuff over here. Now, we have a
normal, but we don't actually need the normal.
We just need a height map. So I'm going to create
an output note, and I'm just going to call
this Height, for example. Copy the identifier
into the label. You always need to do this because the label
is basically how it will be named
whenever we use this. And then if you save your scene, and then press right click and
press publish dot SBSRFle. Now, I'm just going
to paste it into the same folder as where
we have our save file, and I'm just going to
press Save and press Okay. So now we get this. We get this stone generator dot SPsRTs basically
how it will work. So we have our advanced
star max sine over here. This is going to be
our empty scene. You basically then drag
in the dot SPsR file, and now you can see what is happening is we have
a height output, and we have that one
input that we created. Now, there are no settings here, but now what we can do is we can expose all of the settings
we want to change, and then we can
change them in here. As an example for
the height map, let's say that I go for like a grunge Mp Z one,
I can do this. I can plug it in, and what will happen
is it will avoid. See, I will not play
stones wherever I have it white, so
that's already working. So now that you know that,
we can simply go into our stone generator and
just close the tree view, and now we can start
by exposing it. Okay, what kind of control do we want to have? We
have these pieces. We want to have control
over the X and Y amount, and we want to always
have this control to be even so we can use
the same setting. This will basically say how small we want
our stones to be. So what I can do is I
can go down here and I can press expose
above my value. Now, then it will
ask you for a name. I always go to new and
give it its own name. So this is going to be
stone underscore scale. I then press Okay and
press Okay again. Now you can see that we can
no longer edit this value. This is because
now it is exposed. Now for the wire mountain
nice is that you can reuse the same values because I know that these will
always be the same. I can go in here and I can just click on Stone
on the score scale. So that's basically
all that that will do. So let's see. We art
it to a distance. That's fine. We then
detect it. That is fine. And here we are starting
with our first one, which is we are reducing
pieces in our histrm select. Now, we are doing
this. Let's see. Are we doing this using
our range, I believe? So if we go in here,
we can expose this, and this will basically
randomly get rid of the stones. So Random stone
unscoreRmoval. Pass okay. Okay, so we can now control how many stones we
want to randomly remove. Then what we do here
is we have our mask. So what we can say with this one is we can
give it a mask input. So let's add another input. Actually, if we
add another input. Oh, yeah, you know what?
I'm going to do this. Because what I was thinking
about, in the other graph, we would probably just combine all the masks together where we do not want
to have stones. So we can just as well input a single mask here and just say, Okay, so this is going to
be our random stone input. Now at this point,
because this is black, you can see that nothing
will really work anymore. So I'm going to temporarily
leave this on here. And I just need to
remember because it's just for
previewing purposes. So what do we do next? Over here we add our roundness. So we do that using so this
is just like the pointiness, and I don't think we need
to do anything with that. Yeah, we don't need to
do anything with that. I just want to go
into my let's see out levels. There we go. I want to go into
my histogram scan, and I want to expose my
position and just press new and call it stone underscore
round and press Okay. Okay, so we are exposing
the stone rounds. So now we have
control over that. Then what we are doing is we are basically pushing this out. I can go in here and I can
expose this and just call this stone underscore blow out because we are
basically pushing out the stone towards other
pieces. So just press Okay. And then we blend it, and this
is going to be the angles. So if we go for, let's see, flood fill, no, the angles are fine. I just want to go in here, and I probably want to
control this one, this range. Expose this and just call this angle underscore cut
off underscore amount. Now, I will show
you another thing that we can do in case you want to make this
note very generic for many different projects is, for example, over here
we have without angles. What we can do is we can
actually add a switch, and it's called a
switch grayscale. And what you can do with
this switch is you can say if so we can expose
this and we can say if, for example, angle cutting is true, we will cut the angles. So if angle cutting is
true, we use this blend. But if it is false, we will use the blend
before we cut our angles. Doing it this way with
a very simple switch, we can turn on and off the actual cutting of
our angles over here. This is handy, for example, if we want to create pebbles, like the actual smooth
pebbles that we often have, I don't know, on the
beach or whatever. So let's see. Then what
we do is we add Okay, so this one expose And call this random
height variation. And I'm just exposing
the simple opacity so you can pretty much expose anything you
want with this. Then this is the
expose this one, new random angle variation because this one will
expose the angles. Then we have this
directional warp, and then we have this
noise over here. It's just expose this. Noise underscore A
unscoe intensity. And now we have this one,
which is a moisture noise. A No, it doesn't.
There we go, expose. New and just call this
stone cutting amount, I guess, I'm bad with naming. And then we have our generic noise sitting on top of here, so I can just go ahead. Alright, that's this noise. All I had that turned off.
Well, we can still use it. We can expose it in
just new and just call this generic underscore, noise underscore
amount. And press okay. Okay, so we went
through and try a graph and we have now exposed a
bunch of different pieces. Now all we need to do is, let's first of all,
save our scene. You want to click on
your stone generator, and here you get
all the settings of what we just exposed. Now, remember how I was
talking about the labels. Here you can see that these do not all have the correct naming. If that is the case,
you simply want to copy the identifier and paste it
into your labels over here. Just like that. That will just make sure
that they are always called the same whenever we use them in different graphs
because else it might, of course, be a bit tricky. And here you can
see my switch so I can here turn this on and off. See? I can very easily
change the ankle cutting. So I'm just doing
this. Now, I'll show you a few extra things. They are not really
needed, but I'll show you. If you go to presets, you can change
whatever you want. So here you can see all of our
exposed values as sliders. So in presets, you
can just give it a name so you can
call this default, and these are the
default settings, and you can just
simply press new. And when you will do
that here, you can see that it just gives you a new preset which
you can very quickly select in your dot SBSR file. Another thing is if you
want to limit the amount, you can use something, for example, with
the stone amount. You can set your
minimum and maximum. Right now, the minimum is one, the maximum is 64. So what I can do is I can
set a minimum to well, one is the minimum, yes, but I can set the maximum
to 25, six, for example. So we can go much
higher in that version. Once you're happy with it,
you can save your scene, and then you can
right click and press publish dot spSRFle as previous. And once you've done that,
if you go to your new scene, it should have auto
reloaded in here. And you can see here preset, so we can set the
preset to default. And if I just have a look
at this stuff, stone scale. See, I can very quickly now set my stone
scale way smaller, so I can make very
nice little pebbles, or I can make these
very large stones. So we very quickly created a very simple stone generator,
random stone removal. Little stones, many
stones, stuff like that. It's actually turned
out surprisingly well. I was a bit worried at
the beginning because it was a long time since I've
made a stone generator. But here I can say
stone roundness, so I can really make
these little pieces. I can go to the stone blowout, which that one is very sensitive,
so it doesn't do much. The angle cutoff amount, I can make the angle
cut off, like, a lot of them or very little, or I can just turn it on
off, height variation. Angle variation is working. Noise intense noise
intensity is working. This is like one of
those pieces where you can set the limits if you want. So that you cannot go
higher than, say, two, for example, stone
cutting amount. Oh, this is, of
course, very small. And then the generic
noise amount. So now I should be able to go for Slack preset and
go back to default, and then it will
just reset all of my settings because that is the default that
we have created. Awesome. So in our next chapter, we are basically going
to start by actually placing all of these
stones together. So we will go ahead and create a field of stones that
will have big stones, small stones all clustered
together in a really cool way. So let's go ahead and
continue with that.
9. 08 Creating Stone Clusters Part1: Okay. So now that we have
our stone generator, we are going to put
it into practice, and we are basically going to start by placing our stones. The goal for this is
to get these clusters that you can see over here
where you have big stones, surrounded by small stones. But also the big
stones are often in, like, small little clusters. Like you very rarely get like a single big
stone just sitting there. They are always surrounded
by multiple big stones. So that's something that
we want to capture. So here we have a stone generator
in our Advanced Tarmac. Now it is black because remember how we changed our
mask to our input. So that's something that
we just need to do. That does mean that for now, I will just grab something very generic because I
don't have a mask yet. We need to create that, but I first want to
create some stones. So I'm going to go in
here and I'm going to say, Let's see. Actually, let's just use
this mask over here. So if these are going to be our larger stone clusters like you can see
here, there we go. Okay. So now that we have these, now let's go ahead
and I believe that our preset over here is already fine because we pretty
much already set it up. I'm going to have a few
less larger stones. So, this is the size I
want to go for, I think. We can always change later on. So random stone removal. Let's throw that
up so that we have a few less largestones, but we still get some of
these clusters over here. Let's go for
something like this. Okay, so anything
else I need to do? No, I think that is about fine. The generic noise and everything
we can work on later on. I'm first focusing on position. I'm now going to duplicate this. Oh, I need to expose a mask output. That's
something I need to do. We might be going back and forth because sometimes I just
tend to forget some stuff. So if we go to the very ends plug this one back in so that I can actually
see what I'm doing. If we go to let's see where
does our final mask end up? Well, I think, because
we do do the blur. So it might be better
to add it after our directional warp over
here and then just blur it. Yeah, that might be better. Let's go ahead and add a levels after this directional warp, push levels out that we get
like this quite strong mask, and then just push it out
even further so that it also surrounds like a tiny bit
of space around our stones. So if we plug this over here
and then add another output, and we will call this
stone underscore mask. And don't forget, copy
it also in the label. And now we can just
go ahead and we can save a scene and we can publish our SPsR file. Okay, let's go back in here. Oh, that's too bad. So outputs themselves,
for some reason, they only work when we
completely reopen our graph, while our actual settings, they will just reload
whenever we have it. So if we just close
this and just go ahead and open it up again.
I was afraid of that. In that case, I just need
to redrag it in here. So it's good that I show it now. You can close down
entire substance, but I'm not really in
the mood to do that. So what I'm instead going to
do is I'm just going to copy my stone removal. Huh? Why are you the same setting? That is strange. Oh,
wait. There we go. Okay, so basically
what we need to do is I just need to
quickly go back in here again because I once again forgot to
set my input mask. So let's do this. Save,
publish our dot SSR file. There we go. So
basically, just update. So this one we can get rid of. So now we have this
one over here, great. Okay. Our stone removal,
let's tone it down. I'm not sure why it still
shows up like this, but okay. So big stones are
going to be 0.7. Let's go 0.7 for
that. There we go. And now we also have our
stone mask over here. So what we can do with
this is basically this. We can duplicate this note. And in this one, what I can
say is, Okay, these ones, I want to have medium
stones, for example. So I can go to my
random stone removal, add a few more, and then go to my stone scale and add
like a bunch more stones. Now with this, I
can go ahead and I can still use this
mask most likely, but I probably want to let's
duplicate it a little. Let's duplicate it, and then just make it a
little bit bigger. And then what you want
to do is you want to add a blend and you want to grab your stone mask over here and you want to
throw this in here. Now, if you set the
stone mask to be a subtract so that
it will cut out, it should make sure
that no stones, see, no stones are generated
where our large stones are. So they should be just
generated out like this. So now we have these
bunch of stones. So if we go in and
we add a blend, we can blend our original ones, which are just like
with our height with the smaller ones
and set this to be a max ten blend.
And there you go. That's basically how we are
going to create our clusters. As you can see over here,
we now have these stones. Now I would say
these are going to be medium, so not small yet. So I do want to actually
remove a few more. But here you can see the
difference between before. Now we are these clusters, and now what we
would then do is, for example, duplicate our
stone generator once more. And for this one, I'm going
to set the size really small. And just like I don't know yet what I'm going
to do with soil removal. We basically have this stuff. And now we do need to now
mask out both of these. So if we just go ahead and
grab a very quick blend, we can just blend these
two masks together. Just set the blending motor art. There we go. So this
mask we can now cut out. So if I now go ahead and use
this grunge map over here. The reason why I'm just making this one bigger so
that we have some spill out, but we can play around to this. Throw on our stones and set this to be
subtract like that, and throw this into our stone
generator. There we go. So we have all these
really small stones. And now, if we blend
this together, using this height, Max, Lighten. There we go. See? So
now we get this effect. We really get all
of these little stone clusters that
you can see over here. It still feels very generic, mostly because there's almost
nothing in these areas, which makes sense because
that's how we did our mask. And then there might be a little bit too many
in these ones. So I'm going to go
ahead and let's see. I'm going to start
by probably making our stone scale a
little bit smaller. It's also fun how we can
see how they become. So it looks like that
expect them to go 512, and expect them to
go much smaller. I think we cannot
really go smaller. It's a limitation, and this
limitation basically comes from the fact that
the generator, because it needs to
generate specific shells, there's only so much it can do. But that is no
problem. Like we can just scale down
the overall thing. So what we would then do is
something in the direction of this where we have our
larger stones over here. And we will probably
set them to be even larger like this. And then we have our
medium stones over here. We would set those to be a
little bit larger like this. And then we will
have a small stones sitting in here.
There we go, see? Okay, so the small stones, those are much easier to
get into these areas. So knowing that, what I
would do is I would go ahead and probably now duplicate
this crunch map. Once we have our actual mask,
this will be much easier. But for now duplicate
it and just see, I want to get this to be maybe if I just tone
down my contrast, I can. Yeah, so we get a few of them. I'm just really
worried because it feels like there's way too
much stuff going on here, but let's actually
preview this in a normal map so that we can
have a better sense of it. So let's add the normal map and you set this to be like ten. Okay, that's maybe
a bit too much. Let's say five. Okay, see? Yeah, it feels very,
very generic right now, so that's something I
do want to work on. The first thing I'm going to
do is in our small stones. Let's go down here and let's go into our
height variation, boost this all the way up,
and our angle variation. So that should give us
quite a bit of variation. Also in our medium stones,
some height variation, some angle variation to
get rid of some of those. So got these stones over here. Now, what I was planning
to do is later on to simply just tile my
texture a little bit more. So I'm just dialing it twice in order to get those stones. But it is basically a
lot of balancing out. If we would already just have a quick setup for exporting
here, delete this. So let's set this to three.
And let's also plug this into our height map and
add an Ambienclusion note. And remember, you
can hold control to duplicate your output. There we go. I'm an occlusion. By the way, I'm the inclusion, turn on the GPU optimization. So we got this stuff over here. Let's just go ahead and save us scene and export
this so that I can actually see it with
temp inside of Momset. Here we go. TJ Export. That's all fine.
Let's have a look. So we got that stuff. Yeah, we definitely need
to work on the stones. What I will do is I will
still in this chapter, just already set up like
a basin and Mamo set. I know that we had already scene set up for
the basic version, but what I'm going
to do now is I will slowly show you how to
actually set up the scene. But we're going to start
with something very basic. So here we go. Here we
are inside of Mamaset. Now, the first thing
that I will do is I will actually give you
the sphere that I used. So if I go into source
files, measures in here. Now, this sphere, you
can actually find it inside the base
installation folder of substance designer. So it is basically in the
substance designer folder, and I'm just going to navigate. Here we go. So in
your program files, if you go to subs designer, if you want to find
more of these, you can go to resources, view three D shapes,
and in here, you will have your
material ball, rounded cube, and all
of these extra shapes. So that's literally
where I got it from. I just go to my sphere two
tiles, press control C, and then I simply going
to go ahead and go to my actual folder where I can
just supply it to you guys. There we go. So it's
in the mesh folder, and then I just drag
it in. There we go. So we just have this very
simple sphere in here. So what do we want to do now? Let's start with a few settings. I'm not going to use rate racing for a while, in this case, and this is just
because rate racing is more for a final render. I'm going to throw on my
ambien occlusion over here. And I'm going to set the
strength a little bit up. I always do that. I always
set it around eight. I then want to go ahead and go down here to my resolution, and I just want to copy the 1920 and also paste
it into 1920. Because what I can do then is
if I go to my main camera, I can turn on safe frames, and the safe frames
will basically react based upon the
resolution we have set. So if you set the sa frame
opacity all the way up, we get this black bars, which will give us full focus on just our sphere
and nothing else. Now for the sky, I'm not
sure yet what sky I want, so I'm not going
to worry about it. I'm just going to set
my mode to color. And when you set
your mode to color instead of ambient sky, you can choose a
background color. So I can just give this like a dark color simply
by selecting color. And that's it for now.
So it's very basic. All I really want to do now
is just press the plus sign. Call these ones stones for
now, actually, sorry, tarmac. And now all I need to do I
just need to go ahead and import those three
textures that I have. So the first one is an easy
one, it's the norm map. We can plug it in here. The second one we have already covered, it's the occlusion, if you go down here and go to occlusion and the occlusion map. And the third one, oat, we have actually
covered the third one. If you go to displacement
and go to height, you can drag in your height map. Now, the height map
is often very strong, so just already tone down your scale and
throw this in here. So this is what
we get right now. Now, the first
thing I want to do is I want my roughness to be quite dull because I just want this to be quite a dull texture. I want to set my emclusion quite low because I don't want
to have it as strong, and I want to set my
texture over here, the text tiling to two. These are settings
you get used to them. They will be the
settings that you use hundreds of times after a while. So the next thing is, let's
work on our displacement, because right now
our displacement, as you can see, it doesn't have enough geometry. So very simple. All we need to do is go into
our sphere to tiles and go into sphere and just
turn on the subdivide. Now, depending on how
strong your PC is, you can go quite high with this. I'm going to go probably up to, like, a few million polis. You can see it down
here. So 6 million. Let's see. For now,
I think 6 million is fine just to preview. So what I can do now is I
can just go ahead and I can, preview how strong I
want everything to be. So these are stones right now. They are okay, but they feel like they, something
feels wrong. They still feel too generic. So I'm now just
going to go stone by stone from the bigger
ones to the smaller ones, and we're just going to
play around with things. So let's get started with the big stones. What do we find? We find that? What do I find? I find that they are not
here we go to sight. They are not prominent enough. They aren't standing
out as much, so I want to have them
stronger to Willi peck punch, and I would probably want
to have a few more of them. So I go in here, and the cool thing is about substances that
everything is procedural. If I add more stones here, so I can just set my
random stone removal down to add more stones here, it will automatically
detect all the masks, and it will just generate all the other stones
still around it. So we got that. I got
a few more stones. Good. Now what I'm going to
do is I'm just going to go ahead and I'm going to
probably let's first of all, try out the levels to see if
I can I can push it as much. The thing is you
can add the levels, but there's only so
much you can push it before the stones
start to look strange. Yeah. Like you can add
it, but after a while, they will look flat
in certain areas. So it's just like we just
kind of need to see. So for example, now I have
pushed them quite a lot, so I can now go into Mamsat
and I can now see over here. How well the height is working. So if I set my displacement
up a little bit, it just had to reload here. So the height is
working quite well. So I'm basically going to focus my displacement on
the salestones. The salestones are
working really well, actually, as in
height wise, see? Because you can see some are
higher and others are lower. So seeing this, the first
thing that I notice is I need to tone it
down a little bit. So I'm just moving my
right slider back down. Going to Mm set, again, the all the Mm sets
don't have this, but these ones you sometimes
just need to double click on your displacement
map in order to reload it. So there we go. They are now standing out quite a bit more, and
that's quite nice. I like that. They
are quite smooth, but I'm not too
worried about that. I'm more focusing now on
how everything will look. If I now go in here,
what I sometimes like to do is I like to
just go to, for example, this blend and just
turn it off for now because then I can just
focus on these pieces. Here, now I can just turn
this on and off, see? So I can now just really focus on these little stones
that we have over here. What do I notice? The stones, I probably want
to make them a little bit more pushed out
and, more or less. No, I think I have
enough of the stones. Yeah, they are
these ones, right? So maybe make them tiny bit
smaller. So let's go in here. And let's set the stone
scale down a little bit, well, set it up a little bit, depending on how you look at it. I will also actually later on, just go into my generator, see if we can push
it down even more. So here, let's see. So I'm adding these over here. Now I'm adding a mask down here. What I can try to do
if I'm careful is I can try and this mask is most
likely very sharp, it is. So if I add a very quick blur, high quality gray scale, I plug my mask in here and
just like a low level. And then at the levels, I can push this back in
so that now if I go to my blurry quality gris
cal, here, I can do this. And I can basically
control how close I want my stones to generate
to my actual masks. So if I go and blur this more, you can see what will happen
is that the stones will generate pretty much on top of our other stones, and
that's what I want. So not literally on top. I don't want them in,
like, the center, but I don't mind if they are sometimes overlapping
a little bit like you can see
here because it will give us a feeling like
they're really close by. Now, the next thing
I want to work on stone roundness is
fine. Stone blowout. That was the pushback, right. 0.5. Yeah, that
was the pushback. So if we set this to
0.1, that's fine. So the angle cutoff amount. For these stones,
they are smaller. I think I want to just set like a few more
angles to be cut off. A random height variation and angle variation I was
already happy with. Let's go for a
noise A intensity. Okay, that's really sensitive. Et's go for 1.2. Okay, let's see. So
we are placing these. They are quite close together, so they are being
clustered, so that's good. If we just go in here. Tone down my occlusion
map a little bit more. Okay, so let's see. So
they are being clustered. I don't think I think I actually need to go
one more subdivision. This might take a second. Oh, I didn't need to go
one more subdivision. I just had to I forgot that
I had to reset my mask. But, luckily, I just mispressed. So Okay, so that is fine. Yeah. Yeah, I can live with
that. That's looking good. Okay, so we got these
clusters over here, so they are working,
and now we want to just have tiny
stones in between. Now, we are running out of time. So what I will do
is in next chapter, I will start by
creating these really, really small stones to
have them in between here. And once we've done that, we can take it from there and just continue with this texture.
10. 09 Creating Our Stone Clusters Part2: Okay, so we are slowly getting
there. We now got this. I'm now going to
start working more on the really small
stones over here. Yeah, that's pretty much it because I don't think
the overlapping. Like, I'm not sure we can
push this even closer. What was that roundness? No, it was not a roundness. I believe it was like
the stone blowout, but it can only go
one way, doesn't it? Let me just quickly check. Let's go into our
stone generator. And it's basically.
Basically, what I want to look at is where
are you? This one, I believe. So I'm doing the
blowout over here. Okay, so I didn't expose it, so that's why I
couldn't find it. Yes. So I did the
intensity for this one, but I also want to go
ahead and expose this one. And I think that was
what I was missing. So this one I'm going to call
Stone Underscore fatness. Honestly, I don't know. Just going to give it
like a random name. And well, it doesn't actually matter that
I already switch here because I can just save my scene, publish
SBSERS previous. And I just need to double click on here so
that it reloads. Okay, so Uh, excuse me. Don't tell me I just
lost all my work, did I? That's not normal. That
resets the presets. That's definitely not normal. And I once again
realize why this is the case because
for some reason, I have something with just forgetting to actually do this, to just set it back.
I don't know why. I do apologize. It doesn't look very professional
in the tutorial, but mistakes can be made. Okay. So we got this stuff, and now basically what I
wanted to try is see if I can increase the blowout a little bit more,
not this blowout. I mean, the stone
fatness over here. So this is very, very sensitive. So if I said this to seven, Okay, so we are
getting close to that. 0.010 0.02. Okay, so I'm pushing these out, and now if I just play
around my stone blowout. Okay, so this one can now control kind of
like the softness. So if I set this to 0.2, yeah, I wonder if that works. For now just Yeah, there we go. So now the stones,
they are so close together, that's
looking a lot better. Okay, so I got that stuff. Now, what I had in mind for
this one, if I just add it. So these stones, we couldn't
make them a lot smaller, but we are able to
actually change the size by going just into our stone
roundness, I believe. So if I go and set my stone
roundness. Here, see. If I go and set my
stone roundness lower, I can actually make
these a lot smaller. So if I go in here, and I set my stone
roundness lower, but I'm going to set
my random removal. Also low so that they basically just show up in more areas. Now, with this technique, they still feel a
little bit generic, like we cannot get as
many pieces in here. But what we could do is
we could just go in and we can do like a blend. And if we just go ahead
and by this point, the stones are so small,
I might be able to get away with just doing
a generic blend. So if I just change
my random seed for this to randomize the position, plug in these two stone
masks and just said this to be a max Lighten. So I hope that this blend will just work and
that we don't need to separate these out, but we'll see so that we get a few more stones
in those areas. Turn off on and off
my displacement. Okay, so we are getting
the stones. That's good. And yes, as I expected, what I'm not happy
about that over here, they are still too far
out with the spacing. And yeah, that's just something
that I cannot get around. So I do want to
actually fix that because it just
doesn't look as nice. So if we go into a stone
generator over here, we can have a look and see
how that we can fix this. So over here we have
a distance note. Now this note is basically that's how we are basically controlling
all this stuff. So there's only so much
we can do with this. If I go, let's save my scene. Let's save my time scine. If I just go into
my stone generator, what I can do is I can just fiddle around with the settings
in my preset over here. So if I just go, for example, well, it doesn't
matter because as long as I don't press update,
it should be fine. So if I set my stone scale all the way up,
they become lower. If I go 512, here see, there's only so
much they can do. And it probably has to do
with the amounts over here. That is quite interesting
because I would have expected the amounts to be just
increasing, basically. So 512, Are they
getting smaller? It feels like I'm getting more. Do I just need to push this
to like an insane amount? So let's see. If I go
like 2000. Come on. Little dude, give me 5,000. Give me an insane amount of Wow, it's really
as difficult. Okay, now it starts to break. So now it is starting to break. So it does actually give me
some really small stones. I'm just not sure how
far we can push them. Why does it doesn't
add more to this. My levels still dd it. I'm am I doing anything
with my masks over here? Um, no, I don't think so. So I'm not masking anything out. I think this is just a
limit of the system. I think we cannot just
push this anymore. Now, we could wine set the overall scale bigger in order to have them filled up more like you
can see over here. Ooh. Like you can see over here, the scale was too small.
That was the cast. So basically, if I'm
setting the scaling lower, it's not able to
capture as many pieces. So if I set my scaling to let's say let's set the scaling
to the point that we want to have the most Pebble. If I go in here and I set my scaling probably to
because this is too much 0.2, I think that is as
small as I want to go. I think if we go any smaller, I think it's already going
to break the system, if I will not forget this time. Let's go into the very front and let's just see if this
broke the system. It is very close. It's very close to our limit, but it should be doable. Okay, so that's great. So
now that we've done that, we can just go into
our stone generator and just press reset on this. So now that we know
about these stones, we can save our scene and we can publish our dot
SPsR file again, and that should do the trick. So I'm glad that it wasn't
anything more difficult. I was quite surprised
that it didn't work, but knowing
substance, sometimes, yeah, you just miss something. Okay, so we now
got these pieces. I'm now going to
actually get rid of this stuff because I
no longer need it. I just need this one, and I'm going to set my
stone scale here, see. Now it's also being pushed. Now I only need to go up to
100 to get as many stones. So if I go in here and set my stone roundness and a little bit up
over here is that the stones are quite
close together. My random stone removal, I will just set a little bit higher and now I can just
play out my stone scale. Nice. Let's have a look. Turn on and off my
displacement. There we go. That's what I mean.
That is what I mean. So now we have a bunch of little stones just
sitting in between there. Let's not look at
the top over there. But it's starting to
look a lot better. So we will get some of these clusters over
here that you can see. And if you want, what
you can do with this is you can even have
clusters that are really, really close by over here. So if we create a
mask that the blend, that is going to be
this mask over here, along with this stone
mask over here. So let's just set this to art. So we got all of
these little pieces. And now if I go in and
just duplicate this one, so just duplicate
our smallest one, set a random seat. In the no stone mask, what I want to do is, let's see. So these are just stones,
right? Yes, they are. What I want to do is I
basically want to go ahead and, I want to get this, but
I'm not sure if that would be, for now we can just do that. Let's move our shapes over here. Here we go. I'm going to change this masking
system later on, but I first needed
to actually work. So for this one,
just basically set your balance a lot lower so that's only
around these areas. And what should happen
then is that if we add a blend to this and just
blend this into the bottom, since you subtract, it's that
we only capture basically the white spots in between
of all of the larger stones. So capturing only those
white spots means that we will have most
of our stones here if we set the random stone removal
quite low or like this. Most of those stones
will be in between here. So then logically, if we
just add a quick blend, and blend this last one
together as a max lighten, you can see that
now there should be even more stone clusters
around the larger stones, and then it just
slowly fades out until there's almost
nothing left over here. And where there is nothing left, that is where we can
now focus on just creating a few extra stones. But honestly, all we need to do for that is we just need to go into this mask, I believe, and Yeah, probably, like, play around with the
balance a little bit more. It is a little bit tricky. So this balance, right now, what it is doing is, yes, it is adding more
stones to the rest. So what I might want to
actually do is I might want to actually push this
balance down a little bit. Like you can see over here so that the classes
are more there. And then I will
just probably art something on top using a blend. And this will be more of like a generic mass that we
can just throw on top that will just randomly scatter a few stones
here and there. So for that, I'm probably
going to go, let's say, a Clouds one with the levels. Throw that on top and just
set this to be a art. And if you play around
with your levels, you basically just
want You know, I just want to see if I can maybe even set my
cloud scale up. There we go. So I'm
trying to capture that it will just randomly be placed in
certain locations. See? So big clusters here, once and twice some
stones over here. Let's just see before and after. Yeah, that works. So we
got those extra clusters. Now if I go in here to unlove my
displacement. There we go. I think we got it.
So we now have our fairly decent stone clusters going on. That is really nice. Yeah, I think that looks great. One last thing I will
do in this chapter, and that is that I will
just create that effect. So where the scent is
kind of like piling up against all of the stones because it's quite an
easy effect to do. The only thing we
really need to do for this is we need to go in here, and then we need to
first of all, yeah, we need to create
a mass from this, but we can probably just
steal this one or not? No, I think we don't
need to steal it. Let's add a non uniform
blur grayscale. That's what it's called. I want to throw this
into my grayscale. Then I want to add the levels in here and push these
levels all the way up. This is just to mask out
our stones, basically. Throw this into my blur map. And I then need to
invert my levels. There's always a few steps. I need to then invert my levels, add the samples all the
way up. There we go. And now we basically if
I low down my NTNC here, you can see like a fall off
happening between the stones. Once you've done that, there's a reason why I didn't make
these levels as strong. It is because I now need to reduce my levels until
they properly blend. And this is the reason why
I didn't pick this map because this mask over here
would be way too strong. So if I do this, it might
reduce some of the stones. I need to see how it looks. It needs to be very subtle. Oh, wait, I don't
think it's actually plugged in. It is not. If you just hold Shift, you can swap around
your masks over here. Okay, so we got that stuff. Here. So now we got
some of these stones, and now they are starting
to sink into the ground. So that's what we have here, and that's what
I'm trying to get. Let's set our intensity
a little bit lower. And yeah, then the levels, it's a tricky balance to get between the really small stones, but still having, like, around the big stones,
some more pieces. Let's see, how does that look? Because what I'm worried
about is that it will give us a little
trim around it. Actually, that doesn't
look too bad at trim. Now I look at it.
So we got this. If I just do a very quick blur, high quality gray scale, let's see how it
Oh, there we go. See? So if we just blur
this like a tiny bit, 00.2, there we go, see. So now we don't have this hard edge around
it that you can see. So now we get a little bit of that sand that you
can see over here. I just slightly piling up
in between our stones, and that's looking really nice. When we turn this
texture into like a four k texture, it
would look even better. The way that you would want
to do that is you simply go. You probably also need to
go to your stone generator. If you click on your
Advanced tarmac in here, you can set your
texture to four K, and then it will also export
as four K. The only thing is when doing that
is the SPSCR files, they themselves would
also need to be in four k in order
for it to work. So if I set this to four K, and then I do need
to double check that it's still looking
correct because se, so that's still looking
correct because four k does change some of the
masks a little bit. But if we, for example, save this and publish it, we should be able to go
back to our advanced Sarmac you should be able to
see the resolution down here, four K, there we go. And now I just want to
look at my end result. If it isn't too much
here see now you can see that some of these
stones have become brighter. And that's what I mean with the problem and here you can see, these details really sharp. But that can sometimes
be a problem. But it doesn't look too
much like problems. So this is now texture
in four k. So yeah, you can see that it looks
quite a bit nicer if I would open up my subdivision
levels once more, which will turn it into
like 24 million, I believe. So it's a lot of subdivisions. That's why it's
taking set gloat. Wow, that was spot on of me. Yeah, 24 million,
you can see that it really starts to look nice in
how our displacement works. But of course, it's a very
expensive texture now because we have 24
million Blis on it, but it's just for
previewing purposes. So we got this stuff. What we're going to do
in next chapter is we are going to focus on creating our flat tarmac and creating a mask in order
to blend between the two. So let's go ahead and
continue with that, but this is already a
really good result. So let's continue.
11. 10 Creating Our Base Tarmac: Okay, so we are making
some good progress here. Now, there's of course,
some things like over here we have some strange
cutoffs going on, but those are most likely just
because of the clamping of our me these levels. Basically, what you can do
is you can just go into your normal click on your levels and just push
this down a little bit more, see, until we are getting rid of those really small little
pieces that are being cut off. So we got this. Now what we're going to do is we
are going to focus on, first of all, our plain piece, which will look like this
little area over here. So it's just going
to be plain and then having a few more
extra small stones on top. So that's the general idea. And once we have done that, we can go ahead and we can start blending
everything together. So if I go here, what I
can do with these pieces, is I can go ahead and move them, let's say, down here, art frame, and just call these ones
stone nscore clusters. Now for these pieces, if I have a look at
this, for the very base, you know what I'm tempted to do? Maybe I can actually use my
stone generator to create a very rough base and then have something on top and
then clamp it down. So let's try that. Let's grab, for example, one of these, and we
don't even need the mask. For the mask in
this point because we want to have these
literally everywhere, we are going to go
for a uniform color, set it to gray scale
and just make it white. Throw that in here. Now
once we've done that, random stone removal
all the way down. Sorry. Looks like we
cannot go all the way. Oh, that's too bad. Interesting. Okay, but that
doesn't matter too much. So we got this piece. Now for my stone scale, I just want to set this way up. So it just becomes like this. It just becomes this very gritty looking texture
that we have over here. Angle cut off amount. Let's just boost that up
so that we just have like a bunch more Stone fatness. Let's set this to 0.0 0.0. No, sorry, 0.1? No,
I did that w 0.01. There we go. See poo on that they are
very close together. We have some gaps here, but
don't worry about that. Basically, the idea is that
it will look like this. If we add a normal map to this, and I want to just grab the
same strength as this one. So three, OpenGL with a
strength of three here, see? So that already starts to look a little bit like this piece. Now, once I've done
that, because I want to have more
stone sitting on top, I need to kind of
like soften this out. And the way I'm
going to do that is very simply with the levels. I'm grabbing levels,
and I'm just pushing my black and white
slider closer together. And when I do that, we get basically here. If you
look at the normal. See, you get this really soften out effect like
we can see over here. So this is like our
base, basically. Now that we have our
base sitting over here, now what we can
do is we can say, Okay, let's have a look. These stones are in clusters. They are all very
close together, but they are all very small. So I feel like the
best one would be if I duplicate this
one over here. So we have this one.
For the clusters, I'm just going to go
for something that is let's go for something
that's quite generic this time. Let's do clouds, too, and add the levels
to this because we need to turn this
into like a sharp mask. Then just play
around, first of all, with your black slider and
then your white slider. Here, see. So quite generic. We can throw this in here. And there we go. Now we have our stones
mostly in those areas. Now, if I just go to my
levels and just tone down, we probably need to throw
something on top of this. What do we? No, you know what? No, we probably don't
even need to do that. So we got these
pieces over here. They are clusters. They
are close together. I'm going to at
play out my levels and just reduce them
a little bit more. Let's see. I kind of looks
like Europe here in Italy. Sorry. Never mind. I always
get distracted like that. So we got this stuff. I want them. Let's see. Random stone removal. Let's have those a
little bit less that we have a few more of those.
And let's you see. So if we have our levels
that are blend on top, And this time, this blend
is actually interesting. So this blend that we
want to have them on top, we don't so much want
to blend them together. Now, I can try and first of
all, blend them together. Let's see, because
maybe if we just art them on top,
you know, see art. Multiply, no max Lighten. Okay, so we would
need to press art. I just want to make sure that
I'm not losing too many. Okay, so I'm not
losing too many. So we can just add
these on top like this. And then if we go
into our blend, we do probably need
to just set our best we like a little bit lower. I think this one is
more important within the color to actually work with. So we got those pieces
like sitting there. Here you can see that they
are slightly different color. There are sometimes
some patches over here, and these patches, I think those are quite
interesting to capture. Yeah, if we do that. I feel like the background, it is right now there are too many plain stones over here. So what I'm going to do is I'm
going to add some patches, and those patches will
basically just have a variation that is the
stones are so small, they're just going to be pixels. So if we go in, let's first of all,
just grab the pixels. So if we go for a let's see which one will
work best for this stuff. Probably maybe fractural
some rough base. If we boost up the contrast,
no, I don't like that. Fracture sum one. Let's throw in normal on this and just see. No, I also don't like that. Let's try and duplicate my
stone generator and just boost up the stone scale
to, like, really small. I mean, that's good work. And we basically just want
to also then boost up our levels and then
blend between the two. So we are going to blend
between this one and this one. And then this levels down here, you guys will be a little
bit darker so they are further down
than these guys. And then they will
just be blending along with a very simple
grunge map, for example, grunge map 001, change
the random seat, play around with your
balance and contrast a bit. And throw it in here so
that we get this effect. And now my hope is, Okay,
so that's not my hope. I think we just need to blur it, but my hope is that we can
blend between the two, and there will be
enough of a difference. So if we go ahead and blur, high quality gray scale, this one, click on your normals and only blur
it as much as you need to. Here, see. And now
if I just say, let's make this a little bit stronger so that this
is a bit darker. See? So now we get these
down bits over here. And then we add these
stones on top and these stones are now
probably want to make it a little bit stronger. There we go. See so that now starts to look a lot rougher. So we get a little bit
more of variation. And now it's just a matter of
maybe going into my levels and maybe pushing
them up a little bit. You can also go into
your blends and play around with your
opacity a little bit. Just to get this exactly
how we want it to be. Okay, so we got that. Let's tone down this opacity a little bit. And at this point, we can already just have a
quick preview at it. So if we get rid
of our normal and actually just hold Shift and
just here swap this around. So let's see norm map and
Eclusion map, height map. So that should have
Auto exported. So now if I just refresh my
displacement, there we go. So this is our current tarmac. Sorry, brain freeze again. This is our current tarmac. I think if I set my tiling
to three, just to Yeah. Okay, so inside of substance, I probably want to set my tiling to make everything a
little bit smaller. Yes, that's probably
the best case. And I'm going to make these
a little bit less intense. So first of all, let's make these a little
bit less intense. Now if we just go ahead and add a transform today,
tone this down. I'm not sure if I like that. I think doing the tiling was a mistake.
Let's not do that. Yeah, here, I think the
tiling was a mistake. I think something
like this is better. So we got these two
pieces over here. If you want to see
them bit sharper, you can go into your main
camera tone up the sharpening over here to make it a little bit easier to see how
they are working. So let's see. Yeah, I think
once we have the color, that should give us enough
height information. And the only thing is
like those Oh, no, wait. Here they are here, the patches. So let's just see
how that looks. Okay, so those are those ones. Let's see. There may be more
interesting looking patch. So if we go for maybe tone
down our blur a little bit. Another thing that we can tie
is this. We can twin out. I'm basically just
playing around with it. It is okay, but I
just want to make sure that it is as
best as we can. So what I can do is I can
play around with this and just blur it and then
add the levels on top, which will give us this
very sharp transition, but it will hopefully ah. Okay, it definitely did not
do it the way I wanted to. Yeah, let's not do that. Okay, in that case, I'm
going to call this one done. So we now have a base. We probably still want to play around with it a
little bit later on. But let's say that this is
already like our base tarmac. So we can go art the frame, call this base
underscore tarmac. And now what we'll
do in next chapter is we will start by blending these two together using a
mask that we will create. And then everything all of a
sudden will comes together, and then we can just add
some extra details and then move over to the
next texture maps. So let's continue with that.
12. 11 Balancing Heightmap And Adding Cracks: Okay, so we got our
masking here, Dan. It can still use some cleanup, but I like to only
clean up my graphs at the very end because there's just so much that's going
to change, probably. So what I'm going to do now is basically if we
swap to Mm set, I will go over with you on
things I want to improve. Now, I will do
this in real time. Like I'm not going to
go turn off the camera, magically know exactly
what I want to improve because that's
not how the process goes. I will basically, the way it just works, it's very simple. I look at my reference over
here and then of course, look inside the Mum set. Now, of course, when doing this, there's a lot of stuff we still have missing because
we still need to work on it. So just try and
keep that in mind. So, for example, what's
the first thing I see? I see that my plain tarmac over here is a lot softer
than it is over here, so I want to have
that less strong. So then we just go
back and forth with these kind of things and
just do some nice balancing. So this is mostly
these ones over here. So if I go in my blend
and tone those down, let's see how that looks. Sometimes you just want to
turn on after displacement. Okay, I feel like maybe the general displacement is
also a little bit strong. So if we just go into
our, so we do that here. So if we clamp these
down a little bit more like this so that
they become less strong. And these ones also. Here we go. So we soften it out.
We add our pieces. How does that look
in our normal? Okay, I think that's starting
to look a lot better. Yeah, yeah. So that's now
already a bit softer. We have over here these patches which are where we
denting everything in. I want to have those
a little bit less, so I'm just going to go in here and just make this a little bit lighter,
with your sliders. There we go. So that should
get rid of those patches. I know it's a little
bit annoying that I need to keep doing
displacement thing. Maybe if I update my mom set, recently a new version came out, so hopefully that will
fix it. So what else? Okay. I'm now going
to focus probably. Let's focus on the
fall off first. So the fall off I see here, what I often see here
is that the falloff, it has much rougher
stones around that. So I do not see
and capture that. We already have these
stones on the top, so maybe we can just use
those. So we have these. And if I just make these
a little bit stronger, I might be able to use these
if I can capture my mask. And that is this mask over here. Okay, so if I capture this mask, and if I do an edge detect,
and then invert it. I should be able
to detect pretty roughly like these edges. Sometimes if you're
not sure, you can just add a blend and
just blend these two together quickly and
just set the blend to be subtract and then
tone down your sti, see? Okay, so we are hitting
exactly the edges. That's exactly what I
wanted to make sure of. So with this edge detect, because we have this
stone generator or this mask in our
stone generator, I can blend this blend
these on top and I want to set these to art yeah, I believe art. Yeah. Okay. So when I set these to art, I can make sure that there are actual stones sitting there. Now, another thing that I
need to make sure of that is when we blend this out. Okay, so the stones are on top. I just want to make
sure that we do not accidentally
just mask it out. Now, this over here, this over here basically happens because we are pushing out
the colors a bit too much, and I do not really like that. So the first thing I
can do is I can go in my bevel and see if I
can do some smoothing. Okay, so the smoothening
actually makes it worse. And that's interesting. In that case, let's see. I'm adding that on top
of here using my mask. That is quite interesting. But honestly, can
we even see it? Let's going here.
Yeah, we can see it. So you can see the strong edge. These stones here on the corner, that's already looking a lot
better, so that's working. Okay, so these edges on the corners, that
is not very good. So that's something that
we definitely need to fix. And I feel like I want to make my tarmac a little bit less strong.
That might actually fix it. So in beginning, I pushed
it a little bit too much. So let's just tone this down
a bit. Something like this. Because I feel like
the stones themselves, they would have been broken
up, but the rest not. And hopefully that might
also fix our normal problem. So let's push it down
a little bit more. There's always going
to be some balancing. Sometimes I feel
like it looks good, and then I change my mind
a little while later. Okay, so we still have some
of these edges over here. That is quite What's
the word peculiar? I'm not sure. Quite interesting. One thing I can do just to
test it is I can add a blend. Oh, sorry, not a blend. A blur, high quality
gray scale to this. And then just look
in my normal map and then play around with my
intensi just to see Okay, see? Yeah, that is interesting. So apparently in the bevel, the smoothening
doesn't work as well. So we can just add like
an intensity here and set the intensiy
low enough that you only just get rid
of these pieces. So 0.35 seems to do the trick. And then you don't really
need to touch it anymore. So just press D to dock it. Okay. Here. Now all of these pieces are nice
and smooth, so that's good. Okay, so we got that stuff. Now I'm going to go
ahead log Camera one and go into
actually, you know what? Duplicate Camera one. Call this free Cam. That's what I like
to do often because the free Cam has all of my
settings already in here. And if I then go
into my free cam, I can use this to, like, have closer looks and everything
and just make sure that everything is crack. So stones. If I look at this, we have some areas where
there are no big stones. Let's see, do we have
those? Very little. So we might actually
want to just, like, reduce the big stone
amount a little bit, just to capture that area. Another thing, my stones. Are they too big or not? Um, maybe make them
a tiny bit smaller. So we'll make them
a tiny bit smaller. Let's see. The
stones in between. It works great over here. Like, these areas
are looking good. Also over here. Maybe
I'm going to create like a few patches where we have
an insane amount of stones, just like scatter out in
a few very small areas. So I'll do that. Okay, so
before I forget, let's do that. So a little bit smaller. Wow, I already forget half of what I said, but don't worry. These ones. I should really
stop saying too often. Sorry about that.
So stone scale. Let's go set my scale. I need to go higher in
order to make them smaller. So there we go. Just
want to be careful? Oh, yeah, I want to not
have as many of them. Before I do that, I just
need to make sure that Okay, so the stone scale is now good. Now what I want to do is I
just want to reduce them. So first of all, let's go for
the random stone removal. Oh, Wong Wong way. Let's do that. And if we
just have a look Yeah, so they are still
all over the place. So if I go to just this one and I'm going to adjust
my mask a little bit, I'm going to add a
blend to this mask, and I actually know of a
grunge map that might work. It's grunge map 004 because
it's literally patches. So if you just push this,
sorry, not the balance, push the contrast up that might I don't know if
it removes too much, but we'll see we can
set this to be subtrat. Okay, so let's see
how that looks in our normal Let's see. Is this too much or not? So now we have these big
stones sitting over here. And then some areas so
here, lots of big stones. This is really nice
area over here. This is exactly what
I like and over here. And let's see, sometimes
you have an area where there's almost nothing like
you can see over here. Okay, this is good.
So this will work. So we got those pieces done. That is all well and good. The next thing I was going
to add some extra clusters. So let's see. I'm already
doing something like that over here where I'm adding them
in some of these areas, see? I'm adding a lot of them in those in between areas
now I think of it. Hmm. If I'm already doing that, then what would be the best way? Because I don't want to
have this overwhelming. If I look in okay, I didn't do that, that
was automatically. If I look in that area, where is the area like all these stones,
probably in this area. Yeah, you know what?
I'm not sure if I maybe around some
of these edges, I want to add like
a bunch more stones that could be doable. And yeah, let's do that. So let's art around the
edges, a bunch more stones, and I'm just going to art those as like their own little thing. So I'm going to art
blend on top of this. I'm going to duplicate my
stone generator over here. And for the stone generator, I basically want to We
have this edge tact, but I think I want to can I
use this yeah, you know what? This is far enough out. I
should be able to use this. So if I add a blurs blur. Sorry. Actually, I changed
my mind. Let's add a blend. And let's just go ahead and art our Edge stat on top of this, and now we basically need
to break up our edge stat, that's not all over the place. Didn't we have a Clouds
one in here. Here we go. Let's see if we can do that. Let's plug in our Clouds one. Sets to be subtract. So here, now we have
some of those edges. And if I plug this in here, some of these edges will
have lots of stones. Now, I'm not sure if this will look that's good. So that's
something we'll see. Let's plug this into our blend
and set this to be Maxton. So let's see before, after. So we really start to push in those clusters. You know what? That actually. Yeah, that works. Yeah, you can see like we have added a bunch of stones just sitting in
some of these areas. I was a bit worried
about the transition, but I think this
might actually work. So, let's go back to Camera one. Okay, so
that's pretty good. So we got those stones sitting
in there. That's all fine. Our normal map is I don't
think it's too strong. I think it's just because of the there's only gray in here. So that's pretty good. So we got this softness going on.
We got this going on. Anything else I need to
do on the shape before I move on. Let's see. So yeah, like these
really light shapes, I wouldn't do those
in the texture because my texture is tiling. If I really want to get
something like that, I would make a unique norm
map and just use it as a norm map only decal
on top of the road. Okay, so we got those stone formation sitting
in here, cracks. Let's start by adding a few more cracks in
between our stones. I think that's quite nice.
I almost forgot about that. And for those cracks, honestly, what we can do is we can just
open up our basic material. Where are you basic,
basic I need to find it. 1 second. I found it. So what we are going to do? Because why would we remake
the exact same thing? I'm going to steal up until, um, Yeah, you know what? Let's steal up until this point. The cool thing is you can
literally just copy this. You need to remember, actually, let's also copy this mask and this mask because
else it wouldn't work. Copy this and you
can then just go into your advanced tarmac and you can just
past it in here. So I can now go in here and this needs to be in the broken tarmac,
so just do this. Oh, we didn't need that. Now, of course, we need
to do some cleanup, make it work for our version. But what we can do is
we can just select it, right click Ara frame
and just call this frame and cracks, for example. Okay. And if you
then double click, it will regenerate all
of your thumbnails. So let's have a look at this. We have a tile generator, a blend, a distance node. These cracks, I'm actually going to go in my tile generator, and I probably want to make the cracks a little bit smaller. So let's set this to 64 by 64. We then do outer levels, Finag detect Um, yeah, actually, the edge
string should be fine. Invert, warp it around. S. Do I need to, like, slow blur it? That's fine. And add some more warping like
that. Okay, so that's fine. I just want to go into this warp and probably in this one
because these cracks, they are here see, they are
quite a bit more warpy, so warpi, probably
not even a word, but let's set the
scale up a little bit for Burling noise, and then just tone down
density a bit more. But, yeah, we just get
some of that warping. And another thing I want
to do is I kind of want to I might need to make them bigger in
this specific case. But maybe this slope blur
already takes care of that. So what I can do is we
have this plant over here. I can add another blend on top and just throw
in our cracks. Then if we go ahead and
set this to be multiply, now we have our cracks
on top of this. Now, what would be cool is if we have the in betweens of those cracks a
little bit rougher. So this one that
we have over here, let's see if we look
at the intensity, one thing that you sometimes
might want to try is add a transform on top
of your moisture noise, and you set it to X two, which means that we scale it up. Now, this will often
give us larger details, although in this case,
they are too large. So in this case, I'm
not going to do that, but if you do that, I would also recommend
because if you press space, you can see that it's
no longer tiling, because if you
scale something up, it is no longer tilableOly
if you scale it down. So then I would add like a a make it tile
photo grayscale note. That's we'll just
make a tile again. In my case, I'm not going
to do it because it turns out that it actually
looks nice like this. So we'll just have to see. So we have these cracks here. Let's tone down the
opace quite a bit. They can be quite sloppy
because we break them up, and what we will do is in the version where we will have only clean
tarmac later on. In that version, we won't
have them as strong. So let's start by doing an
opacity around 0.17 Okay, so that is really intense. So the cracks work, but I need to really mess them
up a lot more. So first of all, let's start by just fixing our intensity. 0.09? I think 0.09 works. And now I'm just
going to basically go in and let's start
by, for example, this over here, let's, we cannot push that
too much, actually. 0.04 in this one. Here, let's push this one up to an uncomfortable position just to see if it breaks because
it might look very noisy, but what I'm hoping is that because there's
so much noise going on over here that it
would actually work. So seeing this, now
that we've done that, we actually want to probably make this a little bit stronger. 0.17. Sorry if I don't
always call out the values, but there are so many
values that we're working with that I sometimes forget. Okay, so that's looking pretty
good. We got those cracks. Let's go into our free cam. Okay, so we got those cracks. They might feel a
little bit strong and if I just go in here, let's set this to 0.13 0.13. And if I just go into my
very fine cracks over here, maybe if I just add like
the tiniest bit of a blur. So blurring it will just
make it and look softer, but also look a
little bit bigger. The only thing that is risky
is that the blur might make it harder for these cracks
to actually register. But here, you can see
that when I blur it, there's actually quite
a big difference here before and after. So that's what I mean it
might damage some things, but we'll see Now, you
know what? It doesn't. These cracks are good.
Let's go into our showcase. I like to, of course, make everything look very
nice compared to Camera one because that will be
our main camera that we'll create our
beauty render from. So I'm going to make these
0.15 in the final strength, and I need to break
them up a little bit because we now have a
few to many quacks. So we can do that
simply probably after we've done our let's do
after our invert rascal. Let's add a simple blend. Let's add a uniform
color that will be a gray scale at white,
throw it into the top. So we're basically just
going to use a mask, and we are going to mask
out some of these areas. For this, I'm going
to go let's do clouds two with the random seat this time because I
don't want to just keep using the same clouds to. Ater levels, and I'll later on show you how you
can optimize this stuff. It just pushes out I think something like
this, throw it in here. See? So now they are
only in some areas, which will hopefully also
translate correctly here, and that I don't lose the
ones that I really liked, I'm losing the ones
I really liked. Because this area, I want
to have this area also to show some cracks if possible, because I really like those. So if I just go in here, I can simply well, I can actually look in here. It's probably around this area. So if I just play around
with my random seat, see? So now I can see
some more cracks. Yeah, so we got some cracks here. We got some cracks here. We got a few more.
Here and there, I think I want to have
a few more cracks. So when you want more cracks,
you can just go in here. Push this, push this more
towards the black, like this. There we go, let
you do the trick. Okay, cracks, check.
We've done those things. I still feel like my
asphalt is too high, but when I look at it from
the side, no, it's not, see? So it's just like a
bit of an illusion. So we got this stuff
done. Okay, what next? If I have a look over here
at my stones, for example, these stones that
I have over here, they feel very round. Now, some of these stones
actually do feel round, but I feel like I wanted to get a few more sharper stones, especially like the big ones. That might be nice if I can capture that, if
I can capture that. So now that we've done
a racks because we are running out of time,
in the next chapter, what we'll do is we will
go ahead and we will continue and start by
improving the stones, and after that, we'll have another look at what
else we need to do.
13. 12 Creating Our Damage Mask: Okay, so it is mask
creation time. So a few takeaways. Big shapes. So they
are all solid shapes. We don't want to have tiny
little bits in our mask. We just want to go
for big shapes. The far off that you can see over here we
want to capture. So that far off is going to
be a little bit interesting. It feels like the stones
are incorporated with it, which actually within substance makes it handy for
us because this effect that you
can see over here, that is literally the
max lighting effect, basically where they are
just merging together. Oh, let's go ahead and
get started with this. So yeah, we are going to
later on, replace them here, but I first want to
just generate a mask, so I'll go down
here or something. Something nice, big shapes. We can do big shapes using,
blurring and everything. So that's not really that
big of a problem often. Getting rid of those
really tiny small shapes, that's a little bit
annoying, but we'll see. So if we Go for I feel like I'm just using crunch map
series one too much lately, but we'll try it again. Okay, so if we do this, balance down, contrast all the way up. Now, this has a lot of
little small shapes, but hopefully I can
find a way to mask out those really large shapes. And I want to make this
fullly procedural, so I want to have control over how many of these shapes I want. Let's go for this one again. So I believe this is
pretty much the same as this one. So we got this. Okay, now, to blend out
these large shapes, what I want to do
first is I want to go ahead and I
just want to add, like, a bluh, high
quality gray scale. And I might need to
do a little bit of fiddling around here in
order to make this perfect. But I think it is good
if I do this camera instead of just
magically showing you how I did all of this. So we got these shapes, like you can see over here. So now we already start to get some of these large shapes. Now, all these little
tiny pieces over here, I don't really care for them. So the first thing that
I can try to do to mask those out is I can
add a flood fill, and then I can add a flood
fill to bounding box size. And what this often
does is it will often basically make the larger shapes lighter and the other
shapes, of course, less. But we can use this
to our advantage. So we can add like a
histogram, select. And if we set a contrast
all the way up, we can hopefully
set our range, see? So we can kind of, like,
control how many pieces. Let's see how many pieces we
want in something like Yeah, something like this seems
like enough pieces. Okay, so we got this. Now the next problem is going to be like we have all these Well, basically this, it's
looking very strange. Yeah, we definitely need
to play around to that, because right now it's
just like one blobby mess, and I don't know. It
looks very strange. What I often do like to do is, I like to throw an edge
deact just to see if I can it doesn't always work, but just to see
if I can get some really large shapes
like you can see, I'm trying to just
use an edge tact, basically to my advantage to get some really funny
looking shapes. And here, let's press
innards. I don't know. This could work. Now, this looks very silly because it doesn't
really feel like this. But if I would add like a
slow blur on top of this, that could do the trick. Yeah, that could do the trick. These patches, I think for
now we can leave them. I'm not sure yet if I want
to remove them or not, but if I do, we can just use the flood fill
method for that. So let's say we
got this. Now if I add a slope blur
gray scale to this, which remember we can
use to cut out pieces, we can add a purlin
noise to this. So I'm going to add my purlin noise here and let's make this a
little bit bigger. And then in slope blur
samples all the way up, mode to minimum and here. You can see that I can start by cutting out some
of these pieces. I'm not a big fan of what is happening here,
but we'll see. So this will cut
out some pieces, let's play around to
the perlis size to see if we said to around 22 and then intensity to around 1.3 ish and then add
one more levels. See, we can start by creating
some cuts like this. Okay, so we got
something like this. Now we do need to make sure that this works with a
height map and everything. The first thing that
we can try is we can try a very
simple bevel node. And a bevel node just basically arts or it will tw
art like a bevel. If we push this out, the bevel will become nice and round. If we push this in, it
will become quite sharp. In our case, we
probably want to go out because we want to go
for nice and round bits. And you can also play around with your smoothing in order to, like get the same fact. So it's basically like
a non uniform blur, but with more controls
and with a flat base. So let's say
something like this. If we would add a
normal to this, it will look like this. So based upon that, I can also play around with my
smoothing and let's see. A mask like this might work. Yeah, yeah, I think
that could work. If we add the stones in here,
I think this could work. So let's give this go.
So we got these pieces. Now, I want to decide
I'm going to have my White pieces to be
perfect to be clean. Yeah, white pieces to be clean. Okay, let's get started. Let's start by adding a blend. We want to add this to here, which is our clean tarmac. And then we want
to add over here our broken tarmac to the top. And I'm going to, first of all, just get started by adding
my height down here. Okay, so this would now
be blending together. Now, what I want to try and kind of get is I want to mimic also having some stones over here. So let's see, right now, I'm just masking this out. I basically need to
make sure that I'm not masking out extent
like other stones. But the coincidence
is because this is the exact same look that
they do fit quite well. So let's first of all,
just see how this looks just because I'm
quite curious about this. So if we just hold shift
and just flip this around, Oops. Here we go. Okay, so I'm not sure if the
heights is working as well, but we'll Yeah, here. So when I see there's
a few things, we need to make sure
that these stones they keep going
around the corners. So for the rest, we can
keep the stones here. They are actually
working quite well. So coincidentally, I do not need to do too much about these masks that we have over here. I can just kind of
like leave them. But yeah, I definitely need to get the stones closer
to these edges, and I need to have the fall
off to most likely be, I need to have the fall
off to be stronger. So let's get started
by see bev fall off. Actually, a befo
fall off is fine. I think what is wrong is
it is the blend over here. So if we just add a quick
outer levels. Here see? Oh, yikes. Never mind. Because we have very
specific levels in this. We just need to add
the normal levels. And if we go in here, we basically want to
push this all up. So that over here, it
also gets pushed up. Here, see, now this
gets pushed up quite a bit, which is good. So now we are getting close
the height that I want. Okay, so next stop is
going to be having the stones closer to that area. So what I can do for this is let's bring
these mask out over here. I can Go ahead and basically
do something like this. That's Art Blend. So
it's a bit of tink work. So basically what I can
do is I'm going to master this out so that we won't have the stones
around this area, but the only reason I'm
doing that is so that I can see where they are. So if I blend this together
and sets to be subtracted, I know that in these areas we will not have stones, right? Yes, because they go
into the white areas. Based upon that, I can go in here and I can
play around with my balance. Here they do now go around
these areas over here, but just not everywhere. Based upon this, I
can play around with my balance and I can say, I throw this in here,
so the stones will be quite close to those
areas. That is fine. Now what I want to
do is, let's see. Over here, I probably
want to go ahead and do the exact same thing
where I plug this one Throw this in here. Let's see. So we add this and then we add even more
stones over here. And then we are like a bunch
of x or stones next to it. So it's mostly focused
around the larger stones. No, sorry, I need
to invert this. Instead of subtracts,
just send to art subtract. There
we go art subtract. That was the So art subtract and now you want to go
ahead and push this out. That's not working
the way I want it to. I think I'm going to go ahead and I'm going
to invert this. I'm going to invert my mask because normally art subtract is like a cheap way to
very quickly do it. So we are going to set this one. There we go. Multiply.
That should do the tick. Multiply should do the twick because now the stones
are being placed. Oh, my God. I'm still
messing this up. Subtract. Yes. Okay, subtract.
Sorry, guys. I'm really sorry. Subtract
is the right blending mode. Jesus. Uh huh. Okay. I'll take a
break after this one. So we set this to be subtract, but we need to do it with
an invert like this. And what that will do is it will basically place all my
stones around here. Add these extra stones, throw it all together
and boost it like that, which means we get this. So now the stones are very
close to our other pieces. Great. That is exactly
what I wanted. It just took me a
while to get there. Okay, so that's
looking pretty good. So we have our stone
sitting in here. I feel like the fall off and the intensity can
be a little bit stronger. So if we go, first of all, for intensity, push
up the white levels, and then for the fall off, if we go over here, let's see. Maybe it's the smoothing
that is causing here. Maybe if I set the smoothing
a little bit lower Yeah, that should hopefully
work a bit better. There we go. See now, we have
a stronger flow going on. Okay, so now we get
a look like this, which is pretty decent. What I'm going to
do now is I'm just going to finish
off by just doing some very basic random setup so that we can get a
better look at this. Let's get started by going over here and just right
click and press art camera. Now, in camera one, this will be our main camera that we
are not going to move. So let's turn on safety frames. And using this camera, what
I'm going to start with, I'm just going to give
it like a nice angle. You can hold Shift and right click to move your sky around. Let's say an angle like this. Just place it into place,
something like this. And then what you can
do is you can press the little lock next to your camera so that you can no longer accidentally move it. Now, it also locks my setting. So I just need to
temporarily turn it off, set my sharpening a
little bit sharper, set my bloom around the
same level as my size, and throw my vignetting
a little bit, just to give it some dark
corners around here. Next to this, what I
also tend to do is I tend to go to tone
mapping and set this to HJL and then I just like play around a bit with my exposure and contrast. So this will just give me a bit more interesting
tone mapping, which will make it look
a little bit sharper. So we got those pieces. Now the next one would be
for me so lock to go into our sky and we probably want to go ahead and we want to just grab like a sky. So if you go to
presets in your sky, here you have all of your skies. If you've not yet
downloaded them, you need to double click on the sky in order to download it. If you have
downloaded them, it's just a single double click,
and then it will apply. So Ali Halway see, I can very quickly apply my different skies and
just find something. And for now, I want to go for something that is
quite neutral still. See. See, basically I just need to find
something that is quite neutral in terms of color, maybe a little bit in the here, something
like this might work. So a little bit bluish, but still with some
orange in here. Let's go for
something like this, because it has also
some strong lighting. Of course, this will most
likely change later on. Once you've done
that, so you got your sky now ready
to go, basically. The next thing that
we're going to do is we are going to go ahead
and add a light. If you right click, you can add a light and
add a directional light. Now, this directional
light, if you click on it, you can go up here or you can press W and go to translate. I like to always move them
a little bit to the side. And then if you
press E, you can go to rotate or once again,
you can click here. And I'm basically going
to have this light to come from my it's a bit hard to see because
we have a white texture, but I want it to come
from my right top. And then you can
see here that it already adds a lot to our scene. If we just have like a single light with just some shadows. You basically want to get
this light if you want, you can even set the brightness, to have half of our cylinder
or half of our sphere. Into the light,
something like this. And once you've done that,
just tone down the brightness, give it a little bit of an orange color. That's
what I often do. Just mimic like the sun. And for now, let's go for 6.5. Of course, remember, we are
looking at a white texture, so it might change. Next this, I also often
like, add some rim lights, but they often don't yet
work as well with white. So if you press Contra D, you can duplicate the light, and a rim light is
basically this. You basically let
your light come from the very top and
there you basically, like, rotate it so
that it looks and that it captures just
like the very tips. This is great to preview
your roughness map, like your material
response from a distance. But yeah, the thing
is that A see. I often do something like this, and then this one
I make always like a little bit more of
like a bluish color. And then just tone
down brightness. But the bitnss is going
to be a bit stronger. I'm going to wait
with the other one. There will often also be
one in the left corner. But I think in this case, because we are still
looking at the we texture, I will leave it to this. So we now got these pieces. Now, basically what I want to do here is I'm going
to first of all, let's go in my inclusion
map and just set this a little bit
stronger, like this. I want to go up here to our little settings and just make sure that high
DPI is turned on. This will often give you a little bit more like
a sharper look. And for the rest, go into
camera one and maybe set the sharpening a little
bit stronger, like this. And I'm going to save my scene. I would say that it's like
a decent basic setup. Say, everything still
feels a little bit blurry, so I also need to double check my texture to make sure that
there are no problems there. One cool thing if you
are ready for it, what you can try to do is already turn on rate racing
just to give it a nice look. Aateracing often with
stones like this can cause problems with
the shadows if you do not have enough resolution. So it's kind of like we
need to double check. Okay, so this is currently
our rate racing. I think the
brightness of our sun might be a little
bit too strong. Yeah, if we'd like,
go into our tarmac. So because this
would, of course, often be like a little bit darker, as you
can see over here. Here we go, see? So when it
looks a little bit darker, it feels a little bit more
logical how everything looks. So then we've set our
light to like eight. Really, eight is that bright. 6.5? That's strange that there's such a difference
in brightness, 6.8. Yeah, basically, just to make the rate racing look
a bit more interesting. It works better when we
have a fill texture, but here you can already see. Now, looking at this, last thing I will do
is I will go into my camera one and
I'm going to just set my contrast to be
a little bit sharper. It looks like that
I cannot reach the contrast amount that I want. You can also play
around with your sky to try and capture
exactly here, see? Because like this, the
sky is very bright. But if I just rotate it, I can get more of my sky to look into the darkness like
you can see over here. So that's something
that you can work with. Now, we can see some
interesting things going on with our rate raising. I am personally
going to just leave it off for now so that
I have this look. And the next chapter,
what we'll do is we will do some quick polishing. And after that, yeah, we will just do some
improvements and then start working on the sand in between and adding variations and doing a bunch of
different things. So let's go ahead and
continue with that.
14. 13 Creating Our Ground: Okay, so the pointy stones
that we have over here. You can probably
remember that we actually did something for that. So if we go ahead and go to our stone generator over here, we can go in and, you know, temporarily
swap this around. Yard. There we go. So here we like this pointiness. So let's see what
we do. So we add this pointiness out the
level, so that's all fine. Although it's the pointiness, we might be able
to push this up. But what I'm thinking about
is we most likely end up cutting some of it out. So let's go. Actually, no,
we don't do that everywhere. Let's go ahead and
look at this version over here and now start
by adding the pointiness. I need to make sure
that I don't break it. So if I add this pointiness, it pushes it out, but it does
add some of that sharpness. I don't think that's worth
it doing it over there. But what I can do is I can go ahead and
basically what I'm doing here is I'm creating this mask
and then adding poisons, but I believe that I can add that mask
somewhere else, too. You know what? I
might be able to add that mask in my advanced tarmac. Oh, sorry, I forgot
to do something. I forgot to just copy this. And doing it in my
advanced tarmac, I feel that is a little
bit safer in this case, because I just need
it for 1 stone. You can do it in your
stone generator, but because we already have set up our stone generator
in a very specific way. I don't want to risk
accidentally breaking it again. So if we copy this
stuff in here, I believe that we have
this stone mask over here. Now, if I throw this into
an invert gray scale, distance it, invert
grayscale again, out levels it, I should
be able to now see, so we add our levels. Let's do this before
we add our levels. Throw this on top of here. And I will mask these out later on, so don't
worry about that. Yeah, so it's multiply the
only one I can on Mint darken. What is Mint Darken doing? I think let's have a look at
my norm map because I can read this way better in my
norm map compared to the rest. So Mint darken adds some sharpness to some of them, that's
actually pretty good. And the multiply multiply just destroys it,
so that's not good. So let's go for Mint dark. Let's also look in
some other areas just as a second opinion before. Okay, so Min darken definitely add some
sharpness. So that's good. Now that we have this one, the tricky thing is
with this sharpness, it's right now it doesn't it kind of needs
more samples almost. But then we get into
that funny area where if we want to be
able to smooth this, we would lose that sharpness. For now, let's not
do that. For now, let's actually just have
a quick look over here. Let's go to my free cam. Okay, see, so yeah, now we have some of these
sharper stones. That's actually really good
that we have that stuff. Let's start by just
masking them out because I don't want to have
them all over the place. And I can just very simply
do that by going over here. So here we have our
invert grey scale. I need more space. But I will nicely clean
this up later on. And we can go and start
by adding a flat fill. See, I'm going to do
this before I invert it. Flat fill flat fill
to random grayscale. And then in here the gram
select, push up your contrast. Tone down your range so that you don't and then you find
whatever pieces you don't want. And now we can just go
ahead and we can add a blend over here. Throw this in the top and just
set this to be a subtract. So let's see if those
edges cause any trouble. No, they don't. So then
we can just ignore them. So now we have this
sharpness only sitting on, like, a few stones,
not on all of them. That's pretty good. So we
got that sharpness in there. Looking at it from a distance, I'm not sure if I
even need to blur it. Like you might want to blur
it a tiny bit, but for now, I'm actually happy with
this because here, I can see these nice little
points and the sharpness. So this is actually
working quite well. See if I tile it even more. Yeah, see here because
once you tie it even more and becomes
these wy small tiles, you can see that, that detail becomes a little bit more
difficult to see anyway. Doing this tiing, this
actually looks quite cool, so I'm not sure if we might want to go for a tining
that's higher than two. Because if you do
that, you would need to tone down your displacement, so it would look something
like this, for example. Let's see how that looks. I think this might actually be a nice render for us to
work on because here, we can still see
everything quite well, but we get a bigger overview
of the entire material. So yeah, let's do that.
I quite like that. Let's start by doing
something like this. Let's hope that the rad
racing will also still agree with Looks like it does. Okay, so that's quite cool. Okay, so we got the pieces done. Let's turn off raid raising and let's get started
with the rest. So for this, maybe at this
point, I just want to, like, rotate this a little bit so that I get a little bit more of like the bigger stone patches
over here, you can see. And now what I want to
do is I want to start working on the sand in
between the stones. So the sand in
between the stones. For that, technically,
it's just more stones, but at that point, we have so little
resolution that we will just go for, like,
noise, basically. Yeah, let's go here, see.
Sand in between the stones. Let's go in here. And I think maybe good if we just
do a very quick cleanup pass. So this one over here. Oh, this looks ugly, but let's call this
mask generation. And also, of course, things
that you can start doing is, for example, you
can start docking things that you no longer use. Things like here, like levels I don't use because
it's just a clamp, the bounding box
size I don't use, adjtet I might need, the pearly
noise, you can like dock. So yeah, you can dock
a bunch of that stuff. Another cool thing is that if you want to align your notes, you can select them, and up here you have your
alignment tools. So this will just very quickly and neatly organize things
for you if you want, so that you can then
hear like nicely. Place it down. And it just makes everything feel
a little bit more clean. Also, I'm used to using
this type of previewing. However, what you
can do is you can go up here to the rectangle links, and that will basically
give you this type of previewing but I
cannot read this. I actually find it
difficult to read this because after years, I'm just used to seeing this. So you'll get better at
it that it will be very easy for you to
read exactly where everything is going
and stuff like that. So we got those pieces
all ready to go. Another thing that's
annoying me is that my outputs are so far away, so let's do this. Okay, Sand. So this is all still going to be our height map over
here. Set our levels. Yes. So I want to
set my sand over here in between these pieces because before we mask it out, so let's go ahead
and start with that. Let's add a blend here, and we will just create our
sand like in this area. For the sand, the sand is
going to be super easy. It's basically going
to be a generic noise, like a factual sun
base that is a little bit stronger
in roughness, and it's going to be
like a rougher noise, for example, the B&W spots one. And we are just going to
blend these two together in order to create sand that
has different roughnesses. So if we set this
to a multiply in our blend and play around with
our obesity a little bit, we can then add a norm map. OpenGL. Okay. And
when I look at this, let's start by just toning down the roughness of
our fractual sum. That will actually matter
quite a bit like this. So now we get some
rough sent over here. You can play around, yeah, we might actually want to go for the more smaller send over here. But basically, you can also hear play around like your roughness. So it's very easy for us
to just play around with these few sliders to get
something that looks like sand. Now, once we've done that, we have this one, but, of course, we need to capture a mask, and I believe that
we can just reuse this mask because this
send is already included. So if I just reuse this mask, I can throw this on top. Throw this at the
bottom over here. And I want to set this
to be Max Lighten. I believe let me
just double check. Yeah, Max lighten
and then tone down the opacity a lot. And
let's just have a look. You basically just
need to look mostly in your normal in order
to know how strong. Okay, so this is
bad. So we don't want that mode because
we are losing it. Another cool thing that we can do is if it doesn't work in a temp because this sent doesn't really need to be
in our tmp per se. What we can do is we can just do this after we've already
converted it to a normal map. So here we have our normal map. I can then do, for example, this because a norm MP is a
lot more forgiving because a nomp you can overlay without affecting
anything below it. So I can add a
normal node to this. Open GLD, and let's
keep it as one for now. And then in my normal, I can go for a normal combine and set the normal combined
to be high quality. And I believe that we've already done this in the
basics, actually. And now with this normal
map, just add a quick blend. And the top, just add
a normal Clog node, which is just like
a plain norm map, and then use your
mask in the bottom. So is this? Yeah, see? No, wait, sorry, I need to
invert gray scale my mask. There we go. It's in between. We throw this into the normal
combine, and there you go. And now you can just
play around with your normal intensity
in order to, like, get stronger
or less strong. Sand, which should look
something like this, see? So now we get to
send in between. Now, what I'm going to do is I'm going to make it a
little bit stronger. Let's go for like three.
And another thing that I noticed there is we have some patches that feel
like, let's press space. We have some patches,
O over here that have almost nothing in
them. You know what? Actually, that might actually
be fine because it gives us a little bit of a calm effect. So in the massive mess
that's going on over here, you all of a sudden just have a little bit more of a calm area, and we will just
in our base column make this look a bit
more interesting. So we got these pieces over here. That's
looking pretty good. Now, what I will be doing
in the next chapter is, I'm just going to go off camera, and I'm just going to have
a look this time so that I have a little bit
of a plan going on because there's
just some thinking. And then we'll just continue. But we have all the
base stones are here. For example, maybe
we want to break up some of these areas a lot more in certain areas where they are no longer cracks. They are just going to be
like these broken up patches. But that's something
that I will have a think about and we will work on
this in the next chapter.
15. 14 Adding Large Patch Cracks: Okay, so I had a look and yes, I think the last thing we need to do for height map is we need to break up our solid
surfaces a lot more. So right now, we have
them way too perfect. So I want to have a few things. One, I want to have very slight height variation
in between the pieces. Two, I want to add like this breakup like you can
see over here sometimes, just like some random patches. So we'll just do
those on the outside. Here you can see it even better. And yeah, I think after
that, maybe, like, add some randomized stuff in there and we'll
see how it looks. So for these pieces, probably need to start
by doing most of it after if it on load after
we've done our blend. So here, this right now
it feels very plain. So I'm going to get
started with this. First of all, what I
will do is I will start by going over just some
very soft height variation. The way that I'm going to do that is I'm just going to add a very simple blend after
our levels over here, and I'm just going to basically throw on a very large
pearling noise. And set is to be like multiply. So that should create
some denting in. You won't probably
be able to see it, Wi in our normal map. Oh, yeah, you probably
see it a little bit. Maybe semi peronal noise
is a little bit bigger. You see, kind of like if I said it smaller, you
can see it a little bit. And just like we need to make sure that
I don't overdo it. Yeah, you can see
it like a tiny bit, maybe make it a
little bit stronger you multiply. Here, see? And it just gives
us that effect as if on top of everything
having been broken, a lot of trucks
went over it and it just got some bumps and bits and all those
kind of things. So I think that's
quite interesting. Another thing I want
to do is I want to improve my mask a little bit. So, if we just press D, I have this mask. I'm going to start by just going into my mask
and throwing on a very large slobber with also once again,
a purlin noise. This can hopefully just break up some of my edges
a little bit more. Might be a little bit
too much, but we'll see. So slow blur, samples all
the way up, intensity down. And probably, you know what? No, in this case, we can
actually go for, like, blur. So if I set my direction I was hoping
to get these things. This is what I'm hoping for. So where they have
a large green, maybe it works better
if I do minimum. No, that's maximum. Mm. Yeah, I think it actually works better if
I go for, like, a maximum. So we basically just have
these pieces that are being pushed out, which
will look like this. And hopefully, what I
have in mind is that it will kind of
fade in here, see? Yeah, it does work. So you
can see that you get some fading in where it just slowly starts to fade into the
rest of the ground. So almost like it has
been crushed together. And that was basically
my general idea. The only problem is
that we sometimes get these areas over
here where I just need to make sure that my
mask is sharp enough that it doesn't accidentally generate
stones on top of this. But I think, yeah, here,
this kind of stuff, it is working a lot better. So let's just see where
so we use this mask. Oh, but we aren't Oh, wait, because we are pushing it out, that's most likely the problem. Yeah, because we
are pushing it out, it doesn't work over here. So instead, what I want to do is I probably want to go
in and use this mask. I will only use it in
this one over here. No, wait, I need to
use it in all of them. I'm going to use it over here. I have this. Come on. It doesn't allow me to that's always so annoying.
There you go. Okay, so we need to
add it over here. So we have this mask.
We plug this in here, so it's still soft,
and then we all shift and plug this around. And then this mask, because
this one goes over here, before we do the
invert grayscale, I will just leave this on here. That's not really a problem. The goal is that right now it
is picking up on this mask, which means that
it will hopefully not generate everywhere. Here you see and now some of
those stones get removed, and that's looking a lot better. Okay, so we got that stuff going for us.
That's pretty good. Let's go into our camera one. Now that I have that softness, I feel like that maybe we want to push this
out a little bit more. So if I'm switching between free Cam and everything a lot. Yeah, I think I want to push it out just a little bit more. So if I go up here,
we have these levels. Let's just push them out a bit, because
we are, of course, kind reducing them
again because we are adding a pearling noise on top. Yes, there we go. I
think I'm looking mostly around here in
the top left corner. And I think I'm happy with this. Okay, cool. So we got that
stuff all ready to go. Now we are going to
just break up some of these edges, and that's
probably the last thing. So I don't want to
have it everywhere. I just want to have
sometimes some random edges that have these
broken up patches. Now, we had a noise, and
I will see if that works, the grunge map, this one. So this might actually
work if we push up our contrast and it's not so
much this one that works, what will hopefully work, it is a edge detect on top of it. So if we set the edge
detect and just tone down our roundness and
just like an invert, we can almost use this
as cracks, basically. So if we have this version, and let's start
adding that here, let's start adding
that on top of here just because I can
see it a bit better. So we will push
out this version. I will start very easy and
just throw this already in here and just set
like a subtract. And let's see how it looks. Okay, so we are pushing it
out in certain locations. Do I need to do this
in more locations? Um, no, I think this is fine. Now what we need to do is
we need to mask out to only have this like
the very edges. So if we do another edge detect, we probably just want
to grab this one. Make this a very
large edge detect, something like this.
Oh, and invert it. So now we have these
edges over here. Twice some my edge a
little bit higher. So there we go. So we
got these patches. Now if we blur this
because we do, of course, want to not have
them strong here. So we kind of just
fade them out, like you can see over here. So just fade them
out a little bit. And now, lastly, what we need to do is we just need to go in here and just steal some
of these pieces. Contras Contra vie. Here we go. So we steal this, this, this, this, and then
it goes in here, which will hopefully break
up the edges even more. Another thing that we can
do is in the edge tack this time we can set our edge
width to be probably a little bit thicker
because these do look a lot thicker over here compared to
all of our other cracks. So we can make those
a little bit thicker. And I feel like that maybe
we want to add a few more. And the way that I do
that is I just add a blend and a transform. And I basically just push
these two together and just slightly move the
transform around in my center, which will do this. If I said this to art, see? It will just push this around, which hopefully
in our architect, it will not become
too overwhelming, but we'll see. There we go. Okay. So that is the
first generation. Now what I want to do
is I only want to have this in certain areas. I should be able
to do that. Also. Well, actually, I can
do it on both sides. I can do it or here. Or in our mask. Let's try our mask first.
Let's add a blend. And we are basically
going to grab a Berlin noise at,
like, a large level. Maybe change your disorder
in order to get, like, a slightly different angle
and then add a levels, and we basically want to
use these levels to push out some of the blacks and whites to get
something like this. If we throw this on top and
set this to be subtract, that should mask
out here for now, play around with my disorder. See, it should be masking
out in certain areas, and now we can just choose
how much or how little we want of these broken pieces. Let's say something like this and you can just
play around with your disorder to get them
exactly in the areas you want. Finally, tone down your
obste that they are not as strong and let's actually have
look in our normal first. They might feel a little
bit sharp in our normal, but we'll fix it later on. Let's actually see
how this looks. I see almost nothing. I
need to make them bigger. Let's go ahead and set our e detect a little bit stronger. Also in here, let's say this a little bit stronger
in our opacity. Now I'm starting to see them. Okay, see? So we start to
get these broken up pieces. It's going to our free cam. Uh, I have no idea
where I am. Okay. Anyway, here we go. I just want to get
something like shadow. Okay, so we got these
pieces sitting in here. What I want to do
is I want to have them a little bit less strong. I want to have them
a little bit blurry. Let's add a blur, high quality gray scale in
between our cracks, just to give them a
little bit more of like a softness to them. You see, quite subtle. So we got some of that
softness going on, and maybe I want to
have a few more. So maybe I want to go in
here and just in my levels, push those levels back a little bit so that we get
a few more of them. I feel like this might still be too strong,
but we'll see. So it's starting to get there. We're starting to get
these nice pieces. Let's make this a
little bit less strong, even There we go. Now we're slowly
starting to get there. So here, we just get some of these random cracks
sitting in between. Seeing those random patches that we get over here and there. I'm going to probably, it's mostly in this area. I'm just going to change my disorder because I
think we have enough, I just want to have it
in a different area. Here like this. And if
we just have a look, yeah, okay, so we have
plenty of cracks everywhere. So maybe we want to, like, set our edge detect a little bit bigger so it's going a little bit more
towards the center. There we go. See? I think that will do the trick. So
we got that stuff. I'm going to make it just
a little bit less strong, and then I'm going to call today because it's just a little
bit too overwhelming. But I need to keep
in mind that most likely when we start
adding our base color, based upon our base
color, we want to, like, increase it or
decrease it a lot. So that's something
just to keep in mind. But this is looking
good. I quite like this. Yeah, here, I just play around
with like my offsets Yes, I like that. That's
looking good. Okay, so we got all of
these pieces ready to go. So I'm just playing around to my offset
a little bit more. See if I can get a nice angle. Okay. So we have
done this stuff. I would say that for now, my height map is done
and my normal map also. So not as many notes. If you even imagine this was me five years ago, I believe, this was me five years ago, to create a similar material and see how many notes I used
and how unclean it looks. So it just practice
makes perfect to be able to know how to do your materials in even less and less notes. And at one point, you will just get less and less and less, and it just becomes
very nice like this. Although even this is
still quite messy, but that's something
we can work on. So we got these pieces. I'm going to go
ahead and I'm going to add a frame to this, and this is going to be our large patch Oops, cracks, something like this. This over here, I'm just going
to the frame and call it. Height map underscore, combine. This one will just be
called normal map. These pieces we
can call outputs. So this is just some cleanup before we move on to our base
color in the next chapter. Then with this kind of stuff, I would just make them nicely aligned a little bit more, you
can see over here. Just to clean up. And what
you can also do already, if you want, is
you can see if you can clean up some
of these notes. I'm not going to do
that yet because I want to dedicate my own
chapter to it because else it might get lost in translation because it's quite important for you to know this. And I'm sure that
not everyone is watching this specific chapter if they already know how to do most of this stuff and
just here for other stuff. It's just how tutorials work. Not many people actually follow
the entire 100% tutorial. Some people just cherry pick whatever they
want to get in it. I'm just going to call this done for now and in the next chapter, what we'll do is we will start
working on a base color. Our base color will be most likely in the direction of probably in direction
of this color. So a little bit darker
so not so much gray, so a little bit more like this darker color and
a little bit more dusty and sandy instead
of mossy and wet. So that's the general
idea for this. So let's go ahead and continue with that in the next chapter.
16. 15 Creating Our Base Color Part1: Okay, so let's start
with the base color. Now, I'm going to start with the clean tarmac part
of the base color, and then we'll move
over to the stones. For the clean tarmac, what I
want to do is I most likely want to use the
gradient map technique. We've used it in the
simple tiles also before. So let's go ahead and add a gradient map to
get start with. And for the clean tarmac, I want to probably grab this one before we add
our pearling noise. Yeah, this one should
hopefully do the trick. Let's just grab this height
map, throw it in here, and I'm basically going to capture somewhere in this area. So I don't know if I can show you if I go to
Grennthropi gradients. Wait, maybe I can show you. Can I scal this down? There we go. Okay, that should
be doable. So let's see. Let's go for let's
start over here. It's a bit tricky for me too. Okay, that's not looking good. Let's do something
like a bit shorter. I was hoping that
it would bring out those little stones a lot more. I think that the stones are not strong enough
for us to pick up, you can see a tiny bit, but it's not as nice as I
would have hoped it to be. So if the stones are
not able to pick up, I should be able to just kind of split them up and more
likely use something like this. So let's see if I, I should be able to just
use something like this. Whatever I do this,
I grab this one. And then what I will do is I will have another gradient map, and this gradient
map will be for our stronger stones so we're basically
just going to split up the texture in a few bits. So we start with here, this is already starting
to look a lot better. So we are going to start
by grabbing gradients, and this is just going
to be our bare stones. So, if we go over here, we just want to grab something like
you can see over here. Actually, that might be we
will balance out the colors, don't worry, but I
still want to see. I always like to try a
few different colors and just see if we
want to do only, like, a very short line like this, or if we want to go for more
like a noisy line like that. I think we want to go for, like, a little bit more short. Sometimes takes a second to
get exactly what you want. Here, let's have a look
at something like this. And now what I want to
do is I want to try and get more of my brownish dirt in between here.
That is this one. So if we turn this here, like a more brown
dirt. And let's see. So here we have our flat stones. I want to have these a
little bit more gray scale. I'm just here, let's delete
this one. So delete this one. Let's delete this one and this one and this
one because there's almost these gradients
don't really do much because they are
not affecting as much. And now we can just
go ahead and we can, by hand, maybe, balance
out some stuff. You know, let's turn this into, like, bit more darker,
something like that. So we just balance it out, and then here we have our orange. Let's turn this into
a more dark orange. Let's get started with
something like this. So this is like a
very, very basic base. And then this one over here, we can do a grant dor. And we can grab, for example, more of the darker bits
like over here. Mm. Something in this
direction, for example, and then maybe grab some of the more lighter areas and just push them down
a little bit more. See, I'm just trying to
find this is the one, push it down a little bit more
so that we get like this. Now, this might
still look silly, but don't worry we will work on this to make it look
more interesting. So if we now go ahead
and first of all, blend, and I will need to
blend the darkness spots. So if I add an HSL note, what I can do with that is
use saturation and lightness. I can simply push my lightness down for this so that
it becomes a bit darker and maybe also play around with your
saturation a little bit, if you want, and you
throw this into the top. Now, all I need to
do is I need to grab the same mask that we use
over here to blend them. Throw it in here, see? And then we can just
playro with our pass. We don't want to have it as
strong as in our height map. So we get something like this. Then we add another
blend on top of this. And this blent will be
for this graded map. And all we really
need to do is we need to grab the stone. Actually, no, we cannot grab the stone mask because the
stone mask is too large. So let's just grab a levels. Throw that as a mask
and then just push your white slider up until,
like, around this point. You can even, like, move
your white slider back a little bit to have it
blend a little bit better. So now we get these
pieces sitting on top. Of course, what you can do at this point is you
can if you want, play around with your obst
a little bit, actually, you know what, no, I
want probably just go in here and d HSL note. Because if I play around with my obste I can see
the stones below it. I didn't think it was that
bad, but it looks like it is. So here I can play around
with my lightness to just and my saturation to get it exactly
how I want it to be. So we now got
something like this, so it's starting to
sort of look like Tami. It might not look like this yet, but that's something
we'll work towards. So we got these
pieces over here. Now what I want to do
is I want to start by just adding some
very base dirt. So if we add a blend to this
and add a uniform color, this uniform color will just be like a brownish dirt color, something like
this, for example. And then in the bottom, what I want to do is I
always first like to try and use the actual DRT
node in this case, because the dut
node can hopefully generate exactly what I need. So I have this du
node, and basically, I need an ambonuclusion
map and a curvature map. Those are the two
important ones. Now, you know already how to create an ambien inclusion map. You just add an
ambiclusion node. Curvature map is
literally a curvature. That's what it's called, and it basically needs
a non map input. So if we set this to OpenGL, we can start with
the ambien oclusion. For the ambien clusion, I can just grab this
version over here. That is no problem because here, because the em uclusion is strong enough to
actually pick up in between all those
cracks and everything. So you can plug this in. Curvature map, we need to add the norm map because we cannot
use this one since it's already split up and
just plug this into your norm map sent it to three so that's strong and throw this into
your curvature. So then a curvature map is basically like
etche highlights. That's how you can
see them. Once you've done that, you should
be able to get this. So now if I play around
with my dirt level, you can see that I can basically create dirt in between
all of the cracks, and I can also set
my grunch amount to have more or less dirt. My etche masking
doesn't do a lot when we have such
very specific shapes. But basically, if
you throw this into your blend, you should be able. Let's go in here. There we go. See? You should be able to get
some dirt in between here. And now we can also
just go in and we can, play around with our dirt
level to have more or less play around with the colors that's
not as overwhelming, but I just want to
have this color to be like a little bit more
of like an orange color. And also in our roughness, this will matter a lot in our roughness because
we can make this look dull in our roughness
so that it's well, dull, not shiny, and that we
just capture that effect. Now, always with the base color, it's almost always a
miss at the first time. You just need to get
the bases in there, and then you need
to balance it out. So when I look at this, I can see some white
patches in here. Those might also be nice
to just try and capture. For now, what I will do is I will just add a
very simple blend and just duplicate my
uniform color and just make this uniform
color like whitish. And then in our blends,
what we will do is I often just grab a grunge
map for this kind of stuff. So let's say grunge map 013. Maybe play around a
little bit more with your random seat and
your balance and just try and get some nice masking to get
these white patches, see? And then tone them way down so that they are just becoming, I need to play with
my random seat. I need to have it a
little bit more generic, something like
this. Here you see. So now you can also
play around with the contrast make them
stronger or less strong. So yeah, there's
a bunch of stuff that you can do in
order to make this look more interesting. Now that we have this, this
is a very basic base color. I first of all, just
want to already try it out and make
sure that we take this one completely to final before we move on to
the stones version. For that, we need to
do a few preparations. First of all, or the first thing is that I will add this one to my base color. And we also have we don't
need a metallic map. We also have a roughness map. Now for the roughness map, what I want to do for this is a roughness map is gradient, as I said before, so we can
do a gray scale conversion, and I just want to turn this one into grayscale conversion. The nice thing is
because these stones are slightly lighter
than the background, in our roughness map,
they will actually also be slightly shinier
than our background. We can then add the levels
on top, and in these levels, we will throw in, for example, our dirt, like this. And we set this to be art, so the dirt will be even duller. Then we can add another
blend and we can, for example, set
this dirt up here. Also the art. So this dirt. Yeah, it will just basically add like a bunch of
different dullness. Finally, if you just
go ahead and add the levels after your
gray scale conversion, this is for later on because we most likely just
want to make this also a little bit lighter and we just want to
play around with everything. So we throw this into
our roughness like this. The very final thing we need to do is we need
to actually set up a switch so that we can
turn on and off the damage. Now, this switch we can most likely use all the
way over here. So if we simply technically, if this would work, let's see. Let's add a gray scale
that is white because oh, no, sorry, I did black. Yes, we need to have
this to be black. Technically, if I would
direct this into my blur, nothing should I should just nullify everything and
should just become plain. Okay, so we still
have some pieces in here. Where does this happen? Over here, over here, it still happens that we start to art more pieces. Now,
that is no problem. That just means that
we need to move this one a bit forward. And I believe I want to add
this one then after here. And the reason I do that
is because these outputs go to different areas, and it might be easier
if I just add like a blend. Sorry, not a blend. A switch Grayscale. If stones is true, we will have stones
I stones is false. So if I turn a switch to false, it will almost looks like we need to have
a double switch. We need to have a
switch over there, and we need to have
a switch over here. So so these de
vals. How is this? I think only the ground is the last thing that I
need to do, I believe. Yes, because I add
the ground after. See, before, after. Because I add the ground after, I can also because the
ground will only show up whenever we have
our broken pieces, I can also add the switch
color this time in here, and I can say I Stones is true and if it is false do this. And swap it around. See? So this is now going to be
our plane tarmac. So knowing that, we
can just already expose this because
I don't want to go to three switches
all the time, just to turn them on and off. So I can go in here and
I can press expose, and I will call this
damaged underscored tarmac. So if damaged tarmac is true on all of them, it will happen. So this switch use
the same value, damaged tarmac and this switch use the same value
damage Stomac. And that should do the twig.
So now if, for example, look at my normal, I click
on my advanced Sarmac. We have this switch over here. Once again, just duplicate
your identifier into label and damage give the
second to reload that. No damage. And there we go. So that very easily
turns it on and off. So now, this is all
going to be like clean tarmac as far
as I can see. Yes. So let's give that a go. I don't know how the height
map will react. Okay, so the height map seems to be reacting
just fine on this. Perfect. So let's go in and let's actually start
by dragging in the taxes. It's always a scary
moment, but we'll see. Set this all the way
we in our be the map. Don't forget to do
that. And dragging your base color and
dragging your roughness. Okay, yeah, it's not too bad. At this point, I would like set my displacement to be a
little bit stronger often. But okay, this is not too bad. First of all, it's
way too shiny. So let's go in and set these levels a lot more a lot higher and then push all of these
pieces also like up. Like this. Oh, by the way, I actually want to invert
this because I want to have my stones to be darker
and not the background. So if we invert this and
just swap around our levels, we should be able to
get this effect where it's more like the stones
are darker and not the rest. Let's see. And then we have
our 30 in between here, see. So now if I go to my free gam, you can really hopefully see it. The stones should be a
little bit more shiny. Let's make them even more.
Let's go to my levels. Yeah, let's try that. You see, you can see the shine
coming off them. And that often happens
when you look at tarmac on the road, you can often see, like,
little specks of shine, and that's basically what
I'm doing over there. Oops, won one. There we go. Okay, so we got that stuff done. At this point,
let's have a look. Whether I want to bring those
stones out a little bit more I need to keep in mind that I'm not
just working from memory, but actually looking
at something. Okay, so those stones, I want to be a
little bit darker. Maybe at this point, I would also want to just
turn on raid racing, just to give me a closer
look at everything. And I want to just see
this everything feels a little bit too blurry
for my taste in my normal map when
we have this one. Now, I'm not sure where
this blur is happening. Most likely, let's see, over here, or is it just
because it gets arded. Now, a quick trick that
you can do to just see if it's where the
blur happens is to literally add a
sharpen note after it, which will, if you just
push the sharpening out, that sometimes even
already fixes it. Okay, so now we have our rate tracing turn on, as you can see. You can definitely see because
my PC is a lot slower. So the shadows get
quite nicely picked up right now because
of the rate racing, which is, of course, a lot
more accurate like this. Having a look at this. So
I think I probably want to go in and start improving
my render a little bit. Just like adding an extra
back light to this. So if I just quickly turn off rate racing because
moving lights around with my graphics card during rate racing is not fun. So let's just
duplicate Light two. Go to rotate and
have this light come from here from the very bottom and make it even like sharper. So we make it only just
from the very bottom. Make the color to be like
a little bit more of like a softer color. Yeah, don't make it too bright, but we do want to make
it like let's see, I want to try and make
it like quite sharp. So that is sorry, the rotation is quite sensitive. So that's only, like, just
hitting the side over here. Okay, so we got that one. Now if we go to this
light over here, um, maybe I can say, a little bit
brighter and maybe I can make it a little
bit more orange. Here we go. So it just feels a little
bit more like a sun. So basically what
I'm talking about, it's already I think
the sharpness worked, so it is already looking
a little bit better, but I still feel like there are some kind of
blurriness going on. And I'm just wondering it's
most likely because we are using a art with an opacity, which is causing some of
the blurring to happen. So I just wonder if we can
literally make it as easy as just adding some sharpness notes or if we need to
do anything else. So if I go ahead and add another sharpness
note over here, in this case, sharpness
works quite well because it literally just
brings out the details a bit. Here, see, you can
see the difference. So there was definitely some blurring going
on over there. I can turn on and off my
displacement just to check. So that blurring seems to
be working better now. Now, if I just swap this around so that I also have my sharpness
included in here, will that not give
me any errors? No, I don't think it does. Okay, so cool. So now what we can do is we can start by just balancing
this out a little bit, because right now it
does not look like that, and we, of course,
do want to fix that. So if I have a look at this, the first thing I would say is that the colors
are too monotone. I'm going to start by bringing out the stronger
rocks over here. And I can do that by going into my HSL and just set my
lightness to be a bit darker bit more maybe. Too much. Lightness is
very sensitive. So 0.49. Okay, so that brings those
out a little bit more. That's good. Now
what I'm going to do is we have our
dirt over here. Let's go ahead and just push this a little bit
more so that we get, like, a little bit
more of this dirt coming in between everywhere. Okay, so that adds that little bit of extra dirt that is good. Now on the base, I feel like it is too monotone,
which makes sense here. It looks very monotone. So if I just add a blend. Actually, let's do
this after we add after we drag it to our
roughness. Let's add a blend. And I want to go for more let's say some
more whites, probably. So I can just reuse the same
uniform color over here. And I want to go for actually, maybe we can just something
we can reuse this one, we might be able
to reuse this one just to save some space. And if we then add the levels
on top and just press D, docking levels like this so
that I don't need to scroll all the way down just to get it. So now I can just play
around with these levels. And, I don't think I need
any blending modes on this. No, Max lighten
doesn't do anything. So let's just push this and then have a look at the
ends that in the end, you can start seeing those. Maybe make my levels
a little bit sharp. There we go. So we
can start seeing those pieces in the ends mostly, and they're really starting
to, like, come out. Okay, so it's getting there, but it's a little
bit too strong, so let's tone this down. Okay, see, so it's slowly
starting to get to this. Of course, we need to ignore
the fact that we have all of these little bits and
pieces over here. Now, if I have a closer, this one is tricky
because it's too dark, so I need to stick
with this one. If I have a closer look to this, let's have a look
at my free camera. So in my free camera, I
cannot see how it would look in slightly
different areas. So let's go to Camera one. Maybe if we set a sharpen
a little bit higher. Yeah, if I shut my
sharpen a little bit higher, and at this point, I might want to already
turn on my rate racing again over here because that
will change quite a bit. Yeah, basically, the reason that I am doing the rate racing like this is because I want to have
these as my final render. So right now, what I
see is that the rate raising it is very strong. If we just go to our
first light and you set our diameter of our
area shape higher, what that will do
is it will soften out the shadows a lot. You'll see so now the
shadows are a little bit softer when they hit
these little stones. So we are slowly getting there. But yeah, definitely, we also need to work
on our roughness, and we need to work more
on our color and just make everything feel a lot
more interesting, maybe also like our
occlusion, stuff like that. So let's go ahead
and continue with working on our color
in the next chapter.
17. 16 Creating Our Base Color Part2: Okay, so we are back. So this
is what it looks like now. So it's starting to
look quite good. But yeah, we still need to
work on this a lot more. What I probably want
to do first is I probably want to
go ahead and art a little bit more roughness. So we got these
little specs here, which are great, but I just
want to push this a bit more. Now, out of curiosity, if I set my tiing to two, I just want to see
how that looks. And while that's loading, we can already go in here and actually play around
with our roughness. So in this case, what I'm going to do
with my roughness, the most basic thing
is I'm going to art a blend and can I maybe
steal something here? No, I cannot steal that one. Maybe, yeah, I might be able to just huh.
Where's my levels. Sorry, I lost my levels. I can just steal this one over here, throw
it into the top. And sets to be
subtract this time. So if we set it to subtract, it's because we want to
have some more shine. So this will just give me some
randomized shine in here. Okay, so here you can see, when we make our texture
a bit larger, you can see that yeah, it's a little bit more readable, but that's just from this angle. I'm not actually going
to focus on that. One thing I do see
when doing this is that my sharpness
are too strong. So these ones, I'm probably just going to
set them back to one. Because I feel like else, it will be too strong. Yeah, that's a
little bit softer. And yeah, my roughness, I have just reloaded those, so that will, I can
see a little bit. I think some of my lights over
here are a bit too strong, and they are actually hurting
me previewing my roughness. So if I just go into this light, I just made it less strong, and now I'm just going to go and make it a little
bit more visible. See now I can see like
the roughness showing up. And this one I
actually want to keep this strong because that's part of my signature when
I render my materials. I always go for like a
three point lighting setup, one light here that's soft, one light here
that's very strong, and one general light that is halfway through the cylinder, and I find that that
often works best. So we start to get some of these little specks in
here that's looking great. I would like to have these
bits over here to have even more specs to make them
a little bit more shiny. I think at this point, I am going to go
ahead and go back to a tiling of three and
if we go in here. So for those specs, let's see. Because
I'm not adding those. Oh, am I? No, see, I'm not even adding
those to my roughness, so that's why they
don't show up. So if you add to
blend after this, just grab this mask over here. There we go. Art
is to be an art. Give that a little
bit of an opacity. Yeah, that you do trick like. I know that over here, yeah, okay, there is more info in
here. Let's add this one. Basically, the reason I
want to add this one is because it will give us
different intensities or specs, which might be nice, and then
use this one into the mask. And if we set this
to be I don't know, we cannot Well, yes, we
can set this to copy. We just need to tA
levels here at the top, so that I can now push all of these stones to be a
little bit lighter. So let's see. So we got
something like this. Maybe now, yeah, play around with your
past like a little bit. We can get away in the
roughness with lines like this because you often will
never even notice them. So let's see if that even
works the way I want it to. So now I'm just dialing
it smaller here. So you can see, like some of
those specs sitting here. So I'm just trying to capture the light to make sure that they work
all correctly. Yeah, yeah, I think that's
starting to look quite nice. Okay, so we are starting
to grab those specs. That's nice over here
because there is a light beaming on top of this. That's why you won't see
them as strongly in here. But it is starting
to look like tarmac. That's pretty good. We got some of those white
patches in there. Maybe I also want to get a little bit more of the white patches in between my stones, almost as if that
we have the dirt. So we have this dirt over here. Now what I can try is I can
try to add another blend. And this blend has
those white patches. And then I basically just grab this same dirt that
we have over here, but I blend it using a grunge map in order to
not have it everywhere. So I grab this. I use
like I don't know, like a clouds in the top. I set this to be subtract. Add the levels to your
clouds in order to make sure that you don't like to push
it in only certain locations. Um Something like this. Let's start. Okay, we
definitely need to, like, play around with the
clouds too a lot more. There we go. See? So now we get, like, some of the brown bits, and now if I just tone down my opacity for
the light bits, we should hopefully get, like some nice color
variation in between the two. It's not as I want to
have the bits stronger. I also need to make
sure that it's not just because it
hasn't updated yet, because with the rate
raising the update is a little bit slow sometimes. So we got this stuff over here. So we got some nice roughness. I'm happy with that. We
got those white bits here. You can see them sitting mostly
over there and over here. I want to make these a
little bit less strong. I mean, I believe
it's this one, right? That's causing this or not. Maybe it's I don't think it's this one. Oh,
yeah, it is that one. So let's tone this one
down a little bit. So this is just like
some overall lightness, so it's not as important. Okay, so let's say
we got this stuff. One last thing I like the art. And I only like to offer that artist when we work
on stone or concrete, and it's basically a blend. And this blend will
have a gradient map, and you want to grab
your curvature. So your curvature because it just shows some edge highlights, throwing this into
a gradient map and then throwing
this into your blend, what you can do is if you sent your blending mode
to art subtract, it will actually add
those highlights, and it could be nice
to just give us some extra sharpness and just some general
highlights in our texture. It's just I want to
have it showing up, but I do want to keep
it quite subtle. Yeah, I think something
like that could work. Let's go into our free cam
just to have an extra look around. Yeah, see here. So you can see the little bits of highlights sitting in there. So that's looking pretty good. Okay, so we got those highlights all
done that is also good. So that's also now working. Now I think what I want to do is I'm going to first
of all, select this, call this clean
tarmac paste color. And this one I will just call roughness because the roughness often doesn't have
as many nodes. So we will be working on
the damaged version next. But first, what I
want to do is I just want to play around
with my skies and see if I can find better sky
because I've only done, like a few of them, and I just want to make
sure that I got something that just looks
as optimal as we can. Because, for example,
here, I just clicked LD Construction, and I think that one
is already better, but just kind of
swap between those. And just see. Now, if this is
taking too long here, this kind of stuff is also quite interesting because it has a really darkness to it
that you can maybe use. Early robot dog might
also work early trees. These are great because they have a lot of
tarmac in them, so it kind of reflects back
on top of actual tarmac. Hmm. Cars entrance.
No, I don't like that. City Hall. Ah. Good work. Sorry if this goes bit quick. I'm just trying to, like, Okay, so courtyard, let's
keep that one in mind. The courtyard. Oh, sorry. That's what happens when
it needs to download. It shoots all the
way back up and you need to, like,
scroll all the way down. So that's a bit annoying
in the first time. So yeah, we had the
courtyard, courtyard garden, go round Graffiti rundown. Um, Lagoon coast Lagoon ghost also Lagoon goes dusk, actually. No, actually, lagoon
ghost dusk has a little bit too
strong lighting. So lagoon Cost, if I
rotate this around. Okay, so this one, so we are between lagoon ghost. Courtyard. This one, I would say that I would go for
the courtyard right now. And then if we compare that between which one
was it Ally trees? No courtyard still wins, Aynaro no robot dog. Okay, so have more
control over my goal. So Ay robo dog between that's basically I just figure out the
nicest one. Cor chart. Okay, courtyard wins. So I'm going to go for
Carchart D accursio. I probably say that wrong, but I think because it just has the right amount of
darkness in here that we can use if we rotate
our sky round, but still have the right
amount of lightness. So having this now all
we need to do is just balance our lighting a
little bit based upon this. So let's set this to
6.9, for example, just to push it out
a little bit more, maybe seven. There we go. I want to go, for example,
into my camera one, and I just want to make
sure that my contrast is not too strong, but also not too
strong. Let's see. We have our exposure
here. Let's tone down our exposure to around 1.25. Our contrast is just around one. So we got that stuff done. And then what you can also do
is if you go into your sky, if you ever want to
have your sky brighter, you can actually set the
brightness of your sky. So I would set that a little
bit brighter just so that it shows off a bit more
of my material. I think I got it. Okay. So I got this. So yeah,
we got something. Maybe the contrast is a
little bit too strong here. I don't know if I
can just rotate my sky round in
order to fix that. No, I need to go
into my camera and probably set my contrast
a little bit lower. There we go. That we can
just see some of the bits. So one and maybe set
my exposure to 1.4. Okay. I think I got it. So yeah, it's just a bunch of tweaking. So now we can kind
of see this side, so it is still in shadow, but our eyes are mostly just focused immediately
towards this area, and then they get focused
towards the light, and then we also see
some of those specs. So if we have this
light over here, which is the back light, let's see if we can
make it a little bit more intense in
brightness. There we go. And then we have
the bottom light. Let's see if I can just
make it a little bit more visible and maybe rotate it a little bit more towards
the bottom. There we go. So we've got those lights,
we can see those specs. That's all looking quite good. I'm going to save my scene at this point, and
in the next chapter, what we will do is we'll
go ahead and we will start working on our
damaged version.
18. 17 Creating Our Base Color Part3: Okay, let's continue. One thing I did off
camera is I already set my textures to four K.
Remember, same way as before, just click on here
and set this to four K. The reason I do
this is because I know that my final renders in here I want four K texture because they are going to be
portfolio rendos. I want to have the
absolute highest quality to show off my material. It's way easier for
me to downscale from four K to two K than
the other way around. So that's why I'm already
deciding to do this. We got these pieces over here
that is all looking fine. Now what we're going
to do is we are going to work on
the damage version. As you can see on
the damage version, most of the stones will be
roughly the same color, although we do need to
make a ground below it. So we will see how it goes. Let's just get started with
some base colors, shall we? So if we go over here, I'm going to, first of all,
go into my advanced tarmac, and in our damaged tarmac, just turn on the actual damage so that it will
generate everything. Of course, with four K,
it takes a bit longer to generate because we already have quite a large graph over here, but it's not too bad. So we got this stuff over here. Let's go ahead and get started. The first thing that we
want to do is we want to go ahead and create
like a masking system. Oh, that's clean tongue. Masking system so that
we will only show our clean tarmac on
our clean versions, of course, that you
can see over here. So for that, I believe that if all we need to do is
just add, like, a blend. And for now in the
top of the blend, I'm just using a
black uniform color just so that I can
properly mask this out. And I need to go in here
and I need to figure out exactly where the mask
is that I want to use. So it is this one, I believe. Actually, with our invert,
this one, I believe. So let's see if it is this one. No. Trust one
without the invert. So this bevel over here, although no wait, we are
adding our slope grace galaxy. So what I might want to do is I might actually want to grab this over here and then just do a very quick let's just select this line.
Invert gray scale. There we go. So that
should do the trick. Okay, so the only
thing I'm worried about is this fate over here. Because of course with stone, you either have stone or
you do not have stone. It's not something
that can fade, but we can see how it responds. So if we do this and go
to our marmoset scene. Okay, this is a bit tricky to actually look at
now that I see it, I'm going to turn this
into a white collar. Hmm. Oh, wait, I
need to probably refresh my displacement map
because of the rate raising. So that's why it's most likely
not showing up as well. Okay, this is interesting. So it looks like that my
height map doesn't look as strong when we start applying textures to
it. That's no problem. So for now, let's
just ignore that, and let's actually just create
a generic base material. And once we've done that, we can just balance it all out. So
that doesn't really matter. All I needed is the mask. So for now, this mask,
I guess, is fine. And if it is not, then
what we can do later on, we can already put it in place is we can add a
levels behind it. And the levels would
be, for example, if we need to push
this out like this in order to make sure
that we cover every single bit, like you
can see over here. But honestly, for now, I'm just going to Undo
that and we'll see. So for our damage,
let's have a look. We need to first
of all, start by just masking out our
stones over here. So we have ground. We have stones. Let's start
by creating some masks. Let's start with
the ground mask. So the ground mask is
going to be quite simple. Let's move this all
the way at the end. The ground mask is going to be most likely just
like a gradient map. And this gradient
map, we just want to grab something that
has some noise in it. So let's say like a fractual
sum base, for example. So when you plug this
into your gradient map, we are going to grab it. Let's make this a bit
smarter so that we can see. Gradient Editor, let's see
where can we grab this from? I can do it here, but what I'm worried about is
that it will look blue because these images look
very blue for some reason. So yeah, okay, I
guess I can try. So let's start by just
doing a pick gradient. Pick it around here. You know what this
could actually work? Because what I'm going to
do is I'm going to show you trick to very quickly
change the color. So if we have this,
the only thing is these green ones over here, just get rid of those
because they are way too strong in terms of color. So we have this really noisy map over here, but it's
completely blue. That's, of course,
not very nice. But there is a note which is
called replace color range. And with this note, what I can do is I can set like
a source color. And then if I set
my target color, the same as my source
is by clicking on the picker and
clicking on the source. What I can do then
is, first of all, set source range all the way up and go into your target
color and just make this like a more like a brownish color,
like you can see over here. And that can very quickly
just change some colors. You might need to go in here and just play around with
it a little bit, but we will see how this looks. For now, what I'm going to do is just for quick balancing, I'm going to add a blend
and a uniform color. And this uniform
color is going to be the base color that
our durt would have. So let's say our durt is going
to have a base color like, um something like this. We can throw this on top,
well, we can first of all, display around the blend modes to see if there's a blend mode that actually works
quite nicely or not. N, it doesn't look
like it. In that case, we can just simply
use our past to set our past to 0.5 in
order to overlay that. So yeah, basically, we just have a very basic ground texture
to get started with. The next one, if we
are the gradient map, I want to split my bigger stones up from my smaller
stones most likely. So if we go in here, I want to have these
ones in a graded map, and I want to create
another graded map and this one I probably want
to just actually add some new blends
because I need to blend this one together
with this one, Max lighten and blend that. Sorry, blend that one
together with this one. Max Lighten, and blend that
one together with this one. Again, on Max
Lighten. There we go. So those are just
all of these four. Now that's done that we
have this mask over here, and what we can do is
we can just plug this in this graded map. There we go. So now we can just easily
split them up into two. So for these ones, should
be pretty straightforward. We should be able to just grab, if you just go to these stones, you just grab from
one of these stones, for example, let me
just scale this down. That is the nice
thing about pure rev that I can just scale down and still keep
it on my screen. Else I would need to do
it on my other screen. Pick gradient. Start by
picking something, yes. Start by picking something like I feel like having the gradients is not going to work very well. Yeah, that's not going
to work very well. In that case, just add the
very quick levels on top and push your rocks to
become white like that. Then they will just
be plain colors and we will just need
to add more on top. Yeah, the I don't like that. I don't like that, the
fact. Let's do this. Sorry if I'm going
back and forth, but I'm just trying
to make sure that I get the optimal look. Let's have these masks. Let's then add a flood fill and add a flood fill
to random gray scale. Because doing that,
the gradient map is able to read the
different gradients as like their own little thing. So if I would now go in here, drag around here, these rocks, should they should
become different colors. Oh, it would be nice
if I actually attach C. So now they just become
slightly different colors. So I can go pick radiant, go around here, try and find a nice area and make
all of these rocks. See, something like
that. Now all the rocks are just like nicely
different colors. I can do the same over
here. We have this one. I can add the levels
to this and just push the white slider to
the right to left. The flood fill and flood
fill to random gray scale. And let's go ahead and d
this to my gradient map. So this one, once
again, big gradient. Let's grab from different
area like this. There we go. Okay, so we now have two
gradients over here. So we got these really
interesting looking shapes. They're a little
bit long, but okay. The goal is that now
we have three textures that we can now start masking
up and combining together. So let's get started
by adding a blend, and we want to
probably have our dirt always on the base
because it's dirt. So we have that on the base. Then let's have the
big stones on the top. And what I can do is I can actually use this same mask over here as our Obaste now the
stones are here on top. I can then add another blend, plug in our small stones, and once again,
use the same mask. So now we have our small
stones sitting on here. Now the thing that we
need to do is, yes, you do not want to have ambienclusion or
anything inside of your base color because
then it will not be as accurate in terms of PBR. However, I do definitely need to make this
look like stones. I'm going to do
that in a few ways. The first way is an easy one. It's going to be the same technique with our
dirt blending. So we basically add a blend
note with a uniform color, and we make this color to
be a little bit more like a brownish Brownish dirt, something like
that, for example. We then add a very simple
dirt, dirt, actually. Dr node. I know it's
quite expensive, as you can see over
here, but I like it, so I want to use it. An Amoclusion and a
curvature. Here we go. Okay, Aminuclusion. We want to grab This
one, I believe? Yes, because we are
masking everything out. So we want to grab this
one for ambien occlusion. As you can see, tone
down your height, depth, and just turn
on GPU optimization. And I want to add a normal
node and just hold Control and just plug the same input of your ambien glusion
into your normal, set it to three, throw
it onto curvature. And now we have some
dirt. So this dirt, let's tone down our dirt levels. We've already been over
this, so I'm not going to go through these pieces. I just want to
throw this on here, and that we already here. It's already make our
stones look a lot, less flat because now the dirt is being built up in
between the stones. It might be nice
to just make this dirt a little bit lighter. Like this. And then what I'm already going
to do is I'm going to add a blend because here that curvature
technique that we used, so green map with the
curvature actually works a lot better in this one compared to the small stones. So this gray map
with our curvature, let's throw this into our
blend and set this to be art subtract and then
tow down your Passy. You see? So it can immediately, make your rocks look a
lot more interesting. Now, the stones are probably in really silly colors right now, so we most likely
need to work on that. But the goal is that I can, for example, now replace this. And this is now how our
texture would look. So we now got this a very base. You can then, of
course, go into Mm set. Okay, let's have a
look. First of all, ground is too dark,
stones are too dark. The color of the stones is
actually quite interesting. So yeah, definitely something
that we need to work on. I think I'm also going to
go in my sky and just set my overall sky to be a little
bit lighter around 2.45. Okay, so ground. Let's start with
that. If I go here, I should be able to just set my uniform color lighter in order to get a
lighter ground. Course, we don't
have a roughness for the ground yet, but
that's no problem. Let's make it a little
bit lighter even. Here we go. And yeah, because the roughness actually adds quite a bit to the ground, what I'm going to do
is I'm just going to already now add a blend. And this blend will actually be the same blend as over here, use the same texture. And then in the top, we can
go ahead and we can go, Cal over here, we can make the roughness for broken pieces. So I'm going to add by a
greyscal conversion for our ground Add the levels
and it This is a ground. It's very dull, just make it very light, something like this. And then you probably just
want to add like a blend. And this blend will
be for our stones. I want to probably pick
these stones over here. Let's add a Actually, no, we can just reuse this. We can use this one over here because the way
has everything added. Throw this into the top, set
this to be art or subtract. Let's go for subtract. No, no. I don't know. Maybe I do want
to get some shine in there, but not too much, so
we'll see how it goes. We might need to do some fancy masking on it, but we'll see. So for now, just
throw this in here. Maybe like an extra blend for your dirt, since
we're here anyway. And just set that to art. See? So yeah, okay,
that can work. So because there
is dirt over here, the stones will not be as
intense in terms of shine. We got all of that stuff ready to go, so let's
have another look. Here see. So now that we
made this dirt a lot duller, it also looks a lot better. It looks very plain, so
let's go actually boost up our norm map dirt,
which is this one. I sets to like five. Okay. I want to
actually twin and capture some of those specs
that we have over there. So if we go add a levels, so this is our dirt that we
have generated into normal, go ahead and go in here and
like an extra blend on top. So move this up. And we
will just have like levels down here and then a
uniform color that is completely black at the top. Then your levels, you probably
know what you need to do. You just need to twin and
capture only a few of those darker specs like
this kind of stuff. Um, push our levels out. It's a bit tricky to get it. But yeah, something like this, and then just throw
down, yeah, like your robaste inside
of your blend. So it's just going to give me, like, some of that darkness. Okay, so we got that stuff. Let's go into our free
cam so that I can have a closer look to my
dirt before I move on. Hmm. Yeah, so my dirt, I don't like the dirt. Yet, I need to go in, and I'm going to, first of all, make it even duller over here. So just push this out. Yeah, I need to have some
noise in there, basically. So if this dirt
isn't working well, what you can also try
to do is to simply grab some white noise and
throw that in here. And then for this
white nose here, you can see the difference. It just adds like lots
of little white specs, which I was hoping
would give me, maybe if I said stronger. I was hoping it would
give me some noise. Okay, so we got that. So now if I go in and maybe
throw in a splash of color. So if I add a blend
and I just throw in some very strong
orange color in here, something like this, I just want to throw this in something
that's highly tilable. So let's say Clouds
one, for example. So we have Clouds one, we
throw in like a levels just to push it back so that we do
not have that many pieces. Yeah, we get like this
highly tilable texture. Huh. Why are you so strong? I'm not adding that much stuff. Basically, there we go. It had some trouble
updating, I believe. Yeah, okay, so we now get, like, some of that dirt. If I just go in and
just make my levels a little bit stronger
so that they cut off a little bit quicker in our
clouds one like this. Okay, so now that we have that, I want to Set fall off
a little bit stronger. And then I want to
just, like, tone down the intensity
a little bit more like this. There we go. Season now, we start
to get a little bit more of a color variation
within our dirt. Maybe make it like a
little bit stronger. Yeah, I think something
like that should do the trick. If you
go to Camera one. Yeah. So now we see a little bit of the difference between dirt. Okay, so that's pretty good. Now, another thing
that I like to do is I like to just
go ahead and go to my render and turn
off rate racing because changing height maps during rate racing is annoying. And I just want to set my
height based upon my stones, and then I can just balance
out the rest later on. So if I go for 0.008, I feel like that's correct
height for my stones, and I can see now that I need to probably push the actual tarmac a little bit higher in order
to get exactly what I want. So if I go in here and push this a little
bit higher just by moving my white slider So I probably
want to do that over here. Let's tone down our pearl noise, and let's add the null
levels here just for, like, some final balancing. Yeah, see? So now this looks
a little bit more logical, the way that we had it before. Okay, so we got that stuff done. Let's turn on rate
raising again, and now what we'll do
in the next chapter is we will just basically
continue with this. We need to balance
out our stones. We need to make them look
a lot more interesting. And overall, we're getting
closer to the texture, but there are still a lot of
stuff to do in order to make this look as good as
I want it to look. So let's go ahead and
continue with that.
19. 18 Creating Our Base Color Part4: Okay, so let's get started first by
balancing out our stones. I think that's a good
way to start with this. So our stones, I'm quite
surprised that they look so dark because
they feel really bright. If I just have a look
at my actual texture, yeah, yeah, that brightness. Yeah, okay, I guess they
are about as bright. This is the tricky thing
because now I need to kind of like imagine how
it would look with this type of color
with my stones. So I feel like I would probably want to still make
them a little bit brighter, yes, and probably make my ground also a
little bit lighter. So let's get started
by, you know what? I'm just going to
add an HSL note. After my dirt over here that I can just very
easily like my lightness. Now remember, we probably want to before we
do the HL note, drag this one into our roughness so that it stays
at the same level. That will make that a
little bit brighter. Then if we go to our stones
over here, let's have a look. We have a few stones that
are very, very dark. If I just go in here and just delete some of these
really dark areas, they will revert back to
their to more even colors. And over here, probably the same where let's
delete this one. Let's make this one just
like manually a bit lighter. There we go, see, because they
are still the same stones. I don't want to go too over
the top in terms of color. So we got that
stuff ready to go. Now, all I really need
to do is I need to add HL notes to these. And then we can,
like, set our lights, for example, a
little bit brighter. There we go. And if we
just have a quick look. Oh, okay. That's nice. That's cool. So here, that
lightness definitely works. So I do find that right
now everything feels a little bit noisy and that's something
that I do need to fix. So let's see. Does it have to do
maybe with my lighting? I just want to make sure
that when I say noises, when I look at this, it
feels very overwhelming. So it doesn't feel very
nice and sharp and just maybe maybe it's just my sharpness because
often my sharpness if you set your
sharpness too high, you actually get
Not as nice effect. So let's set our
sharpness to around 0.95. Okay, so that does look
a little bit softer. So we've done our
sharpness over there. That is all looking good. Down here, is that
our ambien occlusion? It feels very strong. Do
you see that darkness? I feel like my contrast here, but I'm not sure I don't
think it's my amen occlusion. I can, of course, just
lower this to make sure. It's going to turn
off rate racing. Yeah, here, see? I don't
think it's my amen inclusion. I think it has to do
with like a shadows. So if we just turn on
rate racing again. Because, at this point, it will basically be
a constant balancing. That's just how it is.
We just need to keep balancing this out until we
get exactly what we want. Now, I'm actually fine with
my contrast on my camera, sometimes I'm just, like,
playing around with things. So seeing this, I do
want to make right now, the colors feel too even. Everything just feels like
a very plain looking color. That's something I want to
fix. Also, in between here, these dark spots that doesn't
feel very logical to me. So first of all, let's make
our ground even lighter. Let's see if that Yeah, yeah, I definitely works better if our ground is even lighter. So our ground is even lighter. Now, let's have a look at our texture. So
what are we doing? We add our stones. We
add our dirt on top. Let's make this dirt also
a little bit lighter. See how it looks if it is
like this very light dirt. Ooh, see? That actually makes
quite a big difference. So let's see if we make
it a little bit less brown and go for a little
bit more like a whiter. Yeah, I think I like that more.
Maybe a little bit brown. See, that's the only
thing, like we get some really high quality
previews using Momset, but we do need to, like,
switch back and forth quite a while when we
are at this stage, but that's about it for us. So our curvature. Yeah, I think our
curvature is fine, so I don't think we need to edit that sometimes we do need to, of course, wait for
this to render out. So looking at this, I
would say that maybe after all my dirt is maybe a
little bit too strong, but I don't know if it's probably just a color
that is too strong. S here, it's
probably this color. So if we just tone this down, it's probably the noise because if I look
in my normal map, that does not feel as strong. Also, these pieces over here, I think I still after I want to just try and
get rid of the error. So that error happens
over here. There we go. So if we just add a blur, high quality gray scale to this, set the intensity
all the way down, and now look at your nom
map going to your blur. See, give the tiniest blur. 0.2 is already enough so
that we keep the sharpness, but we just get rid
of that really, really sharp look that we have. So that should already take care of that to make that
look a little bit nicer. So we've got those pieces. Let's have a look.
Let's have a look. Yeah, I just know that
these specs over here, if we would do branches
and everything, they will simply will
not look good because we just don't have the resolution for
something like that. So if I look at this overall
scene and I look at this, I think I want to
have it warmer, but I think I can actually use my light to partly
focus on that. So if I just work
with my lighting, I should be able to kind of like your sets to make it
look a little bit more interesting
because I want to keep my texture quite mon and tone because the lighting will
actually affect it a lot. You have seen it when
we change our sky, how quickly a sky can basically
make everything change. So we got this stuff over here. Now, another thing that
I would say is that it's doesn't feel
as sharp as I want. Like, I know that I'm working
in ten ATP right now, so I do need to
keep that in mind, but I think I'm
actually going to my sharpness a little bit higher now that
we've balanced out our normal map because once we render it out
with rate raising, once you've rendered it out, it will add a little bit
of blurriness to it. This is just like the denoising. So let's keep our sharpness
to around one and do that. Now the next thing is I want to probably break up
my send even more. So here I'm adding this
stuff. Yeah, that's fine. What I want to do now is I
want to add another blend, and I want to just grab some
white colors like this. And then add to
transform and just grab our noise that we
use for the brown colors, move it around a little bit, and throw it into the
white colors also. See that basically I'm just
trying to get more breakup in the sand because right now it
just doesn't look as nice. It looks a way to monotone. Everything feels very
monotone right now. I'm trying to
basically youll see, I'm just trying to get a lot more different colors in here. I think I also want
to do that probably with my basetomach
at this point. If it just go back to moms set. Yeah, my baetomach
let's also go in here. So let's see. What
do we do here? So we add dirt, white, this one. I want to probably
increase this one also. There we go see. So we just get some extra whiteness in here. I think that will look
quite interesting. So we got those pieces. We got
our stone sitting in here. I feel like that by this point, probably because I
set my sky brighter, it is not giving me the
effect that I want. So let's tone it down a little
bit more to 1.7, probably. And now let's go into our
second light and just make that a little bit
lighter in the brightness. And our third light, let's
also make this a little bit brighter. Here we go see. So this already does make for a slightly nicer
render Um, let's see. So sorry if I take some time to think about the
things I want to do. So we got this
stuff ready to go. Yeah, up close, if
we have a look, it's looking pretty decent. Yeah, especially here, but
I feel like my stones, they are still too monotone. I feel like they just don't
have enough detail in them. While if you would
look over here, for example, here, these
stones first of all, they have a little bit
more noise on here, but I'm not sure if it's good
for us to have that noise because that noise will make everything just feel more noisy. But then again, they do have actual colors and
everything in here. So I want to see if
I can capture that. So if I go in let's
start with these one. So here we have
the plain colors. If we just go in and we can
start adding blends to this, actually let's do this
before we do our HSL. So Grady map. Let's
add a blend to this, and let's just grab
probably like white. Here, Let's reuse this white color that
we have over here. And I just need to get something with a lot of tiling in it. Let's go for Clouds tree. No, Clouds tree is
too blurry B&W spots. That might work. Let's just
set this as a mask like a quick levels in order
to push this out. And it's basically to add
variation to our actual stones. So if I also add the
blend over here or hold control and just re select
that white, use the same mask. It's all about just
getting some of that random colors
inside of our stones. You'll see, you can
now see that some of these stones now start to get
some of the colors in here. Yeah, I can see that. So I probably want to have
this even stronger. Let's go into my Grady map. Oh, sorry, in my HSL map. Yeah, here. Sorry I want
to tone down my whiteness. In my HL map, let's
actually just boost up my saturation
a little bit, just to get a little bit more like a stronger color palette. And the reason I'm doing it here is because I know that we are losing a little bit
of those colors later on. So let's play around
a little bit more. Let's set our B&W spot
scale down like this. Play around with your
levels to make them a little bit sharper in
terms of transition. Here. And then by the time
that we get to this area, the stones because of the dust, they will still have
all of these colors, but it's different because these colors they should
not show up as much like, Okay, yeah, they're
showing up a little bit. So now we just need
to tone this down a little bit to get
because in here, now you can see that we start
to get interesting colors. So now that we have this, I just want to tone it
down a little bit, mostly in our smaller ones. So if we sent it 2.5,
am I losing it again? No, I do not. 0.5. That's interesting. I expect it to kind of lose that effect. In that case, I
need to actually go back into my gradient
and change it. So if I go into my
gradient map over here, I can go in here and I can
say, no, not that one. I want to know where this
stuff is coming from. Let's get rid of some of
these colors over here also, just so that we do not have as many different colors going on so that it's easier
for me to manage. Yeah, let's take down some of these green colas over here. And here we are with,
like, the blue color. So I'm just trying
to There we go. See? That's the one I was looking
for. Tone that down. There we go. So that's
looking more logical. So this is model I want. I think some of the
green is still too much. So let's just push this green all the way to, like,
the side. There we go. And now they are gray
that should do the trick. Okay, so those are
now balanced out. That's looking good. Now
what I'm going to do is, I think I now want to
just start working on why this is not
looking as sharp. Now, in order to make sure, because I'm now working on a lower screen resolution
that I'm used to, I'm going to show you
how to just create a quick rando so that
we can make sure that it is not just my viewpoint
or my eyes or something, but that it's actually
inside the texture. Because sometimes if we use a blurry mask inside
of the texture, we accidentally make
stuff look less sharp, and that's basically quite a
tricky thing to get white. Let's turn local reflections and just boost those up. I
like to always do that. But basically, what we
want to do now is if we go over here into
render and output, you can remember how we
set the resolution here. I'm going to set a
resolution to 2560. By 2560. There we go. And then the next thing
that I want to do format, let's go just for JPEG format, and we want to set
where we want to export this. Here we go. So I set my output size
or my output location, and all I need to do
is press render Image, and it will just take a
second to properly render it. But once that is done, I have got a folder over
here with images, so let me just pass the video. Here we go. And if I
just open this up. Oh, sorry, that's my fault. Make sure that you go down here and in the render cameras, turn on camera one and turn
off main camera because ls it will only try and
export the main camera. Here we go. So now
we have a nice, and this is 2560 by 2560. So what you can see is
this is what I mean, because I'm working
on a 1080 screen, I'm not able to see to be able to zoom in
and see the strength. But when I look at this, I can actually see confity that
there isn't as much noise. So when I look at this,
the noise isn't as bad. And that's basically
what I'm talking about. And this kind of stuff
is like, really nice. Yeah, all this stuff
is really good. We can even reduce
the sharpness. It is just something and over
here, we can reduce this. It's something that's very
important to keep in mind. When you're looking at this, we are looking at
it from a distance. But if we use our free camera, there's only so much
we can do to really get a close look. Like if I look up here
and let it render out, it is real and render.
It does look fine. So I hope that that
point comes across. So sometimes it's good
to just take an image. And for example, if I
look in this image, I can leave this over
to my other screen and I can know so we need to, for example, reduce
some of these things. So yeah, let's just already do a bit of
reducing in this chapter, and then we'll just continue
with the next chapter. So here we go in our sharpness. Let's set this to around 0.5, and let's set this
one to around 0.5. So we are reducing
the sharpness. The generic noise
that we have on top. Let's see where do we this
noise. So those are cracks. Oh, do we artists noise? Wait a minute. We
are doing this Wong. Yeah, we are doing this
one. Um, that was an arrow. I can't believe that
I only now saw it. Right now, what it
is doing is it is combining our entire normal map. With this noise, but it's
doing in the wrong way around because I believe, yeah, because this is
supposed to be ground. This is supposed to be
ground. And right now, I don't even know
what it's doing. Okay, it is adding
it to the ground, but it's ignoring our
actual big shape. So that's my fault.
That's something that I didn't realize. It means that in this
mask that we have. So here we have our stone mask. You guys might have already
figured this out long ago, but I only now am
really looking at it. I thought this noise
came from that we add like some generic noise
on top, but apparently not. So we have our stone mask. All we need to do is we
need to just throw in our this one over here, which is our breakup mask
and just said this to be, I believe, art yes, so
we said this is the art. There we go. That should
make a big difference. There we go, see that now looks a little bit nicer and softer. Now, it does mean
that I actually might need to end up adding
some extra noise, but we will see how that
goes in our next render. Okay, what's the next
thing when I look at this? For some reason, our scent
is being a real pain today. It is still not as nice
as I want it to be. Also, our stone's height is
a little bit too intense. Now, I can have a look
and I can, of course, just change the displacement
inside of marmoset, but we just had like
this height over here. We just had it nicely. So what I can instead do
is I might be able to just literally tone down the actual height
of this entire thing. So if I go in here, and I just want to do this
for the ones that are going into our height map because
I don't want to risk accidentally messing
up my base color. So I just another balancing
levels over here, and all I need to do
is if I look in this, just move my white side
down a little bit, that should push every single
stone a little bit down. Then if we go in
here, we do most likely need to just turn
on and off rate racing. In order for it to
register. Here we go. So that now should have a
slightly different height, which it does. Let's see. What else do we want to do. The nice thing also with this is imagine if you are sending a picture for feedback
to like a lead or senior artist or
just some friends. This is how they will look at the picture and how they
will give feedback on it. So I'm basically doing
the same thing over here. So if I see this, the blackness around our
stones over here, I don't really like,
so we probably need to fix our ambienoclusion
a little bit. And yes, the ground. The ground. Why? Because you can see it
just doesn't look like that. It just looks like one
massive plain color. And I'm not very happy
about that because it should look like a
little bit more decent, at least, if I look at
this kind of stuff. So let's see. I'm adding this. Do I just need to
change the tiling or just need to make
the other stuff like, way more intense?
It's a bit tricky. Let's make it Let's push it to an insane
level, both of them, just to make sure that we just make this like
really bright orange, just to make sure
that they do actually show up as we want. So if I do this, I can
go in here, here, see. So now they are really, really strong, and
now I can just go in. I can start by just
carefully toning this down, but I just don't want to tone
it down too much this time. So that is looking
Better, I think. Yeah. And now let's also
just tone down the white. A little bit more There we go. I'm going to leave it like
this because I want to close off this chapter because we are already
running over time. So in next chapter, we will fix our amen oclusion and we will just continue with polishing. This is simply something
that takes a while. So if you ever see
a substance artist that knows exactly what to do, immediately, good chances that he has already made the material beforehand and stuff like that. Because I personally
often like to spend 20% of my time literally
just polishing things up, 20, 30% of creating
the material. But we're very close
to finishing this, so let's continue
to the next one.
20. 19 Creating Our Base Color Part5: Okay, so let's continue. So I rendered out another image, and now we can have a look. So this is also very handy. So I have this
image, and now I can just flip to the next one. So this is after we've
done some of the feedback, and you can see, if you go a little bit closer.
So a few things. We probably want to get
a little bit more noise on our actual tarmac to make
it a little bit more grainy. Our scent is
definitely improving. Like, the whiteness bits are
a little bit too strong, but for the rest, the orange bits I can live with. Our height map is also
probably a little bit better. It's a bit difficult to
swap J back but yeah, you can see that our
heights like a little bit better, so
that's looking good. So let's get started
with the first one. First one, we want to create some noise on our actual
piece which is over here. So on this one, we just want to create
some generic noise. If we just go ahead
and all the blend. Okay, so generic noise, we need to have this noise
closely assembling something in the form of rocks or
something in that direction, but it can be so small that it doesn't need to have
an actual shape. How is Dirt four doing? No, dirt one. We might let's see dirt five. Okay, so we might be able to
do something with Dirt one. If we grab dirt one, let's make this a
little bit larger, maybe what we can
do is we can blend dirt one with a transform node, and the transform node
is also dirt one, but just like a
different position. Just change the position and set this to
be a Max Lighten. So we have a lot of these
small little bits of noise. If I throw that onto my
blend and I set this to be I think I'm just
going to go for an art. I'm going sets for an art, but at a very low level, let's have a look
at my over here. So let's see before, okay? Now if I just set
the art here, see, that might actually
work great to have maybe a little
bit stronger. Over here and don't
forget that you might sometimes just need
to turn on and off your rate racing in
order for this to work. If you go to our free
camera, Yeah, see here. So now we start to get
some extra noise in there. So that's looking pretty good. The next thing was that
I was going to reduce the whiteness in my ground. So here, let's just tone
that down a little bit. Okay, so I reduce the
whiteness in my ground. And yeah, actually, the
rest is pretty much fine. Maybe also just gets rid of some of the specs
a little bit more. Okay, so we reduce
the whiteness into our ground before or after I like to just keep
looking between the two. So that's all looking good. So we got that kind of
stuff, ready to go. Oh, yeah, the ambient clusion. We were going to fix
that. Most likely, if I click on my
ambien occlusion, you can probably see No, no, it's not that bad
around the stones. I was expecting, like, a lot of black lines
around the stones, but it doesn't look as bad. Now, if you just go ahead
and set the samples to 16, just to push them up to make the absolute highest quality. Okay, so maybe it's
just too intense. If I just tone this down, it's going to my camera one. The first thing I want to
do is literally I'm just going to turn off
my aminoclusion, just to see if that is
actually the problem. Okay, so it seems
like I'm not sure. Is that a problem? It's
going to our free camera. No, it might also be in
our render if we go for this mclusion. Well,
that's interesting. The stone just kind of like
stay black around there, but I don't believe that we have anything in our
base color that's causing black et shred stone. I mean, it could be that the brown dirt that we have
makes everything look darker, but I don't think so. If I turn this off, it looks like that might
be actually the case. Yeah, that might
actually be the case. We might just want to not
have this dirt as intense. But in that case, you need to think of
what do you rather want? Do you want to have the dirt
or do you rather want to have not that strong
lines around here? Then I would personally
rather have the dirt. I'm just going to turn on
my ambient inclusion map. And for the rest, let's just have a quick look
at this. Let's see. What else do we want
to fix with this? So we got these pieces. These dark stones, can I maybe get a few
more dark stones in this area because it feels
very empty right now. So let's see. I'm
adding those over here, and my stone generator
happens to mask out exactly these areas,
which is interesting. So if we just set our clouds, this is what happens
when you sometimes just set the same
clouds everywhere. They just tend to keep
going in the same area. So let's try
something like this. If we look at our norm Okay, so that might actually
work a bit better. So now we have those stones in some slightly
different locations. So now we do need to turn on Nova displacement
map, here we go. So I feel like that
looks a bit better. We have some of these
stones sitting in there? Maybe we can make the stones
a little bit darker even. Not too dark because then it will probably not
look very good anymore. But if we go over
here in our outputs, they are quite dark already. Okay, let's just make them
like a little bit darker. Just set the lightness
to 0.48 over here, just to push their darkness
a little bit more. But for the rest, I quite like the location, so that's
looking quite good. Let's see. Is there some cool rendering
start that we can do? You can try and art
a fog volume at a very far away level, and that will give you a
little bit of softness. So if you write an
art fog over here, and then you, let's
leave it to exponential. You set the color to the color that you want your
background to be. So it's going to be a bit of
a more darker bluish color. And then you just need
to set your distance to be a little bit further away. So let's set this to like 2000 to the point where it's only
just affecting your sphere. Let's set the color to be yeah, we can play around
with the color, su. Something that's a
bit more interesting. And then I like to just
tone down my distance. It's almost like
getting adept of field, but for your sphere. So I think I'm going to go
for like 1,500. There we go. For your lighting,
everything, it will just give a certain softness to it. It's a bit hard to explain. And it's also very subtle. I can probably now set like
my brightness over here a little bit higher. So here, if I turn
it off, you see it? It's very hard to see
because it's very subtle, but it actually does
add quite a bit. And also, this fork responds
based upon your light. So let's do 6.8. So that's why I'm just balancing out my
lighting a little bit more. And for example, this
lighting over here, I can just push the brightness a little bit more. So there we go. So we got something like
that. I quite like that. It is blue, but it gives more of like a greenish tint to
it, and I quite like that. That's looking quite nice. So we got those
three things done. For these second light, maybe also just set your
diameter up a little bit, which will give us
slightly softer shadows. Let's see. What else do we have? So we've done that stuff.
We've done our lights. So that's all looking fine. I can't remember that I'm
forgetting something, but I'm not exactly
sure what it is. We can, of course,
do a turntable. A turntables very easy. If you just select your sphere, right click and press
art turn table. What that will do is it
will just have a rotation. So if I would press
the play button now, you can see that it will rotate. And what you can do with
this, you can, of course, I tend to go for a length
that is what is it? Actually, FPS, 60 FPS. That's what I tend to do. Yes. And then I like to set my speed to like
0.2, for example. And now I play around with it, you get a much softer
rotation as you can see. So that's nice,
if you want to go ahead and render out
some turntables. I will do those at the very end. But I'm not yet one I'm cent sure that
this texture is done, I still want to do
some things to it. So first of all, let's boost
up my bloom a little bit. Here we go. Let's set
it to around 0.05, just to give it a
little bit more of like a glow around these areas.
So we've done that. Oh, yeah, I wanted to play
around with my dental field. So if we go into camera
one and go into focus, you over here have
a daptal field. So this datal field in spheres, I don't need a nearblur
so I can turn it off. But it's cool because I can
set a far blur over here, and then I can play around
my focal distance to sometimes get a very soft
blurry edge, but I need to be Careful because I don't want
to have it as overwhelming. I just want to have
it, like, very softly because what this
also does is it mediately also works with your glow bloom. Sorry, it works
with your bloom in order to give you an
even stronger glow. And it also brings more
focus to the center. So if I do I need
to be very soft, let's do 100. There we go. 100. You can see that we have the tiniest
bit of blur here, and it will just
bring more focus to our actual
material like this. So having this done,
at this point, make sure to save your scene, and I'm going to just render out another image over here and
just see how that looks. Okay, so let's have a look. So this was before. This
was our second update pass, and this is our
third update pass. So you can see, it
might seem subtle, but we are actually adding
quite a bit of detail in here. So it's starting to
look really nice. And if we zoom in,
here we get like these really nice
crisp looking rocks and everything that's
also looking good. So that's nice. Our noise, I'm happy with our noise now. The stronger cracks,
how are you doing? I got you in a few places, but I feel like I would like those a little
bit more blurrier, maybe in a few more places. The softness fate over here is actually working quite well. So I'm glad that didn't
give me any problems. Our scent is looking good. Maybe our tiniest pebbles, we want to make
them a little bit less strong in our height map. You know, FRs, we got some
nice lighting going on, so FRs is actually starting
to look really nice. So I will go ahead and
do those last things. And then what I will do is I will do something is off camera. I will have a closer look, and I don't like
to do this often, but at one point, you just need to
really be able to sit down and just have a
close look at your material. And I cannot really do that on the camera
because then you would literally hear me say for 10 minutes just
thinking out loud. So at this point, I was going to go
ahead and I was going to see These stones, I'm just going to tone
them down a little bit. Let's set these to 0.9. Actually, let's do
0.85. On all of them. So that will reduce
the intensity a little bit so that they are a
little bit less strong. We were going to go ahead
and add a little bit more of those larger cracks
that we have over here. So if we just tone up our pastes so that I can have a look and see
where they are, I need to go in this
mask over here. Where are you? Agtech pushes out a little bit more so that we have more of them like this. I want to blur them a little bit more so that they are
a little bit softer in terms of how
deep that they cut. Oh, sorry, that blur needs
to happen over here. And let's go for 0.3. And once that is done, I
can now go in and I can, tone down my opacity again so that they are not as intense anymore. There we go. Now we get these cuts a lot
more and a lot stronger. That's good. So
we've done that one. We've done the cuts.
It's also fine. I can't remember
I said something else, but I think at this point, what I should do is I
should simply just like, maybe play around a bit
more with the roughness, and then I will have look off
camera and just make sure that everything is
correct and else we will just close this chapf. So for example, over
here, what I see over here is that we have almost no dark stone. So here, let's push the
darkness of our stones a bit more to hopefully bring out a little bit more
of those highlights. And maybe tone down our dirt
a little bit. You'll see. So now we get a bit more of those highlights on
our stones over here. So that's also
looking quite nice. So yeah, I'm going
to save my scene, and I will render
out another picture, and I'm going to have a look. And in the next chapter,
we should be able to finish finish this material off, and then we can move on
to our next material, which will be a combination of Cebush and substance designer. So let's go ahead and
continue with that.
21. 20 Final Polish And Optimization: Okay, so I had a quick look, and we are super
close to the end. What I want to do
is, first of all, I want to just go ahead
and I want to add a little bit more contrast to my scene because I was
looking at these images. So this is our current scene, and you can see that they just feel like a little
bit more contrasty. I can see it even better on my four case screen,
which I have to decide. You guys cannot see it.
But based upon that, I can see that I
want to just push my contras bit because it gives me more focus on the material. So 1.006 probably to
get started with. Another thing that I wanted to do is, if we just
go to this one. I want to see if we can maybe a little bit more
difference in our sand, even if it's just like
normal map difference, just like some bumpiness
or anything like that. Okay, this is not the right one. Um, This is our
current one over here. So any bumpiness.
So here, I see, you can see the difference
between the contrast. So also maybe something that I want to do is go
into my fork and just, like, I really cannot
say that word. I'm really bad at saying the
word. I just call it mist. But yeah, basically, just make my background a
little bit darker. So we get now this glow. But because I make my
background darker, more of my eyes are being focused towards the
material again. So for the sand, a few ways
that we can try this out. The first way is that
I want to see if I can really push it up
against my stones. Now, I do not actually
want to do this into my height map
because I find that my height map is
correct now and I do not want to risk
breaking it or anything. Instead, we have this
normal combine here. I can just add another
normal combine on top, set this to be high quality. Then add a normal note
and set this to open Gel. So remember how we created
one of those, where are you? Here, I believe, the non uniform blur gray scales that
we can see over here. So what we can do with this is we can go ahead and
we can art and plant, plug in our non uniform
blur gray scale, and then plug in the
mask that we used on top and twin and set that
mask to be multiply. So when we do that,
we are masking out our stones and we
are only leaving the actual sand in between left. So if I plug this in here, I have now this no map, and I have full control, so I
can make this quite strong. I can make this
five, for example. Now, seeing this,
I actually feel like I'm scared to do this. But let's go in here and
let's set our intensity to 1.2. Okay, 1.25. I need to be very
careful because I always hate it at
the very end that I accidentally mess
up the height map just when I had it
looking correct. So that should do the trick. So now we have this normal
map sitting over here. And once we combine
this normal map, we get this effect. Now, it looks like that I need to play around a
little bit more with my masking in order to not
get these edges around here. But here, I said
it's like three. I guess you get the idea
that we can make the send look in our norm map as if that's really
pushing up against it. So if we go over here, I will go ahead and let's see what's the
best thing I can do? I'm just having to
think about how the best way for
me to get rid of these edges over here or to
basically level them out. That's basically what
I'm thinking about. Now, I'm tempted to
literally just add a color instead into
our black pieces, but I wonder if that
will look as good. So let's art a blend
and just give the twi. Add a uniform color at the top, over here, and then add this mask over
here at the bottom. Now if I just set
this lighter and just invert my mask, so
invert grayscale. I'm hoping that if I go
in here and just like, use this plaque, if
I give this, like, the tiniest bit of Don't worry, we are going to go in and
play around with our mask. So if we can hopefully
level this out, and then we have our invert
gray scale over here, if I just temporarily place this here and add a levels
because you are blurry. It's nice that it's
blurry because it means that I can
just play around with, for example, my middle slider, and I can push this to the
left in order to see if I can mask out some more
of these areas. Like this. It doesn't
need to look perfect. It just needs to look decent. So before, after. Okay, I think we
are getting close. So if I set this to five
in my intensity here. So you can kind of
see that now we don't have these rings
around our edges, but if I go before, after, you can definitely
see that there is something happening in here. So if I go over here, now, it might be a little bit
difficult to see at first, but if we go close up, you can see that the non maps, kind of pushing up against
it, which is quite good. So we got something
like that going on. That's great. Now the next thing I want to do is I might want to just go in and see if I can get some actual
height variation, but just in my sand. So if we go and we add
the sand on top of here, but if we just do a
pearling noise in between the black pieces over
here, that might work. We need to grab this
one and we need to add this only after this area. If we have this levels, let's add a blend on top. In this blend, I want
to basically just get something that has
a bit of height in it. So let's go for a clouds
one that we blur, for example. Here we
have a Clouds one. If we now go ahead and
just add a levels to that, we can push it out so we
get something like this. And I basically want
to, let's say, for now, already start pushing
this in here, and then we have these stones. Do I also have a stone
mask sitting on top? I should have.
Probably. There we go. Here's our stone mask. Throw that into the
bottom, and there we go. Now we have these clouds
below our stones. So if we set this
at I believe it's a Max Lighten Min darken. No, Max lighten and
then tone it way down. So that it's just like
this very subtle effect. Let's have a look
in my nome map. Now, this might
completely break it, so we'll see how strong
we can get here. But you can see that yeah, over there, it's like
breaking it a little bit. So we might need to, like, play around with this
mask a little bit more. But let's just actually
see how it looks. I'm just curious to see if I just turn on and off my
displacement. Here we go. And let's go to our free camera. Okay, so yeah, you can see like there's some
height happening, but I feel like
that it's pushing around my stones a
little bit too much. Now, we should be able
to just get rid of that with this very simple blur. And then this should be good. So if we just add a
quick blur between my espresd that we docket. So if I go into my no maps
so that I can see it here. So we can see these
edges around here. So if I now oh, no, t, we cannot see the edges. Like this, we can see the edges. And now if I blur this
carefully a little bit, it should give me a good effect, and if I then maybe even increase the intensity
a little bit more, hopefully that will give me
a nice height map effect. Here we go. We can turn our
rate racing on and off. Okay, so I made a
quick screenshot. So this was the first version, second version, third version, fourth version, and the
current one. There we go. S. We're already
starting to get there. So that is looking quite good. So we got that stuff going
on. We got the cracks. We now here see our scent
is now feeling a lot more organic and a lot more
wobbly and everything. So that's looking
quite good. Let's see. What else is there? Oh, sorry, I need to one thing I find in between here is I really like the
occlusion in here, and I think we kind
of lost some of that. So that's something
that if we go into our render and maybe in here, push this occlusion
strength back up and maybe also go
into our occlusion here, and we actually want
to increase that also. Here we go. Season now, we start to get a
little bit more of that occlusion sitting
in those areas. So that's looking pretty good. Yeah, the only thing
is that around these areas, things
are a little bit dark. I actually really like this
little chunk over here. It feels very organic,
that's quite cool. But I think for the rest, this is actually
looking really nice. So I would say that
at this point, I would now call
the material done. If there happens to be another polishing stage
after this chapter, then I change my mind. But for this point, I'm
going to call this one done. And what I want to do now
then is I want to move into, well, I will make one final
screenshot over here. And then I will go
ahead and I will move into doing the cleanup
in our graphs. So let's go ahead
and go in here. And at this point, I
just want to go down. And yeah, so four
K, that's fine. You can even go higher. But I'm not going to do that myself. I'm just going to
render one last image. And here we go. So here
is our final render. So here you can see that we
have just add a little bit of that extra occlusion in here and that is all
looking very nice. Yeah, I will later on render
out an even sharper image. Now, this render looks even better on the
fourcase screen. So if you're doing this
on the Fourcase screen, it will look really nice. It's just because of the
recording limitations, I need to be on a
ten ATP screen. But hey, you just need to
work with what you got. We have a clean
tarmac base color. What I can do here is
I can go ahead and I can select these ones. Actually, no, I probably
want to add these also. I think we're just
going to select this entire chunk over here.
Let's get rid of this. I'm going to just add a nice little shelf or
frame, I mean, shelf. That's Maya. Frame
and just call this. Broken tarmac base color. Yeah, you can nicely
organize this. This stuff can be broken
tarmac roughness. And this one we'll call
combo tarmac. There we go. Okay, so we got all
of this stuff done. Now what I will do
is I will show you some ways to clean this
up with your graph. Now, I already showed you
these ones here at the top. They are very basic,
but they are very handy to just make your
graph look cleaner, but it will not
actually make your graph look more optimized. And that's what I'm going to
focus on in this chapter. As you might have seen,
every single node has a milliseconds
attached to it. This means this millisecond is basically how long if we
would change something, will it take for this node to regenerate to
get to that level? Now, you can imagine that if we change something
at the very beginning, you have probably
already seen it, that it takes a while
for it to update. Remember how we switched
everything to, for example, four K and everything, I always takes a while
to update everything. You can actually reduce some of these milliseconds in
order to make them faster. Now, a few basic ways to do it. One is them to reuse mask. You have seen me trying
to do it over here. With these kind of things, this is one time that
I'm not doing it, but there is another technique. Let's say I have tried
to reuse the mask. I probably can do even more, but I don't want to change
my texture right now. Another thing is that not all of these notes need
this resolution. The higher resolution, the
higher your milliseconds. Now, this is a four K map for a plain color.
That's not needed. So as long as the four K map that is a plain color is not in the background because
it reads the resolution, it reads the resolution
based upon the background, but it is in the foreground,
you can reduce it. So what we can do with
the plain colors, we can literally set this
all the way to probably like 16 by 16. See? I'm just doing this
in my base parameters, and now the milliseconds
is a lot less. And setting this by
16 by 16 will make no difference because it gets
dded on top of our texture, this will still be four K.
If I would do it over here, if I would set this to 16 by 16, you can see that it literally lowers down everything, and
that's not what we want. So we just want to Io that. So for these pieces over here, we can just go ahead and
we can reduce those. Now, it is not very logical that it is giving
me a higher millisecond. That is wrong. I think
it's reading. It's wrong. So if I just delete
actually, no, if I delete this note
and take it back, see? That's more logical. So when you restart, it's just a little bug inside
of substance designer. When you actually restart
substance designer, you will understand that or you will see that it
is at the right one. So I like to go for 16 by
16 for everything myself. So these ones can, for example, be all 16 by 16. So that already saves us a few milliseconds,
which is nice. 16 by 16, stuff like that. Just keep an eye out
for these textures that stay at four K. Okay, what is another thing
that you can do? Ambienuclusion maps
have GPU optimization. On top of that, they
also have samples. The lower the samples,
the quicker it will be. Once again, I probably
need to delete it and redo it in order to redo it. But basically, a dirt node, it doesn't need as many samples in order to still be effective. So for that aminoclusion, we can simply go in here. Same here, and we can
set the samples to four and turn on
GPU optimization. That will clean that stuff up. Another thing, these
masks, for example. Now, this one, I need to leave
at four k because we are using this in colors and
colors need to be very sharp. Because if we have a
colors to be blurry, then our entire texture
will look blurry. However, this one is
a very sharp mask. Now, we throw it in here, which means that we most likely unfortunately need to leave
this at four k. Although what we can technically do is we can technically
set this down to let's say one k by one k, because it will not change much, and then in our blend, we can set our blend
back to four k by four k by upscaling it's
a bit more manual work, but what will happen here,
you can see the difference. Actually, no,
that's unfortunate. That is a way that
you can do it. It looks like that in
this specific technique, it probably would not be
worth the risk of doing that. But there are pieces
like over here, these kind of purlin noise, you can just go
ahead and set them to one k by one K, for example, because they simply a slow blur gray scale because a purlin noise is
already very blurry, it doesn't need that
type of resolution. This one is going into No, this one, we need to keep it at four K because they are
going into switches. These ones we need
to keep sharp, pretty much, so that's also. We cannot really
do much on that. Let's see. What do we have here? Also, a stone generator, we can probably do a
little bit of cleanup, although I'm not sure if I even want to
do that because I'm always a bit scared that
it will break renting. So let's see what is
it doing over here? Okay, so it's just
adding a mask. Once again, like
these type of things, I do not really want to
change because we are often just already
integrating them too much. Yeah, the most thing
that I tend to do is I tend to go mostly
for this kind of stuff. Where here we have
the slope grayscale, and I can just like in
a Pearlie reduce the. So I mostly go for
those kind of maps. Now in the base colors, unfortunately, we
cannot do too much. Like this one, we
can probably get away which is also setting
to one K by one K, see? So that one we can
get away with. This one we probably
cannot get away with. No, because this is
an actual ground so that needs to stay sharp. This parlise we can
probably get away with a one K by one K here, so that is also being reduced. This one adds slow blurs. Because it's a purlois we can
probably get away with it. See? Yeah. Okay, so if it would
be any other map, we cannot get away
with it, but because the pearl noise is
already blurry, we can. Like, for example,
this moisture noise, we cannot lower it. If we lower this moisture
noise, it will not work. These pearl noises, let's
set those to one K, and the directional warps, we can also set to one K. So we can already produce
quite a few things. Over here, we have white. This can just be 16 by 16 because it's like
a uniform color. So we can fix that.
And slowly like that, you can make your graph
a lot faster while it should still look
exactly the same. See here, it will still
look exactly the same. So yeah, I would recommend
just go over this. Sometimes, if you are making
these graphs, for example, in a studio, you need to find ways to literally
avoid entire maps. Like the dirt mask
is very expensive. It's 280 milliseconds. That's more than most of all
of these nodes combined. So it is very expensive, but in those kind of cases, you would then, for
example, just try and find different
ways to do this. Like this kind of
dirt, technically, what you can also do is you can generate an
ambient inclusion, invert it, throw on like a grunge map or something like that in order to
create the same effect. That's something that
you will learn when you are actually working
inside a studio. Before that, I would say, get good first at making materials and while still keeping optimization,
of course, in mind. But optimization is not your main focus when
you're learning substance. It will be mostly actually understanding the
program and everything. So that is pretty much
it for optimization, and I will stop talking now. So that was our advanced
substance material. Now what we will do in
the next chapter or in the next part is we will go over on how to actually
sculpt the material inside of sorry
inside of sbh and then how to finalize it
using substance designer. So substance designer
is definitely a tool that keeps coming back nonstop. But this material, it
might look like a lot, but I think we've done a
really good job with it. And although we had some
hiccups along the way, I think we end up with a
really nice looking material. So let's go ahead
and continue into our next part of this
tutorial course.
22. 20 Zbrush Setup And Going Over Our Reference: Okay, welcome to
the Z brush part of this tutorial course. So this will be the material
that will be partly sculpted and partly using
substance designer. So this is another
technique that's often used within
environment art. Now, it kind of depends
on the company. Like some companies like
the ones I worked for, we did a playground
game so we did like 40% in Z brush in
the rest in substance. And for example, on the
division two at Ubisoft, we did like 95% in
substance only. So but this technique
is being used. There are companies that
do this technique like 100% or not 100% of Z brush, but they do basically
all the base sculpting inside of C brush, and not very often actually do the fill material
inside of substance. So my audio might be slightly different because my microphone
is slightly further away, but we are going to get
started with this material. It's actually not going
to be too difficult, so it's just a cobblestone
material, fairly basic. So we are going to start by just like sculpting a few
different cobblestones, and I'm going to show you how to place them in a tiable manner. And yeah, so it
will be quite easy. Stuff like what I like to do is I like to do big shapes
inside of Zebras. So what I'm talking about is I will do the sculpting
for the stones. I will give them a
little bit of noise, but I will not give them very detailed noise and everything. The reason for this is
because I feel like I have a lot more control on that
inside of substance designer, personally. Same for the ground. Like, I will do the ground, but I will not do the
actual noise in the ground. This will also save me, with the rendering because
you need much higher hi polis like to keep
all the micronise intact. So that will also just save a little bit of memory
space in my PC. And what I will also do
is like a little extra is I will actually have some of these weeds
that you can see here, like the little grass
bits and everything. However, I will do those in
a tree D modeling program. The technique is so
absolutely basic. It's literally just placing, so it doesn't matter
what program you use. I think I'm going to
use Maya for this. But yeah, honestly,
it doesn't matter. And we will be using I'll
show you a few techniques. Like we will be using
mega scans for this. However, I will also show you some techniques if you
don't have mega scans. So that's the general
plan of this. So what I want to do is I
want to now, first of all, just go into ZRH and
show you a few things. So here we are in ZBRH. What we will discuss in this
chapter is simply the setup. So as you can see, I have a custom UI. I've had this UI for many years. I believe I don't think I've
made most of it myself. I believe I got it somewhere online or
something like that. It used to be even
more in depth, but I honestly can't remember. What I will do is I will
include this UI for you guys. You can find it in
your SAS folder, Z brush material, and UY. And I'm going to you then just need to go into
preferences and just press load UI and then
you can load this basically. So this tutoral I think it can be used for both beginners all
the way up to, like, well, advanced people will probably
find the sculpting part a little bit boring inside of ZBrush because the sculpting
is fairly easy for this. There's nothing
special going on here. But yeah, so beginners should
be able to follow this. So I will just keep
it fairly basic, but still show you some key techniques
that we need to do. So within this UI, a few
important things that I have is, I have a few brushes over here. Now, what I'm going to do at
this point is I'm already going to just create
a very basic sphere. So I'm just going to
click on the sphere. And once you click over
here on the sphere, you can click and
drag. To have it in. Once you drag in one,
do not click again. First of all, press
Edit up here. You always need to
do this because else it will drag in
multiple objects. The only reason I'm creating this sphere so that I can
show you my actual UY. So I have a few
brushes over here. You can also find
these down here. Here you can find every
single brush, of course. Now I will not go over
the actual UY of C brush, so I do hope that you
know the basics of that, and else just go to YouTube and find a very basic tutorial. So the brushes
have over here for this I will most likely
only use the trim dynamic, smooth move, and maybe clay build up. You can see
most of them here. Clay buildup, you can see
here, move, trim dynamic. The smooth brush is
literally holding shift, and then it switches to smooth. So I will tell you
this a few more times. So yeah, the clay, if I just go and press make
Polmsh three E, I need to do that in order
to unlock all the settings. And basically, if I go, let's go to geometry
let's subdivide. You don't need to focus on
this. I will show you later. So the clay buildup, you'll basically just
add some extra clay or some extra geometry on top. The move just allows you to
move based upon your brush. The trim dynamic allows
you if I do like, if I do like this clay buildup, and I'm now going to switch
over to my drawing tablet, the trim dynamic basically
allows you to create these quite still soft but
still flat areas around. So that's something that
you also see me using. And for the rest, yeah, so the smooth, if you all shift, you can smooth out your mesh, and that is about it
that I'm going to use. Now, one thing that I always also like to
use is over here, you have your orientation. I have it in my UY, but you
can find this in Oh, God. It's been a long time
since it is up here. It is called orientation, but to be very honest, I just need to quickly check where this one is
actually located. It is most likely
located around, like your stroke or stencil, no texture, no transform. You would think that
it would be in here. I'm just going to have a
quick check where it was again. Okay, I found it. So it is in picker
and orientation. So here you can see
the same buttons. So yeah that's the
annoying thing when you have your own UY. After a while you just forget where the other buttons are. So basically what
orientation does. Count Auri just does
the same behavior. Once Auri gives me a much sharper effect, as
you can see over here. So it just change
the orientation. And then you have this pencil, and this pencil basically
allows you to set a angle. So what I can do is
here, if I draw, I can literally set the angle from which I'm
drawing even though I'm looking at one
specific area. So that's basically the only
ones that I use for that. Let's see. What else do we have? So yeah, I have some of
these buttons up here. However, I have on
my draw tablet. You can probably see the pop up. I have this little rotate button which I can use to
scale my brush. So I will just be using
my drawing tablet to scale my brush up and down. But you can also always just go to your brush
size up here and just change it or
you can right click, and in here, you can also
change the draw size. So there are many
ways to do this. I would say that
that is about it. Now you can change
your material, but I will show you
all this stuff. So that is it for my UY. It has nothing special, has a few brushes, and now we are ready to get started with our actual texture. So we will get started
by just creating two or three variations of
our actual cobblestone. So let's go ahead and
continue with that.
23. 21 Creating Our Single Cobblestone Part1: Okay, so we will now be
sculpting our cobblestone. So a few take weights, if we look at our reference. One thing that we want to
do is we want to make sure, so we are going to create probably three
different variations. What I'm going to
make is I'm going to make one that is very
generic looking, one that is more
rectangular looking. And one that is like, it's a
little bit more beaten up, so there's like some
interesting corners. A few things to keep in mind. You might be tempted
with the trim dynamic to make your edges super
smooth everywhere. But then you just end
up with like a clump, and it's not very realistic. If you look at these bricks, the edges are actually
often very sharp. The only places
where they are very smooth is on the corners,
as you can see over here. This is where they really
start to smooth out. So keep that in mind that
you do not go overboard. Also, do not make too many
very specific details. These details, because we are
going to reuse our cubes, reuse our stones
over and over and over again to populate
an entire area, you will be able to see those very specific
details repeating. So instead, keep it
very generic at first, and then what we're going to do is later on once we've
placed all of our stones, then we will go in
and in some stones, we will add some more
specific details. So I would say, let's
just dive right in, and we are just going
to get started with our very first stone over here. So here we are inside of a
clean version of Cebush again. Now, the first thing I
need to do I need to set my document to be a
square because remember, texts are square, and we are going to use that to our
advantage inside of sebush. So we want to go to document,
and then down here, you want to turn off P, and
you want to set this to 2048. Oh, it's closed
down 2048 by 2048. And then you just
want to go ahead and you want to press resize. Now, this will make
scene very large. This is because we are going
for a larger resolution. The resolution itself
doesn't really matter. It matters more
that it's square. But what we need to do is we need to go back into Document, go down to Zoom
and just zoom this out until we can see the
entire square again. Once you're here,
you can also go to this range button and
just tone this down. This will basically just
make sure that the gradient isn't as intense and then it's just a
personal preference. So we have this square
document, we are ready to go. Now what we need to do
is we need to go into Tool and click on Cube three D. So when you click on that,
you can now drag it in here. And then you can
simply press edit. There we go. We have
very simple cube. I'm just moving my
mouse around like this. If you hold Shift,
I'm using shift for the snapping and I'm basically just holding old and mouse clicked
for the bending. That's about it. Don't worry. I will not go over
the very basics. I just wanted to especially just tell you the snapping because we will use the
snapping very often. If you hold Shift and click, you are able to snap
to whatever angle is closest in that regard. So having our cube here, what I'm going to do is
I'm going to make it a polymsh tues that I can
properly edit my cube. And now that this is done, I'm going to go ahead and
I'm probably going to get started by just
adding some geometry. I like to always set my material to be the basic material, so that is gray. I
prefer it that way. But right now, if you go to
the ply frame over here, you can see that the Y frame is very messy. This
is not going to work. So what I'm going to do is I'm going to go into Jome tree, and I'm going to redo the entire wireframe using
something called dynamsh. It's a very handy tool
in order to basically, I'll show you go to dynamesh, and you want to go ahead
and just press Dynamesh. So what you can see is what
it did is it basically just remapped all of the jometr and made it all perfectly
even quads. And that is very good. The higher resolution
you set here, the higher density
your geometry will be. So, the more polish you'll have. In the beginning, we
are going to stick with a fairly low resolution,
I would say. So we are now at 98,000. I am actually going
to go up to around 400,000 simply by going into Jon tree and
pressing divide. And basically, the goal
is that if we click our trim dynamic and we scale
up our brush a little bit, we should be able to make
nice edges like this. See? I'm now doing
this over the top. But basically, this is what we are going to use
the trim dynamic for to basically make these
edges very nice and smooth. So I'm going to Uo that. And I'm just going to get
started with the base. What I mean with the vari
base is I'm just going to get start by just breaking up all of these edges a little bit. Now, inside of Sebas, there will be some
time consuming bits that I will just go ahead and, like, later on time labs. So I will do one brick completely in real time
and the other two, because it's the exact same
process, I will not do that, but I'm going to now get started by just basically
drawing over my edges, and sometimes I go draw
sideways and other times I go with the actual
direction of the edge. So now I'm going with the
direction of the edge, and then sometimes I
like to go sideways. What this will do is
it will just give us a very slight
indentation over here. Don't do too over the top, because remember what I said, we cannot go for iconic details. And what I'm going
to do is after this, I'm going to work
on the corners to make them look a lot
more interesting. But for now, it is very simple. We are just going to basically sculpt a cobblestone like this. And it's just going
to still be like a very basic square
that's no problem. The nice thing about stones that they are often
manufactured, so they often have
the same dimensions. And then later on we are
going to just make this look a lot more
interesting, of course. So we now have like here. We now have basically I
think I've done all of them. Yeah. If you press F, you can zoom in
because I feel like I think my pivot point
is Oh, it is in center. So it just felt like
the rotation in that it was rotating more on the
corner than anything else. But okay, so we
have these pieces. Now, remember how we are going to preview our
texture from the top. So if, for example, click on this top and hold
Shift and click, this is basically how
you will see your brick. And now you can imagine, we are going to reuse this brick,
but we have a lot of side. So we can use this side.
We can use this side, we can use this side, this side, and then
the two top side. So we immediately have six different bricks
based upon this. So I'm going to get started. Let's say that we
start for this side. What I want to do is I
want to go ahead and make this corner
quite a bit smoother. So I'm going to
basically start from the top and I'm going to make this corner
the way that I want it. And here, I said, I wanted
to have this round. So I'm just basically
drawing my cursor on top of this so that when
I look at it from the top, Okay, so this is like
the roundness I want. Once I've got the roundness
I want, then of course, I do need to softly
fade this out. So I'm basically going to nicely fade out this roundness to make it look
more interesting. But what you can see
is that I on purpose, am not going to give
this roundness on here. This is all in
terms of variation. If I make this roundness, I will have a cool side
that looks like this. However, if I look
from the other side, it will still be
looking fairly square, and I can make it
a little bit round because it makes sense to
have it a little bit round. But it's nice that it doesn't
have the same roundness. So this one is
still quite intact, but this one is more damaged. Also remember that when
you look from this side, you will have this
softer side over here. So we have this roundness. Now, if I go ahead and
look at my reference, most of these corners are
actually quite a bit round. So I'm going to go for like a bit more roundness over here. See you like that. Let's
leave this one. Quite intact. So just give like a tiny bit of roundness and then over here, I'm going to probably give
this one like a little bit more like a sharp fall off,
like you can see over here. So it is more like a bevel, rather than like a RC. So it's more like a bevel rather than a nice soft roundness, because I often see that also. I am looking at my reference, but it's really annoying
when I'm working with my drawing tablet
to needing to drag my reference over to this side because
then I need to keep switching between my mouse
and my drawing tablet. So just follow along and just keep looking at your
reference how everything looks. So we will have this
sharp bit over here. So this already
looks quite nice. Now, of course, the corners over here are still
quite boring, but that's something that
we can also work on. Like, I can already give them, like, a little bit
of, like, damage. And what I want to
do is these rocks are quite soft on the top. What I mean, with that, they
don't really have, like, a harsh transition angle, like you can sometimes
see over here. Like, see, this transition angle when I look at my reference, it actually has a
much softer fall off. So I just go over
these transition angles and just make
them a little bit softer to make sure that we are inside once we
are going to bake this, it will look nice and soft. So that's basically
the general idea. Now you just go over to different sides
and you just like, give it some variation. So over here, I can
say like, Okay, I want to have this one to
be like a little bit softer, and then it just continues
on into straight. We already have some
straightness going on over here, and we already have some
softness going on over here. Maybe give it a little bit of, like, a dent in this area, like you can see
like that so that you can often see that
it's on the edge. It's like this type of dents. But it's on the very edge of how far I want to
go with my damage. And I also understand that
when I look at this version, I know that I cannot use
this version as much as that I could use this
version, for example. Sorry. I forgot which one.
There is a version here. So it's just something that
we need to pay attention to. This one is very
straight. I think that's actually quite nice. So we can have it like, Okay, some of the bricks are
just not that worn down, maybe because people just haven't dwelled on
them too often. So this one, I'm
just going to fix those really sharp
edges here at the side. Just by drying
over them a little bit, you can see it like that. So let's say this side is fine. This side is so we got
some roundness over there. Actually, I also want to continue this roundness
a bit over here. I just feel like
it makes sense if the roundness would come
from different areas. Yeah. So we have the
roundness over here, and then over here we have
already some damage anyway. So what we can do is okay, so the roundness trying
get rid of dose edges. So nice, and then it
just starts to break. This one is just very damaged. This one has, like, a
little bit of damage, and then it just kind
of, like, falls off. Et's get rid of these
sharp edges on these two. You can see over here. So we'll get rid of these sharp
edges over here also. Just make this a little
bit more softer. Hey, I really need to keep in mind because I'm the type of person that always accidentally
arts too much damage. So I need to keep in mind that
I need to keep this clean. So this is like almost
a perfect version. This one is, like, worn off it. Whoa, worn off it, one side. This one it's fairly perfect, but it still has some
damage going on. Here we go. That's looking good. And now the top side, I think, all we need to do
is just, like, add some sharp edges or
remove some sharp edges. So, actually, the sculpting of this stuff, it's super easy. It's like there's
not much to it. It just takes a little
bit of practice, but even for beginners inside of Cebush it's literally just
moving your mouse around. So just have a play
around with it and just be a little bit careful when you're
doing the sculpting. Don't just go overboard. That's basically the
general takeaway. So let's say we got
something like this. Okay. Now, the next thing that I want to do is I
just want to give, like, a little bit of using my move tool a little
bit of variation. So I'm using my
moveTol over here, and I'm just going to basically sometimes push some edges
in to get started with. And this will just
give our stone a little bit of like
an organic feel because it feels less perfect. And what you can also
do with this is you can move some edges around a bit to make it
feel like the stone is not the same thickness
on every single side. So it is because of all the cars that
have driven over it, or people that have
walked over it, the rain, the weathering, all that kind
of stuff takes into account how perfect your stone would be. So I'm basically doing that. But this is going to be
my most generic stone, so I want to be very careful
not to overdo it, basically. I can overdo it later on
once I've placed them. Then I'm going to make
my move to a very large, and I'm going to basically
go into the centers, and I'm going to try and, like, move this up
to give me, like, the typical cobblestone look
that you can see here, see. So you can see that
these cobblestones, they always have a little bit of they're not perfectly flat. They always have a little bit of height to them,
mostly in the center. So that's basically
what I'm doing here. Maybe make my brise a
little bit smaller, but you do need to
look at it from a little bit of an angle
in order to properly move it in the
correct direction. But I'm basically
just trying to, like, give it a little bit of, like, movement like this and maybe like a little bit
like this over here. Okay, let's see. So if
we go from this side, now what I do is I
just look at the sides basically to make sure that
everything looks interesting. Like, this side is
still perfectly flat, so I probably forgot it. And also you move tool. You don't have to do it's
always exactly in the center. You can always just move it a little bit to,
like, the side. Yeah. So like this one, just, see this cob so now it
doesn't feel as perfect. And that's great. That's
exactly what I'm looking for. So we got this stuff over here, maybe a little bit
more movement up here and maybe a bit
more here the corner. But basically, we
now got something that looks fairly interesting. So what I'm going to do
now is I'm just going to add some very basic
noise to this. And the way that we
are going to do is we are going to use
Alphas basically. Now, these Alphas, you can
find a lot of free Alphas, but also Bt ones on
Cg marketplaces. This can be flipnrmals.com. This can be ArtStation
Marketplace Gum Road. There are a few more ones
that are also in there. So basically, what I like to
do is I just go to, like, for example, station
because I happen to know that there is a
free rock Alpha on here. Just go to Marketplace
and just type in, like, I just tend to go for Alpha because rock Alpha is
sometimes a bit too specific, and then just click on free. So the one we are going
to use if we Wow. It doesn't happen often
that tation is a bit slow. The one that we are going to
use is there is something. There is a user in here, so I just tend to, scroll
down and have a look. It's always nice to just
discover new stuff like this. But yeah, there should
be one over here, which is called Rock off
or something like that. Here, you have some free crack Alphas also sitting in here. So there is some
interesting stuff, and I realize that
while I'm talking, I'm not actually paying
that much attention to looking for my APAs. So basically the ones
that we want to get, I'm just going to go up here
and go to, like, my library. So because I already
downloaded it, oh, I'm in the Wong account. Sorry. Okay, I found it. So if you simply go and I end up typing in oh,
sorry, wrong one. I end up typing in Rock Alpha, and it's this one
by Alpha House, and it's a 50 Rock Alpha. That's what it's called.
So this one is quite nice. Now, I cannot include
this into my joy, of course, because I
didn't create this. But you can use it for both personal and commercial
use, so that's very nice. Although if you want to support them, they are free alpha. So I would recommend
just buying it. So I will do that, but I'm not going to give him my payment information
during a tutorial. So for now, let's just
artist to library, and you just basically
artist to the library, and then it would
just end up in here, and then you can just go
ahead and press Download. So that's basically
how it would work. I'm sure that many of you
would know how it works. But basically, those are the alphas that
I'm going to use. And if I just go
ahead and go in here, I will just I will not
have them in my project, but I will place them here, or well, I already
have them placed here. And you just end up with
basically these kind of Alphas. So these Alpha maps, they are quite popular inside of brush. They are basically height maps. If you follow the Z brush parts, they are just height
maps, basically. And we can use them in our case, just for some generic noise. So if I go in here, I simply want to
go, for example, to my clay brush, in this
case, and the disappear. So here we have my clay brush. I then go to Alpha
and press Import. When you do that,
you can navigate to your folder and you can
just grab the Alphas. Now, many of these will
most likely be too noisy, but I know I'm looking for
pieces with sharp details. You can just select everything and load it in and try it out, but I'm personally just to
not make it as confusing. I'm going to only
grab a few of them that have some nice
sharp details in them. And you can see it
based upon the height. You can see when there are
some sharp details in here. Like this stuff,
this is very sharp. So that's the kind of
stuff that I want to try. I just hold Control and
just add them in here, and then they will
all be loaded in. So the way that this
works in our case, is going to be that
we need to go to the stroke and set
a stroke from dots, which is normal drawing
to drag rectangle. What Drag rectangle
allows us to do is it allows you to grab,
for example, Apha, set your intensity all
the way up, for example, and then if you click and drag, it will basically
drag in this Alpha, see, as you can see over here. Now, there's a few things
we need to set up. Right now, if I, for example,
Gina, what this one. That one might be
a bit too strong. Let's say you just look
and I will also do that, I will very quickly
just check and see which one feels a
little bit of nice. This one is quite nice. It just needs to be
some generic details just to make it look a
bit more interesting. We can, for example, swap between number 20,
and what was it? Number 30 20 and 32
might be interesting. Actually, most of these
actually are quite nice. I don't want stuff
with too much noise, this stuff is not as useful
for what I need or that one. So we are going to go for number 2032 and 16. So keep those in mind. Now, what happens now? When I drag, what you
can see is that there is a problem because it is literally breaking
my entire model. This is because we
are dragging it so large that it will actually
affect the rest of the model. In order to fix this,
it's very easy. All you need to do
is you need to go ahead and go to your brush. And then go down to outomsking and simply turn on
back face mask. And what that does is
now when you drag it in, it will just ignore the back. So knowing that, I'm going to how you
another cool technique, and this technique
it's called layers. It's a little bit more non
destructive, basically. So almost like inside of substance that you can
turn stuff on and off. So I just I don't need dynamis anymore,
so I can turn it off. If I go and I want to go basically to my layers
over here, now, when you press this big button, what it will do is basically
as soon as you press it, it will record whatever
function you do. So if I drag something
in here like this, and I then go, for example, to this one or actually,
let's say this one. And I can drag and I can rotate to make it look
more interesting. I can then go, for
example, okay, number 32. Let's d that one over here. I need to be a little
bit careful because it looks like that it's Alright, okay, so it's affecting
it a little bit, so we do need to keep that
in mind, but don't worry. So sorry about that. Let's redo. There we go. So okay, let's not redo. So we got those. Try it out and just don't
go too far with it. So we got, one over here. Maybe, have another
one over here. And I just need to
be careful that I don't go too
overboard, basically. And then I'm going to go for,
like, number 36 and give it a little bit more variation
over here. Over here. So yeah, they will
always like overlap even with our rectangle. So we now have this stone, and now it's like these
interesting pieces. Now, what you can
do is you can press this button over here for
record and turn it off. So now you are no longer
recording any settings. Now, if you want to drag
something, it will say, Hey, you are not in a layer, you need to press record. But the cool thing is one,
I can turn it on and off. But another thing is
that I can actually use the slider to
reduce the amounts. And that's very nice
because I can just carefully choose how much of this I want to
actually have in here. So I can say, like, Okay, I
want to only have around 0.7, and that's already enough to make my stone look a
bit more interesting. And this is just like
the help substance later on for some of these
more stronger bits. We are going to create
micronoise inside of substance because
yeah, with that, my PC personally
isn't strong enough to by the time that
I'm placing this, we will probably have
like 50 million polis. If I had to have perfect
micronise on top of this, I would be reaching 100 million
or something like that. And in my case, it wouldn't really
work, especially not for the baking technique
that I want to use. So this is, like, better. So it is still, it is here. It is not the highest
resolution, but it will work. So what I like to do then is I like to add another
layer like this, so now it's recording
another layer. And then I like to
go to Trim dynamic. And in my Alpha, I like to set this Alpha to be
a square this time. So the square alpha
will basically give us a little bit
of a sharp falloff. We didn't need it on a corners, but if we set this square Alpha, I can probably show
you like here, you can see the squares, you can see that there's a
little bit of a sharp falloff. Now, if you set your
focus shift even sharper, the fff will be even more. You can see like now I have
quite a sharp falloff. Once I've done that, I
simply want to go in here, and I want to basically
paint on top of my Alpha details that I have. And I basically just want
to paint out some of this very soft
noise and just try and capture some of
the larger details so that we get something
in this direction. See? So we keep those
larger details in here. But I'm just like softening
out some of this noise. This is just like a
little preference. I'm used to doing this on rocks, and I consider this to
be a little bit of rock. But as a bonus, over here where we had,
like, some overlap, this overlap happens
because we are drawing everything on a cube
and not so much on a plane. We can actually just
draw out that overlap, which will clean up our scene and make everything
look a lot cleaner. So at this point, we
can simply go in. Wow, my, my wedding
sculpting for 25 minutes. You often lose track of
time inside of Sabah. So I simply go in and, if I ever have these arrows, I just go and I just, like, clean them up and
here I get, like, these nice interesting
details sometimes. And those are the
ones that I want to capture. So I'm just
cleaning this up. Also, if you have
the black pixels, sometimes just try and
hold shift and soften it. The black pixels basically
means that there's like geometry that is
accidentally overlapping. So what I tend to do then is I tend to first of
all, just like, clean up my area over here like this
one is especially bad, and then just hold
shift and then just very carefully just don't
smooth it out too much, but just smooth out some of these edition that will get
rid of those black pixels. Technically, those black pixels, once we're done
with all of this, they do not make too
big of a difference. So like, it won't
break your texture, so don't worry if you
like, miss a few. But it's still good
to just do that. And also, keep in mind, like, try to keep your texture still sharp because this
Alpha technique has probably made my corners, like, a little bit less sharp, but we will do,
like, a check on it. This is why I'm using my
layers that I can, like, turn it on and off and
play around with things. But yeah, for now, I'm
just focusing on like here, this is a great one. This is a great one
where I can just, like, have some flat areas where
I can just very quickly. I'm not putting a lot
of tart into this. I'm just like very quickly. Whenever I see a flat area, I just try to, like, kind of
flatten it out even more. You know, like, this one is a little bit more tricky,
but that's fine. It just gives us more variation. And by the time that we have our base color and everything on it, these variations will be
quite hard to even see. So I'm exaggerating them
a little bit so that because I know that
I will probably lose part of these
variations again, especially once I need to optimize this even more
in order to place it. So we are actually going to
optimize this even more, but don't worry about that because we'll
use something that's called dynamesh that will still keep all of these noises intact. Sorry, decimation
master, it's called. So here, that kind of
stuff is pretty good. Now we can look at
it from the side and here you can see that this
sites quite interesting. This site is quite interesting, but it can use a bit more. See here, it can use a
little bit more noise, and also just double
check your corners. This side is quite interesting. It just has a little bit
more of that stuff going on. Over here, let's shift
to soften this out. So if this chapter is
a little bit long, but we're almost done
with our first tone, and then in the next chapter,
I can just kick in the time laps and I can just make two variations
of this basically. So here we go. And yeah, the time lops, I will
not narrate over it because it's too
basic for that. But I will show you some
techniques before we end this course that I might
cover in those stones. But all the techniques
are still the same. So now I'm just going to go in double check my corners to make sure that I do not accidentally have
broken them too much. Sometimes it's better
to just soften the corners instead of using your trim dynamic because
trim dynamic will cut away from them a little
bit. But there we go. So we now got this interesting looking cobblestone ready to go, and it just has some
exaggerated details. At this point, you can,
like, for example, turn this off, and here you can, again, see, I can just use my slider in order to
make this more or less. So that's looking quite good. So at this point, I think it's good if I actually save my scene. So
let's press Save as. And I want to go
ahead and I want to save this in source file, save Cebush material,
and I will just call this cobble Stone nscore single. So that is the one if you want to open it, how it
will be called. Okay, so a few things before I leave that you will
probably see me doing in the next chapter, you will most likely
see me going into Subto pressing duplicate in order to duplicate
my cobblestone, so I would most
likely duplicate it, and then I can even move it. And it's just like a
duplication, very basic. And what you will most
likely see me doing is going into layers
and press Big A. Once you press Big
into your layers, you can no longer edit them. So the layers just collapse, but this is sometimes
needed if you want to do specific functions or if you
want to finalize your model. That's it. For us, all the
techniques are the same. We are going to now create another variation
that's going to be a little bit more damaged and a variation that's going to be a little bit
more rectangular. So let's go ahead and continue with that in the next chapter.
24. 22 Creating Our Single Cobblestone Part2 Timelapse: And H.
25. 23 Placing Our Cobblestone Part1: Okay, so we got our
stone variations. As you can see, our original. Now, this one, I just went
for a more damaged version. But yeah, I did try
to get rid of some of these really strong details
because else we would be able to maybe recognize them. And I
didn't we like that. Oh, I have no idea what that is. So a cool thing now that
you have multiple pieces. If you go ahead and
press Alt and click, you can select your
mesh basically. Here, I have my
cobblestones here. Yeah, here, Alt
clicking means that you select them just
to make it a bit easy. Another thing is, I
also went for this one, and with this one, I
did just duplicate it, but I just completely got rid of all of the
details and then just redone those things just to make sure that they look nice. So we got something like this. This one we will
not use that often, so I'm not too
worried about that. So we got now these pieces. Now the next thing that I'm
going to do, at this point, I will definitely just want to save it. See brush. Thank you. I definitely want to save
it because we do need to do some optimizations
at this point, because right now we
are hitting around 400,000 polis per stone. But as I said before, those
are going to become a lot of polis when we have 100 stones or 50 stones or
something like that. So let's just go ahead and
get start with this one. Basically, the way that I
tend to optimize this is I tend to use something that
is called decimation master. Now, if you go up here
to C plugins and you can use this little round button to click and drag
this over here, here we go, decimation master. If you just click on it, decimation master is
actually really cool. So it will basically twine
and optimize your geometry, but it will tie and keep all of these details still intact. And so we can actually
optimize it quite a bit without actually seeing any
of the details disappear. So what you want to do
is you just want to go ahead and press
preprocess current. And when you do that, it
will just go ahead and it will go through the entire
thing. There we go. And then down here, it will say how much you
want to optimize. If you say 20%, it means that it will leave 20% left of the current
geometry count. So I'm going to go for this
because I need to be careful. Let's go, let's say 50%. I press decimate current, and now what you can see is
almost nothing has changed. But if I go into my geometry, the geometry has become
a lot more messy. Now we are now at 200,000. 200,000 I think I can live with. If I go anymore, I feel like I will lose the details
that I want to keep. Now that I know that I
can just go, for example, to this one, preprocess current. It will go through the cycle, and then we can
just go ahead and press decimate curve
at the same value. So now all of them will end
up with around 200,000. And this is why I just wanted
to go ahead and, like, save my scene before because we are going to
split the scene into its own bit because just in
case we break something, it's better to just split it up. I don't know why this one
is taking so long for me to simply compute. That's a bit
interesting. Here we go. I don't know why
that took so long. It actually took about a minute. If you ever have that problem, you can also press Escape and escape will basically
cancel the function, then you can try again or if you feel
like something is wrong. So yeah, there we go.
As you can see, now, you can see if you
go very close, you can see some of these faces. So you can start to see the
jom tree, but do not worry. Seabis does not show
smoothing groups. However, when we
start baking it, it will actually just
show the smooth group. So this will all be shaded smooth. I hope you
know what that means. It just means that right now
the eggs are really harsh, but we will give them
like a soft look. So don't worry about
it. It will be fine. Even if it is a problem, we can always go into
substance and add stuff to it. So we got these pieces
down here ready. Let's go ahead and
just hide my plugins. Let's do save as, and this time, we want to save this one as Cobblestone underscore
setup. There we go. Okay, so we are now
going to get started by actually placing
my cobblestone, as you can see over here. So we'll just, like, give them
an interesting placement. I actually really like
this divider in here. Also, I can actually use this
divider inside my scene to divide between tarmac and
between the cobblestone, because often, you
would have, like, a row of stones that would
divide between the two. So it's like win win. So I'm also going to include
this divider. In here, you can kind
of see how it works. Now, they just use, like,
oh, concrete divider. Can also be
interesting. Anyway, I always I talk too much. So I need to go ahead and now I want to have a
plane because we are, of course, wanting to
map this all the plane, and the plane is going
to be our ground. So it's just going to
be the base ground. It's the same concept as
in substance designer, but this time we do it in Tweed. We have a plane. We
add the big shapes, and then we add like smaller
shapes and stuff like that. So for the plane, what you can do is
because there is already a default plane in here, you can go into Subtool and you can go ahead
and if, for example, click on the first
one, you can go into Insert and
then you can press, where are you plan three D. Just click it and that
should have Insert yet. Now, this plaint D I Oh, it's very, very small. It looks like here, you
can see that it's very, very small and
it's on this side. So that's no problem. We can go ahead and we can work with that. Now, this plane, I
want to just press a little bottom because I always like to have
my plane on the top, and I'm going to just press
rename and call this ground. Okay, so because our
plane is so small, all I need to do is just
select my cobblestone. Then if I go down here and go to merge and just
press merge down. This will just quickly
combine them all into place so that I can very easily scale them all down like this.
As you can see over here. Now we get them
roughly into the scale over here because unfortunately, you cannot multi
slack sub tools. I believe there is a
tool for it, but anyway, this is just a
technique that I use, but I don't know if it's
an altcal technique. So if you know better
one, please let me know. But basically, I just do this. I scale them down to
roughly what I want. Then I go to split
and I just press split the parts
and that will just split them up into three again. Although this one.
This one is black. I don't know why it did that.
Just press switch color over here and that Hello. That is very strange.
Why are you Black? Am I Okay. Turn off. For some reason, it
made color black. Don't ask me why.
Honestly, I wouldn't know. Basically, now that
we have these pieces, now what I need to do is I need to figure out
the correct scale. First of all, what
I will do is I will just move these over here and let's move
this one forward. I'm just going to move
these onto the plane. Don't worry about the PIV point. I will also show you
how to fix that. But first of all, let's
start with this one. If you just hold I'll
click and just go to this one, the PIV
point looks fine. Basically, I need to go for an uneven number because
what we have in our stones, sorry, I just need to
set this. Here we go. What we have in our stones is we want to as I said before, we want to get this
strip in between here. But for that, we need an
uneven number because else we cannot have the
strip exactly in the center. I also don't want to
place too many stones. If I place too many stones, it will actually
become quite a pain because it just takes
very, very long. The more stones you place, the long grid will, of course, take to make your material. So I personally think I'm going to go for
like a row of seven. That's often what I go for with things like bricks and
cobblestone and everything. So in order to make sure
that scale is crack, I'm going to use technique, although it's not the right
technique that we will use, it's a quick technique to see if we have the
right scaling. Because we have an uneven
number, unfortunately, I cannot use my plane
because my plane, if you go to the
poli frame up here, it does actually
have segments and we could split these segments up, although they are a
bit difficult to see. But unfortunately, we
have an uneven number, so I'm just going to eyeball it. I'm basically holding control, and I then this mess Oh, this measure is composed
of multiple subdivisions. Okay, please ignore what I just said it for us because
I accidentally crashed back then and I had
to redo the optimization. That's something that
you guys, of course, didn't see because
I edited it out. So basically, I'm now
holding Csvaol and then I'm just letting go
once I'm in position. So I basically want
to try and get seven. So I know that the scaling doesn't need to be too precise. Wow, are we de? One, two, three, four, five, Oh,
wow, no, we are not. And if we say, like, Okay, so the scaling is not good, I
just press CtraZ to Ido it. I just scale it
down and I can just use these side angles. Now, go ahead, one, two, three. This one is looking
better, four, five, six, and seven. Yes, this is looking good
enough because I want my cobblestones to be
very close together. And if I push these
closer together, we would be able to
go within this range. So I'm happy with this scale. I see, it's not too difficult. Like, you get used
to kind of guessing. So we have this one. Now, all I need to do is go to, for example, these pieces over
here, and I just hold Alt. And if you go ahead and press
Alt again on your model, what it will do is it
will just basically set your pivot point on the tip, because our pivot
points were reset. If you want to customly
set your Pivot point, you can always just press
this little lock lock button, and that means that you can move only your pivot points,
for example, like this. So once we have
done those pieces, now what we're going to do is we are just going to
go ahead and, like, place these pieces so that we can have everything
nicely into order. But now that I have
this, all I need to do is hold Alt and
click on these, and I'm just going to
move them over here, and I'm just going
to basically make them roughly the same scaling. They don't need to be perfect. The reason for
this is because we are actually going to change the scaling here and there
for variation anyway. But I do need to make
them fairly similar. Here. Let's say
something like this. Okay. Awesome. So we have
these tree stones over here. Now, remember that we are
also having different sites. So what I'm going to do now with this is I'm going
to grab the stone. I'm going to sort of,
like, place it in the position in terms of, like, the height of it,
like you can see over here. And what I'm going
to do then is I'm going to start by
duplicating it. Now, as you can
see, the control, the reason why you
don't want to do control shift is because
it does duplicate, but it leaves it in the
same subtol which makes it a pain for me to select it
once we have 50 stones. But if I just press duplicate, it will just duplicate Subtool. I can then go like this. And let's say this one, I
want to have the second side. So I hold shift, and I rotate. I press duplicate again, move it, hold shift,
and I rotate. And I just keep doing
this, duplicate, move, hold shift, and rotate. This all to speed up my
selection process later on. I duplicate it this time, I want to rotate it hold
shift because shift is just snap rotation and
duplicate it once more. And this time, I want to go 180. You can see down here,
you can see number. So we have now every
single angle covered. And as you can see, it turned
out exactly how I want it. I look at all these angles, but they do not all feel
exactly like the same stone. They feel like different stones. They just happen to
be similar size, but that's something we
don't need to worry about. Now, another thing
that I like to do is when I have these stones, I like to already give them
like a tiny bit of rotation. This gives me this just saves
me some time, basically. So I just go to, like,
these pieces and I just click on basically
this round bit over here, and I just give them
a little bit of, like, a rotation to
get started with. Because the stones in real life would also have some rotation, and I want to just have some
of them sink in more than other ones in order to just create some very little
bit of height difference. Because if you remember that if we are going
to place this one, God knows so well, we have seven by seven. So if we are going to place
these around 49 times, probably more because we
have the thinner pieces, then you will notice that it will just give us,
lots of variation. So we got these pieces ready. Now we just need to do
the same over here. So this one is a
little bit stronger. So what I'm going to
do is I'm probably only going to duplicate
this three times. So I'm going to go in
here and I'm going, Oh, one button, hold Shift. Yeah, just do, like,
a full on rotation. By the way, I also forgot
that I need to move this properly back.
So we have this one. Let's move this one
properly back. Here we go. So these because they are much stronger in terms
of how they look, that is the reason why I do not want to use as many of
them so that I do not accidentally have a
lot of stones that look very broken up because I want to actually
have more variation in this. So we got these three, and I think that's looking fine.
Yeah, that should work. And now, if we go for
this one over here, this one we also will
not use very often. So honestly, we only need to have one variation
and then another one, and this one is just rotate
at nine or 180 degrees. By the way, you cannot rotate when you click on your model. That's why you see me
always clicking outside. So I just need to go
ahead and move this in or I'll click,
move this one in. Here we go. And
now I'm just going to go ahead and I'm
going to also in here. Give it a little bit. Oh, I've got to do the rotation on the
other ones for that. Sometimes if it out the saves, it will hide your
model. Don't panic. It will you can
just move it back. Yeah. So like this one, rotate it a bit. That's
what I've got to do. Like, I only rotated
them inwards. So that's something
I will work on. Yeah. So for these pieces, yeah, I just can give them like small then sometimes like one straight and just
give them some small. Rotations. And then
we can later on, of course, just add more and
more rotations if you want. Awesome. Okay. So we have our
scene now correctly set up. If we zoom out, these
are the stones that we are going to use to
build our actual scene. Now, what I'm going to
do is I'm just going to once again save
because at this point, we are starting to slowly work
with more and more polis. So we now have 2 million. I think we will end up with
around 15 to 20 million. It's not as much, but remember, if we would have 400,000/stone, this was going to
be a lot higher. So the way to make this tlable
normally Oh, that's weird. There's strange text here. I fixed test, the text just
to avoid the confusion. So, to make this tilable, when I had the older
Zebch I believe it was r4r8 and down, I always had this
really cool tool that was made by Bradford Smith, who is an amazing naughty
dog text sartist. Unfortunately, this tool doesn't work anymore in these versions, which are the 2021 versions. So I will have to
do this manually. Thankfully, it's really easy
to do with cobblestone. So all we need to do this plane over here, it is a square plane. As you can see, it
also has even numbers, although we did not
abide to these numbers. All that I care about
is that the scale is square and it is always the
same when we drag it in. Like I said, scale is
a little bit relative. If I place my stone
here and I say, this is going to be
the very first stone. Now, in order to
make this tilable, I would basically
need to duplicate it. Duplicate it and have it on
the exact same position. Sorry, I messed up on this side, then it would
technically be tlilable because it would
just move along. The way that we are going to do that is we are going to go ahead and we can actually
just go into draw mode.
26. 24 Placing Our Cobblestone Part2: Okay. Sorry for
that quick cut off. So let's continue. So we have our stone here
at the top selected. Now what I'm going to
do is I'm just going to press duplicate and
I'm going to show you how we are going
to make this style wall in the proper
way, at least. So if you now go to deformation,
now in the deformation, we have a lot of
different tools, but the main tool that we are interested in is the offset. You can also do
rotation everything. You can do everything
with sliders. Now, because I know that my
plane is 200 centimeters, what I can do is in my
deformation is I can literally just have
my stone on one end, and then I say, Okay,
I simply want to move it 200 centimeters
to the other end. As long as it is precisely
200 centimeters, it will basically just
transition over perfectly. This basically how it looks
like we have a offset. Down here, you can
set your axis, for example, so we
need to be on X axis. And then if we just
set our offset and it looks like that we
need to go into minus, sometimes it depends
on your rotation. So go into your minus
and then this is -100. Unfortunately, defamation
always limits you to -100. But if I do this twice, you can see that now these
are in the exact same angles. So cool trick that we will
later on use if you go to Subto and you click
basically on your plane, which I don't I thought
I named your ground, and you press F
and press F again. What it will do is
it will basically focus the plane around
your entire scene. Now, because this plane is square and our scene is square, this is where it comes
in that we can just perfectly get this to work. So here you can see how things are going to become tilable. Now, I will show you like cord to very quickly
test this later on, but first we would actually
need some extra stones. So we have these pieces here. Good. Now we for example, click on, let's say,
click on this stone. Now all we need to do is press duplicate again and this time, we need to have it
in this corner. So we need to go
around the clock, basically, but that's
only for these corners. The other stones are
going to be easier. Just the cornerstones
are the most important in terms of tiling
for this kind of thing. So if you go to defamation, we want to set the offset this
time to be on the Y axis, looks like that I need
to go into minus again, -100, -200. Great. I then go ahead and go into subtle duplicate it once more. Now if I go to defamation, I can go ahead and set
my offset back to the X, and I need to go into
the plus this time, plus 100 plus 100. There we go. So now I can be confident that this should
all be perfectly tilable. Now that we have
arrived at this point, what we can start
doing is we can start by just selecting
these stones, and you can pretty much place
them anywhere you want. They are fairly like
there is, like, a little bit of
offset and there is going to be like some
difference in scaling, but they are mostly going
to be like straight. See? They are mostly
placed fairly straight. So we can also just be confident that we do
something like that. The only thing that I want to do is in order to make
this even visible, we want to go ahead
and give this like a different tiling
that these stones over here are in a different
tiling than these stones. So we need to play arms with it. First of all, we just need
to have a row at the top, because we just need
something in here. So let's go ahead and just
play round with this. So we have these ones, and I'm just going
to very simply place them together like this. Oh, I might have
actually made them one, two, three, four, five, six. Oh, yeah, I might have
actually made them here if we just grab the Oh, no, no, no, no, it fits. It fits. It felt
like I had a lot of space left. So we
can just zoom in. That's the nice thing
about it like we just have the freedom to,
for example, zoom in, make these at a
slightly difference in height also in terms
of how this looks, just because these stones have been laid
down very quickly. They're a little bit
messy, stuff like that. That's how you can think of
it. Now, there is a reason, as I said before why I'm
placing these on the corners. It is to make the
transition look a lot nicer because if we have
it around these corners, you can very obviously
see a line going all the way around to
texture where you tie it, and you
do not want that. So we got this one. One, two, three, four, five, six,
seven, eight, eight. No, I went for seven. One, two, three, four,
five, six, seven. Yes, no. Wow, I have
a brain freeze here. I know that I split these
up in the corner over here, but I need to have,
one of them here of this like the center.
That is not correct. I need to have something
in my center here. I split them one,
two, three, four. I think because I split them up, I accidentally messed it up a little bit.
Just a little bit. In that case, I'm going to cheat just a little bit
in order to basically set my offset to be a little bit more to the side in order to get like this into the center. And this shouldn't matter, it will look strange inside of Sabush but it shouldn't
matter anywhere else. So basically, the way that we do that is
we have this one, and we basically, for
example, sets like. Oh, sorry, you this one we need to set just
on the corner, but, of course, we cannot
actually use this one because this one needs to be,
so let's delete this. It's basically going
to look like this. You know, but let me just quickly move these out of the way. Sorry
about this, people. But that's just me not thinking
about my calculations. It basically looks
like this. So we basically move this like this. And when we move it like this, now if we like, for example, start adding these extra
stones back again. Hopefully, yeah, see? Yes, now we get one that is
in the center. There we go. So same like this one. So now we have one that is
actually in the center. And because we are
still over the line, this should still look totally fine when we actually
start tiling it because we are just tiling it like a slightly further distance apart. So if I grab this one,
I just press duplicate, and I do the exact same thing. I just go to defamation I
just set it to, like, -200. There you go. And now I can
also see that I need to grab one of these and just throw
them in here. There we go. Maybe you want to do want to make sure that they
are not intersecting, per se. So I'm just going to go, zoom in a bit because we do have
some of these rotations, which are great, but we still want to make sure that there isn't any intersecting. So it's not a lot of
work to fix the problem, so I'll just leave
it into the ttoil because it would be
a lot of rework if I if I had to act as if this problem
didn't exist, basically. But don't worry. I have not made any prompts
or any thing so far. This was just like an accident. So now we will have a center
bit that is totally fine. And because this is still
on the corner over here, it will just
transition just fine. So the only thing I would
really need to do is I just need to redo this corner, and I need to redo
this corner over here. But it's just a matter
of selecting this one, pressing duplicate, going to a defamation and just set
this to be like the X axis. One, two, and then we can just go ahead
and we can once again, perhaps duplicate. Deformation set is
on the X axis and this time in the
plus 100 plus 200. Done as if nothing
ever happened. Okay, so we now have
this centre bit over here. That is totally fine. Now, we also need to
do this on this side, and then we can start
duplicating them over. So at this point, let's say, like I have this one, I'm
going to have this one here. We just basically want
to have these very close in order to
keep it consistent. So another thing
that we want to do later on is we do need to change the tiring for these ones. So we basically need to go ahead and change the tiing
now, normally, I would just like set
these to be a bit bigger, but maybe I can use
this to my advantage. If I grab this one over here, just we need to keep it in mind, hold shift and rotate
this 90 degrees. And if I then use like
two or three of these, that should give me
a size compensation. No, compensation. Sorry size
compensation that will hopefully give me
a different size. So if I now go to,
for example, these, at this point, for now, we don't really
need a defamation. We just want to pus duplicate. Place these ones, and then if I go, for example, this one, hold Shift and move this
one in here. There we go. And then if I grab, for
example, one of these stones, just press duplicate,
move these ones in here. So having two of
these stones will hopefully even this stuff out and else we just
need to do some scaling. Yeah, here. So it
looks like that we need to do a little
bit of scaling, but that's no problem. That's actually good because we want to make sure
that this looks correct. So here, I'm just
scaling these up. They're cobblestone. They can be slightly different scales. I do not mind that. So I'm going to have like
these ones down here. These ones down here. I just need to make sure that I'm going to keep
that unevenness. Yeah, I should be able
to get the unevenness. So if I go for this stuff, by the time that it
arrives over there, we have done like all that
little bit of extra stuff. And it can have a
little bit more space. Maybe rotate this one so that a little bit more space
for plants or something. I believe that now if I would
also grab this one already, press duplicate and then go to your defamation set
this on the Y axis. Ooh. Oh, God. I press PBR. That is Akath. Escape. Escape. Thank you. Wow, that was really mean. I went to offset and
accidentally pressed PBR the white next it.
So we got this one. So all I'm going to do now just because I
want to make sure that this is white before I start
duplicating the whole bunch, and then we will just have
some fun placing everything. I'm going to place
this one here. Okay, so far, it
doesn't look very good, but let's see duplicate this. If we can, there we go. And then if we duplicate
this, there we go. Come on. Okay. So now we are starting to
create some unevenness. That is looking good. I probably want to actually have this unevenness already
start a bit earlier. So if I go for this
and then this. And then this one goes. Yeah, okay, so now we start to get that unevenness
that I was looking for. So even I would say duplicate this one over here,
and I duplicate. I actually want to
have a bit more of the damage tones
in between here. So I have this one over here, and now I'm just going to play out my scaling
to just once again, create a little bit
more unevenness. So we got this version. We got this version over here so we can play place around. This version over here,
which we can just scale. There we go. And actually, at this point, it's already much fine. So, this one is even. This one starts to go uneven, uneven, even, and even again. I think I can live
with that. I think that will not look too bad. We can always have a look and
else we can change it up. So, okay, finally, we
got these stones here. Now, for these stones,
you know what to do. You're basically going to go
ahead and press duplicate. And then we're just
going to go to our defamation and
actually set the offset. Oh, that's undo that. We want to set the
offset on the Y axis. And you said it to be like -200. And we only need to do that, of course, for the outer side. Once we've done the outer side, then we can have free
movement in between all of the stones like this.
It's just the outer side. If we change one,
I keep doing that, we need to change
the other because else it's not tilable anymore. But here, this won't
take very long. So if I just go
ahead and do this, and I'm just going
to probably kick in a time laps at this
point and just do this exact same thing over
and over and over again. And then once that is done, I will show you to make sure
that everything is tilable.
27. 25 Placing Our Cobblestone Part3: Okay, so I finish the
placement as you can see, and then I just select the
plain and I just press F twice in order to
get it to this stage. So what I want to do now
is I just quickly want to make sure that the tiling is correct because
over here you can see, we have very little stones, so I might want to push
those out a little bit, but I first need to see if
that is actually a problem. Now we will be baking from
this exact perspective. What I can do is if I just go
to architecture over here, I can press Grab Dog. What that will do
is it will almost like do like a
screen grab of this. I can then just go to Export
and export this screen grab. And if I just go ahead and files images and
just like other, it's here for testing, but I still need to
place it somewhere. Yeah, let's just call
it A. Yeah, and ploy. So all I'm focused about is if I quickly go to
substance designer and you can do this
EVLCy substance designer is the easiest way
to probably do this. I'm just going to navigate
to my images other, and I just quickly drag this
in and just press input. The only reason I'm doing
this is because I'm going to use substance functionality
of pressing space. So here we have this
if an opera space. Well, would you look at that,
it is perfectly tilable. So this is how it
will look over here. This stuff over here, um Yeah, actually, you should
not be able to see that. Once we fill in all
of the other spaces, you should not be able
to see any of this. So we need to look at
it like this texture. No, sorry. Like this
we need to look at. So it might look a little
bit strange right now, but it shouldn't be a problem. And yeah, this should be
fine, as far as I know. So I can just get started with placing
in all of these pieces. Then we will do
another screen wrap, and then we'll see if it
is wong and if it is wong, I will literally just
delete this recording, and I will learn from my
mistake and do it again. But let's hope that
that's not the case. So if you hear this, then
it was not the case. So, at this point, what
we basically want to do is now we have freedom because we can place whatever
we want in here. So we can just go in and we
can just start selecting these pieces and adding extra variation we
can do later on. For now, it is just a
matter of, for example, randomly selecting some pieces, pressing duplicate,
and just like, moving these all
closer together. So, a just press
duplicate again. Here we'll probably need
to do some scaling, just to make this all
fit. There we go. So just because we, of course, did some scaling on the side. Let's keep that in
mind the side pieces sometimes have some scaling in there so that we put a preference towards
these pieces over here. And you basically
want to do this. And let's say these pieces we can still use because we can duplicate them and we can, like, rotate them and then
kind of place them here. So they will just like some interesting looking
variation on top of things. Because here it will
create even more unevenness between
all of these pieces. So let's see, let's
duplicate this one. And this actually
doesn't take too long. I will refine this,
of course, later on, and I will make sure
that this is all looking just very nice
and perfect, basically. But for now, what I can do
is I can just actually, this is what I mean
with these pieces. They are very obvious, so I don't want to actually
use those too often. So I go, let's say, duplicate this because I know that this one is a
little bit bigger. So I can go in here and I can, try and fit this in here. And then hopefully in the end, we will land on our feet, and we will actually have
just some nice pieces all sitting together. Now, this will most
likely only take me about like a minute
or three, four. So I will not time lapse that. I will just like places and just talk about things
in the meantime. And just when saying that I
have nothing to talk about. But yeah, basically, we are just going to go
ahead and we are just going to go through the
process of placing these. Once we've done that, we
will do another test. Then what we will do is we
will go ahead and we will um, add a lot more variation to
them to make them look a lot more interesting
because right now they feel very generic. So one thing that I feel now is when I look
in these pictures, these ones feel forward. These ones feel sideways. But I think the
only way that yeah, it's a bit tricky
to convey that. But honestly, does it really
matter because technically, right now, these
ones feel sideways, and these ones feel forward. So in the end, I don't
think it really matters. This just maybe I shouldn't have gone for
like a cobblestone that I've never I have done cobblestone plenty
of times before, but I've never done a
cobblestone that has, like, this center separation. But hey, I wanted to give you
guys something interesting, and just like, just
a cobblestone can sometimes be a little bit
boring, to be honest. And I felt like you
guys deserve better. So I wanted to just go for, like, something a little
bit more interesting. But this will this technique that the techniques that
I will show you here, they can work for
everything from bricks to tiles to roof tiles
and stuff like that. So I'm not too worried about that we are
lacking in techniques. Now, of course, there are many different ways to create different textures
inside of Zbrush. There's something
that's really cool, that's called nanomsh
that you can also use, but that will be something
maybe for in the future. And seeing as I'm not the
absolute best Zbrush artist, that might be cool if I can get some ZebushGuru who
has done Z brush for, like, for longer than I've been in the industry
to just show you, like, all those
little techniques. Like, I can do it, but
because I had to do it on Force Horizon on that we I
actually used Sebre mostly. But there's a big difference between knowing how to do
something and teaching. Because I have very little
room for arrow as you might have noticed when I'm
actually teaching this life. But anyway, here, we are
getting near 10 million. So if this was a
YouTube channel, that would be really excited. But unfortunately, it's
just some polygon count. So I'm going to go
ahead and I'm going to, this one. Let's see. How can we like we just need to make
everything fit, basically. The good thing is
these stones they are in real life, really
crammed together. So we can be like super
sloppy about this and just try and fit it all
together like this. And then we will just go
ahead and have a quick look. I'm quite excited, actually, to look at and see
how this one work. So if you look at it
also from the side, you can see that it's
starting to give us an interesting height
difference already, and we will work upon that. We will have the scent higher in some places and, like,
lower in others. And then we'll have in
between those large areas, we will have some
greens growing, and hopefully in the end, I'm pretty sure of it, it
will look really nice. So I'm confident that we can
do that without any issue. So here we go. Let's
just scale this. This one is really close
together to the rest, but that's totally fine.
Yeah, you know what? I'm going to duplicate
this. I'm going to here, I'm going to do something like this that there's
all of a sudden, quite a big size difference. And if I now, see if I can, sort of like tie as
if the stone tiler, he didn't have any more
of these sized stones. So he just pushed this in here because later down the road, something was happening, and
now he's just trying to, like, compensate
for all that stuff. This one we have already used. Try not to have the same two
bricks next to each other. Actually, not shy,
don't have that because it can be very obvious, even though we are going to have different colors and
everything on them. If you end up doing that and you really are not in
the mood to change it, then in the later stages, I will show you how to add
extra variation to this stuff. I'm going to duplicate
this one down here. And the last one
who's Lucky guy? This one over here. Let's go ahead and throw that in here. And here, I'm just
going to give you a little bit of,
like, a squashing. See let's make it then
a little bit bigger. So we are later on going to
look at it very up close, and we're just going to
make it look interesting. For now, this is
starting to look good. 12 million Polish is doable. I think we end up with 15
once our plane is also done. So if we go ahead,
go into our ground, we can just do the same thing again where
we just press F twice. Grab Dog export this. I just call this number
B. I just pass a. And now I can just quickly
go into substance, and I can just
import it and just have a look and see
how it actually looks. Give the secretary but
what resolution now? Okay. Okay, so I think this will
actually work because here you can see that
there is some unevenness. We just need to give it
inside of our base color, maybe some guidance, maybe a little bit more
greens in here. Maybe I'm going to make these, as you can see, there's a lot more ground
in between the two. So maybe I can make
them a little bit smaller in order to
give to convey that. But if you look at this, it's perfectly tlable here
if we zoom in and out. So this actually you quite good. We got some interesting
stones sitting in here. So that's quite nice.
28. 26 Placing Our Cobblestone Part4: Okay. So at this point, MPC is getting a
little bit slow. I'm not sure why because we
don't have that many polis. Maybe it might have
something to do with the amount of subtols
that we have over here. So that could very
well be the case. So one thing I did off
screen because it takes quite a while is the
outer ring over here. I merge them together. So if I just go to
solo, here you can see. So the reason why I did the
outer ring is because I know that we will most likely not change the
outer ring anymore. And this way, I can
simply turn it off. And when I turn it off
and go to something else, my scene will run
quite a bit quicker. So it's strange that it has
to do with the Blicon count. The way that you want to
do this is very easy. You simply, for example, click, whatever you want to art. You then go to rename and you
just give the random name. I just go for zero,
zero, for example. And you do that with all
of your outer stones, and then later on, all you need to do
is just go to merge, and then you basically
have, for example, zero, zero, you just press
merge down on another 00. Let's say that this
one is also 00. So all of these stones
around here are named 00. You simply select
the very top one. You then say, Okay, so the one directly below it is not 00. So I just press this
arrow key to go down, and now I can just
press like merge down, and then it would merge
these two here on a weighted sun that is
doing the merge down, you cannot undo it, so I'm
not going to actually do it. But basically, just
like that, you can just merge it down. So the goal is to just have this basically
all merge together. But honestly, if you do
not if your PC is faster, or I personally don't know
why this is happening. But then I would just recommend
not doing this technique. I just have to do
it. I don't know. I don't know. Maybe my
recording is slowing it down. I honestly wouldn't know.
But anyway, at this case, these are the pieces
that we can edit, and I just want to have a look, and I'm going to, for example, start by having a look
from the sit a little bit. I want to see how I can make
this a bit more interesting. I'm going to go in, and I'm just going to zoom in
and I'm just going to, look at it up close
and just make sure that everything still looks correct and that we have some interesting sizes going on. Maybe it would be
cool to sometimes just quickly change some
of the size a little bit, like these pieces, just give a little bit of like a scaling, just to make it feel a
little bit more interesting. But I don't actually think I expected that we needed
to do a lot more to this, but I don't think
it's that much. So we got this stuff. Is this
the center one, by the way? No, the center one is over here, so I believe go Yeah, so the
center one is over here. So what I wanted to
do for the center one is they are already
a little bit bigger. I wanted to see if I can give them a little bit more space
in between these sites. And the reason that I'm
doing that is so that they stand out a little bit more as being the center line. So I like to, like,
make the spacing between these quite obvious, while all the other stones
are really crammed together. These ones, I just want to give them a little bit more space. And then what I will do later on is I will go ahead
and I will add, like, a few more
extra little plants and everything in
between this stuff. And that will kind of give
us the guidance over here. So you can see, like
some more plants, and you can see
that there's more space in between these stones. And what I will also do is also damage them a little
bit more later on. This one needs to be
scaled down in general. This one move it a little bit. So luckily with these
because I don't need to worry about my edges,
I can just do, free movements and sometimes
I just want to, like, scale some stuff up and
down and see how it goes. For the rest, I would say that. So we did it like on the here. So we already did some
rotations. I'm not sure. You can, if you want to do some more drastic
rotations in some of them, just to make it look a
little bit more interesting. Maybe also change like just how far they are sticking out, but that kind of stuff, I'm personally not too worried
about that because once we have the ground sitting on here that will fill things
up a little bit, it will all come
together quite quickly. Yeah. So like, yeah, no, I sometimes does
the outer zooming. So let's see if we go for, like, I don't know, here. Yeah, this feels like a very
uneven piece, basically. So yeah, yeah, I would say, this feels like quite
an uneven piece, so this could actually
work just fine. So, let's say that the movement or the placement is now done for
our actual stones. Now what we're going to do
is so we have these stones. We do not want to change
the outer stones. However, for the
indoor stones, we can, if we want, go in and out like a little bit of
extra damage to some of them. And basically, what I would do is remember we did
some optimization, so the geometry is not great, so we'll see how this will work. If I go to my trim dynamic and I'm just going to go ahead
and hold, not hold alt. Basically, I'm just sometimes
going to add some damage. If you do not get the
right damage you want, if it looks really buggy or something and you cannot fix
it with just some smoothing, I would recommend just
doing a re dynami on this, and then you will
have like this one, of course, with higher
polygon counts, but it will not be as obvious. So I will see how it goes. So like this kind of stuff, because it's large damages, it looks like that I
can get away with it. That doesn't happen often that
you can get away with it, but I will show you.
Let's say this one. What I can do is I can just
go to JomTre dynamesh, press dynamesh, and it
looks like we need to go much higher in
resolution, 800 or 700. Maybe a little bit more
1,300. There we go, see? So it will make everything
feel a little bit softer, but now this is all
perfect geometry again. So now I can, like, really chip away in this if
I want to, so I can, for example, make one of
these like completely broken. And then for these ones,
like if I have just like some smaller details I want art, I can just go ahead
and I can just go in here and do that. Now, I'm not going to
do too many of them. I would recommend you just, like, take your time for this. But yeah, I'm not going to spend too
much because if I want, I can spend hours on this. But I still want to have it like adding some
extra variations. That's when we look
at it from the top, we just sometimes get this. See, sometimes you see that there's more variation
going on in certain areas, and that is pretty
much unique variation. You still do not want
to go too over the top, because remember, we
are tiiling this. So we are going to still keep
the variations quite small, but they can be
big enough for us to make an impact,
like stuff like that. So I can just, like, add some very soft damages and everything. You
can see over here. And especially like this
is the center point. Maybe in center point,
we can actually make them a little bit more broken up just to
just like in real life, how that center point is like a little
bit more broken up. So I'm just like, making
this a little bit more intense and
stuff like that. Here, maybe, like, play
out at the corners. I only need to really look at
it from, like, a side view. So I can just do that. Oh, over here, something
goes a little bit wrong, so let's not touch that area
because it's not really worth me needing to
fix it. There we go. So here I'm just like adding
bits and pieces to this. Just make it look a little
bit more interesting. Like that. There we
go. I guess you can sometimes use your
orientation to give it try and give
it an interesting cut. But orientation is
always a bit tricky to get white in certain areas. Here, these kind of, like, little slopes or something like that you can do if you want. But I personally, I like
to go for more of like my smooth stones just because it just feels like very
cobbly if it is this smooth. So I'm just finishing this off. Don't worry won't spend
too long on this. You can just fast
forward if you want. I just want to, let's see. What else do I want to do? We got some of these
corners over here. I feel like the damages are a little bit too
rapid in transition, so I might want to go in
and just make them a little bit softer like the
transition pieces, a little bit softer like that, just to make sure that that
doesn't look too obvious, that it is like I also don't
want to have it feeling too typical Zbushy
if that makes sense. Like, the trim dynamic
is very common to use, but it also has it has a feel to it that many
people will recognize. So I don't want to, like, go too over the top with
that kind of stuff. You know, maybe, like, a
chip has been chipped off, stuff like that, something something story
telling. I don't know. I always try to keep storytelling in mind
in this kind of stuff. But of course, also just
look at your reference. Sometimes there's things I don't know about how
they might happen, and then it's just
good to have, like, a reference in order
to fill in the blanks. Okay, so let's say we
got something like this. If I now go down and I like, turn on my edges, and then if I go to the
very top and press F. Okay, I'm just gonna have a
close look at this. What do we have? I want to go, and I'm doing this at quite a large distance at this point, but that should be no problem. So like this one. Yeah, let's make that
quite a bit softer. This one, let's just transition this into,
like, a corner. This one, let's make this a
little bit softer over here. This one. And this one. Okay, what else do I see
here? What else do I see? Here, I'm on the art like a bit. I'm just basically
having a look and see that when I
look at my texture, I don't feel like I'm looking at the same bricks over and
over and over again. That's basically what I'm
looking at right now. So don't worry about the noise. This noise will be so it
will be so difficult to even see that it's just
like this little extra bit just to have here. Um, you know what, to be honest, like, okay, these two
are quite obvious. So I can go in, change like a corner here and change light maybe like
a corner over here, here, see, just to make
that feel very different. Like that? Okay, what else?
Is there anything else? So here we have a tilted one, but yeah, we have it here, but honestly, are they
are difference in size. It will be quite difficult
to even see if you want to get like change like
one of these corners. Let's see. What else? What else? And don't spend, it needs to be something that happens
sort of on first glance. Like if on first glance, you immediately
see like, Oh, hey, I see the repeating
very obviously, then you want to work on it. But because of course, if
I really want to search, I can look for very specific areas and I
can just try and find them, which this is a good
sign that I cannot actually find this specific one. I think it's similar
to this one, but let's see. So we got those. Oh, yeah, here, see,
this kind of stuff. This detail is a
little bit too strong, so I can just smooth it out so that it doesn't look as
obvious to this one. This one over here,
they look too similar. So let's just go ahead and
break my edges a little bit. There we go, just make that
feel a little bit different, see what else we got. These two are just
below each other. So maybe, like,
do that and maybe go to our scaling and just, like, scale this out a little
bit because we can do that. And, yeah, yeah, let's just
try and get rid of this. That's why I was talking about, don't go too specific your s because then you
might run into trouble. And if you really want to, like, break it up, you can also hold
shift, and you can, like, just quickly rotate this
180 and then move it back into place in order to so
that it feels even different. So we got those. And I think let's move this one a little bit closer so that it
feels like it's clipping. There we go. I
think we are here. Yes, I think I got it. Okay, so now that I have this,
this is all looking good. Also make sure to look
at it from the site, and if it also looks
interesting from the site, which it does, it does,
just some differences. We definitely need to
work on our ground in order to make it
look more interesting. But I think for now, like, because I don't think there's much angling
going on, is there? There's a little bit
of angling going on. I will first do the ground, and then I will probably
do another pass just in case I want to add some
different angles to this. But basically, what
we're going to do now is in the next chapter, we will go to our plane
and we will start by just working on
our grounds below it, which will actually add
a lot to our materials. Let's go ahead and
continue with that.
29. 27 Sculpting Our Ground: Okay, so we are now going to start focusing
on line crowd. Now this is actually
going to be very easy. So we have a ground over here, and all we will need to do is we just need to go ahead
and if we go down, let's look at our
geometry over here. So we are now at 1,000 polis. Let's crank that
up. Let's go into geometry and just pass divide. And I'm just going
to go up to, like, um Oh, 1 million might
be a little bit much. Let's do something like this.
I think that should work. So if I now go to
my side view and just press F twice,
let's have a look. So if I go to my clay buildup, that's what I tend
to use for this at a very soft level,
but I just need to. Okay, so see, we have
enough geometry. So what I'm now doing is I'm just basically starting by just dragging in carefully
in between my stones, and don't do it too much around the edges because else we
might break the tiling. It's more like around here, just before the edges. Just like start by dragging
this in in order to get Nice. I know there is a
brush a way that you can continue the tiding, but it requires a setup, and it's not worth it
because we only are going to do some very basic
ground tiling over here. Even if it's not
tiling, I can just make a tiling inside of substance. So here, basically, you can see me just carefully
going around my corners, and I'm just looking at, like, how high my ground
is being wasted. I don't want to go, like, cut
off too many of the stones, but it is nice if it sometimes, cuts off a little
bit of the corners of the stone see? Like
you can see over there. So just do this. Hire
everything a little bit more. Oh, Mong if I look
at from the side, yeah, I can definitely see I felt like we moved
everything closer. Maybe we actually want
to just press move and just move this a little bit forward.
Actually, let's see. Let's go up until this point. So let's move a
little bit forward because I can't remember.
Let's press F again. I can remember that we did, like, moved quite
close to the stones, but maybe I'm mistaken. So yeah, over here, you can see, like it is starting to, like, go around on top of the stone, and you can just hold
art in order to, like, reduce it again if you want. But yeah, in these areas, this is going to be all very simple. I'm not even going to
add micronise to this, as I said before. It's just going to be for
my height map to, like, have some variation in the
height map on our ground here. So it's starting to get close to being
done in these areas. It's a bit difficult to
explain what I'm doing here. I just don't want to move it, like, too far along. And sometimes you around
these stones like, Oh, don't do that. That was an accident. Like, yeah, you can have them, overlap the scent a
little bit, be careful. Don't do it too much because that's not how the
reference looks, also. Then around these areas, it
seems like there's, like, a lot that everything needs to be quite a bit higher
in order to work, but we'll see how it goes. And let's say
something like this. Like, if I press solo down here, this is basically
how it looks like. So it looks very basic, but it does work, and we only need to have
whatever we can see. So at this point,
what I like to do is, I like to go to brushes, and I was like, there is a brush. If you press C, it is
called the crumble brush. And basically what
this does, if I go to solo and I just rotate, you can see that it
just kind of messes up my shapes a bit more,
just to add some variation. So if I go outside of solo, I can just rotate around I'm making the infinity
second or like an eight. So I'm just making eight, and I just move this
around like this, just to make it feel a little bit more
interesting. There we go. And then once I've done that, I can just go ahead
and I can just hold Shift and I can just carefully soften everything out because
these specific details I actually I am
not interested in. I'm just interested in
the height information. Something like this,
Let's go in solar mode. See? So this is now
how it looks like. Bit funny, but it's
sufficient, so it does work. So we got that stuff. Now, yes, okay, around here,
these corners, I need to pay attention to that. I should I should not matter. No, it should not matter
because we have a stone there, but it does matter
that when we go actually have our
low poly plane, which will not be this
plane, we need to, of course, make sure
that the corners are correct because we use
that plane for baking. So, let's say that
now we have our sand. So now if you look at
it from the side here, this already starts to
feel a bit more logical. And this is why I wanted to wait with like a
rotation because now when I'm at this
point, I can, for example, go and I'm just going to kind of give the same angle as
I can see on my reference, which is like this
angle over here. There we go. Okay, and
I'm going to have a look. I want to go ahead and I
probably just want to give it a little bit more
stronger rotations in certain locations
and the rhymes. Let's see. So we have some straightness and
then maybe rotate this one. There we go. See, just give something a little bit more interesting
because I feel like it's lacking a little
bit of those really sloppy and strong rotations that you sometimes see
with the cobblestone because of the way that people welcome them
and drive on them. Also, in some of these, I probably want to not go, like, as high in them.
We'll see how it goes. Let's say, I think something like this
seems quite interesting. So we got that stuff done. Maybe I also want to
now start by just doing some randomized
moving where sometimes I like
to move my pieces a little bit closer
to other pieces in terms of the corners in order to create some open spaces which
will later contain foliage, but this will also just
make everything feel even more sloppy
because I do want to try and get this sloppy
feeling to my cobbles. Let's see. Okay, so let's say, I think something like that
should work pretty much. Okay, this one is a
little bit too small. Let's move it, and
let's move it down a little bit. There we go. I think that's starting
to do the trick. This one, I'm just
going to rotate the other way around
and then just, like, carefully move it
down a bit. There we go. Yeah, you know what? I
think that does a trick. I think we have a decent looking
cobblestone ready to go. Okay, so ground done. Cobblestone done. So those are now done. I believe that we
are pretty much ready with our zebush work. And now what we're going
to do is we are going to export this for baking, but we also need to export this so that we go into a
tree mulling program, and I will show you
how to do the foliage. So let's end this
chapter with that. So this was a short chapter. For the exporting, what I'm
going to do is very simple. I want to go ahead and yeah, 12 million polish that
should be easy because we are going to bake this
inside of Mum's a to Bag. Now, some people bake most
of this inside of sebush. I personally prefer Tobag because I can generate
more different maps. And it's just part
of my workflow. So if we go ahead, all these subtols over here, it's quite annoying
to export them because you would need to
export them all in one go. What you can also do
is if you just go to C plug in and go to
decimation Master, you can just press Export
All Subtools in here, and this tool will just
export everything. So source files,
let's go for exports. Cobblestone. And I
will call this one. Cobblestone underscore HP. So high pool because we're going to our low poly just
a plain, basically. So we have HP, and it
is taking a second. I don't know. Is it
done? No, it's not. So don't worry if it freezes. This is just because
we have a lot of jumtry going on here. You can see that it will
probably hear C. So it is slowly creating our
texture file over here. I will just pause the
video until this is done. Here we go. Okay, so
that's now all exported, so that's good. So
we've done that. And then what you can
also do if you want is, you can just very quickly, we need to go in Let's go, for example, down
here to our tool. Go to plane and just very quickly export
this and just call this Cobblestone
underscore LP because our plane is still the same
size, this will just work. And a plane is one
of the few things inside of C brush that
as far as I know, it has a UV and else we will
just need to create a UV, but it's literally square. Lastly, what I will do
is I will press Import, and I'm going to actually import my cobblestone hypole because now all those subtols
they are one tool. So it just saves me
some time needing to merge everything down and
do all that kind of stuff. Oh, by the way,
before I do this, I need to quickly switch back to my cobblestone and
actually press Save. So we got this one most likely. Don't you dare crash? Thank you. Okay, so I just need to go to
this cobblestone over here, and I just need to
very quickly save this because if I crash now, I will be very upset. So the cobblestone
setup, yes, save. And we're in the clear. Okay, so here
cobblestone HP we have. It takes a while to load. All
we need to do for this one, we only need a general
shape for this. Oh, looks like I'm
missing 1 stone, so that's not good. That is, well, it
doesn't really matter, actually, it does
matter in this case. Let's go in here. It's this one. Let's go ahead and export this. Cobblestone, underscore
leftover underscore HB. This is not sometimes
dynamesh cannot see every single stone or it cannot see every single object, and
sometimes it forgets it. It is often that it only
forgets like one single piece, but it's still important for us to then go ahead
and just fix it. So now we can just go to
our Cobblestone import, import the leftovers,
which in this case, just one piece. Where are you? Oh, it's Fine. I need to click on
like an empty object. Click on Empty Object, Import, Import your cobblestone. Because I accidentally overwit. I I import a object on my actual object that I've just imported,
it will override it. It's just a way
that C brush works. By the tone of my voice, you can probably hear that it's not one of my favorite
features, so to speak. But basically, when
you have this one, now that we have this
cobblestone leftover HP, we need to go in here
and do it this way. So insert cobblestone
leftover HP. And now we can go to the top
Wow, that's really slow. We can go ahead and press
merge down and press Okay. And now we have one big chunk. So as I was saying, we need to get this into Maya. My PC is not going to like 30 million polis
inside of Maya. So all I need is I
need a basic shape so that I know where the stones are and I know
where the sand is. So, Wi, all I need to do
is just go to my plug in and just go to the
decimation master, and we are just going to
preprocess and we are going to take this down
to around 200,000 polis. Maybe 100,000 is
probably also good. So just preprocess current, and let's wait a while. Okay, so that is
done processing. Now, I showed you the
percentage of decimation, but you can also actually set the exact polygon
count that you want. So this is just a guessing game. I'm going to go for 100,000. So 100 K is 100,000, and I'm just going to
press decimate current, and I will just
see how that goes. If it completely
destroys it or not or 100,000 should be
easy to do for okay. Hello, C was. That didn't work.
That is very strange. Let's set this to, like, 1% or 0.3% because we
are in the right, there is only one subdu Please don't let me down now, see Raj. Decimate current. Thank
you. That's all I wanted. 38,000 even. Okay, fair enough. I went lower than I expected, but this is still totally fine. I don't know why it didn't
work the first time, but now we have this really low and it's finally fast again. We have this really low mesh. So this is as easily enough
to work with I Maya. So I'm going to go ahead and
export this and just call this Cobblestone underscore
two for two Maya, or if you use three
as MX two Max. So I'm just going to go
ahead and save this, and this is where
we've ended up. We have our high pool, along with that extra little stone. We have our low poly, which
is just a very simple plane, and we have our
cobblestone to M, which we go to Maya. We have done our
sculpting over here. We've done our placement.
We have done our ground. Next stop is we are only, the only thing we need to do before baking is we are going to go and add some extra
foliage in between here. And once we've done
that extra foliage, then we can finally
go ahead and we can, um, Go bake everything down and then go into substance designer where we can turn this
into a final material. I might also want to twin,
do something with moss, but we'll see, and that will most likely be just
inside of substance. So let's go ahead and continue with that in the next chapters.
30. 28 Placing Our Foliage: Okay, so here we
are inside of Maya. Now, as I said before, all I'm going to
do is placement. You can do this in any
tren modeling program, and if you know the absolute
bare basics on how to move, rotate and how to import
something, then you know enough. So here we have Rs Now
unfortunately it is rotated. It doesn't really matter,
but it is something that I need to keep it
at this orientation. I do not want to scale or move
this because if I do that, I would need to correct
that again once I get into Mamo set toolbag
for the baking. I much rather just
have it like this. So what will we be using? We will be using mega
scans ourselves. Mega scans is owned
by Unreal Engine. This means that it is free,
sorry for that whistle. It is free for
Unreal engine users. And we are going to
I'm actually creating this material to have it
inside of UnreLEngine. So I would say that
I fall under this. Now, with this material,
this is very handy. However, if you do not want to use mega scans, there
is another one. Which is called texts.com. Now, the difference is that in Quicksle we would
go to Tweety plants. So we already have plants that are already placed on planes. So they already
have like a mesh. However, if you use
texas.com or substanurce, substance source is owned
by Adobe or by substance, I would say, and here
they also have it. I will go over them. So
latest texts in text.com, the only thing you need to
know, I'm not going to use it, but just so you know, if you
go to Tweety Scan Atlas, you can over here find
like little leaves, but you should also be
able to find like weeds. If you go down here,
so you can find, little plants that
you can often use. Now, these plants over here, they are not great. The stuff that you want
to focus on is if I just, let me just go because
these are all side views. You can do side views, but
I was hoping that there's, like, something a
little bit more of like a front view kind of something going on here. I can't remember there was,
so I'm a bit surprised. Like here, we have some moss. So if you want to,
like, play some moss, basically, the goal is to
find something that's, like, at a front view or a top view, and you can then go
ahead and you can, like, map this kind of stuff. So here, this kind of
stuff, it has, like, a little top view, and all you would
and this stuff, it also has a top view. I would basically
do here, even more. These are great, is
you would create a plane inside of Maya. You would then map
this texture on it. So you would just use your just importing
material and map it on it. So, but this tutorial is
not about tree mulling, so I won't showcase that, but you can easily Google it. And then you would
do the same thing as what we are going
to do with mega scans. The same goes for substance
in substance source. If you go down,
you have atlases. And I think substance
source is even better. If you have a substance license that's not a student license, anything else, you will
get this, actually. So you can actually go
to Atlas's and foliage. And in here, you can often
find weeds so you can even type it in and here. So you can also find a lot of these Atlas textures
that you can use. Now, to save time, I will be
using quick on Mega scans. So in here, if you go, for example, you literally
have weeds over here. And the one that I'm
interested in, let's see. So we have curbside
weeds or we have Oh, wait, actually, they're
pretty much the same. These are actually full packs, so they are pretty perfect. So you got some grass in here. I don't really care
about the grass. I think I'm going
to go for this one. So you can just go
ahead and sign in, and you can sign in with
your Unreal engine profile, and you just want
to go down here and I'm going to go only
for like a well, yeah, okay, if you want, you can do four k resolution. It doesn't really
matter. You can also go down here in the settings and you can say, like, Okay, what do you want? All we care about is LOD zero, so we can turn all
of this stuff off. So we just want to
go for LD zero. FBX is fine. And for the rest. So we have our albedo normal. I don't need a displacement. I don't need an embioclusion. I don't need a
metalness, roughness. Yeah, okay, I can use that. I don't need fuzziness, I don't need translucency. I do need opacity and I don't
need brush or transmission. So I only need to bare minimum, because I only care
mostly about the albedo, normal and one LOD. So once we've done that,
we can just go ahead and press download and that
will now download for us. Here we go, and three,
two, one and done. And why I will place it for you is I will place
it into textures, S brush materials,
other and mega scans. So in here, I will just
go ahead and place this, and I'm just going
to extract it here, and then what you will most
likely get is this stuff. I didn't ask. Okay. Fair enough. So it still gave me
LODs which I'm not really happy about.
But that's no problem. Like, I can just
go ahead and I can remove the rest. Here we go. So I got rid of everything else, because all I care
about is I care about not about geometry,
but just how it looks. So that's just a general idea. Now, all I need to do is
I need to go into Maya, and I need to just start
by importing these. So let's just go file import. And I'm just going to
go ahead and I'm going to copy my location, and I just want to I believe I cannot do
multi select input. That is a little
bit unfortunate. In that case, what I want
to do is because yeah, I have this model viewer, but I don't think many
people have it, actually. Oh, it actually wouldn't matter. I wanted to say, like, Oh, yeah, I have this model viewer, so I can use that in order to, like, I don't even know
how to move in it, in order to see
what I'm importing. But in that case, I will need
to go a long way around, and I just need to start
by importing this, and I will actually show you how to immediately set this up. Okay, so here we got some
grass, so that could be useful. So we basically input
it and whatever we can use, we will use. In order to add a material. So this is, of course, way too big, but
that doesn't matter. In order to add a
material inside of Maya, just right click on it
with your model selected. Assign a favorite material
and let's assign a Lambert. Then up here in our
attribute editor, we can just go ahead
and go to Lambert and just call this foliage. And all I care about
is to go to color, then go ahead and go
to File open this up, and I just want to open up
my this one with the name. Don't go for billboard
because billboards are just like top down views. So this one let's go
ahead and press Open. And now what I can do is
I can just go ahead and I can select my amt again. And I just need to get a
transparency map over here, which is going to be
our opacity map and open up and just open
up your opacity. Now, if you cannot
see your texture, it's because you need to
go up here and just turn on textures, and there we go. So we got this one. This one, it needs to look
good from a top side view. And I think this one is doable. I'm just going to
now scale this down, and then I basically just
import the next one. And here. So this one. Okay, so a few and
then this one, you can assign existing material
foliage strode in here, and I'm just going to
scale this down again. I will fix all of
that stuff later on the scaling. Let's not do that. I'm not going to have
as many of them. No, that's too thin. So let's say two big pieces of grass. What does this look like? Yeah, I see, because it's
way too flat from the top. That's why I don't
want to use it. 17. Okay, this one looks
like it has potential. Yeah. This one is
great because it's just like top few of some weeds. So we did 17, but I believe
that we skipped over 16. Yes, we did. So let's go
ahead and add this one also. Scale this down, so
we can use those. Let's see what else do we have? So 16 19, I think 19 is
a little bit too big. Yeah, I feel like 19
would be too large. That's more something
that you would have as actual geometry instead of, I think most of these
will be the case. Variation one. Oh,
yeah, that's that one. 18. No. Variation two. Um, okay, variation two can work because
it's a little bit smaller. We can even, go and squash it down a
little bit if we want. So variation two,
what's variation three? Well, actually,
variation two works then variation three
will also work. Let's go ahead and scale
this down for now. Let's see, four. Oh, four actually works quite
well because it just has, like, a lot of leaves. So I'm only focusing on how it will look
from the top view. I don't really care about
how else it will look. Let's see. Foliage. It just keeps making more and more materials because
we import this. Let's see, we're
pretty much there. So let's do this one as
a last one over here. There we go. So that
should be more than enough because we're not
going to place that much. So let's have a look. Now what I want to do is I just press F to zoom in and I'm
just going to kind of, like, fix my scaling because I know that these
will probably be very small. We don't need to have
perfect scaling yet. I just need to have
them all lined up with roughly the same scale so that I can then work on it. And for these ones, um I don't know. No, I'm not going to use these. I don't like this one.
This one. Let's do it. Let's just have these two
and then just call it done. Then I think
we have enough. So let's move this
one and scale it down and this one,
scale it down. There we go. So we got
something like this. Now, let's keep an eye out on just how much stuff
there is in here. Like, there's a lot
of moss in here. We can go ahead and we can
do that inside of substance, just like procedurally
dd moss that's actually more logical to do
that inside of substance. I can even have
variations of it. But showing that, what I will do now is I
will just go Oops, I will just go ahead and select all of these foliage bits. Go to rotate and hold
J because inside of Maya inside of Max's Control and inside of Blender,
I believe, also. But inside of Maya,
for some reason, it's J to snap rotate
using Control. And now I'm just going to go ahead and I'm going to, like, scaling these things
down even more. Even more. They're going to
be like really small bits. So let's say we have this stuff. Now, let's just get
started by just like placing some
of the first ones. So this kind of stuff, if they are sticking
out too much, you can try some
scaling, but else, just have them kind
floating on top. That should not be a problem because we are going to
bake these separately. So logically, we can just
adjust our height map in order to not have them in
a very strange position. Sometimes you see also just
like scaling things down. For example, what
I can also do is I can clone this by holding shift, and I can place like multiple
of these because the grass, it would be nice to
just have the grass sometimes in a few more areas. So over here, I can just
go ahead and do the same. I can move my grass over here, maybe scale it in to have it
not sticking out as much. And then I'm just going to
go ahead and I'm going to, like, rotate this. This one can go over here. You want to just have areas
where you are placing these. Then the more sent
you basically have, the more you can get away with some of the bigger
plans over here. Okay, so two more that
we just want to place, I'm going to place this one
up here and this one up here. And once you've done that,
we can just start by doing the whole copy based
party. Yeah. So this one. We moved forward a bit because I do not want to
have it cutting off. Like you can get away with cutting off sometimes in tweet, but when we turn
this into a texture, we will be so hyper focused on how everything looks that we cannot really I don't want to deal with
those kind of errors. So then I much rather
just move this forward. Or what I even like to do
is I like to just go ahead, right click and go to face
and just double click on the leaf that's cutting
and just delete it by pressing delete. Okay, so let's see
what we have here. I'm going to grab some
grass, throw it in here. And I'm now just holding
shift in order to clone. Grab some grass. I don't want to
have it everywhere. Like, sometimes, let's just leave some space for the
moss or something like that. So the grass, we can have
a little bit more here and there just to make it look a
little bit more interesting. But like these kind of bits, actually, is already this one already feels a
bit out of place. So let's just go and
move it around here. Let's move it forward.
And then this one, I don't want to have these
plants very often, actually. I think that will look
well, first of all, we will be able to recognize them if we have them very often. So sometimes it's fine to, like, clip actual plants a little bit into each other.
That could work. But honestly, we'll
see how it all goes. Yeah, the grass, that one, sometimes you just want to add a little bit more
grass because it's a bit more difficult
to actually see it. So let's start with
like some big plans. So we've got some
plants over there. If I also go for, like, a plant over here and
then maybe have this one, which is like a different
one also in here. And if I then go for
this one up here, or here. Do here. So that's when I look
at it from the top, we will have moss and green and everything around the plants,
so that's no problem. Let's have this one up here and let's
then have some grass, kind of like stretching
along in order to fill up these spaces. Like this. Yeah,
just like over here, you can see, it's
not everywhere. It's just in some locations. I will also do some
scaling later on. For now, that's not the
most important thing. So here you can see me
sometimes duplicating my grass, placing it in certain locations. Yeah, I feel like that space
was just way too open. So if I just use some grass, then we should be able
to get away with that. So we got some stuff like this. I'm just going to go mostly
probably just, like, use my grass in order to, you know, place some grass here. I can go ahead and I
can move it like this. Right now I'm moving every
grass bit individually. This because I can go to tool settings that
I can over here. Set the two, I believe. Oh sorry, not the tool settings, I mean, like combine them. But I don't want to basically
go into Maya functions. That's why I'm just avoiding it, and I'm trying to use
the most basic stuff. We have a Mya, even though it takes maybe a
little bit longer. Okay, so let's go for a little bit more
grass in this area. So we got a bit there,
a little bit here. Maybe I'll go for, like,
a little bit more grass sitting next to this plant. And I'm just trying
to feel get a feeling for areas that can
use some foliage, but that it will not look too tolable when we actually
start repeating this texture. And the foliage, what
we can also do is we can turn it on and off later on. You can even have more
variations if you want. Like this stuff like here,
I can just do some moss. So this stuff over here is fine. Maybe I'll have a little bit more grass
sitting over here. And I want to have, um I
think I want to have one of these sitting down there along with a little bit of
grass to fill up the space. I hope that the grass
will look good. It might be that our
resolution wise, that it might not look as
nice as I'm hoping to, but there's only one way to find out because I've not
used this grass before, so it's always a little bit of a gamble doing this
inside of a tutil, but it should look fine. Here we go. Okay, so
we got that stuff. Now, all I need to do is
sometimes I just want to scale some of these pieces down so that they feel
a little bit different. I'm not sure if I want that one. I think that one it's not
in, like, a good location. So Yeah, You know what? I'm just going to place it
here. Let's place it here. Maybe throw in a
little bit of grass in between, something like this. Skirt this one down a
little bit. There we go. See? So we just get some
random different bits of weeds and grass.
Okay, perfect. So that was it for
our grass placement. We can go ahead and just save
sin I can just go in and I will save this in your As
folder, sea brush material. Foliage setup. And then what you would often do is in your presentation scene, you would just enhance
this foliage with actual geometry
grass in the engine, and that's basically
how it works. So at this point, to Export, I'm just going to press height. So press H on my cobblestone, and I'm just going to
grab these pieces, file Expot selection, make
sure that you do selection. And then we want to
go ahead and just go to Exports cobblestone. And in here, I want
to export this as an FBX and just call it foliage. And just pass Export. Okay,
so that's now all exported. What we'll do in
the next chapter is we will start by
actually setting this up inside of marmoset, and
we will start baking it. It's an exciting chapter. It's also a scary chapter
because if we made a mistake along the way that
I did not realize about yet, then I will have
to, like, fix it. So let's go ahead and continue, but I'm sure it will be fine. So let's go ahead.
31. 29 Baking Our Material: Okay, so here we are
inside of Momset. Now, in case you
might not have known, Momset actually has
baking functionality, and I actually use it for any
type of baking that I do. I know that Substance
Painter also has it. I believe even substance
designer has it and like normal and
a bunch more tools. But personally, I
prefer Momo set. I feel like it's the fastest, best quality, and
easiest to set up. So all we need to do is we need to go into just
a brand new scene. I don't care about
rendering renting. I simply want to go up here
to my little bred icon, and this bread icon just
means a new bake project. And now what it will do is it'll ask you for a high
and a low poly. First things first,
press the low poly and in outer bake,
turn this to none. Else it will try to bake when we are not yet even
ready to set up. Now we can just go
into our cobblestone. So what do we have? We have a cobblestone,
high poly and actually, we also have a
foliage over here. Let's drag these three in here. Now, this one will
probably take the longest to load in because it's
still 12 million polis. But I believe I've been going up to 40 million inside of Mamoset
something in that area. So it should be Mom set
should be able to handle it even on slightly
lower high NPCs. It just takes a while
to actually load it in. So Okay, I'll pass the video. Here we go. So this is
what we got right now. It even already imported some of the textures
for the foliage. So this is our high Polia
you can see over here. Yeah, looks pretty decent.
Nothing too special. So what I'm going to do is I'm just going to go
ahead and I'm going to drag all of these
into our high, just by clicking and wagging. Now, the high is always automatically turned off,
so you can just turn it on. And one thing I
am going to do is for our foliage that
we have over here. I don't like this material. I'm just going to go ahead and delete it because it
is the Wong setup. And then I just
press new material. It's called this
foliage because we can actually also bake our base
colors when we have them. And in this case, we actually have base colors
for our foliage. So I'm just going to
go ahead and well, actually, before leaving this, also just import your
cobblestone lowly, which is just like
a very basic plane. Oh, it looks like that
the plane needs to be rotated 180 degrees. So if we just go ahead and go up here to transform and
clicking the plane, set us do 180 in Y because it's a plane that should still be in
the exact same location. I just want to make sure. So this plane,
that's interesting. Okay, so we have the plane now. Now what I'm going to
do is I'm going to just set up my foliage material. So if we go to this folder, so much navigating.
Others, there we go. Okay, so we have a base color, and you all already know
how to use Momset if you follow the Z brush parts,
we have a normal map. We have a roughness map,
and our obaSit map, if you go to transparency
and set is to be cut out, this is basically your OBST map. And then what you want to do is you want to set the channel to be an R because it's a JPEG. We don't have an Alpha channel. Then all you need to do
is just drag this foliage onto your foliage,
and there you go. So now this is the
actual foliage that is from, um mega scans. So what are we going to do now? Now we need to decide our cage. A cage is basically a
hull that will show us how far we want
to have the baking. If we click on Low, you
can see this green cage. But right now, it
basically needs to cover everything. Right
now it's not doing that. Right now, it's only
covering like a tiny bit, which means that
it would actually miss out on everything
it's not covering, including all of our foliage. So we simply want to go on Low and go to Max offset
and just set this up. Like this. And once
you've done that, you just want to have this just above all of your foliage. Don't go too far out, but
just above it, like this. This is why it was
also important to have a perfect plane because here you can see how
our plane will bake. It will basically straight
down from here onto our plane. Now, I hope that
the plane had UVs. I cannot actually check that
until well, technically, I can just throw on
the foliage material, and then I can see. Yeah, you see, it's a perfect square because else it wouldn't be
able to show this. But anyway, we have a
high, we have a low. Let's go ahead and
let's get started. So if we go into
our bake project, what I want to do is I want to bake most likely my some of these pieces separately.
So let's have it thing. The foliage needs to be
separate so that I can add it on top because
it has a base color. The ground needs to
be most likely also separate just so
that I can mask out my stones because we are
also going to create masks. However, what we
can also do with the ground is we
can also just go ahead and add the new
material and call this, for example, red, so then we don't need
to separate them and a new material
that we call blue. Now in these
materials, if you just said this one to be a blue color in your albedo and this one
to be like a red color. And yeah, just like,
turn off your roughness. What we can do is
we can say, Okay, just go ahead and drag blue on everything except for foliage and then just drag red
on only your back. Because these are
separate subtols, it will still mask out. So this will basically
be our mask. I don't know what it's
doing there. There we go. So basically, this is
going to be our mask. We will be able inside of substance to mask out per color. So the only thing I want
to do for now is I'm just going to leave the
foliage and I'm just going to place this
here in our scenes that it's not included in our bake
project and turn it off. So that we only need to focus on this. I think we're ready. So let's go into
our bake project. Now, first of all, it will
ask us for, like, a location. So if we just make a
folder that I call bakes, I can go in here. I can set this to be like
our location that we have and just call
this cobblestone. And then I will call
the other one foliage. So there we go. Samples
you can leave to four. So the higher samples, the
longer it will take the bake, but the more crisp you texture it, but we don't need a lot. Let's start with two case that we can actually
preview our scene. And for the rest, I'm
just going to go ahead and so what do we need? If you go to your maps, you can choose which maps you want. We want to have a normal map. We don't need a normal
object space map, I believe, and else
we can just bake it. We want to have a
height map. This map often needs some tweaking. A position map would
be handy probably. A curvature map we do
not need because I can just generate this inside
of an ambienoclusion map. I also do not need,
because I can just generate these
inside of substance, and the material ID map is basically the map
that you see here. So we have material D,
but if we go for bido, it will behave the
same way because we have over here the colors. So it will bake a
normal height position in albedo. Close this down. And the first thing I
always like to do is, I like to just go
for a normal map. So I just press bake
on the normal map. And the first time baking, it will be a little bit slower, but that's because
it needs loading your hypol so it takes a while. After that, it will
go much faster than you are able to
bake within seconds. So it is done. Here you can
see cobblestone normal. Now, if you just
turn off your hypol, you can actually go ahead and you can press the
preview button. What that will do
is it will just quickly preview the map
that you just baked. So if I press preview, Sorry, because it accidentally
picked a red channel. Let's make a new folder. Let's call this preview. I will just do it manually. So just drag in
this material and just throw on your
normal. Here we go. So now you can see that
it has baked our no map. And yeah, the reason
we need to do this is because we need to be able to see if everything works.
So this is the normal. Luckily, we have
a Oh, thank God. So we have a subdivided plane. Also, I would need to
subdivide it for displacement. So the normal is
looking pretty good. If we go to our texture, we can set this to tiling of two. Uh oh. That is long
and very strange. That is very strange.
Why does it do that on that location? H I'm curious about that because that doesn't
make too much sense. So that's our first problem
that we need to fix. Although, to be honest, I didn't expect any problems. Now, that is fine, is our cage. No, here see, so that is very peculiar why
it is doing that. So if I have a
look in Photoshop, what I think is happening
is I think that the UVs are wong after all. I think it doesn't
have the correct UVs. So if we just very quickly
import this plain inside of Here cobblestone opo I just
import it inside of Maya, I can just go ahead
and it can press isolate here so that I
can just focus on this. And yeah, so it's
the most basic UV, but you can basically
just select it. Here, see, our UVs
are incorrect. It is for some reason doing
the UVs not perfectly. So in this case, the way
that it would work in Maya inside inside of three Max, use the UVW map, and that we already do the
twig and send it to box. Side of Blender, just do an automatic unwrap and
that will do the tick. And inside of Maya, just go to UV and go to
planar and set the plane. Okay. Let's just go
to UV automatic. That's also fine UV automatic, and that will do the
twig for this one. So I hope that makes sense. Now I can just go
ahead and export this. I'm just going to export this as an OBJ because I'm just
going to overwrite this. Object, low ply.
Yes, override it. And now, if I hear it will
have automatically loaded in. So you can see it because it has imported some
random materials. If we now go for a preview
and if we then go ahead and just rebake
this There we go. See now the bacon is a
lot faster. There we go. So now we have a
perfectly tiling texture. Yeah, that makes sense. Okay, luckily, it wasn't
anything that has to do with me messing up
the tiling or something. So that's looking pretty good. We got a nice norm map. It feels very good. Yeah, we got the center
views over here, so I'm quite up with that, although we would
probably, like, showcase them as something like
this or something. We'll see what we'll do.
It should end up nicely, and else, yeah, it
should just be fine. So let's go ahead and
let's go to our bake. And now that we have
done our non map, the next one will be our height. So our height is that's what tends to always need
a little bit of tweaking. So let's just press
bake on our height. And first of all,
we just want to go into cobblestone
in our low poly. Throw on the subdivide and just give it like a bunch
of subdivisions. So I don't need to go
the highest quality. I just need to sort of
see that it's working. So height. You already know how to set up. Just go
into displacement. Throw on a height. And
here this one I mean. So if you preview it, the height is almost
never strong enough. The way that you can fix
this is you can go into your bake project and just
press the little settings bar. And in here, what
I tend to do is I tend to often set my
outer distance higher. So let's start like five. If you press bake again, I just need to see which
direction you need to go. Okay, so right now it
is getting darker. Now I just need to balance
out my inner distance. I believe if I set this to like zero that often did a twig, Okay, another thing
that I need to do is, I just want to bake
this in 16 bits. So go from eight
bits to 16 bits. Remember how we also did
that inside of substance. So, that's not yet. That is interesting
that it doesn't. So it's starting to should look better than this.
Let's go height. Let's set my outer distance, like a little bit in, this feels like a pretty
decent height. It might be like, oh, let's set our center
scale to zero. There we go. So it's just
for previewing purposes. We will balance
this out later on. So let's see what
do we have here? I think this height is working. So it is just showcasing
our height now. It might need to be a
little bit stronger, but we can easily balance
this out inside of designer to make it
perfect. So there we go. So now we can see our height,
and this is why we did all that rotations and all
the differences in scaling. So that's looking pretty good. So yeah, I'm happy with that.
Yeah, I would say, yeah. Let's go like one subdivision higher just for fun,
just to preview. Yeah, here, so that should
be totally fine. Okay, good. So we got that stuff done. I'm just going to
turn off subdivide and turn off my height. Now, let's go ahead and
position position maps always need to be
at 16 bits also, because they just need
that amount of bit rate. That's just how it is. But that's one I'm
already confident that it works because we need to rebake this all at four k.
So I'm just going to go to my albedo and bake because that's the last one
I just want to double check. And if I throw this
in here, preview it. See here, perfect mask. So of course, it's
not black and white, but it's still a perfect mask. So I'm confident that
all of that will work. Once I'm confident, I can, first of all, we
are now at 16 bits. So just bake the height and position at four K
resolution up here. So set to four K, and just
go ahead and press bake. Might take a bit longer, but it should still be very fast. Now bake your normal
and albedo map. But let's go back to eight
bits over here and press bake again. And there we go. So our bakes are done. Good. Nice. So we now have these school four K
maps sitting over here. This should all
work totally fine. So what we're going to do now is we're just
going to go ahead and we can bake our
actual foliage next. Yeah, see? Yeah, that's fine. Okay, for our foliage, what I'm going to do
is I'm actually just going to go ahead and I'm going
to go in my bake project, and I'm just going
to duplicate it. Now, this might take
a second because I am duplicating also
my hypolcbble stone, which is a lot, so I just
need to wait with it. Here we go. So that's also
nice inside of Mom set. You can have multiple
bake projects. So turn off the first one, and in your hi, just
delete your cobblestone. Because all I care
about is that we grab our foliage and we are
going to bake that one. And I'm just going to have
a default plane on here. Turn on my foliage. There we go. See? So this is basically how this will bake. Now, for this one, because this one has a base
color and everything, we want to go ahead and go
into configure and we want to bake Probably not a
height map, do we? Yeah, I can bake a height map, but I probably won't use it. So normal height. I don't care about
position map in this case. I care about the
bido, the roughness, and the Oh, yeah, we have a normal map,
but it will most likely be caught
up into this one. That should be fine.
I can actually never remember that
Oh, and transparency. I can actually never
remember that I've baked a normal map inside of
here, but we'll see. So let's go ahead and
we have these pieces. Let's set them at
two K and for now, let's just go ahead and
press bake to get started with because it shouldn't take too long to bake
something like this. And I just need to see if this works exactly
the way I want it to. So I did mess up a little bit. I need to actually call this foliage because else it will override it.
That's my fault. Call this foliage and let's turn over height first and now
let's try again. Press bake. Now just quickly set
this format to 16 bits. Press bake again. Okay,
let's have a look at this. I'm just going to create
a brand new material. Just delete that new
material, call this foliage. I just want to see
how it behaves. So let's drag this
onto our plane, and let's just whatever
we have just imported. So we have baked a normal map. We've baked a roughness map. We've baked a albino map. So that one came out correctly. And then the one that
I'm mostly interested about is if we go
into transparency, cut out, please work, cuto map and set this to R Dang. So that did not work the
way that I wanted to. So in that case,
what we need to do is we just need to
go to configure, and what we want to do
is we actually want to use our shape as a cuto
if that makes sense. So let's go for Alpha mask
instead of transparency. And if we then go ahead
and press bake again, oh, yeah, it doesn't really matter that I still had the other one on. Let's call Alpha
mask. There we go. So that fix it. See, so it's just a flat plane, but it has baked everything
from the top down. And the height map,
as I said before, I'm not too worried about that. So we got these pieces. We can, of course,
now get rid of the Alpha. So we
got the foliage. We can also go ahead
and get rid of the roughness in our S, you know, all my cobblestones, I'm just going to delete it. And I just need to rebake this, but I will do this off camera. So what we'll do in
the next chapter is we will just go ahead
and we will start by importing this all inside of substance
designer and setting it up. Don't worry. I did
not forget about that I need to also up the
resolution of my foliage, but I will do this off camera. You now know how to bake it. Here, we got all of
this stuff now baked. Now all we need
to do is just set this back to 16 samples
and rebake that. And in our foliage,
just like boost this up to four k, and
let's bake this. And set this back to eight
bits and just bake the rest. And there we go.
Everything is now done. Let's go ahead and let's
jump into substance Ziner, set it up and see if everything works the
way that we want it to. So let's continue with
that in the next chapter.
32. 30 Setting Up Substance Designer: Okay, so we are now
going to go ahead and set up everything inside
of substance signer. Unfortunately, one thing
that I noticed is that it still has this tiniest
bit of space in between. If you go to UV and go
to automatic and just select a little box next
to it, in your settings, just make sure that your
percentage space is set to zero and then press apply because it was trying to
leave a little bit of space, which is great for
normal met baking, but not when we have
a table texture. So that's it. So now I
just want to go ahead and very quickly,
re export this. And then what we can do is I will just go ahead
and off camera, I will do the re baaking
because we already went over it plenty of
times by this point. So let's go ahead and rebake. Okay. So I finished the baking and I
already imported them inside of substance designer into a scene that I
called cobblestone. I end up not needing the
position of the cobblestone and the foliage height
and roughness because it turns out they just
didn't add anything. So we can just go
ahead and delete them and save some space
because these things are like 50 MBs per file. So if we go ahead and go in
here, this is our height map. I can turn this to
Grayscale. This is our mask. I can go ahead and turn
that one to gray scale, and then we have our foliage, and over here we have
our actual cobblestone. Let's get started
with our no map. So here we have our cobblestone. Now, double clicking on this
map is often very slow, and in order to load it, however, as soon as you add
a blend on top, for example, or anything else, like a levels, it will become very
quick to load. And we need this blend anyway. So we are going to blend our norm map with the normal
of our foliage over here. And we are going
to do that using our mask over
foliage, like this. So that we end up with
just our foliage nicely. And here, it looks like that it has card up on that nor map. Remember, I was a little bit worried if it did that or not. So it looks like
it has done that and it has created our foliage. Only over here, I'm
a little bit worried that it is not able to properly, generate a mask, but we will pass a bridge
once we get there. So that is our norm map. If we can also go here, and we can just plug
this into our normal. The next one would
be our height map. Height map very easy, art in outer levels in order to push them into the
correct levels. Because remember how
I was talking about, it was not as intense, that is where the
outer levels come in. So we have a height
map. If we press space, this is
looking very nice. It's a nice looking height map. We can go ahead and plug
this into our hight channel. We can get rid of our metallic. What we can do is we can
already art Ambienclusion node. And plug this also
into our height, and see, this is why I
wasn't going to bother. Here, I can set the
story like 60 samples. This is why I wasn't going
to bother with baking it inside of Mom's head
when I can just do this, and it will pretty
much look the same. So ambienoclusion done,
height done, non map done. Of course, we do not yet have an actual albedo and everything. What we can do is I can show
you how to generate masks. So we have these two colors. There is a note and it's
literally called color to mask. So color to mask over here. And with this note, what
I can do is I can say, Okay, I want to turn
the color blue. And then if I just set my
mask screens all the way up, and the mask softens
all the way up, and I want to simply turn
the color blue into a mask. And I can duplicate this and I can say, Okay, for this one, I want to turn the color red
into a mask. There we go. It's that simple. We now
have two masks also here. Okay, I'm going to
end this chapter off. This was a short chapter, but I'm going to just end it off by exporting this
to a preview scene. So let's go ahead and
export this stuff. Textis, let's make a
folly called final. I don't know why
that took so long. And let's go ahead and already start turning on
automatic export. And let's go ahead
and export this. Now, what I did is
inside of Marmoset I did a saves on our
Taric material. So just file save CNS and just save it
into its own folder. At that point, what I can do is I can go in here
and I can press the X button on this
material over here. So, Oh, God, I need
to do this without turning rate racing on
because for some reason, rate racing is just really
slow with this stuff. Turn off our roughness, and now if we just go
into our brush material, final, we can start by already
importing a few of these. So we have our height map,
which is our displacement. We have our normal map. Look at that and we
have our AO map. Okay, at this point, let's go into our free cam. So we already used
to this scene, which is always
nice. Here we go. And I can just go into my
height on my displacement. And I can see how far
I want to push this. Something like this. I
think that will look nice. If I go to free camera,
see? And there we go. We have got some
cobblestone ready to go. Textutiling is set to t. Maybe we want to
go for like two. You know, to be honest, we might actually also want
to go for three. DexieF normally I'm
always in the two range, but for some reason this
time it looks cool on three. So we just give it the
displacement that we want. And yeah, for our foliage, that one is a bit tricky. What you can do for now is
you get like a blend and have a uniform color that
is just slightly grayish over here
in the background, and then have like our
foliage color into the foreground and then just use the same mask like this because I'm just curious how the grass will
actually work. So throw that into
your base color. And throw this one in here. Yeah, I feel like I feel like the grass is not
going well, maybe. We will see like this kind of stuff feels really strange, doesn't look very good. But I'm not sure. I'm
honestly not sure. The cool thing is, though,
that it really feels like that this foliage is just sitting on top, while it is not. Like, if you look at it close, it's just like, plain and flat. So although we will
improve that a little bit. But okay, so here you
can see we have this. Let's finalize it by just
turning on our rate raising, and then we can have a
look at our hard work that we did today with all of our
sculpting and everything. Look at that. Tara.
Okay. I like this. We got lots of
variation going on. I'm quite relieved that
it is looking good. That's the thing with sculpting. I cannot just change
the slider in order to make it look better, but what we'll do in
the next few chapters is focus on, like, a ground, focus on the actual like details in our
stones and everything. We'll work on the
foliage and just get this whole thing come together and it will look even better. So let's go ahead and continue with that in the next chapter.
33. 31 Working On Our Ground Details: Okay, so let's get started. Now, one of our
problems that we had was that the mask over
here wasn't so good. So I did some
experimenting off camera. If you set your samples to 16 bits and set your padding to none,
it used to be moderate. So if you set it to none, and then just bake your Alpha mask, then it seems like that it is able to catch
up with the grass. So I believe that the padding was basically
causing some errors which caused it to not really
work. So I just did that. I just said to these settings
and I only baked mask. That's all I did. So that is by itself just
like very basic. What I want to do is I want
to move back into substance Ziner and I have actually
my advanced tomach open. This is because we
happen to already have some ground materials inside of our advanced tomach that we
can use to our advantage. So if we just go in here, here, I believe this is
the ground that we make, I'm just going to copy
it because why would we make something when
we've already done it? We can even later on maybe use something like
stones in between here, but I'm not yet sure. I think that might be a
bit too overwhelming. So at this point, just let's
go back to our cobblestone. And now we can really get started with creating
our material. So that should be the
last baking error. Let's start by just pressing Contrave in order to
paste our ground. And if we just go ahead
and have a look over here, this one, we most likely
just need to re import. Yeah, I think I just
need to go ahead and, like, because you right click reload resources
doesn't often work. So let's just re import
this as a new one. Here we go. Turn
this the gray scale, hold shift, and
swap this around. And there we go. So yeah, now that you already are advanced in subsigner this kind of
stuff should be a lot easier. So we now have those little bits all ready to go, so
that's quite nice. If you just go to
go ahead and go to the brush material
render over here, we can go ahead and load it up. Here we go. Okay, let's go
to our free gam and let's have an extra look to make sure that everything
is now correct. Looks like it is.
Perfect. Okay, great. So that stuff is now also done. Ooh, let's not go
to our main camera. So that is one last
thing to worry about. Next stop is going to be that we were going to
create some ground. Just like in Atomic, we will do this only inside
of the normal map. Like we will have
in the height map, like our actual stone damages, but for the ground,
I'm just going to go ahead and add a
normal combined note. And I simply want to have
this norm map over here. Let's add a blend. And we are simply going
to blend over here. This norm map along with a
normal color node like this, and we now need to
use our first mask, which is going to be I
believe it's this one. Let's move our masks over here. It's probably this
one, actually. I was wrong. It's this
one. There we go. So that we only have
it in our norm map. We then go ahead and combine this stuff together, like
you can see over here. Set this to high quality, and then a few things
that we need to do. First of all, let's set
our normal intensity down quite a bit so that
it is not as strong. The next one is, I
almost feel like here. Let's go into a B&W spot and set the scale a little bit
bigger. There we go. Now we can set this actually
a little bit stronger, and we need to just
mask out our foliage. So if we just go ahead and add a quick blend after
this color mask, we can now go ahead and grab this foliage mask over here and simply add
this to a blend. I need to set this to be Art. Yes. Let's set this to art so that it will ignore that
foliage, and there we go. So that's a very easy one. Just like some ground
bits ready to go. So let's go ahead
and save Rasin. I'm just going to
have a quick look. Let's have it run rout. I feel like we can
probably make this a little bit stronger
if I go over here. Yeah, here, let's make this
no map a little bit stronger. So let's go into our nomap and let's
set this to like five. There we go. So it's
just going to be like this nice strong ground
because over here, it's also quite strong. Now that we have done that, I think that I actually want
to keep working first, mostly on my ground,
just completing that. And then what I
want to do is then I will move over to the stones. Okay, so what would be the
next thing for a ground? There are small specs in here. I can do those, but I can
do a simplified version. It would basically look
something like this. So if we add a normal combine after our normal Sorry, I
didn't mean to do that. Make sure to set
it to high quality because that's what I always do. And let's go ahead and
grab like a dirt one. Yeah, that should do the trick. And add a normal to this
at, like, a strong level. And then for this dirt one,
I just like to always go in and I like to add a blur, high quality first at a very, very low level so that it makes it easier for
me to then use the levels in order to get rid of some
of the amount of specs. So if I add the levels, I can go in my
normal map and here. If I just move my black
slider, I can just, like, reduce the amount of specks until we get something that
looks a bit more interesting. Let's set my blur
amount to 0.05. You see how that looks. Yeah, so that is still
very noticeable. Yeah, see here, that is quite notable if I go to Camera one. Now, of course, because
I decide to go in, like, a resolution for three, it's fine to actually
work like this because often these kind
of textures are tiling. But then, of course, if
you would go, for example, for a tiling of two, and while that is loading, I can just, like, go in here because I forgot
that rate raising is on, so it always takes a second. So here we got a right
click art frame, ground underscore normal. And then the next thing
that we would do is we would work probably on
the moss, here see. I quite like having this moss
that we can see over here. It's going to be a bit
interesting how I'm going to do that, but
I have a good idea. So first of all,
let's just swap back. Here, see. So like this,
you can see a lot better. But often even if
you go this close, you would, you would still not see this strong
inside of the engine. So if I look at this, I would say like term
of rate raising, I'm going to make probably these bits a little
bit less strong. So if I go in here, I'm
going to make these probably to like around
one and that should. Yeah, here, actually
let's do 1.5. And if I happen to see that inside of unreelEngine,
it is looking too strong. I can always go back and just change it. So
that's a nice thing. But often if it looks good, the Mm said it will also
look good inside of unwelEengine. So
we got this stuff. And yes, so now let's go ahead and start
working on our moss. So for our moss, you can see, we have these really
small strains over here, and I am going to kind of, like, try and mimic that. And I probably want to include my height map in this kind
of stuff. Now I think of it. So it's been a while
since I've done this, so please bear with me. What you want to do is you want to go ahead and
go into patterns. And first of all,
you want to have a single like a single strain, like a single hair you
want to create, basically. The way that I tend to do
that is I literally just grab it very because this
is going to be so small, I don't need anything
very specific. I'm just going to grab a square, and I'm going to turn this into a disc and just lower
down the scale. I then add a blend and I add a transform that will go
into the shape like this. Once I've done that,
I can just go ahead and I can set to subtract. And then if I just simply move the shape and maybe
hold contra shift and make it a bit bigger, you basically want to just get something and only focus
up until this point. Here, you get a single hair. Why I say only focus
up until that point, that is because I'm going to add the transform after this. And in this transform,
I'm going to set my tiling mode absolute. Remember this so that
it doesn't tile. Then it's just a matter
of scaling this up a bit and placing this
halfway like this. Scale this up a bit,
maybe rotate it a bit. And it might look silly,
but this will work. So we just got
something like this. Finally, in order
to make it look like this is going
into the ground, we are just going to add a very basic blend because remember, this is going to
be a height map. So we add a very basic blend, and then we add the
very basic gradient on top of it and set this
to be a multiply. See? So it just goes
from big to small. If you want, you can even go
into your gradient and you can add the transform in order to push this gradient
down a little bit to make it really go from
black to white like this. But again, it's very basic to just create like a
single little hair. Now, once you've done that, there's a few things
that we need. We need a shape splatter
or a tile sampler. Let's see. Um, Yeah, I think they can boat work. If they can boat work, I would probably go for a tile sampler, and this is because
a shape platter is often double as expensive
as a tile sampler. So in terms of the slowness. So we get this tile sampler. We basically plug it
into our pattern input. And down here in Patron, we just say pattern input. So now we have these hairs. We set like a ridiculous
number like 512 by 512. So that it becomes like,
really, really, willy small. We then set our scaling
probably up a little bit. And now comes the magic. So I'm want to have
this look like hairs, and the way that I'm
going to do that is I want to grab
a purlin noise. Over here, and basically just set scale bit higher and basically just turn
this into normal map. This is because we are going to fake creating a vector map. So if you set this to
a really strong map like ten, 20 maybe. The normal information can actually be read by
the vector map input. What is a vector map input if you input it in here and go in here to our tile sampler
Inside of rotation. We will have a vector
map multiplier, and it will basically ty
and warp around your shape. So set this to 256 by 256 because it's a
little bit 256 by 256. He see, so it will basically
twi and warp around. Now, if on top of this, we
set some scale randoms. Push our scale up a little
bit that it is overlapping. We want to go ahead and
set a position random. And once you set your
position random, it will really start to work because it will keep
the position random, but it will try and keep
warping around your shapes. If you do a rotation random. Okay, so a rotation random
will actually break it, but you can give it a little
bit of a rotation random. And at this point, here, if I set my pearl noise
a bit, let's see. I want to basically
with your purlins, you can basically
control how much of this random warping you want. So let's say
something like this. Now, I'm going to
add a very quick blurch high quality gray scale to my shape in order to make it a little bit
softer like this. Which will just make it
look even softer in here. So basically get this effect. Having this effect, now, it is not filling up
too much of the space. Two ways you can do this, or
you can just set your scale way higher until you get
something like this, and then scale it down
or you can duplicate it. I'm going to go for this way, and then I will just
show you a little trick. So if we go for this,
and if you go in here, you can see that well, actually, there are
spaces in between here. I will still show
you the trick just in case you just
basically do this. You basically add a blend
into the foreground. And you add a blend with like a transform
into the background, and you move the
transform around. I think I've already
showed you this, and you just set this
to be Max Lighten. And that will basically here. So you can just move this below it and that
will fill it up. And if you want, you
can even use a mask in order to mask out so that only the top layer will exist and only the
bottom layer will stay. Let's actually see if this
works. So we got this piece. It's way too big right now, but all we need to do is just add a simple transform and
simply press minus two. And then it becomes like
these really small strains. So if I would add a norm
map to this, like I said, it's the open GL, and I can see starts with just like
quite a soft angle. So let's start with 0.35. And at this point,
I'm going to start, for example, with my
blur high quality. Let's increase the intensity of that to make it a bit softer. I can go into my tile
sampler and I can scroll all the way down and just add some color random
which will just give us some randomized
intensities, like you can see, you
can see over here. So it will give us a lot
more depth to our meshes, which means at this point, you can also make this stronger. And we can just give this a go. So basically what I will first do is I first need to generate
a mask for actual moss, although that is
not too difficult. And this mask will also
include some height, and then we will just
make these on top of it. So for that, let's go ahead and actually start by
working on a height for this. We need to have there are
many ways you can do this. There is something
and it's called a height blend node over here, which might actually
be interesting. If we have the
height blend node, we can have the it. These pieces at the bottom are actual cobblestone
at the bottom. At the top, we need to
have just something that has some difference
in height in it. Let's go. Could a
pearling noise work? I don't think it will work
as nicely, but we can see. So we have this pearl noise. Strow this into the top. And the nice thing
about it is that you can set the height offset, we can basically
say, like, Okay, I want to blend this in here. So my pearlis smaller, then it will very nicely just
blend in these extra bits. Here, see, so I can just
blent this in certain areas. And the cool thing is it will
also give me like a mask. So, like this, I can very quickly just like
art or remove moss. And now, I am a little bit worried about how the
height will behave. But that seems fine, actually. I was even thinking
like I would need to have a mask to break it up. But honestly, when
I look at this, that might actually
already be fine, so it might have already given us both a blend and a height. So if we have the stuff, I think I actually
do not need to have this in my actual height. I think I actually
want to do that probably only my normal map. But what I can do
at this point is I can just set this
height blend in here. I have this nom map over here, and I can say normal combine, I want to have a
normal blend node because normal blend node is
just like the blend node. Plug this on top and plug in my blend height mask
at the bottom, right? So this mask will go up here. There we go, see. So that will now replace that with moss. And on top of that, I also want to do a normal
combine on high quality, and I want to set a
high quality greyscale, along with a normal in open GL and also plug
in my mask in here. This will basically
give us a little bit of an actual bump in it. See? So it will just
give us this bump. And I should be able.
So is it overlaying? Oh, it's overlaying
on my bricks. So in that case,
just like a blend. Steal your normal color and
steal this mask over here. There we go see so now
just masks out the bricks. And then what we can
do is we can simply play around with this
normal in order to also give the effect as if that moss below here is actually
a lot stronger. Okay, I'm curious if this worked exactly how
I wanted it to be. So if I just go ahead and turn on and off my displacement. Okay. I can see it happening
a little bit. Let's go. Into my free cam and
just have a look. Here it's happening, but I
don't know if I want to have, like, more of it or not. I think I want to have
my no map a little bit stronger and I want to
have slightly more of it. So if we go in here and I just like to look
at my mask for this, let's set the height offset
a little bit higher. So we basically are
a little bit more of that height map strength. And I want to go in here and I want to just set my
normal map to be also a little bit stronger in order to really give
me a push in the bump. And for the rest, I think
I would need to rely mostly on my actual
texture map for this. So okay, so yeah, the moss was a
little afterthought, but I'm happy that we are
going to include that. I think it will actually
look very cool. So else, yeah, you could
have done this in Zebra but Andre that I would need to go over on how to create
fibers and everything, and that is quite a
bit more complicated. And then it's not really a
beginners tutorial anymore. So we got our moss
sitting in here. We got our other stuff going on. I feel like we might
want to do something with my foliage,
but I'm not sure. So if we add a blend, we can grab the mask of our actual foliage and
just like art is on top, and set this to be a MAX
light and at a low level. I feel like this won't I just feel like
it won't look good, but I just want to give
it a ty to make sure. So this should be, that's
all exporting correctly. So if we go in here, I
basically just turn off my displacement and
turn it on again. Here. So now you
can see the height happening a little
bit on our leaves. Feels like we don't
really have the resolution for it, however. But if we go from a distance,
how does that look? Yeah, okay, I think we can just leave a little
bit of height in here. What I would recommend is that we like yeah leave it
around this string, but I would go in and just
add like a very quick blur, high quality gray scale. And just give it like here. If we go to our blur,
just give it like a very soft blur so
that it's not as strong and just
also plug this into your Ab inclusion so
that it will just support in the AO
a little bit more. Okay, so I think this is a good point to
stop this chapter. So we've pretty much
done the ground, at least done the basis. So in the next chapter,
what we will do is we will start focusing on
the actual stone and just include another
layer on top of this just to make it
look extra interesting. So let's save our scene, and
let's continue with that.
34. 32 Creating Our Stone Micro Noise: Okay, so we are now
going to work on our stone and just the rest of our height map and norm map. Now, when you look at this, there is detail in here, yes, and we are going
to create that. However, I would also argue that like many of these details, they are more like
in the base color. It's actually, we have a
really interesting base col, so yeah, you can see, this one
is a lot more interesting. I am going to go
for something like this and not so much this, even though this would
be easier to make. But okay, let's just
have a close look what kind of stuff that
we want to do here. You have some
generic micro noise, but we don't want to just
go for a soft dotted noise. We want to go for
something a bit sharp. As I said, here it's really
difficult to even see. Here you can see, these things we actually did using Alpha. Oh, here we go. Here we can
see what it looks like. This, but then of
course, it will probably be a little
bit less rough. Let's make something
up basically so that we can get it
in that direction. So let me just grab the correct
reference on my onscreen. Okay, so let's have a look
at all of this stuff. This right click t frame moss I just need to make this a
little bit nicer, at least. I put height. And here we have a mask. Normal. There we go. I'll
clean up later on. I rather do that at the end. So, we probably want to go ahead and start working
on this on the height. So having like a
sharp looking normal, basically, I have this
technique that we can use. We basically need something
like an ambient occlusion, for example, I just
need something to generate some details in here. If I go, I only care
about the stones, so I can just ignore the back, so I can set this really high. Basically needs very
strong details on my AO or on my stones. So here we can see
like this is how they would really look if we really
push the Amin inclusion. So that's already
quite interesting. Then I need to have
a edge detect. Oh, no, sorry, not edge detect. I need to have a It's difficult
quantize grayscale node. Basically what this
does is it basically divides your grayscale
into layers. Here, it's now a tree, but
you can see the more layers I add the more it arts here. So it's quite handy,
actually, often. So basically what to
set it to a few layers. So let's say like
eight, for example. And then what you want
to do is you want to go ahead and now
art and edge detect. And my hope is that the edgtect will give
me something that, here, I basically
just need to generate some really weird
looking noise on top that I can use
as like a very base. So we have like edge tact, playout with your quantize note. It's a bit tricky because
the stones are flat. So this kind of stuff
works better when it's actual rock because you have
a lot more variation in it. But I think something
like this could work, and if not, I will
find a different way. So basically, once
you've done that, you want to add a bevel. So now we're going to
soften all of this out. So I'm going to add
a bevel Let's see. Is this going to work? That's I was expecting a lot more white, but maybe maybe it
will work. Let's see. Our djitect probably doesn't
allow me to do much more. No. Okay, so yeah,
maybe this can work. So basically just add
the bevel like this. So now we have these interesting looking shapes and everything. And now what we do is we
will break up the shapes, and by the time that
we're done with the breakup and
adding a slope blur, it should look like a little
bit of, like, sharp chips, but the chips are reacting to the actual height
map that we have. So because we are
using this height map, they will actually react
to already these stones, and that's the important thing for this that they
fell into place and not like they feel like they are just slapped
on top of it. So that's what's basing my goal. So if I add a two
directional warps, for example, I can go
ahead and I want to probably grab like a
Cloud two for this. So Cloud two in a direction
warp is a little bit sharper. And then maybe also
grab a clouds two. Actually, we don't
need to duplicate it. We can just use a transform. And this Cloud two
is like minus two, so it's smaller and just like
somewhere off to the side. So this one set my warp angle. Okay, so I need to actually probably need to make this smaller already the first time. So let's set the scale to two. There we go. So we are warping it, and then
this direction, I'm going to actually going
in the opposite direction in the hope that I can kind
of push it back again. Here, so don't worry
that it looks really strange because we're just
completely breaking this up. The only thing that I'm a
little bit worried about is that we have all this
white in between, and I'm not sure if I actually want to use
that, but we'll see. Now, we can also try out like a multi directional warp
grayscale with the same stuff going on just to see
if if we can make it a little bit C. Sharper, so let's at the direction. Four direction is
fine. Let's set the motor probably minimum. So it tries to cut out
because chain actually, you know what I think I'm
going to go for chain again. So that's set to chain. So there we go. Cuts it
out and stuff like that. And once we've done that, now all I need to do
is I just need to add a very quick slope
blur gray scale and the slopbl grayscale. We've already used
it before using a moisture noise to make
it look a lot sharper. So in the slope bl gray scale, set the samples all the way up, intensity all the way down, and then mode to minimum. And now we can just,
like, set scaling to, like 0.05 I think
that might work. So, okay, so we got
this kind of stuff. Now, the only thing that I find a bit of a shame
is that over here, I add my embroclusion, but then it in between those
darker bits, right now, what I'm worried about is because we are moving
this stuff around, is that it will basically overshoot around these bits,
and it will be very obvious. One thing I can very quickly try to do in order to kind of, like, counter that
is the arte blend. And in this blend, I'm
just going to blend my I'm just going to
blend where my mask. I'm looking for this one. Yes, I'm looking for this
one, I believe. Yeah. So just this mask, I'm going to throw
this into the top. And then I just want to get
a noise that I will throw. So for example, cloud two noise with a
different random seat. Throw this into the
bottom. I knew it. I knew I had to use this one. There we go. So we have
a random clouds too. And then if we just go
ahead and like a blur to this mask so that we can
try and blur the stuff in. And hopefully, what this
will do is it will give me enough information in here. See, this is what I mean, that it will give me
enough information to basically start overlapping
in our quantize node, which hopefully in the ache tag means that we get
more stuff there. We start beveling it,
directional warping it, and now if it overlaps, it should not be as bad. This multi direction
warp is now a little bit strong. Tone it down. And maybe what I also want to do is I might want to scale up my moisture
noise, but we'll see. So we now got this
really interesting, but also a little bit
strange looking shape. However, this shape if we go into a non map, this is
what it will look like. So it will just
give us these here. Then a low level, it
will give us this. You need to, of course, look
at this one on a low level. So it will give us
these sharp little bits that are warping
around everywhere, and that's basically
what I want to get. Let's see. So I'm
pushing this out. Maybe, what if I just use my
multidirectional war Okay, so the multi direction rope, no, that wouldn't work as well. Okay, let's just
see how it looks, shall we? So, we got this stuff. I actually want to
artists to my blend, and I want to artist where am I going to
add this exactly? Okay, so that's my height mask. I need to add it separately
on both my norm map and my height map and
my norm map because, of course, this time we are not diverting our norm map
from our height map. So I plug this on here, and I'm just using probably the same mask like
we got over here. Let's actually There we go. I'm just going
to invert, gray scale. I'm not going to grab the mask. Just invert, gray
scale. There we go. Okay. And now I need to go
ahead and set this to be Max ten or not, multiply. I think you multiply like
a very, very low level. No, wait. Let's see because I do want to capture
mostly of the white stuff. So tsubtract yes, I guess
At subtract does work. Multiply. I was hoping
for Max Lighten, but it looks like
that we need to make it very light.
Okay, fair enough. Let's try multiply
and we'll see if it breaks our height map
if it still looks fine. So give that at a
very low level. And then if we go over here
to our normal combine, we want to go ahead and
so this is our ground Oh, no, sorry, this our moss. Ground at this point. So at this point, I can just add a normal combine. And then what I can be
confident with is that we are then just
cutting out the ground. So I don't need to worry about needing to mask everything out. So I can just throw
the normal in here, move it all the way over here, OpenGL, throw this in here, and then, yeah, throw in here. Setting density quite low.
I think this could work. Yeah, I think maybe maybe some of these edges
are a little bit too strong, but what we can do is
we can go in here in our moisture noise
and add a blur, high quality gray scale, leave the intensity
off and then just basically have a look at your normal zoom
in somewhere and then carefully just
move your blur, see? And that will just kind of soften things out a little bit. So let's say 0.3. So we got that
stuff ready to go. Now all I want to do is I want to just
actually preview this. Okay, this is starting
to look interesting. I have a feeling
like I need to just refresh my displacement map. Told you I had to refresh
my displacement map. Because what I can
see now is that it's way too strong
in my displacement. It's great in my normal map. I just need to go ahead
and really tone it down into my I just need to
have this very, very subtle. You can pretty much
not see it in here, but it will be
happening in here. Turn it off again and on again. There we go. So that's a lot more subtle, so
we still have it. But now you can see
that now we have a lot more interesting
shapes going on our rocks. If we go up close, here, see. So that already feels a
lot nicer and rougher. So I'm quite happy with that. And it does also, it does give
us a little bit of height, which is also extra nice. So that's looking quite good. I'm happy with that. So that
was actually quite spot on. I expected that we
need to do, like, a bunch of balancing,
but that's nice. So let's go ahead
and add a frame. I will call you Stone
underscore noise. Okay, so we've done that stuff. I think we are ready to move on to our base
color already. That's the thing
with this, there isn't much because we've done most of it
inside of seabush there isn't that much that
we actually need to do. So we got our sand, we got our moss ready to go. All we need to do is a base
color for that and we got our stones and those also
have some micronise. It is starting to look
really nice and interesting. Actually, it almost feels
a little bit tropical with this lighting setup
for some reason, so that's quite cool. I'm quite happy with that. At the frame here and
just call this masks. So what I will do is we will now go ahead and we will move
over to our base color, but we'll do that in
the next chapter. So we just need to grab some masks from
here, set them up, and this is actually going to be a very interesting shape to
create in our base color. So we need to have different
masks for different stones. And then once we have done that, some of these stones need
to have overlaying colors. But most of this, if
you will look at it, it might look difficult, but most of it is just
crunches, as you can see. So let's go ahead and continue
with that in next chapter.
35. 33 Creating Our Base Color Part1: Okay, so base color. A few things you take away. We are going to create
a base color, yes. However, these intense ones
that you see over here, we cannot really do
those because then it looks too obvious
in our tiling. So the base colors, they will basically have a
monotone look like this, but they will have
this interesting, almost like marble, sort
of like look or granite like look like you can see over here because this feels way
more interesting to me. So I think what we first need to do is we just need to
start by creating masks. So I'm just moving
all of this up. And I just need to create so we have these masks over here. That's totally fine,
but I need to go in and throw those into a flood fill over here so that I can now
generate my own masks for it. So then flood fill, we go like flood fill to
random grayscale. And this is why I wanted to make so sure that they are
not touching each other. Like this is very close,
but that should be doable. So flood fill to
random gray scale, and now we can say, like I I'll just make a
couple of variations. So then histogram
select on top of this I'm not going to
press space anymore. I'm going to go contrast
range like this. And now it is just
a matter of me duplicating this HGRm
scan like a few times, and this will just be used for overlaying different colors. So I just basically set my position differently
on all of them. So just give it like something that's a little bit interesting. There we go. So now we just have different positions in stone. And on top of that, of course, also just have a very base
stone. So that's number one. I will go ahead and get
started with actually setting my stone ready to go
for this kind of stuff. So if we go ahead and actually, we also have, you know, if we go to Advanced tarmac, we can actually probably steal our sand just like we've
done with the normal. So if we go over here for the sand, I think
it's over here. Yeah, so we got this send
over here, and why not? We can just as steal this? Because why would I make it all over again if it's
the exact same technique? So just go ahead and Contra Z, and then we can just,
like, adjust it a bit. Go to our cobblestone
and Contra V. Here we go. So, oh, well, I am missing something here, but doesn't Oh, it's
the white stuff. Uniform color and just
make it like a bit white, yellowish. There we go. That was what it was.
Okay, so this sand, it is a lot darker,
but it is also wet because the picture has just
been taken after it's waned. So I need to keep that in mind. So I do want to actually
go for a darker like this. And I want, instead of
having, like, orange, I want to probably,
like, go for, like, even darker spots
in between here. And maybe have the white, like, a little bit less strong. Something like this,
maybe in our color range, we want to go more for more like like a black dirt instead
of, like, a brown dirt. Here we go, same over here. See? So it's just going
to be more of like this more blackish dirt, but something like this
should be like a solid base. So we got this. What
do we have over here? We have a blend and we're just blending our foliage on top. That's fine. I don't
care about that. I want to go in here, and I want to start by adding
my first blend. So this blend will have
our send over here, and then it will have our stones sitting at top at the top. So let's just already
plug this in. And we can get rid of
this. So for our stones, we got some marks over here. I'm going to go ahead and I will use the gradient map method. I'm going to start with
creating a very base. So if we do gradient map, we can just grab our flood
filter random gray scale. Plug this in here. This week can turn
into, like, a base. So if we go for gradient
editor, and let's see. I think our base stone
would be like something, something in this direction
would be like our base stone. So if we go pick gradient,
let's see how far we can get. So first of all, let's
just do like oh, I cannot text C. Okay, so that stuff works well. Now I just want to see if I can already get some of those
interesting colors in here. Oh, that's a bit strong.
Okay. Okay. So we can get probably already some of the interesting colors
in here that saves us some masking. Yeah. So if we do that,
it's too strong. But if we go I think something
like this could work. I don't know, it might be
a little bit too colorful. So I might actually just
want to go in here and Wow, okay, that's not
working very well. I'm just playing
around basically, just seeing Yeah, something
like this would work. So I think I'm going
to go for something like this to get started with, and then we'll just
build upon this. So if we have a look, let's say that we got some very basic stones over here, stroll those into the top. Now all we need is we need to have probably like
this mask over here. You didn't see that, that
I did the wong mask again. So we will have our
mask over here. We have a ground below it, and then later on, what we would also have is we'd
have, like, a blend. And this blend just has
a little bit of dirt. So if I just go for add this brownish dirt
here at the top, I then just add a
dirt note down here. And it will ask me for
an ambi inclusion. I'm actually going
to grab this one because it's easier for me to just tone down my dirt
than to add more of it. And I'm also going
to get a curvature. And I'm just going to steal my my stone over
here. There we go. Open GL curve just
same thing as before. And if we just set our
dirt level like way down, I mostly just want to
have this on our stones. So play around a little bit
more with your grunge amount. Actually, you know
what the curvature. I will set it before we
add our micro noise to it, and play around a bit more
with your dirt level. So here. So let's say
something like this. And then in your mask,
you just simply want to grab probably like this one. Here we go and
that will just cut out our actual sand
and having this, we just plug it in here
into our pasty and we just give this
much lower level. Here we go. That will just already bring out
some of the shapes, stuff like that, and then we will add our foliage to this. This is the absolute most
basic thing that we have now, but now we can start
building upon it. If we're just going
to go ahead and oh, I already had my base
color ready to go. This is what it looks right now. It still feels very, the colors now feel a little bit cartoon. So what I'm going to
do is I'm going to go ahead and go into our grading map and add a
little HSL note behind it. And it's just to tone
down the saturation a bit to make them
a little bit more monodoneF now, like this, see? So now they're a little
bit more mon tone, but the colors are still there. The dirt in between is pretty close, actually, so that's good. Now what I'm going to do is now, I'm just going to
start by layering on top basically different colors. So we have all these
colors over here, what I'm going to do
is basically this. I'm going to actually
start by counting. So we have white,
one, two, let's see, one, two, probably
like a lighter color, like three, maybe darker Let's say four different colors
to get started with. So I'm going to grab a gung map like something that has
slightly large shapes in it. Clouds one, maybe. And then just throw
in a gradient editor. You can also do this
with just the clouds if you want to get some
generic colors in here. We then go ahead and we
just throw this on here, and we can just start grabbing some of the
colors that we want. So we go gradient editor, big gradient and
grab, for example, in here, and then you will
get these type of colors. I don't know why it moved
all the way over there. Whoa, that's a bug. That's probably because I'm
looking at it so up close. So we just have these
gradient editors. Yeah, see here, that's
definitely a bug. But don't worry. That's just because of my wird view setup. So if we go to number two, gradient editor, big gradients. Let's go for, like, some of
the why don't go for, like, the gum, you know, let's actually go
probably like here. There we go. So
that's some white. Then if we go for, like, maybe, like, Oh, why is MBC so
slow all of a sudden. Then we go for, like,
a more brownish. Yeah, something like
that could work. And then maybe, like, a
more yellowish white. Okay, that's just
like a bit strong. No. If this does work, I'll do it manually.
Come on, you can do it. Just give me, yeah, you
know what that could work. Okay, so we got those pieces in here. That's
all looking good. I'm going to go ahead and I'm
going to here combine them. So we got this stuff, great. Now all we need to do is we just need to create some masks. So most of these seem like they are quite
they are grunge maps. They have some direction
to them and some specs. So the red one looks
like it has mostly. It's a combination
of some direction and having some extra
patches in here. That's no problem. The white seems like it is more patchy. So let's get started
with those, actually. So let's go for, like, the red one because
it's the most prominent one. So it has both patches, and it has both patches, and it has both direction. Now I know of a grunge map which is
called Grunge map 002, or grunge map 003 depends on how soft you want your
directions to be. I think I'm going to go for 003. And this one, here, if you
tone down the balance, it has, like, this
directional stuff going on. Actually, it's tone
down the contrast, not so much the balance. And if you like play around with our random seats, we can, like here, we can find
already some direction. Now, if we would combine
this using a blend and then find something
that's a little bit more in direction of patches, maybe like clouds, too, I like a different seed because by this point,
we've used it a lot. Maybe set the scale a
little bit lower and then add like a levels. Sorry if I go a little bit
quick, but at this point, we've covered this
so many times, it's just just this
quite basic thing. Sets the Max lighting. Maybe also push your white
slider up a little bit. So here. So now we have patches
along with these stripes. So at this point, you
would say, like, Okay, so probably I'd like a
transform because we want to say minus two to
make it a lot smaller. But we can use this as a very
generic mask. So let's see. We have our HSL note. Now I can add a blend note. What I can say to
this blend is okay, this one is going
to have my orange, but I do not want to have
my orange bits everywhere. Let's go to our
first his Crum scan. I actually want to have
it in a few more so I'm going to set my range
up a bit that we have it still in a few more stones then we simply
blend our mask over here along with the stones
and set this to be multiply. There we go. And then
we throw this in here. There we go. So we get
already some patches in here. So that's pretty good. Yeah. So we probably what play around a little bit
more like the intensity, but it's just like it's a
base to get started with. The stripiness over
here might be a little bit too soft, actually. So we might want to
go in and let's see, play around a little bit
more with my balance. And I'll see if I
need to blur it. But let's first of all, just
get the very bases in here. I feel like I don't
have enough space, so let me just move all of this over here. So those
are the patches. Now the next one that I would
do is I would say, Okay, so let's add a blend, and this one is going to
be some whiter colors. And the whiter colors, they
are a balance of having these patches and sometimes just having something
a little bit bigger. And I have a good feeling if we would use
DRT one for this. And set the levels a
little bit lower so that we mask out some of
the more smaller bits. Also, we've used
dirt one before. So let's just
randomize a seat in order to get it's a little
bit more interesting. And if we then blend this dirt one and blend it with, like, maybe like a clouds
one and like levels on the clouds one and
just set this to be only some very small
patches like this, maybe make it a
little bit lighter. Throw this into our
blend and set this to be art and throw this into here. So this will just like some white patches, and
these white patches, I'm going to go ahead and
I'm going to You know what, I'm probably going to
delete these hecrum scans. I'm going to blend this and
I want to just go ahead and just duplicate this
histogram scan and just change my position so that
we still have as many, actually, probably
even more of them, but they will not be
overlapping with the old one. So if I set this to be
multiply, here, you see, so now some of them
don't have it, but then other ones
do still have it, and they also have
two colors in here. So we got that stuff done. Okay, what's the next one? Maybe like some darker patches. The darker patches,
we can probably do all over the place. So let's go for a blend. And these darker patches, they look fairly generic. So I have this mask which I would like to use
for fairly generic stuff, and we've used it before. It's called the Grunge
map 013 mask over here. And this mask, if I just
go ahead and, like, the first seat I never like, I always need to, like,
play around my seat. But then if I play out my
contrast and balance a bit, here, this could work, and all
over the place white. Yes. So I might want to just add the transform and scale
it twice to make it smaller and then throw our
darker patches on the top. Here we go. So we just get all of these kind of dark
patches sitting on there. So that's fine. And
the next one here, this is how it will look now. So by this point, we
get like this stuff. So let's see. So we
still are very monotone. Everything in here. I think maybe we
want to go for like we need something like
white specks probably, something to make this feel
a lot more interesting. So let's start with, like, some white specks.
Let's start by a blend. And these white specks, if we add the white pieces over here, What I'm going to do is I'm
going to probably let's see. Let's go into our
mesh adaptive in library and mask
generators. And let's see. Is there anything in here
that I might be able to use? Mm. I'm not sure
there is, actually. So I might just want to
make these specs manually. And if I would do this manually, I would go into noises. I would grab, let's say, like a dt one and
blend it together. And just splend this
scatter to something even more intense
dirt four over here, for example, and sets
to be like Max Lighten. Here we go. So we
get, like, a lot of dirt and everything going on. Here we go. So that will just
give me some generic noise. Now, I'm not sure
if I might want to like art to sharpen
to my dirt four, just to make it very, very sharp in the details. Here see the taxi does work. So let's set our sharp
into round one for our dirt four. Here we go. So here we just keep layering on top pieces until we get
exactly what we want. So we got those colos. We got the dark colos, although they might be I
might want a bit more, so let's add our contrast
and balance up a little bit. Yeah, dark colors, we got
that stuff. We got our specs. What was this one? This one
was like a more orange color. We can throw that one
on top everywhere, probably because everywhere
it does have some orange. Maybe I will go for some I don't know,
maybe I'll do, like, some orange teaks
because we do have, like, some streakiness
going on over here, but it's not as interesting. So let's go ahead and
leave at this point, before we add our generic dirt. Let's add a blend. And in here, let's throw our gradient
map in the top. Let's move our masks
so that we have, like, a bit more space. Okay, kind of what kind of
noise shall we do here? It's tricky. I know
of one grunge map, which is like this leaks thing. Here, grunge map 006. And when you tone that one down, it shows these kind of leaks
that we have over here. If you like play around with
the contrast a little bit. Now, if we would
add a transform to this and then blend
them together, Let's blend them
using a Max Lighten. Maybe move it around a bit, so we get
something like this. I should still be tilable. And if we now blend this
once more, and this time, I want to blend it
using a histogram scan over here so that we
don't have this everywhere. So let's say range
down and position, just give it like a random
different position. Sets to multiply,
same thing over and over and over again just in slightly different variants. So, okay, that is working, but what I do not like is how this looks very much
like water, basically. So I do need to go for, like, a better variant. So we want something
that has, like, the tiniest bit of red
in it, but for the rest. Yeah, I think I use this one. So grant editor. Mm. And there is something that slows down my computer a
lot when I do this. It's interesting. To dark. To bright. Come on, give me something that I like. Okay, I think something like
this could do the trick. Let me just quickly reset my scenes that my PC
is not slow anymore. So we got this stuff. Now, let's go in here
and let's just quickly delete some of the
more darker notes. Here we go. See. So now,
that's the one I wanted. So now it's a lot softer. So it gives me some streaks. These streaks do feel
very well, streaky. So I'm just going to go ahead and like a very
quick slope blur, and I'm just going to
break them up a little bit and just need something
like I don't know, maybe like a pearl
noise to break them up. Samples all the way up,
intensity down here see. And if we go, we probably don't even need to
go for minimum. We just want to go
for, like, blur and just set the intensity
very low, like 0.03. And play out with our scale for, I want to say it a
bit stronger, 0.06. Here we go. And I'm
just hoping that I can get a little bit more
softness going on. And then by the point
that we are here, it will be very hard to see. But we are slowly
starting to get, like, more and more
interesting details in here. Once we've actually
added our dirt, we can also do that
technique where we are a blend and a curvature, so we can go like
curvature gradient map. Actually, we already
have a curvature here. Yeah, you know what? I'm just going to
redo it because I want to have this curvature at probably a different
strength like this. Plus D on the gradient map to dock it because
we don't need it. Set is to be art
subtract and just tone it way down to
around 0.00 0.2. Okay. Wow, we've done a lot in a very short
time, all of a sudden. Let's have an actual look at it. Okay, okay, it's
starting to get there. We want to make the
transition between our noises quite a
bit like smoother. I'm also going to go
ahead and I'm going to go in my camera one
and probably just, like, boost up my sharpen
a little bit. Here we go. Okay, so next chapter, make the color
transitions better. I can now see some of these damages which are
actually too strong, but that is just like
our dirt that we need to reduce. So we're
going to work on that. Let's also create
like a base roughness because this is very difficult to properly preview without just having a little bit
of roughness going on. So let's go ahead and continue with that
in the next chapter.
36. 34 Creating Our Base Color Part2: Okay, so let's continue
with our base color. So I was going to go
in and just quickly reduce my dirt amount a
little bit over here. And then I wanted to make
my masks basically sharper. So for example, when
we have these masks, just basically boost up
your contrast quite a bit more to make the transitions
and also for these ones, just do the same to make the
transitions a lot sharper. And I think that will kind
of take care of that. I don't know what this.
Like a little bit of low resolution feel. So we got this one. These
ones are over here, which this one is quite sharp. This one is not,
so let's go ahead. Clam this down to make it
really sharp. Let's see. So this one, this one. Yeah, that looks pretty sharp. These ones are over here, which look not sharp at all. So let's set the contras way. And maybe like set our balance up to kind of compensate for it. Let's see, so we add this
stuff, which is very sharp now. But now that we have
increased our contrast, is also very obvious. So let's just tone down
our opacity a little bit. Then we add this one and
this one is a crunch map, and it can also use quite
a bit more contrast. Like this. So let's see this. This stuff, once again, contrast means that it also
becomes a lot stronger, so we probably need to
do some balancing out after this. But it's
starting to get there. So we're starting to
get strong results. So we have a sharpen here
and a sharp and here. T that might work. So let's
have a look. Yeah, see here. So that already feels
like quite a bit sharper. Let's see. I would say that
our t is a little bit strong. So let's go in here and just
like tone down the epic of our t. This kind of stuff
that we have over here, what am I using for this? You know what? This
one could actually have a bit more white in it. So let's go into our gradients
editor. Let's just fight. I think it's this one
over here that needs to have There we go, see? Let's make that
quite a bit whiter. I think that will actually
do us good. Yeah, see. Okay, the red can be now a
little bit darker again. I feel like now that
I made this whiter, I do need to go in,
maybe tone it down. So over here, we can just
reduce the intensity. This one, we can probably leave it because then we
add this dirt on top. Yeah, it's this one over here. I'm going to go ahead and just
add the levels behind it, and I'm just going to push my
black slider down a little bit to give it a little bit more spacing in
between because else, it feels a little bit too overwhelming. Let's go
for something like this. Here, this is
starting to kind of feel like what we
have over here. So, okay, so we got those
colors sitting over there. Yeah, that's looking
pretty interesting. I think what I want to
do at this point is, I just want to create
a very base roughness because I always find it difficult to really judge my colors without having
some roughness in it. So for our roughness, what I'm going to do
is I'm going to go ahead and are levels. And I will actually just
use this map over here, the output from our flood fill. Because if I clam this down, I can actually give it very
slight roughness variations. So it's stone. So
we do need to make this all quite light. Let's push this up a little bit. And then push up let's see
our black slider like this. Here see? So we just get
slightly different variations in roughness on our
overall stones. We then throw on a
blend and we say, Okay, I now want to have
over here for my dirt, I want to go for a
gray scale conversion, and I just want to grab
my dirt color over here. And then I want to add a
levels on top of it and just pushes all the way up so
that it becomes very light. And yes, I know I once again have mistaken
myself in the mask. There we go. So that's our dirt. Then what we can do
is we can say, Okay, I want to give a little bit of variation using some of
the masks that we have. So we have, for example,
like over here. So we can use this mask, which mask is also interesting. You can probably use this mask. And let's also add
another blend and just use this mask over here, which is our white mask. And then we can say,
like, Okay, so this one, I want to go ahead and I want
to set this to be probably subtrack just make it like that's just going to give it a little bit more shine. This one I probably
want to set like art. And this one I probably
want to go for also subtract to give it a little
bit more like those specs. And let's just see
how that looks. Be, at this point, this dirt actually doesn't do too much. Yeah, I might maybe I actually do want to
increase it again, but we'll see. So
we got this stuff. Let's throw it into
our roughness. Oh, one thing.
Let's add a blend. Let's add a gray scale
conversion and just quickly throw in our over here, throw in our foliage
and add like a level. So I do add the levels, but this actually
looks quite spot on. So just throw this
in here and just add our mask over here. I'm just holding
control and just duplicating it. There we go. Just to throw in some foliage. Yeah, okay, I need to push it, make it a
little bit lighter. Like that. Okay, foliage
done. That is ready to go. So let's have a look. So
let's drag in our roughness. Here we go. Okay, what do I see? I feel like I want to
make my base stones a little bit more shiny. So if we go in these levels, let's just tone it down
a little bit more, so it makes it a
little bit darker. So our sand our sand
can actually be duller. So let's push our sand up
more towards the white stuff. Like this. And then
we add this on top. So let's make this a
little bit stronger to make it stand out a bit more, and then we make this one a bit stronger, see if that works. Yeah, see, so now
you start to get a lot more interesting
roughness variation in here, which is what I wanted. So, okay, that's pretty good. So we got that
stuff ready to go. Now, I think what I want
to do is I just want to very quickly take
a first screenshot. I also do this just because it's nice to keep track of things. So if I go for
like 2560 by 2560, I'm sure that it's
still in the images. I will organize
this, but I like to keep a history of my
materials so that I can see. It's called this
cobble and render. That's done. Let's have a look. Okay, so this is actually
looking really cool. I just having a look
on my other screen, which is four k just because then I can have
a much better look. Okay, so this is
looking really cool. We got some really nice
roughness for spans going on, and we can see some of
the damages in our stone. I would say, let's reduce the strength of our normal
map on this a little bit. Let's try and get a little bit more color in between here. And then, yeah, we still
need to do the moss, but I'm first also
focusing on this stone. So if I look at this stone,
is this sharp enough? Maybe I will make it a little
bit sharper in our mask. We can simply do that just by throwing on, like,
a sharpen note. But for the rest, so, yeah,
we like my roughness. That's looking nice. I would
say that for the rest, so we got, like, some of
these streaks going on. That is all looking cool. I
think I want to actually get a little bit more
color variation in my overall bricks or
in my overall stone. So let's go ahead and
start with that stuff. So first of all, I wanted
to go ahead and I wanted to reduce my normal map, which is this one over here. Yeah. So let's just tone
it down a little bit more. So it's very subtle because
it's a little bit too strong. Now I just want to go in here. So this one, let's just go
in and make it even sharper. So if we go here, let's just boost up my
contrast even more. Same over here. So it just needs to have very sharp transitions. These ones already have
pretty sharp transitions. These ones are fine. The black ones, I actually
I am going to probably go in and just boost up my balance to have, like, a
little bit more of it. And then we have the
white specs, okay? So we got that stuff.
Okay, so now the colors. If we go ahead and go in here, Yes, I can probably try first to set my
saturation to like 0.5, like this, just make sure. But I think this
will just boost up the overall color and wouldn't really do exactly what I
wanted. So let's reduce that. I'm just going to go
ahead and I'm going to duplicate my gradi map. And sometimes if I'm not sure about exactly
what color I want, I just boost up like a
bunch of gradi maps, and then I just try
them out basically. So here I just open
them up and I just go, let's say, pick gradient
over here. Open them up. Big gradients over here. Even though the colors
are very different. The goal is for me to decide if I want to do some
other type of gradients. So I can do that. And now what I can do is
I can just go in, like, Okay, let's use this. And I keep my image over here. I keep my image on the site so that I can see and just
see the difference. Okay, so, I already like that color more, but
let's just keep going. This one it's more let's go and set our HSL
a little bit higher. So let's set to like 0.49. It's actually a re check. Mm. Okay. And let's go for,
like, the last one. I think I'm going to go
for the last one actually. I think the last one or not. So I'm a bit indecisive. It's very subtle. Let's boost up my Let's boost
this up even more. I'm going to go really
strong just to make sure that Okay,
so it is working. Okay, so this one versus Oh, so it wasn't yet done reloading. This one. Okay, let's go for the last one over here
so we can delete these. And now, of course, we do
need to push this back in. So let's say it to 0.5. And I think by this point,
because it is a four K, and we start to get
quite a large craft, I just need to give
it a second to actually update over here. But that is looking good. So yes. Okay. So we got that stuff
that's looking interesting. Now, another thing that
I wanted to do is, I need to convey that everything a lot is a bit sharper
because right now, this feels very sharp, but here the surface
feels very smooth. We have the actual normal
map sharpness in here, yes. But there's something else that we need to do on
the actual shape. So we're going to just work
on that a little bit more. First of all, though, what
I was going to do is I was going to go in my ground,
and I was going to, like, for example, play around with
the difference in color. Maybe something like this.
I do need to make sure that where my dirt over here is still the same.
Oh, sorry, here it is. Yeah, now the dirt is not as visible because
I made it lighter, so I just need to
push this up a little bit. So let's do that. There we go, so hopefully that will add a little bit more. Okay, so for this sharpness, a few things that
we can try to do. If I have a think
at this, we can do a slope gradient basically and just chip chip off some
of the edges that we have. That could be a good way of trying to just get
some sharpness in. So let's go ahead
and start with that. Let's add a slope
blur gray scale, just like an empty space. And I want to get
started by just adding my height map, this
one over here. And then for our slope, I don't know, or pearl noise
or probably a moist noise. Although, let's also try
a cloud two over here. Let's give all of them a go. So let's see how they behave. So if we go for samples, tone the intensity way down, It's blur to like minimum. Okay, so we got this one. We got the Perlin noise, which we would need to
very small in order to get more of the
sharpness effect. And we have our clouds. Okay, definitely our
clouds too now does a better job because it is
not all over the place, and that's what I wanted. So it's like at 0.0 806 maybe. Now, I just want to
check if I throw this or if I turn this
into a normal map, and I set it to like six. It will probably give me a
worse result than this normal. Yeah, here see. I need to start by just
overlaying those on top. The tricky thing is
overlaying them. Because of the way that
this slow blur works. Adding these details on top, it will just, like, increase
the strength of my norm map. So I need to do a
little balancing game. So if we go over
here, so we have this th these stronger
details over here. First thing I'm
going to do is I'm just going to add
a very quick blur, high quality Criscal
I'm just going to give it if we're going to a norm map a little
bit of like a smooth. Here, see. So just to
soften it out a little bit. What we later on probably
also want to do is we do not want to have these
details on the very centers. We just want to have
them around the edges, but we can play
around with that. Now that we have
this, I can go ahead and I do not want
artists to my curvature. I want the artist only
to my normal combine. Oh, I'm adding a blend. I need to add a normal
combine over here. Sets to be high quality.
Throw this in here. But now what you can see is
what will happen is here. It will try to
overlay these two, and it will just make
them way too strong. So at this point, first of all, let's set this
normal as low as we can without losing those
details. So here we go. And now what we need to
do is we just need to on the input of our blend map, add a very quick blend. I can remember we had a
normal color over here. So plug in this
normal color into our blend and then just play
around with your paste. So we look at our
normal combine, and the higher we set
this up until we are balancing things out a
little bit like this. So now they are balanced out, but we still get some of these
stronger details in here. So I can start by
just doing this. So yes, so I will
start by doing that. And I also probably want to make my wife's specs more obvious and more
stronger while I'm here. So these ones, let's go
ahead and add an HSL note to them to the actual color of my white specs and just push up my
lightness a little bit. And if we just go ahead and are levels and just make these, try and clamp these
down a little bit more, hopefully, at this point, give me a much stronger result. So if I now go in here, that gives me much
stronger result. And if I now go in and just tone it down
a little bit more, something like this, Okay,
let's see how that looks. It starts to feel a lot
sharper also around the edges, and we are running out of time for this chapter, so
I will end it off. We're just going and
generating another image. Okay, so here we go. So this was before, this is what we got now. So it's starting to
look pretty good. So we have much more
interesting colors going on. Our white specs and everything are now also a lot stronger, which brings everything out. I still need to work a little bit more like the harshness. Like it is starting
to work a bit better, but I still want to make
everything a little bit sharper. To get that feel, and we definitely need to work a
lot more on the ground. But let's also start
implanting our moss. So in next chapter, work a little bit more on the
sharpness of our stones. Then we can start by just
implanting our moss to see because it will probably
make a big color difference, and we can basically
take it from there. But this is starting
to look quite good. So let's go
ahead and continue.
37. 35 Creating Our Base Color Part3: Okay, so let's go
ahead and continue. We got a pretty strong
looking texture here, although some of the
colors are still a little bit off you can see
the blue over here, which literally only now that
I'm saying it, I notice it. Yeah, that might be a
little bit too intense. But we will go over
that later on. First, I want to focus a
little bit more on the ground. First of all, I want to
make my ground a little bit lighter because I made it too much in this direction,
but this is wet. And once I've done the ground, I want to put my
focus on the moss, because I think that will actually make quite
a big difference. So if we go here, we can
just go ahead and go to this uniform color
and just set it to be a little bit lighter. A bit more. Yes, I think maybe just a
little bit more. It can also go in like
to replace color. And in here, I can also
just set this to be like, a little bit lighter like this. There we go. See? And I'm mostly looking just like how it
looks like inside of the sun. So that's pretty good,
okay? We've done that. Now, I guess I could just, like, very quickly go in here, and, oh, God, I can't. There are so many stones. Let's go into our
HSL note and just set this to like 0.49. What I want to do is I want to literally just go into
the grading map and just select a few stones and
then change the texture, but we have weigh
many nodes 0.48. Here, because look at that. So yeah, that's the annoying thing when
doing this kind of stuff. So you'll see it's
mostly these ones. The other ones are
all totally fine. It's just these ones over here
that are being a problem. Now, I can, like, try and look. So the gradient editor,
you can actually scale the window out like this. But honestly, the chance
that I find the stuff. If I would do that, I would
literally just select rose and press delete and
then see if it changes stuff. So I just delete here, see. I can see that it's in here. So if I delete this one.
Okay, so it looks like it. So that's my technique of
how I would get rid of this. So I just delete and let's say now I want to focus on this. I only will need to
do this, of course, in areas that are very blue. I think it's around here. Yeah, it's around here.
I think it's this one. There we go. That was the one. So let's see. Did that fix it? Yeah, I think that fixed it enough that it doesn't
look as intense. And else we'll fix it
later on even more. So count. Yes. We were going to go
ahead and work on the ground. Now, for the ground,
we have the moss. But what I need to
make sure is the moss, it can very well be that
the moss is actually overlaying slightly
on top of our stones. When this is the case, I don't think I want
to actually add this to our ground texture
that we have over here, but after it, and this is just because else we risk that we
are cutting off our moss. So here we have our
ground texture. So if we go ahead and
add a blend after this, now, first things first is, let's go ahead and have a look. So, it's just moss, little bit yellow greenish. I would say that if I
go for a gradient map, and where is my
moss. Here we go. We have this one. We might
be able to actually use this and just simply drag
it into our granit map. And if we then go
ahead and just, like, grab the gradient. So gradient editor. Big gradient. Let's see. If I go for something like this, Ooh, this one I like. Let's go for something
in this direction. Only the very dark
one over here, maybe make it a
little bit lighter and maybe a little bit more
yellowish. There we go. We just have a very basic color. So if we just plug this in here. Now, for our mask, I believe that we can just
use this mask over here. I think we can simply grab
this, throw it on here. Here we go. So now we get some of that moss sitting in there. How does that look once
we get at this point? Oh, I don't like
the black edges. The black edge shall most, here, the black edge shall
case by the curvature. I do not like that. I'm not a big fan of that.
There is another curvature, but this one often gives me
not as nice of an effect. It's called a curvature smooth. And if you just go
ahead and copy it here, it's like a very smooth
curvature. Oh, wow. Even this one is
giving me black lines, although they are not
as strong, so we could, like, have a look
and see before. Oh. Definitely. I definitely
want to have this curvature. In that case, what I'm
going to do is, well, I can probably
just literally use the levels and as long as I
push the black slider up, No, that is not
doing what I want. This does off the
work because it just these black lines are then, so strong that they map out. I can also just turn this
into a mask if I want. Here, I can do this. I just have this mask. And then what I could
do is I could go for a blend between my curvature and a uniform color and just make the
uniform color like gray. Throw this in here and
throw this into the mask. Oh, sorry, we need
to invert this mask, but just by going
into our levels, there we go, see. And
that got rid of it. I know it's a bit of a workound, but we can just dock this and we can dock this
and before you know it, it feels like nothing
has happened. Okay, I keep getting distracted. I was going to go in and we have this stuff over
here, so that is good. Now, I can already
just have a look, but I first of all, also want
the artist to my roughness. So if I go up here, I can add like a blend. And I probably want to just
add a gray scale conversion, just to still give it a little
bit of, like, difference. And then add like a levels. And this one, it's just going to be slightly darker
than the rest. So in my levels, I just push it up and I just go for this height mask that
we have over here. You see? So it's just a
little bit shinier. And let's actually
see how that works. Okay, so there's
very little of it. It's also it's way
too shiny where I have it. So let's
start with that. Let's just push up our
levels to make that less. And for the rest, I actually expected to see it
much more obvious. Yeah, like over
here, I can see it. But that is in my free came, and right now I'm more
focused on getting this to work unlike my beauty render. So it is nice that
we can see this. So the colors, they do work, although I think the
colors are a little bit monotone. So two things. One, let's go over
here into our colors, and let's just go in
here and maybe just add an extra button and
then just scale this down. I'm basically just trying to see exactly where my gradients
hit, see, like this. That will just give me hopefully a bit of extra interest
in between here. Now, I could probably
also fake this by adding a blend and an
ambient occlusion, just to fake the
depth a little bit. And we can just
copy our height map that we had already created. So let's set this very low turn on GPU optimization and just throw this in light
to the top and then select the line and all the gradient map in order to convert it from gray
scale to color, and set this to multiply. Here or see? Because I think that in this
case, that adds a lot. And finally, if you
want, you can add a very quick HSL and just push up your
lightness a bit to make it. Stand out more. So now I can just very easily change the color based
upon my lightness. There we go. Okay,
so we got that. The next thing
that we need to do is we just needed
to increase this. Even though there's
quite a bit here, I will just go ahead and
where are you? Here you are. I will increase it a little bit, not too much because
I don't want to go on top of my stones. So increase it a little bit, and then go in my
pearling noise, and maybe if I set
like a random seat that it is in more
interesting locations. Well, I'm really
surprised that I can Is it maybe my Ambien
inclusion if I tone that down? Let's just go outside of
rate race mode because this is a bit too slow for
me to play around with. Yeah, so amble inclusion does like a little
bit, but not as much. So maybe I just need to make
everything a little bit brighter in order to
make it stand out. I'll say this ambu
inclusion over here. In our random settings, yeah, it's like, I can see it.
It's definitely there. I think we just need to make
it a little bit brighter. So let's turn on tracing. Let's go back into substance, and I think we just need
to push the brightness. Oh, let's going here
out a little bit. I can remember that happen that happens more
often with my moss. Whenever I make moss
whatever feels very bright, it happens with more things. Whatever feels very
bright inside of substance might
not actually look that bright inside of
your actual material. Here, see so now I can
start just seeing it, seeing the moss over here.
So that's pretty good. The mosh height map. Yeah, the moss is having
height map detail. It's also good and it's
spreading across here and there. I think
that's pretty good. Maybe I will add a
little bit more, or maybe I can just change the variation to get it
exactly where I want it to be. Just as a little bit
of random balancing, because if you look in our mask, that is a lot of moss
that we have actually. Yeah. I'm quite surprised that we have this much and that's
still so hard to see. Let's play around
without disorder. It might just be it just has to do with the height,
because it's a high blend, it will just like
ty and blend based upon the height we have given it, but that
might not always work. So here, if we change
the pearlis scale, you can see our graph
starting to slow down a bit. Yeah, let's set our
Pelinis scale probably like a bit larger,
probably like 23. And else, I'm not too
worried about that. Like, it is definitely
showing up, so we can see it
in between here. So it's not like I'm too worried about
not having the moss. I can go ahead and I actually feel like when
it's in the light, I feel like it can be
a little bit darker, but I know that if I do that, we will not be able to
see it anywhere else. So maybe this is actually fine. Like maybe we are
at the right area. I think all I want to do
is just maybe increase my no map strength a little bit, which is going to be
this one over here. That is the two, just
to really blow it out and really make it
very strong and obvious. Yeah. Okay, there we go. I can live with that. I
think that looks fine. It's like this
extra bit of color, especially over here,
I will like it. And over here, it's
just like nice and subtle. So
that's quite good. We were also going to
work on the edges, but I still need
to do something on my colors because I'm
not very happy with it. So if we go over here, see, here, let's go into
our finals that I can see. Yeah, here, it's really
like these stones up here, still that are causing problems. So let me just drag
out migrate in cecal. So it's these ones most likely. Let's make this a bit
lighter. There we go, see. So it's mostly just all of those dark ones. And
now let's have a look. Okay, so we only have, like, one left that is way too
strong and that one. Oh, that's a little bit green. See, we just need to make
sure that we don't go too dark with our colors.
Think it's this one. Ah, see? White. Got
it white first time. So, let's push this one out. Is there anything
else that is very Over here, I can see one. I don't know. That one
is a bit difficult. This? Yeah, there we go. So it's in this area. Then I'm betting
that it's this one, the darkest one. Yeah, see. So let's go ahead and
just push that one out just to balance it out to make sure
that it's not as strong. Now we are very slowly. If you look at it, it is starting to look the same. So that's
what I was going for. Now, of course, this looks
quite a bit sharper, and I still want to see if I
can capture that sharpness, both in our base color,
but also in the rest. Now, the first thing I want
to try just for fun is I want to add a sharpen note after we've just done
our base colors, see how that behaves. And just set a low value because you would be
amazed that sometimes if you do it before you
start adding these kind of details before you
start splitting things up, that it could actually often
give us a good result. So we wanted to do that,
and we were going to add a bit more sharpening over here. So I was going to set
this probably to like 2.5 and let's see,
normal design. I don't think that's
too strong yet. No, I think that should be
doable. Let's have look. Here, see, everything does
feel quite a bit sharper. So that's good that we did that. So now, also the sharpening that we have
around our stones. Yeah, here, it's starting to pick up, so
that's quite good. I feel like that maybe my displacement is just like
the tiniest bit too strong. So let's say this to 0.018. There we go. And I'm doing
that on purpose with rate racing turned
off while I'm here, is there anything else
that I need to change? I don't think so.
I think what we can do is we can make
another screenshot, especially when here, see? Now I'm starting to
see it a lot more. Maybe it was that, here, see. It is the displacement that
hides it a little bit. But what we can
do at this point, I'm going to load up my images because I just want to see if
there's something that I needed to do
about the lighting. So before, after this
lighting is good. I actually want to I want to
have this lighting brighter, but I want to have more
of an intersection that is a little
bit darker, maybe. So if we go for our first light, let's set this to around eight. Whoa, that's a big difference. 7.1, maybe 7.2.
So let's just do, 7.2 and then just go to our
rotate tool up here and just like rotate it a little bit so that it's a little bit further down like this. There we go. So just a
little bit stronger. And then this one over here, I'm going to go for actually, I'm going to leave it at seven, but I probably just want to, like, push it back a little bit. There we go. Something like that should look a bit
more interesting. Okay, so we got that stuff done. Yeah, the only thing
that I now want to work on is mostly the sharpness. But for the rest, I think it's starting
to look really good. So yeah, let's make a
quick render of this just to make sure that I'm
looking at the final image. Okay, so that's done rendering. So this is the final render. I need to zoom in in order
to actually see it properly on my 1080 P screen. This is why it's so handy too if you have different
resolution screens or well, go for a four case screen
and just downscale it. But that could very
well be the problem in my case that because
I'm downscaling it, it always gives me this little blurry haze if I look right now I'm looking on my forke screen and on my fork screen,
it's looking awesome. It's very nice and
crisp and sharp, but here I only get that
when I really zoom in. So having a look at this, I'm not happy yet with the moss. I think I want to do is I
think I am actually going to reduce the intensity of my
normal map for that back. My dirt, I will maybe reduce the intensity
like a tiny bit. For the rest, these pieces are looking nice and sharp.
That's quite good. And I'm not, I don't think the colors
are too bad right now, so they are very colorful, but I think it just
gives an interest. It's going to be
slightly stylized vibe. That's what I'm getting from it. Our foliage is
doing really well, although the grass is getting kind of hidden at some places, but especially like these
pieces, they are doing great. Although it looks like there
are some masking problems. For the rest, I think we
get something really good. I almost feel like adding
some more foliage to this, so I might actually do that, but I will do that
as like a bonus. I had this idea where I
will create the material, but there are sometimes so many things that
we've already covered, but they're very fiddly. So it's literally me going
back and forth like 50 times, and I'm just going to add
it as like a bonus chapter. And this kind of stuff
might be part of that. So I will leave that foliage
as part of that because it's not very interesting for the tutorial, but
I will record it. So I'm going to go ahead and Here, set this back to one. I'm also going to go ahead
and wear my dirt over here, set this back to three. So that will reduce
those things. That is fine. Yeah, the colors, I was
happy with the colors. I'm just going to take the risk that they will just stay
looking cool like this. I'm going to maybe make my moss Here let's get rid of this one. Maybe make my moms a little bit more in the
direction of yellow. So if we go to the U, you can go in a
minus, here we go. 0.49 to make it a
little bit more yellow and maybe set the
lightness to 0.57. Here we go. So we just
make this a little bit more yellow. So that's fine. That's kind of like it goes together with our foliage
over here, that's good. So we got that kind of stuff. I'm really forgetful
about this stuff. Oh, yeah, I wanted
to fix the roughness because there's next to
stuff that I'm saying, I'm just thinking about so many different things
at the same time. So here we go. If I just
go ahead and, like, play around with
this to basically give these strains a
little bit more like an interesting vibe to
them. I can do that. Let's see. Also, maybe
a cool thing that I wanted to do just so
that I can balance it out is we can actually just add a little bit more
angling to our stones inside of substance if we want,
because we have the mask. So what I can do is I can
have this mask over here. I can add a blend, and then all I need to do
is just add a flood fill. Actually, I don't
even need to do that. I just need to flood fill
to gradient. That's color. Flood fill to gradient
because as far as I know, we've already done
the flood fill before if I can find it. There you go. They
are flat filled. So throw that in here, flat
fill the random gradients, throw on your angle variation. Just make sure that it's
tilable. Yes, it is tilable. And now I'm just going to add
a big blur, so high blur, high quality grayscale, just give quite a bit of blurring. Throw this on our blend at a blending mode that is
set to multiply, see? And now I can just very easily. And maybe I will only do this
here if we grab the mask, maybe I will only do
these to the stones. So if I just mask this out, I think I need to blur this. Oh, no, sorry, I think
I need to actually blur the mask to blur high quality gray skull on our mask. And this
is more for fun. I think at this point, it can't hurt fast just like
play around to things, see how they look so here. If I make this a lot stronger, I'm just curious if
that will since we are going for slightly
slightly stylized, I would say, it might be
cool for me to just do this, and then I just need to turn
my displacement on and off. Here we go, see. So that does a little bit of extra angling, which might be interesting. I'm going to make it a
little bit less strong, so I'm going to go for 0.25, and then we do need to
compensate a little bit by just setting our here, we just set our rundown. I set us back to 0.22 to basically push it out because we are multiplying it on top, so we need to balance it back
out the stuff that we lost. And while that is loading,
I can just as well go in here and start
doing some cleanup. So frame Roughness. Wow. Okay. So this is going
to be dirt cool. I'm going to split
it up like this. So mask creation. Let's grab all of these and
just like set them straight. Moss. I will also clean this up even more
off camera most likely. Ah, the frame,
paste, color, combo. Stone collars. Here we goes a little why it
starts look. A bit better. And the frame calls like base
color on the score extras. Here we go. Okay, so that will make it look
a little bit cleaner. Also, some cool stuff that
you can do if you need to, you can click on online, and if you right click
and press art a dot Node, it is basically like
a guidance note, which will make it
handy for you if you want to play stuff a little
bit more to the site. I rarely use it. I'm just
not used to using it. But I would only use it
when I do like studio work. And you can also,
select these bits to actually I thought you can. Ah. Oh, no, sorry. There is a way that you can, set the angle, but I forgot. As I said before, I
don't use those often. So if I need to set an angle, I literally do it like this. And I would only do this for lights that are very
annoying basically. So don't worry. I won't bother you with that. Here you go see so that you can make it look a little bit
cleaner if you want to. So yeah, same optimization path, I will do that stuff off camera, most likely, just because we've already went over it
quite a few times. It is just me lowering the solid colors
and wherever I can, I will also, lower my
masks and stuff like that. So it's not going to be
anything interesting. So I would say that
at this point, yeah, I think at this point that we are pretty
much ready to go. Here, you see, so this was the first
iteration that we had. Second one, third one. Oh, yeah, that's what I did. But I would say that
there is already a very nice difference between
these few bits over here. I'm actually going to make my
light a little bit bigger, and then I'm going to Oh,
wow, I'm way over time. Then I'm going to go ahead
and call this chapter done. Go so let's do that. Then there will be a
chapter after this, but this chapter is
like a bonus chapter. Your texture you can pretty
much consider done now. If you want to stick along
with the bonus chapter, which is just me making
very small tweaks, adding some extra foliage and I will just
have an extra look. I will just be
narrating over it. But the reason why
it's a bonus chapter is because it's a
lot less organized because it's just
me jumping all over the place and trying stuff out. In the real tutorial,
I would only twice stuff out if I'm pretty
sure that they will work. In the bonus chapters,
I just literally try stuff out for
the hell of it, for the fun of it because I like doing that kind of stuff. But anyway, I would say that this one is now
pretty much ready to go. Yeah, you have a cool turntable, although the turn table
doesn't render with rate racing until you actually render it out in the video. But rendering it out in the video, you can,
of course, do this. Simply instead of image, you go to video and it will automatically play
your timeline. So I'm going to save my scene. And for the people that
I don't see anymore, I hope to see you in the
photogram try chapter, which will be our last chapter. And if not, I hope that you enjoyed the
tutorial course so far. So let's go ahead and continue
with the Bonus chapter, and then we're going
to do photogram try. And then you know how to do environment
texturing for games.
38. 36 Explaning How To Capture A Material: Welcome to the
photogramtry material part of this tutorial course. This material is going to
be a little bit different. This is because with this part, we will actually go
outdoor and I will show you how to scan two
different types of materials. However, because
my audio quality would be very bad outdoor, I first want to give you a quick explanation on what
we will be doing, and after that, I will
show you the footage. I created outdoor
and narrate over it. Photochrom tre texts are created by taking
many pictures of a surface and then
converting those pictures into a tree mesh using
a specific program. The program that we will be using is called Reality Capture. I will personally be using a Nikon D 500 for the scanning. This is a DSLR camera. Now, scanning is very forgiving, meaning that you can even scan with a phone if you
really want to. But if you want to
get proper quality, I do recommend a DSLR camera or any other type of
higher end camera. They do not have to be the
absolute highest quality of DSLR cameras. Just a basic DSLR camera with a pretty decent lens
will get you very far. And speaking of lenses, I will be using a 17
to 70 millimeter lens. All true fixed lenses that only have one focal
size, for example, only 70 millimeter do give
out a better image quality. Often the quality difference
is so little that it will be very hard to notice
by the time that we get our texture
to game engine. And since I only
have zoom lenses, I will have to work
with what I got. Now there are a few key points
that we want to keep in mind when scanning
photogramry textures outdoor. The first one is that we
cannot have strong lighting. With this, I basically mean
that we do not want to have any shadows on our
surface when we are scanning. So in a nutshell, do not scan a surface when
there is a sun on it. The reason for this
is because those shadows will else show up in our actual texture and they
will be very hard to remove. This in turn will give our
material incorrect lighting. I personally think that scanning while there is
overcast to be best. However, you can also
scan when there is just a complete shadow
covering the entire surface. For the materials that
we are going to scan, we are actually going to use the shadow method because
the weather has been bad for weeks and this end up being the best opportunity for
me to actually scan. The next thing that
I want to talk about is camera settings. This one is a bit tricky because there is a balance
you need to try and capture that can change due to many factors like weather,
lighting, and gear. So on your camera, there are three points of focus the ISO, the shutter speed,
and the aperture. The goal is to get
sharp images that have good and plain lighting with
as little noise as possible. So let's address the ISO first. Setting your ISO higher will be great if you want
to lighten up your images. However, the higher
you set your ISO, the more noise it
will introduce. This is why I always try to keep my ISO as low as possible. I rarely go above 200, and I often just keep it at 100. Your shutter speed
can make your images brighter when the
shutter speed is low. However, the lower you go, the steadier your
camera needs to be because it takes
quite a while for the lens to capture all the light to make
your images brighter. This is why when I'm using my camera handhold,
which I often do, for example, for brick walls, I try to stay above 150 to 200. But when I use my tripod, I try to set it as low
as possible as I can. Again, depending on the factors, how much time I have
to wait and how low I actually need to go to
get a clear bright image. Finally, we have the aperture.
This is a tricky one. The higher the temperature, the sharper your image will be, specifically around the edges of your image that
often look blurred. But depending on your lighting situation,
the higher you go, the longer that it will take to actually capture
because you need to compensate this amperture
with your shutter speed. This is because the amperture
lets in less light, which means that for
the shutter time, it takes in longer to just get in more and more light in order to get the
image that you want. Now, this was a very basic
explanation of the three. I'm not a professional
photographer, so I hope I said
everything correctly. I do know, of course,
how to actually use it. So personally, I like to keep my temperature around
five for handheld, and I try to go higher, sometimes up to ten or even
16 when using a tripod, if I have the time to wait and the area of scanning
is not too dark. Now, this is a lot
of information, and many people will tell
you that you always will need perfect most ideal
settings for every situation. But this is not always possible. What I would say is that, yes, it is important to try and get the best settings that you can. But remember that by the
time you turn this into a final game texture
and it is in engine, some of that quality
will be lost anyway. So just keep that into
the back of your mind. For example, if that last
final percent of quality makes your life insanely
hard and it just takes triple or
quadruple the time, then from my experience, I find that it often doesn't make too much of a difference. Also, as for the file format, we will always be
shooting in raw because this will give us the most control over our image, and it is a general
industry standard when it comes to photogramtry, and I believe even
photography itself. Now, finally, I want to
talk about color balancing. I am using something called
a color checker passport. This is a card that
is full of colors. The brand that I am
using is called XRt. With this passport,
it allows us to get the accurate colors on our final images using color balancing tools that
we have on our computer. This is because when
taking pictures, there are always external
factors that get picked up, things like the blue in the sky getting reflected
into your lens, which will then be
converted onto your image. Using this passport, we can make sure that we have
the aqud colors that we need that
were also there in real life when we were
capturing our surface. Now, I will let you know
what settings I will be using in the next chapter when we are scanning
our services. And next to this, I
will also give you more information like what patterns that you need
to follow when scanning, and just in general, I will narrate over everything
that I'm doing so that you have a
full understanding on how to scan textures. So let's continue to
the next chapter, and we will dive in by
doing some actual scanning.
39. 37 Scanning Our Materials Outdoor: Okay, so let's get started
with recording outside. Now, this is the first time
I'm recording outside, so I hope that the video
quality is good enough for you. What I'm doing here is I just have this little tape measurer, and I'm just using
that to make sure that I'm scanning a
large enough area. So it's just basically
for me to just see that I'm having a square area that I can then measure out. Now what you see me
doing is I am following a specific pattern
going up to down. And basically the
goal for this is that your images are
overlapping by 50%. This is very important.
Every image needs to be overlapping by around 50%
based upon the last image. And that's basically
what I'm doing here. Now, I have sped
up this footage, so that's why it feels like
I'm going quite quickly. Also, this wall is in shadow. You can see that it is
only barely in shadow, but it was good enough
for my purposes. I just wasn't very lucky with
how the sun was located, and this was my only
time I could scan this. So getting near the bottom, I'm just switching
to my life view. I will, of course, give you all the settings that I
have used in my camera. They will be on my screen here and also the pattern that I'm using with the capturing will also just be displayed
on the screen here. So yeah, I'm basically just
capturing these images. And now what I'm
doing is I'm just taking a few close up images. I often do this because
it tends to improve the quality a little
bit more when we turn this into
a three D mesh. So over here, I'm just basically creating a few more
close up images. And then in the end, we
end up with I don't know, like 50 to 70 images, maybe 100. I'm not sure. So it is very straightforward
on how to scan. Most of the details I've already explained to you in
the last chapter, and the rest of the
details will be displayed on screen here.
So that was about it. Let's now go ahead and continue
to our ground material. So now we're going
to get started by scanning our actual
ground material. So over here, what
I just want to show you is a
tripod that I have. So for the ground,
I have a tripod that can go 90 degrees. These are actually very cheap. You can actually find
them on AliExpress, which is a Chinese wholesaler, and there you can find
them for 60 or $100. While if you would buy it on Amazon in the US or in Europe, it will quickly go around
150, something like that. So basically, I'm just
setting up my tripod and I'm making sure that the
legs are not visible. And then what I'm
going to do is I'm going to use my color passport, which I actually forgot to
show you the footage of that in our actual
wall scanning, but here you will see
me doing it here. I'm just making a
quick picture of my color passport to
use for later on. And that's basically
it. So I'm just taking quick picture, and
then that is already done. And now what we can do is now we can go ahead and we can move over to actually measuring out area that we
want to capture. So I'm once again using
my measuring tape, and I'm just placing two
small stones on the corners, and this is just for me
to give a little bit of an indication how
far I need to scan. So this is all just for me. Now, you want to
start by scanning from the bottom to the top. The reason that you want
to do this is if you go the other way around,
so you go backwards, you will actually see
the footprints of your tripod inside of the
sand and you don't want that. Now, this sand is
very forgiving. So, I can get away
with quite a bit because it's quite a
hard bunch of sand. So even if you walk over it, it doesn't move too much, so it's quite
flexible, I would say. Also another thing that
you can see over here is that I'm going a lot
slower than with my wall. And this is because, of
course, now this time, I have my camera settings
a little bit higher, so to get a little
bit sharper images. But intern, it does mean
that I need to wait longer. And that's what I was talking
about in the first chapter that you kind of need to
decide if you have the time. So here, I am waiting
a little bit longer. Now, I am actually going
to after this off camera, do another pass because I felt like I didn't make
too many pictures. Like I felt like I
didn't make enough. But yeah, the
general rule is have a 50% overlap on your
pictures, also for the ground. And if you want, you can
also create some close ups, although if you have very,
very sharp pictures, they are not always
needed. And that's it.
40. 38 Color Grading Our Images: Okay, so now that we are
done with our scanning, now we can actually
start by doing the color grading on our images, which will be the first step towards turning our
images into Tweed. So what I've done is in our source files into
the image folder, I found that that
was a good location. We have a photogramry material. Now, in here, I have
the wall material which has all of these raw
images of our wall, and I have the ground
material over here, which has all the raw
images of our ground. So quite a lot of images. It's quite a lot of data. I'll try to supply you guys only like the
necessary to keep it down. So what do we have here? We have over here these images that are the color
grading images. This one over here
actually isn't needed because I did like two
of them, to be sure. So we got that one, and
we got one in the ground. Now, first things first
is that these images, they are that NEF file. However, our color
grading program, which I will show you later on, only allows for DNG files. So we need to convert the
NEF file to a DNG file. I will be doing that
using lightroom. Here I have Lightroom and I have my two images loaded in here. All I need to do
is I just need to load them in, don't
change anything, just load them in and
once you've done that, all you can do is you
can select the two. Right click, go to Export
and then simply export them. Then we get this over here.
First of all, the folder. I have created a
folder that's called DNG and Re let's
get rid of that. That's an old thing. I have created a folder
that's called DNG. And for RS, I need to do
is drop down and here, I need to set my file
settings to DNG. That's it. Just press Export, and that
should now appear in here. There we go. Dot dng dot DNG. That's all we need
to do. Perfect. Okay, now for the color grading, I have this plugin. So every color passport that
you use often has a plugin, they need to have
it because else, how would you get that? You can use this plugin to
basically generate profiles, and those are, I forgot IPS. I think it's called IPS profiles that you can use inside of light room or other
programs in order to balance out the
colors automatically. Now, this is the one
that is owned by Xt. So when you go to, for example, you get an X Rt passport, you will get
information on this. However, you can always go
to Google and just type in X Right color grading software,
something like that. So the way that this
works is you grab whatever program you use and you simply drag
in your DNG file. It will then load in the image, and what it will do is
it will automatically detect all the colors. See here, it says load in the image and it only
cares about these colors, and it has automatically
detected these colors. Once it has detected those, you want to go ahead and
press Create Profile. Now what this will do is it
will automatically open up in a folder that is often already the folder that you need
to place your profiles. This folder that I have, it is called an app data roaming, Adobe Camera ra and
camera profiles. So you can take notes if
you want of the location. It's in your app data folder. However, I will show you also a way that you can just
manually select them. So if you want, you can save it anywhere
you want, basically. Now, I already created this profile because I
just want to test out. So I just called the Tutorial nscore while the score scan, and then you just
basically you name it, and then you press Save. Oh, a DCP profile. That's what it. I don't
know how I got IPS. So DCP profile, it's called. So you basically save it,
and now it will save. Now, this can actually
take a while. This could take up to
a minute or two even. So I will pass the video
until this is done. Here we go. So it
took about 2 minutes. Profile has been
created successfully. And yeah, if you have light room or anything that you
want to use running, you will most likely
need to restart it. Then you can just drag
in the next image, which is going to be RSND. It will to detect, and as long as you
have a good image, here we go, see, it will just
automatically detect this. Create profile, and I will call this tutorial underscore
Sand underscore scan. And let's go ahead
and save this also. Okay, so we have created our profiles and I have now
already went into Lightroom, which I restarted
and I've inputted in all of my textures, which
you can see over here. These are just the wall ones. Now, what I want to do is the
way that I tend to do it, there is an automated way, but I tend to just
click on the first one. And then if you go down
here, it's a profile, you can go to Browse, and in here, you can
find your profiles. So automatically it will have these profiles in here
that we have placed. However, you should
be able to also go. There was a plus, and here you can
import profiles if you have done a different
location, for example. But in our case,
it's already here. So this is Tutor your while. You just double
click on it, and it will slightly change
over here the settings. Now, this is very
subtle here, see? I know that there is a way
that you can turn it on off, but I rarely even use light
room to be very honest. So it is very subtle,
but the change is there. I think in the ground,
it will be much more obvious. So what do you do now? You just basically right click, you go develop settings, and you go copy settings. And once you've done that,
just go ahead and press Copy. And then I'm just going to press Contra A to select
every single image, hold Contra and deselect
that first image, and I'll right click Develop
Settings and paste settings. There you go. Give that second, and what it will do is it will basically just paste this
on every single one. Here, see. There we go. You can see by the icon. And I'm just always like to double check just to make sure. But now these are all
properly color graded. So that stuff is done.
Now, the only thing that we need to do is we need
to select everything again. And we need to export it. So I'm going to export it. What I will do is I will go into my wall and I will
create a folder. So these are walls,
create a folder that I'll call color, unco graded. Now, these images you will not get because that would
be way too much data. Every image is thirtyMB, so it will just be a lot of data for me to send to you guys. But having this done, we can
right click and we can go ahead and we can go
to Export, Export. And now I'm just going to
copy my location over here, color graded, select folder, and FR, let's see,
so that's all fine. DNG, or you can go for original. There isn't really
much of a difference, as far as I know, because
they both supply camera raw. I'm just going to go for DNG, and FRs yeah, everything
is just all default. Like we don't need
to do anything because we just need to export
this with our settings. I'm going to go ahead
and press Export, and it might take quite a while, but it will now export, once we've done that, I will do the exact same thing also to my Sand which I don't really feel like
I would need to record. But here, you can see
them coming in already. Let's go ahead and continue. In the next chapter, what we'll do is I will show you how to use reality capture in order to turn these images
into a TD mesh.
41. 39 Turning Our Pictures Into A 3D Mesh: Okay, so I have now color graded all of my images
and exported them, and I did the same
for our ground, as you can see over here. So that's all looking fine.
So we have done that part. That was probably
the boring part. So with our color
grading images, we are now going to
go to Realty capture. Now, Realty capture is
actually owned by Epic games. It's a really powerful
tool to basically do photogramry and convert our
images into three D. Now, licensing wise, it
works a little bit different because the licensing works in terms of credits. Reality Capture, it
used to cost like four or $5,000 just
to get a license. Nowadays, you just buy credit. So for example, I bought
3,500 credits for around $10, and I know from experience that one of these
materials takes 500-1 thousand credits
in order to capture it. So we can easily do that. So yeah, you will need
to pay a little bit if you want to use
Reality Capture. I believe there are free
programs out there, but I don't have the
experience with them simply. So what I'm going to do
is I'm just going to go ahead and I'm going to
select all of my images. And then I'm simply going
to drag those in here and give that a second to load
in, as you can see over here. So those are now all loaded in. Now, reality capture, another powerful thing is
that it's easy. It is so easy to use. Basically what we need to do and your PC will run very
slow after you've done that. So I want to already go
to File and do a saves. There we go. I just
quickly saved it. And now over here, this is
basically a tab that we need. We first need to go ahead
and press align images, then we need to
calculate our model and then we need to colorize
it, and then it's done. This process takes long. The align image
is quite quickly. It will only take a few minutes, but calculating the model can take depending on the
strength of your PC, it can take from a few
minutes to a few hours. So I'm going to go ahead and I'm going to press align images. And then what you will see is, you will see this happening. Now, by the magic of editing, we will get back to this when the images are done
with aligning. Okay, so reality capture is
done by placing my images. So as you can see
here, the system is really good with just picking it out themselves and
just understanding where every image is located. Now, what you will see here is that you will just have dots. This is just because
it's just a preview. If you zoom out, it
might look like a mesh, but we are going to
create mesh next. Now before we do that, there's a few things that
we can also do. Basically, as you can see
here, we have this box. I always go for a larger
area when scanning, but I don't need as
large of an area. So there's a few things
that I want to do. First of all, I like to always have the rotation
of my box is same. This sometimes
happens that it just gives me a bit of
an off rotation, but it shouldn't
matter too much. And then what you can
do is we can already turn this into pretty
much like a square. Now, I'm not going to
go for a full square. The reason I do not do this is because I do not know how
the final mesh will look, and I want to still have space to play around with
things, basically. So I'm going to go more
something like this. So the really drastic areas, which you can see
are just completely going off the map over here, that those are not included. The main reason I
do this is because it says polygon
count, basically. So it will make my PC run
a little bit quicker, but the rest we can do later on. So we got this stuff done. I like to save at
every stage because MPC sometimes tends to crash
on these type of things. So now that we have saved it and everything is ready
to go, yeah, it is. Now what we can do is we can go ahead and
calculate the model. Now I would not just
press calculate model. I would also always go down here and go for normal quality. The difference between normal and high quality is so minimal that I personally go for normal just
because high quality, it are so many polies that MPC just has a really difficult
time to even handle it. So I'm going to go
for normal quality, and this is just our
mesh, by the way. This is not our actual
color that we have. The collar is the one that we do need to have
at high quality. So this will once again
take quite a while. So I will pass the video
until this is done. Okay, we are back again. And it only took me around I think it was like 20 minutes, 15 to 20 minutes to fix this. So here is our actual
mesh, as you can see. So that's looking pretty good. Nice. Okay, so our mesh is done, and as you can see now we have done those nice little
cuts over here. I'm just going to save
my scene once again. At this point, that might
actually take a while, so I'll just pass the
video. Here we go. So my scene is saved, and we are ready to
go for our last step, which is going to
be the color rice. So what the color rice will
do is it will basically add vertex colors to our mesh. Now, because our mesh
is so incredibly dense, those vertex colors will just basically result in the
actual colors of our mesh. So we go to colo rice and we go to normal quality over here. I'm not sure this doesn't
take that long normally, but I'm honestly not sure
how long it will take. So I will pass the video
once more, and after that, our model is finally done, and then we can continue
into exporting it. Okay, here we go. So
here is our mesh, as you can see, very
nice and high quality and a nice high resolution. You can just zoom in very
high before it starts to go a little bit blurry.
Let's have a look. I like that, the
cracks and everything. And I cannot see any holes. Like this kind of
stuff we need to avoid because you can see that here, it starts to struggle
just because it's so going deep in there. But for the rest, everything
looks totally fine. I don't see any holes
here, maybe. Yeah, okay. So here, this one
we need to avoid. But now after that, I'm
really happy with this, so this looks really good. Okay, awesome. So
we got this mesh. I'm just going to go ahead
and do one final save. And now we get to the point where you would need
to start by paying. So if you go ahead and
go over here to Export, you can export your model. The first time you press Export, what it will show you is it will just show you like, Okay, if you don't have
any credits for, you don't have any credits,
please buy some credit. It's a very
straightforward process. But once you've
done that, you can go ahead and we
have photogram try material over here and Wall in my Export folder, I
made this folder for you. I'm just going to call this
WAL Underscore capture. Underscore HP. Here we go. And then I'm just
going to press Save. Just make sure that it is
a PLI. So you press Save. Here see now, it will say,
like, Okay, so I'm working. Let me just 1 second. Sorry about that. I
just had to log in. So of course, you need to
log in in order to get this. So once you have actually logged in, you will
get this window. So we have over here, the only thing that
I need to check is that export vertex
colors is turned on. So you need to make sure that
that is on, and that's it. So for the rest, everything
else, it's just default. You can just go ahead
and press. Okay. And it will start exporting. That's it. We will end up with
a nice PLI mesh, which is pretty much the
same as like an OBJ or FBX. It just is able to handle really high polygon counts
with vertex colors. So what we're going to do in the next chapter is we are going to go ahead
and we are going to jump inside of MamsetTolbg where I will show you how we are going to
bake down this texture.
42. 40 Baking Our Wall Texture And Balancing Them: Okay, so we're going
to get started by baking our mesh
inside of Momsatolbg. For this, however,
we need a low ply. So with a low poly, I literally mean
we need a plane. It doesn't really matter which twin program
you use for this. All you need is just
like a basic plane. Even scaling it up or down,
it doesn't really matter. So I'm just going
to have this plane, and the plane will
automatically have an unwrap. So I just have this plane, and I will just go ahead
and I will export this. And export file, you can go FBX, you can OBJ, it
doesn't really matter. I'm just going to go for FBX, and I'm just going to call
this plane underscore LP. I can actually use this for
every material that I have. I only need to export this once. Okay. Perfect. So
let's get started. So here we have Mamaset. Yeah, I didn't went over this. So Momset has a very powerful
baking functionality, basically. And that's what we
are going to use just because it's very easy. Momoset can actually
handle a lot of polygon. So I'm just going to
import, first of all, my low polyplne just to see
where it is. Here it is. Let's go into my sky, and I'm just going to make my, let's go for, like,
a simple color. Just make it like a dark color. This is just all so that I can see everything a
little bit better. Okay, perfect. So
we have our plane. The next one that we need
is we need a high poly. Now, importing this,
it might take a while because these would most likely still be around 30
or 40 million polis. Don't know, how much is it? 28 million, 28 million Poli. So it is definitely like a high resolution mesh, as
you can see over here. So this is the
mesh that we have. It's a little bit tilted,
but it doesn't matter. All we need to do
later on is just make sure that the plane
fits within this space. Now, first of all,
I want to actually display my textures
of my hypole. The way that I do this is
I create a new material, and I'll just call it HB and let's just drag
that onto my hypole. Now, luckily, Marmoset actually
has a functionality to showcase vertex colors. So if we go ahead and
go into the Albedo tab, we can go down to vertex
color. Boom, that's it. You can just turn
your roughness off to just make it a bit
easier. But here you go. Here's your mesh with the
vertex colors turned on. Now what we need to do is
we need to place our plane. So for our plane, we need to
make sure to make our life a lot easier that we place
it in the correct location. Now, if I look at this,
what might be easy is if I actually
grab my wall and I actually try to rotate it a tiny bit so that it is more
of like a straight wall. And at this point,
we can just go ahead and we can grab our plane. And I'm going to use W and E. I believe
that we've already went over this to rotate
my plane. Here we go. And I just need to start by let's give it
a rough rotation. Rotation can be a
little bit sensitive. But yeah, just using the
tools here at the top. Okay, so let's go ahead. First of all, let's decide
how large we want this to be. Oh, I think I need to move
this a little bit forward because this will save
you a lot of time. If you do this well now, it
will save you a lot of time. I think if we stop over
here and over here, that should be best. When you see a rotation
is very sensitive. I believe if you try to rotate it a bit further
away from the center, that it's a little bit slower. Now, the nice thing
is so the plane, the image of the plane will stay square even
when we scale it. So what I can do
is I can get away with very small bits of scaling, like you can see
over here to make sure that everything just,
like, fits correctly. So if I have this, I feel like
I need to rotate my plane a tiny bit. Like that here. So at this point, it should be fine because
the plane is basically covering most of the grout. But then here at the
top, it's definitely not fine because it is missing
in bits of pieces. And I rather have
it that I need to paint out stones
than that I need to paint them in because
painting them in later on to make them tilable is a
little bit more annoying. So I believe this
is pretty good. So here you can see that here, the plane pretty much covers everything as far as I can see. Maybe I'll oops. That's a bit too far. Maybe I'll move it out a little bit more. And yeah, just take
your time because Wi it all this saves a lot more time just to make sure
that this is correct, then doing things later on. Now, the next thing
that I want to do is I want to go ahead and I
also want to decide like, Okay, whereabouts do
I want to tie this? So that is a tricky one because this wall
is quite sloppy. Normally, you would
want to basically set your plane on
an empty space. So it would be like empty, tile, empty tile, empty tile. We cannot do that here because they're just all over the place. So what I'm instead
going to do is, I'm just going to
take my best guess. And if I take my best guess, I would say that probably around here should be fine because we have something some empty
spaces here, here, here, and here at the top,
it's like, very close, but I believe that this
should most likely be yeah, that should be the
best solution. We can always change
it later on if needed, but I think I'm quite
happy with this. So I have this stuff done. The rotation needs
to be the same as our al so that it is
very close to our Val. With that, I mean, for example, if I need to rotate it this
way, sorry, other way. That it's needed. So then here, just slowly move this
back and then you can see that when your
rotation is correct. See? There we go.
That is what I mean. So that it is very
straight along your wall. And now the last thing
that you need to do is you simply need
to grab your plane, and you need to
push it all the way back until you can
no longer see it. But you don't want
to push it too far back so that
you can actually go through the other end because
then we will cast proms. Perfect. So our low
poly plane is done. Basically, what will happen is that's where our texture
will be baked on. Everything that our
plane is sitting, everything that is
sitting in front of our plane will be baked
down into a texture. And that's what we're
going to do now. First of all, let's go ahead and very quickly save Arsene. Here we go. So I just
quickly saved our scene, and now we're going to
start with the baking. The baking is
actually very easy. If you go up here, there
is this little bread icon, which is the new bake project. Now, when you click on it,
this is what you will get. It's pretty much a
folder structure. Before we do anything,
quickly go to Low and turn off outer bake. So set this to none
because else it will try to bake while we are not even done yet
with our settings. Once you've done that, you have our low poly
plane, drag it under low. You'll have your
wall capture high poly drag it onto high. Now it will
automatically height, but you can just turn this back on. I love the look of this. That's the thing with photograms looks so cool right away. Anyway, the next thing that
we need to do is we need to go to low and we need to
basically set our cage. The cage basically means from which point that
it will start baking. If I set this higher, as
you can see over here, because if I would do this,
everything that is not included in the green
will simply not bake. So if I push this out, just
out like this, there we go. That is a lot better. So
now it will just basically bake this piece over here. And that's about
it. Now all we need to do is just change
some settings. So if we go into
our Bake project, we have over here our file type, or I mean, our file location, and we can go ahead
and go textures, photo three material wall. And what I like to do is
then make a folder that I'll call bakes just to
keep everything separate. And I'm going to go
ahead and I'm going to call this Well J wall. File type, you can
choose your file type. I personally tend to just go
for PSD and then press save. Now the next thing, samples. I like to go for 16 samples. It takes a bit longer to bake, but it will make your
bakes a little bit more crisp and a little
bit higher quality. For s, all of these
settings are default. They're fine. All you will need to care about is over
here the resolution, which I always bake at four k resolution when
it is photogramry. But if your PC is
powerful enough, you can even go higher, but it's not really needed.
And we have our maps. If you go ahead and
press Configure, you can choose which
maps you want. So if we have a look at this, I want to have here, let's just turn all
these off a normal map, a height map, do I want to, let's do an ambien clusion map. We can also generate our
mbenclusion, of course, from our map, but maybe it will give us a better
result if we bake it. And we want to have
an albido map. Oh, sorry, not albido, a vertex scholar map over here. And then we can go
ahead and close this. Now, the first thing
that we need to do is we need to go
into our height, and we need to go to this
little gear icon because the height settings are almost always wong at the first start. What I always tend
to do is I always tend to set my inner distance to zero and my outer distance
to around three, I believe. You can sort of see
this as levels. So remember how in levels, we have those two
bottom sliders. This is sort of the same that if you keep
these values too low, your height map
will not be strong enough and you will
barely be able to see it. But I find that these settings often just give me
the best result, and then we can
tweak it later on. So we have got this stuff. Now, the first thing
I'm going to do is I'm just going to
turn off my height, and this is because hype map always needs to be
baked in 16 bits, like when we go into substance, we need to generate
it in 16 bits. But at this point, we can go
ahead and save our scene, and then what we need to do is we just need
to go ahead and press bake when
it's done saving. It's a lot of jom try, so it often takes a second to save. Here we go. And now just
go ahead and press bake. Now, the first time
baking will take a while because it needs
to load in your hi poly. But after that, things should
be quite a bit faster. Perfect. So that is now
done, as you can see. And now what we need to do
is just quickly turn on our height and then set our format to 16 bits and go ahead and
press bake once more. And this time, you can see
that it goes very quickly. Okay, now I do want to,
of course, test it out. I want to make sure that
everything is correct. So I'm going to turn off my high pool and
I'm going to create a new material that I
will just very quickly call test, for example. Now, this material, just
drag it onto our low poly, and then we can get
started by importing our vertex colors,
which is this one. Import our normal, this one. Okay, roughness I
probably don't want. Let's go for our
ambienclusion, so ambiclusion. This saves me needing
to open them up into Photoshop here
so that I can, like, see, yeah, yeah,
yeah, that's nice. Okay, so we got all that stuff. And then the last one
would be our displacement. If we just very quickly go
and import that in here, now, I'm just going
to preview it. See? Yeah, this looks totally fine because we don't have
a lot of geometry, so then I would need
to increase it. Another thing that
you can do to quickly test it is to simply
use parallax, if you go to normals
and go to parallax. Parallax is basically
like a fake displacement. And if you drag that on here, set the depth center
all the way down, you can kind of see
that it is working. But of course, parallax is not as high quality because it
doesn't use actual geometry. But the goal is that I could see that the height map
is reading correctly. So now that I know
this, I can just quickly turn back on just
like a white material. And what I will do
is I will leave this scene like this for you guys so that you can
have a look at it yourself. But our baking is now done. So what we're going to do now
is we are just going to do some very quick balancing
using substance designer, and then we can go ahead and we can start by making the tilable. So here we are once again
in substance designer. So I'm going to just
make a new graph, and I'm going to call this um will underscore pre balance, the reason I call it pre
balance is because this is actually being done
so that after this, what we are going to do
is we are going to go to substance painter where we'll
actually make a tilable. But once that's done, we need to come back to substancesigner, just to out like
some final touches. So we got this stuff over here. Let's get rid of
all these outputs. Let's get rid of our metallic
map and our roughness map. We don't need those
yet. Here we go. Those will be in
the final balances, and now you just want to
go ahead and you want to import all of these resources. Now in the vertex colors, it always adds a new layer. So what you can do is, I believe that you can
just go ahead and turn off the vertex color layer and
only need the top one. So go at them because one
of them is low resolution. I just forgot which one. So go at the press,
okay. Here we go. And the only thing I
need to check is that our vertex colors is four
K because as I said, one of them is lower resolution.
But this is perfect. So what are we going to do now? We are just going to do
some very quick balancing. The first thing that
we want to do is, let's go ahead and let's
set our height map to be grayscale over here and let's set our AOMp
to be grayscale. Now, in our tmp, I always like to go ahead and art
in outer levels, just to make sure that
everything is pushed in nicely. Another thing is that
you want to make sure that your texture is straight. Now, this looks fairly
straight to me, but if you want, you can go ahead and just art
like a transform. Yeah, you can, like, tweak
it like the tiniest bit. This is the last
change that you can, because, of course, right
now, nothing is tilable. Yeah, this looks awful, of course, but that's something
that we will work on. So that looks pretty
straight to me. Yeah, that looks good.
So we got that stuff. Now, another thing that I'm
always mistaken in is if I just quickly add
the transform to this, which direction 180? Oh, no, no. Okay, so we are
in the right direction. So I just want to make
sure that I don't edit my texture upside
down, for example. So now that we have
done this transform, we've slightly
changed the rotation. We just want to go ahead and
we just want to over here, duplicate this transform and add this to all
these other pieces, like you can see over
here. Okay, great. Also done. Another thing that we need to do
is, as you know, as I've been explaining,
for our base color, we do not want to have
any shadow detail in it. So over here with
photogrammetry, it's normal that you always just get quite a bit
of shadow detail, and you can see that over here. A way that we can combat
this is if we go into our library and we go down
here to scan processing, we actually have something that is called AO cancellation. You can do with this
is you can plug in your color and then you can plug in your
ambien occlusion map. And it will basically
just cancel out all of these really strong pieces
inside of our ambien clusion. So if I now go ahead
and play around with my AO cancellation, I would say I will
set it to 0.45. Don't make it too light,
but now you can see the difference before and after. So basically just gets rid of all those really dark spots,
and that's really nice. Now this looks a lot better. So now that we've done that one, let's see what else
do we need to do? So we've done our
height. Oh, yeah, let's do a color equalization,
color egalize. Wow. Equalizer, I cannot pronounce. A color equalizer can often be nice for also your height map, but also for your
base color map. And basically what
it does is it will just make your colors
a bit more even. So you plug this in and you turn on input tiled like this. And if you press space,
you can see that now. See, your colors are
a lot more even. So that's basically
what it will do. It will make your
colors a lot more even. However, I found
that this also works quite well for your height map to basically even things out, which will make it easier for us inside of
substance painter. So if you plug in
our height map, it does not allow it because the height map is gray scale. So we just need to select it and turn it into
a gradient map. And I can just
press D to docket. Here. So now you can
see the difference. Where it is just a little bit more even and it
doesn't have that weird. It's almost like a fogginess or like a glow coming onto it. So often this does
give me better result, and else we will
just go ahead and do another pass
on this later on. So we have a height
map, our normal map, our column map, and our
amoclusion map, ready to go. So we can just go ahead and we can start by plugging these in, and we can start by exporting
these to substance painter. So plug all of these in here. Let's save scene, and I'm
just going to go ahead and save it into a
our sage folder. And we want to go ahead and
what the export is also. And now we can just
go ahead and we can export these things over here. So I don't know why,
but for some reason, I cannot really speak today. But, okay, so we are
going to export this, and I'm going to actually
export this as a Yeah, TJ file. For some reason, I thought that TJ doesn't support 16 bits, but it does because else
wouldn't have used it before. So we can just go ahead and
we can export all of this, and that should now arrive in this folder over here that I have in the two painter
folder. Okay, perfect. Now, because the next chapter is going to be quite
a large chapter, I will go ahead and
cut it off here. In the next chapter,
we will go ahead and we will go inside of
substance painter, and I will show you how to make this texture perfectly tilable.
43. 41 Making Our Wall Texture Tileable In Substance Painter: Okay, so we're getting close to the end of our wall
material, at least. Our sad material will
be a lot easier. So if here we are inside
our substance painter. Now, substance painter, I expect that you know a
little bit of the basics, but this stuff is going
to be super easy. Like we don't need that much functionality
within painter. We can just go to file and New, and this will also
feel very similar because we have
already done this. We already have used substance Ziner so this will
feel very similar. And we want to go ahead
and the first thing that you want to do is we
want to select a file. Our file is going to
be our low poly plane. So if we go to Expots
photogram tree material wall and just grab our plain
low poly over here. Now the next thing is
our document resolution. We are actually going to work at two K resolution because
we will later on convert this to four K. We will have our
normal map format. I just want to go
ahead and set this to OpenGL because we will be
working in open GL format. The only difference
really between the two is that the green
channel is flipped. Lastly, we just want to
import our baked maps. Now, I'm actually
not going to do those because this import will
automatically assign them. And the maps that I want, I want to assign
very specifically. So I'm just going to
go ahead and press Okay, and then this
is what we'll get. Now, first of all, you have
this weird split window. What you need to do is you
just need to go down here and go to two D only. Here we go. And if you just hold
out Middle click, you can just pen
around and you can just use your scroll
wheel to zoom in. So now we are going to
import our textures. If we go to file and
import resources, we can drag in the
textures that we have just exported from
substance designer. We can go ahead and set these
to be a texture over here. And then in the input
your resources, too, you want to go ahead and press Project PBR metallic roughness. That is the current project. I just haven't saved it yet. That's why it has
a generic name. So for example, now
that I've done this, if I want, I can now, for
example, save my scene, and I can just go
ahead and I can go to save photogramt
material wall capture, and I will just call this
wall underscore painter. I hope that will be
clear for you guys that this is this current scene. Okay, perfect. We have
our textures here. What I want to do now
is I want to just apply my textures
to my actual plane. The way that I can
do this is we have over here a layer editor. If you do not have
any of these windows, you can very simply
go up here to window views and here you will
find all of your windows. So we want to go ahead
and go to our layers. We want to go ahead and
delete this layer just by pressing the little
bucket or the little bin. And then we want to go ahead and press this little bucket. It's a fill layer.
What we can do with a fill layer is we can
basically assign a texture. All we need to do for
that is we need to go in and you can see
your base color. We don't need a
roughness, so we can turn off our roughness.
We have a height. We can turn off metallic, and we have our
norm map over here. Now we're missing
one. We're missing our ambien occlusion map. If you go to your texture set settings and you scroll
down to channels, you can go ahead
and you can press this little plus sign and you
can add in ambien clusion. Then if you go back,
you can go in here, ambien oclusion and now you have your ambien
inclusion node over here. The rest works almost like any other Mom said, for example, you just drag in your base
color into your base color, height into height, normal, into normal, and ambienclusion
into ambien oclusion. There we go. Now we have our texture that is now
mapped on our plane. The next thing that we need
to do in order to make a tilable is we need to
set our offset over here, if you go here at
the top 2.50 sorry. By 0.5. And now we can see our seams.
So let's have a look. Yes, we did a pretty good job at placing our plate,
as you can see, because the seam is pretty much everywhere on the grayness. Now, over here, if
we have a look, so this one is easy to fix. This one is going to be a
little bit more interesting. We will need a little
bit more space. So yeah, these pieces, we definitely need those are going to be
interesting to fix. This one is going
to be annoying. The reason why it's annoying is because it just doesn't
have enough space, so we need to move
some stuff around. Same for these ones,
like Hmm. You know what? I might want to
actually go ahead and rebake this. I'm not sure. So I know that my bricks over here are
already really long. So I think I can
get away with it. But then, of course,
these ones, yeah, we would have then
a lot more space of grout in between them. So it would be more
like the grout that you can see over here. And that's going to be
the tricky thing in this. So I just want to
make a decision. And if I just have a quick
look at Mamoset here we go. So this oh, sorry, there we go. So yeah, this is basically
the important thing. So now is our chance
to still change it. Once we start, it will
be a lot more annoying. So right now, I am
mostly focusing, I believe, on just getting
these pieces around. If I just go to my plane, and I'm just going to go
ahead and just press W, I'm going to move
my plane forward, and I think I'm just
going to do a rebake. I think what I want to do
is I think I want to move this a little bit
to the side like this so that it is covering mostly like the
center of these stones. There's only so much we can do, of course, but I think that
this will be the best thing. So if we now go ahead
and just push this back, let's push it back a little
bit more. There we go. Make sure that our cage is
still correct, which it is. So I'm just going to
go ahead and I'm just going to very quickly
press bake again. So it will just over
wide all of our files. That's why it's not that big of a deal to just rebake now. So I will go ahead
and bake this. Okay? So the baking is done, and I've just re
imported them into substance designer and
export them again. Now, I must apologize because I do realize
that I could have just double check this in substance designer
instead of painter. So I am sorry for that. But as you can see over here, like this stuff, it's
a lot more manageable. This brick wall, I did choose quite a difficult
brick wall for, like, our first material,
but in the end, it will also be a very
interesting looking. So now that we've got this, what we can do is we can go ahead and we just
need to go in here. We need to press
reload on our alts. Now, most time you
will need to go ahead and just very
quickly restart, or you can go ahead
and I believe that you can delete this and
then press Undo. I think this was a little
trick that we can do. But I'm not sure. Oh, no, wait here, we can just
re add this. That was it. So if we re art these
pieces. There we go. See? Okay, so these are
new important measures. Okay, great. So we got this stuff. Yeah,
we can work with this. So I'm not too worried
about this one. How are we going
to make this tal? Very easy. Double click
and let's call this Wal. The way that you want
to do this is you want to go ahead and you want to go down here and
add a little box, you want to add a
paint layer to this. In this paint layer, there is a specific thing
that you need to do. You need to go next to
the paint layer and you need to set everything
to be passed through. And this will basically
make sure that we are editing everything
at the same time. So in our height, pase colog
in our normal pass through, and in our ambien oclusion. You want to set all of
these to pass through. You can switch between
them here at the top. Now, substance painter has something that is
called a Clone tool. I'm sure that you're
very familiar with it if you've
ever used Photoshop. It is down here next to the
what is called Smudge tool. So the Clone tool,
the way that it works is we basically
just get this brush. What I like to do is, I
always like to scroll down to my alpha and set the hard
is a little bit higher. And you can scroll up and you set your size a
little bit lower. Let's pick a good example. Let's go, for
example, over here. The way that you can do
this is if you go ahead and press V on your
keyboard and click one, you can see that you
get this square box. This basically is telling us whereabouts our clone
tool will start. So I'm going to add quite a bit of grout to this that I
can art this over here. I then just basically click somewhere and I start painting. See? Es does it. So I'm just starting to
paint, and like this, I can just paint in an
entire brick like this. Now, this is just an example. Of course, you wouldn't
want to have two of the exact same bricks
next to each other. But the way that this would
work is, for example, I go, let's say up here, I press
V and I click, let's say, up until this point, and then I go here
and I basically just paint this brick in here to
make it less noticeable. You can see, there we go. So we just got this
brick, and now, yeah, we do need to do
something with the grout. And for that, I
often just tend to go ahead and grab some
grout from over here. And I tried to add that, but sometimes you
just need to set your brush eyes a little
bit slow, a bit smaller. This one is going to be a little bit tricky,
as I said before, just because the grout itself is not going to
be the most easiest, but in the end, we should be able to just get something that's
quite interesting. So you just see me basically
pressing V a lot of times, and I'm just trying to, like, I don't want to do
that kind of stuff. I'm just trying to
find some grout that is fairly plain,
maybe over here. Let's do over here. And
let's just try and art this. Now, I'm still not
completely happy about that. Let's go ahead and
press V, and let's just literally reuse this
grout over here. So as you can see here, the reason why I'm
not happy with it, if you go ahead and you
can scroll down here. So our base color
is probably fine. And if you just go
ahead and press C, you can swap between the view. So the base color is fine. The height map, it's
not looking very good, but we can live with that. I think it's a norm map. No, actually, you know what Oh, it's a normal map plus
height map. I see. So basically, we have this map, which what it is doing is it is converting our height map into a norm map and adding that
on top of our normal map. Now, I do not I believe
that normal mixing replace. I believe that's the one
that I can do to fix this, but I'm not 100% sure. So I would say don't worry about it too much because we won't have it exactly like this. We will just export
our own normal map. So yeah, I'm not too
worried about it. I just need to keep
an eye out and just press C while viewing that our
height map we can fix, but we'll see how it goes. So that's basically how we
can make this stuff tilable. Now we can also, of course,
do this with larger pieces. So if we go back into
our paint layer, maybe set our size a
little bit larger, we have this large
piece over here. If I go ahead and,
for example, grab, let's say up until see
this point over here, and I just go ahead
and I can just start by painting
all of this in. You can see over here, and
be a little bit careful, but once you've got
it, here we go. We can just paint in this brick wall and yeah, then over here, we do have some
interesting details, but that should be fine.
And that's basically it. Now for smaller details,
like you can see over here, you would just go
ahead and press V and just click around
this area and do this. That's a general idea of how
to make this stuff tilable. So it is going to be quite easy. And I will just now go
through the process, and I will do this in real time, just because this can
be quite tricky to do, especially with, as you can see how our height is sometimes behaving, but we'll
see how it goes. So here I'm just painting
another one like this. There we go. So we got that one. That's fine. Over here. If we can just, find
a fairly long one, that's why something like this, we can start start by
replacing it over here. And just art that grout, see. There we go. So luckily, because these
stones are really sloppy, we can get away with having
more grout and everything. Now, over here,
this one is a bit interesting because it
is exactly on the line, but what I can remember
is that over here, we actually have a
missing piece type of grout that we
might be able to use. So if I do this, and I just
like this stuff over here, that might just look
totally fine here, see? Yeah, I think we can
get away with that. Okay, so this one over here, oh, that one's really close by. I want to go ahead
and let's see. What can I grab? Let's
grab this one over here. And just start with that. Let's start by
painting it around here and just continuing it. There we go. Here, so we'll
have one brick over here, and then we just need to go
ahead and I'm just going to grab this rout
over here in order to kind of paint it in
out because I know that my height map will not be as
intense and I also later on, I can just polish up
my height map in order to fix it that I'm not
too worried about it. So I'm just going
to paint in some of this height information
that we have over here. And then later on we can
always improve it later. We can always improve
it if it's needed. There we go. Okay, so
we got that stuff. You can also hold
Shift and right click if you want to just
change your lighting in order to not have as strong
lighting. So we got that one. Over here, we can actually
also just, like, do this. There we go, just to fill
that up. So let's see. So we got those ones. Let's first of all,
start with this one. This one is very large, so I need to go in and probably try and find something
that's just as large. So Let's try this one over here. Let's make our size a little
bit larger. Here we go. Let's try this one. And I think I will start around
this point over here, and I will just start to, like, paint this in. There we go. See. That looks good. So
we got that stuff, and let's give it like that
little extra grout line that we have, and
now we can use, for example, some other
grout like we have over here in order to
basically fill this up. And, we can make
this quite sloppy. Let's make our brush
size a little bit smaller and I can grab
some grout over here. I am actually getting really annoyed by the way that non map. I never notice how
strong this was. But as far as I know, here, if I turn off my height
map, I guess I can do that. I guess I can turn off my t map. And because it is
the same paid layer, it should just add
the height later on. So we can do a little test if
I turn off my ight map now, and I just add a let's
say this break over here. If I grab something
that's um let's see, maybe this one over here. Let's go ahead and
grab this one. Press V. And let's paste it. Think if we start over here, that we should be
able to make it. Yeah, there we go.
So we are able to make that. So we got this one. I just now want to just double check if I turn on my height and just press C. Okay, see? Yeah. Okay. Perfect. So that
still works totally fine. So I don't need to
worry about that. So we can just go ahead
and we can turn off our height right now
to kind of, like, avoid that really strange look that I know that we will
not have in the end. I will go ahead and just also map a little bit of
grout over here. And for this one, I'm probably going to just go ahead and like, Okay, that might
be a bit too dark. Let's go over here.
Let's just map this and just grab
some of this grout. I would say that you probably
have a much easier time. This is definitely one of the more difficult brick walls that I've
ever worked with, but you never know that when
you actually are scanning. So I'm going to grab
probably this one. Let's grab this one over here. And let's just I think I want to give it most of the
space around this area. So let's go ahead and just
paint this in Here we go. Okay, so that's looking
good. So we got this one. Let's just finish painting
everything. Perfect. Okay. And then over here, what I can do is I can
just go ahead and I can just paint in Oops. Don't go too close
to your edges. It works just like the
Clone tool inside of Photoshop where if
you go too close, it will look strange.
But there we go. This doesn't feel
stnge because now that we have so much crowd
here and there, it will actually
feel like it's part of it. It just feels in place. I'm going to go ahead
and grab this one. And I'm going to paint
this one in nicely over here. Here we go. Something like
this. It's painting some of this crowd over here. Okay. And also over here, we kind of need to
do the same because it has given us
not much options. I'm just going to paint this in. I'm going to make my brush size a bit smaller, and
I'm just going to, like, just fix those really
small areas over here, just to make sure that
everything looks correct. This one is interesting
because it is mapped like this that might give us a little bit more trouble
because this texture now, the way that we
are tiling it, it will only work like this. Like if we go to our map and set this back to one or sorry to zero by zero, here, see? I will break in our tiling.
That's just how it works. So we need to go
from 0.5 to 0.5. But then for this map,
I do need to have a quick think about how
I'm going to map that. I think the easiest
thing is if I just like, No, wait, I cannot grab
one of those things. I'm going to have a
think about that. That one is a bit
of a tricky one. So let's in the meantime
just continue with the top, so we can, first of
all, finish that off. So we have one basic
stone over here. I'm just going to
go ahead and grab um let's grab like
this one over here. Make a part size a bit larger. So let's grab this one and place it all the way here at the top. No one will notice that
it's the same stone. That's a goal, no
one will notice that we are reusing
the same stones in order to make everything
nice and tlable. So we got those pieces here. Okay, let's have a look at this. This I can paint in. Maybe if
I just simply paint this in That we can get
away with it here because it will already
have an edge like that. I think that actually
does the trick just fine. So if I just do the same over here because it is
just on the edge, and I think we should not because else it becomes
a real pain if I need to fix that and
then I would need to have a quick look
how we would do that, but I don't think it's needed, and those situations
don't happen very often. Be it basically means that
we most likely need to change our offset again and
then change it back again. So yeah, okay, for the people that what you
can do is, for example, if I would then go for 0.3
by 0.3 and in my offset, I would need to look
at that specific I would need to
try and find that specific brick and
then fix it up. But yeah, this is so broken right now if
I do it like this. So I think we would
then be better off if we actually do that when
we reimport our texture. But anyway, I'm talking too much about stuff that doesn't
really matter too much. So over here, we
have a paint layer. Let's go ahead and let's just fix these really harsh edges
that we have over here. I'm just making my brush
eyes a little bit smaller. Here we go. This one
I can get away with. Over here, I still want to Yeah, play around with it just to make this look a little bit nicer. And, of course, I would
say, take your time. Like, I'm doing this
fairly quick now, of course, because I'm
doing this in real time. But I would say just
take your time, relax, and just paint away every
little problem that you have. You can see over
here, there we go. Okay, so we got those pieces. Is there anything else
like holes in my bricks? Because I can remember we had
one that we had to avoid, but I don't see it here. So I think we just never
actually included that one. So this is looking
actually pretty good. So now that we have this piece, now what we can do
is we can actually go ahead and we can export it. So this looks pretty much tylb in my eyes, as
far as I can see. So I can go ahead and
I can save my scene. And the way that we are going to export this is very easy. We are just going to go to
file and export textures. Now I will go ahead and I will
have another folder that I will call designer. Oh, sorry. To underscore designer. And in this folder
because we need to do one last pass inside
of substance signer, this is the folder where
we will export things. So PBR metallic roughness. If we just go ahead and go
to our output templates, the reason I want
to have a look at this is I want to go into my PBR metallic roughness because I need to make
sure that our height. Okay, so our normal is
going for normal direct X. Which is our converted
maps. I do not want that. I want to actually go in and
I want to grab a nom map. So that should be in here, I believe, here, normal. So what I'm instead
going to do is I'm just going to create
a new preset. A new preset is basically
just an exporting preset that allows us to say which
thing we want to do. If we go ahead and just copy
this value plus Control C, you can then go to presets and press the little plus sign and, if you just double click on
this, you can call this. Photogram underscore
export, for example. Now, the output maps that
we want is we want to go ahead and we want to go for one, two, three, four RGB As. And then you basically go
in here, you paste it, so this is going to be a base
color, you paste it again. This one is going
to be roughness. Again, this one is
going to be normal. Oh, sorry, not roughness. This one will be our height, normal and AO. There we go. Now all we need to do is we
just need to go ahead and Ambclusion up here goes
into embinoclusion, and just say gray channel. And then we want to go ahead and we want to go for
our base color, into our base color,
RGBA channels. We want to go ahead
for our height. That's going to be this height
over here, gray channel, and our normal is
going to be our normal over here. RGBA channels. Perfect. So now that
we've done that, all we need to do
is go to settings. In our open template, just
scroll all the way down and you will have
photogrammetry Export. The file type you want to
go ahead and set this to Targa file and the
size you want to set to four K because we are
going to export in four K. We can then just go ahead and press Export and then
save our settings. And that should
totally do the trick. So here we have our files. If I just right click
and just properties, four k, that's all totally fine. So what we'll do in
the next chapter is we will go inside of
substance designer. We will make sure that
everything looks correct, and then we'll do
some final balancing, and then I will showcase this
material inside of Momset.
44. 42 Finalizing Our Wall Material: Okay, so now that
we have exported, I just import it
into a clean scene inside of substance designer just so that I can have a look. And it is looking really good. There's just one
thing, that 1 stone, remember? Yeah, I
just don't like it. Ironically, I do not
mind this piece, but for some reason here
down at the bottom, it is actually
looking really bad. So I do want to fix that. But for the rest, here, you
can see that everything else, looks perfectly tilable, so
that's looking really good. You wouldn't even notice
how much work we did on it. So in order to fix this, this is going to be very easy. I'm just going to go ahead
and do another part. I basically just do
this. I just add a new fill layer over here and just turn
off the roughness, metal and metal,
revision on the score A. And all I need to
do now is just go to File, Import resources, and I just want to go
ahead and I want to import the pieces we just
exported to designer, and just input them as texture. And go ahead and set
this to be the project. And there is a way that you can avoid this at the very beginning that has some fancy tiling stuff where I believe you set
the UVs of your texture to be 120% big of your plane. But I personally, yeah, I tend to just do this
because it feels like it doesn't take that
my checks or time. So I just throw on
all of my stuff over here. There we go. I just temporarily turn
off my height map. And what I want to do
with this one is I simply go ahead and I just change
my offset a little bit. Oh, turn off your original wall. Here we go. So I
changed my offset and now I can just
do whatever I want. Now I'm going to actually
change my offset, so that it is still Oh,
it's a bit sensitive. Let's try 0.11. Here we go. Because this will
actually improve the tiling even more
because now we have a large stone down here and
a small stone down here. So that might just improve
the tiling a little bit more. So having that done, I'm just going to
go ahead and I'm going to now quickly add another paint layer and just quickly just set
everything to pass through. Normal am inclusion, but I'm quite excited to
see how this is looking. Here we go. And now all
we need to do is in our paint layer
we have over here already our clone tool selected. Oh, our clone tool
is very small, so let's make this a
little bit larger. Okay, what do I want
to place there? I'm going to go for I feel like this one might work
here, all the way up here. Just go ahead and press V
and just click like this, let's just go ahead
and paint this. There we go. Any
last minute things that we also need to change? I don't think I see any,
so that should be fine. Now what we can do is we
can just go ahead and save, and we can just reexport
this all over the same file. So we can just go ahead
and press Export. And there we go. Okay,
perfect. So that is done. Now, what I'm going to do
is I'm just going to go ahead and I'm going
to get rid of this one and also just right click and remove
my resources over here so that I now drag everything in here
and just press Import. Oh, sorry. I forgot that
we do need to turn on our height map when exporting this because se
D of course wouldn't work. So exportets Exports.
There we go. So now we also have
our hit Mt turned on. Now, this is input, but because we use the input function
another link function, you guys can use
the Link function. I just need to remove this
and reimport the height. Here if I do this, you can use the Link function if you want, because you already
have your file form. But because I need to
send this to you guys, I tend to just use
the input function because then it will just stay within my resources and I don't risk actntly
forgetting it. Okay, perfect. We got this stuff. What are
we going to do now? We need to go ahead and we need to generate a roughness map, maybe do some a little bit
more color balancing and we'll see how it goes and then
everything should be done. So I'm just doing the
same things over here. The aminocclusion
is already fine. The height map over here, if I just press space, maybe sometimes it's nice to just do one last color
equalizer on it. Over here. There we go, just to make sure that
everything looks correct or not. Um, Let's see. Oh, turn on input is tiled. Yeah, I think that
will work well. So let's go ahead and
add this to our height. Then we have our base
color over here, and we have our normal. There we go. Okay,
so for roughness, the way that we are
going to create this is going to be quite easy. It's very similar to our other materials that we've created. We are going to
start with a gray scale conversion and we are going to convert our base
color into a gray scale. Then we want to go ahead and add the levels on top so that we push everything
a lot more into the white over here, see? So just use my white slider and my middle slider to make
this all fairly bright, like you can see over here. Once we've done that, I always
like to just add a blend, and I like to always just like a generic crunch map in order to make it look a
bit more interesting. For example, I can
grab crunch map 013. I can add a transform
to it and rotate it 90 degrees just to give
it some directionality. And I can plug this onto my blend and set
this as a subtract. At which point I can just
use my opacity to tone this down like this. There we go. So we now have pretty much
our final texture over here. The nor map is looking good. Yeah, everything
just seems fine. I wonder how the
height map will work, but that's what we are
going to check out inside of Mamas at Tolbac. So for now, you can go ahead
and you can save this, and I will save this as
saves photogramt material, wall capture, and I'll call
this will un score final. Over here, and I will go ahead
and export this for you. And let's also turn on automatic exports when outputs change just in case we are going to play around with
our roughness even more. So we can go ahead
and save this now. Okay, so let's go ahead
and preview this. This is our Z brush material. So if we just do a quick saves, we can just as well save
this as our own thing. So saves photogram
tree material, and I will just go ahead and call this photogram theoncRnder. And I will also render
my ground in here. So I can go ahead
and press Save. Now, this over here
is atarmic material, but we can pretty much just
replace all of these maps, and that should already do the
trick. So what do we have? We have an
ambiencluson. Oh, wait. I'm going to turn off my
rate raising because it's, of course, very
slow. There we go. Okay, I'm the inclusion. We have our roughness
map over here. We have our normal map. We have our base color map, and finally, we have
our height map. Okay, it looks like that our height map is a little bit strong, so let's tone that down. But this is starting to
already look quite good. It feels a little bit sharp, and I don't know my roughness. Oh no, my roughness is fine. Let's go ahead and just
turn on rate raising so that I can actually have
a better look at this. Ah, yes, rate raising
definitely softens. This is just because
we, of course, made our scene like
completely dedicated to this. Let's flip our green channel
in the no map because I have a feeling like my
channels are inverted. Oh, no, no, they're not. Oh, sorry. I thought
for a moment that they were inverted. Now
they are inverted. Now you would see the difference if they are actually inverted. Okay, so let's have a look. Everything that we
need to change. Now, most of our changes will most likely be just
in the render. So we just want
to go to a camera one and just tone down
like this sharpening because we really boost
up our sharpening for cobblestone because they
were looking quite soft. So we got this. So that's
looking quite good. Let's go ahead and m do I want to make
my displacement a little bit stronger?
I think I do. Let's go ahead and just
turn off our rate racing, set our displacement to
be a little bit stronger. Like this over here. And we can go ahead and we
can go into our texture. And if we just go ahead and play around a bit with offset, Let's do something like this. Sorry, it's a bit sensitive. Okay, so right now,
the tiling is three. What if I set my tiling
to two? Oh, come on. To? Mm, that might be a little bit, that
might be too much. I think we want to stick
with three in our tiling. Let's go ahead and go. Let's
turn on rate raising again. Here we go. And let's go into our free camera so that we can have a better look at things. So it is looking quite good. I still feel like
my base color feels a little bit lower
resolution than I expected it to be compared to when
I checked this over here, this feels, okay, as, so don't worry
about this because that's just the thing
with photogram tree. It just often feels a little
bit lower resolution, especially with things
like bricks, because, of course, you need to cram in a lot of information in this. So I'm not too worried about it. We are going to use a
few tricks in order to hopefully improve our things a little bit to make them
a little bit better. But right now, if
I look at this, this seems quite right. Yeah. Maybe in our displacement, we actually want to maybe blur our displacement
like tiniest bit over here if we
just do a blur high quality color in this case, and that often just gives us because a displacement
doesn't need to be as sharp, so it will give us a bit
of a smoother result. There we go. Now, if we go
over here, we have our bitmap. Let's add a very quick
sharpen to this. And not too sharp, just like a little
bit of sharpening. So maybe 0.5, just to push it out a little bit more so that when
we go up close, it does feel like a
little bit better, as you can see over here. Let's see, our normal. I feel like our norm map could probably also use a
little bit of sharpening. Now, I need to be very
careful with this because I don't often sharpen
my actual normal map. But in this one of those cases where I just want
to try it out, basically. So let's see. I
think for the rest, everything seems
to be quite right. So it should have
outer exported. So if we now go back over here, let's go back into
our camera one. Here we go. So that's how it's starting to look a
little bit better. Now, another thing is
that I'm just going to tweet my render
a little bit to make it more towards
this material because, of course, our render it's
still like the base default. So I'm just going to go ahead. Let's start by going
into Light one, and I just want to kind
of like, let's see. I just want to see if I can get Light one to be a little
bit stronger like this. If we then go into camera one, I just want to see
if I can boost up my contrast a little bit
here because I think in this material like a
bit more contrast and maybe a little bit less exposure will look a little
bit more interesting. So let's see. So we got that stuff going
on. That is fine. Maybe push up by sharpening
a little bit more, not too much because I don't
want to make it look fake. Okay. So let's go into our second light so
our second light over here. It's really soft, so
I'm just going to, like, kind of push this out. And my third light over here,
I'm going to do the same. And I just want to basically
rotate my sky around. So I feel like that maybe this sky is not as good
for this specific scene. So I just want to
go into my sky, and I just want to see
something like a brick wall. Um, Eli Graffiti. Here, see. That adds like quite a bit more. So I don't know. This one, let's keep it in mind, but I always like
to try a few ones, as you might have noticed.
Ooh. Alli Narrow. Yeah, I know the lighting
is a bit intense, but I kind of like that. It makes it look
very interesting. So right now I'm going
to go for Alli Nero. Let's just quickly tweeze. No. Japanese apartment, no. CastleGate. No. Mm,
City Hall entrance. So everything City Hall entrance or we're going to go
for our Ay Narrow. Now I'm going to go
for the Ay narrow. I think that one, just gives me a much more
interesting look. So I'm just going to go
ahead and just rotate my sky around until I get
something that I like, something like this,
okay? So we got our sky. That's looking
quite interesting. Maybe make the top light
a little bit brighter. And then in our fork, just tone this down a little bit to make it a little bit darker. Something like
this. Okay. Now we have our sunlight over here. I don't know if we want to
play around to the brightness. Let's make it maybe
only like seven. And finally, if we go into our camera one and just play
around to the contrast. So yeah, at this point, I've already went
over all of this. I'm just, like,
playing around to get, like, the best possible
results that I can get. So we got that stuff done. We have a normal base color. Let's post up my ambien
occlusion a little bit. Here we go. I think
0.7 looks quite nice. Okay, so the only thing that I now have is
that over here, we have those really
strong details. These details
basically come from our height map over here,
but I first of all, want to just do that
trick that I've shown you before where we just make a quick render to make sure that everything's still correct. I'm going to set my shadow
quality to mega just to get even more
quality out of this. And then I'm just going
to go ahead and I'm just going to source files, images, photogramry
final renders. I will just call this brick
underscore wall. And safe. I'm just going to make a very
quick render just to make sure how this will actually
look in our final renders. Okay, so the final render
is in, and as expected, it is looking a lot better
in our actual final image. So this is great. So I'm
actually quite happy with this. I'm also looking at
it, for example, a four case screen now, and it looks so much better. So I wish I could show you exactly what I'm seeing right
now on my other screen. But now, it's
looking really good. Over here, we have, maybe
a little bit of leftovers, which are from our t map, but that kind of stuff
yeah, it's crowd. You can kind of
get away with it. And if you really want to, you could go inside of
substance painter, and you can very simply create a new fill layer and just
only have the height on it. And then if you go over here, you can, like, for example,
set this height higher. Go down here, art a black mask, and then you can only paint in this height, for
example, where you want. Oh, sorry. Yeah, just a brush. You can only paint in
this height where you want in order to kind of
fill those pieces out. So that would be one way of doing it. I'm
doing this very quickly. But like this, you
can, of course, make everything feel a
little bit more plain. But personally,
for this material, I think that is not needed. And for other materials, you often will never even
come across this problem. So it's like, yes, there are solutions for it,
but do you really need them? That's kind of like
the question. Now, for the rest, this is
looking really good. And as you can see, yeah, that's the power of photogramry. You can get really good
qualities really fast. Now, you might often higher resolution to get
those good qualities, and of course, it's
a lot less flexible. Like, there isn't much I can do. I made the roughness, which
is looking fairly good, but for the rest, there's
very little flexibility in what I can actually
do with this. But I'm very happy with this. So what we will do in
the next chapter is we will start working on
our very final material, and that's going to
be our sand material. It will follow the
same techniques up until the point after baking, because we will only be using substance designer for the sand material because I want to show you a more
automated process that doesn't really
work for something as complicated as bricks, but it definitely works for something that's
as tilable as sand. So let's go ahead and continue with that in our next chapter.
45. 43 Building And Baking Our Sand Material Timelapse: Okay, so welcome to the
ground material scanning. So what I did with this material is when I
was scanning, off camera, I also scanned, like, a few
different ground materials that are in the same area just in case that one went wrong. And I actually end up going with this one because I like
this one vastly better. This one, it has, like, some cool tie tricks in it, so just keep that in mind that the material might look slightly different from the ground
that we were scanning on. But for rest, everything
is super basic. Just align your images,
calculate your model at normal, and then go ahead and
go to colorize and just colorize your actual material. And this is what we got. So
it is looking pretty good. Now, once we've done
that, we can just go ahead and we can export
this as a hypoly. So same process as always. And now I'm just going
to go ahead and have a saves on my bake
scene for my wall, and I'm just importing my model and we are just going to
bake it just like normal. So it's just the exact same way. We import the hypoly, we reposition our plane. Add on our hipole
material over here, and then we just go
ahead and press bake. So it is looking really nice. So that's what I'm
going to do next. I'm, of course, always
double checking. For example, I found that those little sticks that you
can see over there. I didn't really like those.
So we are actually going to go inside of substance
painter and just like polish up the material a little bit before we
make a tilable inside of designer and making a
tilable inside of designer that is going to
be in real time. So it's bone BT lap, so
don't worry about that. So over here, I'm just setting my cage to make sure
that it is pushed out. At which point I can
just save my scene, and we can go ahead and
we can, first of all, bake our normal ambien occlusion and vertex
color on eight bits, and then we can bake
our p map on 16 bits. Now, I'm just going to
go ahead and import my low polyplne same thing
as that we've done before. Now, this time, we do not need to do any tiling or any offsets because I'm only fixing my material before it
has become tilable. So the process is the same. I add a fill layer. I add on my textures, and I add a paint layer
on top of that that is set to pass through
on every channel. But the only thing
that I'm doing now is I'm just cleaning up the current material that we have as she can
see over here. And it's just to basically get
rid of some arrows that we might have because you
never know when scanning, there might sometimes be arrows. And although the system, when
we turn this into t twice, it's best in order to fix those arrows. I cannot
always do that. So I always like to also
double check my material, and over here, see
like those sticks. I really didn't like that. There's just some other
details that I didn't like. I'm simply just painting those out again using my clone tool, and this one is a lot easier to do than, for example, val. So here you can see me
just basically doing. And, yeah, I'm just some pieces that I didn't really
like how they looked. I'm just going to get rid of those and just make
it look a lot better. And for that, what
you see me doing here is even in here, you
see me using, like, a zigzag pattern because I'm just double
checking to make sure that there isn't anything that I missed or
something like that. And that's what you
see me doing here. But for us, that is pretty
easy, so that's about it. So nothing too special. And once we've done this, you can just go ahead
and you can export this. Once again. Remember, export the height map as 16 bits
and the rest as eight bits. So the way that I do that is
I export everything as TGA, and then I also
export everything as a TIF file with 16 bits and then just remove the TIF files for everything except
for the height map. And once that is done, we can now go ahead and we can continue to the real time chapter where I will also give a recap on this.
46. 44 Finalizing Our Ground Material: Okay, so before we start, let's have a quick
recap of our time laps. So first of all, I went with
some different pictures than the ones off the ground than the ones that I have taken
in the actual video part. And it's just because with sand, I always like to just take, like, a few different surfaces because they can
be very different. And also because
sand is very noisy. Sometimes you might mess
up with the scanning, like I tend to do sometimes. So I always have, like, a few
variations. So we did that. They came out fine,
and then we went ahead and we baked everything
down just like before. And then one thing that I did differently is I just because we had a few pieces in our
sand that weren't really good, like the branches
and everything, and there were a few
spots that were missing. Although reality capture does often fill in the spots
that are missing if there's ever a tiny little
hole inside of your scan, for example, it will
fill in those details. But I just want to clean
up a little bit by hand. I didn't do any
tiling on it yet. I just went in to
substance painter, and I just basically painted out the stuff that
I didn't like. And this is what we
end up with. So what we're going to do now is
I'm going to show you another technique on how to create these textures
and how to make them tilable and this technique, it's a little bit
more automated. It's great for when you
have more noisy textures. Although with our tire tracks, they might be a
little bit tricky, but we'll see how it goes. And it's just a really nice
way to just quickly make your textures tilable using
substance designer this time. So I'm going to get started and just create a new substance. Let's go ahead and call
this sand nscoreFinl. Four K is fine, and
just press Okay. Let's close a Trey few. Now, we do not need
a metallic map. For all of these inputs,
we can just delete them. And now what we want to do
is we just want to simply import the from painter stuff. Let's go ahead and input that, and I'll pause the
video until it's done. Okay, so here we go. So what I'm going to do
is I'm going to turn my height map to gray scale and my ambiclusion
map to gray scale. And now I'm going to show you
basically two techniques. You have the fast technique and the little bit
slower technique. Now, the fast technique is fast, but it isn't always
the best one. So let's just go ahead
and start with that. So over here we have our bitmap. Now, the first thing I'm
going to do is I'm just going to throw on
a AO cancellation. By the way, we are in our scan
processing in our library. So Ao cancellation. Let's go ahead and
throw in our color, and let's go ahead and just throw in our ambien occlusion. Yeah, that's great. See? So that makes it a lot more plain. That's great. That
it looks like that. Okay, so we got that one. Now, I don't really
think we need a color equalizer.
Let's have a look. No, we might need
for a height map. Yeah, yeah, for a height map. So we still have specks of
green in here. That's good. So, okay, let's get started, and I'll show you with
this one, how it works. So in your scan processing
for the quick making a tile, you have the smart Auto tile. Now with this one, if
you throw this in here and you also need to throw in a norm map and a height map, it kind of needs those things. So over here, what I can do
is I can have the equalizer. You know what? Keep
your height map as color because the color
equalizer needs it. Here, see, so yeah, you can see that it just softens out
the colors a little bit, which in this case is great.
So that's what I want. So let's plug this
into our height map. Now a height map because
the height map is normally considered
to be grayscale, we need to convert it back into a grayscale conversion
again. But let's see. So we have a smart outer tile. Now, if we just double click
on this and we press space, you can see that it is tiling. The only thing that is a problem with this is that
depending on your texture, it sometimes leads like this
quite harsh line over here. You can try and fix
that or improve it by just boosting up your
smoothness and your blur. It will not actually
blur your images. It will just blur
the mask around it. And now you can see
that it seems to work actually pretty well
if I look at it like this. Yeah. Now, the grid
resolution basically just dictates because it's
displaying on the grid, if we set it's very
low here or see. You can see that it doesn't
have enough resolution, so it starts to be sharp again. But if we set it high,
it is able to do it. But the higher you go,
the more resolution gets, which actually
causes us sometimes to have a harsher line. I tend to actually
leave down here or see. So I try to always
find the sweet spot, which seems to be number eight. So that's looking pretty good. Now, another thing
is that we are losing quite a bit
of our texture. That's just the thing
that happens because it basically shings
down our texture, and then it does some offset
stuff in order to tie it. If you hold console, oh, sorry, not control shift. You can carefully here, see, you can boost it
up and you can try to get it to a location that you want to see if you can get a little bit more of
your details in here. This stuff I recommend
just for very, very basic noisy things like very plain sand or
something like that, like beach sand or
something like that. I will now show you
another technique. So this is this technique. I will not actually use
this technique because I have developed a better
one. Yeah, developed. I'm sure many people have
figured this one out. So instead, what I like
to do is I like to go ahead and I like to go
for the clone patch tool. Now, I think that
the multiclone yeah, I think we should be able
to use the multiclone. So let's have a
multi clone color. And then basically what this is, it's like a massive patch tool. So all you need to do
is you need to plug in whatever your texture. And now I first of all, need
to change some settings. So if I just make
this a bit larger, if I move this around,
you will see here, over here, look at this area. You will see that it will
start to move around. So it will try to, like,
patch everything around. Now, if we set our shape to a square, that's the
first thing that we need. And then another
thing that we need is we need to have this
shape to be bigger. I do not want to use the
scale tool over here. The scale tool does
not seem to work. Instead, what I tend to do is I tend to go to my height and set it quite large to like
600% and press apply. Let's see, 600 maybe. It arts on top. So you do not just want to go 700 because then it
will apply it by 700. So let's say 200
and press apply. Oh, you see, that's
already too much. 100 and press apply. Fine, 150. Apply. There we go. Okay, so now what
we get is we get basically just like
a stream of texture. Now, the way that
this is going to work is we are going
to place it somewhere. And then if we scroll down to the target offset over here, you should be able here. So if I go from my X xs, I should be able to move
this wherever I want. So if I set this value to one, maybe a bit more 1.5, here. See, you can see that it is
now on the edges over here, but it is tiling. So if I press space, it has
made it perfectly tilable. Now, we still get this
little edge over here, which I don't know. Maybe I do want to do like a color equalizer
in between this. I think that helps a
bit. But basically, another thing that
we can do is we have the same controls
here where we can boost up our blur and our smoothness in
order to make this, this is pretty much
perfectly tilable. I have a very difficult
time to see the difference. Of course, we still have
tiling over here at the top, but I have a very difficult time to see the difference
in tiling down here. So that's basically it. So we can use this to our advantage. Now, I think our tire
tracks, they are fine. What you can, of
course, do is you can, you can move this
around if you want, but, Alexi, let's
not move it around. Let's instead, if we just
set our target offset, we can have it only
just on the edge if we want to in order
to blend it better. But I think this
seems to be fine. Again, you can also play around with your
grid resolution. For example, here, if
I set this to eight, it seems to work even better. So that is the
multi clone patch. Now, we only have
done horizontal, vertical or we've
only done vertical. I now need to go ahead
and go for horizontal. You would think after 25 years, I would know the difference
between the two. So I'm going to go ahead and I'm just going to duplicate
this once more. Plug in output one in here. And this time, I'm
going to set my height. Set this to 20. And then to 80, 80. Yeah, I just want to
make it square again, and then set my width to 800. Here, now I can just move this. S, I want to try and
avoid the green. So I'm just going to move
this a little bit like this and then go to my
target offset and this time, just copy your X target offset, paste it into your Y, and
just for the sake of it, I'm just going to set my
target offset to zero. Here, see. So now if
I press space again, I'm losing that little bit
that little patch of green. Not that one, the top one. So basically, now I'm
just moving this around, and I just try to find an area
where the details are not as specific something
like this, here, see. And like that, we
have a very tilable. Now, we still like a little
bit of details over here. We can take those
out if we need to, but I don't think they will
be that much of a problem, only when we tile it
many, many times, but in a game environment,
you would often blend this with other textures. But as you can see, we now have a very nice and
tilable material. So because this is a
multi clone patch tool, we can go ahead and we
can actually use it for multiple pieces. And that's
what I was talking about. So although we cannot use it for the norm map because
you can see over here there's a setting because norm maps behave a little bit different when
we clone them. We can go in here and set
the input to I think three, because I think if we
just temporarily, yeah, we just like a gradient map, if we just temporarily
turn our AO to just like a color map,
that's totally fine. Then we can do that. So
here three and here three. The nice thing about this is
that it will just copy and paste the exact same
thing that we did for our base color
into all these maps. Just like this. So
now we have output one. Here, let's press space. Output two, and
output three. Da da. Okay. Now, the only thing
that we need to do is we just need to quickly
duplicate our multi patch. Let's get rid of the
beginning and set the input count back to one and just
turn on the is normal. Let's get rid of that. So you just need to wiggle around your slider in order
to make it update. So we plug in our normal
map, and our normal, by the way, is it I
want to go for OpenGL. Right now it's a Direct X. So I'm going to go in
and I'm going to type in normal invert over here. C, OpenGL. So it just inverts
the green channel for us. Let's press D to dock it. Okay. That's now also working. So that's step number one. So we've done our
color equalization. We got this stuff done. If you want to go ahead and get rid of this color because
it's too obvious, you can, for example, try
a replace color range, for example, plug it in here, set your source color
to be this brown stuff, your target color to
also be the brown stuff. Yeah, and she said, the
source range a bit lower. And then you just
kind of, like, wiggle this carefully into the white. But, yeah, you need to make sure that your
source color is like this really dark brown stuff. And then yeah, see, because it's very sensitive. But this way, you can, like, play around with
things and just make your sent even
whiter, if you want. But as I said before, I'm
not going to do that. So we got this. Let's see. Do I want to, like, throw on? Maybe like for the fun of it, I'm going to throw on
like a sharpened note. I always like to do that,
but my photograms at, like, a very low level, just to give it a little bit more
of that crisp feeling. So let's set it to
0.07, probably. And let's plug this
into our base color. This one is our height. I wonder how it looks
because in our height, it is much more obvious to
see those lines that we have. So we might need to
play around with this, but we can plug in our height, and we can plug in our ambien occlusion because it doesn't always just show up our nom map. And finally, all we need
to do is just create a roughness map for
which I'm going to go for a greyscale conversion, and I'm going to grab my
base color over here. Here, I'm going to
add the levels. Sand is dull, so let's
make it quite white. Maybe give it a little bit of some blacker or
some darker specs. Add another blend to this. Maybe thrown like a
nice little noise. Just for the fun of it. I know, clouds two, would clouds
to be too generic. If we set this to be subtract,
I think that's fine. See, just to add, a little
bit more glossiness to it. And actually, if you want, so sand often has these specks. So maybe we want to
also add like a blend. And this blend has, like,
a white noise over here. And then with the
white noise, if you just add the levels
and just push out the black slider to add basically less of these specks. Throw this on top and set
this to be subtract here. So it's like a low level. I can just give you that
little glistering effect that you often see with sand. So that might actually
be quite cool to have. So we plug this into our
roughness, and there we go. Base color, normal roughness, AO, and our height. And I think in total, making this entire material took
me around half an hour. So, of course, let's actually try it out. I'm
going to save it. And I'm going to go ahead
and textures photogrammetry, sand, sand underscore
final is fine. Okay, that takes a
long time to save. And right click Export
outputs as Bitmap. SAND Let's make a folder
called final. Select Folder. Taga. Yeah, that's fine. Automatic exports
when outputs change, and let's go ahead and export
all of that. Okay, cool. So here we are
inside of Mamoset. Now, this is our wall scene. I did just realize that we made our wall
scene really intense. So what I will most likely do is I will actually do a save as. I'm going to save
this as. Let's see. Where did we So I just need
to make sure that Okay, so we plugged it in here. So if we do the same, and I will call this saves photogrammetry, and I will call
this photogram try underscore render
underscore Sand. And I will just rename
this underscore Val. So let's go ahead and
press Save. Here we go. And now what we can do is
we have over here our L. I'm just going to go
ahead and turn off my rate raising to make
my life a lot easier, and I'm basically just
going to replace all of my al textures with something
else with our sand. So I'm just navigating
to my final, and here we go. So height. Normal base color, roughness,
and amen occlusion. Okay, that's looking
pretty good. That's looking pretty good.
You might not see it, but that's because we
don't have a good sky. So that's the next thing
that we probably ought to work on. Tiling of three. Though we may want to
go for tiling of two. I don't know, let's
stick with tree for now. So the first thing
I want to do now is I just want to
quickly go to my sky, go to presets and pick something that is more
fitting for sand, because this is, of
course, very intense. So if we go in here, let's
have a look Elli Graffiti. Me. Ei Oh, narrow we
already had Highway, no trees to plane. Beach rocky. And the beach rocky could work. Let's keep that one in
mind. Cars or courtyard. Also, yeah, I think
my roughness is actually too strong
now I look at it. So, you know, let's
also sometimes just play around with my sky
just rotating it around. Mmm. Come on, let's see. Courtyard cobblestone that might actually let's keep that one. I think that's my
favorite so far, but I always just
want to give it a go to try, like a few more. So let's see So
this takes a while, but I do want to keep
this in the soil, just because I like
playing around with it. I think I'm going to
go for that, here, because we do have like some
forest scenes over here, or like some more orange scenes. But I think they are often
a little bit too intense. So which one did we have? We have, like, the courtyard, cobblestone. Here we go. Okay, so let's go ahead
and go for this one. Play a little bit with your sky to get a more interesting look. Now, if I just going to go
ahead and go to my light, I'm actually going to
make it a little bit more orange like this. And I was going to
go to my Camera one. Let's make Camera one
a little bit sharper. Let's make my roughness if
we go in here. Let's see. Let's turn down or
tone down the blend. It's export and Oh, okay, automatic exports
is already turned. Okay, I'm going to increase
the specks a little bit. So let's go in here and just increase those
specks a little bit. Oh. Actually, this is bad because I'm not actually looking in it with rate racing, which makes a
massive difference. So if I just turn
on rate racing, it should actually
make There we go. That's more the quality
I was looking for. So I'm talking mostly
about the roughness. So the roughness, if you're
not using rate racing, you kind of need to make
your roughness slightly different because
it just gives off, like, a strange shine,
something like that. So, okay, if I have
a look at this, I'm going to turn
off my rate racing and just play around
a little bit more with let's see with
my displacement. It's not to go too intense. I'm going to go for 0.22. Yeah, 0.22. Okay, so
I've done that stuff. Are these two, these two
seem exactly the same. I don't know if that's just
like a tiling tin thing or if we have two of those that I accidentally
placed them in painter, place two of them
below each other. I place it below each
other in painter. So yeah, if you want,
if you want to fix it, you can go ahead and go
to your scan processing, and you can also have a
single patch over here. So technically, I
could go in here, and I could say, like, Okay, I want to have another
multi clone patch and just like,
plug this in here. And then I would
say, like, Okay, I'm going to you'll
blur it, smooth it. Just keep it as like a disc. Go to your transformations
and just Minus one. -1.3. There we go. See? Yeah, so now the
patch is over there. So I'm just very picky
with that kind of stuff because I don't like to see the tiling very obviously. So I'm just going to go ahead and set this
input count to three. Plug in these three
and then hold Shift and just swap around, you can see over
here those pieces. And yeah, you can do
the same with norm map. Only with norm map,
you can just go ahead and turn the input
count back to one, turn on is normal and do the exact same
thing. There we go. That's just my preference, just that I can now go in here. Here see now that
one is reduced. So we are now, if I just
turn on rate racing, we are now at the tiling of two. For the sand, it might
actually be quite cool if we go for a tiling of
two because it will give me a really close up view
of this, but I'm not sure. So let's see. So this
is tiling of two. Let's now also just go ahead and I said tiling to three.
I just took a while. I think I'm going to go
for three, but I really, really dislike this
stuff over here. That is way too obvious, but I thought that I
already removed that, or did I not remove
the right one? Maybe there's just one
right on the corner. Let's Is it this one? I find this very strange. Let's go into our norm map. Let's see. Whereabouts are you? So, here are the tire tracks. You are sitting at the
top of the tire tracks. That is this one, isn't it? I think our noise, we just cannot see it anymore, but it's probably still
in our minoclusion. Let's also actually
go in now I think of it and have a look
at my amin oclusion. Okay, so 0.7 is fine. Okay, so what I'm going to
do I will remove this one. That's the last thing
that I will do, and then I'm going to
make a final render. So this one, if these
are tire tracks, I think I'm going to keep this into the tutorial just
because we're almost there. It might just be these pieces over here that they
are very obvious, although I find it
strange to believe that I cannot see them on here. Oh, here they are. See? One,
two. So it is this one. It's just very, very
difficult to see. So that means that the
one that I actually removed will most likely
just be the Wong one. So I actually removed
like one below here. So if I just go ahead and just
replace this because yeah, this one was
technically also Wong now I think of it,
but we'll see. I'm going to go
ahead and I'm going to 1 second because it's very difficult for
me to, of course, see it. I think I'm going to look
at it on my embonoclusion. Yeah. Okay, so
keep that in mind. So let's preview it on
my ambient inclusion, and let's go ahead and let's
set our Y offset to one. Let's see. 1.3, and I'll play around with my X,
almost there, almost there. There we go. Okay. And then technical we also still
have some tiling here, which I'm very surprised about. I think it has to do
with the cloning. I think I accidentally
cloned white on that border, but I do not want
to change this now. So first of all, let's
go ahead and fix this. Don't forget to just
reload your displacement. Okay, so now all we need to
do is just copy this also to our norm map because of
course, I forgot to do that. Here we go. So I'm
just replacing this. Okay, so that should
also fix our no map, which means that in
here, there we go. I like nothing ever happened. And that other one, you can
see that other one over here. I am just going to fix it. Now, normally, what
you can, of course, do if you're not as lazy as me, you can just quickly go into Substance Painter and
just fix it there. But if you are as lazy as me, then just like quick
extra note in here. But I wouldn't
recommend doing this if you're doing
work for a studio because then they often like just having everything
looking neat. But your graphs, I mean, they like having your
graphs looking neat. But this is one of the
few cases where I'm like, not in the mood to
make it 100% perfect. Well, it is perfect
because here, see, it's gone now. So I'm just taking it
like a quick shortcut. So we got this one
now also here. So we can just go ahead
and we can Oh, whoops, let's go ahead and plug this in and just plug it out again. There we go. Yeah,
as I said before, the quick tile is a
lot quicker to do it. Now, I would say that what I'm doing now it is a little bit longer than it
normally takes just because we had those
few little proms, but every material is different. So I've had times where this only took me a minute to
get everything perfect. But there we go. So I think our material
is pretty much done. If we just go ahead and
have one last look, and there we go. So I don't see any
visible tiling anymore. Although, yes, we
do have this one, but remember, we
are tiling a tree. So if I see almost no
tiling with a tiling of three on a photogram
dream material, that's actually really good. So I think it is
time for us to make a final render to see
everything in its full glory. Let's go ahead and
save our scene first. And let's just go down here and everything should still
be on just like normal. So I'm just going to go
ahead and I'm going to make a nice images, and I'm going to go for tarmac, final render and just call this sand saves render an
image and let's have a look. Okay, so the image is done,
and let's have a look. So this is what we got right now. It's looking pretty good. Maybe this one is, like,
a little bit too obvious, so you can remove
it if you want. But for the rest,
I will also have a quick inspection on
my four k monitor. Yeah, here, this
is looking great. So we got a really
interesting looking ground. I'm happy that I
went for this one, and not for the more
plain ground that I scanned because I
scanned multiple different types of grounds. Okay, but this is awesome. So our photogram tree
materials are now done, so these are the
materials that we end up with. They're
looking really nice. So that's a very good way to just create some very quick
photogram tree materials. Now, photogram tree is
a very large subject, and I only scratch
the surface of it. I only showed you,
like, the basics. I am planning to do a much more in depth course
on it later on. But for now, this will keep
you going for a while. And depending on which order that you are looking
this tutorial course, this will actually be the very end of this tutorial course. So we went over everything. We went over how to create materials in substance designer, both basic and
advanced materials. We went over how to create
materials using Zbrch which includes sculpting and
also with substancesigner. And finally, we went
over on how to create photogram try materials
and other techniques, including for the first time me going outside and
actually filming myself. So that was quite a fun
thing for me to do. And I hope that the
quality is good. I will try and do this
more and improve upon it. Feel free, if you want
to leave like a review, to let me know if you actually like to see my face more to make things a little
bit more personal rather than just like a face. But I hope that you will
enjoy this tutorial course, and we have many more
environment tutorial courses at Fast Track tutorials. So I hope to see you next
time in our new courses.
47. 45 Bonus Polishing All Our Materials: Okay, welcome to the
first bonus chapter of this tutorial course. Now in this bonus chapter, everything that I will be doing we will have
already covered. This is just me doing
some polishing, adding some extra little bits, just stuff that is
time consuming. And yeah, just general
stuff like that. So I'm going to
start probably by just adding some extra
foliage in here. I found that the foliage
was working quite nicely, so I just want to create a
little bit more of this. You know, sometimes
you just rotate this just to make it look a
little bit more interesting. So there's nothing too special. And this kind of stuff, yeah, it's also like it's a
bit time consuming. But we already have some
really nice materials. This is just like to push
it a little bit extra, which I always recommend in my tutorials that you
take your time and do it. Of course, I cannot always take the time that
I want to take because then a tutorial would be double as long and
for multiple reasons, yeah, that would not be doable. So instead, I do it this way. I go a little bit quicker, and I use time napsters
or I just have polishing chapters where I simply do not explain
as much, basically. Oh, now that I think of it, I can also remember
that we had a problem with some of the moss growing
on top of our foliage. So that's something I just
want to keep in mind. For later on, there we go. So we got some foliage there. Didn't we have, like a
double one? There we go. Let's grab this double one, and let's just throw
these grass bits. Maybe scale them up sometimes
or scale them down a bit, just to fit this nicely in here. Okay, so we got
some stuff there. I'm going to place like one
of these smaller ones here. Maybe another one
over here and just, like, rotate it and move
it forward a little bit. There we go. So we got, like, some stuff there.
It's looking good. I'm going to go for
maybe just like a bit more grass in this area. And then
I think it's enough. I don't want to overdo it again. I just really liked the
look of that foliage. So I just wanted to
increase it a little bit. B, if something looks cool, we can just well increase it. Even if that means that it is not like our reference
because sometimes we can make stuff
look more interesting in our reference for
the sake of games. That's why even
when, for example, make a post ocalyptic road
or something like that, you might still use reference or just clean roads and
then build upon it. See, I want to grab or grab. I want to place a
little bit of grass here and a little bit
of grass over here. And I think a bit
more over here maybe. Maybe like one last plant over here and just
scale it down a bit. Some grass. Okay, I think that
should do the trick. Yeah. Okay. So let's go ahead and hide this and
now I can just go ahead and export my foliage at the same location as normal. So we can just over wide
it and just rebake it. So we went for exports as
an FBX cobblestone foliage. Yes, let's do it. Let's go in here and
save this scene, and let's just quickly
open up our bake scene. Give a second load. Here we go. And all I need to do now is so this has now reloaded, and you can see that we have
all of our foliage in here. So that's all looking good. I'm freezing up.
I don't know why. Okay, that was strange. Anyway, I'm just
pressing reload on my low poding just
to make 100% sure. And now at this point, so
we have an Alpha mask, a normal and an albedo. Those are the only ones
that really mattered, so I can just go ahead and
select those. Yes, sample 16. Don't forget to
keep the padding. All of these settings
are the same. So all we really need to do
is just press over here, bake, and I will now
go to substance. Yeah, so we do have these
resources over here. Now, you can go ahead and
open up your bags if you want inside the Photoshop and then
overwrite these resources. But what I tend to
do is I tend to just redirg them in and just
remove the old ones, just like we have over here. Yeah, like the underscore one, and I just remove, like
the normal alpha mask. So I can go ahead and go
to textis Sbush material, bags, and just need to wait
for Mum set to be done. Okay, so that's done baking. So if we go near, I'm going to drag in, and
there is a link resource. The reason I cannot
use this is because I'm supplying these
source files to you guys, and the link resource
basically doesn't input it. It will just link to
it in your folder. But of course, you
guys do not have the same folder structure as
I have, because who knows? If only one person places this
different in a drive with a different name like
E instead of C or something like that, it
would already be broken. So instead, I'm doing this.
Oh, hey, that's interesting. That it no longer. Oh, yeah, because I removed the padding also
from these pieces. I need to double check the padding that it doesn't
cast like black lines. So okay, it looks like it
doesn't cast black lines because sometimes
the padding is to avoid black lines
on this one bitmap, that would have been the
only case where it could be going in the wrong
direction, but it doesn't. So all I need to do
is, here we go input my Alpha map and it's a bit slow because
there are four K maps, and those are always
a bit slow to input. There we go. We just swap
this around. So that's fine. And now we also have our normal, which is over here, and I can just go ahead
and input this one. Here we go. And let's
just plug this in. Okay, and then we
can delete that one. So if I now go to my base color, I just need to double check. Yeah, that's all looking good. Normals. Where did you go? Roughness. Yeah, so
that all looks fine. Then what you can do over here is you can
go ahead and like the foliage albedo
Alpha mask and normal, you can go at a right click and just press remove because they are no longer
used this time. I believe there's also
I can't remember that. We had a note that basically
says, clean up resources. But I forgot that might be
in a different location, but I'm not going
to go over that because I'm not 100% sure. I just remove them by hand.
So we got this stuff done. Let's go ahead and let's
actually open up once again, let's save scene and let's
open up our cobblestone. Okay, here's our cobblestone. As you can see now we have a
lot more foliage going on, which is looking nice.
It's looking quite cool. Having this extra foliage, I'm not sure if I feel like
my moss is too much now. I know that I've been pushing on getting more and more moss, and now that I have these
extra bits of foliage, I feel like I'm changing my
mind again because those foliage they cover
up some of the dirt. Which, as a result, means that we don't need as
much moss to show the green. So I can just go in my
height of set and like, tone this moss down a
little bit in order to not have it all
over the place. And that will have just
automatically exported like that s. So now I can
once again see in between, and that brings out also the
foliage a little bit more. So that's looking
quite good. So we got this stuff over
here, ready to go. Let's see. What else do I
want to do on this one? So if we just go ahead
and go to Images, Cobblestone, Okay, see, so this is what we
have now. Oh, sorry. Yeah, we got, like, a bunch
more foliage going on that's nice. I'm not sure. Are these colors
still too strong, or maybe just those. Maybe just those are a
little bit too strong still. So if we go in here, and these
are these type of colors. So if I go into my
gradient map, let's see. The stronger ones are this one. So if I have anything that's
around that strength, I just need to get
rid of it or at least reduce it.
Could it be this one? No. Let's just go
ahead and past delete. No, maybe it's in this
area, delete, this area. This one is hidden. There we
go. I believe it's this one. See? So let's just go ahead
and increase that intensity. Now we have another
one over here. Which is probably this one, I assume. Yeah, I see. So let's go ahead and just
make that one a bit lighter. I believe that's about it. Yeah, here. I think
that's about it. I think for the rest, this
is all looking quite good. So we got that stuff
all ready to go. The sharpness is looking fine. Maybe what I want to do
is I just want to go into Momset and I just want
to give this here. So the colors are now
a bit compensated. In my camera one, I'm just going to give this like
the tiniest bit of extra sharpen to 0.1 0.8, I mean. There we go. So a little bit of extra sharpen because when we take our image, we will also again lose
some of that sharpness. So that will give me a
little bit of extra sharpen, so we got that
stuff ready to go. Yeah, maybe I will also go in
here and just quickly tweak and a little bit more like
these edge damages that we have. Let's set
this back to three. There we go. So we just
have those edge damages, ready to go also. So
we got that stuff. Let's go ahead and
just render out an image to make sure
that it looks correct. Okay, let's give that a look. So before, after. Before, after. See? So, we got, like, a bit of extra
foliage in here. That's looking quite nice. I feel like the sharpness
on my norm map. You cannot really see it.
Oh, yeah, yeah, okay. You can see it a little bit. So we've done that,
and our colors are now a little bit more subtle. So for the rest,
that's looking good. So we got that
stuff ready to go. We got our roughness over here. Maybe I want to just, like, make my roughness if I
can a little bit more interesting because right now, okay, so right now
we have this stuff. So let's have a look. So blended. We add some noises. Okay, what I'm going
to do is this one, I'm actually going to set
this as like a subtract. I think maybe that might make it look a little
bit more interesting. So it just looks a
little bit darker. Yeah, let's hope that
something like that maybe works. Here you see? So we just get,
like, a little bit of extra shine here and there. That is looking a bit
more interesting. I'm just going to
go ahead and maybe, like, tone it down
a little bit more. Here we go. Okay, I'm going to save this
and I'm going to call my cobblestone done unless I change my mind later on again. But for now, so
the cobblestone is ready to go. Also, cool trick. If you want to go
ahead and paint out some extra foliage like
you think you have too much, what you can also do is you
can go into your bitmap. You can add a blend,
and then you can add something that is
called a bitmap over here, and you can say
form new resource, and just call this like
foliage underscore, paint out. When you do that and you
set your color to be white and press okay,
give that a second. So that will now just
create a file for you. Now, you can go ahead and just set this to be a greyscale, and you can plug this in here. Basically, if we
go to our blend, everything if we set
this to multiply, everything that will be
black in this bitmap, will basically just be removed. So what I can do is I
can click on the Bitmap, and now you get painting tools
or yeah, painting tools. If I go ahead and set my
colors to be black on this, I can go to my brush
and I can just like, right click and set the
size and basically, whenever I feel
like, Okay, I have too much stuff going on,
for example, over here, I can simply paint it out, and once it is painted out, you would go in here, and
then it would be removed. I'm not sure exactly
where it is. But, for example, over here, I have these two next
to each other, and I'm not the
biggest fan of those, so I'm just going to find them. I believe it's I believe it's these two next
to each other over here. Yeah, that must be it. So let's say I remove one
of these and give that a second to upload or to reload the graph because
it's quite far away. If I go in here, see? So now that one is removed. And it's very picky, but I just didn't really
like that one over there. And now I can just,
of course, need to turn off on my displacement. Here we go. And that
just quickly gets rid of some of your foliage
in case you want. So it's easier to
remove than to add. So we got this stuff done.
We can go ahead and save. Now there's another thing I want to and that is that I
want to move over to my basic tiles over here all
the way back to the basics. And I just want to
add one thing that has been bugging me from
the very beginning, and that is that I
want to just add some height difference
in between my cracks. And basically just
works like this. So if we go ahead and
open this one up, so where are we? Environment turing basic
material, this one. So if we go ahead
and open this up, and in the meantime, I
will go to substance. We now already covered
how to actually do this. So all we really need to do
is we need to go in here, add a blend and then
add a flat fill. For the flat fill, we
do need something. We need to make sure that all of these pieces are not aligned. So what I'm going to
do is I'm going to add a very quick levels in order to make to make this a little
bit stronger like this. Here, let's do this. So we are making it quite
a bit stronger. We throw this into my
flat fill and hopefully, here that reads correctly. And then just do a very
simple flat filter gradient and throw in your
angle variation. So this is just to give me a little bit of
variation in my angles. If I set this to multiply,
I can go in here. And when I increase this, I
do need to be careful that. I'm not increasing
my edges too much because it looks like
I am doing that. Let's go ahead and click on our flood filter gradient
and then just in our level, see how far we cannot really go that far back without breaking our shape. In that case, there will be other ways that
we can do this. For now, let's just actually
see how this looks. If we go into
Marmoset over here, Look is this outer
exporting? It should be. Yeah, it is out exporting. So turn on and off
my displacement? Oh, it's not as well, wait, maybe if I turn
on rate raising, then it will maybe become
quite a bit stronger or quite a bit more
evident that there is a difference in height. Yeah, it is there a little bit. It's not very strong. Let's see. If I just increase
this a lot just for the hell of it just to
see how this works, Yeah, okay, so it is being dded. So if I just quickly turn on
and off my displacement map. I see here. So it is
starting to come through. I think I just need to make my displacement a
little bit stronger. Her see, so it is
starting to work. So let's make my
displacement a little bit stronger like this. And I would just like to
turn on my raid raising again. Here we go. See. So now we just get
this effect that some of these cracks, they're
basically sticking out. The only thing that I now do
not like is that, of course, my cracks have become very
large because they went from this stuff to this stuff, and I don't really want that. I think what I can do, actually, you know what
this is a bit tricky. How am I going to let's see. What am I doing here?
Sloler, Sloler, blend. Can I use this one maybe? Almost. I think I can
almost use this one. So if you just do like
the direction warps and then do this stuff, here or see, so that should fix it. Now it's not as strong. And also maybe something that I do want to
play around with. Let's save my scene
before I do this is increasing the
amount of pieces. So if I go in my
range and just like, add a few more pieces
that are broken. Oh, here we also
have problem that the cracks are being like, they are just being continued. Remember how I said that I
never want to have that. I never cracks be continued. Now, a very easy way
for you to actually fix that is that we probably
need to do that Mm. Before we artist, I believe. Yeah, I think we need to do
this before we artist stuff. So if we have a direction warp, you want to art another
direction warp, but for this directional warp, simply go ahead and just input this the flat filter
random grayscale, because since direction
warps looks at gray scales, if we do this, give it a
warp and just set like 50. What it will do is it
will basically just split up all of your cracks
based upon here or see. Oh, okay, we need
to set it higher. It should split up
your cracks based upon here on how they look. So now that they have
been split up like this, it should give me
better results. So if I go in here, here, see, I just get like, oh, that's one. Okay, that's unfortunately that it is continuing like that. Let's go ahead and see
if I can just change my warp angle and
set it to like 500. I need to set it really high. Okay, now there is no more
transitioning, I believe. No. Okay. So let's
give this a go. So if we now go ahead
and just reload my displacement, here we go. So that will just add those extra bits of quacks
and everything going on. The only thing
that I have now is that I don't really
like the pattern, but that is just a matter
of playing around with my warbngle like this until I get something that I
find a bit more interesting. Oh, and we are breaking. Oh, of course, we
are breaking this. That makes sense that we are. So let's hold shift
and plug this in here. Let's see if I
plug this in here, will that look very silly? It might look very silly. Or it might not look very silly. Maybe this actually works.
Maybe just doing it over here. I was a bit worried,
but of course, because we are
breaking up a shapes, these pieces would
no longer work. So let's give this one more
ty if we go to Momset. Okay. So yeah, that
works. Yeah, that works. Only thing I would say
is that I'm just going to set my displacement. A little bit lower
if it allows me to. Here, 0.00 0.008.
Let's go for that. So we got that stuff done.
That's all looking good. Maybe you can go, play around with your
offset if you want, just to get a more
favorable angle just for your final renders. I like to probably have a
line here in the center like this. There we go. Okay, so we got that stuff done. We can go ahead and turn
on our rate raising again, and then we can also call
this material pretty much done because I believe
that that's about it. Just like a small
addition to this. Yeah, for the rest, I
want to keep them basic, just for the people that
are opening this up, opening up this carve that
it is not too overpowering. These bits over
here, like we have the stones I don't think
that we can do a flood fill and a flood fill
to gradient to add some flood field to gradient
to add some difference. I don't think it
will read like that. If I go in here,
add like a levels. Just push these levels
all the way up. Actually, that might
work. So here we have a where are we
going with this? Not that one. I don't
care about that one. I only care about this one. So if I plug this in here. Actually, no, I
don't want, maybe I can right get away with
just plugging it in here. Here, it will just give me
a little bit more variation in terms of the stones
that are sitting on top. Now, I do feel like they are
not strong enough right now, let's set them to 0.025.
There we go, see. So it just makes the stones feel a tiny extra bit more
interesting over here, just by having some
different depth in it. Okay, so those were
the smart weeks that I'm going to end up with. I'm going to save my scene. And what I will do now
is just have, like, a very quick look in my
advanced material render to see if there's anything
we want to do there. Okay. So let's have a look
because I believe that we pretty much refined
this quite well. So I don't think
there's much, here. I don't think there's much
that I want to do with this just because I
refined it quite a lot. Maybe add some color
difference on, like, a plain tarmac.
That's about it. Just like throw in some blue
or something like that. So I'll just quickly open it up. Here we go. So it might
just need to load in. So basically what I'm
talking about is I literally just want to throw on a grinch
map with some blue in it, just because that often gives
us, quite a nice result. So here we have our
clean tarmac yeah. All I'm going to do is just
add a very simple blend. In this blend, I'm going to
throw on a uniform color, and this uniform color
is just going to be a just like a very
strong blue because, of course, we will
just use our opacity. And then if we just
go into noises and grab like a grunge map 13, change the sat to get
something more interesting, tone down our balance
a little bit. Let's throw this on
here, and we basically just like set it at
a very low level. Oh, wow, our graph Oh, no, wait, our graph is only slow
the first time because we need to reload the entire thing. So let's go ahead
and go in here. Give it a second down here. You can see the rendering for it to load everything into memory. And now that we've done that, we can go ahead and we
can say, like, Okay, I want to increase some of
this blue probably like this, and I'm just going to
go in my crunch map. Let's see. Let's play
around with the seed. Here. Let's go for seed number
three and then just add a quick transform and
set the transform to minus two. Here we go. So we just get little specks
of blue sitting in here, maybe make it a little
bit stronger in our opacity here. So some blue. Here you see. So
now you can see, it's a little bit strong,
but the general ideas, let's make a blue like
a bit more of like a baby blue color that just
gives us a very little, very small bit of
discoloration which often just makes
everything feel a little bit more digital
and a little bit nicer. So we've done that stuff, and I think that's about it. I think for the rest, all of
this stuff is totally fine. Yeah, we got some interesting
roughness going on. Our stones are actually
quite nice and shiny when the light hits them,
all that fancy stuff. So I'm also quite
happy about that. So I would say that is about it. At the point of recording this, I still need to do my
photogram try material. But because the
photogram try material is pretty much done
after scanning, and after just cleaning it up, there isn't much that you can, like, art on top of that. So let's go ahead and continue
in the next bonus chapter, which will be setting
up a very quick scene in unreel to display
our material. So let's go ahead and do
that in the next bonus. O
48. 46 Bonus Creating A Scene For Our Materials: I, like Uh M I I I A B The
 FastTrackTutorials, Premium 3D Art Education