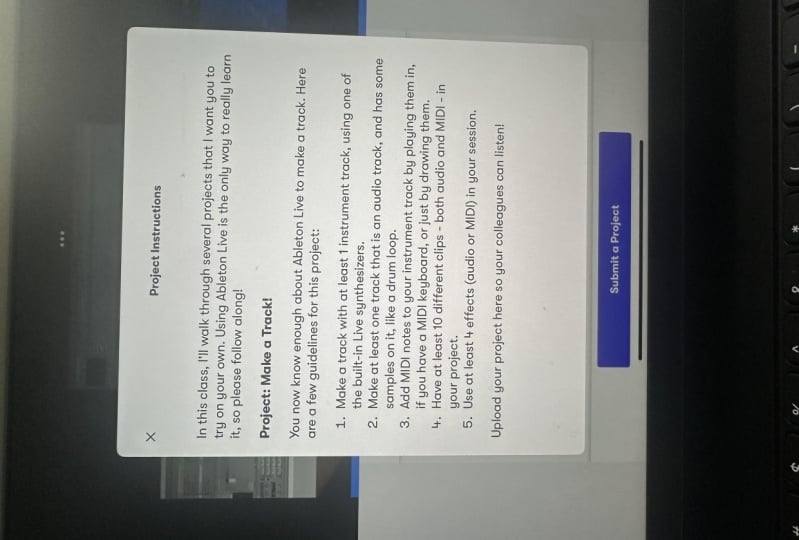
Transcripts
1. Introduction: Hey everyone, welcome to official Ableton certified
training Ableton Live 12. The first in my big sequence of classes on Ableton Live 12. This class we're
going to start from the very basics on
how to use live, assuming you haven't used
any other version of Live, and assuming you don't have any real experience
in music production. We're going to start
at the very basics in this class and
build up from there. Throughout this class,
I'll be showing you how to use all of Ableton Live 12. I'll also be walking you through a couple
different tracks. There are three different tracks of mine that I'm going
to walk you through. I've set up this class so that
we're going to do a couple of things just to get us
comfortable with the software, But then we're going to start
making music pretty quick. We're going to start making our own music clips and putting together
some music sessions. This class is designed to be a big strokes into a lot
of the content areas. And then we'll be moving on to other sections of this class where we dive in
deeper to recording, editing, sound design, and all the other elements that
go into music production. But it is the single
best place to start. If you're looking to learn
Live 12 without further ado, let's dive in and start
making some music. The next is drums. Now in the drums category, we're going to find three
different types of files. Okay, the first thing we're
going to see here is more of these ADG files,
Ableton Device Group. The reason I want that again is because that's what my
microphone is plugged into. Okay. If you don't have
a hardware interface, you're not really
going to be able to record a traditional microphone. You might be able
to record a USB microphone or
something like that. I'm going into channel
two here, okay? So this channel one is my
microphone, this is my guitar. So you can see in that
little thing right there me, makes some sound with my gag. Okay, so what are
the elements here? Here we have.
2. Ableton Live Versions: Okay, in these first
couple videos, I want to talk about just
getting a set up with Live. Which version you should get, where you can get it and getting
it installed and set up. First, there are three
versions of Live. Now, I'm not talking about the
number at the end of Live, like we're going to be talking
about Ableton Live 12. That's the version number
I'm going to be working with in this series of classes. I also have series of
classes on Ableton Live 1,110.9 and I think eight is when I started making
all of these live classes, but that's not what
I'm talking about. There is Ableton Live 12 Intro, Ableton Live 12 Standard
and Ableton Live 12 Suite. Okay, If you look up here, you can see that
there's a breakdown of what has what basically
sweet is the big version. Sweet is the full version. Standard has less stuff than sweet and Intro has
less stuff than that. Balance that against
the cost of each one. Standard is cheaper than sweet and Intro is cheaper
than standard. You can see here that where it really comes down to is the
instruments and effects. You can see here
software instruments. In suite you get 20 in
standard you get 11, and Intro, you get
five audio effects. In suite you get
58 in standard 35 and Intro 20, Midi Effects, Midi tools, modulators, software instruments I
guess is another big one. You get 20 in suite
versus five in Intro. You can go down and see all the different
things on this page. The page I'm at is
Ableton.com slash N live. Compare additions. What does all that
mean? Let's put this into practical
understanding. If money is no, object
to you get set always. That is the professional
tool you're going to want. Sweet, to be making professional music hands
down, no question about it. But if you don't have all
the money in the world, that's okay. You can upgrade. You could get intro
if you're just getting into live and you don't know if you're
going to like it. Get intro, get intro. And then once you decide this
is what I want to be doing, then save up the
cash and invest in upgrading to either
standard or sweet. Eventually you're going to
want to get to sweet if you are aspiring to do
professional work, if you can afford standard, get that and then you can
upgrade to set, okay. My advice to you is
if you can afford it, get set, get what
you can afford. If you really like it,
you can upgrade down the line and get sweet. Now, I can't really
tell you what the prices are because
they change all the time. But I do want to talk about
the purchasing process here. Let's go to a new
video for that, because I have some tips
that might get it for you a little bit
cheaper. Let's go.
3. Installation: Okay, if you're on a Mac, you're going to
download a disc image and you're going to
open it and it's going to look
something like this. It's probably not
going to be orange. And it's not going to say beta. I'm on the beta
version right now. It's just about to be released. So everything is the
same as what you have. All you need to do is take
this file and drag it over to the Applications
folder, and that's it. Nothing fancy to install. Now, when you launch
it for the first time, it's going to take an extra few minutes because it's going to tuck some folders
around your system, but you don't really need
to know what's happening. After it does that, it'll
open up and you'll, you'll see the program
interface just like I have. If you're on a PC it
works very similar. You just have to
drag the file to the right spot or
double click on it and that will launch the
installation process. But it's a very quick and
very easy installation. Easy. In fact,
that's all I have to say about it. Let's move on.
4. The Look and Theme: Okay, so we've got
live installed and you've just opened
it and it looks like this, right? Maybe not. Does yours not look like mine? It might not. If it doesn't
look like mine, that's okay. There's a whole bunch
of different themes of live that are built in. And there's even
like some people on the Internet that hack
together their own. You can do some cool stuff by
changing the colors around. One thing that live
is doing now if you computer is using like
a light or a dark theme, it's going to grab onto that. It might look all dark where mine is like nice in
shades of gray and stuff. If you want to adjust that, we're going to go
to the preferences, go to live and then settings. Or if you're on a PC, I
think it's just command, we'll get you to
your preferences. Here's our preferences. We're going to end up here in the preferences
like a whole bunch. But just to get started, I'm going to click on Themes
and Colors, And then Theme, I'm on Default, you might
be on Classic Dark. I think when I first
launched Live 12, it took me to this one, to be honest, when
I'm working on Live, when I'm working on
my own Music This is the theme I like to use. This is my default. But when I'm teaching it, I go back to this one. This is classic live. I think it's easier
for most people to see, that's why
I teach on it. But you're welcome to use
whichever theme you like. There's also follow
system light and dark. Yeah, this is the one I was on because my system
is set to dark, but I'm going to
set it to light. There's also some other
things you can do here. Can adjust some of the tones, contrast things like that. Grid line intensity, brightness. All of this actually
is new in live 12. Fine tuning, the colors and saturation hues and intensity, All of this is new in live 12. These different
settings for intensity, brightness, hue,
things like that. They are designed to
help people who have some degree of being
visually impaired. If these settings help
you see things better, then that's great, adjust them. But I'm going to
leave on default and the appearance set to light. You can use whatever you like, but if you're confused why
yours doesn't look like mine, that's probably the
biggest reason. Now, you probably also
don't see things over here. Maybe you see
something like this. You can click around here
and explore if you want. I just have more stuff
installed on my computer. You're going to see more things. But don't worry, I'll be
explaining all of this soon.
5. The 2 Views: All right. Let's nip one
thing in the bud right away. There's one thing in Ableton Live that trips
up people the most. It's the thing where, if you have any experience in a different audio program
or a different do, then it can be a
little frustrating. I just want to tackle
it right away. Let's just look at this and
just rip this band aid off. It's not complicated,
it's not hard. But it can be a little
confusing right at first. Here's what I'm looking at. I see these boxes. I don't see a
timeline where I put music and can just see
it scrolling across. The reason is Live has
two main views now. There's a bunch of little things you can show and hide in live. And we'll look at all of those. So the working area, your main canvas is this
big rectangle here, okay? There's two different
sides to it. It's like a coin with
two different sides. Okay? They have names. Here we are looking at what's
called the session view. Okay? If I want to look at
the other side of it, which is called the
arrangement view, I'm going to press the tab key. Okay, Now I have something that might be a bit
more familiar to you. This is a timeline. I can put things on that timeline and hit
play and listen to them while it scrolls
by Session View. Arrangement View, think about the arrangement view is the one with a timeline where
we see things moving. Session View doesn't
really have a time line. Instead it's got all
these little slots here where we can put musical elements
that Ableton calls clips and we can trigger
them all over the place. This is more like what
a performer would do. What a J would do. They would launch
things from here. Right? This is what more of a traditional
composer would do. They would work here, right, and create things. Let me use an example. Here's audio clip. Okay, this is a clip here it is, in the arrangement view where
we have a Ti. Okay, cool. I can hit tab here. Is that same clip in
session view, Okay, and I can launch, okay, two sides of the same coin. We'll spend a lot more
time on this concept of session view and arrangement
view on how to work between the two throughout the class. But I just want to point
out right now that's one of the biggest elements
of live that people get tripped up on is this session view and
arrangement view thing. Now I want to clarify one thing that I
just said a minute ago. What I said is that session view is where people perform and J and arrangement view
is where people compose. While that is true, that is not exclusively true, there are a lot of
people that compose and produce music
purely in session view. This is a view where
you can create music. Absolutely. There
are some people who perform with arrangement view. That's fine too. But
when I look at the two, I think of this side as
more of a performance side, although I know a lot of people that make everything
that they make in session view,
keep that in mind. Both sides are completely versatile to do
whatever you want. It's just a very different
way of thinking. I come from a more
traditional music background where I learned
music by looking at sheet music and reading
it from left to right. So arrangement view is much more comfortable to me
when I'm producing music. But you can use live
however you like. Don't ever let anyone
tell you different. Okay, let's move on.
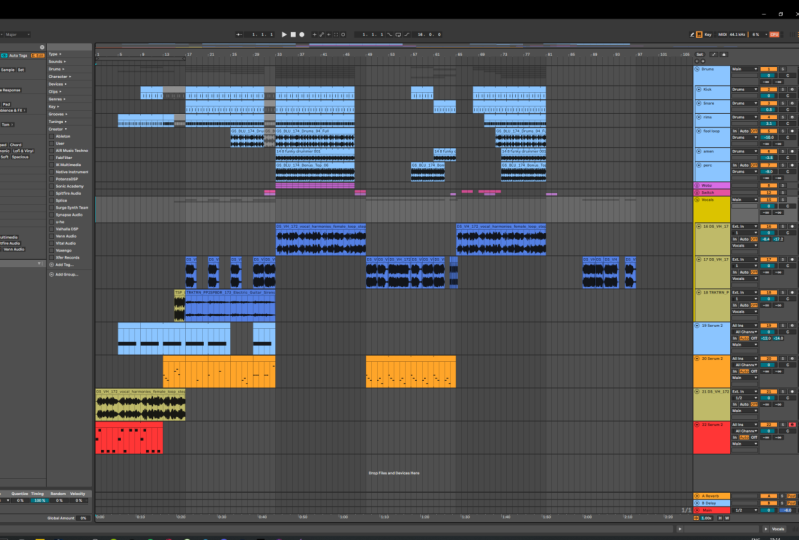
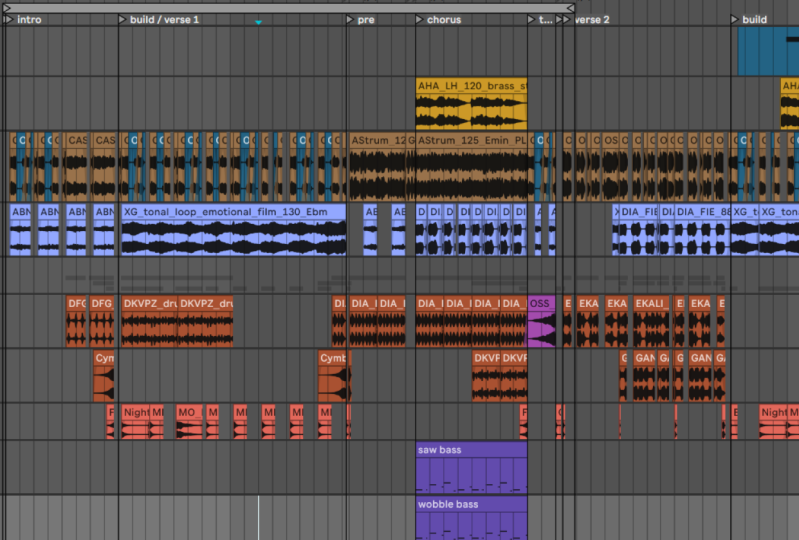
6. Arrangement View: Okay, so now that we
know this session view, arrangement view
thing, let's just take a big picture view of both session view and
arrangement view. Okay, so first let's
do arrangement view. I've loaded up here a little
track that I'm working on. What I want you to see here is the different rectangles
that are around the screen. We've got this big area
here in arrangement view, that's the canvas
right then we've got each track has some
options over here. We've got our ins and outs. We've got a mini
little mixer here. We can get a bigger mixer
on the screen if we want, but it's hidden at the moment. Over here we've got what's
called our browser. Down here, we have
two things actually. We have our clip view
and our device view. That means that if I
click on any clip, we're going to see it down here. Now remember a clip
is any kind of audio or Midi information, Any nugget of sound
making thing, okay? So here's an audio track, that means there's sound in it, and here's Midi track. These are all clips, okay? Anything you can put
on the time line here is going to be a clip. It's a very broad word
that Ableton uses. Okay? So we can see
that down here. Now if I click over here, we can see the instrument
that's on that track. Let's go up here. There we go. So here's the instrument now. Don't worry about what
all this stuff does. We're going to get
into all of it. We got plenty of
time. Don't worry. I just want you to understand the different boxes
where things live. For now, over here I
have a lessons thing. I usually keep this hidden, but I want it to be open
just for now until I get a chance to walk us
through these lessons, which I'll do shortly. Then up here at the top, we have what's called
the transport bar. This is our play stop tempo, metronome, things like that. What's important to note
here is that when we go back and forth between session
view and arrangement view, only this area here
changes, okay? Everything else stays
the same, right? All of these outlying
areas don't change, okay? So keep that in mind.
So in the session view, we can click somewhere
to put our cursor, that's this tal looking line. Then if I press the Space bar, it's going to start playing. I've got different sounds
on different tracks. Each one of these
we call a track. They have different
clips on them. Now, there's a lot more here, but I just want to do
big picture stuff. I'm going to zoom in
just a little bit, then hip play and you
can see the head, which is that tal line scrolling
as it plays the sound. You'll notice that at the
top we see bar numbers 242-52-6207 and at the
bottom we see time. Okay, so this is 1
minute in 15110. Cool.
7. Producing in Session and Arrangement View: Okay, so you might
be asking yourself, well, how do I use
this? This is neat. I've got these two views, I've got two different
content areas, and they share a mixer. That's great, I get it, but how do I use that? My suggestion for you is that when you're
producing music, when you're making a track, use one or the other. Okay? Don't use both at
the same time you can. There are ways to do that and we'll talk about that later. But until you get
really good at it and really good at
understanding what live is going to do, stick
to one or the other. When I'm writing music, when I'm producing music, I'm almost always working
in arrangement view. Sometimes I do some
stuff in session view, but I'm an arrangement view guy, I like arrangement view. I know other people that
only work in session view, they produce whole tracks in session view and that's just
really comfortable to them. That's awesome. If you're one of those people
that's awesome. There's no wrong way here, okay? But try to use one or the other, otherwise it gets
really confusing, okay? When you're making a track,
don't use both sides. Make a track in session
view or arrangement view, but don't try to use both
sides simultaneously. You're going to just create
problems for yourself. Cool. All right, let's move on.
8. Whats new in Live 12: Okay, before we move on, I thought I would just
do a quick little. What's new in Live 12 in case any of you have
used Live 11 before, or if you are currently using an earlier version of Live while you're
watching this class. The difference
between Live 11.12 is a pretty significant difference. You could follow along with
this class using Live 11, that would be more or less fine. I'd say there's probably about 10% of the program
that's different. Nothing really in the way
that we make music with it. There's just some tools that I'll have that you won't have. For example, there's one new
instrument, one new effect. Things like being able to have the mixer in the
arrangement view with this button down here. There's a bunch of new Midi
tools for generative things. Meaning like we can tell live to write us a melody or grite
us a chord progression. And it will, we'll walk
through how to do that soon. There's a bunch of
new functionality in the library that will
be going over just shortly here and all
this key aware stuff that's this here where you can set a key and have all your devices just
follow that key or most of your devices
follow that key. There's a lot of new stuff,
there's a lot more than that. I actually have a whole
separate class on going over all the new stuff between Live 11.12 If you want to dive
into that, feel free. Otherwise, I'm just going to progress forward
with this class. Assuming you've never
seen live before and everything is new to
you, let's do that. Okay, in the next section, we're going to focus
on navigation. Figuring out how to get
around within live. All the different rectangles, the different boxes
here and there. And some weird
little workflow tips that'll save you a bunch of time like how you zoom in and out, which can be a little
strange to get used to. Okay, let's go over
to that section now.
9. Navigation Overview: Okay. There's a lot of things that I love about
online teaching. I really do and I really
believe in it a lot, but not the least of
which is that you can't smell the onions on my breath from these
delicious tacos I just ate. But anyway, back to
Ableton Live 12. So navigating Live. In this section we're
going to talk about all these different
areas in more detail. This top part is
called the transport. Now I know I already
walked you through these, but I want to do it in a
little bit more detail first before we go
into a lot of detail. The transport, this
actually comes from an old tiny term from when we had big tape
machines to record on. There might be over here like
a big reel to reel system. And then you might have a
box about this big that had a big Play Stop Record
forward rewind button on it. It was on a long
cable and you can move it around the
studio a little bit. That was called
the transport box. That's where we get this
term, the transport. Over here we have the browser. Now, the browser isn't the
most sexy thing in live, but understanding your
way around it really well will save you so much time, like hundreds of hours. We are going to spend a lot of time on getting good at
navigating the browser. Trust me, you're going
to thank me for it. Then at the bottom, we have our device view and our
clip view all in one. We can actually see both at once with these toggle buttons. Down here, this is showing me my clip and this is
showing me my device. We can see both at once. But if we only have one open, they're going to flip between. The last thing we
clicked on over here, we have Help view or Info View. I'm going to show you
another Info view that's going to come up in this lower left corner in a minute. Then we also have a few
strange things like this little tuning
window that I can hide if I want, but
that's really it. Ableton is really big
on single window. Like they want one window and you can do everything
within one window. They don't want a whole bunch of other windows popping up on you. There is a way to open your
mixer in a separate window. If you're on like two displays, you can do that by going
to view the view menu. Then there are things like plug ins that will pop
up in a new window, but those are not
Ableton things. Those are things that run within Ableton and are separate. We'll talk about those later. For the most part, Ableton
runs in one big window. Okay. Let's go into Info
View and Help View in the next couple videos
because those are going to be super valuable to you right away as we
start learning live.
10. Info View: Okay, I want to do
something with me here. Go to the menu at the
top of the screen, we're going to go to View and we're going to
go to Info View. Okay, when I click this, I'm going to get this
little box down here. If you already have
this box, do that. Same thing again to get it back because you probably
just turned it off. Make sure that you see this box. This is called Info
View View Info. You can also just
press Question Mark. This is such a handy little box. Okay, watch. If you look at Info
View and then move your mouse over
literally anything, it's going to tell
you exactly what it is and how to use it. Okay, so let's say this
monitor auto button, I didn't know what this was,
I didn't know what this is. So I'm going to put
my mouse over it, look at info view, and it says monitoring. When monitoring is active, attracts input is played through its device and heard
at its output. Great. This can
literally be anything. Anything that is part of live
is going to show up there. Okay. So I strongly encourage you leave info view
open for like a while. To be like perfectly honest, I almost always have
info view open. But when I'm teaching, I turn it off to make it look
like I know everything, but in between
videos I turn it on. No, I don't really, but kind of it's just a super
handy little tool. And whenever you don't
know how to use something, you can just put your mouse over it and look
down there and say, oh, that's the metronome
now I know what that is. So keep that open, and whenever you're stuck, just glance down at it and it's going to tell you
exactly what something is. Okay? And especially for
these classes of mine, if I show you something and
you don't catch what it's called or you want to get a
little more detail on it, put your mouse over that
thing and look over at info view and it will
really help you out. Okay, so just keep that open and glance down at it whenever
you're getting stuck. Super duper helpful. All right, now let's go on to help view.
11. Help View: Okay, the next thing
I want to show you is something called Help View. And that is what I
have open over here. Now if you don't
see this over here, go to View and then Help View. You can also press
Command option seven. Yeah, command option seven
or Alt option seven, I think on a PC that's
going to open up this. Now this is really
helpful because this has a bunch of
little lessons in it. Okay. So you can click
on a tour of Live, okay. And if I click on it,
there's some text. And then it says, click
here to load this set. Sure, I'm going to say, don't say what I was
just working on. It's going to load a little set and then it's going to
walk me through it. Look at that, Okay. Then once I'm done reading it, I click next page at the bottom. And it says, here's this thing, and you can walk through
all these little lessons. Okay. And it loads you up
with a cool little track. Yeah, that's cool. So it's really going to walk
you through each thing. There's session view stuff, there's arrangement view stuff. Then we can hit this little
home button up here to go back and walk through
each of these lessons. Now you have me here helping you learn live
and walk through it. But multiple perspectives
is a great thing. What I'm really going
to ask you to do is take a minute and go
through each of these. Don't worry about
mastering everything, because I'm going to walk you through just about
everything over the course of all
of these classes. But this will give
you a good idea of a lot of different
things happening in live. And show you some cool sets, take some time and do that. When you're done, you can close this view because this is really the only
purpose of this view, is to show you these lessons. Once you don't want it anymore, you can just go to View and then re click on Help
View to hide it. Or you can just click a little x right here and now it's gone. I'm going to leave that
closed for the rest of this class because I've
watched those lessons. They're delightful,
but I don't need them. It frees up a little bit more
screen screen real estate, we like to say, to hide them. I'm going to keep that
closed for now and move on. Check those out.
Highly recommended.
12. Zooming and Scrolling: Okay, let's get to know
navigating in live a little bit. The main way that we
do that is we have a couple weird gestures to learn if you want to zoom in or scroll scrubbing
is this way. We can in this way in and out
and scrub left and right. Now you can do all of that with a single click. It's crazy. It takes a minute to learn it. Okay? What you're going
to do is click up here, Up right above the numbers where you get the
magnifying glass. Okay, you're going to
click and hold down. Now, while you're holding down, if you pull down, you're
going to zoom in. If you pull up, you're
going to zoom out. If you move right, you're going to scrub. And if you move left,
you're going to scrub. Okay? Left, right,
up, down, right. The idea here is that you can
navigate from the beginning of a track to the end of the track with like
one quick gesture. Okay? It takes some practice, but you can do it now. Alternatively, if you
have a track pad, if you're on a laptop or you're on a desktop and
use like one of these, you can do two
finger stuff. Okay? Two finger pinch in and out. Two finger swipe side
to side, does that. That's what I've gotten
in the habit of doing, but it's just much easier
for me because I have this track pad thing anywhere that you
can zoom in and out. That gesture is going to work.
Or the two finger thing. That's true on a
mini grid as well. If we go down here, we can do it up here. We can also do it over here on our notes section if we want
to zoom into the notes. Okay, let's click and drag. Click and drag Or two fingers. That's how we zoom in. And you're going to be
doing a lot of that, a lot of zooming in
and zooming out, it's just the nature of live. You're constantly zooming
in and zooming out. Get used to those motions
either with a track pad or with a mouse by using the up down, left right thing up here. Cool. Go ahead and
practice it. I'll.
13. The Main sequencer (Arrangement View): All right. Now
let's make our way around the arrangement
view sequencer window, our main time line. First, I'm going to
hide a few things. You can easily hide stuff. If you put your mouse over like one of these
dark gray lines like that, you get this icon
that looks like a arrow going up and down. At the same time, if I
click and drag here, I can make that area
bigger or smaller. I'm just going to smoosh it
all the way to the bottom, and then it's going to go away. I can do that on
the browser too, if I really wanted to, but I usually keep the browser open. Okay? But now I can
see a whole bunch of my arrangement view
timeline for each track. Okay? Let's take a
look at this track. Okay? This is a Midi track. We have audio tracks
and Midi tracks. This is an audio track,
This is a Midi track. The main difference
is just that a t, I need to put an
instrument on it for it to make sound an audio track, I need an audio file
to go on it as a clip. I can see that there's Midi
information on this track because you see
these little dots that says this is a Midi clip. Down here, you see
this wave form that says this is an audio clip, Okay, back to my track here, so I can see my timeline. I can click and drag on
stuff to move it around. Now you want to click and drag
on the header of the clip. That's this top part, okay? If you click and drag
on the lower part, you're going to
highlight something. And then if you click
and drag on it, you're going to move
just that part of it. Okay, I'm going to hit
command Z to undo that. But if you want to
move the whole clip, you can move things
around this way. If you want to split the clip, then we're going to put
our cursor somewhere and command E is going to split
it into multiple clips. This works on audio clips and met clips going
to undo that. Okay, now over here we can
use this little triangle to minimize this track, if we just don't need to see
it very much can do that. You can also just grab the bottom of it and
make it nice and big, or nice and small if you want. Here is our ins and outs.
This is a Midi clip. It's looking for
Midi information. This is showing me all
my possible Midi things. These are Midi devices
connected to my computer. I've got some keyboards, This Fishman thing
is a Midi guitar, push seaboard is another
keyboard. All kind stuff. Usually you just want to
leave that to all s that means any Midi
thing I play here, it's going to record
as Midi information. There's not a whole
lot of reason to say just listen to this one
thing or this other thing. In most cases, same
thing with the channel. We're just going to leave it on all channels all the time, our in auto and off. This is our monitor settings. This means what are we going to hear while we're recording? We're going to talk
more about this when we get into the
recording section. For now, just leave it on auto. Then this is our output. Where is the sound
from this track going? In this case, we just
want to send it to main. That's going to send it
to our master track, which is all the way at
the bottom down here. Everything should really be
set to main unless you're doing some other
routing or something. Over here we have our
mini mixer, okay? This blue line that says zero, this is our volume, okay? We can click and drag,
pull it down up. Here's a fun little tip. If you ever want
to take something back to its default in live. This is true all over live,
not just for this volume, but let's say we adjusted this and then say
I don't like it, let's take it back
to our default. Just click on it once to
make sure it's activated. And then press the delete key and it'll go back
to its default. Super handy. Okay, This number five is showing us the
number of our track, so 567, but if it's yellow, that means that track
is on, it's active. We call this the
Ableton's fancy term for this is the Track Activator. I hate that term, but whatever. It's the Track Activator, it's their version
of a mute button. Okay, Except it's backwards. Right now it's on. If
I click it, it's off. Now, we're not going
to hear this track. Okay? The track is active, or not active. Okay. So you can see these ones
up here, like this one. Track four, I've turned off. The reason I did that,
probably because I was doing something on
it that I didn't like, I just turned it off and then eventually
probably deleted it. Here we have solo, that
means turn everything off. Except for this track, we're going to hear only this track. Then here we have Arm to record. This works a little
bit different whether you're in an audio
track or a Midi track. But in a Midi track, it basically means
listen to devices. I could play any Midi device, and we'll hear it this track, if I hit the main
record button up here, it's going to record
onto this track, okay? In an audio track like this one, if I hit Record, this is going to arm this
to record audio. Sound. I hit this to tell it I want to
record onto that track, and then I hit this button
to start recording. We'll spend more time,
a lot more time, on how to record with
live in a little bit. For now, just know
that if you're not hearing your Midi track, make sure it's arm to
record while you're playing something in here
we have our panning. We can move a sound
left or right. Now if you're not
familiar with panning, basically if I go
all the way left, you're going to hear this
in your left speaker. If you're wearing headphones, you're only going to hear
this in the left side. Now, some platforms that I put these classes on throw
out panning information, which is annoying,
but let's try it. Here's how to know if you're
hearing with panning. I'm going to solo this track, so we're only going to
hear this little synth. And if you only hear
it in your left ear, then it's working right. And then here's only
our right ear. Cool. And then I'm going
to put it back. C means center. We're hearing it
equally in both ears. This ominous, negative,
infinity is our sense. We can send things down to, we have two sens. By default, they are
down here, A and B. We can add more sends, we can add as many as we want. We'll get to that
in a little bit. For now, I'm just going
to leave them at zero. That's the main set up of our mini mix in
arrangement view. If we want to get a full
mixer in arrangement view, we can easily do that by
clicking this button down here. And then I'm just going
to make it nice and big. Whoops, this is going to
pull up our full mixer. Now this is the same one
we see in session view. Let's go to Session View and talk about the layout of that.
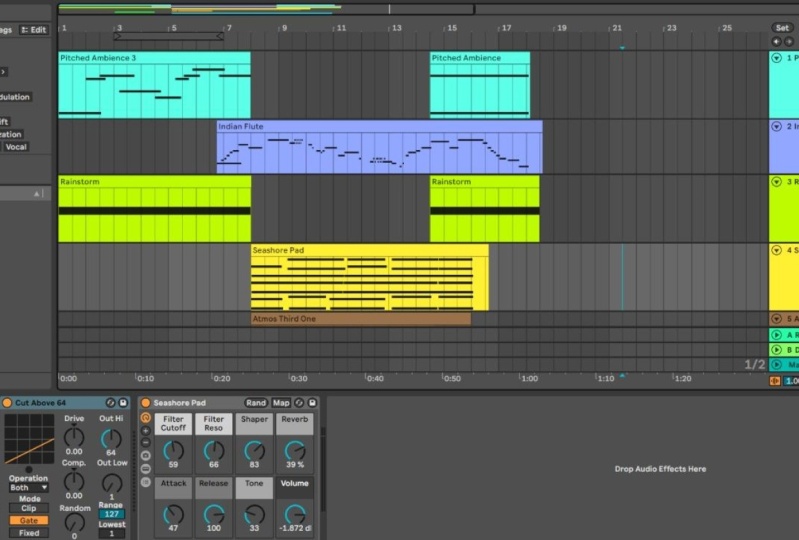
14. Clip View: Okay, so whether
or not you're in session view or
arrangement view, the clip view works the same. So I'm going to take any
clip, let's take this one. I'm going to double click on it, and now the clip view pops open. Okay, now I can drag the
little gray line right here. Click and drag to
make it nice and big. If I want in clip view, it's like putting a clip
under a microscope. Right? We're now
like zooming in, focusing on that clip. We have some controls
for this clip. We have a bunch of
things we can do to it. Just looking at some of
the more simple ones, we can boost the volume
or cut the volume. This isn't a great way to
do that, but it's here. We can change the pitch. If I want this to go higher, we can do that and do all kind of funny things with the pitch. We can reverse it so
that it goes backwards. I can hit reverse again to
make it go back forwards. We can change like is it looping the time
signature of it, the length of it, the position. Do some quantizing
more on that later. Now if you want to hide this, we have this little
arrow down here. We can click on that and it goes away and we can bring
it back right there. Now this area is shared
by the device view, which again we can get
to with Shift Tab. There's no devices
on this track. Let's go to one that does
have devices like this one. Here's a Midi clip. I just double clicked on
a Midi clip and made one. I can shift tab to go over to my device view or I
can click down here. Okay, here's my clip view, here's my device
view. Two of them. If I want to see them
both at the same time, I can just click
this little arrow here and it's going to go up. Now I have Clip View and Device View all open at the same time. Okay, let's talk
about creating clips.
15. Using The Browser - Why?: Okay, so in this section we're going to deep dive
into the browser. So this is going to be
our first section that we're really going
to go deep into. Now, before we do,
let's talk about why, why do we care about
this browser section? It is arguably the most
boring part of life. Let me show you how
as a music producer, I organize all my files
outside of Ableton. First, I use the
finder in Ableton. Here's all my hard drives. I have this tower of hard
drives over here foolishly. At some point, I decided
it was a good idea to name all of my hard drives based on lakes and bodies of water that have
been significant in my life. Eight Point Lake is
near where I grew up. Lake Michigan. Lake
Superior Games. Lake is a lake where
I vacation sometimes. Lake Nicoms is just
down the street. Anyway, you don't
need to know that. In Michigan, I have this folder called Sample Library and I have a couple million samples
in here of just stuff. Then in the games drive
is just sample libraries. This is just tons of sample libraries and hundreds
of thousands of things. The reason I'm showing
you all this is because how do I find anything? I want to find a
cool kick Sound. Where do I go? I don't
know. I could go anywhere. I could spend hours digging around in my hard
drives. No, thank you. Instead, Live knows
about those hard drives. It knows about that giant
sample library folder. It's categorized things
quite nicely for me so that I don't have to deal
with it for a little while. I used a separate program. There was a program
that exists for a while by a company called
Audio File Engineering, local to where I
live, Minneapolis. They had a program called Sample Manager that did all
this really cool stuff. It was a librarian program, and it also did some
batch processing. And it was really great, but
that company is long gone. So is that program,
the Ableton browser, is our way to find
samples quick. Now if I just go search
here and I say kick, I can find a ton of kicks. I can just audition
them really fast, and I can just find
the one I want. I can even be more specific. I can say hard, kick, soft kick, different styles of kicks, all kinds of stuff. This is my librarian, and it's not just for samples, this is also my
librarian for presets, synth loops, effects, plug
ins, all kinds of stuff. Don't think of this
as just the place where our samples live. Think of this as your
whole musical librarian, because that's
really what it is. There's some things you
can do to customize it. As you probably see
in this places area, you probably don't have
the same things I have. And in collections you
don't have the same things I have. Don't worry about that. We're going to go
over all that soon, but that's why the
browser is so important. It's going to save you
so much time to really understand the browser and
get good at navigating it. It is your musical librarian. Cool. Okay, let's go in and talk about how
to use this thing.
16. Sounds: Okay, I want to go
through basically all of these little buttons here and we're going to
start with Library. Okay, if you go up to Library, you can hit Edit
here and you can actually hide different
things if you want. I'm going to leave
them all hidden, but I'm going to show you a couple tricks to make this
a little more useful to you. Okay, I'm going to hit here. And again, if you
didn't catch that, put your mouse over
the word library, and then you get an edit button. There it is, okay. So let's skip all
for the moment. We'll come back to that, and
let's just click on sounds. Okay, so some of these terms
are a little hard to follow, what they're calling sounds
versus drums versus clips, versus samples versus grooves. So that's what we're
going to learn here. Okay, before we get into these, I want to do two
quick things, okay? First, if you want to
see more of the browser, grab this dark line
here, click and drag. You can make it bigger,
you can make it smaller. I wouldn't recommend doing that. I usually like to have
it sit right about here. I like to be as
small as possible. However, I'm going to make
it a little bit bigger for the moment because we're going to spend
some time here. You can do the same
thing with this area. Make that a little bit
bigger if you want. Okay. The second thing I
want you to do is take note of this little
blue button down here. It might not be blue for you. If it's not, let's click
it and turn it on. Make sure that is on. What that is, is your
Audition button. What that means is that anything in this list, I can click on it. I can use the arrow keys
to go down, and I can. Okay, so it's a little
pair of headphones. Right. And that basically
just means like audition. Let's hear what we've selected. Sometimes it can be
annoying to have it on, especially when you're trying
to give a talk like this. I kind of toggle it on
and off on occasion. But when I'm working,
not when I'm teaching, but when I'm actually
like producing music, it's on 100% of the time. Let's turn that on there. Okay. Now let's go to Sounds. So we're going to skip this all for the moment.
We'll come back to that. It can be a little
confusing what's included in the different names
they have here, right? Sounds versus drums
versus instruments, versus samples versus clips. These are all slightly
different things to Ableton. That's one of the things
we're going to learn here. So you're going to find two
different types of files. You're going to find ADG
files and ADV files. Okay, ADV files is
Ableton Live device. It is what live
calls an instrument. You can think of it
as a synthesizer for all of the live instruments, which we can see here. These are all of the
live instruments. Okay, but in Sounds
we're going to see a list of all of the presets
for those instruments, regardless of what
instrument they are for. This is just every
preset that we have for the live instruments
in a very long list. Okay? There's a lot of them. Okay, so if you might
go to this sounds area, if you're just looking
for a synth preset. If you're like, I
want a bass sound, I don't care what
instrument I'm using, I just want a cool bass sound. Okay? And you can audition
it by just going through here o and just listening to all kinds of
different sounds. Okay. Now I'm going to put, turn off for a second. I'm going to point out something about this audition that we're hearing right now with a synth. It does depend on what
note we play, right? Like we have to play a synth or put in a clip or something. This little audio file
that we hear is a preview. They've just picked a
note and usually it's middle C and said, here's a recording of what
this preset sounds like. You can modify it all day long, but that little audio file
that we hear when we audition, it is just a preview. It gives you an idea
of what the synth is. Okay, then the other type
of file we see here is ADG. Okay, Now an ADG file stands
for Ableton Device Group. Ableton has this way of
combining instruments together into what
it calls a rack. Okay? R ACK. A rack of instruments is a group of instruments
put together. We're going to spend a
whole bunch of time on Ableton instrument racks because they are a super powerful thing. What you need to know
for right now is that these ADG files are just
another instrument, but they're like a
group of instruments. That's the easy way
to think about them. But for the purposes
of just loading up a cool sound that you like
based on all of these presets, they work the same
as Ableton devices. Okay, Whether you've got
an Ableton device or an Ableton device
group for right now, they're functionally the same. You can see the icon
is a little different. Ableton device
shows a rectangle. A device group shows like two rectangles
or maybe two squares. That tells you it's a group. Then to load one of these
things, you would do the same. You can double
click on it or you can drag it right
over onto the track you want or onto empty space
and it'll make a new track. There's our instrument
that we made. A group looks a
little different. It can look like that. Sometimes it'll look like that. You can open and close and show more stuff in the group,
but it works the same. Okay. Under this Sounds setting, what we're getting
is a giant list of basically every preset for every Ableton instrument
on our computer. Okay? It's a monstrous list. This is even the whole list. If I go to the bottom, it says Show more Sure. And it keeps going on, and
on, and on and on and on. There's so much stuff here. Okay. Now, if your
list isn't as long, it might be because
you don't have set or something like that, but in suite's a long list. Okay, So that's
what's in our sounds. Now if we want, we could control click on it
and rename this. And I want to because in previous versions of Live you couldn't rename it. Now we can. I want to call it presets. That's what I'm
going to call mine, so I'm going to
leave it like that. Okay, that was Sounds Now I'm going to call
it synth presets. Let's move on.
17. Drums: Okay, next is drums. Now in the drums category, we're going to find three
different types of files. The first thing we're
going to see here is more of these ADG files. Ableton Device Group. That is going to be a
preset for an instrument, an instrument rack specifically. That is some drum kit. Okay, if I load this, one can put it on a Midi file. This is a drum machine. There are my drum sounds. If I make a new Midi clip, I can program drums. It gives me a group of
sounds that are drum sounds. That's one type of file. Another type of file
is audio files wave. If any files able that live has found on your computer that it
thinks are drum loops. Here's a drum loop, cool. Now I can just drag that right into a clip or if I'm
in arrangement view, I can drag that right
into my time line. Whoops. Can drag that
right onto an audio track. Now I've got it there,
just as a wave file. It's not an instrument,
it's just a audio clip. Then the third type of
file we're going to find here is an LC file. This is an Ableton Live clip. This is a Midi file basically. But it's a Midi file that has a drum machine
attached to it. In other words, it's got
some sounds attached to it. I can drag an ALC file onto
a Midi clip and drop it. Now we have a drumbeat. We can see it here.
Let's solo this track, Click on it, right? This clip came with
a drum machine. If I shift tab to go
to my device view, here's the drum
machine that came with it. I can change that. Remember that live, and this is true in all audio software. There's a Mitilip that tells
the instrument what to do. In this case, there's an instrument that
came with the clip, but there are separate things. There's the clip and
then the instrument. If we go to an
Ableton device group like this drum kit and
put it on this track, now we're going
to hear the clip. The same rhythm, the same beat, but played through new sounds. Okay, that was pretty
similar by chance, but let's grab this one, Y. Here's another kit, right? So I've got the same clip, but I'm changing
the sounds because I'm using different instruments. In this case, a
device group which is a preset and putting
it onto this clip. The clips show up in
this list of drums as ALC files like that. Then we've got audio
files that are just drum loops that
go on an audio track. Then we've got ADG files
that go on a midi track, and those are drum
presets. Cool with me. Cool. It's really interesting to focus on the browser
like this because we're learning a lot
about how Ableton works just by looking at the way the
browser is organized. All right, let's move
on to instruments.
18. Instruments: Okay, up next we
have instruments. Now what you're
going to find here is all of the Ableton
live instruments. These are the synthesizers and the samplers that
come with live. Now this is, this is
one of the places where we really see the difference
between the sweet version, the standard version, and
the light version of live. I have the sweet
version, obviously, these are all the instruments
that are available to me. If you have the intro
or light versions, you won't see as long
of a list as I have. But all of these are basically different synthesizers and they make different kind of sounds. What we can do here is let's
take analog for example. Analog is a synthesizer. I can put it onto a Midi track. You can just drag it over there and put it on a Midi track. That's what analog looks like. Okay. I can dial in a sound, I can mess with this, and we'll learn how
to use this later. But I can make a sound
if I want. That's cool. But when I did that, when I drug that over
onto a Midi track, what I made there was the
default analog patch. That's just like the default, what it sounds like right out
of the box, which is this. I'm going to make a mitty clip. I'll solo this track
and let's hear it. Okay, that's what analog sounds like right
out of the box. Cool. Nothing amazing, but
not bad. It's kind of cool. But all of these devices are also folders that we can
open with this little arrow, and then we have all of these
presets for each device. Okay, Now the thought that maybe just came
into your head is, oh, when we were looking at
synth presets or sounds, we all the synth presets and now I'm seeing more presets
for the sys, right? No, you're seeing
the same presets. They're just organized
different here. Okay, What we have in
instruments is each of our instruments with all of their presets
organized by instruments. Here's the collision instrument and the collision presets. Here's the Drift instrument
and the Drift presets. Okay? It's the same information
organized differently. Okay? If I want to use a preset, I can just drag that right
onto a Midi track hoops. What happened here
is I tried to drag it onto an audio track
and it's saying, no, I don't know what
to do with that. This is a Midi track.
Okay. Now here's that same Midi note
through the drift base. Now it sounds like this. Okay. Wild. We can also of audition the presets by
turning this back on. Ohh, Okay, that's cool. Let's use that for
my Midi note here. Cool. And maybe you just
had the thought, well here's a drum kit. And the drum kit is
just Midi notes, right? Like it's still got a drum
set on it as an instrument. But could I just put
a synthesizer on it and have it play
these as Midi notes? You sure could. Let's
use Hickory bells. Okay. Now he's our drums being
played with Hickory bells. Look at the Midi clip. Maybe if we zoom in and look
at that again, it'll help understand
what's happened, right? It's just mini notes. So with this drum clip, we can put whatever
sound we want on it. A drum set is going to sound
the most interesting on it, but you can put any
synth you want on it. Okay, so all of
these presets are the same ones that we found in the sounds or synth preset. Now I've just
organized differently. Cool. All right, let's move on.
19. Audio Effects: Okay. Up next is audio effects. Relatively simple but works
the same as instruments. If we click on
audio effects here, we can see all the
audio effects in live. Again, this is somewhere
where you will see the difference between suite
and the other versions. You will have less of these
if you don't have sweet. But inside each
of these effects, we'll have a bunch of
presets for those effects. Any effect we can drag
right onto a track, it can be an audio or Midi track and it's
going to show up. You can put a whole bunch
of them on a track if you want like that and make
big long crazy effects. Or you can open it up and grab a preset and put it
right on a track. Now if you're in a
different version of Live, you might see these
grouped into folders. There's been quite a
controversy about this idea. In Live 11, they grouped
all of these into, I think, five or six
different folders. And then in Live 12, I
got rid of the folders. If you're in Live 11, you
have all the same stuff. Well, you have most
of the same stuff, but they're just
grouped into folders. In 12, we don't
have any folders, they're just in an
alphabetical list, which is just fine as well. Just remember, open up these
little folders and you will get a bunch of presets
for that effect. All right, nothing
more to see here. Let's move on to Midi effects.
20. MIDI Effects: All right, before we go
on to media effects, let me just say that later
in this series of courses, I will be walking
through how to use every single one of these audio
effects and media effects. So let's go over to
media effects now. Media effects are a
weird thing in live because there are not a ton of media effects and they
are not super useful. I hate saying that I feel like I'm disrespecting media
effects, which I guess I am, but they can do a handful
of things of everything. This is probably the one
I click on the least, especially in Live 12, because the most popular
one to me was our Pgiator. There's other ways to
do our peggiation now, but we will go through how every single
one of these works later. And maybe you'll find something that's like super
important to you. But for the purposes
of the browser, just remember that these
can only go on Midi tracks. They can't go on audio
tracks on Midi tracks. Inside. Each effect is a bunch of presets
for that effect. That's basically everything
we need to know about Midi effects for the moment, until we really get into the
weeds of Midi programming, let's move on to modulators.
21. Modulators: Okay, up next is modulators. This little button in the
library is new in Live 12, but the contents of it are not necessarily,
some of them are. What we have here is a group of effects that modify
other things. They are modulators. Some of these like
envelope follower existed in previous
versions of live, but they've just been grouped differently into
their own thing. Now they are essentially
audio or Midi effects. Now you'll notice this
icon looks a little bit different than the
other effect icons. Okay, this one, there's one that looks like our
modulator effects, but this icon means that this
is a max for live device. Now you don't really need
to pay attention to that. We're going to talk about Max
for Live in just a second, actually, the very next video. Just hold on to that
idea for a minute. For now, all we really need to know is that these work
the same as anything else. They have presets on the inside, like everything else they can
go on audio or Midi tracks. Right, here's our LFO. You might have seen LFO before, that is something that is inside of a synthesizer usually. But we have this cool LFO effect that lets us basically put an LFO on anything and it's super fun actually,
and really valuable. These modulators
are really cool. We'll get into how
they all work later, but let's go on to Max for Live, and that'll help clarify
some of this business.
22. Max For Live: All right, Max for live. I hate to put it this way, but max for live can be a you love it or
you hate it kind of thing. The good news is if you don't want to really get into Max
for Live, you don't have to. You can use everything in Ableton and make
some awesome music and never touch Max for Live. But I personally love Max for Live and I've been using it for
a super long time. What Max for Live
is essentially it's a programming language that
exists inside of Live. The programming
language is called Max. It lets you build your own
effects or instruments. It's very powerful. You can really do
some wild stuff. Now if you're not interested
in programming at all, what this tool lets us do is get access to everyone else in the world who's
making cool stuff. Right? There are websites
you can go on like a great one is
Maxflive.com where people are posting
instruments and effects that they've made that do really
cool and wild stuff. You can download them and
use them a lot of the times, they're free. Not always. What we have here
is a whole bunch of instruments and
effects that have been built in Max for live
that we can play with. Some of these are mine, like probably test demo
class is something I made some of these
other test ones. Driller, I think I made driller, I don't remember, but the little icon shows that
it's a max for live device. If we go back to modulators, you can see this LFO. We can tell just
from this that it's a max for live device
because of this button here. If I click that button
that's going to open like the code editor where I can actually modify it and
make it do really, really cool and
customized things. One of the fun things about Max for Live is that a
lot of producers, myself included, have their
own little secret weapons that they've built
in Max for Live. There are things that they
use on tracks all the time, but they'll never
tell anyone about. It's how they get these
really cool, unique sounds. I have a bunch of those
that I've made in Max and I'll never tell anyone about circling back to the browser here we have a whole bunch of
Max for live things that live found on our computer. We also have blank ones. This is a Max audio effect, Max instrument and
max Midi effect. You can throw that
on a track and start building something totally new. Now we will go into how we do that at the end of this class, we will spend time
learning how to use. At the very end of this
sequence of classes, if you don't want to invest that time to really learn how to use Max, you're missing out. It's really powerful stuff, but if you don't want to
do that, that's just fine. That's why I put it
at the very end. But Max will come up a
whole bunch because Max for live devices are sprinkled
all over throughout Live. At this point, remember
that you don't need to be able
to program Max to use Max for live devices. There's tons of
really cool stuff that you can just use like any other effect or instrument.
23. Plug-ins: Okay, moving on to
Plug ins, okay? Now, let me first
explain what a plug in, and then I'll explain what
this particular list is. A plug in is its
own little program. Think of a plug in as a
completely separate program. Okay, now these
programs are designed to run within other programs. It's like program inception. Let's use an example right here. Bbc Symphonic Orchestra. Now, this is an instrument, this is a synthesizer. It's really a sampler that
is an orchestra library. I can load that as an instrument onto a track.
In fact, let's do it. It's got to go on a
Midi track because it's an instrument and it's big, it's got a lot of stuff to it, which is why it's going
to take a minute to load. Okay. Now this
instrument pops open in a new window because
it is not Ableton. It is put out by this other company
called Spitfire Audio. Spitfire Audio releases
this instrument called BBC Symphonic Orchestra, and I can use it to
play orchestra sounds, and it's a quite good
sounding orchestra. At some point, I went and
bought this little program. I bought it, I think actually this version I have was
free, actually, I think. But anyway, I got it and I
installed it on my computer. Any audio program
that knows how to deal with this particular kind of program is going to
be able to open it. If I open Garage Band or Logic or any other audio
software on this computer, it's going to see this program and it's going to
launch it because these little programs
are called plug ins and they're designed to run
within audio programs. Okay, This list here is everything I've
installed on my computer. It's a lot, you might
have nothing in this list because you haven't
installed a bunch of stuff. I bet you have a few things actually that just came
with your computer. But I've been doing
this for a long time, so I've installed
a bunch of things. What's important to note
here is that none of these are made by Ableton. Okay? These are all
separate programs that run outside of, these are all separate programs
that run inside of live. They are mostly
instruments and effects. Okay, If we go to this
instrument tab here. These are instruments
made by live. They run within live and
they are part of live. If we go to audio effects, these are audio effects
made by Ableton Live. You can only get these
Ableton Live if we go here. These are plug ins made
by anyone but Ableton. Okay. There's a whole bunch
of different companies that make these things. They're not able to. All right,
I'm going to close this. They are really the only
thing that pop open in a new window because they have their own little interfaces. Some of them are little
and some of them are big, Some of these are cheap, and
some of these are expensive. You can comb the Internet for audio plug ins or instruments. You can find a lot of free ones. Expensive ones, cheap ones. There's things all
over the place. Now one thing that
I want you to do is that if you click on plug
ins and you don't see any, then we might need to make a quick trip to our preferences. Let's do that. I'm going to go up to the Live menu
and go to Settings. Now I'm going to go to Plug Ins. Okay, now we need to
turn some stuff on here, okay? Use audio units. Audio units is a plug in. Use audio units version two. Turn that on. Use audio units version three. Turn that on. If you're on a PC, you might
not see that, that's okay. Use VST two plug ins in
system folder, Turn that on. Vst two is another
kind of plug in. Use VST two plug ins
and custom folder. You can leave that off unless you're doing something
weird on your computer, you probably don't need that. But if you do turn that on, you need to hit this
browse and tell it where your custom folder is,
but don't worry about it. Use VST, three plug ins
in your system folder. Turn that on. Custom folder, you can leave that off, okay? And then these plug in Windows, I like to have all three
of these on, okay? Then if you're still not seeing anything show up in
your plug ins window, hit this Rescan button. If you still don't see anything, I might restart live just to make sure that it
gets everything. If you don't see
anything after that, you probably don't
have anything. Search around the Internet for some cool plug ins
and you'll find Simon, install them, okay? So that's what plug ins are. They're really fun,
they're really valuable. After you are producing
music for a while, you will build up a
library of plug ins. And plug ins will
become a big strain on your bank account because it's addictive to buy plug
ins. Okay, moving on.
24. Clips: Okay, Up next is clips. Okay, Now you might think, I've already told you a
few different ways times, that everything in our
content area here is a clip. This is a clip. This is a clip. This is a clip. And
you'd be right. Those are all clips. Every nugget of audio
or Midi is a clip. That is true. However,
this button here, I don't like the
way it's labeled. I don't like it because what we're seeing here
is just Midi clips. Okay, so I'm going to rename
it, actually let's do it. I'm going to control
click on it. Or you can just press command, rename miticlipse, because that's what this is, this is all your miticlipse. You can see ALC
Ableton Live clip, There's a ton of Midi clips here and some of these
are pretty cool. This is just stuff that's been
found on your hard drive. All of these things that are
these really long lists, we have a really robust
way to search through these lists and we'll
get to that in a minute. I just want to show
you what's in each of these half time trip hop. Sure, let's put that on. I just drug it to the open area here and it made a new
track. That's cool. This clip is going to load up a drum sound because
this is a drum clip. Let's solo it. Now you might have noticed that
the preview played at a tempo and this one played
at a different tempo. It's because this
one is going to play at my session tempo,
which is up here. It's cool, we can
add these things in. These are just Midi clips. Some of these ones, the drum
ones probably we've already seen in the drum list
up here in the library. Same info just in another spot, but these ones are
chords, let's hear that. And our pegiatdord. Now what would happen if I
did what I almost just did, which is put this
cord onto this track. This track already has
a drum machine on it, because I put this on it and
that loaded a drum machine. Okay, this has a drum
machine and a track can only have one instrument on
it unless it's an instrument. Group more on that later
when I drug this on. This clip is now going to play
through this drum machine. It's going to be weird, it doesn't know what to do with
all these higher notes, but the lower notes had
drum sounds to them. If you want the clip to
come with its own sound, it needs to go on its own track. Once a clip pulls an
instrument on it, that instrument is going
to stay on it until you explicitly put a different
instrument on it. Okay, I could easily change the instrument on
any of these tracks, but if I want to
use the instrument that comes with the clip, I need to put it on a new track. Cool. Okay. All right, so Midi clips now Samples is something
a little different. Let's talk about that next.
25. Samples: Okay. Samples are
our audio clips. Okay. So these are all
going to be audio files. And you can see there's a lot
of just junk in this list. Like these are things that I probably pulled in and lost
track of what they were. That's kind of awesome.
Just a huge list of the momo stuff, dog licking. Mm. You know? And like, we haven't even got to the
A's alphabetically here. Right. I can do
show more and we're just getting through numbers. This is going to
go on for years. Oldsmobile starting. Okay. So what samples is doing here is I think it's just digging through
my hard drive, it's finding the samples on all my hard drives and
my lake themed drives, and it's compiling them
into this crazy list here. Now this crazy list is
not super useful, right? Like I'm not just going to go through here and find something, that's where the
search functionality really comes into play. But if I wanted to just
see all the audio files, I could just keep digging
through here forever and never ever what you need to know is that in
the samples is going to be audio clips which are
going to be any audio file. We're mostly seeing
wave files here, but AIF files and
MP three files and any other audio file that it knows about
will show up here.
26. Grooves: Okay, okay, let's move
on to grooves, okay? So this is a little bit
of a weird concept, okay? Grooves are not clips, Grooves are not
instruments or sounds, they are, let's say patterns. Here's how grooves
work. Let's say I have a beat, for
example, Like this. Okay, so this is
pretty straight. It's boom, boom. If I wanted to apply
a groove to it, I can make it do
something like swing. Swing is a very common groove. If I click on one of these, you can hear a preview of
the groove with just ticks, You can feel that it's
different than straight echoes. Let's go to, okay, here's the extreme one. I'm going to apply
the swing groove to that clip by
taking this swing, this groove file and dropping it right on
top of that clip. Okay, let's hear it now. Okay, so it's got
that groove to it. Groove files are
swing rock, rumba. Here's percussion,
conga, jazz rock, jazz, African house, hip hop, funk. There are all these
different stylistic patterns that you can apply to a clip. They work on audio
clips or Midi clips. Okay, this button here in our library is
just a big archive of a bunch of different grooves. You can also make groove files, which we'll talk
about doing later using this area down here that just popped up called
the groove pool. Okay, this is the groove. It's a neat little area that comes up when you're
using a groove. The files here in the library, these are AGR files. That's the only thing
you're going to find in this setting that's able, I don't know what the R
is, probably just groove. The R groove files. Chacha, you can add a Chacha. Those are a relatively
new thing to live, and they're not new to 12, but I think they came out in ten, maybe we'll deal a bunch more with using grooves
and making grooves later, but this is where we
find them and that's the quick thing on
how to use them. Let's move on.
27. Tunings: Okay, onto tunings. This is a new thing in Live 12, and it is probably the most
mind blowing thing to live 12 is the ability to apply global tunings,
which is what this is. Let me explain it this way. If you look at a piano, okay, let's use the piano
roll editor to demonstrate. I'm going to make this
nice and big, okay? You don't need to know how
to play the piano for this. But here's what I will tell you. You can see here, this is C two. The number here just
tells us which octave we're in. C two, okay? Now, this is D, E, F, G, A, B, C. Okay? If we take all of those and
the black notes in between, there are 12 notes in an octave. 123 456-789-1011 12. And then it starts
over, we're on C again, right? So
that's an octave. C two to C, three is an octave, and there are 12
notes in that octave. Cool. That's how music works. But that's not how music
works all over the world. For all cultures,
and throughout all of history, it has changed. There are some cultures that
use a different system, where they might have 13
or 14 notes per octave. That means every single note
here is a little smaller. If you want to make
music that does that. Your only way to
do it historically was to do really
complicated detuning things and figure it out, it's really hard to do A
new feature that they added was you can retune this whole thing and it's going to apply to
your whole session. If we go into tunings, we can see all of these
different settings. Look at this, these ones
that start with 12, that means 12 notes per octave. But they're different, they're tuned, different and strange. This 116 notes per octive, 1922, 243-14-1505,
notes per octave, 72 notes per octave. Okay. I'm going to
load that one up. Watch I think just double
click on it. There we go. Now look what happened, like my black and white
key patterns went away. Because the notes that we know, CDE no longer apply. These are all now more
complicated notes, right? It's going to be, to my ears, extremely dissonant to
make music in this way. All right? I'm going
to take this off, but I'm going to click on this tuning area and hit Delete. Now we're back to
normal Western tuning, also called equal temperament. This tuning thing is wild. I love it, I'm so excited to hear the music that people
are going to make with it. It's something that's
not really for me. I probably won't really use it because I really like working with the traditional
system that we have. That's where all my music lives, but there's going
to be some really cool music coming out with this. Trust me in our browser, the tunings section is just
all these different tunings. If you double click on one
of these and load it up, everything is going to
get very dissonant. If you don't know what
you're doing unless you really have a
desire to do this. I would leave this area alone, but look it up, do some
more research on it, You'll find it's
really fascinating. You want to know a composer
who did a lot of this work? Actually, an American composer, I think, I think it was from
Chicago or Chicago area. I'm not really sure. But look up the composer Harry Parch. He built all kinds of
instruments around, I don't know, maybe the
'60s, maybe the '50s. He built instruments that
had nonstandard tunings, things like 43 notes
to the octave. Look him up, see what you think. If you want to make
music like him in Ableton, now you can. Okay, let's move
on to templates.
28. Templates: Okay, templates in live are just super handy
little things. But they've got
one secret trick. Let's say I wanted
to make a podcast. I could set up a
session over here with, I'd have a maybe for
my background music, a vocal for a microphone
so I can talk. Maybe a second for a co host and then maybe another track for
sound effects or something. But I'm going to
do that every day. I make podcasts all
the time. I don't. But let's say
hypothetically I do. I should make a template that has all of
that built into it. Okay, here that is. I
can double click on it. There's a podcast template, here it is. Mastering
sweet music. Ambience voice over. Okay, I can do it here or I
could work with it over here. It's great. Right? Let's do
it over here for a minute. Probably by default, templates built into
live that came with you. You don't see as many as I have because I've made
some of these myself. Production 2021. This was for a project I
was working on in 2021. And I just said like,
this is going to be my template. I made a template. It's got a bunch of
instruments loaded up. It's got a bunch of
effects loaded up. It's got a bunch of sample
libraries loaded up. It's my favorite
tools at that moment. 2022, February default, same
thing, I made a new one. Default live set is another one. Idm template is one I made.
These are really handy. But here's the extra little
secret that we have. We have this little triangle here that's going to
give us more stuff. What it's going to give us
is the individual tracks. Let's go to the podcast one. Okay, here are the tracks. Right? Here's the
voice over track. If I'm in any session
and I'm just like, I have that voice
over track set up, really cool for a mice. You could go in here and
grab just that track. You don't have to load
up the whole template. In this case, I could just
say I've got my template, but I need another voice over. I've got two people
coming in on this one. Let's add another voice
over track, right? Let's make sure it
goes into that folder. Woops, there we go. Now it's going to have all
the same settings, right? Do I need a third voice
over this time? Sure. There you can add just
tracks from the template. It's a cool time saving feature. Once you get into a pattern
of doing something, make yourself a
template so that you don't have to set everything
up the same every time. Like I said, you
can put instruments like you can see here
in this music track. We've got some phase
ducking and an EQ just already set up so that things just fly
together really quickly. It's a big time saver
if you get used to it.
29. Places: Okay, so we've gone
through all of our library places here, cool. In so doing, we
learned an awful lot about the different ways
in which life works. But let's keep going
through the browser. We've got two more
big areas to look at, places and collections. Let's talk about places first. Now, this one in your computer. I bet you don't see what I see. You probably see a
few things here, but all of these
ones in the middle, you probably don't see. Almost for sure You don't
see because the thing about places is that we can add whatever
we want to places. You can think of this as
your bookmarks bar, okay? There's a couple things that
just stay here, like Pacs, Cloud Push, user library,
and current project. Those just live here,
those are useful. But these things, these
are folders I go to all the time for different
projects and I've added them. You can see Add folder, I could say, I'm
going to click on a folder and say, Mastered. Here's a mastering project
I was just working on. Sure. Now, if I click on that master folder
that's now here, I can get access to
these files quickly. The reason you would
want to do that is if you're constantly going to the
same folder over and over, Just give it to
yourself right here in the browser and save
yourself a bunch of time. That's all. It's a bookmark. You can see here, I put my
giant sample library in here. That was cool. Maybe
I didn't need to do that. Here's some files. I put a splice link
here because I downloaded a bunch of
files from Splice, which is a sample
purchasing website. So I bought a bunch
of stuff. I just put a link here so I
could see it quick. This, the hack was some
library that somebody put out. And I was playing with it for a little while just to try it out and see what it was like. And then here's this mastered. I'm going to get rid of this by just control clicking on it and say removed from sidebar. There's some cool stuff here. You're always going to
see Current project, which is going to show
you all the samples and files of your
current project. For me, there are none
in this current project. That's a good way to get into the files should you need to
for your current project, which sometimes you do now. The rest of these things, these other four things
I want to address separately because they deserve a little more conversation. Let's start with Pacs.
30. Packs: Okay, in order to
talk about Pacs, let's take a quick trip over
to the Ableton website. Here I am on the Ableton.com and I clicked on
packs at the top. Look at that, now you can see all kinds of stuff
here. There's tons of them. Okay, let's look at this one expressive choir
made by Spitfire Audio. I think we actually
already looked at a Spitfire Audio plug in. Now the packs are
not necessarily, plus there's a lot of stuff
that can be in a pack. A pack can have a whole
session in it that live calls. A set set is the word that
live uses for its sessions. A whole file of a track or something like
that is called a live set. A pack could have
a whole set in it. It could have a set of samples. It could have a bunch
of instrument presets. It could have some
max for live tools. It could have all
kinds of stuff. If we look through
here, we can see like, here's a max for live
pack, go down more. Here's a Sounds pack, here's more Sound, more
max for live packs. There's a bunch of
different kinds of packs. You can make packs
yourself and people do, or you can download them. Now if you go to
the live website, there's a whole bunch of
free ones that you can have. Actually you can get access
to all of this in live. Basically, you're going to
go here, you can go to Live, click on a free
one, download it, and then after you download it, there's going to
be something that looks like a live file. Double click on that,
and it's going to install it for you here. Okay. These are what we have
installed on our computer. Okay, let's look at orchestra
strings. That's a good one. This is a pack that I installed
that Ableton makes in it. There's samples and sounds. Here is string ensemble and I have a nice
orchestra sound here. Then here I can get access to the individual
samples if I want. This is the Ableton device
group of those samples. This gives me access to a built sampler that I
can play with and use. Okay, so this is a pack that I installed
and it's a sample library. This is a pack that I installed that's a max for live device. There's a lot of different ones. Now you can install more things just from
right with live, it says three updates. These things have updates. I could click here to download the new update
to the orchestra strings. You'll see that like any
good string library, that's a big file, 4.3 gigs, I'm not going to
do that right now. But also I have 194
available packs. I could just download
any of these if I want. Tune track. Bully Kit, Probably a drum kit
that sounds funny. Final classics. Let's find a really small one
and just do it. 6.9 Megs Transient Machines. Cool. I'm just going
to click on it. Download it. There it goes. Once it's downloaded, I'm
going to hit install. There it goes. Now
if I go up here, I can see what was in that, some some more presets. And two Maxford live devices over here tells us a little bit about what's in that pack. So this 193 available packs, that means that on
the Ableton website, I bought or was given a whole bunch of packs and I just
haven't installed it yet. This says there's a whole
bunch of things that you've purchased that you
haven't installed yet. You're not going to see
193 things available. This is one of the perks of the Ableton Certified
Trainer thing is they just give me all the packs I
can install whatever I want. A pack is just a really
handy way to get new things into your version
of live to build it up. It's not the only way, but it's a very efficient way. So get in the habit
of checking out Ableton packs and just remember that this
is where they live.
31. Cloud and Push: Okay, let's move on
to the next two. I'm going to address
together cloud. This is a new feature, I
actually haven't used it yet, but the intention here
is that you can sync up some sets between different machines if you're working on different machines, or possibly if you're
collaborating, this Ableton Cloud will
help your project stay in. Sounds cool. I haven't
been able to use it yet. This is a totally new
feature in Live 12. Looking forward to
checking it out. Okay, this push button here. Remember that Push is the physical controller
that we can use with live. There are a bunch of physical controllers we can
use with live. Push is the one that's
made by Ableton. That's what this thing is
right here with the lights, without getting into too much
detail on push quite yet. The newest push as of this filming is called
the push three. The push three
exists in two modes. There's a mode where
you plug it into your computer and you can
use it to control live. But then there's a standalone
mode in which there's a version of Live in the Ph
and a hard drive in the. In a standalone push, you don't need to connect it to a computer at all.
You can just use it. It's got a computer in it
and a version of live in it. But you still need
to get things onto the push like a set
or files or whatever. If you have one of those
pushes in standalone mode, this is where you would
click and then you can drag things
right onto it like a files or anything to
get it onto your push. My push is not a
standalone push. It needs to be connected
to the computer. It's not showing up here. But
this is how you would get access to one of those
standalone pushes if we had one.
32. User Library: Okay onto user library. Now this deserves its own video for one purpose and
one purpose only. Your user library is a single folder somewhere
on your hard drive. The very important thing
about it is to not move it. If you do move it, there's
ways to deal with that. But if you want to
keep your life simple, just don't move that folder. Your user library has
all of your live stuff. This is where it's keeping track of a whole bunch of
files, your template, some samples, your
presets, all that stuff. If you have an issue where you load a bunch of things up
and the presets are gone, there's no presets, then it might be that something has gone wrong with
your user library. If you want to know where it is, you can go to user library
here in the browser control. Click and say Show
in Finder on a Mac. I think you'll find
something very similar on a PC. And this is
what it looks like. It's got its own folder icon here, it shows you where it is. It's in my user folder. Music Ableton User Library. If I move this, then Ableton loses track
of everything. I can. Go to my live settings library
and reconnect it this way. If you have to move it, this is where you're going
to go to tell Live where you've put it so that everything can
go back together. Otherwise, you probably
won't need to go into your user library here in
the browser really at all. I don't think I've ever dealt with going into my
user library here. We don't need to see it in
places, it's just there. But if we have a problem
with missing a bunch of presets or templates
or anything like that, it's probably because
something's gone wrong with your user library. Go to that settings
tab and relocate it, We'll fix any problems
you have like that. Okay, That's it for places. Remember that if you want
to add anything here, you just hit that extra folder, that Add folder
button and then you can just add things
like bookmarks. All right. Let's go
up to collections.
33. Collections: Okay, So think about everywhere we've been in the browser
so far is just saying, here's all our stuff, okay? Everything in this library
and places has been saying, this is all of our stuff, cool. When we go up to collections and then everything else that I'm going to talk
about in this section for the next five videos, what we're looking at is how to find specific stuff, okay? All of these things
is the stuff I have. But now we're going to
talk about finding stuff. The first way we can find
stuff is with collections. Now, now yours won't
look like mine. If you put the mouse over
Collections and hit Edit, you will see probably a
bunch of colors here. You can turn some
on and some off. You can only have a maximum
of seven different ones here, which is a really bummer. Like I would use a lot of these because
I use these a lot. You can turn them on or off with these
yellow buttons here, you can rename them. If I go done here, I can control click
to rename them. Okay. Now what this is, this is a tagging system. If you know what
a tagging system is, you know what this is. Let's say I'm going to
go to drums here and say like this drum kit, I really like, I really like the way this drum kit sounds. I'm going to control click on it or right click, whichever. I'm going to add that to drums. Now it gets a little
yellow, see neat. Okay, now if I go up to drums it shows up there right here. Okay, so these are all drum things that I've added
through tagging. You can add whole folders, you can add individual
audio files, you can add kits, you can add plug ins. That's the real
powerful thing about this collection tagging is that anything can be
tagged as anything like, let's say this tuning like this was a
tuning I really liked using for since or something. I could put a tuning file into my sins and now
it's going to be there. Right here it is. Okay? I don't really
want that there. I'm going to control, click
on it again and untag it. Now it's going to go away. If I just reload that, you could put anything anywhere. Okay, Now I've seen people use this collections thing
a bunch of different ways. I've seen some people
use it for keys, keys and pitch
content of samples. I've seen people use it for, for like tempo related things, for whole tracks versus stems. But the way I've been using it, and there's no wrong
way to use it, you should use this
however you want. But the way I've been using
it is these categories. Amp emulators. I do a lot of guitar stuff where I plug
in a guitar and play. I'm always experimenting around with different amp emulators. I've got three of them here
and they each have a bunch of presets that I can play with. I plug those in there. I like generative stuff. I've been experimenting
with a lot of generative stuff that means like things
like a plug in or a max effect where I can set some parameters and then it'll start
going like I can say, randomly generate a rhythm. And it'll do it, it'll just
make these random things. I like playing with that stuff. That's why I have a folder
here of that plug ins. Now I've put this one
here because as you saw, I have hundreds of plug ins. When I'm working on something, the last thing I
want to do is spend hours digging for
the right plug in. This is just my favorite, most go to stuff. Lately, things go in and out
of this folder all the time. These are just my
favorite things, samples. Similarly, these
are just some of my favorite samples to go to lately that I've been using
in different projects. I've got a whole
project where I'm chopping up like
Beethoven samples. So here's a wave file of
Beethoven string quartets, these Mr. Bill samples I
bought that are really good seven library
I really like, this is just like a bunch
of random drum samples that I found online somewhere. Then we're great drums again, these are just my favorite
drum sounds for the moment, my favorite synth
sounds for the moment. You can see that
this DX seven is in both synth sounds
and I think samples. Yeah, that's okay.
You can do that. Then I put UVI here
because I've been experimenting with this UV plug in company where you buy a subscription and then they give you like
hundreds of plug ins. I like it so far, but there's too many
plug ins to deal with. I've just putting my
favorites here so that I can sift through what I
like and what I don't like. That's a work in progress. But anyway, you can set
this up however you want. Just think about the
categories that you use that you access the most. Then think about making a
little collection for them. What's the goal of saving you
time while you're working? While you're making something, you're in the creative mode, you don't want to
be digging through your whole library for that
one kick sound you want, make a folder of
your favorite kick sounds and then tag it up here. Okay, You don't have to use it, but it'll save you a lot of
time if you get good at it. Okay? Now next let's go into searching for stuff and ways we can make sure that we
find the right stuff.
34. Browser Tags: Okay, let's talk about, let's search for a
Snare. Snare drum sound. Okay? So I'm going to type in my search bar here
and say snare. Okay? Nothing comes up. Why? Because I'm in UVI, I'm in this
collection right now. I'm going to go back to all. This is the best use case
for that library item. All this just shows you all of everything
which is otherwise useless unless you're
searching when I go here, now I can drill down
a little bit deeper. I find a bunch of stuff, right? Like this is snare stuff, right? This is not useful to me.
This is a very long list. If you don't see
these filters here, open up this little tab,
right here's filters. Now I can say, well, what kind of snare
am I looking for? Am I looking for a
sample or a preset, or a groove, or a device, Let's say a sample. Okay, that narrows
it down a lot. Do I want a loop or a one shot? A one shot is a term that we
use for a snare sound that's crack on just a loop is going to be a pattern or
something. Let's do one shot. It's asking me if I want it in the ambient and FX category. No, I don't think so. Snare tag? Yes. Do I want it to be a
hit rim or an articulation? Let's do a rim. Acoustic analog digital, let's say acoustic. Okay, That's enough to get
me just a whole bunch of good sounds. Let's listen. Perfect. That was all of them. This last one, maybe not. So Rimyka now I've got, I don't know, maybe 20
here to choose from. That's way better
than that giant list. You want to use these
filters and tags. Now you can edit these filters and tags by going to
this edit button here. And you can things certain ways, you can see things about
this particular sample. It's been tagged as
it's tagged as hit. And you could say, oh,
this is actually a clap. And add that to
it if you wanted. But also what's really cool
is you can save this search. If I said, here is a live
search for all my rim clicks, I could hit this
little plus sign here, and it's going to
put it right here. I'll say rim clicks and return. Okay, Now this little
button here in my library is a live search. If I installed some packs or
a new library or anything, and it had a bunch of
new rim sounds in it, it's going to show up here
automatically, right? This list is going to grow. As I do that, that
can be really handy. I'm going to control click
and say remove this. That's browser tags. We can search, click
all, search for Kick. And then we've got these tags we can use to help us drill down better and sift through the things we don't
want much faster. Cool. All right.
35. Browser History: Okay, two more things about searching that will make
your life much happier. One is that we have these back and forward
buttons here now, and these are a search history. We can hit back and say, here are the different
things I was searching for. Here's my snare. I can
go back even farther. Here's my kick, then here's probably some searches
I was doing yesterday. I'm just stepping
back through where I recently been tuning. I'm just like walking through
the browser history, right? So it's going to go
back a long way. You can watch everything we did in this class
so far in reverse basically by doing this, okay? Backwards and forwards with your search history will
save you some time thinking, oh, I just saw that snare
sound, but now it's gone. Where was that? Just hit back, you'll find it. Save
yourself some time.
36. Sound Similarity Search?!?: Okay, there's a new feature that will help you find
things in a freaky way. It's called the Sound Simularity
search. Check this out. Let's, what's a good, let's do snare again because
that's easy to all snare. Let's do sample one shot snare. Let's do acoustic and
that should do it. Okay. Let's pick one of these. Here's a bunch of
rims. Let's go here. Okay, here's a
bright snare sound. Okay, let's say I'm working
with this snare sound, and it's cool and I'm liking it, and I want to find
more sounds like that. Here's what I can do.
Watch this control, click on it, show
similar files, Okay? Now it's going to say
here's the snare you started with and here's a whole bunch that are
pretty close to it. Let's hear, right. They're all sonically similar. I don't know how this
works. It's like, I think they take the name
into account, supposedly. They take some degree of, of analysis of the
sound into account. I don't know how it's
tagged into account, I'm sure, but it's wild. What I really like it for is
watch this if I go to loop. Okay, let's clear
out our search. And let's just say I'm going to search drums
and I'm going to search. I'm going to do sample look, drum loops, let's say acoustic. Okay, so here's a shaker,
right? That's cool. Let's say I'm using
that shaker in a track and I like
it, it sounds cool. But now I'm going to like
a new section of the tune, so I want something
a little different, but not totally different. For that, I'm going to go
Sound Similarity search. Now here's my original and I've got all these other things. These are all good options
for the next section of my tune to add some diversity
but not get too far away. The sound similarity
search is not only good for
finding your files, but it's actually a really
good compositional tool to help you find things that
are close, but not the same, to work in the next section
of your tune. Super valuable. Okay. Enough of the browser.
We've learned a lot. What I want you to do
now is take a step back, take a deep breath,
go for a walk. We're learning a
lot of stuff here. When you're ready,
we're going to move on and we're going to talk about basic recording
workflow and love. When you're ready, move
on to the next section.
37. Adding Content: Overview: Okay, now we know our way a live a little
bit. We're getting there. We definitely know how
to find things and where to get access
to all of our tools. That's over here in the browser. Now let's talk about actually getting some
music into this thing. I'm going to clear this out. In fact, I'm going to
make a new session. So I'm going to go command.
I'm not going to save this. Okay. I'm going
to close this up. Clear that, search out, just do a clean slate. Earlier I talked about the three ways that we can
get content into live. Those three ways depend
on whether or not we're working with a Midi
track or an audio track. For a Midi track,
record a Midi file, just create mid,
import a Midi clip. Okay, We'll do all three
of those in a minute. For an audio track,
we have two options. We can record audio or we
can import an audio clip. That's what I want to do
in this section is get clips into our
content area here, specifically focusing
on the recording aspect of both audio and Midi. It's a little out of the
scope of this class to go into everything about
audio recording theory. We won't have time
for that, but I do want to show you how
to connect a mic to Ableton and record the
same thing with Midi. Connect a Midi controller and record. That's what
we're going to do. Before we do any of that though, we need to take a trip
to the preferences, our settings to make
sure that we're set up to be able to record.
Let's go there first.
38. Audio Settings: Okay, so in order to
get to our settings, we're going to go to
Live and then Settings. Or you can press Command comma. Okay, this is the window
we're looking at. Okay, here we can
set up two things. We can set up our Midi to be able to record and our
Audio to be able to record. Let's go to audio first. Okay, here are the
things we care about. Driver type, audio input device, and audio output device. Driver type, if you're on a Mac, is always going
to be core audio. Make sure that says core audio. If you're on a PC, you get
all kind of weird options, but you want the one that is whatever sound card
you have that you can plug things into
audio input device. This is what you're
going to plug into. Now maybe you've taken my intro to music production class and you already understand all this. But if you want to
plug a microphone in, a traditional microphone in, you need some audio interface
plugged into your computer. The one that I have is called Universal Audio Thunderbolt.
It's right there. Universal Audio is the company and the model of
mine is Apollo Twin. It's great for small studios, but you want here
whatever you're going to be plugging your
microphone into. If you have a USB microphone, it should come up in this list. If it doesn't, you might need
to install some drivers. You can see this is everything
I have plugged in here that can take in sound. Here is my actual microphone, this one going into my
universal audio thunderbolt. I have a webcam set up. My three controller actually can work as an audio interface. I could plug a microphone
or my guitar into that and route it into
live if I wanted to. Steam is like the
Steam gaming platform, if you know that. I think it's open right now, so it thinks it can
take in a microphone. I don't think it actually
can zoom audio device. That's a virtual thing. I'm
not really sure what that is. I can use my phone
microphone if I wanted to. That's coming up here. I want universal
audio thunderbolt. The reason I want that again is because that's what my
microphone is plugged into. Okay. If you don't have
a hardware interface, you're not really
going to be able to record a traditional microphone. You might be able
to record a USB microphone or
something like that. Now our audio output device,
this is just our speakers. This has nothing really
to do with recording. In my case, it's always set to universal audio thunderbolt, the same device because my speakers are plugged
into that device. However, just for the
purposes of recording this, I have to set it to
Telestream audio capture. That's the software that does sound capture for
filming these videos. You can ignore that most
of the time. It's here. Then this is just anything
that can make sound, right Wherever you have
your speakers plugged into, This is what you need
to select here, okay? Now you may or may
not need to do some input and output
configuration. This just says what channels
can I record on Two. In my case, I have inputs on 1.2 and I can do a stereo input of 1.2 that's the only thing
that's selected. Okay, while we're
here, you may as well select what sampling
rate you want to use. Select 48 or 404148000, or 44,100 You can select
these much higher ones, unless you're recording
an orchestra. These aren't really going to do any good for you
and they're just going to make massive files. I would select 48 or 4041. Then while you're recording, if you experience latency, latency means that
I'm going to record a sound and then
if I hear it back, it's like way behind. It Takes a while for the sound to get from the microphone, into the audio interface into the computer,
and then into live. That can take a couple
of milliseconds. If it's too much, this is
where you can mess with that. You can control it a little
bit to minimize that latency, that slowness between
those two things. You can experiment with
this if you need to. We'll get more into
that when we do like a more in depth recording
in live thing in, I think the next unit of
this class of this series. But okay, our audio
settings are figured out, the thing we really need is
audio input device here. That is our audio
input settings.
39. MIDI Settings: Okay, let's get our Miti
settings all set up. Now what I have is
a Midi keyboard. Mine is a rolly seaboard.
It looks like this. This is the small Roy Seaboard. But any Midi controller will do. Most Midi controllers have
a couple octaves of notes. They're actually pretty cheap. Maybe 100, 200 bucks. It's not a major investment
for a decent Midi controller. This is a fancy one, I wouldn't recommend starting off with this,
although I do love it. Okay, so this just has a USB connection and I'm just going to plug it in right now. All right, so let's go
back to our settings. Let's go to Link
Tempo and Midi. Okay? So this Midi stuff down here is what we're looking
at specifically. Right now. We're looking
at this area, okay? What this says, can I
make this window bigger? I don't think I can. What this says is my inputs
and my outputs. Okay. If you have
a Midi keyboard, you're going to play in notes. That's all input that is coming from your Midi
keyboard into live. That's inputs. Outputs
would be live. Going back to our
Midi keyboard now, in most cases there's
not a need for that. Most Midi keyboards can't
receive information from live. Some can, and that can give
you some cool features. But if we just want
to play in notes, we generally don't have to
worry about the outputs. Okay, let's look at the input. These are things that
live knows about that I've plugged in either
currently or recently. Seaboard Rise 49. That is not the keyboard
I just showed you. That is my other Roy
Seaboard that is a full 49 key that
is like right there. Seaboard Rise is the little
one that I just showed you. I have two of these fancy
keyboards because I'm a Dork USB Midi
interface that is my, I think that's my
universal audio that can also route Mitty if it needs
to Fishman Triple Play. This is a Mitty guitar actually, that I have plugged in, and then my Ableton push three
that I have plugged in. And there's two different
settings for both of those. Let's not worry
about that for now. First thing you need is your keyboard to show
up in this list. If it does show
up, that's great. If it doesn't show up, read the manual and see if you need to install any drivers. A lot of keyboards, Ableton already
knows about them. You don't need to
install anything extra, but sometimes you do that should get it to show
up in this list. The next thing you
need is to look at these four checkboxes
for your keyboard. Turn on track for sure. That means this keyboard
can track notes, it can play in notes and
record them onto a track. That's like the main thing
we need to do, do that. These other ones are optional. Some keyboards can use these
and some can't sync in. Remote are for things like if your keyboard has a Play button on it and a stop button on it, it can control the main play and stop of live
if you want it to, You would turn on
these controllers. You would turn on these options. Mpe. We'll talk more about NPE later, but it's like a high definition
version of Midi two, which is an oversimplification, but that's what it is. Some keyboards can do it, can't the C board can. I should probably
turn that on as well. But for just inputting notes and things, it doesn't
really matter. Now, how do I know my
keyboard is working? And live sees it? There's
a fun little trick. Let's say I see everything here. It looks good. I have reason to believe that
this keyboard is working. I'm going to get out of my
Preferences window and back into the main Ableton
window and check this out. If we go up to the
upper right corner, see these two little boxes
right here, the top one. This box has one purpose only. The only reason it's there is just to be an
indicator light for Midi. That means that little
box is going to light up whenever live sees any Midi
information. That's all. It's just to tell us,
hey, Midi is working. That's all, that's what it does. All I need to do is
hit some notes on my keyboard and see if that
lights up and it does. Midi is working. It's
as easy as that, okay? Whenever I plug in a
new keyboard to live, I always plug it in, make
sure it's turned on. And then just like smash my
hands on it for a minute, see that it's working. And then I say, great
Midi is good to go. Get in the habit of
glancing up at that. Whenever something goes wrong, something you're
not expecting to happen with Midi look up there, and that'll tell you if
it's working or not.
40. Recording Audio: All right, let's
record some audio. We're going to go
to an audio track. I'm going to do this
in arrangement view, but you can do this
in session view two, and I'll show you
that in a second. Here's an audio track. You can see my voice
coming in here. Remember this little block
of stuff is our IO settings, In other words, our
inputs and our outputs. External means I have
an external microphone. A microphone that's
outside of live. So that's good.
That's what I want. Now I'm going to see which one. Remember when we hit
that button that said input and output
configurations. This is where we're
seeing that, right? I could record one stereo track, which would mean I
have two microphones plugged in to this
at the same time. You might do that if you're recording like an
acoustic guitar and you put two
microphones on it, right? But if I'm just recording
with one microphone, I want to select just
one input, input one. And you can see a
tiny little meter there showing that it sees
the correct microphone. It's the one I'm
currently talking into, but this is our main meter. Why don't we see that going? It's because of our
monitor modes here. Okay? It means what am I going to hear
while I'm recording? This is important because it's very easy to create feedback. Right now, it's off. That means that I'm not going to hear my microphone through my speakers right now
because it's off. If I turn it on auto, that means that I'm going to hear it through the speakers when
I'm playing it back, but not when I'm recording. If I turn it to, that
means I'm automatically going to route my microphone
through my speakers. In this case, that's
going to be bad. That's going to immediately make feedback because my speakers
are going to play the sound. My microphone is
going to pick it up, which is going to play
through the speakers, which is going to get picked
up by the microphone. And that goes in a circle. It gets louder and
louder every time, and then things
start to explode, including my ear drums. I definitely don't
want to do that. When would I want to do that? When I'm wearing headphones. If I'm wearing headphones
that won't feed back, I need to wear headphones
in order to turn that on. And I don't want to wear
headphones right now, so I'm not going to. Okay, so if I want to
record on this track, the record button is up here. But I can't just hit
this button because I need to tell live where
I want to record. And that's what
this button is for. I click this button and now you can see I am
monitoring through. I don't know if
you can hear that in the way the screen
is capturing me, but but there is sound coming out of my
speakers, That is my voice. I'm hearing myself twice now and it's driving me a little nuts. I am in danger of feeding back. I'm going to turn
that off so that it doesn't play through now. It's a little more comfortable and I'm not going to feed back. The audio setting is going to play through
when you're recording. I think I maybe said that
backwards a minute ago. I'm going to leave that off now. This is armed to record. So you can see that there is a meter here now.
But it's grayed out. It's gray because that means that it's trying to show you
that there's signal here. But I'm not playing it.
If I go back to auto, you will see that
we're playing it. But it's gray means you can't
hear it, but it's there. Okay. I've armed this track to record and now I just hit
the Big Record button. Now we are re hurray bananas. Bananas, bananas.
And then I stop. Okay, We recorded something. If you want to
record on multiple tracks at the same time, by default it only wants you
to record one at a time. But if you want to
record multiple, you can command click, or I think click on a PC and enable two
to record at once. Now I could record this
microphone and this microphone. If I had another microphone plugged into channel two, cold, record them both on
separate tracks. But there we go. Now
we have our audio clip of me playing, of me talking. Now I can play it back
button, now we are. Hooray bananas,
bananas, bananas. We hear it Cool, Super
basic recording. I think in the later
versions of this class, we go into the full, nitty gritty details
of audio recording. But in this first class, we're just trying to make some music. Let's move on and talk
about Midi recording.
41. Comping and Take Lanes: Okay, so let's talk about take lanes. Here's
what that means. Let's say I want
to record myself doing something ten times
and then pick the best take. You don't need ten
tracks to do that. You can record the
same thing and then right on top of each other and then
pick your favorite. Here's how that works. I was thinking
maybe to demo this. I would sing, and then at
the last minute I decided, no, no one wants to hear that. Let's do a little guitar work. Okay, this is not
a mitty guitar, this is just a normal guitar
plugged in with audio, into my audio interface. I'm going into channel two here. Okay. This channel one is my microphone,
this is my guitar. You can see in that little
thing right there me, make some sound with my guitar. Okay? If I arm it to record, you can see it coming in here, but great out. So
I don't hear it. Now, I could do this, and now
I'm going to hear it, okay? Now, it's not going
to feed back because it's a guitar and
not a microphone. I could leave it that
way if I wanted. Let's record something
and I'm going to purposefully screw it up and
record it multiple times. Let's go, I don't
know right here. Then I'm going to
loop. This means loop, this is my loop brace. This means just loop this
over and over and over. Okay, let's zoom in. Just going to make
this 1 bar, okay? Now I'm going to add another
new thing to the list. I'm going to turn on my
metronome, which is right here. Okay, my tempo, Let's
take it down to 100. Turn on my metronome and then we'll start
recording Right here. I'm going to try to strum a chord in time with the metronome and
I'm going to do it a few times and I'm
going to screw it up. So I don't think I'm a terrible guitar player because
it doesn't sound great. I'm screwing it up on purpose. Okay, here we go. Okay. Okay, there we go. Now it looks like I
recorded over all of those, every time that
this circled back, I rewrote over those. If I don't do one
very special thing, then that will be true. If I hit play on this, I'm only going to hear
that last one, right? But if I go over to our track header over
here and I control click, I can say so to take
lanes right there. Okay, Now here is all my
different times through that. Now you'll notice that they're all darker than one of them. The last one is always
going to be the dark one. What I can do is I can click and drag to select the one I want. And then I press
Return. Now I've got that much is my keep. Now I could go here
and say I want that. That actually doesn't look good. Let's go there. That. Okay, now my
keeper take is beats 1.2 3.4 That's what's
making up this. Let's hear it now. Okay, I selected four bad takes, but I actually think the fourth one through
was the best one. I'm going to select all four, all of that fourth take, and press Return
and now hear it. Okay. Perfect. But that was the best take I can go through and tighten
it up using warping, which we'll talk about
how to do later. But for now that shows you how to use take lanes and
select the best take. This is a process called comping where we
play over and over the same thing till we get it right and then we
select the best take.
42. MIDI Comping: Okay, take lanes in. Midi works. Just about the same. I'm going to go up here, I've got a loop going. I'm going to arm this to record and start recording
something on this clip. Okay, So we recorded a
bunch of Midi stuff there. We can now go to show take lanes and we can
see a bunch of take lanes. Now you might say,
what are these? This is actually wild. This is my second
take at this video. I did this video a minute ago and I just didn't like
what I came up with. I'm redoing it, but even though
I deleted the main clip, the other takes of
it are still here. I mean, I thought I
deleted everything, but it's still here. Interesting. But I can select things just like anything
else and make the take lane, put together a composite take of the best versions
of myself playing it. Now there's a little bit
more that goes into this. There's something called
capture which will just automatically put on the screen the last couple mitty
things you did, it's wild experiment with that. Then there's also automation
record which will record just just non Midi stuff. Things like dials and buttons that might be
on your Midi keyboard. That's another
thing to look for. Okay, let's move on. Let's just look at
a track, right? We've been talking a lot about theory and how all this works. Let's look at something. I've been working on
one of my things. And talk through what I did just as a break.
Something fun to do.
43. Session Deconstruction No. 1: Okay, I think we took a peek at this track earlier in the, but now that we know
what we're doing, let's take another little look. This is this synth, wavy, synth wave thing that
I was playing around with. Let's just look at this
section right here. That's where I think
the most is going on. Here's what it sounds like, okay. What are the elements here? Here we have a miti rif, okay? This is just a Midi thing.
Now, with this one, I didn't play this in. I just click through
to make this. You can add notes just
by clicking like that. That's what I did for this.
Then it has on it is the med. We'll talk about how to do that. It also has an echo on it. Delay Here we have
a drum sample. Let's see what this is. If I solo this, I hit the
S here and then listen. Oh no, this is that
vocal sample I found. I think I got this on. Anything you get
on Sp, If you buy it, then you can use it. Royalty are all covered. This is probably just
this little drum groove. Cool. Here's another
synth thing. Here's another percussion layer. Then some of the synth I added. I think I did play this one in. Yeah, Core progression. And you can see the
synth I'm using here. This is actually a plug
in called Contact. We'll talk about contact
soon. Here's another. So this is an oh, this is eight synth. This is a plug in. If I open
it, you can see what it is. This FMynthesizer emulator,
it sounds like this. A warm moving down, this looks like
another FM eight. These FM eight give that real '80s sound that I'm
really into right now. Bass. And then here's
maybe another FM No, this is another
contact instrument. Just piano and then down here, this I believe is just a
guitar track that I played in. Okay, so that's me.
I'm running through this guitar rig amp emulator to give it a nice clean sound. I recorded this the same
way I just showed you. I just sat here and played it. Actually, I think I
stood when I played it, but then there's a
little delay on it. Also a little clap on the next track, what is that? Our peggiated synth, adding
a little robotic sound And then bongos, thicken it up. All of that put together, sounds like this
hoops on solo that you want to hear.
Basically the same thing, but with less context,
with less going on, so different layers
of things happening. But yeah, so it's just a
little peek into a track. We'll look at another track, I think at the end of
this class. It'll be fun. Okay, now let's move on and
let's talk about editing, like how do we get
things lined up just perfectly and what kind of editing can we do
in live? It's a lot.
44. Editing: Cut, Copy, Paste: Okay, up next let's
talk about editing. We know how to get
clips into live, we know how to do a
few things with them. So let's talk about how we
actually start to build a song by cutting things
up and moving them around. In this section, we're only
going to focus on audio. In the next section,
we'll focus on Midi. A lot of things
when you're editing audio and Midi are the
same, but not all. That's why I want
to separate them. So we've got a Midi
clip here, right? The first thing that
you should keep in mind when it comes to making edits is that all of your standard
functions from like Microsoft Word or
whatever will apply. If I click on this
to highlight it, I can click on the header of it to highlight
the whole thing. And then I can press command C to copy. Click somewhere else. Command V to paste,
cut, copy, paste. All that stuff still works. And it's the same key command
that it is everywhere else. Command C to copy, command V to paste or on a PC, I believe it's control C, control V or alt V, one of those for PC users. Whatever it is in Microsoft and everything else,
that's what it is. We can select a
part of a clip on the inside command C to copy
and command V to paste. If you want to select
a finer amount, I'm going to use my two fingers zoom and just get in there. Now I can get little tiny
pieces and paste it in. I can paste it into
a different track as long as it's an audio track. And that'll be just fine. Like I said before,
if you highlight something and then grab
the header and move it, you're going to move just that. But if you don't
highlight anything and just click the header, you'll move the whole thing. Okay, another copy trick
that I use all the time, like probably my most
used key command is take something, highlight it. And then I'm going to hold down option and click and drag. And that's going
to duplicate it. Okay, I can just press command
D to duplicate something. And I can do that
all day long, right? But I can also option
click and drag. That's going to leave
the original where it was and give me a new
one where I want it. That option click and
drag is really handy. I use that especially on
like drum programming where I've got a snare sample and I'm going to put it all
these different places. Option click and drag is a great tool if you forget
any of these things. Go up to edit and you can
pretty much find all of them. Cut, copy, paste, duplicate. You can delete a clip
just with the delete key. Deactivating a clip is something you can
do and you might want to do this
from time to time. Just click on a clip and
then press the zero. That'll leave it there, but we're not going
to hear anything. It's like muting just that clip, which is a handy trick when you're trying out a
few different things. Can press zero
again to unmute it or to reactivate it, okay? Just the standard normal
cut, copy, paste things. If you want to split a clip, just put your cursor where
you want to do that. And then command E. Remember, you can zoom in farther
to get more into that. You may notice that we're
bound to the grid here. I can't move things
in between the grid. You can always zoom
in more and more and more to get a finer
and finer grid. But if you just don't
want the grid at all, you can always just control, click, go down here and
just turn the grid off. Now there's no grid. We can put things anywhere we want, okay? This is a dangerous thing to do, but you can do it if you want. I'm going to go back to
using adaptive grid. And medium adaptive grid means that the grid
resolution is going to change based on
where I'm zoomed in. Actually, I wanted a
little narrower than that. There we go. Okay, It's going to keep moving with me
like we've been doing. Okay, some very basic things. Now let's talk about what's built into a clip in terms of
fades and things like that.
45. Magic Corners and Fades: Okay. Now, every clip
it is a rectangle. But it's a mysterious rectangle because it has six corners. Okay. We have a corner here where this dot shows up when
I put my mouse over it. We have a corner here,
we have a corner here, we have a corner here,
we have corner here. And here, the header
gets its own corners. And each of those corners
can do a special thing. I'm going to delete some stuff around here just to make room. Okay, let's zoom in. First, let's talk about
the header corners. Okay? If I put my mouse over
the top right header corner, I get this symbol with my mouse. Okay? That means that
if I click and open it, what's going to happen
is I'm going to reveal more of that clip. Okay? So I can keep going and I'm going to get
more and more and more. Okay, And it's
going to keep going forever because loop is
turned on for this clip. That means that when I
hit the end of the clip, it's going to keep going. Now you can tell I hit
the end because there's a little black tick right there. See that little tiny
mark right there? That means that's the end
and we're starting over. I do this, I turn off loop, now I can drag it out to
the end, and then it stops. Okay, that's the end of my clip. Okay, so what this means is that if I did
something like this, let's copy just this little bit on the inside.
Let's delete that. Okay, now I have just that
little bit from the inside. I don't really have just that
little bit from the inside. I can always get more of
the original clip back by going to the header and
pulling open the clip. I can do that on both sides. Okay, now I'm back to
the full original clip. I can smh it down. By doing that, all I'm doing, I'm not changing the time or the speed or
anything like that. I'm opening up or closing
a window into the clip. If I want just this bar, I could just smoosh
down to there. And smoosh down to
there if I wanted. Okay. But Ableton and most every modern audio program uses a system of editing called
non destructive editing. That means that if
I was to go through here and I was going to
delete part of this clip, I didn't really delete it, I just hit it from Live because we don't
want it right now. If I want it back,
it's always there. Okay, so nothing ever really gets deleted
from your session. It's there somewhere.
Okay, let's go back to our other corners. Now. Our opposite corner of
that does the same thing. It can open it back up. Okay, Our other four corners. This one here is going to let us just draw a built in fade. Okay, This is our volume fade. The corner at the bottom is
going to let us tighten up that fade a little bit by
making it longer or shorter. I guess in a way this one right now is doing the same
thing that up here does, except it's giving us a little
control over that fade. We have a.in the
middle where we can sculpt that fade just
a little bit, right? These fades should
be automatically. On any clip you can put the mouse over it
and get these fades. And the opposite
sides are the same. Okay? You can do
that if you want. Now if you don't have
these fades automatically, you might need to go to your Settings window and go
to record Warp and Launch. And then down to create
fades on clip edges. Make sure that's turned
on if you want this, if you don't want this
feature, then turn it off, but make sure that's on. And then you'll automatically
have these fades on the edge of any clip. If you don't want
to hear them once, you can always just smash
them all the way to the side and then
they're virtually gone. They're actually gone,
they're not doing anything. Or you can make them just milliseconds long by
zooming way, way, way in. It's a nice feature to have. All right, that's what our
six corners do on the clips. The headers bring out
deleted info from your clip. Then in the clip,
these draw our fades. And the bottom ones control
the bottom of the fade.
46. Reading the Timeline: Okay, it's time to
take a closer look at our time line at the
top and at the bottom. Okay, so the one at the bottom is relatively
easy to read. This is minutes and seconds. If we zoom way, way, way, way in, we get some more info. I think here we're looking
at milliseconds, okay? Second one millisecond,
1.5 milliseconds, two milliseconds, fractions
of a second if you go way in. But let's look up top. This is a little bit trickier to read and also a little
bit more useful. A lot of the time we have this looks like
an arbitrary number 3,737.2 37.3 37.4 okay? If you zoom in farther, you're going to get
a three part number. Let's get there. Okay, Here we have 37 Pint 1.2 Now
that number corresponds to, up here, 37.1 0.1 which is where my cursor
actually is right now. Okay. When you see those three
numbers, number, number, what you're seeing always in
live is bar be 16th note. Okay? So what bar number
we're on in this case 37. What beat it is in this
case the first beat, in this case the
second 16th note. Okay, let's zoom
back out to here. Now if we don't see a number, it's going to be
the last number. And it means we're going
to be at one here. We have 35.2 let's look at that. That's bar 35 beat two is
what this is. This is bar 35. If it doesn't say
anything after it, you can assume it's a
one at one 16th note. Okay, let's zoom in a little bit closer to where we can get. Okay, What we're looking at here is we just see the bar 35. That means 35 means bar
35 beat one 16th note. This is bar 36 bet
one 16th note. If you don't see
something, it's one, like up here, 3611. So that means that
we're looking at a whole bar between
these two points. Four beats are going to be
our four quarter notes. Okay? This is 35, first beat, 35, second
beat, 305335, fourth beat. Our grid here is
quarter notes, beats. Okay? There's
another way to know, actually, that we're
looking at quarter notes. And that is to look
all the way down here, you see this floating quarter that says our grid is
showing us quarter notes. Okay, let's zoom in
a little farther. Okay, Now we've got
measure 35, beat three. We've got all these notes that
happened before beat four. Okay? That means we are
looking at a very fine grid. There's a whole bunch of
notes before the next beat. We are way in, and in fact, if we
look down here, we are looking at 128th notes. That's fat. Let's out 32nd notes. Let's go back to 16th notes. Okay, 16th notes, 35, 36. So these are all our 16th notes. Between the two beats. Just remember that when
we see three digits, it's bar beat and 16th notes. Now why do you
need to know that? Because when you're working on something like a drum beat, you're going to
remember that, well, the kick goes on. You might want the kick
on all your downbeats. That's going to be here,
here, here, and here. You might want your snare on beats 2.4 that's going
to be here and here. And I can see that pretty quickly because I
know how to read this and see that that's
beat two, that's beat four. Okay? Just get used
to seeing that, to know where you are in a measure that while you're
putting music together, you can be keeping
track of the beat. You can quickly see the beat. Knowing where you are
on the grid musically, it's more useful than the amount of time
that has elapsed.
47. Looping: Okay, let's talk about looping. The looping actually can mean a few different
things in live. Let's talk about all
of them all at once. We could loop a clip by
clicking Loop down here. Okay, Now what
that means is that this clip could keep
going forever and ever, but it's only going to do what we tell it to do
in our timeline. Let's actually find a new clip that might be a little easier
to understand this with. Okay, so I'm going
to solo this clip. And zoom in on it a little bit. Okay, this is a cat. Ooooh. Okay, cool. So let's say I just
want this first meow. Okay, so I'm going to
highlight all the rest of this and just press delete
to get rid of it. Okay, now I just have this meow. Now let's say I want this me to loop over and over
and over. Okay? I could press Loop here. Okay? But then if I drag it out, we're just going to
reopen the file and get all those other
memos that I deleted. So we're going to
loop the whole clip. Okay, now it's
starting over here. I can tell because
of that little tick right there, it's starting over. And I can just keep going. Okay, I can loop the whole clip, but
that's not what I wanted. What I wanted to do
was loop just this. Okay, let's go back.
Let's delete all of that. If that's what I want
to this much of it, then I need to set a
loop length down here. I could do that much. And
then press command L here. Okay, now I have this loop brace actually set to be just this
much, not the whole clip. Now when I drag it out, I'm going to loop
just that much. Okay, let me explain again
what just happened there. Let me undo here. Okay, so loop is turned on, but it's set to be the first bar up to
the fourth bar, right? That's this whole thing. This is my loop
brace that says how, where the loop starts and ends. Okay? The loop starts at one and ends at the end of beat four. Okay, that's the whole, I don't want to loop
the whole clip, I just want to this, I'm going to change
that loop brace and bring it all
the way back in. Now I have to do this
in the clip view, not in the session view. Okay, Now I can loop
this all day long, okay, that's one way of looping. Now if I want to loop the track, the whole arrangement view, okay, I can highlight
anything really. I can click on a clip
or I could just drag some space and then
press command L in the arrangement view. That's going to make
a loop brace here and it's going to also
automatically turn looping on, which is this button right here. Okay, now let's make it shorter just to prove
what's happening here. Now, when I hit Play
Agent View is just going to loop this part of the track over
and over and over. Okay, I can put it here, restart it, and now it's
just going to loop that. Okay? Two different ways of
using the same word loop. I can loop a clip, I can
loop a section of a clip. I can loop the whole
track that way. Okay, with this loop brace. Now in session view, this is a little
different because things loop by default. If I was to put my cat Sound, which I've lost, let's go
here and take my cat Sound. So I'm going to take
this, I'm going to click and hold it. I'm
not going to let go. I'm going to press Tab
while I'm holding it, and I can drop it into
my track over here. Okay, these just
loop by default, so this is going to
keep going forever. But it's looping because the clip is looping,
just that amount. It works the same, really. I just don't need to
do the global looping because there's no time line. There are other
ways that we look at looping in session view, and we'll come back
to that later when we dive into actually producing
music in session view. But for now, hit my back to arrangement button so it knows I'm looking
at arrangement view. Just keep track of the different ways you
can loop something. You can loop a clip, you
can loop part of a clip, or you can loop
the whole session.
48. Automation: Next, let's talk
about automation. Something very important if you're going to be
making reasonable. Music What is automation? Automation is
changing a parameter over time. Very simple. The way we do automation, and this is the same in every
do I've ever worked with, is we make two points
and then we draw a line. Let's say I want to change the volume of my cat
meowing over time. I could draw in a
fade this way, right? But that lets me go so far. It only lets me go
this far because it can't stretch over a loop in
this way that I'm doing it. Let's say I want it to
fade in all the way, to be nothing here
in full volume here. Okay, for that I need to
go into automation mode. There's two ways to get
to automation mode. The first is just press the key. No modifier, just a. Now that may not work for you if you have this
button turned on. This is our computer
Miti keyboard. This means you can treat
your letter keyboard like a music keyboard. That's cool. But you can't have that on and use
this automation key command. If you have that on,
you can either turn it off or you can just go up to view an automation mode
right here and select that. Okay, now we're in
automation mode. We see these pink lines
going across our computer. I'm going to go click on
what I want to automate. That's the volume
which is right here, and it gives me a dotted line. Dotted line means
there's no automation. That's cool. I'm going to click on a spot on that dotted line where
I want to automate. And then I'm going to
click on another one. And I'm going to pull this down. Now what this is
going to do is it's going to change my
volume over time. If I start right
here and I hit play, let's turn our looping off. I hit play with the space bar. It's going to get
louder and louder. Okay? And you can see
my volume right here. Climbing. See, look over here. Okay, that's my volume. You can also see that
there's this new kind of red pink dot right here. Whenever you see
those little dots in the corner of a parameter, that means it's been automated. There is automation information that has been created
for that track. In other words, it's going
to change on its own. How about panning?
Let's do panning. In order to switch
over to panning, all I need to do is click on it. I click on Panning, and now
I've got another dotted line. That dotted line is there
because there's no automation. It's dotted, it will become solid as soon as I put
some automation on it. It's right in the
middle for center, Let's make a dot, let's
make another dot. Move that up. Here's another do. Move that down another dot. Oops, move that. This is how you make
someone seasick if you do this nice and fast, which this isn't because I
don't want you to be seasick. Now, our panning
is moving around. Our panning is going
to move around. It's going to sound like it's
going from left to right. It's also still going
to be faded in because our volume is still
automated. Okay. We have two automated
parameters on this track. Well, okay. I really wish, and I would have picked a
better sample for this example, but whatever we'll roll with it. Okay, So over here you can see everything
that is automated. Okay, anything with
a dot is automated. And we can switch between
them here if we want, or again, we can just click
on the parameter as two. This is just a list of all your possible parameters if we want to see both at once. If we want to see our
volume automation and our panning automation, we can click this little plus here and then click on volume. Up here, down here is panning, okay, This shows a new lane, we call it a new
automation lane. Here we can see both. If you do a lot automation, these will eat up a
lot of your screen. I can hide that panning
there and go back to just toggling between the two by clicking on the
different ones. Now, once you start working with effects and all kinds of stuff, you're going to have automation
going all over the place. I'll show you that in a minute. Key takeaways here.
Automation is changing a parameter over time. Any parameter, virtually any
parameter, can be automated. We're going to do it by
going to automation mode, clicking the thing
we want to automate. Then you'll see this pink line and you can move it to
wherever you want it to go. You're always going to get
straight lines doing that, I'll add one more thing to this. If we want to get rid of a
dot, you can click on it. If you want a curved line, you can put your mouse right over the line so that it
turns dark like that. You actually have to be
a little bit under it. And then I'm going to hold option now my mouse has
this little curve after it. Now I can click and drag
and make a nice curve, either up or down. Okay? If you want those kind of automation
lines, you can do that too. Okay, let's look
at another track.
49. Session Deconstruction No. 2: One of the things
I've been doing for the last year or two is
contributing music to podcasts. There's a couple of
podcast companies I work with where I'm writing the
music for their shows, primarily narrative shows
and primarily sci fi stuff. Because that's the things
I find really fun to work on doing sound design
for is like Dream job. So here is an episode
of a podcast. You can see if I go all
the way to the end, it's probably like
40 minutes long. I don't even remember this one. This is a really short one. This is only like 15 minutes
long, but it's a narrative. And you can see what I
have here is I really have all the different vocal tracks that were recorded
by the actors. Then down here we have
some sound effects. Then at the bottom, we have
music that I wrote for it. It's just little chunks
of music here and there. But you can see in this whole thing how important
the automation is here. I'm just fading out the volume. But as you mix something, you really have to do a lot
of delicate automation. Especially when it's
a narrative like this and there's like multiple people talking
over each other. Anywhere you see this pink line, there's some automation
in it somewhere. Looking at this section,
you can see it's just very subtle things
that happen when you're working on anything music or narrative or anything. I believe these are
all just volume. But here, the volume of this character needed to
come down just to touch. This one came up just to touch. Then it looks like we wanted this word to be
comparable volume. I just boosted that
word because it was recorded quietly and the actor must have turned their head away from the mice or something. This is how we fix
that. It turned out really quite nice Ions
over at a time like this. Oh, wow Hannah, you
know, it's neat. It's a big session.
Here's some musical thing I wrote for them and then a
couple other music things. The music it looks like
is just Midi stuff. That's actually it. Let's listen to what's
at the end of this. Did it just? I'm afraid it did. Yep. Just pissed on
him and blew up. Look out the window. It's it afraid it is. Mars is no longer
our discovery gone. Done you. Pretty simple. But you know, it's nice to see
a whole big kind of session like this
with all these actors going and then looking at how the music gets
placed and put together. These are fun projects
I like doing the.
50. MIDI Tracks & Instruments: Okay, let's move on to
talking about Midi editing. The first thing I want to say is something
I've said before. But it is the number one
question I get asked at this point in your
live training. That is that you go
to a Midi track. Maybe you double click,
you make some notes, or you play on your
Midi controller, but you can't hear
anything, okay? Now, I know I've talked about this before, but just humor me, because you're
going to encounter this and you're going to say, why can't I hear
this Midi track? Remember, the
principle Midi data is numbers flying
through the air. There's nothing to hear. What
you need is an instrument. Okay, let's go over
to instruments. Let's go to a sampler. And then we offensive, let's actually just
search for piano. Grand piano. There we go. Let's throw that on there. Now I'm going to
hear things, okay? You must have an instrument
on a Midi track in order to hear what you're doing. Also, remember that when it
comes to Midi instruments, you're putting an instrument
on the, not the clip. Let's say I make
some progression. Let's say, what is
that, an E flat? Let's do something
a little easier. K, D. Here's a D minor
chord with weird it, okay? So here's a D minor chord, okay? So let's say I want to hear that in two instruments, okay? I want to hear
that in the piano. And I also want to hear
it in this Liz keyboard. The way we're going to do
that is we're going to go to another track and we're going to put that wor
letter on that track. Then we're going to copy this clip and paste
it down here. Okay? Because you can only have one instrument on a track. Okay. All the clips that I put on this track are
going to be piano. I might as well just
name this piano. That was command R to rename
the name of the track. Okay, now there is a way using instrument racks to group some things together and we'll talk about that in the future. For now, just remember that you can only have one instrument
on a track at a time. Now we're going
to hear that this played through two instruments. Okay, cool. That's how
tracks and instruments work. Just as a quick little recap, now let's go into basics
of editing Midi clips.
51. MIDI Editing: Cut, Copy, Paste: Okay, when it comes
to Midi clips, we have a lot of the
same editing principles as audio clips. Let's make this one
a little bit longer. What I'm doing here is I'm
grabbing the top right, which is just going to
loop this one chord. Okay? If I want to make
the clip longer by itself, I can do that by double
clicking on it, on the header. Then going down here and say, here's the start,
here's the end. Okay, let's crank that up to say this is 22
measures along now. And then turn off the loop. Now you see that I have
a nice long Midi clip and Accord here, just
at the beginning. Okay, here's my whole
midi clip, mostly empty. Let's take this and I'm going
to do Command D. Command D, slide it back to
get it on the grid. And we'll do, that's going to make some different
material for us here. So now we have a nice
long Midi clip here. Let me just redo what I just
did in case it was weird. I can double click
to make a Midi clip. And when I do that,
it's going to make that Midi clip fit into
my current grid. My current grid is
these rectangles, and if I zoom in, I can
see how long that is. It's 1 bar 41, 42. But if I made a Midi clip, now it's going to make
just a quarter note, which is one of these boxes. It depends on how
far you're zoomed, but it's going to make it the length of your current grid. Now it doesn't really matter
because we can double click on it and go here to the end box and just click
and drag and make it longer. Turn off loop, and then I can just open it up and
do whatever I want. Okay, that's how we set the
length of the Midi clip. Now I'm going to go through some tools to help you
navigate this thing down here, and this is called the
piano roll Editor. In just a minute, let's
focus on up here for now. Just the same as audio. I can select some stuff, command C, go to another Midi clip
command V and paste it. Like I can do that
all over the place. I can click the header
to copy a whole clip. Let's delete that
one. I can press delete To delete a clip, I can use the magic corners
that we talked about before, but those work a little
bit differently. I can grab to suck it in and
chop off the back stuff. I can grab the right
side to do the opposite. But I don't have fades. I can't just zoom in and get an automatic fade
on a Midi clip, because Midi clips
work differently. In that way, volume is determined by a
thing called velocity, which we're going to look
at in just a minute. You can do that with velocity
or you could do it with just volume automation on
the track if you wanted to. Most of the time
though, you don't need a fade for a Midi clip. Otherwise, you can click and
drag to move things around. You can move Midi
clips between tracks. Just remember that if you do, they're going to change instrument to the new
instrument, right? This is a piano and now
this is a Worlizer organ. Your instrument stays on
the track that it was on. Now there's one
other weird thing that you can do which is drag these two in audio track. Let's maybe take a minute
and just talk through that because it's confusing.
52. Transforming Tracks: Okay, so I've said
to you before, Midi clips go on Midi tracks, Audio clips go on audio tracks. That is still true, but if you drag a Midi clip to an audio track or an audio
track to a Midi clip, different things
are going to happen depending on what your set up is and what you're trying to do. Okay, let's look at that. First of all, I have an audio clip here and I
have a Midi clip here. Okay? If I take this audio clip and I drag it onto the
Midi clip and I let go, This is going to
be fairly simple. What happened was it converted
this to a Midi track. It said live, you have an audio track and you're trying to put
a Midi track on it, but that audio track isn't
doing anything right now. So it's fine. I'll
just make it an mitty track because that
audio track was empty. Okay, let's undo that. Cause command Z and now let's not make that
audio track empty. Let me put an audio file on it. Now there's an audio
file on that track. Now when I drag this down live
is just going to say, no, I can't put that Midi
clip on that track because that is an audio track and because there's
other things on it, I can't just convert
it to a Midi track. That isn't going to work. Okay? It's just going to say no. Now the same thing is
true for the opposite. I'm going to make
a new Midi track, which I can do by going to
Track, Insert Midi track. Or if you want command, we'll make you a
new audio track, and shift command, we'll
make you a new Midi track. Okay? So this is how
you make more tracks. Okay? Now I have
a new Midi track. Okay? Now, there's nothing on this track right
now, it's a Midi track. If I drag an audio file up to it live is going
to say the same thing. It's going to say, oh, well, there's nothing on
that Midi track, so I'm just going to convert it to an audio track for you. And that's exactly
what it just did here. Okay, Now let's undo that. Now let's go here.
That Midi track has some Midi information on it. It is now firmly a Midi track. Okay? Now I'm going to drag
this audio track to it. This is where it's different because live isn't
going to say no here. It's going to say, okay, I can take that audio track, but tell me what you
want me to do with it. Okay? So I'm going
to let go. Okay? And this is live saying, tell me what you want
me to do with it. What it's saying is I can convert this to
Midi information. So if you have notes or drums, or something in that audio file, I'm going to figure
out what those notes are and make a
Midi clip for you. That's what Live is saying here. You want to help it out
a little bit by saying, is this a harmony? Does it have a bunch of chords
in it? Is this a melody? Is it a single note thing? Or is this drums, is
it drum patterns? Now, this was just one note, so I'm just going to
say it's a melody and there it found
out what note it was. Now before you get too
excited and say, oh, that means I can take
a whole track and dump it into a Midi track and it's going to figure
out what it is for me. Yeah, this is not exact
science quite yet. If you do this with something
really complicated, it's going to get
in the ballpark and help you figure out what it is, but it's not going
to be perfect. I wouldn't use this as a
compositional tool really, But it can figure out the pitches of relatively
simple things. Let's find something else here. Let's find like a riff,
okay? That's a good one. Okay, Let's hear
this whole thing, okay? Now, my guess, if I copy this and put it up
here, tell it Melody. It's going to be pretty close. I think this will actually
be pretty dead on. Let's put an instrument
on this. Instruments. Sure, Road. Sound Okay, now let's hear both of these at the same time so we can
tell how close it is. Yeah, got a little extra, something there that was weird, but pretty good if I did this with like a
chord progression though. Let's find that. Okay,
sure, let's try that. Here's two guitar chords. Sounds like this? Oops. Okay, let's take it
up to midea harmony. And this will probably get pretty good anyway.
It's not perfect, but it can do pretty
good sometimes. So remember, if you
want to trigger this thing asking you what's going on or what
you want me to do. The conversion tool here, you need to make sure
it's firmly a Midi track. First, put something
on that track, put an instrument A, so that it doesn't just convert it over to being an audio track. Okay, let's move on.
53. The Piano Roll Editor: Okay, let's go down here
to the piano roll editor. To get there, I'm going to
go to any Midi clip and I'm going to double click on it
if it's not already open. Okay, If I want to
see more of it, I can grab the little dark bar here and click and drag
to make it nice and big. Now you can scroll up and scroll down in here,
just like before. You put your mouse up here and do the click
and drag thing. You can also do it over here on these notes to zoom in that way. Okay, so this is called
the piano roll editor. If you've never seen
one of these before, this is emulating an old
school player piano. If you've ever
seen one of those. They were a piano that, that you would pump
with your feet and it had air in it and
you would punch out these little holes on
this paper that would spin. That's what your
feet would pump, if air could get through
the little hole. It played a note. They were, the roles were
called piano roles. And those pianos were
called player pianos, or sometimes they
were called pianolas. Look it up, They're fascinating. You can still find
them here and there. That's what this
is modeled after. Now this model of the piano roll editor is
not unique to Ableton. You'll see this in virtually every professional
audio everywhere, even non professional
audio tools. If you want to represent notes, this is just how
everywhere does it, each one of these
lines is a note, okay? So it has a start and an end. We can grab the ends
and shorten it. We can grab the start
and shorten it. Let's tidy up these chords. Let's make them so they all
start right on this measure. One beat two line right here. I'm just going to tuck
these in a little bit. Now in that one, instead
of tucking it in, I slid the whole thing over. That's okay. Can do that too. Let's make these end
right on beat three. I'm going to drag them
right up to the edge there. Okay, looks good. Let's do it with this one too. I've got these two
stray notes here. I'm just going to click on
that and press Delete. Delete. I can select all of these. I can use the arrow keys to
move backwards and forwards. I can use shift
arrow keys backwards and forwards to extend
the length of it. Or reduce the length of it
just going forward and back. Okay, now just normal
arrow keys back. Do that with this one too. It's just going to help me get it right on the line quickly. Now, some other things you
can do with arrow keys. The most valuable
arrow key for me while I'm actually producing music
is if you click on a note. You can move it to a different
note by going up or down. That's really handy. But to me, the most valuable
thing is shift. We'll flip it up
an octave, okay? You can say, I like
this whole thing, but it's too low. Let's make it an octave higher. Shift up. Still too low. Shift do you can move things by a whole octave that way. And it's
really quite nice. Okay, let's set this
to end on beat four, or on measure four. So I'm just going to
drag the end of these in now if we want to, and we've got the
stray one over here, I'm just going to delete. Okay, So let's just hear this now pretty. Now if we want to
adjust the volume of this volume in terms of
Midi is called velocity. We've got velocity
controls down here. This gives us some control. But the real velocity settings
are these dots right here. They are a little hard to
see, so I'm going to grab this bar above it
and just click and drag to make it nice
and big for us. Right now, every note
has a corresponding dot. If I select this one,
that's that dot. Select this one, it's that dot. Okay? I can click
and drag to move it. Now in the simplest way, velocity just means the volume, with the bottom
here one being very quiet and the top 127 being
as loud as it can go. If I wanted this whole
chord to be quiet, I could drag it down here. You'll see the color
change of the note, that's a good indication
of the velocity. This is a little bit
darker purple than this. If I want everything to be
louder, I can go up there. If you've got a situation
where like here, all these notes are
slightly different velocity and you just want
to even them out, You can take them all and just smash them to the top and
then pull them back down, that makes them flat. But also if you want to just totally randomize your
velocity, you can go down here. And just at randomize,
now they're all random. This isn't what I'd want to
do here because in this case, that means some notes in this corridor are
going to be quiet. And some notes are
going to be loud, which isn't going to be a very
good way to make a chord. Let's hear, So different
notes are going to stick out. But I do like
randomization features, so let's smush that
all back to the top. And then just set it
right around there. Okay, One other important
thing I want to show you in the piano roll
editor before we leave here is this little
headphone thing here. Okay? Now what that means is that is just like this
one from the browser. Remember in the browser,
what that meant was I can audition clips, right? If it's on here, If I turn it on, I
can audition notes. If I move a note around,
I can hear it, right? If I add a new note,
I can hear it. If I turn it off, when I
make stuff, I won't hear it. It's probably a
good idea to turn that on so that you can
hear what you're doing. I almost always have it
on while I'm working. There's really no reason I
can think of to turn it off. There is one, like if
you're doing this, select all and you're going to transpose this up
with the arrow keys. I'm going to use an arrow
key and I'm going to move it up a half step. Then again, that's
not a great sound. You might turn it
off to do that, but otherwise otherwise
keep that on. Okay, there's a
whole bunch more of the piano role editor
and we're going to go into more of those things in the next five or
six videos here. A lot of these things are new in live 12 like the transform
and generate tools, which I love super fun. And some of them are just modifications of
what we had before. That is true with
this scale tool. Let's go and talk about how to use the scale settings and the key aware features of live.
54. Scale and Fold: Okay, so I think we pointed out this box up here when we were
looking at the transport. This is our global key setting. Okay, This says we're
in the key of C major. Let's change it. Let's
say we're in the key, let's do, I don't
know, C minor, okay? You've got all these
different modes here. Mode is a weird word, but it works for all
of these things. Let's not split hairs
on that at the moment. Let's just go to
minor, and then we can set a key, C minor. Now you can turn this
little on or off, this little symbol here. Okay, I'm going to turn
it on When it's on, what that means is
that this is our key. Okay? Minor, it's like
posted in the Clouds. Minor is our key. Any clip or device that is capable of dealing with
nodes can reference that, can say, wait, what is our key? Looks up at the clouds. Our key is C minor, okay? And then it can stay
within that key. Cool. Right? If I go to this clip, okay, I have this turned on, this is in minor. Now, that doesn't mean that all these notes have
to be in C minor, it doesn't mean that at all. We can go outside of
the key all we want. What it means is that the notes, it's making purple here, are in the key. Okay? But the notes
that are light gray, dark gray, whatever you want
to call it, are not in key. And I can still use them. Okay? If you know anything
about my music theory content, you'll know that my motto is, if you 100% stay in
a key all the time, You will write a lot
of very fine music, but virtually nothing brilliant. If you experiment with
going outside of the key, that's where you will find
some really brilliant moments. Stay inside the
key all you want, that's great, but experiment with going outside of the key. Now, the way we have
this set up now, scale is on, it says
we are in C minor. I've got some notes like this
one that are not in key. That appears to be the only one. There it is again, I could leave that there
or I could change it. What I'm seeing here in my piano role editor
is all possible notes, not just the notes and key. If I wanted to turn off showing me the
notes that are in key, I could go here where it
says highlight scale. Could turn that
off. Now I'm just seeing black and white notes. I'm still seeing the key
on the notes over here, but it's just showing me
black notes and white notes. If you look at a piano, there's keys that are black
and keys that are white. That's what
it's showing me here. I'm going to turn
the scale back on highlight scale if I want it to hide all the notes
that are not in this key, not in this scale, without going too deep
into music theory, key and scale are the same. If we're in the
minor key or scale, and I want to hide the notes
that are not in key so that I'm just working
within that minor. I can hit scale here. Now it's showing me only the
notes that are in minor. And this one, because I used it, if I get rid of that one, actually, let's highlight both
of these and move them up. Okay, Now if I hit scale
again and again to reload it, that note is gone because
they're not using it. It'll show out of key notes, but only if you're using them. Now they're not using, this is only showing me
the notes that are in the key of C minor,
my global key. Okay, You might be wondering
what this fold button does. It takes it a step further and hides all the notes
that you're not using. Okay, now it's only going to show me the notes
that I'm using. This fold thing is useful when you're programming
drums primarily. I haven't found use
for it otherwise. Okay, and if you're asking, what happens if I
change the key here, Let's go to minor. Okay. Everything shifted,
my notes don't shift. Okay. Now I've got
some notes that are out of key, probably. Yeah, here's one, these ones. But I also changed my
global key up here. Okay, So if you change it here, and this is on, you're going to change it up here globally. But just remember, it
doesn't change the notes, it just changes what's
on your screen. You can adapt your
clip to the notes if you want to. Okay, moving on.
55. Quantizing: Okay, let's talk
about quantizing. Quantizing is maybe something
that is on your mind, that is the ability to
rhythmically fix midi notes. We play something in,
we play it sloppy. How can we just magically tighten it up and make
it block onto the grid? Is there like a key we can press that'll just
magically do that? Actually, there
is, it's two keys, but you can do it. Let's look at these. See how these notes are not
perfectly on the grid. Let's do in a little
bit more, okay? Not quite perfectly on the grid. Let's select them.
Let's tell it quanti. Quanti means look at
each end of those notes, find the closest point, you can find the
closest grid marker, like vertical line here,
and snap it to that. If I do this, I've selected these few notes and now I'm going to
press the magic button, which is command for quanta. Do not make the mistake
of doing command for quanta because command
means quit the program. Don't do that. Command is what we use
for quanta command. And then watch the
notes on the screen. They just click
together quite nicely. Okay, so you can use
that for everything. I could select all command you blink and I
could get it tight. Now what that's going
to do is move it to the closest grid spot. Okay? So if I'm going to undo that. Okay, So now I'm
back unquantized. If I go in here and now I do it. See this one, it's
just going to move it over to right there. Right watch. That's very different
than doing it out here, because this one
is going to move it all the way back to here. The grid resolution does matter. Now, luckily, there's a
way for us to adjust that. One way is to zoom in and
zoom out of the grid. But we can get a little
bit more control by going over here. Go to transform. And then from this
list, select quanta. Now you can say current grid or like quarter note
or eighth note, 16th note, 32nd
note, or a triplet. You can also say quanta is the beginning of the note
or the end of the note, which can be important
sometimes or both. Okay, So now we
have quarter notes. Every note begins and ends
on a quarter note, okay? You can see this kind of
radically changes our melody. So that's not
actually what I want. You can also tell it to have
a little bit of flexibility. If I do this and I
turn the amount down, you can see it
breathing a little bit. What that is, is at
100% that's going to make it exactly on the grid. If I dial that amount back, it's going to let it have a
little bit of flexibility. It's going to give it a
little more natural feel, quantizing, tighten up
your sloppy performances, or just make things fit onto the beat a little bit tighter. Now, this menu, this transform
menu is a new thing, and I want to go over that next. This gives us all kinds of
interesting tools that we can use to help us just
generate new material. It's wild. This Generate button, this really lets us
generate new stuff. The transform option lets
us take what we have and spin off into weird directions and let
Ableton write music for us. Let's play around with
that for a minute.
56. MIDI Transform Tools: Okay, let's do some fun stuff
because this is really fun. If we go to this transform tool, you have all of
these options and these are just ways
that I like to think of these as
creative seeds. You can take something.
You've got like this melody. Remember this melody we got from this clip which
was just a sample, right? We turned it into this melody
which sounds like this. Okay, cool. Now let's turn it into our
own thing. Let's take it. I'm just going to select
all what the heck. Let's do something to it. Our Peggy means we're going to play notes one at a time and we can tell it to on that
and play with it. That's more of a tool
for, if we have chords. We don't have chords here,
we just have a melody. Let's go to connect.
We can say spread. It's going to add notes here. In between the
notes that we have. We can say where we
want them to go. Density, like do
we want to fill up all the space or not rate, this is going to make smaller, faster or longer, shorter notes depending on
what we do tile. I think this is the amount
of overlap between notes. So let's say, I don't know, spread somewhere around there. Density rate,
something like that. Okay, Now here's what we have. Now it's adding all
kinds of notes, but because of the key stuff, because it knows
we're in D minor, it's sticking to D minor, right? All these extra
notes like fit and are making a cool
blues groove here. It's wild connect. Ornament means take the
notes I have and add a little flourish
here or there, right? With ornament I could say add
a grace note here or there. Now I've got everything
selected. It did it. You can see it added these little stutter
notes all over the place. This is going to sound wacky. Okay. I'm going to take that off. If I went to high, it's going to add a little
note before or a little note after that's a little intense for that you want to do it on just like a couple
notes here or there. Let's look at quantas. We already know recombine, this is a head scratcher. What this is going
to do is it's going to separate our pitch
and our rhythm. Let us shuffle things around and then it's going to put
them back together. What it looks like if we
drag this rotate things, we're, the notes we have are on a loop and we're
going to rotate through it. Watch. You can see it going this way. Now
we'll go the other way. It's keeping the notes the same but changing the rhythms apart. It's confusing, but you can get some
interesting results that way. Span is going to give us
different articulations. If we want all of these
notes to be short, we're going to say staccato. Now it's just thing, okay? Tenuto, the length
that they're written, the actual how they're written, legato means stretch
them out a little bit more, let them overlap. So in this case, we can't
really hear difference between tenuto and legado because we don't have a lot
of overlapping notes. Strum is really great, let's use strum over
here. Watch this. One thing I'll point out because it just happened on accident, is that we do have a pencil tool that you can get up
here or you can command to get a pencil tool because was print with that you can draw Midi notes just
freely if you want. You can toggle it
on and off with the letter command or
with this tool up here. Anyway, check this out. I have this chord, it
just starts like this. What if I wanted to simulate, we've been, we're kind
of strumming that cord. We can take this
strum transform and just go look at that. Look at what it does now
let's hear it right. This actually looks
really simple, but if you try to just make it sound natural and
like roll it like that, it's actually really tedious to like slide your mitty
notes over just enough. This is a huge help. Yeah. Drum time warp. This does all weird stuff. Let's go back to
our melody here. You can think of this
as the rhythmic speed. If like a 16th note or the short notes are fast
and these notes are short, what we can do is say put a bunch of short notes at the beginning and long
notes at the end. The squeezed all of that stuff into there and stretched
all this stuff out. We can also make a
third point and say, I want fast stuff in the middle. Slow stuff on either side of it. Slow stuff, slow
stuff and fast stuff. This gets really bizarre. Uh, okay, let's hear now weird. But all of these
things are taking that melody and just
transforming it. Maybe none of these landed
right where we want to land in terms of what
we want for our track. But all of them are going
to give you a new idea, spur your creativity,
and get you working with an idea
that is now yours. Because you've modified it. You've turned it into
something that is your own. They're really fun to play
with if nothing else.
57. MIDI Generators: Okay, similar to the
transform operations, we have generate operations. Now these are super fun. Let's do this. Let's take that, move that over there,
make a new Midi clip. Let's make it, I don't
know, a couple bars long. Okay. Turn loop off. Sure. Okay, now
let's just make something. I've got no notes on this clip. Let's just make me
something. Make me a rhythm. Okay. I can say I
want this many steps. This a pattern density, is it really empty,
Something in the middle. Now, this pattern, what I, what I'm pretty sure this is, they've taken number of steps, that's number of grid steps here by the density and calculated a number
of possible patterns. In this case, there are
69 possible patterns and you're just scrubbing
through possible patterns. Think of this as like
something you might use for drums or
something like that. You can add some splits to it, so you could say 39% of the time it's going to split
in half and give you double. You could shift it left
or right if you want. You can do some velocity
and frequency control too. This is not particularly brilliant, here's
what it sounds like. But sometimes you're working on something, you're just like, I just think like a rhythm just spit me out of a rhythm that
I can start playing with. If I was like programming high hats or
something like that. This is wonderful for that. But let's keep going. Let's say now these next three, Seed shape and stacks. Stacks is the word
they're using. Shape is the word they're
using for melody type things. And seed, I believe, is just giving you, it's
like spraying on a canvas. Spray paint just on a canvas. Give you some place to start. We can say the range of pitches, this is flat two to five, make that a little smaller. Maybe you can see like all these pitches that
have just come up. Duration, long notes
and short notes. Let's make some
more longer notes. Velocity a randomized range. It's going to basically make
some notes in this area. Now if you want this to be
more useful melodically, let's make a smaller
range for our pitches. Okay, a little bit more. All right, I'm going
to take these, our initial rhythm out. Let's see what it made. Okay, Let's cool. What I could do is
now that I have this, I could take this
and I could go to transform and I
could say quanti, start by 16th, let's
make it rigid. Then span staccato connect. And I can really doing
even more to it. Ornament, quantas recombine can move it around. Now
let's cheer it. It's getting somewhere.
Anyway, back to seed. Seed shape is going
to generate me a melodic idea and I can
just draw on here and say, okay, that kind of a thing. Now I can adjust the, the tiling of it, meaning the different
rhythmic ideas, density, leaves some holes in it, and
jitter is just randomness. I think here's a
brand new melody that Ableton just
created for me. Cool, Let's go to the last one, stacks now. This is chords. This one is a little bit
weird because I haven't quite figured out exactly how
these symbols work, But I can say root
and inversion. Then I can select one of all
of these different symbols. Here's my go back to more
simple chords down here. You can experiment
with it and end up making some really cool chords. All of this generate
stuff is new in live 12 and it's just wild
play around with it. I'm going to make a
whole class, I think, on writing music with this. I'm going to try to make
a whole track just with this and transform stuff.
Keep an eye out for that. I'll do it, so I think.
58. Velocity Editing: Okay, we looked a minute
ago at velocity editing, but there's a couple
more controls related to velocity that I just
wanted to show you here. Let's go back to our crazy invented melody here and let's see what it did with the velocity. That's cool. If we look down here, we've
got a couple more controls, we can randomize the velocity. I've already showed you that
we can give it some limits. I believe this is
setting an upper range. We can say don't go above 101. We can also set a ramp. Now this is a new
thing we can do. We ramp the velocity up. This takes the place
of like a volume fade. But just in the Midi world, we could say start at
one and go up to 64. If I did like select all, then I said start at 17
and go up to one oh seven. This is going to ramp them up. This is a little easier than
just drawing the velocity. And I can say deviation, give it a little bit of
randomization, right? That means that the velocity we get is going to be in
this range somewhere. Adding this little
bit of randomization can make it a little
more human, right? If I did this, then we're going to get a
more natural sound. When a person plays a
keyboard or any instrument, they don't play exactly the
same velocity every time, unless they're a robot. To make a more natural sound, add this deviation just so that it's nothing that you would really notice
if listening to it. But unconsciously, it'll make it sound a
little more natural and human while they're
playing inhumanly fast. But if they were playing
something more natural in human, adding this would give it a little more control over that. Now there's another
thing built into the piano role
editor that gets us some cool opportunities for more of that chance
in randomness. Let's move on to a new
video and talk about that.
59. Chance Editing: I think for this one I'm
going to load up a drum kit, because the best use case
of this is in drums. Here's what we got, okay? Going to slow it down
just a little bit. My global tempo up
here is going to slow everything down. Okay. Now when I loaded
in that Midi clip, it brought with it a drum kit. I can shift tab over
to see that drum kit. It's over here. It's cool. On the Midi grid, I
have this high hat. Okay. For some reason, this clip has the grid off. Let's turn it back on, and I
want to look at 16th notes. I'm going to add 16th notes all over the place
in this high hat. I'm just going to
add a ton of them. Not every 16th note, but I'm going to do
some patterns here. Okay, cool. So now I have all these 16th notes.
Let's add a few more. Okay, so here's what this
drumbeat sounds like now. Okay, cool. All stumble you over there.
Let's clean that up. Okay, so let's make these
high hats sound natural. First, let's do a little bit of variation in our
velocity with them. Let's take them down a little bit and then vary
our velocity like so. Okay, that's a nice start. Now I'm going to click this
little arrow down here, this teeny tight little arrow, and I'm going to say
show lane velocity. I'm already looking at that. Let's add chance. Okay, now we've got
this other lane here. I'm going to make that
nice and big chance means like probability. What are the odds that each of these notes are going
to play at all? Okay, I can go to chance
and I can just say randomize if I want, right? Or I can just say smash it up to the top
and then bring it back down and say 50% Okay. For any of these notes, there's a 50% chance that
it's going to play at all. When it does play,
it's going to play at this velocity or in
this range of velocity, but with something
like high hats. This is now going to
give me a cool flavor. It's going to randomly choose every time it plays through. This is really never going
to loop technically, because the high hats are
going to always be changing. Let's listen. Okay, again, it's just
going to keep changing. If I want more, I can raise my chance probability, right? This chance improbability
is really fun. It works kind of the same as velocity in terms of these
controls we have for it. But it really can liven up a rhythmically repeating thing by just having it drop
out every now and then. You can do some fun stuff like
grouping things together. Like let's say I
wanted this whole bar of high hats to either
play or not play. In that case, I could say play one and group
them together. Now I have one velocity
control for all of one chance control
for all four of those. They're either going to play or they're
not going to play. In this case, I don't want that. So I can ungroup them and now I get four chance
controls for them. Experiment around with
this chance thing and randomizing it. It's really fun.
60. Session Deconstruction No. 3: Okay, let's look at a track. This is a track of
mine. This came out on an album a couple of years ago. The finished version of the
track is called Time Givers. You can see the session is
called ten version two because when I was working on this was the tenth track that I
worked on for that album. I chose this one right
now because it's got a whole ton of
Midi tracks in it. If we go forward, all
these green things are Mitty actually
in the red one, there's more down here and it's just a whole bunch
of mitty strings. Virtually all of
this is strings. The way I made this,
I think I made this opening and then I put some string samples
on it and then I just started adding layers to
it in different tracks. A lot of these tracks have the
same string synth on them, but I just kept building it and building it with
more and more stuff. And then there's
some keyboards and some pads and some bells
and things like that that come in this rhythmic loop.
61. Freeze and Flatten: Okay, one more thing.
That's an important concept in life that we just
haven't touched on, that sometimes we
want the ability to lock down a track and say
this track is the way it is. Now there's a whole bunch
of reasons for doing that, but the two most important ones are you are either
sharing this track, like sending this whole
session to someone else, and I'll talk more about
that in just a second. Or your computer is
just running too hot. Like if you look up here, we see this 1% right? That 1% is telling us how hard
our processor is working. We can click on it and get
a little bit more info. But if that's getting up pretty high and your computer
is starting to go slow, then you might want
to do this trick. What this trick is, is called
freezing and flattening. What it's going to do is
it's basically going to render a Midi track
as an audiophile. Or render an audiophile
with out all its effects. In other words,
it's going to put all the effects into the clip and then
turn off the effects. It'll sound the
same, but you won't be able to make any
adjustments anymore. Okay, here's how we do it. We just go over to
the track control click or right click, freeze track or freeze
and flattened track. If you freeze the track, that's going to disable miti stuff, effects,
instruments, anything. It's basically going to be
a temporary audio file. You can see that it turns
blue because it's frozen. This, there's like a hidden audio file
that was just created. The reason you might want
to freeze something but not flatten it is you
can unfreeze things. I can unfreeze it, wake it up. But if I flatten it, it's going to turn it into an audio
file and I can't go back. Okay. I can undo it right now, but once I get further
down the road, I can't go back from that. But it's going to be
rendered as an audio file. Now, if I go to my audio file and they have
effects and things on them, and my computer is
running really slow, so I might want to render those effects onto the track and then turn off those effects. That'll help free
up your computer. Okay. Freezing and flattening
is just how we do that. Different programs call
that different things. They might call it
render in place. They might call it print. Like printing the
audio is like a thing. It's a weird term, but
it is a term in live, we call it freezing
and flattening.
62. Collect All and Save: Okay, so let's go down that
road a little bit farther. Let's say you want to share this session with
a friend, okay, Not this track like
you've made a track, you like the track, we're going
to render that track out. And we'll talk about
how to do that next. If you want to share
a session like this, everything I see on my screen, then there's an extra step
you want to do to make sure that the person
you're sending it to is going to
be able to open it. First, you're going
to want to make sure they have the same
version of Live, in our case Live 12. But then there's this
extra little step in order to explain that step, let me explain briefly how live puts together
the Ableton set. When you have a
session like this, what live remembers, what it's keeping track
of is like a map. It's a map with spider webs
all over your hard drives. It's looking for all of these files that you've pulled
in here, like this one. Not necessarily these Midi
files because we made those, but these audio files
and anything else you imported into your session. It's got these fingers
all over your hard drive. It doesn't make a copy of these, it just remembers where it is. It knows that for this file, it's got to go into
one of my hard drives. A folder, another
folder, another folder. And that's where this file is, that's how it's
keeping track of it. If I send this session to
somebody and they open it up, what it's going to do is it's
going to open this file, it's going to get to the
spot where it's trying to load this file and it's
going to say, hey, this is on the
Michigan Hard Drive and that's not connected to this computer because it's not, the other person is not going to be able to open it because they don't have the
same files that I have. It's going to look
like this. It's just going to get graded out and it's going to say
session or clip deactivated. It's going to say the way we fix that is before
we send it to them, we're going to go to file and
then collect all and save. What this is going to
do is it's going to remake that map with all those spider webs
going everywhere and it's just going to
take everything we're using and save a copy of it into a folder pack that
altogether as our session. We want to say files
from elsewhere. Yes. Files from other projects. Yes, file from the user library. Probably safe to do. Files from factory packs that
you can usually leave off. If you turn that on, it's
going to make some of your sessions
really, really big. If you're using
like big libraries, I tend to leave that off unless
I'm sure that I need it. Then you say, okay, and it's going to take a second to think. Then you can save that
session and it'll make a folder that goes along with your session that'll have
everything you need. Then if you want to
send that to someone, send that whole folder. That's what they need
to be able to open it. Okay, last thing, let's talk about rendering out your
track when it's done.
63. Exporting: Okay, so we've made a track. We're happy with our track. It's super cool.
Let's export it as a wave file or an
MP three file or whatever we want in order to send it to our friends or
upload it to the Internet. If you're not sure what
type of file you want, we basically have two options. Full quality, big
deal audio file, that would be a wave
file or an AIF file, or small compressed file, that would be an MP three file. Those are really our
two options to export. If you want to post this on social media or E mail it to someone or
something like that, you want an NP three file. If you want to
upload it to Spotify or Apple or more
importantly send it to a mastering engineer to master that track, then
you want to wave file. Luckily we can
make both at once. In order to do this, first
thing we're going to do is select the region
that is our track now. Most of the time
that's going to be beginning until the end
of your track, right? You select the region, sometimes it's easier to put your loop brace over the region. Let's say this is the
beginning and this is the end. Now we're not going to loop it. But what we can do
with the loop brace, it's just a handy way to select everything
within an area. Okay, This is what
I want to select. This is my track.
It doesn't need to start at the beginning
of the session, although that's usually
easier to deal with. Okay. Make sure nothing soloed.
Make sure everything is. When I hit play, we're going to hear everything
that we want to hear. Okay. Once we have that all set, we're going to go to
file export audio Video. Okay. Rendered track.
What are we listening to? And main, the main track. That's this one down here. That's everything
that we can hear. That's almost always
what you want. Here's our start and end
points, rendering options. You can do these
things if you need to. If this is a rough mix, you may select normalize, that'll make the
whole thing a little d. But if you've really
worked on your mix, you want to turn
that off, probably. Sampling rate should be the same as what you're working at. So you can see up here,
this is 48.0 kilohertz. Sample rate here should be 48,000 kilohertz
should be the same. Now I have three
export options here. Pcm is that quality
big deal audio file we talked about encode PCM. If you turn this off then
it's just not going to make that full quality audio file and it's just going to make
an MP three. That's fine. You can do that. If I do this,
it's going to make both. I'm going to wave bit
depth 16 is fine. Dither options, you
can either leave this at none or if
you want to be fancy, you can do power minus R one.
That's what I always do. This just helps suppress any glitchy things
that might happen. We can talk more about dithering in the
recording section, but don't worry about
it too much for now. Okay, P three. I
can have it make an MP three or not video. I can have it make
a video or not. Now in this case, it's
not letting me make a video because there's
no video in this thing. It doesn't have anything
to put in video. But you can import a
video file into live. If you're doing like a film soundtrack or
something like that, that is a handy way to do it. And then you can export a video, but there's no video here,
we're going to leave that off. Then we say export. It's going to ask
us where to put it, it's going to make
those two files for us. There you have it.
64. Thanks for Watching!: Okay. Last but not least, this is my opportunity to
just say thanks for watching. Thanks for being a
part of these classes. I started making these classes. Oh, I don't know. A
long time ago now. I've really gotten into it. I really believe in
online education and I love teaching live. I love teaching
everything I teach. I have tons and tons
of classes out online. Now, thank you for
taking this class, for being a part of this class. I hope you decided to
take more of my classes. But more importantly than that, I hope you had a
good time and you feel like you've really
learned something. I'll leave you there and
we'll pick things up in the next class in this
series recording in Live 12. And hopefully I'll see
you there. Thanks again.
65. Bonus Lecture: Hey everyone, want to learn
more about what I'm up to? You can sign up for
my email list here. If you do that,
I'll let you know about when new
courses are released and when I make additions or changes to courses you're
already enrolled in. Also check out on this site. I post a lot of
stuff there and I check into it every day. Please come hang out
with me in one of those two places or both,
and we'll see you there.
 J. Anthony Allen, Music Producer, Composer, PhD, Professor