Transcripts
1. Introduction: Hey everyone, welcome to Ableton Live 11. In this class we're going to cover all aspects of Ableton Live, from just learning the program to recording, to producing, two deejaying, mixing, mastering. Everything is going to be included in this huge multi-part class. So if you're brand new to the program, This is the best place to start. If you're already familiar with another audio program. All of these classes will get you up to speed on using Live to do professional music production in no time. So this is part one, the interface in this class, we're going to focus on everything you need to know to become a master of Ableton Live 11. If you're brand new to the program, we're going to learn every aspect of how it works. If you've already used another program, I'll walk you through how this is different. But if you're brand new, don't worry, I'll get you all up to speed on how to use Ableton Live 11, professional music production. Let's dive in. So what actually is in Ableton Certified Trainer, people who have that credential, I have gone through a fairly rigorous process with the able to accompany to prove that not only you're an expert at the program, but also you know how to teach it. So the actual process of getting the Certified Trainer stamp of approval is a two-part process. One, you have to prove that you're a super ninja and a program. And two, you have to be really skilled teacher or else they're not going to give it to you. And you see somebody that says there aren't able to Certified Trainer, like me, you should know that that's someone who Ableton itself has given their stamp of approval after a very rigorous process. It's not just buying a certificate. I had to do like two or three day lying exam that included a lot of teaching demos. And in addition to that, I've been out to their international conference in Berlin to present unable to topics to the entire international live community. So it wasn't easy to get. I'm pretty proud of it and I'm hoping to bring the benefit of it to you up.
2. Tools You Will Need for This Class: Alright, here we go, live 11. So I wanted to start by just talking about the kind of tools you're going to need. And the reason I'm kinda starting here is because I've made hundreds of hours now of Ableton classes and videos. And I just want to address a couple of questions that you're going to have right away. The first question that I get all the time is, which version of live should I use? So that means a few different things, k. So let's just cover that first before you go out and even purchase a copy of Life if you haven't yet. So in terms of the number Live 91011, if you want to be if you want to do professional work, always use the latest version, just period. So in this version I'm going to be using live 11. Now if you have a copy of live ten or even Live nine, you can use that and follow along with this class. And it'll be like 90% makes sense. There's a couple little things, but you know, it's not hugely different. However, you should really be using live 11 now if you haven't bought it yet and you're gonna go to their website, which is the best place to get it. You can you probably can't buy an earlier version. I think they only sell the latest version. So you're probably using live 11 if you're new to it. Now, maybe you bought a secondhand copy. Maybe you came across your copy through other nefarious means and you have an older version. That's probably okay in terms of following along in this class, in terms of ethics, I don't know, I will make no such comment. But if you can always use the latest version. Now, that being said, there are three different kinds of live you can get, you can get live, something like live basic. I came in what it's called exactly lives standard and live suite. I would recommend if you want to do professional work to go with live suite. That's what I'm going to be using in this class. However, you can always upgrade. So if the price tag is too high or you just don't feel like doing that. You know, maybe you don't know if you're going to really commit to this for the long term and get one of the smaller versions there are cheaper. And then you can always upgrade to live suite. The biggest difference is in the instruments and effects. So when we get to the instruments and effects, if you're not using live sweet, you'll notice a few things that I have that you don't have. So something to keep in mind. But if money is no object, live sweet. And there's also an edu version which is available to students and educators. And if you're in this class, you are a student. So you can be eligible for that. Send me a message and I can walk you through how to get that if it's possible for you. And that is a full version of live suite at a significant discount, so it can be a good move. Now the last thing I'll say is that there is a very impressive free trial that you can get if you haven't used, if you haven't got anything yet, and you're just diving into live, go to the Ableton website, download the free trial. That's a full version of lives sweet. I've 11 suite that you can use for a limited amount of time. It's either 30 days or 90 days. Depending on what kind of promotions they have going on at the moment. Maybe they split the difference and they're doing 60 days now. I don't know. But and it's a great way to just test the waters and see if this is something you want to do. So I highly recommend starting with that. Ok, then there's the question of like Mac or PC or tablet. So just to address that, Mac or PC, totally fine. Everything works the same. There's a couple of key commands that are different when I say I'm on a Mac, so when I say like press Command S, the command button is different on PC that's came on when it is alt, control, whatever. But that's really it. Everything else on the screen is laid out exactly the same. There is no tablet version live. So you will not be able to use Ableton Live on a tablet. There are some things you can do with a tablet that we'll talk about when we get into controllers. But you can't use the full version. Any version of Ableton Live on a tablet does not exist. So you'll need some kind of desktop or laptop computer to use it. I think that covers everything for what you need to know. Cool. Go. Okay. Let's dive in to the kind of biggest questions that people have right off on the gate. And that is how to deal with the two views of life.
3. The Two Views: Okay, so the most confusing thing about able to end when you first pull it open is the two views. Okay, so let's talk about those right away. If you've ever used any other audio software before, you're used to looking at things like this. Like what I have on the screen here, where we have a timeline going from left to right. And when I hit play, we see kind of a playhead and things are moving across the screen, right? We can kind of make sense of this. It's analogous to a musical score. There's audio files here. I can move them around. And there's midi files here. I can move them around. If that doesn't make sense, don't worry. We'll cover that in just a minute. But basically, what we're looking at is each horizontal line here is has content and the software reads it from left to right. Okay, so nothing too strange. Let me zoom in just to show you that again. So here's our playhead. We may reap the fruit of our labor case, so things are scrolling across. Now. Ableton Live has this whole other view. And one important thing to keep in mind is that if you're perfectly happy with this, you don't ever have to go over to this other view. You can take full advantage of everything in the program just from here. However, one of the really powerful things about live is the other view. So to get to it, I'm going to press the Tab key. So I press Tab. And now I'm taken over to this. Okay? What are we seeing here and all of these little boxes. If you've used other audio software before, you might think, well, those look like plug-in slots. They're not, they're not for plugins. What we have here is almost a completely different session. Okay? What we're going to put in these little boxes here is audio or midi content. Okay, so I could take, let me just take a sample here. Here's just a little thing. Okay, so I'm gonna put it right there. Okay, so now you'll see that these little dark gray squares were actually stopped buttons. And now that I have something in there, they become a Play button. So I can play that. Okay. And it's gonna play everything else that's going on, on the other side. Okay. Now where is all that content from the other side? We don't see it here because like I said, it's almost a different session. When I press play here, they're actually all going to play. But if I go down here and press this means stop everything. Now I'm just going to get this audio file. Okay? So the content is not shared between the two sides, but the mixer is okay. If I go down here and I move this mixer for the second channel, if I move it all the way down here, and then I press the Tab key, go back over. You'll see up here, my volume is very low. This is the volume for the second track. You'll also see everything's kind of grayed out here. The reason it's grayed out is because that's able to him telling me, hey, you're listening to the other side. Okay. So to separate content areas that share a mixer, that's the way you think about it. Now let's put some words on this, this we call Arrangement view. Okay, so this is Arrangement view. If I want to take back over and I want to say I want to listen to Arrangement view. I'm going to press this little orange button up here. And now arrangement views in charge, okay. If I press tab over to this side, this is called Session view. Okay. So if I stop everything, and there's that little orange light again, right? That means we're going to talk more about that little button later. But basically what that means is Session view is in charge. Okay, I press this and I can hear it after in the volume all the way down. There it is. Okay. So Session View and Arrangement View to different sides of the same program, different content areas, they share a mixer. Now there are times when we would want to share content between the two sides. And there are easy ways to do that, and we'll talk more about that later. But for now, I just want you to get into your head that there are two separate content areas that share a mixer Kool. And the way you get between the two of them with the Tab key. Now one last thing I'll say about this is that the way that I use live and I think probably safe to say the way that most people use live as that for a given project, you're probably going to use either Session view or Arrangement view. It's pretty rare to use both at the same time. They have different purposes. Some people prefer to write music in Arrangement View, like me. Other people work almost exclusively in session view to write everything. And when you get down to performing and you wanna do like kind of a DJ set. You're going to live here in session view. So they have different purposes. But for the most part, when you're working, you're going to be working in one or the other and not very often using both at the same time.
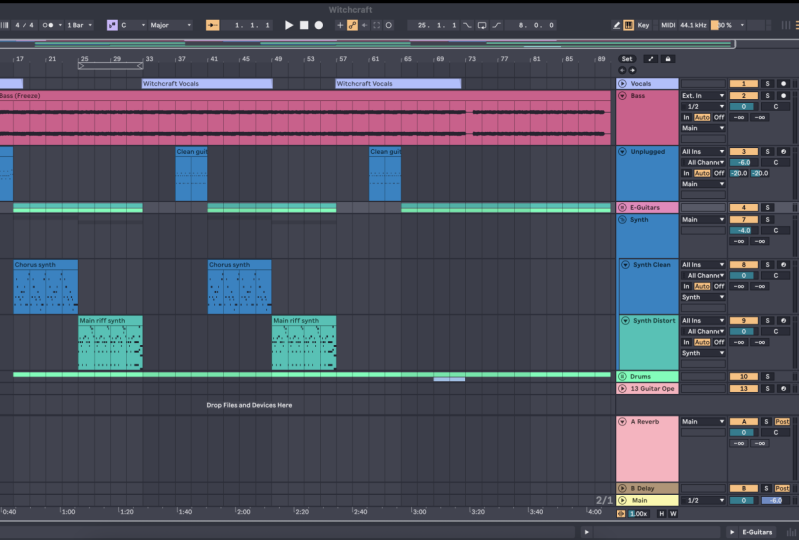
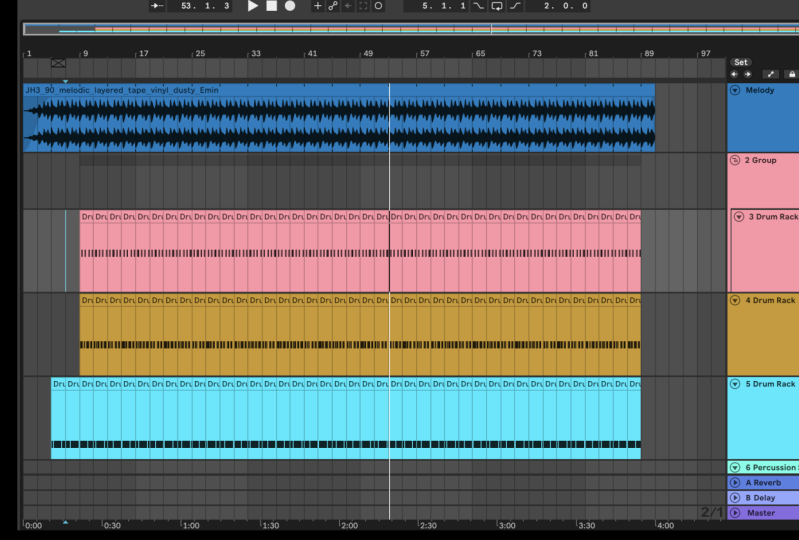
4. Arrangement View: Okay, now let's look a little closer at the Arrangement view and the Session View separately. So we're just looking at the big picture here, right? We're going to dive in deeper in a minute. So I just want to kind of give us a big overview of what we're seeing here. So in the Arrangement view, we have different kinds of tracks. Ok, so if we look over here, here's our track label, and then kind of a little bit of a mixer. And then some routing, some inputs and outputs. This particular track that I just clicked on is a midi track. So we see midi info here. And each of these little blocks is called a clip. That's just like Ableton's term for everything, whether it's audio or midi, it's called a clip, the block of stuff content. So this is a Miniclip. This is an audio clip. Okay? So I can only put midi clips on midi tracks and audio clips on audio tracks. If I move an audio track or an audio clip to a midi track, it's going to try to convert it and vice versa. Ok, we'll talk more about that later. So I have midi track here, midi track here, midi track here, audio track here. I know it's an audio track because there's audio clips on it. Okay, I know these are midi tracks because there are midi clips on that. What about this track? Straggling, availing on it. So how do I know if it's audio or midi? Well, a few different ways. First, if I look at my I0 here, I see all ends and all channels. This is going to say channel. Whereas an audio track is going to kind of list are available inputs and there's depending on how your system is set up, there's probably only going to be two. But this is always going to have 16 for a midi track. But the better way to tell is if we look at what's happening down here in this area, this is going to be our instrument. Now, all midi tracks need to have an instrument on them. The instrument is the thing that makes the sound. So this is a midi track. I can tell because there's an instrument on it. I can't put an instrument on an audio track because an audio track has audio information and that's what makes the sound, is the clip itself, midi track. This just has notes. If I double-click on this clip, we see notes. Notes don't make sound and you need to apply the sound to the notes in order to make the sound. So if I go back over here and I see this as an instrument, if I go to an audio track, there's no instrument, there. Doesn't need an instrument. So that's probably the best way to tell if you're in an audio track or a midi track. So then like I said, we scroll from left to right. I can click anywhere and hear my music playing. So that's Arrangement view. Now let's look at how things work in session view.
5. Session View: Okay, so I've set up a few little things here in Session View just to give you an idea of how Session View kinda works. So coupled terminology things. So we already know what clips are. Each of these is a clip, whether it's Miniclip or an audio clip. Same deal applies. Mid eclipse, go on midi tracks, audio clips go on audio tracks. But beyond that, we don't really care. So we have clips. Each of these little rectangles is called eclipse slot. Ok? So in each clip slot goes a clip. And don't worry about having empty clip slots. You're always gonna have a ton of empty Eclipse, Eclipse slots. That's just how it works. This whole thing is called the clip slot grid. Okay? Everything in a vertical, sorry, horizontal line like this is called a scene. So this is a scene, okay? And this is a track. Okay, so everything on this track goes that way and everything going across horizontally is called a C. Okay, so now you can think of each clip slot as like a little spinning record. Okay, so here I have a kick sound. It's just a single kick. Okay, cool, nothing fancy. However, if I want to turn this into something cool, I can loop it. Okay, so now I have a one beat loop. Cool, right? That can go on forever if we want. I can turn on this thing that we had before. And you'll notice that it blinked when I click play, right? The reason for that is because it was waiting for the next downbeat to launch. When I play on a clip, it's going to wait until the next downbeat or whatever I have set right here. Okay, This is what controls that. I can change it to be every 16th note, or just as soon as I click it if I want. But in terms of everything staying nicely and sync, I'm going to leave it on the downbeat. You know, I have a few other kinda weird sounds here. Let's launch this one. So this is the looping weird sound. Now, let's say I want to drop my kick out. I'm just going to hit any of these stuff. Let's Kuo, friend kick back in. Let's pull out this weird bubbly sound. It's going to wait for the next downbeat. And you'll notice also that everything is sinking to the tempo. The master tempo is right up here, right now it's 88. So everything is going to adjust to fit into 88 beats per minute right now. Okay, now, you'll notice that I have another clip here in the track. Only one clip can be playing at a time. So if I launch this next one, it's going to stop the previous one. And the next downbeat. Okay. I can switch back. Okay, now, if I wanted to hear these both at once, all I have to do is put them in the same scene. So I could move this one over to here. Now they're in the same scene. So now I can play in both, but only one for track happen at once. But now I can't play either of these. So if I wanted to play all of these sounds at once, I will put them on the same scene. And then I could launch them all at the same time by going over here to the scene launch. This little play button is going to launch everything in that scene. Actually want to do that. We haven't heard this one yet, so let's hear what this is. Just an orchestra hit. Cool, whatever. Okay, then I can press the spacebar to stop everything. So that's kinda how it works. Oh, I want to point out one more thing. You can kind of see the little spinning record analogy down here. Right? That tells us how long the loop is. This loop is quite a bit longer, right? You see the kind of pie turning. That'll tell you where the end of the loop is coming. So it's just kind of a good visual indication of what's happening here. So the reason that people like Session view like this is you can kind of improvised with a structure. Once you've got your clips set, you can kinda zigzag around and everything is going to stay in sync and it's going to be fun. And you can play it however you want to play it.
6. New In Live 11: Okay, I thought here we take a little look at some of the new stuff in live. Now if you're working with an older version of live, this is basically the stuff you're missing out on. And, but if you are totally new to live, then all of these things we're going to dive in much deeper on in the context of learning the whole program as they come up. So just stay tuned and we'll get more detail on how each of these work. But I thought it'd be cool just to take a moment and show you some of the cool new things in the latest version of life. So the biggest one to me anyway, the one that affects my life the most is take lanes. This is something that other programs have had for a little while and we call it copying. Copying is when you're recording, let's say you're recording this vocal track. And we wanted to do like five takes of it. Well, you would create a new take ln, right? So now I have to take lanes. And let's say I just recorded three actually two different versions of it. And just to make it clear what I'm doing, I'm going to change the color of this. That will make sense in a minute. Okay, let's go. Sure. Purple. Ok. So now what I could do is let's say I did these two takes and say I like that part. Now I like that part of that take. That part of that take no, I like that part and that part and that part. And that part and that part and that part. Right? So I can build like the perfect take from all of my take lines. We're only going to hear this one. But the transition between this is going to be so smooth and this is very, very elegant the way that this is designed. So this lets you record multiple takes and create a composite Take That is the perfect take. So more on that. And how to do that soon we'll do a whole section on how to record with live. The other thing that's new, that's a big improvement is the stuff called MAPE. You'll hear us talking about empathy a little bit throughout this class. And what it is is basically fancier version of midi. With midi in the past, we would put in notes and you could do a little bit, you could adjust the volume of each note and that was about it. Now you can do a lot to each individual note. And that's all because of this new thing called MAPE. You can kind of think of it as like a high resolution midi. So it's really cool. We'll go into how that works more later. We've got some new devices built in. A new hybrid reverb, which is really cool. Some spectral devices and spectral devices are like, It's hard to explain what a spectral device is without getting too complicated. But spectral effects are like really pulling apart a sound down to the millisecond level and then being able to like reorganize the different samples sort of lets you work with time in really strange ways. So we've got a spectral resonator or spectral time pitch loop, some new sounds built in. And then another kinda really wild thing is a new emphasis on kind of chance and randomization. So if I look here at this Miniclip, you'll see here it says velocity. Velocity is kind of a fancy term for volume of each note. So this is the volume of each midi note. If I go here and just say Randomize velocity, Sure. I can just keep clicking this and randomize the volume. I can click this and randomize the probability, meaning the possibility that that node is going to happen at all. This, I really like working with random elements. In. Random elements can be really fun to play around with. So something to check out. And we'll experiment quite a bit with randomization Later. I like, I like using randomization and then kind of taking the result of the randomization and then crafting it. Sometimes it can really just kinda get you out of a creative RET and help you come up with some new ideas that are really fun. So lots of new stuff that's just kind of a quick overview, but I just wanted to point out some of those cool things that are in the new version. And again, if you're totally new to live, we're gonna go over how all of these work in the context of one, they come up throughout this giant class on how to use every aspect of this program.
7. Navigation Overview: Okay, in this section, we're gonna talk about navigation. And what I mean by that is generally getting around within the program. If we're going to be making music, we really want this program to be second nature to us. So getting comfortable moving around is going to be really important. So we're gonna talk about some of the different interface areas. In particular, Info view help view some of the tricks to zooming in and out which are unique to able to talk about the main sequencer window, clip view, Session view. And then we'll dive into just making a clip. Okay, so I think just without further ado, let's dive into this section and we'll start with Info view.
8. Info View: Okay, the first thing I want to show you here is actually the first two things I want to show you here are things that will help you learn live, okay, so I want you to keep these open, especially this first one, so that you can always look down and reference it. So the first thing we are talking about is the Info view window. That's this little box down here. You can see right now it's empty. If you don't see a little box right down there, go to Window. Oops. Go to View and make sure info is selected. So what this shows is whatever you've put your mouse on, it's going to tell you more info about it right there. Okay, so you can see here I have my mouse on Info view and it saying I am in full view. Neat, right? Let's move our mouse over on top of a Miniclip. Okay, it says Miniclip, a clip representing a piece of midi. Click to select a clip and drag and blah, blah, blah. Okay, so this is true of just about every single thing in this program. So if you don't know what a particular button or symbol does, like, What about this? What's this little thing right here? Well, let's put our mouse over it, and then let's go down and look at info view. And we'll see that that is the metronome. Okay, how about this 1%? What's happened with that 1%? That's our CPU load meter that tells us how hard our computers working. So keep this info view open all the time. And then whenever you don't know what something is, put your mouse over it, and then read what it says down there. That's going to help you out a ton K. It's like having your own little Tutor write on standby. It's called Info view. Keep it handy.
9. Help View: Okay, the next thing I want to show you is called Help view. Help view is kinda similar to Info view except help view is designed to walk you through a number of lessons that are built right into live. So in order to get it, we're gonna go up to view again. And we're gonna go to help view. That's going to open this window on the right side of my screen. Okay, here I have help view. Now one thing you might notice is that it says Live ten lessons and what's new in live ten. And yours probably says what's new in live 11. Reason minds as live ten is that actually live 11 isn't out yet, and I'm using a beta version. And I haven't updated this yet. But it'll probably be all the same except it'll say live 11 here. But these are little lessons. So I can click on a tour of Live, for example. And it'll say Welcome to live, and it'll walk me through how to do things. It'll even load sets for me. It says click here to load the live set. Okay, so this is going to prompt me to load a set. And then once I do, I go down to the bottom to next page. And it says, you can see this, do this and click here and click there. And it'll walk me through these nice little lessons. These are really great lessons and I highly recommend you pause the class and walk through these lessons, do a few of them. And just look at the way able to in walks you through it. They're very well-thought out. There, very nicely done. So I highly recommend it. And then if you don't want to see the help view anymore, you can always close it with this little x and send it away if you want to get it back, you can go again to View and then help view and you can bring it back. You can also just grab the little divider here and just mash it all the way to the right. That'll get rid of it to k. So Info view and help view are things built into live to help you learn live there great, little kind of areas that, that are designed to teach you live. Now they do take up kind of a lot of real estate, especially help view and buy real estate. I mean, like your screen area, especially if you're on like a laptop. So I almost always keep helped view closed because it takes up so much space. And Info view, I generally actually leave Info view open even though I don't really need it. It doesn't take up much space and it's right there. So why not? So I usually leave it open.
10. Zooming And Scrolling: Okay, the next thing I want to show you is this weird little trick that you'll get really comfortable doing once you use live. And this is how we zoom in and out and how we scroll. Kay, you'll be able to do this anywhere that there's kind of a top menu bar, like right here. You see this little magnifying glass. That's our symbol. That means we can zoom in and scroll with this one kind of hand gesture. This is as far as I know, unique to live. I don't know of any other programs that do this. So what I'm gonna do is if you're using a track pad, this is great. So what you can do here is click and hold down, OK. Now if you pulled down, you're gonna zoom in. If you push up, you're going to zoom out. If you go right, you're gonna scroll. If you go left, you're gonna scroll. Okay. So I haven't unclicked yet. Okay. So if I want to get to a very specific spot, him put my cursor somewhere, click, pull down and push over to get to that spot. This is hard because I'm doing it backwards because it's like a mirror image thing here. But pull-down, zoom in, push up, zoom out, and then scroll or scrub right and left. Now you can also just go anywhere in your session and put the mouse anywhere. Don't click. And just do a two finger open to zoom in and close to zoom out. And with two fingers you can swipe side to side. Okay, so no clicking, just pulling open, closed and scroll this way and zoomed into much. Scroll that way. If you have a trackpad, if you're on a mouse, then use the magnifying glass thing here at the top. So you click down and then pull down, push up. Okay, so that's the kind of zooming in scrolling trick built into live. It's here in the browser window. In arrangement view. It's also if you're looking at an audio clip where we'll talk about this area and just a second. But it's right here also. Anywhere you get this little magnifying glass. Or if you just have something, you can do the two-finger pinch and zoom thing done here also, midi clips, same thing. You get it right there.
11. The Main Sequencer Area: Okay, next, let's talk about our main sequencer window in arrangement view. So we've already talked about this a little bit. But what we have here is each track going horizontally, right? And we have audio and midi tracks. So I've started a new session here. I have two audio tracks and to midi tracks. Ok. So what we're seeing here, let me just go over the different areas real quick. Okay, so we have our track. We have our sequencer window here. This is where we're gonna put all our eclipse right up here we have the timeline and it's showing here bars, Ks 0172125. If I zoom in, we'll get down to complete sequential 21-22, 23-24, et cetera. Okay. Up here we have this is kind of a 10000-foot view of the whole project. So you can kinda see everything that's in the project and scroll super-fast. Okay. It's actually not something I regularly use. At the bottom, we have the timeline again, but in terms of minutes and seconds. Okay? We also have some return tracks here. We'll talk about how to use these later. But these are kind of specialized tracks where you don't put any clips directly on these tracks. Then on the right side we have our mixer section. Okay, so here we have the name of our track. And we have a little show hide triangle here. This'll just kinda minimize that track to make it nice and small. Okay? Here we have our inputs and our outputs, and in between is our monitor stuff. We'll go over how all that works soon. But on an audio track, our output is going to be, what is it listening to if we're recording something? So let's say external in channel one, that is the microphone I am currently talking into K, So now we see my voice. So now that I've set that up right, I could click somewhere and press record. And we're recording my voice. Hurray, bla bla bla bla bla bla bla bla bla. There it is. Cool, right? Monitor section means what we are going to here while we are recording. And this is our output. And right now we just have it set to the master. We want it to go out to the master. The master is here at the bottom. This is our master output that generally descends right to our speakers. Over here we have more in the mixer part. This yellow box is a is what able to ankles track activator. But in all reality it's a mute button. So if it's yellow, that means we're going to hear that track. If we click it, we can turn it off. And now this track is off. Okay, we're not going to hear this track. So you want them yellow to hear them. Solo means we will only here this track, so all the other ones turn off. And this red button means it is armed to record. That means once we start recording, we're gonna record on that track. This blue slider here is the volume of this track. You can click and drag. And this little c here is our panning. Panning is the left-right balance. Okay, so if I go all the way here, it's 50 left, that's all the way left. 50 hours all the way, right? And then C is center. Okay? We'll play around with panning more later Dory. One really cool interface thing is if you've done something like this and you've changed the settings and you just wanna get it back to the default on. I think this works on any Ableton parameter. Just click on it once with the mouse and then press the delete key. That'll take it back to its default. It's a handy little trick. These two little boxes are to send the signal down to our sends, which are these down here. Okay, so more on that soon enough means negative infinity trees. We're not sending anything. Okay, so that's how this section works. Now if you're not recording into an audio track and you just want to drop samples in there or anything else than your input doesn't really matter because you're not using it as a live input track. So if you just want to drop a sample in there, you can do that. Okay, so just kinda of a quick overview of what we're seeing here in the main sequencer window over Arrangement view. Now let's go over and look at Session view, the same kind of area, but in session view.
12. The Clip Slot Grid: Okay, so first remember that in order to get between Session View and Arrangement View, we use the Tab key K, that's gonna get us over to Session view or back. We can also press these buttons up here. And you'll notice that the Ableton logo is like three lines horizontal and three lines are vertical because it's like Session View and Arrangement View, right? Anyway, these will toggle us between the two. But tab key is just a little bit easier. Okay, so here we have our Tracks and they're going to be named the same as they were over in session view, which we can change by the way, if I click on the name of a track and I press command R, I can change the name of it and then just type. So base. This is a mini tracks, so it's a keys and drums. Ok, So command are virtually anything that has a name that can be changed. Command are after you click on it, it's going to change it. So now just to prove my point, if I go back over to Arrangement view, Here's guitar, bass, keys, and drums. Ok, back to Session view. So I have my clip slot grid. We've already talked about that. At the bottom here, I have the mixer, same mixer as from the arrangement view. So here's our input section. External in first microphone. Monitor section. Remember monitor is what we're going to hear while we're recording. And then our output right now we're just sending out our audio to the Master. The Master now is over here. This is our master output. Here we have those two sends. So a and B, that's going to send to these a-ks tracks to again, we'll talk more about how to deal with Ox tracks later. And these also, if I turn them up and I wanted to set them back to default, can just press delete after clicking on them. K. And now I have, my volume is now this little bit more familiar volume. My panning is now this. So my left-right balance. My track activator or mute button is now this. And then solo and arm to record. Now you'll notice that when I press arm to record, my microphone starts coming in here. And what was little squares and my clip slot grid now becomes little circles. That means I'm gonna record on one. So if I just press on one of these circles and then start talking blady, blady blah. And then I go to another one and start talking blady, blady blah, and another one, and I start talking in bloody blurry blah. So now I've recorded three different clips. I can double-click on them to see what's in them. And I can play them if I want. And then start talking. And then I go to another one. And your goals and then start talking. Start k. So that's the basic layout of Session view. We'll go into more details on how it works later, but I just kinda wanna get us poking around getting us comfortable with the different buttons and terminology of the program. Okay, so you'll notice here, I opened this window down here at the bottom. This is called the clip view or the clip window. So let's go to a new video and investigate what's in here.
13. The Clip View Window: All right, so if you double-click on any clip, you're going to get to the clip view window. Now if you clip on, click on an audio clip, it's going to look like this. A Miniclip is going to look a little different. You're gonna see a midi kinda keyboard, the piano roll, we call it here. But a lot of this stuff on the left side of it is the same. So let's look at an audio clip first. So what we're gonna see in the main part is the waveform. This is where we're gonna do warping, which will again talk more about soon. We can set the loop and do all kinds of stuff. Here we have some stuff that controls just this clip. Okay, so some of our warping settings, what the tempo of it is. We can transpose it by moving this up. This is steps, so 18 steps, that's a lot. So 12 steps would be an octave sense. Is that a fine tune? If we want to pull something in tune or AUTO-TUNE, we would do it by cents. So that's going to be very fine tuned. Adjustments. We can boost the gain if we want to and just really crank the tar out of it. Don't recommend that. And this edit buttons gonna open an external editing piece of software. If you have another program that you'd like to do audio editing in, it's going to open it. I don't have anything set up. So it's saying you don't have a program, say cancel and reverse. We can just flip that sample backwards if you want. Okay, and we also have another tab over here. This is one of the new things in live 11 is this second tab. And this is going to lead us draw in some envelopes. So again, envelope is going to be like an envelope is basically just a fancy way to say something happens over time. So here we have a gain envelopes. So the volume is gonna go down in the way I just drew that. It's going to get fade out and get quieter and quieter. I can make more points by just clicking and say, I want to do this. Make something really crazy happen there. Okay, so now that's what my volume is going to do over the course of this. K. Then over here, we have kind of the start point, the end point, we can adjust where they are if it's looping and then what's the position of the loop is and what the time signature is. And if we've applied a groove, so time signature isn't going to affect the time signature that it plays back at, because we're gonna be using the global time signature that's up here. So we're in 44. And it says it thinks this is in 44. So it's going to leave it in for, for the time signature is really only going to affect how it sits on the grid when you look at it against a quarter note. We'll talk more about that later. A groove is like a feel like we wanted it to have a swing or something like that. We can apply what's called a groove to it and we'll look at how to do that shortly. Now, also in the quick view window, we can zoom in and zoom out and scroll is same way as before. These lines up here and get out of my envelopes. This is your loop bracket, this green one in this case. So we're going to loop like that. And the little ones, these ones, this is the start point and this is the end point. Okay? So why are those different then the loop? Well, you'll find this a lot in live. It's because if I set this to do this, let's say what's going to happen here is when I launched this clip, it's going to start playing from right here. And it's going to play, and then it's going to get to here, it's going to keep playing. And then it's gonna loop back to here. And then it's gonna loop back to here, et cetera. And it's gonna do that forever. You see that? Cool. I could put a different endpoint, but the endpoint actually isn't going to matter here because we're looping. If I wasn't looping, then the endpoint does matter. So I turn off loop, you'll see now the endpoint becomes active, and now it's just going to play from here to here. Now everything pretty much works the same in a Miniclip, except you have a few more controls. You have more options when it comes to envelopes you can draw. These are more midi parameters that you can kind of use to shape the notes. And we'll get more into that soon. And you can do a couple other things to the midi clip like double the note values or have the note values reversed the clip invert the clip. Duplicated. Legato means kind of let notes bleed into each other. But the looping section is the same. Last thing on QlikView is that it's virtually identical in session, Session View and Arrangement View. If I click on this clip and go over here, can see not much has changed. We have a couple other parameters, but for the most part it's Clip View is identical in Session View and Arrangement view.
14. Creating Clips: Okay, last thing for this section. How do you make a clip? Let's just do that real quick, right, so that we can start making some noise, right? Well, first it depends on what kind of clip, audio or midi. Okay, let's do midi clips. First, There are three ways to make a midi clip. The first way is to record in. So if you have a midi keyboard or something like that, you can, you can arm this track to record and then hit their big record button at the top. And play your midi keyboard like I am doing right now. Or any kind of controller doesn't need to be keyboard. And now we can see we have a midi clip and here are all the notes that I just put in and it was a mess. Okay. So way number one, you can record it in. Way number two. You can drag it in. If you can find a Miniclip somewhere. Here's a midi clip. And I just drag it in from the browser. We can spend a bunch of time talking about this browser in just a minute. So if you can find a Miniclip and just drag it right onto a midi track. That'll work as well. And then the third way is you can just double-click anywhere on a midi track. And it's gonna make a blank Miniclip. So I can grab the little bar down here to give myself a little more room if I want. And then start adding notes just by double-clicking in here. Okay? You can add as many notes as you want and you can do whatever you want. Okay, so just double-clicking on a midi clip, we'll run a midi track will make a Miniclip. And of those three ways, the ones that work in session view also are all three of them. All three of those things work in both Session View and Arrangement View. Now let's talk about audio clips. Audio clips we only have two ways. We can drag something in. Like so. So any audio file you have, you can drag into an audio track. And then the other way is to record something. So like I've already done. If I just want to record, blah, blah, blah, I can record an audio clip. Those are two main ways of making an audio clip and other is some weird things you can do that converted midi clip to an audio clip, but the majority of content, those are your two ways. You can't just double-click on an audio track to make a blank audio clip doesn't work that way. And the same is true in session view. If I go to an audio track and I double-click, nothing happens. I can't just make an audio clip, but I can drag one in or I can record one n. Okay, so that's how you make clips.
15. Using The Browser: Okay, the next thing we're gonna do is spend a little bit of time on the browser. The browser is this big rectangle over here. Now you might be thinking, you know, the browser is just how we grabbed stuff. Once so much time on it. Well, it's actually organized in a really smart ways, but ways that can save you a ton of time if you really get to know it well. So we're going to spend a good amount of time kind of poking through these lists of things and going through what's in them. Because you're going to be all up in the browser and every project that you do all the time. Now I will point out one thing. You don't need to use the browser. If you have, let's say you have like a file on a hard drive or something. Let me just get to one quick here. Okay, for example, here I have a sample library folder where I have just thousands of samples. So let's go to hear some noise samples. Okay, we are dark and creepy sample. It's going to get something a little bit brighter. Let's just go to here. I'll just go to my old favorites folder, beats and grab go. Okay, so I have this file in my Finder windows. So on a Mac that's this thing. Pc has something the same eye camera, what they call it. So if I wanted to, I can just drag right over into my session, whether I'm in session view or Arrangement View, I can, this is an audio file. So I can either put it on an audio track or I can drop it in an empty space and it'll create a new audio track. Ok, and there it is, that's just fine. So I don't need to use the browser to do that. However, there are some advantages to using the browser that can make that a little bit faster. I can get to that same spot using the browser. This is actually kind of like the Finder plus a bunch of extra stuff built in. So you can just drag stuff right over in from your desktop or a hard drive or whatever. But there are a lot of advantages to using the browser. So let's go into the various areas of the browser now.
16. Collections: Okay, so first, there are three ways to get the browser to show up or go away. The first is the sill triangle up here. This is going to either show the browser or hide the browser depending on if we want to, depending on if it's already open or not. Second way is to go to View and then down to browser. Okay, it's checked. So that means it's currently showing it. If I click this again, it's going to hide it. Okay, and then I can get it back the same way or wherever I want. The third way is if you're really gung-ho about key commands, you can do option command B on a Mac or PC, I think it's Option B. And that's going to toggle the browser. Now typically, I leave the browser open all the time. That is what ID. You can change the size of it if you want by grabbing this bar here and click and drag, make it nice and huge, or EBD either way. Okay, so the first thing I wanna do is this collections area. Now, this is really cool. But you have to set it up, right? If you don't set it up, right, it's useless. So what we can do is we can define different things and have them automatically pop up here. So you probably don't see what I'm seeing. I have since drums and samples because I've set those up. So if you want to set these up, right, what you're gonna do is hover your mouse over collections and then hit this little edit button. And then you have these different areas, right? And you can, they're probably in your case because you haven't done anything with them yet, all labeled by the name of a color. Like I have blue here. So I'm gonna click on blue. I'm going to rename it. I'm going to sew command R to rename it. And I'm going to call it, I don't know, kicks that I've kicks, kicks. Ok. I'm gonna press return. And then I'm going to click this button to show it. Okay? Now I'm going to click on done. Okay, so now we see kicks. So when I click on kicks, it's empty. Nothing is showing up here on cakes. But if I dig all the way through my browser and I'm only going to have to do this one time. So let's just search for kicks samples. Okay, there's a kick sample. Now, what I'm gonna do now is I'm going to Control click. And I'm going to select kicks. Ok, now it gets a little blue dot, right? Here's another one. Blue dot. So everything that I categorize as kicks is now going to show up in this tab. This is really just kind of like tags, right? So we're gonna tag something and then it's going to show up under collections. So what I've done here is put some sense drums and samples. This was from a previous project, so I've sends kinda clear them out. I like to use collections on a project basis. So the last project I was doing, I put together a handful is since I liked some drum grooves that I liked, or some drum samples that I liked. And then just some audio samples that I like to. Actually, there is stuff here. I just had the search, a note about the browser. You have to clear your search to see everything. See under samples. It was only showing me kicks because I still had that in there. And when I click this little x to clear that out, now you can see the samples. So in this last project I did, I was using these kind of Beethoven samples. Here's all the drum samples I wanted to use. And then a couple of cents that I really liked. You can put anything into collections. It doesn't need to be audio files. Or audio clips. Can be mid eclipse, can be instruments, can be effects, can be virtually anything that you find in the browser here. So I could go new effects and say, here's this looper. And I could say, I'm going to put that into kicks because I like using that effect on kicks. So now I go here and there's my looper effect. Ok. Now, that would be kind of silly because I don't like using the looper effect I'm kicks. It would be kind of weird. So I'm gonna do it again and get that to go away. Now if I reload that kicks thing, loop is going to be gone. Now I didn't delete looper. It's just not showing up in that collection. So here's what you need to know about collections. It's a way to tag stuff, to find it quick. So when you're working on a project, you can get to all the things you want really quick. But you have to set it up using this edit thing, this edit button. And then you have to go in through the browser and tag things correctly so that they show up in the right collections.
17. Sounds: Okay, next, let's look at everything in this category section. Now, what's going to be interesting here is to differentiate between what is Ableton stuff and not able to and stuff. Okay, so in this sounds category, this is going to be able to insert stuff. This is going to be basically all of your preset patches for all of your able to instruments. So your instruments are here, we'll get to those in just a second. But this has all your instrument presets organized in a different way. So it's the same stuff. You can get to the same things under instrument, but this has them organized by the type of sound they make. Okay? So if I go to sounds and I say I want a bass sound, I can go here. And these are going to be all my synthesisers which are able to in calls instruments on my synthesizer presets. Okay? And I can click on one and here a sample of it. Okay? Now, important, if you don't hear that preview sound, then go down to the bottom here. This is where your preview sound is. Click this little blue headphone thing. If this is off, you're not going to hear the preview. Okay, so turn that on and make sure that's blue. And now you can actually use the arrow keys and just fly through this and find the sound you're looking for. So I'm just gonna press down arrow. Go. Let's say that's the one I'm looking for. Then I can load it. I can load it in two ways. I can drag it over onto either a midi track or an empty area. And it'll make a new midi track. And there it is, loaded up. Or I can just double-click on it. And it's going to load it onto the selected track. If it's a midi track. You can also just press return and it'll load it as well. If I get rid of this track by just pressing delete, and I just, I'm here, I press return. And it's going to load that track. So it's really, that's all I load it. Boom, really fast. Cool. Ha, and that works for all of these. So I would use this sound category if I had a very specific sound I was looking for. So let's say, and I don't really care about what instrument I'm using. So let's say I want to get a percussive sound like a Tom kinda thing. Then I might go here and look under percussive and top. You can see in the end ADV or some of these are ADG. These are different instruments. Adv is able to devise a, d, g is Ableton device group. That means it's a rack. We'll talk more about that later. For this, doesn't matter. We don't care what it is. So to summarize, the sounds category is able to stuff all of the presets built into the instruments that you have in able to him. But organized by the type of sound.
18. Drums: Okay, next let's look at the drums tab. So if we click on drums, you might see less than what I have here. This is also able to insert stuff, but it includes extra content that I've downloaded. So you might have less, you might have more. So what we see at the top is drum hits. So this is able to sound presets just like in sounds, but these are specific to drums. So all of these drum hits are going to be single hits or what we sometimes call one shots. So if I go to like a snare and click on one of these, it's, it's going to be a single sound, either more shaker than anything. But because I clicked on shaker, snare sounds more like a snare. Okay, God, Now these are audio files. So if I want to use one, I can just drag it right over onto an audio track. If I zoom in, you can see there's my snare. Now, also in this drums category, our instruments. So the drum category of instruments are going to be full drum kits that are going to be in a media kit. So here we see this again. This ADG. All of these I think are going to be ADG. Yeah. So able to devise group is what that stands for. That in this case means it's probably a sampler. Most of them are probably samplers that have a lot of different sounds in them. So if I say there's a good old 800 eight, I can load that onto a track. And now I can get all of my individual sound here. And I can play with that 800 eight. Okay, don't worry about how to use these instruments yet. We're gonna spend a lot of time learning how to use these instruments. Um, but just know that in this section, I have all of my drum kits and I can audition them. Just like anything else. By scrolling through with the arrow keys or clicking. Going to loop. One cool thing I didn't point out when we're looking at the sounds because it didn't really matter. But here it does, is that if you have a track going, when you audition something, it's actually going to audition it at the right tempo. Let me show you what that means. Let me open a session. Okay, so here I have a project that I'm currently working on. And you'll notice that my browser completely stayed the same. Even my collections. These are built into the way live is set up. They don't have anything to do with an individual project. So they're gonna stay like your collections are gonna stay your collections until you change them. It's not specific to a project. So here I have this track I'm working on. Let me mute the drums. And let's even just kinda loop this section. Bright days will come. Vogel storing line. Okay, it's cool. Now it's audition. Somebody's truncates, right? So what was happening here is it was playing sounds from the drum kit that I had clicked on in the tempo of the track. And it was, you heard some silence in there and that was it waiting for the next downbeat to start playing it? Now, that doesn't mean that's necessarily what it's going to sound like when I load that drum kit, right? Because I can change the rhythm and do everything I want. It's just to kinda give you an idea of the sounds that are in that kit, right? Because I can set that drum kit to go crazy and do whatever I will hunt. But it just gives you a little bit of a preview of the type of sounds that are in that kit. Right? So right now I don't have the track playing, so it's just going to play it at any old tempo. Ok, this is cool. So industrial setting materials. What do sounds feel like in this track? And an applicant is again, go, if I like that, I can load that into a Numidia midi track and then program those drums to do the kind of b that I wanted to do. So that's what's in the drums tab.
19. Instruments: Okay, next let's look at the instruments tab. Now. This one has really all of the same content that we saw under the Sounds tab, just organized a little bit differently. So if I go to instruments, I see all the different instruments that are installed in my version of live. Now this is something where if you don't have live suite, you probably see less instruments than I have k. These are the instruments that come with live sweet. So these are all able to instruments. So these are the names of the instruments, wave table tensions, simpler, sampler operator, you know, et cetera. So each of these instruments is like its own thing. It's its own synthesizer is what it is. Live calls synthesisers, instruments, ok, and samplers instruments, anything that makes sound is in instrument. So if I open one of these up by clicking the little triangle next to it, I can see that on the inside of it, it is organized by presets, right? So I can go to pad and say, and I can audition them. If I like one, I can click return and loaded up. Now just to prove this, let me, let me go to analog base, basic analogue base. That's there. Now if I go to sounds and look at all my sounds and I go to base, I can find right here basic analogue base, same thing, just organize different. This is designed to help you navigate quick, right? So, so why would I go to instruments instead of sounds? Well, I would go to sounds if I wanted a very specific sound. If I said I want a bass sound, that's going to be like I just want to scrub through bait based sounds. That's what I want to do. But I would go to instruments if maybe I didn't exactly know what kind of sound I wanted. But I wanted to, but I knew what kind of instrument I wanted. And that can happen. Because you might think to yourself, once you get really familiar with these instruments, you might say, I kinda want to wave table sound here because that's an instrument that has a very specific sound and it's a sound that you really like. So you're really start to get to know the sounds of the instruments. Something like wave table has very specific sounds. Although it's very flexible, all the instruments are flexible. You might just kind of being a mood to work on a wave table sound or an operator sound, or an analog sound or something like that. So when I'm in kind of a creative mode and just thinking, I need to add a synth to this track. What kind of thing do I want that? I'm probably going to go to a wave table and start dialing it in and playing around with it. But if I'm just like, I just want to throw a big buzzy sinth on there. That's going to be a lead sound. And I don't want to deal with it all that much. I might go to sounds and go to leads. Simply. Just find a big buzzy Lee. Pop that on there and then I'm good to go. So that's the main difference between the two, but it's really the same information. Just organized. It just with the presets organized differently.
20. Audio Effects: Okay, up next, let's look at audio effects. So you might be thinking, I know I can get more plug-ins and install plugins, right? That's true. You can install plug-ins like any audio program. You can download or buy more plug-ins. And they will run in life. However, this is not where you would find them. Audio effects here are going to be Ableton's built-in audio effects. Okay? So if you have lived sweet, they're always going to be the same. And these are the audio effects that come with live. Sweet. And this is again where if you have a smaller version of live like live standard, you won't see as many as what I have. So these are organized by the type of effects that they do. So dr is going to be like distortions and stuff like that. So I can open this up and see different audio effects. Okay? Any audio effect can be put onto an audio track. So let's go. Let's make, oops. Let's make a new audio track that was just Command T to make a new audio track. Any audio effect can be put on any track, even a midi track, as long as it comes after the instrument, more on that later. But to do it, we're just gonna make a new audio track with command tease what I did to make a new audio track. And let's go to samples. Okay, here's like a bass sound. And then I'm going to take an audio effect, say Dr, That's AMP. And there's really no preview for these because they're in effect, they need something to run through. So let's use this heavy preset and just do that. And you'll see the audio factor comes up, down here. Okay, so now if I play it, that sound is going through this effect K. So I can load in effect one of these effects by just dragging the preset onto a track. Or I can just hit return and it'll load up that preset. Now, if I don't want to deal with presets, you can always just throw the effect right on the track. So if I just say, Let's go to something different EQ and filters, let's say EQ eight. I can skip looking at the presets and just throw a blank EQ eight on the track. And then I've got a flat effect and I can start crafting it how I want. So if you don't want to use presets, you don't have to just throw the effect itself right on the track. Ok, so important to remember that in the audio affects category here, this is just able to lives audio effects, not plugins that you installed elsewhere or that were made by any third party. Third party plug-ins are going to be right here under plug-ins will get to those in a minute. Audio effects, just the Ableton Live effects lived there.
21. MIDI Effects: Okay, midi effects. The next one, again, just like audio effects, these are affects built into live and they are things made by Ableton, nothing else. Okay, so no other effects are gonna go here. Other than the stuff that comes with live. Now, these are a little bit different than audio effects because these can go only on a midi track and only before the instrument. So these du, Midi like things, the easiest thing to understand about them as like the arpeggiator. So if these are going to do is take midi notes and spread it out, we'll talk more about what midi effects are and how they work. I'm a little bit later. But just know that these are different than audio effects because audio effects affect the sound and midi effects affect the notes. Okay, so if you're just working with a recorded sound like a sample, then you, there's no reason to use a midi effect. In fact, it won't work. Here I have an audio track. I can put a midi effect on it and it's just going to say no, it's not going to work. So these can only go on midi tracks. And they affect the notes, not the sound more on that when we get into midi stuff.
22. Max For Live: Alright, next on our list. Max for Live is where things get really fun. So I mentioned this already once, but Max for Live is kind of like its own programming language that lives within live. Now I don't wanna go into too much detail yet. We're going to have a whole huge chunk of this class at the very end on Macs. But the short version is max. Max is a sort of audio video, midi specific programming language. Kind of that's been around for a long time. But couple of years ago, a version of it got built into live and recently, Ableton bought the company that owns and develops max. So now Max for Live is kind of part of Ableton. What you'll find in this tab is all of your Max for Live devices. Now, what's cool about Max for Live devices is that anybody can make one and you can share them. And you can go to websites where you can find hundreds and hundreds of cool things that people have made. And what's even cooler yet is if you know how Maxwell I works, you can take something that somebody's made. You can open it up and it kinda rewire it and make it do your own really cool, unique thing. Super fun, does have a bit of a learning curve though. But if nothing else, what you have with Max for Live is unlimited amount of devices that you can download and play with almost always for free. So in this tab, you'll see all your Max for Live devices sorted in three ways. Audio effects, instruments and midi effects. Okay, so and each of these categories, you'll see everything you have installed or that you've made that fall into these groups. Okay. This is prompting me to go download some more stuff because right now I don't have anything on here. I just have this blank max audio effect. If I load this up, which I can do, it's not going to do really anything. This is designed is kind of a programing template. But don't think of it as a programming language. It is, but think of it as a way for users to share cool affects and instruments that they've made with each other. So I encourage you to poke around online and find some stuff. Now in your version of live, if you have sweet, you might see a whole ton of stuff here that has come with your copy of sweet, my copy is a little early version, so it doesn't have all of the Max for Live stuff in it yet. But there's probably tons of cool effects and things you can do here will spend more time on Max for Live later. But for now, just know that they are more audio effects, instruments and midi effects that you can play with. That some of them get pretty weird and fun. So I highly encourage you to check them out.
23. Plugins: All right, now we're down to plug-ins. Now, the plugins category is where you're gonna find affects mostly audio effects and instruments that are made by anyone other than Ableton. Ok. So the Ableton made effects are going to be under audio effects or midi effects or instruments. I, everything else is going to be under plugins. So if I go to Plugins, I see first the different types of plugins. See audio units is a type of plug-in, VST is a type of plug-in and VS t3 is a type of plug-in. You don't really need to worry about that. If I open it up, I see the plugins installed on this computer. So I have a lot more VST then VSD threes. But that's okay. These work just like everything else. I can load them onto a track. And these will, most of these are going to pop open a new window. Like this one is popping open a new window. Man, it'll give you access to the interface of that particular plug-in. Now if you don't see plug-ins here, if you don't see anything here, you might need to take a quick trip to your preferences. So if I go up to live and preferences, and I go to the plugins tab here. And I say use audio units on and use VST plugins system folders on US VST plugin custom folder. I don't need to turn on VST plugin folders on. So just be sure you turn those on for plug-in system folders for VS2, NBS, T3, and use Audio Units on an end down here. Allow, I like to allow plug-in multiple plug-in windows and auto hide windows, auto open plugin windows. Alex, from those on, but that's a preference thing. You can play around with that. But be sure you turn these on. If you turn these on. If you turn these on, then do a rescan with that button there. It will populate this list with anything installed on your computer and you probably have a few things installed on your computer. And there's some just kinda basic stuff that comes with most computers. But this is where if you download and buy more expensive and fancier plug-ins. And again, that can be audio effects or instruments like serum is a really popular synthesizer right now, that's gonna show up and plug-ins, okay? Because it's not going to show up in instruments, because instruments is only stuff maintained and developed by lot. Everything else is going to show up and plugins. So I have serum in here somewhere. And I can actually find it quick by just going through the search serum. And then I'm going to click on plugins. And it's going to say, and that's probably in this folder. And there it is. So if I throw that on, empty space, serum comes up cool. So serum is a synthesizer. It's an instrument, but it's not made by live. So it's going to be under plug-ins.
24. Clips: Okay, moving on, let's go to clips. Now I'm gonna do something here just to prove my point. I said this before, but I just want to emphasize it. If I click on clips, I'm going to see nothing. Ok, I see nothing because I still have serum in my search. And what I'm searching for right now is serum in the clips category of which there are none. I don't have any clips called serum, so I have to clear that out. So if you ever are expecting to see something and you don't see it, makes sure that there's nothing in your search up here. So I clear that out and now I see a ton of clips, right? So remember that clips are midi and There's gonna be a ton of them in here. What I have here is just a whole bunch of midi clips, glycol, drum grooves. So what you're gonna see under Eclipse is all the clips installed on your computer. Now I find this clips category to be not very useful because it's not super well organized and there's just a ton of stuff here, right? You're just like scrolling through it just like an insane amount of stuff. So I don't spend very much time in this clips category. You might find it to be useful for you, but for me it's a little tricky to navigate.
25. Samples: Now if I go here to samples, this is all the audio samples or audio clips that live knows about. And again, it's an insanely long list. If you have a whole bunch of stuff on your computer, I'm not sure exactly how live knows to put stuff in here. Does it know about my external hard drives and my sample libraries? I'm not really sure what all goes in here. Because just like what I side with clips, I'm finding this one to be not very useful also because it's just a lot of stuff. You know, it's just like thousands of samples. And what we have here in this case, we just have like tons of different kicks. So I don't spend much time in this samples. To clarify something I just said. Clips appears to be midi clips only and samples appears to be audio clips. Again, I am noticing that because I don't really use either of these tabs very much. Maybe there's a better way to organize them. But I haven't really found it. So both of these, you can basically search everything that live knows about. But for me it's just too much. I would much rather. If I just want to dig through a huge folder of clips, I would much rather use this places section, which we'll get to you in just a minute for that kind of thing. But jumping ahead, we've got two more things to cover under the categories.
26. Grooves: Okay, let's go to grooves. Grooves are a little different than everything else. So what we have with grooves is a very specific kind of file. You'll see this AG extension. I'm able to groove something. I don't know what the R stands for. Now, grooves are an analysis file. It's not audio and it's not midi. You can't play it or put it on a track. If I try to drag when he's on a track, it's just not gonna work. What you do with grew files is you apply them to an audio or midi clip. Okay, not so much a track, but a clip. And that's going to adjust the feel of the clip. Okay? The best example of this is swing. Ok, let me give you an example real quick here. Okay, so what I have here is just the hi-hat group, an audio file. And that has a little bit of swing to it already. But let's go to, here's one that says when you hit that little clicking, let's kinda giving us a preview of what it's gonna do. Okay, so I'm gonna take this one. I'm going to drag it right on top of this audio file. Okay, now I'm gonna listen to it here, how that changed it. Let me undo it. Here just without okay, here it is width, right? So it's like moving notes around. That's what a group does. Now, there are better ways to use a groove then to just throw a guru file onto an audio track, we actually have a whole section of the interface devoted to helping us craft those grooves just right. And it's actually hidden way down here in this little button. This is called the groove pool. So what we can do here, one of those grooves into this. And now we can actually adjust some of the settings in it. And then once we adjust the settings, then we can drag it onto something and gives us a lot more control. You could also go the other way where you can take your audio clip and say, I really like the feel of this drummer, for example, drag that into the groove pool and it's gonna extract the groove with the feel of that drummer. And then you can save that as a groove file and apply it to something else. So now here's that groove, right? It can do a lot of cool stuff with groups. We'll go more into how grooves work later. But just know that this is where you can find all the grooves on your computer. This is great. This is a live 11 thing. Grooves have been around for a long time, but they're actually really hard to find all of your groove files. So now they're included under categories, which is great because I remember spending tons of time digging around my hard drive looking for grew files. So I'm going to hide our groove pool here and move us down to templates.
27. Templates: No templates are really fun. This is also new in live 11. What you can do with templates is basically set up a session exactly the way you want and then save it as a template. So you can see here, I've set up one here called Studio. This is when I'm working in my recording studio, how I have to have a whole session setup with all my routing and everything set up. So if I double-click on this, I'm going to say, don't say my current session and it's going to open a whole new thing. And then now it's set up with my hero back routing. Um, my different tracks all set up with take lanes and everything. So it's great. So here's one that came built in with live 11's podcast template. Let's open it. Ok. So music ambience, voice over, little mastering plug-in setup. So they're just different templates for sessions. Now what's super cool about these is that you can actually mix and match them. So if I say like podcasts template, but I want audio track from my recording session. I can open this up and just grab that audio track and throw it in here. And now I've added the audio settings from my studio session or this audio track one settings from the studio session into the podcast template. So you can template out individual tracks as well as whole sessions, which is kind of fun. But the main way we would use this is just to load one of these templates and you can make your own will talk more about that later. But there is a way to just make your own templates and save a session as a template.
28. Places: Okay, moving on to the last big chunk here. Let's talk about places. Now. Places is just kind of a quick way to get around your system. You can add whatever you want here. That's what's really cool about this. So if I click on Add Folder, then it's going to open my finder window. And I can say, go to my sample library, which I think is on superior, Michigan. There is sample library and I'm gonna say open. Now, my sample library shows up here in under the places and it's always going to be there. It's just going to live there. So not much is showing up here yet because it's kind of indexing everything and trying to figure out what all is there. I click out of it and back into it. You can see this list slowly getting longer. But it's digging through that and trying to figure out what all is here and put it altogether. So there's a lot in that sample library, so it's gonna take a few minutes for it to build it all out. But once it does it, it'll never have to do that again. There's more. So you can see here I have a songwriting project that I've just put a link to right there so that I can get into that really quickly. Now that a couple of these things are always gonna be here, your current project. So if you have sounds and everything already in the project that you're currently working on, what would be a quick way to get inside of it and see your sample folder. In this current project, your user Library is where a lot of different things live. Most of this stuff already shows up here. But if you really want to just get in the weeds, your loser user Library is where you can find a lot of stuff. Okay, so you can add anything you want here, any spot that you go to all the time and you just want a quick way to get at it from inside the browser. Just click this Add Folder and make a link to it, and it'll be really easy. Now one other thing that's really cool here is that if I go into my sample library and I say, I don't know, this dx seven library, okay, here's dx1 library. That's an old since that I really like I can now because it's showing up in the browser, I can right-click on it and say add to since. And now it's gonna show up in collections, right? There's my dx1 stuff. So that's why you would want it to show up in the browser so that you can sort it with tags and get it show up in your collections, right? That makes things work so much faster and so much better. So it's really great. And there's one element here that I didn't talk about yet under places, and that is pacts. Let's go to a new video and talk about packs.
29. Packs: Okay, packs is lives way of letting you share stuff and download a lot of stuff really fast. So somebody might make a sample library and save it as a pack. Ok. You can look around online and download Ableton Live packs. And inside a PAC can be a whole bunch of different things. It can be a session, it can be a sample library, it can be instrument presets. It can be Max for Live devices, it can be kind of anything. So if I go to packs, I'm gonna see all kinds of different stuff. Core libraries, what's already installed with my version of live. So I have some devices lessons. This is where those lessons are from, the help menu that we started at the beginning. But I also have these packs from the Ableton website. Ok, so you can download a whole bunch of free packs just off Ableton.com. And there are some paid packs. There are two. So it's telling me here I have a 173 packs that are in my account, meaning they're either free or I've paid for them, or able to gave to me. And I can download them right here. So let's see what these are. Going to open this up a little bit more. So let's say bombastic. That sounds cool. Let's add that. So I'm just going to download it right from within live group. There it is. I'm going to install it. And this is incredibly fast. Go. Now under packs I have bombastic. And let's see what's in bombastic because remember, it could be a lot of different stuff. I have some clips, I have some drum files, and I have some samples. Let's see what's in here. Sandra. Cool. So then I can use that stuff. Great. That's what packs are. There's a ton of different stuff. So if you've downloaded more content and you can find pretty much anything in a pack. There's an insane amount of content that you can download, either from Ableton or from other sites. As a pack. That'll let you extend what live can do, kind of an infinitely. So if you've downloaded that stuff, it's going to live here under Packs, unless you've categorized it in a way to put it in a collection. Like I could say, I really like these drum sounds. I'm going to categorize them as drums. So they show up here. In addition to you under packs. So I highly encourage you to check out pacts. It's a great way to get more sound content into live and just give you an infinite amount of stuff to play around with.
30. Adding Content: Okay, so we just spent a ton of time going over the browser. Sorry about that, but I just wanted to make sure that you really understand what's there because it's going to save you all at a time. But we need to do is take a moment and just make some music, right? Let's make something. So what we're gonna do in this section is we're going to record something, a few things actually. So if you remember, there are three ways to get clips into live. The first way is to record something, and that can be audio or midi. The second way is to just drag something into your session. And then, and that can be audio or midi. And then the third way is just to double-click to make a clip. And that only works with midi stuff. So let's start by recording something. So we're gonna start with audio and then we'll also do a little bit on midi recording here to know in order to do this, we need to set up some things. We need to make sure we have the right tracks queued up and we need to take a quick visit to our preferences. So in order to kick this section off, lets take that trip to our preferences and make sure that we are all set up correctly for both audio and midi recording.
31. The Preferences: Okay, so to get to the preferences, were gonna go up to the live menu and down to Preferences can also use command comma t to the preferences. So in our preferences window, we have a few different tabs on the left. Now for the purposes of recording, just going to focus on the audio and midi tabs for the moment. So let's go to the Audio tab. These are the things we really care about right now. Right here. What is our input device and what is our output device? So for me, I have input device being quartet because that's what my microphone is plugged into you. Quartet is the name of my audio interface. If you don't have an audio interface here, you might see something like internal microphone or something like that. Whatever your microphone is coming into. We're gonna get a lot more detailed about recording in a later section. So in that section we'll talk about what an audio interface is and if you need one at all. But for now, just know that I have my microphone. This microphone plugged into an audio interface called an apogee quartet. So I want my input device to be that, that's essentially my microphone. And my output device is going to be your speakers, whatever is controlling or speakers, it might be internal speakers or something like that. In my case, I have a weird setup here because this Teller stream audio capture, This is actually my screen recording software. So in a normal case here, I would select quartet because that's also controlling my speakers. But I might say Mac Pro speakers, sound bridge. These are different display as I have connected to my computer, had a lot of displays. So whatever you are listening to you is what you want to have here. Ok, now, for recording, we're going to visit this input config button. And this is going to tell me what I can record from in my device. So my particular audio interface has two inputs, so I'm going to turn on 12 as both mono and stereo. That means I can record in three ways. I can record on a channel one, I can record on a channel two, or I can record onto channel 12 at the same time, which we would call a stereo track. Now if you have more inputs, you can turn on more by clicking them here. Most of us, unless you have a fancy interface, are just going to have 12. Okay, so then you click OK, I'm going to click cancel. And here you can set some of your recordings settings. I like to record at 48 thousand. You might also see here 44,100. In my case, this is being set by my audio interface. So I don't think I can change it. And the stuff with latency has to do with if you're, let's say you're playing your guitar into live and you play a note, and then you hear it come through live like a millisecond later. Well, not in milliseconds, maybe like five milliseconds later. And that's driving you nuts. These are the settings you want to play with to get rid of that latency. The latency is the delay. You can improve it. But in my case right now, I'm not listening back to lab, so I don't need to worry about it too much. We'll deal with latency more once we get into actual recording instruments in a later section of this class. For now, I'm just gonna make sure my input and output is right. Now also, while I'm here, I'm going to look over at my midi settings. So I'm gonna go to this tab link tempo and midi. And what I wanna do here is mostly I want to look down at my midi ports and make sure my main keyboard is plugged in. Now my keyboard is called seaboard rise 49. So it's right there. So I see in seaboard rise 49, now we have to select what can it do? Track means it's going to be able to play notes onto a track. So we wanted to do that. Sink means it needs, it's going to be able to synchronize itself with live. My keyboard doesn't have any kind of internal clock or any, or internal tempo. So it doesn't really need to sink back and forth with anything in life. Most keyboards don't. Remote means that it's going to give you the ability to play, stop, pause, record on live. It means that you can control these parameters up here from your keyboard, right? I don't need to do that, but a lot of keyboards do have the ability to start, stop record, things like that right from the keyboard. And that's cool trick. But it's not going to work unless you turn it on here. Okay? And P0 is that new Real high-end midi stuff. And my seaboard rise does support and PE, not all keyboards due in fact most don't, but this particular keyboard does. So I'm going to turn that on to make sure I'm taking advantage of that stuff. So long story short, make sure you have track selected these other things. Maybe, maybe not if it supports MTBE turn out in PE. And that's really all I need to do my preferences for now. We'll look more at preferences stuff later. But for the purposes of recording, I'm good to go.
32. Signal Flow: Next, let's talk quickly about the signal flow of life. This is important because you're going to need to understand this when we're recording. What I mean by signal flow is how sound travels within the program, okay? Not how sound gets into the program. That's what we just figured out from our preferences, right? We select our input microphone and that's going to get it into the program. But once it's in the program, how does sound move around? So it's going to start in the track. So I have a little Miniclip here. Let me start actually with an audio track. Okay? Here's some audio. Okay, so what's going to happen here is south, this clip is going to play chord COGROUP. So this clip is going to play the sound, then goes to the mixer. And the mixer is over here, right? Okay, so you're gonna see the signal right here. There's our audio. Where does it go next? Next, it goes down to our affects area which is down here. Okay. Now I know you're thinking you're thinking, wait, no, that's the clip area at both. Because look, see these two little tabs down here. If I click over here, this is the clip view. If I click here, this is the effects view. Okay, effects and instruments both go here. You can quickly get between these two with Shift Tab. Shift tabs gonna switch you between QlikView and affects view. Now, a quick note about key commands are not someone that's gonna advocate memorizing the hundreds of key commands that are built into live. This one, however, is a lifesaver. You're gonna be hidden this all the time shift tab to get between those two things. So we're in an audio track. So this is going to be our effects. If we were in a midi track, this would be instruments and effects will look at that in a second. So our signal comes down to the left side of the effects area and it travels through it to the right side. Ok. Watch. Now it's going to go through here to the other side. And right now there's nowhere for it to go. It's not going. There's no effects. So it's gonna go straight from here to our master channel and there's our signal. Okay, so signal flow, clip to track mixer, two affects area to master channel. Go. Let me put an affect on there and just show you what that looks like. Heres. Do some simple. Here's an EQ. Okay? Now look at our audio signal. Comes in there, goes out there. That's the end of my audio effects. So it's gonna go from there to the master channel. But if I put more audio effects on there, now I have to audio effects important here. And this is why signal flow is important. It's gonna go to this effect first and then this effect. Watch our signal from here to here. And two here. And then from here, it's going to our master channel. With me so far. Get. Now let's look at a midi track. So mini track, basically the same. So we have a Miniclip. Okay? So in this case it's going to go down to the instrument to make sound. Okay? Remember, midi without an instrument makes no sound. So this is the instrument. So you can see right here, see these little dots, those say midi signal. Those look different than an audio signal coming out of the instrument. It looks like an audio signal, right? So it goes in as a midi signal, comes out as an audio signal, then it goes through affects. So now that it's an audio signal, we can put whatever affects on it that we want. And it's just gonna keep passing it through before it goes to the Master channel at the end. Okay? But super important, midi channel, a midi track without an instrument does nothing. Look at this. I have audio effects here, but I don't have an instrument. So it's gonna go in as midi notes. And this doesn't know what to do with midi notes. This is an audio effect. So if I play, it says, okay, well here's midi notes, but suddenly is a convert it to an audio effect or audio before it goes into this audio track. The main thing to take away from this is audio flows from the clip into the effects or the instrument, and then effects and then to the master channel.
33. Recording Audio: Okay, let's record something. So first we need an audio track. So this is an audio track. I've already put a sample on it, but I could still record to it anyway. It doesn't matter that it's already gotten a sample on it. So let's use it. So I'm going to put the cursor somewhere or the playhead somewhere. Let's put it right here. Now, I'm going to arm this track to record. That means that this button right here. Okay? You can see once I do that, the signal coming in to this track from right there, that's this microphone. So once I arm it to record, what that means is that this track is now all ready to record. So as soon as I press the record button, we're gonna record on that track. And only on that track. Now why is it gray and why is it not full color? It's because of our monitor modes. So these monitor modes mean what you're going to hear while you're recording. It's off. So that means my microphone is not going to play through the track, which is correct for me right now. Because if it did, it would come out my the sound would come out my speakers, which would then go into my microphone, which would then come out speakers then go into the microphone. Cannot speakers go to the microphone? And that's the definition of feedback. So I don't want it to come out because I'm not wearing headphones. If I was wearing headphones and I wanted to hear what's being recorded, I could turn it on in, right? That would be easy enough. In means always play through. Auto generally means play through when we're armed to record. But don't when we're not armed record. So I don't want to turn it on auto. Normally, you leave this on auto. If you're in a normal settings. You want to put this on auto. But I'm not gonna put it on auto because I'm not wearing headphones and I'm using a microphone and I'm recording the screen. So I've got weird stuff going on. But maybe just for it to be funny, I'll do it for just a second until I get some feedback. Here we'll see now it's all feedback, ea and strange. Ok. I didn't trigger big feedback. I'm lucky. But in my case, I'm going to leave it off. No matter what your monitor mode is, you're still recording just fine. You're just not hearing it through able to. So I've got my monitor mode set. My signal looks pretty good. I could adjust the volume if I need to, but that's a pretty healthy signal. We want it to be about halfway up, maybe little higher. So I'm going to press record and record something. And I press stop to stop. Now you'll notice that as soon as I hit record it started recording. If you want to give yourself a little lead in, what you're gonna do is go up to your metronome. And that's kinda coward counterintuitive, but select perhaps one bar count in. That means when I hit Record, it's going to give me a bar and then it's gonna start recording. Now it's recording, right? So it gave me four beats and then started. So I'm going to turn that back off. And that's it. So now I've got a good signal. So if I go here and play it, I'm not actually going to hear it because I'm still armed to record. And we'll turn that off. Now. I should be able to hear it. And there it is. Easy enough, right? So a couple of different things I, to play it. I just clicked on the clip to highlight that area and I press the spacebar to play. I could also just put the cursor wherever I want. Impressed spacebar. Great. Now we have a beautiful little sound.
34. MIDI Editing: Okay, now let's record some midi. So let's go to a midi track. How about this one? Nothing on it yet. We can see there's nothing on it because I have the little dots, right. The dots tell us. It's me and there's no instrument on that track. Do I need to put an instrument on it before I record? No, I don't I'm not going to hear anything though. If I just arm this to record by clicking here and then click record, it's playing notes. You can see me playing notes. But we don't hear them. If I play this back, we're not gonna hear it are so good here, might want to now see a bunch of notes happening here. But here's the thing. So let's put an instrument on it. Let's just put our default analog on it. Now we're here. Lovely. So now that I have an instrument on it, I'll rerecord it. So record. Okay. Spent that whole time looking for that weird sort of pitch I was singing. So I'm going to try and record it one more time. I'm going to select the clip, press, Delete, and hit record over time, neat, whatever. So now I recorded some midi. Everything really works the same. All I did was arm the midi track to record. Put my cursor where I wanted it and press the record button up here. And we started to record. Now this works because I've set up midi already in my preferences. If you don't know if a keyboard is working, uh, or is setup correctly, a great way to find out is when you're not recording, just go to your keyboard. Even if you're not armed record. Just go to your keyboard and hit some notes. Just start smashing around on the keyboard like I'm doing now. And you see, because I'm not armed to record, nothing's coming in here. We can't tell if this is really working. But there is a way, if Ableton as getting midi, anybody from anywhere, what's going to happen is this top little square is going to turn yellow. See, when I hit some notes, any notes, any anything? That little square says, hey, amides happening somewhere. So it's a good way just to test that your amides working correctly, hits some notes. If you see that light up like cool MIT, he's working. Now can record. Now the great thing about recording midi is that if I don't like this instrument, if I don't like the sound, I can always delete it. My midi info still there. I can go to another instrument. Let's just grab this whole different instrument on it. That's fun, kinda cool. And I can double-click on the clip to go into the note editor and I can adjust the notes. For example, right here, I see that, you know, I was trying to hold down all of these notes in my pinky was really stretching. So I didn't quite get that note the first time. So I'm gonna delete that, pull that over so I can get that note right where I wanted it. Then we'll stretch that out more on midi editing soon.
35. Take Lanes: Okay, let's, so let's show something that's totally new in live 11. And that's take lanes. You can do a cool trick where you can loop record. And basically you can set up a loop and record on that loop and save all of your times through that loop, right? Watch. I'm gonna go back to my audio track. You can do this with audio or midi. And I'm going to set a loop to record right here. Okay, so in order to set a loop, I can use this brace. And I can change it. This is my loop brace. And then I have to have this button on that's gonna make that loop. You can also just select an area and press Command L. That's going to loop it. Okay, so now I'm going to record on this loop. Now that error, okay. So what it looks like here is that I recorded over each passthrough and my previous paths is gone. But now, if I go over to the track name and I control-click or right-click. And I say show take lanes. There's all that takes I did. Right? There's all of them. And I can decide which ones that I want to use. And I can do some kind of fun things with them. This is what we would call in traditional recording. We will call this comping. Comping means like recording a section of a tune. And then going back and recording like the middle section again. And I'm putting the middle section into the whole session. So it's from a different take. So let me just show you how comping works.
36. Comping: Okay, so if I want to build a take out of all of these, first thing I'm gonna do is zoom in. And let's say. So right now, it's showing us the last take We did. But let's say I want the first take up two there. So I'm going to highlight that. I'm going to press return. In fact, before I do that, let me just change the color of each of these takes because it will help you see what I'm doing a little bit better. Okay, so now I've got this kinda purple, green, and yellow. So you can see the yellow one is what we're seeing as the big take, the composite takes sort of. So now I want this take for the first part. So I'm gonna highlight it. I'm just gonna press return. Okay, now you see that take, get pushed up here. Now I want this take for a little bit. And then, then the yellow take, which I could select or I could just leave it. Maybe some more of the red first take and make it stuff up. Now, there we go. Okay, so what I'm actually going to here is the top one, which is a combination now of all the takes. So you're gonna hear me jumping between two sort of in tune nodes, N1 really out of tune note. So let's just hear this. You could almost play a song by going. Yeah, try that. Okay, sorry, I like to goof around and take lines. So cool. Alright, we've built a composite take by using different pieces of multiple takes. Its really fun. You can do this with audio, you can do this with midi as well.
37. Session Deconstruction: Okay, one thing I like to do in this class is these session deconstructions are going to take you through a session that I'm, that I either made or I'm still working on in a lot of cases and just kinda walk you through what's going on. So you can see a real session in action. So here's a relatively simple one that I just did yesterday. This is a recording that I did of a piece of music by a student of mine. It's actually an arrangement of a piece by Zola for, and it's arranged for piano, cello, and Trombone. We haven't recorded the trombone part yet, but we have piano and cello. So what I actually recorded here is this is the piano part. And the piano was recorded on a midi keyboard. So I recorded the audio from the piano itself because I had a pretty good sound, but also recorded the media at the same time from the piano so that I could apply some better piano sounds to it. And then we recorded the cello. Now what I've done here is I've put it together into take lanes. So you can see here that I have multiple takes of different sections of the piece, and also in the cello part. So I'm still piecing this together. I've already decided that I want this take of the cello for this middle section. But we're using the first take for the beginning section and the end section. Like I can show you what the transition sounds like here. Oops, I'm soloing the piano. Okay, so this is the transition to the second. So it needs a little bit of touching up yet, right? But I should probably do is let's back if I can or forward to find a better spot for that to jump in. Probably right there. Let's try that. So now the cello actually sounds pretty good. Let's listen to just the cello. And it does a little preachy thing, but I can correct that if I just play around with the adjustment at various slightly here, the piano jumps to a whole different sound, I think here. So I still need to work on this piano a lot. But what's happening in the midi here is I've turned off the sound. I guess I didn't. So I also yet need to go in and do a little bit of a tuning job. That cello part, which I'll talk you through how to do that later once we get in more detail about running a recording session. But so this just needs some more work to piece together the final take. And then we'll be going back into the studio with it on tomorrow to lay down the trombone part. But it's pretty simple tune. It's nice, mysterious, creepy. I like it. So just to give you an idea of what a full session looks like, granted, a very simple session with just two instruments for now. But that's what it looks like.
38. Editing Overview: Okay, so what we want to go through next is editing. So with editing, what we're talking about is we have clips in, we have content into live. Now, let's arrange it and get it just how we want it. So we're going to cut, copy, paste, trim, shorten, tune, reverse, whatever else you can think of. So we're gonna cover all that in this section. So for this, I'm going to use a track that I'm currently working on. I probably shouldn't show it to you because it's very, very much under progress. But since I am currently editing it, I thought this would be a good example track that I'm producing with a singer-songwriter. His vocal, which is right here. And some of the stems he sent. And just focus on the actual production of the track that I'm working on. So as you can see, it's almost all midi. You can see these are midi tracks because you see the little dots on them. That means midi. These are audio tracks because you see little waveforms, right? So midi tracks or audio tracks. More miti where Mini, so everything's midi here except for and these two tracks, which is a kind of drum track. So we'll walk through that in just a minute. But let's use this as kind of a template for talking about our general editing tools in life.
39. TimeLine Functions: Okay, so let's start with the general cut copy paste stuff. Basically anything you use and like a text document, like like command C to copy command V to paste. All that stuff still works. So if I go in here and say, here's a clip, I like it. So command C to copy, I click somewhere else. Command V to paste that all works. I can copy midi. This is a midi clips, so I can put it right next to it on the same track. I can also put it on any other midi track. And that would be just fine. But I can't put it on an audio track. If I put a midi clip on an audio track, it's going to try to convert it or do something strange. Now one really helpful trick that I use every five seconds probably is option click and drag. Okay, so what option click and drag does is its going to duplicate the clip, but it's going to leave the original behind. Ok, so if I take this one and let's say I want another one of these out here. I can hold down Option. And then while I'm holding down option, click and drag. Okay, now I've left this one where it was, and I made a duplicate and I dropped it in the new spot. That's a, that's a nice one to know. You can also duplicate if I just click on one and Command D, If I want another one right after it does Command D, You can do that all day long. If I went out here and said, I want to keep this little snare HIT going all night long. Just boom, boom, boom, boom, boom, boom, boom, boom, boom. You know, it's going to keep it going. And Z, Command Z is undo. That's what I'm doing there to get rid of those. Any of these commands you can find up in the Edit menu. Cut, copy, paste, duplicate, delete is just return. Deactivate is an interesting one. That's 0, no command or anything just 0. That's what I've done here. This is kind of like a mute, but for a clip, not for the whole track. I wanted to mute the whole track. I go over here and turn that track off. But if I want to just turn this clip off, this press 0, and it just deactivates. It, basically mutes it. I can press 0 again to get it back. You can even see what was here. Wherever that was. I didn't like it. So I just did that and I didn't delete it in this case probably because I thought maybe I want that later. So I'll just deactivate it. It's a handy trick. So that's what all of these little deactivated clips are. If I click on one, I can see what's inside of it. Moving clips around, just click and drag. Also, you can grab the edges of clips and all of this stuff is true audio and midi tracks. If you go to the top of a clip and put your mouse right over the edge, you're going to grab the end of the clip. And if you click and drag, you're going to shorten the clip. Okay, I'm not moving it here. I'm shortening it. Same thing on the other side. If I hover over the top left, I'm going to trim the beginning of it off. Okay. Now all of this stuff that I'm talking about is specific to Arrangement view in the timeline. Most of it works in session view. Also, if I go over to Session view, you can see I was playing with a few things over here. Actually, this is what we were playing with earlier. I left it here. Neat. Here I can copy, click on an empty clip, slot and paste. I can paste, can duplicate Command D is going to put stuff in the same clip. I can Option click and drag to move stuff to, to copy and leave the original behind. I can click on one and press delete to get rid of it. You can deactivate something was 0. So most of this stuff works all the same in both Session View and Arrangement View. Press tab to get back over. There is a lot of controls you can get if you control-click or right-click on the top part of a clip, you get this little contextual menu to come up. That'll give you some of these editing functions. Also zoom, zoom settings, rename, edit some metadata about it. Deactivate. Consolidate is a nice trick. What consolidate does is it joins multiple clips together. So let's say these two clips. Lets say I always use these two side-by-side and I just wish it was one clip. I can click on one and then shift click to select both of them, or even all four of these. So I shift click, select all four, and then press Command J. And it's gonna join them into one clip. Okay? You can do that with audio to your have audio. Select all of them. With audio, it takes a second. It's asked to actually think about it a little bit more, but it can be done that way. So that's our main timeline functioning. It's really just moving clips around. Remember one of the really important things when you're producing is to be zoomed into where you want. You'll see here this clip starts right on bar 28. And I should point out here these timing mechanism that we see at the top here, Psych 28.1.228.1.3. What we're seeing here is Bohr's beats and 16th notes. So 28.1.2 means we're on the first bar or the 28th bar. The first beat, the second 16th note. And if it just says 28, that means you're on, you're at the beginning of the bar, or just as a single number without a dot. So let's say I didn't want this to be on the beginning of the bar, but I wanted it to be a little before, a little after. I can slide it over. But this grid that I'm sliding it over onto, depends on how zoomed in IM, right? If I zoom up to here, now it's showing me 16th notes, right? If I zoom out farther. Now it's showing me quarter notes. So it's bigger depending on my zoom level. So if you really want to get in the weeds, you might have to zoom way, way, way, way in, especially when you're working with audio files. You can adjust this by control-click on anywhere that's not a clip. And you can see adaptive grid is what we're looking at. Adaptive grid means the grid is going to change based on my zoom level. That's what we were just talking about. But I can say don't do that and just say fixed grid. Always snap to a quarter note, for example, right? Or always snap to an eighth note. Now it's going to stay in eighth note no matter how zoomed in, I am generally either like to leave this on adaptive grid and narrow. That's kinda how I like it. You can also go here and just turn it off completely right here. So now there's no grid. You can slide things wherever you want them to be, which is dangerous if you are making beat based stuff. So I'm going to turn that back on. Cool. Okay, so just some of the quick and basic, just normal timeline editing stuff. Next, let's go into looping.
40. Looping: Okay, so looping is a big part of Ableton Live, so it can mean a few different things. We've already seen this. This is the session loop k. So if I adjust this loop brace, it's going to loop everything in this section, I have to make sure I have loop turned on right here. But now we're going to loop just this section, right? So that's that loop. But we can also loop on a clip level. So let's go to, for example, this, this is just some hi-hats. So it's, I think it's two bars of high hats. So let's solo it and just listen to this clip. Okay? Now, it is not set to loop presently. If I turn looping on, the place I would do it is down here in the clip view, over here loop. Ok. Now it's going to behave slightly different. It's going to sound the same and it's going to work the same for what I've already done. But if I grab this top bar right here, it's not going to extend the clip. It's going to be looping of the clip, right? So now it's playing more of the clip. It's playing the clip multiple times. Might be easier to see, something like this kick. Okay, look, if I so this kick, let me just show you what this what we're hearing here. Oh, sorry. It's a snare thing. Kind of a rim click. On this click. If I zoom in, if I grab the edge of the audio track and pull it open, you're gonna get some other stuff that was originally in the audio file that I chopped out. And then it's going to stop. That's it. That's the full audio files, so I can't extend it out anymore. But if I turn on loop, now what we're gonna get is I can extend it out forever. And we're going to keep getting that same thing. Right, because it's looping. Now if I don't want that, if I just want it to loop this, let's go back and let's set our loop positions. So I wanted to start looping at the beginning of the file that's here. And I wanted to end looping here where, where it is. So I have to zoom out a little bit. So now I see what's going on. So I can move this over, my loop brace over. So now we're just looping that part I want. So now if I drag it out, we'll just get that hit right where I want it. Now that empty space here, empty space is important, right? Because if I don't do that, if I just do the sound I want it's going to fall off the beat and see what it did there now it's a mess. Right? So in this case, I gotta leave that empty space if I wanted to fall right on the beat. So that's looping now when you're in session view, same thing happens. Remember what we did with this kick, right? So I have this kick looping. And the way I did that is I double-clicked and I went in here and I turned on loop. Now I added this empty space so that it filled up a whole beat, right? If I didn't have this, be that empty space. It's just gonna go crazy. So if I wanted it to happen every two beats, I could add empty space here. Right now what's going to happen every two beats? But let's leave it on every beat. So looping works basically the same here.
41. MIDI Editing: Okay, let's talk about midi editing a little bit. And then we'll talk about quantizing, which is a very important element of midi editing. So let me go into this clip here. So I'm going to open up my piano roll editor. So this is called the piano roll editor. We call it that because it looks like a piano roll, right? It was the piano keys here. And it's kind of analogous to an old timey piano player piano, if you've ever seen that. That's kinda what we base these on. But you'll find these piano rolls and just about every audio application, and they all work the same way. There's a note, we're going to hear that note. Let me zoom in a little bit here. The grid works the same way. We can extend that note. We can shorten that note. We can cut, copy, paste, duplicate, whatever you want. With that note. The whole bunch of key commands you can do. One really Hindi key command that I think is unique to able to actually shift up. So you can use the arrow keys to move the notes around. But if you do shift and then up arrow, you bump it up an octave. Same thing works down. Shift to the right is going to extend the note. And shift to the left is going to shorten the node. So, and those are just a hand handy couple key options. Option, click and drag works. Basically everything works the same. Yeah, you can select multiple notes by drawing a box around them and deleting them. Down. Here is our velocity setting. So each note has a velocity, and the velocity is basically a fancy way to say the volume of that note. So I can make this a little bigger by dragging this little bar right here up. So we can see, so the range for velocity is always one to a 127. And so I can click a note and then adjusted philosophy. So it's going to get really quiet down here. And louder up there. Can also randomized the velocity by clicking this button. Do some funny stuff. Now, this is also where we get into MPV, which we'll talk about in a second. Hold on to that for a minute. But midi note editing works almost exactly the same as what we've talked about. Can move notes around, we can cut, copy paste, all that good stuff. One of the new features here is that actually map to a scale. So you see the green and gray lines here. It's because I'm telling it to show me a scale over here, can turn that off. And now we just see the black keys and the white keys, you know, kinda setup as variations of gray. And if I want to say, you know, show me where C major is or C minor is. Then the green stuff is going to be in that key. I can still do stuff out of the key if I want. But if you wanted to limit yourself to only being in key, you can actually click this scale button here. And then it's going to hide all the notes that are not in Qi. Okay? Now, in this case, it didn't hide all of them because I'm using some of them. Right? Here's an E And that's not in key. So it's not hiding those. So I'm gonna unhide that because I'm not actually in C minor. Okay, so next let's talk about quantizing, which is an important element to midi editing.
42. Quantizing: Okay, if you're not familiar with the term quantizing, let me just explain it by demonstrating. I'm gonna make a new midi track here. And let's put a sound on it. It's something with a little bit of definition. That works. Okay. And I'm going to arm it to record so I can hear it. Okay? Now I'm going to try to record like eighth notes along with this part of the track. So here we go. Alright. So there is my eighth notes or so. Now, you'll notice those were not very good eighth notes. If we go in here and look at this, you know, if I really wanted to be right, these would be right on the bar, right on the line. It looks like maybe they were yeah, they're eighth notes, but there were quite a bit off. So let's fix that. What quantizing is, is it takes the rhythm that we played and snaps it to the grid. So what I can do here is I can, I'm going to do Command a after clicking inside the piano roll editor to select all the notes. Now I'm gonna control click. And I'm going to go to, I could just go to quantize, which is command you. But first I'm gonna go to quantize settings. And I'm going to say quantized 2 eighth notes. And the mount a 100%. The amount is like if you say less than a 100%, it's gonna leave some flexibility around there, but I want it to be dead on those eighth notes. So now I'm going to say, okay, Okay, so now it's snapped all my notes to being right on the eighth notes. Now, didn't do it for this earlier part of this clip. So let's just open that up. There we go. Now let's yeah. So now it's dead on. So if you know that your settings are right, you can always just command a and then command you to quantize where you are, right? But if you're not sure, you can go to quantize settings and tell it how you want it to quantize. It's an important thing. So just remember that quantizing isn't going to change the notes that you played. It's only going to change the rhythms. And it's just going to snap them to the grid to make you perfectly in time. So that's quantizing.
43. MPE Settings: Okay, let's go back to some of that MPI editing stuff. So I'm going to open up our piano grid a little bit here for this clip and go back to this velocity area k, we see all these velocity controls here. But if I go up here and over to this tab, we're gonna get even some more controls. Okay, now look down here. I can open this even higher here. And now we have more controls for every note. We've got velocity, but we also have the release velocity. We have pressure and we have slide. Now, I didn't record pressure in slides, so there's nothing really here. So this particular instrument I don't think is using these parameters, So it's not giving me control over them. But all of these extra things that are here are part of that MPI business. So there's a lot of different parameters in the ED that we can control. And you'll even find more. If we go over to this middle tab for our envelopes. We can find here we have pitch bend, but there are even more depending on the instrument and sometimes the midi controller that you used to record the clip. But this particular instrument that we're using doesn't have a lot of MPs settings. So let's go to one that does. If I go to instruments, wave table does a lot of MPs stuff. So let's open that up. Okay, so now we have the wave table instrument. And you can see here there's a separate tab for MBE. So there's a lot we can do with MBE, but let's, but we can do things like transpose by individual note. So now each of these nodes as being transposed differently, which can get you into quarter tones and things that people like to. So now it just sounds crazy. So that can be fun. Anyway, MPA gives you a lot of flexibility to do a lot of fun midi stuff. So whenever you are working on an instrument, if you want to really get in the weeds and do some out of tune and stuff or something a little weirder. Look at the MPs settings. It might give you options.
44. Automation: Okay, next, let's talk about automation. Automation is changing any parameter over time. So the way we do that, typically in just about all audio software is with envelopes. So let's take a look at automation for something like this high hat to clip. The easiest way to look at automation is with volume. Okay, so we can adjust the volume of our track easily. Make it louder or quieter. But what if we wanted to get, start quieting, get louder? We do that with automation. So to see automation, you press the letter a point. Now we're looking at automation. Okay, so I'm gonna go to the volume. I'm going to right-click and say show automation. If you don't see it automatically makes sure you do that. Now I see this dotted line. The dotted line means no automation has been set yet. So if I click on the dotted line, I'm going to make a point. I click on another spot, I make another point. Okay, so now I'm going to do this. What this says is when this clip starts, the volume is going to be at 0. And then it's going to slowly get louder. Now, you can do this with audio or midi tracks. You can do automation. If you want to get rid of a point, by the way, just click that point again and get rid of all of these points. So now I go back to a dotted line. So I got rid of all the points. Now there's no automation. So now this volume over here, it's going to affect my whole track. You can automate just about anything. I can say my panning. If I click on panning, say show automation, can say sure I wanted to go left, right, spin all over the place, make everybody see sick. That's gonna make it switch between the speakers. It's always fun. You can also just clear the automation by going back here and doing Delete automation and get rid of it. If you have effects, if you have anything like that, they're going to show up as automation parameters here. Okay, so right now I don't have any effects on here, but let's add some effects. If I go to audio effects at a phasor to this track. Ok, so now I've added a phasor. See all these knobs here. There's a lot of different stuff, or this is my instrument, but here's my effect. Now i go here and say show all parameters. Here's everything I can automate, right? It's like kind of an insane amount of stuff. Right, and each one of the top drop-down list is the device we're looking at. And the bottom drop-down list is the parameter. So this phasor is a device. So let's go find the phasor. There it is. Phasor. Then here's everything I can automate related to the phasor. Like amount. So amount is right here. It's all the way up. But if I want that to go like that, you'll be able to see it updating. See that little dot right there that tells me this has been automated. That's what that little pink.me. So now when I play this track, you'll see that change to match our automation. Right? So in these double drop-down menu, this is device and parameter. You can look at automation in different lanes if you want to look at a whole bunch of different automated parameters at the same time, click this little plus down here, and you'll see it in differently. And so let's say we want to see our volume in this lane and our in this case, chain panorama. In the other chain. I'm not sure what chain panorama is, but that's okay. So we can look at multiple genes at once. If I look at panning and let's go panning and a new lane. So now we're looking at volume in the top lane. If I click on it. And then panning second lane, chain panorama and the third lane. So we can look at a lot of different automation all at once. If you're searching for something to automate, just click on it. That's the easiest answer. Don't dig through this list. You'll go mad. So let's say I want to automate the warmth of this phasor. I'm just going to click on it. And then my top thing here becomes phasor warms just automatically, right? Let's say I want to automate the dry wet mix. Click on it. This becomes dry wet mix, right? So always just click on the thing you're looking for and that'll switch your automation over to looking at that thing. Will save you tons and tons a dime. Okay? And if you want to hide all this stuff, just press a and get it out of your way. But don't forget that it's there because that can drive you nuts. But remember that's what these little orange dots are for right there that tells us the volume has been automated. Down here, amount has been automated. We don't see that the dry wet mix or the warmth has been automated because although I queued it up, I didn't actually draw any automation. So it's not showing up that way. Ok. So just about everything can be found in automation. And that is a lot of what producing is, is automation adjusting things to change over time.
45. The Groove Pool: Okay, so we talked about the groove pool earlier when we were in the browser and we looked at our grooves over here. I just want to show you how it might be used if we look at something like this clip. Okay, so it's a lot of 16th notes, really strange. Daga, daga, daga, daga, daga, daga, daga, daga, daga daga. If I wanted to give them more of a feel of a swing or just some kind of feel. I might use the groove pool. So I'm gonna open it down here and click on this little button. Now we see the groove pool. Okay, so let's go to our grooves. And let's say swing or some different. It's kinda fun. Okay, so let's pull that down into the groove pool. Now I can make some adjusting here, increase the randomization possibly. Quantisation came when I have this the way I like it, I'm going to drag it right over on to that clip. Okay, now let's hear it. Okay, it's a little bit goofy here. So I didn't love that. If you come down here in the clip view, you can see it's right here. This is where it shows the groove that's been applied to it. And I can turn it back off in a media file anyway. Let's go to a swing. Let's try that one. Let's put that on it. Now it's here. It's kind of funky. I don't know, maybe I might like that. Let me hear that in context. I don't think I like it, but it was fun to try. I think for this I'm going to leave it going just perfectly straight. So I'm gonna say none and turn that off. But that's how the group fool works. You can apply those to audio or midi clips.
46. Session Deconstruction No. 2: Okay, so now that we've been playing around with this track for a long time, if I should actually just show you this track that we're working on. So let's do another little session deconstruction. So here's what I've got going on here. This particular singers sent me the stems for this track. Now the stems are like the individual files of the guitar part, the bass part, the vocal part. And what I decided to do is mute them all. So there's none of them there. And I'm just going to work with his voice and I'm just going to rebuild a track around it. This is kind of the typical way that I approach, kind of a remix or a production kinda job. So I just have his vocal here and I've chopped it up a little bit. It needs to it's going to need to be rerecorded. Two for the final version because I added a verse and things like that. So in addition to what I've added to it, let's just go down through. So this intro thing, I found this. I wanna just kinda look at ominous bass sound to kinda kick it off to make it really dark. So I added this. And that's with a plugin called an FM eight. You see here this, this means it's a plug-in. So if I click the little wrench here, it's going to open the window for the actual plugin. So FMEA is a really cool plug-in. It's kinda designed to emulate this old synthesizer called dx1, which has come up already once in this class. I like the old dx1. So FMI made by Native Instruments. Next m I have another FMEA doing this really subtle kinda minor thing. Just doing that to add a little texture. Then I have another FM eight doing this. Oh, right, I remember now I put this in playing around with ideas and I ended up meeting it. And because I didn't like it, you can see this track is needed. So that was just kicking around some ideas, experimenting. And then I just muted it all out because it wasn't for me. Then we have the drums. So for this, I wanted it to be really simple for this first part of the tune. So it's really just a kick on one. That's really all it is. But it's a kick with a little bit of a symbol in it as well. So I use the sample here. I could have used a midi instrument or something built in, but I found the sample I liked. So I just used that for the kick for now. I think later in the tune, it's gonna go to a more cleaner kick later. But for now that's it. And for the snare I want and kind of a woodblock sound and I wanted it to get really choppy. So what I did is I used this sound. But then I, I always do this weird little trick where I'll copy the end of the sound like that much and then paste it in somewhere else here so that we get a click and then kind of a ghost note of the.click. So it's like the end of the sound used as like kind of the build into the sound that gets you this sound. Right? So it's, it's just like how a drummer would do a ghost note basically. And then every other time I did it three times with the first one being slightly different. I think I just copied a different part of the tail of the sound just to make it a little offbeat, a little, a little weirder to make it feel a little stranger. So that makes the beat. This when put together. Pretty simple, right? Moving on. Later, we have these high hats. It's high hats or just a midi clip. We looked at these two just from 808 kick, that's or 800 eight kit, sorry. That's built into live. So this is just one of those standard live kids. It's just that we already talked about that I added this rhodes. A Rhodes organ, if you haven't seen one is like a, it was really popular in the seventies. I still really like it. It's a physical thing. It's a keyboard, but it's kind of hybrid analogue electric. Anyway. This is a sample library of them. I use this program contact and you'll see a lot of samples for contact if I opened it up. Contact is basically a sample player. So you buy libraries for contacts and you can get really high-end libraries. So I have this strings library. I have some piano libraries. Yeah, this maverick is a piano library. Grandeur, gentlemen, These are all piano libraries. These are some weirder sounds, just libraries that I've bought an installed and contact basically just plays them. So for this one, we're using this roads library that I got. And it's a really nice, realistic roads sound. So it sounds like this. Pretty simple. So a chord progression. Then down here, I can't remember what this is. Yeah. This is just one of the built-in instruments and operator on live. Just to add a little texture, I just wanted this kind of buzzy synth right there. Over in this section I added a few more things. Violin, here, just a solo violin. Again, this is using contact. You can see down here. This is a really high-end library of solo violin stuff. So it's a very realistic sounding violin. So I'm really happy with that sample library, so I really like it. This is another operator. Just default patch read out of the box. Nothing adjusted at all. Just create a little texture. This is another contact library made by this company called output that does kinda weirder things, but I really liked this one after I adjusted it a little bit to make it sound the way I wanted. And I sound. And then everything else is stuff you've already done. So yeah, that's it. Apply it for you from the beginning. I'm going to keep the vocal muted though for now because I don't think he would like me playing soccer. You as far as I got, which is up to here. And let me un-solo stuff. Oops.
47. What Next?: All right, so that gets us to the end of part one with live 11. As you may already know, there are a ton of live 11 sections that I'm making. I'm really dedicated to going through every aspect of this program to get you to be a super ninja of it. So what comes next? Part two is all about recording and warping. So we dove into recording a little bit in this section of the class. But in the next class, we're really going to go deep in recording. We're going to talk about recording other instruments, hardware you need dealing with microphones, Mike placement, how to tweak out your latency settings. More on comping, overdubbing, punching in midi editing, midi recording. And then we're also going to spend a lot of time on warping. Warping is how we adjust time to conform to the time of our track, right? Let me give you a preview. For example, let's say this was my sample, but I wanted this kick to be on beat four. I can just go whoop. That's warping. Let's say I wanted to just kick to be really long. R2p I could do that and make it long. So warping is a huge part of Ableton Live and it's something that Ableton does better than any other software out there. So it's really important to understand all the intricacies of how warping works if you're going to be really producing with this program. So I'll leave you in suspense for now, but please check out part two, recording and warping.
48. Bonus Lecture: Hey everyone, want to learn more about what I'm up to you. You can sign up for my e-mail list here. And if you do that, I'll let you know about when new courses are released and when I make additions or changes to courses you're already enrolled in. Also, check out on this site. I post a lot of stuff there and I check into it every day. So please come hang out with me. And one of those two places are or both? And we'll see you there.
 J. Anthony Allen, Music Producer, Composer, PhD, Professor