Transcripts
1. Introduction: Have you ever needed to integrate topography into your work without knowing exactly which one to choose and how to use it naturally in your work, have you been curious about the possibilities, not just functional but also plastic aesthetic of typography. How to play with them from the perspective of an Illustrator or an artist, have you felt somewhat intimidated by it because it's complex and in theory oriented to graphic designers. In that case, this is your class. My name is role and I'm an illustrator and designer. I worked for editorial content, brands and products, interactive narrative projects, videogames, and any medium in which images, ward, or interaction are combined to tell Soyuz. Very often I apply to my work as an illustrator. My knowledge of topography obtain after 20 years working in fields such as visual aid entity or interface design. And trust me, it can be a great tool for an illustrator. This is not a graphic or typographic Design Glass, but in it, you will learn more about typography in how to use it in a practical and intuitive way. How to integrate it into your regular work as an illustrator and how to use it from a more graphic perspective. Will start by giving some essential tips for choosing the right phone based on the context. In a practical and nonacademic way. We'll talk about different methods to visually integrate it into your work so that it doesn't seem detach from your way of throwing. Next, we will propose a three exercises with a small project associated with each one you can choose to do. All of them are focused on the one that interests you the most. These exercises will range from basic texts integrations to using topography as a key visual element in your illustrations. I'll show you my own examples and those of other illustrators and Alec company you're creating my own projects around the proposed exercises. Lastly, I'll give you some references on where to find some completely free or very affordable quality fonts and some final tips. By the end of this class you'll have practical notions of typography, new creative tools, and hopefully some new and interesting illustrations that allow you to elevate your portfolio. To take the class, you're basically need your creativity. The means you'd be fair to make sketches and your usual tools as long as they allow you to manipulate topography, at least in a basic way. Illustrator, Photoshop, procreate, Affinity Designer, any of them will work for you. This class is specifically aimed at illustrators who want to learn how to use typography in their work. But is completely open to anyone creative with an interest in typography or illustration. Are you ready for this? I went for you in the next video. Let's start.
2. Your class project: This class is divided into three exercises that represent three proposals to explore topography. To illustrate each of the exercises, I will create a personal project. I invite you to develop your own projects around the glass. As a student, you can choose to produce one project for its exercise. Yes, choose one or two, or even make multiple illustrations for each exercise. It's completely up to you. In our example project, you can see how we have presented our proposals for each exercise, describing their creative process behind them, the fonts used in a little context around the solution. You can use our projects as an example when structuring yours. But of course, you have total freedom to show with a supernova. So with the project clarified, let's start with the glass and the first exercise, accompanied by various tips, I invite you to develop your projects as the class progresses. It start.
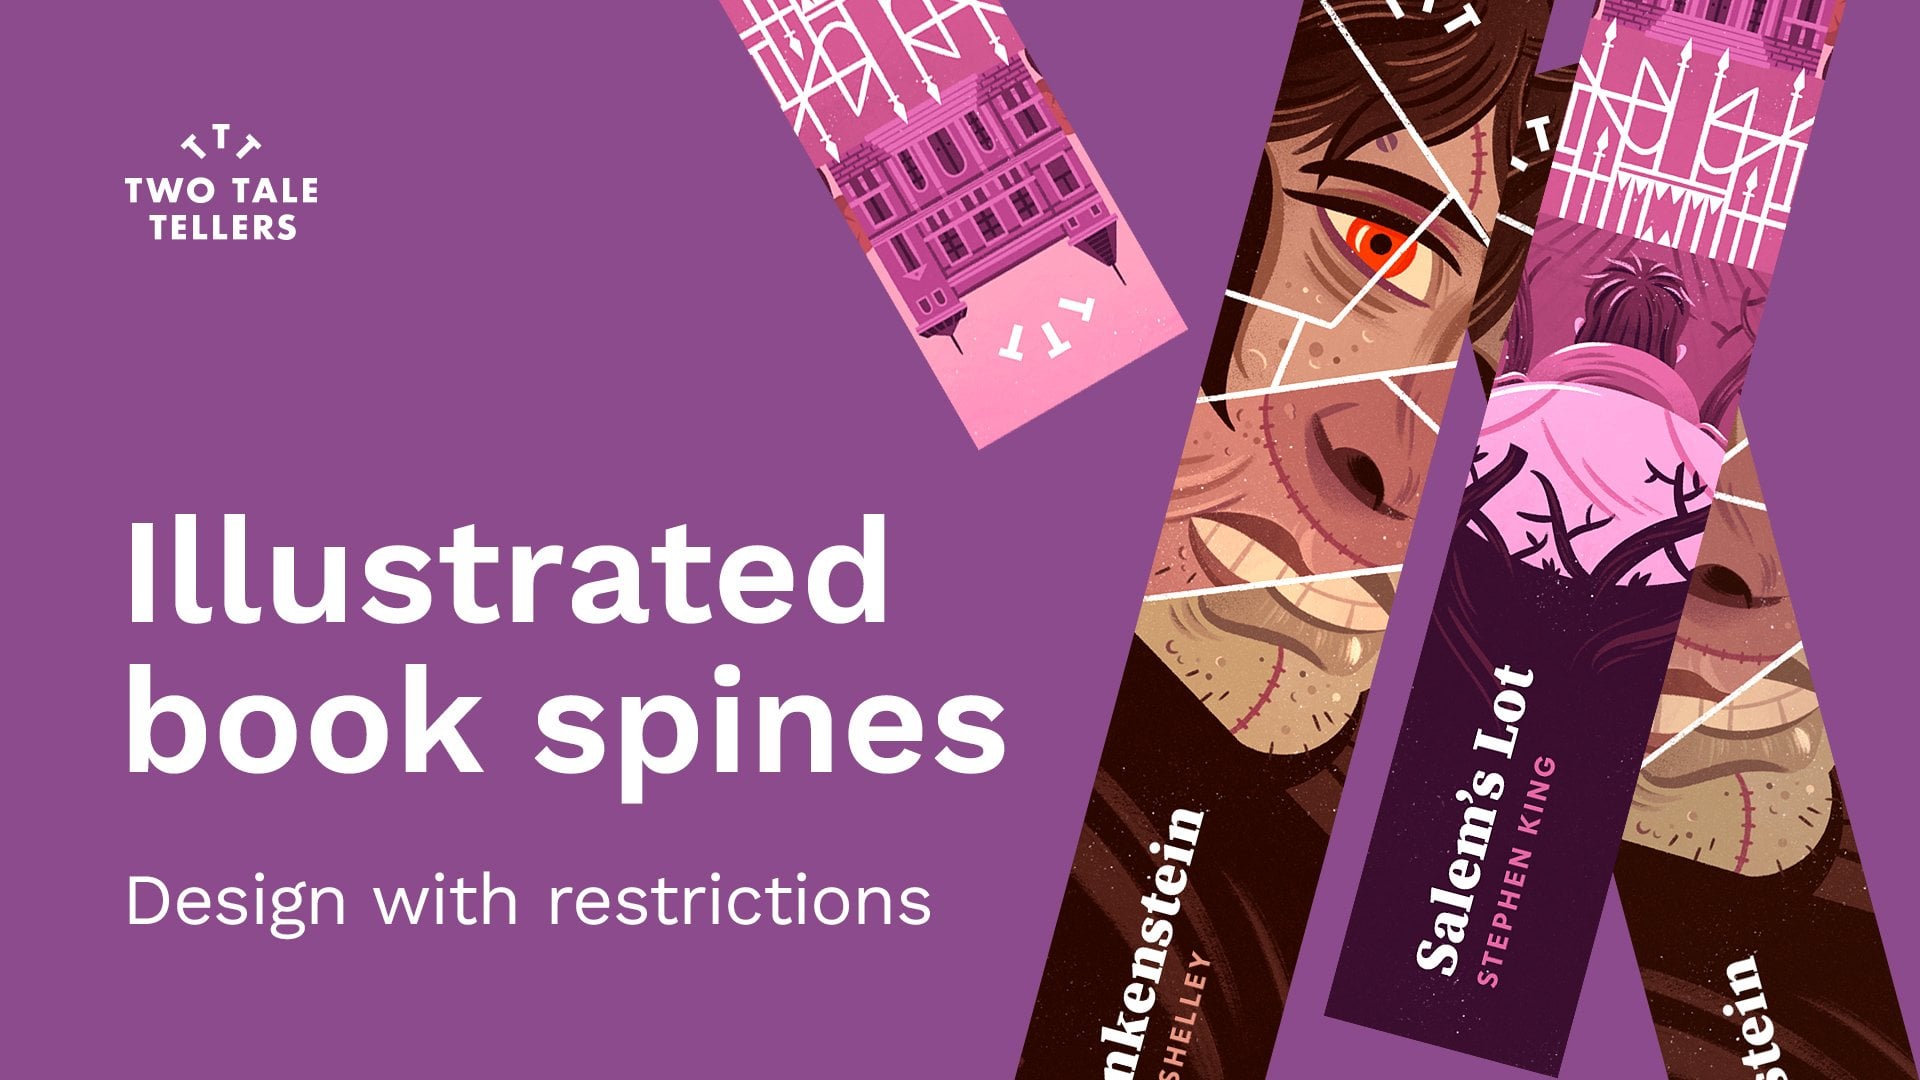
3. Exercise 1 – Integration of text: We'll start with one of the most basic contexts when it comes to the dorothy applied to illustration, that is the presence of topography as part of a text. This text can be bite off a piece of newspaper, a sign on a street, a typographic design on a character's t-shirt, texts on an Illustrated map, etc. Let's see some examples. Sometimes these texts can have a very limited presence in your work. As in this illustration made for an article on Medium. As you can see, some small texts, such as the license plate, are perfectly integrated into the illustration. And despite its subtlety, they provide the necessary credibility to this small visual component that poorly treated could have a really negative impact on the whole. In this other illustration, we adapt the typeface to the context at hand linked to protein with the Meghan or Egyptian typeface that adapts to the flow of the drawing. In this other one, we can see how the topography adapts to the construction of the illustration, integrating itself on it, and delivering a message at the same time, which strengthens the general result. In this beautiful illustration by the great artist steeps card, we can see how he has integrated this sign into the building with a clever typographic choice and a definite finish for its context. Steve offers as countless examples on how to professionally integrate topography into his work as an illustrator using practically all the integration methods described in video five of his glass. Well, I've talked to you about how to use type in a way that doesn't seem out of place considering your personal style. On many occasions, the little care in the choice of the font and the lack of visual integration into the illustration, even in professional contexts, makes the results somewhat clumsy and doesn't say much about daycare for output finish for this reason, before we begin with our first project, we are going to see some tips regarding the choice and use of typography without going into too many technicalities. The indention is to facilitate the use of these resources for people who don't have a specific training in graphic design generating despite this, a good final result, let's go with our first steps, which will be very useful in all the exercises of the class.
4. Exercise 1 – Typographic choice tips: Choosing the correct typeface represents probably 70% of the work. The choice of typeface is something really subtle and requires knowledge in judgement. As usual, the more we know about typography, the easier is to subvert it. Use an experienced professional graphic designer at good masterful use a database seemingly inappropriate for a context. But let's start from the premise that we don't have a specific training and disregard that see some tapes to the law faster by the fog is our choice. Let's consider at least three aspects. One, general context to functional necessity, three aesthetic properties. Let's look at some examples and analyze each of the points mentioned in them. Let's go back to the previous illustration by Steve Scott. Let's think about the general context burst. We are talking about an elegant, sophisticated hotel with a traditional touch. It seems drawn from a few decades ago. Logically, this situation does not demand an informal, youthful, daring punk dephase, quite the opposite. It requires a certain sovereignty and distinction. Being aware of this, we'll have begun to focus our choice. Functional needs in this case, R is dominant. We are talking about a large visible sign and we only need the name of the hotel to be legible. And even if it wasn't totally legible, it would not affect the general perception of the illustration. Finally, let's consider the aesthetic properties. What kind of typeface does such a situation require? An alien serif typeface might have been a suitable choice. But here Steve uses a fond with some contemporary historical reminiscences that offers the right degree between modernity and tradition to contrast with the handmade, the ends up providing a beautiful final finish. Let's move on to another case. Here we see how the license blade in the background receives all the typographic tension in the illustration. In this case, a general contexts and functional need. Clear. We are talking about a license plate, and the vast majority of license plates in the world have a similar appearance in terms of topography. The reason is simple. We are generally talking about OCR font. That is the sign for optical character recognition. Clearly legible, recognizable, and scannable, so that it's impossible to confuse some characters with others. Even if this font is not the one actually used in license plates. It meets all the requirements in terms of context, function, and aesthetics, so that it's perceived as credible that they biography for New York is much freer and simply provide a contrast to the license plate number. The contrast that is not only produced in terms of style, but also in scale, weight, and color, clearly separating both bats. And as an additional k's, we can study how in this video game that I helped design the typographic choices, responsive the points described with an obvious esthetic relationship. Triple Squad was a very simple and powerful game. All elements in the game where minimalist and compact editing or heart and mechanical looking monospace font was used for the construction of the logo and supporting text. The vehicles in the game appeared to have been designed alongside the font. There's an obvious aesthetic or relation. Functionally, Arete was relegated to short an impact texts. Finally, we could see the budget as the fourth to consider. Having the budget to buy. Typography can multiply your possibilities, although it also opens an immense space. Limiting yourself to accessible fonts will help you focus on the available options, although you may have to sacrifice access to better alternatives. Let us remember again, let's be logical considering the general context. Let's weigh the functional need for that font to what extend It's Bertha creating necessary. Let's assess what do we want that typeface to express? Formerly seriousness, kindness, freshness, ascetic parallels with the rest of the elements of the illustration, etcetera. These are some general tips to guide you in that first choice. We'll see more about this in the example project. But once that choice is made, it's time to use that dipole RFI into the illustration. How do we integrate it? How do we use it in such a way that it doesn't feel from a different world from your illustration. Let see some practical tips in our next video.
5. Exercise 1 – Integration tips: If your work is formally simple, flat, and mainly vector-based, you won't have too many problems since the Buffett finish of the topography will fit well with your illustrations. If on the other hand, you have a more organic style, that topography could seem out of context like a but something super-imposed on net. And that belongs to a different world, little integrated. So I'm going to recommend three different methods to do the integration. One, digital manipulation, to redrawing, and three, imitation. Let explain very quickly what they consist off using some examples. Digital manipulation. This is one of the options, are used the most in my work, but it requires a skill at digitally manipulating topography. The intention is to digitally deform or erode the letters so that we get an artificial finish that is close to or at least compatible with our illustrations. That is exactly what I did in this illustration that talks about nomads and those people who literally carried their home in their circuits. The presence of texts is subtle and not very relevant in the illustration, but its integration is adequate. Let's look at the finish of the typeface. The same happens in these other illustration. We see that the topography, despite maintaining all its original features, is slightly distorted so that it integrates more naturally. In my example project. In the next video, I'll show you how we can make this types of modifications using Photoshop. Let's look at the second possibility when integrating topography, redrawing. It literally consists of using the corresponding typeface in your composition. And simply it redrawing it using your usual brushes and finishes. As you can see in this illustrations that I made a few months ago for the video game, Threadless trail of blood. The text appear to be simple typography arranged on the illustration. But if we get closer to see the detail of them, we'll see that the finish of the letters is exactly the same as the rest of the illustration with all its imperfections. In essence, our hand has traced the perfect design of a font by hand. We can see the same process in the topography arrange on the T-shirt of this character from the same video game. Or on the final little note in this short and structure official story. The result is that we keep all the virtues and characteristics of the original typeface, but slightly subverted by our own work process creating a remarkable integration. Obviously, this option requires a lot of effort and it's only recommendable for small typographic interventions. Let's see another way to integrate topography, very used by illustrators and imitation. We have an alternative that we could already consider lettering, since it involves imitating the appearance of a font manually. The difference with redrawing is at, in this case, we do not need to have a reference to draw on that. We manually interpret the attribute of a font based on our need. Generally, the result ends up being a typeface that has already distance itself from the original reference, but which broadly maintains its identity. We can see some examples why material don Notice how he imitates a condensed sans serif typeface without being recognized as anyone in particular. You are essentially drawing letters, so these fit perfectly with your illustrations. Here's an example by Steve Scott what a typeface is reminiscent of multiple similar fonts without actually being any, since it mimics the approximate look of the font here requires. So let's remember, choosing a suitable font is an important decision. Both. So E is using it correctly in context. Functional aspects are often above aesthetics, but brilliant cases are those that strike a proper balance between the two. And original and interesting use of typography can become an important identity element in your project. With this information in our hands, we are going to start solving our project for this first exercise. See you in the next video.
6. Exercise 1 – Example project: Now that we have the full context of his exercise, I'm going to start with my typographic integration project. I invite you to join me into process. It will be quite brief since we are going to focus on the typographic in duration on a readymade illustration. Let him would start with a very simple example, which can help us warm up since the typeface would be applied without too many other Asians in perspective, will start from this example, a secondary illustration for an article that talks about the importance of book covers. The illustration alludes to the fact that the cover, especially in self published works, should speak of the other. Your identity or personal image should reach the cover. We express it through a drawing in which, uh, the cover and the phase are the same. Now we need to iterate to texts, title and other, although both will be very generic. So we'll solve it with my novel and the name and Smith. Now we need some contrast between the two texts. And there are several ways to obtain this contrast. It can be through a difference in the weight of the type, phase, difference in size, difference, in color, difference in style, or several of these possibilities at the same time. So we'll start by experimenting with various combinations. In this first example, the contrast is somewhat exaggerated. Although the text is reminiscent of monospaced typewriter at fonts, it's very thin and would probably get lost in the conversation. On the other hand, the title is somewhat generic in terms of style. By inverting the styles, we don't get a particularly interesting result. Let's try changing the title font to one with serif. Honestly, I like it better. It has more character. But a contrast with the monospaced typeface doesn't quite convinced me. Remember that we don't have to use different styles. I'll use the same form for the name init Alix and respecting the difference in sizes. Not bad. Maybe if it's classic. Ok. Let's go back. How about using a sans serif font? Uppercase with certain weight. I like it, but I think I'll consider using the same font for both texts as we did with the previous serif font. I think there's two options are definitely the most interesting. So let's go to Photoshop and I'll show you how we apply those funds to the original illustration using the first integration method described in the previous video. Let's go keep in mind that the previous process is a simplified and straightforward version of what would be a much more organic and sometimes rigorous process. Take the time you need to study the possibilities. Once we're in Photoshop, We'll start by entering the necessary text to separate text boxes to be able to be manipulated independently. Will position each textbox roughly on the illustration. Next we'll apply color to each one to give the color palette is a smallest possible. We'll use one of the greens for the title and White for the lower text, which will contrast sufficiently, will change the size and weight to bring it closer to the final look we chose in our previous study. And after that would rotate both textboxes 15 degrees, which was a TLT used to rotate the book in the illustration. And once a decision is adjusted again, we have our first proposal outlined. As you can see, the imperfect finish of the illustration is different from that of a typeface which keeps its perfect design intact. This makes the topography seem poorly integrated, obviously super-imposed on the drawing. Later, we'll apply some adjustment. Avoid this filling and improve integration. Now let's move on to our second proposal. Using the sans serif typeface chosen earlier will apply the appropriate way to each text, will position each of them where they belong. In the case of the author's name, we're going to reduce its size and increase the space between characters. And easy way to do this is by selecting the decks and pressing option plus the left or right arrow to increase or decrease it. And with this, we have our two proposals, time to choose. Let's compare both. Although both of them seem adequate. It seems to me that in this case, the serif typeface is somewhat classic for the graphic style of the illustration. And although that could result in an interesting contrast, I think that in this case I will opt for a less contrasted proposal. After all, topography here is a complimentary element with a decision made it's time to improve the visual integration of the typography. For these, I will use Photoshop to modify the barons of the font. First of all, I will select both text and turn them into a smart object that will allow me to apply effects on the typography in a non-destructive way. One of the things that they use most in this cases is the ripple filter, which is slightly distorts the contours, making them less perfect are more organic. In this case, it's all about playing with the size and the amount of defect. Fortunately, making a mistake will not be a problem. We can change the parameters as much as we want. We're going for a smaller, more subtle size, and a lower amount of effect. If we zoom in, we can see how the demography seems to be somewhat closer to the finish of illustration. Maybe defect is to invisible when zooming out. So we're going to force the social in a bit more. We'll edit the small filter and change the parameters. Since the illustration has a subtle texture or applied, will enhance the feel of it being imperfect printed texts by masking the dx with some texture. If you look at the detail, you'll see how definitely the text seems to be part of the illustration in a natural way. Observe a small detail. Right now we are working at the larger size than the one we'll find our use. So we're going to copy the contents of the file. We're going to paste it in another document. And we're going to reduce the scale to 50%. In this way, we can see the final finish up the image reduction. Many of the details that might seem somewhat artificial have become much more natural and it's difficult to know how this typeface was applied to appear so well integrated. This way, I have already integrated these small text that have ended up being part of my illustrations. On the one hand, the chosen Font seems appropriate for its context. The integration with a slight other rationing angle is credible enough. The slight deformation to avoid the mechanical finish of the characters, along with a distress effect helped to integrate it on the illustration. Regarding important factors. One, a good typographic choice based on the advice seen in our previous video than to a treatment and integration appropriate to the nature of your work. And I hope that in this way, adding a small integrated texts over your illustrations will be a little less intimidating from no one. Go ahead and prepare and share your project for this exercise. If you feel specially brave, give yourself an interesting challenge, such as having to iterate a text of notable importance in the context of your illustration. Now let's move on to a second exercise. This time much more focused on the plastic value of typography.
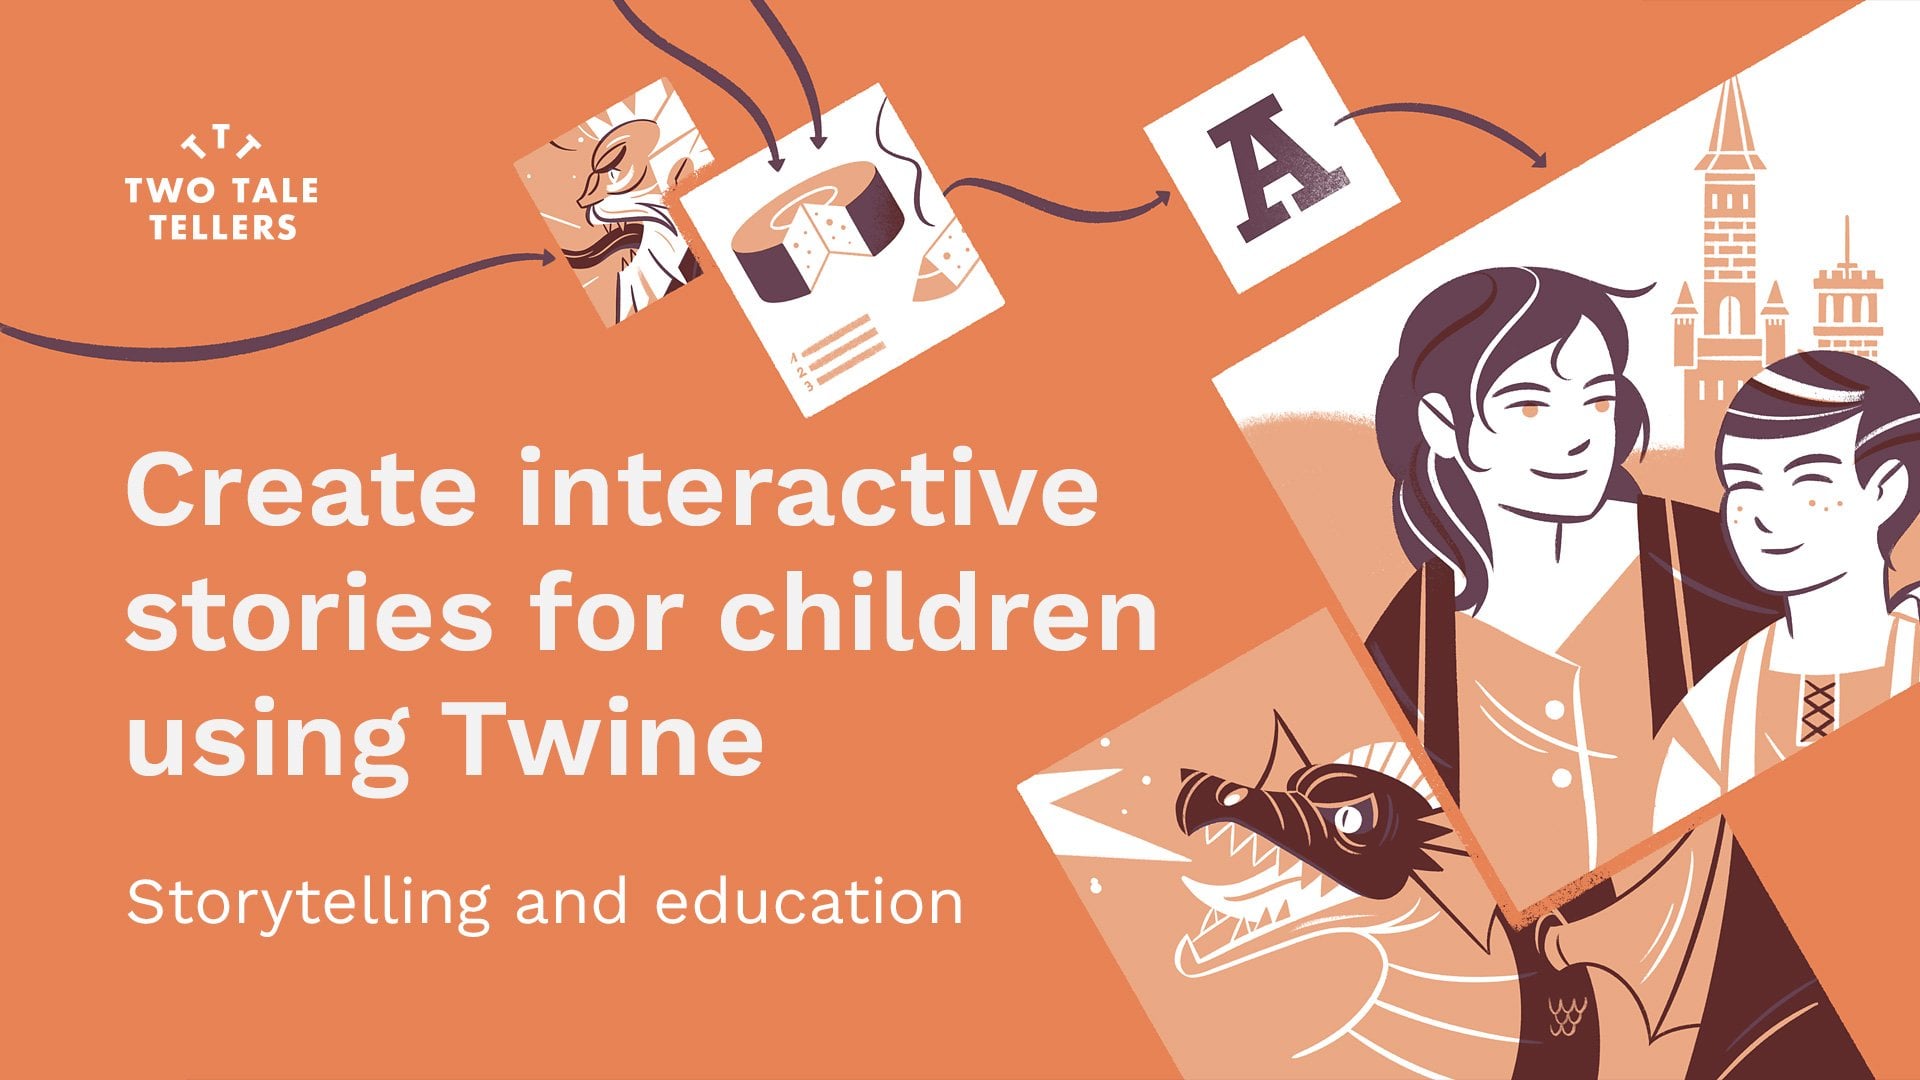
7. Exercise 2 – Typography as a visual framework: In this simple and fun exercise, we'll see how typography can be used for other purposes, closer to graphic design, the aim is for the exercise to inspire you to do more research on topography and to use it in a more graphic plastic way. We'll choose a concept that we are interested in representing. It can be a filling, color, that country, a musical gender, anything that can be illustrated and that we can identify with the word. Next, we'll use type 4f0 to create a visual element to frame our illustration. It can be a single illustration or one for each character dramatically unified. The idea is that the topography if reinforces the character of the illustrated concept. The simplest thing will be to see a clear example. I invite you to follow my own process so that you can see how I create this small illustrated typographic composition step-by-step. Let's go.
8. Exercise 2 – Example project: For this exercise, I have this edit to use the concept of Noah, a poorly defined error, which covers a good number of themes and such generous that I love. So i'm going to portray various stereotyped, since in each of the characters of the word, let's start at the beginning. A little research. Depending on the chosen theme, you will need more references than in others. In my case, I am going to do a brief research on the non-gender, especially during the forties and the victors. If we don't have first-hand recommendation, we can do some research on the internet, especially in the cinematographic field. I've been able to find multiple references in the form of posters and also in the graphic design used in the productions themselves. I must say that the typographic treatment in those years is surprisingly reach. But we can see how certain patterns repeat themselves in most NWA productions due to the need for space. And many of these iterations the fonts use tend to be condensed and generally heavy to provide an obvious contrast. They also tend to be grotesque funds without tariffs, strong, solid. And so we're funds not very emotional. We'll summarize it in the dye need condensed, fake and compact ones. Hundreds of fonts that would respond to that description. But I will only consider those that are available to me and that feed the identified need. If you don't have options that meet your need. In-video 11 of this class, I'll offer you a few resources that will help you find the fonts unit. With this rap contexts, the options are reduced and we can focus much better. We know that kind of topography we need. And now it's a matter of comparing some and blame with them. Well, my selection would be roughly this. As you can see, some options respond to the identified contexts, but perhaps they are to modern like Avenue or t-star or excessively eroded like Vn road. Bazaar is perhaps the phone with him Mozart accommodations is statistically linked to articles, signs from the mid-thirties. However, it shares a peculiarity with Garrett Gothic. It is quite thin and the interior space available to place the artwork is somewhat small. So we're going to opt for knock-out. A beautiful family with a classic and character full design, which also has a multitude of weight. We can even allow ourselves to increase it to achieve a greater typographic mass. At this point, we get finished with the first step of this exercise. But if you feel like playing a little more, maybe we can take this first typographic choice a little farther. Again, we connect a cliche element like a gun to the typographic composition. Let's try. First of all, we'll type the word I'm using an Australia for that. I'll duplicate to the textbox and use the second one to type a couple of commerce and long dash. And then we'll convert all text into shapes so we can't control them freely. You can see how we've lost that decks editing capability, but now we can play with the characters independently. Everyday. The, oh, so it's longer and we didn't use it to start creating our typographic gun. Then I start spacing all the elements and would move the arm to create the handle. And now the commerce will work as a trigger and the hammer. And we have a very abstract gun, which is still readable. To increase the visual tension will rotate the whole composition 15 degrees. And here it is. After that, we can export our composition where we needed Photoshop, procreate, or stay in Illustrator at if this is the application we usually use, you might guess, are exported PNG file and unimportant in procreate. So we've successfully transform this into this without losing our NWA work. Now that we have the base for our illustration, it's time to start drawing. It might start with some sketches. There. I'll jump to the actual drawing process and then I'll apply cholera using procreate. Let's hear it very quickly. So let's decide what we can draw in each of the characters. I think will play with stereotypes. Like the classic detective, the classic template url, and the classic does setting of noir films and novels. Let's decide how to separate all of them. I think I'll position the detective and the femme fatale In the opposite characters facing each other as if there was some kind of tense relationship between them. So we have the detective in front of the lady. And now we should decide what to use in the rest of the characters. Perhaps some bullets or cigarettes and a small matchbox. Perhaps we could avoid a cigarette inside the comma and make the later smoke. So we have these very different character, severe. One of them there are white and another one very vertical. Perhaps we are going to feel the I with some details of a dark alley with a street light. And use the o to present a car from the forties or fifties. Or we could connect both of them. So they are showing a single scene connecting the car and the early. So this seems like a plan. Let's do it. We'll start by importing our type of ethnic composition and use it as a base so we can see the limits of each character and will start dropping all the important elements into different, since we won't spend much time with the details. Let's start defining the big elements and we'll get back to them later. Let's draw the bullet would only make one and then replicate it using different angles. As all the bullets look the same, let's make things easier for us. Remember to name your layers. Let's go back to the galley, will draw some horizontal lines and then distort them to simulate and perspective. These lines will work as guides for our cat so we can modify it to adapt better to the NGO. Now will make the rest of the details inside the eye. Let's build the bridge by drawing any ratings on lines here and there. And the Matchbox, which should be pretty simple and straightforward. And finally, our femme fatale. Let's try some hat and hairstyles till we get the right ones. Okay, let's change the expression that make the hostile much simpler and formal, amorphous, special, it looks, seems better for the character. Now the clause elegant and simple, which also made the had much bigger. So we're tight part of her beauty making her more mysterious. So we finally have our bay Strolling finished. Time for the color will use our reduced palette of bluish raise and some bread. First of all, I tend to make a super wrapped S with a pilot to see if it works. You don't have to spend a lot of time with it. Once you're done, we can start coloring the final piece. Generally, I start doing the flats, basically the main masses of color defining the important elements in the scene. This usually takes time, and it's important because these shapes will define the illustration at many levels. Once we have this flood shapes, we can start adding things here that extracts defining Tom details, textures, volume, et cetera. As you advance, your probably improvise a lot with some of the details and the use of your own palate. Don't worry if you need to rethink some Thanks at this stage, as long as you respect your previous drawing, which is defining your path all the time. Using radius palette is great because sometimes you need to find clever solutions to specific situations. Because of your own limitations. We're almost there. Let's define the final character a little bit. Some more details, and we're done. So we have our appears done, bad surprise, surprise. Once finished, I've decided to utter the whole pallet using a less contrasted and more red or one less vibrant but more elegant. These things happen if you've been methodic when structuring your file, it doesn't have to be problematic. Digital media offers a great flexibility. Fortunately, from here, you can even encourage yourself to animate the elements contained in the typographic connectors to give life to this small window into your illustrated warm. It's your turn. Do your own research and start creating your base. You can be as simple as a war typed, using the upper PA topography or as complex as a free typographic composition and then introduce those illustrations to generate finite beers. Take detain, you need n police, share the results when you're ready. We'll move onto the third exercise in which we'll use typography in a slightly different way. Our width for you in the next video.
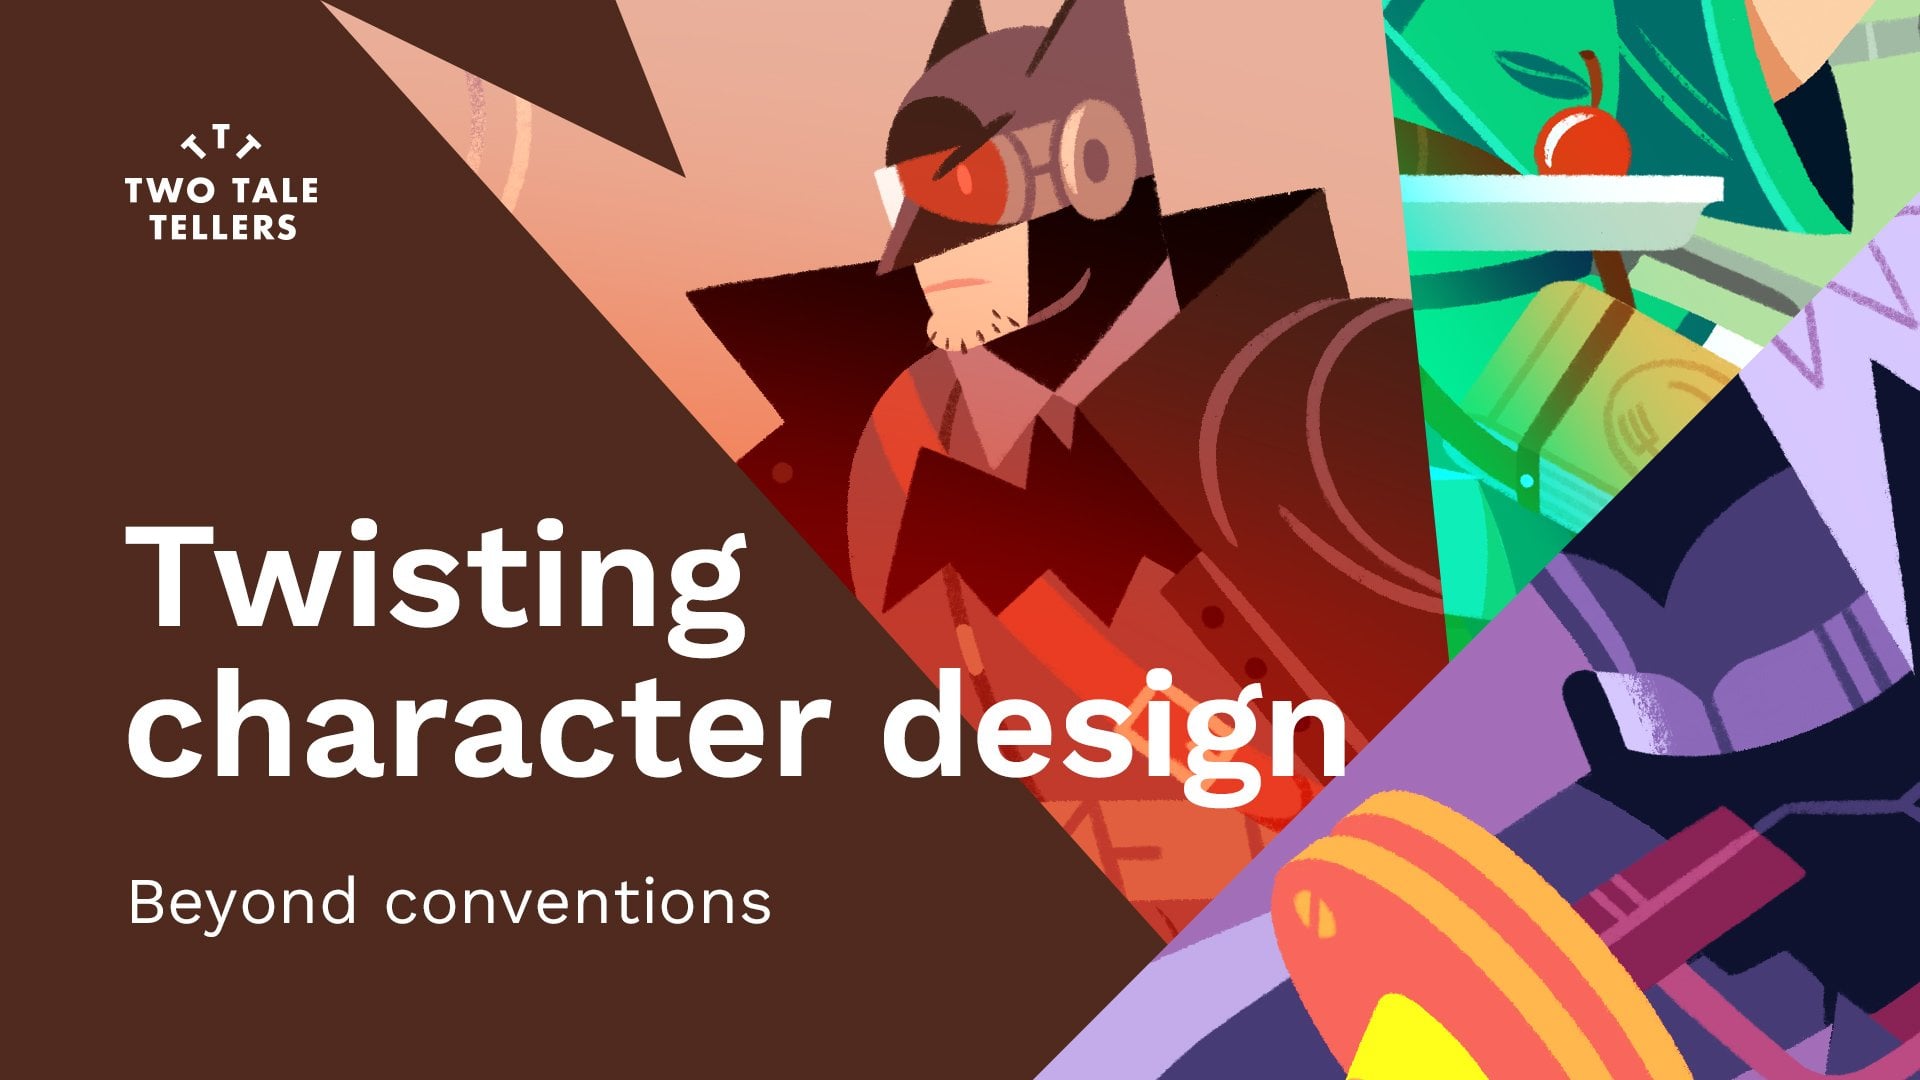
9. Exercise 3 – Typography as a graphic element: In this exercise, we're really going to play with a biography. We are going to break up these words, separate their characters if you want, and turn them into objects that will have weight, an entity in your illustration, we'll try to treat the letters as graphic elements. On this occasion that they bought coffee should have our communicative value as well, but it's not necessary. That will look for a textual reading. Let's look at some examples. In this illustration by my colleague and friend McGautha, super-talented illustrator, we can see how the exclamation acts like the mountain back. Turning into a question Mike, with the bunches. A brilliant way to integrate topography and illustration with a communicative and aesthetic purpose at the same time. In this illustration that they made to illustrate the past about mantras for writers, we see how some typographic characters float among the rest of the objects that surround the writer. In this case, the letters become elements that are part of the characters live and behave like physical objects. In this other illustration by Steve Simpson, We see how his made use of typography to create a volumetric 50 that is an essential part of the illustration while integrating many other texts as we saw in our first exercise, in a vibrant, carefree and visually coherent way. And here we can see a piece by the always asylees to see morning Dasani, in which some characters act as almost architectural elements. I recommend that you take a look at one of Cimon is most beautiful projects involving topography. And precisely, you can see how all these beautiful characters shared the spaces with typographic characters that behave like physical objects. A beautiful and inspiring project for lovers, half topography and illustration. So first of all, think about the essential concept of your illustration. How these characters are going to be part of your composition. How will they interact with the rest of the elements? Before moving on, spend as much time as you need to do all the sketches necessary to define your concept. Joined me in my project for this exercise, and perhaps these will inspire you a little to create yours. See you in the next video.
10. Exercise 3 – Example project: Well, and we wanted to develop my project around this exercise to do is I start by shuffling some ideas and it will see which ones we can develop that sort some random ideas. I'll make a very fast election in order to illustrate the process. But please take your time and develop your own concepts as much as you want. First idea could be using the word sports as physical element in scene, in which each character could be doing some kind of activity using the characters. For example, someone jumping through the O. A gymnast using the T as an obstacle, or transforming the S into arrays with people running. Second idea could be focusing on people wearing typographic accessories, for example, pendant, earrings, and other things we could come up with. Perhaps we could make these characters more evident by using a clear color distinction. A different thing. We could try it as drawing a character supporting the weight of a series of typographic characters. That would be cool if the characters formed the right word conceptually. For example, life. We could experiment with different ways of displaying the same scenes. So I think I'll choose this last option, but I think we could do something interesting with this other one. Eventually. Once we are clear about that general concept, it's time to start solving the illustration. Again will take a tour at the drawing phase, coloring, and finally, typographic integration. So we'll make a very average person, someone working at an office, wearing a suit and a briefcase, and experimenting the weight of life, literal and conceptual. Let's start by drawing the main character. We can start adding some compliments like the briefcase, so it feels more legalistic and mundane. If you use procreate. The quick length feature is really interesting for creating more inorganic element. And to create a shadow was just make a couple of circles and then unite both shapes by erasing the unnecessary lines. Let's go now to the second arm, will try to define it and reposition it a bit. Let's add some volume to the clothes when we color it will use some visual pattern for the inside of the jacket. And now that we have the main Canada, we can play around with it, letters, trying to imagine different dispositions. Although we'll make this in photoshop trying to imagine now how we could use deform, rotate, or plays this characters will be very useful in doing it now doesn't require a lot of time and precision, and we'll save a lot of time later. So go crazy and imagine as many scenarios for the typography as you want. Some of them accumulated in a vertical disposition, some of them in a more blocks away. This is already defining your typographic choices. Well, one of the thing convenience we have is that the character's back is basically descending. So there's no solid phase for positioning the topography characters. More test. This part is a good example of all the visual thinking that nobody sees in another person's work. And that sometimes implies hours of work. But of course, they're necessary to get to the final result. Sometimes clients thing, Our work is created spontaneously immediately without meditation under the simple illustration like this, should be done immediately. If you can make this fast. It's just because you're really skilled. But that has to play in your favor. So we'll never work on a time basis. But on value. After experimenting with some colors, this is our rough color test, and we'll use it to create the final piece. We'll place our character, set the layer to multiply, and then scale as much as we need. For the moment. We'll ignore topography. Time again to generate the main color masses. It is the same stroke drawn 20 times in a row. This happened. It's hard to get the right one which feels natural, spontaneous, and that respects the original line. You can also call our masses with no precision and then erase the part of it that you don't need. Let's go now to the face and the hair. And now the shoes. Little elements like this one are usually more detailed. But don't overdo it. What it will feel out of place. You need to get a proper balance within the general context. Some final strokes here under some details inside of an element. And finally, the textile pattern for our jacket. We'll use a very classic one and then mask the whole composition time now to export the file and open it in Photoshop. So we can start playing with a vinyl typographic composition. We'll start with this one that feels stylish, but perhaps not too heavy. So it's not helping a lot conceptually. Even if I like it visually, I'll duplicate the whole composition and tiny deciles. Perhaps a heavier sans-serif will help. Specially we put one character over the other. That would generate a very practical illustration, which is not bad. Considering we don't have an initial brief from a client. Let's try now a serif font. It's definitely bringing something to the whole. It's classy, elegant, serious, and heavy. What if we used different font sizes? Let's try something different. What about a monospaced mechanical font? It feels like metal blocks, which is very raw and powerful. Not that trash your instinct. Yes, make use of your resources and let your eyes tell you what feels better in the context. You don't need to look for a specific typeface, just for a specific feeling. Remember video for when selecting a font thing of the context, the functional need, and the aesthetic properties. In this case, we need the font to feel solid, heavy, and we definitely need to read the word to understand the concept. So legibility is important in this one. Regarding ascetics, we have more freedom in this case. Whatever doesn't feel out of place will work. Although we have a character who was very specific, close, slightly outdated, maybe a classic choice could be interesting. So finally, my friends, after all this process, we end up using a big, heavy, solid formed in italics with aggressive serifs that seemed to be stopped in this poor man's back. Life seems to be hard for our friend. And as a place, I experimented with a third concept using phases of young people with different styles. We didn't typographic characters, some kind of complement. And hearing abandoned sunglasses and a hairpin. And we'll use them to present each video into glass. So double project for this exercise. And now it's your time. Don't necessarily thinking about interactions between typefaces and characters. These typographic characters could be objects in a landscape that could compose a set and Fieger between them. They couldn't contain texture and volumetric attributes. Feel completely free. When you finish your exercise. We'll talk about some cool resources around topography, letter.
11. Some final tips: Unless you are a professional designer and your font collection is likely to be limited. As you can imagine, good typography usually comes at a price. Let's remember the immense work that requires type design. Sometimes years and years of work. I recommend you take a look at the chapter of the documentary series abstract dedicated to Jonathan Hoefler. Fortunately, there are also websites in which you can find quality dipole RFI for free or a very affordable arthritis. Let T is on fonts. Quiero is one of the most popular free topography web repositories. Here you will find high-quality fonts that are directly downloadable. Logically, not all of them will be interesting, but your personal idea and your specific need will help you find what you need. You can feel that the results by font type tags. And you even have tools such as a font identifier. In case you're interested in a typeface of wood, you only have a visual reference. Personally. I also really like future funds. In this case, we're talking about typography in a state of development. You can support some of them with very low prices that range between $2100. And you will have a constant free updates as the designers complete them. It's an interesting way to ensure you have access to an interesting typeface at a very low price, you'll find very graphic proposals, less design from a breathable perspective, and more from a visual one. Within southern and context can be extremely interesting. Such as, for example, grin at Ligia, retina. Supervised BOP means grotesque, kicker, ISO, and many, many others. I also find some proposals from graphic designers like Brandon Nicholson, special interesting. They are generally humbled but courageous proposals with some really interesting funds, like in this case, b n Hamburg hand, or Route 22, which already present a slightly eroded and irregular design that can feed very well with a work of many illustrators without requiring further editing. It's important to note that many commercial type embrace and make trial versions of the fonts available to users. This allows you to download limited funds, do use and see how interesting they are to you. I have included in the class a small list of type foundries that may be useful to you. Why buy topography, having so many free alternatives? While overtime, I have found that they tend to reuse the same fonts again and again. So once I found at least large enough to cover all the situations by just fall back on them. This forms are very specific, very special, and somehow even helped to generate the specific identity for your work than anything, it's worth investing in them. Finally, I encourage you to research graphic designers who throughout their careers used illustration and typography in a prominent way. You'll be able to learn a lot about their own use of typography and illustration for communication and aesthetic purposes. Do your own research on this. I recommend that you take a look at the work of Paul Rand and Dani muddy, yes. Milton Glaser or dendritic, forget to name just a few. And now let's go to the final completions.
12. Conclusions and farewell: He runs this glass front. Congratulations on making it to the end. I hope this class has helped you better understand the aesthetic possibilities of topography and that it encourages you to use it much more in your work. Generally, people assumed that topography is nothing more than a functional vehicle, which it is, but it certainly is much more. The beauty that height each character in a well-designed font drawn with care and precision, deserves to be recognized, enhanced, and used by designers and illustrators. The pressure to develop in this class will go directly to my portfolio. I hope that's your case as well. It did mean that the glass has been productive. It'd be great if this glass has also lead you to have more interest in design and be motivated to expand your knowledge. I'd love to see many illustrators, game and interest in typography and add it to their technical arsenal as a valuable resource. If you've come this far, please leave a review in the class that will help us a lot to improve our classes in the future. Remember, leave us older comments and w may have, we'll be happy to answer you. And if you're interested in our classes, visit our profile and take a look at the classes published so far. You may find some that are of interest to you. Follow us on Instagram, Twitter, or medium, and of course, on skill share so that we can notify you every time we published a new class. It's been a pleasure. Once again, thanks for your time and your attention. See you very soon in an upcoming class, daycare.
 Two Tale Tellers, Using words and images to tell stories