Transcripts
1. Introduction: Tunisian crochet is
so fun because it's a combination of
knitting and crocheting. And the first time
that I tried it, it actually felt a
little bit like magic. And it's just such
a fun technique, it feels really whimsical. My name is Le Sartre
of Coco Crochet Lee. I'm a crochet
designer and I love making crochet patterns
that everyone can enjoy. Today we're taking a look
at Tunisian crochet. It's a combination of knitting
and crocheting together. It's such a fun technique because it takes
the basic ideas of crochet and elevates them
into a brand new skill. It really unlocks
that knit fabric that is so desirable that you don't usually get to
achieve with crochet. For this class, I really wanted
to give you a sampling of some different textures of Tunisian crochet that you can combine into future projects. After completing this class, I hope that you'll walk
away with a really, really fun Tunisian
sampler pillow in colors that really
express your personality. If you're a little
bit nervous about starting off with
Tunisian crochet, don't worry soon,
you'll be hooked. I'm so excited to begin
this class with you. Let's get started on learning
how to Tunisian Crochet.
2. Discover Tunisian Crochet Basics: Tunisian crochet is so fun. And there are a few
things that you need in order to get started. First, let's talk about
the Tunisian crochet hook. You'll see here that I have a really long stick that has
a crochet hook at the end. Now it almost looks
like it should be a knitting needle, but it's not. It's a Tunisian crochet hook. And what happens is you use the hook to mimic the crochet, but you use the handle
to mimic knitting. All of the crochet stitches will rest along the long part of your hook until we need them at the end where the crochet
hook will come in handy. Next, let's talk about
the yarn that you're going to use for the
Tunisian crochet class. Whenever you're looking for
yarn to start your project, you're going to look at the recommended size of
crochet Hook for the yarn. Specifically, you
can use any yarn for Tunisian crochet and you can use any yarn for the
Tunisian crochet pillow. I recommend using a medium
weight yarn to start and when you're picking
your crochet hook size for your Tunisian crochet, always go bigger than what's
recommended on the label. That will help you with any
curling of your fabric with Tunisian crochet and
it'll ensure that your fabric is nice
and perfect tension. Now that you have
your materials ready, let's learn how to do the
basic Tunisian crochet stitch. It's the building blocks of everything that we do
in Tunisian crochet. Don't let the long handle of our crochet hook trip you up. Because the beginning of
Tunisian crochet begins exactly the same way as we
would crochet anything. You're going to start with
a slip knot on your yarn, leaving yourself a
little bit of a tail a couple inches long to
weave in your ends Later, insert your hook onto your loop, just like we would
with regular crochet. And you can hold
your crochet hook like you would your
regular crochet hook. The shaft of your
hook off to the side. And just pretend that it's a regular crochet
hook for now because the length doesn't
come into play just yet crocheting like normal. You're going to start with
your beginning chain, just like you would with a
normal crochet project for this sample of the basic
Tunisian crochet hook. We're just going to start with a small amount and you're going to follow the instructions on the PDF for the
crochet pattern, for the length of
either the front panel squares or the length of the
back panel of the pillow. Make sure you follow those
correct number of stitches. We're going to make
a starting chain in the amount indicated
on the pattern, just like you would in
regular crocheting. The difference here
with Tunisian crochet is going across your
starting chain. Now normally the loop
that's on your hook will not get used
and you would work into the second chain
from the hook to begin your single crochet or whatever crochet stitches
you would regularly use. What's going to happen
is we are going to insert our hook into the
second chain from the loop. But the loop that's
on our hook right now is also going to
count as a stitch. What's going to happen
now is we're going to insert our Tunisian crochet hook into the second chain
from the hook yarn over. And draw up a loop. Make sure it's nice and loose the
looser, the better. Now you have two
loops on your hook. Normally, we would finish a crochet stitch by yarning over and drawing through and
making a single crochet with Tunisian crochet. We're actually going to keep
drawing up loops all the way across our chain and that's what the length of
the hook is for. Those loops are
going to rest and live there on the shaft of
the hook for the entire time. We're going to insert our
hook into the next chain, yarn over and draw up a loop. Again, making sure
that your tension is nice and loose. The
looser the better. In Tunisian crochet,
you don't want to hold your crochet hook really tight. The loop on your hook tight, or the yarn on your hand tight. And we're going
to continue doing that all the way
across our chain, Insert into the next chain, yarn over, and draw up a loop. Give yourself a little
time to grow that loop, a little bit extra, and
continue on to the next one. The key to success
with starting off your first row for Tunisian
crochet is a loose tension. I can't express that enough and that's how you're going to avoid getting that curly fabric. That happens
sometimes when you do Tunisian crochet working
across all the way to the end of our chain and each of those loops is resting on our Tunisian crochet
hook on the handle. The bigger your piece is, the more room you're going to need on your Tunisian
crochet hook. And that's why the
handle is elongated. You can even find corded
Tunisian crochet hooks that add even more
length to your crochet. Now that you've gone all the way across your starting chain, the row is not over yet. We still have to deal with all the loops that are on our hook. And here's how we
get rid of them. Much like we chain one at the front of a row
in regular crochet, in Tunisian crochet,
we chain one at the end of the row,
that's for height. You're going to chain one through the last loop
that you just made. Now we're going to
complete the basic return. The basic return is used in every single type of
Tunisian crochet. No matter where the placement
was on the starting row, the basic return will
remain the same. You're going to yarn over and draw through only two loops, leaving the rest of the
loops alone on your hook. And you're going
to yarn over and go through two loops again, continue doing that all the way back to the start of your piece. And it becomes really rhythmic, especially with a
long crochet hook, it becomes really fun to do. The basic return is often my favorite part of
Tunisian crochet. When you get to the last
two loops, yarn over, draw through both those loops, you've completed your first
row of Tunisian basic stitch. In order to progress with the basic stitch in
Tunisian crochet, it's important to know how
to get to the next row. Here's how it's done.
You always have the first loop of
Tunisian crochet ready to go on your hook. The first loop is technically the first stitch for
the basic stitch for the remainder of
either the square or the back panel is done
exactly like this. You'll notice on all of the Tunisian stitches that
we made in the first row, they all have a
vertical front bar and a vertical back bar. We're going to skip the very
first vertical front bar because the loop on our hook is the equivalent to
that first stitch. You're going to look for
the second vertical bar and insert your hook under
just that front vertical bar, only leaving the back one alone. Going to yarn over
and draw up a loop. We're going to repeat
that process all the way across for the second row of the basic stitch under
the vertical bar. Draw up a loop under the
vertical bar in the front, and draw up a loop
now that you've had a little bit of a go at the basic stitch in
Tunisian crochet, You may also notice that in future crochet patterns that it's called the simple stitch. They're exactly the same thing. Those two names are
interchangeable. The basic Tunisian crochet
stitch or the simple stitch. Now that drawn up all those loops under all
of those vertical posts, we have one stitch
left at the end. Now here's where it
changes just slightly. Instead of putting our hook under just the
front vertical bar, we're actually going to put our hook under both the
back and the front. And then draw up the last loop. The reason that we do
this is so that we have a straight edge that when you go under both pieces
of the last stitch, you get this nice
edge on the edge of your crochet to
complete the basic return. If you remember
from the first row, it's exactly the
same. You chain one. Then we're going to
yarn over and draw through two loops only all the way back to the front yarn
over under two loops, over under two loops, Yarn over under two. Again, you're just
going to repeat that all the way across again. No matter what crochet stitch
you're using for Tunisian, the basic return is
always the same, always just as satisfying. Then the last two you've
completed your second row. The Tunisian basic stitch
looks like from posts almost. They look like vertical bars
and it's such a fun texture. Now that you've
learned how to do the basic Tunisian stitch
or the simple stitch, you're ready to work
on the first square of the front panel
of your pillow. You can also begin the back panel of the pillow which also includes
the basic stitch. Now I'm ready to show you how to do the Tunisian knit stitch.
3. Tunisian Knit Stitch: The Tunisian knit
stitch is one of my favorite ones because
with crocheting, seeing the knit stitch
around is very enviable, especially if you don't
know how to knit at all. And with this stitch,
you can mimic the fabric of knitting and do
it in an easy way. That's actually really
accessible to crocheters. It's really, really fun. I'm going to show
you the placement of the Tunisian knit
stitch on top of the basic stitch
row because again, the basic stitch row is the building blocks of
all Tunisian crochet. You can't make a first row of Tunisian crochet knit stitch. You always have to
start with a row first of the basic stitch
or the simple stitch. Now that the simple stitch
is done on my sample here, I'm going to use a contrasting
color for the knit stitch, just to show you the placement, you're going to be continuing in the same color
though Once again, the first loop on our hook for the Tunisian knit stitch is
the same as the first stitch. So you're not going to work into the very first bar
right underneath your first loop on your hook for the Tunisian knit stitch. Instead of putting
our hook under the front vertical bar like
we did for the basic stitch, we're actually going to punch our hook between the front
bar and the back bar. I'm going to show you
on the first stitch. We're skipping this
first vertical bar again because our
first stitch is done. Technically, we're going to
go for the second stitch, the second vertical bar. Punching your hook
from front to back, between the front bar
and the back bar. Then you're going to yarn
over and draw up a loop. What happens is you can
almost see it already, the front bar and the
back bar get separated. It looks the same
as a knit stitch. The key to success on this row, especially with the knit stitch, is not to have a tight tension. You want to have a
nice loose tension. Just give yourself
a little bit of extra time to draw
those loops up to a good height above your first row and let those
stitches really shine. Again, a loose tension is
key in Tunisian crochet. I'll show you that
placement again. You're going to look for
the next vertical bar. Insert your hook
from the front to the back between those 2 bars, the front bar and the
back bar between them, from front to back yarn
over and draw up a loop. Give it a little
bit of extra time to grow nice and loose. We're going to repeat
that all the way across. Bringing up a loop
between the bars of each and every single one of those Tunisian simple stitches. Or the basic stitch, we're going to pause before we
do the very last stitch. Because if you remember from
the Tunisian simple stitch, the placement of the
very last stitch is really important to get those nice straight and clean edges. Instead of going under the vertical bar or
just taking one, you're going to
make sure that you get under both pieces of the side and draw up your loop. Then the fun part,
the basic return, that's the same for every single Tunisian crochet stitch chain, one at the end and go through two until all of your loops
are gone from your hook. I'm going to show you how
to do the second row of knit stitches on a base of knit stitches because it's important to know
how to continue. Once you have your first
row of knit stitches done, you're going to not go into
the very first stitch again. You're going to put
your hook between the posts or the bars of each of those stitches all the way
across the loose tension. Making sure that
those stitches grow a little bit before you
move on to the next one, the very last stitch. Make sure you go
through both pieces, that last loop chain. One basic return, then let's take a look at
what this fabric looks like. Now that we've done two rows
of the Tunisian knit stitch, you can really see those knit stitches starting to happen. If you are a fan of knitting, now you know how to
mimic this fabric. Now that you know how to do
the Tunisian knit stitch, there's nothing that happens in knitting without the
pearl stitch two. We're going to learn how
to do that texture next.
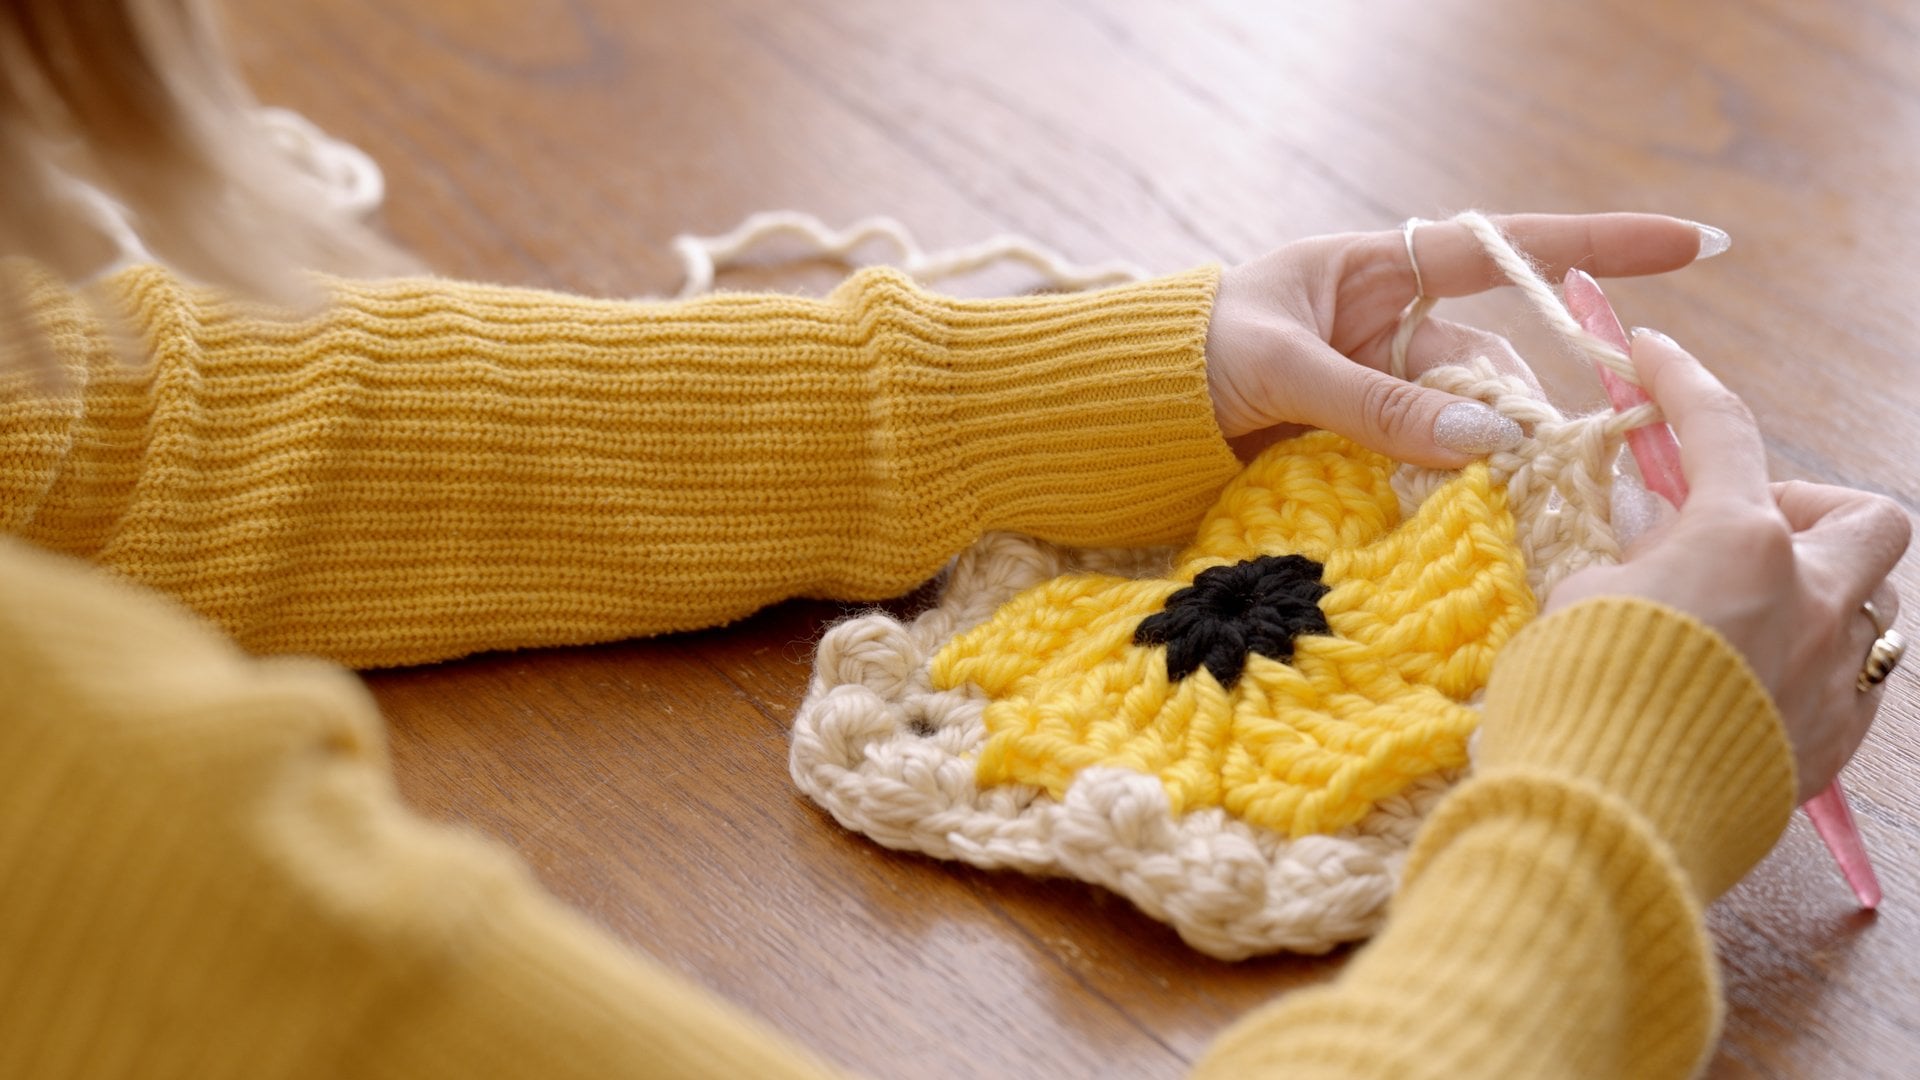
4. Tunisian Purl Stitch: When you're learning how
to Tunisian crochet, one of the appeals is
being able to mimic the knitted texture
of knit stitches. And now we're going to learn
how to do pearl stitches. Knitting, you can specifically
make a row of pearls, but they're also found on the
underside of a knit stitch. Let's learn how to create that pearl texture with
some Tunisian pearls. With Tunisian pearl stitch, you can't make the
first row without first doing a row of the Tunisian basic stitch or
the simple stitch. You'll see here that I have my first row of
basic stitch already completed And I'm
going to work in a contrasting color to show you the pearl
stitch placement. But you're going to continue in the color that you use
for the first row, again with Tunisian crochet. The first stitch is
already done for you. It's on your hook already. And that is the first
loop on your hook. So you're going to count
that as stitch number one, which means you're
always going to look for the second bar or the second stitch to start
your Tunisian crocheting. Now unfortunately, the pearl stitch for Tunisian
crochet is the most fiddly. It can give you a little
bit of heartache, but it's actually
the same knitting. A lot of people really hate
to do the pearl stitch, but the fabric is so fun. And I find that in
Tunisian crochet in particular the pearl
stitch is really fun to do rather than having your working yarn behind
your crochet hook. For the pearl stitch,
you need to change it to being in front of your work
and with your hook behind it. This is where the
fiddle part comes in. I like to anchor my working yarn to the front of my fabric
and hold it there with my thumb that it doesn't slip
away on you because we need that yarn to stay in
the front while we also are moving our Tunisian
crochet hook around. That's the fiddle part about
doing the pearl stitch. We need the yarn to really create a texture in
the front of the work. Now that that is pinned down, you're going to locate the vertical bar of our Tunisian simple
stitch or basic stitch. Put your hook under the
front post as if you were doing the basic stitch
or the simple stitch. I can let go with my thumb on that anchor of the
yarn in the front. And you'll see now that
my hook is in the post. The yarn is in
front of the post. I can do a yarn over. Now. I still like to hold onto the anchor just
for this yarn over. I'm going to yarn over and draw under that front post of
our Tunisian basic stitch. Now if you let go, that yarn that we anchored in the
front turns into a pearl. Let's take a look at
that. Across this row, we're going to move the
yarn in front of our work. Insert the Tunisian crochet hook into the vertical front
bar of the next stitch. Anchor the yarn to the
front of our fabric, right under that front
vertical bar yarn over. And draw up a loop. Again, the looser your tension, the better this stitch will look and then you can
let go of that pearl. The pearls are made by leaving
that yarn in the front. We're going to continue
on. You're going to put your yarn in the
front hook behind it. Insert your hook from underneath
the vertical front bar, anchor that yarn to the
front of your fabric, and draw under that front bar. You can really see
the placement of these Tunisian pearl stitches when you're using a
contrasting color. But when you're using one color and continuing on
in working rows, they can be a little
bit tricky to see. Make sure you take your
time really make sure you understand the
positioning of each of these pearl stitches
as you go along. Leaving those loops on your
hook all the way to the end. Now we're at the final stitch of our Tunisian
pearl stitch row. Instead of pearling
at the very end, we're just going to do
a basic final stitch under those two posts
that we usually do. That's just to get
that nice clean edge without pearling at all. You're just going to
insert your hook into the final stitch over and
draw up that final loop. You'll notice that the pearl is omitted on the final stitch. It is noticeable on a
really small swatch, but it's not noticeable
on a big piece of fabric, especially if you're
using one color. Then you're going to complete
the basic return chain one. Yarn over and draw
through two all the way across yarn over and under two, yarn over and under two. Just a little bit of
a troubleshooting, if you are unsure if you've arned over
and drawn through two, or maybe one or even
maybe three by accident. There's a really
easy way to check. If you take a look to the
left of your crochet hook, you'll be able to
see that there are two loops stuck to
your working yarn. That's how you know
you've drawn under two. Say for example, if I made a mistake and
I went under three. You'll see here that you can see visibly three different loops
on your hook all at once, and that would be
considered a decrease. We don't want to go
through three at all. How do you fix
something like that? Simply take that
loop back off of your hook and put it onto the shaft of your
Tunisian crochet hook. It's a super easy fix. Continuing on yarning over
and drawing through two. Yarning over and
drawing through two. We're going to do one more row of the Tunisian pearl stitch, showing you how to work into a row of already existing
Tunisian pearl stitches. But the good thing
about this stitch, even though the placement of
it is a little bit fitly, the actual rows are
really easy to see going forward because the pearls rest at the bottom
of the stitches. As you can see here,
what's left behind is what looks like a very visible
row of basic stitches. Again, our first stitch
is already complete. We're going to look
for the second post now you're going
to get to see what it looks like in one color. We're going to pearl
all the way across, making sure our
working yard is in the front and doing those pearls all the way across. When you get to
the final stitch, remember to omit the pearl. We're not going to pearl, we're going to insert our hook. Making sure that we hit
those two side bars. Draw up your loop chain one and complete
the basic return. Let's take a look at this
Tunisian pearl fabric. Now that we've
worked a few rows, you can see that by leaving the yarn in the front
of those stitches, we've left these
little pearls behind. And it perfectly mimics
the knitted pearl stitch. We've taken a look at the Tunisian basic stitch
or a simple stitch. The Tunisian knit stitch and
the Tunisian pearl stitch. I'm just really
excited to show you one more Tunisian crochet stitch that creates a really
wonderful texture. And you'll find it in
the pillow pattern, in the front panel square as well as in
lines on the back panel. Let's take a look at the
Tunisian net stitch.
5. Tunisian Net Stitch: I'm really excited to
show you how to do the final stitch in
the simpler pillow. It is the Tunisian net stitch. But before we get started, I wanted to first show you what the net stitch looks
in all its glory. Because it's one of my favorite Tunisian
crochet stitches. And once you build it
into a series of rows, it creates such a
wonderful texture. And you can really see
this netting situation happening with all
these front bars. And it's actually just as simple as the Tunisian simple
stitch or basic stitch. It's just all about offsetting the placement of those stitches. Before we get started on
how to do the net stitch, I did want to talk about
how Tunisian crochet has a tendency to curl at
the beginning few rows. You can see that
my swatch here is starting to curl on our table. That happens for a
number of reasons. Tunisian crochet is really
textured on the back. Let's take a look at
the back of our Swatch. You can see here
that a lot of yarn gets used on the back
surface Tunisian crochet. Although it does mimic knitting stitches
and pearl stitches, it uses considerably
more yarn than knitting in order to
use the crochet hook. That's what happens
with Tunisian crochet. All of the fabric gets
thicker on the back. It'll never be as thin as knitting will be,
it's still crochet. There are a couple ways
to troubleshoot when the front two rows or
front few rows, I should say, of your Tunisian
crochet starts to curl. You can use a standard crochet
hook in a different size, a larger size to do
your initial chain. Because the chain isn't
technically Tunisian crochet, it's just a regular
crochet chain. If you make your initial
chain in a larger size, that will loosen the tension
of your starting row. You might be able to avoid
a little bit of that curl. If you do find that your Tunisian crochet
is curling, it matters. For example, for
our sampler pillow, the curl doesn't matter at all. It's a great beginner project because we're going to
be seaming the pillow together and the curl doesn't present anywhere
in the pillow at all. If it's something like
a sweater or a scarf, though, and you don't want
that first few rows to curl. You can do something
called blocking. You can hit the panel with a little bit steam and
make those stitches relax. Or you can wet block by soaking
your Tunisian crochet and pinning it to dry and it
should retain its flat shape. Just a few tips on how
to get that curl to go away for the purposes
of this pattern. If you are noticing
that you are starting Tunisian crochet for
the first time and your Tunisian crochet
is starting to curl. Don't worry about it at all. It doesn't matter
for this pattern. It can be curly because
it will work itself out when you go to seam
the panels of your pillow. So now that that's
out of the way, let's get started
on our net stitch because I'm really excited to show you what
this looks like. The net stitch starts
off the same way as the basic Tunisian
crochet stitch. And it's actually
works the exact same as the Tunisian
basic stitch, except for the placement of the stitches are between the post instead of
under the front post. The difference between this
stitch and the others is that where they all
had a one rope repeat, meaning that each row
is exactly the same. The Tunisian net stitch has a two row repeat so that the stitches offset
and turn into a net. That means that the
first row placement is going to end up a
little bit different. We have our first stitch
on our hook already. We're avoiding that first stitch on the side here that
we always avoid. Next, we're going to
actually put our hook, the next two Tunisian
simple stitches. Not under the front bar, not between the 2 bars at all. It's actually literally between the two stitches themselves
into the gap between them. And you're going to yarn
over and draw up a loop. We're going to do this
all the way across. Drawing up a loop between
all of these stitches. The important thing about this particular stitch is that you have to
count the number of stitches indicated
in the pattern and maintain that number
of stitches because it's really easy to add or
subtract stitches because we are skipping the first stitch technically on the next row, we need to add it back in. We've gone between the posts of every single stitch we've
gone between the stitches. All of the previous
row stitches. And we're at the end
of the row again. We're going to go
through the side bars of the final stitch, yarn over and draw up a loop
yarn over and chain one. Then we're going to do the
basic return yarn over and draw through two,
all the way across. The basic return is the same no matter what Tunisian crochet
stitch you're doing. We've got our first row of the repeat lined up for
our Tunisian net stitch. And here's how these stitches offset one another
for the second row. Usually we would skip the first stitch and work between the
next two posts here. But to offset the stitches and make them turn
into a netting, we're actually going to
work in the very first gap between the side bar of the first stitch and
the next stitch, inserting your hook
at the beginning, the first gap between
the stitch is possible, and drawing up a loop. We're going to do
that in every gap between the stitches
again, all the way across. Working those
Tunisian net stitches between the posts of
every single stitch. And leaving those loops on
your hook until the very end. Now with this row, because we went
into the first gap, we're going to skip the
very last gap between the side edge of the last
stitch in this gap right here, there's one stitch
complete, there's a gap. And then there's the side
stitch that we usually do under the 2 bars
of the side stitch. We're going to skip this gap. And that's going to
adjust our count because we added that extra
stitch at the beginning. Instead of skipping
it, you're going to insert to do this side stitch yarn and bring up
your loop chain one and complete
your basic return. If you get lost on
whether you are on row one or row two of
the net stitch repeat. I'm going to show you a little
visual on how to figure out where you are
because it can get easy. If say for example,
you put your crochet hook down for a little
while and took a break to pick it back up and
figure out whether you're on row one repeat
or a row two repeat. The way to tell whether you're on a row one repeat or a row two repeat to look at the placement of the very
first stitch in the row. If you notice the row two
repeat that we just did, it is more to the right of the stitch
from the previous row, which was our row one repeat. If you look down again
on the next row, you'll notice that
this stitch is also to the right further than this
stitch which was a row one. If your stitch is further to the right of the stitch
prior in the row prior, that means you're on a row two. If your stitch is to the
left of the row prior, that means that
you're on a row one. It's a really good way
of figuring it out. You can also use stitch markers on the sides of your rows and maybe just mark row
one only so that when you put your cook down
and your crochet down, you'll be able to tell if your stitch marker
is in your work. That means you're on a row one. And if your stitch
marker is not in it, then that means
you're on a row two. Just some tips on
making sure that you know exactly where
you are now that you know how to do
all of these knit and pearl and net stitches
in Tunisian crochet. Let's put all those skills together and finish
up our pillow.
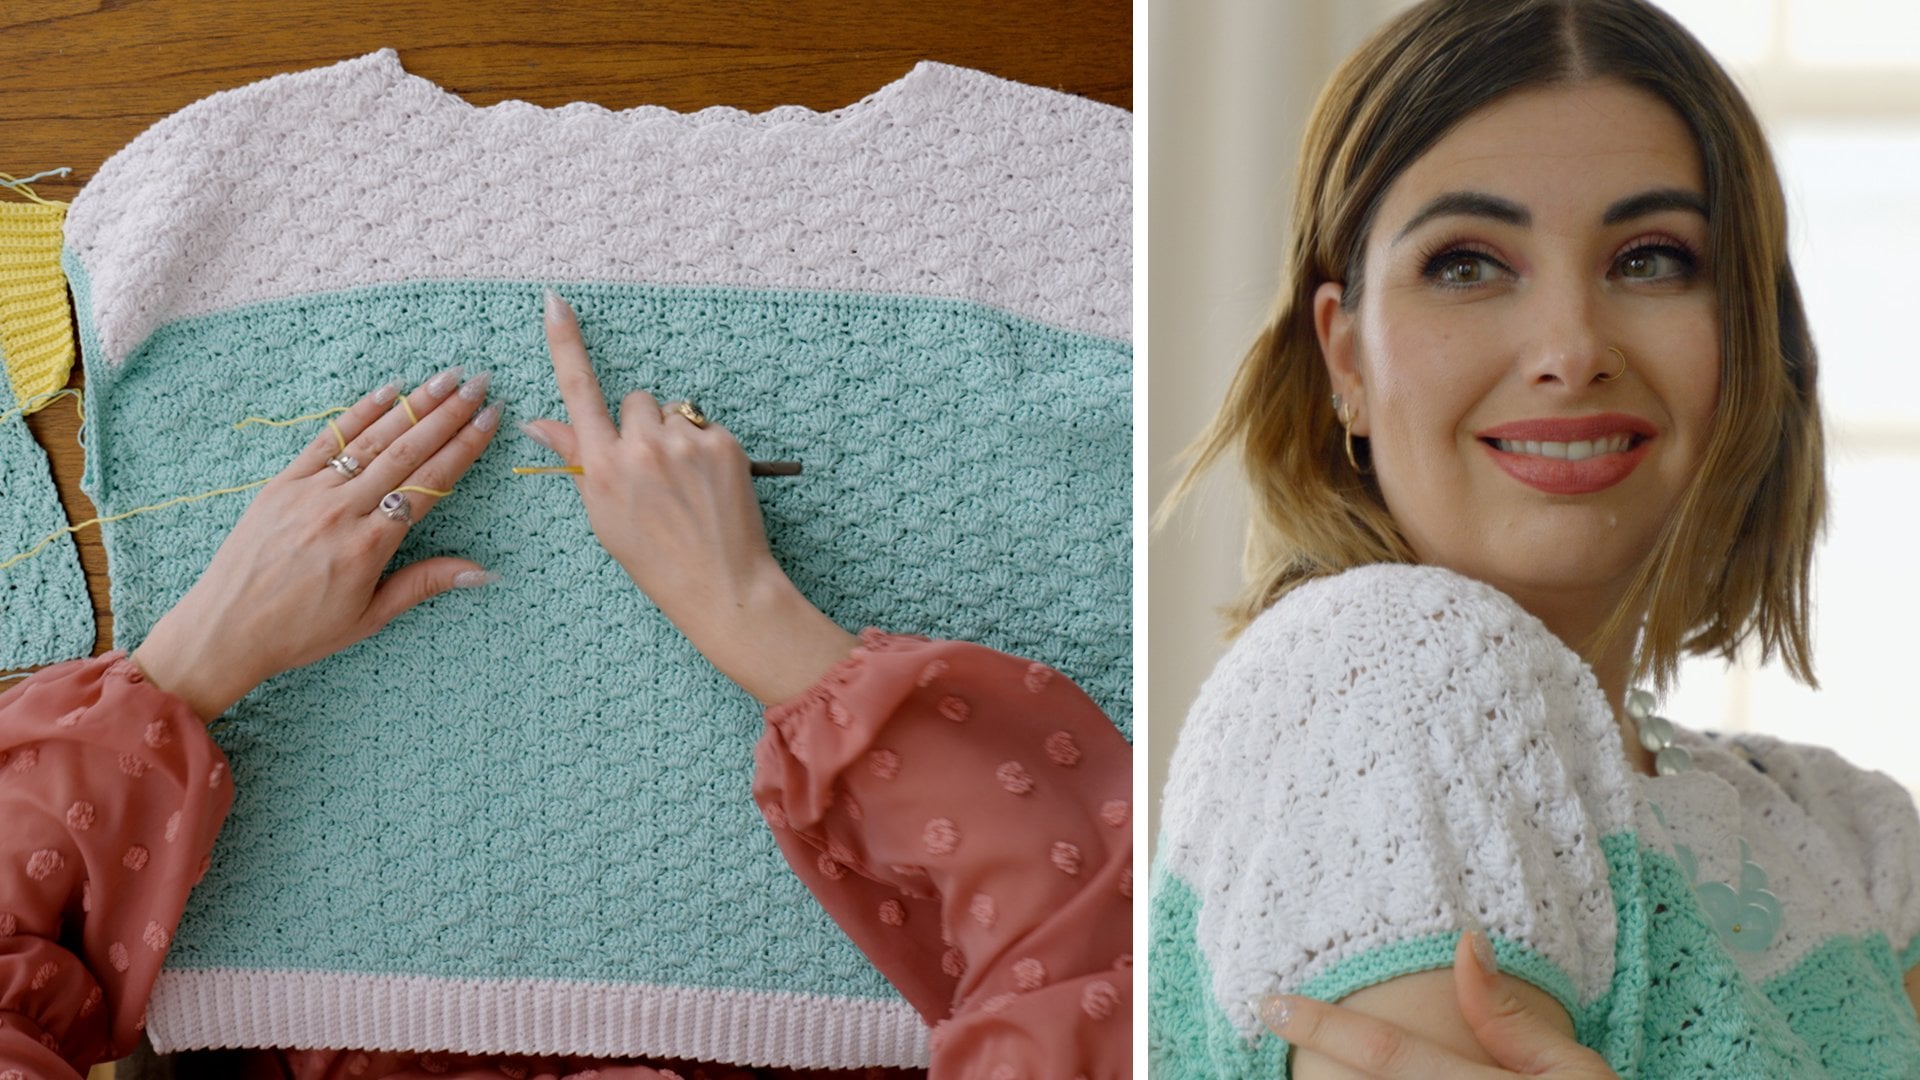
6. Put it All Together: We've learned all of
the Tunisian stitches required for the
Tunisian sampler pillow. Now that you have
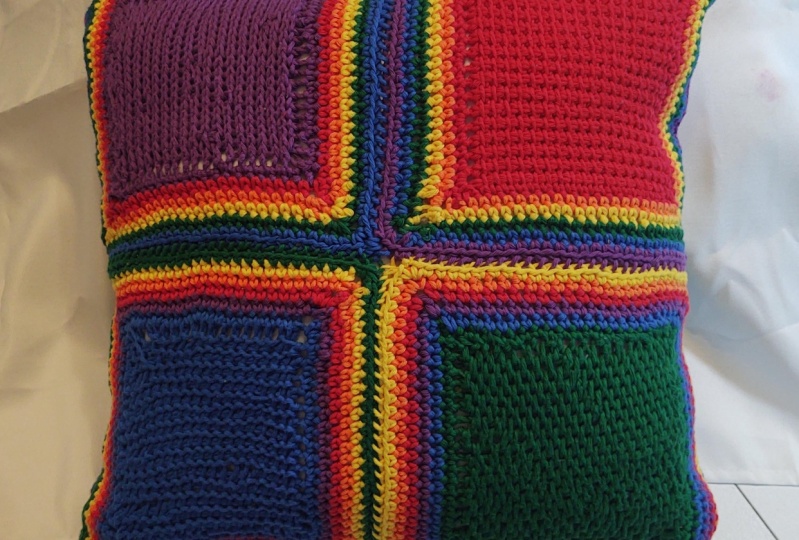
learned them all, you can see them all in action. Here on the front panel, we have the simple stitch, the Tunisian knit stitch here, the Tunisian pearl stitch panel, and the Tunisian net stitch. You'll notice that all
of the squares have a simple single crochet border around them to jump them out. And then it seemed in a four square to
make one big panel. And if we flip the pillow over, you'll see all of the
Tunisian stitches in action. Again, on the back panel, you'll see the Tunisian
simple stitch here, the Tunisian knit stitch. And when you see a big swath of it compared to the
other stitches, you can really tell how smooth and flat the knit
stitch is and how much it really does mimic knitting next to the pearl stitches
which are really bumpy, and mimic that pearl
stitch in knitting. And then finally ending with the Tunisian net stitch which has that really
great raise texture. Now that you have tried all
of those different stitches, let's talk about the
single crochet border that's around each of
the front panel squares. Bringing back in our Tunisian basic stitch
or simple stitch, there is that single
crochet border around the edge of
each of the squares. It's just literally
as simple as doing a regular single crochet with
a standard crochet hook. You don't have to use your
Tunisian crochet hook. And doing those chain
edges and going into the last two bumps of the
last stitch in all of our Tunisian stitches
meant that we have a nice, crisp edge to do our single crochet
stitches along each side of all of our squares. The border of each of the squares consists
of several rows of single crochet with two chains at the edge of each corner. It'll grow on top of each
other, one after the other. You can add as many
colors as you like. Once you have all of the edges put on all
of your squares, it's time to seam
everything together. The front panel of our
pillow consists of four individual squares that
are all seamed together. They all have a
single crochet border around each of them and then they are whip stitch together using a darning needle
or a yarn needle. You're going to
leave a long tail at the end of your final
round for each square. For sewing, joining those
two seams together is as simple as joining through both single crochets
on each square. You're going to insert
your darning needle through both stitches on both squares and simply draw through
for a whip stitch, lighting them both up and
joining them together. Once you've seemed all four
of your panels together, you're ready to seem around the entire edge of the outside of the
pillow front and back. And that's it for our Tunisian
crochet sampler pillow. There is insert inside, you can find standard 18 inch by 18 inch pillow inserts at any craft store as
well as online. The best practice for
stuffing your pillow and finishing the seaming along
the outside edges is to flip your panels
inside out and seem the first three edges close by sewing and then flipping
the pillow right side out. Again, stuffing it with the 18, 18 inch pillow insert. And simply closing the last seam with the right side facing. Once you're done
seaming up your pillow, you're going to have
a cuddly Tunisian sample pillow to
add to your home.
7. Final Thoughts: You did it. You worked on
a Tunisian crochet pillow. And now you have something
really amazing to add to your home with a whole bunch of new techniques to add
to your repertoire. Thank you so much for
joining me for this class. Be sure to upload
your projects to the project gallery so
that we can see all of the color choices and all of your new techniques that you've learned and happy crocheting.
 Lee Sartori, Crochet Designer