Transcripts
1. Welcome to the Class: If you're starting to edit or have been doing it for years, any small improvement
on how you do things will immediately affect how much you edit in the long run. Hi, I'm Eddie, and I have been editing on
Adobe Premiere for more than six years now
to the point where I spend many hours per week
in this program alone. Perfecting this craft
that is video editing. This was a skill
I developed over the years trying and
researching again and again. This course compiles the small niche
techniques all the way to the big things that altogether will help you triple
your editing speed. Let's take the simple
example of cutting a video. This is one of many fundamental techniques that we
use all the time, and learning the
optimal way over the long run will drastically
improve your editing speed. At the end of this course,
you'll learn how to do these things the simplest
and fastest way. The only prerequisite is that you edit with
Adobe Premiere. In the class project,
you'll be able to share your optimal layout
that can be the same as mine or
personally that's yours, and you can ask any questions in the discussion tab for me or any other
students to answer. Sounds good, then I'll see
you in the first lesson.
2. Master the Basics First: For the first lesson,
let's start off simple, especially for the ones who
have a potato device like me. So as you can see, this is how I mostly organize my windows. In case that you're
a bit confused, you can always go to Windows, workspaces, and editing
to get the same effect. You can change how
big or small you want things to be Optimally
on a bigger screen, I like to have this bigger and the image smaller unless I'm
doing some detailed work, for example, when I'm masking, that I will do the opposite. So the first and
most basic thing you have to think about
is when you're editing, especially with slower
computers like mine, is when you're
editing with a lot of files and big
files in four K, it might be a little slow to maneuver or to play again
because in this case, I'm playing in full,
in full resolution, which means what
you're seeing here is what you'll get
in the output. Most of the time
when you're editing, just cutting and putting things clips together or
just adding text, you don't need the best
resolution when you're editing. So the thing you
can do is you can either put in half one half of the resolution or one fourth even one fourth of the
original resolution. You might not see a
big difference here. Let me show you a bit better. But if you play, you see, it's a bit more blurry. When you pause,
it's actually okay. But when you play, it actually renders one fourth of the
actual original quality. So the difference between full is that you're actually
seeing the full quality. And if I put it on one fourth, as you play the video, you can really see how blurry it is. Now, you might think
that you like to edit all the time in one fourth
of the original resolution, but that's not actually true. In some cases, it's actually advantageous to have it on full, but most of the time I
actually edit on one quarter. So when do you edit on full? So if, for example, I'm manually masking
out something to do a transition so I can be
in front of the text, I'm doing really intricate
and detailed work. So I'm really close to the
screen, and I'm masking, I'm roughly doing
it, not really, but like this frame by frame. And if you'd like to animate this mask and go frame
by frame, you see, as I'm going one frame further, it's the same quality. It's the original quality, which is really important, like this, like this,
like this, like this, and I move this
around to the right. So you see every frame,
I'm tracking it, and I really need the details of the information that I need. So if you decided to edit on one quarter of the
original quality, you see if I go
one frame further, you see how blurry it is, you have to wait so it
renders, and then it goes. As you play the video, it gets really blurry. And if I have to wait for each frame for it to
render and then move, it becomes really slow. So in these cases, I like
to go on full quality. So each frame I have the original quality
without having to wait. This also applies if you're doing some intricate text work or intricate edits that you really have to know
and see the quality, then you should edit in full. In most cases, I would say 95, 98% of the time
that I'm editing. It's always in one quarter
of the original quality. This is the first of
many techniques that will help you edit
that much faster. And the best way to learn
and edit faster is to combine every single technique you'll learn throughout
this course. And now it is your turn. Then next time you'll edit, make sure that you are mindful of the quality that you'll render out throughout
the editing. If you're doing
just rough cuts or bunching stuff together
in the timeline, then most probably you don't need to have
the best quality. But if you're doing
intricate work, then you might want
to set it on full. With that said, best of luck.
3. Default Useful Shortcuts: In this lesson, I compile the default shortcuts
that come with a program that I find extremely useful and
use it all the time. So you know in the
following lessons, I'll cover the custom
shortcuts that I changed in order to
best fit my needs. For now, these ones are the
ones that I haven't changed, and I set them on default
and are extremely useful. Fading to black or
fading the audio to zero is one of the most common techniques
that I use all the time. For audio, I don't
want to abruptly end a sound and then it
distracts the viewer. And for video, it slowly fades to black in
certain moments. Which might be very useful. The original way I learned
was to actually set key frames from here to zero, so you can fade to black. But this turned out
to be a lot of work. The second best way was to just right click and apply
default transition. And you see, it also
just fades to black. Here you can change the length and how quick
you want it to be. This right click
technique is very useful. It also applies for audio, apply default transitions, so you can fade
the sound to zero. So this way isn't bad, but there's a third way
that's even better, and it is to use the
shortcut Control D for video, just like so. So you skip the step of right clicking and then
default transition. You just click Control D, and it's automatically done. And for audio, it's
Control Shift D, Control Shift D. So instead of right clicking and applying
the default transition, this just skips that extra step. This is something I
use all the time. Every time I'm doing
a video and an audio, I don't want it to abruptly end. But today, things change. And even if you
have a plasma TV, I still genuinely think. And maybe at the end, I
want to fade to black, so it's more smooth. This is something that I
use really all the time. A very useful shortcut that's
default to this program. The next default shortcut is also a one that I
use all the time. And for example, let's see here, we have this video, and all of a sudden I don't
have the audio for it. Instead of just searching
here on the left where I can see and then see which
audio part I should use, I can just click F. So I click on the clip I want,
and then I click F. All of a sudden,
automatically here, I have the audio
that fits perfectly. It saves me so much
time from having to go back to the footage and see
which part of the footage, especially if it's long, it automatically cuts to
the part data you need, and you can drag and drop
the audio or the video. This is really useful if
you're editing and you have so many clips and
you're just lost with them. Finding the clip would
have been way too hard. So just clicking on
your clip and then F will immediately go
automatically and search for it. That's so much easier. And the third
shortcut that I use all the time is to
copy and paste. And instead of just clicking Control C and then Control V, I can just hold Alt and drag. You can drag anything. So
if you select these two, you can hold Alt, and you'll copy those two,
which I will not do. You can copy individual
things just an audio clip, or you can copy everything
that you select. By holding Alt, you copy
everything that you selected. It's that easy and you can drag and move where
you needed to be. This saves a lot of work
because for example, originally, I had it like this. If I copy and then paste, it will copy in the
first video track. Instead, I have to switch
to the second video track and then Control V to paste
on the right video track. This is a lot of work. So
by bypassing all of that, I just hold Alt and drag. I can drag up down
anywhere I want. And that's so much easier. It's the easiest way
to copy and paste, which you'll do a lot of times. Trust me. Now, it is your turn. You can open any
timeline and just practice these really
important shortcuts. There are thousands of them. But these three are the ones that I personally
use all the time. I copy and paste all the time. I sometimes cannot find a clip, and I just have to click F, and I fade in and
out all the time. It's something that
I use so many times. Just knowing these three
shortcuts will help you that much more when you're
editing in the long run. Best of luck.
4. The importance of your tools: I tried editing with all
sorts of different things. I delve into editing
with a Pan and tablet, which didn't work out, so
I went back to a mouse. And you might be thinking, why am I talking about a mouse? And will that help
with editing speed? No, you can edit
equally as fast with a bad mouse or with an expensive
gaming one, for example. But there's one major factor I want to point out the size. See, for video editing, it really doesn't
matter if you have an expensive or cheap mouse. But what really
matters is the size. If you're going to be
editing for long hours, the size really
makes a difference. I've noticed that when
I use a thin mouse, my fingers really tend to
cramp after a long time. But with a bigger one, it makes
it much more comfortable. I included this topic
in this course because, although it doesn't really
help you with editing speed, a good mouse really
makes you be able to edit for long hours
without cramping. Trust me, I tried with both, and it really makes a
difference in the long run. Because I feel like
with a tiny mouse, it really makes
your fingers cramp. And having a nice mouse that's appropriate
to your hand size, you can go to a store and really try them and see
if you like them. You just have to make sure
all of the surface area of the fingers are able to
really touch the mouse. Instead of editing
with your fingertips, which gets tiring really fast, you should choose a mouse
that you can really wrap your hand around and
really rest on it, which makes editing a much better experience
just because of it. So in this case, for editing with the mouse, it's not a race, but it's a marathon on how long you can
actually edit for, which makes a big difference. So with that said,
now it is your turn. Maybe you don't have
the best mouse. Maybe you have a
really small mouse, ones that are really pocketable
and really portable. If that's the case,
maybe you should consider if a big
mouse is good for you. When I was a teenager, maybe my fingers didn't
used to cram so much. But now as I'm older, it really starts to
make a difference.
5. Customize Shortcuts for Maximum Speed: In this one, we will dive deeper into the
potential that we can truly get from this program
by customizing a few things. For example, when I add it, I have my right hand on my mouse and my left
hand on my keyboard. And every time I would
do certain shortcuts, I would realize that I would waste my time taking my hand off of the mouse or taking my left
hand to do something else. So just like typing, the best way to type
is where you have a fundamental position
and you don't move, you don't go right or left. You always stay in the
fundamental position and you can reach all the keys without
moving your arm like this. I thought I would apply the same techniques
for typing speed, but this time we'll use
it for editing speed. And as a consequence,
my right hand will always be on my mouse. I will never leave the mouse, and my left hand will always
stay on the left side of the keyboard where it's most comfortable for typing
or anything else, but it will just stay
on the left side. So the first custom
setting that I want to show you might
not be for everyone. So I'd like you to watch and see the effects and
see if you like it. And if you do like it, then
you can apply it later. So what I'm talking
about is the timeline. So if I play the video and let the timeline
go to the right, it goes past wit
and it disappears. And if I pause with space, it automatically teleports me to where the timeline
is right in the middle. And this can be pretty
annoying, at least to me. So what I do is I go on edit, I go on preferences timeline. So timeline again on timeline
playback auto scrolling. I would like smooth scroll. This is my favorite. So I go anywhere, and then I press Play,
see what happens. The timeline is
always on the middle. And this is my preferred method where the timeline says
always in the middle, and all the videos actually
go from right to left. This is especially useful
if I want to go here, for example, on the
right, and I click Space and pause, play
and pause again. Immediately, it teleports me to where I want to be
opposed to the other one, where I would pause, and
it would teleport me, and I wouldn't know
where I would be. So for example, I go to the left where I want to
be and I play immediately, teleports me to
where I want to be. It's a small thing that didn't really bother me
in the beginning. I didn't really care, I didn't even know
there was a problem. But as I was editing, I kept being slightly
frustrated over the years, and I had to Google, and this was the best
solution I got. And this with some
custom shortcuts that I'm going to
show you will really, truly elevate how you move around and maneuver
inside your timeline, which is really important. We're now here again. If I go on Edit and then
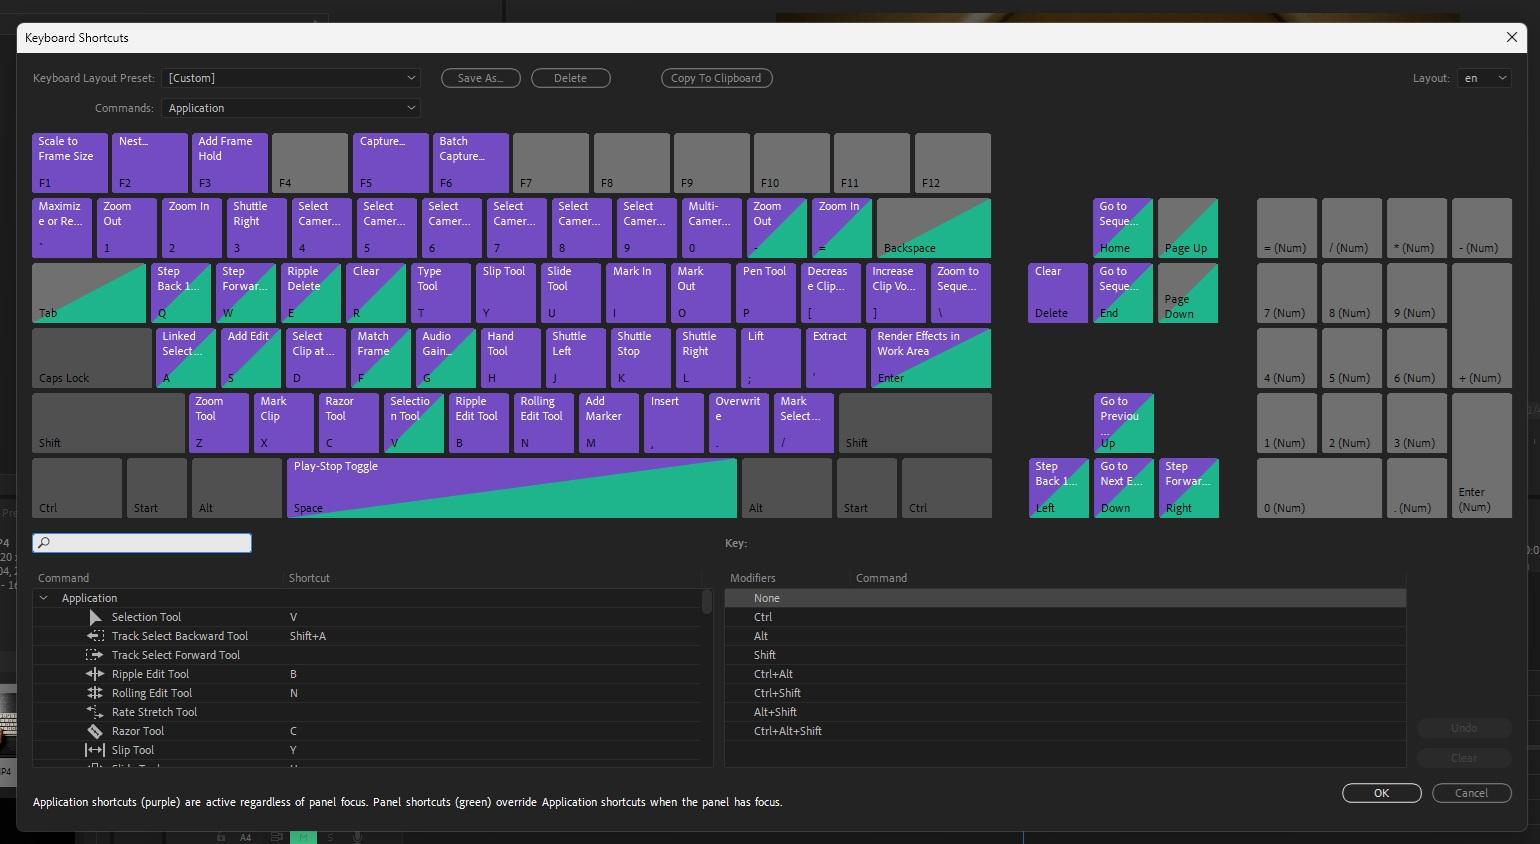
keyboard shortcuts, it will open this big window. This window basically determines every type of
shortcuts you have, and you can change them all. You can change
everything you want. This is key for faster editing. Now, it might seem overwhelming at first,
but don't worry. I'll go one by one, one thing at a time so you can understand and build up the
things that you really care. For example, I would say this right side here
of this keyboard, I don't even use it. This is all default
here on the right. I don't use it all. Only here on the left side
is where I change. So to better customize, you'll click on two, for example, I will want to zoom in or out. This
is what I'm going to do. Here, you can search Zoom in. In this case, you can
right click and press two. And automatically
applies. So you see here, the Zoom has the equals button, which is the default button. I don't use it. And I just
edit eight number two. So every time I click on two, it will automatically
zoom in. Simple as that. And the same you can
do for Zoom out one. That's it. The minus is the
default. I don't remove it. It's there, but I
don't really use it. It's the one that I use. So one and two will
zoom in or out. So I click Okay, and
now you can see, two will zoom in. One will zoom out. So this is really useful to
move along your timeline. So I want to go here. I want to edit.
The smooth scroll has always the timeline
on the middle. So I click space and
I pause immediately, teleports me to where I want. Now, what I want is
to zoom in so I can edit and see more specifically what I
need to change and cut. So I click two, two,
and just like that. I'm really close, very
comfortable for me to cut, edit, something like this. And if I want to edit
something behind, oh, no, I want to edit
something behind. I click 11 to zoom out. I drag the timeline to the left, click space and pause again. It teleports me to to zoom in, and immediately, I'm there. It's so easy. That's
how I move around. Before, I used to always tweak around with
this thing here. This and then here, and then I would zoom in again. But this just takes too long. Having a custom button just for zooming out and zooming
in is way easier. This is the easiest way I found
to navigate smoothly like butter throughout my
timeline and edit bits and parts here and there
on the left or right. If I want to go right or left
and zoom in and zoom out, this is the easiest way. And it makes the editing
process that much more smooth and more fun for you to
change around things. And there is two more
custom ones that I find really useful as so again, I go edit, keyboard shortcuts. And it's Q and W. You see it
says step back one frame. If you want to do
it, you go step back one frame, you remove it, whatever you want,
or you just go Q, and you see the other key is the left one
for the arrow key. And you see beforehand, I used to use the arrow
keys all the time, left and right to go one frame left and right to
go one frame right. The problem was
having to take out my right hand off my
mouse and having to go to the keyboard and then
press left or right to go one frame back or forward
just takes a lot more work. And I noticed that if I
just changed to Q and W, so Q is one frame back
and W is step forward, one frame, it will just make
things that much easier. This is especially
important if I'm tracking something frame by
frame and masking out. In this example,
I go WWW or QQQ. You see, how it just like this, I can move around
so much easier. And the last custom shortcut that I'm going
to introduce here in this class is also
a very useful one is if you're editing a really
long clip, for example, of me talking like this and I want to go through it faster, you'd usually click L default. And you can see the more times you click L, the faster it goes. This is a really useful
shortcut to roughly cut everything and go
through stuff much faster. However, it's the button, the L default button, which means either my
left hand has to jump to the right or my right hand
has to get out of the mouse. As you can see, L to
speed up is shuttle right and K to stop is shuttle
stop K. In this case, I use three for shuttle
right, shuttle, right. You see, I only need one. One of the keys, which
is number three. I don't need the shuttle
stop because the space bar, if I click on pause, it
will automatically pause. And as I'm editing,
I click three, three, three for faster. And if I need something,
I pause and I go back. I never needed the two keys. I only need to go faster forward because when
I pause, it pauses. So anytime I'm editing, I go on the left here, I go zoom in, and then I three, and I go much faster. Before, I used to jump every time to click on L specifically, which was useful but just
really annoying over the time. With that said, I would
like you to experiment. Maybe one, two, three are different buttons that are
not so useful for you. Maybe you would rather like
maybe F one, F two, F three. These are things
that you can change around depending on
your preference. If you like them, change them, experiment them, and
maybe get used to them, maybe play around and get used to how you move around
in your timeline, zooming in, zooming out,
dragging the timeline. These are really fundamental
and really important things you'll have to do anytime
you edit a video. So best of luck.
6. How to Cut Faster and Smarter: The last lesson we covered how to maneuver
in your timeline, and I think that compiles about 30% of what you do inside. And I think the most basic tool, the one that you use most of
the time is how to cut Avio. So this lesson, I
will solely focus on this one thing and you do it
right from the beginning. It is really crucial to learn this because we
cut all the time, and in the long run, it significantly helps you
to add it much faster. I remember when I first
opened this program, I learned how to cut
using this razor tool. I would click and
then select tool, and then I would delete
it just like so. Really, really slow. And I'm going through
a very common example where you have two
individual videos, and you want to cut here, and then this video goes here. Usually, what I would do
is left click, cut, cut, V, select, delete, and then right
click and ripple delete, where it would just
combine both together. These were a lot of steps. So instead, I found out the best way to do
this is by actually, again, doing the
keyboard shortcuts. So this is what I
did differently. So R will be clear, which means to delete. So you clear and see here, I selected R. And then E
will be ripple delete. Riple delete and you add E here. And then D, it will be Select clip at
playhead. Don't worry. I know it might
sound overwhelming, but it will be really
easy once you notice. So you select here and put D, and S will be to add
edit here to add edit. So before I explain it, I will give you a
simple demonstration on how I actually cut
things day to day basis, just like so. Do you see? I was really quick. Maybe you didn't notice.
Let me do it again. So Just like so, it was that easy. So if you compare this with
cutting with the shortcuts, do you see how much
more time you save? Knowing how to cut properly
makes a whole difference. Makes a night and day difference on how fast you
can actually edit. Cutting is fundamental, and this is the best
way I have found. So with the custom
binds already set, I will explain how I do it. So I go where I want to cut
and I click S, and it cuts, and then I click D. D will select anything that's
on the timeline, which in this case is this
little area of the video. And then I click E, where it will delete and
immediately match them together. E. It deletes immediately
mashes them together. In case you don't want
to mash them together, you just want to
delete, you go S, you go S to cut, D to select, and R to only delete,
just like so. So again, S to cut, D to select and R to delete. I can delete anything
with R just like so instead of using the
delete button where I would always have
to shift around and jump my fingers
to the delete button, this by deleting with R
is much, much easier. In case you want to delete and mash together, you click E. Immediately, it does
everything automatically. It's that much easier. If you have a lot of videos
on top of each other, you might see some difficulties. So, for example, I
have this text layer. And I want to cut it. See, I only cuts here,
these two. But why? Because you haven't selected here the targeting
for this track. Let's see. I want to
cut anything that are selected here on these
tracks and I click S. Okay, now it selects
everything. It cuts everything. If I click D, it selects
everything again. And if I click R, it
deletes, just like so. So this is the case
where you want to cut the ending of the video. So what happens if, for example, I want to cut the beginning? So I have the beginning
and this is too much. To cut what's on the left, I will go to desired place, click S to cut, Q to go one frame back, and then, D will select
what's on the timeline, and then R to delete or E, if you want to delete
and then put it back. So you cut with S,
if you click D, it will select the forward, what's on the right, but
that's not what you want. You click Q to go
one frame left, you click D to
select, and then E, E, deletes and shifts immediately where the
original point was. It's that easy. Once you get the hang of it, you'll see that you'll cut
so much easier, like so. Especially if you have
a long video where, for example, this video, I'm talking to the
camera a lot and I need to cut the parts that
are just necessary, too much pauses, maybe mistakes. This makes it so much easier to now cut how
you want to cut in just a few simple clicks
instead of moving around your hands or right
clicking your mouse, it's just so much
easier this way. It removes all the. All the fluff is gone, only
the necessary steps are here. Now, it is your turn. You probably seen how much faster it is to do it this way. If you're interested,
do follow how I am doing things with
the custom keys first. On your timeline, put a
video and then practice, practice cutting from
what's on the right, and then practice cutting
what's on the left. These two techniques
are fundamental to cut. Just make sure your video is
selected here on the left, where is the toggle track
for this line here. If you want to cut
the text layer two, you toggle V two because
the texts on the Vt, so you S Q, D, and then E. That's so easy. Best of luck. Do practice
this is really important, and best of luck.
7. Save Time with Custom Presets: I've seen many
that when editing, they don't use any
presets whatsoever. Anything you do repeatedly, you should have a preset for it. Trust me, if you're working for a company
or a client that has a specific style you want to use over and over again,
use a preset. If you editing for a
long time and you have your own style and you're doing the same things over
and over again, use a preset because if you have to repeat anything
over and over again, you skip all the steps by just clicking and
dropping a preset. It's that easy. So if you add any effects, you go here to this window
and you can see here. There is a folder
called presets. I will first teach you how
you create any presets. So, for example, if
you have, for example, a certain style of
text, a certain font, I always use, for
example, he Vertica bold. Think of this text
as a subtitle. Because it's a
subtitle, I will put the font and size a bit smaller. This is a subtitle. Every time you do a subtitle
on a different video, you don't have to do all
of these steps again. All you have to do is go here. Right click on the text
and save as a preset. You can name it, let's
say, test subtitle. Click Okay. I'll delete it. And the next time
on another video, I have to create a text
layer just like so, and I go to my presets
folder here on Effects presets
here, Test subtitle. Left click drag and
drop immediately here. And just like so it's there. You can edit, and then you
can change the subtitle. It always has a uniform
and same style, which is so important. Presets can be
used for anything. It can be used for
color grading, text, effects that
you use all the time. It can be used for
basically anything. I will show you my list
of personal presets so you can maybe go
around and use them. For example, when I do an old
video or nostalgic video, I prefer to instead of having 24 frames per second,
30 frames per second, I prefer to have 18, so you have this jittery effect, and it makes it more nostalgic. In this case, I'll just go here, click and drag and drop, and then you see immediately it's like 18 frames per second. Another useful one maybe
is to flip horizontally. I use this a lot of times
to correct for things. So if I'm going left to right in a video and I don't like it, and I prefer to go from
the other side, I go here, flip horizontal drag and drop, and it flips horizontally. That easy. Lumetric color will just do some
color correction. I use this because I
do this all the time. Or radio voice. This is a really useful one. Sometimes I like to change
my voice a bit to make it a little more interesting
radio voice is one of the ways that I actually
use to sound different. You see texts, small, Helvetica texts from different colors that
I use all the time, the subtitle. That's basically. Anything you use all the time, you should have a preset for it. With that said, what things do you maybe use all the time? Do you use the same font all the time and the
same positioning, for example, for a subtitle, or do you have some animations you want
to save up and use it all the time that you
just click do the work once and then click drag
and just have it on the go. With presets, you can do all
of that. Take your time. Think about the things you
really repeat because you will save a long time just by
doing this, best of luck.
8. The Ultimate Editing Speed Hack: The thing that really up my
editing pace and quality was actually with a
completely free plugin. Use several ones, but this one that I'm going to
show you stuck with me. It's simple to use.
It's completely free. Of course, they
have some premium packages if you
want to buy them. But let me show you what it can do just completely for free. So if you install
Premiere composer for your Adobe
Premiere software, you can go on Window
Extensions, Premiere Composer. You open and you see
it's this simple. You have all of these really
useful animations you can use and transitions and
stuff like that you've probably seen on YouTube
videos that I don't ever use. And simple things, arrows,
some animation, squares. And maybe some useful
sounds that you can use. These are the free things that come with the
software alone. I have to say,
simpler is better. I don't use all of them. When I first learned about it, I used to use all
of these effects, maybe a bit too much, but I think just using the simple ones really
goes a long way. For example, one, I go from
here to the editing screen. This transition was like that, or you can go left
or you can go right. These things are really nice. For example, this
text that seems to be written, I go here. Left click and drag, Helvetica. You can change to
anything you want. And then this is really cool. And as you see, if I play the
video, this is really cool. Yeah, it's blurry, again,
because it's one fourth, but if I play on full,
it looks better. This is really
cool. Just like so. See bit lagging, my
computer is not that good. That's why I edit
mostly on one fourth. If, for example, I want to do this animation from let's say, from these two clips. So here to there, I will pan, let's say, you can pan to the
right, pan to the left. You can do anything.
You can rotate, zoom in, zoom out. Let's do pan left. Like so. You drag, you see
where this cut is, it has to coincide
with the same cut. Wait. Just like that. So easy. I used to do all of these transitions
manually by adding blur, adding movement, and
it would take so long. And with this
completely free plugin, I'm able to do all of these things by just left
clicking and dragging. It's that easy. I completely recommend this one. No one paid me to say this.
I tried several ones, but this one is the
one I like the most. One other cool thing I
notice is if you go here, you can set a folder on your computer where you
put all the things. For example, if I add a folder with stuff,
for example, here, I can add a folder of
videos and stuff like that, stuff you use all the time. So, for example, maybe I use this super eight
layout all the time. This alongside with
my other preset, the 18 frames per second. It makes stuff look much better. I use some of these things, maybe some sound effects
that I use all the time, grain, old film, camera sounds that I took from epidemic sounds or
these pause effects, animations that I did it by hand and then saved
it here in this folder. These are things I don't
want to go around on other things and search
it on the correct folder. Everything here is organized, and I have everything
that I use all the time. I think this is the ultimate
way to have your things organized and to do animations and simple things
that you'd like to do. I would say you five
times your editing speed if you combine all of
these techniques together. No, it is your turn. If Premiere composer sounded really cool, it's
completely free. You can go and
download the plugin. Just remember, you
have to afterwards, go to Windows extensions
and then Premiere composer, and it will open the
window like this. I usually edit like this. And if I need, I just
go down and click and drag and then go back down because I don't
have a second screen. It's such a good plugin. It's the best one I found of
the several ones I've tried, and it's really useful
because you can add your own folders with your own things that you
use also all the time. If you have a certain style, it just makes the whole
process much smoother. If that sounds good, best of luck installing it and
customizing everything. I'll see you in the last one.
9. Final Tips & Outro: Thank you so much for
reaching the Annabs course. If you like optimization and using your time
the best way possible, I made courses
about typing fast, which you can literally use everywhere and how to
best study anything. I have a master in physics, and I put into action
these techniques so I could minimize
the hours I would study and maximize
the hours I would do classes like this
or YouTube videos. If you're watching this course, chances are you're
also making videos, and I've made a course
about that step by step how to make
your best video. Everything that goes
around the story that's the most important part. Feel free to check that out. And feel free to also check out my YouTube channel where I do
a lot of nice storytelling, cinematic storytelling that have nothing to
do with teaching. This is completely different
from what I do here. I hope I got to triple
your editing speed by just combining everything
you've learned together. Feel free to leave a review. It really helps and
don't forget to share your optimal desk seven. If you have any questions, feel free to ask them
in a discussion tab. I checked it every day. And with that said,
I wish you the very best for your
future video edits. Thank you very
much for watching.
 Edi Liang, Physicist + YouTuber