Transcripts
1. Introduction: [MUSIC] I find that one of the
best parts about traveling beyond the actual act of
traveling and all the excitement and adventure that you experience
while you're doing so, is the ability to go back
later on and relive some of those memories and share some of those experiences with
people that you love. Hey everyone, my
name is Sean Dalton. I am a travel photographer
based in Bali, Indonesia, but today I'm actually solo
traveling in Venice, Italy. I thought that this short
trip to the floating city would be a perfect
opportunity to share with you guys how I best approach documenting my trips and my
travels across the world, and also how you can do so in a way that's
effective as well. We're going to start things
off talking about cameras and which camera you might want to use for documenting your trip. Whether that's a smartphone, a mid-range point and shoot, or a professional DSLR. Then we're going to talk about some overall philosophies and approaches to
documenting your trip and making sure that you're documenting your trip
in a way that doesn't get in the way of your
actual traveling experience, where you can take the
photos that you need, but not be overly burdened by your camera or by the actual
process of documentation. After a few short
photography lessons on the canals of Venice, we're going to come back
here and I'm going to show you how you can sort and organize and also edit some of the images that you captured
while you're out and about. Then we're going to talk
about how you can best share those images with
people that you love or at least put them
in a place where you can easily access them in the future and truly relive those memories
for years to come. This course is for anybody that might be looking to travel soon and or maybe you have
aspirations to travel, or maybe you've traveled
in the past and you realized that you
had this epic trip, but now it's all a blur and you didn't
properly document it. Well, this course will help
you not repeat that mistake. You don't need any fancy cameras to take this course either. You can do everything
on a smartphone. We're actually going
to be talking about the smartphone a
lot in this course. You also don't need any
photography skills in general. This course is relevant for a complete photography beginner, but it's also
relevant for people with a bit of a
higher skill level, who are looking for
a different way to document their travels. No matter who you are, if
you're watching this course, it's clear that you do enjoy
traveling like myself, so why don't we start talking about how you can best document your trip so you can be prepared for your next
traveling adventure. [MUSIC]
2. Class Project: This class, like all my
classes here on Skillshare, does have a class project, but I want to keep it simple. I want you guys to go
on a trip somewhere. It can even be a nearby city, a nearby town, whatever, capture a series of photos and then come back
here to the course and post 3-5 of your favorite
images that you captured. These might be random
things that you saw while you were
walking around town, or they might be more
planned out specific shots that you really had in mind. But no matter what
those images are, go ahead and take those
images and post them here in the class so we can check those out and comment on them as well. Now, I recognize that
not everyone can realistically travel
abroad right now, but you can have an amazing
mini travel experience by going somewhere
near your hometown. For example, I was visiting my sister in
California and we went to a little town
about 30 minutes away from where we grew up. We walked around, ate some good food,
went to a museum, and had a lovely day
exploring this little town. I took a ton of photos because it was a
great experience, and I really wanted to remember this
experience that I had with my sister on a
sunny day in California, walking around this
old, little town. That was important to me,
so I'm glad that I brought my camera and took those images. Now, if you're not
necessarily interested in doing that, that's totally okay. You can write a
short description of a trip that you'd
like to go on. Maybe tell us about some of the things that you
aspire to do when you're traveling in that location and brainstorm a little bit for photos that you might
want to capture while you're traveling
there in the future. But no matter what you share, I'm looking forward to
seeing it and you can post your class project after
you finish the course, after you go through
all the content, or if you're feeling inspired
midway through the course, you can go out and take
those photos or write that description and post
them whenever you're ready. But now that we've
talked about the class project for this class, let's move on and start
talking about some of the approaches that you can follow for documenting
your trip.
3. Your Goals with Documentation: One thing I think
everyone needs to spend time reflecting
on before they go travel is how
much energy do you actually want to put into
your documentary process? Documenting your trip can be as intense or as simple as
you would like it to be. For example, you could
go on trips where the only main goal of that trip is to capture beautiful images. You're waking up at sunrise,
you're going hiking, you have a ton of gear, you're location scouting, etc. The whole trip is
revolved around taking beautiful photos or, I think where most
people fit in, photography can just be a
secondary thing to your trip. Where you're just
capturing images, just to simply
document the things that you're doing on
a day-to-day basis. You go eat at a good restaurant, you want to take
some nice photos of the food that you had
and just to remember that experience or just take some photos of
the city that you're visiting so you
remember what it was like when you were there. I personally do both. I love those crazy photography
adventures where I'd go out and the only goal is to take photos but I also like
these more relaxed trips, where I'm going to museums,
going into restaurants, exploring a city and just documenting some of
the things that I see. Just before I came here
to Venice yesterday, I was actually up in the Italian Dolomites in the
Alps with my friend Eliot. We were there for a week, shooting the mountains
and shooting the trees, and just trying to
photograph this place in the most beautiful
way possible. It's hard work when you're doing something like that
because you're waking up every day at sunrise
and you're just doing everything you possibly
can to get good photos. Now this trip in Venice is
not necessarily like that. I would love to come away
with some beautiful images. But like I said, this
trip is more aimed at just experiencing the city, seeing some of the sites and documenting my experience here. I want to be able
to look back at my experience from
Venice in 5, 10, 25 years and just remember what the four days that
I had here were like. For me personally, it really
does depend on the trip, but I always spend time reflecting on what I
want to get out of the experience and how far I want to take this
documenting process. I think it's important
to have that in mind before you go travel so
then when you're traveling, you know your boundaries with photography and how far you
actually want to take it. I think this is a really
important thing to do because it does impact your overall
presence while you're traveling. When I say presence, I
mean your mindfulness, your ability to truly
live in the moment. For some people, having
a camera almost gets in the way of their
overall experience. This was actually
the case for me when I first started photography. I used to have a
little DSLR camera that I would take a
lot of photos with. But I went to Europe
when I was in college and I
actually didn't bring my camera because I felt
that it was so difficult for me to separate creating, making images and having this amazing travel
experience at the same time. I just felt like I
couldn't do it because I felt like the camera was just sucking me out of
that moment in time. I actually decided not to
bring my camera with me to Europe on that trip
because I felt that way. I ended up taking a bunch of
photos on my iPhone anyways, so I couldn't fully separate myself from the
photography experience. But I know for a
lot of people that is a stressor and
it is important to come to that designation
before you travel is what type of role is photography
playing in this trip? Is it everything to me? Do I really need
to come away with all these amazing
photos or is it just a simple way for me to document the trip
that I'm going on? Now, the actual specific camera does have an effect on this. In the next lesson,
we're going to talk about some of the cameras
you might want to use, everything from a smartphone to a professional DSLR and help you decide which one is
best for what you're trying to achieve on
your specific trip.
4. The Best Travel Cameras: When it comes to taking
photos or videos, of course, you need
some type of camera. In this day and age,
a smartphone is absolutely amazing for
documenting your trip. You can do a video,
you can do photo, you can write text, I mean, it's just an incredible tool. If you only have one of
these and you don't have a dedicated camera,
that's totally fine. You can do everything you
need on a smartphone. I actually use my iPhone
probably more than my other cameras for documenting my trips just because it's
always available to me, the images look great and it's
just a nice tool to have. But I think there is a case for having a dedicated
camera as well, having something like this. This is a Fuji X100V, and this is probably my
favorite camera right now because of the fact
that it's small, it's light, and it
looks really cool and it also takes amazing photos. It's nice to have a
dedicated camera. I'm not like holding my phone all day and looking
at my phone and reading texts and that can pull me out of my
traveling experience. Having something like this, a dedicated camera that isn't
connected to the Internet, where I can just snap photos of things that
look interesting to me, I can go on little photo
walks throughout the city. This is really probably my favorite little travel camera for documenting my trips. I probably use it less than the iPhone because the
iPhone is always with me, but I really do
love this camera. I'm using it a lot,
so I definitely recommend little mid-range
cameras like these. Now this specific
camera actually doesn't have a zoom lens. One of the things that is important for
travel photography, if you're trying to capture a wide range of
different photos, is to have a camera that
can zoom in and out. A lot of little point
and shoot cameras like the Sony RX100 series, I'll put a link to those in the description of this course as well as all the
other cameras I'm going to talk about in this class. Those cameras are
great because it's small and it can
zoom in and out, so you can get a wide
range of photos, you can shoot wide
scenes, big landscapes, and then you can zoom in
on specific things and get really tight
detailed shots as well. For the everyday person, I think having a camera like that or having a
camera like this, the Fuji is just a really great
travel tool if you're not seriously invested in
photography and you're not necessarily looking to capture the most amazing photos ever, but you do want to capture some really solid imagery and just remember some of the things that you
see on your trip, these type of mid-range little cameras are
perfect for that. But if you are
somebody that's much more invested in your craft, much more invested
in photography, you can definitely use
something like this. This is a professional DSLR. This is a Sony A7III, and it has a 24-70 lens on it, which means I can
zoom out and shoot wide or I can zoom
in and go close. I also have other lenses
with me so I can take this lens off and put
other lenses on this. Now this is much more of
a professional setup. When I'm using a
camera like this, I'm in work mode and this isn't something
I like to carry with me when I'm just
walking around through the streets because I
feel like it's big, it's bulky, and it just
doesn't make me necessarily inspired to take
different types of photos like something like
this little Fuji would, or maybe even an iPhone would, because it's just
so simple to use. This is a much more
hands-on process. Now if I have a very
specific photo in mind and I think why I really
want to get that photo, this is exactly what I
want it to look like, I'll approach it from a
more technical standpoint and I'll use
something like this. But like I said before, this trip for me here in Venice isn't necessarily
that type of trip. I just want to relax and hang
out, have a light setup, and explore the city on my own two feet without carrying
a bunch of gear around. I'm not really going
to be shooting with this camera too much
during this class, maybe a little bit, we'll see. But for the most part, I'm going to be shooting
with my little Fuji here, as well as an iPhone. Now in terms of which
camera is best for you, there's a lot of
different cameras on the market and there's people on YouTube that dedicate there entire lives to reviewing
different cameras. But I would definitely recommend
the Sony RX100 series, I would definitely recommend
the newer iPhone models. This is the iPhone 13
Pro and it's incredible. It has a zoom lens, it has a wide lens. It just takes amazing images, and also for you
photography purists, I would definitely recommend
this little Fuji X100V. It has a fixed lens, which means it can't
zoom in or out, but it simplifies the
shooting experience. It makes me want to take more photos and I just
shoot in aperture priority, which means I
select the aperture and the camera does
everything else. It's pretty hands off and I just really enjoy shooting with this. But I do urge you to find a camera that's best for
what you're looking for. You don't need a big DSLR to get the photos
that you often need. It's a big camera and
it can get in the way, and it's also much
more expensive. But if you are
seriously dedicated to photography and you really
have these images in mind, a camera like this might
be for you as well. It really does depend on what your intentions are
for documenting your trip and what you'd like
to get from the experience.
5. Documenting Intentionally: One thing you need to
be careful of with photography is getting trigger happy and just taking photos of absolutely everything
that you see. I'm certainly a victim of this. I've gone on trips where I've captured thousands of photos, only to find later on
when I'm looking at them that I'm completely overwhelmed
by the amount of images, and I never take the time
to go through them all, and sort them, and
publish them later on. I think it's really important
that we really take the time to evaluate
scenes in front of us and think through
shots before we take them instead of just spraying and praying and taking
a ton of pictures, hoping that one of them
will turn out nicely. I think the best way to do
this is just to really be intentional with every
photo that you take. When you're walking
down the street and you see something interesting, take a moment and just see
everything for what it is and take it in before you actually raise your camera
and take a photo. Slowing down and doing this
will allow you to determine the best way to
capture that scene. This will not only allow you to take more high-quality photos, but also less photos that
you'll never do anything with, and that will just slow you
down later on when you're sorting through your
photos and you're editing them at home. Another thing to
keep in mind with documenting intentionally is, do you want to tell a
story with your photos? Do you want to tell a story on each day where you're
waking up and you show a picture of your breakfast
and then you're just going throughout your day and
it's a linear story of your entire trip, or are you not necessarily
fast about that, and you just want to remember specific moments on your trip, and just some of the
beautiful things that you saw when
you're traveling. Just keeping a mental note
of this can be really helpful for you while
you're taking photos, so you know which photos
that you need to take, and which photos you don't
really need to take. Now one thing to know about documenting your
trip with photos is not every photo that
you're going to capture has to be
this incredible, beautiful image that you're
going to post online, and put on a postcard and do
all these crazy things with. You can also just take
snapshots as well. Simple phone snapshots
where you're really not fussed about how the
image necessarily looks, but you just wanted to capture that specific moment in time, maybe you saw
something interesting. For example, last night I was walking and I saw
this little dog sitting in the doorway of a little shop and I was
like, oh, that's cute. My mom would like
that, she likes dogs. I just took a crooked photo of this dog and it's not like a
beautiful photo or anything, but it shows this dog sitting in the doorway and that's
what I wanted to show. Snapshots are totally fine. Not every photo has to be this incredible grand, well-thought-through
technical photo. If you're not into that at all, you don't have to
do that at all. You can just take a photo
for what it is, a snapshot. But I still think it is
important to focus on what you're trying to achieve
with your photos. This, once again, just all comes back to what are your intentions
with documenting your trip? Do you just want to
capture the moment or would you also like to have some nicer photos
that are well-thought-out, the lighting looks nice, and just a photo is
a beautiful image? I like to have both of those, I like to walk away with, yes, some simple snapshots, but also some really beautiful
images that I'm proud to share online.
6. Things to Look For: Like I said in the last lesson, there are two types of photos
I like to take on my trips. General snapshots
that aren't made to be particularly beautiful, but more so just to
capture the moment, and also photos that are
quite beautiful that really do capture a scene
in a beautiful way, and photos that I'm proud to share with friends and family. This second type of photo
is a more engaged process. This is where you might want
to slow down and take in the scene and capture it
in the best way possible. I think there are four
things you should be looking for in order to capture
photos like these. Those four things
are subject matter, light, color, and composition. Let's talk about those now. Subject matter is the
actual thing in your photo, the actual subject
in your photo. Shooting interesting
subject matter can often lead to a good photo. For example, I've
been really drawn to the old architecture
here in Venice. I think it looks really
cool and it just looks nice in photos as well. I've been taking a
lot of photos of old doors and rooftops
of buildings, always just looking out
for things that are culturally interesting,
visually interesting, socially interesting,
whatever it is, if it looks cool or fascinating to you,
take a picture of it. The second thing I always
look out for is light. Cameras actually capture light. That's how an image is created. Light is very important for photographers
that's why a lot of photographers like to shoot
at sunrise and sunset is because the light is nice
and soft during that time. But you can take photos at any time of the day and
they'll look great. I'm always looking for interesting ways that
light is hitting things. For example, I woke
up this morning in this beautiful apartment
and the light was spilling in through the windows and it just looked gorgeous. So I snapped a few
photos of that. In a lot of my
photos online you'll see that I really do
place an emphasis on light because that
can really help shape the photo and make what might
look like a boring scene, make it look quite interesting. Always be on the
lookout for lights and always be on the lookout
for color as well. We're humans, we love color
and color is everywhere. It's naturally occurring,
it's man-made, and it can really make
or break a photo. Here in Venice,
there's a couple of streets that are
really colorful. I'm looking forward to
go checking those out and seeing if I can capture
some of that color. The last thing everyone
should be thinking about is this concept
of composition. Composition is essentially
how all of the elements in your scene in front of you
are arranged in your camera. A photo with good composition is usually just much
easier to look at, your eye will naturally move from one side of the
frame to the other, and it'll pick up on all
the most important details and it won't get trapped in
certain parts of the photo. When it comes to composition, there really is no right or
wrong as to how to do this. Each scene is so unique. It's hard to teach specific
rules about composition. If you're even thinking about composition
and you're thinking about how you can best capture
a scene in front of you, that puts you ahead of 99 percent of other people that are out there
taking pictures. Like I said it earlier
on in this class, before you take a
picture sitting there and really taking
in the scene and evaluating it and looking at all the different details and then deciding how to
best photograph it, is the best thing
that you can do to ensuring that you're
capturing beautiful images. One of the best tips I have
for composition is to just try to photograph a scene
from different perspectives. Perspective is how you orient yourself in accordance
to your subject matter. For example, you're going to see when I'm out
shooting later today, I'm going to photograph
something wide, I might shoot it from far away, and then I might move a little closer and photograph
it up-close, maybe from the
side, from the top, from the bottom, etc. I really do like to photograph things from
different angles, and I like to walk
around something as I'm photographing it so I can identify the angle in
which it looks the best. There is one more thing
I think we should be looking for when
we're out shooting, and that is human interests. As human beings, we like to
see other humans in photos, and just having a
human in a photo makes an image much more powerful and much more relatable
to the viewer. I was out walking
through out Venice last night and it was blue hour, the sun had just gone down, and all the street
lights were on, and it looked
absolutely incredible. I captured a bunch
of different photos, but all my favorite ones were the ones that actually
had people in them. Like this particular photo, the lady is walking
under the light. I really do love this image. It's a great photo and
I'm happy that I did take the time to go on that walk
and capture those photos. Those are some of the things
you should be looking for if you're trying to capture
this beautiful images, is interesting subject
matter, light, color, composition, as well as having a human being
in your photo as well.
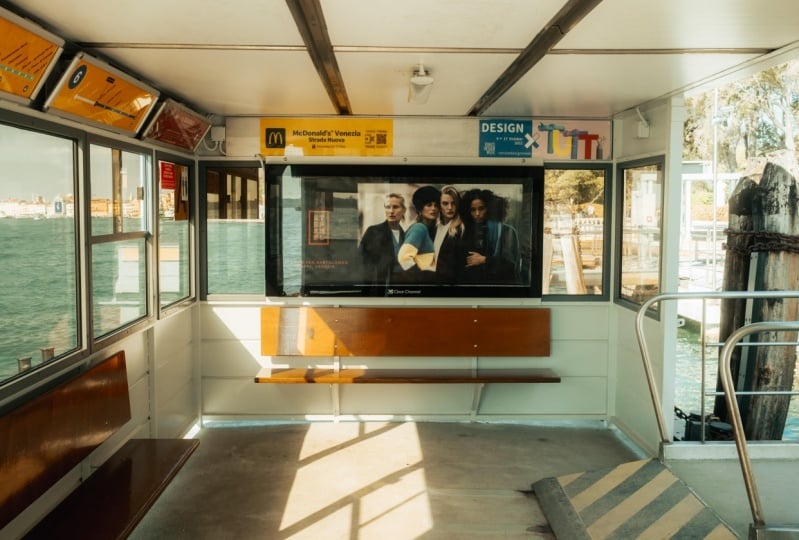
7. Hitting the Canals!: It is day two here in Venice, and it's finally
time for me to get outside and do some exploring. I'm very excited to be here. From what I've seen so far, this is an incredibly
beautiful place, not overrated at all. It's exactly what I
was expecting to see. It's beautiful, it's old, there's so much
history and character, and I'm really excited to
capture some images here, and also just see the city and document my experience eating, drinking, seeing the sights, and generally just
having a nice time. Today is going to be spent just walking around, exploring, capturing images, and
just trying to see the city for what it is
and take everything in. I really do want to document
it as best as I can. I want to take
snapshots of some of the things that I'm doing, some of the things
that I'm eating, but I also want to
capture some more artistic photos as well, and I want to do so in a way that's not going to rip
me out of the scenario. I don't want to be
glued to my camera. I want to be able to
be in the moment. I'm focusing on
documenting intentionally, and really trying to capture the photos I need
so that I can put my camera away and be
present in the scenario. That is my main goal today, is to really explore the city, but also capture
some nice photos, live in the moment, and just
generally have a good time. Why don't we head out, capture some images, and see what Venice
is all about.
8. How to Photograph a Place: I'm currently in Murano, which is a little island
right next to Venice. I think this is the
perfect location to talk about the next concept
in this course, and that is how to properly
photograph a place. Now it might seem
self-explanatory, you photograph a place, you
just take pictures of it. But I think it's
important to set guidelines or
formulas that we can follow in order to make sure that we're properly
capturing a place but not being fully
consumed by our camera. This allows us to really get the photos that we
need and then we can put our cameras away and
truly enjoy the experience. A general rule I like to
follow for doing this is to aim for about 4-5 wide shots. Shots that show a
lot of the scene. Maybe you're using
a wider angle lens, like the wide-angle
lens on your iPhone. Then once you capture
4-5 wide shots, then you go into
the scene and you find specific things
to photograph, and you capture about
8-10 detailed shots. These detailed shots are
really going to help add to that story of that place. The wide shots are
great, they're all encompassing and they show
everything as a whole. But the detailed shots really
bring everything together. There is a bridge
very close to me now, here in Murano, and I think it's a perfect location to
put this to the test. I'm going to capture a
few wide photos from the top using my
iPhone and my Fuji. I'm going to move to
both sides as well, I'm going to change
my perspective, and then I'm going to walk
down into the scene and just walk slowly and look for interesting things
to photograph. Things that might be
unique to this place. Interesting people,
interesting storefronts, whatever it is,
I'm just going to photograph whatever
catches my eye. Now the exact number of photos isn't actually that important. You don't have to capture
exactly 4-5 wide photos and 8-10 detailed photos. But it is a good guideline and a good formula to follow
if you're just starting out and you feel like your
camera really does get in the way of your overall
travel experience. Not fussed about that, if creating doesn't get in
your way of your experience, then take as many
photos as you want. Throughout my years
of traveling, I've found that I've
been able to develop a pretty good balance between creating and living
in the moment. That 4-5 wide photos and 8-10 detailed photos is just a really good
formula to follow. Let's head over to the bridge and capture those photos now. Moving on to the
detailed shots now, some of the things I'm looking
for while I'm doing this is anything off the bat
that just catches my eye. First and foremost, I'm
also looking for some of the things that
we talked about earlier in this course; light, color, composition, lines, shapes, just really
anything that stands out to me that I think might make a
cool photo or a cool memory. Putting a lot of emphasis
on subject matter, the things actually
that are in my photo, the things in front of me, and maybe it's things that I've interacted with or things that I just really associate with the place that
I've been visiting. In Venice, for example,
the boats come to mind. There's boats everywhere
and I feel it's very specific and
unique to Venice. That is something I
really want to capture in some of these photos
is the boat and the boat culture and
the colors associated with the boats and
everything related to that. You can see some of those
things in the photos. There's a few boats in there. There's a few storefronts that I was interacting
with on the trip. Just anything that I
thought was interesting. I've also edited the photos in a few different styles as well. Some of them I
pushed a little bit more and made up more stylized. Some of the edits
are more natural. There's even a black and
white one in there as well. But some of my
favorite photos of this trip were actually on
one of the boat terminals. In Venice, they have
these boat taxis. It's just like a bus stop like you would see
in a city except for everything is done on these little boat buses
and they're so cool. I was just so drawn
to the light and the colors and the shapes in
this little boat terminal. I just took a bunch
of pictures and I'm so happy with
how they came out. These were all shot
with the Fuji and I edited them to look like film, to look like
specifically Portra 400, which is a very
popular film stock. It has been for decades. Artistically, I just really
I'm drawn to these photos, but there are also a
really good depiction of the boat buses in Venice, which I just thought
was the coolest thing. I'm really happy with how
these images came out. When I look at all the
photos I took of this place, I really did capture about
four wide photos and about 10 to 12 detailed photos. Pretty close to that
formula that we've been talking about
in this lesson. I definitely think
that's a good formula to follow if you're trying
to strike that balance. But that's the gist
of photographing a place and making sure you walk away with just
the right amount of photos and not too many, but I think it's time to
head on to the next lesson. Let's move on to that now.
9. Capturing Local Charm: I've made my way over to another little island in
Venice called Burano. Now Burano is famous for these amazingly
colorful buildings that you can see behind me. The entire island is covered
in these gorgeous buildings. I think this is the perfect
place to talk about, capturing cultural charm
and cultural character. Now everywhere you go
in the world that has some type of cultural uniqueness to it and Venice is probably
one of the easiest ones. Everywhere you
look is culturally different from the
rest of the world. There's these amazing canals
that just span through the entire city and Burano
is just an offset of Venice, really close to it. This place is same
as for, like I said, these colorful buildings. I think one of the best
things we can do when we're traveling is to capture
this cultural charm, capture this cultural
character because it really does stand
out in our photos. I think one of the
best ways to do that to capture cultural trauma, cultural character is
to go for photo walks. Now if you guys have
seen some of my other classes here on Skillshare, you know, that I
love photo walks. I think they're an amazing
way to see cities. They're amazing way to explore. It's also a very
healthy activity creatively because you're getting out there
and you're pushing your creative mind
and things like that. I definitely recommend going on photo walks and much of my
trip here in Venice has actually just been going on these photo walks and
exploring and trying to capture cultural interests
of this amazing city. You can probably
see that based on the photos that I've shown you already throughout this class, a lot of it is really focused on capturing that
uniqueness of Venice. I just wanted to make
this short lesson to talk about how you can use these
creative photo walks. Just walking through a city, instead of taking
a bus or a train. Just go on your feet, just walk on your two
feet if you can, and take it slow and taken
all the sights, smells, the conversations really immerse yourself in the culture
and keep an eye out for good photo opportunities
because some of the best photos of ever
taken were captured on a spur the moment when
I was walking through some crazy city somewhere and I saw something
happened in front of me and I just happened to
have my camera and boom, I caught an amazing photo. Always be on the
lookout for photos and don't be afraid to walk. Because walking is
going to put you in some pretty amazing
scenarios that you wouldn't be in if you took a car or a train or something like that. Now I've already been shooting a little bit here in Burano, but the sun is setting now
it's getting quite dark, so I'm going to use the
rest of my time to capture a few more photos before I catch the boat back to Burano, but hope you guys found this lesson useful. I'll
see you in the next one.
10. Capture Moments with Video: All right, guys,
well, welcome to a completely different room that you guys have never
seen before and you're also probably
wondering why I'm talking into what looks to
be a small ferret. This is just my microphone. I'm actually in
Lisbon, Portugal, and I'm staying in a hotel and the acoustics in this room
are just terrible so I have to keep the mic close
to my face hence why I'm talking like a reporter. But the reason why I'm in
Lisbon now and no longer Venice is because this is the end
of my European travels. I've been traveling in Europe, solo traveling for
about a month and most of the course was
filmed out there and Venice, but the second half
of the course is going to be filmed
here in Lisbon. I have a more stable setup and I'm not on the go all the time, you know when you're traveling things are always on the go. But there is a video that I
realized once I got here, I completely forgot
to film when I was in Venice and that is a lesson
on short-form video. Now, short-form
video, in my opinion, is one of the best ways
to document your trip. I think a lot of
people are put off by it because they're
intimidated by the idea of having all of these
clips and then trying to figure out
how to edit them together and you actually don't need to edit
your videos at all, you can just save those
clips just as you would save photos so you can watch those later on and relive
those memories. The iPhone and
your smartphone is an incredible way to
film short-form video. I have filmed so many
smartphone videos over the years and I'm so happy that I did because I can just open
up my camera roll, go to any of my albums of any of my trips and there's just videos there that I can
watch and just really transport myself back
into that place. I think if you
have a smartphone, you definitely
should be shooting just a little bit of
short-form video while you're on your trips and I
have a few tips for doing so. Now all of the
photography concepts we've discussed in this course so far in the things
to look for lesson, light, color,
composition, wide shots, detailed shots, all
of those things translate perfectly into video. All of those concepts are
exactly the same with video, the only other thing you
need to be thinking about with video is this
idea of motion, because with video
you're capturing a ton of photos all
at once and you can actually capture movement
in motion and that is one of the things with video that you should
definitely be focusing on. When I'm shooting video a lot of the time I like to
move with my camera, so I'll walk forwards or I'll walk backwards or I'll do a pan or I'll look for things
that are moving and I'll film those things and
I'm also listening, I'm also paying
attention to audio as well because audio is
something that we often neglect and audio can
completely make a video hence why I'm talking into this
microphone because I want you guys to have a
good audio experience. So if someone's playing
music or something, just pull out your
phone and record a short video of that
person playing that music, you might not be creating a
YouTube video of your trip, maybe you are, but even if you aren't you will have that clip
to look back on later on. Now the other tip I have for you in filming short-form
video is to film clips that are both
vertical and horizontal. In this day and age, social media
dominates our sharing and a lot of the video that we consume on our phones
are vertical videos. If you're planning to post
your videos on Facebook, on Instagram, on Snapchat, whatever the social media
is of the time TikTok, vertical format is definitely
the way to go because it takes up more
screen real estate. For me personally, I
love to share my trips on my Instagram stories
and we're going to talk about this a little bit
later on in the class, but I shoot short-form
videos specifically for my Instagram stories and then I can save those stories
as a highlight. I have just a really
great documentation of my entire trip with
videos that show emotion, sound, movement, and it's
just very immersive. But I also like to shoot
horizontal videos as well because horizontal videos are great for just seeing
more of the scene. In fact, a lot of the videos that you guys have
seen in this course, a lot of the B-roll
footage was actually shot on my iPhone and I just
pulled it out of our pocket, hit record, I didn't
change any of the settings and I just let
the phone do its thing. You really don't need to
overthink that either, you can just pull your
smartphone out of your pocket, open the camera app, hit record and start
shooting video. But horizontal video is great if you're not planning to
share those videos with anybody or you're planning to edit those into a
YouTube video or something, horizontal footage
is great for that. I just really wanted to
highlight the importance of video because for me
it's an amazing way for me to document my trip
and while this course is focused primarily
on photography, photography and videography
go hand in hand and I don't think at this day and age they're
mutually exclusive. I think if you're
taking photos and your phone or your camera also has the ability
to shoot video, why not just capture
some videos, capture a few clips of some of the things you're
doing and save those. Don't necessarily think about
sharing those later on, just think about
preserving that memory, preserving that moment and
videos do that really well. But now that we've talked
a little bit about video, now let's move on
and start talking about what to do
after you get home from your trip or after
your day of exploring the city that you're
in and what to do with all the photos
that you now have, how to organize them, how to sort them, and how to find a place for them to live for the
rest of your life, whether that's on social media, whether that's in a
travel journal, etc.
11. Sorting & Organizing Photos: You've gone on your
trip and you come home and now you
have hundreds of photos and you have no idea what to do with all
of them because it's so difficult to even just start looking at all of them
and choosing the best ones. I know exactly how you feel. I think a lot of
people feel like that. That's exactly why
it's so important, right after you get
back from your trip or even after you get home
from the day of exploring, is to sit down, import your photos, and start the process
of organizing them. Organizing your photos
and making sure they're in the right place
is so important. For example, when I
was 21 years old, I went on a two-month solo backpacking
trip through China. It was absolutely insane, and I went to some of the
most incredible places I've ever seen, the abandoned section of
the Great Wall of China, all of these amazing places, and I lost the photos, all of these amazing photos. Pretty much my first
photography trip, all I have is like the edited
JPEGs that are low quality. [LAUGHTER] Don't
make that mistake, I really do recommend
spending the time to just organize and sort
through all your images. Now in terms of doing this, it's going to really depend on, number 1, what you're
taking photos with. Number 2, just your
general overall workflow, whether you use a
computer or not. There's so many different
factors that go into this. In this video, I've found a few simple ways that I
think most people can use, most people can follow
to make sure that they're organizing their
photos in the right way. Now first things
first, if you're shooting on a smartphone, this makes it really easy. If all your photos
are on a phone, it's really easy to just select all of the
photos from that trip and then add them into an
album for that specific trip. I do this for all of my photos and videos
while I'm traveling. For example, under my photos, under albums, I have a
folder called trips. Then in that folder, I just have some of the trips
that I've done recently. But you can see, I have
some of the trips here, and right there I have Venice, so these are all the
photos and videos that I captured with my
phone in Venice. That's so nice because
they're just right there, they're easy to access and I
know exactly where they are. Then once I have all
those photos there, I can just go through and delete the ones that
I don't think I'll ever use or I don't need or if I have a repeat of an image, I can just go ahead
and delete that. I do recommend deleting
photos because, otherwise, you're just going to
get a massive backlog of images of thousands, tens of thousands
of photos that's going to bog down
your hard drives. If possible, it is really good to sort
through your images, select the best ones, and then delete the ones that
you're not going to use. But if you're also like me
and you shoot with a camera, something like this, or one of the cameras we talked about
earlier on in the course, you're going to have an SD card. Getting the photos
off of the SD card onto your computer is a
completely different process, so let's talk about that now. A lot of these cameras
actually have Wi-Fi now, and you can just
send the photos from your camera to your phone,
which is super cool. I think it's a
really great idea. If you are only taking, not that many photos, I would definitely
recommend trying that out. It's finicky, it can be
annoying to set it up at times, but I definitely would
recommend trying it out. I take a lot more photos and it's just not
really practical for me to have all of
my images on my phone, all the images that
I'm taking with my camera on my phone as well. Instead, I import using my
SD card and a card reader. This is actually a
very simple process. All you have to do is
plug your SD card into your computer and this is
relevant for both PC and Mac. I'm using a Mac and
we're going to be using something called Finder. But the PC folder function is
basically the same as Macs. On my desktop here I have my SD card labeled
as untitled 1. Sometimes you might
have to look through your photos on Fuji. They keep it under DCIM
and then 101 Fuji, and these are all
the photos here. I actually have a tone of photos because I didn't just
take photos in Venice. I took photos in Verona, in Milan, in France, so there's a bunch of
photos on this hard drive, and I've actually
already imported them, so I don't actually need
to reimport them again. One thing you'll notice here on the screen is you'll
see that there's JPEG files and then
there's also RAF files. Now, the RAF file is
essentially just a raw photo. The difference between a raw
photo and a JPEG photo is, a JPEG photo is slightly
edited in camera. It looks nice just right away. Whereas a raw photo has as
much information as possible, which means it's
better for editing. If you're professional, you're taking photography
very seriously. Shooting in raw is
definitely recommended, but if you're not
too fast about that, then JPEGs are fine. JPEGs are what we upload
onto the Internet anyways, and you can still edit a JPEG. It's not the end of the world,
so I actually shoot both. Every time I click the shutter, my camera will shoot both a
raw photo and a JPEG photo, which is great because then I
can use the JPEG if I want. If not, if I want
to edit it more, then I can use the raw photo. Here are all of my photos
here from the trip, and now I just need to drag and drop these onto my hard drive. Now you can add a
folder on your desktop, you can create a folder under your photos here on the left-hand side,
something like that. For me personally, I organize all my photos on an
external hard drive. This is because I have a lot
of photos that I work with, and the internal memory
on my computer is just not enough to
handle all those photos. I have a two-terabyte
external hard drive. Within that, I have places
where I can store my photos, my videos, and all
those different things. You can see here up on the
top right, extreme SSD. If I click that, click "Photos", "2021", "Europe", and then I have just a bunch
of my folders here from just different trips
that I've taken or different shoots that
I've done here in Europe. Then I can just go ahead
and create a new one, we'll just do 1125 test
album, something like that. Then I can go ahead and just select two or three
of these photos. I have already
imported these, so I don't actually need
to import them, but I'm just going
to show you guys. Then I can just drag
and drop them there. That'll just take a little
bit of time to import, but then your photos
are actually on your computer so you don't need to worry about carrying
the SD card around. You can clear it and then
go take more photos. You don't want to
keep your photos on an SD card for very long because they're a
little bit unstable and they are known to
fail from time to time. It's very rare, but it happens. So just try to get
your photos off of your SD card and onto your
computer as soon as you can. Now if you're not
planning to edit your photos, you're
pretty much done. All your photos are
in this folder. Now you can just
sort through them, delete the ones that
you don't want, and then all your
photos are here, nice and organized,
ready to share online. If you do plan to
edit your photos, I recommend using a software
called Adobe Lightroom. I like to use a software called Adobe Lightroom to
edit my photos, but also just to sort
through them a little bit more and just better
organize all of them. Adobe Lightroom is free, but I think for an
extra $10 a month, you get Cloud storage, which allow you to edit your photos between all of
your different devices. This is something I
absolutely love and I use religiously because I
love to edit on my phone, on my tablet, on my computer. Then I can just edit on one, switch over to another device, and all my edits will be saved. It's so cool, it's so
efficient and so nice to use. I'm just going to
show you guys how to import into Adobe Lightroom now and then sort through
some of your images. Once you have Adobe
Lightroom open, you just click "Add Photos". Go ahead and click "Browse", and then you can find the
folder with your photos in it, and there it is,
1125 test album. Then I can just click
"Review for Import", create a new album, 1125 test album, click "Create", and then
go ahead and add photos. Now I've actually
already imported the photos, was not
going to let me do that. Once you've done that now, all your photos are in a
nice little album here. Then what I recommend
doing is going through and sorting through them
and finding the best ones. I have to do is click on
the album and then just hit the arrow keys and all
your photos will pop up, and then if you find a
photo that you really like, you can just hit "Five stars". Boom, and then when
you're done with that, you can go up here to the top, click "Five stars", and then all of your
favorite photos, the ones that you labeled as five stars, will be right here. All the best ones
are right here, and then you can delete the
other ones if you want. I recommend doing that, but I would recommend going through a few times to make sure you don't delete any
really nice photos. Now that we've done
this, now that we've imported our photos and we've sorted through all of them
and found our best ones. Now it's time to edit your photos and really
bring a little bit of magic back into those images. Let's move on and
talk about that now.
12. Quick & Efficient Photo Editing: In this lesson, I want to talk a little bit about
editing your images. I don't want to spend too
much time on this because I don't want to just get into
a rabbit hole of editing. There's just so many
different things you can do with your photos. I do want to focus more on the process of
documentation, organizing, and then also sharing, and finding a place for those photos to
live in the future. But editing is an important
part of the process, so I do want to talk a
little bit about it. Now I've always
felt like editing falls into two
trains of thought. You can edit quick and
easy using filter apps, or you can spend a
little bit more time and really focus on each individual photo and try to bring out the
details in each one. I personally use both. Sometimes I'll edit a photo, I'll just slap a filter
on it and I'm done. Sometimes I'll spend
a lot of time, meticulously editing
an image to get it to look exactly how
I want it to look. But in this lesson,
I'm just going to show you guys a few apps that I use and I would recommend you to
use for editing your images. Now, I actually edit
a lot on my phone. The reason for that
is because phones these days can do almost everything that
a computer can do. It's absolutely crazy. But the best app I like
to use for quickly editing my photos is
an app called VSCO. I've talked about this in so
many of my other courses, I love this app so much. I mean there's one filter in particular that I really love. I'll just open the
app here, VSCO, then I have photos from my
camera roll or I can go into drafts where I already have
some photos I was working on. I'll just scroll down here. There's this one from Murano, which I really like. I've actually already
applied a filter to it. But if I just click "Edit" here, you can see there's just so many different filters
that I can try, and they all just do so many different things to my photo. There's so many to try here. I think it's just
the best app for editing because they look
really good as well, they're very nicely
made filters. My favorite personally
is a filter called A6. Where is it? There's
so many filters that it can be difficult
to find the right one. There it is, A6. This one gives a film look. Increases the contrast,
desaturates some of the colors, but makes them brighter and also saturate some
of the other colors. It just looks really nice, and that's probably
my favorite filter. This is what I use for
quickly editing my images. Then I'll just go ahead
and click "Next", "Save to Camera Roll", and I'm basically done
editing that photo. I'll just show you again
on a another photo here. Let's find another
one from Venice. There's so many. I loved a lot of the photos
I took there. They were really cool.
We'll do this one. This is another one from Murano, which was that really
beautiful, colorful island. You can see here, I can just tap and all these different filters
are available to me. I use A6, like I said, and there's more
features as well. Like you can crop, you can
increase your exposure, darken it if you want to. When I'm using apps like this, I really don't spend too
much time doing that. I just like to apply the
filter and I'm done. But they do have really
solid functionality. You really can't spend the time editing your images
if you're into that. But usually, just basic filter, contrast, adjustments and
you're pretty much good to go. Yeah, big fan of VSCO. Other apps that are great
for quickly editing your images on your phone
are Snapseed is a good one. There's an app
called Rookie that I've been using for years. That one has a lot
of cool effects. Be I recommend just heading
to the App Store and just trying out a few
of the different apps that are available there. There's so many, and I guarantee you one of them is
going to work out for you. But if you are like me
and you want to spend a little bit more time
editing your images, I would definitely
recommend Adobe Lightroom. We talked about it
in the last lesson. It's such a good software
and it really gives you full control
over your edits. There's so much you
can do with it. But in this lesson, I
wanted to just talk about a basic overview that you can follow to
make sure that you're doing all the right things when you're editing your images, and you're not missing any of the most important features. Now, I'm going to be editing on my phone using Lightroom, but you can follow along
using your computer. The sliders are
exactly the same. It's just in a different layout, but everything is
exactly the same. It doesn't matter if you're
editing on your phone, or on your computer,
or on your tablet, Adobe Lightroom is
exactly the same between all three devices. Now when I open Lightroom,
you can already see I have all of my photos that
I've already imported, all the different
albums that I have. There is my Venice
trip right there. All the photos
that I imported on my computer are right here on my phone because I do have
that creative cloud package. You can see I have it sorted
by five stars already. It's only showing me the photos that I
ranked as five stars. These are all my favorite images that I've already selected, which is so great. It's nice to just be able to
quickly and easily access all of my favorite
images from this trip right there in my pocket
at any time of the day. These are full-res photos too. These are full-res raw photos. Let's just find a cool photo
here and I'll just show you guys a basic
editing rundown. This is a good one. I think
this photo is really nice. It's simple, the
exposure is really nice, and it just looks pretty good. If it's your first
time using Lightroom, there's actually tutorials
built into the app, which is so cool. It's such a good
software for beginners, as well as advanced users. But there's a lot going
on here on the bottom, but you really don't need
to pay attention too much. I'm going to walk you guys
through the whole thing. But the first thing I like to do is crop my photo
which is right here, just click "Crop", and then go ahead and crop in a way that you
think looks nice. This photo doesn't
actually need a crop, but I just wanted to
show you guys that. You can also
straighten it if it's crooked by just
dragging left to right. Then there's another feature
that I think is really worth highlighting and
that's the presets feature. Now, Lightroom
actually comes with presets already in the software. You can just click
those and just run through them and try out
the different filters. There's so many
cool ones in here, and I definitely recommend going ahead and trying
out some of these. You can also purchase presets
from your favorite creator. For example, I sell
presets on my website. I have a bunch of
different packs. Then you can just
go ahead and apply those presets onto your images and it'll just do a different
effect on your photo. I definitely recommend
trying out presets if you do use Lightroom. But in this lesson, we're not going to
be using a preset. I'm going to be
showing you guys how I would do it from scratch. I like to follow a
very basic principle. After I crop the image, I just go ahead and work
my way down the line here. I start with light,
color, effects, detail, and honestly, that's pretty much it. Let's go ahead and
start with light. This image is really
nicely exposed. I don't need to
adjust the exposure, but that's just going to make
your image light or dark. I might enhance the
contrast a little bit. You can just do that with
the contrast slider. Maybe bring the shadows up a little bit to
enhance the detail. Highlights down to bring more detail out
in the sky there, make it more colorful. Then I also like to enhance
the contrast by bringing the whites up and the
blacks down a little bit. But that's pretty much it for the light and you can see it just adds a little
bit of a kick, a little bit of a punch, brings out some of those colors. Pretty simple, but
very effective. Then we move on to color here. The white balance
is going to have a big impact on the overall
color of your photo. If you go to the
right, it'll get warm. If you go to the left, it will get blue. I like to just work
my way through all of these different
options here and see which one looks the best. Honestly, usually as shot
looks the best or auto. In this case, as
shot looks the best, so I'll leave that there. Then you can come in here
and adjust the vibrance, which is going to
affect their colors that aren't very saturated. It'll pull more color into those more desaturated colors, or you can increase
the saturation, which is just going to increase the saturation of
the entire image. You can try that, but don't
go too heavy-handed on this. I think a common
beginner mistake is going too heavy-handed with
the saturation slider, so I wouldn't
recommend doing that. Now in the top left-hand corner, you can click that to make
your photo black and white. In the top right-hand
corner here, you have a color mix, and this is going
to allow you to adjust each color individually. For example, there's
the blue hue here. I can drag this hue slider
to the left or the right, and that's going to change
the actual color of the blue. I can adjust the
saturation of that blue, and I can adjust the brightness of the blue as well
and the luminance. You can do this for each color. There's so many options
available here. I mean that is one
of the features that makes Lightroom so powerful. I might just bring
up the oranges, just a tad there, and then maybe make the
sky a little bit brighter. But that's basically
it for the color. We've only done a few things to the image and already
it looks so much better. There's so much life being
breathed back into the image. Then we'll move on to effects. There's a bunch of
stuff going on here. One of the things
that I like to do is add a bit of Dehaze, that just adds a
bit of contrast. Then I'll add a bit of
clarity, maybe plus five. You can see clarity does
a lot to the photo, but you really have to
be careful with this. A lot of people go
too much with this. I'll just add five, and I'll basically leave
everything else the same. Maybe go down on the
vignette, minus five there. Last but not least, I'll come into detail and I'd like to add a
little bit of sharpening, just about plus 40, plus 45. That's it. There's our before,
there's our after. This is definitely a
more realistic edit. Now I definitely could
spend more time editing this image and making
it really stylized. But I think for most people, having just a
realistic depiction of what they encountered, nice natural colors,
good contrast, is part of the best
thing you could do for your photos and definitely shows when somebody edits to the photo
in a nice way. I would recommend just following that basic workflow that will ensure you pretty much do everything you need to
do with your image. You're hitting all the
right sliders and you're not really missing
anything at all. Once you're done with that,
you can just go up here and click "Export to Camera Roll", and then your photo
is good to go. But now it's time to talk
about sharing our images, finding a place for our
images to live forever. Let's move on to
that lesson now.
13. Saving & Sharing Your Trip: At this point, you've come home from your trip
and you've gone through all your photos
and videos and you've sorted them and you've
done a bit of editing, but now it's time to sit down and give those
photos a home. When I say give
those photos a home, I mean find a place
where you can save those images so you can easily access them for years to come. I think this sounds a lot
easier than it actually is. The reason for that is because
our mediums of choice, our apps of choice, or the methods in which
we consume our media, is constantly changing throughout the
course of our lives. Back when I was a kid,
everything was physical. There were no computers. We didn't have digital photos
that we could look at. Everything was in
physical printed folders. Then when I became a teenager and a young adult and
I was traveling then, everything was on Facebook
and I would share all of my trips and all of my
travels on Facebook. Then I got older and then it was Snapchat and then
it was Instagram and physical albums
dropped by the wayside. Even to this day, my mediums of choice are
constantly changing. That's why I think when
it comes to actually publishing your images or your
thoughts about your trip, it's so important to
think about the medium or the location that you want those photos to be stored in
for the rest of your life. This really is just a
very personal decision and it's going to
depend on number one, what is your medium of choice? Do you like digital? Do you want to look at
your photos digitally? Do you want to look
at them physically? Do want to print them out? Also, do you plan to
share those photos? Are these photos only for you? Do you want to share them
with the broader world or just with your
collective local circle, your family and your friends? Also generally what
do you think you're going to be using in
20 years that you can easily look back on
to see those images. I know this is a lot
easier said than done. I'm sure my parents thought that the film that they were
taking in the '90s of me and my brother and
my sister running around Disneyland was totally
going to be viable in 2021. It's not unless you
have it digitized. It's not really an easy process, but I do really think we should spend the time to
think about where we want to publish our
photos for the future. I can't speak to all the
different options that you can possibly use to give your
photos a permanent home. But I can speak to the
methods that I have used over the years and the ones
I think I'm going to stick with from here going out. The first one I
want to talk about; this is the one that
I have learned to love the most and that
is travel journaling. When I am out traveling
and I get back from an awesome
day of adventure, one of the first things I do is plot myself down on the couch, open up the Notepad
on my iPhone and just start typing out some of the things that I've
done throughout the day. I started doing this back
in 2012 on my Belize trip. I was so enamored by everything that was
happening around me. I needed to document it and I wasn't into documenting
through photos at that time. A little bit, but not so much, but it was very text heavy. I would sit down and I would write everything
throughout my trip. I would write my full day,
everything that I did, the girls that I was
falling in love with and everything that was
happening in my life. I'm so glad that I took the
time to write those things out and save those memories because now I still
keep that habit. I still like to
write things out, but now I also have the
ability to document my trips visually through my
photos, through my videos. When I put those
two together and I line up the text
with the photos, it tells such a
comprehensive story that I know it's going to elicit emotions in me when I'm 85 years old laying
on the couch, looking back at my
trips from my 20s. I've tried out several methods of travel journaling
over the years, but the one I just
keep coming back to, honestly, is the simplest
one and that is just writing everything in the notes
app on my iPhone. The reason for this is because it's a very accessible app. I can just open it, find my note, and
just start writing. I can upload photos and also everything is
saved onto the Cloud. So if I get new
iPhones later on, all my stuff will still be here. That's actually so important
because back in 2011, I went on this trip to Belize 2012 and I wrote
out all this text. That text would be
gone if I didn't save it to the Cloud
because I wasn't the most responsible
person in backing up my iPhone when I
was 20 years old. I'm glad that I took the time to write that out and
save it to the Cloud. My travel journals
are really simple. When I open up my Notes tab, you can see I have
travel journal here and I have some
of the trips that I've done over the years
and I can't say I've done every trip as
a travel journal. Sometimes the trips
are quick and I'm not good about sitting down
and writing and that's okay. I'm not forcing
myself to do this. This is something I like to do. I have got a few trips
here that I like. You can see here I'm working
on the Portugal one now, I've been writing
in it a little bit. There is some
private stuff in all of these so I'm not
going to show you guys all of them but I will show you the one that
I did for Venice. I've changed the way I
structure these notes over the years back in my first
one with the Belize, it was a wall of text. There was nothing really
organized about it. As I got older, I started
to organize them a little bit more and you can
see here in the Venice one, I have Day 0. I have a little write-up
about what I did that day. Then I've added some photos, then I'll show you how
to do that in a second. Just day by day, just a little bit of
text and a little bit of photos for each day
that I was traveling. I also have some
videos in there. I'd get home, I'd sit down on the couch and I'd start writing. To add photos here, all you have to
do, it's so easy. You just tap there and you
click the camera here, choose photo or video and
then you can just go in and very easily add a photo. When you first do it, the images are actually going
to be really big. All you have to do is, if you only have a few
images that's not bad, but you have to do
is tap and hold the image and click
"Small images", and then they all become small. My only grab with the
notes as of right now is the videos are
still really big. I can't make the videos small, which is so annoying
because I want to put my videos in there as well. But for now, my
videos will probably stay in the photos
album under each trip. That's not the end of the
world, but it is nice to have the photos right
next to the text. I'm really happy
with how this works. I'm able to save all my memories and I'm glad that I've done this over the years
and I've been able to document my travels
through this way. There's so many different
ways you can travel journal. If you want to physically write in a journal, you can do that. There's apps that you can try. But like I said,
I've used some of those apps in the past and you never know if those
apps are going to be around in 20 years. The Apple Notes app, Apple is a massive company
I'm sure they'll be around. I would also say the same for the equivalent on
an Android phone. Android phone has a
similar note feature. It's honestly just
as good and I really think it is a great way
to document your trips. Besides travel journaling, I think we should talk
about social media. Social media is one
of those things where the landscape is
always changing. Like I said before,
I was posting on Facebook for a
while and I'd post my photos there. That was great. It's nice to look
on my Facebook page and see some of my old trips. I found an album from South Korea that I took
back in the day and the photos are great
and it's so fun seeing all those photos and
the people that I met on that trip and the
things that I was doing. But I really don't
use Facebook too much anymore if I'm
being completely honest. The only social
media form that I use now really is Instagram. I do like Instagram. I have a love-hate
relationship with it, but it's probably my most active social media next to Twitter. I love sharing my trips on Instagram because
it's a really great way to share photos and
videos like I showed you guys earlier with
the Instagram stories. Instagram stories are
a really great way for me to document my trips because I can put everything
into a linear timeline. I can show you when
I'm getting there, some of the things that
I'm doing while I'm there, I can share funny
moments, sad moments, emotional moments, things that are generally
happening that are interesting. I can capture a video of it, a photo of it, I can
be artistic with it. There's so many
opportunities with these Instagram stories and it's none of big barrier to entry. You post something on there, it'll stay for 24 hours. Then you can also save it as a highlight and it'll stay
there forever on your page. I really like that
feature because all my trips are right
there on my front page. If you guys want to go
see any of my trips, my California trip, or any of my trips to Europe
or Bali, anything. They're all on there and the Venice trip is
on there as well. So you can see all the
things that I caught up to while I was in Venice. Instagram also has other
features like Instagram Reels, which are essentially TikToks. There's also Snapchat. There's so many
different options available for social media. It really is a
personal decision. I'm not going to say
Instagram stories are the best way to share
your trip online. I'm not going to say Facebook is the best way to share
your trip online. It does depend on you, your choice of social
media and what you think you're going to be using
in the future as well. The last place I'd
recommend giving your home, and I will recommend this
until the day I die. That is in physical form. One of my favorite
things to do in the entire world is to go
home and visit my mom and look into the garage and
see all the physical photos that we've captured throughout the course of my childhood, all the way through my dad's childhood,
my mom's childhood. There's something about holding a physical image that just does something that looking at a photo on a
screen doesn't do. It allows you to
focus on the image. You can feel it, and you're just present
in the scenario. That's why I always say, if you have the time
and the patience and the organization to
go through all of your images and make a
really good selection and print those out into
a physical form, that's the best thing you can do for preserving your trip. I am personally a nomad. I'm always on the go. So it's very difficult for me
to print out my photos and keep physical copies
of my images with me. But later in life, when I find a little
bit more stability, one of the first things I'm
going to do is sit down and create physical
albums of my travels. While I don't have photos of
my travels in particular, I do carry a lot of
photobooks around with me. I absolutely love photo books. For example, one of
the first things I did it in Lisbon was find a magazine store and buy this magazine that I've been
wanting to read forever. It's called Rucksack Mag. It's a collection of
beautiful photographs from amazing photographers
that I've looked up to. I love sitting with a
coffee in the morning and looking at these photos
in physical print form. It does something to me that, like I said, looking at
a screen doesn't do. If you do decide to
print your photos, I would recommend a service
like Artifact Uprising. I've had several
friends use them in the past and I've actually
held them in my hands. They're really nice
books and they actually have a travel
journal option. You can upload all
your photos in there and organize it in a
way that you like. You can choose the paper, the texture, and the colors. Everything is just really
nice and easily laid out. I checked out the
website and I would definitely recommend
a service like that. But there's also many
others out there as well. If you know somebody that's
printed folders in the past, maybe you have some
friends that have some nice travel journals. Just ask them who they use and if they recommend
them to you. But in short in
summing everything up, I think it really is important to take the time to reflect on your favorite mediums and how you want to be able to
consume those photos and those videos and that
text later on in life. I found the methods that
personally work for me, but the methods
that work for you might be completely different. But now that we've
talked about this and we've summed everything
up in the class. Let's move on to
one last lesson. We'll talk about a few
more important points and then I'll send
you guys on your way.
14. Conclusion & Next Steps: Well, if you've made it
to this last lesson, I just want to say thank
you so much for being here. Thank you for watching
me for the past hour, and I hope you guys have
enjoyed the course thus far. I think travel is a
super exciting thing. It's certainly is for
me, it's my life, it's what I love to do. I'm glad that I've
taken the time to think through the process
of documenting my trip, finding what works for me so I can relive some of those
memories later on in future, especially when I have
kids in the future. While this class did
focus on a lot of really solid concrete
information, that's not really what
this class was about. It's more about getting
you to think about how you want to document
your trip and giving you a few tools that you can use to do that
effectively as well. We talked about some of
the basics of photography, some of the things you
might want to look for while you're shooting, how to identify
your intentions for your trip and what you want
to document on your trip, as well as how to sort through your images,
edit your images, and eventually find a place for those images to live
for the rest of your life. That last part, finding a
place for your images to live, finding a place for
those memories to live, really is probably the most important
part of this course. You can capture
all these images, but if you can't put them in a place where you're
going to be able to find them [LAUGHTER] later on in
life and really remember them and consume them
in an efficient way, then all of that photo-taking, all of the editing and all
that was really for nothing. I think it's really is important to give your photos a good home. If you have a trip
coming up or you have a trip that you're
aspiring to go on, I just want to say
have an epic time. Traveling is one of the
best things we can do, I think, to better
ourselves as people. It's one of my favorite things
to do in the entire world. I don't think I'll ever stop traveling and I'm excited
that you're going to be able to go on your own trip
and explore somewhere new. If you guys want to
learn more from me, I have a ton of other
courses here on Skillshare that really do hammer in some of the things that we talked
about in this course. I have courses that focus specifically on
smartphone photography and photography in
general and how to use your DSLR and a lot of
other courses as well. I recommend checking those out. If you guys just want
to say hi or what's up, or see some of my work, I'm available on Instagram. You can send me a DM there. I'm super open. I love to chat. I'm very active there and I'm also very active on
Twitter as well. I love sharing just some of
the moments from my trip, some of the smaller
things that I see as well as some
general thoughts. Last but not least, I'm also
on YouTube where I create videos about photography and traveling and stuff like that. If you guys do enjoy
my teaching style or just want to
learn a little bit more about photography, you can stop by there as well. But seriously, thank
you so much for watching this course
up into this point. The sun is setting and I'm actually going on
another trip tomorrow, so I have to get
my stuff together. We're going to the Madeira
Islands in Portugal. I have a few friends
coming out from England and we're going to go
take some photos out there. I got to get ready to
go. Thank you guys so much again for
watching this class. I'm going to hope to see
you in some other courses.