Transcripts
1. Travel Painting for Beginners: Watercolor the Tetons: One of my favorite ways
to travel and hike is to bring my painting
supplies with me and create this really beautiful
moment of stillness and creativity that I can keep with me always the
best souvenir. Hi. My name is Colby Bloom, and I have been
teaching watercolor and creativity and mindset work
for about eight years. I love finding new ways to
share creativity with people, whether that's through my books, through online courses or
through in person adventures. Recently, I went on a watercolor painting trip to
Grand Teton National Park, and I had so much fun that I just couldn't
keep it to myself. So this class is
all about learning how to take your watercolor
on your travels, paint out in the wild, using some reference
photos and videos that I took on this adventure
to the Tetons. Look, even as a
professional painter, going from painting
in my studio, at my kitchen table, you know, wherever is most familiar to painting in the wild,
painting plain air, which basically just means
out in the open air, it can be really frustrating,
especially at first. That's why this class
isn't only focused on painting some really fun scenes from Grand Teton National Park. It's also going to
break down three easy, doable methods for travel watercolor painting,
even if you're a beginner. First, we'll break down all
the supplies that you need, including supplies that you might think you need,
but you really don't. And then we'll go over some watercolor sketching
techniques when you're actually sitting outside because painting outside is different from painting in your studio, and it's good to
have those things clear before you
actually get started. Then we'll get started
on our projects, three scenes from Grand
Teton National Park. Each of these projects has a really simple hook that will make painting the scenes easier, not only during this class, but also as you go to fill your own sketchbook with your own travel watercolor
adventures. Whether you're a beginner
painter or you maybe have some experience with watercolor
and travel painting, but you're looking
for even more ways to explore experiment. This class is hopefully going to help you feel like a
real artist when you're out in the wild and actually use those painting
supplies instead of letting them gather
dust in your pack. Plus, it's a fun way
to wander through a beautiful place like
Grand Teton National Park without even having
to leave your house. So, what do you say? Want to join me? I'll see you in class.
2. Class Projects: Hello, my friend.
Welcome to class. I'm so excited to paint the Tetons with you in
watercolor and to hopefully teach you some really
easy techniques for you to take with you on your travels so
that even if you're not traveling to Grand Teton
National Park like I did, you can watercolor the world
to your heart's content. In this video, we're
going to talk about the projects that we're going to complete
through this class. We're also going to talk about the techniques that I'm teaching you about travel
watercolor painting. The first thing I
want to talk about is the term plain air painting, which you may or
may not have heard. Plain air painting
refers to the style of painting where you
are sitting outside, painting what you're looking at. And plain air in French
means in the open air, and that's exactly what
we're going to practice. The reason I'm talking
about it is because plain air painting can
be super intimidating. And especially if you've
never done it before, the most important
thing to remember is it is different from
painting in the studio. Even if you have
tons of experience, painting landscapes and
animals and flowers and all sorts of scenery
that you might encounter on your
travels in your studio, that doesn't always
equate to, you know, take into account the
different context of painting in the open air. Now, we're going to
talk a lot about this. How my biggest philosophy
for plain air painting, for travel watercolor painting, especially for a beginner, is to lower the bar, is to make the bar
simply painting outside. It doesn't matter
what you paint. It doesn't matter how
high the quality is. It doesn't matter what the
skill level required is. In order to successfully
paint plain air, then the goal is to get paint on paper while you're sitting
outside. That's it. Now, if you want a few really easy kind of anchoring techniques to help you
a little bit more, as you are sitting outside and thinking about
what to paint, that's what these
projects are for. So in this class,
we're going to talk about three different
ways that you can approach plain
air watercolor painting specifically
with a sketchbook, specifically with
minimal supplies in order to make
it totally doable. The first technique has
to do with composition, and I'm going to give you
a really easy shape to look for in the wild
that will help you paint mountains and tree lines and help you bring
movement and interest to your sketches and will help make sense of all this information that's
happening around you. The shape I'm going to
give you is a zigzag. Our first project is looking
for a zig zag in the wild. This is all of these projects are based on reference photos that I took while I was in
Grand Teton National Park, and this project
is going to focus on locating the zigzag, putting together the layers, using plain air watercolor
painting techniques. The second watercolor
planar painting technique that will help
make your sketches feel doable and also fun is
to focus on only one subject. So when you're sitting outside, you're sitting on a log,
you're sitting on a rock. You're looking at all
these beautiful scene, all this beautiful scenery, all these beautiful
plants and animals, it can feel really overwhelming because
you're not exactly sure what to paint or even
can paint everything. And the secret is
you don't have to. You don't even have to paint
anything to look realistic. You don't even have to
paint the whole thing. You can choose just one. And that's what
project number two is all about is sitting in a scene, picking one subject to paint, only one and then
experimenting with it, relieving yourself
of the requirement to make it look
realistic or to even, you know, make it look exactly like the thing
that you're looking at, and just using the world
around you more as inspiration to fuel your
creative explorations, as opposed to, you know, a standard that
you have to meet. For Project two, I
specifically chose a subject that is usually
intimidating for me, flowers. And we're going to
look at, again, a real reference photo that I took in Grand Teton
National Park. But instead of painting
the actual scene, we're going to use the subject as inspiration for mark making, for adding some ink to our sketches and just
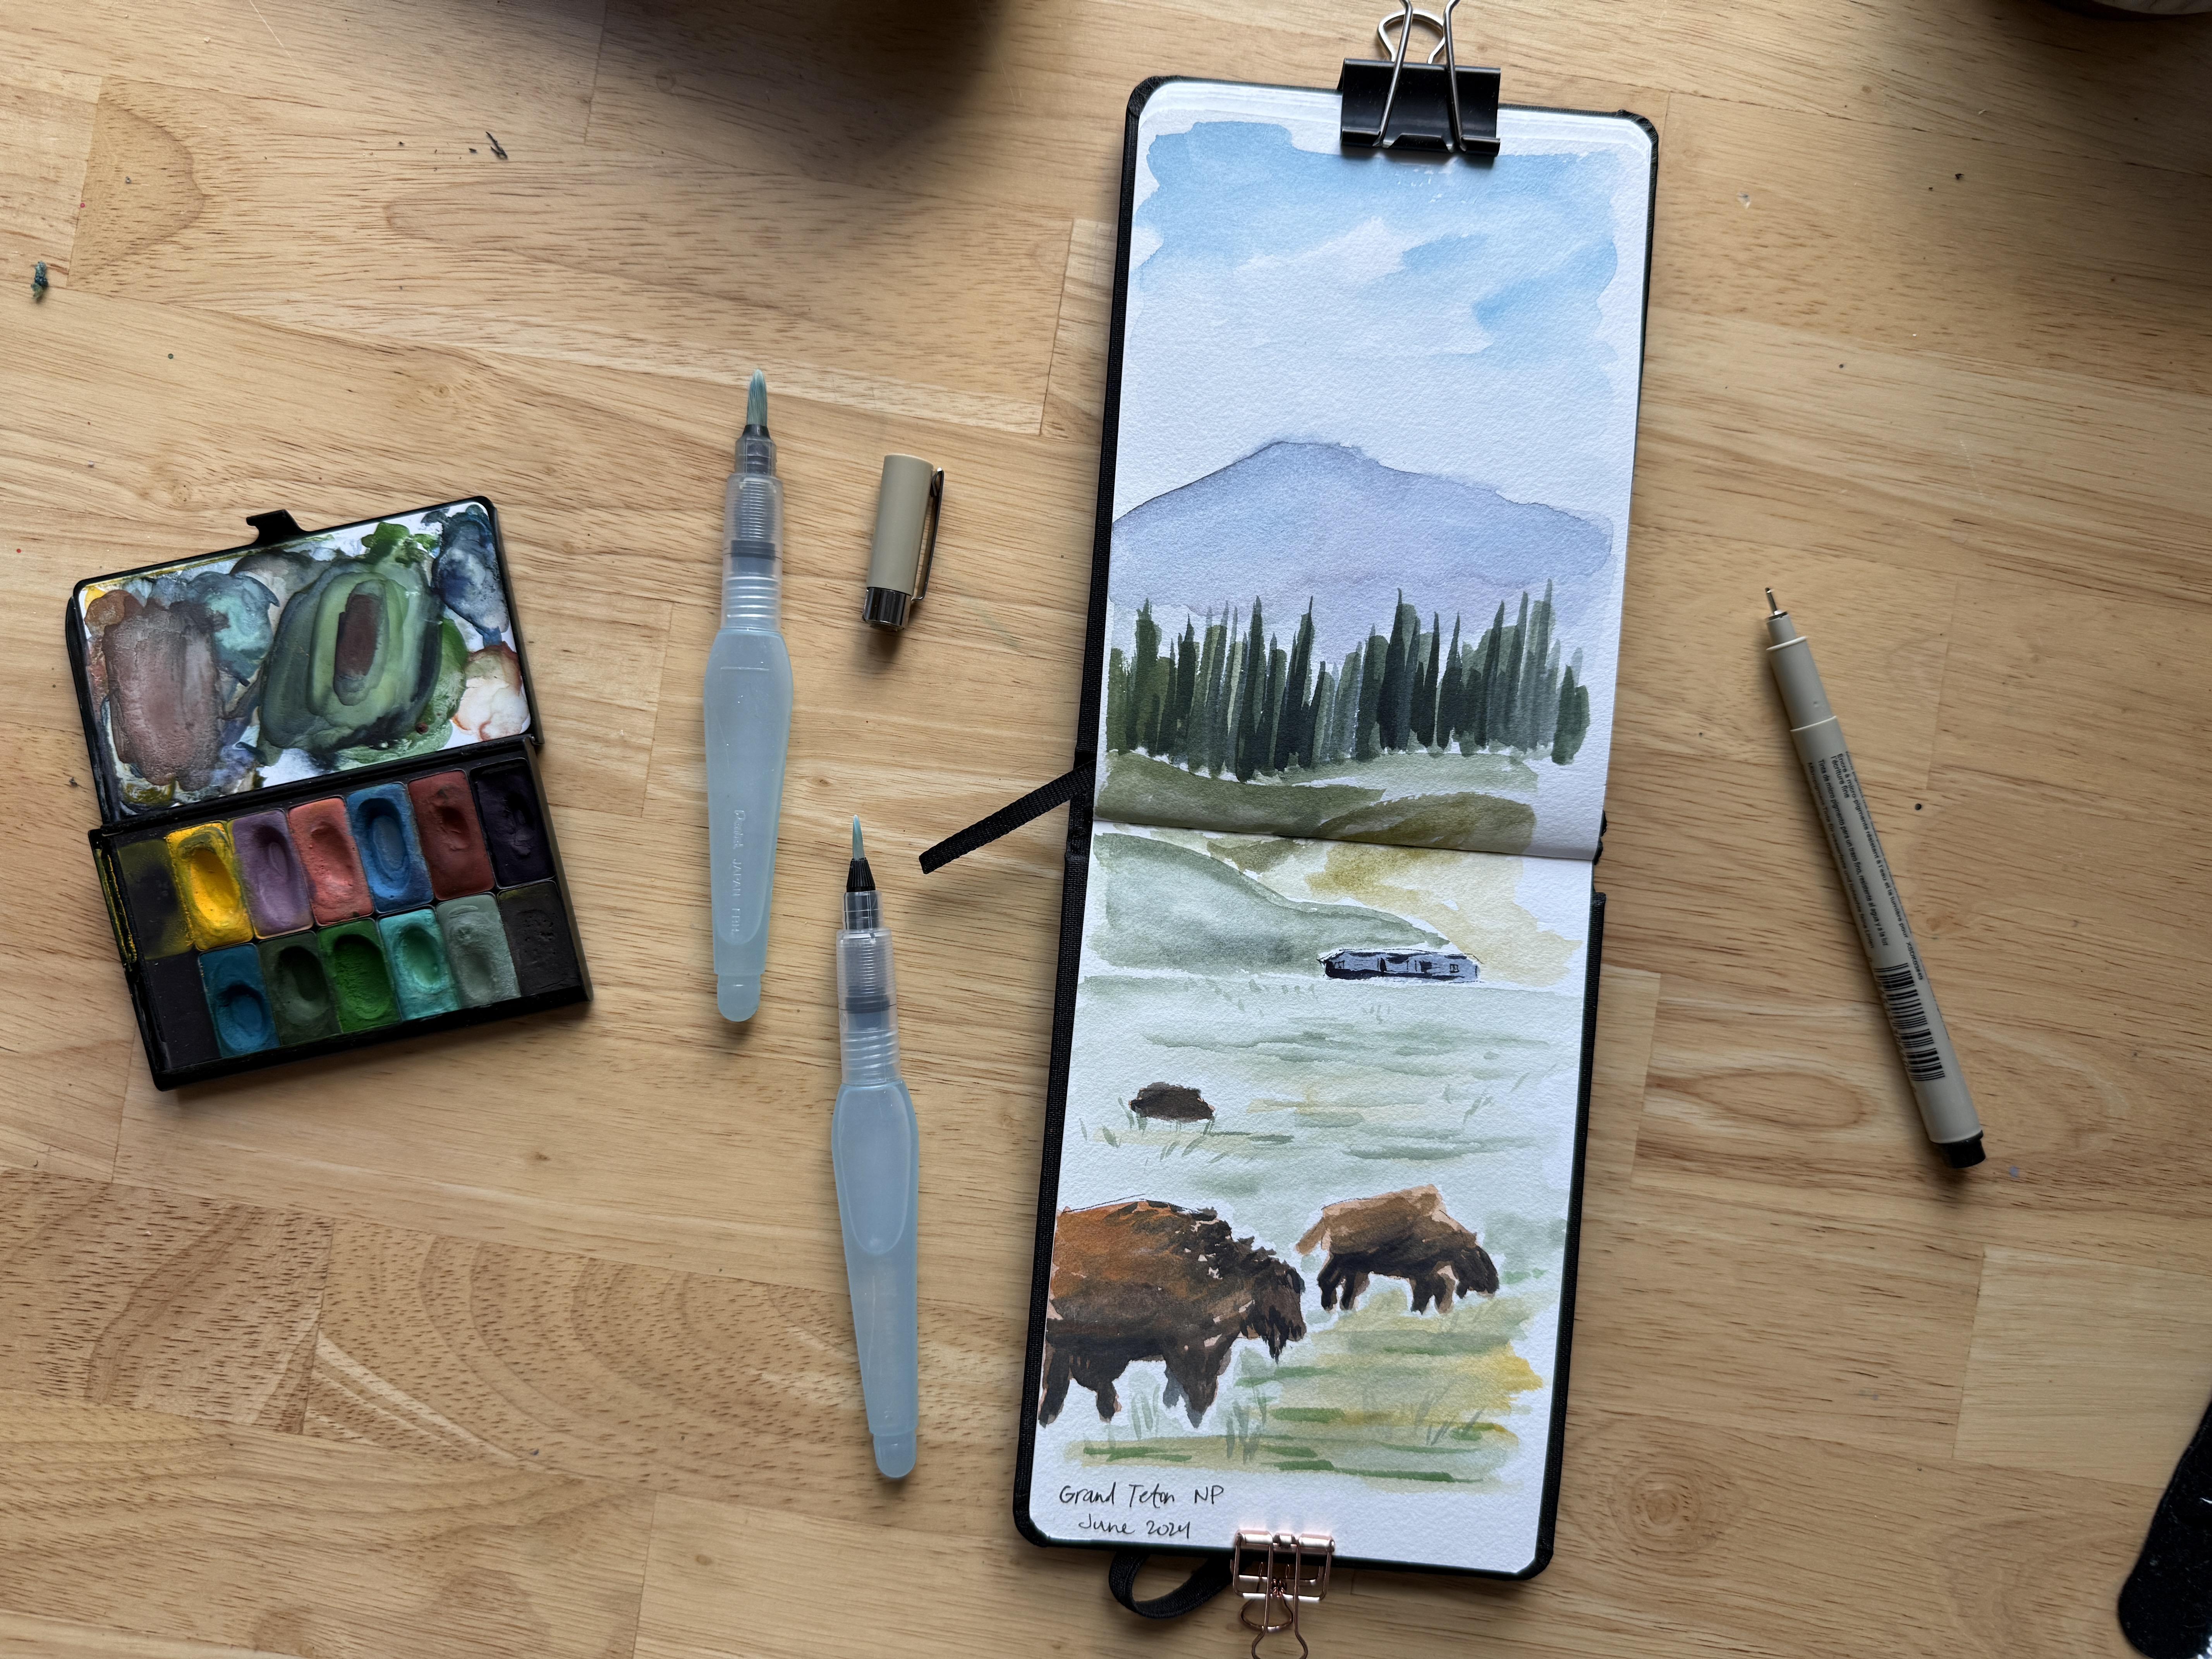
generally having fun. Finally, project number
three and technique number three is all about, again, making it simple, simplifying all the
information around you so that you can actually find
a scene that's doable, even if it's vast. And the way that
we're doing that is a two pronged approach, okay? The first prong is to zoom in. When you are looking
at a big scene, when you're looking
at a big scene, it can feel really overwhelming because you're not just
looking at a photo, right? When you're sitting
in the middle of all of and it's easy to feel so small and for everything
to feel so big and to feel ill equipped to
paint that, right? So one of my best
pieces of advice, something that helps me
actually put paint on paper, is to zoom in. And that can literally
be with a camera, right? That can, like, you're
opening your phone and you're zooming in to make
the scene smaller. So you're zooming in, you're
making the scene smaller. And this is what I mean, right? Well, if we look at
the reference photo that we're going to
use for this scene, it's a vast field filled with bison,
filled with mountains. And in order to make it doable,
we're going to zoom in. So these bison that are in
the reference photos look, you know, way smaller
in the picture. But when I zoom in,
they look bigger. And then I can more easily
scale what I'm painting, and it feels easier to paint. So we're going to zoom
in. We're going to make it even more simple
than it has to be. And then we're going to apply that also to the subjects
that we're painting. We're going to zoom in, make it easier, make it more simple, and relieve ourselves of the burden of having to
include all sorts of details. We're just going to focus on simple strokes on making
it look like a painting, not like a photograph. Alright, to sum up,
the three methods that we're going to use in order to anchor our
watercolor sketching practice while we're
out in the wild are, number one, looking for zigzags, and we're going to use that zig zag kind of composition tool to layer all the different layers in any kind of mountain
scene that we're looking at. Two, we're going to paint
one subject only and use that one subject more as inspiration as fuel for
creative exploration. And three, we're going to zoom in and then make
it smaller, right? Zoom in and then make it more simple so that big scenes that feel really overwhelming
can be doable and fun. Okay, that about wraps
it up, my friends. I'm so, so excited to get
started painting with you, and I will see you
in the next video.
3. Mindset Check: Hello, my friend. Before
we start painting, let's do a quick
mindset check so that as we are, you know, learning these planer
painting practices and also preparing to
actually go out in the wild, you can have the kind
of confidence that will help make your experience
the best that it can be. So, the first thing that
I want to talk about is, you know, we kind of
mentioned this in the previous video,
but plan air painting, when you're sitting outside in the open air trying to paint
everything around you, that's a lot more
information than you would get from looking
at a reference photo. And the thing about brains is that when they get
too much information, when it's information overload, your brain is working overtime to make sense of everything. That means you are
spending energy on just being calm and
figuring out, you know, how to access all these painting these painting
skills that you may be already have that you would normally spend on
refining your technique. So that's one of the
things to remember about the difference between
studio painting and plan air painting is that plane air painting always
requires more energy because your brain is
working overtime to make sense of all the information
that's happening around you. That is why it's so important
to remember that the goal of plane air painting is not to paint these, like,
beautiful masterpieces. The goal of plane
air painting is to paint outside. That's it. All you have to do to
make it qualify as plain air painting is to
be outside and paint. That's all. And, you know, maybe you want to
paint something a little more refined than just swatches on your sketchbook. But even if that's
all you manage, you still were a plan air
painter. You still did it. And I always like to start
with some kind of, remember, this is about the process
spiel because it is, right? You're not out there to prove that you're some
kind of master painter, and if you are you're
going to be disappointed. Like, it's going to be a
really frustrating experience. But you don't need to
be a master painter, to be a plain air painter. You just have to paint
outside. That's all. And so you can go into if
you can go into it with this mindset of giving yourself permission to lower
the bar, right? To make it so easy to actually succeed at
plain air painting, you're going to
do it a lot more, and you're going to find
so much more joy in it. The second thing I want to
talk about is to remember that every single time you are painting, even if it's just, like, in your house, on your kitchen table, right, every single time you
put paint to paper, you are practicing courage. It's not just that you're
growing a skill, right? Which painting with watercolor
is definitely a skill, but you are also growing an emotional skill in
that you are practicing, doing something uncertain,
doing something that's scary, doing you know, you're practicing courage every
single time you paint. And when you paint outside
where the people are, that is so much more courage. It requires tons
more courage to do something where
some random person might be watching you, right? Or even if it's like
if it's very remote, even if the circumstances
are you are still alone, doing it in a
different environment where from what you're used to, that also requires
even more courage. And so when you're painting outside and you're
getting frustrated, which, by the way, you probably
will, and that's fine. Whenever especially
when I first started, but even now, like, when I plain air paint, it is just generally
more frustrating than painting in my studio
because of the context, because of the bugs and the wind and the discomfort
and the hunching over, and, like, all of the
people passing by and, you know, making
comments or whatever. It's going to be way
more uncomfortable. And so going into it, knowing that it's going to
be more uncomfortable than if I was painting painting
at my house or in my studio, it helps me to remember
that every single time I paint outside, it's
practicing courage. And if I instead of making, like, painting the goal,
if I just remember, like, I am practicing
courage right now, that makes me feel
more emboldened. It makes me feel more able
to do what I'm doing. And it makes me proud of the
work that I'm putting in, even if my sketches
turn out very messy. And that kind of leads
me to number three, which is, especially if you're gonna paint
in national parks. You know, I went to Grand
Teton National Park for all of these projects. Especially if you're gonna
paint in national parks, you're going to people are
going to find you, right? They're going to
find you because it's so interesting
when you're hiking and you stumble upon
somebody else doing something really interesting and cool, like painting, right? And if you are one of
those people doing a really cool and interesting
thing like painting, people are gonna stop
you and they're going to look over your shoulder and they're going to ask
what you're doing. And you don't have to talk
to them. That's fine. But one important thing to remember because your
inner critic is going to do its best to make you think that this isn't true, right? Your inner critic
is going to do its best to convince you that
they're judging you, that they're looking at
what you're painting, going like, Oh, that's
cute for a kindergartener. But they're not, okay? I can almost guarantee you
that 99 out of 100 times, anybody who stops
to look at what you're doing, they're
rooting for you. They want you to succeed. They think what you're
doing is very cool, and more likely than not, they wish they had the courage
to do what you're doing, maybe not to paint necessarily, but to, like, do some kind of creative
thing out in the wild because it is so empowering
and fun and exciting, and it makes life magical. And so anytime
somebody stops you, anytime they might not
even talk to you, right? They might just, like,
look over your shoulder. But anytime somebody's
looking over your shoulder or you're
feeling the eyes, right? You're feeling the eyes on you. Just remember, people are
generally rooting for you. They think it is very awesome, very inspiring, that you are out there doing the thing,
and you never know. One of them just might, after a conversation or after
watching you feel like, Wow, if they can do that,
maybe I can do that. And it's just it's such a wonderful way to feel
connected to the world, not only, you know, nature, but also other
people in the world without necessarily having to spend so much emotional energy, like, building lifelong
connections, right? So yeah, people are
generally rooting for you. I promise their thoughts are not nearly as
judgmental as yours are. And so if you can
take that with you, it's going to be a lot easier to sit out and just do the
thing that you love to do. Okay, to sum up those three
kind of mindset reminders, the goal is to paint outside. That's it. That's the bar. If you have painted outside, then you have then you
are a plain air painter. Number two is that every single time you paint,
you're practicing courage. So even if the goal isn't
to paint something, if the goal is just to practice courage, you
will have succeeded. And then number
three is people are generally rooting for
you. They really are. They think that what
you're doing is amazing, and the truth is they're right. Alright, enough mindset
stuff. Let's get painting.
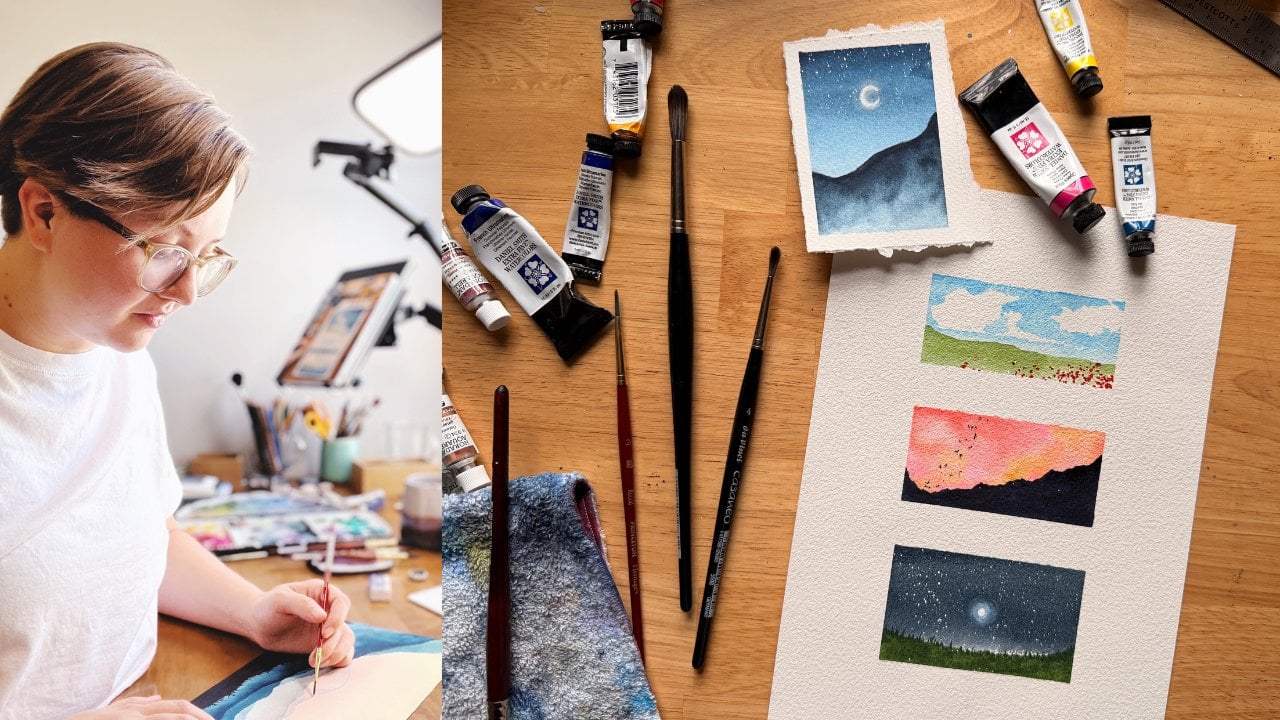
4. Travel Painting Supplies: Hello, my friends. We're
going to talk about watercolor supplies to take
with you on your travels, on your plan air
painting adventures. If you take one thing
away from this video, it's that you do not
need very much supplies. You don't need all
of the paint colors. You don't need all of
the paint brushes. You don't need the biggest,
most fanciest sketchbooks. In fact, taking more supplies
is going to be a hindrance. It's going to make it
harder for you to paint. That's because, as we've
discussed at length, and we'll continue
discussing at length, painting outside
plain air painting when you're in the
wild, on the scene. It's so overwhelming already. And so having to make decisions requires
executive function. Like, making a decision
requires you to have energy, brainpower to decide
what's important. And if you can already make those decisions before
you even get outside, it's going to make getting
paint to paper way faster. So, and this is coming from
I tend to view myself as, like, a watercolor
maximalist, right? I have tons, tons of art supplies that you can
see on my desk, right? So I am definitely
not a person who is an advocate for you never, ever buy tons of art supplies, 'cause that would be
hypocritical of me. But when it comes to
plan air painting, the thing that I have discovered through trial and
error and through my own experience is that when
I take very few supplies, I am more likely to paint. So with that said, let's take a look at what
I recommend for you. Like I mentioned earlier,
especially if you are new to travel watercolor painting to
plan air painting outside, more is not always better. In fact, smaller and
fewer supplies are going to ensure that you
actually put paint on paper. So piece of the first tool that we're going to
use is a sketchbook. This is a watercolor sketchbook. It's by the brand Hnomule and notice how it's a
really compact size. Now, you can get
smaller than this. But the reason I wouldn't recommend going
much larger than this, especially if you're
just starting out and especially if
you actually do want to sit outside and
paint is because making everything smaller just makes it less overwhelming, right? So we have this 100% cotton. These are the projects
that we're going to do throughout
this class, right? And then a few other
projects that are from my own traveling
adventures in other places. Um this is the sketchbook
that we're going to use. It's 100% cotton. It's not quite as thick as
other watercolor papers, but that makes it excellent
because it dries faster. So this sketchbook is
depending on your climate. But generally, a
watercolor sketchbook, like a sketchbook bound like
this with watercolor paper, is probably going to dry a little faster
than you're used to, especially when you're sitting
outside, and that is good. We want that. We're
going to talk about why a faster drying time
when you're sitting outside can be helpful in an
upcoming technique video. So watercolor sketchbook,
watercolor paper. You can have a sketchbook
with mixed media paper. I just recommend that
your thickness is at least in somewhere in
the 200 GSM range. Uh, so you definitely don't
want the thickness of, like, printer paper, but
you don't have to necessarily have it be as
thick as, like, 300 GSM. You can have it somewhere like mixed media
paper would be okay. So watercolor paper, sketchbook. Then you want a compact
watercolor palette. So this is a watercolor
palette filled with, like, handmade watercolor
paint that I got from one of my favorite
brands case for making. And then the palette itself is from another small business
brand called art Toolkit. This is very slim.
It's made of metal. And so that means it's magnetic, and it can stick to if you have a magnet
that you want to stick, like this sketchbook El that I'm going to talk
about has magnets on it, so I can stick that on it. But even if you
don't have a magnet, the slimness of this
palette makes it so that it's very travel ready, right? So you can travel with it. You can slip it in your pocket. And it makes
painting really easy to have these really
slim watercolor pans. One thing about
watercolor paint and selecting which colors to bring because this is
always a question I get. One of my favorite things to do when I go plan or painting, when I go travel painting is to take a limited
palette and think about, A, you know, how can I
arrange colors so that I can mix any other colors that I might not be able
to take with me? So, making sure
you have a set of primary colors in your palette. But also, B, how can I make my painting experience very
unique, very memorable? And one of my
favorite ways to do that is to use paint that I don't actually use as often
when I'm just in my studio. So when I go travel painting, I almost always use, like, handmade paint that I've purchased from another
small business. Feels more meaningful, that
feels really special to use, and that I might not always pull out when I'm in my studio. Because remember, what
we're doing when we're travel painting is we're making
a creative memory, right? We're putting our creativity inside these memories that
we're already making. And so using supplies that feel really special
can be one way to do that. So that's my little
spiel on paint. Next, let's talk about brushes. These are water brushes. You may have seen them before. They're called water
brushes because they're paint brushes with the water
already in the barrel. And there's a whole
video showing you how to use these, so
don't worry about that. You might be intimidated. You might have already
decided that you hate them. A lot of people have
trouble with water brushes, and I definitely did when I
first started using them, but they are my absolute
favorite for travel painting. And like I said, there's a whole video where I
show you how to use them, and all of the paintings
that we are doing in this class are with
water brushes. So those are the most
important things sketchbook, paint, waterbrush. The other things are helpful, not necessarily,
like, essential. Well, I mean, I
would say, I guess, the towel is kind of essential, right, unless you want to use
your clothes or something. But especially when I'm
travel painting, I buy, like, a bunch I buy tea towels, and then I just cut them
up into little strips, and it makes it so
easy to carry with me. Some people I know when they're travel
watercolor painting, they like to purchase, like,
a terry cloth sweat band or something to put
on their wrist. I haven't done that yet,
but that would also work. You could use just like an elastic band on
your arm to put this under or I will show you my setup and how I use
it in just a minute. So make sure you have a towel, and I like to have binder clips. So these are like, more like heavy duty, right, like clips. But the binder clips,
especially are to like they're there for
a few different reasons. You can use them to only
keep your paper tat, like if that's something like you're not really using
them for anything else except just keeping the paper really clamped on there, right? That is a super helpful tool whenever you're painting planar. It's also binder clips are
also really helpful if you're trying to paint travel like
be travel ready, right? Like, you can
simultaneously keep your paper taut and also just, like, clip your paint
onto your sketchbook, like, the side of your sketchbook
that you're not using. Similarly, you can do
that with the Te towel. You can just, like, slip
that on under there. And then, even if you don't have this handy little sketchbook El that I'm going to show you, you can still have a pretty
portable travel ready setup. Just holding this
in your hand and then doing your painting, right? And then having your towel
there and your paint, and it's all mostly compact. Um another handy thing that can be a fun way to also
make a little bit of memory when wherever you're traveling is I like to
in most gift shops, they're going to have some
kind of little ceramic dish. This technically was labeled
like a ring holder, right? But any type of dish that is made with ceramic is going to
make an excellent palette. Bonus points if, like, look, this has, like,
a little mountain. I actually purchased this in Grand Teton National Park
because I thought it was just really inexpensive and also fun and memorable
way to not only, you know, have a
souvenir to take home, but also an artsy souvenir
that I actually use. And this travels with me in
a lot of my planer setups. So having a little ceramic dish, an extra mixing
palette can be handy. And then I also
have a micron pen. So a micron pen is like
this is waterproof ink, and we're going to use this in a couple different ways
throughout the project. But especially when
you're painting quickly, pens can be an
excellent way to add detail and to just have, you know, bring in
an extra element when you are working with
watercolor on the go. So a watercolor pen, a micron pen, and
then some tape. So this is Hallbn soft tape. But basically, if
you have washi tape, if you have masking tape, painter's tape, any kind of small compact tape,
it's not necessary, but it can give you
these really crisp edges that can be useful for whatever useful for providing a level
of satisfaction, even if whatever you've painted feels a little bit,
you know, mediocre. So tape is handy, and I think that about
wraps most of this up, except for Dan turin. This is called a sketchbook El. It is another small
business item from an artist that
I really like. It's linked in the
supplies list. All of these things are
linked in the supplies list. But let me show you
how to use this. So like I said, you
don't need this, but it is so handy. Um and ever since I purchased
one about a year ago, I have been using
it all the time. So basically, this El has a
little notch in here, right? And so you just slip that in the binding
of your sketchbook, open to whatever page it is
that you want to paint on. And it doesn't you
don't have to, like, go to the
back or anything. You just, like, slip
it in the pages. And then you take the clamps and you clamp the
sketchbook on either side. And clamping it on either side will make sure
that the sl stays put. Mostly. Yeah, it's
going to stay put. And then because
these are magnets, you can stick your metal
palette right on the magnets, and then these are
little holes that you can stick your paint brushes in. She has different lots of
different versions of this. So there's a bigger one. There's one with a big hole right here in case you
have a little cup, like a travel water cup that
you want to travel with. You can also set that extra
mixing palette right there. So this is a sketchbook sol. El meaning it's just, like, a handy, you know, almost portable
tabletop that you can use whenever you're
trying to sketch. So that's the setup. That's how you kind of arrange everything together and
get yourself ready. Remember, the point of travel
painting is, you know, you're sitting on rocks,
you're sitting on trees, you're sitting on park benches. And absolutely, you can kind
of set all this stuff up, like, on your lap or you
know, if you have a table, you can maybe have more space, but the more you
can use the clamps, use the sketchbook El to, like, make everything
all in one place. The easier it's going to be and the less frazzled
you're going to be. So that is those are my
thoughts about travel supplies. Again, all of these are
linked in the supplies list, and let's move right
along to the next video.
5. How to Use a Water Brush: Hello, my friend. In this video, we are going to have a
demonstration for one of the most intimidating pieces of art supplies out there,
the water brush. And, you know, I use the water brush to paint all
the projects in this course. Whenever I plan or paint just for my own personal
creative practice, 99% of the time, I
use a waterbrush. But when I first picked
up a waterbrush, which, by the way, we kind of talked about this in
the supplies video, but a waterbrush
is a paint brush that has an empty barrel, right, an empty handle that
you can put water in, and it, uh you know, it's self watering, basically. So you don't have to travel around with a water
cup all the time. And when I first used a
water brush, you know, some eight years ago,
I was very confused. It seemed a huge hassle. Like, why would anybody
even want to use this? And I didn't pick it
up for a few years. Then I started messing around with it and experimented with it on planer painting, and now it's my favorite
tool to use when I'm out in the wild because
of the convenience. Now, is it going to
be as, um you know, are you going to have the
level of finesse with a water brush that you would with one of your
fancy paint brushes? No, definitely not. But when
you're plain air painting, you're in the wild, right? It's not about finesse. It's about the experience. It's about accessibility. It's about making it
doable without having to worry about things
like giant jars of water. So, let's take a look
at the water brush. There are three things that
are important to practice, think about, remember when you are working with a water brush. The first thing that
we're going to practice, that's probably the biggest
question that I get is, how do you get the water
out? I think that. This kind of speaks to a
more overall question of, how do you control the
amount of water that goes on your brush that you can use with
your paints, right? And the simple answer is, you push down with your fingers in order to squeeze the water
out of the tube, right? So we're just going to
push down on the barrel. One of the first
things that I would recommend even before you travel anywhere is to practice
with these in your studio. So you want to get comfortable
using these supplies in a comfortable place so that
you're already comfortable with the supplies before you're in an uncomfortable
place, right? Okay, so squeezing really hard is going to push out
drops of water, right? And I'm just squeezing them onto this pallet for right now. So squeezing really
hard is going to push out big drops of water. So the first thing we're going
to practice is squeezing really hard to get out
big drops of water. This is going to be handy
for you for when you want to create big watery washes, right, for when you
want to create, like, gradients or you want to or you're just kind
of messing around. So I am and this is like
the medium size brush. So bristle the bristles
are kind of big, right? So I have a lot of water that I got squeezing by
squeezing really hard. And if I want to continue
squeezing really hard, like, if I want to get my
whole paper wet, then I'm going to paint and
squeeze at the same time. So painting and squeezing at the same time is going to make sure that I'm getting lots
of water on my paint brush. So, you know, painting with
a water brush is tricky, just because you
have to remember multiple things at once, right? You're not only focused on,
like, what you're painting, you're also focused on how much water is coming out and how you're
controlling that. And the way to do that is by
squeezing the barrel, right? Squeezing the barrel
of your water brush. Now, one question you
might have is, like, what happens if you squeeze so much that you
run out of water? Because this was nearly full by the time I started painting, and, you know, I put so much water on here and in here that now it's half gone. Well, we're going
to talk about that in one of the other technique
videos where we talk about, you know, plain air painting, plain air watercolor
sketching techniques. But one thing to remember
is that you actually don't want big swatches of water
like this all the time. You want to preserve your dry
space as much as possible. And so you're probably like, you're not likely to use
this much water all at once. But also we're we're practicing
painting small, right? We're practicing painting
a little bit at a time. So even if this water
doesn't last you very long, it's at the very least
going to last you like little small
paintings that would fit in this compact
sketchbook, right? And then in between sessions, you can go and fill
up the water brush again in the bathroom or
with a water bottle or, you know, wherever
you might find that. So water control is
pushing really hard. I mean, pushing really
hard on the barrel to get tons of water out to make it really watery
and get that nice, like, watercolor texture, right? So, what happens, though, if you want just a little
bit of water, right? You don't necessarily
want giant fat drops, and you want to kind of control the amount of water that's
on your paint brush. Well, the way that you do that is I would recommend, like, squeezing to get enough water so that you can see
it on the brush and then maybe using
your towel to you know, to catch the water
if you don't want it to fall on your paper, even though that did
fall on my paper. Like, use your towel
to catch the water, and then just pay very
close attention, like, squeeze just enough to get the water to soak
into the bristles. And this is one of those things
that will take practice. Like, it's one of those, I don't know what your
hands are like. I don't know what your
water brush is like, even if you purchase the
exact same one that I have. So it's going to
require a lot of curiosity and
practice on your end. But I promise it's possible
to get just enough water on your bristles so that you
can create thin ish lines. Like, again, we're
not in the studio. These aren't like the super
high quality paint brushes that you might be
used to, right? But they're not terrible
quality, either. And if you practice and
with enough precision, so like getting enough squeezing just enough water into the barrel that you
get the bristles wet, right, but not so much that it's, like,
leaking everywhere. Then you can make these paint brushes have
the level of detail that you might be used to with
paint brushes in your studio. So just takes a little
bit of practice, and also a lot of
self compassion, a lot of readjusting
expectations to remember that, like, this is a different tool from your regular paintbrush. This is a different tool, and painting outside has different goals than
painting in your studio. When we are player painting, our goal not to get the
most perfect painting, at least not at first, right? Maybe that can
eventually be your goal. It can eventually be your goal
to uplevel your technique. But for right now, the goal
is to just paint outside. That's the goal. And so by
making the goal so small, you give yourself more
room to be messy, to not know what you're doing, and have that be okay. And that's the first step to you actually being able to get to know what
your supplies are. Okay. So the next question that I often get asked with
a water brush is, how do I rinse it off
in between, right? So, like, say I have
especially a color that's, like, highly staining,
right, like indigo, right? So, I mean, even before then, can you do the dry brush
technique with a waterbrush? And the answer is yes, you
just kind of have to use your towel to make sure there's as little water on the
brush as possible. You can definitely
get those really cool dry brush strokes. It's just gonna take a little
bit of experimenting with. But then what happens when
you want to get like, you know, yellow after
playing with indigo? Well, you squeeze your brush, and then just kind of blot it on your towel until it goes clear, especially if you are really paying attention
not to, like, mix different colors together, then you're going to need to
use that water to kind of, you know, rinse it out,
but you just squeeze until it comes out on the
brush and then on your towel, you blot it out just like that, and then it's clear,
and you can use it. Um, one thing to note about
water brushes is that these bristles can handle a lot more than your in
studio bristles. So typically, with round
watercolor brushes, we like to be nice to
the bristles, right? We don't want to,
like, ruin them. These are heavy duty. These are supposed to be
used in a way that you know, takes into account the elements, takes into account
your circumstances, takes into account that, like, you might not be able to use the same level of precision
that you're used to. And that's okay. So don't
be afraid to get down and dirty with these bristles. You're not going to ruin them. And even if you do, like, even if they get kind of bent
out of shape or whatever, you can always, A, reshape them. And B, remember that we're
painting loose paintings and maybe a ruined brush because
you've used it a lot, right? You've been really
heavy handed with it. That might just make you
have a greater ability to create texture and to create really interesting shapes
with your paint brush. So it's really okay to actually use this
paint brush to make it, you know, to be overzealous, even with it and make all
sorts of fun art that you can. So the very last thing that I want to talk
about is, okay, how do I refill it
once it's already, you know, once I've used it. And the very quick answer
is most water brushes, you can just unscrew
the head like this. And either you can go to if there's a bathroom
or something where you are, then you can just stick it
under the sink under, like, a pretty low flow and
wait for it to fill up. If you have, like, a
little water dropper with some kind of water well, water droppers can be really helpful because you
can just, like, stick the water dropper inside, and then it fills
it up that way. Or you can have a water
bottle and just, like, pour it over the side
knowing that a bunch of water is going to spill out, but that's not the point, right? You just want to capture enough
that it kind of fills up to the top and then
screw it back on. Then voila. All good. That is a very quick tutorial on how to use your waterbrush, hope that it was helpful, and I will see you
in the next video.
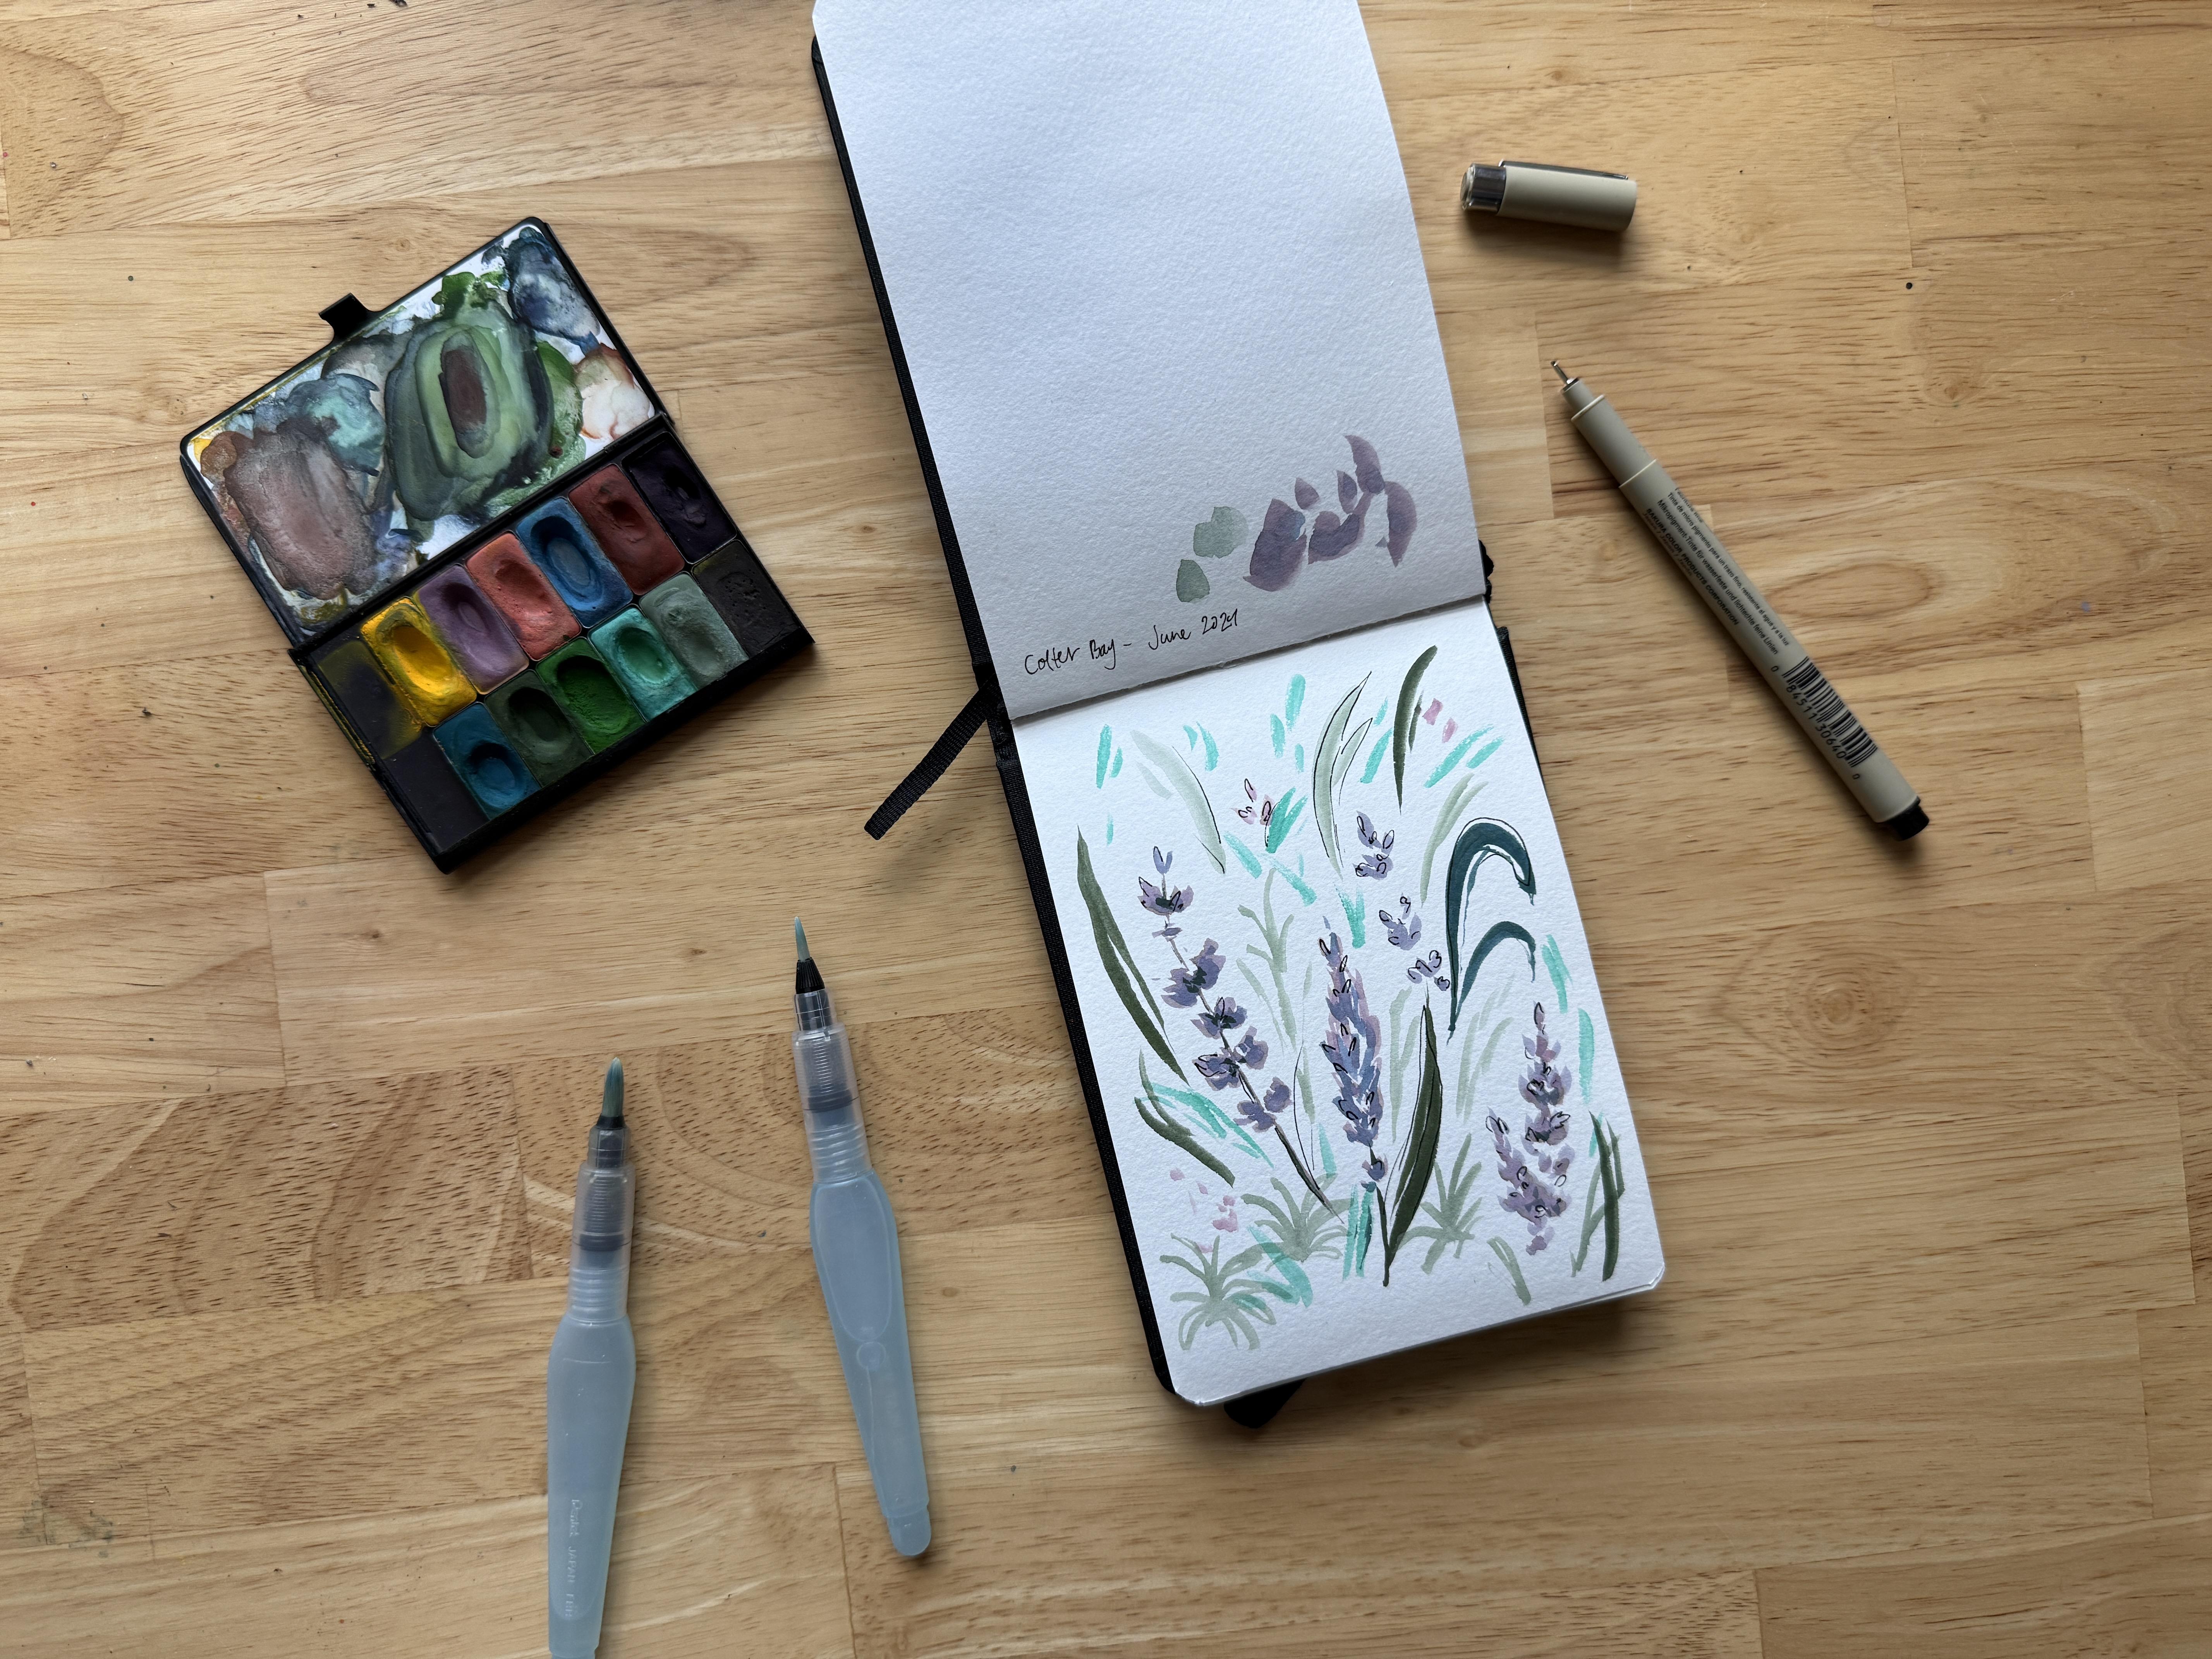
6. Painting a Single Subject: Hello, my friend. In this video, we are going to take
a look at how to go about watercolor painting in
a sketchbook on plain air, right, when you are outside in the wild and there's a subject
that you want to paint. So the thing about
plain air painting with watercolor specifically
is that because you are, you know, exposed
to the elements, it's going to be different. The way that you go about
putting together a sketch, putting together a really
quick representation of the thing that
you're trying to paint, very different from the way that you might approach
it in your studio. So we're going to talk
about those differences in this video and
in the next video. This one is specifically about how do you go
about piecing together the different parts of a sketch
or the different parts of a scene when you're trying
to paint one subject. Okay? So, when you're trying
to piece together the layers or the elements of
one subject and, like, what order to
put everything in, what methods you
might want to use, we're going to talk
about kind of my go to strategies in this video. So if what you are painting is a scene or parts
of a scene, right, elements of a scene that mostly has a subject
with detail, then when it comes
to planar painting, because dry space is the way that we
create detail, right? We want to focus on
giving ourselves broad details very first before
we paint the background. So the order is subject first, like broad, detailed
subject first. And then we can paint
the background details, and then we can paint the on the subject details
a little bit closer. And let me just like demonstrate that a little
bit better, right? So, like, say we're
painting a flower. Say we're painting
some kind of flower. We see a flower, maybe
it's yellow, right? So maybe I'm just
like, and remember, when we're playing our
painting especially, we're just painting loose
structures, loose marks, right? I'm not going for
specific detail here. I'm just painting loose marks. And this is a very generic
kind of flower, right? I'm not actually
looking at a flower, but say I am, right? Say I am. The first thing that I'm going
to do is think about Okay, since I'm painting
a subject, like, the main point of
this painting isn't really the whole
scene, or rather, even if it is a scene, one very specific subject
is the point of the scene. I'm going to focus on a
broad outline or a broad, like, block in of
the subject first. So that's going
to be the flower. And then the stem, right, if I have a stem and then maybe
also some leaves, right? Just a block in meaning, I'm not focusing too much on very specific details
on the actual subject. I'm just blocking in the overall structure,
the overall colors, and then letting my paintbrush add little details
as it goes because, you know, notice
how on the leaves, I have little skips in
between in the paint, right? Texture that's created because of the way that my
paintbrush worked. Is that texture actually what I see in real life,
it doesn't matter. That doesn't matter right now because when we're
plan or painting, the goal is to paint, and if it looks somewhat
like what we're painting, then we've made it, okay? So we want to do the broad
blocking of the subject first. And then because some of this paint might
be a little wet, we might not be able to add little details on
top of it just yet. So we can paint the
background now. And the background could
be anything from, like, smaller subjects to even just
a general overall you know, color that I'm painting
around around the flower, around the subject, right? Like, it could be
the scene. So it could mean you're focusing on other parts of the
scene that are not touching the
flower at this point. Or it could just mean I am
painting around the flower, to have some kind
of background to place it or just to give myself something interesting
to do while I'm waiting for these parts
of the flower to sketch. Because remember,
another thing to consider when you're
plain painting is that we're not really
planar painting to have, you know, these gorgeous
paintings at the end. We are planar painting
because it's fun to do while we are wherever we are. It's a fun way to remember whatever travels
that we are going on. It's a fun way to It's a fun and meaningful way to
incorporate creativity into, you know, whatever memories
you are trying to create. And so sometimes you
need to look for opportunities to you know, make whatever it is that
you're doing fun while you're waiting for elements
to come in your favor, like waiting for this flour to dry so that you can
paint more details on it. Because like, one of the
most important element here is that you need to have dry paper in order to
paint details, right? If you have wet paper, then the paint with watercolor, it's going to just bleed
everywhere, right? You're not actually going
to be able to control it. And so that's one of the reasons why with plain air painting, instead of painting like in tons of layers on
top of one another, we are more careful about
what part of our painting is dry and when and thinking about dry time
all along the way. So I started with the
blocking of the subject. Then I painted the background
behind the subject while I'm waiting for the
subject mostly to dry, right? And because I'm in my studio, the painting isn't drying, so I'm going to do a
little cheat coat and just dry this as if
I'm sitting outside. But if I were actually
sitting outside, it probably would be
mostly dry by now. So the flower is dry. And now the last thing,
once we've painted, like, the blocking
of the subject, we've painted the
background elements, whether it's a scene,
or it's just, like, a kind of a larger swash, like a general
background color, right? The last thing is we're going
to add smaller details. And when you add
smaller details, typically, they are
darker in value. So meaning they
are darker colors because that's going
to help give us shape, and you're not using as much water when you
are grabbing your paint. So, I am going to get
some more of this yellow, but I'm not using tons of water, so I can make sure that this
yellow is a darker value. And I'm just going to add, like a little lip on top
of one of the petals here. Just like that. And then
maybe another one over here. So we're having we're
adding little details onto the flower by adding darker contrasting values
onto the petal. And this is only
possible, right? If this was dry, then it would
bleed all over the place. But this is possible because
the paper is I mean, if this was wet, it would
bleed all over the place. But because this is dry, and when you are
player painting, your paper is going to dry faster than if you
were in your studio, it's possible to add these
tiny little element, these tiny little details
on top of it, right? So with flowers, if you add slightly darker value on top to give the
petals some shape, you can also add slightly
darker value to the leaves, like on one side, to give
the leaves some shape. So if I just do maybe
the leaves and the stem, like a little bit
of shadow here, a little bit of shadow here. It doesn't have to be perfect, right? This is just practice. And then maybe I want to take some darker color and
just add a little bit. To the center just like that. And there we go. There's a planar, there's a painting as if the main thing we're
painting is the subject, right, where we started
with the block in. Then we did the
background details, and that could just be a
big swash of background. And then after the
block in is dry, which hopefully that
was happening while the background while we were
painting the background, then we can add some
details right on top there. And one last thing
that you can do is, especially if you're
painting plants, I mean, you can do it
without plants, too, but especially if
you're painting plants, a really fun thing to
do is to take your pen, a micron pen and make
it super sketchy. Sketchy, meaning just, like, sketch right on top of it on top of the details
that you just painted. And especially if you want
to use your pen to, like, darken up the dark parts or add details that you
might not have been able to add fine details that you
might not have been able to add with your paint
brush because these water brushes are
difficult to control. Or if you've painted a really messy sketch
and you just like, I just want to have
fun at this point, making scribbles on top
of what you've painted is a really fun and
easy way to lean into being messy and just
make it messy on purpose. And so that can be a fun
way to relieve yourself of the requirement to be perfect while you are out in the wild, painting outside and already worried about different
circumstances happening. So this was through tutorial as if you are
painting a subject, right? Like one subject, one object or element is the main thing
that you're painting. And in the next video,
we're going to talk about how you would use
these similar techniques, but if maybe you're trying
to capture layers instead. So I will see you
in the next video.
7. Painting Layers in a Scene: Hello, my friend. In this video, we're going to talk about how to approach putting together a watercolor sketch on plain air when you're
out in the wild, when it's a scene, okay? So in the previous video, we talked about how
to use dry space, how to use different, you know, different layers and
piecing together different parts when we're
just focused on one subject. In this video,
we're going to talk about some of those
same elements, but putting it together, putting together a scene, right? So a scene, meaning
different layers, specifically for this class. It's layers of
mountains or layers of trees or just layers
of landscape and how you might put
that together to compose a really
beautiful scenic view. But using all of the resources and taking into account all of the limitations of
painting outside. It might seem pretty
straightforward. And one very important thing
to remember about layers, especially landscape layers, if typical rules are applying, right, is that light
lighter layers, like light value, meaning colors that have
more white in them, right? Those go in the back, okay? And darker layers or
more vibrant layers, those go in the front, Layers that are behind, especially if like you're
painting mountains or something or layers of trees or
anything like that. The layers that are far away and in the distance are smaller, and they look more blue and they are lighter in value, okay? And then the layers that are in the front are darker in value, more saturated, so you can see more vibrant colors in them. Um, and yeah, they're
more vibrant. They don't they don't look as muted because
they're in the front. And so that's just kind of
typical across the board. But how do you capture that when you're worried about maybe your layers all blending
together, right? Like, how do you capture
layers of mountains, say, when you're nervous because if you're playing or painting, you don't have time to, like, paint one layer and
then let it dry, then paint another
layer and let it dry. Well, one thing
that might help is if you put together some kind
of just very loose sketch. So let's just say we
have a little loose, like, zigzag mountain
range going on here, okay? So we have, this is a
background mountain. We'll have the background
mountain be right there. I'm making this up. Okay. So this is the
background mountain, right? And then it slowly gets
bigger and bigger and bigger. Now, if I were to paint I want to paint the
background mountain, so it is, like, really light, very
watery, right? And so I'm making sure
I have tons of water on my brush and in
my little palette and then I'm just going to paint the background mountain within the areas that I've
set out, right? And the reason that
I put this sketch in is because normally, if I were in my studio,
I might recommend, I would recommend painting
the background and then letting this dry and
then painting this layer. But what happens
if maybe you don't want to let it dry or you don't have time to
let it dry, right? Well, one benefit to
having like a quick even just with ink, right? Just a quick sketch or kind
of being able to see what the natural movement
of the layers are in your mind is
you can jump around. And the only rule that
you need to remember is that if two layers that are
wet are touching each other, they're going to bleed
into each other. And that's because of the
wet on wet technique, right? Paint that is wet is
going to bleed into, um, anywhere else that it's
wet if they're touching. So if I don't want my
layers to touch and I'm painting outside and I'm trying to paint
all this at once, then I would jump around. Instead of doing like, a very linear back to front, I would jump around
to wherever there's another dry spot that isn't
touching this dry spot. So I'm going and so
I'm going to have to mentally kind of
calculate and maybe, you know, putting together
a little color palette off to the side will
help with that, right? So there's, like, the lightest
color swatch right there. Then I'm maybe going
to add just, like, slightly darker slightly
darker colors to it, right? And then the darker and
more vibrant I get, the closer to the
front I'm getting. And so if I have a little color
palette then I can kind of mentally say
to myself, Okay, so if I'm skipping this layer and I'm jumping
straight to this one, then this is about the
color that I want, right, about the color scheme. And another kind of important
thing to remember, like, if you're painting
mountains and you're painting layers
with the mountains, it's not only jumping around layers to make sure you're
using the dry space. It's also using the dry space effectively to create
texture, right? So, I'm very intentionally
not pushing down on my water brush all the time because I want to leave
some of this texture, especially if I want to create, like, a rocky kind of texture, then what that looks like
is very intentionally not always pushing down
to have water come out, but sometimes letting
the brush just naturally create some
of this texture. And again, this isn't
necessarily going to look exactly like what I'm actually looking at when
I am playing or painting. I'm not trying to
copy what I'm seeing. I'm trying to take inspiration from what I'm seeing, okay? So we have this layer now, and maybe I want it to be just, like, slightly darker to make
sure it's slightly darker. And so I'm going to add
a slightly darker paint, especially along the bottom
to add some depth to it. And then I can go
ahead and paint this middle layer in between
all of those, right? So I can go back and kind
of capture that mid value. And that's one of
the reasons why having a tiny little mixing pal like this can be so handy. And then I'm just going
to kind of carefully make sure to paint in
between the layers. And once I have this,
like, wet layer down, this is a good opportunity too if I wanted to add some, like, interesting elements to it, some interesting color blends. While it's wet, I can go
ahead and just, like, tap in some colors to just have some interesting
shadowy textures while the painting is still wet. And then my final layer, as I'm jumping from
layer to layer, right? 'cause I'm not going
back to front, I'm trying to go from
dry spot to dry spot. And so here's my final
layer, and it's the darkest. So this is, like,
indigo at its darkest, and I'm being pretty heavy handed with my
paintbrush, right? Like, my bristles are
kind of taking a beating, but that's because I really
want this texture, right? I really want this dry brush
texture, and that's okay, because the bristles on
this travel paintbrush are supposed to kind
of take a beating. Um that's what they're for. And so I'm also going to
take some of this indigo, and just to add, you know, another interesting
element to this, maybe along this ridge
here, add some trees. And it looks like
the layer on top, like, the layer above this
is still kind of wet. That's okay. So my trees are a little bit blurry,
and that's fine. If I'm painting in,
like, on plain air, if I'm painting
outside in public, sometimes that happens, right? Sometimes the layers don't dry. At the rate that I want them to, and that's going to
be fine because I'm not painting to capture
this perfectly, especially as a beginner. I'm painting to
practice courage. I'm painting to practice
painting outside. So that is kind of how you might approach painting
a layered painting, like painting a layered scene. And it doesn't and
it's the same way, even if you're not
painting mountains. It's kind of in your
mind thinking, Okay, the back is where the lighter
things are going to go, the front is where the darker, more vibrant things
are going to go. And I'm going to kind of piece
together how to get, like, put those puzzle pieces together without making any of
those sections touch because dry space is a
really hot commodity because dry space is how
can keep the layers separate and distinct so they
don't just all run together and how I can capture little details like
texture and trees. And so giving myself time
to let different parts of the painting dry while still working on other
parts of the painting, that's going to be really key to managing these layers
all at one time without, you know, the nice, cozy
conditions of my studio. So hopefully this was helpful and we'll help prepare
for the projects. We're going to get even more
practice practicing both of these styles,
and I can't wait. So I will see you
in the next video.
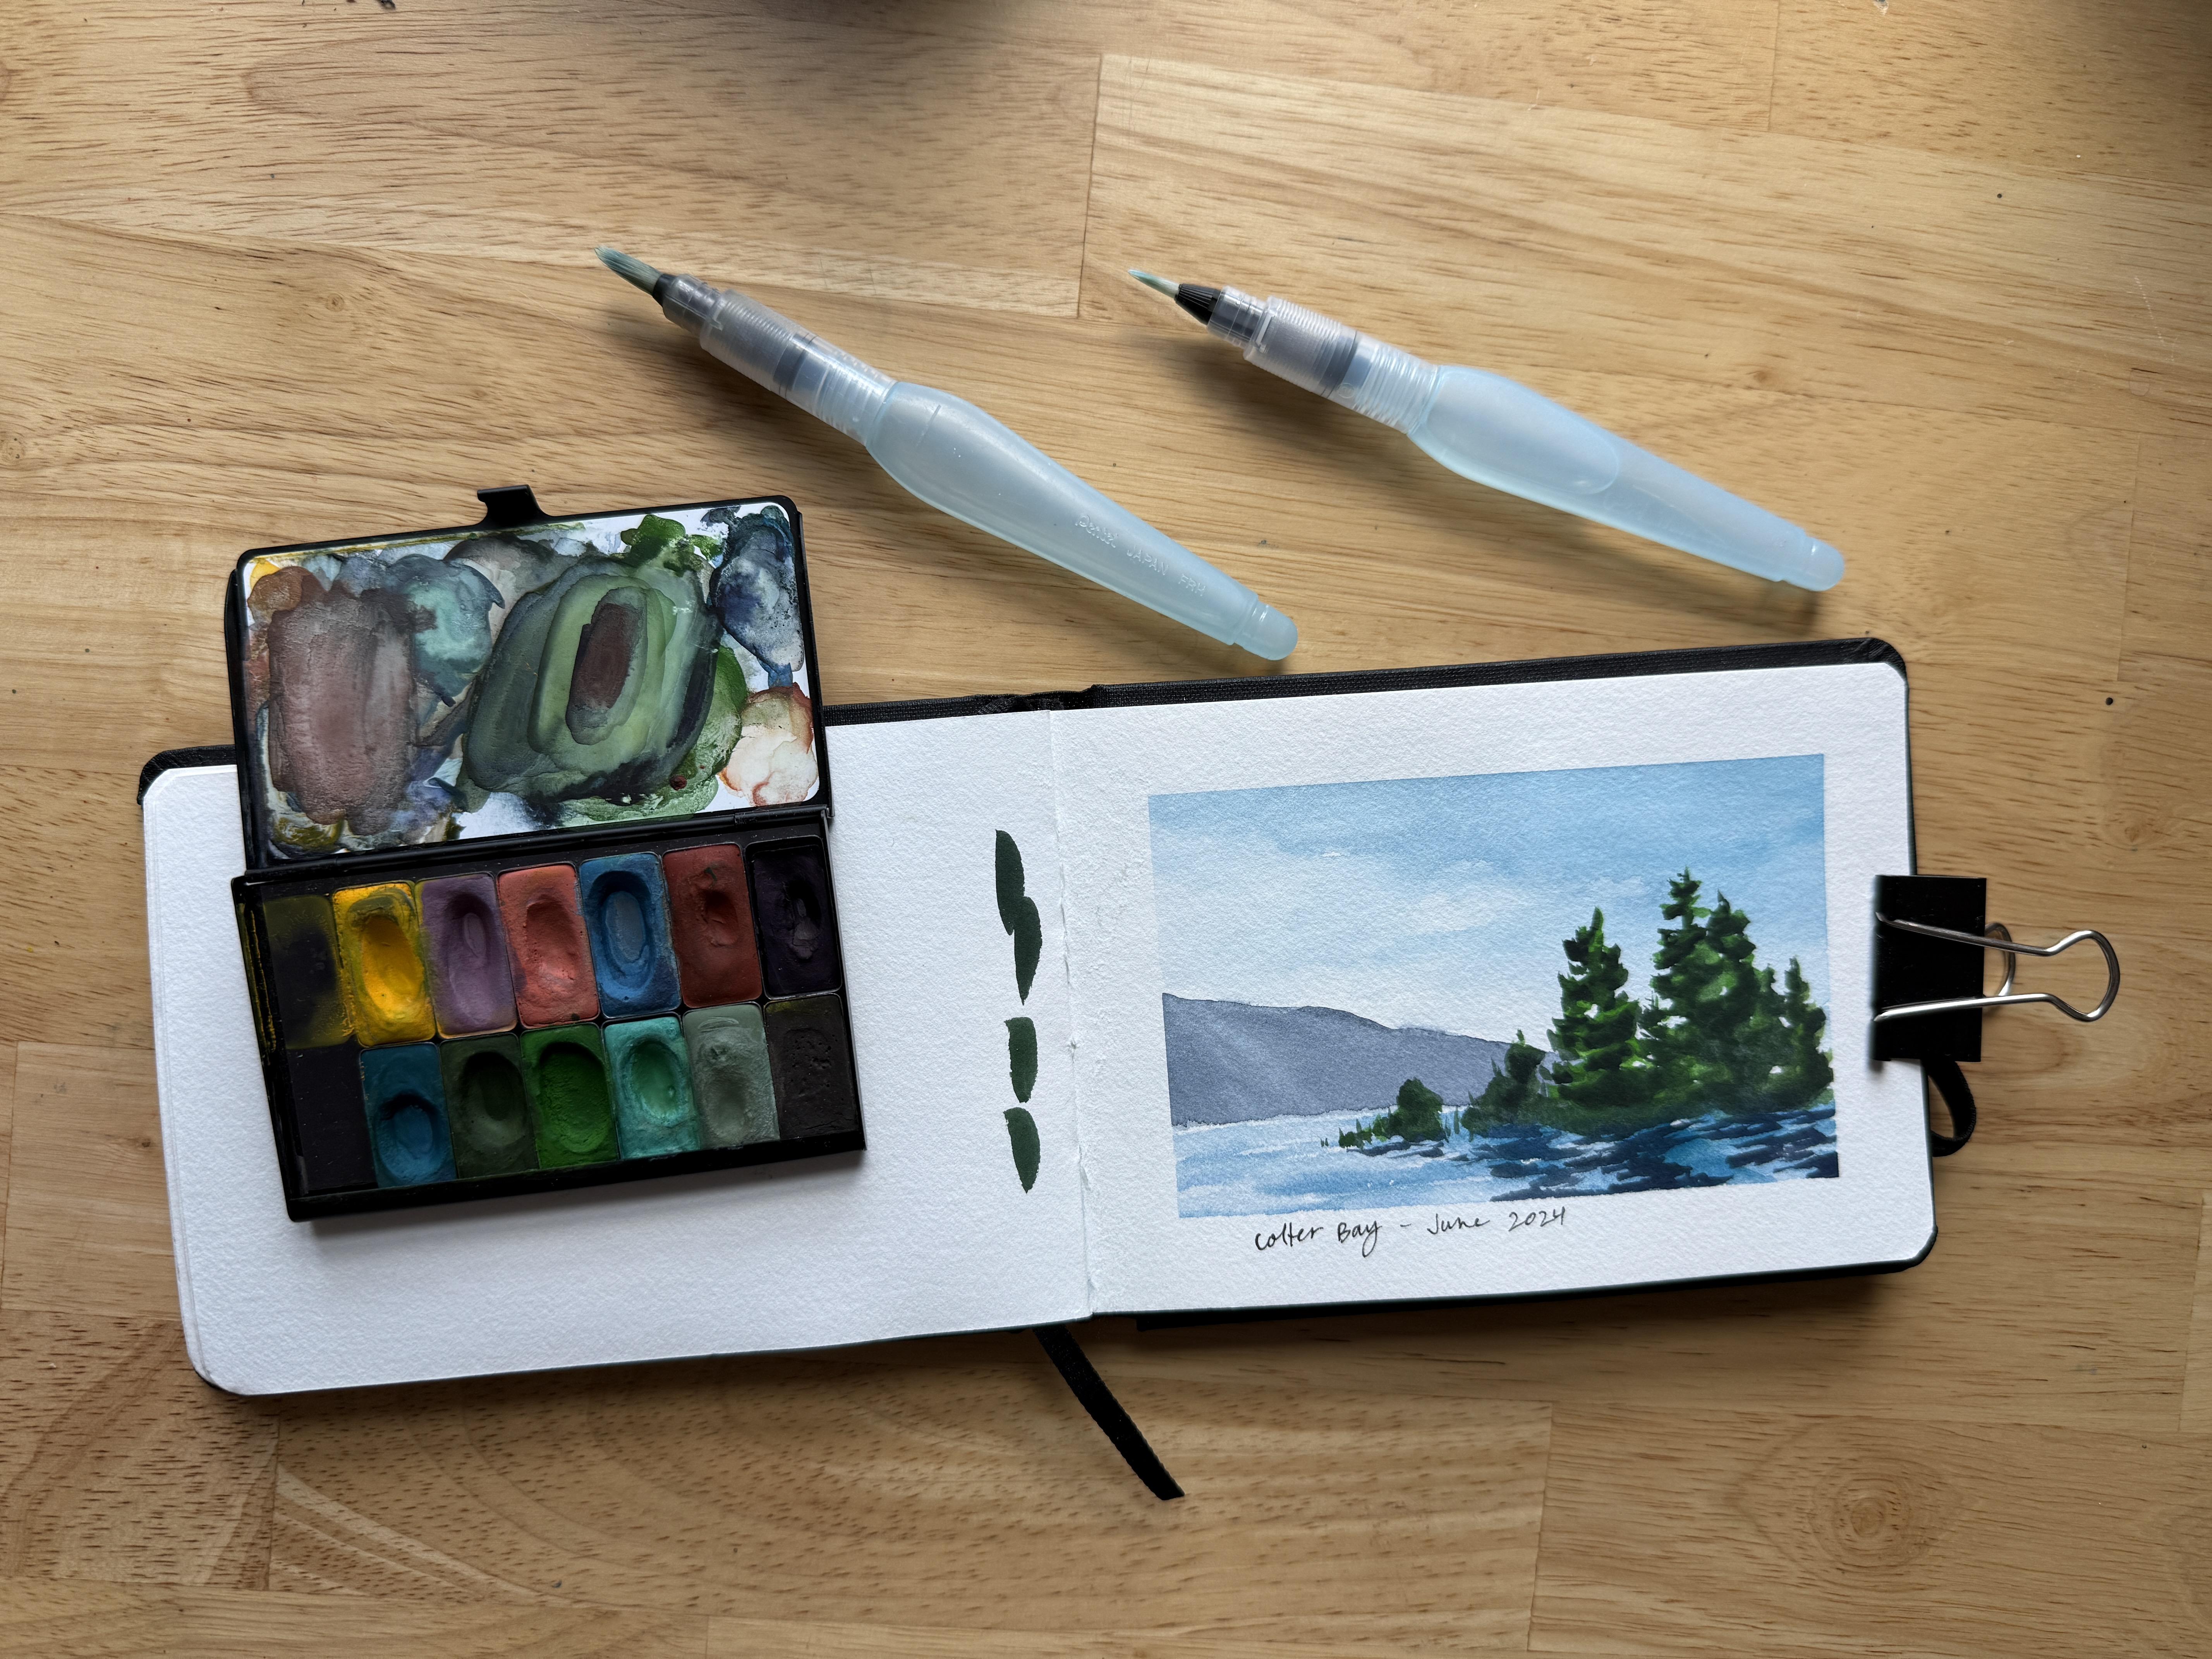
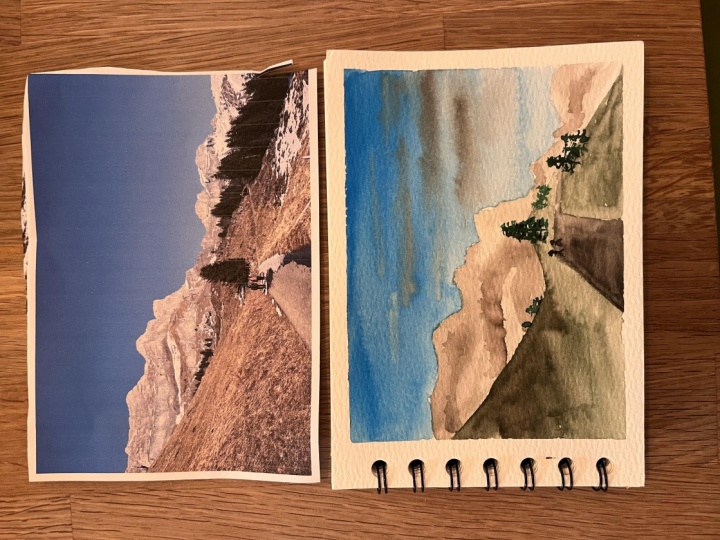
8. Project: Colter Bay: Alright, let's get started
with our first project. And we are going to practice
looking for a zigzag. If you are out in the wild, especially with mountains and trees and hills or, you know, various elements of a landscape that are kind of
layered together, one easy way to find, you know, a scene or
a reference photo or anything that feels doable to paint is to
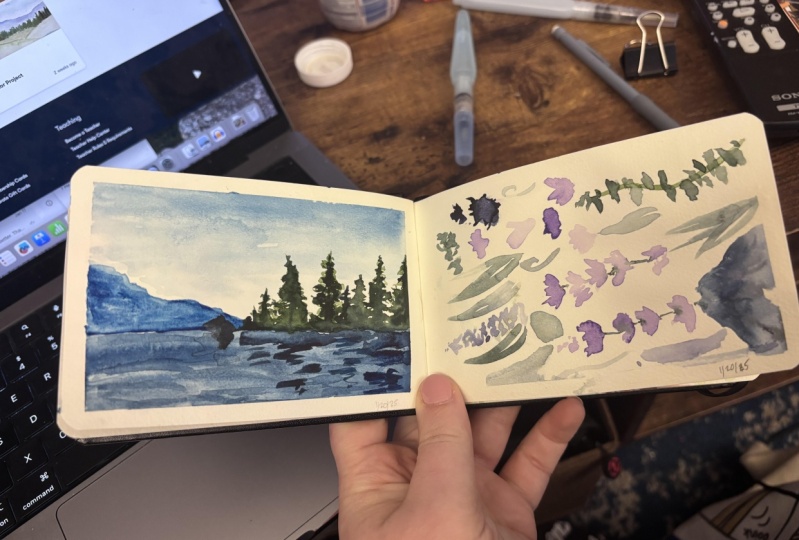
look for a zigzag. So as you can see in this scene, this is a view from Colter Bay, which is, like, a lake in
Grand Teton National Park. Wanted to find a zig zag, which I did with the layers of mountain and then the
trees and then the lake. And then the sky behind it also contributes to
the zigzag, right? When you're trying to
layer mountains and trees and lakes
all in one scene, a zigzag is usually
pretty easy to find. And so we're going to talk about how to put this sketch together, and hopefully this can
fuel your own inspiration. Alright, my friend. Let's start sketching. So I'm going to
prepare my sketchbook, and for this project, I think that I really
want to use some tape. So I'm going to pull
out some washi tape. It, it doesn't matter what
kind of washi tape you use. It just matters that it's,
like, kind to paper tape. So I'm using some washi tape to just give myself
a little border. So I'm going to put
the tape down and then fold the tape underneath. And I'm doing side side and then bottom top so that all of the pieces of
tape aren't just, like, stuck to each other. And a bonus of using tape. This is the only project that we're going to use tape for. But a bonus of
using tape is that especially if you make it a
little bit extra long, right? You can kind of fold
it underneath, like, over the side of the sketchbook
so that it's extra taut. But especially because I like
to use binder clips, right? We can still keep it
taut by, you know, lamping down the side
of the sketchbook. And then I like to
put a binder clip in the middle binding also just to make the
sketchbook extra stable. This is important,
especially if you're putting the sketchbook on your lap or something like that, and just makes it possible for you to keep painting even when the terrain
feels a little bit rough. Like, the circumstances aren't
exactly, you know, ideal. So let's start painting. This photo is of a scene in Grand Teton National
Park. This is Culter Bay. And the first thing that
I'm going to paint, well, the first thing
I'm going to do is to look at all of the layers, and then I'm going to decide what layer do I
want to dry first? I want to dry I want the
mountain to be dry first because I want to paint the trees over the top
of the mountain, right? So I've already
identified the zigzag. I've already
identified that, like, the mountain is coming
in from the left, and then the trees are
coming in from the right, and they're layered
on top of each other. But I want the mountain
to be dry first. So I'm painting that first. And I'm just eyeballing it. I'm not even putting
a sketch in. I'm kind of seeing, Okay, I
think that the mountain is starting basically
from the top from, like, half of the page down, and I'm going to paint it
a very loose triangle. That's it. I want it to
be pretty light value, so there's lots of water there. It can be handy. To
have a ceramic dish. It doesn't have to be
ceramic, but just, like, some kind of dish to help you get some of
that watery paint, or you can even push
down just a little bit on your water brush to add more water onto the
watery mountain ridge that you just created in order to kind of create
more white space. The thing about this
mountain specifically, is it seems like there's, like, some sun rays peeking over
the top of it, right? And so you could add some slightly dark while
the mountain is still wet, add some slightly darker paint. So add a tiny bit of indigo
to your blue, right? And just, like, paint around
some of that light space or use your water brush to push away some of the paint
to just create a really, you know, subtle kind
of contrast to make it appear that maybe there's
a glow on the mountain, not necessary, but something fun that you can, you
know, experiment with. Then I'm going to
leave that mountain alone and paint the sky. I will also want the sky to be dry before I paint
the trees, right? So I'm painting the sky, and I'm grabbing sky blue, just
like a light blue. I'm starting from the top, and then I'm pushing down
on my water brush as I'm, you know, putting laying
strokes down onto my paper, I'm pushing down on my
waterbrush to get more water out to make my strokes
pretty smooth. But the closer I
get to the bottom, the more water and the
less paint that I'm using. I very intentionally want there to look like there
are some clouds. So I want the top
right hand corner. I want that to look darker. And then to my strokes to be to just kind of fade
into white space. And I can do that by having
my paper be a little bit wet. And I can get it a little
bit wet by pushing down on my water brush to release some of the water onto the paper. So I'm just going to kind of tinker around with this using, like, loose, wavy
strokes, right? I'm not trying to overdo it. I'm just trying to add a little bit paint
so it's darker at the top and then gradually fades a little bit down
toward the bottom. As you are sitting outside, your paper is going to dry
a lot faster than if you are sitting inside,
just for the record. And so that's something
to keep in mind. Next, while I wait for the
mountain and the sky to dry, I'm going to paint the
first part of the lake. So I'm using some
really watery paint because when we're
layering water, especially if you're
painting water, you're going to
start really light and then gradually grow darker using zig zags to make it look like
there are waves. So I'm adding a bunch of
water because I don't want my light layer
to be too dark. And especially on
that left hand side, the water is lighter, right,
on the left hand side. On the right hand side, where
the trees are, it's darker. We can see lots more shadows. So I'm keeping that in mind. And I'm painting this lake. The lightest part I'm
painting all of it, the lightest part, and then I'm gradually going to get
darker and darker. So I'm adding a bit I'm
adding a bit of, like, blue green or, you
know, indigo, whatever. I'm adding a little bit more um a color blue color to that mixture so that it's
a slightly darker value. So it's not quite that
light watery anymore. And then I'm doing
really choppy zigzags. I'm doing really choppy
zigzags, and notice, like, I'm sitting inside as
I'm painting this, and even with this sketchbook, the paper dries pretty fast. I'm leaving that top, like, the top part of the leg, especially on the
left hand side. I'm leaving that mostly light. And then toward the bottom, that is where it's okay to
be a little bit darker. Now, this is still
just the mid value. Using zig zag so
that I can still get some slivers of that
light space underneath. But this is still not the
darkest it's going to be. And if you don't have
a smaller waterbrush, if you only have that
one size, that's fine. But this is where if you have that smaller size waterbrush, it could be handy
to trade because now I'm going to paint
even darker waves on top. And having the darker I get, the smaller I want the
zig zags to be and so using this water a smaller water brush
can be handy for that. Now, I'm going to paint the darker waves even
before I paint the trees. And I'm going to kind of
loosely in my mind, say, Okay, this is kind of
where the trees are, but I don't it doesn't
have to be equal. So these are like
the shadows, right? These are going to be the
shadows the shadow reflection, basically, the reflections of shadow of these
trees on the lake. And it doesn't have
to be perfect, but I do kind of want them to be generally in the
shape of the trees. And I'm painting
these first before I paint the trees because
I want the lake to dry in case I decide
I want to add a few more waves on
top of this already. So I just painted some slightly darker blue
on top of that for shadows, for the trees, and now I'm going to focus
on painting the trees. Now, the trees are
going to be similar to everything else
we've painted. The sky should be dry by
now, so should the mountain. And I'm going to paint
these trees light to dark. So I'm going to
paint them all like this really light layer, and then I'm going to use
dark after to come back in and add depth to the trees to make them
look even more realistic. So, again, this is a
sketch. This is very quick. I'm just using really
quick, like, blobs, basically on either side to loosely give myself the
shape of a pine tree. And I know that these
trees really these trees are kind of like the
main subject, right? These are kind of the
hero of the whole scene. And so I do want some of the I do want some detail
on these trees. Now, am I going to
have enough space or enough wherewithal to paint very specific detail on
the individual trees? Maybe not. So instead, what I know I can do Is, you know, kind of intentionally make
the trees themselves, give like contribute
to the overall shape, overall zig zag of the composition that I'm
trying to make, right? So I want it to be varied. I want different sized trees. I want the trees to
be different shapes. But I'm giving myself because the trees are kind of like the main,
the most detailed, but still contributing
to this zigzag shape, I am using kind of an outline of the trees to form
this layer first. And I want the trees. I don't want any of the trees to be exactly the same height. I want them to look like they're kind of
going up and down. So not only are they
contributing to this, like, horizontal zigzag
with all the layers, but also adding, like
a vertical zigzag, right, where the trees are going up and down
and up and down. Kind of like, you
know, like a graph. So I'm painting in
this lighter green. The thing with painting
in the lighter green that is so important
to remember. Otherwise, you could
get caught up in all of these details is that most
of the lighter green, it's going to be
covered up with dark. And so, really, we're just using the light green to give almost, like, a silhouette, like an
outline of the tree, right? And another really
important thing, especially if you're
struggling with painting trees like
this where you're starting with the
trunk and then just painting like blobs
on either side. Leave white space. One of the biggest tricks in order to make sure that
your trees actually look like trees is to leave little bits of white space
in between the branches. The white space is going
to give you the detail that makes the
branches look sharp, that makes the branches
actually look like evergreens. So that's one of
those important, it doesn't really matter
what the blobs look like, but it does matter that
you leave little bits of white space in between the blobs so that you
can give them shape. So now I'm going to
add the darker green, and I added I did
that same grain, but I added a bunch of indigo, and I actually made it, like, way darker than I needed to. One of the reasons why
I only like to paint on one side of the sketchbook is so I can use the
other side for, you know, to scratch
paper, basically. Now, when you start
adding the dark, I would start toward the
bottom of the branches so that you leave the top light and then the bottom part dark. And Or generally
just knowing, like, most of this is going to
be dark with a little bit of light green that I'm
letting peek through. And then just using that
same back and forth, almost, you know,
again, zigzags, right? Zigzags to fill in the
branches so that you have little slivers of light green but mostly
that dark green. And having those little
slivers of light green, even if they're
not exactly where you think they should be
based on the reference photo, it's still going to snap together to give
these trees depth. That's another thing
about the zig zag. That's why I'm featuring
it so prominently in this project is when in
doubt paint a zigzag. When in doubt with
a composition, make things go up and down in a varied way or side to
side, in a varied way. The zigzag is one of the most naturally
occurring shapes that you will find
basically anywhere. And so keeping that in mind
is enough. It's enough. When you're sitting down when
there are bugs everywhere, when the light is too bright, or when it's a
little bit chilly, you're not sure what to paint, it's enough to say,
Can I find a zigzag? Let me paint that. And you'll be able to paint
something really cool. And like I'm showing you here, it's not just in terms of
the composition, right? It's in terms of adding
depth and adding contrast throughout the elements and the layers of your scene. So now that we have
the trees painted, you could even go
back and add in a slightly darker layer. And when you do the, like an even darker layer, you don't really need as much. So with that mid dark
layer that we added, right, we added kind of a lot. We covered up almost
all of the light green. But if you're going
to add an even darker layer on top of that, which especially if it's like nighttime or
evening time, like, the trees that
you're painting are cast in a lot of shadow, having three layers that you're gradually starting
light and then getting darker can also, you know, be really effective
in making these trees pop. And making these trees pop against all of this
blue, all of this, like, really luminous, like, watery blue is an effective way to make the zig zag work, right? Because all these subtle
lines coming together and then the trees are popping
up against everything. So now we have the trees. The trees are pretty much done. I'm going to add more shadows. And again, we we
painted the lake first and the shadows that initial layer
of shadows first, specifically so
the lake could dry so that now I can go back
with a slightly darker indigo and do some more
zigzags underneath the trees to be the reflection
shadow of the trees. So that we have you know, so that we can just
kind of anchor the trees in the actual scene. But we're still leaving behind some of the
light space, right, some of those that
medium and light value from the initial layer
that we painted here. We're still leaving behind little slivers of
that because we need that contrast to actually
give this scene shape. That's the whole
point of the zigzag is to help you remember, Okay, how do I leave behind
little slivers by painting a little zigzag? That's how you leave behind little slivers of white space. And once you do that, you can kind of go
back in and say, Okay, are there any more, you know, detail things that I
might want to add? Maybe some of the
reflection in the lake, I want not to just be blue, but maybe some of the
reflection, I want to be green. Maybe I want to add
in a little bit more like detail to
the foliage, right? Like, maybe we want some
little pieces of grass poking out from the lake as
sometimes happens, right? You can see some
reeds poking out, or may and this is especially true when you're
trying to sketch with paint. You start with big blobs, and then you add in
sharper details after. So like, you can add
in sharp points to the pine trees to the evergreen trees once
you've got your big block in. But a big important thing to remember about
plain air sketching, about watercolor
sketching, especially, and if you're keeping it
small like this, right? I done is better than perfect, and simple honestly
is going to be so much better than
detailed because it's doable because you can feel good about everything that you can accomplish rather than
everything that you missed. And even if what you
created was a hot mess, taking off the tape
is, oh, so satisfying. So that's one of the best
reasons why I like to sometimes use tape for my
little sketches is even, like, at the very least, I know I'm going to be able
to pull off a really crisp, clean edge, even when, you know, circumstances are not ideal for me to be painting
and to have a steady hand, it's going to be really great. So I hope that you had a lot
of fun with this sketch. I hope that it was, you know, I chose this scene specifically because I just thought that it was such a fun representation of where to find the zig zag, not just in terms
of composition, but also in terms of how to use your paint brush and what
shapes to create in order to emphasize the contrast
between light and dark and to give movement to whatever it
is that you're painting. And, of course, make sure to
write down where you were, what time it was, any kind of
notes you want to remember. That's going to
make this sketch, your travel sketch,
even extra special. So thank you so much
for painting with me, and I will see you again
in the next video.
9. Project: Wildflowers: Project Number two, for
project number two, remember, we are going to focus
on one subject and use that one subject as inspiration for our own
creative exploration. So this idea is really helpful. This method of planar
painting is really helpful. If you get super overwhelmed by everything you're looking at when you sit outside, still want to use those elements for your own inspiration. So in this project, we're going to take a look at these beautiful
reference shots that I got while I was in Grand Teton National Park
of plants and flowers. And instead of painting
an actual scene, we're just going to
experiment with one subject, using marks, using
different tools and mediums and having fun, even if it's not, being
super realistic with it. First things first.
I in deciding between painting, like,
landscape orientation, horizontal or vertical, I
decided vertical mostly because the flowers
themselves are vertical. Like, they're the lining the shape that they
give off is very much, you know, reaching
toward the sky and very thin lines and curves. And so, anyway, that's just kind of my reasoning for choosing this
vertical orientation. And before I actually
put painted paper, I do want to take a minute to
mix and prepare the things, you know, prepare my tools. If you're trying to mix colors, and especially when you're
trying to experiment, there's, like, one of the vastest ways to be frustrated is when you
don't have mixing space. And so taking some
time to just, like, wipe off some of
the paint to clear the way so that you
can mix new colors, excellent idea, even when
you're out in the wild. It doesn't have to
be perfect. You just need a little bit more space. So with these flowers
and the palette, the specific palette
that I'm using, I don't have purple
that, you know, is the exact shade
that I was hoping that is in this scene. You don't need the exact shade in order to paint. That's fine. And it's also okay
to experiment. I think that when
you're color mixing, one of the most important
factors is, are you having fun? And is this helping to
stoke your curiosity? Because remember,
the whole point of this project is we
are using the scene, we are using the subject. We are using this, you know, these objects out in the wild as inspiration for curiosity, as fuel to help our
creative adventures. So I mixed a little
bit of purple, and now I'm just kind of starting by painting the
petals that I can see. And I'm doing blobs,
essentially, right? And I'm doing kind of quick, intuitive strokes loosely in the shape of some of like in the shapes
that I'm looking at. And you might look
at that and say, Okay, but what shapes are those? And to that, I say, there is, that's the point is you don't really know
what the shapes are. These are called organic shapes. Whenever you're painting a
shape that is not, you know, like a geometric
shape that's not like a rectangle or a triangle, it's just organic, meaning it's a shape you can recognize, but it doesn't
really have a name because it's in nature, right? It's found in nature. Um, trying to look for to find organic shapes is
a really fun way to use sketching with watercolor when you are out in the open air because then the
goal is not to paint something so that
it specifically looks like what you're painting. The goal is to just see if
you can find some shapes. So I kind of did that. I pieced together the shape
of this flower using these, like, organic blobs, right? And I did it with that lighter
violet first that I mixed. And then because we paint
from light to dark, right? We paint the light layer first. And then we add a dark
layer to add contrast, to add depth to whatever
it is we're painting. I added a tiny bit of
indigo to that violet, and I added shadows like underneath all of those
petals closest to the stem. That was kind of where I see
the shadows playing out, but also it's
generally, you know, a decent place to put shadows whenever you're
painting flowers like this. Next, I added a little
bit of red or brown to the mixture to paint
a stem like in between. Whenever you're painting flowers or you're trying
to sketch flowers, especially wild
flowers like this, right, where there are lots
of little petals altogether. Um whatever is in the front, so you want to paint that first. Whatever is in the front,
you want to paint first, and then paint the layers behind it because we can see the petals and the petals are
covering up the stem. So we don't want to paint
the stem first because then the stem might show through the paint when we eventually
paint the petals. So when you're painting
with watercolor, that's kind of an important
thing to keep in mind. You want to paint you're
painting front to back, even as you're painting
light to dark. Ah, okay, so now I'm trying to paint the
same kind of flower, but in a slightly
different way this time. Remember, this is all
about experimenting. I'm not trying to
capture this scene. I'm trying to find multiple ways to capture
this one subject, right? The flowers and the leaves. And so the first time around, I started with just the petals. The second time around,
I'm kind of giving myself a little sketch for
the overall shape of the entire flower. So it was kind of
like a cone, right? Like a long skinny, um just a long skinny
shape with, like, two circles, two half
circles encasing each other, and then adding the
petals on top of that. So adding the texture, the details on top of
that overarching shape. This is another
way that I like to sketch when I'm trying
to figure out how to sketch with paint one
single subject, right? I give myself, like, this is the general shape that I see
the entire thing making, and then I'm going to fill in that shape with the details. And again, you can
see what the details are because of the
different values, right? We have the lighter vile and
then also the darker violet. And those are kind of
intermixing with each other. And when you're
sketching, remember, your paint is gonna bleed
together, and that's fine. As long as you have
at least a little bit of white space
between your strokes, then you're going to still be able to capture
some of that detail. So now that I've
painted two flowers, I thought I would try
experimenting with the leaves. So I can see some leaves
that are kind of, like, long and skinny and flowy. So I'm getting, you know, just kind of like a dark green. Doesn't even matter if it's
exactly the right shade. I'm just getting a dark
green and painting long skinny leaf shapes by painting two lines
next to each other, like two curves that meet at the top to form the
top of that leaf. But then the two curves will help me use negative
space to form, basically, like the
vein of the leaf. And especially
with these leaves, what I notice is
they're really curvy. There's a lot flow
to them, right? And so I don't want to just
paint straight leaves. I want to give them
a gentle curve. So that's what I was
experimenting with, right? Now I'm going to try
some more flowers, and I'm using kind of
the same techniques, but maybe I'm trying to
paint bunches, right? Like a bunch of
different flowers. Just with some loose
marks, you know, kind of loosely in
the shape of what those flowers are
in the light value. So the light value
has more water in it, and then adding some dark value on top of that to add dimension. So this is, you know,
the same kind of thing that I did with
that very first flower, but I'm trying it in
lots of different ways. Another technique as I'm doing this is to instead
of trying to paint, like, entire flowers, just
use the marks, right? I'm saying, Okay, maybe I'm going to deconstruct
this flower. And because I know I'm not painting a specific
scene, right? I'm sketching out in the wild. I'm just trying to have fun, with whatever is
right in front of me, maybe what I'm going
to do is just put a bunch of these elements all on the page and just have my goal be to fill up the paper, right to fill in
the white space. And so my first
initial sketches, right, the first flower, the first leaf, all of
those were kind of, you know, drawing more
inspiration from real life. But then maybe, as I continue
on with this sketch, if my point is to use the
subject as a starting point, for more exploring, then
I'm just going to fill in the space with
whatever I see with whatever feels like
fun for me, right? So I'm going to look
for some more shapes. I started I painted some petals
kind of scattered around. I see some kind of, like, some of the leaves in this photo are making this almost
like a star shape. So I thought, why not? Why not try this kind of star shape with the leaves
and see how that goes. And, you know, having that kind of mindset is exactly what makes these sketches so fun
because it turns out those, like, star shaped leaves super
messy, didn't love them. If I had decided that I was
trying to make a scene, it would be really
easy for me to get frustrated at
this and be like, Oh, my gosh, I'm
ruining everything. But because I intentionally
made this a sketch, because I intentionally
made this, I'm just exploring with
different elements of things that I see as I'm
looking at this scene. Even though I might not like some of the things
that I'm making, arranging them together by just challenging myself to fill in the space with
little marks, right? It makes it a fun experience, and it makes it basically
impossible to ruin, because as long
as I'm filling in the white space with more paint and marks
that kind of, you know, look like those
curves of the leaf or the little blobs
of the flower, then I'm using elements that Are in there, right?
It is working. It is a success. Now, I really wanted to use that
turquoise color that I'm painting
with right now. So that was more of like I'm feeling really inspired
because these are fun colors, and I think turquoise
would go really well, not even necessarily because
I see it in the scene. I don't, right? I'm just trying to fill in the
white space and, you know, give myself ten or 15 minutes of really enjoyable painting time as I'm sitting out in the wild. Now, I'm saying this to you, especially the
reason that I used this reference for
this technique is because painting flowers, especially painting flowers
in an actual landscape scene, probably some of my most
frustrating projects ever. And so if you want to be more comfortable painting
flowers, start with this. Start by deconstructing
the elements. Start by just exploring with all the different
shapes that you see, all of the different shapes
that your hand makes, even if you don't
even see it, right? Because the goal here is not, again, it's not to be a camera. The goal here is to
use your surroundings, use nature as fuel for your
own creative explorations. And that might mean not even painting what
you see, right? That might just mean letting any and all thoughts that come
into your brain as you're painting be good thoughts that can allow you to have a really meaningful
creative adventure. So I started by, you know, just writing down the notes
to say, This is where I was. I was at Culter Bay.
This is the date, right? Whenever you're
travel sketching, it can be really fun to make notes of the things
that you're doing. But then I decided, hmm
I wonder if I could use this I wonder if I could use ink to kind of make this even
more interesting. And one of my
favorite things to do with watercolor is using a micron pen like this to kind of just outline
some of the shapes, not even all of the shapes, just to add a little
bit of depth, you know, like
shading almost, like, along the side of
the stem or just outline a few of those
tiny little petals, tiny, you know,
little flower parts that make up the entire flower. So we're not trying to outline
all of the subject here, all of the object here. We're just using ink as a way to add little details that we might not have
been able to add. With the paint brush, especially when you're using a
water brush, right? It's really tricky to be able to get super detailed
precise marks like this. So using an ink
pen either before or after you've
already painted can be a really effective way to add those details and to further fuel your
creative exploration, because I think that a
combination of, like, only a few details, right, only a few of the
petals are outlined, only half of the
leaf is outlined, it can be a really fun way
to kind of tie everything together and make it very obvious that this is a
sketch made by a human. So I hope you had so much
fun with this project. I think it's a really great way to make painting
doable and accessible, even if you're overwhelmed. And I will see you again
in the next project.
10. Project: Grazing Bison: Finally, project number three. In this video, we are going to practice the third method
that we talked about, which is to zoom in and make it smaller
and more simple, right? So we're looking at this
really scenic view of some bison in a field with
the mountains behind. It's very beautiful,
very overwhelming. I was actually standing on the side of the road
when this happened. When I took these shots, it was very overwhelming,
and it was intense. And we're going to
practice taking a big scenic shot like
this, potentially, like using your phone or
some other, you know, method to actually help zoom into the scene
to make it smaller. In this case, we're zooming
in and only taking, like, a sliver of the
reference photo, right? Just like a sliver of the shot, zooming in so the bison
are pretty big upfront. And then keeping it
simple by relieving ourselves of the need to make any of these subjects
particularly detailed, right? They're kind of
blocky. It's mostly just values and short
simple strokes. And I'm going to walk you through how to paint that scene. And then hopefully this
will also help you remember when you get to an overwhelming scene like
this in your own travels, you're allowed to zoom in and make it smaller and just paint, you know, a little
sliver of the scene, and that will make it
so much more doable. Alright, let's get started. We are going to open
up our sketchbook, and because we're
trying to do, like, a little sliver of this scene, I thought that it
would be fun to have it be vertical orientation. So just to keep the book
a little bit more taut, I put the binder clip
right in the middle, like, on the binding to give me, like, more of a flat
surface as I'm painting. And I'm probably first, what I'm going to do is kind of paint the bottom
scene most of all, and put that on the bottom
half of the sketch. And then if I feel up to it, I can paint the top
half of the sketch. So I think mostly what
I'm trying to paint are the bison and the house. And then, like, the trees
and the mountain, the sky, that can go on the top half
if I feel like I want to. So I'm going to start
with a sketch with ink, and I know that you
might be thinking, why would you start with
ink instead of pencil? And the reason that I
start with ink instead of pencil when I'm out in the wild, especially is because
I'm trying to go fast. I'm trying to very
intentionally be loose, give myself lots of
space to be messy. And when I'm sketching
something like an animal, where it can be overwhelming, right, to get all
the details right. Painting with ink reminds me that actually
simplifying the shape. So notice how I'm doing kind of short but confident
strokes, right? I am doing just like a line
here and a line there, and they're kind
of angular, right? The shapes that I'm
making these bison, it's almost like I'm
painting I don't know, like a hexagon or a rectangle. Like, I'm not trying to
get specific curves. I'm not trying to get
very specific details. I'm using short, blocky strokes basically to
make a blob, right? So I have the big blob like the bigger part of
the body is bigger, and then the head is kind
of smaller and lower. And those are the only factors that I'm taking into
account as I'm sketching. So I painted those three bison, and I very intentionally
painted three, and I painted them kind
of going up in a zig zag. Notice how the biggest one
is on the left hand side. Then I have the medium
one on the right, and then up is a
very small bison that's kind of just like a dot. And then the cabin that
I'm doing just, like, a very quick sketch very blocky, like a rectangle for the house, a triangle for the roof, a few rectangles
for some windows, like, very quick, loose, doesn't matter at all if
they're detailed, right? Very quick sketch. I very
intentionally organized the objects in this way to make a zigzag,
kind of, you know, going back to what we talked
about in the first project, where if you're ever
worried about composition, if you're ever thinking, I don't know how to
put this together, zigzag is, like,
the easiest tack. So we're starting with a sketch, and that's all I'm
sketching for right now, especially because I'm
giving myself an out, right? I'm giving myself I'm saying I only have to paint
the bison in the house. If I want to paint the
mountain, then I can. But for now, just the
bison in the house. Now I'm going to
start by painting the bison first because
I want them to have a chance to dry in case I want to maybe put more
details on top of them. And when I'm painting
subjects, right, we start with the
lightest color first. So where on that bison
is the lightest color? Well, kind of at the top, right, where the highlights are, especially in that front in the largest
bison at the front. And to me, it looks
kind of yellowy orange. So I went for, like,
an orange brown, and as I'm painting this, as I'm mixing my colors, and I'm doing the whole thing, this kind of like orange brown, and then I'm going to layer on the dark colors on top of that. As I'm, you know, layering
on this orange brown, I'm using lots of
water by pushing on my water brush to get the
paint to get more water into the paint directly on
my sketchbook without necessarily needing to use the ceramic palette to
hold all of that water. And I'm painting
the whole thing, knowing that probably
only portions of the orange are actually
going to show at the end. Now I'm going to do the same
thing for the middle bison. That one's going to
have less highlight than the foreground bison will. I'm also, you know, while I'm doing this
drawing legs coming out, like, painting legs coming out in the shape that
I can see them, right? The front bison, the legs
are kind of more straight, like more angular, and
then that middle bison, they look curved in the back. This is also an
important time to note that while you
are on the scene, sketching something is not the time to critique
your technique. It's not the time. Right now is the time to get
paint on paper, and it doesn't matter
if it's messy. That's one of the reasons why the sketch is
blocky and messy, and it's in ink, so I
can't do it over again, even if I wanted to, right? The sketch is in ink because
that's what I'm working with because the goal here
is not to paint perfectly. The goal is to get
paint on paper. So now I took some of that
like that dark brownish red, and I added a tiny bit of indigo to it to
get more of like a dark brown so that I can
start painting in the shadow. Now, when I started painting
this bison, I thought, I'm going to be a little more intentional about making all
this texture, and, like, you can wherever it's hair, you can add little
jagged strokes to kind of imply that there is, like, fur or hair
texture going on. And then I kind of checked
myself and thought, you know I'm just going to make this so simple,
right? So simple. It's okay if there are a
few strokes where, like, I'm using negative space, right, to show the orange
underneath for highlights. I used the light layer first, and then that dried, and now I'm doing
the dark layer on top and how the strokes that I use are going to determine
the kind of texture that the light layer has to make it look
like hair, right? So that's why I can
use kind of short, swoopy, choppy strokes if I want to make it look like fur. But I also am checking
myself to say, Am I putting too much
detail into this? Am I making this
too complicated? Is it going to be easier
for myself if I just kind of make this smooth strokes? And this is about the time
where I'm thinking to myself, Yeah, I think that's about all
of the detail that I want. So now I'm going to add
some, like, darker orange. So I added some, like, warm yellow to that red
color that I had to get this dark orange and to kind of blend in the dark brown
with the highlight, because while the highlight is definitely lighter
than the brown, the contrast with,
like, the really, really light orange
was still you know, the contrast was still
a little bit much. And so I added some
slightly darker value to it just to kind of
blend those in. And I stopped trying to
be super detailed with my strokes and just
embraced being choppy, embraced being having really simple strokes
and focusing on, okay, what is it that
I'm actually doing? Right now, what I'm
doing is I'm adding dark values to give
this shape more shape. And the most important thing is to keep the dark where it's supposed to be dark and to keep the light where it's
supposed to be light. So as long as I'm doing that, then I'm doing it right. And it's okay if these Bison
don't look quite like Bison. It's okay if I hold it up to the photo,
and I'm like, Wow, these look like a
child painted them because I'm not trying to
be a camera right now. I'm trying to be a painter. And especially if you
are painting this out in the wild with all the
elements going on, all you're trying to do is
have this experience where you are watching these real
life wild animals, and you're trying to
replicate them or at the very least capture the essence of what it was like to
be in their presence. And that's the most
important thing. So, as we're painting
these subjects, we're keeping it so simple. We're starting light, and then we're gradually getting darker. So I did the light orange, then I did the dark brown. And as we're looking
at the bison, right, the top of the bison are
lighter, the bottom, where the feet and the head are like the bottom of the body, where the belly is,
those are the darkest. And so I added a
little more indigo to my brown to make it even
darker than before. And this is the order
that's going to make it easier whenever you
are watercolor sketching, whenever you're plain
air watercolor sketching is remembering that you want to paint light and
then medium, and then dark. And the darker you
get with your value, the less paint you're
going to need overall. Now, I started again. This is I kind of
was trying to add even more detail to this
bison and make it look, you know, use negative space, meaning I am painting with dark value intentionally leaving behind light values
underneath to create detail. And that can work really well. And also, there is definitely such a thing as
overworking your painting. There is such a
thing as spending so much time on the details
that you forget to have fun, right, that you forget that you're painting
this whole scene. And especially if you're painting a whole big
scene like this, right? I'm painting this bison. I'm trying to follow the
pattern that I set initially, where the top is lighter, the bottom is darker, and
I'm just generally using really simple strokes to
imply that contrast, right? It's easy to forget. Oh, I'm also trying to
paint a whole scene. I'm trying to paint
these bison in a field. And so I don't need to make them super complicated
because actually, if I spend all of my
energy and all of my emotional resilience
on the bison, am I going to enjoy painting the rest of
the scene around it? And the answer is, maybe not. And so you kind of have to balance how simple
can I make this? What details do I actually want? And then how can I juggle all the things
that I'm trying to paint? Okay, so we painted the bison. That third bison, that's just like a lump in the
background, right? I basically painted it just one mid to dark brown,
right, in the background. That doesn't need to be
any more than a lump. And the nice thing
about your eyes is that especially when you put all of these
things together, it's going to fill
in the blanks. So then I did the light
layer of the cabin, just a really light value
indigo with lots of water. And then I'm letting that dry. And now that I've
painted these subjects, I'm taking a lighter green, still using a bunch of water, but I'm taking a lighter green, and I'm just filling in
the background space. And I'm painting this right now because I know
that I'm going to want to paint in some details
like grass on top of, like, these whiter expanses of green that I'm painting
around the bison, right? Um, and so I want to give this field a chance
to dry, basically. But I also want it
to be pretty watery. So I'm picking up this green, and I'm also squeezing on my water brush
while I'm painting. And that is making it so I'm
getting paint on the paper, but I'm also getting
water on the paper. When you're sitting
out in the wild, your paper is going to dry faster than when
you're in your studio. And when you're sitting
out in the wild, you are not going to to sit on a rock for much
more than an hour, probably even less
than that, right? And so we're not looking
for shortcuts necessarily. What we're looking for are quick ways to give you the
experience that you want. And painting the subjects that have the most detail first, in this case, that's
the bison, right? We're starting with the subjects that have the most
detail so that we can use the dry space in order to craft that detail
from light to dark and then painting the background
around those subjects. Um so we're just going up to
the house with the green. And then I'm also painting one layer of mountain
behind the house. Now, in the reference
photo, all of the, like, hill sides are kind I just kind of looks
like one big hillside. I'm going to take some
creative liberties here and paint kind of, like,
multiple hillsides. And I'm just kind of messing around with
different color mixes. I added a little bit of
yellow to make it, like, more of a warmer green for
a hill that's going behind. And because we're
sketching, right? Because I'm sketching this, I am painting the front layer first and then filling in
the back layers as I go. This kind of goes
back to what we talked about with
painting layers, right? It's not necessarily
about painting back to front or having a
very specific order, like we do if we're
painting with watercolor and lots of
layers in the studio. It's more about how do I
paint something and then give it enough time to dry so that the layers
don't all run together. How do I patchwork
this scene together? So I did those first two, like, background hills and then I came back to focus on the grass
in front of the bison. It's a little more
yellow than green, and so I thought, I'm going
to add some yellow to it. And then I thought, Oh,
that looks terrible. And that's going to happen
when you're sketching. That's going to happen a
lot when you're sketching, especially if you are out, you know, in plain air
in the middle of it all. You're going to
paint something and you're going to make
split second decisions, and it's going to feel like oh, I don't love that. And that's okay. That's fine. You can, you know, make
do with what you have. You can make different decisions that maybe cover up
the mistake, right? I think that all of
that yellow is not really what I wanted,
but that's okay. I added a little bit
of yellow in, like, loose zig zag strokes to
the rest of the field. And ultimately, you know, like, one mishap is not
going to ruin this scene. So now I'm adding in
some more hillsides, and I'm just kind of, you know, going front
to back, which, again, I'm doing this
in my sketchbook. I would not normally do this in my studio, but I'm
going front to back, specifically so that I can still have all the
details that I want and without getting all of the dry space
too wet, right? Because I want the front to
overlap all of the back ones. I'm also, as I'm
layering these hills, kind of following that zig
zag movement pattern, right? So I want them to
kind of be like angled down and layering
on top of each other. Now, at some point, I decided, Okay,
that's enough hills. Now let's paint the trees. And especially with the trees, I am being so loose. And again, this is one of my when I'm out in the wild trying
to sketch something fast, painting a tree in a very specific tree shape is
going to take way too long, and I might get impatient. So instead, I'm just doing
kind of flat vertical strokes, and then I'm going back in
after where I maybe have a little more opportunity to be precise and making some of those trees a little
pointy on the top. So I'm like, I'm blocking
in essentially all of this space with the
green vertical marks that I know trees make. And then I'm going to go back in after and add in some
more, like, sharp, maybe a slightly
more accurate detail to make them look
like evergreen, to make them look
like pine trees. But remember, these trees
are in the background, so they don't need to have nearly as much detail as
you want them to have. Now, this photo is
in broad daylight, and so you can see,
like, specific details. But just because you can see something in a
reference photo doesn't necessarily mean it's going to translate well into
your painting. And so as you're painting, especially as you're
painting plain air, especially as you're
trying to really simplify and zoom
in for a sketch, one of the most
important methods for simplifying is letting go of detail of letting
is saying to yourself, even though the thing that I'm looking at has
a lot of detail, that doesn't mean I have to
capture all of that detail. And in fact, capturing all of that detail might make
my painting worse, and it definitely will make
my painting experience worse. So, we painted the
trees, notice how, like, especially for that
background blocking, that layer was lighter. And then as I added on the
sharper details in front, those details were a
little bit darker value. So what I mean by
darker value is there's more paint and
less water in the mixture. So now I'm going to continue on adding my layers by adding this mountain
layer in the back. And this mountain is kind
of like a blue violet, but it is in the background, which means I know for sure that I want it to
be pretty light value. I want it to be blue, and I want it to be
pretty light value. Now, the trees might have
had a chance to dry, in which case, I might
be able to, like, bring down this layer
slightly on top of the trees, but I'm trying to
paint around it around the tops of the
trees as much as possible. Then I added a little
bit of pink to this blue layer to make it
a little bit more purple. Mixing colors directly on the page is one of my
favorite things to do, especially when I'm sketching out in the wild because
it's so much easier and it's more
interesting to have lots of different colors kind
of reflected in one layer. Now, I do think that I had a little bit too
much purple in there, a little bit too much pink. It's more than I wanted. So easy fix. I took my towel, I mopped up that paint, and especially because
it was still pretty wet. It was able to pick
up pretty easily. That's definitely a trick
that I would use, you know, especially if you're painting
big flat washes like this, you can just, you know, you don't have to
keep something if you feel like it was a mistake. So now I've done the mountain,
and I'm adding the sky. The tricky thing with the sky, I'm using, like, a lighter blue. The tricky thing with the sky is that that mountain
used a lot of water. And so I want to be really
careful as I'm adding my sky. I'm using lots of white space. I'm very intentionally
not bringing that wet layer directly to the top of the wet
mountain ridge. And, you know, when I'm outside, it's going to dry faster
than it would in my studio. But still, I don't
want the mountain that I painted to get
mixed up with the sky. I want that mountain
ridge to still be clear. And so I'm using I used short, kind of choppy strokes
to bring down the sky, knowing that it is not
going to be perfect. Okay, I have most of
this scene painted. So now I'm going to
add in a few details. I took some indigo to add in just a few shadows along
where the house is. And again, this isn't
going to be perfect. All I knew is along the bottom and along
some of the sides, I wanted to be darker, and
that was good enough for me. And my brain will
fill in the rest. As long as there's
that contrast there, my brain will fill in the rest. So, Nan, then I'm going to
go back in and I'm going to add just some really
quick strokes for grass. Bigger in the front, smaller
as we get in the back, but using various
shades of green. And I don't have to fill
in this whole field, but adding a few vertical
flicks like this, again, very small in
the back and larger in the front is going
to add to the texture, and it's going to
add to the movement. Then I'm just adding a few zig zag strokes here and there, especially because we were able to paint the trees
and the mountain, like that top layer. This bottom layer
of grass was able to dry so that now
I can go back and add in these details
that are going to make this part of
the scene you know, look even more interesting. And especially because it's
closer to the foreground, we do want this to be slightly
more detailed, right? I do want where the bison are and that field to have
maybe a little more detail, a little more movement than all of the subjects in the back. And that's just because I
can see them better, right? I want that detail
because the contrast of more detailed to less detailed as we go
from front to back, and foreground to background is going to help
everything snap together. And there we go. Uh, I, you know, as always, I like
to say, This is where I was. Make a little note about the
things that I was painting, especially when you're
travel painting, making little notes about the process and about
where you were, it's just going to make it even more interesting and memorable. And I had so much fun painting this little simple scene with Bison and which are especially meaningful for
Grand Teton National Park. So I hope you had
a lot of fun, too. Thank you so much for
painting with me, and I will see you again
in the next video. Y.
11. Thank You!: Well, my friend, thank
you so much for watching. Thank you so much for
painting with me. I hope that you enjoyed this little watercolor tour
of Grand Teton National Park, and hopefully it
inspired you to get your own watercolor
travel supplies out and take an adventure. It doesn't even have
to be at some place super magical, like
a national park. Even if you use these ideas
in your own neighborhood, which neighborhoods
are pretty magical, I know that it can bring
you so much joy that these techniques can help
you feel like a real artist, because the truth
is you are one. You are a real
artist, and you, too, are just as qualified to be a planer painter out in the wild using your
creativity as anybody else. If you really liked this class, I would love to hear from you, especially on skill share. One of the best
ways for me to get feedback is for you
to leave a review. It's also one of the best
ways for other people to figure out if this
course is for them or not. And as a bonus, it helps with the old
algorithm stuff, right? Anytime you leave a review
on one of my classes, it helps other people find
my class on skill share. And I would just really
appreciate that. So, um, yeah. If there's one thing
you could help me with, it would be to leave a review. Or you can feel free to shoot me an email Colby at this
writing desk.com, if you have any thoughts or anything that you
want to share with me. I am always so happy to hear any stories or
anything that's going on. And I just really
appreciate you being here. So thanks so much
for joining me. Thanks so much for
painting with me. If you really
enjoyed this class, I have so many others. Feel free to check them
out in my classroom. And I hope to see
you again very soon.