Transcripts
1. Class Intro: And Hello, everyone, and welcome to tonal values for
Absolute beginners. I'm your instructor, Mau Pitts, and I structure this class to be a brief yet
comprehensive guide for the aspiring visual artist on the sometimes elusive subject of tonal values and
value structure. This class is filled
with information I wish I had when I started
working with value, and I'm positive you'll find it both instructive and useful. In part one of this class, we'll cover some very simple
beginner friendly stuff, such as the definition of value. The three drawing primaries, the definition of
no tan dominant and Kiaroscuro dominant images, and the differences
between them. I'll show you my approach
to value grouping to hopefully make your life easier
when working with value. And finally, I'll show
you how to use value keys to create different moods and atmospheres
in your own work. Although I'll be using
some drawing and digital painting
tools and concepts, this is not a drawing or
painting class per se, but rather an introduction to tonal values and value
construction to help you see, understand, and
manipulate value, so you can use it as a narrative device in your
own visual productions. If you're interested in any
field in the visual arts, your understanding
of tonal values will be key to your success. So let's not waste any
more time and get started.
2. Primaries of Design: Before we start
working with value, we need to talk about
the three basic tools that will allow you to
understand and manipulate. Those three elements are line, shape, or mass, and form. The most basic element in
art and design is the line, a point that moves continuously making a mark
across the surface. Line drawing gives us
the ability to represent two dimensional objects that
have a length and a width, but we can also create
the illusion of depth with the help of
linear perspective, thus representing three
dimensional objects in a two dimensional surface. Shapes, on the other hand, are more simple
than lines in that they are always two dimensional. If I feel this line drawing of a cube with a tone, any tone, however light or dark, and remove the line drawing,
I would get a shape. You can also think of
shapes as silhouettes. Shapes can be
geometric or organic, symmetrical or irregular,
representational or abstract. But the one thing they'll always share is
that they will be close contours consisting
of one solid value. Form is the three dimensional
appearance of an object. Form relies on angles, edges, light and shadow to create
the illusion of depth. If I feel the line
drawing of my cube but replace the one solid value
with three different values, one for each of the
three sides of the cub, I can see from this
perspective, I get a form. I could take it a
step further and describe the shadow
that my object would project in space and get an even more believable
three D object. It's through the
use of line, shape, and form that artists are
capable of creating beautiful, well balanced and eye
catching compositions, bringing their artistic
vision to life. And they all play a huge role in understanding and
manipulating value.
3. What is Value?: Okay, so what is value? Almost all things
have their own color, which we call local color. And every local color
is tied to a value, which we call local value. Value is how light or dark
a given color or hue is. If we somehow lost our
capacity to perceive color, we would see the world
in achromatic values, including black, white, and
different shades of gray, but we would still
be able to identify and tell things apart
from each other thanks to the influence of light
over objects and the corresponding changes in
values that it would create, which means all things have local values independent from, but only visible through
the presence of light. Artists measure and match
the values we perceive with our eyes with the
help of a value scale, where pure white is the
brightest possible value and pure black the
darkest possible value. Between these two
extremes of the scale, there's a number of gray tones. Most artists work with a one to six or a one to ten
steps between white and black, depending on the
medium of choice. We use a value scale to simplify the seemingly
infinite range of value that we see in nature to a much more
manageable range. To create a value scale, you can use any medium
available to you. If you're working
with graphite pencils and a sheet of white paper, all you got to do
is draw ten boxes. Leave the white of the paper as your lightest value in one
end and press as hard as you can with your pencil
to fill the box at the opposite end with the darkest shade you
can possibly get. Then go to the middle
of your scale and calculate the midpoint
between those two values. After that, it's just a
matter of going progressively darker towards black and
lighter towards white. You are welcome to use any medium to produce
your own value scale. By a ready made value scale
at any art supply store or print the value
scale I'm creating digitally to help you
progress through the lessons.
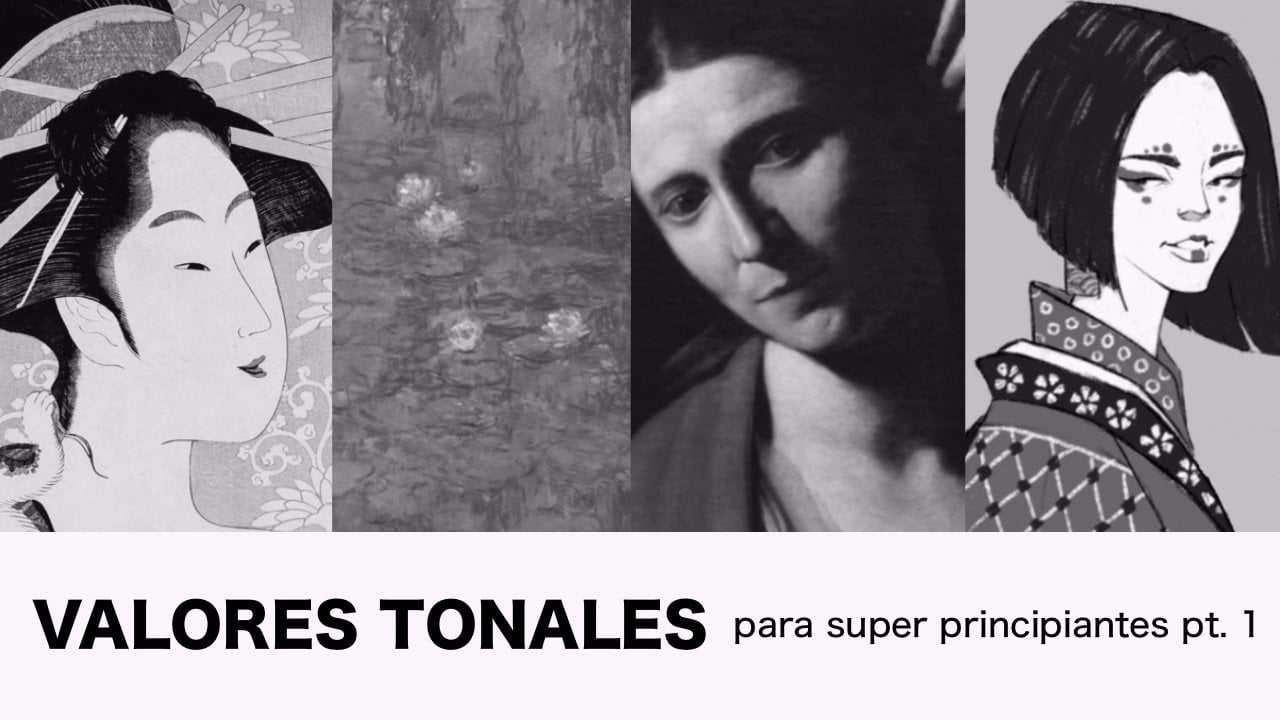
4. Notan & Chiaroscuro: Artists have
basically two ways to organize black and white
values in an image, no tan and Kiaroskuro. No tan is a Japanese design
principle to achieve a harmonious balance between light and dark
shapes and patterns. In traditional Japanese
woodblock print, artists were only able to paint the local value of the objects
they wanted to represent. Painting local value
simply means you're painting things with no hard
shadows affecting them. In other words, you're painting
primarily with shapes. We know that we cannot see in total darkness that in
order to see anything, we need a light source, but not all light affects
objects the same. When an object is lit by
a direct light source, it creates shadows
with very distinct, perfectly sharp edges, also
known as hard shadows. But when the light is indirect, which means that it bounces around before hitting an object, as it does during an
overcast day, for example, the local shadows of
the object are very soft and the cast shadows
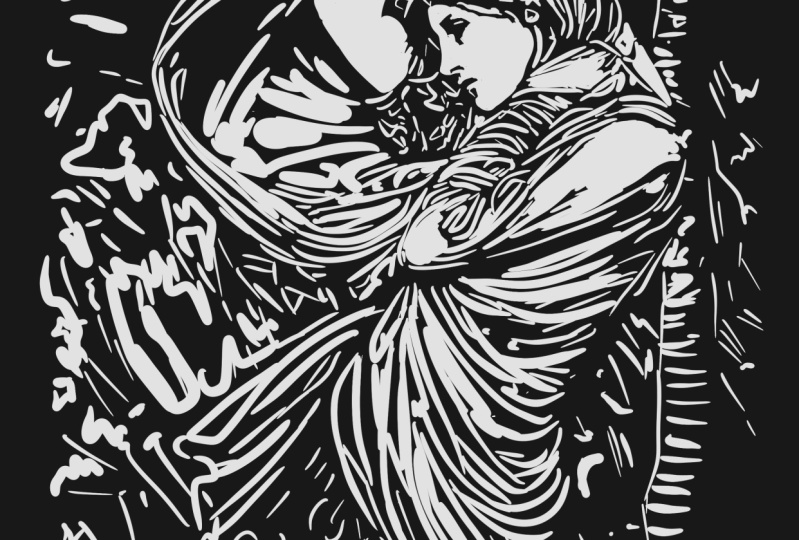
are barely noticeable. This is the type
of lighting we can see in no ten dominant images. In this type of images, the lighting is soft
and flat throughout, which means that the local
values of darker objects stand out against the lighter local values of lighter objects. In this example, we can see that the strongest
difference in value is between the local
color of the hair, which is pure black, highlighted against the lighter
value of the pale skin. We could say in a sentence
that in no ten images, we find the strongest
contrast between the local values of its
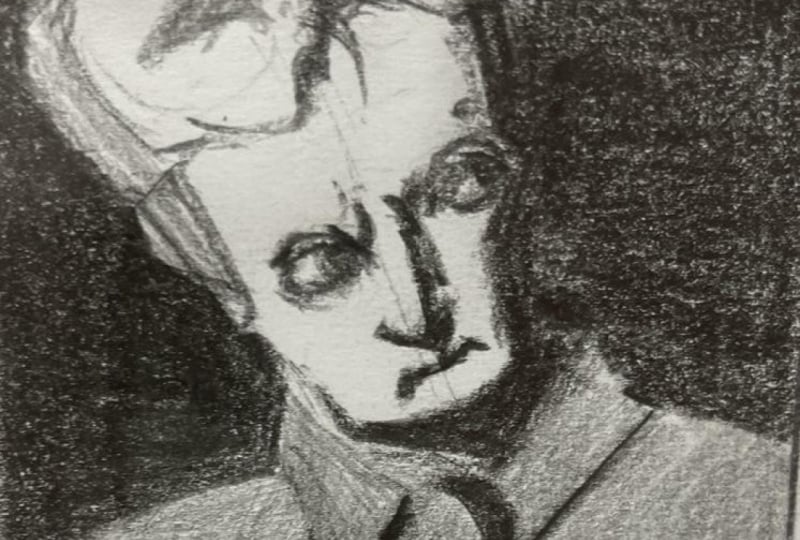
different components. Kioskuro is a Latin word
that means light and dark. In Kiaroscuro there is an emphasis on the effect
of light over objects. Instead of the soft
and flat lighting we had in the no ten examples, this time we have a strong
direct light hitting the objects and creating
sharper edge shadows. The local values of the objects in this type of painting play a secondary role
to the values used in the areas of light
and areas of shadow. In this painting by Rembrandt, we can see that the values
of his face in shadow are pretty much the same as the values of his
hair in shadow. So while in no ten images, dark and light areas
are determined by local values of
different objects. In Kioskuro, the
values are grouped between areas of light
and areas of shadow. But this does not mean
that a painting has to be entirely no ten or
entirely karoscuro. These techniques can easily
coexist in the same image. So instead of making
you think of them as different schools of thought or even as different techniques, I'll suggest to think of
them as designing tools. I like to think of no ten images as images where the
artist is designing with shapes and kioskuro paintings as images in which the artist
designs primarily with form.
5. Value Grouping 1: Notan: If you take any art class on the fundamentals of
drawing or painting, you'll surely hear the
teacher talk about the importance of grouping
and controlling your values. The idea behind
value grouping is to reduce the amount of values
that we use to a minimum, so we can create
harmonious compositions that are easy to read. We learn to group and
control our values through exercises
called value studies. If you search the Internet, you'll find that the most
common value studies use two, three, four or five values, but rarely any more than five. The basic mantra
of value grouping is the fewer the values,
the better the read. There is only one major problem, and that is that our eyes don't see the world
in gray scale. We see it in full color. Furthermore, the three types
of cone cells in our eyes can register about 100
different color shades each, which combined
together amount to almost 10 million combinations. So how do we condense the
millions of possibilities that our eyes can detect and turn them into three or
four simple values? In his book, Creative
Illustration, Illustrator Andrew
Loomis developed a scheme for organizing the
tonal values of a picture. He presents squares of
four different tones, white, light gray,
dark gray and black. His claim is that one
can create any sort of picture by rearranging
these values in four different ways. Grays and black on white, black, white and dark gray
on light gray, black, white and light
gray on dark gray, and grays and white on black. He calls each one of these
arrangements a pattern. And the way it works is that one should use one of the values as the background and play
grays and darks against it, or have a light gray as a
dominant tone with dark gray, black and white
playing against it. Following Loomi's idea
that white, light gray, dark gray and black are the only values we need to
create any sort of picture, I came up with my own way to assign values to the
different objects we see in real life based on soft
lighting conditions or no ten. The idea is the following. Every object we can observe in the entire universe can be grouped into one of
those four families, white, light gray,
dark gray and black. One thing you should
have in mind, though, is that by white, I don't
mean just pure white objects, and by black, I don't just
mean pure black objects, but rather a multiple
range of values. This is when our value
scale will come very handy. I think of a white object
as any object with a local value ranging from
zero or pure white to two. Light grade objects
have a value 2-4. Dark rays are anywhere 5-8, and black objects
have a value 8-10, ten being pure black. With that in mind,
we can look at the objects around us and
avoid trying to match their exact value and instead
ask ourselves which of these four main values is the closest to
their local value? Take a look at this
object, for example, if you had to
assign it to one of these four families based on its local value,
what would it be? My guess is that you would
put it in the Black family. Now take a look at
this one and try to assign it to one of
the four value groups. I'd say it probably
belongs to light gray. What about this one? I'd say that dark gray is
a solid answer. Finally, let's take a
look at this object. I had used rather neutral
desaturated objects precisely because being
closer to the grays, it's easier to figure
out their local value. But when the objects
we observe in nature have a very
saturated color, it gets significantly harder to pinpoint their local value. There are several ways
to solve this problem. One is to place a
black object and white object next
to them and try to figure out to which
one of them are saturated object seems
to gravitate towards. If it gravitates towards white, it means its value
is light gray, and if it wants to
go towards black, it means it's dark gray. Remember that the
value of an object is not light or dark
in and on itself, but in reference
to other values. And you can also do it with digital painting software by adding the photo to a canvas, create a new layer on top, change the blending mode to
color and fill it with white. Generally speaking, blues,
reds and purples get significantly darker in value when getting closer
to full saturation. But you can take your
own mental notes or actual notes about the value of different
saturated colors in your sketchbook, for example. With this newfound knowledge, you can look at any image that
is form dominant or no tan dominant and easily identify and group the values
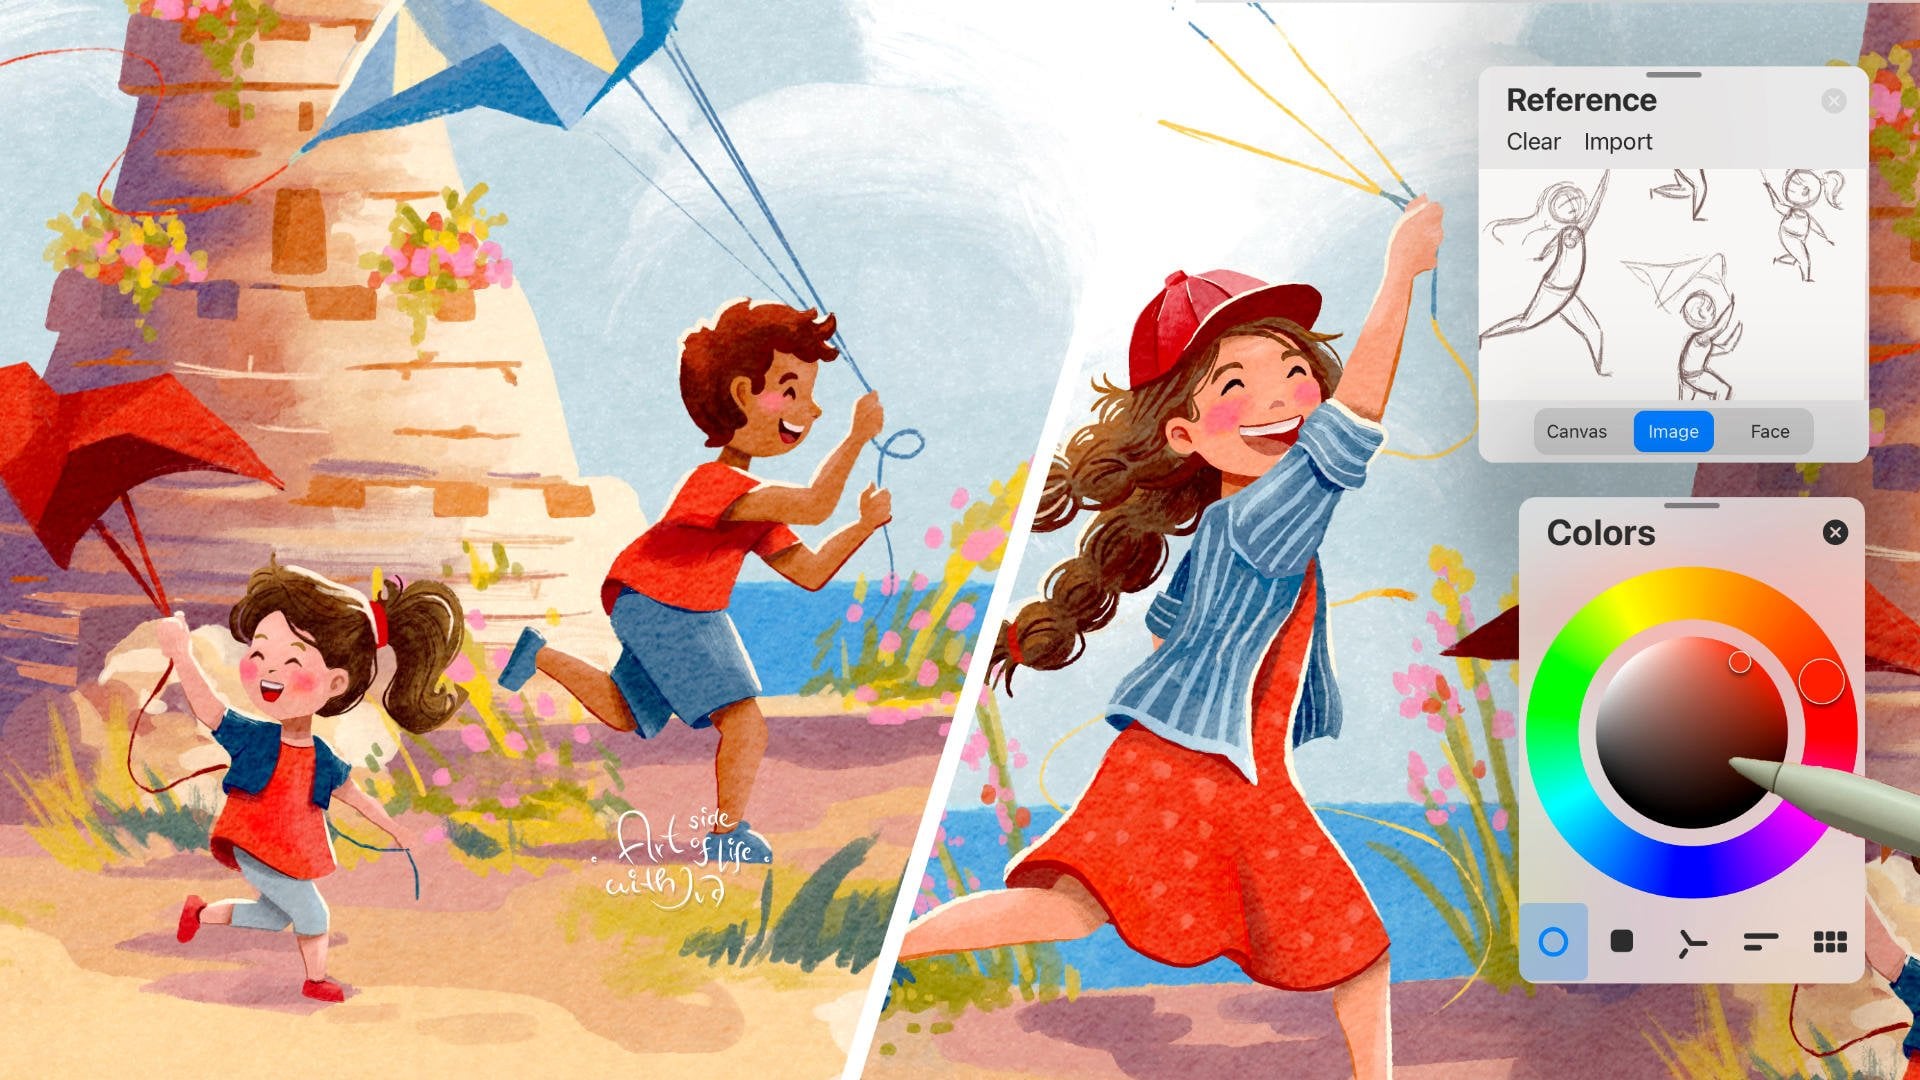
that conform it. Let's make a
demonstration of what a quick no tan value
study would look like. Here I have a sketch in
duplicate of a character, which you can find in
the resources section if you want to follow along. To add color to the character, I'll use a single brush, the six B pencil from the
sketch folder in procreate. To color my sketches,
I will only use the four values at
the top of the screen. I will start by making
an arrangement of grays and blacks on
a white background. To do this, I will begin by painting the background
white, of course. Then I will add a
gray square shape that will allow me to frame
the focal point of my sketch, which in this case, is
the character's face. After picking one of
the tonal patterns proposed by Lumis, the rest of the process is very intuitive and experimental. I don't really have any
preconceived ideas in my head, except perhaps that I want
the greatest contrast in the image to be at the
focal point of the sketch, which, as I said
before, is her face. Feel free to experiment with different arrangements until you find one that satisfies you. There is really no
right or wrong way to do this exercise, and trying unusual or
unorthodox arrangements can give you surprising results. Don't forget to add touches
of a lighter value in a predominantly dark
area and vice versa. This can create more
dynamism and interest. And that's my first
version of this sketch. Next, I'll try to make
an arrangement of gray and white on a
black background. The process is exactly the same. After establishing
the background color, I draw a gray shape to
frame the focal point. And then I start looking for new possibilities in the
arrangement of my values. At this stage of the study, you can start to change
some local values and even the design
of your character. Let the atmosphere created by your dominant tonal value dictate the personality
of your character. I love doing no tens sketches because it takes
very little time and effort to turn a simple sketch into a more finished piece. Just remember that the most important thing is to establish a solid value structure with clear shapes that
are easy to read. And that's it for grouping tonal values with the
no tan technique. In this demonstration,
I only developed two of the four tonal patterns
proposed by Loomis. Feel free to try them
all, if you like. It's a great exercise. In the next lesson,
we'll explore how to group our values in
a chiaroscuro setup.
6. Value Grouping 2: Chiaroscuro: Since in keroscuro
dominant images, the whole point is to
create a strong contrast between areas in light
and areas in shadow, value grouping
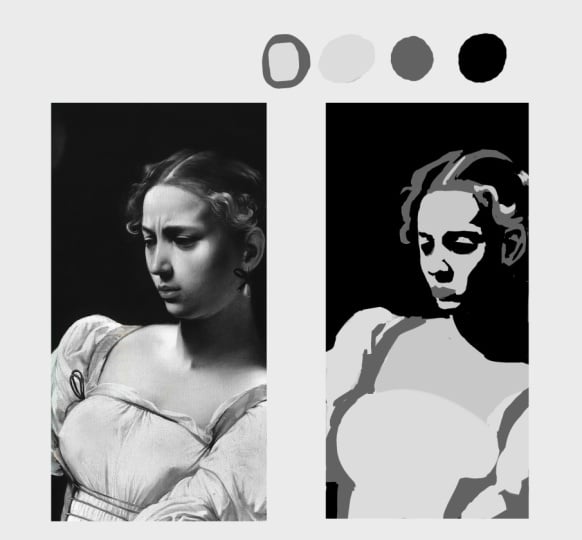
becomes a lot easier. In Keroscuo setups, we can use as little as two values to get our images to read properly. I'll use this detail
of a painting by Caravaggio to demonstrate it. I'll simply pick one overall
light value for the areas in light and an overall
dark value for the shadows. As I start separating the areas hit by light from
the areas in shadow, notice how I take objects with different local values like
the skin tones of both women or the different
fabrics that compose their clothing and group them together in
a single family. If you wish to push your
images further and create paintings as complex and full
of detail as Caravaggio, you obviously need to add a
lot of extra information. By stating more subtle
differences between local values, adding some mid tones, we'll talk about
that later on, and, of course, you'll need
to be familiar with other drawing fundamentals
such as human anatomy, perspective, color mixing,
and along, et cetera. But regardless of the amount of detail and rendering you
wish to add to your images, the one rule you
must follow is to preserve this
original statement, this very simple and yet
rock solid value structure. Now, I'll integrate
every element in shadow into one
single solid shape. Notice how the two
main elements that compose the image are still
pretty much readable. We can tell the
younger woman and the older woman apart with
very little information. This is the same principle
used by stencil artists. Another way to analyze an
image in Keroscuro introducing a third value would be using Andrew
LumisTnalPatterns approach. In this case, this
painting of Sappho by Chan's Menon could
be considered a light gray and black over
dark gray tonal plan. Now that you know a
little bit more about value grouping and the two
main types of image making, no ten and Garo Scuro, it's time to talk about how
you create the illusion of three dimensionality by
shifting your local values, creating a one, two, three read.
7. 1-2-3 Read: The one, two, three read of an object is a technique
that allows us to create the illusion of a three dimensional object
in a two dimensional plane. The idea is to make a
noticeable shift in value in at least three
visible planes of an object. This concept is super easy to understand when
we light a cube. The idea is simple. We know
that a cube has six faces, but we can only see up
to three at a time. You have a side that's
facing the light. That's number one, another side that is not facing the
light. That's number two. And finally, a third one that is not facing
the light directly, but it is not fully
in shadow either. Now I'll take the cue from lesson one to
demonstrate this point. You'll begin by making a
line sketch of the object. Then I'll label each one of the three sides
with a number 1-3. The number one surface or highlight is the
lightest surface. This surface tends to be
at the top of things, since in most
lighting conditions, light illuminates
objects from above. In this case, we'll pick
a local value of one. The number two surface is the shadow side and the
darkest surface on our object. To determine its value, we can use the halfway
to ten approach, meaning that if our object
has a local value of one, half the distance to ten
would be somewhere 5-6. In this case, I'll pick six. The number three
surface or mid tone is a surface that's still facing the light but turning
away from it. And hence, its value is clearly different
from number one, but not nearly as dark as
the number three surface. In this case, I'll assign it a value of three
in my gray scale. Finally, we can fill
in the cast shadows. Since our background has
a local value of five, our shadow will be somewhere
around seven and eight. During this step, we can also
add some occlusion shadow, meaning the darkest
area of our painting, where light has more
trouble reaching. I'll repeat the
process, but this time, I'll fill surface number
one with a value of four. Surface number two
with a value of seven. And the mid tone
or surface number three with a value of six. Since the ground plane has the same local value as
an example number one, the cast shadow of the cube will have a value of eight as well. To create the one, two, three read of a sphere, which will come very handy in
the next couple of lessons, I'll start by drawing a circle and filling it with
a local value, which in this case is a two. After that, I just need to grab a soft airbrush and add a
value for the form shadow, going halfway to ten, which results in
a six or a seven. Now I have a one, two read. To add the three, I could either paint a
mid tone like I did with the cubes or add in a little bounce light on the
shadow side of the sphere. You just need to
remember to pick a value that is closer
to your shadow value than your light value to keep your light and shadow
families separated. Now it's time to color
the cast shadow. For that, I create another
ellipse on a layer below my sphere and I fill it up
with the corresponding value. To get a more believable look, you can lighten the value of the cast shadow and
darken the surface directly beneath the sphere to create a nice ambient occlusion. It's worth noticing
that when shading an object without sharp
edges like a sphere, instead of a distinct plane, the mid tone becomes a smooth transition area
between light and shadow. After this very quick
introduction to shading, it's time to use different
value ranges to create different moods
and atmospheres in your work with the
help of value keys.
8. Major and Minor Keys: Oh Value keys are a tool to help us
establish the range of values that we use to
produce a particular image. There are two types of value
keys, major and minor. The major key refers to a greater proportion
of value in an image. Simply put, it means if you decide to use mostly
light values, mostly medium values,
or mostly dark values. If an image consists
mostly of light values, we call it a high major key. If it has mostly mid values, it's called a medium major key. And if it's mostly dark values, it's a low major key. The minor key refers to the range of contrasts
within an image. In simpler terms, how bright are your light values and how
dark are your dark values. The farther apart the
lightest and darkest values are from each other in an image, the higher the contrast. And the closer
together they are, the lower the contrast. Establishing your value
keys correctly is extremely important because
they will determine the mood or atmosphere
of your final piece. For instance, a low
major and high minor key might be scary or threatening. Medium major and medium minor will produce
a dream like state, and a high major and a high minor might be
uplifting and happy. To put this idea into practice, I'll create a simple
sketch of a sphere. The the them I'll use this example
of a high major, high minor key to
demonstrate how quick and easy establishing
your value keys can be. I'll start by looking
for an area with the lightest overall value
and color pick a sample. It doesn't have to be
the brightest spot, and you shouldn't go all
the way to pure white. You should always be able to go brighter in case you want to
add some highlights later. Then I'll color pick a
sample of the darkest value and another one of the value in between them, which
in this case, since we're shooting
for a high, major key that consists
mainly of light values, it's closer to light gray
than it is to black. But I'll start by blocking
in three graphic shapes, one for my sphere, one
for my background, and another one for the
cast shadow of the sphere. Notice how in this
stage of the process, my image looks very similar to Lumis value patterns
in Lesson four. Notice how I didn't
add my darkest value, but rather use a slightly
darker version of my mid value to separate the cast shadow from
the background. That's because I find it easier to work from light to dark, and if I added my
darkest value too soon, I'd have to do the opposite
and work from dark to light. But since I want to create
a oscuro image this time, the second step
would be to separate my values into light
and shadow families. To achieve that, I'll simply
color pick the value of my cast shadow and paint the
form shadow of the sphere. Notice how in spite of being
a mostly graphic image, this simple step starts
suggesting three D form already. Step three would be to add my darkest value in the
darkest area of my painting, which in this case would be the occlusion shadow
beneath the sphere, where would have the
most trouble reaching. I I'll also tweak and create smooth
value shifts and transitions to create the
illusion of different planes. Notice how subtle those
transitions are, though. Remember that you
must keep your light and shadow families
clearly separated. Don't go too dark on your
transitions on the light side and don't go too bright on your transitions on
the shadow side. And that's it as easy
as one, two, three, I could continue
rendering this sphere until I get an even
more realistic finish. But remember, this is not a digital drawing
or painting class, and the focus is on
understanding and getting a solid value structure that allows us to read our images
properly and quickly. And I'll say that mission
has been accomplished. So I rather talk
about how to adjust any given value key to create different moods
on the next lesson.
9. Minor Key Examples: In order to change your
minor key from high to low, you'll need to adjust the
contrast of your image. That means that you should
shorten the distance between your lightest
and your darkest value. In our high major
high minor key, our darkest value was
around an eight or a nine. This time, you'll turn
your darkest value to a five or a six
in your grade scale. Following the exact same steps, you can see how you
can get an image that looks and feels
really different. You'll reset your image and repeat steps
one through three. Only this time,
your darkest value will be much lighter and you can even make your lightest value darker to pull them
even closer together. Notice how with this new
value structure in place, you get an image
that's closer to a diffused lighting setup while also looking more
delicate and ethereal. For my last demonstration, I'll show you how I tackle a low major high
minor value key. I start by blocking
in my shapes. Only this time, I have two dark values against
one lighter value. Step number two is to integrate the shadow areas
into one family. And in step number three,
I go ahead and work my value transitions
so I can get my desired ratio of
darks versus lights. The key in this step is not just to paint
more values randomly, but to stick to your
initial value grouping. Keep your shadow
and light families strictly separated from
each other by making sure there's a clear gap between your light and shadow families to maintain a clear
readability of your image. Adding the full spectrum
of values can produce muddy images and losing your initial
statement altogether. Here you can see a little chart I made showcasing examples of every major and minor key and their possible combinations. It'll be a great
exercise for you to try. I use master paintings to
avoid any copyright claims, but you could use
any type of image you want from TV shows to illustrations to movies or pieces by
contemporary artists. Feel free to use images that
appeal and inspire you. O.
10. FINAL PROJECT: Hello. Now, for your final project, you have a large
variety of options. You could paint a
little no ten sketch like I demonstrated in
Lesson number four. You could also paint over
some old master paintings and try to simplify them into
two or three value studies, like I demonstrated in
lesson number five. Or you could try and do a
chart presenting examples of the nine different value keys like I demonstrated in
Lesson number eight. If you're good enough
operating a camera, you could make value
studies using that, too. The sky is the limit, and I would encourage
you to try and present a final project
that suits your needs, interests, and skill level. Lastly, I'd like to
thank you for taking this class and making
it all the way to here. I'm looking forward to
see your class projects, and I hope to see you
all for part two of this tonal value for absolute beginner's class
until next time.
 Mau Perez