Timelapse Photography II: The Art of Hyperlapse
 Ian Norman, Photographer / Creator of Lonely Speck
Watch this class and thousands more
Watch this class and thousands more
Lessons in This Class
-
-
1.
Motion Types and Anchor Points
2:12
-
2.
Hyperlapse Shooting Techniques
2:47
-
3.
Stabilizing with YouTube
2:50
-
4.
Advanced Stabilizing in Adobe After Effects
8:22
-
5.
Explore Photo Classes on Skillshare
0:36
-
-
- --
- Beginner level
- Intermediate level
- Advanced level
- All levels
Community Generated
The level is determined by a majority opinion of students who have reviewed this class. The teacher's recommendation is shown until at least 5 student responses are collected.
2,490
Students
1
Projects
About This Class
Welcome to Timelapse Photography II: The Art of Hyperlapse
Camera motion is arguably the most impressive addition to any timelapse movie. Where timelapse adds the dimension of time, hyperlapse adds the dimension of depth. Hyperlapse is the ultimate form of motion timelapse with camera motion that covers long distances.
Usually the addition of camera motion requires expensive equipment like motorized dollies or belt-driven camera sliders. Hyperlapse is extremely accessible and requires no special equipment. Anyone with a digital camera can create a professional, high definition hyperlapse movie.
Timelapse Photography II: The Art of Hyperlapse is the second part of a three course series on timelapse photography. Students will create a hyperlapse, a specialized timelapse with camera motion over long distances.
In the prerequisite course, Timelapse Photography I: Introduction to Timelapse, students learned the basic professional timelapse workflow and created a timelapse of their favorite local landmark.
In the final course, Timelapse Photography III: Seamless Day to Night, students create a sunset timelapse that seamlessly transitions from day to night.
What You'll Learn
- Hyperlapse Motion Types and Anchor Points. Pre-planning motion and camera setup.
- Hyperlapse Shooting Techniques. Executing the hyperlapse shoot and techniques for the smoothest motion.
- Hyperlapse Stabilization Methods. Compiling and stabilizing frames into a high definition movie
What You'll Make
- Deliverable. Create a high definition hyperlapse movie of your favorite local landmark.
- Brief. You'll learn how to setup, shoot and edit a professional quality hyperlapse sequence with camera motion that covers a long distance. You will learn how to stabilize and compile your frames into a high definition movie to share with the world on Vimeo or YouTube.
- Specs. You'll use a digital camera or smartphone to shoot a hyperlapse sequence. You'll edit these photos in Adobe Photoshop Lightroom and add background music. You'll share a stablilized sequence on Youtube or Vimeo.

Meet Your Teacher

Ian Norman is a commercial photographer specializing in Timelapse Photography and Night Photography. He is the creator of Lonely Speck, where he shares astrophotography techniques and tutorials, and Photon Collective, a creative photography project community.
You can find more about Ian at his site's facebook pages for Lonely Speck, Photon Collective and on twitter and Instagram.
See full profileHands-on Class Project
Create a hyperlapse of your favorite local landmark.
Hyperlapse Motion Types and Anchor Points
- Pick a local landmark as a hyperlapse subject
Rather than picking a subject that moves, like in the Intro to Timelapse class, we'll be looking for a stationary landmark as a subject. Choosing a subject for hyperlapse becomes more about the camera motion than the subject motion, so we don't have to worry about finding traffic or crowds or slow moving clouds. All we need is an interesting landmark. Architectural landmarks are particularly great hyperlapse subjects. Pick one of your favorite buildings or structures as your first subject. It could be a large building in the area, a statue or even your own home.
- Pick an anchor point on your landmark
The anchor point is the one point on the subject that stays in the same position throughout the duration of the hyperlapse. To make a successful hyperlapse, you will want to choose a feature on your subject that will be visible for the whole hyperlapse sequence.
On buildings and architectural landmarks, it's often easiest to pick a prominent feature like a sharp corner or spire on the top of the building. Just make sure that you can keep the anchor point visible along your path (so it won't be blocked by other parts of the building or by a foreground object like a nearby tree).
- Identify the anchor points
I find that it's useful to try to find anchor points in other photographers' hyperlapses in order to better understand their method of hyperlapse creation. It gives light to how they are choosing their anchor points and also helps with inspiration for choosing combinations of motion paths and anchor points.
Search Vimeo for hyperlapse videos and watch a few of the most popular ones. When each new hyperlapse clip comes up, try to see if you can find the anchor points that the photographer is using. You might find that some anchor points are actually very difficult to find, while others will be obvious.
Also pay attention to the motion. Are they performing a push or pull? Maybe a truck left or right? Or are they doing something else, perhaps with a diagonal motion? There's no wrong way to choose a path, but each has its own look.
- Decide on the type of motion for your hyperlapse
Once you've selected your anchor point, you need to decide what type of motion path you wish to take: truck left or right will make it look like the hyperlapse is rotating around the building. A dolly push or pull will make it look like the camera is rushing toward or away from the subject. Whichever motion type you select, make sure that the path is clear to walk.
Hyperlapse Shooting Techniques
- Pick a straight line path
With your anchor point and motion type in mind, pick a path that you will be able to walk without obstruction. I usually like to find some sort of line on the ground, like the edge of a sidewalk. Keep your path straight if possible.
It might be tempting to curve around your subject, but I only suggest this if there is already a path with a continuous curve that you can follow. Trying to "manually" walk a curved path usually doesn't work very well!
If you're in a crowded area, you might want a friend to help you walk the path so that you don't bump into anyone.
- Lock your camera's focus
In Camera Awesome (smart phone users)
In Camera Awesome, simply tap the screen with two fingers to separate the focus and exposure metering points. Drag them to your subjects in the frame and tap them again to lock them in place.
On a Digital SLR
Focus on your subject with autofocus and then switch the lens to manual focus.
Alternatively, use manual focus with live-view mode and the magnify function to check for critical focus.
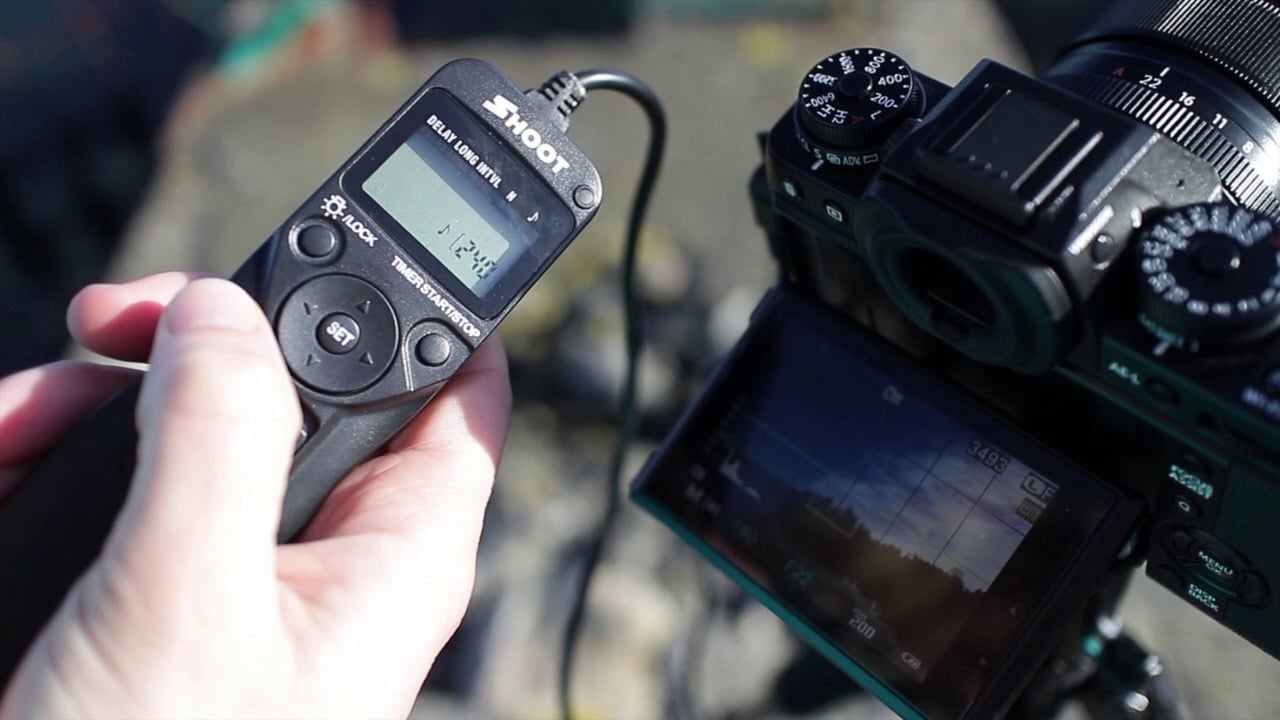
- Lock your camera's exposure
In Camera Awesome (smart phone users)
In Camera Awesome, simply tap the screen with two fingers to separate the focus and exposure metering points. Drag them to your subjects in the frame and tap them again to lock them in place.
On a camera with manual exposure mode
If you're using a DSLR or camera with manual controls, set the camera to "M" mode for manual exposure control.
ISO
Most of the time you should set the ISO to a relatively low number. Since we're using a tripod, we don't need to worry too much about shutter speed, so a low ISO sensitivity will work well and give us the best image quality. I recommend starting with ISO 100 or ISO 200.
If you're shooting at night or in the dark, you may need to increase your ISO accordingly in order to keep the shutter speed shorter than your chosen timelapse interval. Just remember that higher ISOs will result in noisier/grainy photos.
F/Number (Aperture)
Most of the time, you should set your f/number to a relatively high f/number in order to get the maximum sharpness in your photos. Most lenses are sharpest at f/8.0 or f/11. The higher the f/number, the smaller the opening in the lens and the less light that the camera lets in for any given time.
If you're shooting at night or in the dark, you may need to lower your f/number in order to allow more light into the camera.
Shutter Speed:
Finally, set your shutter speed so that your camera's exposure meter is roughly centered. Take a test shot and check to see if your exposure looks good.
Sunny 16 Rule
If you're shooting your hyperlapse in sunlight, it's often good to try setting your exposure using the Sunny 16 Rule:
Set your f/number to f/16 and then set your shutter speed to the reciprocal of the ISO or 1/ISO. For example:
At f/16, ISO 100 set your shutter speed to 1/100.
or
At f/16, ISO 200 set your shutter speed to 1/200.
Try it out, take a test shot and adjust accordingly.
- Shoot, step, shoot, step...
Now that you have your focus and exposure locked, you're ready to start shooting. Take a photo and then take a step along your path. Rinse and repeat! Just remember to keep your anchor point in the same location in the frame (using grid lines, etc.) throughout the duration of the shoot, and try to keep your camera roughly level.
Don't worry too much about timing at first. You'll find your own rhythm as you shoot a couple more frames, and your timing will even out. I like to think out the steps as I do them in a cycle: shoot, take a step, breathe, frame the anchor point, shoot, take a step, breathe, frame the anchor point, shoot... and so on.
The resulting hyperlapse will definitely be a little bit shaky but we will stabilize the sequence in the next unit.
What about using a tripod?
It's actually a common technique to use a tripod for shooting a hyperlapse but I don't recommend it for your first hyperlapse. Most of the hyperlapses that I shoot are completely handheld with no tripod.
You will find that the use of a tripod is particularly difficult for a number of reasons. For one, it's an extra thing to move along your path. Since you'll likely take over one hundred frames, picking up a tripod and camera every 5 seconds one hundred times can be rather strenous (a hyperlapse workout of sorts). Also, once you move the tripod, you will need to reframe the photo so that the anchor point is back in the same location in the frame. Fiddling with a tripod head for every step of the hyperlapse is an added annoyance that adds difficulty to the whole hyperlapse creation.
The only time I would recommend using a tripod is if you decide to shoot your hyperlapse at night in conditions that are so dark that your camera needs to use a shutter speed that's too slow to handhold. Just remember that use of a tripod will make your hyperlapse significantly more difficult.

Hyperlapse Stabilization Methods
- Stabilize your hyperlapse sequence
Use either YouTube or After Effects to stabilize your hyperlapse sequence.
When stabilizing in YouTube, you will need to first compile your sequence with a timelapse compiler like PhotoLapse 3 for Windows or Time Lapse Assembler for Mac. Then, upload the unstable hyperlapse to YouTube and use the enhancements page to apply stabilization. Once stabilized, you can download your stabilized video from the video manager.
You can also stabilize your hyperlapse manually by using Adobe After Effects.
Download a Free Trial of Adobe After Effects and Adobe Premiere
- Combine your hyperlapse clips with some music
Add some music to your hyperlapse clip(s) in your favorite video editing program. iMovie, Windows Movie Maker, Adobe Premiere and Apple Final Cut are all programs that can help you cut your timelapse clips into a complete movie with music.
Jamendo is probably the best and easiest to use site for open music, but here are a few more great resources for finding free music to use in your timelapses:
- Share your hyperlapse video on YouTube or Vimeo
Now that you have a completed hyperlapse sequence, you should be ready to share it with the world on YouTube or Vimeo.
My personal favorite site for sharing my finished timelapse videos is Vimeo. It features a clean interface and keeps your movies looking great.
Once it's online, be sure to share the link on your project page.

Class Ratings
Why Join Skillshare?
Take award-winning Skillshare Original Classes
Each class has short lessons, hands-on projects
Your membership supports Skillshare teachers
Learn From Anywhere
Take classes on the go with the Skillshare app. Stream or download to watch on the plane, the subway, or wherever you learn best.


Related Classes