Transcripts
1. Trailer: My name is Brent Eviston. I practice and I teach drawing. Now, although I absolutely love the traditional
aspects of drawing, there is so much more
to drawing than simply creating images that look
like the objects they depict. Drawing is also a powerful tool that will allow us to explore our creativity as well as to discover new things
about ourselves. In this course, you'll be introduced to the ParadolaPject. Paradola is the
phenomenon of seeing meaningful images in random or abstract
visual information. Nearly all of us have had the
experience of seeing faces, figures, animals,
or other shapes when viewing clouds or stains. In this course, we
are going to leverage paradolia into a
creative project. O This course begins
with you twisting, tearing, crumpling,
and otherwise shaping pieces of
blank white paper. Next, we'll examine those pieces of paper to see if you can find any indications of
figures or other living forms. Once we find them,
we will draw them, but we will not simply draw them as crumpled
pieces of paper. We want to bring these
drawings to life. We want these drawings
to appear figurative. I'm going to take you through
the process of drawing each piece of crumpled paper as if it were a living figure. Now, this will be unlike any drawing or creativity
course you've taken before. So you may be asking yourself, why should you take this course? First, you will improve
your drawing abilities. This course will
challenge you to combine both the technical and
expressive aspects of drawing. Next, you'll increase
your creative capacity. A course like this is like a workout for
your creative mind. And finally, you will discover new things about the
workings of your mind. This project is an excellent
tool for self discovery. But beyond those things, this is a very human project. It leverages a phenomenon
that we've all had. In fact, you don't
even need to be an artist to participate
in this course. Even if you have
never drawn before, you are welcome
to participate in this project and have a
unique creative experience. So come join me in
the PeradolaPject, where you will improve
your drawing skills, increase your
creative capacities, and learn new things about who you are as a
unique individual.
2. Introduction: What do you think
these drawings depict? Do they appear abstract or
do you see hints of life? When you look at these
drawings, what do you see? My name is Brent Eviston. I practice and teach drawing. Now, as much as I love
traditional drawing, there is so much more
to drawing than simply creating images that look
like the objects they depict. The project you're about to experience is a more creative, expressive and experimental
drawing project. I'm going to be
leading you through a project that I've
done for many years. It begins with me
twisting, tearing, crumpling, creasing, and otherwise shaping
blank pieces of paper. I then examine each
sheet of crumpled paper to see if I see
any signs of life, anything that looks
figurative or animalia. When I find pieces of paper
that appear figurative, I draw them, but I don't simply draw them as
pieces of paper. I draw them as if they
were living figures. Our minds are hard wired
to find figures and faces. This tendency is so strong, it often misfires when we see random or abstract
visual information. Nearly all of us have had the
experience of seeing faces, figures, animals, or other shapes when
viewing clouds or stains. This is a very
common experience, and this project leverages that experience into
a creative project. There's this
wonderful quote from Leonardo Da Vinci that
goes something like this. Stop and look into
the stains of walls, the ashes of a fire,
clouds or mud. If you consider them well, you may find marvelous ideas. Battles of animals and men, various landscapes
and monstrous things. By indistinct things, the mind is stimulated to new inventions. DaVinci was aware that
our minds often interpret random visual information like clouds or stains as meaningful. This phenomenon of seeing
meaningful images in random or abstract
visual information is called paradolia. Paradolia is something everyone
experiences time to time. In this course, we are
going to be working with randomly crumpled pieces
of paper that are not shaped or formed
with any intention. But despite the fact that
these crumpled pieces of paper will have
been randomly formed, some of them will absolutely appear to take on
living characteristics. You will be amazed at how
easy it is to start to see figures or other
recognizable forms in these random pieces of paper. Now, when we interpret random visual information
as meaningful, I don't believe that this is merely a misfiring of the mind. I believe that
these specific ways each individual interprets this visual information
can teach him or her about how their mind
processes information. So not only is this
a creative project, it is also an incredible
tool for self discovery. You will learn how your
mind processes information, how you come to think
the way you do, and how you determine
your beliefs. Projects like this one
are a way to delve deep into the subconscious to see
how we process information. I've done this project
for many years, and I will tell you that
different people come up with completely
different interpretations, even from the same
pieces of paper. The question is, what will you see when you
do this project? What will you learn
about your mind? So you're probably asking
yourself a very valid question. Why should you take this course? Well, I think there
are a few reasons. First, it will introduce you to a completely novel
approach to drawing. For those of you who are most interested in more
traditional forms of drawing, this is a way to expand your vocabulary of
lines and marks. This course will
teach you ways of drawing more expressively
and creatively. As you may know, I do a
lot of figure drawing. So much of the line
quality that I use in my figure drawings I
learn from this project. This project will also challenge
your technical skills. Part of this project
requires you to believably draw the folds and creases
in crumpled pieces of paper. This can be an incredibly
challenging exercise that will absolutely improve your
traditional drawing skills. But the drawings you'll be
creating in this course will also be creative
and expressive. This course will give
you some experience finding a balance between
drawings that are both technically
believable as well as beautiful, creative,
and expressive. I believe that a
successful drawing hovers in between
these two extremes. On the one hand,
a drawing that is technical can be
very impressive, but they can often seem a
little dry and distant, while as a drawing
that's too expressive, can often appear abstract and be difficult for
people to interpret. This project will show you how to create balanced drawings that are both technically proficient and expressive and beautiful. And finally, this course
is an excellent way to explore and expand
your creative capacities. Creativity is one of the
most sought after skills, not just in art, but in business
and in entrepreneurship. So even if you're not
interested in drawing or art, you can still get a huge
amount from this course. This course will show
you practical ways to become more creative. So now that you have a sense of the ideas, we'll be exploring, let me take you through
the project so you understand what this
course looks like. First, I'll take you through
the process of how to take blank paper and shape it into dynamic and interesting
abstract forms. Next, we'll examine
each piece of crumpled paper to see if we
can find any signs of life. We're looking for
anything figurative, animalian or any other
kind of recognizable form. Once we find those forms,
we will draw them. But instead of simply drawing them as crumpled
pieces of paper, I'm going to show
you how to create drawings that emphasize
the figurative aspects. I'm going to show you how and
where you can exaggerate, how you can use line quality to make these forms become alive. I'm going to show
you how you can use quick compositional sketches to plan your finished pieces. And finally, I'm going to take
you through the process of doing completed crumpled
paper drawings all of Europe. The materials for this
project are pretty simple. First, you'll need a
number of pieces of cheap white paper for
you to crumple and form. Next, of course, you'll
need drawing materials. As always, you are
welcome to use whatever drawing materials
work best for you. In this course, I will be drawing with black
colored pencil. You'll also need some paper or a sketchbook so you can create simple sketches of
your crumpled pieces of paper before we do
more finished drawings. And, of course, for
your finished drawings, you will want high
quality drawing paper. So the materials for this
course are very simple. Essentially, you'll
need paper and pencil. As with my other courses, I recommend completing
one lesson per day. But as always, you
are welcome to adapt the course structure
to fit with your life. My guess is that
while you've been viewing glimpses of these
mysterious drawings, you have already started to populate them with
figures and forms. My hope is that you're
starting to ask yourself why? Why are you seeing
these specific images in random crumpled
pieces of paper? So if your interest
has been peaked, let's head into the
studio for part one of the PeradoliaPject.
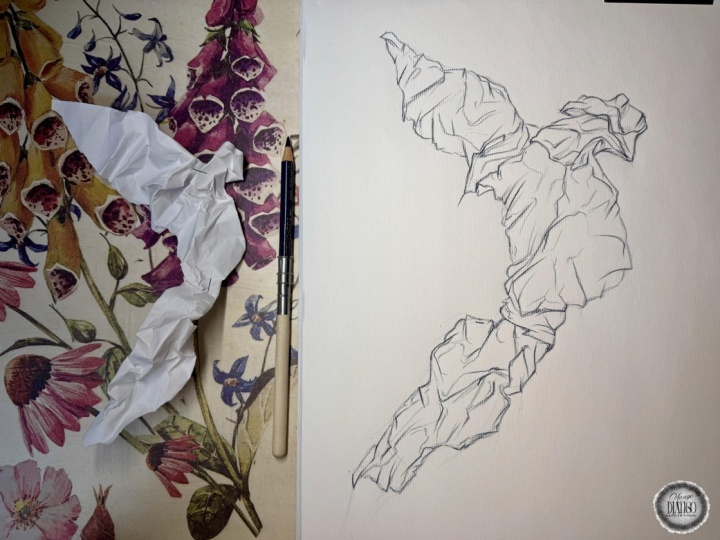
3. Creating Paper Specimens: So here we are in the first
part of the ParadolaPject. Here we are going to focus on creating the paper
subject we'll be drawing. Now, I often refer to these
paper subjects as specimens. The paper specimens we'll create really tend
to remind me of insects or other
small animals that we might find as specimens
in a laboratory. Now, as you know, our
ultimate goal is to create paper specimens that have
living or lifelike qualities. However, while we're
sculpting our forms today, we don't want to try to
create lifelike forms. I don't want you to
intentionally try to sculpt things that look
like figures or animals. We want to create random forms. So right now, I
simply want you to focus on creating complex, dynamic, abstract paper forms. You should not try to sculpt anything that
appears living. The goal here is randomness. In the next part of the project, we'll examine all of the
paper subjects that we create and try to find some
that have living forms. But again, we want this
process to occur randomly. At the heart of this
project is our seeking out lifelike forms in
random information. I think that the randomness is what makes this
project interesting. I believe that seeking out
lifelike qualities from random visual information is a much more fascinating way
to see what is in our minds. And I think in doing so, we learn things about how
we process information, how we come to our beliefs, what kinds of ideas and avatars may be
populating our minds. This project creates a forum for all of the
ideas that are deep in our subconscious to come to the surface so we
can see what they are. That's why the randomness of
this step is so critical. So here is how this part of
the project is going to go. Right now, you are going
to crumple, twist, tear, pull, and fold pieces of paper to create complex
abstract forms. Now, it's important
for you to understand that most of the paper specimens you'll create will not appear lifelike or
figurative in any way. But the more paper
specimens you create, the more likely you are to find some that look like figures
or other creatures. This means that it's best to create many more forms that
we actually draw from. When I do this project, I tend to create
dozens at a time. I'm going to ask you to create a minimum of 12 paper specimens. But remember, the
more you create, the more likely you are to find some that
appear figurative. So for this part of the project, you're going to need at least
one dozen sheets of paper. And what I found is that the best paper to
use for this kind of project is just cheap
8.5 by 11 inch paper, printer paper, copy paper. You don't want to use
any fancy papers. In fact, I've worked with watercolor paper or other
kinds of art paper, and they tend to have
a softness to them, which is great for
a drawing surface, but they just don't hold a fold as well as
cheap printer paper. So once you've got your paper, I'll take you through
the process that I go through while I'm shaping
these papers specimens. Now, of course, from
one perspective, there is no wrong way to
crumple a piece of paper, but there are some things
that I like to think about while I'm shaping
these paper forms. Some people have a tendency to simply ball up their
piece of paper, and then they wonder why it
doesn't look like anything. I don't want you to simply
ball up a piece of paper. That's not what we're doing.
Remember, we are trying to shape complex abstract forms. So the first thing that I
do when I get a piece of paper is I start
to tear into it. I like to break up the
rectilinear edges of the paper, and by tearing into it, we immediately start to
create different textures. The straight edge of
the paper appears very different from the
more ragged torn edges. So because I'm tearing
into the paper, I usually get at least
two paper specimens out of each sheet of paper. As I tear into the paper,
I have to make a decision about how big I want
each specimen to be. Sometimes I tear into a piece
of paper just a little bit, but end up using the
entire sheet of paper. Other times, I'll tear
around the edges. Sometimes I'll tear a
single sheet of paper into four or five
different paper specimens. This tends to create
rather small specimens, but remember, we're
going for a range of different kinds of shapes. I also want to remind you once
again that at this stage, we are not trying to
sculpt anything specific. So one of the things that I do, so I'm not tempted to try and sculpt figurative forms
out of paper is I will often not even look at the paper that I am
manipulating in my hands. This keeps me being aware of the specific forms
that I'm sculpting and allows me to be
surprised at the end. And as I mentioned before,
I am not simply crumpling. I'm twisting, I'm
folding. I'm pulling. Oftentimes, I'll crumple
up a piece of paper to create an initial
set of crinkles, then I'll uncrumple it and
then start shaping it again. You want to create a wide
range of shapes and folds. You want some folds that are very big and seem to
soar through the air. You can create other
sections that are really crinkled and have all kinds
of intricate little details. Now, while I'm
sculpting these forms, I often try to create
what I call switchbacks, areas where the paper seems
to zigzag back and forth. These switchbacks can often
start to resemble appendages. Every single time I get a fresh sheet of
paper in my hands, I try and manipulate
it in a different way. I try to create shapes that
I've never created before. Now, I've been doing this
project for many years now, so it is a bit of a challenge
for me to try to come up with new ways to tear, crush, and manipulate the paper. But that's still
my goal. I still try to do something unique each and every time I get a fresh sheet of
paper in my hands. Remember, the more different
kinds of shapes we create, the more likely we are to see something figurative
in these forms. Now, it may seem strange
that I'm trying to give you instructions on how
to crumple paper. But remember, this is
a creative project. This is part of how
creativity works. We're trying to deal with a familiar subject
like a sheet of paper in ways that we've probably never
thought about before. And this is what I love so
much about these projects. It will really change
the way you look at simple, mundane objects. So while you're crumpling
your sheets of paper, I want you to feel
free to experiment. You don't have to do it the
way that I'm talking about. What I'm giving you is
just a starting point. But remember, in a
creative project, your goal is to
make it your own. So feel free to go far beyond the kinds of ideas that
I'm giving you right now. Now, I am not particularly
superstitious, but there is something about working with this
paper and starting to see figures or other
living creatures come out that feels
almost seance like. It's as if we're starting to pull creatures
from the ether. I'm not claiming there's some spiritual component
to this process, but I am saying that the hands
can work things out that the mind sometimes struggles
to consciously deal with. On some level, we are making our hands perform the actions
that shape these papers. And I choose to believe that there could
be meaning there. I'm going to let you get to crumpling your sheets of paper. Remember, you want to create at least a dozen individual
paper specimens, but the more the better. If you want to create 30, 40, 50 or more, feel
free to do that. And remember, try not
to consciously shape these pieces of paper
into any specific forms. The goal here is randomness. We want to be surprised when we see the shapes
that we create. And this is the first part
of this process to allow our hands to create
random paper forms. And I say random with a bit
of a wink because I don't know where the meaning starts
to come into this process. I do know that the images
are meaningful at the end. And so I like the idea
that each part of the process is a forum for us to work out ideas in the mind. Projects like this
are a way to explore the depths of our mind to
figure out what drives us, what we're afraid of, how
we construct meaning, and what are the mental models we use to navigate daily life. So go create your
paper specimens, and I will see you back here for the next part
of the project, where we're going
to begin examining these paper specimens for lifelike or
figurative qualities.
4. Selecting Paper Specimens: Welcome to the second part
of the PeradolioPject. In the first part
of the project, we shaped numerous forms of paper into dynamic
abstract forms. Here in this second
part of the project, we're going to be examining
these paper forms to see if we can find any
figurative qualities. We're looking for any pieces of paper that resemble humans, animals, or any other creature. Now, I say any other creature, because in addition to animals, you may see things
that look more like fantasy creatures
like dragons, leviathans, or
mythological creatures. Remember, we are just looking
for indications of life. These forms don't
need to be realistic. Once we find some
paper specimens that resemble humans or animals, we need to set those aside
and prepare them for drawing. Now, at this stage, it is
likely that you have crumpled at least a dozen sheets of paper into dynamic
abstract forms. But remember, only a few
of them are going to appear to have human or
animal like qualities. Most of the paper specimens
that you've created are unlikely to show any human
or animal like qualities. Once you do find pieces of paper that appear to have
figurative qualities, they are likely only to appear that way from a very
specific viewpoint. This means that we
not only need to set these paper specimens aside, but we need to do it
in a way where we can display their
figurative qualities. So now I'm going to share how I examine my paper specimens. Remember, you don't
need to do it exactly the way I do it, but hopefully this will
give you a sense of how you can proceed with
this part of the project. First, I recommend laying out
all of your paper specimens on a flat surface so you can
see all of them at once. It's best if the surface you
lay them out on is dark. A dark surface will help to showcase the white
shapes of the paper. First, you should
just take a look at all of the
specimens laid out. See if any of them jump out at you as having any
figurative qualities. But if nothing immediately
jumps out at you, the next thing you
want to do is to examine each piece of
paper individually. Pick each one up and examine it from every
possible viewpoint. Turn it in your hands to make sure that you are seeing
it from every angle. While you're doing this, move your paper specimens slowly and pay close attention to anything that might
look figurative. Now, at this point,
you're probably realizing why it
was so important to create paper specimens that had a wide range of dynamic
shapes and forms. So now, I'm going
to take you through some of these
specific qualities of the paper specimens that I feel make them look
particularly figurative. And in doing so, my hope is that you will get
a sense of what you should be looking for when you examine your own
paper specimens. So I want to start
off by sharing some of the pieces
that I've selected. These are the pieces that
looked figurative to me. Now, while I'm
showing you these, I want to make it clear that you need to work with the paper. You need to meet
the paper halfway. It's not as if
these are going to look exactly like figures. You need to respond to the information that the
paper is displaying and allow your mind to start to
craft the images of figures. Let's start by focusing
on this piece. Now, before I share what
I see, I want to ask you, what do you see in this piece of paper oriented in
this direction? Now, we all tend to see these things a little differently, and maybe you don't see anything in this piece of
paper. That's okay. But I just wanted to give you an opportunity to come up with your own interpretation before I started to share what I see. So to me, this figure
appears to be in profile. It appears to be walking
from left to right. Here is one leg moving forward while the
other leg is back. I see this as being a torso
and this as being a head. This appears to me to be
an arm projecting forward. Once I saw this
figurative shape in this piece of paper,
I couldn't unsee it. This figure of the
image walking forward from left to right is
very strong in my mind. Now, the more I look, the more information
that starts to come out. For example, here and here, the folds start to
resemble feet or shoes. The curves in the contour
here start to suggest a face. This shape here appears to be
part of the upper arm that comes down and bends into the part of the arm that's
projecting forward. Now, again, if you're not
seeing this, that's okay. But I wanted to share with you the kinds of things that I'm seeing that start to bring
these pieces of paper to life. Our goal right now is not to figure out how to draw these. It's just to start to
see something lifelike. So next, let's take a look
at this piece of paper. So hopefully, you're
starting to see why it's so important to create pieces of paper that have a lot of different kinds
of shapes and folds. This project is
nearly impossible if all you're doing is
balling up the paper. But when we have all of these different
changes in direction, we have big shapes,
we have small shapes, that's when we can
start to trigger the paradolia effect in the mind and begin
to see figures. For this figure, I'm seeing
something very specific. But before I share
what that is, again, I want to give you an
opportunity to take a look and see how your
mind interprets this. I am seeing a figure that
is pulling something. Imagine for a moment that
this here is an arm. This is the back, and this
shape here is the head. Just by accident, this
line could almost represent what this figure is pulling a rope or
perhaps a chain. The figure has
leaned way back with one leg forward and
the other leg back. Now, if you saw something completely different when
I asked, that is great. Remember, there are no
right or wrong ways to engage these paper forms. Now, many of the
figures that I see tend to appear to
be wearing dresses, robes, long coats or other
forms of flowing garments. Now, because of the
way paper works, many of the creases and folds do a good job at emulating
a look of fabric. Alright, let's take
a look at another. Now, to me, this piece of paper feels a little
more abstract, but I'm still seeing
figurative elements. I'm seeing this as the front of the head
where the face might be. The torso is here,
and we see one leg extending back while this
leg is coming more forward. This appears to be an
arm traveling forward, and this almost appears to be a headdress or some kind
of flowing fabric. I can feel my mind having
to work a little more to create this particular
piece of paper into a figure. Remember, you need to
work with the paper in order to start to see
figures or other forms. Remember, these
pieces of paper only tend to appear figurative
from particular directions. If we change the orientation, some of the figurative
qualities start to disappear. But when we orient these
figures in particular ways, they really begin to
embody specific elements, elements that can appear
remarkably figurative. It can also be fascinating to start to place these
figures together. So interesting relationships
start to emerge. However, we'll talk more about that later on
in this project. But hopefully, this
gives you a sense of how to start to look at
these paper forms and how to work with them to start to discern
figurative elements. So at this point, you
should have a good idea of how these paper
specimens appear to me. But it's important for
you to remember you may see things completely
differently than I do. The figures or animals you find may look completely
different from mine. We're looking at these
paper specimens the same way we might look
for shapes in the clouds. This is something your brain
is naturally inclined to do. This is not a special skill. You just have to
open yourself up to the experience and allow your
mind to do what it does. Now, if you're really struggling with this
part of the project, if you feel you've
got your pieces of paper laid out and nothing is jumping out at you as being particularly figurative,
that's okay. Here are some things you can do. First, take a bit of a break, get away from the
project and come back to it later on
with fresh eyes. It's not uncommon
for me to think a particular paper specimen
has no lifelike qualities, and I've come back days, months, or even years and
found something figurative in a paper specimen
that I had written off. Now, after seeing
some of the paper specimens that I feel
appear figurative, you may decide that your paper specimens are simply not complex or dynamic enough. This does happen, and in fact, rather than starting with
fresh sheets of paper, you can simply tear into and reshape the paper specimens
that you've already used. It's also very important to come to this project with
the right attitude. If you're coming to
this project thinking, there's nothing to see here, but just pieces of garbage, then you are highly unlikely to see anything figurative
or meaningful. So you need to open
yourself up to the experience and come at
it with the right attitude. Assume that you will see meaningful forms in these
abstract paper specimens. I'd also like to
note that you may see things beyond
figures and animals. Some people tend
to see more plant like things, trees,
vines, flowers. I've known people who have seen more architectural
or mechanical things like buildings or vehicles. So if figures aren't
jumping out at you, but some other forms
are, that's fine. Work with what you see. Remember, part of this
project is letting your mind bring these
paper forms to life. They don't need
to be figurative. You get to learn what your mind interprets in
these abstract forms. Now, ideally, you'd
be able to find at least three or
four paper specimens that resemble something
that you can draw, but you only really need one or two for this project to work. So once you found
some paper specimens that have some
figurative qualities, we need to set them
aside in a way that we can come back and find
these forms again. If you simply set the
piece of paper down at a table and think you're going
to remember, you may not. I've been through this
experience before. I have found a piece
of paper that displays some figurative qualities
that I find very compelling, and I've simply set it aside. When I picked it back up,
sometimes I can't remember exactly the viewpoint that I saw these figurative
qualities from. So when you set these
pieces of paper aside, you need to display them in
a way that allows them to showcase whatever forms you saw that you found compelling. Now, there are many ways you can display your paper specimens. The easiest way is to lay
them out on a dark surface. You want to orient
them so that they are showcasing their
figurative qualities. You want to lay each one
down in the position that shows whatever form
you found so compelling. Now, this method
works pretty well, although if you live
with other people, you need to tell them
that these pieces of paper that are crumpled up
are part of an art project. They are not trash. I have absolutely had
roommates who have thrown out my precious
paper specimens. Now, one of the most
common ways that I display my paper specimens is by pinning
them to black foam core. Now, if you're unfamiliar
with foam core, it is a kind of board
that has a piece of foam sandwiched between
two pieces of paper. It comes in all kinds of colors, but I feel that the
black foam core is most useful for this project. It really offsets the
white of the paper. So I will take my paper specimen and pin it right
to the foam core. The foam corp does a great job accepting push pins
or specimen pins. Now, for this project,
I actually use specimen pins that are
designed to pin insects, but push pins will also work. I've also used various
kinds of clips. One of the most useful clips I found is attached to a wire, and it's weighted at the bottom. These kinds of clips will
hold up your paper specimens. Now, depending on how big the paper specimen is
or its specific shape, these clips don't always hold them up properly, but
many of them work. You can even put these paper
specimens under glass. Putting them under glass
can hold them up as well as protect them.
Get creative with it. Experiment to see
how you can display your paper specimens
in a way that they best showcase their
figurative qualities. I also recommend snapping
a quick picture of your paper specimen
with your phone so you can quickly capture
the figurative qualities. Now, at this point
in the project, some people do start
to question it. They realize that they've been
spending a huge amount of time staring at crumpled
pieces of paper, something that most
people think of as trash. They start to feel
childish or as if this kind of thinking is
potentially disturbing. But here's the reality.
If you want to be creative or if you want to
have creative experiences, you need to learn to
tolerate and even appreciate this feeling of being a little unsettled,
a little disturbed. Remember, when we deal
with creative projects, we are confronting the unknown. And a confrontation with the unknown is always going
to be unsettling. But that's what
creativity is all about. If we're dealing with
what we already know, by definition, it
is not creative. Now, hopefully, most of
you are very interested in this project and curious to see where it's going to go. For those of you who may
be struggling a bit, stick with it a little longer. See if you can find something meaningful
and valuable here. I know that Ia found
this project immensely useful in discovering things about myself that I didn't know. People who have
been introduced to this project also get a
great sense of meaning from. At the very least, this will
give you a sense of how the creative process works and
how creative people think. So now, go examine
your paper specimens to see if any of them
appear figurative to you. Once you've found
some paper specimens with figurative qualities, you'll be ready for
the next part of the project where we're going
to do quick sketches of each specimen and
start to discover what about them
appears figurative. I look forward to seeing you in part three of the
PeradoliaPject.
5. Sketching Paper Specimens: Welcome to part three
of the ParadoliaPject. In this third part
of the project, we are going to
familiarize ourselves with our paper specimens by doing
quick sketches of them. This is a very important
step between examining our paper specimens and doing
final drawings of them. The goal of these
quick sketches is to learn about our paper
specimens and in particular to
discover what about them makes them appear
lifelike or figurative. You're also going to gain
some experience drawing these paper specimens and learn how to emphasize their
lifelike qualities. For these quick
sketches, you'll simply need some paper and
a drawing tool. You do not need to use
any costly art paper. In fact, you can use the exact same cheap paper that you used to create
your paper specimens. For a drawing tool, you can
use either pencil or pen, whatever you're most
comfortable with. I'll be using a ballpoint pen. I like using ballpoint pen
for this part of the project, because it keeps the drawings
from being too precious. BallpointPen is a down
and dirty medium. It has a very limited
range of line, so I have to keep the
drawings pretty simple. I recommend spending
no more than 5 minutes on each quick sketch of
your figurative specimens. And in these quick sketches, you don't need to
add a lot of detail. You want to focus
on the larger forms of the paper specimens. 5 minutes should be plenty
of time to simplify your paper specimens down to their most
figurative elements. So now I'm going to take you to the drawing board where I'm
going to show you how I approach these quick sketches of my most figurative
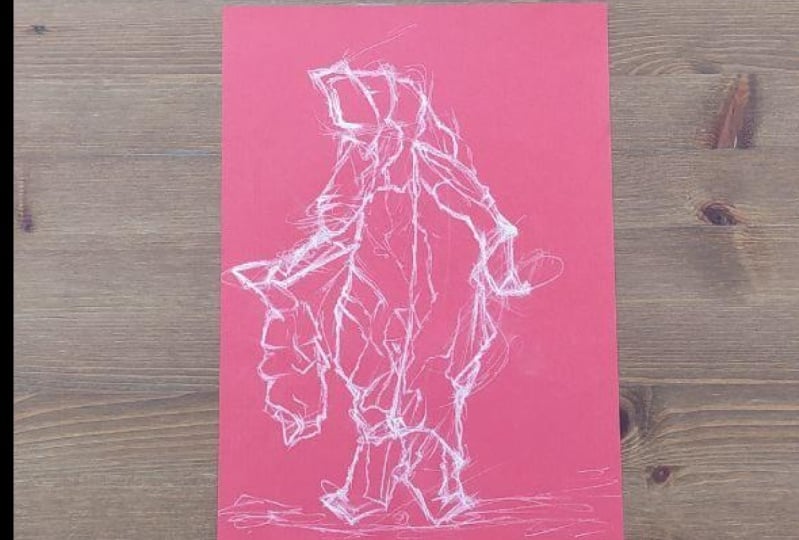
paper specimens. So here on the left, I have a paper specimen that appears to me to be
very figurative. To me, it looks like
somebody walking from left to right
with an arm raised. So the first thing I
want to capture is the overall gesture of
this paper specimen. Now, gesture drawing is a fundamental concept
in figure drawing. So very lightly, I am
drawing this line that moves from the top of the head all the way down to the
bottom of the foot. This to me, seems like
the primary action. Instead of focusing
on any details, I'm simplifying all of
this information to capture this line that
flows from top to bottom. Hopefully, you can
see that movement flowing through this
paper specimen. Next, I'm going to draw this
leg projecting forward. So to me, these lines capture the overall position
and flow of the figure. So next, I'd like to
start breaking this drawing down into its
various elements. So up here, this looks
like a torso to me with the chest being here and the back of the
figure being here. I'm keeping these lines very light because I
want to adjust them. Next, I'll start
drawing the rest of this leg projecting
back into my left. I think this line
can project even more forward at
more of an angle. So one of the things
I'm immediately doing is focusing on the
figurative elements. Our goal here is to
find a balance between accurately representing the
forms we find in the paper, but also to emphasize the
figurative qualities. I'm not doing a realistic
rendering of crumpled paper. I'm emphasizing the
figurative elements to make them come forward, to make them occupy
center stage. To me, the head of the figure appears to be about right here. Now, it's not a very
head like shape, but there are some
indications of a head. So now that I have the
large shapes drawn, I can start to add some more of the folds of the crumpled paper. I'm looking for
elements in the paper that seem to emphasize
the figurative qualities. Remember, the goal
here is to draw this piece of paper
as if it were alive, as if it were a figure, not merely as a crumpled
piece of paper. So we're looking for
information that seems to enhance the
figurative qualities. We can also de emphasize
any elements of the paper that are detracting from the figurative qualities. We get to decide what goes
into drawing and what doesn't. This line here
seems to correspond to how the muscles of
the leg might actually curve or how fabric might curve over this
upper portion of the leg. Right down here, I
can see a couple of creases that look as if
they could be a knee. So I'm going to
emphasize those creases. Now, this element
that sticks out here, I might deemphasize that
or edit it out entirely. So instead of using
a dark, hard line, I may just indicate it
very, very lightly. Now, as we get down here, we can see this part
of the paper curve. I might emphasize
this shape just a little to make it look
more like a foot. So here you can see I'm
not inventing information, but I am exaggerating
this shape just slightly to make it look
a little more foot like. You can see this shape here, I've moved up a little bit to give the figure a
bit more of a waist. So this shape here
starts to appear almost like the pelvic region. Now, there are some other shapes coming off the back, but again, I can de emphasize those to focus on this cinching
here that implies a waist. Again, I'm not
inventing information, but I am exaggerating just slightly to emphasize the
figurative qualities. It's amazing how visual
information will start to resemble familiar things
the more we focus on it. For example, this
triangular shape here almost looks like a knee. The folds of the paper almost
seem to appear like fabric. Now, by doing these
quick sketches, I can work out so many
of these shapes and forms before I start
on the final drawings. So by the time I get to my
more finished drawings, I'm already very familiar
with the subject. This shape here starts to
look like the calf muscle. So again, I'm going
to emphasize that. I think I want to lower this
foot just a little here. Once again, on the right side, I'm going to
emphasize this shape. I'm going to stretch
it out just a little to imply more
of a foot like form. Again, I'm not
inventing information, but I'm exaggerating what's there to bring the
figure more into focus. So hopefully, this
is really starting to appear to you like a figure. This shape here starts
to look like a shoulder. This shape here
almost starts to look like fabric of a shirt
coming over the chest. Now, this shape here appears to be a little
too big to be an arm, so I'm going to make this
shape a little smaller and de emphasize all of the
shapes coming down here. This way, I can focus more
on the part of it that seems to have the shape
and proportions of an arm. This piece of paper here, I can include it just a
little bit, but again, I'm going to de emphasize it so it does not
take center stage. So again, this line here, I'm just going to
draw very lightly. So hopefully, you can
start to see what I mean by finding a
balance between the technical
information we find in the paper specimen and the more figurative qualities I'm focusing on in the drawing. So now I'm going to put a little more detail into
this form for the head. So this shape here
almost appears to be the divot we would find near the eyes and
right above the nose. It almost looks like a
bit of a face shape. I'm going to pull this form
out in the back just a little bit to give it more of
a head like proportion. Once again, I'm not inventing, but I am exaggerating
the figurative elements. So I'm going to include
just a few more of the technical elements
in the drawing, just a few more of these folds, just to add some dynamism and some visual interest
to the drawing. The last thing I want to
point out here is how this initial gesture line is still detectable
in the final drawing. You can really see
how that gesture line informs many of these
contours of the figure. After doing this quick sketch, I feel much more prepared to do a more finished drawing of
this paper specimen later on. Now, as I'm wrapping this up, I want you to compare my paper specimen
to my quick sketch. They are not exactly the same, but they are incredibly similar. But here, I've just pulled out the more
figurative elements, so the drawing seems more alive. And this is the
kind of drawing I'm going to ask you to do today, quick sketches that emphasize the figurative qualities
of your paper specimens. So I wanted to take a few
minutes and show you some of my other sketches
of my paper specimens. Again, I only sketch the most
figurative paper specimens. I've really tried to make
this figure appear as if it's a leaning back
and pulling something. We really feel this sense of pulling that goes through the
arm and into the shoulder. I wanted to emphasize this leg coming back and supporting
the pulling motion. In this next paper specimen, we can see a figure
that appears to be running or in some
other kind of stance, but we see this
leg extended back, this leg projecting
forward and bent. We can see here the shape
of a head that has hair or perhaps some kind of
headdress extending back. Now, this figure does not
appear to have any arms, at least not in this sketch. Next, we have a figure
that appears to me to be in some kind of robe. This figure appears
to be wearing a headdress that extends back. I tend to see a lot
of these headdresses in these paper forms. Here we can see an arm
coming forward and down. And here we see the robes widen before they come and hit
the flat ground plane. Once again, we can
see some indication of a mask or a face. Here we see two figures. I really like this figure. This figure appears
to be in a twist. The legs we're seeing
in a side view, but the torso appears to
be twisting towards us, and to me, this shape for the head makes it appear to
be looking this direction. And here we see a hint of an arm extending out
toward the right. So here we see a figure
that appears to be lunging. This could be interpreted
as an arm, but to me, it almost looks like
a wing extending from the back of the torso. Here, of course, is the
front of the head, again, with some kind of headdress
coming off of the back. So hopefully, these
quick sketches give you an idea of what
we're looking for. To me, these drawings
start to look more like figures than
crumpled pieces of paper. My goal was to really showcase
the figurative aspects. So hopefully now
you have a sense of how you can approach
these quick sketches. As always, you do not need to
do it exactly how I do it. You are free to
make your own kinds of decisions and explore your paper specimens however you feel most inspired to do so. We're trying to find a balance between depicting the
crumpled paper in a believable way but focusing on the more
figurative aspects. These don't need to be
realistic drawings. These quick sketches are an
opportunity for you to show what about these paper specimens looks most figurative to you. Now, while you're drawing, I encourage you to ask yourself questions about your
paper specimens. Do they seem to have an age, a gender, any
personality traits? Do they seem to be engaged
in a particular activity, dancing, fighting,
flying, falling? What does the body language tell you about these
paper entities? Remember, you want to be
open to these experiences. You want to go in assuming
that there is meaning here, and you want to fully
experience that. So at this point,
I would encourage you to begin asking yourself, what does it mean
that you interpreted random information in
these particular ways? What is your mind trying to tell you with these
interpretations? What can you learn about yourself and how you
process information? Your ultimate goal with
these quick sketches is to familiarize yourself with your paper specimens
and discover what about them makes them appear
lifelike or figurative to you. You can even try and draw
the same specimen in different ways to see if you can tease out more
figurative aspects. And as always, feel free to experiment and to make
this project your own. The most important
thing is that we are here to have a
creative experience. So now it's your turn.
Go do quick sketches of the paper specimens that you
found to be most figurative. And as always, if you want a
more immersive experience, I recommend doing some writing about these paper specimens. Take some time and
write a paragraph or two about each of
the paper specimens, their characteristics,
their personalities, their physical attributes. Writing about them
will help them become even more alive and
meaningful in your mind. All right, go do
your quick sketches, and I will see you back here for the fourth part of this
project where we are going to start final drawings
of our paper specimens.
6. Crafting Finished Drawings: Welcome to the fourth part
of the PeradoliaPject. In the previous video, we did quick sketches to familiarize ourselves
with our paper specimens. We explored what made
them appear to be figurative and practiced emphasizing those
living qualities. Now, in this part
of the project, we're going to take
everything we learned from our quick
sketches and apply them to more finished drawings that appear to be
more thoughtful, more detailed, more
expressive, and more resolved. So today we're going to explore some essential
concepts that will help these drawings
appear more finished. We're going to
explore line quality, composition, and sense of place. Line quality refers to the different kinds of
lines we use when we draw. These lines can
be light or dark, thick or thin, hard or soft. We're also going to explore composition, and in particular, we're going to see how placing our paper specimens on different parts of the page
may impact its meaning. And finally, we're going to
talk about sense of place. We don't want these
paper specimens to appear that they're just
floating in a void. We want to give them
the sense that they're occupying a particular
environment, even if that environment
is just hinted at. So before we get to
today's demonstration, let's go over materials. Because this is going to be a longer, more finished drawing, I encourage you to use high
quality archival art paper. I'll be doing my drawings
on Canson metiens paper. Each side of a piece of Canson paper will have
a different texture. I'll be drawing on the
smooth side of white paper, but you don't need any special materials for this project. If you have access to high
quality drawing paper, great. But if not, you are welcome to use whatever materials
you have on hand. I'll be drawing with my
most common drawing pencil, a black Lyra
Rembrandt poly color. And, of course, it
never hurts to have a new eraser and
a drafting brush. So now that you have
a sense of materials, there's one more idea
I want to share with you before we get to
today's demonstration. You'll notice that
my drawings of these paper specimens contain little or no light and shadow. These are line drawings. I'm not rendering light. I'm creating these drawings
with line quality alone. When I first started
this project, I tried out many different
ways of drawing. And my initial drawings of these paper specimens did
include lighter shadow, but I felt this made them
look almost too solid. By stripping away the
light and shadow and crafting these drawings
using line quality alone, it gives them a much more
apparition like appearance, which I think is very
appropriate for this project. So now let's head to
the drawing board where I'm going to
demonstrate how I approach my drawings of these individual crumpled
pieces of paper. So here you can
see I'm all set up with my paper specimen pinned to my foam cord board on the left and my white drawing
paper on the right. The first thing I want to
think about is composition. This arm appears to me to be
outstretched as it pulls. So whatever this
figure is pulling is going to be to
its upper left. This means that I'm going to place my figure on
the lower right. I want to leave some room
on the upper left to imply that there's something up there that this
figure is pulling. Now, again, I'd like
to remind you that this is all my interpretation. None of this information is innate in this crumpled
piece of paper. These crumpled paper
specimens are random. We get to choose how
to interpret them and how to communicate
our vision on paper. So I'll begin with my gesture. As I would with a
regular figure drawing, I'm going to begin
very, very lightly. I'm going to focus on the largest shapes
and dynamic forms. To me, this figure appears to be captured in mid movement, so I want my lines to help
communicate that movement. Now, it's very likely
that at this point, these lines are just
barely visible, and that is okay. I'll darken these
lines later on. Here's an indication
of the figure's head. This part here appears to be a shoulder, perhaps sticking up. And here is the arm reaching
out as it pulls back. As the figure begins
to take shape, I can get a little more specific
with my lines and marks. And you can see that
I'm starting to draw with slightly darker lines. At this stage, I'm not yet
using any very dark lines. The darker lines will come once I've captured the
more basic forms. I want to make sure
I've solidified the subject before I start
drawing with darker lines. It's so interesting to me the information that
starts to emerge. For example, this point right
here can almost stand in for a kneecap pressing from underneath what
appears to be fabric. This tight curve here almost appears to represent
an ankle of the foot. Now, of course, not every crease or fold will
be meaningful, but I do think it's rather
fascinating that some of them really do appear to stand in for specific
anatomical features. Remember, the more time we
spend with these specimens, the more specific and meaningful the
information will become. So here you can see that I've
emphasized the lines and the visual information that support the idea
of an arm pulling. But of course, up here, we have all of
these other lines. I rarely edit out
information entirely, but I don't need to
emphasize those lines. I can draw them lightly. This is how I tend
to compromise. I want to create honest drawings of the information that's
contained in the paper, and yet I want to push
the vision of a figure. So this comes down to emphasis. Anytime I want to
emphasize something, I can use darker, harder lines. But if I want to de
emphasize something, I can still include
the information, but I'll draw it with light, soft lines that tend to
fade into the background. And as I've mentioned before, I'm also very comfortable
altering proportions. I don't alter proportions much, and I'm not making up
visual information. Right here, you
can see that I've enlarged this
portion sticking up. To me, this starts to
look like a head that's sticking up behind
a large collar. By slightly increasing the
size of this area here, it makes it look
more like a head. Now that I'm looking,
this curve right here almost implies the
muscle of the thigh. And down here, we
have some lines that stand in very well for fabric
covering a calf muscle. This is what's so incredible
to me about this project. The more I look, the more the
lines seem to gain meaning. It's absolutely fascinating to me how much the
brain can start to populate and bring to life
random pieces of information. This point here is starting
to look like a pointed toe. This here starts to
look like the heel of the other foot as it grinds
into the ground for support. The more time I spend
with this figure, the more it seems to
come alive in my mind. This truly is a testament
to how creative our minds can be if we give
them the right opportunities. So at this point, we've
talked about composition. We placed our figure
on the lower right, so it appears to be pulling
something on the upper left. We've talked about
gesture and capturing the overall movement and
action of this figure. At least, to me,
this figure really starts to look like
it's pulling something. We've talked about emphasizing the anatomical features that support our vision
of the figure. I've been using darker, harder lines to emphasize certain information and lighter softer lines
to de emphasize. Now I'd like to introduce you to another way we can
use line quality. As I'm getting more specific
with these paper forms, I can use line quality
not only to emphasize, but to show tension and release. In the areas where the
paper seems to be twisted, folded or contorted
with the most force, I like to darken the lines. I think this really starts to communicate the twists
and turns of the paper. Right here, for example, we find that the paper is
really twisted and contorted. So I can use darker lines to
really emphasize that idea. Areas where the paper
tends to relax more, I can use lighter, softer lines. Here, for example,
where the papers just folded a little bit, I can use these
light soft lines, so I can include
the information, but they're not going
to take center stage. Other areas where
the paper seems twisted and contorted quite
a bit would be right here. So I'm going to emphasize those folds and contortions
with dark heavy line. As the paper relaxes
as it gets further away from these epicenters
of folds and twists, I can use lighter, softer lines. Now, of course, this is
not a strict system. It's just a way of
varying line quality so we can bring dynamism
to our drawing. I don't draw every forceful
fold with dark lines, nor do I draw every relaxed area with lighter, softer lines. It's just a guideline. Ultimately, our
goal is to create beautiful drawings that
appear to be lifelike. Often I use my
intuition to figure out what lines to darken and
what lines to lighten. And in every drawing,
the solution seems a little different. Another way I'll
use line quality for emphasis is
if I want to pull something to the foreground or let something else fade
into the background. You can see that quite
clearly with the arms. Here, this appears to
be an arm in front. But with this line
being so light, it appears to be an
arm further back. So all over, you'll
see me emphasizing certain pieces of information while de emphasizing others. This information at the
end of the arm here appears to imply a bit
of a hand or fist. But rather than draw the
entire length of it, I'm just going to
emphasize the ends. To me, this gives it a
more hand like appearance. And I can see a hint of perhaps another hand
coming up right behind it. So at this stage, the drawing
becomes all about emphasis. What pieces of information
do you want to emphasize? What information do you really want your viewers
to take notice of? And, of course, what information do you want to de emphasize? What information do you not want to be as a
parent of viewers? So, hopefully,
this has given you a sense of how to
approach these drawings. There are just a couple more
things I'd like to address. First, we can give
the illusion of grounding our figure
on a ground plane. So here you can see
I'm using lines to emphasize where the feet would come in contact
with the ground plane. I can even put in a hint of shadow to really
create that illusion. Again, I'm doing
this very subtly. I can also create a
sense of place by adding a simple horizon line
or other visual information. So to do that, I might grab another piece of crumpled
paper as a model. I might take a look and
draw very simple folds of this new piece of
paper just to give a hint that there's
some kind of landscape. This particular piece of paper, which I just grabbed at random, almost starts to communicate a mountain range
in the background. I think that's
pretty interesting. Again, we don't need
much visual information. We just need enough to
imply a sense of space. Now I'm going to continue
to work on this drawing. I'm going to
continue to look for the pieces of information that I really want to emphasize. We'll check back in
with this drawing once I've done a little
more work on it. But my strong hope
is that my vision of a figure that is pulling something is really
beginning to appear. So here is where this
drawing stands right now. I may go back into it later and finesse some of
the line quality, but I think this is
starting to work. I think the figurative form is really coming through
as well as the action. First, I want to
call your attention to the overall gesture. For whatever reason, this
figure seems male to me. We really feel this
figure pulling. I've added a few
lines and marks to suggest a rope or something
else that he's pulling. I created this by grabbing
a random piece of crumpled paper and following
the contour of one edge. These paper forms hint at hands, and we can see where these hands are grabbing and pulling. The figure is leaning
back as he pulls. We see one leg coming forward. We see the other leg first come down and then jut backward. This form here hints at ahead. There's a slight cinching
here as if this were a waste. The way I drew the line quality made this part of
the paper appear to be the arm closest to us and
this arm being further away. I ghosted in just a hint of crumpled paper to create a
mountainous horizon line, and I've anchored this
figure to the ground plan by giving just a hint of
shadow under the feet. Hopefully, my vision of this figure is starting
to shine through. So at this point, you should
have a sense of how to approach drawing an
individual paper specimen. So now it's your turn. I want you to do drawings of
individual paper specimens. For now I only want you to draw one paper specimen on
each sheet of paper. Later on, we're going
to start to combine multiple paper specimens
into a single drawing. But for now, let's just
focus on individuals. Now, I want you to think of these drawings as
portraits of people, not merely drawings of
crumpled pieces of paper. Your goal should be
that when somebody else views your drawings,
they don't see paper. They see a figure. You want them to
see the specific figure that you conceived. Now, of course, this is a
very subjective project, and to some degree, this goal is impossible
to achieve in every case, but this should be your
driving motivation. You want to approach
these drawings more as figure drawings than as
drawings of a still life. Now, I know that some
of you may only have a single paper specimen
that appeared figurative, while others may have many, but I want you to
do one drawing for each paper specimen you selected that appeared
figurative to you. Of course, you will
start off by drawing from observation,
but at some point, feel free to put
the paper specimens aside and just work with the
drawing in front of you. That's your opportunity
to really start to pull out the figurative
qualities of your drawings. The paper specimens should
be a starting point, but the end point should be your vision of the particular figure
that appeared to you. And as always, while
you are drawing today, I want you to think about
who these entities might be. Why did you see these
particular forms? What does this tell you about
where you are in your life, about how you think
about things? What stories are these
figures a part of? What are these entities trying to tell you
about yourself? Remember, in
reality, you're just drawing meaningless
crumple pieces of paper. All of the figurative qualities, all of the associations
and ideas that are coming forward are entirely
invented in your mind, and I choose to believe that
this could be meaningful. And as always, you
can enhance and deepen your experience of this project by
writing about it. It could be about the individual paper figures that
you're seeing. It could be about
stories that they imply. It could be about the thoughts, memories and emotions that
come up while you're drawing. Part of these kinds
of creative projects is going deep and allowing yourself to experience the full breadth of ideas. If you're going to do
a creative project, why not go deep? Allow yourself to
experience it fully. Delve deeply into the emotions and ideas this
project brings up. In my experience, this is what being creative
is all about, being open to these experiences, even if at times they seem
strange or unsettling. But as someone who's done
a lot of these projects, I can tell you, it is
absolutely worth it. These kinds of projects have benefited not just
my creative life, but my personal life as well. So now, go do your drawings of your
individual paper specimens. I will see you back here for the fifth part of
the PeradoliaPject, where we are going
to begin to combine multiple paper specimens
into a single drawing.
7. Further Explorations: Welcome to the fifth
and final part of the ParadoliaPject. So far, you've created more finished drawings of
individual paper specimens. In this lesson, you're
going to combine multiple specimens into
a single picture plane. By combining your paper
specimens together, you'll be able to
explore new meanings. These paper specimens will seem to interact
with one another. These combinations can
suggest situations, narratives, or even stories. To me, this is when this
project really comes to life. Each figure in an
image will be in relationship to every
other figure in it, whether you only have two
paper specimens or several. And beyond figures,
you can also include paper specimens that remind
you of other objects, architecture, vehicles, anything that you see when you look at your
paper specimens. Remember, this is a
creative project. The goal is not simply
to follow my rules. The goal is for you to have
a creative experience, so feel free to experiment and explore with your
paper specimens. Now, for this part of
the project to work, you are going to need a minimum of two paper specimens that are either figurative or remind you of some other
kind of object. You're first going to create a single image that combines
multiple paper specimens. After that, I'm going to
encourage you to create as many drawings of
these paper specimens as seem meaningful to you. But our first goal is to
figure out how to combine multiple paper specimens
into a single picture plane. The first thing I'd like
you to do is gather all of your figurative
paper specimens together. Lay them all out on a surface and just take a look at them. Ask yourself what
paper specimens might seem meaningful or
interesting to combine. I want you to select only two, bring them together
on a flat surface, and start to arrange
them in different ways. Even though you're only starting with two paper specimens, you can arrange them in
many different ways. You can turn them around. You
can raise them up and down. You can place them close to
one another or far apart. The goal is to look for some combination
and arrangement of these paper specimens that seem meaningful or
interesting to you. And remember, you don't have
to understand the meaning. It just has to seem
compelling in some way. The more you engage in
these creative projects, the more familiar
you will get with this feeling that
something is working, that something here
is compelling, even though you may not
be able to explain it. Trust that feeling.
Those are the kinds of moments we are looking for
during creative projects. Once you feel like you've
explored a single pair, try another pair
and then add three or maybe even four paper
specimens together. Keep combining them in
different ways until you find unique and
compelling combinations. Some paper specimens may appear
friendly to one another. They may appear to engage
one another in conversation. Some of them may
appear to dance, while others may
appear antagonistic. They may appear to fight or otherwise argue
with one another. Once you find some
compelling combinations of these paper specimens, it's time to create some
simple composition sketches. Before beginning a
more finished drawing, I recommend doing a number
of compositional sketches. These compositional
sketches will help you figure out how you want
your picture to look, how you want to compose your paper specimens
within a picture plane. Even if you've only selected
two paper specimens, there is still a
near infinite number of ways to compose them
in the picture plane. When I create my
compositional sketches, I tend to do them in a sketchbook
using a ballpoint pen. My goal here is to simply
explore the composition of the paper specimens on the page and their
relationship to one another. I keep these
drawings very simple and include very little detail. Now, when I create
these sketches, I often use composition grids. I'll either use a grid that divides the picture
plane up into thirds, both horizontally
and vertically, or I'll use a grid based
mostly on diagonals. To create this grid,
I tend to draw a diagonal line from
corner to corner. Next, where those
lines intersect, I will draw a cross with one vertical line and
one horizontal line. Finally, I will connect
the ends of the cross. This creates a diamond in
the center of the page. You can use the lines and intersections of either of
these composition grids to help place your figures in an interesting and
aesthetically pleasing way. But these composition grids
are completely optional. You are not required
to use them. For this project, we are much
more focused on creating meaningful and
compelling images than images that are composed in
any particular kind of way. We want to prioritize
the position of the paper specimens in
relationship to one another. Now, I find that these
combination drawings work best with two or three
paper specimens, but I've created
drawings that include five or even more
paper specimens. Remember, it is
entirely up to you. I just want to give
you one more note before we explore more
finished drawings. You are more than
welcome to change the scale of your
paper specimens. If you think one paper
specimen should be much bigger or
smaller than another, even if they don't appear
that way in reality, you are welcome to
change the scales. Remember, the goal
here is not to produce hyper accurate drawings of
crumpled pieces of paper. The goal is to create meaningful drawings
that appear figurative. Use any tools you want
to to achieve that goal. Remember, this is a
creative project. There are no wrong
ways to engage it. Now it's time for you to create your first finished drawing
of multiple paper specimens. When you're ready, select
one of your compositions and begin to draw it on high
quality drawing paper. You're welcome to create your finished drawings at whatever size seems
appropriate to you. My drawings tend to range
from about eight by 12 " all the way up to
about 18 by 24 ". When you're creating your
finished drawings, remember, you can use all of the
drawing techniques we explored in previous lessons. Vary your line quality. You should have some aspects of these drawings
created with dark, sharp or heavy lines, while other parts of the drawing can be created with very soft, hazy, almost vaporous lines. Some areas of your paper
specimens may appear solid, while other areas may
appear transparent. And just like we did with your drawings of individual
paper specimens, you can create a sense of place by adding value
in the background, a horizon line, or even indications of some
kind of environment. So now, I'd like to take
you through some of the variations that I've done with this project
over the years. When I started this project, I was creating very
small drawings of these paper specimens. Many of these drawings
were approximately the same size as the paper
specimens I was drawing from. Shortly after that, I started creating very large drawings, the largest of which were five feet high and
eight feet wide. Next, I experimented by creating
drawings on wood panel. I did this by first adding
gray and white gesso to create a textured background. Now I do think the
drawings done on white paper do have a
certain beauty to them. However, I started to get
this strong sense that these entities
needed to appear to be emerging out of
a dark background. Now, I have experimented doing drawings on dark
paper with white pencil, but I just wasn't getting
the effect I was hoping for. When I work on these
more creative projects, I often digitally manipulate
the final images. This is not something I tend to do with my traditional work, but with the creative projects, I really open the doors. So I photographed the drawings, brought them into my computer, and started to experiment
with the color and contrast. By first creating the
drawings on white paper with black pencil and then
inverting the values, the lines started
to appear to glow, and the dark background really
took on a beautiful depth. This also started to
give the appearance of these figures and forms
emerging from the darkness. So by digitally manipulating
these drawings, I was able to get much closer to the vision I was looking for. But the black of the background still seemed
to me a bit too harsh. For whatever reason,
I kept envisioning the dark background
as a deep blue. So I began to experiment with
different colors of blue. And finally, I
arrived at a version of blue that just seemed
right for this project. When experimenting with these
more creative projects, I really tend to
work intuitively. I don't plan as much as I do with my more
traditional work. This intuitive way
of working often leads to immediate
decisions being made, and I often don't know why I'm making these decisions or why certain ideas or ways of
working seem so compelling. So I've done this project
for many years now, and this is one of the reasons
I keep coming back to it. Working on these more
creative explorations feels completely different
than working on more traditional drawings. I really love just
following my intuition about not always knowing what's going to
happen in a drawing. So even after all
of these years, these drawings still seem
very mysterious to me. These are some of the only kinds of
drawings that I really get that sense that I'm looking
at someone else's work, despite the fact that
they are deeply personal. Truth be told, I
really don't know how people are going to
receive these drawings. They are so different from
the work I usually create, or at least the work
that I share publicly. But there's something
about these drawings I find so fascinating, both in the process of creation
and in the final results. I find them haunting. To me, this project is right
at the intersection of more traditional
realistic drawing and creative experimentation. Now, for those of
you who are more interested in realistic
or traditional drawing, I urge you not to write off
creative projects like this. If you are studying
drawing of any kind, but you are not engaging
the creative side, then you are limiting
your capabilities. Studying only the technical
side of drawing and not the creative
side is kind of like having a computer but not
hooking it up to the Internet. To experience the full
power of drawing, you must engage both the technical and the
creative sides. Well, thank you so much
for joining me here. It is truly an honor to be part of your drawing experience, and I truly hope that you've gotten something
out of this project, even if you're not
participating, hopefully, this project has
opened your eyes and your mind up to
new ways of drawing.