Transcripts
1. Introduction: If you want to become a U R ux designer, you are in the perfect place. Thes complete course will teach you all of the essentials with, well organized, an easy to follow tutorials. Hi, my name is a rash and I'm a UX designer. Together, you and I are going to learn how to become a user interface designer using the software sketch Thes course has been designed for people completely new to your UX design or let's say design in general. At first we're going to learn about the design basics and you elements, and then we will learn about sketch map and all of its hidden secrets together. Then you will learn how to create a simple wire frame. From there, you will learn how to set up your Stein guide and how to apply your colors appropriately to your design. You will also learn about all the principles off mobile application and Web design, then reveal a redesigned the Instagram at as our first project from scratch, and then we will design a finance some together, and I would share with you all the necessary techniques and secrets for designing a world class application. Moreover, you will learn about both simple and advanced micro in directions. We will also talk about mark ups and how you can create your own online portfolio without writing a single line of code. In addition, you will learn about three D modeling and creating augmented reality scenes. And last but not least, you will learn how to start your own business and get your first client as a UX designer. So during the scores, we will design to complete mobile applications and one website to develop your design skills and master all the necessary tools. Additionally, you will get access to two brand New York eats worth more than $3000 you can use them in your commercial projects. So I hope you're ready to learn new skills and become a user interface designer. I see you in class
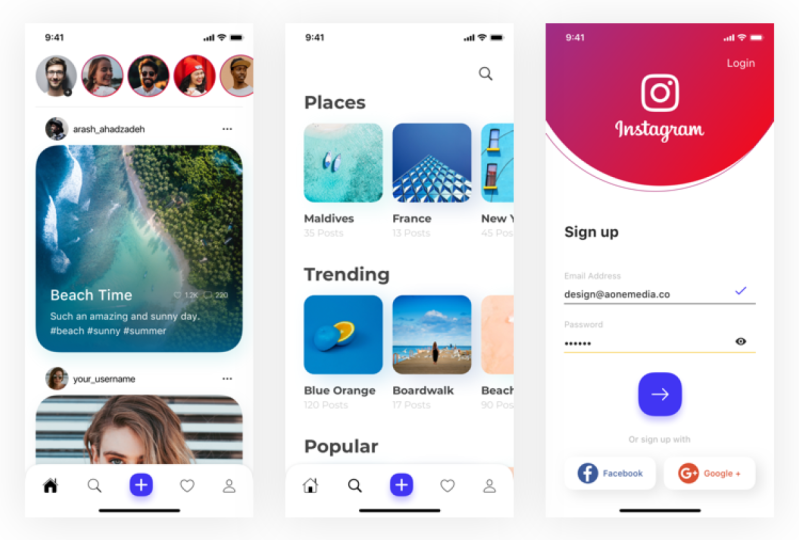
2. Introduction to UI/UX: Hi, everyone. Welcome to the first chapter of these course In these section, we're going to be talking about the differences between you, I and UX design and the course structure that you can understand how the course is organized in order for you to follow it up properly. And last but not least, we're going to be talking about the tools and requirements that you need to know to proceed the course. So without further ado, let's get started. First of all, I'm going to talk about the differences between you I and UX design. Although both elements are crucial to a product and work closely together, their roles are totally different. Your ex design is a more technical and analytical field. However you I design refers to graphic design with more complex responsibilities. So let me give you an example. If you consider a product like a car, the chassis is the code, which gives it a clear structure. The other parts, such as doors, full filter etcetera, represent the UX design, which lets the car function properly. On the other hand, you ideas nine represents the appearance of the car. It's sensors, etcetera. In other words, you X, which stands for user experience, is about how a product should work. And you I, which stands for user interface, is about how a product should look. So you, as a product designer, should know how these two terms work together and how to distinguish between them. For instance, you should know what are the responsibilities off a UX designer. And on the other hand, what are the responsibilities off a U I designer? As you can see in the pictures, we have two different screens. The left one shows us how the product should work. For example, suppose that you have a screen with two buttons and to text fields. Okay, the U X shows us how these buttons should interact with the user, and the right picture is all about user interface, and it shows us how the product should look. For instance, here we have a button and a square. The your eye designer decides how big this button should be or which color is suitable for that square. These are the you I designer responsibilities. All right, thank you so much for watching this video. And I will see you in the next video
3. Course Structure: Hi, everyone. In this video, we're gonna be talking about the structure of the course. As a matter of fact, you can divide the course into two main sections. The theoretical part and the practical part. The theoretical part creates 10% of the whole course, and the practical part forms 90% of the course content. So instead of focusing on theories, we will focus on practicing the skills you learn by working and different kinds of projects . In the theoretical part, you will learn about design basics, your elements, business ideas at Centra. And in the practical part, we will design different mobile applications landing pages. And also we will talk about wire framing prototyping, three D modeling logo design and so much more. So if you're a complete beginner, I highly recommend to watch the theoretical part first and then proceed with the course. On the other hand, you can skip the theoretical part and jump into creating a project. All right, guys, thank you so much for watching this video. And I will see you in the next video.
4. Required Tools: Hi, everyone In these video, we're gonna be talking about the require tools for completing this course. In these course, we're going to use different graphic design tools to design world class user interfaces together. The main suffer which we're going to use is called sketch, which is only available for Mac OS. Therefore, if you do not have a Mac OS device, you may not be able to learn the practical parts. The other tools that you will learn about our invasion studio and adobe for the shop. We will also talk about useful websites such as dribble be hands, etcetera. If you don't have any of the above mentioned suffer, make sure to install them before starting the course.
5. Introduction to Design Basics: Hi, everyone. Welcome back to another section of thes course. In these chapter, we're gonna be talking about layouts, iconography, typography, colors, composition and so much more. If you want to become a professional and great, you are ux designer. You need to start off with design basics. So now that you know the importance of knowing design basics, let's start thes chapter.
6. Layout: Hi, everyone. In this video, we're gonna be talking about layouts in design. When it comes to you are UX design. The way we show the information in a nap or website is so important. As a matter of fact, there is not a specific right way to create your own composition, so you can easily create a layout based on your own need, as long as it is consistent and understandable to users. As you can see in the pictures on the right, both screens are well designed. Although the spacing is different, the composition is absolutely clear and consistent. You need to pay attention to consistency a lot. While you're designing a user interface, no matter what kind of platforms you're designing for the same rules, apply to all of them. All right. Now let's check these pictures out as it can see in the Left picture that the senses are quite consistent. For instance, if you look at the distance between the profile image and the top of the screen, you can realize that the value is 50 pixels and also the D since between the same profile image and the text field right under that is again. 50 pixels. As you can see, the layout of this design is quite clear. And the reason of that is because of the consistency of spacing. In the next lectures, we will also talk about spacing and the importance of that in design. Now, if you look at the right picture, you can realize that the design is also clear. In that layout, However, the only difference is the colors and the spacing. But as you may have noticed, the spacing is again consistent. All right. Thank you so much for watching this video. I will see you in the next video.
7. Visual Hierarchy: Hi, everyone in these video, we're gonna be talking about visual hierarchy. Visual hierarchy is about how we look at designs. Does it sound? Were. So let's put it in another way. We, as designers, should put ourselves in users shoes in order to realize how they see our designs. Content in any digital page layout will pursue a particular hierarchy. For instance, menus go to the top bottom left or right of the screen, or a combination of these headers appear above body tapes. In other words, hierarchy is a simple way of staying organized from most to least important. Remember that users defined hierarchy of any app or website. The item that first grabs the user's attention is at the top of the hierarchy. The visual specifications that the designer can utilize to influence users, understanding of the information, our size, the larger the element, the more attention it will attract. So if you're familiar with the HTML and what development process, you may know that we have six kind of headers from H one to H six. H one is the largest header, and H seeks is the smallest on. So when we want to get so much attention. We will use each one. For instance, suppose that we want to get the user's attention to a specific section or specific item, so in that case we will use the larger header. Or on the other hand, sometimes we don't want to get so much attention to a specific section or content. In that case, we can use the smaller header so size is so important. The next item is collar. Bright colors are more noticeable than muted ones. If you do not have enough information about colors, you don't have to worry about it because in the next lessons, we will cover all the necessary information about choosing the right color in your design. The next item is alignment. An element with a different alignment of others will attract more attention. So what does that mean? Suppose that you have a layout off, Let's say, four different videos or four different photos. If you align Onley one off those videos or those photos differently, it will draw more attention to it. As a matter of fact, in that case, the user can realize that something is different. The next item is contrast. Sharply contrasting colors will catch the eye easily. Contrast is a very, very important topic in you I design, and we will talk about contrast in next lessons. Deeply. The next item is proximity Elements, which are placed closely together, appear more related. And that's true. If you look at the pictures on the right side, you can see we have two different screens. Let's focus on the left screen. As you can see, we have two different sections, new promotions and new stories. Can you realize that elements in both sections are placed closely together so that users can easily understand that they're related together? The next item is repetition. Repeating styles can indicate that content is related. So what does that mean? Let's look at the pictures on the right. Can you see that we have four squares at three circles, so the user can easily recognize the relationship between those elements. And the next item is white space, which is another important term in ur ux design. More space between elements will draw more attention to them, so let's look at the pictures on the right. But this time we need to distinguish between the left screen and the right screen As you can see in the left screen, we have enough space. Or let's say, enough whitespace between our elements and our sections so the users can easily wife through the user interface. However, on the right screen, you can see that all elements are very, very close together. And there is not enough white space between all elements in that kind of layout. All right, thank you so much for watching this video. I hope you enjoyed it. And I will see you in the next video.
8. Visual Noise: Hi, everyone. In these video, you're gonna be talking about visual noise in design. Visual noise, as you can guess from its title, is all about a screen or part of a digital product, which has so much information and many elements on it. When you're designing an APP or a website, you need to pay attention to details a lot, because by the end of the day, we want to design a screen which is user friendly and easy to walk through. So make sure to eliminate all the unnecessary elements or information from your screen. If you're not sure whether your design has video noise or not, it is recommended to ask for users feedback. If you look at the pictures on the right side, you can see that we have two different screens in the left screen. There is no visual noise, and it is great in terms of you I design. On the other hand, in the right screen, there is too much visual noise. As you can see, there are so many text at the top, and then some items, which could be videos or photos than again some videos. And after that, some stories and you can recognize that there is not enough white space between those elements. Thank you so much for watching this video. I will see you in the next video.
9. Iconography: high in these video, we're gonna be talking about iconography in design. Iconography is a visual language used to demonstrate aspects, contents or functionality. Arkan's are meant to be simple and clear visual elements that are recognizable immediately . You do not have to redesign well known icons such as home icon, search icon, etcetera or, let's say, do not reinvent the wheel. You can get access to almost all kinds of icons on websites for free or ads reasonable costs. But what if you need it to design some icons specifically for your project? Well, in that case, you should design icons, which are in harmony with your design and other icons. Keep in mind that icons need to be understood easily by users, so make sure to show consistency in your design.
10. Typography: high in these video, we're going to talk about typography. What is typography? Typography transforms language into a decorated visual element. Typography is one of the most important parts of you are UX design, so it is worth your time to learn more about it. When you're designing an app or a website, limit the number of typefaces and sizes you use in order to keep your design simple. Start B two funds at most, one for the headers and the other for the bodies. You can use free or paid funds in your projects, but I highly recommend using free funds. If you will like to use paid funds, check the license carefully. You should inform your clients that they need to pay extra for using paid funds. Now, if you look at the right side of the screen, you can see that I classify the typography foundation for you. Let's check it out. Step by step. Right at the top. We have properties. Every text line in any program has a base line. As you can see, it is indicated here with the blue line, and also it has the letter spacing that you can modify it in your design off course. There are more properties related to typography, however, for proceeding T scores, it is enough to know these two properties. Now let's focus on letter spacing comparison on the left, you can see we have the default spacing. But on the right, I modified the spacing off those letters. Depending on what kind of project you're working on, you can modify the letter spacing as you wish. Now let's talk about the weight off each fund. Most funds have at least three different weight, but some of them have more. For instance, the fund can have six different ways. As you can see on your screen, we have here from light toe, bold and last but not least, declassification off fonts. As you can see, we have two different classifications for funds. The serif, which is the left one in the picture, and the Sand Saref, which is the right one. The picture. So what is the difference? For sure, you can distinguish between them, but let me explain to you in order to memorize the rule off serif and sans serif. Actually, Sarah funds have some kind off flat line at the top off them and also the bottom off them. Or you can say they have feet. On the other hand, sensory fonds do not have this kind of lines. Sands in English and French means without so sans serif means without serif. You as a designer are responsible for choosing the best wave of funds and also the best classifications depending on what kind of project you're working on. Thank you so much for watching this video. I will see you in the next video.
11. Color Contrast: Hello, everyone. In this video, we're going to be talking about color contrast, which is a very important topic when it comes to you I designed. Applying colors effectively is a skill that everyone who works it, visual compositions must have so you, as a your designer into know how to use colors in your projects. When it comes to applying colors, readability and legibility are the key factors. Researchers have shown that vibrant colors enable enough of contrast, helping to increase readability and legibility. Please take into consideration that too much color contrast make us difficulty in reading. I highly recommend that designers should create a meat level of contrast and for highlighting elements they can use high contrast ing colors. You can also use websites to provide you with a ratio when comparing two colors to see whether there is enough contrast or not. If you look at the examples under right, we have six different colors. As you can see, the 1st 4 are acceptable and have enough contrast, but the others are not readable. So when we're designing a user interface, we need to pay attention to callers a lot because sometimes you as a designer, I want to be as creative as possible. However, creativity should come after readability and legibility
12. Color Pallete: Hi, Ron. In these lesson, we're gonna be talking about color palette. Creating a color scheme for product might seem like a hard task, especially if you're a beginner. However, in reality, it's not as complicated as many designers think. What is the color scheme you are? Color scheme is a mixture of colors used in your user interface. Almost every color scheme contains the falling groups of colors. Primary colors, secondary colors, accent colors, neutrals, semantic colors. What are the primary and secondary colors? Primary and secondary colors are the base colors of your user interface. The colors, which are used most frequently in your you I design, are called primary Colors. Most designers usually choose brand colors as primary colors. As a matter of fact, it's recommended to have no more than three primary colors. Optionally. You can use secondary callers in order to distinguish your products and make more interesting you. I designs all right, but how to choose colors properly When you're working with colors, you should not create a combination of random colors because the result would not be the one you expect. In order to understand how to work with colors. First, you need to know what the color will ease and how it works. Here are important color combinations you need to know complimentary, which are two colors that are on opposite sides off the color with, and the next one is monochromatic, which are three shades, tones and teens of one based color. And the last one is analogous, which are three colors that are side by side on the color wheel. If you look at the right side of the picture, you can see that we have a color will here. As you can see, we have monochromatic. For example, if you look at the red, we have three different shades or, let's say tens of one based color, and also we have complementary. For instance, here we have purple and yellow, which are on opposite sides off the color with, so the combination of these colors is great
13. Spacing: Hi, everyone. Welcome back to another lesson off these course in this video, we're gonna be talking about spacing in design. Consistency plays a key role in you. I design. So when you're designing, you need to measure everything and keep it consistent. As a designer, spacing is up to you. But once he said it, you need to use the same spacing patterns in your designs. For instance, if you said the spacing between the header and body takes to eight pixels, you should always use the same spacing throughout your project. As you can see the picture, all the spacing has been measured accurately and makes the design clear. For instance, if you look at the picture, you can see that we have 50 peak cells from the top to new pictures title and then eight pixels from new pictures to the top off subtitle and going on and on. So in order to keep your design clear, make sure that you use consistent spacing patterns throughout your project.
14. Composition: Hi, everyone. In these video, we're gonna be talking about composition in design. What is the golden ratio? The golden ratio is a mathematical proportion between the elements of different sizes, which is thought to be the most aesthetically pleasing proportion for human eyes. The golden ratio equals 1 to 1.618 and it's usually illustrated with seashell shaped its piles. This number was used in creating proportions for architecture, paintings, photography, design, etcetera. But how to use the golden ratio in your design? If you have a screen with the with off 1200 pixels, you need to divide it by 1.618 and the result will be 741.6. And now we can say 1200 pick songs minus 741 equals to 459. So we have two sections with the with up 741 pixels and 459 pixels. As you can see on the right side of screening here we have a screen shot off the medium website. Can you see how it has been designed based on the golden ratio so it can get the user's attention to the right place at the right time?
15. Design Guide: in this video, we're going to talk about design Guide. What is a design guide? A design guide is a system that can help you to keep your design consistent. It can also accelerate your design process. The examples you're looking at are only a few components that can be used in your design guide. There are lots of things that can be included in your design guides such as you elements, topography, iconography, sizing and spacing. Color pad. It's etcetera, so having a design guy makes your life much, much easier.
16. Consistent Fonts: Hi, everyone, In these lesson, we're gonna be talking about funds in design. As a designer, you always work with different fonts, so you need to know how to use them properly. As it was mentioned in the typography section, it is recommended to work with two different funds at most to keep your your eyes simple. Whether the best funds for you, I designed number one San Francisco. It is best for modern websites and more by lapse number two Open sense. It is best for websites and mobile relapse. Number three concert. It is best for minimal websites and mobile APS number four Proxima Nova. It is great for modern content centric websites and mobile APS and last but not least, roboto. It is best for modern websites and mobile maps as well.
17. Consistent Colors: Hey, everyone, in these video, we're gonna be talking about colors. Applying colors to your your eye elements is one of the most crucial parts of the U. Y. Design process. Do you remember what was playing a key role in your eye designing your right consistency, so you need to keep your colors consistent as well. For instance, if you apply Blue two titles on one page, you need to apply the same color two titles on other pages or, if we apply, read to purchase button. You should use the same color for any other purchase bottoms on other pages. This is why we need a design guide and the style right. If you look at the picture on your right, you can see that we used a specific black color for titles, and we use a specific color for our bottoms, etcetera. So it is so important to keep your colors consistent
18. Consistent Icons: Hello, everyone. In this video, we're gonna be talking about icons in design. You may think that working with icons is an easy part of the U. I design. However, if you do not pay attention to details, you will not get appropriate. Result your some important points that you need to take care off. Number one. Test the scalability. Check if you're icons can still be recognized at small sizes such as 15 by 15 pixels. Number two properly sized there. Commended Target size for touch screen objects is 7 to 10 millimeters. Also remember to add padding between icons to preventing correct taps. Number three Internal consistency. Use the same color scheme for all icons and also the same styling attributes such as the size of borders. Number four. Perfect alignment. Always try to have perfect alignment in a con. Ah, graffiti. But sometimes because you have icons with different sizes, you need to balance them by yourself. If you look at the picture on your right, you can see that we have two different groups off icons in the left group. You can see that we have consistent iconography because we only use outline icons. But on the other hand, we have inconsistent iconography because we use both outline and solid icons at the same time, which is not true commanded.
19. Consistent UI Elements: Hi, everyone. In these video, we're gonna be talking about consistency of your elements. One of the things that you always work Fifth, while you're designing a user interface is au element. What are the EU elements? Bottoms, cards, text fields, sliders, dialogues, charts, steps, tables, selection controls, menus, snack bars, etcetera. As it conceding the picture. I chose only some of them for you because certainly I could not put all of them here. However, you will learn about almost all of them in the U Elements chapter.
20. Font Resources: Hey, everyone in these video we're gonna be talking about font resource is sometimes choosing the right funds for your project could be tricky and time consuming. So in these part, you're gonna know about the best online resource is to get your funds easily. The first website is called Google Fonts, which is so famous and you can find free funds there. The second website is called my phones and you confined free and paid fonts, ter and last but not least, you can check out the Adibi Funds website which you can find paid Foncier. If you're having troubles repairing funds, you can also use type off or fun pair.
21. Color Resources: Hi, everyone, in these lesson, we're gonna be talking about collar. Resource is now. It's time to look for our colors in order to use them in our projects. Most of the time. Finding good colors is a difficult has for you, I designers, especially if you're a beginner. Here are some absolutely useful resource is for finding colors. Number one collar haunts number two Adobe color, which is so useful by the way Number three I don't know how to pronounce it, but I think it's coolers or collars. Number four Web Grady INS, which is another good website for finding Grady INTs. If you're looking for them, make sure to spend enough time finding the best possible color palette for your projects.
22. Icon Resources: Hey, everyone, in these video we're gonna be talking about Icon Resource is for your design project. As mentioned before, iconography is an essential part of the U. I design process, and it is so important to know where you can find engaging and a standard icons. Here are some useful resource is for finding icons number one flat icon, but you can find paid or free icon, sir. Number two, I can find her, which is another good website for finding icons and last but not least, nuclear, which is an application, and it gathers all the icons for you in one place. Remember that you should use the icons, which are easy to recognize by users. So take your time and check out all the available icons that you may want to use in your project.
23. Introduction to Sketch: Hi, everyone in these video, we're gonna be talking about sketch What is catch? Sketchy? The Professional Vector Editor, which is designed for those who want to turn their ideas into incredible products. As I mentioned before, sketches not suitable for raster graphics. It's a vector editor, which is developed for US UX design, and it's really good for this purpose. If you want to try it out, you can get a try, allergic of it and then purchase of one year license by parishes and get you will get all the updates until the end of your subscription. So if you're a fan of Adobe for the shop, I need to tell you that it's not a good software program for you are UX design. However, it is useful for editing your images in order to use them in your projects.
24. Sketch Requirements: Hi, everyone. In this video, we're gonna be talking about sketch requirements. If you want to use Cage as your designed toe, you need to access at least one off the Mac OS devices. It doesn't have to be the latest or greatest version, but it needs to be ableto have Macron's High Sierra or a newer Michaela's. If you want to make sure that you can update your macros from time to time, it's recommended to keep your Mac OS updated to delay this version. Whether you're sure about your operating system or not, I recommend that you should get the 30 day trial worsen before purchasing any license. So in that way you can be 100% sure that everything works perfectly. If you're working with more complex documents involving multiple pages and hundreds of art boards, a powerful Mac will definitely improve the performance
25. Sketch Environment: Hi, Ron. In these video, we're gonna be talking about sketch environments. Sketches. Interface is designed minimally right at the top. You can find the toolbar that contains all the important tools and actions underwrite the conceding specter that lets you modify the properties off the selected layer. The layer list is the pain on the left side, and it lists all the art pores and layers in your document. Last but not least, the canvas is in the middle where you will see on your designs. So, as you can see, we can divide a sketch interface into four main sections. Toolbar that contains all the essential tools you need. Layer lists, at least all the layers and our board's inspector that lets you customize the properties of your layers and lastly, canvas that shows all your art pours in one place.
26. Layer Basics: Hello, everyone. In this video, we're gonna be talking about layer basics the later least contains all the layers on the current page. We, as designers worked with layers all the time, and it's so important to know how they work. As you can see, you're able to insert as many pages as you want with the help of the plus button at the top . Whenever you add something to your art board, it appears in the form of a layer in the layer list, no matter what it is. For instance, the headline in this layer list is a text layer, and you can recognize it from its unique icon for hiding a layer you can hover your mouse over. That's a specific layer, and then I I can't appears immediately. By clicking on that, you can hide the layer and wise versa for renaming a layer. We should creek in its name, and you can change it easily. One of the most important things about layers is the way we organize them. I sent so many designers that do not care about well organizing their layers, and it's not good at all. Here is why, when you're collaborating with a team of designers. The way you manage your layers matters a lot, because if it's entirely other team members cannot understand the hierarchy of your project . And in order to modify anything, they have to spend considerable time. So make sure to name your layers once they're created and keep them as organized as possible. The other important point is the order of placing layers in the layered early so that the layer at the top with appear above the other layers in your arse board.
27. Toolbar: Hi, everyone. In these video, we're gonna be talking about tool more. The toolbar in the sketch contains all the tools you need to create your incredible design . When you install sketch on your computer, there is a defaults toolbar, but the good news is that you can easily customize it as you wish to customize the toolbar . You can right click on it and choose customize toolbar from the options. So let's take a look at the tool war and see what our default tools are right on your left . You can see the insert pop up menu, which lets you draw a new layer. The data will apply random image to shape players or text content to text layers. Creates symbol lets you convert the selected linger or group into a symbol. We will talk about the symbols in future lessons. The zoom buttons allow you to see more or less off your document, depending on the zoom level. The group and then group buttons let you organize your layer lists, which is so useful the next five Martin's, which are editing controls, allow you to modify and manipulate your selected shape. A mask and scale also become active when shape is selected, and these stones will allow you to clip layers to shapes and resize them respectively. Flattened bottom is for applying transformations and flattening a shape to single layer and resetting its origin. The next set up icons are the Boolean operations, which are used to combine shapes. We will talk about them in next lessons. Then we have view menu, which allows you to show and hide visual aids that can be used wild working and complex projects. For instance, it can show grits, layouts, rulers, etcetera. The preview button is for Previ in your arch board in a new window on IOS Devices or Web. The cloud icon is for sharing your design with your friends, clients or colleagues through the sketch cloud. Last but not least, the export bottom that's you export your assets. Alternatively, you can use short cards to choose the right toe, and it can really help you to accelerate your design process. You can find a list of most important short cuts at the end of this module.
28. Shapes: Hi, everyone. In these video, we're gonna be talking about shapes. Shapes are the most common type of layers in your design. There is a wide diversity of default shapes provided with sketch such as stars, rectangles, oles lying etcetera. To add a new shame to your art board, choose a shape tool from the insert pop up menu and then shape, click and drag anywhere in the canvas to insert your shape while you're dragging to insert the shape sketch will demonstrate how large the inserted shape will become. You can also find more details about your shapes in the inspector, and you can change the variables as you each. Some shapes have extra options, such as the ability to add more signs to a polygon around corners.
29. Editing Shapes: hi, everyone in the video, and we're gonna be talking about editing shapes. Sometimes you need to add. It shapes in a way you want, and it's a very simple thing to do. Sketch allows you to edit change easily and conveniently. First of all, that shoes rectangle from the insert public menu. Second of all, we need to draw it on the canvas, and after that we can double click on it or press the enter key to begin editing. Once we are in Edit Moon, we will see a circle point in each of the corners. Now let's click and drag on any of these points to change their position, and we will see how the shape changes. We can also add additional points to shape by hovering over the path between two points and clicking to insert. To delete a point click. The selected impressed the back space key on your keyboard. The path between points can appear as either strength lines or cares. It depends on the type of point that is connecting them. If you double click and appoints on a rectangle, the point type will immediately change to create a care of path by doing that. You will see two handles on either side of the point that control the character off the path. These are called handed control points in order to understand how they work. Think of them as if they were pulling the path towards themselves. There is a good short cut for changing the point type and at his prancing numbers between 1 to 4 on your keyboard.
30. Boolean Operations: Hi, everyone. In these video, we're gonna be talking about boolean operations. Sometimes you look for a shape which does not exist in a sketch. In that case, you need to create your own shape. Although you can create a shape by using the vector toe, it's much easier to make a shape by combining basic shapes together. For instance, think of a cloud which is around the rectangle combined with a circle. Haven't you talked about that before? There are countless shapes that we can break down into basic shapes. Now what? See how Boolean operations work? We have four different Boolean operations. Number one union. The result is a vector that is the sum of both vectors. Areas number to subtract. The result is a vector where the area off the top shape is removed from the one under it, Number three intersect. The result is a vector consisting off the parts where the original shaves overlap and last but not least, difference. It's the inverse off an Intersect operation
31. Text: Hi, everyone. In these video, we're gonna be talking about text you can add takes by choosing the textile from the insert menu in the toolbar or press T. Then the pointer will change to the text into tool icon, and finally, you can click anywhere in the canvas to insert your text layer. At that point, as you can see here, a new text layer will be inserted with type something already selected, ready to be replaced. If you want to create a text box, you can click and drank, and then you will have a fixed size textbook. So in this case, when the text gets to lying to fit inside the box, it will create a new line. Unlike in normal text, which increases its with two feet the content. When you select the tanks and click on the text menu item, the sketch confined a number of options available. You can change the time face Tallis eyes bold or on their line, your tax layer and much more. For more complex modifications. You can also use Karen Ligature baseline at Central
32. Text Inspector: Hi, everyone. In this video, we're gonna be talking about Tax Inspector one of early. Select the text. You will notice that the inspector has changed to show you all the properties which apply to text apart from what was mentioned before can also modify most of them, including typeface, font size alignment, etcetera, right Inspector section. However, if you want to use bullet points, you should use the tanks menu at the top. One of the most important things you should pay attention to while working with tanks is the line value which basically adjusts the line heart. If you're not sure how much your line height should be, don't worry. There is a good formula that you can use in order to gets an appropriate line height. The formula is fun. Size multiply by 1.5. For instance, If the font size is 20 points, then the line value should be 30 because 20 multiply by 1.5 Is ik on 2 30
33. Text Style: Hi, everyone. In these video, we're gonna be talking about textile when you're working on a complex project which contains a lot of tax layers, many of those layers would contain the same takes properties. So a sketch allows you to create a textile and applying to those tanks layers. You may ask yourself, what's the point of using the tanks styles? Well, let me explain it to you with an example. Suppose that you've been working on a website for one month and you have used a specific funding your project. Then you would get a phone call from your clients, and he or she would ask you to change the funds off All buddy, thanks to something else. So in this case, if you have used a textile for your body text, you could update it once, and the changes would applying toe all across the project. Isn't that pretty? Cool? That's awesome. So in order to create a new textile, we can easily click the text that reads No textile Indian specter and choose create new textile from the many. And whenever we're going to use that text time, we can head over to the appearance section in the inspector and change the no textile toe. Our text layers side
34. Images & Bitmaps: Hello, everyone. These video. We're gonna be talking about images and beat maps as sketches. A vector editor. You may be wondering how you could edit your images without jumping between different design tools. Well, there's nothing to worry about because the sketch allows you to use the most common beat map editing capabilities to make your life even easier to start editing your image, you need to select it by double clicking on it. The inspector will show you to selection tools. First of all, you need to select an area on the campus and then peak the tool you want. Here we have two different tunes Selection, which selects a rectangle area on the image and magic wand. With this tool, you can click and drank anywhere on the image to select an area. Once you have selected an area of your image, you can either cards or copy the selection and use it for a new beat map layer or use one of the options in the inspector, for example, here we have invert crop and feel, but using invert the area that was not selected will be selected now and wants Ursa or using crop. It crops, the layer toe Onley include the selected area and by using feel it lets you feel the selection area with colors, and after that we need to click on finish editing, and that's all.
35. Styling: Fills: Hey, everyone in this video we're gonna be talking about feels one of the most important pains off sketch is the inspector. Here. You can find a variety of options and tools that will allow you to apply effects such as shadows change the color of a layer etcetera. In these parts, we will learn how to use feels in your design in order to use. Feels should creek on the add button. In the Field section title, you can apply a range of different fields toe layers, including solid color Grady Ins, an image feel. In addition, you can add as many fields as you want to your layer, which will be stacked on top of each other from bottom to top. The feud options from left right are solid feel linear, Grady int radial, Grady int, angular Grady int and, lastly, image field. In the next lessons, we will dive into each of them specifically
36. Styling: Borders: Hello, Ruin. In this video, we're gonna be talking about borders. All layers in sketch can contain as many borders as you want except text neighbors. You can modify their thickness colors, etcetera, just like feels. In order to add a border to your layer, you should click on the add button in the border section title. Not only can you customize their appearance such as colors, thickness, etcetera, but also you can choose how they should be positioned. The border position can be modified on closed shapes by being placed on either inside centre or outside of the shapes Outline. Additionally, there are some border options that you can use, such as ends and joins, that let you control how the border should end and how it should join the joining points. You can also use arrowheads, but using the start and end options and dash nines for using the dash and gap options.
37. Styling: Shadows: Hi, everyone. In these video, we're gonna be talking about shadows. Nowadays, you can see shadows in almost every kind of design. However, knowing how to use shadows appropriately is so important. There are two kinds of shadows in sketch shadow and inner shadow. They behave in much the same way. The only difference is that shadow will spread outside of the shave it applies to, However, in her shadow will cast inside the shape. You can adjust shadows as you wish, by changing their ex and why value and also modifying the Blair and the spread amount. Not to mention that you can change the color of shadows. Do whatever you want. I'd like to give you some tips about using shadows. First of all, keep the capacity of your shadows as low as possible because otherwise it doesn't look right, and it seems so exaggerated. Second of all, don't use dark shadows for color for objects. Try to use the objects collar as the shadow collar and decrease its capacity. Because in real world, for example, a red apple doesn't have a dark shadow. It has a slight red shadow. You learn how to use shadows properly in future lessons
38. Styling: Blurs: Hi, everyone In these video, we're gonna be talking about Blair's in general, there are four kinds of Blair effects that you can apply two layers in a sketch. We can choose between them by clicking on the title section in the Inspector and choosing from the pop up menu number one gas assembler. It's a common Blair type that will accurately Blair in all directions. Number two motion blur. It blares a layer Onley in one direction, and it gives the user the illusion of motion number three zoom Blur. It blares from one specific point out, and lastly, background blur. It blares any content that appears behind a layer. Unlike other kinds of Blair's Migron, Blair requires you to modify the capacity of your fields in order for defect to be seen.
39. Styling: Gradients: Hello, everyone in these video, we're gonna be talking about grade. Ian's Great inns are so popular nowadays because it helps designers to attract users attention. As I mentioned in the field section, you can use three different kinds of radiance, linear radio and angular grade. Ian's. However, the most common Grady Int is the linear Grady int, and you can find these kind of radiant in almost 90% of designs in one way or another. One important thing about radiance you need to know is that you cannot combine any random colors to make a Grady INT. For instance, you can use analogous colors from the color will in order to create a good radiant. Alternatively, you can get inspired by nature. For example, it's possible to get your colors from the photo of a landscape. To do that, you could use online tools to accelerate the process. I'm gonna give you some tips about using radiance number one. Don't overuse Grady ins in your design number to double check the contrast of your content because sometimes you're using a great and beautiful Grady int. However, there is not enough contrast between your content and elements, so make sure to double check your elements and also your content colors in order to see whether the your readable or not.
40. Styling: Shared Layer Style: Hi, everyone. In these video, we're gonna be talking about shared layers side. You can create an apply a layer side toe any layer just like text times. It can help you to save a set of stylistic elements, which can reuse them across any of your layers in the project you're working on, just like text size, layers size allow you to keep the appearance of your layers, both consistent and up to date. If you make any changes to their appearance to create a layer side, click on the text that reads no layer style in the Inspector and choose. Create the layer stone from the many. Then you need to choose a specific name, and that's all. You can also add a layer style recent layer site and also detach from layer side update layer style updates on the layers using the same layers. Recent near sign removes the changes made to that layer side and finally detached from layers. Sign keeps the changes you've made to death layer but removes the layers stung attributes from the layer
41. Masking: Hi, everyone. In this video, we're gonna be talking about masking masks in a sketch, let you select and show parts of other layers. For instance, you can mask an image layer to circle, and if you'll give the image a circle shape, there are many ways you can use masks in a sketch. However, the most convenient one is to select your shape players and click on the mask button in the toolbar. Remember that the order of placing your layers is so important wind working with masks. For example, if you select three shape players in click on the mask button, the two layers above the last one will be clipped to the third layer. Another way to use masks is to give it a Grady int, which is called All From Ask to do that. We can go to layer menu, mask a mask mode and then on from ask from the Manu
42. Symbols: Hi, everyone. In these video, we're gonna be talking about symbols. Symbols is a great featuring a sketch that allows you to reuse elements easily across your our ports and pages or even multiple documents. We can break down symbols into two parts. A master, which takes the appearance of an art board and an instance, which is a flattened representation off the master. As a matter of fact, a symbol instance is a single layer that mirrors the content from its master. You can recognize it with the help of a purple icon. It's sinking arrows. We can create a symbol simply by selecting an object and clicking on the create symbol button in the toolbar. Then you will be prompted to choose a name for your symbol and in the end press okay, You can find your symbols on the symbols page, and you can customize each instance with overrides. You can find the overwrite section in the Inspector
43. The Canvas: Hi, everyone. In these video, we're gonna be talking about canvas sketches. Canvas is infinite in size. It's basically where your arm wars will be place and you can easily navigate around by using the scroll will on your mouse or a track pad, you can scroll in any direction. Additionally, you can hold a space bar and click and drank the canvas to pan around. If there is no object selected, you can also use the arrow keys to pan the canvas. There are times when you want to zoom in and zoom out in order to see more details or the entire campus, respectively. To do that, you can use the zoom item in the toolbar optionally. You can hold the command key and use your scroll will on your mouths. The maximum zoom level is 256,000% and the minimum one is 1%
44. Plugins: Hello, everyone. In these video, we're gonna be talking about plug ins. Plantings are an important part of any design tool. You can extend the sketches functionality by installing plug ins. All plug ins have been developed by third party developers and can be downloaded for free or parishes from the developer. You can find the newest plug ins on the Extensions page of sketch website. Once you're plugging is installed, you can access it while you're the plug INS menu in the menu bar. Sometimes, after an update, plug ins may become incompatible with sketch. In that case, your sketch me crash and you can fix it by disabling plug ins. To do that, we can hold down the shift key during launch time to disable all plug ins you have installed. If you choose manage plug ings from plug Ins menu, you can access the plug ins preference pane where you can manage your plug ins.
45. Exporting: Hi, everyone. In these video, we're gonna be talking about exporting. When you have finished your design process, you'll probably want to export parts of your creation or even all of it in a sketch. We can easily export your design in no time to see all your exportable finds can click on the export button in the tool war and then mark what you want to export to mark any layer group or art for exportable in sketch, make sure it's selected and click on the make exportable bottom at the bottom of the inspector. After that view will appear and you can modify and define the settings for export, and these savings will be applied when the layer is exported. If you click on the add button, once against cash will add another scale to your export. If you have more than one export scale defined, then you need at least one prefix or suffix depend to the start or end, respectively, off the exported files. Name to tell them apart. Typically, objects exported as a two X scale will have the saw fix off at two eggs as this meets the naming conventions required by Apple when designing for the operating systems. If you're designing for Android, however, to eggs is represented by the Ex edge DP I prefix. We can choose your designer find format by clicking on the format. Button exporting is not limited to files. You can also export some of your design as code. You can easily copy the CSS attributes and SVG code by selecting any number of elements in the canvas and then hold the control key and click and choose Copy CSS attributes or copy SVG coat. It's an amazing feature for Web designers.
46. Introduction to UI Elements: Hi, everyone. Welcome back to another section of thes course in these section. We're gonna be talking about you elements which are so important when you're designing a user interface. In the next years of videos, we're going to talk about tax bills, bottoms, sliders, cards, dialogues or even steppers and charts. So if you're confused about all those elements, I suggest you watching this section. So see you in the next series of videos.
47. Text Fields: Hey, everyone will come back to another video off this section. In this video, we're gonna be talking about text fields, As you may know, takes feels are you elements which allow users to enter attacks into a u I. They usually appear in dialogues and forms. Almost every mobile adapts and also website use at least one kind of text fields, for instance. You can use them for entering dates, names, time, etcetera. As a U I designer, you need to know what the anatomy of a text field as described in the picture. You may find different kinds of tax feels on different platforms, so it is recommended to know about the standard your elements that a specific operating system uses. If you look at the picture on the right, you can see that we have the anatomy off a text field. As you can see, we have label. We have the input text. We have the trailing icon, which is optional. As you can see, it's number three. Also, we have activation indicator. Sometimes you may use voice input icon or even a drop down icon, and at the end you can see that we design different States off attacks field. For example, if the user enters the password incorrectly, the text fields color may change to something else for instance, red.
48. Buttons: Hey, everyone in these video, we're gonna be talking about bottoms in design bottoms let users take actions. So one of our user needs to do something. Bottoms coming to play. I think now you understand how important it is to know about bottom designing. When you're designing a button, make sure to pay attention to the falling points. Number one states design all states off the bottom, such as active, inactive, tapped, hover, etcetera. Number two hierarchy know about the hierarchy of your buttons, for instance, whether it's high emphasis, medium emphasis or law emphasis. Number three placement multiple button types can be utilized to represent various emphasis levels. Number four takes button text buttons are typically used for less pronounced actions, for example, in dialogues and cards and last but not least, contrast buttons should have enough contrast to stress the importance off they functionality. So if you look at the picture on the right, you can see that we have different states off the bottom. For instance, we have active. As you can see, it has a sharp color, and the capacity is 100%. On the other hand, we have inactive to show that this button is disabled for now, which is grey here, and also we have tapped. So when the user taps that button, it changes to that specific color. As you can see, we have that's light blue, and at the end, as a conceiving have for different buttons, we have text button. Also, we have outlined button and then contain button and also toggle button, and you need to use them carefully when you're designing a user interface. Because it is so important to no the users expectation and also in terms of user experience , it's better to use the correct type of bottom in your design.
49. Sliders: Hey, everyone in these video, we're going to talk about sliders in design. Sliders allow users to make selections from a range of values. They are ideal for adjusting settings such as brightness, volume, etcetera. Sliders can have icons on both sides of the bar. When you're designing a cider, make sure to pay attention to the following things. Number one states design all states off the Steiger, such as enable disable, tapped, hover, etcetera, just like buttons. Number two. Adjusting sliders should only be used for choosing selections from a range of values. Number four quickness. Sliders should react immediately, so changes must be instantaneous. And last but not least, accessibility Sliders should provide the whole range of choices available to the user to select from. If you look at the picture on the right side, you can see that we have two different sliders. The 1st 1 is continuous slider, and as you can see in thes kind of Snyder, you can modify it continuously and without any interruption. On the other hand, in the second type of sliders, which is discreet slider, you cannot modify it without any interruption. There are some fixed points that the user can choose from
50. Tooltips: Hey, everyone, in these video, we're gonna be talking about tool tips in design Tool peeps are for displaying informative text when users hover over, focus on or tap an element. When you're designing a tool tip, make sure to pay attention to the falling things. Number one conciseness Tool tips Should Onley display a brief text? Don't add an image or detailed information. Number two Pairing tool tips are always paired nearby, the element with which they are associate ID and last but not least, transitory tool tips appear on hover, focus or touch and disappear after short duration. They recommended time ease 1.5 seconds. As you can see on the right side, we have a tool tip, which shows informative text. We have a short cut for bold, and also we have additional information here, safe for confirm button, so make sure to use them properly.
51. Selection Controls: Hi, everyone In these video, we're gonna be talking about selection controls. Selection controls allow users to easily select between different options. It's useful for declaring preferences such a settings. When you're designing a selection control, make sure to pay attention to the following points. Number one Familiarity. Selection controls have been used in you. I design for a long time and should be utilized as expected. Number two efficiency selection controls let users easily compare two or more options. And last but not least, scannable selection controls should be appear in a way that users can recognize them at a glance. Selected items should be visually distinguishable from one selected items. As you can see on the right side of the screen, we have three different selection controls. The 1st 1 is speeches. It's useful for targeting a single option on or off, and it is so popular. The next month is radio buttons. They are useful for selecting a single option from a least, and the last one is check parts, and it's useful for selecting born or multiple items from a least, so make sure to use them in the right way.
52. Chips: Hey, everyone, In this video, we're gonna be talking about chips. Chips allow users to make selections, trigger actions. Enter information, etcetera. Unlike buttons, which should be a consistent counteraction, chips should appear dynamically as a group of multiple interactive elements. When you're designing a chip, make sure to pay attention to the following things Number one states. Just like bottoms and sliders. You need to design all states of your chips, such as in able disable tapped, hover etcetera. Number two relevancy chips should have a helpful relationship with the content or task they represent. And the last one compactness chips are compact elements that represent distinct information . If you look at the picture on the right side, you can see that we have different chips. Some of them have icons or even an image. On the other hand, some of them only have a text, so make sure to use them in your urine design carefully.
53. Cards: Hey, everyone, these video, we're gonna be talking about cards in user interface design cars are containers that display content and actions on a single subject. They must be easy to scan, and elements such as images or texts should be placed on them in a way that certainly indicates the hierarchy. When you're designing cards, make sure to pay attention to the following things. Number one individual. A card cannot be divided into multiple cards. You should not marriage a card with another one number to independence. A card doesn't need to rely on its surrounding elements. It can stand alone and last but not least, components. A card can optionally have reach media such as images or videos, Tex Barton's icons and film nails. Nowadays, most designers use cards in there. You I design, so if you want to use them as well, make sure to use them carefully
54. Dialogs: Hi, everyone. In this video, we're gonna be talking about dialogues. Dialogues inform users about critical information or even tasks. They also ask users to make a decision or choose between different options. For example, dialogues can be used for asking for permission or even choosing from a range of different variables on a Snyder and so much more When you're designing dialogues, make sure to pay attention to the following things. Number one hierarchy, a dialogue has the highest hierarchy, and it blacks the APP usage until the user tanks a dialect action number two visibility die unlike must be recognizable easily. So I recommend adding a dark overlay to the view and putting the dialogue on top off That's number three. Straightforward dialogue should convey the message in an understandable and clear way. And lastly bottoms, I recommend using side by side buttons on a dialogue, as you can see in the picture
55. Lists: Hey, everyone, in these video we're gonna be talking about lists. Least are a continuous group of images or texts. They are composed of items including primary and second reactions, which are represented by icons on texts. When you're designing lists, make sure to pay attention to the following points. Number one consistency least must present icons, tax and actions in a consistent format. Number two action police show content in a way that makes it easy to recognize a specific item in the collection and act on it. And last but not least, scannable at least should be classified in logical ways that make content easy to scan. As you can see on the right side of the screen, we have different kind of lists. For instance, here we have your contacts. As you can see, it's composed of images and tax, and also it has an icon
56. Tables: Hey, everyone in these video, we're going to be talking about tables. Tables are containers that show users different records, such as products, prices, status dates, etcetera a day. The table contains ahead a row at the top, at least Colin names, followed by rules for later. They're usually scroll herbal and easy to scare. So if you need to populate some data, which are sore doble and follow the same pattern, you can use tables when you're designing tables. Make sure to pay attention to the following things. Number one expandable rows in the table can be expandable in order to allow the user to evaluate additional information without losing its context. Number two pagination pagination works by presenting a set of numbers, interview with the ability to navigate to another set and, lastly, fix headers. Fixing the row header while a user scrolls through a table helps the user to know about the column name
57. Navigation: Hey, everyone, in these video, we're gonna be talking about navigation. Navigation is the act of moving between screens of a nap to complete tasks. For instance, you can navigate from explore page of a nap to the profile page. There are different types of navigation. Number one lateral. It refers to moving between screens at the same level of hierarchy. The main apse navigation component should provide access to all destinations at the top level of its hierarchy. Number to forward. It refers to moving between screens at consecutive levels on hierarchy and last but not least, reverse. It refers to moving backward through screens, either hierarchically within a nap or karna logically within one app or across different APS.
58. Menus: Hi, everyone. In these video, we're gonna be talking about menus in user interface design. A menu displays at least of choices on a provisional surface. It appears when users interact with a button action or other kinds of controls. Menus allow users to make a selection from multiple options on like selection controls. Menus are less outstanding and take less space. When you're designing menus, make sure to pay attention to the following points. Number one scannable. Many options should be easy to scare. Number two quick menus should be easy to open, close and interact with, and last but not least, placement menus appear in front of all other your elements.
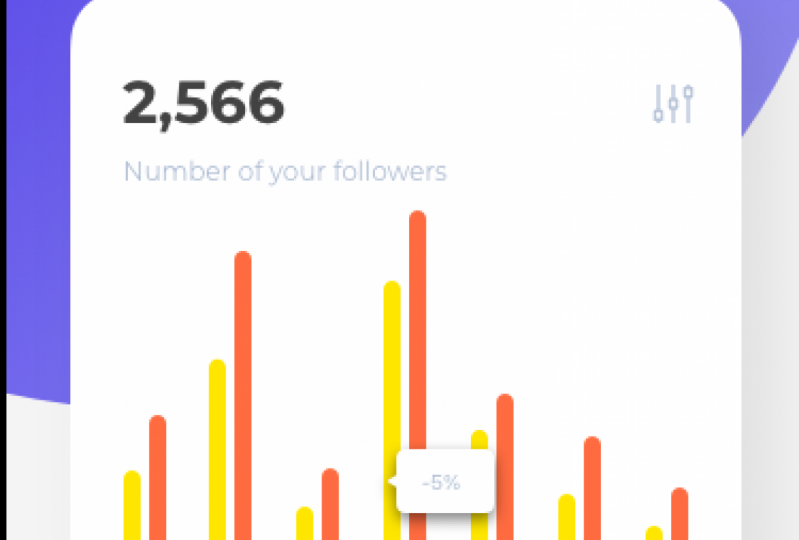
59. Charts: Hello, everyone In these video, we're gonna be talking about charts. Charts help users to compare Values individualized away When it comes to comparing many values, it's much easier to look at charts right area numbers and agreed. When you're designing charts, make sure to pay attention to the following things. Number one. Visibility. Visibility of a chart. It's so important because sometimes you have a chart with very small details. Number two consistency. Place your charts on a card in order to keep your design clean and consistent. Lastly, margins. Make sure that there is enough white space between your charts and other elements later on . In these scores, you will learn how to create charts and how to use them in your projects.
60. Steppers: Hi, everyone. In these video, we're gonna be talking about steppers. Sippers show progress through a sequence of logical and numbered steps. Sometimes you may use them for navigation. Suppers may display a temporary feedback message after step is saved. Using steppers could help users to avoid losing their focus when they need to feel up forms or take some action. When you're designing steppers, make sure to pay attention to the following things. Number one sections do not embed steppers into other steppers or you've multiple steppers on one page. Number two types. Generally, there are two types of steps. Editorial steps and non edible steps. We have horizontal steppers on vertical steppers and lastly feedback. You can optionally design transient feedback to show the users the progression. You should only use feedback whenever there is a long, latent see between steps.
61. Snackbars: Hi, everyone. In these video, we're gonna be talking about snack bars. Snack bars provide concise feedback about an operation through a message at the bottom of the screen. They should contain a single line of text directly related to the operation performed. They may contain a bottle as well. When you're designing stacked bars, make sure to pay attention to the following points. Number one. It should be brief. Snack bar should only display brief information about an operation and not detailed information. Number two transient snack bars automatically time out from the screen so they should disappear quickly and last but not least, hierarchy. If the action is important enough to black the APP usage, you can use dialogues instead of snack bars in the snack bars. Only use one button if it's needed and not more. As you can see on the right side of screen, we have two different examples. The first group of snack bars are designed perfectly because it doesn't have more than one button and the Connors that have been used or great. However, on the other hand, the second group off our snack bars has two buttons, which is not ideal for snack bars, and also it used an icon. In addition to the text
62. What is wireframing?: Hi, everyone in these video, we're gonna be talking him out via framing. Violent framing is a way to design an APP or website services at the structure or level. A wire frame is generally used to layout contents and functionalities. On a page, which take user needs and experiences into account, we can consider wire framing a graphical skeleton similar to the blueprint of a car. The viral frame determines the details off the whole project at the initial stage as the project description, Most beginners think that wire framing and prototyping are somehow the same. However they are not. A wire frame is a low fidelity design, so it does not illustrate the final appearance off the user interface. On the other hand, a prototype is a high fidelity design, and its dynamic and interactive prototyping looks almost like the final product.
63. User Flows: Hi, everyone. In these video, we're gonna be talking about user flow. User flow is a path taken by prototypical user on an APP or website. To complete a task. The user flow directs them from their entry point through a set off phases toward a successful outcome and final action, such as sending a message or purchasing an item. Let me give you an example of a very simplified user flow for an e commerce app. The user starts from the home page from the home page. The user clicks onto a category page. Then, from the category page, the user clicks on a product and then from the product page, the user adds an item to the card and then from the shopping cart to use their checks out. And after that, from the check out page, the user completes the payment, and in the end the user can get his or hair received. So this is how a user flow look like, and it's very important for every project to have at least a simplifying user flow
64. Interactive Prototypes: Hi, everyone. In these video, we're gonna be talking about interactive prototype. Nowadays, prototyping is playing an increasingly vital role in the design process. So you, as a young UX designer, need to know how to make a high fidelity prototype of your project in a way that it can clearly convey the message of your design and also the exact interaction you want to achieve. Not only can prototyping help you as a designer to show off your work, but also it can help developers to know how your designs should be converted to code. Here are some useful tools you can use for interactive prototyping sketch. It can be used for simple interactive prototyping. InVision studio It can be used for modern and complicated interactive prototyping principle . It can be used for modern and detail, interactive, prototyping and so much more. For instance, you can use proto pie as well for advanced prototyping
65. Wireframe tools: Hi, everyone in these video, I'm going to talk about wire frame tools. Now that you know the importance on wire framing in your UX design, it's time to talk about the tools, which are absolutely useful for preparing your wire frame. Although some designers prefer to use standalone software for wire framing, there are designers who prefer to use Web based tools for wire framing. No matter what way you like to choose, make sure to keep your wire framing consistent. Here are some useful tools you can use for wire framing Number one Mike Flow. You can use mike flow dot com, and it offers a variety off free and paid services. Number two figure. You can use feet, Mother Calm, and it also offers free and paid services. Number three sketch. It's a paid application and last but not least, Adobe X'd, which is free, and you can insult it on both Mac OS and Windows
66. What is a Color Style?: Hi. Welcome back to another section of the scores in this video. We're gonna be talking about the color Stein. What's the color style? As a matter of fact, every brand has a set of colors that they stick to. So, for instance, when you think of Tweeter, I'm pretty sure you think blue. So in the section, we're going to create our own color style or, let's say, our own style guide to help us during our design process. So I will see you in the next video.
67. Primary, Semantic, & Accent Colors: Hi, everyone. In this video, we're going to start creating our first style guide having a style guide. It's so so important when you're designing an interface because it's going to save you so much time and makes your life easier. So without further ado, let's get started. First of all, I'm gonna put a new art port here so you can go to insert arts board. Or, alternatively, you can press a button on your keyboard. Then I'm going to choose Responsive Web and this stuff HD perfect. So first of all, I'm gonna rename me two collars Great. And then let's add text here and right colors. And if you hold old, you can see the D senses between those ages and the text. So let's make it 100 from the top and 120 from the left. Great, I'm going to zoom in a little bit. Now let's insert around it here, and I'm going to drag and drop perfect, and I'm gonna choose the color with the code for 135 F three Perfect. And now let's increase the corner radius in order to get smooth corners. Awesome! Now we can align it and the padding. Gays. Eight pixels perfect. So now let's insert another round it here and drag and drop. And let's make it 180 by 180 peak cells. As you can see in a sketch, you have two options. Round corners or smooth corners. I prefer using smooth corners because it's going to give you a very, very nice smooth corners like what you see in our US all right, twenties. Great. Now I'm gonna inject this box, and now let's choose our collar. That's right for 13 five F three. Great. If you're not sure what colors you would like to choose in your project, don't worry. You can always come back and modify all of your style guides components. So now let's move it a little bit. Okay, 100 is great. And now let's duplicate it with Command D and put it here with 30 peak cells padding. Great! And this time let's choose the color. Seven. Bond seeks eight F six perfect and once again, let's duplicate it. But it's right over there and choose the next color. A 09 a f nine. Great and again that's duplicated. I know it's kind of boring, but believe it or not, it's gonna save so much time and makes your design process so much quicker. And the last one. Let's shoes see if cc f c great. All right, These are our primary colors, so let me drag them a little bit down. Now I'm going to write primary car. There's OK, and now let's capitalize all these letters. Instead of writing with capital letters, we can easily go over there and click on that setting button over there. Here we have takes options and you can choose uppercase Perfect. Let's make it smaller. 24 pixels is great and the distance 40 pixels. So these are gonna be our primary colors that he used mostly in our project. So now let's create our start guide first of all, but select the first color. On the right side, you can see a section, which is called appearance, and here is written no layer style. So if I click on that, you can see there is an option. Create new layer style. So let's click on that. And here that's right. Colors slash primary slash purple 100% and enter great so we're going to do the same thing for all of those. So let's go there. Create colors, stash primary slash purple, 75% and again, colors slash primary slash per pill, 50% and the last one. Colors slash primary slash purple 25%. Great. So right now we have created our primary colors shared Siles, which is great, all right. Before continuing these process, I'm going to create a layer. We align and I'm going to change its collar. Something like this. That's great. And the spacing 16 from top and 40 from bottom. Awesome. So now, in order to organize our layers, let's group them so you can use command G and then rename it to title Great. And also, let's choose thes colors, Primary pair pill and here as well title. All right, so the second thing we need to do is to create our accent colors. So what I'm going to do is to hold these two groups and duplicate them and drag them down in here. 70 Big sells Great. So now let's change the title to accent colors. All right, now, let's choose the first square over there and change the color, too. B e 52 f two. And if I click over there, you can see we have some options. If I click on update layers time, this is going to update the previous layer star that we just created. It is not what we need. We need to create a new layers toe ill and let's call it colors. Smash Accent Slash. It's like purple again. Sold its college purple one and the 2nd 1 Let's change it to D. B. A five if fine, great and let's create a new layer style. So I'm going to change it to colors, accent slash purple to and the next one e the f F two. Awesome. So let's create another layer style colors. Accent, Purple three and the last one. Let's shoes if three e eight if six. Let's change it a little bit now it's great and create new layer style colors. My accent. Careful. Four. Awesome. So the next thing we need to do is to create our semantic colors, so let's make art for a little bit larger. You can click on that and then change the height to 2000. And now let's change the group name here to accent colors and also the title title Dash accent. Great. So let's hold on and duplicate them and drank them down. Right? So that's changed the tax, too. Semantic Connors. All right now we only need three colors here nor to make it simple for you. That's shoes. If if cf five see great, let's create new layer style colors. Semantic orange one and the next one f f e 29 d again creating your style semantic orange to in the last one f f f eight e seven. Create new layer style semantic orange. Three. Perfect. Now let's hold them and duplicate them. Right? 30 Pixel is great. That's used the 1st 1 and change it to 0084 f four. Let's call it blue one. The 2nd 166 be five F on eight Blue, too. And the last one d five e nine f A and that's college blue three. All right. You can add as much as you want, but I think for the sake of this course, it's enough for now. Thank you so much for watching this video in the next video. We're going to add the Grady in star color guideline and also the gray colors that he used mostly in backgrounds. So see you in the next video.
68. Grey Colors & Gradients: Hi, everyone. Welcome back to another video of thes section in these video. We're gonna be creating our gray background colors, which is so important, because most of the time we're going to use them a lot in our project. So let's go ahead and make our art for a little bit larger. So I'm going to change the high to 3000. And then, as you all know, we need to hold these groups and duplicate them. There we go. That's changed its title to gray background colors. Perfect. So now let's elect the first color and change it to 28 37 for B Perfect. And now let's create a new layer style and colors. I'm going to say gray BG slash one also, and let's select the 2nd 1 and change it to 87 98. A de great. That's create a new layer style. I know it's repetitive, but believe it or not, it's gonna make our life much easier. So it's worth our time to create our color side. Or, let's say, our style guide, generally in order to make the process off, are designing quicker. Now let's elect the next one and Let's change it to si seven d zero the A and then I'm gonna go ahead and create a new layer style colors, gray and three. I need one more. Let's duplicate the last one with Command D and hold it and move it a little bit perfect. And that's changed the color to Yvonne E six e b. Great. Let's create another layers file. And here, let's say for awesome. So right now you may be thinking, that's why should we do that? Let me give you an example in order to understand how powerful a style guide is when it comes to user interface design. So let's say that we have around it here, okay? And suppose that you want to fill it with our primary color. So when you have shared inside, you don't need to memorize the color code instead, If you go ahead to the appearance section and click on here, you can see all the colors and layer style that we created for our project. As you can see, we need to change this layer style the name of that because it is not consistent, so the sketch couldn't categorize it as colors. Great So, first of all, let me change it. We'll go to organize the years and then here. Gray. Awesome. So let's go ahead and choose our primary color. AARP 0 100%. There we go. Did you realize how easy teas to work with style guides? It's going to save you so much time and you're designing an interface. The other advantage of using style guide in your project is that you can always modify every component of your style guide easily, and the changes will apply to your whole project. That is awesome. Suppose that you design a project with these primary color that we have over there, and after two months, your client wants to change it to something else. If you didn't use shared layer style in your project, you needed to change it one by one, and you cannot even imagine how much time it takes. So instead of that, you can easily go to your style guide and select that specific color that you want to change and easily change it. For example, let's try something out here. I'm going to change it to this color, and then you need to update it so Yes. What happens if I check our square over there? You can see the color has changed. That is awesome. All right. I hope you understand how powerful ladies and it's worth your time to create your own style guide. All right, now I'm gonna go ahead and create our radiant colors. So let's duplicate these, and we need to remember to rename our groups. All right, let's change the title to grading scholars. Awesome. Now I'm gonna go ahead and select these two and remove them because I just want to create to Grady ins for our style guide. So let's go to feel section and click and color. And here, as you know, we have some options. The 1st 1 is for choosing single color, and the 2nd 1 is for Grady INTs, so you can easily click on this circle and choose this color and then click on the 2nd 1 and choose the second primary color, and you can change the direction off these beautiful gravy ins. Perfect. So again, let's go and create a new layer style this time colors radiant one. And that's changed the 2nd 1 here, too. This one and it's fun awesome. Create new layer style colors. Grady Int to perfect. All right now, let's go ahead and change the name of our groups because it is so important to always keep our layers and groups organized. So what do we have here? Semantic colors. That's changing too semantic. And these two also should be changed to semantic colors on the 2nd 1 blue and then thesis title to Gray. And here also gray BG Collars and the last one vital Grady Ins. And here, Grady Int perfect. So we just successfully created the color part of our style guide. And it is enough for now. In the next video, we're going to create the borders and shadows for our project. So thank you so much for watching this video. I will see you in the next video.
69. Borders & Shadows: Hey, everyone, welcome back to another video of this section. In this video we're going to create shared layer styles for our borders and also for our shadows. So let's get started. So first of all, let's choose acts and colors and duplicate them because we're going to need them here. And I'm going to change the title. Two border colors. Awesome. Now let's select the 1st 1 But this time we don't need feels. We need borders. So let's on Chek feels and check the borders. The with or thickness is one which is great and that change the color to our first accent color. Great. And the positions gonna be inside as a default. And let's go ahead and change the 2nd 1 and check this box. Check Borders. There we go. The same thing for the 3rd 1 Okay, we don't need the last one because it's too light. So these three are enough Now, As you know, we need to go ahead and create new layer style. So let's write border slash one and for the 2nd 1 border slash two and the last one border slash three. Great. So let's change the group name here to border colors and also this group to borders great. And then I'm gonna go ahead and select the's great background colors and duplicate them. Let's move it down perfect. And that's changed the title to shadows. Great. We need four different shadows, but all with the same color. So let's select all of them and changed a collar, too. Right? You will know why in a second, and then that's at shadows. There we go. That zoom in a little bit. All right. First of all, let's select all of them and change the all far from 50 to 20. Great. Then I'm going to select the 1st 1 and modify these shadows options. So, first of all, I'm going to change the eggs 21 and the UAE to five, and that's increased the Blair Mount a little bit. Let's set it to 10 because it's gonna be our small shadow and why I think it's going to be six great and the 2nd 1 again. One. And let's set the Blair 2 20 changed. Why over there? Let's increase the amount of X a little bit 25 and the next one that said the eggs too to and increase the Blair amount 2 20 why is going to be 19? However, I think it's better to change the X 22 and this time I'm gonna decrease the all fire amount to 10. Great in the last one. Let's decrease the offer. Amount to 10 and then said the X 21 the Y 25 and the Blair for a teen. Great. Now it's time to create our shared layer style. So let's select the 1st 1 and go ahead and create new layer Stein. Here, let's say shadows slash one again. Shadows that's copied in order to save our time. Smash to and shadows Strache three and the last one Shadows slash for great. As you can see, we have feels here in order to understand how these shadows look. But we don't need them, because when we want to add shadows to our layers or components, we don't need to feel it as well. So let's elect them and then check this field, barks great and click on multiple layer styles here and opted layer sides. Awesome. This is what we need. It may look weird, but it works perfectly. All right now, let's go ahead and organize our layers here. That's changing two shadows and also this one. Then I'm gonna go ahead and group these layers with their title. And then I'm gonna go ahead and group the colors or shadows with their title. So let's group them on a meat shadows. The 2nd 1 borders Grady ins, gray BG collars, some anti colors, accent colors and the last one primary colors. Awesome. All right. Finally, we finished creating off our color style. I'd And in the next video, we're going to create our input layer size. Thank you so much for watching this video. I hope you enjoyed it. And I will see you in the next video.
70. Inputs: Hey, everyone, welcome back to another video off thes section in this video. We're going to be talking about inputs and we want to create shared layer style for our imports. What do I mean by inputs? Almost every kind of product design such as websites, mobile applications, etcetera need some kind of inputs. For instance, when you want to design a registration for or a log in page, you need those text fields and we create shared layers side for imports in order to make it consistent and make the process of designing much, much quicker. So without further ado, let's get started. First of all, I'm gonna go ahead and just increase the art part size to 3000 and 500. Great. And then I'm going to select great background colors and duplicated Bring it down right here and let's change the title. Two inputs. Great. Now I'm gonna uncheck these fields and use borders and let's choose the primary color for the 1st 1 And now let's go ahead and create new layers. Time inputs slash one. Then let's go ahead and said like the 2nd 1 and choose again the primary color. However, this time I'm going to decrease the all my mount to 10% again. That's used borders and choose the primary color. Now let's create new layer style inputs. Slash Let's write warning. So when something is wrong, for instance, if the email address is wrong or something else, we use thes kind of inputs. And the 3rd 1 again, I'm gonna feel it. Beat the color white and the border with the primary color. And now let's go ahead and create new layer style inputs slash three and the last one. Let's on Chek feels and it's at borders. This time I'm gonna use this gray color and create new layer style inputs for awesome. So now suppose that we're going to create a text field for a registration, for we can go and insert around it here just like this, and then just increase the corner radius small corners. 2 20 Perfect. Let's go ahead and use our inputs. For instance, Year. Let's have the 1st 1 Isn't that awesome? Or suppose that we want to change it to a warning state? We can easy to go ahead. Inputs warning. There we go. That is great. All right. Thank you so much for watching this video. I will see you in the next video
71. Intro to Typography Style: high in these video, we're gonna be talking about the text time, just like what we did with our colors we're now going to be doing with our typography. So in these section, we're going to be creating our own textile. And we need to set different sizes, different weights and also different colors to our typography style in order to use it in our project. So I would see you in the next video.
72. Typography Guide Part 1: Hey, everyone, welcome back to another section of thes course in this video. We're going to be talking about typography styles and we want to create our typography guideline. So first thing fares. I'm gonna go ahead and duplicate the same art board with command D. There we go. Let's change its name to typography. Great. And now I'm going to remove these groups because we don't need them. And also this one perfect and has changed the title to take Parker. Fears bow. And here I'm gonna change it to H one. Perfect. And that's make it smaller. I think 18 would be great. And now I'm gonna make this line a little bit longer. Withholding shift. Perfect. So what we're going to do is to create three different header styles and also three different body styles. So what do I mean by three different sides? So let's create a text year and right sample text, and I'm going to change the color to this one. Great. And then I'm gonna make sure that it is a line to the left. And also I'm gonna go ahead and change the size to 34 pixels grave. So 20 from this line is great. And let's change the line Hi to 50. And also, I'm gonna change the with 2 230 also. So the next thing going to do is to duplicate these texts and put it right over there. And this time I'm gonna make sure that it is aligned to the center. And again, I'm going to duplicate it and put it right over there. And that's aligning to the right. So now what we're going to do is to select all of them and choose distribute layers horizontally, distribute unevenly. Great. So let's change the group text to H one. This is going to be our header one, and I'm going to select these three texts and group them perfect on. Let's duplicate it. 50 is great and that's changed a header toe age two. And then I'm going to select all of these tax and change the phone size to 26 and also the line hi to 44. Awesome! And here we have aged two and that's duplicated again, but changed a header two h three and also select all these texts and change the size to 16 pixels and the line hi to 30. Awesome. And once again I'm going to duplicate it and put it right over there. Change header toe H four and that select all these texts and make them 12 pixels and also the line height of 17. Great. Now let's go ahead and change the group's name, Aged three and H four. Great. All right now let's go ahead and create our share, Starnes. But for thes section we're not going to do for all of them. I'm going to do it by myself, and I will give you the final file in order to use it in your project. So now let's go ahead and select the first text and create new textile. That's right. H one slash left and the 2nd 1 h one slash center and the last one h one slash right. Awesome. So that's enough for this video. And in the next video, we will create our body, Tex. And also we will finish our typography guidelines. So see you that
73. Typography Guide Part 2: Hello, everyone. I hope you're doing well in these video. We're going to create our body text and finish our typography start guide. So without further ado, let's get started. First of all, I'm gonna duplicate one of these. That's put it here, and that's change the header to body one. And let's select all these texts and change the phone size to 14 pixels. Great. Now we need to change the share stars. So let's create new textile here. We're going to change it to body one slash left, the 2nd 1 by D, one slash center and the last one by the one slash Right? Awesome. So now let's duplicate them. But before that, let me change the group name to body one nerd to keep our layers and groups organized and then duplicate them. Then here I'm going to change it to body, too. And that's select all those tanks and change the font size to 13. And once again, let me change the group name to body, too, And this gun to body three. Great. So let's elect all texts and change the font size to 11 pixels, so I'm not going to do the same thing and create new textiles. I will do it by myself in order to save your time. And you can download the final style guide in the resource is section of this lecture. Thank you so much for watching this video. I will see you in the next video.
74. Project 1 - Instagram Redesign: Hey, everyone, welcome back to another section of discourse in thes section, we're gonna be redesigning the Instagram. I am so excited that we finally are going to start our first project. So let me explain to you the design process, off piece application, first thing fares. We're going to design a registration for or let's say, sign up page. As you can see, we have different textiles here. We also designed two different versions off Sign a page and then here we have a page that the user needs to feel he's or her personal later in order to complete the profile. Then we have the completed form, and here we have lugging page. And then we will start designing our feet page or let's say, home page. As you can see here, we will design posts and also stories and all these elements together. And then we will go ahead and start designing off our profile, as you can see here and after that, we will design the camera page off this application. As you can see, we have two different pages for camera. Here is the default page, and the next one is for when we modify the settings and then we will go ahead and design are explore page with different categories. And here we have explore page with search bar and then we have messages and after that we will go ahead and design message here, like, what's app, as you can see and after that, we will design our settings. And also we have an athletics page which is so important, and I'm gonna teach you how to design such a page and how to use other you I kids nerd to get the best result possible. And last but not least, we're going to design three different on boarding pages together, as you can see here. And I'm gonna show you how to get these beautiful illustrations and also the important principles off designing on boardings. So in total, we're going to design 21 different pages of an application, which is amazing. I'm so excited to start this project together, and in the next series of videos, we will design all pages one by one. In order to start this project, please download the file that I already prepared for you, and it is included all the icons and images and all the things you need to have in narrative. Finish this project. You can find this file in the resource is section off this lecture arrive. Thank you so much for watching this video. And I will see you in the next video.
75. Registration Page (Sign Up Screen): Hi, everyone. Welcome back to another video of this section. In this video. We're going to start creating our first page, which is our sign up page. So first thing fares. As you know, we need to create our art board. So let's go ahead and insert on our port Apple device says I'm going to choose iPhone excess Great. That's got its sign up before starting the section, Make sure to install the requires funds and also the required you like. It's from Apple Website. So the funds that you're going to use our called SF Pro text that you can find on Apple website. If you check out developer that apple dot com slash funds, you can download them for free here as have pro, and then you can install it. And the other phone that we're gonna use is called Monsour it that you can download it from Google Fonts website. The other thing you need to do is to have the standard apple you like eat and you can download it came from their website. So let's look for you. I teat apple. There we go, Applebee's and Resource is, and here you can find very very useful resource is, as you can see, you can get the A standard on us. You like eat. Also for Mac OS, watch us and TV us all right. And here you can click on add all your sketch library and it will be added to your library . The first thing we need is to add the state has far right over there. So let's go to insert Apple are usu I Mars status Bar iPhone And here we're going to use light. Perfect. And the second thing is to add the home indicator at the bottom of our screen for Let's go toe apple arias you. I bars home indicator iPhone and we're going to use portrayed and also light. So let's put it right over there and align it. Perfect. Now we're ready to start our design process. So first of all, I'm going to create a circle over there. So let's insert it, Okay. And then I'm gonna feel it to be the Grady int. So that's uncheck these borders and then color radiant. Okay, let's select the 1st 1 The code is going to be seven f three c b one okay. And the other one if eight C nine and zero to and also I'm gonna add another color right over there and let's make it e f zero c and 20 right? As you can see, these are the Instagram brand colors. I'm going to change the direction by these indicators. Let's make it like this and almost 45 degrees perfect. So then let's move it up a little with and duplicated because I'm going to create a line. I think it's gonna be nice. So let's uncheck these fields and check these borders, and the color is going to be this one. So let's move it up and a little bit to the left. Perfect. All right, let's elect both the years and group them and make sure that it's placed under our status bar. Okay, I think it's better to change the status bar to the dark mode because I think it's better to have white on this background so we can select that and easy to go to symbols. Click on that, and here you can use dark. It's easy, right Then what I need is to place the Instagram logo right over there and also the instagram text under that. So let's go ahead and bring those fines from the assets that you have downloaded from the previous lecture. Resource is logo that's select these two. Drag them perfect. So let's change the location of Instagram logo 200 on. Make it larger. I think 62 by 62 would be great. So let's change that. And this one. Let's scale it down and change the with 2 160 and put it right on there. Dean's the ground logo. Okay, As you can see, there is not enough contrast between those colors. So I'm gonna select both off them and Kelly can feels and I'm gonna choose White. Now that looks awesome. Now let's make sure that they are aligned to the center and thats group them. I'm going to change the name to logo. And again, let's align them perfect. The next thing you need to do is to add our sign of title. So let's write, sign up. However, I'm going to change the fonds to as if pro text and also to wait too old. Awesome. That's Jake the padding, its 39. I'm gonna make it 30 The distance between the title and our circles. Let's make it 50 two. Don't worry. We can modify all of those spacing later on. All right. Now let's change the font size to 24. That's great. And then I'm going to create another text. Let's write logging and the weight of regular and change the font size to 18. And also, I'm going to change the color two white. So let's put it right over there and check the padding. So, as you can see, it's 27. I'm going to move it in order to get 30. Perfect. The next thing we need to do is to create our text fields. Okay, so what do we need? We need an email address, takes field and also a password text field. Okay, we're gonna make it simple. So let's go ahead and create another text and right e mail address. And let's change the color to be nine b nine b nine. Okay. Can we can get that noise gray, and also I'm going to make it smaller and decrease it to 14 pixels. All right, the next thing we need to do is to create our text feel line, so Let's go ahead and insert a line. There we go make sure that the padding is right, so we have 35.5 year. We need to make it 30. We need to enlarge it great. And let's change the color to black, but not absolute blank, because it's not a good way to use a pure black against a white background. So let's use this one, and I'm gonna go ahead and copy these color code and use it for our sign of title as well. Great, that's moving down, and I'm going to duplicate this email address and here what we need is a simple, emit address, which shouldn't be riel necessarily. So let's write design at a one media that co. And you can change it to whatever you want. And again, that's changed the color to the same black that we used. However, we should increase the size of this fund because we need to pay attention to use their experience and the visual hierarchy off our design. So let's make it 16. And also let's change the weight two medium perfect. So now let's check the spacing between those elements. We have 9.5, which is not good. Let's change it to six. I'm gonna change it from here, to be precise. Awesome. And here we have nine. So let's make it 13. Great. So I'm gonna group them and they changed the name of Group two e mail address and duplicated. And that's changing to password. Great. And also, I'm going to go ahead and change the title to password. And here I'm going to use some black circles in order to show that in these page, the password should be secure. Okay, So in order to create those black circles, I can hold Ault an eight. That's great. However, for these line, I'm going to change it to some kind off orange or yellow. So let's use f six b 90 A. And the reason that we're going to change these lines color is because we're going to show that how secure are past four days. By changing the color off that specific line. For instance, if the password is too short or too simple, the lines color is going to be read, and that is what we call use their experience. All right, So what else do we need? We need to add some kind of thick icon in order to show that our email address is fine and there's nothing growing with that. So let's go to our I can't folder like Cones, and here we have a bunch of STD's done and it's drag and drop it over dir Perfect. The color is what's it's going to be because I already designed these screens. So the code is for 135 F three. And let's shake the spacing. It's 14. Let's make it 16 and also 15 from right. Great. The other icon that we need is an eye icon because we're going to let the user to hide the password and also show the password. So let's find the I icon. It's right over there. Okay, that's put it here. Perfect. And again, 13 and 15 from right. Great. Before proceeding to the next level, let me organize our layers here. So I'm gonna open off this group email address, and I'm gonna move these done group under this email address and also for the password. Let's move the I into that group. All right? The last thing we need for our sign of page is let's say a next button in order to take the user to the next page. So let's go ahead and design that I can't together. Let's click on insert Shape around it and hold shift button. Great. Let's make you 72 by 72 pixels and change the corner radius to smooth corners and also the amount to 25. And then let's on. Check this border and fill it with our primary color, which is some kind of purple like this done icon over there. So the Cody's for 135 F three. Great. I also want to add a shadow. I think it's going to make it look nice. So let's change the shadow from black to the same color. Remember that when you want to create some kind of shadows, the shadows should not be necessarily black or grey. If you pay attention to an object in real world, you can see that the shadows color is inherited from that object. So we used the route color, which is the same color as our object, and then we're going to decrease the opacity to 30% great and let's change the Y 28 and also the Blair to 11. Can you see how niceties. So we need one more. Think we need an arrow in order to show that we're going to take the user to the next screen. So let's go ahead and bring that arrow. Here we have our right, Let's hold the arrow and also our rectangle in order to align them. All right, great. And now it's time to group that has changed a group name also to next Barton. And last but not least, we need to once again aligning to our whole page perfect and check their spacing. It's 62. Let me make it 60. That's awesome, all right, now that we have designed our sign up page successfully, you can also preview that on your phone. But how is that possible? It's simple. You can install the escaped app on your phone and make sure that your phone is connected to the same wireless as your computer is, and then you can see something like that. Panic orishas iPhone. If you click and that you can preview the page that you just designed right on your phone, that's really cool. So now that we have successfully designed our sign of page. We need to create another version off that, and in that page you're going to include two more things. You're going to add registration with social APS such as Facebook or Google Plus. So let's duplicate our art board with Command E. And I'm going to change the name to sign up Dash Social media. Great. So first of all, I'm gonna hold these two tax feels and move them a little bit up, maybe 20 pixels and also the Spartan. And then I'm gonna add a text and write or sign up with. And let's change the color, too, this gray. And also I'm gonna make it smaller. Let's make it 14. I think that's great. And align it to the center, move it up a little bit. So the other things we need are two buttons, one for Facebook and the other one for Google. Plus, So let's insert around it on. Let's make it 151 by 54 and change the corner radius to 15. And I'm gonna on shake these borders and choose white. You can see anything right now, I know, but we're going to solve that problem by adding some shadows. So now let's decrease the all 4 to 10 great. And that set the eggs to nine. And also why? To seven on the Blair to 24? That's really nice. As you can see, we have a slight a nice shadow order in order to make our bottom recognizable. Or now I'm going to duplicate it and put it right over there and 13 between. Does is great. Now we need to add the Facebook logo and also the Google plus logo. So let's go to I cones. And here we have Facebook local and also Google plus Local. That's drag and drop them over their great I'm gonna put Google plus right over there and also Facebook. They're So now let's add a text line, then right Facebook and 14 is great. Let's change the collar to this one. Put it here. That's align it. Now I'm going to check the distance between the Facebook logo and the stakes. It's 12. Let's make it eight and then group them and select this group, be these rectangle and once again aligned them awesome. And we're going to do the same thing for Google plus So that's right. Go, go plus and change the color to this one. Go, Go Plus and a distance. It's gonna be eight and align it. And then that's group them and select this rectangle and align them both horizontally and vertically. Right now, let's change the group name to Facebook. Okay, To put it here. And also this one to Google. Plus And now let's elect both off them and again group them in order to align it with other elements easily on. That's right. Social APS. All right, we have 34 pixels to the bottom, so I'm gonna make it a little bit higher. I think 45 is great. And also for sign up with text. Let's make it 10 to 1. And for this one, I think 30 pixels would be great. Yes. All right, guys, congratulations. You have successfully created your fair screens, and as you can see, the result is awesome. I hope you enjoy this video. I will see you in the next video.
76. Personal Data Page: Hey, everyone, welcome back to another video off this section. In these video, we're going to be creating our personal later page and also the personal later completed page. So without further ado, let's get started. First of all, I'm going to duplicate one of thes art boards because we're going to need these status bar and also the home indicator. So let's go ahead and remove the rest of our design. I'm going to select I love them. Perfect. And then we need to change the status bar from dark to light because the background of this page is going to be white. Then let me change the our part. Name too personal. Dado Great. So what do we need for this page? Right at the top. I'm gonna put a circle. So let me insert it in order to let the user to upload their profile image on Let's make it 120 by 120 and aligning to the center and let's on Czech Borders because we don't need that . And I'm gonna feel it with our primary color. Okay, So because we're going to use this color as our primary color a lot throughout our project . I'm going to create a shared layer style in order to make your life much easier. So let's go ahead and write color. Primary. Careful, Awesome. And after that we need an icon. I think it's good to put a camera icon, so let's open up the file, all right, and let's open up the icons on. We need to look for camera, so verities I'm gonna drag and drop it right over there and put it right in the center of that circle. And if you said, like both of them, we can align them both resentfully and vertically. Perfect. Let's group them and change the group. Name to profile image. Great. And let's shake the spacing. It's 41. Let's make it 50 perfect. And what else do we need? We need a left arrow in order to create some kind of navigations between our pages so the user can go back to the first page and saw. So let's open up the fine. And here we have arrow left and the padding is 25. Let's make it 30 and also the top padding is 25. Let's make it eight. Great. All right, so Now it's time to create our text fields. But in order to make our design process much quicker, I'm gonna go ahead and copy and paste one of thes text fields that we already created. So let's copy and paste it with command C and command be great. And let's change the group name to use their name. And here I'm gonna go ahead and change the title to use their name as well. And here, instead of thes email address. That's right, you're user name. All right, let's copy and paste thes collar code and use it for these takes as well. However, we need to change the way to regular and also we need to change these lines color to the same gray, and we don't need these done here. However, instead of removing that, we can hide that because in the next page we're going to need that I can, so it's a good practice to hide it from here. All right, let's go ahead and duplicate these text field and put its right over terror and changed the title to first name and here your name and I'm going to change the group name to first name and again duplicated. Let's change the title to last name. Also here. Your last name. All right, so let's go ahead and change this group name as well to last name. And now I'm going to show you something in order to set the spacing between these three takes feels you can select all of them. And as you can see, we have an indicator here in order to change the spacing evenly, quickly and easily. So I'm gonna set it to 24. Great. And let's group them all. And here that's right. Text fields and aligning to the center on. Move it a little bit up and the padding gives 127. So let's make it 120. Great. And the next thing we need to do is to add a shadow toe, our profile image holder to make it look nice. So let's select that circle. So, in order to use the same shadows, like what we created for these button, you can create a new shared layer style. So let's select that button. And first of all, I'm gonna uncheck these fields. Anglican No layer style here. That's right. Shadows purple. Okay, So now if I choose the circle and Quicken shadows here, I can check the fields. You can see we got the same shadows that we created their awesome. The next thing we need to do is to create a complete button and put it right at the bottom of our screen. So let's go ahead and insert around it and make it 200 by 71 and also make the corner radius to smooth corners and change the amount to 25 unchecked thesis porters and again color Primary Purple and also shadows Perfect. Then let's write complete here and make its 18. And it's changed a collar to white. And also, I think it's good to add the same teak button right over there. So let's coffee that and paste it here and Scalea too 22 by 16 pixels and changed the color too white and then select both layers and align them vertically. And also the spacing between those should be 16 pixels. And now I can group them and one more important thing, because in these screen the form is not completed yet. Okay, so they use their can Nuts used this button So we need to show the user in a way that our bottom is deactivated. And in order to activate that, the user needs to feel this form completely. So you can do it in a way or another, for example, can change the color of bottom to something lighter were to something gray to show it, that is, to show it that it is disabled. However, in this project, I think it's better to decrease the opacity off our texts and this icon to 50% to show that and after that, that select both layers that this rectangle and also our takes an icon and align them both vertically and horizontally. Perfect. We can also group them and change the group name to complete button. And if I hold old, I can see the padding its 74. Let's make it 60. Great! All right. Our personal later page is ready to use. However, we need to create one more page, and that is the person later completed page. So let's go ahead and duplicate this page and change its name to personal data. Complete it and we don't need this icon anymore. Let's remove that. I'm gonna hold command and select the circle, and I'm going to add a photo to our circle. So how can I do that? You can either bring your own photo or get your own photo from any website you want and make sure that you check the credit of that photo that you're going to use. Or you can easily go ahead and use the sketch database. You can click on T's data and here sketch data and click on faces. Great. You have a very nice photo. Then I'm going to change your user name to John underlying Smith and also the first name to John and also the last name to Smith. You can write whatever you want and also I'm gonna hold command and shift and select all these texts and change the color to our primary color here and after that again, I'm gonna hold command and chief and select these lines and change the caller to this black one. So let's use the I drop her. And here we used the same black. There we go. And last but not least, we need to add the teak icon over there in order to show that the text fields are filled correctly. Do you remember the tick button that we hide when we were designing our previous page? Right. We need them here. And I can open up these groups and I can present them easily. The last thing we need to do is to increase the capacity off our techs here. Because now the state is different. All the text fields are field completely. And now the user can use this button inner to complete he's or hair profile. All right, guys, we have successfully created our personal later. And also personal data completed screens, which is awesome. I hope you enjoyed it. And I'm going to see you in the next video.
77. Login Page: Hey, everyone, welcome back to another video of thes section in these video. We're going to be designing our liking page in three different versions. So without further ado, let's get started. First of all, I'm gonna go ahead and copy the sign up page and that's paste it right over there and changed the name of these art for two lugging dash typing because in the space we're going to present our keyboard and we want to present the case that the user is typing something. So let's duplicated again and change it to liking. And once again, changing to lugging passport in these page, we're going to change his eye icon and show our password. And also in this page, we're going to just change the sign up title to log in okay and the liking button to sign up. But before doing that, let's make sure that it is aligned to the right. Okay, because we need the same spacing and padding over there. So now we can change too. Sign up. Great. As you can see, the padding is steal 30. So let's come back to this page. What should we do right now? We need to remove the Spartan because we're going to present our keyboard here so we don't need that. And let's go to insert Apple are usu. I ceased them keyboards, iPhone And here we have two different versions off that keyboard. The 1st 1 is dark, the 2nd 1 is light, and this is what we need. And also here we can choose between different versions off that light keyboard. Do we need alphabetic or emerges or numbers? We need alphabetic. So let's use that and insert it right at the bottom, and we can remove the previous home indicator. And also we need to change this sign up to log in and these logging to sign up. Great. The last thing we need to do is to change the location of our tax feels and also this title . So let's select both of them and move them up. And also let's elect piece title as well. Okay, the top padding should be 12 in here. Let's make it 24. Okay, because I'm gonna go ahead and add the auto correction to our page. So let's go to insert apple on us. You I sees them keyboard, iPhone, light and here. We have different other correction bar. I'm gonna choose the 1st 1 and what? It right over there. All right. The last thing you need to do is to add an input text marker to show that the user is typing. So let's go ahead and insert a line here. That's old shift and drag and drop, and I'm gonna make the with to 1.5. And also that's changed to start an end here to 75 and 75. Great. So now I can easily choose thes eyedropper and Kitty Candy Scholar Perfect. So lets align them. That's great. The second page is ready and the last page that's changed the title to log in as well and here, logging to sign up. And then we need to change these eye icon. So let's go ahead and open up. Our icons file here. We need to look for I hidden. As you can see. We have it here. Let's try and drop. There we go and put it right over there. Awesome. That's shake the patty ing's great and I'm gonna move these group to Password group, and now we need to show the password to user. So let's change it from thes black, sir kills two riel password, for instance. It could be you. I ate for seven You. As you can see, we have six circles here and six characters here. Great. All right. Thank you so much for watching this video. They have successfully created three different versions off our lugging page. I hope you enjoyed it. And I'm gonna see you in the next video.
78. Feed Page: Hi, everyone. Welcome back to another video of this section in these video. We're going to be designing our homepage. So without further ado, let's get started with adding an art board Great. And that's got it home. And I'm gonna go ahead and copy and paste thes status bar from the previous screen to here . And let's change it from dark to light. Great. All right, From now on, we need to add a tap part. Our pages right at the bottom of our screen we can easily inserted from are your keys from here Bars tap ours regular. You have plenty of options. However, I'm going to teach you how you can make it but yourself. The first thing we need is to insert around it and then let's make the height 129 and change the corner radius to 24 and also smooth corners. After that, I'm gonna on shake borders because we don't need that. And also let's make it white. As you can see, there's no contrast between our tap our and the page, so we need to add some shadows, and that's changed your pass iti to 18% and also Let's make the Blair seven awesome. Can you see a snide shadow order that is enough in order to make the kind of contrast that we need? So now let's move it a little bit up and add a home indicator that's copy and paste it Here . There we go. And if I double click on that, you can see that those circles will appear. If I hold chief and three condos, for example, this one and that one, I can change the corner radius 20 great. And then I can decrease the height off. Our tap are awesome. Now it's time to add our icons here. The first I come we need is a home icon, so let's go ahead and bring it here. We have home active home, the active. So for now we need home active because it's our home page. Let's put it here. The next thing we need, ease the search icon, and here we have searched the active that's put it there, and two more things one is like There we go and the arteries profile. Great. All right. The next thing we need is to create another button, which is our at button when the user wants to post something. So let's insert around it and decrease the corner radius. Let's make it 38 by 38 also the corner radius to 14 and I'm going to go ahead and on Czech Borders because we don't need that. And we need to choose primary color for that square. The next thing we need is to add some shadows so we can easily choose shadows here and this feels great. And finally, we need a plus icon right in the center of that square, and we have it in our fine plus that's put it here. And let's change the color to White, and I'm gonna make it 20 by 20 big souls and let's elect him and align them both vertically and horizontally. And now it's time to group them. And that's college, huh? Bottom Great. So we have all the icons and buttons we need. Now it's time to organize them. I'm going to change the height again to 87. I think that's appropriate. And now let's elect all these icons and Quicken, distribute on evenly and then group them. And again, let's select the rectangle and also our icons and once again aligned them to the center. All right, now I'm going to change the padding of these home icon, so we need to own group them again. Otherwise, we cannot shake the spacing. It's 51. I'm gonna make it 25 great. And also from the search icon to these home button. I'm gonna make it 42 and these pro firing, also 25 to the right great and 42 for these, like button on, Let's say, heart icon, that looks great. You may be wondering why they are not placed evenly. It's because sometimes, in order to keep the balance off our icons, we need to try difference pacing to balance the manually. So I think it's the best spacing possible for here are right now that we have created our tab are we can create a symbol, nor to use them easily. So let's select all those elements and also this home indicator and the rectangle and click on create symbol. And here we can write Tab bar. Awesome. So from now on, whenever we need the stop bar, we can easily go to insert dark humans. And here is our tapper. That's awesome. Now it's time to create our posts to do that. Let's drag and drop around it here. There we go. I used a shortcut to do that and eighties the you button on your keyboard. And then let's make it 341 by 341. And also let's change the corner radius to 36 uncheck these borders. Great. You can see that we've got 17 pixels from right and 17 big cells from left, and that's fine. So now it's time to add our photo here. How can we do that? We can either use random photos, or we can go toe on splash dot com and get the photo that we want. So I already did some research and found some great images for our project. However, you can use whether you want. So now let's go ahead and open up the photo files. There you go images and number one is going to be our first image. There we go. Let's put it right here and now we need to select thes photo and also the rectangle that we just created both and click unmask Perfect. And now let's change the group name to post one, and probably it's great to add some shadows. So let's use the I drop her and select one off the colors off this photo. I think this blue would be great. However, we need to decrease the opacity to 15. And also let's change the X 24 and of why, to 11 and the Blair to 29. Perfect. As you can see, we don't have any tax here, so let's create one That's right. Beach time. It is pretty relevant. Haven't changed away to medium right, Let's put it here. And that's duplicate it because we need subtitle as well. And here we can write such an amazing and sunny day on Let's make it 16 and also regular. All right now we need to write our hashtag so let's right hashtag beach hash tag Sunny in High Stag summer. And then let's increase the line high to 24 Pretty awesome. Right now it's time to check our pad ings, so let's select the beach time, which is our title, and you can see it's 25. Let's make it 24 the bottom padding it. Six. Let's make it eight, while some. And also here we have 27. That's making 24 which is like our left padding. So can you see that there is not enough contrast here and our taxes? Not that readable? So I'm going to teach you treek in order to solve that problem that's insert a shape. You're, for example, a rectangle and drag and drop it and on Czech Borders because we don't need that and put it right above our image. Great. And then click on these color and use Grady Int and click on the circle and decreased the all thought to zero and then click on the other circle and used the eyedropper to choose this blue. And also, if I click on these circular gain can see it's white. I can make it black or the same white. I think black is better. Can you see how amazing it ease? So what else do we need? We need a heart icon, nor to show the number of likes that thes post got and also the number of comments. So let's go ahead and open up our files Goto icons and here we have like there we go Let's put it over there and a scale it down to 14 peak souls and also change its collar to white . These are the SF pro icons, and you can get the software from the Apple Developer website for free. And I can also change the thing here to medium to light. Great. Then I need to text that's right, 1.2 k and change the text color to White and align them vertically and also said the spacing between those two four. Great. So let's group them and also change the group name to likes. And then we need to add the comments right there. So let's go ahead and bring the comment. The comment icon It is here it's put it there and copy and paste thes text and change it to 220. Gagne said. The spacing to four and now let's group them and changed its name to comment and the padding to the left would be eight. That's group these two right like and comment and check the right padding its 25 Let's make it 24 hold shift and select thesis title to align the vertically. Everything is great but I think it's better to change the weight of these icon to think that's awesome, all right. The next thing we need to do is to create the owner information right over there. So we need to add a circle for the pro fight image. It's 38 by 38. I think it's okay and that's on Czech Borders. And again we need to use the schedules database in order to add a face to our circle. You can also refresh the data if you're not happy with debt. I think it's great. And then a text. That's right. Alright. Underlying hard said it. She's my I D on. Let's make eat 16 pixels and the padding to the left could be eight and also changed. Await from theme regular. Great. So let's go ahead and group them and write post owner. Let's shake the pad ing's. It's 12 from bottom and told from left, Let's make it 16 from left and eight from bottom. That is pretty us. The last thing we need in order to complete the creation of our post is to add and more buttoned right over there we have it's in our icons There we go. It's 18 by 19 pixels. That's okay. That set the right padding to 16 as well. And the bottom padding to 17. That is pretty awesome. And now we can group all of these elements together and colleague post one. Fantastic. So now it's time to create our second post. But before designing that together, I'm gonna ask you to pause the video and go ahead and design it for yourself. You can choose any photo you want and any content you want. Just go ahead and do it. All right. Welcome back. Have you designed your post? I hope you did that. So now it's time to do you together. I think we forgot to group these elements as well. So let's go ahead and put them right here and call it post one. Let's move it a little bit up and I'm gonna duplicate it. Great. That's high. Thesis one for a second. Now we need to change. The photo has realized the tax and also the profile image and this user name. So how can you do that? You can either bring your own photo or you can also use some plug ins to do that. For instance, I have here some content generators. As you can see, I can look for any foot I want, or here as well as you can see, there are different groups that you can choose from. However, for these scores, I prepared another photo that you can get access to from images. There we go. That's dragon. Drop it and I'm gonna hold Command Key and click on our photo and remove that. And instead, let's put these photo right above the mask. Awesome. So for these photo, I'm going to change the grading color from that blue to something like this. That is pretty good. And that changed the title to photo Shoot and also the subtitle to the last day off these project Awesome. And also let's change the Hashtags to photography Warrick and modeling. Great. Did you see how is eighties to create new contents? Now let's change the user name here to anything you want. You can add your use, their name or anything, so let's write your user name and changed the photo again. Refresh the data. That's awesome. And the last thing we need to do is to change the shadows So let's select our mask and change the shadow to dis gray and 15. That's also now you can present a previous post and put the second post here below our tap bar. Let's put it down. Also disposed. Here, arrive. Thank you so much for watching the studio. I hope you enjoyed it in the next video. We're going to design the stories and put it right above our posts. So see you then.
79. Stories: Hi, everyone. Welcome back to another video off thes course in these lesson. We're going to design our stories and put them right over there. So without further ado, let's get started. First of all, I'm going to create some circles. So let's hold shift. There we go. And let's make them 68 by 68 and then shake the borders on. Let's shake the padding. It's 17. That's great. And now let's duplicate it and put it right over there. And if I hold chief and all and try to duplicate it by dragging it, and I placed it here with a pixel padding. From now on, if I use command D, it will be placed automatically in the right location. That's fantastic. Now let's choose them all, and we're going to add some photos to them. So how can we do that? You're right. You can go and use the schedules, database, sketch data faces that, uh, that's great. If you're not happy with those pictures, we can refresh the data as much as you want. See how easy teas. All right, the next thing we need to do is to change the photo off this circle because the first photo is going to be the accounts owner photo. So let's go ahead. This is our owner and copy and paste thes photo that's on Chek Shadows and Scary down to 68 and put it instead of these. Circa. That is great. So what else do we need to do? We need to add borders to these pictures. So let's shake borders and change the with 22 And here I'm going to use Grady INTs, and the first color is going to beat this one, and the 2nd 1 is going to be this one, and that's changed the direction. Great. But in my opinion, it's better to decrease the wave toe 1.5. It's much better, and the last thing we need to do is to add a plus button over there. So let's go ahead and insert circle and let's make it 14 by 14 pixels and on Shake the borders on, Let's set the color to diss black and then I'm gonna move, eat right above other circles and place it here. So the last thing we need is to add a plus icon to it. There we go, and that's scaling down to six and put it right over there and change its color. Two. White and let's shake the pad ings. 44 and four. That's great. That's group them great. All right. Now let's group all of these photos and write stories, and let's set the top heading to eight. Okay? And I'm gonna go ahead and create a line in order to separate these two sections. And it's gonna be 17 in 17 from right? Awesome. And also let's set the color to E 99 any night. Okay, let's make it 131 and 131. Okay. And check the padding. Its 11. Let's make it 17 from top and also 17 from bottom. Great. And the last thing we need to do is to check the spacing between these two posts. So, as you can see here, we have 32 picks. Souls. Let's make it 24. That's awesome. All right, guys, I hope you enjoyed this video. I will see you in the next video.
80. Profile Page: everyone will come back to another video of these course in this video. We're going to be designing our profile together. So without further ado, let's get a started. We'd duplicating these art board and let's change its name to pro fine. And then we need to remove these elements because we don't need them. Great. Everything except our tapper. So first thing first, because it's our profile art board. We need to deactivate this home button so its appearance should be changed to something else. If you look at the icons that you have here, we have home the active. That's dragon. Drop it. As you can see, it's an outline. I can't like the others. So how can we change that? Because it's on except symbol from Apple. We can easily double click on that. It's like a text and copy it and again, double click on this one and pace it. It's so easy, right? Great. The next thing we need to do is to create our profile image right over there. So let's go ahead and insert a circle and hold shift. There we go. That's on Czech Borders and change it to 90 pixels by 90 pixels. Perfect. The left margin should be 29 and the top padding should be 90. Great. So let's add a photo to our circle data skate. Shada faces and it's refresh it. Gain are right. That's fine. Then we need a left arrow in order to be placed right over there for our navigation purposes. So let's bring it as well. We have it here. Copy and paste it. We can also create symbols in order to make your life easier. All right, now, let's create a text for our users Name and right Emma famous and changed the phone to SF Pro text and also from between two medium great and change the color to 40 tree 40 tree and 43 Great and also decides to 22 are right. We have 22 picks cells from the left. That's enough. Let's duplicate it. And here I'm gonna write her specialty, which is, for example, make a parties make up artist. All right, let's decrease the font size to 14 points and then from medium to light. And also the change the color to nine C nine c and nine c. Perfect. Okay, that's changed a spacing. It's 26 to the top. That's enough. And then what we need is to create two different buttons, one for letting the user to follow this specific user and the other one for sending a direct message. So let's go ahead and insert around it. Let's make it 116 by 32 on Czech Borders and the corner radius to 16 are right, and then we're going to change the color to 4135 F three. Great on, Let's right, follow and change it to bold and make it white. Great. That's aligned them perfect, and I'm going to group them on. Let's call it, Follow Martin and then that's duplicated and changed its name to Message Button and remove these text and also change its size to 40 by 32. I'm gonna put it right here with an eight pixel padding are right. Now let's change its color to two D B three and e five. Awesome. In order to complete creating this button, we need one more thing, which is an icon. So let's go ahead and bring it here. We have a message. There we go, that's aligned them awesome. The other thing I'm going to do is to group these two texts to use. There's name all right, and the spacing here is 13 picks cells. Let's make it 14 and that's group all of these elements in order to align them with our photo. So let's click on Align vertically. Great. Now I'm gonna groove these elements with these photos low and change its name to users. Information. All right. Now we need to add another button, which is a hamburger menu button. So let's bring it here. We have menu, we need to put its rights over there, and the padding is 29 which is great, that select are left arrow in order to align them awesome. And then we need three different tax in order to show the number of posts and also the number of followers and following. So let's write photos and change it to regular. And also it's collar to the same gray here. All right, and let's make it 13 points, and then I'm going to duplicate it and put it right above our previous text, and that's right, 45 change its size to 14 points. Then that select both of them and align them to the center. Great. Let's group them photos and then I'm going to duplicate it, which it right here and here. Let's write followers on once again. That's changing to one K and select both off them and align them to the center and change its name to followers. And the last one, which is followings following. And here, that's right. 80 and lined them great. I'm gonna call it following as well. Awesome! All right. What I'm going to do is to set the left fighting to 42 also for the sons that they're right padding to 42 as well. All right, And then that select all three of them and Quicken distribute layers horizontally. Group them. It is our statistics, so let's college status stick are right on that. Shake their spacing. It's 24 I think it's great, right? The next thing we need to do is to create our posts. So unlike Instagram that has Onley square photos imposed, you're going to create post with different heights. That is fantastic. It's gonna be like Pinterest, so let's insert around it here and change its radius to smooth corners, and I'm going to change its size to 152 by 144. Great. Let's on Czech Borders. I'm going to change its with two 152. Great. Now let's duplicate it and put it right over there and change its high, too. 218. Great. And that's duplicated once again and put it here. And let's duplicate it for the last time and put its right over there. And that's changed the high to 214. That's great. So now, instead of dragging and dropping our photos here and then masking them, I'm going to show you another way that you can do that that select this first rectangle and go to feels and the last option. You can feel it with any image one. So let's choose it from our files are right. I'm going to choose number three. There we go. It seemed that right? And the next one as well. I'm going to choose number four and the next one it's going to save us so much. Nine. The next one gonna be number five. And for the last one, that shoes number two which we used here. That's amazing. All right. Everything is great. Thank you so much for watching this video. I hope you enjoyed it. And I will see you in the next video.
81. Camera Page: Hey, everyone, welcome back to another video off this section. In this video, we're going to be designing our camera pages. I'm so excited. So without further ado, let's get started. First of all, I'm gonna insert another art board iPhone access on. Let's put it right here, and I'm gonna Akopian pace thes status bar. And we also need at home indicator. So let's insert it bars home indicator on phone light portrayed. Let's put it here and align it. Great. So what do we need here? First of all, let's go ahead and change our art boards. Name to camera. Off course. We need a photo here in our background, so let's insert a rectangle and dragon. Drop it in order to feed our page and put it right under other elements. Great. I cannot check borders. We don't need that. Then let's go toe feels pattern feel, and here I'm going to choose this photo number six. Great. I think it's better to change the color of our status bar from light to dark. As you can see, it says dark. It means it's suitable for dark background. But as a matter of fact, this is the light worship. Then we need a shutter button rights over there. So let's go ahead and insert a circle and drag and drop here. Let's make it 60 by 60 and I'm gonna intake fields and change the borders Caller toe white . Then make sure that it is in centre option right here and also changed with 22.7. Great. As you can see, the spacing is 27. I'm gonna make it 40. There we go. I think it's good to Poots, a setting icon right over there and also an image right there in order to choose another photo from Gallery. So let me go ahead and bring our settings. I can hear it's turned to buy 24 pixels. Let's align these elements together a line layer to bottom, awesome and also the padding to the left. Let's make it 24 pixels and then I'm gonna insert another circle right here, and that's changing to 44 by 44 pixels and on Czech Borders Anglican data. Because we need another face. That's awesome. We can refresh that as well. Great. Then I'm gonna add some shadows that set the X 25 the y 22 and a Blair to for teen. That's awesome, then that select all these elements and allowing them to the bottom. All right, let's check the padding. 17. Let's make it 24 grave and also align our shutter button to the center. That's fantastic. What else do we need? You're right. We need thes left arrow to make the user able to navigate through our project. So let's change its color to White. Great. So now I'm gonna go ahead and duplicate this art birds in order to design the page that the user is modifying the setting. So let's change its name to camera settings. And then I'm going to remove these three elements because we don't need them that Mizzou mean and I'm gonna insert around it. Dragon. Drop it here and it's make it 338 by 45 and on Czech Borders. Let's set the color to black and decreased capacity to 18. Great for these something I'm going to use Blair's option. So let's click on here and choose background player Perfect, and I'm gonna increase the background player amount to 41. That's great. So let's check the pad ing's Let's align you to the center and its bottom padding is 28. Let's make it 33 all right, and now it's time to add our icons. So we need to add five different icons here. Flash, brightness, contrast, crop and stopwatch. There we go. That's select all of them and put them here. I'm gonna align them vertically. There we go. And then let's distribute them on even the all right. So let's change the left padding, too. 30 great and also the right padding to 30 as well. And for these crop icon, let's change it to 42 to the right and 44 to the left. Let's elect these contrasts icon and this wreck tango and aligning to the center, and it's gonna be 42. There we go, and also for thes crop icon to the left. Let's make it 38. All right now let's select all of them and click on distribute layers, and then we have these indicator that we can change the spacing evenly. So now let's make it 36 big souls and group them and select these rectangle and aligning to the center. That is great are right. We completed our camera settings and also our camera page. I hope you enjoyed it in the next video. We're going to create our explore page, so see you then.
82. Explore Page: Hey, everyone, welcome back to another video of this section in this video. We're going to be designing our explore page. So without further ado, let's get to start it. First of all, I'm gonna go ahead and duplicate this profile page. There we go on, That's college. Explore. Great. And I'm going to remove almost all elements here except our status bar and also our tap are great. Now we need to change the search bar are now in order to change the search. Far we need to detach it from symbol. So let's right click here, detached from symbol. And here let's double click on that. There we go and I'm going to change it from theme to regular Awesome. The next thing we need to do is to add a text here on Let's Right places. We're going to create three different sections, places trending and popular. So let's change the font. Two months, Sarah. Great and change the way to bold. And also I'm gonna increase its size to 30 points perfect. And let's change its color to dese gray Awesome and it's left padding is going to be 30. So it's now it's great and then we need to insert around that here. Let's change its size to 130 by 130 it's corner radius to 17 and I'm gonna unchecked borders now. We don't need smooth corners, so let's keep it around corners and it stop adding going to be 16 and 30 to the left. Great, Then that's duplicate these text and put it right here and change its size to 18. And here, let's write ma leaves and let's put it here with a 16 pixel padding. And let's duplicate it once again and put it right here and change its size to 16 and from bold to regular. And also we need to change its color to see the CD CD. There we go. And here, let's write the number off post. For example, 35 posts awesome and the top adding gets to pick cells. Let's make it three. That is awesome. And I'm gonna go ahead and group these three elements our around it, and hear these two texts. It's going to be our first category, so let's college mall leaves great. And then I'm going to double click on that and let's go to feels pattern feel and choose a photo from our photos images. And here, let's click on number seven. Great. We can also add some shadows here to make it look better. So let's go ahead and choose this nice blue color and decrease its all for to 20%. And then said the X 2 16 y 28 and Blair to 33. That is awesome. And then I'm gonna go ahead and duplicate it and put it right over there, and the left padding is going to be 16 pick souls. And once again, let's duplicated perfect. And then let's go ahead and change this photo first to number eight. Great. And here let's right, France and changed the number of posts to 13 posts, for instance, and the next one as well. Image Choose image number nine. And that's changed the title to New York and the number of posts to 45. Fantastic, but we need to also change the shadows collar here, so let's go ahead and choose this one and decrease the Alfa to 20 for this one. The same is great, and now let's elect all of them. Also select this title in college places. Then I'm gonna go ahead and duplicate it and put it right over there. We'd 40 big cells margin great, and that's changed its title to trending. And then I'm gonna go ahead and again change its photo to number 10 Thesis Blue Orange. So that's right. Blue orange. That's interesting. And change the number of posts, too. 120 and also the shadows to this plume change the all foot 20 and the next one the same process. I know it's kind of repetitive, but practice makes perfect. That's shoes number 11 and changed the title to Boardwalk Awesome and changed a number of posts to 17 for instance. Always try to use riel images on real contents. You know it's really matters, and the last one, Let's make it. It's one number 12 and and changed its name to Beach and the number of posts to 90 Great. And don't forget to change the group's name to trending and let's go ahead and duplicated once again. And let's change it too popular and put it right under our tap bar and change its title to popular on. Make sure that the padding he is going to be 40. Great. All right, don't worry. We need to move them. The top padding is going to be 67. That's great. I'm not going to change the content off the last category, which is popular. If you want. You can do that for yourself. I'm not going to take your time, and the last thing we need here is a search icon right over there. So let's go ahead and bring that we have search Great, let's put it here and the right padding is going to be 30 as well, and the bottom padding is going to be 14. That is pretty fantastic. The last thing we need to do is to change these icon color to the same gray here. Perfect. All right now are explore. Page is ready, however. We need another page in order to demonstrate how the pay should look like whenever the user is trying to search something. So let's call this art board, explore, search awesome, and that's removed the search icon. So whenever the user clicks on the's button over there, it's going to be hidden, and instead we're going to present a tax field that he or she can typing. So what I'm going to do is going there and copy and paste one of our takes field because we need to be consistent. There we go on, Let's change its color, our primary color great. And the bottom padding is going to be 30 then here we need attack. So let's write, travel and make it regular. And also let's decrease the size to 16 points and change the color, too. The same primary color and the left padding is going to be 16. So let's check it out. That's great. And the bottom padding is going to be eight. Perfect. The other thing. We need these attacks input marker. So let's copy and paste it. I'm gonna put it right over there. However, I'm going to change its color to yellow for this page. So the code is F six B nine and zero. A great. The last thing we need is a dismiss bottle to put it right over there. So let's bring it here from our icons. There we go. It's going to be the same color. You can change it if you want. However, it's the same color were using for this project. It's going to be 12 from right and six from bottom. And then let's go ahead and group these elements together in college Search bar. All right, now, we need to change something here because we are searching the war travel. We need to remove some of these categories. Okay, so the first thing I'm going to remove is the popular section, and then I'm going to remove this blue orange category and move these categories to the left. Great. And then let's select thes two sections and moved them down. It's going to be 56 to the bottom. Great. And also move the search bar down as well. And it's going to be 32. The bottom. That is pretty awesome, isn't it? All right, guys, Thank you so much for watching this video. I hope you enjoyed it. And I'm going to see you in the next video.
83. Messages Page: Hi, everyone. Welcome back to another video of thes course in these video. We're going to be designing our message page. So without further ado, let's get started. First of all, I'm gonna go ahead and duplicate thes explore page here. Great on That's changed its name to messages. Great. And after that I'm going to remove almost all of these elements and also these categories. However, I'm going to keep peace title, and that's changing two messages. Great. And after that, I'm going to, and after that I'm going to create three different cards for our messages. So first of all, let's insert around it here, all right, and let's change its size to 315 by 85. And also let's change the corner radius to smooth corners and it's amount to 20. Fantastic. And then we need to uncheck Borders, and that's changed its collar to white. And after that I'm gonna add some shadows and let's decrease its all far too 12 right and change its X 2 19 And that set why, to nine and the Blair to 38. Great, then we need a photo here, so let's go ahead and insert the circle and its size is going to be 26 by 26 big souls and on shake borders. And let's use data here. Great and it's left and top padding is going to be 16. Awesome. And then we need a text to write the name of this user. That's right, David Smith, and I'm going to change the way to Regular and also its size to 14 points. And let's change the color as well to D, B, D, B and d be fantastic. So let's align these two. All right on the space between them is going to be eight pixels. The last thing we need is another tech. So that's duplicated. And here I'm going to write new message from David, and that's change its color. The same gray that we have here. And I'm going to change its size to 16 points and it stop adding is going to be eight pixels and the left fighting and also bottom padding is going to be 16 pixels. Great. Now it's time to group these elements together and colleagues message want. All right, so here I'm gonna go ahead and duplicate it. However, instead of doing that you can also create a symbol in order to make the process off, designing these messages much quicker. So let's go ahead and create a symbol. And here I'm going to write cards slash message. All right, so from now on, if I go to document, I can see cars here and I can put it here. All right. Great. So now that we have a symbol, we can easily change everything here. So now let's go ahead and change its photo that select that and click on data Refresh data for Master. Let's refresh it once again. Great. And then let's choose thes text. And here I'm going to change it to sorrow. Williams, can you see? How is it? Ease? And then that's used the stakes and change it to, for instance, Saara posted. I knew we dio fantastic. Then let's go ahead and duplicate it and put it here. And once again, that's changed this photo great. And also this name to Emma Jones. And also I'm going to change these text to Emma Life your post. All right. That is pretty fantastic. Wait, What if I want to add something to our symbols? For instance, What if you want to add a time here in order to let the user know the exact time that this notification or message has been received? Or also, it's add small arrow here. So in order to do that, because the you see molds, it's so easy. Okay, so let's double click on that. It's going to take us to the root. Or let's say the master file, I'm going to zoom in. So whatever changes you make here, it's gonna apply to all of those cars that we just created. So let's create attacks on right one hour ago. I'm going to change its color the same light grade that we have. And also let's change its size to 12 points and it's right and bottom padding is going to be 16 pixels perfect. And also, I'm gonna add a little arrow here, so let's bring it from our icons. As you can see, we have small arrow, so let's bring it over there. Awesome. And I'm going to change its color to our primary color so you can double click on that and choose our primary color. Fantastic. And it's right. Padding is going to be 16 as Ball and its bottom padding is going to be six. Perfect. Now, if we return to our incense, you can see that it applies to all of them. However, we need to change these times as well. So let's go ahead and change it to two hours ago and the next 1 to 1 day ago. Let me go to the master once again in order to make sure that we align these time correctly . As you can see, it's the line to the left. How whether it needs to be aligned to the right. Okay, now it's great. And then let's select all these three messages and check the spacing between them. It's 21. Let's make it 16. Awesome! And also it stop hiding is 38. Let's make it 40. Amazing! Can you see how powerful this symbol feature is? It's going to save you so much time than you're designing a user interface. All right. Thank you so much for watching this video. I hope you enjoyed it. And I'm going to see you in the next video.
84. Chat Page: everyone. I hope you're doing well in this video. We're gonna be designing our chat page. So, as a matter of fact, this is a page that when a user clicks on one of these notifications or cars is going to show up our right without further ado, Let's get started. First of all, I'm going to go ahead and duplicate thes art board and let's put it here in order to keep our campus organized rate, and I'm gonna call it chat, and then we need to remove almost every thing. So let's remove these cards. And also, surprisingly, we need to remove thes tap are. However, we need a home indicator. So let's go ahead and copy and paste it from here. Awesome. The first thing we need is a navigation bar. You can easily go to insert apple on yours. You I bars navigation bore iPhone compact, and here you have two different versions because it's the Arya's 13. You like eat. However, instead of choosing these default one and put it here, I'm gonna show you how you can create your own customizable navigation bar. So let's go ahead and insert a rectangle here. All right, and let's change its size to 375. Okay and tie to 88. It's the standard one, and I'm gonna and take these borders and let's change its color to white. Great as you may guess, we need to add some shadows on Let's change. It's all far too 15 great. And also it's Blair to 41. Great. The next thing we need is a title here. So in this page is going to be the name of user. So that's right, David Smith. And I'm gonna go ahead and change its color too, this gray. And also let's enlarge it. That's changed its size to 17 points. And also I'm gonna change it from regular. Too bold. Fantastic. Then I'm gonna line into the center both vertically and horizontally. And what else do I need? I need a photo right over there and also left Arrow here. So let's add them. I have the left arrow here, so let's copy and paste it. I'm gonna put it right over there. And then that said, it's left padding to 24 and its bottom padding to 20. All right, we need to also put these title down and align it with our arrow vertically. Great. And let's select all these elements and put them right under our status bar. Fantastic. And the last thing we need is the profile image here. So I need the David Smith photo. I cannot use the data because it's going to give me a random image, and I have to refresh it until I get it. So it's better to go ahead and here I'm going to double click on that and I'm gonna choose this photo, coffee it and come back to these chat page and let's paste it here. There we go. Its size is great and it's right. Padding is going to be 24 its bottom padding is going to be 20. Everything is set up now. We can create a symbol off our navigation bar in order to use them much quicker. So let's select all these elements, including the status bar and group them, and that's create symbol here. That's right, Bar Navigation bar perfect. So the next thing we need is to change our background color, so I'm gonna go ahead and insert a rectangle two feet our page and on Czech borders, and that's changed its collar to F five if five and F five. Great as you can see, we've got a light gray, which is awesome. And now it's time to create our messages. So what I'm going to do is to insert around it and dragon drop it here. And that's making 290 by 52 on Czech Borders. And also let's increase its corner radius to 15. Awesome. However, I'm going to Double Creek and this wreck tango and choose thes corner. And then I'm gonna change its radius 20 You can see how it's gonna be. And also let's change its color toe white, and it's time to add some shadows to eat. Let's change. It's all 4 to 10. It's X two to its writer, too, as well. And the Blair to 10 pretty good. Now I'm gonna go ahead and create a takes. That's right. Hi, John. How are you doing? I'm gonna make its regular and also change its size to 14 points. Great. And it's morbid here, and I'm gonna align you to the center vertically and it's left padding is going to be 17 peak souls perfect 17 from top left and bottom. And then I'm gonna add a time here. So let's write 12 Colin four. I'm gonna put it here on That's changed its size to 10. And also it's color to DB db. Andy be great. That's align it vertically and it's right padding is going to be 16. That's awesome. Now let's group them and here are left padding its 19. Let's make it 24. Now it's better. And the next thing we need to do is to create another message, which comes from John instead of David. So here, let's change its group name to first message. And then that's create another around it here, and I'm gonna make you 290 by 70. Great the same corner radius, and that's double click on that and this time, choose this right corner point and decrease its radius to zero in on Czech Borders. And then I'm gonna feel it. We'd a Grady int, So let's click on the circle and choose 50 64 F nine and the other one that's used 54 3 F and E eight. Great. I'm gonna go ahead and change the direction it's gonna be like this or we could change it here. Now it's better. Perfect. Then let's go ahead and copy and paste. These tanks need to bring it down and change its color to right, obviously. And here, let's right. Hi, David. I am great. How are you? Is everything all right? Awesome. And then I'm gonna move it here and try to make it smaller and align it to the left. I think it's better to set the with 2 232 Great. And that's a line into the center of where tickly and it's left. Padding is going to be 17. Remember to be consistent in your design. Let's go ahead and copy and paste this time, all right. 17 from bottom and 17 from right, however, and I'm gonna go ahead and change its color to white and decrease its capacity to 50%. That's fantastic. So let's go ahead and group them, and here we have second message, and then let's duplicate it, and depending to the top is going to be eight Great. However, this time that's double click on this rectangle and click undie circle and decreased the corner radius to zero and also choose the circle and increase it to 15. That is pretty cool, right? Then I'm gonna go ahead and change its tax to have you completed your project. All right? And remember to change these times because it doesn't make sense to have the same time for all messages. So let's make it 14 and this one as well. All right. And here we have our third message. And now we have an answer from David. So let's go ahead and duplicate this message and put it right here. But before then, that selectees to messages and check the padding. It's going to be 24 also for this 1 24 And now I'm going to double click on this rectangle and change its high to 70. Awesome! And let's align these takes to the left and change it to Thanks. I'm fine. And yes, I have. Then are you free tonight? Great. And this time is going to be year 17 from bottom and make it 17 from left. Also for this one as well. Great. So now we need another message from John that's duplicated. Oh, I forgot to change the group name. So First of all, let's change it to fourth message arrive. And now let's change these tax, too. That's great. Yes, I am free after nine PM Why? And let's decrease the with 2 224 It's better. I almost forgot. Let's make it 12 25. And for this one, that's make it 12 35 great. And this is going to be our fifth message. So let's right, fifth message. And then that's duplicate our previous message and put it right over there. The top planning of our previous message is going to be 24. So it's right and also for this one awesome. And that's changed its takes to Well, I wanted to in white you to, you know, and also we need to decrease its with 2 232 and that's changed. It's time to 12 45 awesome. And then that's changed its group name to six message, and the last message is going to be this one. So let's duplicate it and put it here with a 24 pixel margin. And then that's right. Thanks a lot for the invitation. I would love to see you and then change. It's time to 12 55. Great and that me change the group name to seventh message are right. It's been so much I know. However, it is really necessary to pay attention to the details, and you're designing a user interface. So then we need a container in order to let the user to type pain. Let's go ahead and make it. That's insert a rectangle. But it's right over there right under our home indicator, and its size is going to be 375 by 71. It's okay, lets on Czech Borders and fill it with white color. I think it's a good idea to have some kind of borders. However, I'm gonna decrease its all far too 20%. And also it's with 20 point to, and then we need to change it from inside to outside. There we go, and then that's at some shadows. I'm gonna decrease its offer to 8% and that said, it's why to zero as well and the blur to four that is pretty good. Then here we need a tax. That's right. Write something here and dot, dot, dot and I'm going to change its color, too. B six, b six and b seeks. And also it's fun size to 14 points. Let's change. It's fun to SF pro text. Now It's better, all right, and it's stop patting is going to be 17 and 44 to the left, so we need two more things here. One is a plus icon here in order to attach something. For instance, a photo or a video. So let's go ahead and bring it from our icons file. There we go. It's left padding is going to be 15 great, and the other one is an emoji icon in order to add some emoji. So let's bring it. Also here we have Emordi like on Let's put it here 20 to the right and 17 to the top Pretty good, and I'm gonna go ahead and group them. Let's right, right, Message container. Great! Then I'm gonna group all of these messages and that's right messages and bring them down like this because we need to add the last thing, which is the date off this conversation. So let's go ahead and insert around it and make it 77 by 20 and also on Czech borders and change its color to white. I'm gonna align it to the center. Then we need a text that's right. Monday, 18 March and I'm going to change its size to 11 points and its color, too. 83 83 93. That's a lake both players and align them vertically and horizontally and also group them here. I'm going to write date and it stop adding, is going to be 16. Amazing. So we have successfully designed our chat page together, all right there. Almost non, However, we need another art board, so let's duplicate it. We need to present a keyboard here, so let's right, chat, typing, and I'm gonna go ahead and remove the last message and let's remove this indicator and it's emoji on. Let's put it right over there and let's move the rest of messages up a little bit, something like this. And then we have a keyboard here so we can go ahead and bring it here, paste it and put our right message container right above it. I'm going to change its height to 50 all right, and also we need to change these takes too. This one. Thanks a lot for the invitation. So let's go ahead and align it to the left and right things a lot for the invitation and then change its color to this fun. And let's bring the text input marker as Whoa we needed here, All right, Everything is great. The last thing we need to do is to add sand message button over there. So let's go ahead and bring its icon from our icons. We have send icon here. Let's bring it here. It's wife, so you cannot see that. Let's go ahead and create a circle. And on Jake Borders, that's make it 24 by 24 and choose primary color for that. Then I'm gonna put it's right below our sand icon. Here we go. Let's align them vertically and horizontally and I'm gonna group them and call its and bottom and its margin is going to be 13 to the left. 13 the bottom and ferreting to the top. All right, everything is done. We created two different pages together. I hope you enjoyed it, and I'm going to see you in the next video
85. Settings Page: Hey, everyone, welcome back to another video of thes course in this video. We're going to be designing our settings page. So without further ado, let's get started. First of all, I'm gonna go ahead and duplicate these chat typing, and that's changed its name to settings. And then I'm gonna go ahead and remove almost all elements here. All right, we need this home indicator, however, Then I'm going to change our navigation bar in this space. We don't need this profile image. So how can I remove that? I can easily right click here and detach it from symbol and then choose thes profile photo and remove that. And after that, I'm gonna align these takes to the center and change it to settings. Great. So in these page, we're going to create two different sections. As a matter of fact, I'm going to create two different cards and include our settings option. All right, The first section is going to be notifications. So let's write notifications, and I'm going to change its fate a regular and change its size to 16 points. And also it's color. Two c eight, c eight and see eight. That's great. Let's put it here all right. Annexing we need is to create a rectangle. Oh, so let's add round it here. And I'm going to change its size to 329 by 139. And that's change its corner radius to 17 all right, and on Czech Borders and feed it feed white color. Then we need to add some shadows. So let's change. It's my to 14 and split air to 43. And also let's decrease this offer to 8%. Great. Our first option is going to be promotions. I'm going to change its color too, this gray. Then we need a search controller. So let's create one. Instead of bringing it from somewhere, I'm gonna go ahead and show you how you can create your own switches. So the first thing we need these around it here, and it's unchecked borders and make it 40 by 17. All right, and that's changed its collar, too. Eight a 84 f f great and let's create a circle as well, and it's going to be 25 by 25 pixels and on Czech Borders, and I'm going to use the same Grady Int that we used in our previous art board. So let's go ahead and create a Grady int and choose this one as our first color and this fund as our second. Then that's changed the direction awesome. And after that, we're going to align them vertically and move this circle to the left. That is pretty good, and the last thing we need is to add some shadows to the circle. So let's add shadows. That's changed the Y 23 and Blair toe eight on. Let's decrease its all 4 to 18%. That is pretty good. And then I'm gonna go ahead and group them and let's call it switch dash on and let's create a symbol here. Switch slash on. And now let's duplicate it and detach it from Symbol and select its rounded and change its color to e six, e six and e six. And now let's elect this group OK and right. Click and transform, flee presentable and then click on the circle and change its color to white. All right. After that, I'm going to change its name to switch off and let's create another symbol switch slash off perfect. So We don't need that right now. So whenever you want to toggle, it can go ahead here and change it easy, Right? So let's remove that. And I'm gonna align these switch with our text particularly. And the padding to the right is going to be 13. And the padding to the left also is going to be 13 here. Awesome. Then let's go ahead and group them on right promotions. So we're kind of creating at least on a card, all right, The top adding, is going to be 16. Then let's duplicate it. We'd a 16 pixel margin grave, and I'm gonna align these promotion text to the left and change it to new items. And let's make it off easy, right? And I'm going to change these group name to new items as well, and once again duplicated and changed the name to messages and make it on perfect, then that select all these elements and group them and college notifications awesome. And after that, let's select this notification and this group and duplicate them because we need to create another section which is general, and put them with a 40 picks. Old margin, great, that's aligned this title to the left and change it to general. There we go. And first thing first, I'm going to choose this rectangle and change its high to 303 and the first option. Let's change it to language. However, Here we don't need speech. Okay, we need a little arrow like what we used here in our cards. So let's double click on that. And Selectees Arrow copied and pasted here. Let's put it right over there with 13 pixels margin to the right, and also I need another text. So that's duplicated. And let's change it to English, and I'm going to change its collar, too. C eight, C eight and see eight. Perfect. All right, let's put it here. It's right. Padding is going to be a pixels on. Let's select thes two layers and align them vertically. And also let's select our language and align them. Let's change the line high to 20 and also for Thesis, takes to 20 as well and once again aligned them. Now it's great. I'm gonna put this left arrow layer to this promotion fuller. But remember, let's change thes group name to language, and let's put this English takes to language well, and it stop adding, is going to be 16. Perfect. Then that change thes item to photo night more, and I'm going to keep it off and the next one to using said you'd are. And let's keep it on And let's go ahead and change these groups name. Let's make it or Tonight mode and the next one you seeing cellular. Great. So let's go ahead and duplicate the last item and change it to or the like. I'm going to keep it on as well. And let's change the group name to Photo Lark. And for the next item, I'm gonna choose Thesis one and duplicate it because we need these little arrow and let's change it to pass code and face I D. And remove these English, I think here we need to move these English a little bit up. Now it's better. And let's change the group name to pass code and face I D. And we need two more things that's duplicated. All right, let's change these tax to user agreement and here as well. User agreement and last but not least, is going to be privacy. And now let's change this group name as well to privacy. And then let's select all of these options and check their spacing. It's going to be 16 and also 16 from the top and 16 from the bottom. All right, so in order to change the height, we need to calculate something. Here we have 35 so let's drag and drop it here. It's 21 now. It should be 16. So we need to decrease it by five pixels. So let's make it 284. And now it's right. Then we need to change thes group name to general and everything is on. All right, guys, I hope you enjoy this video and I receiving the next video.
86. Charts: Hi, everyone. Welcome back to another video off this section. In this video, we're going to be designing our an athletics page. So without further ado, let's get a started. First of all, let's go ahead and duplicate thes settings aren't board. There we go. And that's changed its name to an athletics perfect. And then I'm gonna go ahead and remove these cards and also typhoons and exchange the title of this navigation board to an athletics. Awesome. Then I'm going to remove this rectangle here because we're going to have some kind of circle right behind these information. So let's go ahead and insert a circle. There we go and I'm gonna on Czech Borders and change its color to Grady Int. And it's choose the 1st 1 and change it to 50 64 F nine and the other one to 54 3 f and e eight. Great! And now let's change the direction of thes color. I think that's great, and I'm gonna move it down right under our navigation bar so it's gonna be here and let's move it up a little bit. So let's change its with 2 630 and it's high to 540 Great. And I'm gonna put it like this a little bit up. Now It's great. Then let's go ahead and change the color of thes information. The first thing you need to change is our status bar. So let's choose that and change it from light to dark and then that selectees title and also changing to white and last but not least, this left arrow to white as well. Great. What else do we need? We need some cards. For example. I'm gonna put a large cart here in order to show the number of followers and also a bar chart and then four small cards right under that. So let's go ahead and insert around it, and that's changed its size to 315 and 317. All right, And then let's change The radius lied to smooth corners and set it to 24. And then I'm gonna go ahead and on Czech Borders and change its color to white. Great. That's a line into the center, and as you can see, we have a 30 pixel padding from left and right, and it's stop adding, is going to be 115 to the edge of these aren't board great. And then we need to add some shadow. So let's go ahead and add some shadows and I'm gonna change these all 4 to 8 and change x 2 16 Why? To eight and also Blair to 33. Perfect. And that's Renay me to card, all right. And we need to duplicate it because we need four more cars. However, I need to scale it down to 150. Great. That's what it here read a 16 pixel margin, all right. And let's change its corner radius to 24 as well. Awesome. Then duplicated and put it right over there and selectees to and duplicate them and put them right here. Perfect. And I'm going to rename them to card to card three, card four and card five in the 1st 1 to card one. Great. So here I'm gonna add attacks. And that's right. 2566. It's gonna be the number of followers that's changed his fund two months, Sarat, and change it from regular. Too bold. There we go. And also I'm gonna change the size to 28 points and change the color to Dis Gray Perfect and the line hi to 35. Great. The left fighting should be 24 pixels and the top heading is going to be 35. Then let's duplicate it and put it here and change it to number off your followers, then change it from bold to regular and also its size to 12 points great and its color to be zero b, e e and G four. Great and it's left padding is going to be 24 its line high. It is going to be 21. Great. So let's set the top heading to four pixels. Awesome. And then what we need is an icon. We need a setting icon here, and we can use the same setting. I can that be used for our cantor page. So let's go ahead and copy and paste it here. Awesome! And then we need to change its color to this one. So I'm gonna go ahead and copy and paste the code and select these shapes and paste it here . Great. Let's put it right over there and select all those shapes. I'm gonna add borders because those shapes were to theme. So I'm gonna use the same color and change the border with 20 point. Fine. Great. And now it's time to change the size from 24 pixels to 18. That's great. And the right padding is 24. Let me align this setting with our number here vertically. Perfect. Now I'm gonna go ahead and create a bar chart here you can either created by yourself or you can use free. You I kids for this purpose. You can also buy some you like. It's if you want for your project. However, in these scores I'm gonna teach you how you can create your own bar chart. So let's go ahead and insert around it. There we go. Let's unchecked borders and directly Kan Dat and choose thes two points and change the radius 20 Great. Now I'm going to go ahead and change their with and hide to eight and 55 respectively. Great. And then that's changed a collar to double f E 700. Great. Now let's duplicate it and put it right here with a four pixel margin. Great! And this time I'm going to change its high to 81. So let me change it your great. And then I'm gonna go ahead and change its color to double F six C and 40. Awesome. And let's go ahead and group them and colleague Colin one. We need a date here. So let's write seven slash 12 and changed his fonds to SF pro display and its size to eight points. Great and let me change the top padding to four and again, that's group them and call them column one. Perfect. Now we can duplicate it with 20 pixel padding. Great. And let's use both bars and increase their heights like this pretty good. And also we need to change the day here. From 7 to 8, it's gonna be calling to and once again duplicated and select both bars and decrease their heights. Something like this, they shouldn't be precise for now. However, if you're working with riel later, make sure that their precise then that changed the day to nine and that's call it calling three on once again duplicate them and select bars and increase their heights to something like this. I'm going to select thes bar specifically an increase it again and change the day to 10 and it's gonna be Call him for and again, let's duplicate it and select those bars and decrease their heights. Awesome. And let's change the day to 11 and it's gonna be our column. Five. And we need two more. There we go. That's shoes those bars and decrease the size on disk one specifically and change the day to 12 and rename me two Column six and the last one is gonna be even shorter. So let's select them like this. And also the day to 13. Perfect. And let's change your name to call him seven. All right now, I'm gonna go ahead and group all those Collins and right bar chart. Great. And now let's elect our card. One, which is this one and in line into the center. Great. And it's bottom padding is going to be 23. That is great. Can you see how amazing it is? We need one more thing here. We need some kind of bubble here to show detail information such as a percentage of increase or decrease. So let's go ahead and create one. I'm gonna insert around it again arrived. Let's decrease the corner radius 26 and change the with 2 70 Great. I'm gonna inject borders great, and I need a rectangle here in order to create small arrow. So let's insert a rectangle. Hold shift perfect on Czech Borders. Double click on that and selectees top corner and increase the radius to two. Perfect. And then I'm going to rotate it to left by 90 degrees and scale it down to eight pixels. Great. And then let's unlike its size and increase the with 2 10 That is pretty good. And now let's elect both shapes. Great aligned them vertically. As you can see, it's 19 and here 18 but we need to change the size of this rectangle. We need to increase its height by one great, and now it's 19 and 19 so it's been positioned right in the center, and then that's a like both of them and change their color toe white. And I'm gonna use the union in order to make them one combined shape. Great And lastly, let's add some shadows. So let's decrease its all far to 10. And it's why to four and it's Blair to 10 are right. That is pretty good. We need a tax year also. So let's write minus five percent. And I'm going to change the font size to 12 and align it to the center vertically and horizontally. Great. And now let's group them and call it Bobbo Perfect. And then I'm gonna position it here and scale it down to 50 by 31 pixels. So let's put it here. Great. So whenever the user clicks on one of these Barnes this bubble woodshop pretty good. And now let's group all these elements. So let's elect discharge and also this bubble and then this card and is numbers great and group them and Collett statement card. Awesome. I think it's a good idea to increase the size off the text here in our bubble. So let's go ahead and align it to the center and also increase it to 10. Now it's visible, I suppose. Pretty good. All right, now it's time to go ahead and design our next chart. So here I need another number like this. So let's go ahead and copy and paste it here, and I'm going to decrease it to 15. Perfect, and it's left padding is going to be 17 and its top padding should be 15. Great. So now let's change it to 10.2 k And then I need another tax like this. So let's copy and paste it here, and I'm going to increase its size to 14 and change it to like it should be regular. And let's change the line Hi to 10. Perfect. And it's left. Fighting is going to be 17 great, and we need to change the line height of the stakes as well to 19. Now we can see that we have a four pixel top, adding, So let's make it three. That's pretty good. This time. I'm gonna go ahead and create some kind off care of lines, so I'm going to use Victor Tool and here is going to be my start point. Then I'm going to click here and drag it somehow like this, and that's click here again and here and here. Perfect. Now let's go ahead and increase the border with to 1.5, and I'm going to change its ends to this one. You see the difference. It's going to make its round it, which is pretty good. And after that, let's change the color the same orange. If we have here, make sure to be consistent in your design. I'm gonna move it down and we need another path. So let's create one the same starting point here and that's end it, like this perfect again changed the border with to 1.5, and it's ending to this one, and you can change its color to two c D nine and C five. Awesome. And we need one more path. So let's create it the same starting point here and here. Great. That's change its border with to 1.5 as well and its color to the same yellow that we use for our bar chart. Pretty good, then that select all of them and group them, and I'm gonna call it lying charge. Great. However, I'm going to change its with 2 116 her faked and then that select our card and align them horizontally. As you can see, we've got 17 from left and 17 from right, and we need to have 16 from bottom perfect. And now let's group these elements together. That's got it like perfect and for our next card, we need all these elements. So let's go ahead and copy and paste thes tanks. Great. And let's change the first tanks to 1.2 K and the next one to comment. It's gonna be the number off our comments. And then I'm going to create another path in a started from here and ended here something like this. Perfect and changed the border with to 1.5 as well. And this ending to the middle one and again I'm going to use this yellow one Perfect for these charge. I'm going to use some circles. Let's create some off them on Czech Borders and fitted to if 80 to 6 A and F nine Great, that scale it down to three pixels. Awesome. I'm going to duplicate it and randomly put them here, here, here, right over there. And some of them here. And that's group these elements now with our cards and also these texts, and it's gonna be our comment group. Perfect. Then make sure about the alignment. So we need to group these elements again and it's call it lying charge as well. And as you can see, we've got 17 from left, 17 from right, and we need to have 16 from bottom. Awesome. All right, for our next card, let's go ahead and again. Copy and paste these elements here. It's gonna be 17 to the left and 15 to the top. I'm gonna go ahead and change the top, adding of thes tax as long it should be. 15. Also this one. Now it's great, then that's changed this number to 255 and change these tax, too. New follower. And again, let's create another path and started from here year. We don't have any care in these kind of line charge and finish it here. Perfect. Let's change the border with to 1.5 and change the ending to the middle one and also change the border color to this orange pretty good. And now let's select our path and change its with 2 116 Great. Let's line it to the center Perfect. And now let's have 26 from bottom and let's group them and call it new follower Awesome. And for the last card that select these elements and copy and paste it. And let's change this number to 190 and this takes two messages. It's going to show the number of messages that the user received. And here we need another bar chart. So I'm gonna go ahead and cut him paste one of these columns year on, Let's scale them down. 29 pixels and I'm going to select the yellow one and put it here with one pick self heading . And then I'm going to right click on that transform, flip vertical. Great. And I'm gonna put its right where there like this. Okay, let's group them and duplicated with a six pixel padding. Great. Now let's decrease the height of peace Bar orange on to 26. And also this yellow one, 2 16 and once again duplicated and decreased this orange one 20 and the yellow one to 12. And again, we need to decrease it to 14 and this one toe eight and again, this one lets make it eight and the yellow 1 to 4. And from now on, we need to reverse the place off these orange and this yellow one. Okay, so let's duplicate it and right click, transform, flee presentable and changed the color of this orange, one to yellow and this yellow one to orange perfect and again duplicate them and increase their size. For example, this orange 1 to 18. And this yellow 12 22 the last one, the orange to 22 the yellow to 31. Pretty good. So here is our bar chart. So let's change the name. And as you can see, our right padding is 19. So we need to make it 17. How can we do that? We can easily increase the with by two. However, we need to scale it. Okay, so here, let's write 116 and select this card and align them horizontally. There we go. And 26 to the bottom. Can you see how amazing these are? Now? I'm gonna make some changes in order to make them look better. I think it's better to move this line chart little bit up. It's gonna be 20 to the bottom. And also this one that's move it up again. 22. The bottom. Now it's great. So let's group these elements as well and call it messages. Perfect. It's been too much. I know, However, it is necessary to know how to create these kind of elements by yourself. On the other hand, can use free resource is on the Internet, or you can purchase one, but it is essential to know how to create it by yourself. All right. I hope you enjoy this video, and I'm going to see you in the next video.
87. Onboarding: Hi, everyone. Welcome back to another video of thes section in these video. We're going to design the on boarding pages. What is on boarding? As a matter of fact, on boarding is the first impression off your app. It works like a visual on boxing off the app you're designing, so it is essential to pay enough attention to it. We don't share. I do. Well, let's get started. First of all, I'm gonna go ahead and duplicate thes art board and that changed its name to, um, boarding one. Great. And we're going to almost remove all these elements because we don't need them. That's just keep thes home indicator. And then I'm going to change the backgrounds collar. As it can see, we have a rectangle here that's changed it to 41 35 F three. Great. What else do we need? We're going to put an illustration here and also attacks under that and a sub tighter right over there. And at the end, we need to put two things a page indicator and also a next button right there. So you can either use your own illustrations or you could use free illustrations There is a very good website which is called on Draw That CO let me show you that you can find so many illustrations for your projects. And the good news is, all of them are free. So if you open up the on drug that CO and you go to illustration section, you can see there so many illustrations here in almost every category you can think of. Okay, However, you can also search here, let's say app. There we go. You can see how many beautiful illustrations there are. For example, this one you're going to use in our project and so much more. You can also change the main collar off these illustrations. For example, let's change it to yellow. Great, and you can easily down with them with SPG format and also PNG. So we're not going to download it right now because I already put it in the asset fuller and you can get access to them easily. So let's go ahead and bring them here. There we go illustrations and here we have paid Run page two and page three. So let's drag and drop the 1st 1 There we go. Its size is going to be 250 by 192. Let's put it right over there and it's top padding is going to be 130 pretty good. Then we need the tanks to put its right under our illustration. So let's right. Take and share your memories and I'm gonna go ahead and change their fun to Monserrat. It's and also change the way to bold greats and also the fund size to 24 points. Fantastic. And let's change the with 2 307 and also align it to the center. Perfect. It stop adding, is going to be 68 great and let's duplicate it. And I'm going to change the way to Regular and also the font size to 19. And that's changed the color to be six b one f f great. And here, let's write. Instagram is a photo and video sharing social networking service. Pretty good. That's changed a with to 300. All right, and now let's go ahead and change the fund to SF Pro Display eight and also the line high to 28. The next thing we need is a page indicator So let's go ahead and create one what we need. First of all, he's around it. Let me on Czech Borders and I'm going to change its with 2 22 and its high to five great. And let's change the color to White. And then that's duplicated and put it right over there. And let's make it a circle, which is five by five. Great, we have four pixel padding. We need another one because we have three pages. Fantastic. So let's group them and call it indicator great. And I'm gonna align it to the center. And let's select thes two circles and change their color to the same color as we have here . Perfect are right. And now let's check the spacing. It's Tom. Padding is going to be 127 great, and the last thing we need is an ex Martin. So let's go ahead and bring our bottom here from our registration page because we are not going to create it once again. And let's pace it here. The only thing we need to do is to uncheck shadows because we don't need them. And also let's change the color to white and let's change the color of our arrow to 41 35 F three pretty good. And now let's scale it down to 40 by 40. Great. And it's bottom padding is going to be for the three right here. Awesome. It is pretty good. So now it's time to go ahead and create our next fatal That's duplicates our art board and changed its name to some boarding to. Then I'm going to remove these illustration and bringing the next one Page two. Great on. Let's change its position to 63 and 145 pretty good. And then I'm gonna go ahead and change the text. So let's right. Share your stories with the world Fantastic and also here. Let's change it to share your photos, videos and stories with the world in no time. All right, the next thing you need to do is to change the place off these indicators, so let's go ahead and change the place off the first rectangle without first circle awesome and make sure that they are aligned to the center pretty good. And once again, let's duplicate this art board and change its name to awarding three. It's gonna be our last page. Great that's removed these illustration and bringing the last one perfect. And it's X is going to be 77 the why. Let's make its 143 perfect and attacks I'm going to write, gets notified anywhere and any time and the next x two. You will be instantly notified about new posts and stories. Awesome. And let's go ahead and change the place of our indicators. There we go pretty good and make sure that they are aligned to the center. All right, we're almost done. However, we need to do the last thing, which is changing. These Barton together started button because it's our last page. So let's elect our bottom here. And unlike the size and changed the with 2 111 Great headline into the center, and I'm going to remove these arrow and create a text and right get started. Great. Let's change the phone size to 14 points and also its color to 41 35 F three Great, and let's align it to the center both vertically and horizontally. As you can see, a ripe heading is not equal to our left padding. So we need to increase the wif off our EC tango by one. Let's make it 112 and now everything is done. Then let's group them and right get it started. Perfect are right, guys. Be finally finished our first project together and I hope you really enjoyed it. That was a line journey. However, I'm pretty sure that it's worth it. I hope you like this video and I'm going to see you in the next video.
88. Logo Types: Hello, everyone in these section, we're going to be designing our logo. And also in these video, we're going to be talking about seven different times off logo design. So without further ado, let's get a started. The first local type is called Monogram or you could say letter marks. Here we have different logos as examples, such as HBO, which stands for Home Box Office. As you can see here, we have Onley letters, so they're kind of spelled out and represent their company. The second type is called Ward Marks or, let's say, local times they're actually similar to a letter mark. However, award Mark focuses on a business name alone, like Google, Canham or Jeep. The next local type is called abstract local marks like Pepsi, Nike or BP. As you can see here, as a matter of fact, an abstract mark is a type of pictorial logo, and the next local type is called pictorial marks or logos symbols like Apple logo to Eater and other famous brands. Actually, a pictorial mark is simply an icon that represents the company's characteristics. The next local type, these mascots mascot logos are logos that involve an illustrated character according to 99 designs dot com. If you want to get more information about local times and how you should use them, you can check out there. Great article under website. The next local type is combination marks, and this is the local time that I'm going to teach you how you can create in these kind of logo type. You can find a letter combined with an illustration or a specific shape. And last but not least, Emblem Logo's an emblem logo consists off font inside the symbol or an icon like Starbucks logo. All right, thank you so much for watching this video in the next series of videos. They're going to create four different logos together, so make sure to download the starter project because I already prepared the colors for you . In order to save your time, you can download the fine from the Resource is section off the next lecture
89. Designing Our First Logo: Hi, everyone. Welcome back to another video off this section. In these video, we're going to be designing our first logo together as a matter of fact, that logo that I'm going to create east for a finance app, which is called money. That's interesting, right? So we don't very do. Let's get it started. First thing spares. I'm going to mention that we're not going to create a complex logo, because in that case we need a full course to cover that topic. However, I'm going to show you the power of sketch and combination of basic shapes together. So first of all, let's go ahead and insert around it here. That is so mean Great that increased their with all right, Perfect. And I'm gonna on Czech Borders. Let me increase the with more great and then let's duplicate it and which it's right over there. Perfect. And the space is going to be $20 selectees, two layers and click on difference. What I'm going to do is on shaking these check box and let shank borders great and increase the border with 2 10 Great! And I'm gonna use thes Grady int here for our first logo. Every go and this one pretty good and let me increase the with. And then if I go there and click on this icon, you can see that we chose difference. I'm going to change it to union. It's much better, and that's change its size. To see how it's gonna look are right. And let's increase the with pretty good. Can you see the M that we just created here? That is pretty awesome. That's great. The next thing I'm going to do is to change the direction of our gravy ins. I think it's gonna be better perfect. And then let's scan our combined shape down to 65 pixels by 64 I'm going to zoom mean and we need a text because we're going to create a combination mark. So let me decrease the font size to 30 and right money. Then I'm going to change the fund to as a pro, rounded, great and also it's way too light, previous, awesome and from Tex options. I'm gonna capitalize my text here like this, and also let's increase the character amount, which is the white space that we have between our characters. That's increase he to Fine. That is awesome. And then I'm gonna add a feel because I'm gonna have a grade. Ian's actually the same Grady int that we use for our logo. Perfect. There we go. That is pretty cool, isn't it? All right, the next thing we need to do is the alignment, Okay? Because we increase the amount off our character here. We cannot align them correctly. Okay? As you can see, we have these white space here. So what's the solution? Can t do anything off course you can. As a matter of fact, if you select this text and go ahead and right click on this layer, you can have the converter outlines option. And if you could take that sketch is going to convert our tanks to an outline, which is great. Of course, from now on, we cannot change it or modify it, and we don't need that. Okay, so now we can select our shape and also our text and quicken align horizontally. Great. And the top heading is going to be 16. Fantastic. Let me group that and call it money color. Okay, because we're going to create a different version off this logo later on. All right, let me put it here. Perfect. So now let's create another version of thes logo we dark gray color arrive. So I'm going to duplicate its imported here. Awesome. Let me select our shape and change the grade Ian's to a solid color and choose three ee three ee and three e great. And also let's choose our text. Or here we have our outline and change the field to a solid color and choose the same dark gray that we use for our combined shape. That is fantastic. Don't you like that? Can you see how simple it is to design a creative logo? We just combining simple shapes. Or right now I'm going to scale them down. Perfect. It's 96 by 83. Great. So we successfully created our first local together in the next video. We're going to create another logo which is so simple to create. So I will see you in the next video
90. Designing Our Second Logo: Hey, everyone, welcome back to another video of this section. I hope you're doing well in these video. We're going to be designing our second logo together, which is a moon. So without further ado, let's get it started. As you may guess, we need another shape. So let's go ahead. An insert, a circle. There we go. And I'm gonna on Czech Borders. Perfect. That's changed the fields to the start, gray, and I'm going to duplicate it. Great. Let me change it to something lighter that you can see. And then I'm going to move these circle like this and select both bears and click in Subtract Awesome. Can you see how quickly be created our moon? That is pretty cool. The next thing I'm gonna do is adding an inner shadow to eat. So let's go ahead and click on inner shadow and change its color to this life gray, awesome. And decrease the Blair to zero and change the Y position to two and the exposition to one. That is pretty cool. And what else do we need? Your right. We need the text. So here, let's write Moon and again I'm gonna go ahead and capitalize that and put it here then that scaled down our combined shapes to 60 by 68 put it right over there. And now let's change the color of our text to the same dark gray as we have here. And after that, I'm going to convert our text to an outline. So let's right click over there, convert outlines awesome and select our combined shapes or our moon. Let's align them to the center, and it's gonna have a 16 pixel padding. Pretty awesome. Let's group them and right move. All right for the slow go. I just wanted to create one version because it's gonna be repetitive. So if you want, you can go ahead and use your own creativity and choose amazing colors for that. But for now, I'm going to put an end to this video, and in the next video, we're going to design another simple logo together. So see you that
91. Designing Our Third Logo: Hi, Ron. Welcome back to another video of thes section in these video. We're going to be designing our third logo together. This logo is called amazed. OK, so I'm going to create an a letter, of course, with shapes. So what do you think? I need your right. I need a triangle. So let's insert one. Awesome. I'm gonna so mean. Then I'm gonna on Czech Borders and double click on our triangle. And let's select all these points and increase the radius like this. Pretty awesome. And that's unlike the size, because I'm going to increase the height to 148. Great. And again, I'm going to double click on these shape and hold shift key. And here you can see a point appears. Can you see that? I'm gonna click here and a steel hold shift key and drag it and drop it like this. Awesome. And since this point is selected, I'm gonna increase the radius to 40. Great. So you probably can see the a shape here, but we need one more thing. Okay, let me insert around it. All right? And I'm gonna feel it with white. Let's put it here and decrease its height. 40 and it's line it to the center pretty good. Now it's time to change the color of our triangle. OK, so let's go ahead and click and color radiant, and we're going to use thes Grady int. I'm going to choose these colors, and that's changed the direction pretty good. Then let's group these shapes on, right? Amazed. And what else do we need? We need a fund That's right. Amazed. And then that's capitalize it just like other logos. And I'm going to use a single color for these, which is this yellow Great. Then let's scale down our shape to 110 pixels. And after that we need to convert our text on outline energy, align our shape to the center. Great. And here the petting is going to be eight. Because as you can see, we have this white space here. So I think now we can group them. And here we can write, amazed and finally skated down to 100 by 121 and put it right over there. We need only this colorful version. That's pretty good. All right. I hope you enjoy this video. We're going to end this video right now. And in the next video, we're going to design our last local together. So see you that
92. Designing Our Forth Logo: Hey, everyone, welcome back to another video of this course in this video. We're going to design our last logo, which is called Rabbit. It's interesting, isn't it? So what I'm going to do is creating a simple shape, which is like a rabbit. OK, not exactly, however, it's going to convey the message, and I'm going to use thes two colors for that. So let's create that together. First of all, that's insert around it. Great. As you can see, I chose small corners here. Let's increase the radius a little bit. Now it's perfect 49 here we have 132 by 130 to pick songs, then on Czech Borders. And that's choose this Liping as the skin off our rabbits face. Then we need to create the years. OK, so let's insert a circle like this. I'm going to zoom mean on Czech borders, perfect and duplicate. Eat and put it right over there. Let's decrease the space to minus 30 and since both off them are selected, can intersect. Awesome, Can you see? Just created the first year? That's pretty good. And let me increase the size to 38 pixels, and then I need to rotate it by 15 degrees. If you hold shift key, you can get these 15 degrees easily perfect. And let me duplicate it and put it right over there and once again rotated here to positive 15 or right. And the spacing is going to be zero like this. And then let's set the color to thes dark pink. Okay, that's pretty cool. I'm gonna group them and select these shape as well and align them pretty good. The next thing I'm going to create ease its eyes. Okay, so I need a nod around it. Let me drag and drop here, decrease the radius, too. 15 on Czech Borders and choose the same dark pink here and decrease its size to 18 pixels by 18 pixels. And put it right over there with a 30 pixel top heading on. Let's duplicate it. That's a like both off them. Group them and select our face and align them to the center. Awesome. The white space between them is 24 pixels. She's great, and we don't need any other detail here. However, the last thing I'm gonna create is some kind of shadows never to make this two d logo. Look, three d. Okay, so I need a circle like this that's on Czech Borders. Then let's add a Grady into it or write the first color is going to be these dark pink pretty good. And that's use the second color and again, the same dark ping. However, this time we need to decrease the all far too zero. Awesome. Then I'm going to rotate it like this on Let's elect our face. Both our circle and our face shape are selected The Anglican mask pretty good. Now I can customize the position of the circle, so I'm gonna put it here and let me decrease the capacity to 40%. That is pretty cool. Can you see how amazing and beautiful it ease? The last thing we need to do is to add a text. So let's right, rabbit. However, this time I'm going to change the font. Two months. Sarit, There we go. And once again that's capitalize it perfect and change its color to this dark pink and we need to group are elements your and college rabbit shape, and it scared it down to 74 pixels by 121 and put it here. Then I'm gonna go ahead and convert these text to an outline on after Dad. Let's select our shape and align them to the center. And the top heading is going to be 16. Pretty good. Let's call this group Rabbit. I'm going to scale it down to 96 pixels and put it right over there. All right, guys. We created our final logo together. In total, we created four different logos and I hope you realized how powerful the combination of shapes is. I hope you enjoy this video. You can download the final project from the resource is section of this lecture. I will see you in the next video.
93. Introduction to Adobe Photoshop: Hello, everyone. Welcome back to another section off this course in these section. We're gonna be talking about Adobe for the shop. Although I mentioned before, that's Adobe for the shop is not a good software for user interface designing. It's good to be familiar read at the before the shop environment and also the basics of photo shop for preparing our images sometimes or even editing our fines. So in the next video, we're going to start our lesson with the environments off Adobe for the show. See you then.
94. Environment of Adobe Photoshop: Hi, everyone In these video, we're gonna be talking about the environment off adobe further shop. So without fair I do. Let's open up our I don't before the shop are right. As you can see, I'm using Adobe for the shop version. See a six. It doesn't matter which version you're using right now, because we're going to focus on the basics on Lee. And I can assure you that almost Onley elements are the same in all versions. But it would be great to use an US version as well. So here another before the shop, we can divide this environment in different sections. For instance, on your left, you can see that there is the tools panel. Okay? And here there are all tools that we need for editing our images or even creating some graphic design. And on your right, you can see that there are more panels. For instance, here we have the layers panel, which is one of the most important panels in adult before the shop. And also we have adjustment colors, etcetera. OK, but the most important panel here is the tools panel. Okay. All right, guys, Thank you so much for watching this video. And in the next video, we're gonna be talking about the basics of adult before the shop and how you can use these tools. So see you in the next video.
95. Basics of Adobe Photoshop: Hi, everyone. Welcome back to another video of this course in these video. We're gonna be talking about the basics of Adobe for the show. Okay, As I mentioned in the previous video, we're going to use different panels. Another before the shops such as tools, panel layers, panel colors, adjustment, etcetera. But first thing spares. We need a canvas or let's say, a page for starting our project with. In order to do that, you can either go to file Anchalee, can you? Or you can press command on end on Maxie Stems or Control and N on Windows. And here, as you can see, there is a window that you can choose the dimension of your art words. For instance, here we can set the with 2 1920 make sure that it's set to peak cells and the high to 10 80 . And as you can see peak cells and I'm going to change the resolution to 72 because it's enough for computer purposes and a Connor mode, we need to set it to RGB because we're going to present this project on computer or on screens. Okay, So, seeing why K is used for printing purposes. Okay. And I can go ahead and click on. OK, and there we go. Your art board is ready. I didn't set a specific name for that, but make sure to set your desire name. And now we're going to talk about the tools panel. As you can see here, we have different tools and different sections. This one is called Move Toe, and it's for moving objects or elements on your canvas or your art boards. And the next one is the selection tool. Okay. For instance, let me create a new layer here. If you want to create a new layer, you can easily go to layer section and click on this layer icon. As you can see, we've just created a new layer. And then I'm gonna use the selection tool in order to select a specific area like this, and I can feel it with any color I want. So if I want to change the color, I can click on this section and I can choose these flu and let me choose the brush to fill it. And now with this move toe, I can easily move this around all right, the next tool is called selection to okay. And every tool here contains some hidden tools. Okay, As you can see, there is a small arrow in the bottom, right corner off every specific tools, and you can see that there are some hidden tools here that it can choose from. The next tool is called magnetic lasso. Okay. And it's for selecting as well. You can easily select a specific area, okay? And you can separate your desire section from that specific image for the selecting. You can press command and D or control the on windows and here as well, you have different last so tools. And this is the magic wand. Okay, It's for selection the habitants sketch as well, so it can select a specific area magically. And the next sel is crop. It's for cropping your art pores or your image. And the next one is the eyedropper. So you can choose a specific color off a photo or an element. Okay. And these tools are for retouching. Okay. As you can see, they have spot healing brush, healing brush tool, Pashtu, etcetera. And then we have brushes. For example, I can choose the red color here As you can see, I can freely paint here. And if I right click, I can change the size off that and also the hardness off my brush. Okay, The next tool is called Clone Stamp to it. So retouching as well we do not work with that a lot. And then we have history, brush, tool and a razor that you can erase your painting or even a specific area off an image. Then we have Grady int like this and Blair to for blaring an image or specific part of an image. And this is the Dodge Tool, and it's for editing the brightness off a specific area off an image. Then we have the panto, which is a very important tool in a door before the shop and with pan tool. You can select a specific area precisely. Okay, And then if I right click here, I can clear can make selection, the feeder radius is going to be zero, and that's click on. OK, there we go. So now if I choose the brush tool, I can feel it with red color like this, and the next one is type tool for typing and creating some text. You have different options. Here you have a presentable type, vertical time to horizontal type, mask tool and verity con type mask tool. Most of the time we use horizontal Type two and its path selection tool. We're not going to use that a lot. And then rounded rectangle tool is for creating different shapes. For example, I can create around the object like this. Then I can make a selection with dry click, and now I can feel it with any color I want. Like this. The next option is hand tool, and it's for panning around. You can also present it withholding space on your keyboard, and then we have the zoom to okay to zoom mean and zoom out. Alright, guys. Now let's focus on the layer section to see what we have there. Okay? As you can see, we just created a new layer. And as I mentioned before, every time you want a new layer, you can easily click on this icon, and it creates a new layer for you. You can change the layers name by double clicking on its name, and you can change it to whether you want that's changing to you, I perfect. And now I'm going to create another shape here with the selection tools. There we go, and I can walk around. If you want to hide a layer, you can click on this icon like in sketch. And remember that the order of placing your layers is so important in other before the shop . Okay, so here the u is above this rounded rectangle. So if I move it on top of this rectangle, you can see the difference. So I'm going to change the color to make it clearer like this. You can also change the opacity here from 0 to 100% and the other important thing in at oh , before the shop is the layers time window. So let's double click on this your layer. And as you can see, a window pops up, which is called layers side. And here you have different options for styling your layer, for example. Here we have blending options default, for example, who can change the opacity and the bland mode. Here you have these options right in these swing Go as well as you can see, you have plenty of options here you have stroke for example, I can change the color to red and increase the size you have. Inner shadow. You have inner glow color over lake, radiant and so much more. Okay, you have drop shadow as well here. Like this. All right, guys, thank you so much for watching these video. I hope you enjoyed it. And in the next video, we're going to talk about the usage of Adobe further shop for you on UX design. So see you then.
96. Adobe Photoshop For UI:UX Design: Hi, everyone. Welcome back to another video of discourse in these video. We're gonna be talking about the usage of Adobe for the shop for you on ux design. You as a young UX designer may need to edit your images in order to use them in your project properly. Okay, so there are some modifications that you cannot do in sketch, and it's a good idea to process them in a door before the show. Okay, so in this video, I'm going to teach you how you can use a door before the shop for editing your images. Okay, so without further ado, let's open up our idol before the shop. All right? As you can see, I have downloaded an image off this shoe from unspool ash that come in order to show you how you can separate any object from its bank around in adobe for the shop. Okay, so suppose that you're designing a shopping application and we need to have some shoes in our shopping lists, OK, so in this case, it's better to separate this shoe from its background and then save its as a PNG five and then imported in your sketch. Okay? so there are different ways you can do that. You can use different selection tools. For instance, you can use the magic wand like this. It works in some examples, but first of all, let me show you something. As you can see, this layer is called bank round, okay? And we cannot do anything when it's locked. So energy on like that, you can double click. And the slayer, for example, sets a name. It doesn't matter what it is. You can set it to shoe, and now it's unlocked so you can make changes, and I'm gonna click and delete like this. As you can see, we don't have any bag around here. However, you need to make sure that the background has been removed completely. For instance, here, as you can see, you have some white space, so we need to once again select this white space and click on delete like this. Now, in order to show you what's the difference here, I'm going to create a new layer. And let's call it BG as our bank round, and I'm gonna move it down right below our shoe layer and let's press command a or control and windows. And then that's choose a different color. For example, this one and press option delete. There we go. As you can see, we could easily change the backgrounds color. Okay, so I can also remove the background and save it as a PNG file and import it in sketch and use that so you could have more possibilities to work with this image. But there are some images that you cannot use the magic wand easily for separating your specific object from the background. Okay, let me undo these processes. In that case, you can use other tools. Okay. For instance, you can use the magnetic lasso like this, and you can select your object easily and perfectly. You can also use the pen tool, which is the best option possible because you can get a precise election off your object. However, it takes more time. And here, after selecting two different points, you need to hold option key and press on this point like this and select a new point and saw. Okay, all right. Now I'm gonna show you another example of using Adobe further shop for modifying your images. Sometimes you may need to change the color off your product. Okay, so first of all, let me select the bank around and remove that like this, and suppose that I'm going to change the color of this shoe. Okay? It's a little bit difficult because it's too dark. However, I'm gonna try it out. First. Let's create a new layer. Then I'm going to select the whole shoot. How can we do that? We can hold command key and clip undies Square here and as you can see it selected already . Then make sure that you have selected the new layer and change different color. For example, blue color. Then choose the brush tool. Okay, Like this, let's paint all of it like this. Now it looks strange, but in a minute you can see how amazing this technique is. So as you can see here, we have two different layers. Okay, here we have the bland mold and we have different options. If you select color, you can see that are objects. Color has been changed perfectly. Okay. And it is fantastic because sometimes you as a U I designer, I need to have different versions off a specific product, but it's not available on the Internet so you can create your own. Now suppose that you want to change its color to something else and you want to see how hundreds of options instead of choosing each color one by one. I have a good solution for you. If you go to adjustments, you can see that we have different options. Okay. However, if you can, we can hue saturation. You can change the hue easily and as you can see, the color off, our shoe is changing instantly. It's amazing, isn't it? And for saving your files, you can simply press command shift and s. And then here you can set the name, for example shoe. Then you can choose the specific format you need here. We have plenty of formats. However, when you want to use this image without background, you need to choose PNG. Okay. Thank you. You can save. Okay. And it's done. Now we can import thesis PNG file into your sketch project. All right, guys, Thank you so much for watching this video. I hope you enjoyed it. And I will see you in the next video.
97. Project 2 - Finance App: Hi, everyone, welcome back to another section of the scores in these section. We're going to design a modern finance app from scratch together. So here is what we're going to design. We need to design 24 different screens together. As you can see, we start with launch screen, then well designed a welcome page and also signing page. As you can see here, the sign up page as well And after Dante will design the OTP Verification page. As you can see here we have three different pages for that. The first page is forgetting the number. The second page is when the user is entering the OTP, and the third page is when the bottom is active. And after that we will design the profile and also the completed form of our profile here as a conceit. And then we would create our home page with these chart over there. And after that, we have our hamburger menu here with five different menu sections. And then we'll head over to our cards page and we will design two different cars here the primary one and the second everyone here. And also we will design some transactions like these, as you can see. And then here we have the transactions page well designed to different screens for our transaction. As you can see, here we have a car that the user can search and find the specific transaction. And when these cards goes down, we'll have this screen, which shows us the detail of our expenses. And then here we have the transfer screen will create these number pat together and all these elements. And after that, we have the confirmation page, as you can see and then the notification page. Also here we have at least of notifications with different photos with different names. Here. The user can search among these notifications, and also we have the profile here with these tax feels and beautiful colors. And last but not least, you'll design three different on boarding pages for our lab. As you can see, it's pretty nice. I'm so excited to start designing this project together. In order to start this project, you need to download the assets that I already prepared for you, and you can get it from the resource is section of the Assets lecture. Thank you so much for watching this video. I receiving the next series of videos
98. Launch Screen: Hi, everyone. Welcome back to another video of discourse in these video. We're going to start the design process off our finance app together. The first page that we're going to design is the launch screen. Okay. So without for I do, let's get it started with adding an art board to your we need an iPhone X s great. What I'm going to do is so simple. I'm gonna put the money logo that we design in the local section together because the name of this app is going to be money. That's interesting. So let's go ahead and bring it here. When you open up the ass, it's fine. You can find three different Fuller's here icons, illustrations and logo. So here, I'm gonna open up the logo and we have this one the colorful logo. Great. It's 96 by 77. That is fantastic. Let me align it to the center both resentfully and vertically. And I'm going to change the name of our artwork to launch screen. Perfect. All right, we're done. We just created our launch screen. Remember? When you're designing the launch screen, do not put so many elements on it, Okay? It needs to be simple, clear and attractive. Here we have a very attractive and colorful logo, and also its simple because the APP is going to show this page for only 1 to 2 seconds to the user. Okay, so we don't have that much time to put so much information. Just a simple logo would be great, are right in the next video we're going to design are signing page, so I will see that.
99. Sign in Page: Hi, everyone. Welcome back to another video off this course in these video. We're going to design the signing page together after a launch screen. We need the welcome page here, okay, to let the users choose between signing and sign up bottoms. However, first of all, I'm going to design the signing page, and after that we will get back to our welcome page. So let's duplicate these large screen, and I'm gonna remove our logo because we don't need that. And that's changed its name to signing. Then right at the top. I'm gonna put our logo and also right. Welcome back. Okay. However, first of all, I'm going to create some simple circles in order to make some great and beautiful elements to put right over there. Okay, so let's go ahead and insert a syrup ill like this, and I'm gonna make it 352 by 352. That's on Czech Borders, and then I'm gonna fit it with a gray. Didn't perfect. The first collar is going to be 50 to 64 f nine, and the second color is a light blue, which is three a f nine and e f awesome. Then let me change the direction of our Grady int. Make it like this are right now I'm going to duplicate it and put the second circle right below our first circle. Let me move it to the right in order to make it with double. And then that's changed the grade into two. F 56 and F eight are right and the second color to see seeks 30 and f eight. Okay, then I'm going to change the direction of our grade. Ian's here like this, and after that I'm going to select this color and decrease the offer to zero. Awesome. Let me move it a little bit like this, and I'm going to change the direction a little bit like this. Perfect. Then we need another one. So let's duplicate it and put it right below our second circle or right. And we need to change the Grady int once again to see seven two F and F eight and the other color is going to be the same pretty good. I need to change the direction of our Grady int to something like this and let's move it a little bit and these two as well. We need to change their vacation in order to get the best results possible. So it may take some time. Let me move the third circle a little bit up. Also, this one year, let's elect the first circle and change its position to minus 74. And it's why, to minus 84. It's great in the 2nd 1 to minus 43 minus 56 and the last one to All right now I'm going to rotate it by minus 45 degrees. So let's hear right minus 45. And then let's change its X two minus 85 it's going to minus 179. You may be wondering that how I could get those strange numbers. As a matter of fact, it takes time to get the best location possible. So in order to save your time, I change their vacation so many times to get those numbers. So you, in order to become a great designer, need to have patience to get the best results. So this is how I got those numbers, all right? And then I'm gonna go ahead and bring our white logo here. As you can see, I exported a Pdf find here. Let's bring it Terror. There we go. It's a point version of our logo or right. It's left. Patting is going to be 52 and it's stop heading is going to be 64. Then we need a text here. That's right. Welcome back. We'd Monserrat fonds. The weight is going to be regular, and also the font size is going to be 28 points. Perfect. And now let's decrease the with to 136. Awesome! And let's align it with our logo Perfect, and its top padding is going to be 16 pick cells like this. Then we can group them. And here, let's can't it logo? Awesome for the space. We don't need any status bar, however. We need the home indicator, so let's go ahead and insert its apple. I issue I bars home indicator iPhones and here light portrait, Let's put it here, the line it or resent early and align it to the bottom pretty good. The next thing we need is a title, so I'm gonna go ahead and add signing title here signing. Let's make it Dark grey with the code three a three a and three a and I'm gonna make it bold and it's going to be the same 28 points. Pretty awesome. Now the left padding is going to be 30. Great. I'm going to group our circles. That's right, shapes pretty good. And our top patting for thes signing title is going to be 16 like this. Then we need to tax feels like the instagram of that. We redesigned. If you wish, you can go ahead and copy and paste it here in order to save your time. Or you could use that project as a library to use the same elements that we use their. However, I'm gonna create it right down because it doesn't take so much shine. So what I need is a title that's right email address and change the fund to SF pro text and then decreased the font size to 14 points and also change the tax color to be nine B nine and B nine, and it's going to be regular pretty awesome. Put it here with the 30 pixel left padding and then I'm going to duplicate it. And here let's write the email address. That's right. Design. That's a one media that go and change the color to the same dark gray that we used for our signing title. Awesome. And finally, we need to create our takes. Its not so I'm gonna insert a line here like this. It's going to be 345 and here we got 315 and line into the center. So here we got 30 to the right. 32. The left. This is exactly what we need. And then let's change the color to 27 43 f de. This is our primary collar for this project. The top heading for our Symantec's is going to be 16 pixels, as we have here. And also the bottom padding is going to be eight. So let's make it eight awesome. And then that's group it right? Email address and duplicated because we need the password takes feel as well with a 24 pixel padding, and I'm going to change these title to pass for and this cement to some black circles, withholding option key and pressing eight number perfect. Now let me change the name of our group here to password. So what else do we need? Your right. We need to different icons here. We need a teak icon and also an eye icon for these past for tax field. So let's open up our icons, Fuller. Here we have the teak, and here we have the I pretty good that we put it here. And this one here, I'm gonna put the tick icon Teoh our email address folder and then let's align it. It's going to be 16 to the bottom and 16 to the right. And for these I as long, let me put it in past first Fuller 16 to the bottom and 16 to the right. Pretty good. And the color of this tick icon is going to be CB three e f nine. It's our secondary color, right? So now let's in a both tax feels and group them and I'm gonna name it. Takes feels. What else do we need here? I'm gonna add a forgot password link. So let's write for God password a question mark and change its color to to be 47 and F c, which is our primary color, as we used for these text feels lines awesome. It's fund is going to be a safe pro, rounded and also light, and its size is going to be 16 points. Let's shake the padding. It should be 30 to the left and 24 to the top like this. All right, The only thing we need to do is to add a signing button here. So now we need to insert around it. Let me change the with 2 315 and high to 72 then on Jake Borders and changed the radius. Time to small corners and increasing to 28 like this, I'm gonna line into the center. Pretty awesome. Then we need to add a great into it. So let's use the colors. The 1st 1 is going to be 49 60 and f nine, and the 2nd 1 is going to be 14 33 and f f great. Let me change the direction of our Grady int here and also here like this. Awesome. Then let's add some shadows. I'm going to choose the same blue here and decrease its all for 2 20 and changed the Y 28 and the Blur to 15. That's pretty great. Then we need to add a text she's signing. Let me change the color and changed the fund to Mont Sarah it. And then I'm going to change the font size to 20 points, and also it's going to be irregular. That may align it to the center vertically pretty good. As you can see, we've got 24 pixels to the top and 24 pixels to the bottom, and also we need to have 24 picks on to the left. What else do we need? Your right. We need a right arrow to put its right over there. So let's bring it here, right arrow drag and drop it. But it's right over there, and then that's align it vertically. Great. We have 24 pixels to the top and 24 pixels to the bottom and also to the right. As a matter of fact, it's great right now, however, I'm gonna add some details to our bottom in order to make it unique and amazing. So what I'm going to do is adding circle right order and let's on Czech Borders and make it 144 by 144 pixels. Great. And then that. Select the circle by holding command key and clicking on that. And here in our layer, least we can right click in, Click on copy Stein. Okay, then let's use the circle and again, right Click and paste I. That's great. After that, I'm gonna rotated by 90 degrees like this and put it right were there. Then let's elect our rectangle and kick a mask. Pretty awesome. That may move it a little bit. I'm going to change the direction off these Grady ins like this Awesome, and let me duplicate it and put it right over there. And once again, that's choose the first circle and copy the style because you're going to use the same grade Ian's here and paste it for our second syrup ill. And I'm going to change the direction like this and let's put this layer below our purple circle Pretty awesome. I'm gonna move it a little bit, and also this one. I think it's great. Can you see how beautiful it ease? We just adding simple shapes. We could make it look much, much better than let's group our elements all together and call it signing bottom. It's bottom padding is going to be 64 like this on That's all it successfully created Are signing page are right. I hope you enjoy this video. In the next video, we will continue creating our signing pages and also the welcome page. So see you then.
100. Sign in & Sign up Page Part 2: Hi, everyone. Welcome back to another video off this section in these video we're going to design are welcome page the other signing pages and also our sign a page so without, for I do let's get it started. First of all, I'm gonna move these artwork to the right side and let's duplicate it and let me bring it here. Awesome. And then I'm going to change its name to welcome Great. Let's remove these elements because we don't need them. Perfect. And then I'm going to select our Shapes group. And let's scare Lee to 970 pretty good, and then I'm going to rotate it by 28 degrees. That is awesome. The last thing we need to do is changing its position. Let's set the eggs to minus 595 and a y tu minus 581. That is great. So what else do we need? We need another button here for our sign a page and let me move it up a little bit and I'm going to duplicate it and put it right over there. It's gonna have a 16 peaks L padding pretty awesome and I'm going to change the folders. Name to sign up, button. Oops. We need to change these folders. And Emma's? Well, I wrote sign bottom. I need to change it to signing. Great. And for these button, I'm gonna and check fields and also shadows. And let's check borders. Remember, when you're putting two different buttons like these signing and sign of buttons that we have here, you should use two different types of buttons. For instance, here, we're going to have on an outline button for our sign a button, all right. And let's remove thes circles because we don't need them. And I'm going to change the color of our border toe, our primary color, which is 27 43 F d. Let me copy these hex code because I need that, and I'm going to change these techs to sign up. Let me change its color to our primary color as well. And also, I'm going to change the color of our arrow to the same primary color. Fantastic. And let's like both bottoms and move them up because we need to have a 64 bottom padding. Like what we had here. It's 64. Perfect. This is going to be our welcome page. All right, we need one more signing page here, So let me duplicate it. And this time I'm going to reveal these password. Okay, So I'm gonna change thes art boards. Name to signing password. Great. And let's change these password to something like you, I to any 20. And we also need to change these icon. So let's bring our new I can hear my cans and we need to look for I hidden. There we go. I'm gonna put it right over there and let's remove the previous icon and that seat. This screen is ready as well. Now we're going to design two different sign of pages. Okay, so let me duplicate this signing page, all right? And I'm going to change its name to sign up. Awesome. And let's go ahead and change his title to sign up as well. And also this button you need to change it to sign up and remember to change the Fullers name here to sign up button. Pretty good. This page is also ready, and the last page is going to be another sign of page. However, this time you're going to change the state of this tax field. Okay, that's changed the art ports name to sign up. Dash rowing email. All right, let me zoom. Mean So here. I'm gonna modify this email address to something like this. Okay? Definitely. It's the wrong address. And what we're going to do is to change the color of thes title email address and also our text fields line to red color. Okay, so let's elect our title. And I'm going to change you to f d 27 27. Great. And also select thes text feels nine and change the border scholar to F D 27 27. The last thing we need is an informative text here. Okay, so let me add takes here and right, the email address is incomplete. Awesome. I'm going to change its way to light and also its size to a 13. Pretty good. That may align it to the left, and I'm gonna put it inside our mail address, Fuller, which is here, and then we can align perfectly. It's gonna have an a pixel top padding. Awesome. And let's elect these text field on. Also forgot past for text and move it down. You'll get a 24 picks. L top adding, like this Now everything is right. If you wish, you can go ahead and design different states off any tax feel. However, for the sake of these course, we're going to just design two different states, all right? And we need one more screen here, which is the typing state. Okay, so let me duplicate thes sign a page. Great. And I'm going to change the our ports name to sign up typing. Then what we need is a keyboard. So let's go ahead and insert one apple I usu. I system keyboards iPhone, and I'm gonna use light. And here, alphabetic, I'm gonna put it right over there. Pretty cool. So now let's elect these elements are sign of title and also our text fields and move them up like this. Our top hiding is 299. I'm gonna make it 300 like this, and we need to also add a text input marker. Okay, so what we need is just adding a line like this. I'm going to change it to 19 and also its border with to 1.5 and its color to the same purple here. And let me move it down like this, and I'm gonna put it inside our past for textiles. Fuller. There we go. Like this Pretty good. I'm going to change something here. Let's elect these textiles and move them up till we get a 24 pixel top adding. Great. And now let's elect both our text fields and our title and move them down till we get a 311 top hiding like this. I think it's great. We can also preview Eat this. Everything is right to successfully design our signing and sign up pages and also our welcome page. So in the next video, we will design our OTP verification pages. I can't wait to see you there. So see you that
101. OTP Verification: Hi, everyone. Welcome back to another video of these course in this video. We're going to design our OTP verification pages together. So without further ado, let's get started. First thing Spurs, we need a new artwork. So let me go ahead and duplicate thes welcome page here, and I'm gonna put it right where they're to keep our cameras organized like this. And we need to remove these shapes and also this logo and also our sign up button. I'm gonna insert the status far right at the top. There we go, and I'm gonna line it to the top and let me put this song in button here. We need to change it later on. So, what is OTP verification for? OTP stands for one time password. Okay, so we need to get the users number, and then we should send a pass code, for example, a four digit password, and then the APP needs to confirm it. So we're going to design three different pages for that. First things fares. Let me go ahead and change. These are ports name to OTP. Great. And then I'm gonna put an illustration right over there. So let's open up the illustrations folder from our assets file. There we go. Here we have OTP. Perfect. I downloaded this illustration from Andhra website. As I mentioned before, you can get it for free. Then let's align it horizontally and it stop. Fighting is going to be you 100 like this and I'm gonna go ahead and copy and paste this title here because we need the same funds in the same color and a line into the center and also here. Then the change, the font size to 24 points and right OTP verification Pretty good. It's going to have a 60 pixel padding like this and let me duplicate it and change. It's fun sized to 16 points and also from bull to regular and the line high to 24. Then let's right. We will send you at one time password to this mobile number. All right? And then I'm going to decrease the with 2 310 and a line into the center Perfect. And it's gonna have a 24 peak sell top fighting like this. Then we need to have a text field here and also a title. So let's right end her more bile number, and I'm going to change the fund to SF Pro text and also its size to 14 points and the color to a light gray. That's right. B nine b nine and being nine pretty good aligning to the center and we need the tax field here. So I'm going to choose the same takes field that we created for our signing page. Let me select that and copy and paste it here. And then I'm gonna make you 233 and it's lining to the center and move it down. We also need a number here, so let's duplicate it. And here you can write any number. So let's right. Plus 49. +111222333 Okay, And let's make it bold and changed a collar the same dark gray here. And we need to also increase the fund size to 18 points a line into the center. It's gonna have 24 pixel top fighting, so make it 24 pretty awesome. And let's select all these elements. Group them right, more bile number. And now it's time to create our new bottom here. Okay, I'm gonna make some changes in order to make it unique. First in first, I'm going to remove these icon and select these texts and our rec tango and aligning to the center Perfect. Then let's right. Get OTP pretty good. Once again align it. And last but not least, we're going to change the position of these shapes. OK, I'm going to select this blue one and put it right where There that's moving down on. I'm going to rotate it like this. Perfect. And let's select the 2nd 1 and put it here and let's rotate it as well to the right to get something like this. That's pretty awesome, isn't it? And I'm gonna change the Fullers name to get OTP. Barton, Let me move this blue one a little bit to the left and this purple one every little be down and to the left. Now it's great. Now it's time to check the padding off thes spot in. It needs to have a 64 pixel bottom padding, so let's make it 64. And now everything is done. All right, Now it's time to create our second page here, So let me duplicated here and I'm gonna call it OTP verification. Then that's changed these tax too. Enter the OTP sand too. This number. Okay, that's right. Plus 49 +111 222 and 333 Then select this number and make it bold. Perfect. And we need to remove these elements thes enter my lumber title and also this number. However, we need to keep this line. So let's select it and make it for the eight like this and created text. For instance. Let's write seven and change the fund to SF pro text and increase the size to 24 points. Awesome that select both elements and align them. It's gonna have an a peak sell about impacting like this. Let's group them and here we need to write text field. Then that's duplicated three times. We're going to add a 24 pixel padding between them. Okay, Like this Perfect. I'm going to group them, align it to the center and right or TP text feels. Then that's changed these numbers. I'm going to change the 2nd 123 and also let's remove these two because we're going to deactivate Thies to tax feels okay like the user is typing. So I'm going to change these border color to be nine B nine and B nine Pretty awesome, and I'm gonna move it up. We're going to have 58 Peak, sell top padding and let's have a tax here. Let's right, Didn't receive the OTP resend OTP. All right, I'm going to change the font size to 14 points and also a line into the center and then that select the first part of this sentence and change the color to be nine benign, benign and select the second part, which is resend OTP and change you to our primary color, which is 27 43 F d. That is fantastic. Then let's move it up. It's gonna have a fourty pixel top, adding, like this and last but not least, we're going to change the Spartans. That's changing two. Very fine. However, As you can see, the user didn't complete thes tanks, feels OK, so this button is going to be deactivated. How can we do that? We're going to select our mask here on that's duplicated, then movies straight to the top like this, we need to change the Grady int to feel and let's make it white and decrease the capacity to 40% pretty awesome. And also, let's elect our where find tanks and decrease the opacity to 50% pretty great, right? Can you see the difference here? All right, these pages done as well. We need one more page. So let's duplicate it and I'm gonna complete these Tax feels. So let me duplicate this number. Put it right over there and line it to the center. And I'm gonna put it in its own folder. Let's change it to zero Awesome. And also once again duplicated. Put it here, align it and let's put it in its own fuller as well and change it to two. Now we need to change the color of our lines. Okay to the same primary color like this. And last but not least, issued activator water. What we need to do is removing this additional layer like this and also increase the capacity of our text to 100%. That is fantastic. And let me change the our ports name to OTP Verify. Alright guys, that's all for this video. I hope you enjoyed it and I will see you in the next video
102. Profile: Hi, everyone. I hope you're doing well in these video. We're going to design two different screens. The first screen is our profile, and the 2nd 1 is our profile completed page. So we don't hear I do. Let's get it started. First of all, we need to duplicate this art board, and I'm going to change its name to profile. Awesome. Then we need to remove almost all elements here because we don't need them. However, I'm going to keep this button right there. Then I'm gonna go ahead and insert erect tango as our background like this. Perfect. Then that's on Czech Borders, and I'm gonna feel it. We'd a great didn't. The first color is going to be 49 60 and f nine, and the second color is going to be 1937 f e awesome. And let me change the direction a little bit. Gonna make it like this. Perfect. Then let's make our status bar and also our home indicator white. So I'm going to change it to this one and also here. Perfect. What else do we need? First, we need a left arrow for our navigation purposes. So let's bring it here from our assets file icons. And here we have left Arrow Dragon Drop it. Pretty trying to order. Like miso mean It's gonna have a 30 pixel left padding and also a 68 top adding, like this Perfect. Then we need an image placeholder here. Okay, so let's inserts around it whole shift and click and drag. Awesome. It's gonna be 100 by 100 pixels and change the radius Time to smoke corners and also changed the amount to 36 then on Czech Borders and make it white. Perfect. Now it's time to align you to the center for is entirely Then I'm going to duplicate it and put our new layer right below our first layer like this. And I'm gonna change you to blue because we need to change the color to blue as well. And the color is going to be 40 c e f. Two. Awesome. Then let's rotate it. And here, let's write 38 degrees pretty good on. Now let's elect the Slayer the blue one and change its size to 104 and aligning to the center like this and once against elect our white rectangle and duplicated and put this rectangle below are blue one and change its color to be five to double F and eight and then let's rotate it by 30 degrees, and I'm going to change its size to 106 big cells by 106. Then let's align them to the center. Both vertically and horizontally are right. And now let's elect this blue one and I'm going to rotate it a little bit to the right like this. 57 degrees would be nice. So what else do we need? We need a camera icon right over there, so let's bring it here. Here we have camera. I'm gonna drag and drop it here and it's place. It's right over there, and I'm gonna align it to the center both recently and vertically. Perfect. Then let's group them and I'm going to name it. Profile Image. Awesome! And it stop adding, is going to be 84 to the edge of our screen like this. Pretty good. Then it's time to add our tax seals here. OK, we need to add user name, first name, last name and date of birth takes field so Let's use the tanks feels that we created for our registration page. I'm going to use this one. You can copy and paste whichever you want. Let's put it here. Perfect. All right, Now let me move it up like this, and I'm going to change the first title to user name And this Thanks also to your user name . Perfect. The lines are going to be white, so let me make them white. Perfect. You don't need this icon, obviously. And let me hide this tick icon. I'm going to change the second text fields title to first name. And here you're name. Then we need to duplicate these tax field. And here I'm gonna write last name. And here we need to write your last name. And the last one is going to be the date off birth. So that's right. Date off birth. And here I'm gonna write your birthday. And here I'm going to write D D. Which is day Mm. Which is moms And why? Why, Why? Which is the year perfect? Then let's select old tanks. You can hold command and shift key and choose them and changed their color to a T E. zero double f. Fantastic. I'm going to change our Fuller's name here. The 1st 1 is going to be user name. The 2nd 1 is going to be first thing last name and birthday. Awesome. It's top heading is going to be 44. There we go. And then the last thing we need to do is changing thes spotting. So first thing's fares. I'm going to choose a rectangle and make it white. And here right, complete. And let's change the color to a light gray like C eight c eighth and see eight. And we don't need these circles. That's remove them are right. What else do we need? Your right. We need a teak icon here, so let's bring it here. I'm gonna go ahead and copy and paste it. Then let's change its position. It's gonna have an eight pixel padding to the left, and I'm going to make it larger. So let's change the with 2 22 perfect and align it vertically, so we need to get 28 to the top 28 to the bottom and eight peak songs to the left nights. Time to change the color here. That's right, C eight c eight and see eight. Pretty good. Then we need to group Arctic icon with our text and choose our rectangle and align, eat or is entirely fantastic. Now let's go ahead and duplicate. These aren't board a name it profiled, completed. Awesome. Then let's remove thes camera icon and select our profile image place holer, Anglican data, sketch data faces. Let's refresh data to get the best for the possible. I think it's great. And then I'm going to select the blue and purple shape that we created and move them out of these fuller like this and put them right about our bank run rectangle. And let's kill them to 438 like this, and I'm gonna put them here. If I double click on this blue one and hovering my mouth's over thes path, I can see that a point appears by clicking here. I can move it like this. I can change the radius as well, so let's put it here. I'm going to change it to get the best shape possible. Perfect. Now it's time to change our purple shape. It's double click on that and click here. Click on this path to insert a point and move it a little bit like this and changed a radius. Pretty awesome. And finally, let's move it here, rotated a little bit on Let's scale it to 445. That is fantastic. Then we need to add our data here. So let's use the user name on right Emma on their line, Ashley, and make it white and remember to present a tick icon here. Okay, then let's change the name to Emma on. Make it White as well. And here, the last name to actually Perfect and the Birthday to 20-12 Dash 1990. Make it white as well, and that's duplicate these tick icon. Nor to have it in each tax field. I'm gonna put it in its own fuller and here as well. We'd a 16 pixel about impacting, and that's one for our date of birth. Pretty answer. Now it's time to activate our rotten. So let's elect these text and change the color to to be 47 FC. She's our primary color. And for the stick icona slow to be 47 f c. All right. We're almost done. However, I'm gonna add some shadows to our photo. So let's select that rectangle and at shadows and decrease the on farm to 20 and the wine to eight and Blair to 22. Pretty awesome. And remember to change the name of these folders. Here we have gets OTP button because we duplicated the R word. So that's changing to complete Botton and here as well. Fantastic. Alright guys, that's all for these video. I hope you enjoyed it and I receive a in the next video.
103. Homepage: Hi, everyone. Welcome back to another video of thes sections in this video. We're going to design our home page together. So without further ado, let's get started. First of all, I'm gonna insert a new art board. There we golden be moved here. Then we need the status bar. I'm going to copy and paste it. I'm gonna leave it as a tease. It's white because we're going to add a background over there. Then I'm gonna insert around it like this, and I'm going to change its high to 278 and its radius to smooth corners and then increase the radius to 66. Perfect. After that, I'm gonna double click on that first Let's on Czech Borders and then selectees top points perfect and decrease the radius to zero. So we will have a shape like this. Then I'm gonna add a grade into it. We're going to have the same Grady INTs as we used here in our profile page. So let me choose Theis Rectangle in profile, completed page and right click. And that's copy style and click on indirect angle in thes art board right click paste. I pretty good then I'm gonna go ahead and change the art boards. Name to home page effect. So what else do we need? We need a profile image over there. Hamburger, many icon rights at the top. A text here. We're going to insert a card here and put our charge on that and right at the bottom. We need to have a tap. Are So let's go ahead and design are tap are together. What do we need? We need to insert Eric tango like this, and I'm going to change the high to 92 on Czech Borders, then align it resentfully and aligning to the bottom. Perfect. And after that, I'm going to change its color to want, not some shadows. I'm going to decrease the all five amount to 10% and the Blair to 20. That is great. Now we need a home indicator here, so I'm gonna go ahead and bring it here. Let's change it to light. That is great for these type. Are we need to have three different sections or, let's say, three different icons. The first icon is going to be a wallet. Okay, which is for home page. So let's bring it here. Icons. And here we have tapped for Fuller and three different icons over their wallets, profile and edification. So let's bring all of them like this. I'm gonna put the wallet here. The profile here and a notification writes in the centre. Awesome, then that Select all of them and align them vertically. And the right patting forties wallet icon is going to be 90. And also for these notification icon is going to be 90 as well. So let's move these profile icon to the left like this, then group them and move them up. And let's have a 24 pixel top padding and align them to the center like this. Perfect. So for showing that these icon or this page is activated, you're going to change the color of these icons to our primary color like this. Okay, so because thes page is going to be our wallets or home page, we need to keep that as it is. However, I'm gonna add something to it. I went insert a small circle on Czech borders and make it five by five and change its color to our primary one like this. Pretty great and it's gonna have an eight peak sell top heading Perfect. Let's elect a wallet icon and also our circle and a line into the center. Awesome. So what I'm going to do is creating some symbols in order for us to activate or deactivate are icons. Easy. Okay, so let me group this wallet icon with this circle and I'm going to write, I want it. Then create symbol. That's right. Haps slash wallet slash active. Okay, then let's copy the color code off this dark gray and go to Symbols Page, and I'm going to duplicate this symbol like this. Then let's remove the circle and change the color of our wallet, too. Are dark gray. And last but not least, we need to change the name here from active to the active perfect, and we're going to do the same thing for the other two icons. So let's go back to our our pores. Perfect. And here if I said like this wallet, I can easily toggle between active and the active here. See? How is it he's fantastic are right now let's like the our notification I can and click on create symbol and here I'm going to write taps slash notification slash the active. Then let's go to symbols. There we go. And then I'm gonna increase the height here to get the same height as our wallet icon. Perfect. And it's duplicated and I'm going to copy and paste e Sirico. Let's align it to the center, and it's time to change the color of our shape. There we go. And now let's change the art boards. Name too active. Perfect. And here we can easily toggle between the active and active great and the last one. Let's create another symbol. Tabs slash profile slash the active. Let's go to symbols Page. There we go and then increase the height perfect. And now I'm going to duplicate it and copy and paste thes circle here and line into the center and change the color of these shape. And that's about the least. Remember to change the name off this symbol here. We need to have active, that's all. Let's check it out. Two works perfectly. All right, then we can group all these elements and right tab are, and also we can create a symbol nerd to use that in our next art boards easily here we can write Tab are perfect. The next thing we need to do is moving thes rectangle straight to the bottom like this. And then we need to bring our hamburger menu icon here. We have hamburger menu drag and drop it. Awesome. Let's put it here. It's gonna have a 30 pizza left padding and 68 pixel top patty like this. And after that, we need to put our profile image right there. So let's go ahead and copy and paste it from our profile page like this on a scale it down to 50 by 50 pixels when I put it right over there. Miso mean Now it's time to insert a circle a small circle here and make it 10 by 10 pixels . Change the border color toe white and change the field to 20 c nine 68 to get this beautiful green. And it's the status indicator in order to show whether the user is online or not. Okay, so it's gonna have a 42 pixel top padding and a 38 pixel left patting. Then we can group them, and here, right profile image. As you can see, we have a 30 pixel right padding, and we need to have a 68 big sell top, adding perfect. The next thing we need is a text. So let's insert one and write Good morning, end her Emma and a comma that's aligning to the left and make it white. And I'm going to change the font size to 24 points as well. Like this. The next thing we need is a card. So let's insert around it here like this, and I'm gonna make it 315 by 316. I already calculated it because we need to put a charge on that, that we make it white on Czech Borders and add shadows. Change your wine to nine and Blair to 49 decreased the on for 2 10% like this and then align it resentfully. As you can see, we've got 30 pixels left padding and 30 pixels right padding that we move it up and then I'm going to decrease the radius to 40 to get a beautiful rectangle. And it's stop. Adding to the edge of the screen is going to be 199. Okay, so let's make it 199. And the padding between this text and this rectangle is going to be 16 pixels like this. So here in this card, we need to add a text and right your total balance and changed the color 23 a three a and three A. And changed the phone size to 16 points like this and it's gonna have a 32 peaks sell top adding and also a 32 peaks. L left padding like this duplicated and make it bold and also change the font size to 30 points. Then I'm going to write $8500. That's changed the color to two D 99 double f pretty good. And the line height is going to be 37 the top heading. It's to be eight pixels like this. Awesome one. Also, we need we need to put a chart right in these white space and an icon right at the top here . Okay, so let's bring our more icon. There we go. When I put it here, let me take the pad ings. It's gonna have a 32 picks, help adding to the right and I'm gonna align it, Pete, this text to get a 32 pixel top heading as well. Now it's time to create our chart. Okay, We can also use pre made charts for our project. However, I'm going to show you how to create a chart by yourself. I'm going to create a bar chart that has a negative value as well. So let's insert around it like this. And I'm going on Czech Borders and changed a with 29 and a high to 122 that miso mean double Click on this wreck tango and choose these bottom points and decrease the radius 20 Perfect. Then we need to change the color to to the 99 double F. It's the same color that we use for our balance text. Okay, then I'm going to duplicate it, move it here, right click, transform for the vertical and make it shorter and put it here. Now what's changed? A collar to a five F three and double f perfect, and it's gonna have a four pixel left padding like this. Then let's group them. That's Collett Colin one duplicated and place it feed a 16 pixel padding once again duplicated. I'm gonna have five columns for now, like this. Then select these tall column and decrease its height. Perfect. And also this one Decrease it And this one as well for some. Great. And now I'm going to select these light blue column and again flip it vertically and put it here. Okay, that's decrease its height. And I'm going to duplicate it two times like this. And now we need to sleep. They start blue column, theoretically decreased the height and put it in the negative section, Then increase the height of our life of the bar to 70 pick cells. And I'm going to remove it in order to save some time and duplicate the last column and increase the height of this dark blue bar and increased this one as well. I'm going to select this poor and decrease its height as well. Now it's time to group all columns, and I'm going to call it a bar chart. Perfect. Then select a wreck tango, align it to the center horizontally and its bottom padding is going to be 32 like this. Can you see how amazing it ease? And now it's time to group our elements and call this group balance card awesome. And the last thing we need is another card. Or, let's say some kind of bottom to navigate user from wallet, page two, bank accounts page. Okay, so what I'm going to do is duplicating Theis rectangle and move it down and changed the high to 146 like this and change the color to our primary color, which is to be 47 f and C awesome. And it's gonna have a 24 pixel top adding and let me insert the tanks here. I'm going to write, check your bank accounts. I'm going to change it to regular and also the font size to 20 points and a collar to white . And last but not least, I'm gonna decrease the with 2 150 That's pretty awesome. Now I'm gonna align it vertically, and it's gonna have a 32 peaks. L left padding like this while should be add to these card or let's say button. I'm going to go ahead and copy and paste these shapes here like this and select this Rick tango and click unmask. Then Let's elect the purple one and I'm gonna make it 198 pixels and put it right. Order and the blue one also to 198 pixels and put it here pretty good. And then we need a small arrow to place here. Okay? So let's bring it here. Small arrow. There we go. And I'm gonna align it to the center vertically, and it's gonna have a 32 pixel right padding as well. Then let's change the group name to bank accounts card. Awesome. And we're done. Everything is great. So it's previewed. As you can see, this successfully designed an amazing home page together. I hope you enjoyed it, and I will see you in the next video.
104. Menu: Hello, everyone. Welcome back to another video off this course in this video. We're going to design the menu screen. Okay, So when the user clicks on these hamburger menu, icon and menu comes from the left side of screen here. Okay, So first of all, let me go ahead and insert an art board, and I'm going to change its name to menu. Then what we need is to export this home page. So let's click on that. However, remember to hide this status bar and also this home indicator. I will tell you why in a minute. Okay, so I'm going to select this home indicator, and here I can set it to non are right. Then select our aren't board make exportable. And here, as you can see, we don't have any background, so I'm gonna check bank run color, including export, and it's white by defaults. Then I'm going to change the size 23 x and its dragon drum. Pete here. Perfect. I'm going to scale it down and change the with 2 375 which is the with off our screen. And now let me bring our status bar and home indicator back. Awesome. So why did the export thes homepage? But see what's going on here? When the user clicks on this menu button, this page is going to move to the right side like this and hear a menu would appear. So let me move to the right, and then I'm gonna insert around it year that's double click on that and choose thes two points. The top left corner and the bottom left corner. The radius 20 pretty awesome and changed the with 2 281 And the radius Here, as we can see, we've got 40 for these two points. I'm going to make it 20 and on Czech Borders and make it white. Perfect. Then I'm gonna move our image to the right. Now it's great. However, it's too bright. OK, so it's a good idea to puts an overlay layer in order to make its darker. So let me insert a rectangle here like this on Czech borders. Make it black and decrease the capacity to 30%. There we go. That is awesome. What else do we need? We need the home indicator, so let me bring it here now you can see why I removed the home indicator and the status far when I was exporting that our port, because in that case it would have two different indicators, and it doesn't make sense. OK, so it's necessary to pay attention to the details when you want to become a professional yuan UX designer. All right, we need a pro fine image right over there, then the name of our user, the user name and hear some menu sections. So let's bring our profile image from here. Copy and paste it. When a protector, the size is going to be the same. And let's have a 30 picks. LF padding in a 68 pixel top heading, then I'm going to write a name year. Let's right, Emma actually make it bold, and I'm going to decrease the font size to 18 and change the color. 23 a three a and three a. Perfect. It's gonna have an eight pixel left padding and I'm going to duplicate it. Put it here, and that's right at Emma. Underline Ashley. Make it regular and decrease the font size to 14 points pretty good. Then I'm gonna move it up and put it like this, it's gonna have a 22 picks on top heading to the top edge of our name. Text. Okay, like this. Then group them and align them with our photo perfect. Group them again and changed the name to users. Information. Fantastic. Now it's time to create our menu sections. The first thing I'm gonna do is inserting around it here, and it's gonna be 281 by 60 pixels and change the radius to 14 like this on Jake Borders, double click on that. Choose these points top left and bottom of corners and decrease the radius 20 Then let's change the color two F two, F four and F eight. So we get a light blue collar, as you can see here, a very life blue color. And then we need a text. So the first section is going to be payments. There we go. Let's make it 18 points and change its color to our primary color, which is to be 47 f c. All right, what else do we need? Your right. We need an icon. So let's bring it here. Here in our icons folder we have a menu, Fuller. So let's bring payments right and put it here. I'm gonna align our tanks with our icon vertically. Great. And it's gonna have an eight pixel left padding. Perfect. The last thing we need is a small arrow. Okay, so let's bring it from here on, paste it change the color to our primary one. She's this one. I'm gonna put it right there. That's a line It vertically, even our takes an icon, and it's going to have a 30 pixel right padding like this. Then we can't group these elements and colleagues payments. And after that, let's double click here group these elements as well and here, right payments, and then I'm going to copy and paste it here and move it down. Let me change it to transactions, and it's gonna have a 50 peaks on top. Adding to our payments takes here, so let's check it out. It's 48. I'm gonna move it down now. It's 50. Then we need to change the icon here. So let's remove that. Then let's drag and drop the transactions icon. She's a pdf. Fine. Here. I'm gonna put it right over there and Let's elect these payment icon and align them horizontally. Awesome. That's changed these groups name to transactions and group them once again with this icon transactions. Awesome! And once again, we need to duplicate it and put it with the 50 pixel padding like this. Let's change the tanks to my cards and remove this icon and bringing to my cards. Icon, put it here. It's gonna have an eight week sell padding and I'm gonna put this folder inside the transactions Copy Fuller and change the transactions copy to my cars. Awesome. Once again, let's duplicate it perfect and change the text to promotions. I'm gonna bring the promotions icon. There we go. That's put it here. That's align it and it's gonna have on a peak seller right padding. And that's changed the name to promotions. And last but not least, let's duplicate it for our savings section. That's changing to savings and remove these icon and bring the savings icon when I align it . Also that we put this saving icon to promotion copy folder and I'm going to change the name of promotions copy to Savings. Then I'm going to select all these icons withholding command and shift and align all of them to the center or is entity Okay? So now we can be sure that all icons are aligned perfectly. Now, let's check the left padding. Here. It's 50. I'm going to make it 32. And now let's elect all the sections and move them to the left. Make it 30 to pick cells, and then we need to move these small arrows to the right to get a 32 picks are right padding now. It's fantastic. We need one more thing. We need a sign out button right at the bottom. So let me go ahead and bring our sign up button. Here. Copy it. Paste it. Here. I'm going to use the same outline. Button removed these arrow, make it smaller. It's gonna be 221 pixels and changed the tanks to sign out. And we need to bring the leg out. I can hear it's gonna have a 24 pixel right padding. Group them and call it. Sign out button, and it's gonna have a 56 pixel bottom padding like this. All right, guys, we successfully designed our menu page as well, and I hope you like it in the next video. We'll design the cars page together, so see you then
105. Credit Cards: Hi, everyone. Welcome back to another video of this course in these video. We're going to design the cards page together. So without further I do. Let's get started. First thing spares. I'm gonna go ahead and duplicate this home page. Let me move it. Here are right. And then I'm gonna change the artwork. Name two cards. Perfect. And we need to almost remove all elements. Okay. Except this rectangle, which is our header. Let's go ahead and remove all these elements. And also this profile image and this menu icon. Then we need a left arrow for our navigation purposes. So let's go ahead and copy and paces from our profile page. There we go. And also, we need a home indicator, so I'm going to copy and paste it from here. Perfect. First of all, we need to have a text. Okay. Here. And I'm going to write. You can check your cards here, and then I'm gonna make it bold. And finally, I'm going to change the with 2 274 like this. It's left patting is going to be 30 pick cells and it stop adding to the edge of the screen . is going to be 125 as a tease. Then we're going to place two different credit cards here, the 1st 1 which is our main created card. And the 2nd 1 which is the alternative. Okay, And after that, right at the bottom, we're going to have recent transactions. So now let's go ahead and create our cards. To do that, we need to insert around it like this. Then let's make it 209 by 305 and changed the radius type to smooth corners and also increase the radius to 40 Perfect on Czech Borders. I'm gonna fill it with white. However, in these parts, I'm going to teach you a very good technique in order to create a very interesting radiance or, let's say, bank run for our cards. So what I'm going to do is clicking on these plus button in order to add another feel. And this time I'm going to change you to radio Radiant. Okay, then that's use the first color and change it to 40 d three f and two, and I'm going to copy and paste it to the second color. And we're going to have the same color here. However, I'm going to decrease the all fall to zero perfect. And then I'm gonna move it here like this, and I'm going to change the direction effect. Then let's add another fields again Radial Grady int and choose the first color. And I'm going to change you to e 100 double F and the same color for the 2nd 1 and again decreased the off to zero. And I'm gonna put it here. Have changed the direction like this. I'm going to rotate it like this. Perfect. And then we need another Grady int. So let's make another radial radiant here and change the color to to be 47 FC and use it for the other color as well. And decrease the all 4 to 0. Perfect. And I'm gonna position eat here at the bottom right corner. All right. And now I'm gonna move our Grady INTs to get the best result possible. So let's shoot this pink one or let's say purple when I move it here, and then I'm going to choose this blue one. The first Grady int, as we have here are right and the last one like this. That's perfect. Let's use these purple one again. I'm going to move it to the right in order to get this light color here. That is pretty awesome. So can you see how easily you could create background to make your card unique? Alternatively, you can create your background with solid colors, and after that you can put a new layer and check the background Blair option. However, with using this technique, you can easy to costume either background here. Perfect. Then I'm gonna move this card illegal with up, and it's gonna have a 16 pixel top adding like this and a 30 pixel left patting, What else do we need? We need a balance here, So let's write $4500. Perfect. I'm gonna move it here. It's gonna have a 38 pixel top padding and 24 pixel left batting that's duplicated. And here I'm going to write company, which means this card is related to job purposes and make it 18 points. And also let's change line hide to 22. You might be wondering, Might be changed a line height. Okay, because we have only one line here. So what's the catch when we want to sit the padding between our tax here, the line height matters a lot. Okay, so suppose that's here. I have an eight piece on top heading If my line height Waas 29 here I would get four picks Celta padding, and it would be like this. So the line height matters a lot, but they put it here with a three pixel top, adding and I'm gonna insert another text right over there and let's change it to regular and also the size to 14 points and the stakes is going to represent our expiration date. Okay, so here we have month and the year pretty good. We have 24 pixels to the left or right, and now I'm going to duplicate it, nor to create our cars number for the 1st 12 digit off this card number, I'm going to use a star like this. And the last four numbers are going to be 22 04 I'm gonna move these expiration dates up and it's gonna have a 13 pixel bottom padding. And this one also needs to have a 40 pixel bottom padding let me hold shift and select our expiration date as well, and moved them up. Perfect. The only thing we need here is the MasterCard logo or weasel. Carla, go as you wish. Okay, But for this project, I'm going to use MasterCard. So let's bring the logo here. There we go. Here we have logo and MasterCard logo. Let me drag and drop it here. Perfect. It's gonna have 22 pixels, right padding, and also a 12 pixel left patting. OK, and the bottom padding is going to be 32. And these two are aligned perfectly. Pretty awesome. I think it's better to move these purple Grady in a little bit. Make it like this. Now it creates a better contrast. Feed our content. Okay, then let's select our elements and grouped in college MasterCard. And the last thing we need here is adding some shadows. So let's elect a rectangle. And here I'm gonna add some shadows, and I'm going to change the color to 59 88 f eight. Awesome and change the all for to 20%. And also the Blair to 49 the Y 2 90 It looks great right. We've got a slight shadow behind it. All right. As I mentioned before, we need another card here, which is our alternative. So let me duplicate these card, put it here, and then I'm gonna scale it down and set the with 2 176 Perfect. And it's gonna have a 24 peaks on top, adding 24 pixels left padding and 24 picks cells, bottom padding. Okay, like this. And I'm going to change the name to Master car to. And this night we're gonna have a white card. Okay, so let's uncheck these grade Ian's, then select our elements here pretty good and change the color. 23 a three A and three A. And also, we need to change these shadow color year a changing to 29 29 29 make it 10% like this. Remember to change some of these contents in order to convey the message that these two cars are completely different. That's make it for 1000 this company to home. And also this expiration date. Let's change the year to 20 to anyone and a month to three or four and Also, these four digits 2 90 50 All right, we successfully created our cars together. Now we need to design the recent transaction section. OK, so first things fares. We need a tight ill that's right, recent transactions and then make it bold and change the size to 22 points. Perfect. And it's gonna have a 50 pixel top adding and a 30 peaks of left patty. So what we're going to create here is at least of transactions, we should put three different transactions here. For instance, the 1st 1 could be for shopping and the next one for medicine and the last one for sports. So what I'm going to have here is an icon to represent a specific type of transaction. So let me insert circle and change it to 48 by 48 like thes on shake borders and change the collar to double if C. F and 87 perfect. And here we need to insert an icon. So let's bring the shopping icon here we have my cones and transactions, and here we have four different icons. We need the shopping for the 1st 1 or right, let me a line into the center. Pretty awesome. Can you see what color are used for these shopping bank? I can suppose that we have a black color here and we want to choose a great color. Okay, My suggestion. Ease. First, choose the same color as we have for our bank round, and then move these color picker to find a dark hair version of death specific color. This is the best way to create suitable contrast. Okay, so this is how I chose thes specific color. Then we need a title here. That's right. Shopping and make it 18 points and also regular. And the line high to 22. Pretty good. And let me duplicate it because we need to have time here and also a date. And let's write 15. March 2019 comma 8:20 p.m. And I'm gonna make it 12 points and changed a collar too. B f b f and B f k and the line height also to 15. Pretty awesome. So these thanks is going to have a four pixel top adding, like this that select the shopping takes as well group them. And here we have texts. Choose the circle and align them vertically. Pretty good. Okay, I'm going to select thes circle and also our icon and group them. Here we have my Khan and put this icon Fuller inside our shopping folder. So what else do we need for a transaction? You're right. We need the amount here. And also, I'm gonna put a small arrow right over there. So let me copy and paste thes text shopping. We're gonna put it here and change it to minus $120 change the font size to 16 points. And also the line hi to 19. Pretty good. That may align it vertically. And then we need a small arrow here, so let's bring it here. We can also create a symbol nor to use that easily, paste it and change the color to C seven C seven and C seven like this. And I'm gonna put it right over there with a 16 peaks. LF padding like this and with a 30 pick cell, right, Patty, however, remember to align the text to write, okay, because otherwise, when we change this amount, alignment is going to be wrong. Okay? And then I'm gonna put these two layers inside our shopping folder as well. Perfect. So as you can see, we've got a 30 peaks are left and Ryan padding, which is what we want it. Then let's duplicate this layer and place it with the 16 pixel padding like this and change the color of the circle to easier 09 f F F. That's removed this icon and bring the medicine I can hear that's aligning to the center vertically and horizontally. Pretty awesome. Then it's time to change the Fullers name to medicine like this and also this title and the time to 13 March 2019 and here Let's change the time to 12:10 a.m. and the amount to 89 I'm gonna have some change here. So 89.50 because we aligned it to the right. The with automatic, they increased from the left side. OK, then we need to duplicate it once again. And here I'm going to change the Fullers name to sport and the cereals color to a light blue. Let's write 87 F zero f f r. Right removed this icon and bringing the sport icon from our transactions. Fuller, let me put it in icons Fuller and aligning. Both resented Lee and vertically. Then I'm going to change the title to sport and the time to 10th of March and the time to 6 50 PM And here let's change the amount to 99.90 and that's it. Everything looks line. Let me group these transactions together and name it transactions. And that's all are right, guys. We finally created out card space together. I hope you enjoy this video and I will see you in the next video.
106. Transactions: Hi, everyone. I hope you're doing well in these video. We're going to design our transactions page. So first of all, let's duplicate this art board, and I'm going to remove almost all elements here. Let's keep these left arrow because we need that. And I'm going to remove these tanks and also these transactions. Okay? We don't need them right now. Then I'm going to change this rectangle a little bit. Let's change the high to 245 and the radius from 66 to 62. Okay, so I'm gonna change these two numbers, so we've got a shape like this. Now I'm going to duplicate it and put this layer right below our first rectangle movie down approximately three pixels because you can see here the wines three. And then let's change the color to a solid one and city to 87 F zero and double left to get a nice light blue. All right, then I'm going to set the Y 25 I think it's better. Yes, it looks great. And here, what do we need? We need a navigation bar. We can insert easily from our apple on us. You like eat here. Navigation bar. Okay. However, I'm going to show you how to create one. So let's write transactions and changed the fund to as of pro text. And then let's make it bold and also white. Lastly, let's change the font size to 17 points. I'm gonna line into the center horizontally. That miso mean I'm gonna put it with a 50 pixel top, adding to the edge of our screen like this. And then I'm gonna move these left arrow Scalea down to 19 picks. Owns perfect. And then I'm going to change it from scene to regular like this. Then select our left arrow and also this text Align them vertically. So we need to get with divine pixel. Stop adding and a 24 pixel left batting. All right, then I'm gonna group these elements with our status bar. And here, let's write Navigation bar. Perfect. So what else do we need here? First let me change. These are pours name to transactions. So here we need to ride the expenses. Okay, so I'm gonna add a tanks and write your total expenses like this. Then let me change the fund to Monserrat it and the font size to 22 points and also the color to this light blue. As we have here, I'm going to select both our tanks and this header, our rectangle aligning to the center horizontally. And it's gonna have an 82 pixel bottom padding. So let me make it 82. Perfect. Then duplicated here. Let's right. 1000 and $63.30 I'm going to change it too bold. And also the fund signs to 28 points. The reason that I chose this number is because of our transactions. Okay, so later on, when we create our turns actions and we calculate them, we will get thesis number. All right, Now, let me a line into the center or is entirely, and it's gonna have a 16 picks. L top adding, like this. Remember to set the line hi to 34. Otherwise, our alignment would be different. All right, so everything is right here. The next step is creating our card that the user can slide up or slide down. Okay, to get more details. So what I'm going to do is selecting piece rectangle duplicated. I'm gonna move it here, then that's changing to card right kitty con dat transform 50 particle and then set the high to 541. Pretty awesome. I'm gonna move it up. It's going to create a 21 pixel top, adding to the age of our light blue shape. Okay, And then I'm gonna choose thes card. And here, let's change the direction of our Grady int like this and also here. That would be great. All right, the next thing we need to change is this home indicator from this light to dark. Perfect. Now it's nice. And then we need to create an indicator here for this card in order to show the user how they can open and close thes card. So let's go ahead and insert around it here like this on Czech Borders and change the high to four. And with two 47 then I'm going to change the collar to white and aligning to the center, or is entirely and it's gonna have a 16 pixel top, adding perfect. Then here, right at the top. We need a search for, so we don't need to use the standard search part we need to create our own search bar. So let's go ahead and insert around it here like this. I'm going to change the with 2 315 and high to 53. Perfect on Czech Borders. Aligning to the center and I'm going to change the radius to smooth corners and change the amount to 16 like this. And lastly, let's change the collar. 2051 99 e So we got this nice dark blue here in order to get a good contrast ratio. And then we need to add a text here. So let's write, search and change the funds to SF around ID like this, and I'm gonna make it regular. And also the fun size is going to be 14 points and change the character here a little bit. Let's set it to zero points the road to now It's better. And lastly, we need to change its color. It's gonna be three B 54 FB Perfect. It's align it vertically. So what? Also we need here? You're right. We need a search icon, So let's bring it here. There we go icons And here we have search pretty good. It has the same color as our search tanks that may align it vertically. And then we need to get a 16 picks on top, left and bottom padding. Okay, so let me make it 16. Perfect. And the left patting of thes surge tank is going to be eight picks owns like this, and then we can group them and call it search bar like this. The top padding of our search bar is going to be 44. Very nice. So what else do we need here? You're right. We need the transactions. So here we created three different transactions. Let me copy and paste them here like this. It's gonna have a 24 pixel top padding. Perfect. So what should be changed here? Obviously, the colors off our tanks should be changed. So let's select them. And I'm gonna make them white and said like these texts as well on our date and time and make them 80 e zero double F to get this nice light blue. And we're going to copy and paste thes color code in order to use for these small arrows as well. They pay seat. Perfect. So what should we do here? We need to duplicate some of these transactions and create new one. OK, so I'm going to duplicate these shopping like this. And as you remember, they have a 16 pixel padding between them and here. Let's change the date to vie for March and a time to 7 20 like this and also the amount to make it look rial to $155. Then once again, let's duplicate it. And now we need to create another type of transaction. Okay, which is travel. So I'm gonna go ahead and so mean and choose the circle and change the color, too. Double F 87 87 that's removed this icon and bringing our travel icon here transactions. And here we have travel. Perfect. I'm going to choose the circle and allowing them both vertically and horizontally. And obviously you need to change these title to travel and a day to three and a time to 5 50 the amount is going to be $399. Makes sense, right? Remember to change the fuller Zane. Let's change it to travel. And last but not least, we need one more transaction here. So I prefer to use sport. Let's duplicate it. You can choose whatever you want, Okay? And let's change the day to 10 off February. And the time is going to be, for instance, 5 20 And the amount the same. Okay, so it likes that it's a subscription service. Okay, so we've got the same amount each month, and I'm gonna go ahead and select these elements in order to group them together. And that's got eat transaction car. Pretty awesome. You might be wondering that why we didn't create a symbol for these transactions. And after that, we could change them easily. You're absolutely right. But for the sake of this course, I'm going to show you everything in detail in order to make you practice at launch. Okay, because this is how you would become a great designer. But remember, if you want to create seem bowls, you should create four different symbols. Okay? You need to have a specific symbol for each transaction type because we have different transactions. Icon, and then you can easily change. The amounts are right. The only thing I think we need to change is the size of these left arrow. Here So let me is a mean double click on that. And because it's an asset symbol from SF symbol application, which is developed by Apple, I can easily change its size like a font. Okay, so let me change it to 20 and then I'm gonna align it once again with our text here and now . I think it looks great. Are right. He successfully designed our transactions screen together. I hope you enjoyed it. In the next video, we're going to design another transaction. The screen, which has all these elements with one difference in that screen. We need to close thes card and move it down. And in said we need to create some details about our expenses. I'm so excited to start designing that page together. So see you that
107. Transaction - Detail: Hi, everyone. Welcome back to another video of these course in these video. We're going to design another transaction page to show how the user can interact with this card. And what happens if the user decides to move these card down? Okay, so we don't try, do Let's get it started. We duplicating these art board, and I'm going to change its name to transactions dash detail like this that I'm gonna go ahead and move this car down, Told it, Select that it seems that we forgot to group these travel icon here. So let me include it here. I'm gonna put it in travel for LIRR like this. Then I'm going to set the y 2 693 Perfect. So what do we need to put here? We need to add a title right over there, then four different small cars to show the total amount of each transaction time. And then we need another large card. Like what we have here like this, and we need to make it for credit card repayment section. Okay, so let's go ahead and insert our text here and here. I'm going to write track your expenses perfect. Then I'm going to change the fund to Mancera it and also its size to 22 points. It's gonna be bold and its line height should be 27 the color is going to be our dark grate The cheese. Three a three a three A Like this. Let me put it here it stop adding is going to be 32 2 The bottom edge of our light blue shape like this and it's left padding is going to be 30 pixels. Okay, then we need to create our cards. So let's insert around it. Perfect. And I'm gonna make it 153 by 103 like this. Change the radius to smoke corners and increase the amount of radius to 25 on Czech borders . And here I'm going to choose a Grady int. The first color is going to be see 16 a and six A. In the second color should be double F 87 87 like this. Then I'm going to change the direction of our radiant something like this that looks nice and it stop patting is going to be 16 pixels so let me make it 16. All right, So what else do we need here? We need a text. Okay. Which indicates the type of transaction that's right. Travel. And I'm gonna make it regular and change its size to 18 points and a collar to a 7 31 31 Pretty awesome. Then let me aligning it. It's gonna have a 16 pixel left padding and a 24 pixel top hiding. Then I'm going to duplicate it, and here I'm gonna line it to the left. And that's right. $399. Let me make it bold. And I'm going to change the font size to 24 points and a line high to 29. Make sure to align these stakes to the left side as well. And it's not. Padding is going to be four pixels like this. All right? And then I'm gonna add more details to this card. So what I'm going to do is inserting a circle here like this on Czech Borders, and I'm going to make it 112 by 112 pixels and then add a great into it and the first color is going to be double F 91 91 in the second color that set it to blank and decrease the offer to zero. Then I'm going to change the direction like this whole command key and shift and select thesis rectangle, Anglican mask. And after setting the position off the circle, I'm going to change the grade Ian once again. So let me align it. It's gonna have a six pixel bottom padding in a 54 pixel right padding. Then let's change the Grady int this one that we said to black and choose this color. Okay, then decrease the awful like this. And I'm going to change the direction a little bit to get something like this. That looks fantastic. Now it's time to group are elements together, that group them and I'm going to call it travel. Then that's duplicated and put it here with a nine pixel left patting. Then change the Fullers name to shopping and the tie fell to shopping as well. And the amount is going to be $375 lastly, we need to change our colors. So first thing stairs. Let's change the Grady int here and the first color is going to be see a 95 and 47 the second color is going to be double F C F and 87 like this. And also, let's change these circles. Grady in two F, six C five and seven A. I'm going to copy this color and pace it for the second color here and then decrease the offer. And lastly, let's change our text color to a 27 43 0 pretty awesome. And then that's duplicated once again because we need to get four different cards like this , change its name to sport and also the title to sports and the amount to 199.80. Then let's change the color of our tanks to 29 86 93. And after that, let's change our great into three Double A to B and one and the second caller to 87 F zero double F perfect, and now it's time to change the color off our circle. Here, let's set it to 73 D C and e be awesome, and that's copied and pasted for the second color. Like this and decrease the awful to zero pretty awesome and the last card. Let me duplicate it. Change your name to medicine and changed the title to medicine as well. And the amount is going to be $89.890.50 then that change the colors to 91 37 B C and ingredient to eight, a 46 and a B and the second color to easier or nine and f f NF like this. And it's time to change the color off our circle here. Two D, Double eight F f f and let me copy and paste it for our second color and increased the offer to zero. That looks fantastic. All right. Now it's time to create our created car repayment card here, so let's go ahead and copy and paste this card. Or let's say button man, paste it here. Then let's double click and choose thesis rectangle, and I'm going to make it 315 by 105 like this and change the radius to 25. And the reason that we change it to 25 is because used 25 our cars above, so we need to be consistent. Then let's use thes shapes and move them up like this. And I'm gonna align this small arrow vertically here. Also, this text pretty awesome and then changed his text to credit card repayment Pretty good. Then that's changed the group's name to credit card repayment like this and move it down to get a 16 pixel top, adding And now everything is done. Can you see how amazing it looks? If you want, you can go ahead and add some shadows to these cards. However, I prefer to keep it simple because, as you can see, they have so many elements in these page. And if we add some shadows here, it's gonna look heavy. Okay, so I'm going to keep it simple. I hope you enjoy this video and I will see you in the next video.
108. Transfer: Hi, everyone. Welcome back to another radio off this course in this video, we're going to design our transfer page together. So without fair, I do. Let's get it started with duplicating thes screen. Perfect. And I'm going to call it transfer. All right, then we're going to remove almost all elements in this page. Let's remove these tanks. Also, this fun on all of our cards Pretty good. Then that's changed his home indicator color to this light version. Very nice. So what do we need to change here? You're right here. We need to change our navigation bar. That's changed the title to transfer. However, first we need to align you to the center and then changing to transfer like this. Then I'm going to select our shapes here, both off them. Group them okay. And let's set the y tu minus 141. Pretty awesome. This is our navigation bar. Now then, in this page, we need to place some elements here we need to write enter a mound than the actual amount. And after that, a separator and the receiver or beneficiary and right at the bottom. We're going to have a key Pat. Okay, so let's go ahead and inserts the text on right and her amount, and I'm going to change the fund to Monsour it. And let's change the way to Regular and it's fun size to 18. And then I'm going to change the color to 27 43 f d and the line high to 22. Really awesome. I'm gonna line it resentfully. Let me duplicate it. And here we need a dollar sign. Space zero. OK, but what for? It's the place that the user can enter the actual amount he or she wants to transfer. Okay, so let me make it bold, and I'm gonna make it 36 points like this Don't change the color off. Zero here to be seeks B f f f like thes to show that it's inactive right now. So when the user enters an amount here, it's gonna have the dark color. Okay. However, when it's zero, it's gonna look like this. Then let me align it to the center and its line height is going to be 44 pretty awesome. Then that set the top fighting to 16 peak cells like this. And here as I mentioned before, we need a separator. So let's create one week line. I'm going to make it 224 and change the color to the E E and one e f like this. Aligning to the center, Let me said it. Stop adding to 16 like this. Pretty awesome. Then we need another text. So I'm gonna go ahead and duplicate thes text and that's right. Two. Pretty good again. It's gonna have a 16 pixel top, adding once again duplicated. And here we need to write the name off our beneficiary. Okay, so let's right, Grace Edison, and I'm going to change the color. 23 a three A and three A and the font size to 16 like this. So what else do we need here? Don't you think it's nice to have the photo of our user? Or let's say our beneficiary here, So I'm gonna go ahead and insert around it, and it's gonna be 34 by 34 peaks. Cells. Let me change the radius type to smooth corners, and here I'm gonna set it to 12 on Czech Borders. And let's use the sketch database to add a photo to eat like this. It's nice. We can also add some shadows. Let's make the Y zero and the player seven, and we need to decrease the off obviously to 20% pretty nice. And after that, let's check the alignment. This tax is going to have an eight pixel left padding like this, and I'm gonna line them vertically, group them and once again allowing them to the center, or is entirely, and our group is going to have a 16 pixel top heading as well like this. That's pretty awesome, isn't it? So what else do we need here? We need a keypad. Okay, so let's create one. First of all, only when a group, all these elements together and that's right transaction detail, move them up like this. So what do we need for our number, Pat? Here? We need to have total different rectangles and have numbers from 1 to 9, including zero right at the bottom. So let's insert around that here. I'm going to make its 89 by 70 and its radius is going to be 17 on Czech Borders and change the color to F five, F six and F A like this. Then I'm going to write one and let me change the fund to as of pro text and the fun size too. 24 points like this, and I'm gonna make it medium. Finally, the color to our primary one here. Then let's line them vertically and horizontally and group them. Let's name it one. Then duplicate it and place it with the 10 pixel left. Padding once again duplicated. And I'm going to change their name off this fuller 22 and this 123 And again, we need to duplicate them. And once again, and we need the last row. Okay, so let's change the group's name. First of all, this last button is going to be our sand button. Okay, so now we need to change these text. So let's be changing too. And again align them and so on. And here we have dot and zero. Ok, And finally, here, we need to have our send button, so we need a right arrow here, so let's bring it from here. I'm gonna copied it's a text, okay? And paste it here and you need to change the fund to s a pro around it because it's an sf seem bow and doesn't work with the other funds. Make it 28 points and also flight pretty awesome. Then that's align it and also change the color to wind. And we need to add a Grady into this button, which is the same Grady int as we have here. Okay, so I'm going to select this header right click on that copy style. And here I'm going to, Right. Click and paste are pretty good are right Now it's time to group our buttons, aligned them to the center. As you can see, we've got 44 pixels to the left. 44 picks cells to the right, and we need to have 74 peak cells to the bottom. OK, and now let's move our transaction details down to get a 58 picks. L bottom fighting like this. All right, now let's change the group name here too. Number pan and also the group name here to navigation bar like this are right. Everything is done. I hope you enjoy this video. And in the next video we will design our confirmation page together. So see you there
109. Confirmation: Hi, everyone. Welcome back to another video of this course in this video. We're going to design the confirmation page together. So without further ado, let's get started with duplicating thes transfer art board, and I'm going to rename me to confirmation. All right, then let's remove thes number, pad and also some of these elements. For instance, we don't need this amount and the separator, so let's remove them. And here we can change this title either to transaction or confirmation. So I'm going to write transaction like this, Then let me on group these elements, right? Click here on group Pretty awesome. And here, that's right. You have successfully sent $99 to Grace Addison are right and then decrease the with 2 248 and the line high to 27 like this. I'm gonna align it to the center and movie down pretty awesome. However, I'm going to say like this name and make it bold in order to get the user's attention on. Let's see, what else do we need here? First answers. Let me remove these name. And I'm gonna scare this photo to 78 like this. And I'm gonna add some details to it. Okay, So let me bring the status icon here. I'm going to choose this green one, copy it and paste it here on enlarge it to 18 by 18 pixels. Pretty awesome. And lastly, I'm going to change the color to orange, and it shows that the user is not available right now. So let's write F seven A and 700 like this. It's gonna have a 60 peaks of left padding and a 60 pixel top heading. Group them and once again aligning to the center. Then we need a tick icon like Don Icon here. So let's bring it from her icons. Icahn. And here we have done looks great. That's aligning to the center. It stop. Fighting is going to be 217 peak cells to the age of our screen like this, and it's bottom padding is going to be 16 picks zones. So let me move the stakes down and the top fighting off our image is going to be 40 like this. He denies. So we need two more things. We need to place two buttons here. The top button is going to be the execute again button, which lets the user to execute the same transaction once again. And the bottom button is our confirmation button. Okay? Which gives the user the confirmation of that transaction. So let's go ahead and copy and paste this verify button. No. So I want this sign up button. And first of all, let's change the Fullers name too. Execute again and now change the tanks to execute again. Pretty good. Move it up on. Let's remove this arrow from our second button and I'm gonna align. This takes to the center and change it to confirmation once again a line into the center. And here I'm going to change the folders. Name to confirmation Like this are right. The bottom padding of this confirmation button is going to be 37 it stopped. Padding is going to be 16 pixels like this are right. Guys. I hope you enjoy this video. We successfully designed our confirmation page together and I would see you in the next video. So see you then
110. Notification Page: Hi, everyone. Welcome back to another video of thes course in these video. We're going to design our notification page together. So without further ado, let's get started with duplicating. These aren't board, and I'm going to rename me to notification Pretty good. Then let's remove almost all elements here. Okay? However, we need the status bar as we have here. Let me bring it here, and I'm going to change you to light. Pretty good. So what do we need here in these page? We need to place a search bar right at the top. OK, so let's go ahead and bring the search for a has recreated being transaction page I'm gonna copied and pasted here. Pretty awesome. Then that's change its color to f five f seeks and f A like this and we don't need to change anything else. It stop fighting is going to be 68 pixels to the edge of our screen like this. Then here, we need a title. Okay, so I'm gonna bring thesis title here. Let's copy and paste it and let me a line into the left and change it to you can check your notifications here. Pretty awesome. and that's decreased. That with 2 274 Pretty good. Well, it stop adding is going to be 32 pixels and left patting is going to be 30 big cells. Okay, so what else do we need here? We need to create our identifications, obviously. So we need an image for our notification and also in name and a message. Okay, So what I'm going to do is copying and pasting this photo from our home page like this and let me have scaled it down to 40 by 42 picks. Elves denies. I'm going to zoom mean, and I'm gonna enlarge the size of this status icon. Okay, that increased to 11 align it to the bottom and write three denies. And then here we need a title. So let's write a name. Okay? And may Lane, we need to change the photo later on. So let's right, Floyd Farmer. And I'm going to change you too regular and decrease the font size to 14 points like this. And the line hi to 18. Pretty denies that they put it here, duplicate it, and here we need to write our message. So let's right Floyd just send you $20 like this and I'm going to change the size to 16 points and also the color to our primary color. You can use this color pre denies the top heading is going to be three picks, cells or right. And the left padding is going to be eight pixels like this. Then group them and in line it with our photo vertically pleading eyes. What else do we need for our notification? We need a small arrow to put here. Okay, so let's bring that from here. Are right. I'm gonna align it with our photo and tanks vertically, and it's gonna have a 30 pixel right padding. Pretty good. Now let's group all these elements. And here, let's write notification. Awesome. And remember to change this photo, refresh the data you need to get a male photo. OK, that's pretty good. Then, in order to make this process much quick care, I'm going to create a symbol. And here that's right. Notification. Okay, then let's go to Symbols Page. There we go. So at the moment we can change the photo and also these two titles, but we need to be able to change the status icon as well. So we need to create another symbol here. Let's create symbol. And here, let's write status slash Available. Awesome. Then here we have another symbol that's duplicated. We need to create three different status. Okay, so let's change the name here. Too busy, and I'm going to change the color to orange. So let's write F seven a seven. Double zero. Pretty awesome. And it's duplicated once again, which is our last status, and change the color to ce ce and ce pretty awesome. And also changed the name to offline. Pretty denies. Now let's go back to our page one year. And as you can see here, we can change these tanks and also the status. Okay, that's pretty awesome. So what else do we need here? We need a separator. Okay, But first of all, let's duplicate thes notification, and it's gonna have a 32 peaks. All top padding. Okay, once again duplicated pretty good. We need also tap are. So let's insert a tamper here from our document because we created a tap or symbol. I'm gonna put it here, and I need to the bottom and remember to make thes tab the active okay, and make thes certification active like this. Then let's put our separator here. So we need to insert a line like this, and it's gonna be 315 and change the color to D double E one e f. Okay. It's gonna have a 16 picks on top heading and a 16 pixel bottom padding. So I'm going to duplicate it pretty good. Let's group these lines. And here I'm gonna rename me to separators Pretty good, all right. And now it's time to change our data. OK, so let's elect the's no education, and I'm going to change the name to something else. So let's right, Jane. Pretty good. And also here I'm going to write. Jane sent you here we are meet just because she sent the user, for instance, one day ago. OK, so let's right. Jane sent you $99 and I'm gonna copied pretty awesome. And it's a like this photo and refresh it. It's fine. Let's go and change the 3rd 1 I'm going to write at ah Maxwell, and that's paste that takes here and change the name to at all. And the amount to $500 we need to change the photo as well like this. But now let's change the status from available to be easy. Okay, If you want to make this process quick hair OK, you can use the plug in called Craft. As you can see, I have it here. It can generate some data for you easily and quickly. For instance, here I can generate names, headlines, article, even dates, currencies, countries, cities, etcetera. OK, but for now, we're going to do it manually, one by one. So now let's change the next one. Let's change the name to Herman Frasier. Like this. And here, Chairman as well. And the amount? That's right. $25. Remember to change the photo. That's great. And the changes status to our flying pretty awesome. And the next one here, let's change the name to William Weight. And here William sent you $10. Let me change the photo. All right. It's fine. Okay. We need two more. So let's change the name. No. Seem calm and here to Elsie as well. Else he sent you $12 the status is busy and we need to change the photo to something like this. And the last one. Let's change the name to Harriet Coleman. Pretty awesome. And attacks to carry its send you $25 the status is going to be offline. And also, the photo is going to be this one. That's pretty good. And that's it. And believe me, if you work it craft plugging, it takes less time to do all these process. So let me show you how this plague in warrants. Suppose that here we have a text, okay? And it's gonna be a name. Silicon names, and I can choose between male, female or both. So let's write female. There we go. Or I can choose countries, cities, even dates. That's fantastic, right? So using this plugging saves you so much time. All right? Now let me group them. We don't need this last notification that we created, so I'm going to remove that. And now let's group them. Here is our notifications, and we can once again group it with our separators. And that's all. All right, guys, Thank you so much for watching this video. We've successfully designed our next vacation page together, and in the next video, we will design our profile page. So I will see you in the next video
111. Profile Page: Hello, everyone. I hope you're doing well in these video. We're going to design our profile page. So without further ado, let's get started with duplicating this art board, all right? And I'm going to rename me to profile pretty good, and we need to remove almost all elements except this title pretty awesome. And let's make this tap the active and make this one active. That's great. And we need to change thes title to profile and make it larger because it's our large title or, let's say, Large Header. I'm gonna make it 41 points and it's nine height is going to be 50 and it's gonna have a 90 pixel top padding and a 30 pixel left like this. Then we need to go ahead and copy and paste thes shapes from our profile company that pace it here, move them to the bottom of our layer list like this, pretty awesome. And here I'm gonna rotate them a little bit like this on Let's like this purple one. Move it up and wrote, If it's a little bit to the left, that is fantastic. We need the user's profile image, the name, the status and hear some takes feels such as user name, first name, last name, date of birth, and at the bottom. We need to have the same selling out button. Okay, so let's start bringing those elements. First of all, we need thes profile image, so I'm gonna bring it here. Let's scary to 60 pick zones like this. It's gonna have a 30 pizza left padding and a 33 peaks sell top heading like this. Then we need a name. So let's right, Emma, actually, and change the font size to 20 points and the line high to 24. And finally, we need to change the color to three D 56 f a like this. And let's change the fund to as a pro text, and I'm gonna make it medium fantastic, then duplicated. And here, let's right. The status which is online, make it light on the font Size is going to be 16 points and the line height should be 19. It's gonna have on a pixel top heading like this. Group them and align it vertically with our profile image. And let's have a 16 pixel left padding. Pretty awesome. Once again, group them here. We need to write users information like this. Then let's go ahead. And from here I'm going to copy and paste all these tanks fields year. And now let's elect all these titles, which are user name, first name, last name and date of birth. And we need to change the color 23 a three A and three A and also select the input okay and change the color to this one like this. And we need to remove these teak icons. And last but not least, let's change the color of our separators. We need to change them to D E and one e f like this. Oh, I forgot to select this one. So let's change it as well. The e e and one e f are right. The top patting of our tax feels is going to be 40 peak Selves. And then, as I mentioned before, we need a sign out button. So let's go ahead and copy and paste the sign up button that we created for our menu. I'm going to move it down awesome. And let's change the size too. 315 by 72 like this. Aligning to the center. And here we need to move this icon to the right side to get a 24 pixel right patting like this. Fantastic. And finally, that's moving down to get a 30 peak cell. But I'm patting, and that's all. All right, guys. He also created our profile page together. I hope you enjoy this video. And I will see you in the next video, which is our last video. And it's about on boarding pages. Okay, so see you then.
112. Onboarding: Hello, everyone. Welcome to the last video off this section. In this video, we're going to design the on boarding pages together. So we, doctor, I do. Let's get started. First of all, I'm going to go ahead and inserts and art board here. Pretty awesome. Then let's change its name to own boarding Juan. And I'm going to duplicate it two times because we need to design three different pages and it's renamed them your on Boarding to an on boarding three, respectively. Perfect. So what do we need here? Right at the top. I'm gonna put a logo. Okay, The color for logo. So let's bring it from our lunch screen. This one copied, pasted here. And I'm going to remove these tanks that I don't need that. Let's move it up and it stop hiding is going to be 84. That's great. Let me copy and paste it in all art boards like this, then here. We need to put our illustration. Okay, so let's bring our illustration here. There we go. Here we have safety bikes. Saving and trading. The first illustration is going to be saving, so I'm going to drag and drop it here, let me align it to the center and it's gonna have a 170 top hiding like this. Then here we need to place our tanks and here at the bottom, we need to put our bottom. So let's insert the text here and right, save your money. Conveniently like this. I'm going to make it larger. Let's make it 24 points and also change the fund to Monserrat it. And it's going to be bold and the line hi to 36 pretty awesome. And the last thing we need to do is decreasing the with two 307 like this and it's gonna have a 30 pizza left padding. Pretty awesome and a 116 peaks. L top adding, Okay like this. Then let's duplicate it because we need to write a description here and now I'm going to use a self protects fund and let's make it 19 points and also regular, and I'm going to change the color to seven c two a double F like this beautiful. Then that's changed it with 2 300 change these tanks to get 5% cash. Bank for each transaction and spend it easily. Pretty awesome. And now let's change the line high to 28 like this, and it stop heading is going to be 22 pixels. Awesome. Then here we need a button and also the page indicator. So let's go ahead and copy and paste this sign in button and I'm gonna change the size to 153. So let's decrease the with, like this. Pretty good. I'm gonna bring back our techs inside the Spartan, and it's gonna have a 24 pixel left patting like this. Let's change it to next. Fantastic. I'm gonna rename this folder to next, and it's gonna have a 30 pixel right padding and a 38 pixel not impacting like this. So what else do we need here? We need a page indicator. So let's make one. We need a circle here and I'm gonna on Czech Borders. Make it five by five at Mizzou. Mean duplicated, and it's gonna have a four pixel left patting. And now I'm gonna insert around it here like this on Czech Borders set the high to five. And with 2 22 like this, it's gonna have a four pixel padding Group them, and that's changed the color off the first indicator to to a 46 and double F and select these two circles and change their color to be five b f f f awesome. Then I'm going to rename this fuller two indicators and let's create a symbol here. I'm going to write indicators, slash page one, then go to Symbols Page and duplicated two times like this and renamed them to Page two and page three because later on, we can change them easily. So now, in Page two, we need to change the place off our indicators. So let's place the large indicator here in the middle, one year to the left and for the last one. It's placed this large one year, and the other two, let's move them to the left like this. Perfect. All right, it's gonna have a 30 peaks of left patting. You can align it with our bottom vertically. Fantastic. The only thing I'm gonna add here is a circle. So let's insert a circle and make it 470 by 470. And on Czech Borders, I'm going to change the color to have five f seeks and F A like this movie to right to the bottom off our layer list and changed the Exposition Tu minus 125 and the white to 423 like this and it looks fantastic. I hope you like it as well. So for other pages, we need these content as well. Instead of just copy and pasting them, I prefer to remove these are boards, pay and duplicate them. It's gonna be much easier once again that's renamed these art boards Tom boarding to and your on boarding three like this. Then, first of all, here, let's change the illustration. So let's bring the safety box here. Awesome. Aligning to the center and change the war into 170 to get a 170 peaks on top, adding, And here we need to change the title to secure your money for free and get rewards. Awesome. Then let's change the description here to get the most secure payment app ever and enjoy it . Then we need to change the indicator your two page two like this and the last page. Let's remove this illustration and bring the trading illustration here. I'm gonna align it to the center and change the wine to 170. Awesome. And here, let's change the title to enjoy commission free stock trading. And here, let's write. Online Investing has never been easier than it is right now, Previ. Awesome. And now let's change the indicator to page three. And we need to change our button here to get it started. Awesome. Aligning to the center and remove our right arrow like this and rename this folder to get a started pretty good. And that's all. We successfully designed our own boarding pages together. And this is the last video of this section. All right, guys, I hope you enjoy this series of videos. It was so interesting creating this project together, and I hope you really enjoyed it. If you want to get access to the final project, you can download it from the resource is section of the last lecture in this section. So once again, I hope you enjoyed it. And I will see you in the next video. So see you then.
113. Project 3 - Landing Page: Hi, everyone. Welcome to another section of this course in these section. We're going to design a landing page for our money application. So as you can see, we're going to design and modern, beautiful and interesting landing page together. So here used the screen shots off the application that we designed in previous section. And also, as you can see, we have menus at the top. We have a call to action. Then we have key features. As you can see, here we have six different key features. We're going to design every single thing here and then we have feature one and feature to and also we have the customer section and here we have the call to action again for the last time and the food her. So at the end of this section, you'll understand how you could design an amazing and also creative landing page. So to start designing these landing page together, make sure to download the assets find from the resource is section of the assets lecture. So I will see you in the next video
114. Layouts & Grids: Hi, everyone. Welcome back to another video of this course in this video. We're going to create our layouts or let's IR agreed in order to start designing our landing page. So the first thing I need you to do is opening up the money app that we designed previously and here in pages, I'm gonna add another page on. Let's write landing page. Perfect. Then here, we need an artwork. Okay, so let's go ahead and insert an art board. There we go. Here, you can choose Responsive Web. Okay. And as you can see, we have different options. We have the mobile inversion, tablet and desktop. Okay, we're going to design the desktop version. However, every have disc up, which is 10 24 by 10. 24 or desktop HD, which is 14. 40 by 10. 24. Okay, it's under standard size. However, we're going to change its with 2 1920 and tie to 10. 80. Okay, we'll increase the height later on as our design goes to further levels. Okay, So remember, when it creates a new art board, this is a custom artwork. So in order for you to could Previte appropriately unity Quicken custom here and create a constant size. You can write, for example, desktop HD like thes, or you can call it landing page like this. So when we create a constant mart board, we can easily previewed in an appropriate way. And when we increase the high later on, we can scroll down and scroll up easily. Okay, Perfect. The next thing we need to do is setting up our layouts and greets. So what are layouts and greets? Greets, basically, are our guys OK? So to design a responsive Web page, it is highly recommended to use great systems. You can use different grid systems. However, for these project, I'm going to use a 12 column group system. So how can we create our greed? It's so easy. We can go ahead and click on view. And here, as you can see, we have two options show greet show layouts. Okay, so I'm gonna kill you, can show a layout like this, and then let's click on layout settings perfect. Here we have different options that we can modify. The total with is set to 1920 pixels. Right now, however, we don't eat our with to be that wind. OK, so we're going to write 1600 like this. And by the way, it's not a random with it's a standard one can also use 960 for that. Then I'm going to set the offset to 160 the number of columns, as you can see it said to 12. Okay, and this is what we want that shake gutter on outside. So it adds, got her outside of our columns. And here we have two different options. Got her with and column with. So the gutter is this white space between our columns and our column, obviously, is this darker area. So let's set the column with two, 117 pic cells. And as you can see, the gutter with automatically changed to 16 pixels, this is exactly what we want. We can also check Rose, however, we don't need that. So let's keep it unchecked. And here you can choose the colors so I can choose the dark one or lights. It's up to you. You can change it as you wish. You can change it to whatever you want. I'm going to keep it like this That's perfect. Make sure to kill Lincoln Center. OK, perfect. We successfully created our guidelines or, let's say, our greets for this project. So in the next video we will start designing our hero section together. So see you then.
115. Hero Section 1: Hi, everyone. Welcome back to another video of the section In the previous video we set up our layouts, as you can see here with the with off 1200 pixels. And in this video, we're going to start designing our landing page. I'm so excited together started. So what? May mansion something. Every website has a hero section. OK, what is a hero section? Let me open up the sketch app website to show you an example. There we go. This is the sketch. I'm website and this section is called hero section. Okay, so what do we need in here? Oh, section. As you can see, we need a logo at the top and also some menus. And then a title and a stop title. And finally we need counteractions. Okay. And you can see we have some buttons, try for free and see pricing. These are called call to action. And after that we have another section. It could be key features off the application or the website or even the product. Okay, there we go. These are the key features and here we have some other features and then the customer section, Another contract shin section And in the end, we have the footer. Okay, so in this video, we're going to focus on creating our hero section. Let's get started. As I mentioned before, we need a logo to put right here. Okay, so let's go ahead and open up our assets file. There we go. And here, I prepared for you some folders. We have screens, which is the screenshot of our application Beach redesigned. Exported five art boards here. As you can see, we have cars, homepage, menu transaction and transactions detail. And then we have icons, illustrations, logos and attacks. Fine here. So right now we need to open up the logos and here we have money. Perfect. Let me drag and drop it over there. Actually, I created another version of our logo like this. The only thing that I changed waas the position of our text. Okay, so I created a horizontal version of our logo like this. Now I'm going to zoom mean, and we need to use our greed in order to align our elements. Okay, So what I'm going to do is moving these elements like this until it touches our column. Perfect. And its top padding is going to be 50 like this. Perfect. What else do we need here? We need some menus that's ad attacks. And I'm going to choose on Sarah phones perfect. And that's changed a phone size to 17. And it's gonna be irregular and the character, let's and the character it's going to be zero effect. And then let's change the color. I'm going to change it to three a. Three a and three a. The same dark color that we used for designing the application virgin off this product. Okay? And finally, let's set the line high to 24 because we're using an eight pixel systems are numbers should be divisible by eight. Pretty good. I'm gonna zoom mean. And here, let's right. Products are right. That the mood here duplicated and right, Developers perfect. Once again, duplicated on right pricing again, I'm going to duplicate it. And here that's right. Support. Let me move them to the left side. And we need two more things here that's duplicate it. And here we need liking. And the last option is going to be our sign up button. Okay, so what I'm going to do is going to page Juan. Okay. And here I'm gonna zoom mean and choose this gets or tp button copied. And here in landing page, I'm gonna pay state perfect. And now I'm gonna duplicated once again because I need the same bottom. And now let's double click on the 1st 1 and remove these shapes pretty good. If you want to hide these layouts, you can easily hold control and l And why, sir? Sell. Perfect. And now I'm going to select my bottom here. And that's changed their with two, 178 by 72. I'm gonna align our tanks to the center. Pretty awesome. And it's changed a phone size to 17. Once again, align it pretty good. And remember to change the lion High to 24. And as you can see, we've got 24 pixels to the top and 24 pixels to the bottom. And here I'm going to rename this fuller to sign up. And also, let's change this text to sign up pretty good. And let's move it here, and I'm going to present our greets. All right, So where exactly should reposition our elements for this project? I decided to use the second column from the left side and the second column from the right side as well. So this button needs to be here like this, and it's top hiding is going to be 40 pixels. Perfect. Then I'm gonna go ahead and select are many humans, move them to the lab side. And now let's align them. First off, all I'm gonna align this lugging tanks. It's gonna have a 64 peaks of right padding like this. Pretty awesome. That's a line. It's vertically as well, then that's a like support, and it's gonna have a 72 peaks. All right, padding and so on. So these pricing 72 peaks cells as well, developers and products. Pretty awesome. Then let's select all of these texts and aligned vertically group them. And here, let's write menu perfect. And as you can see, it has a 64 pixel top, adding, that's fantastic. And once again, I'm gonna align all our elements here, so we need to choose our logo, our menu on our bottom, and align them vertically. Pretty awesome. So the only thing that changed was the position of our logo. As you can see, it's stop hiding its 56 p cells right now. Fantastic. Then I'm going to move the spot in to the left side and here we need to add some elements which are tanks. So let's add a text and I'm going to change its size to 65 like this. And it's also changed the fund to as have pro text, and I'm going to change the way to the scene and the line hi to 80. Perfect. And the last thing we need to change is the color I'm going to set it to to a 46 on double F like this, and then that's changing To secure your money for free and get re warrants pretty awesome. Let me decrease the with 2 667 and I'm gonna align it to the left side, and I think it's better to change the Fonds. I'm going to change it to SF pro display, so let's look for it. That's a pro displaying perfect. Now it's better. And then I'm going to zoom in and aligning perfectly with our reads. As you can see, it's align perfectly and it's stop adding is going to be 367 pixels like this, Then I'm going to duplicate it. Remember, as I mentioned before, you have a tax fine here, so if you open it up, you can get all these tanks. That's your using in this project, and you can copy and paste them easily and quickly. Just a reminder. We need the second line. Copy it and here paste it. And then let's change the phone size to 17 points and the line high to 24 pixels pretty good. And then I'm going to change the weight from theme to light on. Let me change the with to 472 like this. We can change the alignment from auto hide to fix size, so I'm going to change the high to 48 like this and it's top heading is going to be 16 pixels perfect. And then it's time to put our call to action here, which is our registration button. So what I'm going to do is renamed this folder together started, and also these takes together started as well and let me change the phone science of 17 points and the line high to 24 pretty good I'm going to select our rectangle, and I'd like to change the with 2 251 like this and let's align our elements once again to the center, vertically and horizontally. It's pretty good, and it stop heading is going to be for the pixels like this. It's great, isn't it? So far we added the menus logo title subtitle and a counteraction button to our hero section. In the next video, we'll add and mark up to its in order to make it look interesting and fantastic. I hope you enjoyed the CDO and I'm receiving the next video.
116. Hero Section 2 - Mockups: Hello, everyone. I hope you're doing well. As I mentioned before in this video, we're going to design our markup to place it right over there. Okay, what is a markup? Let me show you an example. If you search iPhone Mark copping Google, you can see you will get different options and different examples. For example, this one, it's pretty great. As you can see, it's a placeholder for your screenshots energy. Present your design. We have iPhone 11 here as well. There are so many free and paid resource is out there that you can use. However, you're going to create our own mark up because it's gonna be so simple and unique. So let's get back to our sketch up and here I'm gonna insert around it perfect. And then let's go ahead and change their with 2 260 by 563 like this unchecked borders and change the radius type to smooth corners and it's amount to 41 pretty awesome. Then I'm gonna add some shadows. So let's decrease the all 5 to 10% and a Y 2 43 I also want to change the x 21 And finally the Blair to 56. Pretty awesome. So what I'm going to do is placing our screenshots from the application that we designed on these rec tango. So how can we do that? Actually, there are different brace. The first way is just to drag and drop the screen shot and then choose this rectangle on mask. It's, however, there is another way which I recommend you to use that and that he's using pattern feel in feel section. So if you open up fields, you can see here we have pattern feel and I can choose an image. So here, let's open up screens and I'm going to choose home page like this. And there we go. It was easy, right? In my opinion, it's the best way to do that. And also, it's the most precise way, All right, then I'm gonna go ahead and duplicate it like this. I'm gonna place it with a 60 pixel patting perfect. And let's change the photo two cards pretty good once again duplicated and change the photo to transactions detail, and we need two more, so I'm going to duplicate it once again and changed the photo to transaction and the last one that's changing too many pretty good. Then let's elect these two middle screen's que and move them up a little bit like this. And also let's select these two and move them up like this. And finally, we need to choose all of them, grouped them and call it markup Awesome! Then that's rotated by 30 degrees to the left side. So let's say to minus 30 degrees, and I'm gonna move it down to get the best place possible. I'm going to present my greets here and let's move it a little bit when a zoo mean and this screen is going to touch this column, Okay, I think now it's great. However, you may be wondering that what's going to happen for the rest of these mark ups. Actually, they are not going to be clipped because we need to increase the height here, so I'm gonna multiply by two. It's a good way to calculate sizes here, so I'm gonna multiply by two and we will get to anyone 60 pixels perfect. So now if you click on preview, you can easily scroll down like this and here we're going to put our key features. That's fantastic, isn't it? All right. One thing that we need to remember is changing our backgrounds color. Okay, so if you select this art board, you will have the background color option. I'm gonna go ahead and check this box and check including export like this on that settee. Two F five F six and F A to get this very light and nice blue. OK, now it looks fantastic. All right, guys, I hope you enjoy this video. I will see you in the next video for creating our key features. So see you then.
117. Key Features Section: Hi, everyone. I hope you're doing well in this video. We're going to design our key features. Okay. As a matter of fact, we need to design six different key features for this landing page, which are safe and secure. Easy saving. 5% cash back, user friendly, cloud based and 24 7 support. Okay, So if you have noticed, I already prepared for you six different icons and it can find them in assets file. So now we can go ahead and insert around that here like this. I'm going to make it 80 by 80. Perfect. And changed a radius. Time to smooth corners and the amount to 25. Pretty awesome. Let me zoom mean, then I'm gonna go ahead and on Czech Borders, and let's change the color. I'm gonna make it orange or are safe and secure. Feature. So let's write F five a six and 23 like this. Pretty awesome. And now it's time to open up our assets. Fine. And here we can go ahead and open up the icons, fuller. And as you can see, we have different icons. Okay? I'm gonna go ahead and Dragon dropped a secure icon like this perfect. And when a movie down, that's a line it both vertically and horizontally and finally group them and I'm gonna write secure pretty awesome. Then we need to text. Okay, so first thing spares. I'm gonna go ahead and change the fun to SF Pro displaying like this on. Let's change the phone size to 22 points. Perfect. The line height is 26. It's fine and make the line high 24 pretty good. And lastly, we need to change the color. 23 a three a and three a k. And here I'm going to write safe and secure pretty good. That's aligning to the center, and the padding between them is going to be 16 pixels. But this that's awesome. Make sure that the text is a line to the center. Once again, let's group them and call it safe and secure. Pretty awesome. Then we need to duplicate it, are right. And first of all, let's change the color. So if I go ahead, I can choose another Connor easily. If you're not sure what Connor's are great to combine together, it's better to just move this color pick here or let's say slider like these. And as you can see, you can choose the best Connors possible in this way. Make sure to not change the position of thes color picker like this. It's not an ideal way, however. It's an option. For example, these two are great, but for these landing page, I already prepared the colors, so I'm gonna go ahead and set it to 23 5 c and F five. Pretty awesome. Let's remove thes icon and bringing the money box icon like this. I'm gonna align it to the center both vertically and horizontally. However, you should not always trust this kind of alignment, because sometimes you have to balance and align a manually in order to get the best results possible. So as you can see, it's not in the center. So let's choose that and move it up by two pixels and I'm gonna move thes folder and put it inside the secure fuller like this. As you can see, it's hop adding Eastern Devaughn and its spot impacting is 24 pixels. Right now, however, as you can see, you can recognize that it's a line to the center. Okay, so let me change the tanks too easy saving like this and once again aligned to the center Pretty good. And here we need to change the Fullers name too easy saving as well. That is awesome once again duplicated. And here I'm going to change the color to be 32 3 F and five Awesome. That's removed this icon and bringing the cash back icon here. So we have credit cars. It's going to be our cash back icon. That's a line into the center, and we need to balance it manually. It looks great. And then I'm gonna go ahead and move this folder and put it inside this secure, fuller and change the tax to 5% cash back like this line into the center and then rename this folder. That's right, Cash Bank. Pretty good. We need three more key features. Okay, so let's go ahead and duplicate them like this. And now we need to change the color of this rectangle. Or, let's say Square Teoh have 5 23 and 23 pretty good that's removed this icon and bring the like icon here. There we go. I'm gonna line it to the center both vertically and horizontally. And let's change these tanks to user friendly. Pretty good. Remember to move these folder and put it inside the secure Fuller here and renamed its Fuller to user friendly. Fantastic. And the next one as well, I'm going to change the corner to 23 d c and F. Fine. Okay. And then I'm going to remove this icon and bringing the cloud icon here because it's about Cloud based. I'm gonna balance it manually like this. And that's changed the name to Cloud based pretty good. Finally, I'm gonna move this folder and put it inside a secure fuller and renamed the main folder to Cloud. Based on last but not least, we need to change the color of thes square as well. So I'm going to change it to F 5 23 and nine D like this. Remove these credit cards and bringing the support. I can hear a line into the center both vertically and horizontally and change these text to 24 7 support. Then I'm gonna go ahead and move the support fuller inside the secure fuller and renamed the main fall or to support Fantastic are right. The next thing we need to do is aligning them. So I'm gonna go ahead and choose their safe and secure and user friendly like this, and I'm going to set the padding between them to 107 picks cells like this. The same thing happens to these two as well. 107 and East to pretty good. Then let's choose safe and secure. Group them and let's rename me to one group. Easy saving with Cloud, based on Lee two and 5% cash Bank B 24 7 Support and call it three. Select them Anglican. Distribute resentfully like this, and we're going to set the patting between them to 200 pixels. Pretty awesome. Once again, group them. And here, let's write feature section pretty awesome, and I'm gonna line into the center horizontally moving down like this. I think I'm gonna set the wine to 14 45. It's a better position, and that's previewed. There we go. They look amazing. However, I think it's a good idea to add some details here because we have some empty space right at the top and also here at the right bottom corner. So what? I'm going to do is going to pay John. And if you remember, in profile completed art board, we created two shapes, so I am going to choose them, copy them and hearing landing page, paste them, then select the blue one. Move it here and the purple one. Here. I'm going to select the blue one and rotate heats to the left side like this. Let's move it here and the purple one again, rotated to the right and move it here like this. So I'm going to present my layouts year by holding control L. And let's move these blue one to the left side like this. Perfect and the purple one as well. To the right side, that's awesome. As you can see, our key features are not aligned with our layouts. Okay, perfectly so it's not a problem. You should just focus on that, that everything should be aligned with your layout. The layouts and greed are just here for helping you to keep everything organized, okay, and sometimes it happens that you cross them. However, it's perfectly normal, pretty good. Once again, that's Previte. However. First, let's change the high to 3000 like this and create now. It is fantastic, isn't it? Are right, guys, we're going to put an end to this video. I hope you enjoyed it. And in the next video, we're going to design our first feature right here. So seeing the next video.
118. Feature 1: Hi, everyone. Welcome back to another video off the scores in this video, we're going to design our fares feature here. Okay, So first inserts, let me present our layouts here pretty good. And then I'm gonna zoom mean, Let's add a text here. The fund is said to sf pro displaying, which is what we want. And I'm going to change the way to medium and the size to 15 points. Pretty awesome on the line. Hi to 24. I'm going to write, always improving like this and it's capitalized at from takes options that is fantastic. And the color is going to be be five to double F and eight like this, aligning to the left side and duplicated. And now let's set the fund signs to 24 points. The line height is going to be the same, and the weight also is going to be medium. Let's change the text to we keep improving our services like this and let's change the color to to a 46 double f fantastic, and it's gonna have a 16 pixel top padding like this and once again duplicated. However, this time, let's change the phone science to 16 points and the line hi to 32. It's not going to be capitalized. I'm going to set it back to the previous option. And that's changed the color to a four B zero and double s like this. Do you remember that? I mentioned about the text file that I prepared for you. So now we're going to open it up. There we go. And as you can see here, you have all the tanks. So in order to save your time, I'm going to copy and paste it. There we go. A finally, that's changed With 2 517 like this. Pretty awesome. It's stop heading is going to be 32 pixels like this. Select all of them and moving to the left side and aligning to the left edge of our second column like this. The only thing we need here is a bottom. Okay, We need to create a learn more button here. So what I'm going to do is scrolling up, OK? And copy and paste thes get started. Button. There we go. I'm gonna so mean. First of all, let's remove these two shapes. We don't need them and change the text to learn more. However, I'm going to change the with 2 200 allying the takes to the center. Fantastic. Remember to rename our Fuller Learn more. And as you can see, it's align perfectly and it's stop adding, Is going to be 32 peaks cells as well. Like this? That looks great. So let's select all of them, group them and call it feature one. What else do we need here? You're right. We need an illustration. So let's bring it here from our illustrations folder. We have three different illustrations. I'm going to drag and drop the 1st 1 Actually, I got this illustration from the Andhra website as I mentioned it before. You can check it out. It's a great source of illustrations. Pretty good at Mizzou mean? I'm gonna move it to the right side. As you can see, it's align perfectly with our second column, and I'm gonna make the why 22. And to any like this pretty good. Let's move these takes down as well and align it with our illustration. That is fantastic. So now it's time to preview our landing page. There we go. That's great, isn't it. All right, guys, Thank you so much for watching the video. I hope you enjoyed it. In the next video, we will work on our second feature. So see you then.
119. Feature 2: Hello, Ron. I hope you're doing well in these video. We're going to design our second feature. So without for I do, Let's get a start it. I'm going to scroll down a little bit. And let's select our art world because we need to increase the height size to, let's say, for 1000 like this It's enough, I suppose. All right. So for our second feature, we need another illustration to place right at the left side. You're right. We need to put it in the opposite side. Okay. In order to keep the balance off our landing page. So now let's elect our first feature duplicated. I'm gonna move it down and put it here like this. Make sure that it is a lying perfectly, pretty good. I'm gonna go ahead and change these content. So I'm going to open up the text file. And here I'm going to copy and paste 24 7 support That's paste it here. Perfect. And for the subtitle, let's copy and paste thes sentence Experience Help when you need pretty good. And here we have the description compete and paste it here. And that's all. Remember to change the Fullers name to feature two. Then we need to place an illustration right in front off our text. Okay. However, before doing that, that's insert a circle here and I'm gonna make it 11 06 by 11. 06 on Czech Borders Pretty good. And we need to use an amazing and interesting Grady in for it. So let's go ahead to page one. And as you remember, we created some great grade. Ian's here. So I'm gonna go ahead and select this blue one right click on that and copy style pretty good. And I'm gonna pay sit here. Awesome. That's changed a direction off our radiant a little bit. It looks fantastic. Then let's duplicate it once again and on Chek Fields and check Borders. And I'm gonna set it to 0.9 and we're going to use the same color here. So let's use the first color and choose thes blew. The code is 48 a three F five and the second color again here and decrease the on for 20 Pretty awesome. Now let's move it to the right side like this. However, I think it's better to change the color to something darker. So let's set it to three C 54 f a pretty good. I'm going to change the direction a little bit now. It looks fantastic, and it's moving to the left side and move it up once again duplicated with to the right side and move it up like this. Now it's time to add our illustration to our landing page. So let's bring our second illustration pretty good. Actually, I got this illustration from humans website. It's a very great resource off illustrations, so make sure to check this website out. Can download those illustrations for free. Pretty good. So what I'm going to do is placing these illustration here. I'm gonna align it, feed our second column from the left side, as you can see, and let's choose our circles group them. I'm gonna call it Circle one movie to the left side like this. Now it's great. And the top fighting off these tax is going to be 430 picks owns like this. There we go on. Let's go ahead and preview it. That looks amazing. All right, guys, Thank you so much for watching this video. I hope you enjoyed it. In the next video, we will design the customer section together, so see you that
120. Customers Section: Hello, everyone. Welcome back to another video of the section in this video. We're going to design the customer section together so we don't favor do. Let's get started with increasing our height here to 5000 like this. Pretty good. Then I'm gonna present my layouts here and we need a text. As you can see, the font is said to SF Pro Display and the fun size is going to be 24 points and the line height is going to be 29. And finally, let's change the color. 23 a three a and three a. Pretty awesome. Then I'm going to write, visit some of our customers like this, a line into the center and it's gonna have a 610 picks. Alter padding, as you can see, then here we need to place our logos. So let's go ahead and drag and drop our logos here. Logos, customers. We have five different logos, so I'm going to drag them and drop them here pretty good like this. The second Munn booking. And then I'm gonna place Shopify and after that slack and instead cart, as you can see the height, have these logos is set to 30. Okay, and I'm going to select all of them. Can You can distribute Presente Lee and distribute unevenly like this. So now we need to set a 60 Peaks Ella padding between them like this. Awesome. Pretty good. Perfect. Now let's group them and I'm going to write no, goes a line into the center and let's shakthi alignment. As you can see, we need to change the padding between them in urge, aligning perfectly with our columns. So let's select all of them, move them to the right side until we get a good alignment here. Pretty good. And that's a like the last logo and movie to the left side. Awesome again. Let's select all of them. Frankly, can distribute unevenly are right pretty good. Then let's elect our logos Fuller and we're going to set a 72 peaks. Sell top hiding for it. Fantastic! And that's all. So let's previewed Pretty awesome. Alright, guys, thank you so much for watching this video. I hope you enjoyed it. And in the next video we'll design another call to action section here. So see you. That
121. Call to action: Hello. Everyone will come back to another video off the scores in these video. We're going to design another call to action here. As a matter of fact, almost every website has a condo action just right before the footer. So we're going to create one here for these parts. First of all, I'm gonna increase the height 26 1000 like this. Then let's go ahead and duplicate our circle on. I'm gonna flip it horizontally like this. Pretty good. All right, I'm gonna put it here. We have 1234 and five columns. That's great. And it's gonna have a 72 peaks sell top heading. Then what we're going to do is changing the Grady int here to something else. So let's choose the first color, the slight blue, and set it to one F three c and F E. And the 2nd 1 to be five to double F on eight like this. Then let's change the direction of our Grady int Pretty awesome. And finally, we need to bring our illustration here. It's another illustration from humans website, and I'm gonna put it here just like this. All right, then what do we need here. We need to Tex. Okay, so let's create the 1st 1 I'm going to write. What are you waiting for? A question mark? Then let's make it 30 points and it's nine. Height is going to be 24 and the color to be five to double F an eight. However thes time, I'm going to change the character here. So let's change it to 1.5 in order to get more space between our characters and duplicate it, and it's gonna have a 32 picks Eldar padding and change you to sign up today and enjoy your 5% cash back. Then I'm going to change the color to to a 46 and double F like this Pretty awesome. And here we need to buttons as our call to action. So let's go ahead and copy and paste this get started button, and I'm going to change these takes, too. Try for free. And this time I'm gonna make it capitalized like this, and it stop adding is going to be 64 pixels and we need another button. Let's put it here. However, remember to rename the Fuller I'm gonna make it try for free and for the Spartan. I'm going to remove these two shapes, and I'm gonna go ahead and change the color to a solid white like this. On that's changed the text color to one e three b and f e like this. That's changing to contact us. Pretty awesome. And finally, we need to change the color of our shadow. Let's make it three C three C and three c k. And after that I'm going to decrease the all far to 10% and the rest should be untouched pretty good. Finally, we need to rename the folder to contact us. Now let's elect these texts and these two buttons group them on. Let's write call to action, move them up a little bit until you get a 555 picks out are patting like this and then that's previewed. There we go. That looks amazing. All right, guys, Thank you so much for watching the video in the next video, which is our last one. We're going to create a footer by that end off our art board. So I will see you. That
122. Footer: Hi, everyone. I hope you're doing well in this video. We're going to design the last part of this landing page, which is called Footer. Every website has a footer, and it needs to have for sure, because we need to put some important Ling's or some important information about the language or location off the user. And last but not least, we need to write about the comp right, so without further I do. Let's get it started with inserting a line, which is going to be our separator here, so I'm gonna create a single line. As you can see, its length is 1920 pick songs pretty good. I'm going to change its with 20.5 and then the color to a light blue. So I'm going to set it to nine b a nine and I will be pretty awesome and let's align it so I'm going to remove these points here. So let's set the top heading to 100 pick songs like this. And then what do we need here? We're going to create three columns off menus or let's say links and right here we're going to put two different tanks which are next, the two different icons in order to indicate the location of the user and the language off that landing page. And finally, year, we're going to write our comp right, so without further I do. Let's get started with creating our first column. So here I'm going to write product. Awesome. The fund is going to be Monsour it, so it's perfect. However, I'm going to change the font size to 16 points, and I'm gonna make it bold. And let's change the line high to 24. That's great. Finally, we need to change the color, so I'm going to use a light blue. Let's set it to nine b a nine. Onda will be pretty good. I'm gonna put it here. That's duplicate eat and it's stop hiding is going to be 16. Pick Songs like this make its regular aligning to the left, both off them. Then I'm going to change it to payments duplicates, and it's gonna have an eight pixel top hiding. Let's change you to billing once again, duplicated, and here we're gonna have loans and the last fun he's going to be credit cards like this. Select all of them grouped them and call it product. And then that's duplicated. And I'm going to change the folders Name to company, All right, And now let's go ahead and change these products to company pretty good. And the payments is going to be about. And the next one is going to be enterprise awesome. And the loans is going to be customers in the last one, that city to jobs, all right, and we need one more common. So let's duplicate it, and I'm going to rename the folder to Resource Is. And here the company should be changed to Resource is as well and about should be support. Enterprise should be contact and the customers. Let's change it to policies, and the last one is going to be side map. All right, now, let's go ahead and select all these three columns. And as you can see, the resource is Column is in our second column from the right side, pretty good, and they're gonna have a 100 picks up top, adding, as it can see and here we're going to create the location on the language off the landing page. So let's go ahead and write a city name, for instance, I'm gonna choose San Francisco like this, and that's change the color to to a 46 on double left. The font size is going to be the same. It should be 16 points, however, Let's change the line. Hi to 30 are right, and now it's time to bring the icon. So here in icons, we have another folder, which is called Footer, and we have two different icons, years old. Let's drag and drop them here. We have language and compass, Okay, so let's move them down like this. The 1st 1 which is a compass, is going to be for our location, and it's gonna have a 16 pixel padding like this. Group them and call it a vocation. And I'm going to copy and paste thes text pretty good on here. Let's write English United States pretty awesome. It's gonna have a 16 pixel padding like our location and group them. Let me rename me to language like this, and as you can see, it has a 16 pixel top padding, which he's perfect. And last but not least, we need to add our copyright here, so I'm going to change the color too. Nine b a nine and double B and let's change the line high to 24. And I'm gonna add a copyright symbol by holding option key and clicking on G like this. And that's right, money up comma 2019 and all rights reserved. It's a standard text and it's aligning to the left side and it's gonna have a 60 peaks and top hiding like this are right guys. Now the only thing we need to do is decreasing our height, OK, because we're going to get a 100 pixel bottom padding as well. So as you can see here we have 250 peak cells. We need to get 100 pixels. So let's go ahead and choose our art board. And here I'm going to write minus 150. There we go. Everything is set up perfectly, are right. And remember to align these two as well they're going to have a 100 pixel top hiding like this. So we need to change the alignment off our copyright text here gets a perfect alignment. There we go. Now everything is great. So for the last time, let's preview our landing page together. Previ. Awesome. Everything looks fine. Here is our footer. All right, guys, I hope you enjoyed this video. And also the section if you want to get the final project can download it from the resource is section off the last lecture which is called Final Project. Once again, I hope you enjoyed it. And I will see you in the next video.
123. Introduction to 3D Modeling: Hi, everyone, and welcome back to another section of these course in these section. We're going to talk about three D modeling. You may be wondering that how three d modeling is going to help you in your career as a Yuan UX designer. So let me explain it to you in a simple term. For you as a yuan UX designer is good to know a little bit about three D modeling because sometimes you want to design a creative landing page or, let's say, a scream for an application that needs some simple shapes or even some three D contexts. So in the section, I'm gonna teach you how you can use thes techniques in order to create amazing self for your design. So you may be familiar with traditional three D modeling software's, such as Cinema four D three D's Max etcetera. However, working with these traditional software's could be quite dunning for the beginners. So instead of working with those Softwares, I'm going to show you another great environment. There is a Web application, which is called Victory. It's an amazing and brand new Web application that can help you to create amazing three D stomp in a quick and easy way. So instead of working with some complex tools, I'm gonna teach you how you could use victory to get the best results possible. So if you head over to victory dot com, as you can see, this is the landing page. There we go. We can see these features. And the good news is, when you finish this section, you can easily create these kind of stuff. And you can put the coat on your website or you can even preview it as an augmented reality model. Okay, so the first thing we need to do is to create an account. Okay, there are two types of account. The first time is free. So if you go to pricing, you can see we have two types free and premium For these course. You can use the free account because we're going to focus on basics only, so make sure to create your account. And in the next video, we will start our first three D modeling project together. So see you then
124. 3D Shapes: Hi, everyone. When come back to another video of these course in these video, we're going to start working with rectory. So without further ado, let's get a started. First of all, let's go ahead and click and start creating. Then here you can create new project. Or instead of that, you can use some pre made projects. So I'm gonna go ahead and click on this project our right. As you can see here, we have a three D environment with three dimensions. There we go. So far, we were working on a toothy environment. However, now we're going to dive into a three D environment That's so interesting. So, first of all, let me explain to you some basics. If you want to move around these canvas, okay, you can easily hold space on your keyboard and move around. If you're gonna zoom in or zoom out, you can scroll like this and you can also pan around. We left click on your mouse. Rectory is a quite complex application, so we're not going to cover all the tools. However, I'm going to teach you the requirements in order to let you know how you can use this great application. Right at the top. We have some moments. As you can see, we have object edit mode, library and comments in object. We have different options as well. Here we have primitives, as you conceive, have bikes, fear, cylinder tube, etcetera. You can easily click and banks here and there we go. You have your bunks, so let's zoom out. Pretty awesome. And on your right, you can modify some variables such as position, rotation, scan size and even material like this. Pretty awesome, isn't it? Behalf segments as well, So I'm gonna make it 10 for now. As you can see here we have a gizmo. It's some arrows, some cubes and some arts. Okay, This gizmo lets you rotate scale and move your object. Okay? So if you want to move your object, you can use these arrows like this in any direction you want. If you want to scare your object, we can use thes cubes. As you conceive. We have two different cubes. The outer cube lets you scale your object in one direction like this. And the inner cube lets you scale your object proportionally. If you wanna rotate your object, you can use thes arcs. Fantastic. So now I'm going to remove this object. The other thing you can use is text. Okay, so whenever you click on this three D tanks, you can see that victory automatically creates a new tax year for you. And if you want to change these tanks, that can easily head over to a three D tax section. And let's change this to you. I ux design pretty awesome, and I can move. It's easily here. I can change the depth perfect. And also I can change the material. Or, let's say the color in this case pretty awesome, and you can also change the funds. So let's look for months aretz there ago. You can change the weight as well, the characters pacing and the line spacing. When you're working with a three D object, you need to render its OK. So here at the top can see the reason grander toggle. And if you hover your mouse on top of that, you can see that there are three different options, low quality, medium quality and high quality. So I'm gonna go with medium quality. There we go. It has been rendered perfectly, of course, There are some watermarks in free version. If you want to remove them, you can use the premium license off victory. So now let's stop rendering our text. Alright, guys, that's all for these video. Thank you so much for watching this video. I hope you enjoyed it. And in the next video, we'll talk about the camera and lighting. So see you then.
125. Camera & Lightings: Hi, everyone. Welcome back to another video of thes course in these video. We're going to continue working on our previous project. As you can see, we have these three d tex. However, now it's time to add a camera to our canvas or our view. Okay, let's get it on these camera pretty awesome. And now if you pan around, you can see the camera is fixed and facing our tax in the specific view that we said. Okay, so if you click on this camera view layer least there we go. You will get your designer camera view. A camera helps us to keep a specific view whenever we want to render our project. OK, so now let's render our tanks once again. And as you can see, it doesn't seem realistic, OK? Because we don't have great shadows and gray lighting, so let's fix it. What we're going to do is choosing a shadow plane pretty awesome. I'm gonna move it down, and as you can see now we have a shadow plane. Okay, As a matter of fact, whenever you puts an object or anything, been a very puts an object or let's say a three D tanks on top of a shadow plane. It will automatically create a shadow for that. So, for instance, here at Mizzou Mean, As you can see, our tanks is not perfectly above our shadow plane. So first of all, let's elect our three D tanks and press a pretty good. And then I'm gonna move it up like this. Make sure that it's above your shadow plane. Okay, As you can see, it's not so. I'm gonna move it up again. Now it's pretty good. Okay, So if you render your objects right now, you can see that we've got a great shadow. Can you see that? As a matter of fact, you can also add some lights, for instance. Here, I'm going to go for a rectangle light like this. I'm gonna move it a little bit and let's render are seen once again. It's too bright now it's better. Fantastic. All right, guys, Thank you so much for watching this video. I hope you enjoyed it. I will see you in the next video.
126. Materials & Textures: Hello, everyone. Welcome back to another video off thes section in this video. We're going to talk about textures and materials when you're designing a three D object for sure you need a tax share or material. As I mentioned before, you have a library right at the top. So let's go ahead and click on that. And here you have different options. Here we have collections. We have a collection of different shapes, as it can see here, we can use these shapes like this or this one. And we have other options as well, such as assets. You have plenty off three D assets and then we have materials. Okay, so suppose that we want to change the material off our text here. Okay, so here we can choose one of these materials. I'm going to go for this one so you can drag and drop it on your three d text like this. That's pretty cool, isn't it? It's. Render it once again and you can see the difference. Can you see how amazing Getty's you can easily change the material as you wish. So let's change it to something else. For instance, this one So you can choose your text and click on that. Perfect. Or it's better to create another shape. Here. Let's create a blocks here. I'm going to scale it down. Let's move it. You're perfect. And then I'm going to change its material to something else. Okay. For instance, this one It's pretty cool, isn't it? Can you recognize how many possibilities there are for you to create amazing objects there ? That is fantastic. All right, guys, Thank you so much for watching this video. I hope you enjoyed it. And I will see you in the next video.
127. Creating a 3D Scene: Hello, everyone. And welcome back to another video off these section. In this video, we're going to start designing our 1st 3 D seen together. So what's a three D? Seen as you may guess, a three d scene is a scene which consist off different three D objects. Okay, so, for instance, here we have a scene because we have at least two elements here. However, we're going to create a more interesting scene together. So first of all, let's remove these two objects pretty good. I'm going to keep Shadow Plane are right, and I don't need the camera anymore. So let's remove that. And after that, I'm going to create a text. So let's click on three D text over there pretty good. And then I'm going to change it to you. I like this and let's set this color, too. B 7 42 and double F like this pretty awesome. And then I'm going to duplicate it and let's change its position. And let's change it to you. X like this. And after that I'm going to change the color to 36 46 on double. If that's pretty awesome, that Mizzou mean and then I'm going to rotate it by 90 degrees like this. Pretty awesome. And let me move it. Toe wars, The u I text like this, and once again, I'm going to rotate it like this. It looks like that the U X is lying on top of you are OK, all right. And then I'm going to decrease the size of UX K by this cube like this on. Let's move it to the left side. Pretty awesome. And let's move thes you. I takes a little bit up because we need to get that shadow. If you remember, when you're using a shadow plane, we need to put are objects above it in order to get a shadow. All right, Fantastic. Then that's shoes you x here and movie to the left side like this. That's fantastic. However, I'm gonna make you x a little bit smaller. I think now it's better. Pretty good. And the next thing I'm gonna do is adding a wall behind this. Okay, so let's go to library and then go to zigzag shapes by victory. And here we have a corner wrong. So let's click on that Pretty awesome. I'm going to zoom out because we need to enlarge this wall. So here, make sure that the wall is selected and used this cube to enlarge it. And this Cuba as well. Pretty awesome. Then what I'm going to do is changing its color. So let's change its color to something like this. That's pretty great. I'm gonna zoom mean and then I'm gonna go to library. And this time I'm gonna open up environments like this. And here we have different kinds of environments. So, for instance, we can try this one. You can drag and drop it like this and let's render are seen to see how it looks. That's great. However, I'm going to change it to something else like this one. Remember that the environment that you choose is going to have faked the reflections and also shadows. OK, so make sure to choose the best environment possible. Let's try this one as well. I think it's great. Then that's add some three D assets to our scene. So let's go to Asset Section and here look for books and I'm gonna choose this one pretty awesome. Let's enlarge it fantastic. And I'm gonna look for something else for instance, a cup of drink like this. Let's make a smaller movie to the right side. Fantastic. And we can also add a doughnut. So let's look for Don't not. We can add, for instance, this fun. It's a locally doughnut. I'm gonna make it smaller and put it next to our cup of drink. Okay, All right. As you can see, they have a rectangle light. However, I'm gonna add another light are seen. So let's look for directional light pretty good. I'm gonna zoom out. Let's move it to the right side. Rotated a little bit. I think now it's better. We can also add different objects are seen in order to make it look more professional and also more complex. However, for the sake of thes course, I'm going to keep it simple. Or Ryan. Let's render are seen to see how it looks. It's pretty great, isn't it? You can also go ahead and add some objects from collections. For instance, we can go ahead and open up organic shapes, and here we have different objects like this one that scale it down. Or you could use another objects, for instance, around the shapes like this one. It depends on you and the project you're working on. So make sure to choose great objects in order to create the best combination possible. All right, guys, thank you so much for watching this video. I hope you enjoyed it. And in the next video, we will talk about rendering and exporting. So see you then.
128. Rendering & Exporting: Hello, Ron. And welcome back to another video of thes section in these video. We're going to talk him out, rendering You're seen as I mentioned before. Whenever you're working on a three d project, you need to render it in the end. All right, so now I'm gonna show you how you can modify the rendering settings and also how you can use the viewer option and also how you can export. You're fine. So before doing that, I'm going to do some adjustments to our shadow plane. Let's go and select our shadow plane, and I'm going to change its color to something like this. I'm going to choose the color picker. All right, now let's render are seen. It's great, isn't it? All right, for rendering your scene, you have different options. First of all, let's go ahead and open up the render menu right at the top. The first section is like thes toggle. Okay, so you can modify the quality. You can set it too low, medium or high, and it can kill. You can start friend or preview like this. You can add some effects through it. We can change the situation. The contrast the color filter and also color balance, etcetera. And last but not least, you can export. You're seen as an image. However, you need to upgrade your license in order to get that functionality, and then you can click on down with image. The next important feature of victory is viewer. Okay, so when you go to viewer section, you have different options here that you can modify like textures baking. And these are about lightings. And here you can choose center camera view, and it means that the camera view will be centered on currently selected object. Okay, so if you select you eye, the camera view will be centered on this object and the augmented reality is on, which is great because we can get an augmented reality seen as well. Then we generate our court here and now we can click and generate. It takes some time, and it's done all right. And here you can get the coat. As it can see, you can copy and paste the I frame code. You're a shame and code, or if you're not developing your website or the application can easily give it to your developer and he or she could use that perfectly. However, if you want to display to your clients in advance, you can change the format from a shame Ally frame to link, and you can copy this link to your clipboard and send it to your clients or your friend. So first of all, let's check it out here. There we go. It's gonna look like this. Isn't it great? We can hold command and so mean. That's fantastic, isn't it? And if you open up this scene on your phone, we can use theater, commented reality option in orderto like meant this scene in your environment, that's pretty awesome, so make sure to check it out. You can use both Android and RUS devices to do that, and that's fantastic. The next option is export, and here you can export your file with any format you want. O B g d a ust Z, which is augmented reality format for Rus etcetera. However, in order to use these kind of functionality, you have to get an extended license for that. Alright, guys, that's all for this section. I hope you enjoy this video and I will see you in the next video
129. Prototyping Tools: Hi, everyone, welcome back to another section off. He scores in these section. We're going to talk about prototyping, But first things first. I'm going to introduce you to some of the best tools for prototyping your projects. As a matter of fact, you can make a prototype, are using sketch. However, if you want to make a fancy and complex prototype, I recommend that you use other websites and applications well, whether the best prototyping tools Number one prototype I, which is my favorite application as well because it's so easy to work with. And there is a trial version, and you can try it out before purchasing any license number two Zeppelin number three Framer X and then envision Studio Sketch and Morrow in this section. We're going to work with some off them in order to make you familiar with the process off prototyping in each application. So in the next video, we'll start prototyping one off our previous projects in sketch. So see you that
130. Prototyping in Sketch: Hello, everyone. I hope you're doing well in these video. We're going to talk about prototyping in sketch. As I mentioned before, you cannot create a complex prototyping sketch. However, sometimes you don't need a complex prototype. So in that case, you can easily use catch for prototyping your project. So, as you can see, I'm gonna prototype our finance app that we already designed. Let me zoom mean. And here we have a welcome page, if you remember, and we have two different buttons. So basically, when the user clicks on signing button, this sign in page is going to sliding from right side, okay. And whenever the user clicks on sign up button, the sign up page is going to slide in. So what we're going to do is clicking on Sign in button, as he concedes, selected right now. Then click on Link at the top and Kelly Candies Art board like this. As you can see, an arrow immediately appears. And here you can see two different options the targets and the animation. Okay, the target is our destination screen, which is in this case are signing screen and the animation, for instance, here we have no art for the animation. So if I click on preview and click and signing, you can see that there is no animation. However, I'm gonna choose sliding from right side and once again previewed signing. There we go. It's amazing, isn't it? So then we need to create another link for our sign up button that museum out and click on the sign up screen. Pretty awesome. Once again preview it. That's fantastic. So can you see how easy it is to prototype in sketch? But you cannot expect so many functionalities in these kind of prototyping. Let's go ahead. And here I'm gonna add a link to this complete button and click on this home page pretty awesome and previewed. Fantastic! I'm going to change the type of animation from bottom to top like this. That is pretty great. Alright, guys, that's all for this video. I hope you enjoyed it, and you can now start prototyping your project easily in the sketch. However, remember that we're going to work with more complex prototyping in the following videos. So see you then
131. Prototyping in InVision Studio: Hi, everyone. Welcome back to another video of thes course. In this lesson, you're going to learn how to prototype in InVision studio, one of the best applications in the design industry. First of all, you can download and install the envision studio on both Mac OS and Windows for free. Second of all, you need to import your sketch file into the envision studio. To do these, we can easily click on the open study your sketch file button. Alternatively, you can choose file import and select your sketch. Fine. All right, so now we need to import our sketch find year. So let's go ahead and import it here. There we go. Your is our finance and project. So here, I'm going to show you some techniques that you can use for prototyping or project. Remember that in the previous video, we started prototyping this welcome page and these signing and sign up pages in sketch. However, it was so simple, but we can make it look better and more professional. So what I'm going to do is selecting this welcome page. And as you can see, we have some common shapes in thes welcome page and signing page. Okay, for instance, here we have the logo and these circles, and these are the common things that we have here. Remember? That's when your prototyping in envision studio you need to make sure that the name of your layer is the same in both screens. For example, here I'm going to create an animation that when the user clicks on these signing button, thes circles will become smaller and will be placed in this position and these elements. For instance, signing and these tax feels are going to fade in. And here, in these welcome page, these two buttons are going to fade out. Okay, so here, remember to check the name of your Fuller's. For example. Here we have shapes and in sign in screen, it's also shapes that's perfect. Now let's elect sign in button and click on this icon to add an interaction. And here you have a floating arrow, and I'm going to select this sign in our cord. Interview with shop immediately. Here we have some options. Trigger, for instance, do you want it to be click whole click, double click or even tap hole tap, touchdown, etcetera. But now we're going to choose Click, and the destination is going to be our sign in page. And here we have transition time, presets or motion. I'm going to change it to motion. Here we have two different options that we can modify duration and delay. I'm going to set the delay to zero and the duration to 0.6 seconds and click on Save. All right, so now it's previewing prototype to see what's going on here. There we go. It's our welcome page, and I'm going to click on Sign Me. That's amazing, isn't it? Did you see how beautiful that animation waas? With just two clicks, we could achieve this kind of prototyping, So let's look for welcome page again to check it out once more. There we go. That is pretty awesome. I hope you like it as well. Now it's time to add a link to our sign up button, so let's go ahead and do Mt. Click on this ad into reaction button and choose Sign up art board again, motion, and you don't need to change anything here. Click and save. Once again. Let's preview it Fantastic. That's pretty great, isn't it? If you look at the right side. You can see here that in interaction section you have the edit timeline option. So let's click on that. And here you have a timeline that you can see your interactions and your animation in lower speed. Can you see how beautiful and small fifties that is? Pretty awesome. As a matter of fact, there are so many things you can do in invasion studio. However, we cannot cover all the features and all the functionalities. All right, guys, thank you so much for watching this video. I hope you enjoyed it. And I will see you in the next video.
132. Prototyping in InVision Studio Part 2: Hello, everyone. Welcome back to another video of these course in this video. I'm going to teach you another great technique for prototyping your project in InVision studio. So without, for I do, let's get started in the previous video. As you remember, we started our project with prototyping. This welcome page. And we added two different wings to these two buttons. OK, now I'm going to show you another technique in order to use that in your projects. So let's go ahead. And as you can see here, we have two different transactions. Page, the 1st 1 is called Transactions, and the second is called transactions Detail. So what we're going to do is prototyping thes transaction card. Okay, so whenever the user drags it down, it's gonna be like this in transactions detail. And, of course, whenever the user moves it up, it's gonna be like the's art board. As I mentioned before, when we're going to prototype a specific component in two different art boards, we need to make sure that their name are the same as you can see. Here we have transaction card and in these art board, we have transaction card as well. Okay, so so far, it's perfect. However, the only problem that we have is that in these are poor transactions. We do not have these elements. We do not have these title and these cards. So if you start prototyping, thes two are pores as they are now. When the user drags it down, these elements are going to fade in. Okay, it's not what we want, so let's try it out in order to show you and give you a clear vision. First of all, I'm going to select this transaction card and click undies and interaction or, let's say, adding a link. Then click on these art board and here in trigger, I'm going to choose drank down like this we can save, and it's previews are right. Now let's try it out. As you can see these elements fading immediately, and this is not what we want. So the best way to fix this problem is to just go ahead and select these elements. All of them copy them and paste them in these transactions screen. So let's paste them here, and I'm gonna move these folders down and put them right below our transactions card like this So now that's check it once again. And as you can see, it works perfectly. However, you need to make sure that you create another link for swiping up. OK, so let's go ahead and say, like these transactions detail art board. And here I'm going to select the transaction card Anglican at Interaction Button and this time that select our transactions aren't worth. And now I'm going to select drag up and save. That's previewed once again. And as you can see, it works perfectly. I'm gonna mention something else here. As you can see, we have lots of different our ports here, so we need to find a way to specify which are port is our starting point. So to do that, you can easily go ahead and click on these home icon right over there. And in this way, InVision studio knows that our starter point or let's say our starter screen is these transactions. Okay, You can change it whenever you want. All right, guys, Thank you so much for watching this video. I hope you enjoyed it. I will see you in the next video.
133. Mocking up an app: Hi, everyone. And welcome back to another video of thes course in these video, we're gonna be talking about mark ups. Creating mark ups is an important task for you as a UX designer because no matter how amazing and how creative your designs are, if you could not present it in a great way, it cannot impress others and even your clients or your boss. So in this video, I'm going to show you how you can create and mark up in the sketch. As you can see here, we have our finance app that we designed together. And I'm going to show you how you can create a mock up for thes project. Nowadays. There are so many resource is out there that you can use for free or paid, and I'm going to show you how you can get access to them. Let me open up the Google website and here I'm gonna look for iPhone X s mark up and sketch . Okay, here you have plenty of sources. For example, here we have iPhone access and iPhone access Max resource is, and in these websites, ketchup sources, you can find out so many great resource is And as you can see, these templates or this mock up has been designed by this person or this account, I'm not sure you can check his account out on Dribble Teacher or his or her website. First of all, I'm going to show you how you can use it. That's going on down, Old resource is, and then I'm gonna open it up in sketch are right. Fantastic. As you can see, we have iPhone excess on excess. Max. I'm gonna go ahead and copied thes art board iPhone excess riel. Let's copy it and paste. It's in our project here. And if you open up the body folder, you can see that there is a screen fuller here and a screen layer. So in order to put your screen inside this phone, you can easily export your art board for incense. Let's choose this one, and here I'm gonna export it, are right, and now you can select this screen layer, and here in image feel can choose your image or, let's say, our screen and it's done. That was pretty quick and awesome, isn't it? It's fantastic. You can also modify this template or this iPhone as you wish, and there are other. Resource is as well. So let me show you. There is a very good website for finding markups, and it's called ls that graphics? There we go. And here you can look for device mock ups under plenty of free and paid resource is here that you can use. You can also go to free mock ups and tools for finding free Resource is here. There we go. We have free iPhone X are markup, for instance, or this one as well. You can download it for free and use it as you wish are right, guys, thank you so much for watching this video. I hope you enjoyed it. And I will see you in the next video. So see you that
134. How to use the Sketch app on your phone?: Hello, everyone. And welcome back to another video of these course. In this video, we're gonna be talking about the sketch mirror application for Android and our US. As a matter of fact, whenever you finish your design process, you can easily preview your screens. Or let's say you're our pores on your phone instantly, and that is amazing. So to do that first you need to install the sketch mirror application on your phone, and then you need to connect to the same WiFi as your computer is. And after that, when you open up your sketch Muir application, you can click and this notification right over there and you can click. Connect your phones name, and that's all. Then you can easily preview your screens on your phone instantly and anything you change in your art boards. It will be changed instantly and immediately on your phone, which is an amazing feature. All right, guys, Thank you so much for watching this video. I hope you enjoyed it. I will see you in the next video
135. How to Create Your Own Online Portfolio?: Hi, everyone. In these video, we're gonna be talking about online portfolio. You as a you are UX designer, absolutely need an online portfolio to show off your abilities and design skills. It's extremely essential to have an outstanding portfolio in order for you to get a good job, whether as a full time designer or a freelancer. So how can you create your own online portfolio without writing a single line of code? To do that, you can use websites such as Dribble or Be Hands, which are designed for designers, and almost every employer needs to check out your profile on one. Off these websites, Be Hands is an online platform to showcase and discover creative work. It's owned by Adobe and can create a great portfolio using its for free. Alternatively, you can used rebel in order to showcase your artwork, and it automatically creates an online portfolio for you. You can also customize your portfolio as you wish, but you need to keep something in your mind. In order to used rebel services for free, you need to be invited by other designers. Otherwise you can parishes. The premium subscription
136. How to use Dribbble?: Hi, everyone. In these video, we're gonna be talking about how you can use drivel in order to use driven services. First, you need to have an account. Once you create your account, you can whether browse other designers, artwork for inspiration. Or you can upload your own creative artwork each month. You can upload up to 48 shots, and your shots should meet the DRI bones guidelines. You can upload high resolution images we PNG J pic and GIF format and also animated GIFs to your profile. Additionally, if you're a pro member, you can upload videos as well. After applauding your artwork, you can set a title for it. You can also add relative tanks to let other users find your artwork easier. Last but not least, you should write a short description for your shot, and then you can publish it right away or in the future.
137. How to use Behance?: Hi, everyone. In these video, we're gonna be talking about how you can use be hands just like using dribble. In order to use Behan services, you need to have an account first. Then you can browse and check out other designers artwork or create your own project. The main difference between DRI Bell and B hands is the aspect ratio off your shots or projects on dribble. You cannot upload vertical shot like a landing page completely. However, on being hands, you can upload images with any aspect ratio. To showcase your artwork, I recommend using both be hands and rebel at the same time and trying to use their unique features to present your design perfectly. Behan's also lets you upload your high quality images and videos in a single project, which is a great feature to present an interactive product in no time.
138. How to get your first client?: Hi, everyone. And welcome back to another section of this course in these video. We're going to talk about business ideas and how you can get your first client and start your own business. As a unit designer, you may be wondering how you can get your first client. Well, hopefully, there are plenty of ways to start with. The first stage of finding clients is to have a strong portfolio. If you haven't watched the portfolio section yet, I suggest you watch the portfolio section of this course. After creating your portfolio, you need to ask yourself what type of jumps you like to have. Do you want to work as a full time designer or you want to work as a freelancer? If you wanna work as a full time you're a designer. You need to prepare your resume and apply for the company's you wish to working. On the other hand, if you wanna work as a freelancer, you can register on some freelancing websites and find your first client is very. There are so many websites out there that you can work with, For instance, freelancer dot com fiver up work 99 designs. Three Bell etcetera. So make sure to check them out and find out which one is the most suitable option for you.
139. How to start your own business?: Hello, everyone. I hope you're doing well in these video. We're going to talk about how you can start your own business. Starting a business is hard, so you need to determine the level of your motivation before getting into this process. When you're thinking about starting a business, you should know that it takes so much time, energy and patients to achieve your goals. If you're aware of all these aspects, you're ready to take the next step. First of all, you should evaluate your skills level and find out what kind of services you like to offer . Then you need to find out who your potential clients are. In addition, you should work on your pricing and analyze your numbers. Second of all, you need to register your own company. In this regard, I recommend getting some advice from a lawyer and making sure you understand all the legal requirements associated with registering a company. After registering your company, you need to start creating your own brand, design a logo for your company and choose your brand collars. Last but not least, you should definitely design your own website because it's the most crucial part of your business. Now that you have your website ready, it's time to think about your marketing strategy. If you could not offer your services and skills to the right people, your business would not be successful, no matter how professional and useful your skills are, so make sure that you have a great marketing plan and execute it accurately.
140. How to scale your business?: Hi, everyone. I hope you're doing well in these video. We're gonna be talking about how you can scale your business. Now that you're running your own business, you may be wondering how you can scale your business or, in other words, how you can increase the revenue of your business dramatically. When it comes to online businesses. Most entrepreneurs usually focus on one geographic region for the sake of simplicity. It's a great idea for starting your journey. However, it's not enough for developing a profitable business. So, as you may guess, the best solution is to expand your global options and get customers from all over the world. The next step is trying to automate your manual processes, which can prevent wasting your time because no matter how many customers you have, there are only 24 hours in a day. We can utilize buffer website to manage your social media automatically, and also there are plenty of other tools to remind your customers about, their invoice says in no time. So you don't need to spend so much time on those tasks that can be delegated and done automatically. Instead, you should focus on your content and the outcome off each project
141. Communicating with your client: Hi, everyone. In these video, we're gonna be talking about communicating video clients. Efficient communication with clients plays a key role in any kind of business. And for designers, there are no exceptions. The way you interact with your clients is so important. If you want to be a successful entrepreneur, how should you handle the situation if something goes wrong? Well, in any kind of business, there are times that something goes wrong and it's normal. However, the way you face these difficulties, it's so important. Suppose that you set a deadline to hand over the final project to the client and in the middle of the design process, you understand that it might take longer. Well, in these case unity, inform your client about it as soon as possible and try to find a good solution that works for both of you.
142. Contract: Hi, everyone. In this video, we're gonna be talking about contracts just like any other business is. You should have a proper contracting place for starting a project, no matter how big or how small that project is. Having a contract keeps everything clear and protects both parties writes what should be included in the agreement. The most important thing you need to add to the contract is the declaration off your services in a clear way. And sometimes also, it's even better to mention what you will not do for the clients. Make sure to mention the deadline for delivering the project and also about the payment schedule. Remember that the contract should not be only about those things that might go wrong. It's better to focus on what should be done right. In general, it's a good idea to get legal advice from a lawyer in advance
143. Where to Find World Class Design Inspiration?: Hi, everyone In these video, we're gonna be talking about inspiration and resource is being inspired by other designers is absolutely fine and important. However, you need to make sure that you do not copy their works. If you're interested in their designs and you would lying to use parts of them in your project, you need to ask for permission first. As you may remember, we talked about being hands and dribble in the previous sections of the scores. These two websites are the most popular places to find artistic inspiration. There are so many websites and instagram pages that you can refer to as a source of inspiration. You can also show your clients what you have got as an inspiration to know what their expectations are.
144. Image Resources: Hello, everyone. In these video, we're gonna be talking about imagery sources. We has Designers work with images a lot. It could be any kind of images in the form of profiles, products, etcetera. So having efficient resource is is absolutely essential in order to get the most appropriate images for our projects. There are so many websites that offer you a variety of images, Some of them are paid and some of them are free. However, if you're looking for royalty free images to use in your projects without any doubt about their license, I suggest you use unspool ash that come. It's one of the best websites out there for finding almost any kind of images in different categories. Remember that you should make sure about the licensing of images you wish to use, otherwise you may be in trouble.
145. What is the next step?: higher ruined in these video, we're gonna be talking about the next step as a Yuan UX designer. Now that you have learned so much about user interface design, it's time to take the next step. You're now ready to start designing amazing more while APS and websites. As a designer, you should always be creative, So try to challenge yourself every single day to find out hidden secrets of young UX design . You must have probably heard that practice makes perfect, but remember that your design should not be always perfect. The only thing that matters is your progression and improvements. So I think it's a good idea to change that famous phrase to practice makes progress. And with that said, you should become a better resign er every single day. Last but not least, I should thank you for watching these tutorial. It has been a long journey for both of us, and I hope you enjoyed it. I wish you the best of luck, and I cannot wait to see your art words
 Arash Ahadzadeh, UI/UX Designer | University Lecturer