Transcripts
1. Introduction: Hey everyone, welcome to the complete Mastering
masterclass. I'm so excited to finally
have this class live. It's taking me a
long time to make it really wanted
to get it right. And I'm really excited to be at the point of being
able to release it. If you don't know me,
my name is Jay Allen. I have I have made
over 100 classes now, over 1 million students in my online classes all
over the internet. And I'm really excited that so many people have found
my classes so useful. I hear from him every
day and I love it. I have a PhD in Music with a focus on electronic music and a master's in
computer music. I've been producing, writing, composing for 2030
some years now. I worked on some records
that have been in the top CMJ charts. I've been acknowledged by the Grammy Foundation for
some of my educational work. And I've produced, mixed and mastered tons and
tons of tracks. But the most important thing is I just really love talking about this stuff and being a nerd. So if that sounds like you, you're in the right place. One of my favorite things to
do is get up in the morning, read all the questions I
have in the classes and answer every single one
of them every morning. It's my favorite part of my day. In this class, we are going
to deep dive in mastering. Everything you
need to know about mastering is in this class, we're going to talk about
types of mastering, the theory behind Mastering
what we're trying to achieve. And of course how to do it. We're going to get in the
weeds and master a track. The track we're going
to master is actually a student track that I
invited someone to submit. We're going to master
that track throughout this class and I'll
walk you through every gruesome step of it. I'll talk about all
the effects you need, all the tools you need, how to build your chain, details of what you're looking for and what you need to submit to Spotify and the other
streaming services. How to control the
three-dimensional space that we're working in, adding
additional sweeteners. And then of course, rendering to the different file
types and what your Perfect Render
settings should be in order for it to be accepted by
the streaming services. Lastly, I'll talk about
things you can do to make the mastering
process easier for yourself in the long run and how to get gigs as
a mastering engineer. So without further ado, let's dive in and
start doing it. It's important for me to convey that you can do
this in just about any software, any
audio software. If you're using
Pro Tools, Logic, FL Studio, reaper, the, the tools we need for a mask. Just kind of sticking out. L and I stopped doing Dequeue. So okay, so what we've done here is
we've just really pushed it really hard. But that's not what we
want to do. Obviously. Adjust our ratio attack
and release times here, okay, so everything
works the same as just slightly
different interface. Here's our side, right? So we can set compression, smash up against that ceiling.
It's going to distort. That's what it does. So what this one does is has
this soft clip function. So as long as we don't
smash up on there too hard, it is going to let us have a little bit of distortion
from doing that, but it's actually kind
of a nice distortion. So it's okay.
2. What is Mastering?: Okay, so what is mastering? Let's go through just really quick to get
us on the same page. So let's go through the process that we do to make a track. Okay, skipping the hardest part, which is the actual art
of making the track. You sit down to make music. You make track in whatever
software you make a track, hurray, you wrote the music,
you're happy with it. Cool. Now, what
happens after that? And this is the typical thing
that happens after that. After you write the track, then typically what people
will do is I'll say, Great, I've written
a good track, I'm happy with it now
it's time to mix it. So you're going to
spend a bunch of time mixing that is getting all
the levels just right, getting the relationship of one sound to the
other, just right, and getting it sounding exactly how you want it. Chefs kiss. So you've done that, okay, I have a whole separate
class on that process. After you do that, then what you do is
the mastering process. So you take your mix and you
export that out of your dye. You export that as
stereo audio tracks. So two channels left and right, the kind that we stream, the thing we hear. You couldn't call it done there. And sometimes people do. Sometimes people
say like This is my mix. It sounds great. I'm going to send
it off to Spotify, and that's going to be great. However, you couldn't do this last step and you
should do this last step. You really should
master your tracks or have your tracks
mastered by somebody else. So mastering is one
last layer that we do in order to get the
tracks ready for streaming, for putting on a record. Although I'll talk about
that in just a second, but that is something
that has to happen. Putting on a CD, playing in your car or playing
on crappy speakers, planning on great speakers. It's a way to make
sure your track is going to sound great and as many different
places as possible. It's a way to make sure that when your track is
being played on the radio, no one reaches for the dial to turn it up or turn it down. It just fits in with what music is being played
on the radio station. It's a way to make
sure that there's no kind of oddities
in the track, like a whole bunch of low stuff that you didn't hear in the mix or some weird Hi stuff that
you didn't hear in the mix. Just to kind of put a shine
on the whole thing and make sure it's going to work on
all of these platforms. And it's going to
sound It's best. That's what mastering is. The main thing I want
you to take away from this first video is that mastering means we are
working with a stereo track, k, two channels like this. Like look at this track here. This is two channels,
you can see. And this is not all
part of one session. These are 1234567
individual tracks. This is not 1 s. I just
pulled in seven tracks here to show you something that we'll talk about
in a few minutes. But these are completed
tracks that I have in a session and I'm
mastering these tracks. So we look at this
one, it's stereo, it's got two files. This is not the mix. If you are mastering something, you are done with the mix. You are not mixing it
anymore. It has gone. So our mix is written in stone. We, we've bounced it
down to a stereo track, and now we're moving on
to the mastering phase. So that's what mastering is
and that's what we're going to learn how to
do in this class.
3. A Note About Terminology: Okay, a quick word about terminology before
we get too far, I just wanted to address this. There is a movement in audio engineering to stop
using the word mastering, as it is seen by some
as oppressive language. I am totally
sympathetic to that. Alternatives that
are being proposed are finishing and maximizing. Both of those two terms
are great and work well. And I'm trying to I'm in the process of
adjusting my language to say to use both of those terms for the interests of people understanding
what I'm talking about. I'm primarily going to stay using the term
mastering for now. But I may go back as soon
as one of those two terms, kind of sticks and re-edit this, this whole class to
use the new term. But for now, most people
know what mastering is. And so I kinda have
to use that for this class in order for people to really understand
what I'm talking about. Other words and
language that are being rethought up in audio. There's actually a lot of them. Things like when we have two
hardware devices that work together like a tape
machine and a clock, or a synthesized or
annotate and computer. I'm the relationship is always called a master
slave relationship. We're kind of getting rid
of those terms as well. But just so you know, you may hear people
refer to mastering as finishing or maximizing or
maybe even something else. It all mostly means
the same thing. I like finishing better
than maximizing because maximising to me is one
element of mastering, but not the whole element administering anyway,
more on that later. So I just wanted to put that out there so that when
you hear those terms, you understand what
we're talking about. Cool. Let's move on.
4. Software and Hardware Recommendations: Okay, Let's talk about the
tools we're going to use now. You can use a lot of different
stuff for mastering. There's a lot of
people who insist on hardware mastering and there's some really cool
hardware for mastering. But what I wanna do in
this class is we're going to stick primarily to software, or we're going to stick only
to software in this class. But you'll understand
how hardware works. We'll talk about it
when it comes up. So I'm gonna be
using Ableton here, but it's important for
me to convey that. You can do this in just about any software, any
audio software. If you're using Pro Tools, Logic, FL Studio, reaper. The, the tools we need for mastering our EQs
and compressors, maybe a couple of other things, but any audio program has
those tools built-in. Really, it totally shut. I'm almost positive.
Every single, you could probably
do a lot of this in GarageBand if you really had to. It's not so much about
access to the tools, but using them precisely. That's what makes a good master. So whatever data you have is going to be fine even
if you don't have a dog, you doing this in like
Audacity, a free program? Can, you can do that. It's going to be a little
harder, but you can actually master in
Audacity just fine. So everything you need to
master something really well, should be built into
your software already. So don't let my using
Ableton throw you off. If you're not using able
to and it's gonna be okay. You just need to understand how to use your
software pretty well. You need to
understand how to use your compressors and EQs. We'll talk more about
that when we get there. So you don't need to buy fancy
plug-ins to do this stuff. That being said, if there
is one fancy plugin to buy, and I'll talk more about
how I use this later. But it would be isotopes, ozone, it looks like this. Ozone is a Mastering plug-in. You do not need it. Let me, I cannot
emphasize this enough. You do not need it. You can do a great
master without it. However, it does do some things really well that your
dog probably does also. But ozone is gonna do it differently and there's some
advantages to using ozone. We'll talk more
about that later. Don't go out and buy ozone yet. Maybe you'll want to buy it
by the end of this class. So I'm primarily just
going to use this stuff built into Ableton at the
very end of this class, I'll show you some advantages of adding ozone into our chain. But until then, use,
use what you have. Any door will be fine for this.
5. Types of Mastering: One more caveat before
we get into everything. And that is that I kind
of mentioned this a minute ago when I was talking
about what is mastering. But I just want to make
sure I hit home this idea that there are a few
different kinds of mastering. And what we're doing in this
class is digital Mastering. We are mastering
a track to get it ready for digital distribution, meaning streamed on a website, put on SoundCloud, put on
Spotify, all of those services. There are things like
vinyl mastering. That is a whole
different animal. I don't know really how
to do vinyl mastering. It really takes a
professional to master something to get it
ready to print on vinyl. If you're interested
in doing that, you should contact someone at the vinyl pressing
planet who does that. It's a whole different process. Some of the similar things, but there's a lot more
that has to go into it. It's, it's much
more of a science. So the type of mastering we're gonna be
doing in this class is really focused on getting
our tracks in any genre, whether it's acoustic
or electronic, orchestral, anything. I'm getting those ready for streaming platforms,
digital files. That's what we're focusing
on here. Go. Alright.
6. Vocabulary: As I was outlining
this class and kind of figuring out how I was
going to teach this. I realized that
there are a lot of terms that are gonna come up, a lot of technical terms, some of which might
be familiar to you already and some of
them if you've taken my other classes like mixing and some of them will
be totally new to you. So when these terms come up, I am going to stop and
introduce them and define them. But I also thought it would
be handy for you to have a little vocab list to refer to. In the next little segment, I'm gonna give you a PDF
that is my vocab list. Don't worry about reading through this and
memorizing this. I'm giving this to you
now early in the class, hoping that maybe you'll
print it off and set it next to your computer or keep it as a file open
on your desktop. So that when I talk
about these things, you can reference this list. So each one of
these I am going to talk about in context
when they come up. Some of them won't be
for a little while, but I want you to
just have this list, use it as a reference. You can write on it, annotate it however you want to help you understand
the concept even more. Okay, So up next vocab list, then we're diving in.
7. To Be Loud and Clear: Okay, so let's talk about the theory behind
Mastering a little bit. And primarily we're
going to talk about what our goals are for mastering. Why did we do this? Why did we go through
this whole process? The way I think
about it? There are two goals for mastering. Two things we're
trying to achieve. One is to make our track
as loud as possible. Now there are some caveats to that and we'll talk about
that in just a minute. But loud second is clear. So loud and clear is what
we want our track to be. And this is something that gets down in the mastering process. So when you're
mixing what you're doing in a track as you're listening to all the
different layers of the track, all
the instruments. And you're comparing
them to each other and you're
getting the best mix. So you want, Let's
say you've got your drums and then you've
got your guitar, right? So you, what you wanna do
is you want to listen to that drum track and then
you wanna get your guitar. Maybe you want it a little
louder than the drums, maybe a little quieter
than the drums. Maybe write on there. But you're going to mix
that relative to the drums or whatever your starting or
reference track is, right? Then you're going
to add in your base and you're going to
mix that relative. And then you're going to add in any sense or anything
else, vocals. You're going to mix
all of those together. They're all relative
to each other. When you're done with that, you're gonna be like, Sweet, I have a great mix. I am happy with my mix. And maybe it's
good and loud mix. Maybe, but maybe it's not
and that's okay if it's not, the job of mixing is not
to make the loudest mix. You wanna get your mix
as loud as it can be, but it won't be as loud as a mastered mix because
there's special things we do. Mastering to make it
a little bit louder, more on that in a minute. So you mix relative to all the other instruments
on the piece of music. But you master relative to all the other tracks that the listener might
be listening to. The example of the radio, I think I already
mentioned this, but when we listen to
a track on the radio, we don't want to
listen to one that's quieter than all the
other ones around it. If we do, Someone's
going to reach for the dial and they're
going to turn it up. Okay, if they turn
it up a whole bunch, then the next track is
going to come on and it's going to be really loud and it's going to blow
their ears out, right? They don't wanna do that. So we want our mix to be just as loud as all the other
ones that are on the radio. Maybe radio is a bad
example for the modern age. I still listen to the
radio, but Spotify, all tracks on Spotify, we don't want one
that's quieter or louder than the other
ones around it. If it's louder, it's
probably distorting. If it's quieter, you're
going to turn it up. Or worse, if it's really quiet, Spotify is going to apply some algorithm that's just
going to boost the volume for you automatically and that's probably going to make it
distort and sound not great, okay, so loudness does matter. The other thing we
want is clarity. So what we're gonna do
is we're going to listen for any problematic frequencies. Is there a whole bunch
of base stuff piling up? Is there a whole
bunch of high stuff? And there's some ringing
frequency going on. We're gonna just kinda nip
those out and deal with those. Then we might even apply
if the track needs it. A little bit of what we
would call sweeteners, a little bit of extra stuff
just to make it polish, just to make it shine
a little bit more. We'll talk about all that later. But our main two
goals, loud and clear.
8. It's More Than Just Turning Up the Volume: Okay, so back when I learned
how to do this stuff, I always thought the loud
thing was a little strange. So let me explain If you're confused the way that I used
to be confused about this. Because why? Like loud, I can make a track louder just by
turning up the volume, right? Like, why don't we just
turn up the volume, right? This isn't rocket science. It's much more
complicated than that. And let me tell you why I
used to compare this to like you ever see those like beer commercials where they say, we have the coldest beer. And you're like, just isn't, the function isn't the
coldness of a beer, the function of the
refrigerator you put it in. Just make it colder, leave it in the
refrigerator longer, or put it in the freezer if
you want it really cold. I don't understand
this. I still don't understand that the coldness of beer as something
that's advertised. But with sound, it
is not the same. It is not just that like you can just make it colder
or in our case, make it louder by
turning up the volume. Okay. Let me show you why.
Let's look at this track. This is a completed track
and it's pretty loud. We can see that there
is some headroom here, meaning a little bit of room at the top of the
tracks, but not much. It's really mixed as loud
as it can possibly be. Okay. Let's just make it louder. Okay, so I'm gonna go over to my meters
here, it's on this track. Let's make these nice and big so we can see what
we're doing here. Okay, So here's that track. It's soloed. It was like we'd been through
it all. Highs and lows. I'm still when my dog I don't feel good crowds, I
can keep my store. That's just how it is going all the way up to its peak
goes like we've been doing. Is I'm still wearing my dog. That's good. Zero is the tap. We can not go above zero. We'll talk more about
this later, but we cannot go above
zero and this is getting up to negative 0.02. That means it is
right up to the top. It is mixed all
the way up there. That's great. It's loud as it can possibly be. So if we wanted it louder, we can just turn up the volume. It was like we've been doing. But the highs and lows, I'm still when my dog
I don't forget crowds. I can keep my sorts of
small change supposed to. That's just how it is.
I didn't make a lot of strangers and close
friends and Salama. Ok. Right. So I turned it up louder and
what happened? It distorted. So we can't just turn it up louder because it's
going to distort. If we go over that
zero-point here, we will distort that
got up to 5.91. Okay, we need to go up to zero. Isn't it already mastered
perfectly if it's peaking all the way
at negative 0.02, that's as close as you
get to zero, right? Well, not really, because that's where
mastering comes into play. Let's look at the
waveform, right? So here's just a random
spot in the waveform. This right here. This is all the
way up to the top. This is going right up to
zero or negative 0.02. That's as loud as I can go. So we can't get that any louder. But this is not. This can be louder. This can be louder. This can be louder. And let's go even a
little bit closer. This can be louder, and these can be louder. The highs are at the top, but the lows, those
can go up, right? And this is where the science of all of this comes in, right? I want those highs to
stay as high as they can, but I want the quiet
stuff to come up. Well, this is called
the dynamic range. The dynamic range is the
distance from the highest, the loudest point, to
the quietest point. And what we're gonna do is
we're going to squish that. We're gonna use some special
tools to squish that. So the whole thing is louder. We're gonna do it in a way
that doesn't ruin the music. Now this brings us to something that I would be remiss
if I didn't talk about. There's this thing called
the loudness wars. And it's something that you just kinda have to address when you're talking
about mastering. So let's go to a new video
and talk about that.
9. The Loudness Wars: We bit of history. Let's go back to the 80s, e.g. this is supposedly
had been going on since the seventies,
arguably the 60s. But let's say we're in the eighties and you're
listening to music. You're listening to music
on the radio because that's how a lot of people
listen to music it back then. You're listening on the
radio and you hear two songs side-by-side and one sounds
louder than the other. There were studies
that showed that that one that sounded
louder sold better. So people started trying to make music louder and louder using these techniques
that we're talking about, either actually louder
or perceived louder. Now at some point, loudness
is the function of the dial, of the volume knob in
your car or whatever. But you can push up against
that knob really quite hard. And it was very difficult
to do back in the eighties. So people were just
experimenting with it. Because we were still
working with things like cassette tapes and
analog signals. Once we got the compact disc, the CD, which was
invented in 1981, but really became
the standard way we were selling and consuming music in the very
early 90s, I think. Now we had digital signals and those can be more
carefully manipulated. So people started
really pushing this. How can we get our track
to be the loudest? Because if there's five tracks
played on the radio and one is mixed or
mastered really loud, and it stands out
from the others. It's going to sell better. We know this. So this weird little war started called the
loudness wars, where everyone was
trying to make their music the loudest. And we're still in
this little war. In some ways. Some artists have fought against it by saying that they
don't want to be part of it because the there's an
argument to be made that by making a track as
loud as it can be, by what we end up doing is
reducing that dynamic range. And that takes away the
musicality of it right there. There's something
lost in the delicate qualities of the music. When we do that, the artists that have
said we're going to have quiet masters tended to bend to be artists that
don't need to worry about album sales or streams
as much as the rest of us. A really good example of
this is Nine Inch Nails. I can't remember what record. I think it was near year zero. I think it was where he released two versions
of that album. One was called, I think he just called it the loud mix
or maybe the radio mics. And it was loud. It was mastered loud the
way you would expect. But then there was an
audiophile file version that was not mastered loud. It was mastered with a much wider dynamic range and that's the way he liked it, That's the way that
artists wanted it. But it wasn't going
to do very well on the radio or on streaming services. So he
made two versions. So the loudness war is
still going in some ways. We're always trying
to find ways to make the master louder. But I kinda feel like we've
hit an upper limit to it to where we're not going to
push it much farther. Because the streaming services
limit us to some extent. They have standards
that they require. And they're not going to
let music go above those. And there's only so much you can do to hit up against
those before you're just making a
weird wall of sound. But loudness is still important. So making sure your
tracks are mastered loud enough to compare with the other things that your audience might
be listening to you. That's what is the
most important piece. So there's a lot more to the loudness war
is if you Google it, you can find a history of artists that were
foreign against it, albums that are
kind of milestones or the loudness wars
throughout the years. So if you want to do more
reading on that, Go for it. But let's move on.
10. Genre Matters: A quick note about
genre before we go, because genre does
matter with this stuff. You want to consider the
genre that you're working in while you're mastering and while you're
thinking about loudness. In particular, we
want to think about the importance of the dynamic
range. So do this for me. Next time you're
driving in your car. Tuned to your local
commercial pop radio station. Listen to some music on
that station for a minute. Then I want you to turn
the dial as quick as you can over to your local
classical music station. Okay? It's quite
possible that when you get to your classical
music station, you don't hear anything. It's so quiet that you
don't hear anything. You need to crank up
that volume on your car in order to hear the music
and the classical station. Because classical music
is not mastered loud, the dynamic range of
classical music is important, is fundamentally important to listening to and
enjoying that music. So we don't squash
that dynamic range. In Mastering when
we're listening to classical music, we just don't. We might have a little bit, a little bit, um, but people that master
classical music are very specialized and that's not something I have a
lot of experience doing. But I bring this to
your attention to just remember that the
genre does matter. If you're mastering dance music, you want that thing
as loud as it can be because you want
it to pump in the club. If you're mastering
Brahms solo piano piece, you don't want it pushing
all the way to the top. You want it to it's
quiet to be quiet, and it's allowed to be loud. You want it to really
fill that space. You don't want it to just
pump all the way through. That's not what that
music is about. If you're mastering,
like pop punk, you want it to be
pretty slamming all the way through, right? But if you're mastering
acoustic folk music, maybe you want a little
more breadth in it, and you don't want it to push
all the way up to the top. That will sound weird if you
master that extremely loud. But you do want to get it
as loud as you can get it. So always be thinking about the genre that
you're working and what's, what's appropriate for
that genre, genre. Now, in a few minutes, we will talk to you about using guide tracks to
help you with that. Guide tracks are something
that we'll use in the mastering session
to kinda keep us connected to what's
happening around us. So we'll talk about that once we dive into our first big session, which we'll do shortly. But I want to talk about tools that we're going to
use for this process next.
11. The Frequency Work: Okay, We've been
talking a lot about loudness and not a lot about the other things
involved in mastering, primarily the frequency work. And so I want to spend just a minute on
that because it is a quite common thing that
when we talk about mastering, we talk about loudness and we neglect these other
important aspects of it. So when we talk about
frequency work, we're talking about are there any problematic
frequencies? That's the main thing. It might be low stuff, it might be high stuff and it might be stuff right
in the middle. It might be that there's a
weird ringing coming through. It might be that there's some low
frequencies building up. That may be you didn't see
when you are mixing the track. But using the tools of
mastering, you can see them. Am I didn't even be things
you can't even hear. But you can see
them on our meters. And you're like, Whoa, there's a big problem building up
in the lowest up here. Now why would that matter? Let's say you're doing
like you're mixing like a big dance track, right? And you've got something that's got this pump and base like, boom, it's really
great and you're feeling it got a great mix. Let's say you don't catch in mastering that there's
a bunch of low stuff happening underneath what you can hear on your speakers
or your headphones. So you don't do
anything about it. Then you go to a club
with that track, a club that has
these huge PA system and these giant subwoofers. You play that track and you just hear this just terrible sound. It's because it was there but your speakers didn't catch it. So these are the types of things we tried to
catch in mastering, and that's pretty
extreme example. But those kinds of
things can happen where you hear something on a
different set of speakers. And it sounds totally different. And we're trying to
eliminate that in mastering by looking for those
problematic frequencies. That's why when you're in a studio that specializes
on mastering, you'll often see a whole
array of speakers, right? Because they're going to have
some really nice speakers. They're going to have some
really cheap speakers. They might have like a
set of car speakers. They might have like
some just cheap earbuds, all kinds of different things. They're going to have
a little switcher. So they can switch
between all of these different speakers and just listen for any of those problematic
frequencies coming through. Then work on them. Right? So that's what goes
into the frequency. Work. More on that soon. Okay, now let's get into
the tools of the trade. We're going to start with
our main three tools. More will come up later, but these are our main tools.
12. Tools: The DAW: Okay, so let's talk
about the tools and let's start with the dog. This isn't really
one of the tools, but I just want to talk
about this really quick. We're gonna be working in a die. You don't really need
to work in a die. Because we're really only
going to be working with one track at a time here. Like a typical
mastering session. Looks like this. It looks like this, like there's one track that we're
gonna be working with. So you can do this in any
kind of audio editor, even something like Audacity, all the way up to Pro Tools. It doesn't matter. I'm going to use Ableton. You can use whatever
software you want. As long as you have access to the tools and the plug-ins
that we're going to talk about in the next
three videos after this. Okay? So don't get stuck on that. I'm using Ableton. Ableton has nothing to
do with this process. It's really just kind of
what's holding my track. Well, I do these things to it. But you need some
program that you can load a single audio
file in and then apply some effects to it. That's what we need. And it should have a
really good meter, which is the first thing
we're going to talk about. So let's go to a new video and
talk about that right now.
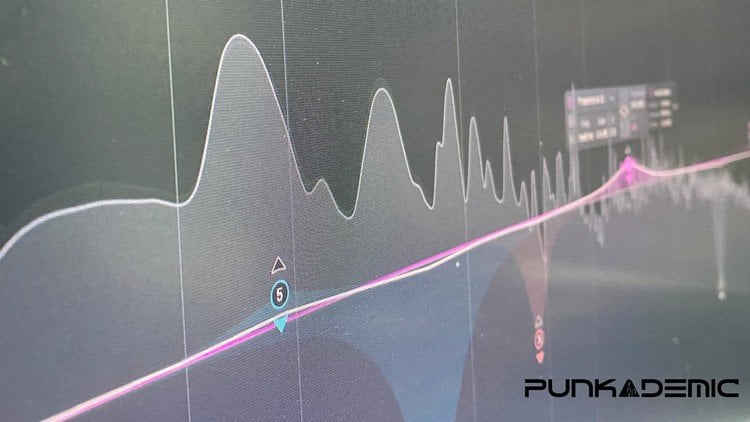
13. Tools: The Meter: Okay, Our first
and debate bubbly, most important tool of this
whole process is the meter. You probably thought I was
going to say compressor. If you've got some
experience with this, and the compressor
is very important, we'll talk about that next. But the meter is what's going to show us what's really going on. Okay? So in live, I have to flip over to this view
to really see the meter. This is the meter, right? It shows based on check for me, okay, now there's a few
different elements to the meter. Your meter may look different, but here's what we need
to be able to see. We need to be able
to see the peak. For me, it's showing
up right there. So if I click on it, it says negative
infinity, which means, which is very cerebral, but it just means it doesn't
have any information yet. And if I play the track, this is going to update to show what my highest level is based on, check for me and this
is never gonna go down. It's always just going
to get pushed up, up, up, up, up. And then it's going to
finally say like Okay, Nothing louder than
this has happened. Okay? And you can click
on it to reset it. It's gonna be important
whatever software you're using to be able to
see that peak level. Sometimes it shows
up in the meter or sometimes it shows
up somewhere else. But as long as you can
see it, it'll work great. Okay, The other thing we
need to see is the RMS. Ok, now you'll notice when
I hit play on this track, there are two green bars here. Well, let me clarify
that a little bit more. We have a stereo track
that we're playing here and there's a
left and a right side. You should see that
you're going to see two different sides of the
meter and we want to see that. But in addition to
those two sides, you're going to see
two different colors going up and down, okay? And in my case, you're going to see a dark
green and light green based on check from me
unless you've got MIA. Okay. So that's showing us two different ways of
looking at the volume. Okay? So the dark green one is our peak level that is
at any given moment, what is the loudest
sound we're seeing? Okay? That's useful. That's basically what
is showing up here. Okay? But more important for
us is, in my case, the light green one, which is the RMS volume. The RMS level is
what's telling us. It's kind of showing us the more perceived volume
that we're hearing. Rms stands for root mean square. Some math thing. The what it's basically
doing is it's calculating an average volume about every 300
milliseconds or so. So it's saying, here's all of our volume for the
last 300 milliseconds. What is the average of that? And then plotting a
number and then saying, for the next 300 milliseconds, what is the average of that? But they overlap, right? So it's like this. You don't really need
to understand that. Just understand that
it's a better way to look at the perceived
volume that we're hearing. The dark green is the peak volume and that's
also showing up here. So I'm not going to deal
with the peak volume too much in my meter because I'm
gonna deal with it here. Instead. The green, the green
is our RMS value. And that's what I'm
going to keep my eye on while I'm looking at
our overall signal. It's also important to know that you've got
two different spots. You can see your level. You've got it on the track and you've got it on the master. If you're in a dark. We want to keep our volume adjustments
here right at zero. We are not going to move this fader in this
whole process. Same thing over
here. At our master. We're going to keep that
sucker right at zero. We're not going to touch those. So our track level
and our master level, our master fader,
will be the same. Okay, we're not going to adjust
any levels on the track. We're only going to adjust
levels in our tools. Cool. So get to know whatever
meter you're using. We want to make
sure we're seeing the RMS value and
the peak value.
14. Tools: The Compressor: Okay, Up next is the compressor. And the compressor
is going to be our Swiss army knife of
the mastering process. We're going to spend a lot
of time and a compressor. So remember a couple of
videos ago when I said, we've got our peaks up here, but if we look at our
waveform, there's low spots. And if we can make
those low spots bigger, let me just do it again. If we look at this
waveform, zoom in, we can see like yes, this stuff is at the top,
but this stuff isn't. So how can we make this stuff louder without
affecting this stuff? That is largely what
a compressor does. It does it in a slightly different way
than what I just said. What a compressors
primary role is, is to reduce the
dynamic range, right? So we talked about
the dynamic range is the distance and the quietest
sound, louder sound. A compressor is
going to compress that. So it goes like that. So it's going to make
the loud stuff quieter and the quiet stuff
louder, right? So that these, this
distance is smaller. So it's gonna go
like that, but then it can boost the whole
thing up a little bit more. There are a lot of different
kinds of compressors and virtually any one
of them will work. So when whatever
software you're working, you can use the
built-in compressor. You can get a plug-in that is a fancy compressor if you want. All of them are fine. The main tools in a
compressor is the threshold. It should have a makeup amount. Ideally, we are going to play with our attack
and release time. The ratio doesn't matter. All your standard stuff
that a compressor has. So virtually any
compressor will work. So if you have a
built-in compressor, you can make do
with it just fine. We'll go into a lot more
detail about how compressors work and what we need
to do with them soon. But I just want to
introduce the compressor.
15. Tools: The Limiter: Okay, next thing is a limiter. Hopefully you have
a limiter built into whatever software
you're using. If not, you can get a
plug-in that is a limiter. You can find tons
of them around. A limiter is actually
a fairly simple tool. What it does is it sets a
ceiling, a volume ceiling. And then we say, you
shall not go above that. So it just says, no sound is getting above here. So we can go in and we can say, so here's a simple limiter. We can say zero is our ceiling. Now we can be super-duper. Sure. No frequency is going to
sneak out and go above that that ceiling.
That's the top. We're not going to
let everything, anything go above that. Now you might find
a reason to make this like less than
zero, negative 0.3 e.g. so we're going to leave a
little space at the top. That can be okay,
there's good reasons for doing that and we'll talk
more about that later. But all it does is just kinda
set a hard limit and say, if the signal is going up
and it hits that ceiling, it shall not pass. That's what a limiter does.
16. Tools: The EQ: Okay, one more,
actually two more tools that I want to talk about
just to introduce them. This one is the EQ. Now if you've done
my mixing class, if you've done any production
stuff already or recording, you know what an EQ is. But just to get us
back in the fold, Let's look at a simple EQ. What we have when we
look at an EQ as we have volume going this way
and frequency going this way. And when this line is
what we're affecting. So if it's zero, you'll notice this is 06120, negative six, negative 12. So if we're on the zero, that means we're not changing
the frequencies at all. If I go this way, I'm
boosting those frequencies, in this case low frequencies. If I go this way, I'm
cutting those frequencies, in this case low frequencies. So if I have a sound
right in the middle, maybe around three K, I'm gonna go up here. And I'm going to say, I want more of that signal or
I want less of that signal. So as you may know
from my other classes, very rarely do we want to
boost a signal with an EQ. We mostly use EQs to cut. So if this, if we find a
problematic frequency here, we're going to pull that down. We might make it very narrow. And say it's just right there
is one little frequency that's bugging me and we can kinda chip it
away like that. We're gonna do a lot of
fine tuning with EQs. With that. If you have an EQ that has a bigger view that will really
show you what's going on. It can be helpful. This one, if I hit this little arrow here,
it gets nice and big. And I can make it
really big like this. And you can see the
actual frequency content of the track that I'm listening
to you while I play it. Based on check for me.
Yeah. Right. So I can see here this frequency viewing, play after play, play, play on Friday and
you'll have repeat. If I decide that
frequency is problematic, I might work with
it a little bit, but this kinda shows me
all the frequencies. I can see what's sticking out, what's checked from C. So that one looks
weird right there. So check for me. Okay, So this would cut
out that frequency, not completely out, but it's going to reduce
it a whole bunch. So get to know a good EQ.
17. Tools: Your Ears: Last but not least, I want you to always remember
that a very important tool, I probably should
have started with this one as our most
important tool. But that most important
tool is your ear. Because mastering is an art. It's a very delicate art. It takes a lot of listening,
a lot of focusing, a lot of practice, a lot of training to
really get good at it. So don't get frustrated. If your first couple of
times you master something, it doesn't really
shine like some of your other favorite
tracks, it takes practice. There are people
who get paid a lot of money to master tracks. It's not as easy as just throwing a compressor
and throwing an EQ on and rendering it
out and calling it good. It's an art and it takes a good ear and a
lot of practice. So also patients
mastering takes patients. Alright, that being said, let's go into the next section, preparing to master where
we're going to take our track that we're
going to master. And I have two
student tracks queued up to for us to master. And we're going to talk about
what we need to do to get these ready for master and what makes a track ready
to be mastered? Off we go to that.
18. Setting Up a Mastering Session: In this section we're
going to talk about setting up our session. And this all falls under
this big heading of preparing to master a
couple of things we want to make sure we
have right Before we dive into the track. So we're going to,
in this section, we're going to look at the actual track we're
going to master. We're gonna make sure that
it's all ready to be mastered. And we're going to
start to do a couple little nip tuck things. First-level stuff that we should do on any
mastering project. Okay, so first, let's talk about setting up
our session now, no matter what
doll you're using, a couple of things
you should do just to make sure you have a
completely blank slate. We want to make sure that
our diet is not processing this track in any way
until we tell it to. Everything is very
delicate here. So we want a very clean track. We basically just want like we want to emulate like a
tape machine, right? Like just it just is what it is. No effects, no nothing. Okay, So first
thing I'm gonna do, I'm gonna get rid of any
tracks I'm not going to use. I want one is
stereo audio track. That is all I want
on this session. Next I'm going to go in,
I'm going to make sure there's no effects
on that track. Okay, So this is where my
effects would show up. There's nothing there. I'm going to look
at my master track. Make sure there's no
effects on the master. Will look at my sends, make sure I'm not
sending anything. These are down and they're
going to stay down. All our effects processing
that we do mastering, we're gonna do
directly on the track. Now I know that in the production steps and
even in the mixing steps, we've talked about applying
some effects via bus, like time-based effects
like delays and reverbs. And things are better sometimes to use on a bus and then
apply into the effect. And that is still true, but it's not part of mastering. On mastering, we're gonna do everything right on
top of the track. Okay? The next thing I'm gonna do is I'm going to
turn my grid off. So you can see here, I'm on a grid of a full measures what
I'm looking at here. Okay, so whatever your
dog needs to turn that grid off because we want
very fine resolution here. It's easiest just to turn
off the grid entirely. So for me, I'm going
to Control click, go to fixed grid off. Now I get kinda dotted lines, but I can do any
kind of fidelity and I'm not locked
into any kind of grid. Cool. Okay, now I'm going
to pull my tracking. So this is the track
we're going to master. I'm going to drop it
in and I'm gonna put it all the way back here. Okay. It looks pretty good. Let's just hear what we got. Here is the loud part is
it's kinda like a rock tune. There's one big thing
we have left to do, and I wanted to just
hear a little bit of this to kind of demonstrate it. So here we go. Okay. So you don t know this track, like idea, this is
a student track. And the thing that I know that you don't is
that this is way vast, able to in his planning
this way fast. So if you are in Ableton, one step you need to do
is turn off warping, and this is super important. So what warping does for you not able to end users
is it basically analyzes the tempo of
the track and then tries to play the track
at our session tempo. So it's trying to
conform the tempo of this track to our session tempo, which is currently 96 ppm. So we need to tell
it not to do that, play it at its actual tempo. So I'm going to double-click, go into my warp settings
here and turn off warping. Okay. Now I'm going to play this track and it's
going to sound really slow. Okay? This is the actual tempo of the track. Okay,
It's not the other one. The fast tempo I
kinda liked actually, and I'm into it, but
it's not my track, it's not my decision to make. So we're going to
call that good. This is where the
artists made it and this is the correct track. Okay, So we've
turned off warping, we've turned off our grid. Last thing I wanna do here
is I want to make sure all my levels are set to zero. Okay? So I'm gonna go here. Here's my main volume level and this is really hard to read. It does say zero here, so I can move it up and down. If this is at anything other
than zero and able to, and you can just
click on it and press Delete to get it back to zero. But if you want to see
it a little better, if you could go over
to Session View here. This is kinda how we look
at meters in Ableton. Make these as big as
I can, which is this. And here is my level. It's basically the same
thing I was looking at over and before I
switch to this view. So here it is. I'm just going to make sure this is perfectly and
exactly at zero. I'm also going to make
sure my master fader is perfectly in exactly at zero. Okay? Don't worry about this for now. This little peak indicator. We'll deal with that later. Okay, the next thing we need to do is take a close look at our premaster at this track
we just pulled in here, see if there's anything we
have to deal with right away. So let's go to a new video and let's focus in on
this version of this track and make sure that
it's ready to be mastered.
19. The Pre-Master: Okay. So what is this file that
we pulled in and how do we make sure we have a good file that's
ready to be mastered. Okay, so what we're
looking for is first, we want the track to
be mixed pretty well. We're hoping that we're
happy with the mix. If you're not happy
with the mix. Or if you're working
with another artist's track and
they're not happy with the mics. Do not master it. Mastering it is like
think about mixing as like putting all the ingredients
of the cake together. And mastering is like putting it into the oven and
baking it. Okay? Once you've baked that cake, you can't add more ingredients
to the mix, right? It's done. When it comes out of the oven. It's done. We can't go back. So don't master something thinking that you're going to adjust something
in the mix later, because once it's mastered,
it has done right. Okay, So our mix is finalized. We know that we're
happy with our mix. Now what we really need is
a full quality audio files. We need a WAV or AIFF file. And ideally it's one that
has six dB of headroom, six to ten dB of headroom. Okay, here's what that means. Headroom is this stuff up here. The distance from
the loudest peak, the loudest point of
the track, to zero. That is headroom. Okay? So we can see
the headroom here. This is our headroom.
Okay? And we can be a little more
scientific about that if we look at
what our peak is, right now, our peak is
negative time negative seven. We're hoping this doesn't
get above negative. All right, Good. It's under negative six. So negative 6.18, that's
about perfect. Okay? So you want to mix that levels
off at about negative six, that gives us some
room above it to work. We can push up into that
to make it nice and loud. We can also do some
work in there, some frequency work that gives us a little bit
of room to play with because you don't
want to track that's mixed all the way up to zero, what we call zero-sum mixing. Where you mix absolutely
add up to zero. If you have a track
that mixed that loud, you can master it, but it doesn't give you much room to work
and you're going to have to actually quiet it, make it quieter before
you can make it louder. I know that sounds weird, but that's just kinda how it works. So it's better to
have a track that's mixed with up to
negative six dB. If you took my mixing class, I think that was the
standard that we set that I hope we said mixed to negative six dB as
your highest point. So negative six to negative
ten, that's what we want. We're going to make sure our
sampling rates are the same. This is an important step. So if the file you have is
at a 4041 sampling rate, 44,100 samples per second. If that's the way
it's been rendered, that's cool, that's fine. You need to make sure
you're mastering session is either at the same sampling
rate or exactly double. Same sampling rate
is probably great. So this track that I
just pulled in here, this is at 48, 48 K sampling rate, 48,000 samples per second. It's very common
to record it 48. That's just fine. So I need to make sure
my session is also at 48 K or at what is that? 96, 96 K. Alright, so exactly, or double major benefit in
this case to doubling it. We just don't want our
computer to do the math of having to sort out 441248. That's going to create
artifacts and sounds. We don't want potentially
sounds we don't want, so just try to keep it at
the same sampling rate. And last I already mentioned, make sure you have a WAV
file or an AIF file. We need a full quality
audio file here. I'm just, I just want
to point out here, do not master an MP3 file is
not high enough fidelity. You're not really going to
get what you want out of it. I'm trying to justify not being
an audio snob about that, but just really don't do it. Someone sends you an MP3 and
says, can you master this? Respond back to them and say, yeah, but can you
send me a wave file? And hopefully they
just don't convert the MP3 WAV file because that
won't be very good either. They need to go to their mics. They need to export again as a full quality wav
file at 4041 or 48. Okay, cool, cool. Alright, Next, let's inspect our waveform and see
what's inside this sucker.
20. Inspecting the Waveform: The next thing we're
gonna do is look really close at this waveform. Okay, so I'm gonna go down here, zoom in quite a bit. And what I'm looking for is just anything
that really sticks out. I'm going to listen
to this a few times. Always be listening throughout
this whole process. Remember your ears, the most important tool in this process. But your eye isn't
that bad either. So I'm going to look
through, I'm going to look for like anything that
really jumps out. So right now I see this, this little peak here. There's not a lot
of peaks around it, but it is right at the
beginning of this thing. So let's hear what that is. It's a kick, so it's fine. It doesn't really
jump out to me, that's probably another kick. So I'm seeing everything. It looks pretty cool. So dynamics are good
things that we have, probably this kick
sticking out here, or maybe it's a snare kicks
and snares can stick out. I'm looking for
anything that looks kind of randomly placed, just like a weird big spike. And I don't see anything
jumping out at me. All looks pretty fine. I am noticing the right channel looks a little bigger
than the left channel. Maybe that's an
optical illusion. It might be. Okay, and
we're going down and out. Okay, So nothing really
jumps out at me. If there was just like
a big spike right here, then what I would do is I'd
say, okay, what is that? And we'd listened
to it a few times. It could be a rendering glitch. It could be just like a sound that happened when
the track was rendered. If that was the case, the best way to get rid of
that would be to go back to the mix session and render
it again to get that out. You don't want to try
to get those out by cutting them or cuing them out. All of that is going to degrade
the system or the file. So if you can just go back
to the mix and re-export it, it'd be way better and faster. To be honest. If it's not a rendering glitch, it could be just something
a problem in the mix. So before we get too far, we want to just make sure we address anything that's just odd in it so that we don't
get all the way done. And then be like, Oh, here's
this problem I can't fix. And it's now it's in the master. So if there is any problems that you see in the waveform and definitely
if you hear them, the easiest and best solution
is always just to go back to the mix
session, fix it there. If you can find
it, fix it there, re-export a new version and then load that
into be mastered. There's no special audio track to get rid of those things. Go back to the mix section, fix it, come back here. But this one looks good. I don't see anything
that sticks out. Okay, so what I'm
gonna do now is, and I won't have you sit
and watch me do this, but I'm just going to listen to it like two or three times. I'm just gonna make sure I
start to really feel it. Um, and nothing sticks
out to me about the mix. And I feel good about it. Okay, so I'm going to listen
to it and a couple of times. And then I'll come back and
we'll go on to the next step. Okay, Here I go.
21. Starting the Track: Okay, So I listened
through this bunch of times and it's all good. I'm pretty happy moving
forward with this. So the next thing we're gonna do is we're going to
do three quick little. I don't want to call them edits, but kind of edits to the file. Just to make sure that
it's set up to sound good. In the end. Basically, we're just going to give a hair cut to the
beginning and the end. That's very simple stuff. Okay, so first, let's look at the very start of
the track camera zoom way in to the
start of the track. Okay, So here's what we've got. Ableton, it's
automatically giving me a teeny tiny
fade in right here. And that's cool. We do want that
teeny tiny fade-in. We're going to deal
with that in a minute, but for now I'm
gonna get rid of it. So you see this track
starts right away. It's just n. Okay? That's not great because some streaming services
put a little crossfade. And some devices do a
little bit of a cache to like to Bank a little bit of memory before
it starts playing. So we wanna give a little bit of time before the track starts. So good practice here
is 100 milliseconds, which is right about there. Okay? So we need to remember that
when we render this out, we're going to render
this whole thing, including this empty space. One thing you can do
if you want is just, you can insert silence here. Or what I like to do sometimes
just to make sure I do it, is you can control, click all of this and then Command J will actually
insert that silence there. Okay? So now I can push that
right back on it. Okay, cool. So now I've got my track all set up with that
extra silence in it. So with that command J
did was basically wrote in that empty time to the beginning, It's
called consolidate. So if you look at consolidate, your if you're
using not able to, they might call that like rendering place or
something like that. Just make sure that
you're rendering it when you do that at the full sampling rate, which it should do by default. Okay, now we want a
little bit of a fade in. And that little fade-in can
be all the way back here. But let's use this
empty time to ramp up. So this looks like it's
going to be a big fade. And, but remember this
is over silence and it's only 100 milliseconds. That's like a tenth of a second. Okay, That's quite fast. So you're not really going
to hear any of this, but this little
fade is important. And here's why we need
to make sure we hit as we create a zero crossing. This is what a zero crossing is. If we look at our waveform, see the line goes
through the middle. You can think of this line as like your speaker
standing still. The, above the line, your speakers pushing
out below the line, your speakers coming back and your speakers always
doing this, right? So, right when your
speaker is right there or directly on the line, that's called the
zero crossing over, crossing over that zero point. Ok. Now if you tell the track to start when your speakers out, it's going to make a little click because
it's going to have to go and then go out, right? That's, that's makes a tiny, tiny little click, but
we don't want that. We don't want that tiny,
tiny little click. Same thing if it's back. So the easiest way to create a zero crossing is just with
a teeny tiny little faded. Because right here
there's no sound. So it's going to make
a zero crossing there. So that's why we like to
have a little fade-in at the beginning and we're
gonna do one at the end. Also. It's just to make
a zero crossing. You're not going to hear that. In fact, if we zoom way back out, you're not even
be able to see it. Okay, so here's what the
beginning sounds like. Now, write all that work we just did is
totally inaudible. But when it's on a streaming service or
something like that, will be glad it's there.
It's good practice. Give yourself 100 milliseconds, and then our little fade leading into the
start of that track. Now one more thing
I'll point out about this before I move on. If you have a track
that fades in, this can be a little trickier. So what you might
do if it fades in, is still give yourself 100 milliseconds before there's anything that you
plan on hearing. And then let your feet in, kind of follow it a little bit. You can brush that up
into it a little bit. If you have to. Assume no one's going to hear anything until 100 milliseconds. But you kinda get a feel how you want that
fade to climate. It's a little trickier
and fade ins. Okay, let's move on and deal
with the end of the track.
22. Ending the Track: Okay, Now we're going to do the same thing at the
end of the track. And this can be a
little harder because almost all tracks fade out
in one way or another. If the music doesn't fade out, there might be just like
a symbol ring that fades. It might be a teeny
tiny little fade. I'm just reverb or an effects, but there's almost always
something that's fading out. Okay, so let's zoom way
in here and take a look. You can see this
one's doing it to, let's hear what this is like. Okay? So what we need to do here is make sure
that there's not a ton of extra empty space. So we want this to fade. We want it to do
what the creator of this song wants it to do. But we don't want it
to go into lungs. So we have to use our fade out because we still need to
add a fade out to it. Because we want to make that
zero crossing at the end. We want to force
that to be there. So we're gonna do a fade out. But sometimes you can just kinda ride the fade that's
already there. Like this is fading out. And it's, this tract is a really good job of
fading out to the end. It looks like the
sound is totally out. Around here. Let's
look at our meter. See if we can figure out where exactly the
sound is totally out. So go back here. I'm going to look
at my meter here. Yeah, it goes by so fast, but it basically is out
all the way at the end. So we're just going
to mirror the fate of the end with this to get us down all the
way at the bottom. So there's, there's
no real extra space here that we need to cut off. We don't need to add
any space to the end. That's not necessary. And we just need to make sure there's not a
bunch of silence at the end. If there's a couple
of milliseconds to silence, that's good. But we want just to make sure we forcibly faded all
the way out at the end. Okay. Let's hear that now. It's pretty good. I could make that more
aggressive if I wanted, but I don't want to alter what the artist who
mixed this did, right? Like they wanted it
to go that long. I'm going to leave
it going that long. And that's okay. Okay. So what we did here, I said earlier we're
gonna do three things. The three things we're
put a little space on the beginning and then a
fade at the beginning, and then a fade at the end. Those are my three
things that I did to kind of prepare our
track for mastering. Alright, so we are in it now, we are mastering this track,
we are working on it. So I'm going to save my session. I like to always save
these as I'm going. So I'm saving this as mastering one-on-one because
that's what I called this class while
I was filming it. So be sure you're saving
along the way, right? Eventually, at the very
end of this class, I'm going to talk about
how to set up like a template to make this a little easier
so you don't have to do this from
scratch every time. But I want us to do it
from scratch together this time so that you really see what I'm doing and
why I'm doing it. But I do like to save sessions and keep them
mastering sessions. They're quite small. They're really just one track. So they don't take
up a ton of space. So I have a little folder
of tracks that I've mastered for myself
or for people, just in case I need to go back
to it and master it again, or there's some problem
with it or whatever. So it's good to save
these as their own thing. Alright, Next, let's go on
and talk a little bit about referencing tracks and how we can use those to make our mastering process
a little smoother.
23. What is a Reference Track?: Hey everyone. Okay. Onto referencing. So first, I apologize for
the shift in lighting. I know it's not ideal, but I am recording this video very early in the morning
and it's still dark out. The joys of doing this while you have a young child at home. So I'm referencing this is something that's
going to play into our process a
little bit later, but I wanted to introduce it now so that we can get used to seeing it and know what
we're looking for. And then we'll start to use it. We'll use it right away. I'll show you how to
use it right now. It's going to be an even
more powerful tool later. So by referencing what I'm
talking about here is using another completed mastered track to compare your
mastering session with. So it's very common
to where if you go, if you hire someone
to master one of your tracks, if you like, shoot an e-mail out to a
mastering studio and you say, I need these five tracks Master. Or even just as one
track mastered. They're going to respond
with like a quote, say, we know we charge
this much bubble blah. Then they may ask you a very, very common that they asked
you for a reference track. They say, what kind of sound
you're going for here. Give me an idea
of what you want. Give me a reference. So you might say, well, my track is in
this vein of 21 pilots. And specifically this one song. That doesn't mean that your song sounds like they're
song necessarily. But maybe it's a similar style. And you really like the mix and the master of that other tune you really liked the way
it just overall sound. That's kinda what we're
looking for here. So that's a reference track. And what we're gonna do
is we're going to load that track into our session. And we're going to
AB it on occasion. So AB means this. It means I'm going to solo one. And then I'm going
to solo the other. I'm going to solo one like
this is a, this is B. I'm going to toggle
between the two just to see if I'm getting
a similar vibe, right? This is really helpful in the volume space to know if my volume is
in the same ballpark, if I'm pushing as loud
as that track pushes. But also just for
frequency response in my bringing forward the
same kinds of things that the other track
is bringing forward. There's not a ton you
can do in that area. In the mastering part. That's more of a mixed thing, but there is a good
amount you can do with just EQs and making sure that you're helping
to clean things up. So let's find a
reference track for this tune and loaded
into our session.
24. Finding A Reference Track: Okay, so remember what
we're looking for here is something that has
similar vibe, what we want. Now, this artists didn't
give me a reference track. So I'm going to
find one on my own. I'm going after what I think we're, we're
listening for now. This is dangerous
because it's going to input a lot of my
own bias into this. But that's okay. I think it'll still
result in something nice and I think I found
something good that'll work. So here's our track just to
get it back in our head. So I thought about this
for a few minutes. I thought What what is something that is
that I really liked just the overall sound
of the overall vibe of that distorted kind of hard, but not like screaming metal, but has a, has a crust to it. What is something that
fits that kind of genre? And I just kinda scan through
my playlist of stuff. When it came up with was
deaf tones, white pony. Now I'm using an MP3 here, which isn't ideal,
but it's what I got. So I'm just going to import
it right into my session. I'm going to turn warping off. Okay, now, I don't really need to align
these up with anything. They're totally different
tracks or not on a grid. They're not warps, They
don't need to be lined up. But one thing I do like to do is kind of put the loud section where the other loud section is. So you can see allowed
section starts here, and this is some kind of intro. And in this track, this is intro and this is loud section. So I'm mostly worried
about aloud section here. Not worried about, but kinda
focusing on loan section. So I'm going to line
this up just like that. It doesn't need I don't
need to fill in the space. It's fine and all
of this is fine. But we can see this track. It's good and loud. It's got a dip here, some kind of bridge or something like
that, which is great. But it's loud. It's fears if you
don't know this tune, I probably shouldn't play it, but here's just a little taste. Okay? So if I compare the two, AB, the two, you can
hear right away. The difference is, I mean, it's gonna be obvious in
the volume, right? Let's go. Okay, So they're very
different volume wise. So that's something easy,
intangible I can work with. I can play with my
compressor and get the volumes to be more
in line with each other. But there's other things
in here that we'll use to reference a
little bit more later. Okay, so here's what I'm
gonna do with this. For now. I'm just going to mute it
and let it hang out there. I might even collapse
it like that. And what I like to do, and you totally don't
have to do this, but what I'd like
to do and I'm not really sure why it's
put it on the top. I like to have this
reference just kinda sit there out of the
way as possible. But whenever I really
want to hear it, I can just go up
here and grab it, turn it on. I can look at it. It's there when I need it, but not in my way. That's kinda how I like
to have everything setup. Okay, now you might be thinking, does that create a
copyright problem? Let's go to a new video
and talk about that.
25. Copyright and Reference Tracks: Okay, so copyright issues
and reference tracks, not really anything you
have to worry about. And here's why. For two reasons. Really. One is that no audio from this track is going to make
it into our master export, our mastered version, where we're not gonna put
any of this in there. We're going to make
sure this is muted or deleted when we export it. So there's no content from this is that it's
going to get there. So that's kinda
reason why there's no audio coming out of that
track in our final product. Reason number two is you can't copyright a mix and you
can't copyright a master. Like the process
that someone used to master something that
is not copyrightable. And we don't know what their process they use to master this. We're just kinda try to emulate the sound of it to
get a similar feel. It's the same as like listening to a death camp for acuity song. And realizing that you
really liked death camp for acuity and studying their music to figure out how they
write such good songs. There's no copyright
issue there as long as you don't actually
copy their music. So same thing here. No copyright problems at all. The only copyright problem
we face with doing this is me playing that deaf tones
song for you in this video. But that has more to
do with the way I sell these classes and not the
way we master things. So you don't have
to worry about it. It's not a new thing. So you can pull in what
ever you want into your session without
any copyright problem, as long as none of it makes its way
into your final bounce, and it's not uncommon to have
multiple reference tracks. You can put two or
three tracks up there. I'm just stacked one after
the other like like this. You can totally do that. I don't like to, I like
to just work with one. Adding multiple. It's kinda complicate
things for me and I wanted to just kinda
focus in on that sound. But if that works for you, you can totally do that. But that's not my thing. Cool. So we're gonna leave that
reference track up in there. We're going to use
it. We're gonna we're not gonna use it a
whole bunch right away. But when we get done, when we, after we do our maximizing, after we do our E queuing, after we build our whole
effects chain on this. Then we're going to come
back and we're going to listen and compare
to the reference. You can listen and compare it to the reference all the way through whenever you want. Okay, so don't be afraid to just fire that up
and give it a listen. But in this class
we're especially are going to use it in the end to kinda use it as a way to check our work to make sure that
we're in the right ballpark. And there's a reason,
right? Remember that what we said early on is like
the radio analogy, right? You're driving in
your car, you're listening to the radio if that deaf tones song comes on. And then our song, which I should refer to it by its name, it's
called black shirt. Our song called black shirt
comes down right after it. We don't want anyone
reaching for the dial and having to turn it
up or turn it down. We want it to compare with
that deaf tones sung. We want it to sound like it was recorded in the same
studio on the same day, maybe even by the same band. So that's where these reference
tracks really help, right? Okay, let's move on.
26. Mastering Effect Chains: Now it's time to start
doing some processing. Okay? So the first thing I
want to talk about is the effect chain. You see people talking about the effect
chain all the time. So let me explain to you
what an effect chain is. You can find the slide if
you Google around like, what is the Lady Gaga vocal effect chain like this is something
that people search for. And what they're searching
for when they type that in is the string of effects like this effect and then that
effect and then that effect that people that engineers use when they're mixing Lady Gaga's voice, right? You, you can find a popular effects chains for
popular guitarists, right? So in effect chain is
a series of effects. The distortion, the echo, the reverb in this order
on these settings makes the effect chain
that so-and-so likes for their guitars
or their voice. Okay, so what we're gonna do is we're going to build
a mastering effects chain. Now once you build a master effects chain
that you really like, you can save it and
use it all the time. You're never gonna
be able to just slap it onto another
track and say, sweet, I mastered that
track and walk away. It's always going to require tweaking and working with it. But I'm going to
give you right now, right up front, my master
effects chain skeleton. Okay, so this is what, when I'm mastering something, I'm gonna put these three things on it right away without
even thinking about it. And then I may add
some more stuff. And after that, it's a matter of dialing it
in and tweaking it. That dialing in and tweaking it. That's where the real
art of this comes in. And don't forget what I think
I said at the beginning here is that all
of this is an art. And it's a very precise art. So it takes experience
and it takes time. So if you're not getting
sound you want right away. Don't worry, it'll be okay. But this is where the art really starts to come in when we're dialing
in these effects. But more on that in a minute. Let's go into the
skeleton effects chain and then we'll start working through how to dial it in and what those
settings actually are.
27. The Basic Mastering Effect Chain Setup: Okay, here we go. So first thing I want is an EQ. So I want your biggest
best EQ you got. You need at least eight bands. A really nice graphic EQ
that you can work with. I like the EQ Eight in Ableton, but any EQ plugin will
work great as well. Okay, and we're gonna
put this right on track. Remember, this is
a good example of why we're gonna do this right on the track and the master bus, you will see some people do all their mastering
on the master bus. And there is one occasion
where doing your mastering on the master bus or the
master channel is a good idea. I'll talk about that way
at the end of this class. But the reason I like it, the reason we're
gonna do it right on the track is because of
our reference track. Right? Like if I put this on the
master that I got to, I got to know that
this reference track is being affected by my effects. Also. Don't want that. So we're going to
keep our master clean, no effects on it. We're going to put it
right on the track. So I've got an EQ here, we're
going to leave it flat. We're not gonna do
anything with it. One of the things I
like about this EQ is that I can hit this button here and open it up and get a nice big graphic
interface for it. I see down here the frequency and pitch and
decibels that I'm looking at. All of these make
this really nice. It's only showing
four bands here. A-band is each of these points, but I have up to eight. I can turn on down here, can also dial them in. More precisely with this. So this is a good EQ, but again, any professional EQ plugin,
it's going to work great. Okay, after our EQ, we need a compressor. And the compressor
that I'm going to use is this multiband dynamics. Okay? This is kind of like an EQ
and a compressor combined. This is three
different compressors. The layout of this and the graphics of this
are a little confusing. We will go over how it
works later, don't worry. But basically, this is going to let us compress
the low stuff, the good stuff, and the
highest stuff differently. So if I've got a lot of base, I can compress that
different than I can compress the high
frequencies, right? So this is three compressors
in one basically. But this is going to do my heavy lifting of my compression. Okay, and I'm gonna put
that right on the track again so that it
falls after my EQ. So, well, let me do
one more thing and then I'm going to talk
about signal flow here. Okay? After this, my third thing is going to be
another compressor, but a slightly different one. I'm going to use this
glue compressor. So this is another compressor. You can use any
compressor you want here. But the reason I'm
putting this one here is because this right here
gives me a limiter. So if you're not in Ableton, you might want to put a limiter here instead of a compressor. This particular compressor. It's called a glue compressor because it uses
an algorithm that supposedly helps glue things together and make
them feel like one. It's kind of an abstract idea. But it has this, this really nice soft clipping limiter in it that I like a lot. Your third thing
should be either a compressor with a
built-in limiter or just a limiter would be fine. Okay, Now, I'm going to add
in some other stuff as well. Right? There's going
to be there are some occasions where I
want reverb in here. It's not very often,
but sometimes a D&C bit of reverb is handy. And I might want that in here. There's also a plugin called
ozone that I like to use. I don't always need it,
but sometimes I do. So we'll add those in later. So just think of this as
your skeleton effects chain. You can EQ, multiband
dynamics and a limiter. Basically, those
are three things that we need to
get things going. We can add in more as
the track requires it. But basically every track I've ever worked on needs
these three things. Last thing I'll
say about this is, remember the signal
flow is important. And that means the
order of these are audio signal is coming in here and it's moving this way. So it's going to
go through this EQ than it's coming here. And it's gonna go
through this dynamics, the multiband
dynamics compressor. And then it's coming here. And then it's going
to go through this limiter or this
compressor or slash LTR. And then it's gonna go
here and then it gets sent to the master channel
where it goes out. Okay, So what that means is that this arrangement
I have now is gonna be quite different
than this arrangement. Right? Now we're going to
compress it and then EQ it. That particular thing might
not be radically different, but it'll be different. We want to keep
it in this order. Okay. You can see what I mean
by this criminal flow. If I hit play on it. There certainly coming in
there, then it goes to there. Then again, there's nothing. None of our effects are
really doing anything yet, but that's our next step. Okay, So from here, I want to dial
these three things. And so first, let's
start with our EQ, first-pass of our EQ.
28. How an EQ Works: So for our UQ, so we
remember what an EQ does. We've talks about EQ
and my mixing class. We've talked about
EQ and production, but the short version
of what an EQ does is on the left side
is low frequencies, on the right side is
high frequencies. The, you can see here it says 06120 negative six,
negative 12th. Okay, So here if you look
at the numbers 101 K, ten K, Okay, so if I go to 100, I move it up to six. That means everything at
this frequency at 100, I'm going to boost six dB. That's a kind of a lot. So I'm going to boost it, but also the frequencies
around it, right? So this area around
that center frequency, this is called the queue, is how wide this is. If I go down here, and this is what I'm
working with here. Here's the queue. So let's see, I'm on
band 3123, the queue. I can make it higher
to make it narrower, or lower to make it wider. Okay, that's gonna be
important later. Alright. So if I want to boost low stuff, I can do something like this. I want to boost high staff. I can do something like this. Now rarely with an EQ
do we want to boost? We almost always want to cut. So I can pull things
out this way, right? So if the line is on the zero, we're not doing anything. This EQ is not doing
anything until up here, but we'll talk about
that in just a second. Suzy Q isn't doing anything. If we go under zero, we're reducing that
range of frequencies. That band of frequencies. If we go above zero for boosting that band
of frequencies. Ok? So you can see the
whole song on this EQ. Most EQ's look like
a slope like that. They look like yeah, I can't really do
it manually here, but they generally sloped
down this way because our low stuff is louder
than our highest stuff. Generally do
something like that. I'm not always and that
doesn't really even mean anything and it's not something you
should use as a basis, but just something you'll find. You don't want to try
to level this out. You don't want to boost so that everything is even
all the way across. That's not what you wanna do. You're going to see
things just kinda sloping down like
that and that's fine. That's how it should work. Okay. So I'm going to zero
this back out by just, I'm just going to
press Delete on all this stuff to
get it back to zero. And then let's do
some dequeuing. So we have to kind of
housekeeping EQ steps and then the first round
of ringing out. So let's, let's
let's get into it.
29. Low End Starting Points: Okay, first thing of
just housekeeping, do this on every track. We're going to cut
our Lowe's has, so we're gonna go down here. We're gonna look at
this first band. I'm gonna change this
to a high pass filter. Okay, so if I go down here, your EQ may be different,
but basically, what a high-pass filter
does is it makes a bracket like this and so that all the high frequencies
can pass and the low stuff, it gets cut out. Okay? It looks like that. Or if I want to be more extreme about it, I
could do it like that. Let's not do that. Let's give a little more gentle. Okay, so what's happening
here is wherever I put this, everything under it,
under this point, which is called the
cut-off frequency. Everything under it
is going to thrown out and everything over it
is going to get let through. Now I don't want to do this. This is a little too extreme. But I want to put this
around 25 hz or so. So we can look down here and see that 25 hz is right there. Okay? Now why would I do this? So we hear frequencies, remember, down to about 20 hz
and up to about 20,000 hz. Okay? So reading these vertical
lines is a little deceptive, but this is 100. This is zero technically, but it's exponentially goes up. So this is a 1,010,000 and
this line here is 20,000. Okay? So we don't hear
much under this, but there can be a lot of
frequencies that buildup there. So there's not much that we can actually here in this area. But there can be a lot
of stuff there and it can lead to volume problems. So we're just going
to cut it out. We can't hear it anyway. But let's make sure that
there's nothing there. So let's hear what we always want to be listening
while we're doing this. Let's here and make sure we're not actually losing anything. Okay. Let's go forward. Clearly now we've lost that day. We want to make sure we
don't lose anything. I might move it up
until I started here at the back it off a little bit. But it's generally going to be about 25 and even
clearer picture, right? Okay, great. We can make sure it's
not doing anything by a being that EQ. So let's turn off
this compressor and turn off this limiter. And I can turn on and off this EQ by toggling
this button right here. Right now, we really
want to hear nothing. That's pretty good. So this might seem like a
pointless step, but just remember, just
because you can't hear them doesn't mean
that there's not a bunch of frequencies there. So we're just doing
some tidying up, making sure there's
nothing down there that's going to
cause us problems. And remember, we're doing this first thing in our effect chain. So it won't give us any problems in our compressor are limiter or
anything like that. Where it's going to shave
this off right at the bottom. Make sure there's nothing there. Cool. Good practice.
Always do that. So that's step one, step two, Let's give it a little
haircut at the top.
30. High End Starting Points: Next we're gonna
do the opposite. We're going to go up to the top and we're just going to do, I guess not really the opposite. It's kinda the same
thing, but at the top, we're just going to cut
off any frequencies above what we can hear
or what we're using. So we already have up
here a low-pass filter. So that's the opposite. So this is a high pass filter, meaning is the highs
can pass through it. Is the low pass filter, meaning the lows can
pass through it, but the highest get cut off. That's gonna be this
one right here. Okay? So again, we can hear
up to about 20,000 hz. A lot of high-frequency stuff. Distortion is, has a lot
of high frequencies in, as symbols have a lot of
high frequencies in it. So with this one even
more than the low one, you really want to listen
and make sure you're not really changing anything. This thing, this n, both the low stuff
and the highest F is the kind of thing that we might not
here on our speakers. But you can hear these, some of these
frequencies if you're on a big club system or
something like that. So it's it's good safe
to get rid of them. Okay, so generally I'm
aiming around 16 K or so, is where I really kinda
wanna get rid of. Start rolling this out. But let's listen. Definitely here,
something's happening here. Some muddy, right? Because I've lost a lot of
high frequencies that are contributing to
the distortion and symbols that I don't hear really anything
changing up this year. I'm going to go up 15151. That felt good. So I'm going
to leave it there at 151. That didn't seem like we're
really affecting anything. We're just killing
all this high stuff. Okay, and while I'm
at it, I'm going to tighten up this, this low EQ. Alright, so now we've made sure that we're not going to
have any unexpected things, the top or the bottom. Next, let's work on
wringing out the tune.
31. "Ringing Out": Okay, So this next thing
is called ringing out. And what we're
trying to do here is look for any frequencies that are just ringing weirdly
and we don't want them. This can take a lot of time to both to just do in a track, but also to kind of
get good at hearing. So here's my method. We're gonna take our EQ, we're going to pick up a band. We're gonna make
it pretty narrow, so we're going to tighten up
this Q coming around there. And it's going to boost
it all the way up. We're going to crank it.
Even though I told you just a minute ago,
Don't ever do this. And then we're gonna kinda scrub through and listen
for these bands. So I'm looping a section
of the track here. I'm just going to listen.
Oops, let me get to that loop. I don't want to go to a part
where there's the symbols really like to put
it here before. Right here. This is a pretty subtle one. But hearing this, this
frequency right here, which is about 650 hz, just kind of standing out. It's ringing in a weird way. So one thing you can
do is if your EQ, let's you isolate that band. It's even better. So in my EQ, I think click this
little headphone icon. And with that enabled, when I click and hold this band, it's going to only play
what I'm affecting here. So it's going to
really boost that. So here is just that bad here that this is a picture That's
just kinda ringing through. Doesn't feel like it has a
musical reason to be there. It's just kinda sticking out
the cow and I stopped doing. Okay. So what we've done
here is we just really pushed it really hard. But that's not what we
want to do. Obviously. We've boosted it with our EQ here for the
sole purpose of funds. Lost it. There it is. Okay. Now that I boosted
it, I'm going to cut it. So the easiest way is to go to the gain here and just go. And then I might even tighten
that EQ a little bit more. So I don't need to take it
all the way down to zero. But that is going to help. Now that frequency is
going to be reduced. You don't usually want to take it all the
way down to zero because you do want
that frequency. I used to want it to ring. Now, that's not there. Now let's keep going. I'm
going to turn on and off. I'm going to pick another
band and keep going. Yeah, I don't love that. Man. Three. Let's pull
that out a little bit. Like I said, this can
be really tedious. Here's four, boost
up that queue. This needs to be, there we go. Sometimes you'll see them
really kinda spike up in the interface here that can
help you identify them. When you're doing this,
especially difficult areas to keep an eye out for is like
two K to eight K or so. Um, so that's about
here to about here. Jumping out. What kind of okay, here. Now, you might be
asking yourself, well, what am I
actually listening for? This is a good example
that we're right here. So you can kind of hear
what I'm boosting. You hear that kind of whistling sound going up along
with my EQ, right? So what I'm listening for is, as I'm moving up, is there a jump in volume
on any frequency, right? Is it going like, it's going like as I go down but
does it suddenly go like, you know, like is there like some frequency that really
jumps out volume wise? That would mean that frequency I should probably deal with, but not really
hearing anything. So I think we're in good shape, so I'm gonna get
rid of that one. But we did find these two. And I think she's got a
little better without them. Alright, so that's ringing out, finding anything that's really ringing and dealing
with it by cutting it. So this is one of
the first things we'd like to do when it comes to the processing
elements of a master, but this isn't the last
time we're going to do it. We're going to come back
to this later after we've done some more
processing because some of these compressors and limiters can affect this a little bit and kinda can let some
frequencies come forward. So we will be back to take
another look at this. But for now, let's move on and talk about
compression and getting loud.
32. How Compression Works: Okay, let's get into
our volume control. Now. In some ways this is an easy thing to do because we're just going to
try to slam it to the top. But there's a lot of
delicate control we want here to make sure that we don't clip and to make sure
that we don't boost, things that we
don't want boosted. But this is the
most obvious thing that we're doing, right? It's the most audible thing. Like we're making it louder, but we're making it louder
and very smart ways. So step number one, let's do a little
refresher or a new, or learned from
the beginning how a compressor works
because we need to get to know our
compressor pretty well. So I've loaded up a
multiband compressor here, and this one's a little tricky. Let's look at just a normal
compressor really quick so we can see how
the controls work. So I'm gonna go to
my dynamics here and just throw the normal
Ableton compressor on here. I'm gonna get rid of
this in a minute, but I like its
interface the way it shows us what it's doing
better than this one. This one is really confusing. I just want to show you what the controls are
and how it works. Okay, So no matter what
compressor you're using, whatever software you're
using for your compression. It probably looks like
either this, this, or this. These are the three
different layouts that most compressors have. Here's might be doing something different and that's okay. But these are just
three different views of the same kind of info. Okay, so I'm going to start on this view so that we can really see
what we're doing. Okay? So this line up here is
called my threshold. I can move it up or down. Alright? So the threshold is
what I'm going to let the volume get up to before
I start messing with it. Okay. So everything under
the threshold, we're going to
leave alone, right? And this is volume
we're talking about. So everything quieter
than the threshold will just leave be okay. If it goes above the threshold, we're gonna do some stuff to it. Okay, so let's look at
what's happening here. So I'm really kinda right on
the top of my sound here. I'm not doing very much. Okay, so our threshold is
just sitting right there, right at the top of the sound. Now, this gold line here is
called our gain reduction. That's how much we're
reducing the volume. Okay? Now these two things
are related, right? So every time the signal
goes above the threshold, the gain reduction is
going to push it down. So imagine this is our
threshold volume is gonna go up and then the gain
reduction is gonna go no. You stayed down there. I didn't plan on using my head for this,
but it kinda works. So we're gonna go above the threshold and then it's
going to push it down. Let's do that and see, you'll see this pushing
the volume down. Let's turn our threshold to get a little more
aggressive there. Now you see moments like this
where there's a spike right there and there's a spike coming down to
counteract it, right? So the gold line is
really just our volume. It's like a volume
knob, someone going whoop and trying to catch those spikes and compensate them so that our volume
stays about the same, right? So we're kind of squishing
the highest stuff, the loud stuff, and making
it the same going through. Now if I wanted to be totally compressed and have
all the volume be exactly the same
from beginning to end. I could throw this threshold
all the way to the bottom. Right. And now you see this
gain reduction is happening all over the place. It's just really trying to push that volume down to
make it just flat. Right? Now, there's one thing we
haven't talked about yet, which is what does a few things here I'm
talking about yet, but one of the main things
we haven't talked about yet is we have some control over how the software deals with those sounds when they
go over the threshold. It's not just that we
smash them down, right? In this case, it is that
we smash them down. But we could let them go over the threshold
by some amount. And we could craft how they are dealt with when
they go over that amount. So the first way we can do
that is the speed at which we slam the volume down and then the speed at which we
let it go again, right? That those things we're going to find here, attack and release. Right now we're at
one millisecond. Attack and 30
milliseconds release. So that means when the plugin
sees a signal go above, it's going to take one
millisecond to push it down. That's really fast. And then after that signal goes
below the threshold again, it's going to take
30 milliseconds to kinda back off and
let it go up. Okay? Now that timing is going
to be important because we went pretty fast
amounts in mastering. So we'll come back
to that timing, but that's what that is. That's what those settings are. I'm sure. And whatever software you're using, you have that. You have a timing, attack and release time settings somewhere. It's an all compressors
I've ever seen. The next thing is the ratio. That means when something
goes above the threshold, are we going to just always push it all the way down
to their threshold, or are we going to let
it crafted a little bit? Okay, so for that, let's go to a
different view here. I'm gonna go over to this view. Okay? So what we're seeing here
is here's our threshold. And a little bouncing
ball is our, is our threshold also. And you're going to
see our current volume show up as another
little ball here. There's our current volume
gain reduction here. Okay? Now, look at this line. If I was just going to
smash it down and say, Do not go over the threshold. I would do this. This means if the volume gets louder and louder
and louder, That's okay. This is, we're going
to leave it alone. Is what this perfect angle means here, is we're
gonna leave it alone. Once it gets above
this threshold, We're going to act as a ceiling. We're not going to let
anything go above that. But maybe we don't want to act as a ceiling
and we want to tilt it a little bit so that
the really loud stuff still gets a little bit louder. And it has a little
bit of room to get louder and quieter,
but not much. So for that, we
would do this right? Now. When something gets really loud, it can still get louder
than the threshold, but it's still scaled way down. This point up here would be if we didn't do
anything to it. Okay? Now this setting, the angle of this line is called
the ratio, right? Hey, if I set the ratio
all the way down to 11, And I did this, our
compressor is doing nothing. This means all of the sound coming in is the same as
the sound coming out. So we can do this. And we can say, well, let's trim it down a little bit. This is actually a lot. Let's say this will
be a little bit. This would be a lot
and this is just flat. Okay? Now, in addition to that, we have a couple
of other settings. We have something called
lookup that's going to help it move a
little bit faster. Shouldn't need that here in
Mastering, we have the knee, which is the angle
of this right here. So we kinda round that
off by boosting the knee. We shouldn't need that too much. But there is one other setting that I want
to tell you about. We're getting pretty long here. So let's go to a
new video and let's talk about the makeup gain, which is how we actually
make it louder.
33. Makeup Gain: Okay, Let's go
back to this view. Okay, and let's do the thing
I did a minute ago where we just take the threshold way down and just compress the
heck out of this thing. Okay, there we go. Now you can see
we're just pushing that volume way down and making everything
the same volume. Okay, let's crank up our
ratio so it's just like flat. Okay? Now, we have a
problem here, right? Because our whole point here
is to make things louder. And all we really did is
make it quieter, right? This is the opposite. We've
gotten the wrong direction, but we really haven't. So here's what we've
done. We've done is compressed it, right? That's what the thing
says it's gonna do. It's gonna take the volume, the spikes and the
volume that go up. And it's going to flatten those down and it's going
to make them all the volume equal or close to it depending on
what our ratio is. Now, now that we've done that, now that we've flattened
out that waveform. Now, we can boost it. And it's going to stay
right where we want. Now if only there was a way
for that compressor to say, for us to tell the compressor
that you reduced it by x volume when you
are compressing it, after you're done
compressing it. Now I want you to add in x volume back to
the whole thing, which will basically keep
the highs where they were and boost everything
back up to the highs. Let me explain that again. So let's use this. Okay, Let's say our signals
coming in and it's about, hey, here's the
top of our signal. Okay, so our threshold
is at about negative 13. Okay? Now, let's say I
compress it a whole bunch down to negative 14, 45. Okay, This is insane. Don't do this, but it
should make my point. So we've compressed it
down to negative 45. So we were at negative 13. Now we're down to
negative 45. So what we want to do now is
tell the plugin, take the difference
of those two things and boost it by that much. So that negative 13 is what our highs
we're at negative 13, We're now going to push
everything back up to that. Okay. It's a confusing concept. I don't feel like
I'm nailing it. Maybe I'll try this
a few more times. But the long story short is, see this little button
here that says makeup. That is makeup gain. What that's gonna do exactly the thing that
I'm talking about here. It's going to just
boost everything. Okay? So let's do it. So here we are. Super-duper compressed. Okay? I'm going to turn on
make up our allowance. Okay? Right, so let's, let a be this, Let's see, with this
compressor on and off. Here does off. Okay, turn-on. Definitely added volume, right? Let's compare it with
this deaf tones track. Here's ours. We're in the ballpark, right? We still got a little
bit more work to do, but we're in the ballpark. Okay, so to wrap this up, get to know these controls
on your compressor, and then make sure that you have makeup gain turned on because
that is what we need. Now, we're gonna
be, when we go back to our multiband compressor, which we're gonna do
in just a second. The makeup gains a
bit more delicate. We can really push the output
exactly the way we want. So let's now go back to that. Okay, so now that we know
how the compressor works, let's go to our multiband
compressor and talk about that.
34. Multiband Compression: Okay, so I'm gonna get rid of this compressor and go back
to our multiband dynamics. I'm going to turn it on. Now what we have here in
a multiband compressor, okay, I think I
explained it earlier, but let me just make sure
we're on the same page here. So what we have
basically in this is kinda two devices in one we have an EQ and we have a compressor. So we've got a little
bit of an EQ saying. And that's this right here. So it's saying here's
our center frequency. And it's saying this
is highest stuff. We're going to let
this be highest stuff. And then we're going to
compress it different ways. We've got low stuff, we're going to compress
that different ways. We've got middle stuff and we're going to compress
that different ways. If you don't have a multiband
compressor like this, this one just comes
stock in Ableton. So if you're using
Ableton, sweet anyway, you have this, but there are a bunch of multiband
compressors out there. If you don't have one,
you could do this without one by
setting up a kind of complicated chain using an
EQ and then a compressor, and then, and then in parallel, another EQ and
another compressor and other EQ and
Miller compressor, you would need to have some sort of effect rack ability to be
able to split the signal. But it can't be done. That's a way to do
it and that's fine. It's just a lot
more complicated. Having one effect that can really do this for you is
going to be a good idea. So right out of the box, Here's what it looks like. So here's our three
bands is high stuff, mental stuff, and
low stuff, right? I can solo each of the
three compressors. There's really three compressors
happening here, right? So I can solo the high one
with this little S right here. So here's just our
high stuff, right? So we can kinda, we can compress it differently and we can see what's happening. Here's our middle stuff. Okay? And here's our low stuff. Okay, See now, this is
great because I can say, I want to boost that low stuff. Get real bumpy with it. They don't want to cut
some of the high stuff. This is effectively our
makeup gain over here. So we don't really want
to do what I just did. We're going to be a little
more focused than that. Okay, So let's dive in. Let's focus on the
highest stuff first.
35. Setting up Multiband Compression: Okay, so the first thing
we need to do here is make sure our EQ part of our multiband compressor is
set up the way we want it. In other words, is this
focusing is the highest stuff, focusing on just
our highest stuff. And then our middle stuff. Where does this line
is too high, too low. Let's lock that in and
get it just right. So there's a couple kind of quick and relatively
easy ways to do this. I'm kind of general
rules of thumb. This is how I was
taught to do it. So think of the highest stuff as you're shimmery stuff, okay? Distortions, symbols,
things like that. And that kind of line between the high stuff and the midst of kinda has to do
with the snare drum. This is just like
my rule of thumb. You can do this however
you want. So I'm going to solo the highest stuff. Okay? I want to not hear
that snare drum. We're hearing it. Right? So let's raise. Yeah, that snare is so crack. Like I don't think we're gonna be able to
totally get it out, but we definitely
don't want to hear any body of the snare. We're hearing a little bit of the crack of the snare,
the highest stuff. But we're not hearing
the body of it. Let's go down to the body. Here. I'm feeling a little bit
of the body of that, fair? Right. I don't want to hear
that bodies when you go up. That's pretty good, right about there, it's
feeling pretty good. That snare doesn't really
have any body to it. It's just the, the crack part. So I'm going to live with that. Okay, Now, I'm gonna
go down to low stuff. I skipped the middle
for the moment. Okay, so low stuff, I
just wanted to hear this mud I just want to
is gradually muddy stuff. Again, I'm going to use
the snare as a reference. I really don't want to hear
the body of the snare here, which I don't, but let's go up. Okay, Now I feel
that that's there. That's pretty good right there. Okay. Religious muddy stuff. Don't want that snare to
feel that snare in there. Okay, And then what we're
left with is the mid. You'll notice here that we
don't have control over the mids because
the mid is going to be the distance
from this to this. So we should have basically
all of our snare drum. Pretty good. So I'm comfortable with that. So we've kind of
dial this in there. So the snare drum thing is really just kind of a
trick I was taught. It doesn't always work, but it's a good rule of thumb to
kinda set those areas. It's worked well for me.
36. Dialing in High Frequency Compression: Okay, so let's look
at how our bands are moving around and which
ones are the most active. The one that's the most active is usually the
best one to start with. We're gonna mess
with all of them. I just like to
start with the one that's moving around the most. So we're still
soloed here, okay. Okay. So motion here, not a lot of motion
in the midst. Eyes are moving around the most. I think they're going all
the way down to here. Okay, So let's solo the highs. And let's work with
this a little bit. Okay, so here's our
multiband interface. It's a little different, but a lot of the
same stuff happens. Okay? So this is our
threshold right now. So we want to take our threshold down
to where we're just doing a little bit of compression to this high stuff in there. A lot. Back it off a little bit. So we want to be reducing
the gain just a bit. We're getting into
the threshold now. Our signals are in their
angle a little bit more. Okay? Now I should have said
this before we started. Make sure you are in RMS mode. That's gonna be really
helpful to us now, for me, that's this
button right here. We can do RMS or peak. Rms is really going
to be better. Because we wanna
look at the kind of the average signal right now. So be sure you're looking
at RMS and not peak values. Okay, So now my signal is
going above the threshold. I'm giving it a little
bit to go over. Now I need to apply
the ratio, right? I need to tell it what to
do with that signal that's going over the threshold. The way you do that, and this
one is really different. Okay, So what we're gonna
do is I'm going to click in this box here and pulled down. And what you're
going to see is that these vertical lines
represent ten dB, right? 30 to 40. These represent ten dB
on our way up to zero. So these are all negative
on our way up to zero. And what moving
this down is gonna do is it's going to move
those closer together. So now for our highest stuff, each of these lines still
represents ten dB, right? So in other words, this is like angling that
curve that we looked at so that it is compressing that sound that's going
above the threshold. It's a little
confusing in this way, but but it's actually kind
of a cool way to look at it. It's, it's a different
kind of interface, but I don't know, I like it, It's cool. But it does take some
getting used to. So just remember the closer these little vertical lines are, the more we are compressing it. And you can see this
number coming up here. This is our gain reduction. So this is the amount that
we are squashing it down. Just for good measure. Here's our attack
and release times. I'm going to adjust this to one. And these 230 are
attached to one sec, one millisecond and are
released to 30 milliseconds. Okay, so then our output, this is that makeup game, right? So what I'm gonna do
here is I'm going to look at how much we're reducing. Reducing. Let's see,
9.49, 0.7, ten. Let's go nine. And so now with the output, I'm going to boost
it by that much. So I'm going to
boost this by nine. Okay? Now, this amount of boosting, this is just our ballpark. Okay? What we're gonna do
is we're going to un-solo this. We're
going to listen. And we're going to make sure we haven't done anything
crazy, right? Always, whenever you're doing any of this kind of
mathematical stuff, like we're cutting by 90 beats, we're going to add nine dB on the other side of the
compressor like this. Always remember that your ear is the most important
thing here. So let's listen. Let's feel it okay for now. Let's continue on to
our lows and then our mids and dial
those in as well.
37. Dialing in Low Frequency Compression: Alright, let's head on
down to our low stuff. Okay, so I'm going
to solo our lows. I'm going to do the same thing. I'm going to take my
threshold down to, we're just hitting
the tops there. Don't need very much here. And I'm going to pull
it back a little bit. Now the amount of compression
I'm doing here with this, There's not a real
scientific thing here. I'm feeling it, I'm
kind of guessing, and I'm going to come back and dial it in a
little bit more later. But generally I'm
going around here. I want to see compression
happening here. I want to see gain
reduction happening. My whole point here
is gain reduction. So I want us to gain
reduction happening here. I'm not being real
scientific about it, but I'm going to come
back to it later. Again, I'm going to
change my times. You can be a little more. This one doesn't
need to be so fast, but I found that making it
so fast doesn't really hurt. If you have a slow computer,
this can be a problem, but should be fine.
Okay, Let's go there. We've got about 6526
dB of gain reduction. Let's add that up here. Let's go 5.5. Alright, let's hear it. Now. Let's do our mids.
38. Dialing in Mid Frequency Compression: Alright, mids, next. Now you may be asking yourself, why did I jump over minutes? Why did I do highs
and lows than mids? I don't know. That's
just what I like to do. You can do high, mids, lows. That's fine. I like to start where
there's the most movement to try to lock that in. Then I tend to usually
highs or lows for me. And then the opposite is
the one I'll do next. But that's, you know, you can do this in
whatever order you want. Alright, let's look at
the lowest or the midday. Pretty solid. They're a little bit by little
bit of compression. Okay. I was just saying
I kinda felt that like lock in and kind of a fun, a way that felt kind of good. Alright, so reducing by three
up to three-and-a-half. Three. Alright, let's do a
little thing. Okay. I feel like I've got a little
too much lows happening, but I'm going to leave
it alone for the moment. We'll come back to
it in the next step.
39. Upwards Compression: Okay, Before we move
on, I want to talk a little bit about
upwards compression. I don't think we need it here, but I want you to
know that it exists. So upwards compression would
be messing with this stuff. So this would be like, let's use it on this base, e.g. we went up here,
gotten the threshold, this line kind of close to our, to our downward threshold. This is downward compression. And then we moved our lines. This is now upwards compression. And what that's gonna do,
it's gonna keep it loud. It's going to not let it go under the threshold
very much, right? It's going to keep pushing
it to make it loud. It's not so useful in rock
stuff and this kind of a vibe. But if you've seen like compressors with
like OTT settings, That's what, that is. It's really popular
in like EDM and stuff for keeping things
really loud all the time. You can also on the quieter
stuff, which is this. You can also compress down, which is kind of like
and compressing it. If you have something that's
really compressed and you want to try
to uncompress it, you can with this, that'll kinda space it
back out and let it, let it breathe a
little bit more. But we do not need it here. So I'm gonna move this down. Then there's kinda reset these, then girls playing with
these a little bit. So I don't really need them. This can I get to
be the default? Alright? I can get that exactly set
at zero, but that's okay. It doesn't need to be. Alright, so that's
what those things are. I don't think it's
useful to us here, but it's good to note
for you to know about.
40. "Ring Out" and Compare: Okay, at this point, I'm going to kind
of wring it out. Again. Go back to my EQ, make sure nothing's
really standing out. Oops, jumped all
the way back there. Now I'm feeling the base
has gotten on muddier. So my dial this
back a little bit. And then it's hard to wringing out thing to really get base Medina is dealt with. That's really in the mix. But there's a few
things I can do. So I've got a band here. I'm gonna go back to look for any kind of
problematic based stuff. That's one. So I'm listening for what's
making that moneyness worse. Okay, So kinda feel
it right there. You could see a frequency jumping out right there with
widen that a little bit. They're actually helping out. Good. Okay, So let's hear
it now without the EQ and the multiband dynamics. Here's our original. Alright, so we're definitely
on the right track. We haven't gotten
real loud yet, right? We've done some compression to kinda team what's,
what's in there. Our real volume is going to come from the glue compressor
and the limiter on it. So what we've done here is kind of squashed it
with the compressor, kinda tamed the sound a lot. And now we're going
to move it over to that Glue Compressor, where we're going to use
that to really push. It's kind of like
our own makeup gain. But the limiter is
going to make sure we don't, we don't go over. So let's move on to that next.
41. Using a Second Compressor?: Okay, up next is our Glue
Compressor and limiter, or our compressor and a limiter. Or if you want to just
keep things simple, you can just use a limiter here. So what I'm using here is
this Glue Compressor, um, because I really like it
for the soft clip function, but I am also going to
use it as a compressor. So you'll find a lot
of people when they're doing this kind of work will
use multiple compressors. Typically when you do that you
use different compressors. So different plugins,
different hardware things, they all compress things
differently and it can give you a little bit
different quality to it. So it's not uncommon at all to have a second
compressor in your chain. So we are going to
use this compressor for one more level of just kind of thinning out the
dynamic contrast in here. Okay, so I'm just going to, so I'm just going to turn down my threshold a little
bit till it's, until it's hidden the music, and we're just cutting a
little bit off that top. There it is. Alright. Now I'm gonna make
sure my attack and release are going nice and fast. Okay, so when we adjust our attack and
release time here is one really kind of
odd thing here is that the attack time here, this knob is in milliseconds. One millisecond here. Okay, That's good.
We'll leave it there. We could even pull it
back to be a little bit faster if we wanted to do like
a tenth of a millisecond. But I'm actually okay with
one millisecond here. The release time is
actually in seconds. So I want to pull
this all the way back to 0.2 s or 0.1 s. Okay, I'm going to leave the
ratio right there. I think that's fine. Okay, So now we've
got this compressor doing some work for us. Now let's talk about using
the limiter built into this.
42. Limiting: Okay, so now we're going to
turn on this soft clips. So what this soft
clip is gonna do, it's gonna, it's
a limiter, right? So we're going to set a ceiling, and that ceiling by
default is zero. Okay? So it's not going to
let us go above zero. So we can crank up the makeup gain here
as hard as we want. And it's never going to let
the signal go above zero. Let me show you. So I'm gonna go over here
so I can look at my meters. I just hit tab to get that
if you're in Ableton, I'm gonna look at my
master output here. Okay, Let's reset that. And you might want to turn
down your speakers for this. This is gonna get a little loud. So I'm going to hit play and I'm just going to push the makeup. I'm just going to crank it. Okay. See we stopped at
negative 0.5, right? We never hit zero, even though clearly we're way past it and we heard
it distorting, right? It didn't sound very good. Because when you have a limiter and you go
up to that limiter, if you just smashed up against that ceiling, it's
going to distort. That's what it does. So what this one does is has
this soft clip function. So as long as we don't
smash up on there too hard, it is going to let us have a little bit of distortion
from doing that, but it's actually kind
of a nice distortion. So it's okay, but we don't
want to hit that heart. Okay? So what I wanna do is
use the makeup gain and go up until we're seeing this clip light go off
just a little bit. We just want to see
it flicker a little bit. Okay, so let's go up there. Pretty good. Pretty good. Let's reset our meter here just so we can see
where we're landing. Right at negative 20. Okay? So now we're using
that limiter and we're pushing hard on that, on the makeup gain in
order to get it all the way up to the absolute
top that it can be. And we're actually going a
hair farther and letting that limiter kind of rolls off at the top
to get that soft clip. Okay, So now let's talk about headroom and
figuring out how much we want and how to get it.
43. RMS Headroom Standards: Okay, so remember
headroom is the distance from the loudest
signal to up to zero. Because remember all our signals are measured in the negative. So if our louder signal is zero, negative 0.5, which
is where we are now. That means we have
0.5 of headroom. We have this much space
before we hit zero, okay? So our limit is
setting us there. But remember, that's
our top peak, that's not our top RMS, right? If we look here, the RMS
is the bright green line. So let's look at where
our RMS is sitting. This is showing us our peak. Okay, so our RMS peak
is about negative six, negative seven or so, just under negative six
is what it looks like. That's okay. So what we want in general, a good rule of thumb is
you want your RMS to be landing around negative
four and negative five for like kinda heavy
stuff like this, or more aggressive stuff. If it's maybe acoustic stuff, maybe you want to chill back to negative eight, maybe ten. You definitely don't want
your peaks to go over zero. But that, that area, the difference
between your RMS peak and your actual peaks. This we want to be
relatively small and we can make it bigger or
smaller by more compression. Okay? So this is pretty aggressive, so I actually want my RMS
to be a little bit higher. I'm going to leave my peaks
right where they are. Negative 0.5 is great. The reason I'm not going
all the way up to zero is that it's always
good to leave a little extra headroom. 0.5 is kind of like
the minimum 0.5 to one in terms of that headroom
is really what you need. And the reason for that is because when you
convert this to an MP3, there can be some digital
things that happen. And it can, it can boost
the volume a little bit. And if you're all
the way up to zero, That's going to clip
you and it's gonna make distortion than not good. So we always want to leave a little bit for any of those conversion
errors to happen. So it'll still sound good. So we'll leave that
at negative 0.5. That's great, but I want to
boost my RMS a little bit. Okay, So I'm just gonna do
that here by tightening my threshold a little bit
more and pull back on my threshold a
little bit to kind of squeeze it down
a little bit more. And then I'm going to kick up my makeup a little bit more. Now I'm up to 0.6
pretty reliably. Well before I would go. Alright, now that compressor
is really working hard, but I think I got
it where I like it. So I got my RMS peak
around negative five, maybe getting up
to negative four. And my peaks up to negative 0.5. That's kinda of money
for where I want to be. So you make that gap
between your peak and RMS bigger or smaller
by more compression, or you make it smaller
by more compression. So you're going to compress
more than makeup gain, compressed more makeup gain. And that's gonna get that RMS up to where
you want it to be. The limiter is gonna make sure your peak does not
go above that. Negative 0.5. Okay, That's gonna
get us good and loud. Next, let's listen and let's do our AB with
our reference track.
44. A/B It!: All right, Let's listen. We're gonna go back
and forth between our reference and this one. Okay, Let's go back over to here just so it's a little easier
to see what we're doing. Let's make sure our reference has something nice
and loud here. Perfect. All right, so here's our track. Whoops. Okay, and here's deaf tones. To me are sounds louder or an R sounds a little
more crisp too. I think we're getting a better sound out
of those guitars. Let's look at what their
values are doing and the deaf tones track. Going up to positive. There are a mess. Rms is
sitting around negative six, negative seven, that's where we were before we went
up a little harder. Okay. And are there going
over there going up to 0.1? That could be just from the conversion to the
files I got that. They probably didn't
mix it up there. That just can happen from files getting thrown
around and getting converted and converted
into converted m plus. I think I took this one. I think we're actually
listening to an MP3 file here. So that's not great. But that's probably
where that comes from, is that conversion. But even so, pretty
happy with what we got here. Cool.
45. Looking at our Work: Okay, Let's real quick just take a look at what we've done here. So I'm gonna go back over to
look at our waveforms here. Because a little extra space. What I'm gonna do is
I'm going to duplicate this entire track,
effects and all. Okay, now I'm going to render this track so that we
can see the wave form. So I'm gonna go to freeze
and then flattened. This is like if you're in another Dawes is like rendering
place or some like that. Okay. Let me get that sucker.
Big thick black lines. And that's where we were.
That's what we are now. So let's zoom in and look
a little closer at that. Alright, we still have
our dynamic contrast and nothing's clipping. We're just real good and loud. If we go up real deep here, we're going to see some
of that soft clipping. It's like things like this where we're getting
right up on the top. But we're not going over that limiter is just
kinda rounding off the sound and then rounding
it off back down instead of just slamming it up in there and making like sharp angles. That's what's typically what we see when we see
eclipsing dull. We see this rounded edge to it, which gives it a little
bit of distortion. But again, like a
soft distortion, something that's
usually pretty nice, especially if you've got
look distorted guitars. But that is good looking. But let's move on and
we're going to talk about stereo imaging and doing
some extra sweetening. We still got a little
bit more to do.
46. The Role of Reverb in Mastering: Okay, So at this point, we've done a really
aggressive but good master of this track, right? Like when we looked at that
waveform, it was solid. We could back that
off a little bit. This is very aggressive master, but that's okay, that,
that can be good. We've, we can be done. We can walk away and say we did it or we can keep going. Okay. Now, I'm going to caution you
from doing too much, right? Like you don't want to overdo
it with all this stuff. So from here on out, what I'm giving you as
options to consider, um, our volume is good, we've got any problematic
frequencies dealt with. So now we're looking at kind
of extra things we can do. So the first thing I want
to talk about is reverb. The role of reverb in mastering is somewhere between
none and teeny-tiny bit. Okay? We do sometimes use
reverb and mastering, but if and when we do, it is very, very subtle effect. But if we are going to do it, this is the place to do it is the next thing
in our effects chain. So here's what we would do. And I'm already going
to tell you that this particular
track we're working on is not a good
candidate for this, but okay, so we've
got our chain, we've got our EQ, multiband
Dynamics Glue Compressor, and then some reverb. Remember this is
going to Pi reverb to the whole track, right? It's not just that we're
going to add reverb to the vocals or the
drums or whatever. This is gonna be
on the whole track and we can't separate it out. So to do this, you want to use a very,
very minimal amount. The only situation
I would do this in is primarily acoustic music. Very gentle music that has a feeling that it's
just a little too dry. If it feels like it's just got
that little dryness to it, then you can add a little
bit of reverb here. It's the kind of sound where
if you feel like you've, you're aware of the reverb, you've probably gone
a little too much. So acoustic music,
sometimes classical music, if it's recorded really dry. I've used it on vocal music like pure vocal
music like acquire. Because that's music
that is often, we hear it in like a big
church with a ton of reverb. And if you get a recording
of studying like a studio, it might need a little bit of reverb to make
it sound normal. If you're going to use reverb, just remember a little touch and only use it if you need it. And it's only in those
cases where you've got very gentle music,
acoustic, acoustic guitar. This kind of sound that we've got going on here,
big rock stuff. It's not going to work. We can try it. Yeah, I already don't like it. So we're not gonna do that here. It's not going to work here, but it is something
you can consider.
47. What is the Stereo Image?: Okay, the next thing we're
gonna do is we're going to talk about the stereo image. We haven't spent any
time on this yet, at least not intentionally. We may have done
a little bit with the stereo image in our
dynamics processing. But now we're really
going to look at it. So what we're
talking about here, stereo image is
the sway of music. You can think of, kind of
like volume is that this way, stereo images, that this way, weird way to say that basically we can hear music all around us. We have these ears and they're designed to hear
things all around us. They're not so good at
hearing things in detail behind us because it really
kinda aimed at this way. But when we work on music, we can make it sound like
it's coming from right there. We can make it sound
like it's coming from there or there, or over here or
over there, right? That's why we use two speakers
almost always, right? So two speakers means stereo, that means the stereo field. And with that, we can do
tricks to make it feel like sound is coming from
anywhere in that area. So if I want something to sound like it's
coming from right here, I'm going to place
an exact copy in both speakers and your brain's going to kinda put it together
that it's right there. I'm going to try it.
My voice right now in this video should be mixed
right in the center. So if you, if you're
wearing headphones, take one out and
you're pretty much going to hear the same thing
except only in one ear. You can switch it and
you'll hear the same thing. That is because exact
same copy in both ears. It makes it sound like it's
coming from the center. Now, if I wanted to make
it sound like it was coming from the
left or the right. I would use panning, right? But we don't want to
use panning here. So paintings, that process we do where we can
move sound around. We wouldn't really
use panning in mastering because we have access to the whole bloody song. And if we use panning, we can move the whole
song left or right, but that's not going
to sound very good. Right? Panning is, is something
we would use in mixing. After the mixing process, we can't really use
panning anymore. But we typically want to make our tracks sound
like it's filling the whole space in
front of us, right? We want to take up
this full stereo image is what we call it, right? I want to make it feel
nice and big like that. So we have some tricks we can do to make it really
fill out this space. And that's called
stereo imaging. Adding a little bit of reverb
can be one of them that can help make it feel bigger if you want it to
feel bigger in the space. But there's a lot more we can do that doesn't involve reverb. So for the next
couple of videos, we're gonna be talking
about techniques for kind of filling out that space,
the stereo space. Alright, so here we go.
48. Mid/Side EQ (MS EQ): Okay, so the way we do this is something
called mid-side EQ. And this is maybe
something you've come across before. Maybe
you've seen this. It does get used in
mixing sometimes. The point of it is
basically we're going to EQ things differently, whether it's in the mid, which is the middle,
or on the sides, the sides, like over here. So by doing that, we can control what's in the middle and
what's on the sides and kinda really fill
the space better. So it's called mid-side EQ. Sometimes you see
it written as M, S EQ or MS imaging. I stands for mid side. So we have a few tools
we can use for that. You need something more than
your average EQ to do this. Built into Ableton, we do have a few tools that can deal
with it a little bit. Mostly down in the utilities. We've got left channel mid only. We can mono, which is
handy for listening. Write-only sides only. So there's your mid
and your sides. So you can kinda play
with things that way. But it's not very useful
for what we need. So we really need to go
to a new tool for this. There are some other
tools you can get for live through like Max for
Live and stuff like that. But doesn't matter. If you have a tool
that will give you access to a mid-side
EQ. That's great. It probably is enough. Because as you know, I like to focus on
tools we already have in this class
and not say you should go out and
buy some plug-in. However, I'm going to tell you to go out and
buy a plugin here. You don't have to,
but it's handy. There's one plug-in that's really kind of a standard
Mastering plug-in. It gives us really
good midside control. And it gives us a couple of other bells and whistles
that we're going to use. So for the next
couple of things, I'm going to use this
plugin, this plugin. So let's go to a
new video and let me introduce isotope ozone.
49. Izotope Ozone: Alright, so I'm gonna
go to my plugins. I'm going to load isotope, ozone and ozone seven. We're currently
there is an ozone ate out and they're
constantly updating this. So get the latest one. I'm gonna be using ozone seven. Okay, so I'm going
to throw this on that track on the chain
after my glue compressor. Now, ozone made by
the company isotope. Not a free plugin. I don't remember
how much it costs. But it's not as expensive as you would think
for what it does. This is a powerhouse
Mastering plug-in. This is what a lot of people use for everything we've done so far can be done in ozone. You can build effects
chains right here. Just like we've done down there. I like using the
built-in Ableton stuff to get us this far.
But you don't have to. I mean, here's an EQ. Here's dynamics,
There's maximizer. I think there's a multi-band
dynamic processor in here. Or maybe you can, yeah, you've got access to the
multiband compressor here because you've
got an EQ in there. There's a lot we can do, right? There's a lot of
different views. We have. There's presets. I don't really have any
presets installed here. I'm not really sure
why, but doesn't matter. We're not
gonna need them. So this is going
to show us a ton about what's going
on in our track. Let's look overall. But what I'm going to use this for is just mid
processing for now. So I'm gonna get rid
of that and that. And let's just go to equalizers. I'm going to get
one equalizer back. And then one thing
you'll notice here is that the level meters
look a little different. So what we're seeing
here is, first of all, this level meter is our input, That's what it's hearing,
and this is our output, what it's sending out. Okay, So the difference
between these two is what isotope is doing, which is right now nothing. So the yellow in the
middle is our center, and the blue on the
side is our side. So this is showing
us midside level. So it shows us our
sides are quieter than our center or middle,
which is fine. And that's typical. And we can see a good amount of motion in both the
mid and the side. Again, we're seeing the peak as the lighter color and the
RMS as the darker color. Cool. So this midside is what
we're going to tackle next. There's a couple of other
things to look at with it. And this is going to
spread it out quite a bit. Now, I can already tell there's been a lot
of midside work done in the mixing of this track because there's already a lot of action
happening there. So there's probably not much
I'm actually going to do to this track with midside because it doesn't
need it and why I never wanna do it if it
doesn't really need it. But I do want to show
you how it works. Let's go to a new video
and let's crack it open.
50. Reading a Mid/Side EQ: Okay, I was just thinking about this in between
videos and there is one thing I'm going to try to improve on this track with. I still feel like the low
end is a little bit muddy. And I think I might
be able to get it back a little bit of a back or a little more clarity in it by using a mid-side
EQ technique. So let me first show you how to see the different
settings of the mid and the SAT. We already looked at this. But what I'm gonna
do is go over here, we see stereo, that means we're looking at a stereo right? Now I can click the next one. Now we're looking at
midside representation. Okay? Here's our mid and
here's our side. Notice also up
here it says side. So right now I'm looking
at the EQ for the side. And the side is soloed. Okay? So this is soloing my sides. Right now. Let's
solo the middle. And here's the sides. Now I can EQ them separately. See here's the mid, because that's what I
have selected here. This is the middle and
this is the sides. So what I have
selected there, okay? So now I can adjust
the EQ for the sides. And I've got an EQ here. You're used to seeing
this kind of an EQ. And I can adjust the EQ
for the mids differently. For the mid, I shouldn't
pluralize that mid differently. So what I'm going to try to do here, let me turn that down. And I'm going to
try to separate out that base a little bit and push some of the
low frequencies to the side and keep some on the, on the middle and see
if we can separate them out to clear out that
moodiness. Okay. Let's try it.
51. Cleaning Up the Low End with Mid/Side EQ: Okay, So I'm going to
start with my mids here. And I'm going to cut these down around 300 hz with a high-pass. Make that a little sharper. Let's get down to about 20 hz. This is just going to
kind of redundantly do what we're doing with
our EQ down here. So this actually shouldn't
really be doing anything. But I'm going to leave
that there in our mids, now in our sides and
get rid of that. And our sides, I'm gonna do a high-pass and cut
it off around 200. Tighten it up. Okay, So if I do this,
what's happening now? Our sides don't have those
really low frequencies, those really low things. Anything under 200 hz
is only in the middle. Everything above 200 hz is going to be in the
middle and the sides. So we're kind of separating out that really low stuff and just
putting it in the middle. Okay, now I'm going
to dial this in the taste by listening
and see if that helps. Solo the sides. There's that moneyness. Write that out. I don't want to get rid of, I don't want to lose the low end. I just want to control
a little bit more. I think that helps a little bit. So that's one technique
we can use for with mid-side EQ doing to help control that low
end a little bit.
52. Adding Shimmer with Mid/Side EQ: Okay, there's, there's a
lot more we can do with mid-side EQ and the
mixing stage, right? Like it's a really
good technique while you're mixing to carve out different areas in your mix so that you and your
vocals can sit better, or sometimes your
drums can sit better. Any kind of sense can
kind of sit better. Explore using this for
your mixes in mastering. The only other thing that
I would regularly use is using this to add a little
bit of shimmer back to it. This really helps with
your stereo image as well. So I'm gonna go to
my sides, solo them. And I'm just going to bump up my upper frequencies just a tad. But like really high stuff. Let's try that. Let's bypass them. That's interesting. If I AB the side, what we're doing, you can
hear that rumble comes back. All that rumbles what
we've trimmed off. And also we're, we're
kind of boosting the upper end of it
a little bit here. So this is what's this EQ is. Get a little bit more
out of it about there. Alright, now let's do this together. My bad. So that's giving us a little
extra color on those sides. There's other things
we can do to give us more life in the upper end. With harmonic exciters, we'll look at those
in a little bit. But this is kind of doing a similar thing, although
a little cheaper. So you can have some
good results with it. This is really subtle what I'm doing here
because there's, with all that really
distorted guitar, there's already a lot happening, so it's pretty subtle, but it's, it can be nice.
53. Mid/Side Compression: Okay, Next and more relevant
to our discussion of the stereo image is
midside compression. We looked at mid-side EQ. Compression seems
concept except we're going to compress the
two sides differently. Okay, So in ozone, I'm gonna go to my compressor. They called dynamics here. And I'm going to switch
it to midside mode. Here I have my midside readout. Just by default, we're already doing a little bit
of compression here. I remember what
kind of compressing the tar out of it back here. We might want to dial
this back to give us a little room to do
this if we want to. Okay, so here's this image
that we remember seeing. We've got our threshold
here and we're looking at our mid, right? So we've got our threshold here. And then we can adjust our ratio and our attack
and release times here. Okay, so everything
works the same. It's just a slightly
different interface. Here's our side, right? So we can set compression here. Now, two things. If you're going to do this. First of all, you
don't have to do this. A lot of people don't use mid-side compression at all
in mastering and that's fine. Experiment with it, see if
it's something you'd like. It can sometimes take the place of multi-band
compression. The argument that
I've heard is that multi-band compression
takes away from the mix a little bit. So if somebody has
a really good mix, you can destroy it a little bit by using multi-band
compression. Whereas in mid-side compression, the mix that was made
still mostly stays intact. But you have access to kinda
refine certain elements of it and control it in similar ways that the multiband dynamics
gives us control. So you could consider this to be a replacement for multiband
dynamics if you want. I like using multiband
dynamics because it's easier in a way and gives me
a little more control. And it's a little more for, it's a little easier
to just kinda from my brain to wrap my head around multiband dynamics than it
is midside compression. I don't know why. But experiment with both
and see what you like. You don't have to choose
one or the other. You can use both. But typically people use one or the other as
I understand it. Another thing is
that we've added a lot of compression here
with our Glue Compressor. And if we really want to
make good use of this, we're going to have to
dial that Glue Compressor back a little bit
or whatever are, whatever compressor is doing our main amount of compression. We're gonna wanna make some
room for that with this. In fact, let's do it. I'm going to turn off my
multiband compressor. In fact, I'm going
to do another thing. I'm going to
duplicate this track. Let's do this. This is not something you
should do in your mix. I'm just doing this for
demonstration purposes. I'm going to duplicate
this whole track. I'm gonna mute that
one. Hello, This one. Go back to this one
and delete Ozone. Okay? So this one does not
have ozone on it. This one does. Now with this one, I'm going to turn off
multiband dynamics. And I'm going to dial
back our compressor. We've got a lot of room
here for compression. So next let's do
some compression that focuses on increasing
our stereo width.
54. Mid/Side Compression for Stereo Width: Okay, so the theory here is if you want to expand
your stereo image, what you want to do is compress the middle more than the sides. Okay? If you want to make the
stereo image smaller, compressed the sides
more than the middle. That's the formula. So we
wanna make this bigger. Let's try it. Okay, so one of the
things that isotope that ozone is doing
here is it's doing multiband dynamics
at the same time. So I've got the four
bands of an EQ here. You've set the compression
differently for them. I hit there's a link things, they were all the same. Okay. Now I'm gonna
get my makeup. I've got a limiter in here also. My glue compressor is
still on here by the way, but it's before this. So I should probably put my ozone before my
glue compressor. Okay, Well I have this
styled in. Pretty good. And now it's my
side compression. Cool. So I don't know if
you can feel that through the magic of video. But for me it does feel quite
a bit bigger. To do that. We have increased
the stereo field. However, I don't love the sound of it versus
what we had before. Like I said earlier, this has already had
some midside work done to it in the mix. So it doesn't really need this. So this is kind of
overdoing it, I think. But let's listen to the
two of these side-by-side. So this one has ozone has
ozone midside compression, and this one has
multiband dynamics. So yeah, I like the guitar tone we
got in this one better. And our base is a little better
controlled with this one. Now, maybe that
has to do with I'm much more experienced
and comfortable with with multi-band compression
than midside compression. And so I'm just
not as good at it. I think if I dial this
anymore, we we'd get it. It definitely needs something because it looks like
we're peaking here, but things to consider. Okay, let's talk about adding
some additional sweeteners.
55. Controlling The Low End (Again): Okay. So let me tell you what I did. In between those
last two videos. I got rid of our duplicate track because that one was getting
a little out of control. We just went back to our one. I put back in ozone and just set up the
opening back up here. So I just have a mid-side
EQ doing this trick that we looked at to
help us control the little that moneyness
that's still in the base. I worked a little bit more
on the Medina is here. And what I think I would do, I prefer to do to clean
that up even more, is just go back to the mix. So I might send this
back to the artist or whoever did the mixing and ask them if they can clean
that up a little bit more. I've kind of reached the
limits of what I can do in mastering
to clean that up. It's just kind of there. This helps a little bit. But let's look at
where we're at. So here's a quick
reminder of where we are. Yeah, I just, I really
wish I could get more clarity on
the low end here, but I think it's just
kind of in the mix. So that's about as good as
I can get with mastering. You can't solve mixing
problems with mastering. You're really only going
to accentuate them. So I did a little bit of what I could do
to clean that up, but there's not much else I
can do. So let's move up. Next we're going to
talk about, so again, what I talked about at
the end of the previous, previous section, after
the dynamic section was that we couldn't be done. We could be done at that point. But we went on and talked
about stereo imaging, trying to fill out that
stereo space, right? That's a thing you can do. You don't have to do, but it can help the master. This next thing is
the same as that. This is a step you can do if you think it's going to
help the master. You don't have to do there. There are certain
situations where this will help and there are certain situations where
this is going to hurt. So what we're gonna
do here is use a harmonic exciter and just add some shine
to this whole track. We're going to make it pop. So let's talk about what harmonic exciters
are and how they work.
56. Harmonic Exciters: Okay, a harmonic exciter is, in a way, a form of synthesis. There's a lot of different
ways this can be done and plugins do
this differently. But basically what it is is if you know anything
about synthesis, if you took any of
my synthesis classes or you've done any
work on a synthesizer, or, you know anything about how the overtone series works. Basically, what we have
is when we play a note, I'm playing my clarinet. When you play a note
on a synthesizer or an instrument or
anything with any sound, It's made up of a series of other sounds that
are above it, right? Those are the overtone series. So the sound that we hear
is made up of many sounds. Okay? So what a harmonic
exciters gonna do is it's going to bring out some
of those upper sounds. Usually upper. We don't usually do this
for the lower sounds. Now the way it does that, it can do it with a kind of EQ by listening for
the fundamental, which is the note you
intend on playing. And then using an EQ to bring forward the upper frequencies
that are already there, it can work that way. A lot of these harmonic
exciters don't work that way because that tends to bring with it a lot
of kind of moneyness. What these plug-ins tend
to do, the good ones, the high-end ones, is regenerate
those higher overtones. So they will look for the
fundamental frequency and basically dial in like
a synthesizer to have that. And then the upper harmonics, and then they'll
bring those out. So it is adding
something new usually. But it's not really
adding any new notes. It's information
that's already there. It's just kinda
muddled in there and this is going to
bring it forward. And it's going to give it
an extra kind of shine. Now again, we
normally do this on the higher stuff,
higher frequencies. It can make things
like distorted guitar, which we have a lot
of in this track. We can dig a distorted guitar and kind of shape the
distortion a little bit more. We can give it a little more
color if it's a flat sound. Really, anything that is
kind of a flat sound, we can give a little
bit more life to. It's really easy to go over the top with this
and give it too much just because it sounds
cool for the moment. So you have to show some restraint while
you're doing this. Okay. So if I'm in Ableton Live, I could look at my
built-in stuff. I could do some
of this with some of the built-in
stuff is saturate or even these various distortions would do some of it kind of
because a lot of the time, this kind of a third way that
this can sometimes work. So I mentioned in the first way is with an EQ that's
not very common, but it can work that way. Second is to regenerate
these upper frequencies. And the third way
is to kinda do it with kinda just really
careful clipping and get some
distortion in there. So distortion is
a way to do this. So you can do a little bit
of it with distortion. Even a carefully
used phaser flanger can give you a little bit of this sound but not perfect. Okay, So what I'm gonna do for this is I'm gonna
go back to ozone, which has the easiest to use a nicer sounding
exciter that I like. So if I reopen my
ozone patch here, I'm going to go
through here and add an exciter to my ozone chain. Okay, let's go to a new
video and dial this in.
57. Dialing in Harmonic Exciters: Okay, Let's dial this in. First of all, one thing I didn't say in the
previous video on this concept is that this is adding harmonic exciters like this is something that
we're often doing in the mix. And it's kind of a better
place to do it in the mix. If we're doing it in the master, It's certainly allowed
and you can do it. But we're going to go a
little more gentle than we would in the mix and
the mixed process. You can really use
these kinds of things to really shape
your distortions, even like your snare sounds
and stuff like that. Here, since we have
just the overall track, we have a lot less control
over where it's applied. So we're gonna be a little
bit more gentle with it. That being said,
let's dial it in. Okay, So here's my
interface for our exciter. There's two main
things we have here. First is we have
these presets here. You can kind of
guess what they are. So warm, retro tape, tube, triode and dual triode. Let's dial in a
little bit of this. And then we'll switch through
these these processes. You can think of these as
like different algorithms, like warp modes enabled and
if you know what that is. So we can add the amount
that we want and then try it out with these
different presets. Let's add a lot just so we
can hear the difference. Okay? So what we have done here
is we have four bands. It's kind of becoming a
similar interface, right? You can see those bands here. There's the second one,
it's the mid-range. Third one kind of upper mids and fourth one is
the highest stuff. So this knob is our mix. Like how much of
this we're hearing. I'm going to leave that at 100. Leave all of the mix
of these at 100. You can play around
with this, but I like leave them all up and then just push in a little bit of
this harmonic excited. Okay? So this is the amount. Now, like I said, doing this on the low end, not gonna be very useful. And especially in
our case where we already have a low-end problem, this is just going to create
a bigger problem for us. I'm going to leave
that one alone, leave this one alone to, but I will go up to here
and see if we can hear it. So I'm going to push it in a
little bit and listen close. It's really affecting
the guitar. The guitar tone almost kinda liked what it did the guitar tone, but
it really kinda, okay, let's leave it
there for a minute. Let's add a little bit more. Let's add some to the high-end. Okay, there's a lot, but it's a bit more
subtle up there. Now let's experiment with
these different sound. So here's the warm setting. Okay, So this warm has given me a feeling of like
a fresh compressor look anew, not compressor. A new preamp, like we're running the mids through a preamp here. Retro is like running it
through an old preamp is the feeling that I got tape sounds like running it through
an old tape machine, tube, running through an old tube AMP tryout
and dual try out. I'm not actually
sure what these are. Tube exciter circuit modeled. So this is modeled
after a triode circuit. They're not really
sure what that is. All of these were too much
for what we were doing here. Let's go to warm. I'll leave this how it
is and let's AB it. See if you can focus your
ear in that real high stuff. It's really present, but only in that really narrow band of
high stuff. Listen again. Okay, So I'm going to back it up here. Okay, I think that's
a good sound. We added just a little bit of
shaping to that distortion. Now much also keep
in mind here we can do this in a
mid-side pattern. So we could do it
to just the sides. Try that and then dial
in about where I had it. This might actually get
us a good sound here. And we'll leave the
mids all the way out. So we're going to
add that harmonic exciting just on the sides. Okay? I kinda like that. It kinda gives a little more
width with our distortion, makes it feel a
little bit bigger. Okay, let's, let's take a little pause and listen to our whole master and just kind of gut check this whole thing.
58. Gut Check: Okay, so what I wanna do right now is I
want to be able to AB the entire
effect chain, okay? So this will be easy or difficult depending
on which doll you're using. But in Ableton and
it's really easy. So I'm gonna do is I'm
gonna go here and select All and hold down Shift
and click on that. So that we've got this kind
of blue band on all of these. I'm going to press Control G. What are you going
to put them in Iraq? So now they're all you can see there's no space between them. We get this little
bar over here. It's going to sound
exactly the same. But now what I can do is toggle the whole
thing on and off. Okay, so I've not
changed anything except I added some global
controls for the whole thing. So here's the whole thing off. Okay, so obviously our volume is working like
we're much louder. And one thing I'm
also hearing is that that low Medina this is in when we're off when this is off here and all of
that load stuff. That low buddy Think
fighter but it's there. So we're not making it worse. I think we're making it better, but if I hear the
rumble from that. Okay. So at this point, what you
might do is you might say, okay, it's time for me
to kinda ring out again. Go all the way back
to the EQ setting, see if there's anything
new that you're finding that needs
to be dealt with. Any frequencies. I still, I'm tempted to try
to clean up the low-end more, but I don't think
I'm going to be able to do much more for
it or find anything. I'm going to leave
that alone, I guess. But so wring it out again, adjust compressors again, just kinda go through everything again and just keep seeing
if you can make it better. So I would like to do one
more pass through everything. And I'm gonna do that now I'll do that off
camera and just do another pass C and
I'll let you know if there's anything that I
changed. So here we go.
59. Last Tweeks: Okay. I did do one thing. I here's why I did that. That low-end was his bugging me and I knew I
could get it better. And I handed it back to
my dynamics compressor. I boosted up the compression on the low end and then I
adjusted my EQ a little bit. What this did is really take
away a lot of the low end, but it's not muddy. So this kind of cleaned
it up a little bit, but it also reduced
our low-end bylaw. So here's what it
sounds like now. Oops. Sorry, AB. So I've, it's lacking and
low end a little bit, but it's at least it's
not really muddy and there's so much rumble in it. So again, I really
need to send this back to the mix engineer and
say clean up that low end. If we really want
us to be perfect, because I really just
can't do much more. So we're going to call
it good like this. But that's it. I left
everything else the same. I adjusted our our makeup
compression a little bit here. After. I can adjust
it, this compression. And Plato's my EQ
just a little bit. Okay, So I think we're going to call it
a day with this sucker. Next though, we need to talk about our render settings
and make sure that we're rendering it exactly
perfect because this is it. This is our last stop
before streaming services. Whatever we kick out here, we're going to send
directly to Spotify. So we need to make sure our Render Settings
are spot on Perfect. So let's devote time to that.
60. Rendering Settings: All right, Welcome to a lovely winter snowstorm
here in Minneapolis, Minnesota, right
here at my window. It's snowing like crazy. But that doesn't matter to you. That's the joy of
online classes. I don't have to go anywhere
in order to teach today. So let's talk about
our render settings. Like I said in the last video, this is our last stop. We got to make sure we get these right because if when we send these to the streaming services,
there's no going back. Okay, so in Ableton, I'm gonna go to
File Export Audio. Now in your diet, it
might be called export, it might be called render, it might be called bounce. All of those do the same thing, different programs call
it different stuff. I think maybe logic now calls it share because
that's an Apple thing. But whatever, you're gonna get to a screen like this
that has some options. If you don't see a
lot of options here, see if there's a More
button somewhere or you can get into
more rendering options. We want to make sure that
we're right on this. Okay, so I'm gonna
go through these and a lot of detail because
again, this is important. So for me, I got to make sure that first-time
rendering the right thing. That's this first
block of stuff. Which track do I want
to render? The master? Yes, that works. So everything going
through the masters, what's going to
get rendered here. I could, because I'm really only working on this track to, I could select this track too. But I like to just leave
with something Master. That's fine on the master. Render start an end. This is very important. We're starting at 111, so that's all the way
back at the beginning and it's ending at 64 to one. Let's double-check that. So 111 is here. And I added this little fade. So that's right. 64 to one is way out here. Oh, that's the end of the
white pony track, probably. Yeah. That's all the way out here. That's a little
farther than that. We don't need that. So I want to make sure I'm
rendering the right thing. So I'm going to
select this track, make sure my fade-out
is still there. I'm getting the whole thing. I didn't make any
edits to the track. We want to make sure we select the region that we
want to export, in this case, the whole track. So I'm going to select
it just like that. Now I'm gonna go back to my export settings and it
should have updated 4712. I can't scroll
that windows open, but that should be right. 4712, why does it want to
export it to right there? It should be. Let's try that one more time. 4712. Okay, so it's defaulting here to
4712 as the length. I'm not sure why it's
defaulting to end it here, but I definitely don't
want it to do that. I want it to go all the way
to the end of this file, which is 48.2,
between 0.2 and 0.3. So let's, we can err on the side of
going all the way to 48.3. So we're gonna make sure we get three and then
we'll end that at one. That'll put it to right
here. That's okay. That's insanely small amount of time we're going
to add to it. That's just fine. Okay, So I got my length
dial done correctly here. We will, of course, double-check
that after we render it, we're going to listen to it and make sure that it's right. Now we're gonna go on and render options here we need to make sure basically what I look
for really fast here. I want these all off. Include return and
master effects. No, we don't want those. That's gonna be any of
these return tracks. We shouldn't be using any
of those render as a loop. That would mean probably
it's going to try to put zero crossings
at the end, which is fine because
we've kind of manually done that
with our fades. But let's just not do that. We don't need it to be a loop. Convert to mono. No, we don't wanna do that. Normalize. You may know, normalizing is if you've taken some
of my other classes, but this is a volume thing, this is a dynamic thing. And we don't wanna do it here. Probably. It's something you might want to consider
if you're having a very specific problem. But what normalizing does is
it kind of like compression, where what compression will take your volume and take the quiet
stuff and the loud stuff. And if you process it right, kinda even them out, right? What normalizing
we'll do is take the quiet stuff in,
the loud stuff. Not even them out, but just boost it so
the loud stuff as, as loud as you're
going to let it go. So might say are allowed, his peak is at negative one and we can boost
it up to zero. So if it can boost the
loudest point up to zero, it's going to lose everything
else that same amount. So it's basically just turning the volume up to
hit the maximum. In our case, we've done a lot to get the volume exactly
where we want it. So we don't want
this normalize on. Create an analysis file that's an Ableton thing,
we don't need it. And the sampling rate, we already looked at
the sampling rate, but we want to make sure our
sampling rate is the same as our initial track
or double, right? So in this case our
initial track was 48 K. And so my sampling rate is 48 K. We want to render it
at that sampling rate. The same thing as our track that we're
mastering, or double. Okay, so those are
your quick mastering or rendering options. Next, let's talk about
the file type business.
61. File Type: Okay, so what I have here is
a little confusing looking, but when you see this PCM, what we're talking about here is if full quality audio file, That's what PCM generally means. It means pulse code modulation. It's the way we convert
analog to digital. But you can kind
of translate that as full quality audio file. What we're actually
seeing here is it says, what do you want
for your PCM file? And I can turn it off, right? I can say No, I don't
want a PCM file, meaning like a wave file, a full quality audio file. Say instead I just want an MP3 file That's not a
full quality wav file. That's very compressed file. Or I can say I
want a video file, which I can't do in this case, I can turn on video because I don't have any
video in my session. I can import video
into my session. And then it would
import or export the video and audio put
together into one video file. But that isn't letting me do it here because there's
no video my session. So I can do an MP3 or a PCM. Okay, so we'll talk
about mp3 in a minute. But for now, let's
talk about PCM. Pcm is the encoding algorithm,
pulse code modulation. You don't need to remember that. But we still have to
choose the file type. We have, I have three options you might
have different in your DAW, but you definitely have
these two options. You have WAV or AIFF, you may have flak. Okay, let's talk about them. A WAV file or WAV file is
a full quality audio file. No compression. This is the full
quality audio file. This is what you want. This is the gold standard. This is your master file. Okay, wave, It's good for that. Cool. There's gonna be no loss. Aif, same thing. Full quality audio
file, no loss. You can totally do that. What is the difference
between WAV and AIFF? Not much anymore. For awhile. Long ago. Wave was the standard on PC and AIFF was the standard on Mac. That's kinda gone. Now. They can both handled both. Even on Macs, though, I think wave has
become more common, we generally render out
to waive more than AIFF. I think that file standard
is starting to go away. You sometimes see it
as just AIF, also. Same thing to both
of those are fine. I would go with wave though. We also have FLAC file here. I hate FLAC files. I know there's some
people who live and die by FLAC files and
love FLAC files. I don't like them. I believe they are a little compressed. They have some
compression in them, which means you lose some
fidelity teeny-tiny bit. It's supposedly lossless
compression style, but they do do compression. It's just a certain kind
that's supposedly lossless. They're just it's just
not a universal standard. Not everything can
play FLAC files. They're hard to work with. I don't know. I don't like working
with FLAC files because I don't understand them. If you understand them
and think they're awesome By all means,
do FLAC files. I'm going to go with
Wave. Okay, bit depth. If you're going for
a standardization, you want to leave this at 16. Or you could go
higher if you wanted. But the standard here is 16, so you can leave it at 16. I wouldn't worry about that. And did their options. This is a really
complicated one. So let's go to a new
video and talk about dessert options because
dither options, because it is important here.
62. Dither Options: Okay, so dithering is maybe
a term you've seen before. It's you see it kinda floating around
a lot and it's often misunderstood thing and I'm not going to lie and say I know every detail about
dithering because it's very complicated topic, but I know a little
bit about it. And I know what we
need to do here. So basically, what
we're doing with dithering is protecting
against any kind of aliasing, which we can think of aliasing as artifacts
from digitization. In this case, this is a
gross simplification, but let's say this track
was made with samples. And some of them were at
41 k and somewhere at 48 K and somewhere at other
sample rates are bit rates. And so in order to render it, the computer has to
do a whole bunch of conversion, right? It's kinda do a whole bunch
of conversion anyway, because it's adding all these effects and
doing all this conversion. So in the process
of doing all the, all that conversion
artifacts can happen. Artifacts are weird, little
digital glitches basically. And dithering can help
protect against those. Now in some cases, the
way dithering works is it's a very low-level amount of noise that gets put 0-1
dB, it's like nothing. And what that does is when the volume of something
is going down to zero, that's tends to be where it
glitches when we hit zero. So that low-level noise, you'll never hear
this amount of noise. But that low-level
noise basically prevents the volume from
hitting zero, right? It can't go down there because that noise is just
taking up that band. So the dither protects the computer from making any of those rendering errors that
cause little tiny glitches. Okay? So when it says dither options, we can say no dinner, we can say rectangular
or triangular. These are the different
algorithms available. I don't know exactly how all
of these algorithms work. I really don't, but here's,
I'm going to tell you, Pao minus R1. That's where the money
is. That's what I use for mastering and I've had
good results. Also. That's what mastering people that taught me how to
do this have used. And so I stick with that. This power minus R1
setting is what I like, It's what I was taught
and it works great. Okay, so that's
what dithering is. Use this setting when
you're mastering. And it will 99% of cases, you won't even notice
that it's there, but in that 1% of cases
you'll be glad you did it. So just make it a habit to do that when you're
exporting a master.
63. To Mp3 or Not to Mp3?: Okay, so let's talk about, do we want to make an MP3? Also, if I turn this on, I'm gonna get both a
WAV file, an mp3 file. Why would you want an MP3 file? Well, maybe you want
one for sharing. Maybe you want to email
this to some friends. Maybe you want to put
it up for sale on your own website and you
just want to make an MP3. That's fine. You can
totally do that. Just make sure that what you're
submitting to Spotify or whatever is the WAV file or
an I just looked this up. Spotify does like FLAC files. They say they'll take
a wave or a FLAC file. So you might wanna do FLAC file for
submitting to Spotify, but wave is also fine. They're going to
generate their own files based on your own. So you just need to give them the highest quality possible. So you can make an MP3
for your own purposes. If you want. I typically don't. Actually. I would rather have the official wav
file from my reference. But if you're, if
you're doing something, you need an MP3, you
can make one here. As a step. That's just great. You can export it here. And then again, like I
said, the video options, if there was video in here, you could export video,
but there's not. So we can't. So once all of that is done, we're happy with our settings. We're going to hit Export. Now, coming up with a name here is actually kind
of a complicated thing. So let's go to a new video and talk about
naming conventions.
64. File Names: Okay, so the thing about
naming these files is you just want to
keep track of them as the master and version. Like this was sent to me as the name of this
file was black shirt, white Converse dot wave. So I don't want to call it that. I want to make sure this
is the mastered version. So I could put it in
a folder that was separate and mastered
versions and put it there. So typically what I would
do is make a folder for the album and then put this
in a folder called mastered. But I also like to put an M1 after it and you can
do this however you want. This is just my convention. So I'm going to call this black
shirt, white Converse M1. I don't put spaces
in the file name. I think you can just fine. This is just like a old habit
I developed from back in my being a bad programmer. Day's file names with spaces
always cause trouble. So I use a capital letter for every word and not
leave any spaces. You can probably leave
spaces and that's fine. This is just what I always do. Then I end it with
underscore M1 master, one, first master. So that when I export this, I can listen to it. I can evaluate it, which we're gonna do next. And if it needs adjustment
that I'm going to come back. I'm going to make
another version. I'm going to call it m2. Then I know that my
final is always m. Then the highest number. That's the one that's the best. I can show you, e.g.
here's my last album, The mastered versions of it. You can see these
are all m1, m1, m1, m1 except for three. This time givers
track wrong day. And then the first one, which is a remix of wrong day, all our M2, which means
they got mastered twice. Now I didn't do this master. This was something I sent out
to somebody else to master. So this underscore m1m2 is not just my
thing, I've seen it. A lot of people use it. And you might be
saying to yourself, why didn't you master
your own stuff? I'll talk more about that
in just a few minutes. Stay tuned. But here we have the
name of the album. And then Masters in that folder, we have the M1 versions. So come up with a
convention that you'd like. Underscore. M1 system
works really well.
65. Check Your Work: Okay, so now what I'm gonna do is I'm going to pull
our mastered version. Says our black shirt, white Converse M1 track
back into our session. And let's just take
a look at it first. I'm seeing like, yes, clearly we have
mastered it, right? Like this is much
louder than this. Let's also compare it
to our reference track, this deaf tones we see we're at about the same ballpark
just looking at it. Let's listen. Okay. And deaf tones. Okay, like similar volume, these two things can
play together nicely on on Spotify or on
the radio or anything. We can see our levels
like pushing on the top. Perfect. Now, if it wasn't perfect, we can, this is, we're not we're not at a point
of no return yet, right? We could easily open this backup and go back into here and maybe pull back our
compression a little bit. Maybe those guitars
aren't just a little too distorted for me, which
I think they are. Maybe we can help a
little bit with that by pulling down some of our
makeup gain just to touch. Maybe taking off that soft
clip in our limiter and replacing it with a
different limiter that might be worth considering. And then render it out
again and pull it back in. So you can absolutely
still do that and listen. Go back and do a second
master. A third master. Just make sure everything is dialed in exactly
where you want it. This is our last step to
just kinda check our work.
66. Save Your Session!: Okay, Just a couple last
housekeeping things. Make sure you save this session. Just save it exactly like this. Not just the file, but
the whole session. I would save it and
plan on holding onto it for at
least a few years. If you're mastering this
for another artist, then you kinda wanna hold
onto it just to make sure that they're not
going to come back in a year or so and
request or we master. Because if they
do, you can update it and you'll at
least have a head start and you don't have
to do it from scratch. If you're mastering
your own work. If this is one of your own
tracks and your mastering it, then keep it in the same session folder
as your folder for that track so that you have the mastering
session and it's always good to have
and you can always go back and tweak it later. So what I do is I have
a folder setup on a hard drive for
mastering projects. Things I've mastered
that are not mine. When I'm asked her
one of my own things, I put it in the session
folder for that track. So just make sure you
save the whole session, not just the track, so that you have access to it. If you want to go back and make any revisions or
modifications later.
67. Save Your Effect Chain: Okay, another thing that'll save you a lot of
time in the future is to save your effect chain. You have now created
an effect chain that is this all our effects
with these settings. You created an effects chain
that is unique to you. It's the things that
you like to do. Maybe you put more
stuff in there, maybe you took some out. So if we save this, then what you can
do is the next time you master something, you can pull this out and plop it on there and start dialing it in and save yourself a
lot of setup time, right? This isn't like an
automated master. It's not like you can just
throw this effect chain on another track and it's
going to master it for you. You need to dial it in and you need to know
what you're doing. But it can save
you a lot of time. So all of the different doors have different ways
of saving chains. So if you're in something
other than Ableton, I would just search for how
to save and effects chain. In Ableton. What we do is we already
put this in a rack. That was the thing we did with Command G to get it so I could turn the whole chain on an off. But the added bonus of doing that is I can go down
here and press this. And now I can save the
whole effect chain, right? So I could call this
j is mastering chain. So now whenever I need
to master something, I can import my track, maybe import a reference track, and drop this right
on that track. And then I've got my
whole mastering chain. Cool, huh? Saves
you a lot of time. I still got to dial it all in, but gets me halfway there.
68. In-Session Mastering: Okay, I want to address one more big thing
in this section, and it's something called
insertion mastering. So let's look at the
big picture here. What we do as music creators, producers, composers,
wherever you want to call it, we make it. The typical workflow
is we make a track, we record the track, we produce the track in a DAW. We export that as a stereo file. We either send it to a mastering engineer or we've
asked for it ourselves. And we bring that track back in. We do some mastering
stuff to it, and then we export it again. It's a bit of a
cumbersome process and there is a trend developing. I wouldn't say it's a trend yet, but it's something that's new that I've just seen
a few people doing. That's really interesting and I wanted to point it out to you. And it is to skip the mastering process
as a separate step. They're still mastering. But what they're doing
is in session mastering. What that means is that
they're working on a track, their recording attract,
they're producing a track. And there are taking
a mastering chain. They're putting it on
their master channel. Everything's running through
that master channel. That's where their
master effects are. And so they're mastering it while they're
mixing it, right? In the same session. They're not doing a separate
session to master it, but they're mastering
in the session. This is weird. I know one guy
who's doing it and I was talking with
him the other day. And it makes really good sense. In his case. He does a lot of
work for television. He does a lot of work for producing for different artists. And he's in situations where
he's got to work fast. So he's producing a track. He's working with a vocalist,
he's making a track. He's got to kind of bounce out a mastered version really fast. So he's doing everything in the session now in
his track session, not a separate mastering session is a cool technique and I
think it's got some merit. If you want to do it,
you can totally do it, but you have to be
really careful about it. Just make sure you're
stepping through everything and not letting your volume get out of control, you still want to produce. And then as a next phase mix, then as a next phase master. But we're going to do it
all in the same session rather than exporting and then pulling back into a
new session to master. This is called
insertion mastering. It's really interesting idea. It's not something I've done yet on any of my tracks,
but I might try it. I might see if I can get
good results that way. Somebody consider,
I think you'll probably see people
talking about it in the next couple of years if you follow mastering,
chatter online. But something to try out
if you're interested, all the same techniques. Just gotta be a little bit
more careful about it.
69. Should You Master Your Own Music?: Okay, two more things
that I want to cover. Should you master
your own music? I think I alluded
to this earlier. And I think we've talked
about this a little while ago and I said we devote
a little bit more time to it near the end, which is now. Here's the deal. One of the things you need
when you're mastering a track is a fresh set of ears. Listen to that track. Totally new, totally raw. Hear it for what
is in the track, not what you think is
in the track, right? This is a super important
part of mastering. So for that reason, I don't like to
master my own tracks. I really don't. I have a mastering
engineer that I send it all my stuff out to. Most of my stuff out too. If I'm just doing
something fast and trying to just get something out for a collaboration
or something like that, then I might master it
and I have done that. But I kinda like the process of
having someone with fresh ears listen to
it and just say like, Hey man, like you're really
low on base in this track. Like the base just really isn't cutting through like
you think it is. Then they they
apply some material to some processes to increase the base and
make it pump a little harder because I thought
it was pumping harder. But it wasn't. This has happened
to me many times. Like you think something is
in the track and you hear it, you hear something
in that track that is not actually there. Maybe it was there
and you took it out and your brain is just
still processing it. This is just an illusion
that our brains do. We hear stuff that isn't
there all the time. And I swear I'm not that crazy. So to me, there's a huge
benefit and having someone else Master our music just to make sure everything's there
the way it needs to be. That being said, if
I'm moving fast, yes, I will master
of my own stuff. But also as much as
I like for someone else to use their fresh
ears on my music. When they do the master. I like to be that person
for some other people. So when one of my friends
finishes attract, they might send it
to me to master so I can be the fresh
ears for them. So you can certainly do it. You can master your own
music all day long, but I just want you to
consider that there is a benefit to having
someone else do it. So something to consider.
70. Getting Gigs as a Mastering Engineer: Okay, Let's say you enjoy mastering tracks for
other people and let's say you're getting
pretty good at it. How can you get gigs? Maybe you're interested in starting a little company
to be a mastering engineer. It is certainly possible. So the key thing to doing
this if you want to, is probably two things. The first is a portfolio, which means you need to already have mastered a
whole bunch of tracks. And I would make sure you've got a somewhat diverse portfolio. So you want to hear a lot of different kinds of tracks
in that portfolio. So what that means is
that for a year or so, I would master everything
you can get your hands-on. Ask everyone you know,
that's making tracks if you can master for
them for free. I know like doing stuff for
free is kind of a dirty word, but you're making
a portfolio here, so get a big portfolio of stuff. Just to show you're good at it. That's what you need. The second thing that you
need is some connections. People need to know who you are. And that will come
partially from having done a lot of mastering
already for free, reaching out to
everyone you know. That'll also come from building a reputation as someone
who's really good at it. And you can do that by reaching out to some studios
in your neighborhood. By getting to know people
who are doing mixing, but getting to know a bunch of artists and working with them. Any connections you
make will be good. So getting a lot of people, build yourself a little website. It doesn't need to
be anything fancy. It can be like a
Squarespace website. It's just gotta be able
to host some audio files that show your mastering work. And then once you start
getting calls for gigs, set a price. It's usually a price per track. Some people do it
per album though. I've seen that done, and I've
seen some people do it per hour of their time
to master something. But what I would do for pricing is looking at what people
in your area are charging. It's very different
around the country. So look at what
people are charging. Be realistic about
your experience. Start off low because you're new and then
build up from there. I will say if you
really if you want just like if you want me to just tell you a
number what people charge, I will take this with
a grain of salt, but someone who's pretty
good at mastering, but not like a rock star at it. Someone local here
in Minneapolis. That's good at mastering, but not very experienced at it. I would expect to pay
about $100 a track. So 100 bucks track. Sure, That's good price. I've paid their
professional person that I use is about
$250 a track. I've seen it higher,
I've seen a lot higher. So it can be a lucrative gig. But portfolio and connections,
that's what you need.
71. Thanks for Watching!: Okay, this is the very last
video where I tell you. Thanks for watching this video. It's always fun to make
these. I really love it. People have been asking
for a mastering class for a long, long time. And I finally got around to
doing it. It was really fun. Thanks for watching. I hope you are. I hope you got a lot out of
it and I hope you are able to master some tracks, maybe find a new career
for yourself in mastering. So yeah, thanks for being
a part of this experience. Thanks for taking
my online class. I've got a little bit more
for you in text after this, so please check that out and I will see you
in the next class. Bye.
 J. Anthony Allen, Music Producer, Composer, PhD, Professor