Transcripts
1. Introduction: Design brief is essential for any design project,
big or small. In your ability to use and understand the brief can
make or break the design. In this class, I'm
going to teach you a briefing methodology that covers all the bases and sets you up for success.
My name is Danny. I am a print designer and creative director
behind any till studio. I have worked with a bunch of clients from all over the world, licensing artwork and
creating bespoke designs. And I can assure you
that I would not have been able to work
on multiple projects at the same time if I hadn't had an effective Briefing
Methodology in place. In the beginning,
I thought it was incredibly difficult
to work with clients. I was afraid I would never be able to create a
design that meets the client's expectations while also incorporating
my own handwriting. But I'm so glad I give it
a try because it helped my business grow and I've
learned so much along the way. And guess what? Turns out, it's incredibly simple to develop design briefs
that sets you up for success and have
your clients want to work with you
again and again. Bullet proofs and brief
allows you to set your client's expectations
for the delivery. It saves you a ton of time during the creative process and prevents you from making unnecessary tweaks after
the project is finished. Both beginners and experienced print designers are
welcome in this class. By the end, you're going to
have a solid understanding of this efficient methodology and you'll be able to use it
right away with your clients. As a bonus, you also
have access to, to design brief templates plus the questionnaire
template that I use with my own clients to develop
their design briefs. And you can start using
them straight away. If you're ready.
Let's get started.
2. What is a Bulletproof Design Brief: You've probably come
across design briefs if you're an in-house or
a freelance designer, or even if you only
work on commission. The design brief is essentially
a document that contains all the information required to create a project
for your client. It's basically a
blueprint that guides you along the creative process so that you don't have to
start from scratch. And you will always have
that blueprint to tell you what to do and
what to design. The design brief is one of the most important documents
in any designer's workflow. It's the foundation that
every design is built on and it sets the tone
for the entire project. Working with clients
requires you to communicate with
them and understand their vision and ideas
so that you know exactly what they need and
want for that project in you. The designer can then sets the parameters and guidelines
for the finished design. Developing a design
brief before you begin each project also allows you to set your client's
expectations for the delivery because they
will know the style, the color palette, manufacturing
specifications, e.g. all upfront. And by using an effective
Briefing Methodology, and that's why I call it the
bulletproof design brief. Trust me, you're going
to save a ton of time and unnecessary two weeks after the project is finished. Before we move on
to the next lesson, I'd like to clear up
some misconceptions about design briefs. A common mistake I see designers make when working with clients. Not paying attention to this briefing stage
because they believe it's a waste of time
and they should be focusing on creating
the artwork instead. This is so not true. The design brief is a critical component of
every design project. Before you begin
creating a design, you and your client must agree on what's
going to be created. And your client must
provide you with a written approval so that you can move forward
to the next steps. And because this is the
document that contains all the information required
to complete the project, you just can't skip it. If you don't create a brief or if your brief is too vague, you run the risk of having to make lots of
adjustments later on. We consider the design
brief as another contract. A brief contract. You and your client
agree on all of the details and if they
request additional changes, you can accommodate them for additional fees and
your availability. This is fair to both of you, and this is how a
professional designer works. Another misconception is that the design brief can be
boring and repetitive. But Danny, I just got off
the phone with my client. I know exactly what they want. I don't need a brief, it's a simple design,
you might say. And I'm here to tell you that. Yes, you do. We may believe the information is crystal clear in our minds until the moment when we show
the design to the client. And they say, Oh, this is not what I had in mind. Now, what do you do? If that happens? You're going to have
to redo the work. You didn't have a document
with all of those specifics. And that can happen more
often than you think. Even when using a
fantastic brief. Some clients may even change their minds when they see
the finished product, or they may feel like repurposing the app
or for instance, and they have the
right to do so. However, you must protect yourself and be
compensated for the work that falls outside
of the scope of the project that you had
previously budgeted for. Also, when working on multiple projects at the
same time as I normally do. It's easy to forget things
and you don't want to bother your clients with questions you have already
discussed with them. So make a list of everything
and create a simple brief. If the design is simple, it doesn't have to be
overly complicated. Later in this course,
I'm going to teach you how to create briefs for more complex projects and simple brief for
the simpler ones. In a nutshell, the
bulletproof design brief will provide you with the blueprint
of all information you need in order to create a project for your client
so that you deliver exactly what they requested with this few
adjustments as possible.
3. Understand the Briefing Structure: A compelling design brief
must be to the point. So only use information that
is relevant to the project. It must be clear that
is easy to follow. So try to avoid industry
jargons if possible. It also must be concise
with a well-written text, and it must be visual. So include imagery that
illustrates the color palette, the style of the motifs
you're going to design. Provide image references so your clients can see what
you're talking about. Now let's take a look at how an effective design
brief is structured. Here are the main
components of the brief. The first component
is product line. What is your design
intended for? Before you start any
creative process, you must understand what
your client produces and the kind of things
they want to design for. Fabric accessories, e.g. are usually printed
on a small scale. So the artwork must
be proportional to the fabric space visible
in the finished product. Bedding designs,
on the other hand, are typically larger in scale and may not require a
seamless repeat layout. The second component is concept. What is the design
going to be about? It could be something seasonal like Christmas
or Halloween, or it could be
summer at the beach. It could also be
something as simple as a vintage floral
or animal kingdom. Your client will most
likely know or have some ideas about the thing
they wish to develop with you. You can also help them
explore the concept by offering your own
ideas and suggestions. And this interaction is extremely beneficial
for both of you. And the clients love hearing
the designer's vision. After all, they hired you
for this creative project so that they could see your handwriting in
the finished product. The third one is
elements or motifs. Be very specific and try
to avoid a generic words. Let's say your client
wants a tropical flora. Which flowers and leaves
are they referring to? Be specific? Make a list of each flower
that will be designed, such as hibiscus, banana leaves. In some ferns, e.g. if they are unsure about
which elements they require, show them imagery to assist
them in making a decision and discuss with them which ones would be more appropriate
for this design. Number four, style. Take note of this tile you're going to use
in this design. Is it minimalist, is at
your own signature style? Is it modern, playful,
traditional digital art? Here are some
examples of styles. Again, try to be as
specific as possible. If hand painted, stage,
the painting technique. If the client does not specify
a style they most likely want you to design and the style with which you are
most comfortable. However, it is worthwhile
to confirm with them. Number five, color palette. Is your client looking for a specific color scheme or are they open to
your suggestions? Perhaps they want you
to coordinate with a certain color palette that they already use in their items. Or maybe they need
Pantone colors. Is there a limit to the
number of colors you can use due to
manufacturing requirements? You need to find out all of those specifications
and incorporate them into the design brief. Number six, scale. The artwork size varies greatly between
screening printing. It also varies from one
product to the next. Is your client looking for a large-scale design with
more indicates details? Or do they want a tiny pattern? Number seven, printing
specs and deliverables. It is critical to understand the manufacturing
specifications and limitations before
creating the artwork. What's the manufacturing
process like? What are the constraints? What's the required file size? Is it necessary to separate
colors for screen printing? When designing patterns
for fabric, e.g. you may have a strict
color limitations, so you must know how many
colors you must use. A head of time. And number eight, timeline. How long will it take to
accomplish this project? When should the final design
be delivered to the client? Do you plan on showing
it to them and requiring their
approval along the way? Share these important dates with your clients so that they
know what to expect from you. These are the fundamentals to develop an effective
design brief. Make sure you create a professional looking
document containing all the information you need
and use reference images. Don't forget to
ask your client to review the brief and approve it. They can now detail
anything they want to change or that you
haven't stated in the brief. I guarantee this is
going to save you a lot of time after the
project is completed.
4. Real Life Examples: In this lesson, I'll show you two examples of design briefs and the final brains I made
based on these briefs. So this is a short and
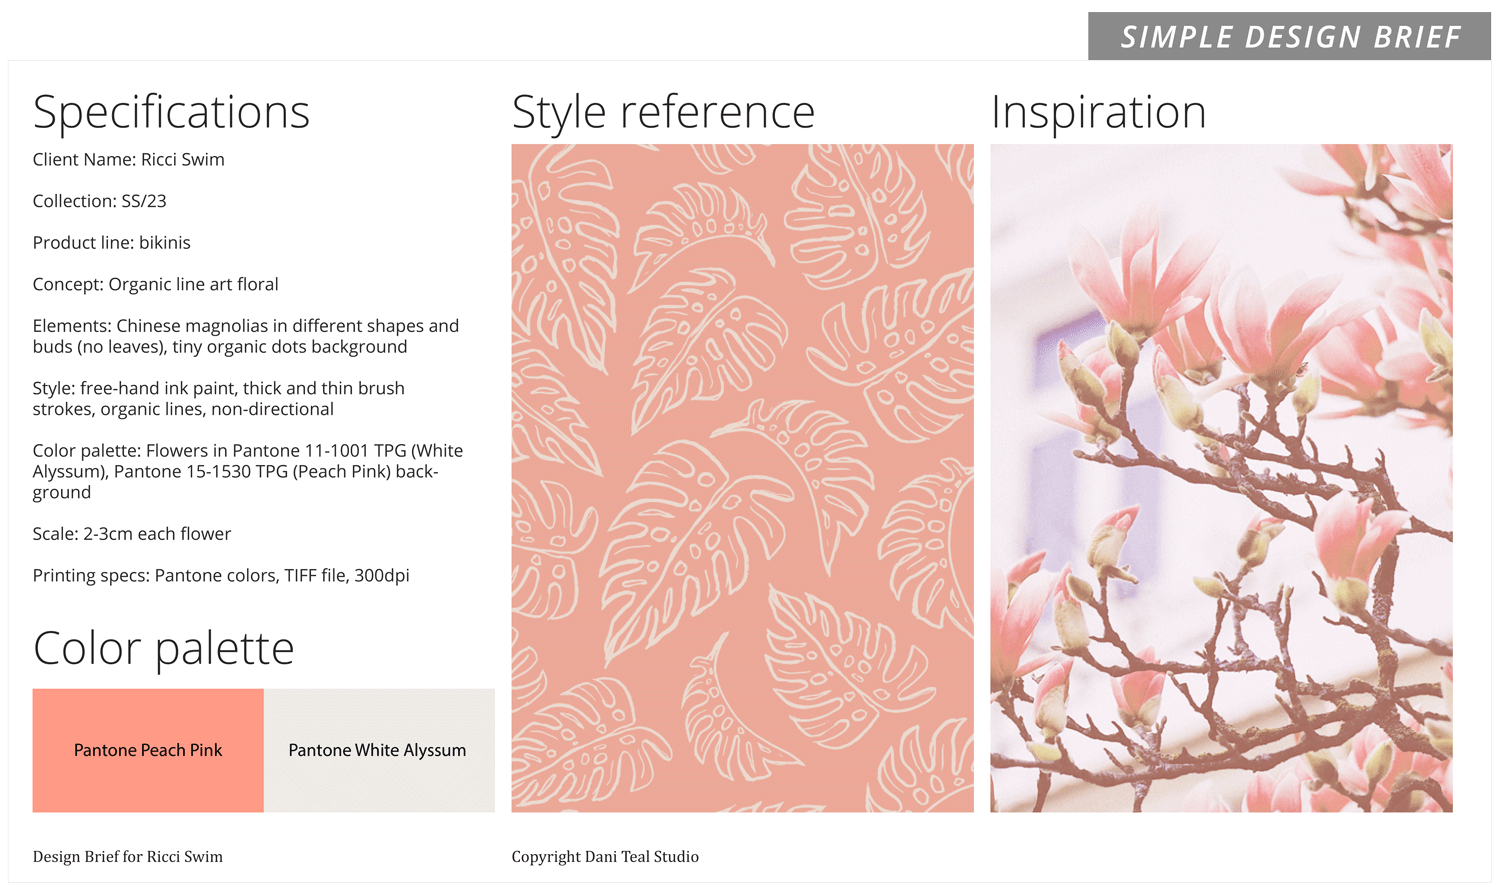
super-simple brief. It's basically a mood
board and it has all the requirements for
this particular project. So one-page only and we have
the project specifications. So product line, concept,
elements and motifs. I'm going to design the style, the color palette, size, as well as the printing specs. Use imagery to
demonstrate the style and color palettes to your clients so they know exactly
what you mean. Make sure you show one
of your own designs that are in the same style as
the project requires. You won't need anything else for simple artworks
like this one. However, you must
state all the details so that you and your clients
are on the same page. And as you can see
from this brief, the client wants
Chinese magnolias in different shapes and buds, organic lines with
take brushstrokes and tiny irregular dots
on the background. It's a two Pantone color print. Very straightforward. And now I'm going to show you the print I made
from this brief. As you can see, I used
the required pentagons. So it's a non-directional
print with the brushstrokes, fluoro of Chinese magnolias. Not a different flower, but the Chinese magnolias
that were stated in the brief and the tiny dots
on the background. Now, a design brief for
a more complex artwork. We will have the same
components as a simple brief. But this time we're
going to delve a little bit deeper
into each topic. On the first page,
we're going to write a client overview. What's important here is to know the brand concept in values. You can ask the clients for
this information, of course, in your questionnaire,
or you can just take it from their
website if it is there. But be sure to include
this in your brief. I also ask the clients brand guidelines if they
have it and the logo files. Because in the final delivery, when I use mockups to
show the print I made, I'd like to add your logo. This allows the client to
see how the design will look like before it's
actually created and also make it very
unique to the brand. On page two, we're
going to write down the project specifications. So a more detailed concept
of the new collection, the product line, and
the printing attributes. You may ask what if the
client doesn't have a design concept or they don't seem to be
interested in having one. Well, in this case, I recommend that you explain how important
this is to guide the creative process and perhaps offer to develop
the concept for the client. This adds value to your services and even allows you to charge
a higher price for them. Now, we're going to look at the design elements and motifs. Make sure that each
element has an image. You're not going to design a generic abstract
brand or just a floral. You must specify the
elements that will make the design and use imagery to illustrate
what you're saying. Here. It's the lily bouquets. Monstera leaves an animal skin, just like this
leopard print here. These are the motives that
will make up this design. So display the images that
you intend to design so that your client
is able to request changes before you
begin the project. This will save you a
significant amount of time and unnecessary adjustments after
the project is completed. You can find royalty-free
photos on websites such as unsplash.com
and pixels.com. In the style reference section, include images of previous
works in the same style. Or if you already have a signature style
which is fantastic, you should still mention it here and show have visual examples. The same thing for
the color scheme. If your client requests
a limited color palette, you must have the exact
codes and only use those. Alternatively, they may be open to your suggestion,
which is wonderful. However, I still
recommend that you list the colors here
and perhaps explain that they are only
guidelines and that you may change the colors
as the project progresses. So for the size, what size should be, how big should each element B? And I usually like to add an example of a
similar print type. For this design, e.g. it's a seamless pattern
that can be repeated endlessly with no visible
seams are interruptions. So I like to have one
here to show as well. Last but not least,
that project timeline. According to the brief, this project is going to take
4-6 weeks to be completed. The week one is
the design brief. Week two to three, first drafts
and lots of sneak peeks. Week four to five,
Friends delivery, week six, revision and
final files delivery. And now I'd like to show
you the final design I created in response
to this design brief. As you can see, the
lily flowers and monstera leaves are done in the style I described
in the brief. Everything is in fact exactly
as stated in the brief. The color scheme, the
scale style in motifs.
5. Class Project: Now it's your turn. Your class project. You're going to create a
one-page design brief, including all the specific
cations and imagery. Just like we discussed
in lesson four, you are not required to
create the final artwork, but you're free to
do so if you wish. And when you finish
your design brief, make sure you upload it to the project gallery
so everyone can see. I can't wait to see
your design brief.
6. Final Thoughts: Thank you so much for
watching this class. I hope you've
learned how to write your own bulletproof
design brief and that you feel
confident that you have the resources to use this incredibly
effective methodology in your workflow straight away. If you enjoyed this class, please leave a review. Your feedback means a lot to me and we'll help me improve
in my future classes. If you have any questions
about this class, Use the discussion
session down below. And remember to upload
your design brief to the project gallery so everyone can see and I
can comment as well. If you want to learn more from me or if you want
to follow my work, you can visit my
website at Danny tilde.com or follow
me on Instagram. Danny tilde dot Studio also makes sure you follow
me here on Skillshare. This way you'll be the first to know when I launch a new class. Once again, thank you for taking this class and I look forward to seeing
you in the next one. Bye.
 Dani Baumgarten, Artist, designer, teacher