Transcripts
1. Intro: As the name suggests, image transfer is a method that involves transferring
an image that has been printed on paper onto a
different background or new backgrounds using a
specific medium or method. Image transfers and paintings, and photographs and drawings, nor are they prints. They are absolutely amazing. They are versatile and the
technique is very effective. Height, my name is Nina, I'm an artist educator and
online content creator. And this class is the
first in a series of classes that are
going to deal with various methods of
image transfers. In this first-class, we
are going to learn how to create image transfers
using clear packing tape. Yes, you've heard correctly, you can use simple
clear packing tape or sedative to create the most
amazing image transfers. In the beginning we are
going to have a look at all the tools and materials
that you're going to use in this class. Then we're going to look into
the actual method of how to use the packing tape or silver tape to create
the image transfers. Once we've mastered
this technique, we will then explore
several projects involving packing
tape transfers, starting very simple ideas
that are easy to follow. But if you would like to
take it a bit further, I've also included more
advanced art projects. However, this class
is suitable for total beginners and you don't need any previous experienced. There's a few who are more experienced
crafters or artists. Once you know the
basic technique of packing tape transfers, you can just hop on to the more advanced
methods in this class. I have made you at least
a little bit curious about the image transfer method. I would absolutely love to
see you inside this class. So why not have it go and
join us in the studio? See you there.
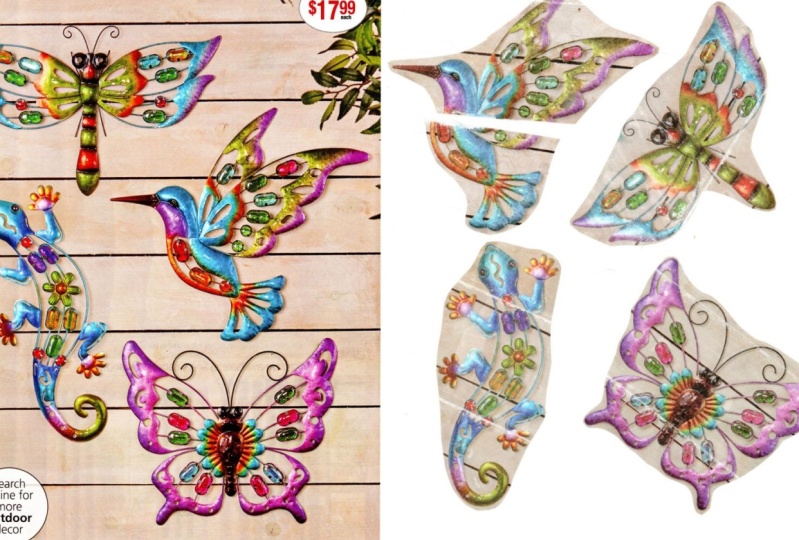
2. Tools & Materials: Okay, so first of all, let's have a look
at the tools and materials we're going
to need for this class. First of all, as the name
of the class suggests, we will need some
packing tape and we definitely need the
transparent tape for this. They usually come in two widths. It's one is like the normal solid tape width and the other one
is slightly wider, probably about twice the
width or facilitate. It doesn't really matter
what brand you go for. I've tried various tapes
and it didn't matter if they were more
expensive or cheaper. They all worked. Well. You will have to do with images that are bigger than the tape. You will have to layer it and
you will have to overlap. The individual strips of tape. Both work really well. So if you just have solid table at home and
you want to get started, that is absolutely fantastic,
That is brilliant. You don't need anymore. You, if you've got any
of this one at home, you can use this,
you can use both. And I also find that
for some images, it gives different
extra dimension and exited detail whenever I'm
using the thinner tape. So even for bigger pictures, I will sometimes use
the thinner one, but we will talk more about
this when we're actually going to start on
the image transfers. Then the second thing we're
going to need our images. If you've taken any
of my other classes, you probably know that
I'm a big believer in using what we've
already got and making use of materials
that might otherwise be recycled or not be used rather than go out and
buy new materials. So I've got a whole stack
of various magazines. Some of them are actually quite
old but just Kept hold of them because I know that I can use them at various
craft project. So it doesn't really
matter what you go for. As long as there are
images in there that you think you would like to use
for your image transfers. Then something else
that works really well are not only magazine
spread obviously, catalogs, that various
forms of catalogs around. So make sure that before you put anything into the recycling, just to maybe go quickly
through them and see if there are any
images you might like. Also talking about the
paper quality for this type of image transfer of find that any paper quality seems to work. There. Some work a little bit
better than the others. And I even find that, let's say one publication like the country living magazines. Just get one out. I used to be subscriber, so I've got kind of like ten and more year old publications and then I've got new ones. And you can just tell when
you're working with them that obviously the inks and
what I might call them, the glazing or the finished
the varnish on top of the glossy magazines
will have changed over time and some are lot easier
to transfer than others, but you will just have to play around and just
see what happens. And I find that's one of the really beautiful things
about image transfers. That there's always a little bit of an unexpected result that he learned to
play with that. This is another really nice one. It's gorgeous paper. I really like this for various
craft and art projects. But this is a clove catalog. And these are really, really brilliant to use. Then as I've got quite
a lot of sheet music, I tend to use sheet music a
lot and lots of art projects. But if you come across any
sheet music and I don't know, secondhand bookshops
or charity shops. They always worthwhile
picking up because they're so useful in so many craft
and art projects. So you could use that as well. Then think about wall calendars. You could use a
probably try a few. Images. And here for our class, another really
amazing and fantastic go-to stash of
materials or old books. Anything that you can find in charity shops that
can be a bit tatty or something that you really feel when be really used but has fantastic
images in there. So I'm thinking about
using something out of here for one of the projects. Then children's books. Really good. They've got some really
fantastic images and they tend to
work really well. I've got these. Then. I also planning on using some images
from this book. This is quite glossy and I did try and image transfer
just to see if it worked. And it did work
really, really well. So we'll be playing around with some of these
images as well. Then another paper
sores that you shouldn't forget
is wrapping paper. I've got here some Christmas
Eve wrapping paper because I just couldn't find
all my other wrapping paper. So just ordinary
wrapping paper and your birthday wrapping paper
works really well. It's no rant about
Christmas time. You could just think about
just using a reindeer and do an image transfer if you ran this and then
you can stick those on on parcels and you're going to have a look
at this later on. This is really nice to be
used in strips or just again, little details of this. Yes. And then just
any other nice paper? This is tissue paper. And I have used something like tissue paper
before for an image transfer. What we're going to have a look at this one as
well in this class. So you can see that's
going to be a lot of, Let's have a go and see if
this works in this class. I've worked with a lot of them. But I still find it also
really important in a class to add an element of not knowing what it's
going to happen in it. And why I like doing
is it's just to encourage you to keep trying and just work with the
results and not get disheartened if
something doesn't work out because at least you've
tried and then you know, Okay, this doesn't work. But the other thing I
tried worked really well. So always keep trying and don't get, don't
get discouraged. Then something else you can
do is work with images. Like I've got this
vintage clip art. And I find it quite nice to kind of like make my own
little stickers this wave for my journal or
just to put it onto presence or just wherever I think I should have a sticker. So what I've done, I've found some free vintage clip
hard on the Internet, and I printed it
out on my computer. It's very important to know
I've got an inkjet printer, so you can't use images that have been printed
out on an inkjet printer. If you have a laser printer, that would work really well. But for an inkjet printer, because we are going
to work with water, it will just dissolve
the inks and your image transfer won't work, not with a packing tape. This sort of image transfer
works with other media, but not with a packing tape. I then went to our local
library and just took some photocopies of my
printed out sheets of paper. That works again
because the toner that is in photocopiers
works really well. So what I have done then
is just also choose a few images from my trip
to Paris earlier this year. Because what I want you to do, I'm going to create a journal that is all about
my trip to Paris. And that is going to
be a class based on this that is going to be published and is kind of like already in the making. But I thought it
would be nice to not only have printed out for two graphs of my journey, but have photographs from
my truck for my trip to Paris and just play
with the images. So I'm going to do a
few image transfers that will hopefully
then make their way into my into my travel journal. Now that we've looked at the different kinds of
images you can use, I'm quickly going to take you through the tool we're going
to need for this class. Right? So apart from the
actual packing tape, you're going to need
a pair of scissors. One just to cut the packing
tape to cut out the images. And maybe smaller
pair of scissors. If you then wanted to cut more detail
into the packing tape. You're going to
need a bone folder to burnish your images. But you could use the back of this scissors
or anything else. And then for one of the ideas I have which are
going to be the Polaroids, you would also need
some cut stock and a ruler pencil,
a glue stick. And this is absolutely
this optional. And then to store the images
because you won't be using them all at once and they are all going to be a bit sticky, so more than others,
but you don't want to store them on paper
because then they will stick. Really good. Way of storing them is on grease proof paper and
then have them in folders. So that would be another
good thing to have if you haven't got any
at hand the moment. So any kind of black
plastic bag or if you've got if you have laminated anything but you don't need
that piece of laminated. That lemon is to cheat anymore. You can also stick
them on there. Before I forget you're
going to need a container. It could be bowl. It could be something like a storage box or a small kind
of like a washing up bowl. And you are going to
need some water as well.
3. Putting the Tape on - Part 1: I'm going to start with
two smaller images just to show you the basics
of the image transfer. This one is a clip art. Both of these have
been printed on my, on my inkjet printer
and then photocopied. This is obviously
a color photocopy. And this is just a black
and white photocopy. That's just because I
haven't got a laser printer. And I can choose and ink jet printer print because
the ink will just dissolve. I'll start with the smaller one. And I'm going to use
my wide packing tape. As you can see, I am using my
my cutting mat to work on. The reason for this is that, um, my table is quite old. Some of the varnish
is coming off. I put some of the
tape onto the table. Then it would pick up
some of the varnish. And I don't really want that. So you might want to look for either using your cutting
mat or a laminated sheets or maybe a plastic placemat
or something like that. I haven't got a dispenser
neither for my packing clip, not for my standard tape. I usually put a little
paperclip under the end of the tape because it's easier to
just find it that way. I'm going to use the whole width of this packing tape
to cover the image. The size is just perfect. Something that I find that for some reason the paper or almost wants to jump up onto the tape. Have to be aware of this. I'll just try and hold it in place while at the same
time sticking it down. Then I'm going to
use my bone folder to burnish the image. Because I want the area
of my image to really, really kind of stick onto the tape so that the stickiness, the glue of the tape
can really hold onto to the ingrown
toenail in this case. Okay. That should be enough. Just cut off. Let me give tapes.
So this one is done. For this one. I'm going to use the seller tape just to show
you how I kind of layer the, the tape or severe this image, you'll see that I've
cut kind of like a rectangle or rectangular
shape around the image itself, which I haven't done here. The reason being that I had quite a few images quite
close to this one, so it had to cut around it. However, I'm still going
to layer the tape, so it will end up with a rectangular shape
for this image. The reason being that the tape is delicate and I don't
really want to tear it. And it will be a
lot easier to use the final packing tape transfer. It will also be easier to get rid of the paper
without having to worry that you might
damage the tape. Okay? For this, you might want
to make sure that you're a surface is really nice and clean so it doesn't
pick up the tape. Basically doesn't take
up any dirt if possible. Then I'll just stick
down the first layer. Go up to here because the
tail of the bird ends. There's, I want my tape to
go all the way around here. The next trip or set a
tape will have to overlap. The first one. I have just a few
millimeters or enough. Because basically you need
this tape to stick together. Because once you're
washing off the paper, if you still want all the strips of tape
to stick together, if I just put my strips
of set of tape right next to each other so
they wouldn't so they wouldn't overlap if I washed off the paper background, my salad tape strips
would fall apart. Something to keep in mind. If you would do in a
particular image transfer or a mixed media project where
you would want your image to be on separate
strips of solid tape. Probably need at least one more groundless
going to overlay. Again, I'm going to
make sure that I get the whole image because
I really don't want to lose any detail. Okay. I'm going to peel
it off heavily. Then I can already cut
some of the tape off. I would say around about here. Might've been easier to have
done that with my knife. What we're still on the
cutting mat, but careful. There we go. So I've now got my
first two images ready. And basically, that's
the technique or the technique of partying on the packing tape onto images. And you would do it the
same way with images from magazines or books
or any other images. We using. I am going to make another video where I'm going to show
you some other techniques. What you can do,
first of all, how to deal with bigger images. And then I'm also going
to play with the paper. Basically I'm going to
crease the paper to create a different effect on the
packing tape transfer. But this is all in
a different video.
4. Putting the Tape on - Part 2: So here I've got a bigger image. This is an image obviously
from a magazine. So first of all, I'll finish cutting it out. And then I'm also
going to cut off the writing here because I
don't want it on my image. I am going to use the
wider tape for this. I would recommend in
the beginning maybe using the narrow tape because I do find it
easier to work with. I also start with
smaller images and then basically work your way
up to bigger images. You can basically go either
this way or the other way. I think I'm just go this way. Again, be aware of the
fact that the paper might come up towards you sometimes
with bigger images, I'll just put something heavier on the image that
seems to help a little bit. Then again, if i'm I'm
overlapping the tape a little bit so it's basically wider than
the actual image. I can stick it onto
my cutting mat. And that makes things easier. Now, I have to make sure
that overlap that first. This is actually lying, really nice and flat. It's not always the case. But as I said, I find that that's one of the really beautiful
aspects of doing these image transfer so that you can never really know what
the result is going to be. So you always work with an
element of the unknown. Okay, so now at the top, I've only got this
little bit left. So it's actually not
really necessary for me to use a wide strip. So I'm going to do now, I'm going to patch work. I'm going for the last trip, I'm going to use
oversee overlapping. It was just perfect. You can do something
like this as well. And then we're back
to obviously using the bone folder and
just varnishing. We're back to using burnishing
the image really well, make sure you take now you
take your time with that. Okay, Is it really makes
a difference and how well your image turns out. I'm going to use this
image in my journal. Probably. Let's see. Okay. And then next I'm
going to show you kind of other techniques. Way, basically
manipulate the paper before you put the tape on. And then all others do. I'll just cut off type that. I'm not my thing. Just cut off the tape. Sticking out. This one is ready to go into the water bowl.
5. Putting the Tape on - Part 3: As you can see, the process
is always very much the same. You are putting your tape onto the image that
you want to transfer. I just wanted to give you an additional idea
of how you can start playing with the images that
you're wanting to transfer. I have a selection of these really fantastic
wall calendars. They're all literary
wall calendars. They've got lots of
fantastic vintage images. So I'm going to choose
a couple of those. I might actually use these two. Okay? So what I'm going
to try with this one is if I'm thinking
of kind of like almost like recreating
a vintage photograph out of my packing tape. And I wanted it to look a
little bit battered a little bit as if it's being carried around and move from one place to another
a little bit creased. I'm just going to
crease the image. Then I will automatically
have some inconsistencies in the way that the table's
going to adhere to the image. I might also try and you try and not put the tape
on to perfectly. Whereas usually I
will try to make sure that the tape doesn't crease, that there aren't as
many air bubbles. So I'll just try and kinda do
it and not as perfect way. Just cut it. I can drop it a
little bit and yeah, I can already see that I've got even the the tape
creasing a bit more. I have to say this is
very well-behaved. Tape. Sometimes have tape that
has a mind of its own, but this one actually
wants to like quite flats. And again, that's something
you can experiment with and try different things. I'll still be using my
bone folder to make sure that the tape does
stick to the image, but there will be areas
where it won't stick as well as in some other places. I find even just looking
at it like that, it looks it almost looks
like an old photograph. So I quite like that. I'm kind of as a
comparison with this one, I'm going to just
leave it as it is and just quickly cover
it with a tape. Again. Before I soak it in water. I will just cut round here to
cater for the excess tape. I would definitely
recommend that you also choose images to just
play around with. Maybe don't start
with the images that you really care about. First, give yourself
the option to just play with this method
and just see how they come out and
just getting used to the whole packing
tape transfer method. Also tip, sometimes it
can happen that I've got a three strips of
the white tape. Now I've got this tiny, tiny strip left over
here on this side. So what I usually do with this, I can either go over it with
my white tape or what I can do instead is just used my cell type and kind of
create a little patchwork. And just use that to make up just for that little
bit on the side. But again, experiment and
see how things work for you. I'm going to repair a
few more these transfers and then it's time to put them all in water
and let them soak.
6. Removing the Paper: Now it's time for
your bottle of water. You can just use cold water
that works absolutely fine. It doesn't seem to
make any difference. If your water is cold or warm. Sometimes I just have a tablet
because I find it's nicer to work in water that
isn't freezing cold. Right? Then next, just stick in your
prepared tape transfers. Because what we
want the paper to do is get soaked with water. And then we can rub away the paper and we will be
left with our images. Obviously, a paper
that is thinner, like my printer paper
won't take that long to soak up enough water
with anything else. I would just leave it
in for a bit longer, especially if you've
got Let's have a look. E.g. the calendar pages
were definitely thicker, so this might take a little
bit longer to soak up the water and anything
that has a glossy finish. So if you've chosen
magazine pages like this one or catalog
pages have a glossy finish. Those will take a little bit
longer to get soaked up. But let's just get
started with these. I'm just using my thumbs
to just rub away the well, we can actually call
it pay for pub now, I don't have to use a lot of pressure comes off
nicely because I have to be careful that I don't drop too hard because I
don't want to rub away any parts of my image because
that is possible you can accidentally rub away
parts of your image. But if you're careful on your religious rubbing
away the paper, you should be fine. We can already see that almost
all of the paper has gone. Once you've got all the
paper of your transfer, you can just put it to one
side sometimes what I do, I just have a dry towel next to my table and I put
them down, upside down. I want the sticky part to
look up because obviously I don't want any towel fluff or anything to stick to
the back of my images. Just to show you all just
sticks and Matthiessen. Mike's also sends to obviously change your
water on a regular basis, make sure that you take as
much of the pulp out as possible so you don't
lock your drains. You don't want to do that. You can definitely put
more than one image into the water and get
them all to soak. Sometimes I'll just
I'll just do a few of the I prepared a few of the images and then just
stick them in water. Then I'll go away,
do something else. Or this one actually
comes way already. I'm go away, come
back, have a look. Have a look with this one. Yeah. Slowly. This one is starting. This was coming away. But I know if I left it
in for a bit longer, it would be even
easier to get it off. Some work with this one. Yeah, this will definitely
take a little bit longer. Because you can see it's glossy. I can sum comes off. I might just leave it in
there for a bit longer just to make it easier to
get the paper off. Let them all soak. Maybe just quickly do the other smaller
image. There we go. That should be done. Sometimes, always have
a few or a couple of balls on the go. One in which I'm
soaking the images and the other one wagon
cleaning them off. I find this just
makes it easier, especially if you've got quite a few you want to get through. And that was really quick when I've got
my little typewriter. Alright, so I let these soak and then starts to get those ready. And we'll just come
back for a few updates. And I also want to give
you a few tips of what to do with the glossy pages. And if you find it
difficult to get the back of the
paper off the back. Right? So if you've got a glossy
surface and you'll find that it's really
tricky to start. If you rub like
little circles with your thumb and you find
that nothing is happening, you can do, and I would do that in a corner
of the image that isn't maybe your most
important focal point, e.g. if that was a face or we're
doing a difference pod, you can use your fingernail, just gently start scratching
just to kind of like a tiny little hole because once you've
got an opening there, it will be much easier
to get the paper off. So that's a tip for
any glossy paper. Then I can just get
this little bit off. You will find that some papers will kind of come off in layers. So actually most do apart
from the printer paper. So it's almost like I've
got this layer off, but I've still got
something here. So I just carry on rubbing. It really depends
there some papers where you don't seem to be able to just
get everything off. What I would go for if you can. If your surface starts
to feel really smooth, almost like the
friend of your image, like yeah, almost as
smooth as this one. Then you should have got
rid of most of the paper. However, if it's still feels
a bit like little bit rough, like wet bulb is
ill or something, then you will still have
some paper on there. But sometimes I'll
just do it in stages. I'll get some get as
much paper off as I can. I can seem to be
able to get off. I sometimes even
just let it dry. And once it's all dry, you can then see if there's
still some paper there. Then I'll just so good again. And try and get the rest
of the paper off the tape. You can see that this one
will take me this long. Does it take me longer
than the first one? Horse you can see that
it's you can study. If you didn't know, you
wouldn't really know. You can't really tell much that we forgot
paper underneath here, but no paper up there. So this one works
actually really well. The image transferred amazingly, but you've still got
these little areas where you can see this is where
the where the two layers, if the solid tape overlap, then there's a
crease and the tape, and still these little textures in there that just make
it look so different. Okay, That's this one. Then we could just
have a quick look. This one came off, yet. This one is coming
up beautifully. And that shouldn't be
any trouble at all. We can see again that it's coming off in different layers. Are we needing to change
the water in a moment? So yeah, that's coming off
really, really nicely. And what about this one? Yeah, same here. This one was a
little bit thicker, but because I've lifted
in the water to soak, it's coming off really nicely. To finish this one. All fantastic. I absolutely loved this. Remember this was the
one that I creased. And I can't tell
you how beautiful this result is. It really is. I'm really thrilled and
I know I'm going to do more like this. We've got something
else in here. Let's just have a quick look. This one's looking
like, Yeah, that's one, that one's coming
off quite nicely. Again, you can see
the different layers. Just get a little bit more. Perfect. Absolutely perfect. You can really see how, if you just use
this core nice e.g. here you can really
see my fingers. So that wouldn't be really
brilliant for layering. You go back to this and I know I haven't
quite finished it. But you know, at the
top, It's see-through, but it has really taken a lot of the color on the original page. So you can see that different kept taking
different images from different kind of
different magazines and pages and destroying you get so many different results. And it's just really
beautiful and so exciting. So I'll be cleaning
all of this off. And then we can get started
by having a look at some of the projects that you can do
with your image transfers.
7. 1. Packing Tape Stickers: Right, So let's first have a
look at how you can use your packing transverse as
very simple stickers. This is my bullet journal. I don't have a pretty
beautiful bullet journal on my bullet journal
is very practical. But I still like to
use some washi tapes. I'm just thinking if I was e.g. to have a to-do list
and I wanted to have like an anything I
need to write or if e.g. I. Had my list of
e-mails to ride or let us write anything. I could use a typewriter. And then I can have this as a, instead of writing my
writing to do list, I can just use my
little sticker. It's really quick and easy. And I really like this page layout and then I'll
just start doing my list. Then another option, e.g. in this one, I've used one
of these stickers just here. They I photocopied some of the, these vintage scrap
paper images. And these look really pretty in journals or junk
journals as well, but you could also
use them to decorate any letters, you right? Okay. So this is basically the
easiest way of using your packing tape
transfers as stickers. You can almost make it like
your own series of stickers. Next, we're going to have
a look at how to very quickly make a tag that you can use either as a bookmark or
as a tag to add to presence.
8. 2. Packing Tape Tags: Another idea you can use the packing type
transfers would be to create those little
luggage labels. And I like to use them to put them as kinda like
name tags on presence. But you could also use those as bookmarks or in
your junk journals. So I'm going to use the OWL. Just had a quick look on how big my label
and needs to be. Obviously, if you've
got a ready-made and carts luggage labels, you can just use those. You can buy them readymade, but you could very easily
just make them yourself. I'm going to use Kraft paper, but you could just use card
stock and any color that you like that we're this one
just to have a look. This one. I like this size. Actually, quite good. Other words we can just
do basically you just measure how wide it needs to be. This one, I would probably
want to go about 5.5 cm wide. Then it's let's give her 10 cm, ten, maybe even 11. 11 times five. Okay, let's do that. Okay? So if you've got one, if you've got large
labored at home, you can also use that as
a template to make more. Then obviously the next
thing that needs to happen is to make
it look like one at one of these luggage labels is to cut off these corners. You can just usually I
just eyeball the corners, but I might in this case
just use this one as a template and just
cut off the corner. Just like that. If, if
I didn't have that, I would just probably
do something like that and try and have a similar
angle on the other one. And there we go. Next, I am going to
use my hole punch, but just for one whole again, I'm going to just
eyeball it and try and punch a hole somewhere
in the middle. This case, I could
actually make two. Next, I'm going to use these a whole enforcement stickers. They usually come
in packs of many. I think this one
came in near 300. To make it kind of like a
blend in with the theme. I've just use a stamp
pad to color them in. These are quite dark. It's actually black just
because I couldn't find my brown stamp pad. But again, you can do that
really in any color that would go with the card stock
that you've chosen. Okay. I'll do one on either side there and
I'll grab my image. Usually these stickers are
still very, very sticky, especially if you're
using the clipboard, because it only had to take
on a little bit of ink rather than the other images
that have a lot of color that they take up and
then it loses the stickiness. But these tend to
be quite sticky. If they're not sticky enough, you can just use a glue
stick to attach them. Have a look wherever
you want this. Yeah, I think that looks
quite good. Let's put it on. And then I'll just use the
scissors to cut off any of the tape that
is hanging over. There we go. I might even get my bone folder just to make sure that it's
sticking really nicely. On a little label. Fantastic. And then I've
got some bakers twine here, which I'm going to use. That was kinda like an off cut. I think the the last bit
of the bakers Twine, but it's just the
length is perfect. So I'm going to use, and there we go. We've got our little
kind of a gift tag or bookmark label that we made using one of our
packing tape transfers.
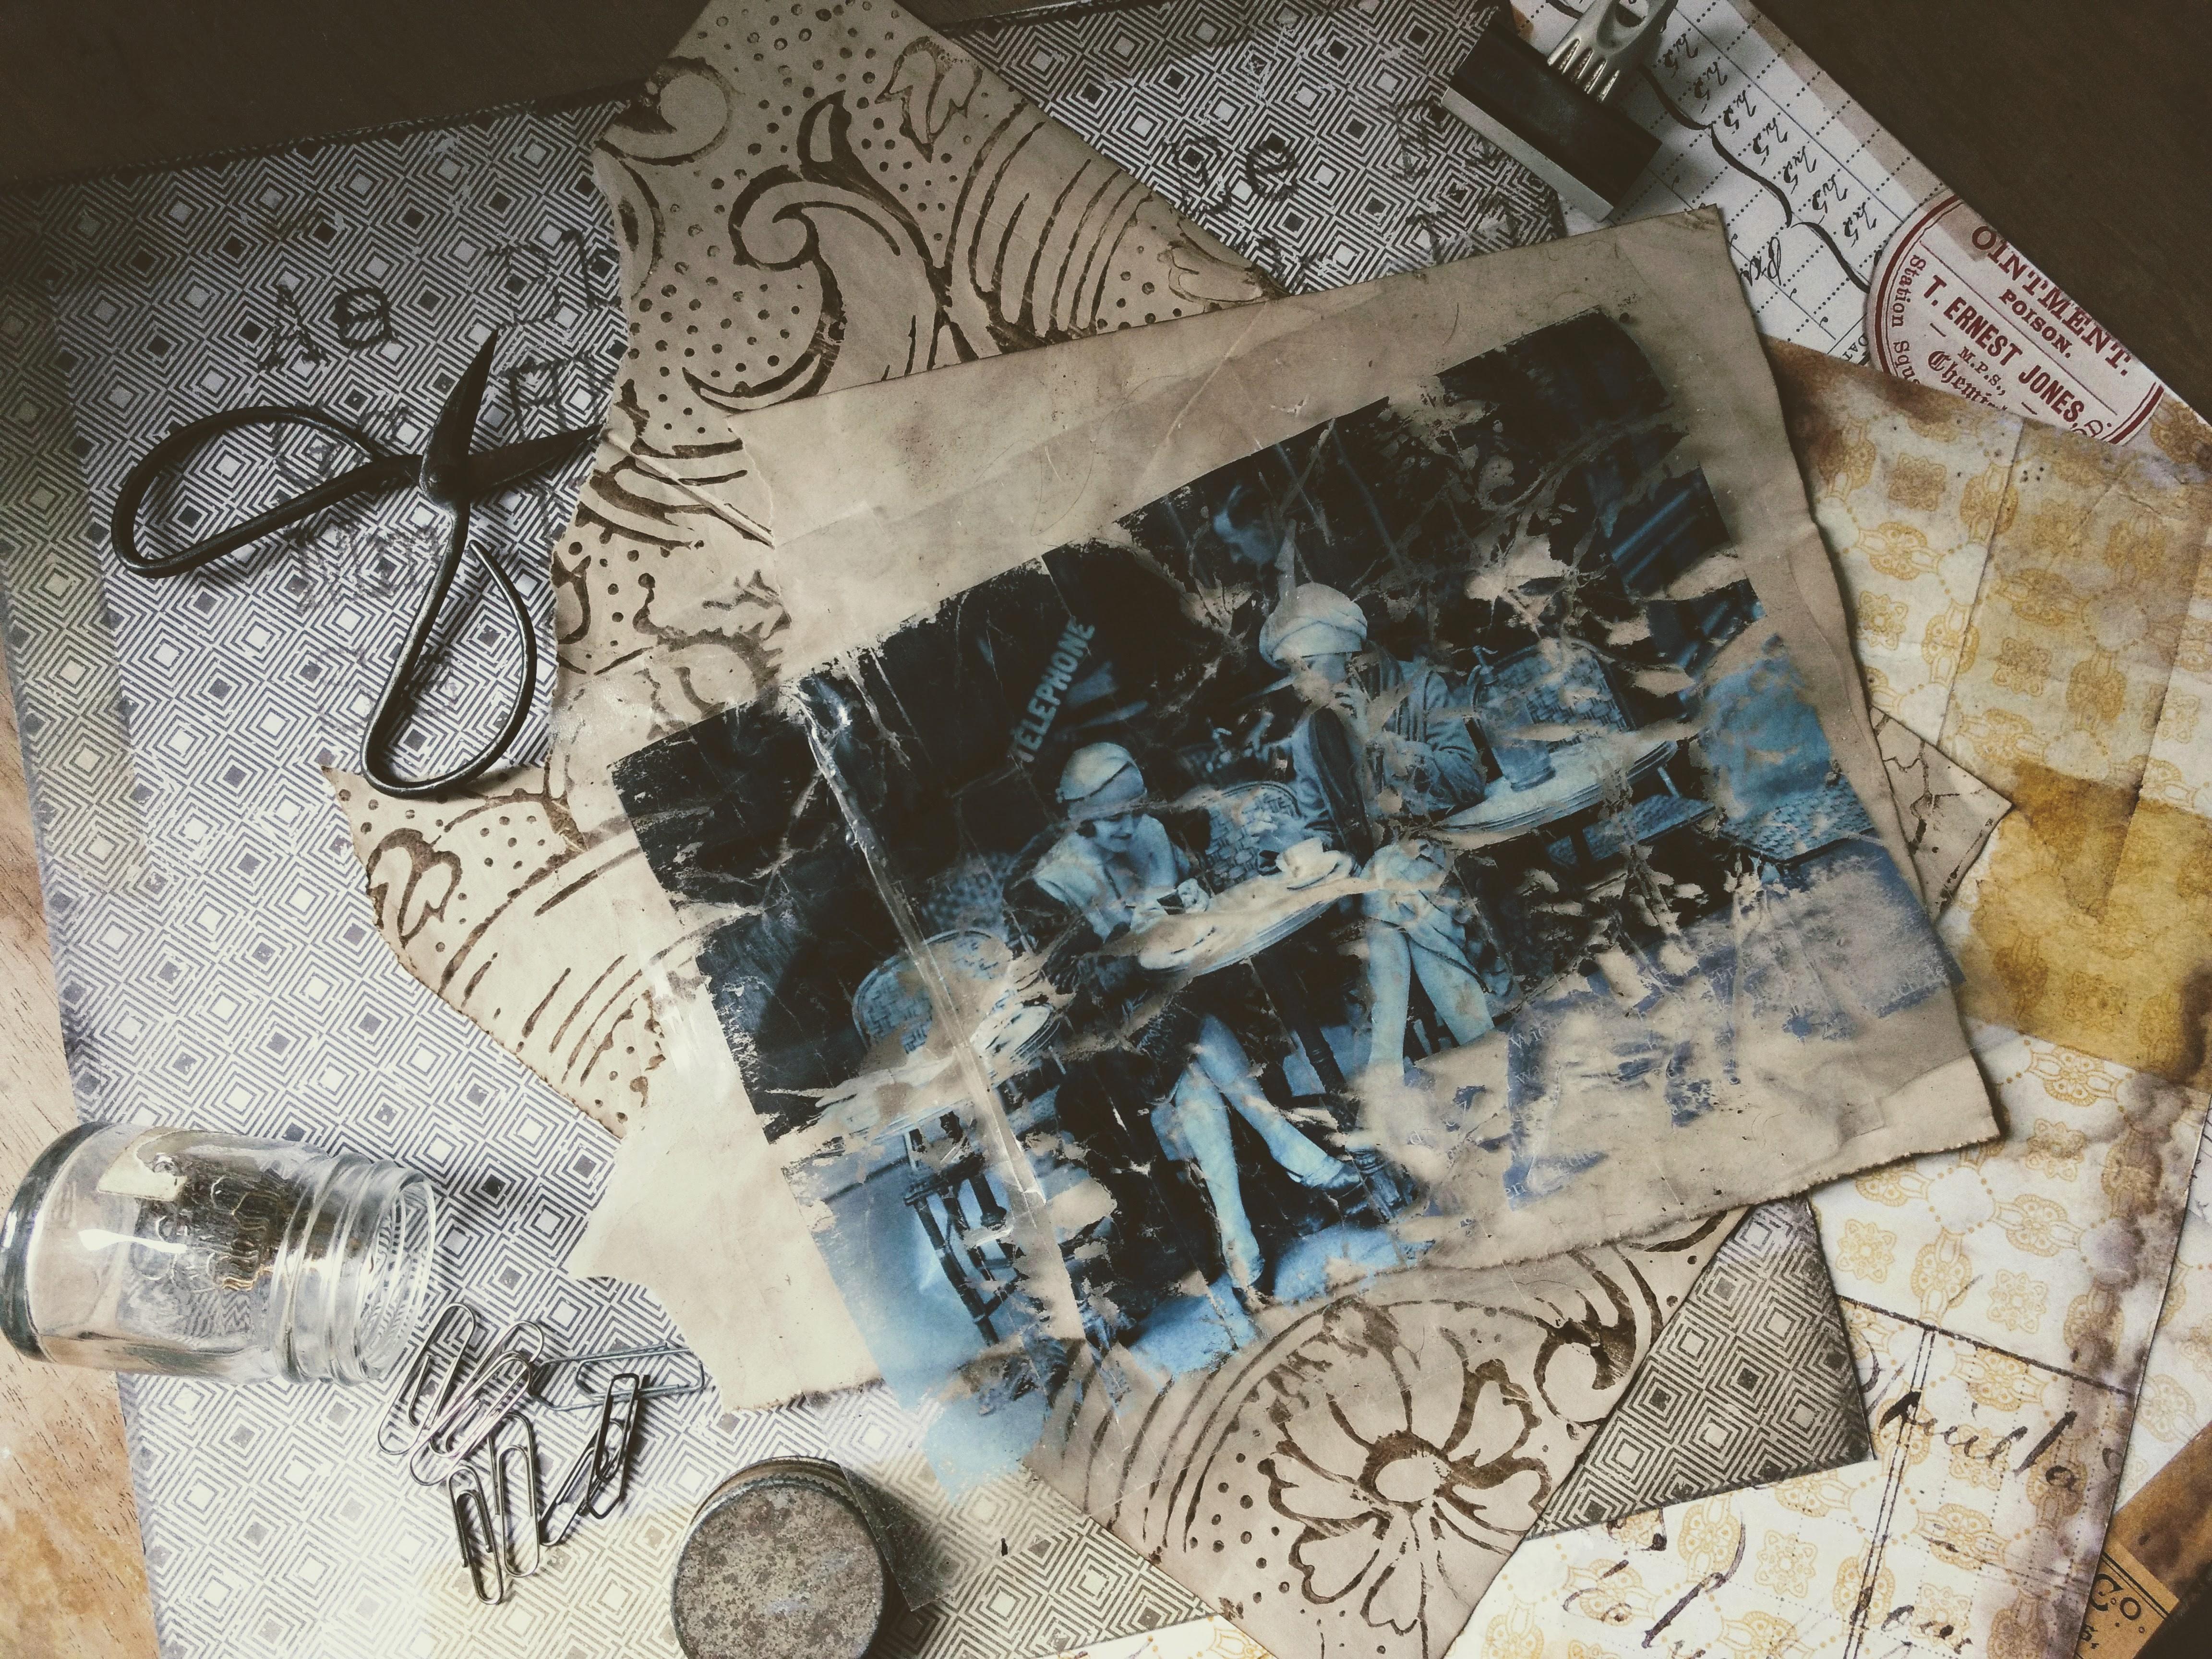
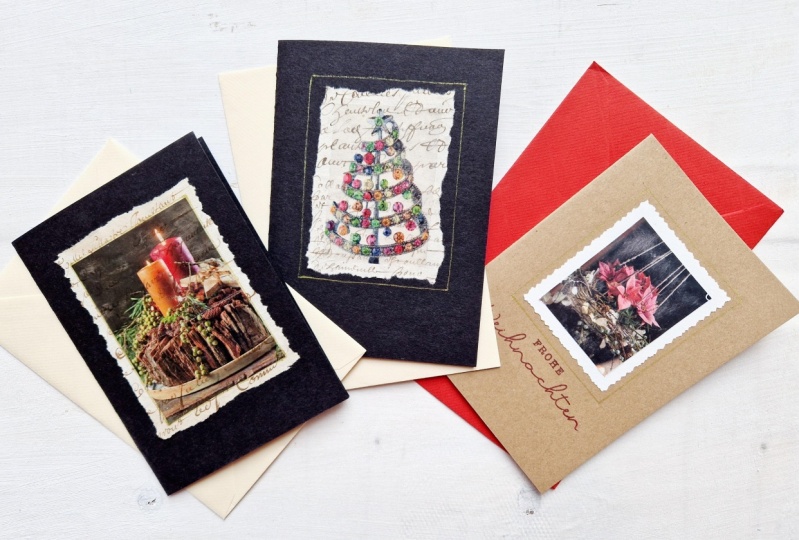
9. 3. Simple Cards: In this video, we are
going to take the idea of packing tape transfer
sticker step further. In principle, it's
the same idea. But this way you can
make a very simple card. And we're adding,
if you wanted to, we're adding an extra layer of creativity to the whole project. As you can see, I've already
got a simple card finished. This has a story behind it. As you can see,
I've not only got the sticker of a lady
drinking a cup of tea, but I've also got
these letters on here. And so basically what happened? I was wondering whether
I wanted to put this a packet tech transfer on to a book page, lifted there. Then came back and decided
that I didn't really like it, but because this tape
was quite sticky, I couldn't just pull
it off the book page. So I had to soak it again
and the paper came off. But the letters stayed on. And I thought it was actually a really interesting
accident that happened. So that's something
else you can do, is have one transfer. And if the back is
still really sticky, you can put it on
something else and create another layer on the back
of your packing tape. But I thought this would
make a really nice image to be put onto a card
and send to a friend. Just to say, would you
like to meet up for a cup of coffee or a cup of tea? In this case. All the cards that I have
here, our watercolor paper. And I've used ink
to just give them a wash because I felt it might be quite
nice to have a color. As a background. You can basically use any
card stock you have at home. We might have ready-made cards that you can just
use to make things really easy for yourself. If you have card stock, you can cut it to size. It doesn't have to be white. You can use a different color. I would probably go
with cameras at onto dark just because you won't be able to really see
the image that well, if your card stock is too dark, but just experiment
and see what, what it looks like and what you personally like as a background. Then I just used
watercolor paper. I had a home. I didn't go for
anything special. You can also stain just ordinary card stock as
long as it's not too thin. This was just a card stock
that is about the same. Maybe it's a little bit thicker. I think it's exit eight. I would have to look up, um, how how thick it is, but it is basically that the normal kind of card
stock you can buy. And this has been
stained with coffee. And that's what I've
done with this one. I thought it would look
quite nice to have coffee stained card
stock to put this on. And also the other thought I had that even though I
really like the blue, it turned the lady's face blue, which made her look
a little bit ill, or potentially made her
look a little bit evil, which is fine depending
on what you're going for with
your image or what your messages with the image? Yes. So what I've done, I've
did two different things on these two piece
of watercolor paper. I added first, added a thin
layer of water with a brush, and then added the ink on top. Basically, this way
the ink tends to just kind of distribute itself more evenly across the background. However, on this one, I didn't. And you can see that it has I know the color is
a little bit darker. But you can see
that this is kind of spread out more
evenly than here. And exactly I wanted
to have an effect where I could also have a bit, what I would call maybe
a little bit more structure within
the color itself. Then you can see that
I've got some have clean edges and these have
torn off edges. Basically what I've just
done is use a ruler, line it up, and then just rip or tear the paper
along the edge of a ruler. The ruler will help to
keep a straight line. So it really depends
on what look you're going for then. Yes. So I thought I'll
just show you quickly how I then I can just very
quickly make another card. I've chosen another one of the Victorian scrapbook images, and I thought that we could make a nice little birthday card. We can just have a
quick look of what this image would look like
with a different backgrounds. We've got that could
look like it was a blue a little bit like a
sky in the background. Then if we I should have
had one that is just white. But if we turn this round, that gives you an
idea of what it might look just on
just white card stock, which is absolutely fine to do. Um, these two are quite similar. I like both, but
I think I'm going to go with this
background because it really makes a little
pink flowers pop and gives the whole image. I kind of like a really
nice warm feel to it. And let me just see. I think I might go with having them in the right
corner with this one. I just had it on the
right-hand side. So with this one, I'll just
have it there and then I'll just grab my glue
stick and glue it on. As you can see, I sort of did a fussy cutting
around the edges. The reason was that
I didn't have it. My tape wasn't the
tables quite uneven, especially at the bottom, so I had to even it out. So very, very carefully, not quite fussy, cut it, but left a little
edge around it. Because I find if you fatty cuts very delicate features because
the tape is so delicate, it might just tear. So I tried not to do that. And also when I'm using the glue stick
because I don't want any of the little details to it. I don't want to don't want to
accidentally tear them off. I go from the middle
to the outside. Make sure that effort
glue everywhere. Then I can just position it and glue it on a card. And wallah, I have got another card that I
can send and I really, really, really like it. I think it looks really
nice and also the torn edge looks really nice with this one. I'm just thinking about it. You could very easily make journaling cards in the same way and just add a few more layers. As you can see, there's
so many ways of how you can use these
packing tape transfers. So, um, anyway, as you can see this another really simple, easy, quick way of using
your packing tape transfers. And now let's move
on to the next idea.
10. 4. Simple Fake Polaroids: Next we're going to look into
creating fake Polaroids. Or I've also had them being
referred to as foliar Royds. An expression I really, really like and I wish I
had come up with this one. Basically that two
ways of doing them. I'm going to show you both. One is really simple and straight forward
way of doing it. And the second one is a
little bit more complex. It's either way, it's
still easy to do, but it takes a little
bit more time. I'm a bit more accuracy and
it's a little bit fiddly. I personally prefer
the second method because those really look
like fake Polaroids. But if you're just
getting started, this is a fantastic way of, I'm creating your own
little fake Polaroids. Let's just stick with the
term furlough, right? Okay. Basically the
difference between the two of these is
that in the first one, all I've done really
is take a piece of white card stock and decided
on the size of my Polaroid. They furlough words always
come in a rectangular shape. And then the picture I've
used is kind of a square. Sometimes they are
kind of a square. Butt. Still. One side is a
little bit longer. Usually. I find it really
depends on the picture. And sometimes you
might just want to go ahead and let me
just have a look. If I've got one, you really
just want to go ahead and have this square. I think this one is
more or less a square. And sometimes you want to
just add a little bit more. So it's worthwhile
playing around with your, with your images. The second variation
is, yeah, Sorry, I've spilled some
coffee over this one or had an accident
with a coffee cup. So I've got coffee
sprinkles on this. But Haidt all adds
to the kind of like a vintage feel of the Polaroids. And basically it's,
it's very similar, but your image is
being sandwiched between the back of your
further right and the frame. So first of all,
perhaps have a look at the simple and
straightforward way of creating a Polaroid. You can see I've got
two examples here. I've got a bigger one
and a smaller one. Again, I tend to vary the sizes depending on the
size of my image. But what I'm going to do, have a template for you with the kind of the original size of a Polaroid if that
helps you to get started. I'm also going to include
at least one frame size. So I've, the images I'm going to use for this video
came from a magazine? No, actually a catalog
for children's clothing. And basically, I just wanted to kinda give
you an idea how you could also use
family photographs to create these photo road. So in this case, you would have to get a color
copy of the photographs. You want to turn into
a furlough, right? Either by printing them out on your inkjet printer and then taking them to your
local library. Or printers are a
place where you can get a color photocopies. Or if you've got a
laser printer at home, you can just use
your laser printer. So but yeah, but I
went for images from a catalog and those work out
the normal glossy images. I did prepare them in
the same way as before. I used white tape
on all of these. And I left the left the
paper in the water for quite a while because I just
didn't didn't have the time to deal with them
immediately and they came off really well, or I could almost
just peel them off. Right? I'm going
to use this image for the first variation. So if I have a quick look, I might actually use
one of my frames. I tend to have some, while, not tend to. I have, I have a few templates that I tend to use when I'm creating
my Polaroids. And those also
help you just have a look at what the
picture would look like. And to give you an idea of how big you might want,
wanted to be. Here. This is quite, quite
a nice size because I want both girls to be on there. Let's have a look here. It was just a little bit
smaller even that works. This is kind of like really
sweet because you're almost, it's almost like a headshot. And I've just added
quite a, quite like it. It gives me, it
gives a picture of a more intimate feel to it. And this is a really
small one and even that would be really, really sweeter. Just have a little one. Think I might go with
roughly about this size. So let's just have a quick look. So this one is 11 cm
long and 8.5 cm wide. And I find that this
is kind of the, let's say the traditional size. So if I just get
started with that, I need to put this to one side. You can see I've
already used some of this cart stock for
another Polaroid. Just see how long
would this part B now that's a bit too short, but I might just go ahead. Okay, So we'll
need 8.5 cm width. Okay? Check this might actually be 11. Yes. I've got my furthermore
it background. Now, all I need to do is
just cut my image to size. Let's just have a look again. If I was just too, I'm just going to go for this. So then that means
the image would be 6.5 cm wide, 7 cm long. Yeah, this is what I find that I personally find
that the pictures look best if they are at just a tiny little
bit longer than wide. And this is just
really only 5 mm. Do I mean, one thing you could do if you've got a
template is just put your template onto the
image and then kinda like use a pen or something
that will ride or will make a mark on the tape. And then let me just
mark the four corners. Or you can just use your ruler. And I'll show you in a second. Basically, you could just say, okay, this is a bird. I'm kind of 6.5. I like this. And then you make a little mark there so you
know where you need to cut it. And the same contract this way. But I do find that A-frame really helped because
then you know exactly what part of
the image you want. You want to see
on your Polaroid. Okay, comes the cutting part. I again find that a cutting
mat really helps me because I can just have the image
on there, restraint. It, it won't move around. And then I can just use my, uh, my knife to cut it. Now I've just line up
the two marks I made. I try and catch it
really gently because obviously I don't
want wanted to tear. I can actually see it comes off. That's one. Just cut very carefully. You don't have to use
a lot of pressure. It's just really easy
to just pull this away. Now I'm going to turn it around. I could turn my cutting mat. But maybe this is easier. As you can see, I'm also using the lines on my cutting mat. That again makes it so much easier to do all
the cutting plan. I just have to find my marks. Again, I can use my cutting
mat or is it a wound? This as a top of my image so
I could just cut this off. And then I said it's 7 cm long, so I can just use the
squares on my cutting mat, so that would be 1234567. And I can also see my marks can work this another way
that the cutting mat kind of like it really helps. Let's double-check
345678 at 6.5 and seven. Again, you might want
to just practice this with an image
maybe let's say from a catalog or an image that
isn't, isn't really precious. So just so that you get, get a feel for cutting the your image transfer
and also measuring it. And maybe that also
takes the pressure off a little bit. Sue. I never that would be I'm just eyeballing
this at the moment. Something like that. Where I might do again
is use my use my frame. And again, just make
little dots in the corner. So I kind of like, you know, what I need to
position my image in. The other thing you can do is
obviously just eyeball it. You could put it on. Depending on how sticky
your your images, you can just put it on. The other way, round,
eyeball it and say, okay, this looks good. Then make the little marks so you know where you
need to position it. If you are tape is
still really sticky. You probably don't
need any any glue. I find this is sticky, but I really wanted to
adhere to the back of the of my card stock. Go. You might get some creases
and then I get it here. It was because of the way actually managed to put to how flat I was able to put the tape onto the
original image. So there was a little kind
of like a little crease. I'm just going to try
and use my bone folder to flatten it as much as I can. And then just not worry
about any little creases or imperfections because I
feel those are just part of part of the look. There we go. And I have to say, I'm really, really pleased with this one. It looks really cute. And as you can see, it doesn't
take very long to make. And they really look
like a little Polaroids. I, okay, So, and
in the next video, I'm going to show
you how to create the more complex Polaroids
with these little frames.
11. 5.1. Fake Polaroids with Frame: Fantastic. So in this video
we're going to look at how we can create a furlough Royds with images that
are basically sandwiched between a backboard and a frame. I, um, I'll just show you a few examples of some of
the photos that I've got. You can tell that some of
them have different sizes. I've been talking about
this in the previous video. I'm basically once you've got the hang of how to
create these Polaroids, it's really nice
to be able to play around with the different
formats and sizes. I know there used
to be like that. The one size in the olden days when when the first
Polaroid cameras came out. But now with a kind of like
a revival of the Polaroid, I've seen all sorts of sizes, like really small
ones and bigger ones. It's something really nice you
can play with depending on the size of your image. I'll try and go for
something that is kind of the more or less roundabout,
the original size. But maybe if I think this is potentially because
I did look it up on the internet to take all the measurements
that would have been kind of like the size roughly of what a Polaroid
would have looked like. Let's just have a
look at my frame, which is actually pretty
much the same size. However, I do find that it
makes things a lot easier. If your frame is a
little bit thicker, then you might have seen
or you might see on the old Polaroid is just so much easier
to cut and handle. And yet, well, I mean, basically the thinner
the frame gets the way the easier it
is to make mistakes. So I would suggest start off something that is
slightly why does, even if it's something like this and I feel this
looks really cute. Let me just have you
just measure this. I've actually got almost
not quite as centimeter. I think it's about a
two millimeter a day. Yeah. I've actually got at the top, I've got 10 mm on the side. I've got 8 mm. Again. Mostly it looks like the top
part of a frame is a little bit wider as long as your frame
looks, what I might call. So if neat and tidy,
It's absolutely fine. And I will make
sure that I'll put at least one template,
what I might try and do, maybe I'll put the template in for the wider frame and then a template for the
thinner frame. And once you've got those two, you can just start
playing around with your own frame sizes
and make templates. Because I would definitely
recommend creating a few templates because it
makes life so much easier. So let's put all of these to
one side and get started. I'm going to cut the back first. Well, actually I can do
the back and the front, and they're going to be again, 8.5 cm width and
11 cm in length. Just do that first. So obviously I've got a
template for you to choose. But if you were thinking of, if you didn't want to
print out the template, we can just have a quick look. If we have an if he'd go by the 88.5 widths and 11 cm length. The bottom of the photo
ROI is about 3.4. You can make it easy. You could make it a
little bit longer or you could just make
it three point. You can just go with 3.5. So then obviously, just
go two by 3.3, 0.4. A few marks there. I put all of those measurements into the template as well. This is the bottom
part of your frame. And then just got
the three marks. And then I'm just
going to draw a line, thin line all the way. We've got seven. It might be seven all
the way round and this one actually 777. Yeah. Same here. It just measure this seven. Make little marks. So as I said, it is, it takes a little bit more time. But once you've got
your template sorted, you don't really have to do all the measurements unless you were going for something that is completely different size. Now I'm going to cut out
the part in the middle. And what I'm doing, It's really helps that I
have that my lines kind of overlap because this is
going to help me to see exactly where I need to cut
and where my corner starts. So if I was to go and cut here because I've got a line coming up from this sideline and the one
coming up from there. I know exactly that
I need to start cutting in this corner. Then stop at this line, and then basically
just stop over there. Okay. Then I'll do it
all the way round. And I'm honestly don't
worry if, you know, if when you finished cutting out your little window that you feel that your frame
doesn't look quite perfect. We know we're doing
this by hand. And I've done,
I've kept so many. And it doesn't matter how careful I'm doing
it, it just happens. And I feel that's okay. We've made them by hand. Okay? Right. So I suppose the more we do it, the better we get. Not too bad. I'm quite
pleased with that. Yeah, I think I can
live with this, obviously because I've
got all the pencil marks on one side. I'm going to turn it around. This is going to be my outside. Now I find that because
I've cut that is a little not quite
sure how to call it, but it's almost the the card stock has become
a little bit uneven, an almost like pushed out. So I'm just using my bone
folder to gently push, smooth it out
again. There we go. Might also be an
idea to protect, to put the word template on your templates so that you know. Okay, and yes, the
other thing I do, if you were to use my
printable templates, I can either print it out on card stock or printed out and printer
paper and then stick it on the back of a cereal box because it will
make it so much easier. First of all, use
your template if it's made from a sturdy material and also it will last
for much longer. Okay, so we've got a back-end for might also want to make sure that they
both they both line up. Because again, it doesn't matter how well you've measured. They usually end up not
being quite the same size. Or at least whenever I do it, they never seem to be
entirely the same size, so I'll just make sure
they're the same. The my the backboard seems
to be a little bit longer, so I'll just adjust it. Okay. Now, it's time to
get our picture.
12. 5.2. Fake Polaroids with Frame: And in this case, whereas before, when with the
other image, where is it? There we go. With
the other image. We just used this window to. I think it was the
other one, the template to measure the
size of the image. However, in this case, because we are
sandwiching our image in-between the backboard and
the frame and the front. Our image needs to
overlap a little bit. So basically, let's put it this way round so
I can draw on it. I want to cut my
image roughly this. I'm going to, I
need to add about, I don't know if you
millimeter about 5 mm, four to 5 mm, all sides. So I can sandwiches
really nicely between the back and the front. However, I can still, what I can do is I'm going
to use a ballpoint pen. And then again on the side, I have to make sure
that it overlaps. So it has to go a little
bit over kind of like that. And then I'll make just a very tiny
little dots here. So now I know that I
have to when I cut, I need to maybe just
do this side close. I have to add a
little bit extra. So this is where
the frame, this, I've got a little mark
here and this is where the actual frame opening is. So if I would just move the ruler little
bit to the left so I get extra space. And as I said, it
doesn't have to be much. Just a would go maybe
for at least 3 mm, I'll do that on this side. I don't have to do anything
on this side because I've received already it's already very close to
the boy in this image, so I don't want to cut any more affair as before in the other
video or find, it really helps to use my cutting mat to
cut these images. Just line up my image with the lines on
the cutting mat. Again, I've got my two dots
are my two marks there. I'm going to add a bit extra noise or when I'm cutting
a really don't have to use much pressure. Okay, Again, here and there. So if I know it's
kinda like this, I really need to go about here. Then I can cut. And also, as I said
in the other video, what we're showing you how to do the simpler version
of the Polaroid. It does, it really,
really helps to, to experiment and to, yeah, I've got enough experiment and maybe start with images that are not really
precious to you. Just to get into, just to experiment
and just to have a look and how it works and get used to get a feel
for this technique. Because obviously you
don't want to use your most precious images and then have to worry
that you mess them up. Okay, I've got the backboard. I've got the friend. I'm now going to align them. And then using my pencil, just making a few marks on the blackboard just to give me an idea of where my
image needs to go. When I stick it on. Again, I'll use a glue stick. Got some scrap paper. Or as I said, with the
other furtive rod, yes, I want the back to be
really sticky so it sticks really nicely on the backboard and
doesn't come off. And it also looks like a proper. I'm Polaroid, so I'm using a
glue stick for this because I do find that most
images on sticky enough. Okay. Now, obviously I have
to remember that i've, I need to have this overlap. I've actually still, still got the little dots I can see on my on the top of my image. So if I just line
them up like that, I'll use my bone folder carefully because
obviously I don't want my image to move, but I wanted to stick
nicely to my backboard. If you look again slide, you can see if there are any air bubbles or if you feel that your tape doesn't
doesn't really stick to the back and you can
just go over it. Okay, fantastic. And all that's left to do is
glue our frame onto back. Again. I'm going to
use my glue stick. And then I just have
to make sure that I cover the frame
evenly with the glue. Or is it I'm trying
my best not to get any glue kinda like on
the inside of the frame. Because otherwise he would
potentially go onto the image. I'll just try the
best I can here. Because obviously, you
know, apart from that, I want these two
to stick together. Then it's just a
case of aligning the backboard and the
frames best as you can. While I'm aligning it, I'm
not pressing too hard, so I get a chance to move
it around if I have two and once I'm happy
with how it's sitting, then I really kind
of press down. Sometimes it's easier
to go from the back. Because obviously
the front side with a frame is a little
bit more delicate. However, can use the
bone folder and just gently press it down. You don't want to
move it around. You just want to make
sure that both sides sit nicely on top of each other
and get a chance to dry. Then I'm going to put this under a heavy book because
heavy books are my go-to whenever it comes to drying glue and paper or making sure that it's flat
or it's sticking together. If you're interested in having
a look of what else you could create or other ideas of how to use these Polaroids. I just stay tuned and have
a look at the next video.
13. 6. Simple Photos: Here is another quick idea. I know we've talked about the fake Polaroids and this
is in a way very similar to this idea by basically pretending that
you're creating photographs. So as you can see, I've got two examples here. Where I have used a
packing tape transfer and just glued it onto the
back of some card stock. I also left a wide frame around it just to make
it look a little bit more like your vintage
style photographs, even though obviously these
images aren't really vintage. Again, this is kind of an
idea of how you could use a holiday snapshot or a
photograph of your child, your niece or nephew, or your, your grandchild. And turn this photograph into
a packing tape transfer. Turn that into a
kind of photograph. So I have got this packing tape transfer
that I'm going to use. It has a vintage feel to it. If you know me by now, I have a strong leaning towards everything that has a
vintage vibe to it. But you can use all of these ideas without having
to add a vintage vibe. That's just my
special preference. I've got lots of
card stock here. All of this has
been coffee died. So what I thought, I'll do, I'll make a little background
for this photograph using, wow, there's packing
tape transport using a coffee dyed a
piece of card stock. Can just show you, let me just do this. What we can do is if I just
show you what the image would look like if I used just a
white as the background. And then we've got those as almost looks like we've chosen an Instagram filter here. Just because these
two have the back, have a white background, I thought it would
be nice to just have a look at creating one with a more
vintage background. First of all, what I'll
have to do is I'll just even the image out
because I want a proper rectangles that
are quickly do that. I just make sure that
I've got I've got even even size and just cut off the black off,
straighten the sides. Then I'm going to
cut background. So what I was straightening
the edges of this transfer, I realized that it
could very easily just use this off card. All of these are off cuts. And I thought that this
size kind of looks really, really good and that would fit. So I cut a little bit
more of either side. This is 8 cm wide. So I cut this to 7 cm wide because we need
5 mm on either side. Now, I just have to
adjust the height. Our image is 9.5 cm. So if we add centimeter
to that, that's 10.5. So I'll just quickly do this. Okay. So next, I'm just going to make a little mark so I
know where my corners. Because in this case I wanted to it could either eyeball it. This case I'll make
just little marks. That's 5 mm. I have to say sometimes
I find it easier to just eyeball it rather
than measure it. So that's the other
thing you can do is just put your tape if it's sticky, put it on the wrong side, up, center it, and then just make little
pencil marks in the corner. Then I'm going to quickly grab the glue stick and
some scrap paper and just line it up with
the marks you've made. I usually try to just
kind of like not pressing too firmly on I'm on the back until I'm sure that's that
I've got it where I want it. Burned folder. And again, if it's not
100% in the center, don't worry about it. It's not meant to be. Perfect. Go. I can tell this isn't
entirely in the center, but I think I can live
with that. If I wanted to. I can just cut a tiny, tiny, tiny slice off here. And along this side, um, I won't use, I will wet. I'm going to wait until
this is all dry before I just removed carefully remove the little pencil marks
that are still sticking out because I don't want
to move the packing tape. Whoops. There we go. Got another little photograph. And that's just another
quick and easy way of creating a little project with your packing tape transfer.
14. 7. Vintage Photos: In this video, we're
going to have a look at our pretend vintage photographs. I am going to get started
with these three. If you remember, this was
the one that I creased. And I'm going to show
you the image with a background because
it's much easier to see. And I have to say, I really, really love this effect. The card stock that I'm
using is coffee stained. Basically, what I do is I
keep all my coffee grounds. And then when I need a
solution to stain my papers, I just use or using all the
collected coffee grounds, borrow them up in a
special sauce pan. I just keep for this purpose. Then obviously wait
for it to cool down and I've got a big brush. And then basically paint or color wash in a way,
the backgrounds, but you could use
inks or you can use watercolor paints to just give your card stock a color wash. But because I wanted to make these fake vintage photographs, like real photographs, I
thought we would be nice to give them a kind
of sepia look. Therefore, the coffee
stained backgrounds, all of these are off cuts, so I'm trying to see if I
can work with my off cuts. And just to quickly show you, I've got let's just put this
one over there for now. This was the the couple riding. I thought there were donkeys, but now I can see
they're probably oxygen. Anyway. I really like this one on a
coffee stained page as well. This isn't as creased, but you can still see
some details here. And then I've got a third
one that I made for. It was a different project
that was left over. These three girls dancing. And I really like this as well. So let's just try something
because this one is darker. Let's just see if I might like this one to go on a darker one. I have to say I quite
like this. Then. For this one you can see that this is a lighter
coffee stains, a card stock. It has some patterns on it. And I quite liked to use
these backgrounds for my fake vintage
photographs as well. Because it gives kind of the picture in a way a
more authentic feel. You can see that in
this bit of the sky, we've got a lighter background. And here it goes
darker as it gives it an idea as if it had aged. Where we're not, the
whole photograph is just dark but
it's a little bit. One part is lighter in
one part is darker. So I think I would probably use this one for this
little picture. Maybe you could just get
started with this one. The process is just really
simple and straightforward. Once you have chosen the background for
your vintage image, you really just need to to cut it and then glue it
onto the background. But we can just do that
very quickly here. Also find, I do make sure that my blade is really nice and
sharp when I'm cutting. Very delicate features. Because that means that the
tape is really fragile. Doesn't get pulled
up or just, um, if doesn't tear. Okay. Here we go. And just double-check. And yeah, I I really like the fact that it's
lighter here and you can see a little
bit darker there. So the glue stick. And scrap paper. One thing you could do if you wanted to have
something like a little frame around
your vintage photograph. If you remember that, um, some of the old photographs
have a kind of like a white border around
the actual image. You could make
sure that when you are putting the tape
onto your image, that you make it definitely
make it overlap enough so that you've got a border
all the way round. And then when you, um, cut your image to size and make sure that
you leave a little border. And then you would glue it onto the background
in a way that you would have the card stock
looking through the clear border
around your image. And this way you could
even have a little border. And I really should have
done it with this one. But there wasn't enough left. And then I just let the blue dry before I cut the card stock. In the meantime, you can have
a quick look at this one. I have actually decided to cut this image
round about here. I really wanted to
just make it kind of a snapshot of this capital. Then also, because this
image is quite big and I would maybe want to use this in another project as
a kind of like a snapshot. So I wanted it to be
a little bit smaller. So I'll probably cut it
here and then about there. So I'll do that quickly. So here we go. So as you can see, he can definitely kind
of even afterwards, decide on having just using a detail from your
image transfer. So this is now a smaller image. And I really like this one. Then what I can do
is use this part in maybe a collage or a kind of a mixed media project or even journaling
card or something. So you can hold onto
bits and pieces of your tape transfers that you could still use
in other projects. Quickly cut this one. Here I've got my little, my little vintage photograph. As you can see, it's obviously
because it's the glue, the card stock at the back. It starts to warm
up a little bit. So all I'll do is put this
under a heavy book, of course. And then, um, yeah, here we go. We've got a little
vintage photograph. Now what I'm going to do is because this is a very
simple and straightforward. Let's create a fake
vintage photograph. I've got a few other
tape transfers that I would like to
show you an also kind of like other takes on how you
can use a background if you don't want to make it look particularly look like
a vintage photograph, but you would like to
incorporate it into a different project or
just use it differently.
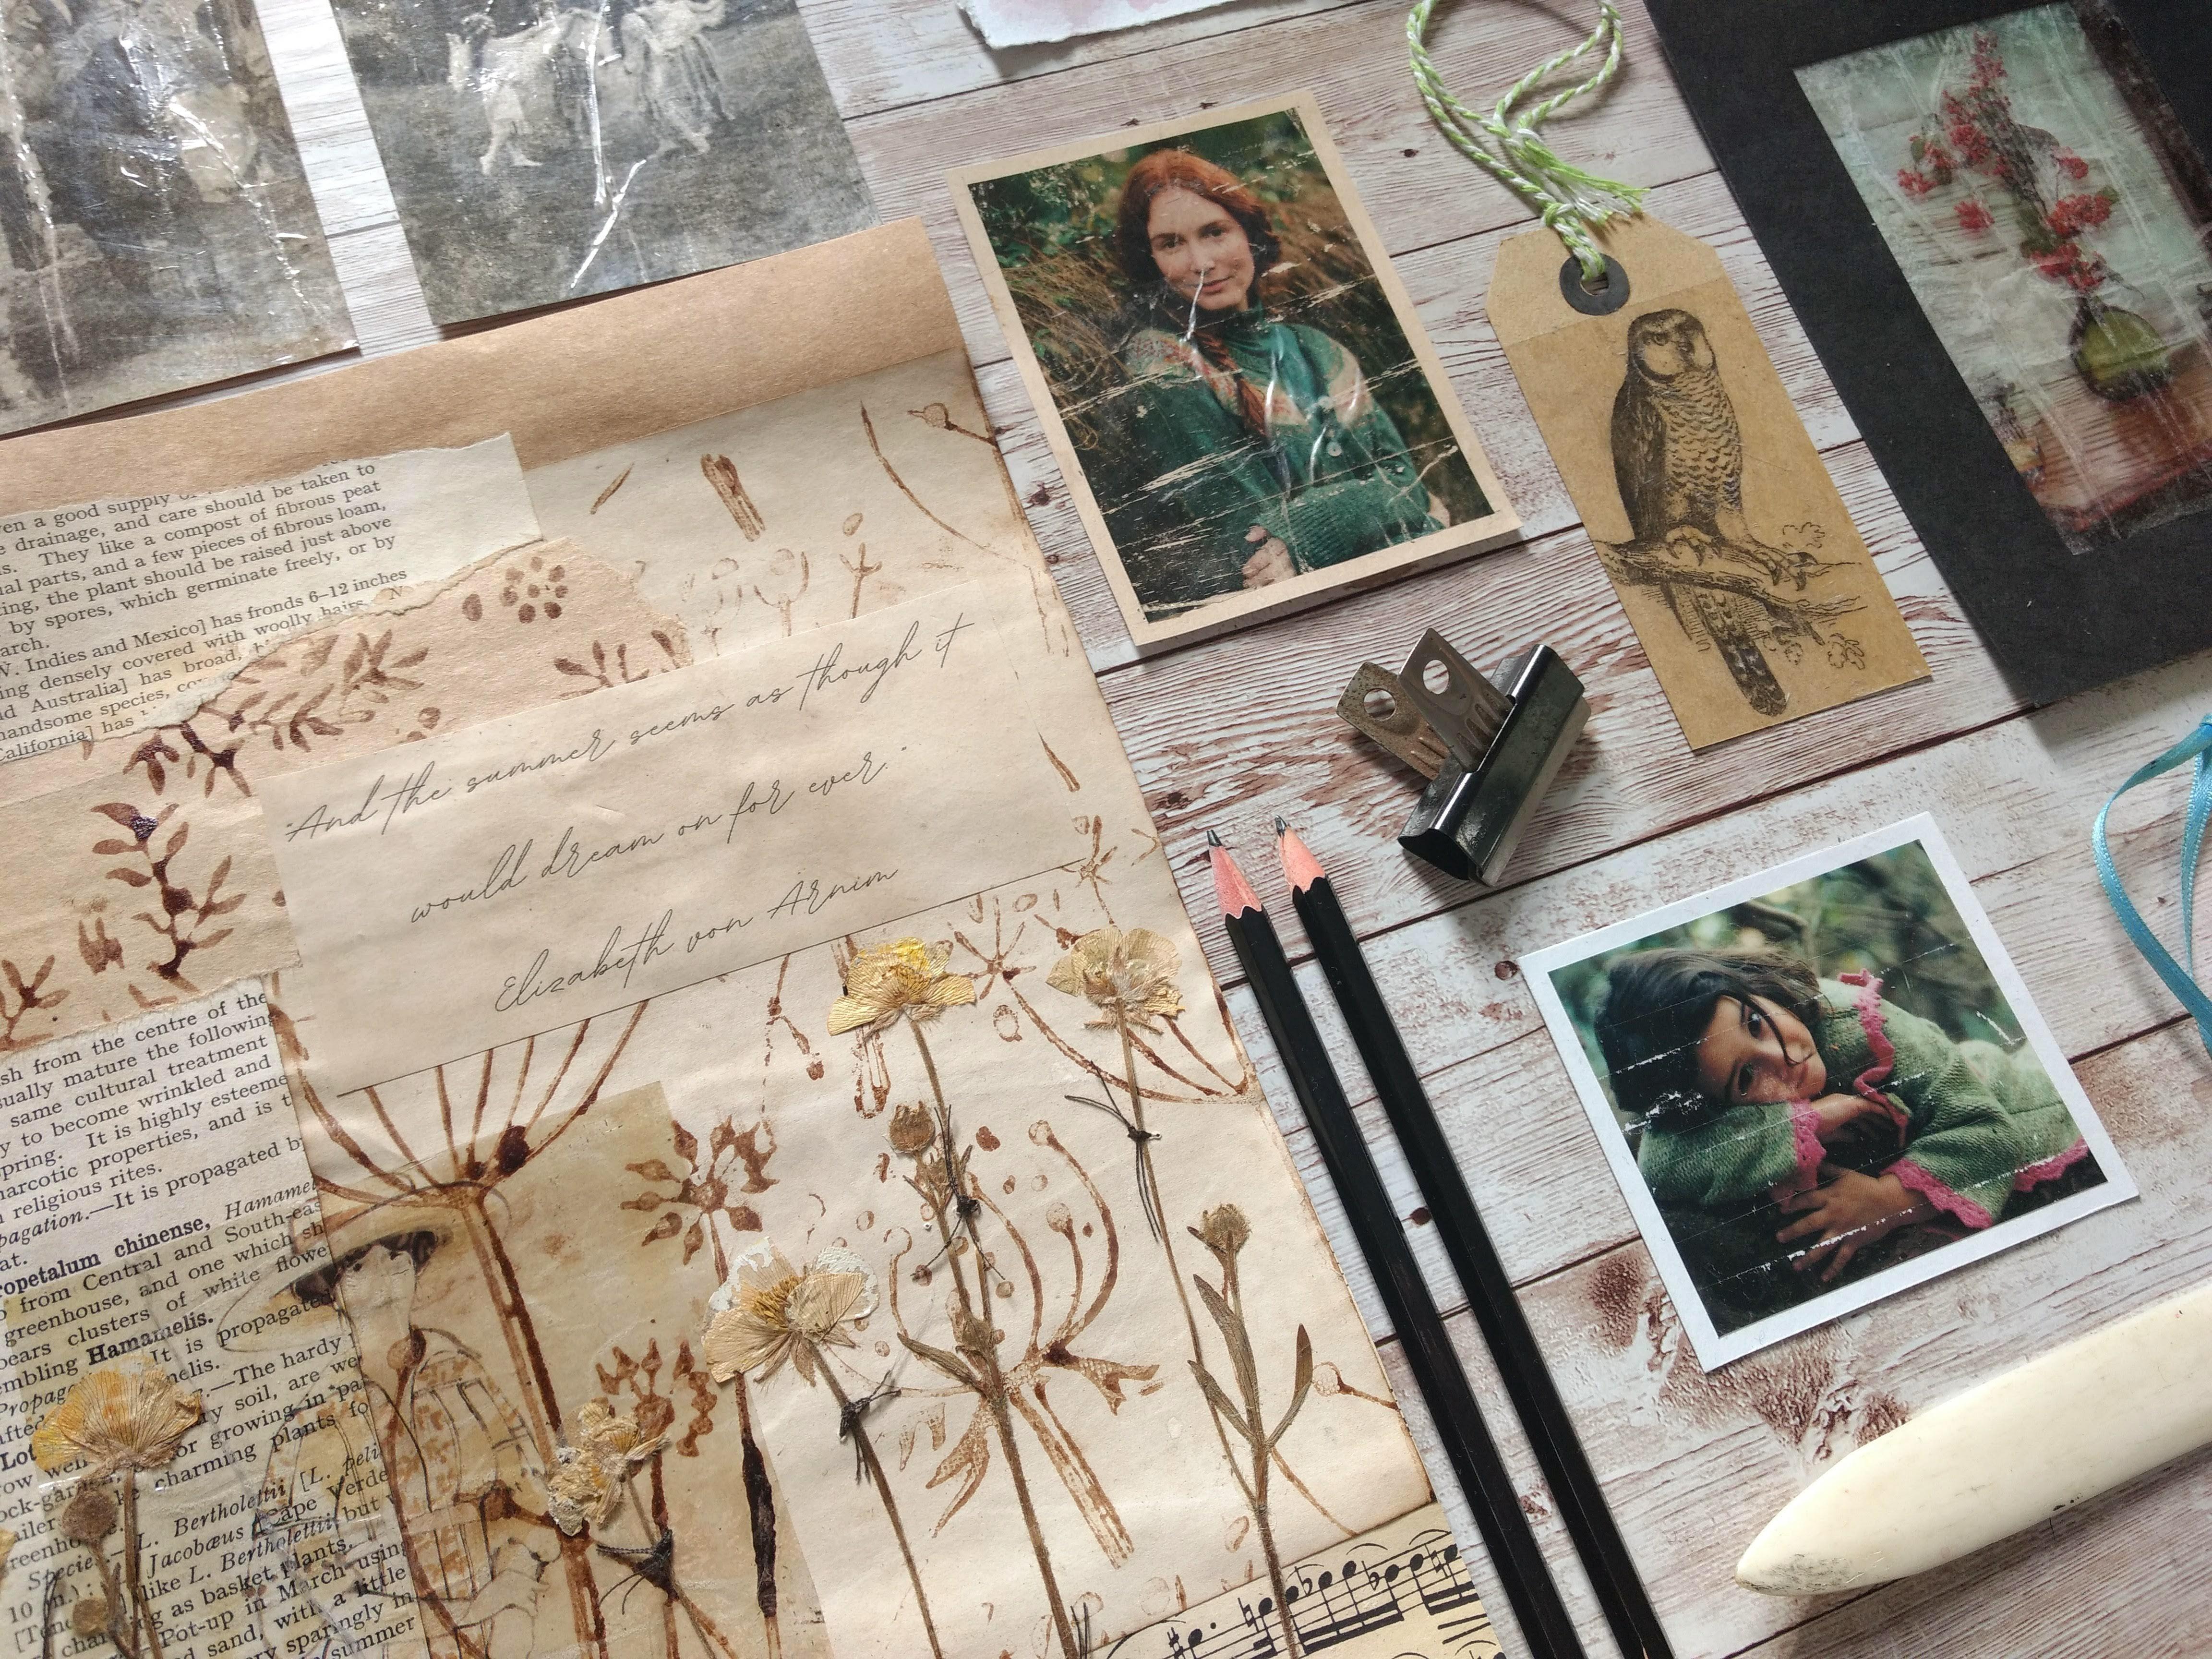
15. 8. Mixed Media Image: In this video, we're
going to look at creating a mixed media image using a one of the
packing tape transfers. I've got two images
here that I've taken out of the ballet book. They are both costume
designs for a ballet. And I treated them as all the other packing
tape transfers. I covered them with the tape. I've been using
the white tape for these and then I just
soaked them in water. If you're using a paper that
has a glossy finish on them, like in this book. It will take a little
bit longer for the water just soak through the
papers that we will take a little bit longer until you're able to start peeling back your tape off
or the paper ofs. So the, it gets to the image and sometimes I find it have
to do it in various stages. So I'll get most
of the paper off. And then I'm kind of like as much of the
paper off as I can. I try and change the
water in-between. Then I let the image dry. And occasionally, I
hope you can see it. I can still see like
little places where the paper is still stuck. Two parts of the tapes or what it can do then is just stick it back into the water, let it soak for a little
bit and just get rid of the remaining
bits off the paper. So I've done that with
this one already, and this is the one
that I'm going to use for this particular project. I'm going to use the other one, probably to create
one of my slides. So I'll put this
one to one side. I thought, I hope
you can see this. I do. This image very much
reminded me of. And also I really like
Elisabetta, an anime. You might know, her book, or actually the film that
is based on her book, The Enchanted April. But she's written a whole
series of books and a lot of them are 0, deal with gardens and her love
for gardens and gardening. I thought we would be
a really nice idea of incorporating one of the
quotes that I've got here. Printed it out. And I thought it would
be nice to make it look as if it had been handwritten. And the summer seems as though
it would dream on forever. So I'm going to use this
and kind of like do a summer garden inspired
a mixed media image. I've got some dried
pressed flowers here. Let me just put
this to one side. I also printed out some botanical
illustration I might use. I forgot. Pages, coffee stand
pages from a gardening. But all of the pages
or coffee stain, which I feel would work really nicely with that vintage
feel and also the color scheme of the original
image I'm going to use. These patterns have been added using a wallpaper pattern
roller and more coffee. This is another pattern role, and I've just used
packing paper. I've got some plain
coffee dyed papers. I've got a oily
that I might use. I've just collected a few
things that I thought I might use in this image. And the other thing
I thought I might try and do was thinking of
maybe framing the image. I could actually use a
mount and also use that to see how the image
is coming along and how if I could fit
everything into that mountain. So I might do that,
I might not do that. So that's also another option. I might just start off with using one sheet of paper
as kind of a background. It can also sometimes
just help to have a background of having a space in which
you're going to work. Then next, I definitely
want to use one of those patterns because that can black felt like her
being in the garden. Oversee. I have
to make sure that because it's a very
delicate image, I want to make sure that
I can still see her. So if I'm positioning
it somewhere, I obviously I don't
want her face to be obstructed by anything that will come through
from the background, depending are you doing in, might add a really
interesting effect. But in this case. I think I would quite
like to have her face. I'm kind of just coming through so that
concede really nicely. So I'll have to play
around with this. The other thought I had was just using kind of just using one of the book pages in the
background as well. So let's just play
around like that. And I could have her
kind of like halfway on on the book pages because I could I can
see her quite well. And then she can be a
coffin in the garden. And I really like that. I have to pay attention to
this part because obviously, the way the drawing
has been made, you can see her feet. So I would probably want
to think that this is where my image would end. And I've only just murderous, they're talking about your
film, Enchanted April. I've got I just got
the word April here, so I think there's just
absolutely perfect. So I'll definitely use this
this page from the book. Then I could add
some sheet music. And I don't really want
to have a straight edge, so I might just tear this
critical thinking she use it. You could just think, I didn't know birdsong things, so I'll have a look. I could just slide it. Kind of like, oh, this snare, I don't want to
cover up the word a pro. I just really, what I'm doing is I'm playing around with
all the elements that I have. I would like that. Then we can have a quick look. What it would look
like with a mountain. I quite like it. I'm not entirely sure
if that's what I'm going to do in the end. But it does look nice. It gives me an option. I can have a look
what this looks nice like if I have this bit on top. And I might potentially
prefer this. As you see, is a lot of playing around with the different
elements that you've got here. Now I'm going to have a look at the quote that I'm going to use. I just cut this out. The reason for me printing
it out is I'm sure I've mentioned it plenty of
times and other videos that my handwriting
is not entirely, it's not very neat. And so in certain circumstances, depending on the project, I prefer to not use
my handwriting. So in this case, I just found a font that I really like in a
few works with it. So I thought if I had
this some way here, and then I might want to
have something there. Actually feel that having
a little frame in a way really helps to know what to focus on or
to bring it together. I could use a bigger one, but that's the only
size I've got at home. At the moment. I might have
to bring this down a little. I have to see if all
of that fits in. And I might decide that the frame would squash
everything too much in. And then I would actually
like a bigger one. So if we had a look at that, maybe here and then I would quite like to have
something over there. So the next thing I could do if I think I've
actually noticed that I think that would just be
probably a little bit too much. It might just become too messy. In the end. Especially as I
would really want to add those dried flowers. Let's try this in the corner. Let's just go for if we had potentially
something like that. Um, oh, oh, have this
overlapping here. Okay, so I'm quite
happy with the way this looks like
sometimes what I do if I'm not entirely sure if I like something or if I feel like I might want to add something
or take something away. Yes. Because sometimes if
you're not quite sure, if if you're happy
with with your image, It's a good idea to just leave
everything as it tastes. Go away, do something
completely different, like do the dishes
or do the laundry or go for a walk or
whatever you need to do. And then just come back
and then have a look. Then you very often
either notice that, oh, now I know what I
need to change or what is missing or
what is too much. Or you will see that
this absolutely perfect. And I just want to
leave it the way it is. Also kind of thinking, I would like to have
maybe three flowers on this side and two on there. It's like a camera
like this balance. So I'll have a
look if I can find another one of those dried
flowers which I'm sure I have. Use this. And the other thing I'll do, definitely I'm going
to take a photograph of the collage because obviously it's only
been put together. I haven't glued anything. And if I like it
the way it looks, I want to remember kind of
like what it looks like because every take it apart and then try and put
it back together. I might find it difficult to do it exactly the same
way as I have done. So I don't want to
lose this image, so I find it really good way of not worrying that you can put it together
the way you had it before. It's just to take a
quick photograph. So talking about going
away and coming back to whatever creative project
you are doing at the moment, I had exactly the same. I went back, I
went away and came back and realized that I
needed to change a few things. First of all, I thought
I had just too many. I just had well, I just had too much
happening and I needed to simplify it slightly. It's just because this figure
is so delicate and I didn't want too much
distracting from her. I quite like the idea that she is in a way almost
hiding in her garden, but the same time, I want to be visible and they're not to be
too much noise around her. Then I went away and had a look at all the dried
flowers that I had. And I came across this. And I feel I actually
prefer them to the other ones anyway
because they are so long. I've still got the
really long stem. It almost feels like, it feels like she's part of the flowers or can
hide in her flowers. And I also felt that
the colors blended in better with the rest
of the color scheme. Yeah. So what I quite liked is
I was looking at lines. So I was looking at
continuing this line of having like an empty
space down here. Now I feel I might
just not worry about her not having feet there. I'll just I'll just use this as an image almost like a photograph
that is in this. I won't worry about that. But I quite like the
empty space down here. I like the fact that I
can see the page number. And here I've got the
words and the paragraphs. And I've got some
kind of a similar, I would say, pattern here
on the sheet music's, I wanted it to continue, whereas being
slightly different, but still continuing the
theme here so that it's not too distracting
from the whole image. Right? Now, I can get started
with all the gluing. I'm just going to
use a glue stick. I'll be using craft paper is actually a thin
sheet of craft paper. I was debating whether
I could use one of my thicker bits of craft paper. I would probably definitely
want to use something that is thicker than just
ordinary printer paper. But just, just experiment
and see how things go and you can always kind
of glue everything onto, let's say card stock in the end. But we just need some sort of background so that we
can glue everything. On there and also failed if any of that kind
of looked through, it would work really well with the other items and the color
scheme that I've got here, I'm trying to do now is
I'll just slide it very carefully underneath so I don't disrupt too much
of my composition. I have taken a
photograph of this. Or is there something
else that came to my mind that you can actually use your phone
as a kind of frame. So if you were looking at how your composition
looks like and you'll find that all of these pieces are distracting
you and you can't really see what the actual
image might look like. You could just grab your
phone and use that as a frame and have a look
on what it looks like. So that's another idea for you. Then something else
to think about is the order in which you're going to glue your items onto the page where
you have to see even, you could even make a list with the numbers if you find
it difficult to memorize it, you can just have a look
which ones at the bottom? So this one is e.g. the book page is right at the bottom of the
whole composition. Then I've got the sheet
music or the piece of sheet music is on the book page. But under this part, and just really
be aware of where the individual pieces are, I'm going to have the flowers, probably most of them on top of the of the packing
tape transfer. But I think I might like to
have this one underneath, might do a bit of both, but that's something else that you might want
to think about. And as I said, if you felt like you wanted to
just write it down or write into numbers,
then do that, just make a list
of book page one, sheet music to
patterned paper 30, whatever way that
would help you to remember in what order
you want to glue them on. Okay, then you might
also want to just grab some scrap paper. Okay, with this one, I
always want to line it up. So if this line with the
end of the textblock, quite like the idea of how those could fit into each other. So I'm going to do is just codes for methionine
there because this is going to be covered so that I know
where I need to glue it on. Greg and you cut everything that sticks off the page
as overlapping. I'm going to deal
with that later. So I'm not going to
worry about that now. Let's have a look. I find myself going back to the photograph that I've taken. It's just really,
really helpful. Now, the packing tape
is still quite sticky, so I don't think I need
to add any glue to this. I can just stick it down. If yours isn't sticky enough. You can just use the
glue stick to help. Then I've changed my mind again. I'm going to have all
the flowers on top of the packing tape transfer. Right now. The flowers are going to
be a little bit tricky. Because obviously
they've only got like a really thin stem. And they are very
delicate on top of that. Plus. It might be tricky to, you know, to have something, to get something to stick
on top of the tape. Just position them first
again to make sure that I know in the place where
I want them to be. So when you're gluing
down any dried flowers, you have to be really,
really careful. They're very delicate. So I'm constantly worried that I'm going to decapitate
them with my glue stick. But so far so good. If I was to frame it and
just hide it behind glass, then that would also
keep them in place. So we'll see. I know that idea could be to
kind of sew them in place, use a needle and thread, and kind of just attach them as you would
do with set a tape. But instead of
solid tape, you're using a needle and thread and that could look
quite nice as well. So I might look into
doing that on top of having them glued on
maybe in two places. So we'll have a look
and see if that works, which would also obviously
work quite nicely with the general gardening
theme and thinking about convect garden
or gardeners Twine. So that could be quite fun. Going to do. The other thing you can do
is also use washi tape. That's what I thought first of adding some detail
just with a washy. But I quite like the idea of the of the needle and thread. So I might do that. And we're just experiment. I don't know if that's
going to work or not. But I always find that being
creative and just creating, working on a project is also all about experimenting,
trying new things. Not only thinking
about the outcome, also the learning
on the way. Okay? So what I'll do is
probably cover this Ruth, maybe something like a sheet of acetate and then put
it carefully under a heavy book to make
sure that it all dries. But at the same time
I don't want any of the glue to stick to paper. So I feel like if
I used acetate, hopefully, that
might work though. I'm really worried that I might
damage any of my flowers. So what I might do is just
wait for the glue to dry and then put everything
under heavy book just to straighten
the piece of paper. So everything has dried
really, really nicely. I'm actually quite
pleased how well the dried flowers are
sticking to the background. As you can see, I have started with my idea of kind of sewing the flowers
to the background. You can notice the thread
and every lagging. Or if you're thinking
about gardens and garden twine and
everything, that makes sense, but at the same time
it doesn't stand out too much and gives kind of another detail to it and some more texture
to the whole image. So I'll just thought, I'll just show you
how I did it is It's just an ordinary
needle and thread. And because I quite
like the little ends of the thread on the outsides of the top went in with
a needle from the top. Basically, I just
kind of feel where I want the needle to come back up. And I made sure that I left
quite a bit of the thread behind because that
makes it easier to tie a knot in the end. And then I'll just go
through one more time. And then can turn it around
so I can find the hole. Just pull it through. Time. I double knot. There we go. We've got this one finished. As you can see, I've added
just a strip of a book page is the same book because
I noticed it's in case I wanted the image to
be a little bit taller. I had the craft paper as a background and it
looked a little bit lost. So I just add it this
just to show that it can be continuous process that even if you've
had one idea, it's okay to change it while you're while you're
creating it on, even at the end, to change something about it, I have to say I'm quite pleased
with the outcome of this. And I just feel
it's kind of like one really easy way of using a packing tape image
transfer and use that as part of a collage
or a mixed media art work.
16. 9.1. Oldstyle Slides: In this video, I'm going to
show you how I create what I like to call slides. They very much remind me of the old slides near
the square format. And also at the same time, a kind of what negatives
might've looked like. Hope you can see the images. All of these images
that I've used to create these slides came
from the ballet book. All black and white images. And I felt those
worked really well. For this one. This is definitely, I would say, a more advanced method of using the packing
tape transfers. So you might want to work with the others first before
you do this one, or just watch this
a few times and just take it step-by-step. It's not really very difficult. But it might, well, I will definitely take
a little bit longer than the other projects, but I really, really
like the way they look. And I like the whole
idea of creating these vintage inspired slides. So the image I'm going to use is the other costume
design from the ballet book. I've just created. The mixed media. Summer inspired a collage
in the previous videos. So I thought we might
be quite nice to have a similar image and just do something completely
different with it. So this is the one
I'm going to use. But at the same time, a thought, I could use have a go and use something that is kind of like maybe slightly
more colorful. All of them are others. Even the vintage slides are? Yes, because I like them to
look vintage and to look a little bit yeah,
like old negatives. So I thought it might
be nice if you have something where the image
is a little bit clearer. So I'm going to use this
image which came from a book that also
had a glossy pages. So when you look at it
from the other side, you can still see kind of
like a white layer on there. But this is as far as I
will be able to get for this image without actually destroying parts of
the image itself. But I felt this is a K
because I don't have to look at the slide
from both sides. Plus, I thought it might also
be an idea to work with one of the color further
to copy images. Um, so this is another kind of like a more
faint image is actually, as you can see, it's myself. And it's a snapshots
always still from a video that I
made a while back. And I thought this
would make a fun or an interesting image
to use inside a slide. And then we've got
another one here, which is part of a project that was an
Instagram takeover, working on a prompt. And again, this is more fainter, but I thought it
might be quite fun to have this as a slide. So I'll get all the materials
and all the tools that I need to get started
for this project. If we just have a
quick look at one of the slides that I created, I have maybe a
slightly better look at the actual image inside. First thing that had
to do is basically strengthen the image itself. So instead of just leaving it
as one layer of tape, well, I'm going to do first is
add a second layer of tape on top of the
front of the image. And basically this is
just to make sure that it's not too floppy
because in a way, thinking about the really
old are the first. Slide is they were
actually covered in, they were covered in glass. And it's also a lot easier
to actually put them in between the frame because they're sandwiched
in-between the frame. So that's the first
thing I'm going to do. I'm going to find
with the cutting mat, it's sort of helps, just helps to keep
the image straight. I'm also going for
a slight overlap here because we
will need the image to be slightly bigger. So as you can see, I'm going
to create a slight overlap. I'm going to show you in a minute why we're
going to need, you will find that it can
be quite tricky to add another layer without
getting any air bubbles or that maybe it
won't lie completely straight and flat onto
your first layer. But I would just say, just
don't worry too much about it. And just take this as part of the character of your slide
that you're creating. What I can do, however, is use a bone
folder and just try and make sure that the two layers nicely
aligned and stick together. If you come across anything
that is an air bubble, really all you need
is a little needle, like a sewing needle, and then you just pop the
air bubble carefully. And that does the trick. Right? And while it's nice and
flat on your surface, you can start and measure. So you're first going to
measure the actual image size. So this would be
about 10 cm wide and about 14:14 centimeters high. So I'll just write that down. If we know, thinking
about the image needing to be sandwiched
between the two frames, it will just have a quick
look at this image. So I've cutout one frame, then I'll put the
image in between, and then the other
frame goes on top. So obviously we
need some part of the picture to be sticking
between the two frames. And because I don't really
want to lose anything off the actual image I am creating or I'm basically
enlarging the original image. And that's why I
did the overlap. Using the tape. I can take this off. Sometimes you might
find that you even, you want to add
another layer to it, kind of like a
third layer on top. And I might actually
do it, but this one, especially because this is a slightly bigger image than
the others I've done so far. So now that I'm holding, I didn't even
though I'm going to add two layers on the back, I almost feel like
I want to have another one on the front just to make sure that it will stack. It will stay nice between the two frames and kind of
state as flat as possible. Having added another
layer, obviously, I get kind of like
more folds and potentially more air bubbles. But for me, it
kind of just looks like an old glass that has been cracked or
is not quite perfect, but that is my
personal preference. With these. You could use just the
narrower solid tape to do this because I find it's easier
to manipulate it and you get less many air bubbles
and less many creases. So you could play with
both of them and just see what it would look like if you're using
one rather than the other. Okay, So the next
I think I have to do is measure the frame or does actually decide and
how big I want the frame to be or how wide I want
the frame to be. So if I had a look, I feel that I might actually
quite like this width or might go for something that is a little bit wider but not much. So if I just had a quick check, so this is two-and-a-half
all the way round. If I had a look, if I did three. Yeah, I would be
tempted to go 2-3. So what we can do, rather than experimenting
with the card stock, we can just grab a piece of printer paper or
some scrap paper. And then just make a quick, a quick frame and see if
we like the wider frames. I'll try one that is
as a width of 3 cm. Okay, so now how do I measure? How do I find out how big
the frame needs to be? Okay, so looking
at our test frame, we said that the picture is
10 cm wide and 15 cm high. We have to add, or in this case we're trying
to add or thinking of adding 3 cm all the way round. So that would make the
frame B or the slide. I'm ten plus 3.3. So that's 16 cm wide and then
14 plus three, plus three. So that would be 20. So that's what I did at first. I've got 16 here, 20 cm here. And then on the inside, I just created this
little cut out. Basically I just need to measure 3 cm in and then cut this out. And this is our frame. We can have a quick look of what I thought
this looks like. And I have to say, I feel that the size
of the image and the size of the actual frame works really
nicely together. I think this is a really
nice width for this image, but this is a really
good way of kind of not wasting any card stock, but just having a quick look on what a certain width
would look like. And then I can go about, I'm going to cut too. Two frames to slide pods of the slides next for the image. Obviously, would it be
really nice if I could have, I got two frames out of
one sheet of card stock. But I still feel that
can probably create a double frame
narrative this part. So that's okay. When it comes to cutting
out the part in the middle, I like to cut both parts of the frame at the
same time because it doesn't matter how
well you measure, they will always be a
little bit different. So I figured if I'm cutting
them at the same time, I can make sure that both frames are as
similar as possible. I'm going to just get
some just going to get some paper clips to make sure that they don't move while I'm
measuring and cutting. And I can use a pencil line first rather than
cutting it immediately, I'm going to measure the
inside of the frame. I'm going 3 cm from
the outer edge. I'm using my cutting mat to help me with the measurements. And I will say it helps
me to keep to keep it all aligned. Okay. Okay. And then I
can start cutting. And also I can use I can use these lines here as a guide to how far
I need to cut side. Don't get any other advocates. I really like to
take my time with this with the whole
measuring and the cutting.
17. 9.2. Oldstyle Slides: Okay, so now we've
got the frame cut. Next thing, takeoff
the paperclips. Then take the frame
that's on the bottom, put it out there on top
of the other frame, and then open it up. You might want to
watch this a few times because this way you make sure that you've got the frames in the end sitting on top of each
other the way you cut them. It doesn't matter how
precise the measure in cats, there will always be
slight inconsistencies. So this really is the best way to make sure that
you've got them stacked in the most fitting way possible because that's
how you cut them. You want the pencil
to be on the inside. The next thing I also do, I'll just write it as a t here to indicate
this as the top. I'm also going to write a t here because then I know
that this is the inside of my other frame and also
the top of the other frame. And believe me, but
just by doing this, this is going to save
you so much time in the end when you're putting
everything together. Okay. So I'll just put this
one to one side. I'm going to use this
as my top frame. Okay, So next I need to put, because now the next part
is going to be sandwiching the image transfer
in-between the two frames. So I've got my image
transfer here. I'm just going to kind of just
cut off some of the tape. The overlapping tape can be a bit tricky because
it would just wants to stick to your scissors. Let's have a look. So I've got the sticky
part towards me. Right? Yeah. This is looking good. Now I'm going to
get my glue stick. And I'll just put some glue just on the
inside of the frame. On at the moment, only on to the part
where I'm going to stick the image so the part where
the image is overlapping. Okay. Right. I'll, I'll
try and have it in a as as straight as possible
depending on your image, it will be it can be really
easy if it's darker. With this one, it's quite light. Can be a bit tricky. I always find that
it's just have a look because the the tape wants to stick to
my fingers as well. So what I'll do then I need a little bit of
extra help with some tape. It depends. Sometimes sometimes I find that the the tape I've been using is stickier at
some times then others. It also depends on the image itself and
the way it came off, I find you just
have to see, right? I'm going to just cut
off some short pieces of tape because I'm going
to use them to help me put the image in place. Okay, that's looking good. Let's just do it
like that. Okay. And then on the other
side, oh, go down. I'll try and make sure I'll
do my best to make sure that the images lying as flat as possible you can see it can be a little
bit of a challenge. Sometimes it helps
just move it around. I might even count a little
bit more of the bottom. Just take your time with this. Okay. One more on this side. Okay, so we've now
made sure that it is kind of it's secure in this space
where you want it to be. I am now actually going to use the thinner tape
because I find I can manipulate it easier than
the white tape because now, as I said, I've got
two layers of tapes of added another layer of
tape to the friend. And now I'm going to
add two layers of tape at the backside of the
sticky part of the frame. At the same time, I'm
using the tape to also attach the image to the
inside of this frame. So I've made sure that
I'm overlapping the tape. So it's kind of
like half on the, uh, on the frame and
half on the image. If you find that you're really struggling because your tape, your image is really
sticky on the inside. What you can do is just add a layer of tape
onto the back, the sticky part of your image before you put it
into the frame. And that's also okay. Because then you can use
the second layer of tape to attach it to the inside of
the inside of the frame. I'm using the bone folder just
to make sure that I've got this layer sticking nicely
to the back of my transfer. You can also have a quick
look before you attach the image onto the back of the frame to see if you
like the way it looks. And yet I find this
is okay so we can get started with gluing it in. Okay, Now I'm going
to quickly add the second layer over to something else you
could do to attach the. If you find that your glue stick doesn't really want to work, which can be quite tricky on because obviously
it's plastic. And to get the
plastic off the tape, just stick on the frame. You could use double-sided
tape and just put it around the frame and then
put the image on top. Maybe might want to just
experiment with a few ways of attaching images to
the back of frames. First, before you
start putting in your favorite image transfer. Here we go. I know what I need to
do. Now. Let's have another look to say, I really like this and I
also like the a, I do like, I do really do like
the effect that the tape has created by not
sticking on 100 per cent. And also the little
air bubbles in here. And I find it very, very much reminds me of, hi, I'm blown glass. Now. We see we've got top
here, I've got top there. So I just need to
turn it around. Now just debating whether
to use double-sided tape or go with the glue stick. I might just go with a glue stick for
this, but as I said, you might want to use double-sided tape to put
the two frames together. I'm going to add blue to
both sides of the frame. I'm trying not to go onto my image because obviously I don't want to have
a glue on there. I could just wash
it off but I'm just trying not to get any glue on
there makes things easier. Make sure you cover the edges
k. So you've got one done. Again, just double-checking. Yes, this is the inside. And then I just line
up the corners. Again. It can be a
little bit fiddly. Then I just first for just press really
lightly to see if I've got all the corners are
sitting on top of each other, so I've still got a chance to move it around a little bit. That seems to be okay. You will find that even
if you've, you know, you've done it as
carefully as you can, that sometimes the
top and bottom frame won't be Andrew present. But we can deal with that. Can see that there's
a slight overlap there and a little
bit down here. But I can just cut that once
it's all dried so I wouldn't do it while the glue
is still drying. There we go. I have to say I'm quite
pleased with the result. Stick this as always under a heavy book just
to make sure that the glue dries nicely and that the two sides of the
frame stick together.
18. 9.3. Oldstyle Slides Example 2: Our first slide is drawing under a stack of books that
I have a quick look at, one that is colored. And also one way you could, you can see the
image better than the big one that I've just done. I'll just quickly
do this server. Just recap. I've got the
pencil marks on here. I'm taking the one
on the bottom out, put it on top, and open
it up like a book. Here you can see
more clearly where the where the image ends
and the clear tapes dots. You can double-check
by just turning around just to see
if it fits nicely. And yes, it does matter as much easy to put on because the back
doesn't really stick. You can see it's
definitely possible to use the wide tape, but I do find it's slightly more difficult to maneuver it
than the narrow seller tape. So yeah, nodes is completely up to you
which one you're using. But yeah, try and try
and do it with both and just find the way that
you find it easiest to do. Or was it the same
thing? If you see that you've created a little
air bubble as before, just use a needle. This piece a little hole. And I'll let you could just
get rid of the air bubble. Okay, and then I'll put this one under the stack
of books as well. But as you can see,
you can create all different kinds
of slides with this. I really, really like this. I feel they're all kind of have a slightly vintage
feel about them. One thing that you
can definitely do is use family
photographs for this. Just use a color photocopier. Or if you have a, a color laser printer, as I've mentioned before,
and those could be used. And that will actually also be a really nice way
of sending somebody a gift or sending
a photograph and a completely different way
and have it as a slide.
19. 9.4. Oldstyle Slides "Show & Tell": So first of all, obviously, the slide that I made in
this class, the first one. I know it's a very
delicate picture. So you might think, Why would I want to
have a slide like this? But as I said before,
I really like the way this looks and I like, kind of like the more vintage
vibe that comes with it. That's my preferred way
using these slides. Now, let's have a look
at some of the others. Okay, So first, so first have a look at the other two samples that
are made for this class. You can definitely see
that it's possible to have different colored frames and how that gives a different
vibe to the image. You can see that this is
a more colorful image and one we can actually already see a lot more of
what's going on. So I really do like this one. Then I've got this
here where I used a, I think I've
mentioned it before. It's a snapshot of
video that I took. And even movies this again, it's a little bit fainter, but I still really
like this one. But just to show you, this was a color photo copy of an image. So that gives you an idea of potentially what
you could do with your own photographs and turn
them into slides like this. Then if we were to enhance
the idea of vintage images, I found a series of images in a book that Ethel would work
really nicely as frames. In that case, I even
wanted this slide frames to look old and
slightly battered, so I just coffee stained
the card stock beforehand. I've got a few more samples. I've got I've got this one. In this case, you can see that the tape is even more crinkled. That was an attempt of trying to flatten it more with an
ion that wasn't too hot, but don't, don't
try and do that. Because it was just it just made the whole tape
trying crinkle up. But I thought I'll just
use this image anyway, so learn from my mistakes. And here is hooks. Here is another one of those. And you can see they're all
very what you might call kind of quiet, dark, surreal, maybe even
steam punk, inspire. But that was the vibe
I was going for these. And then I've got a few
more from the ballet book. Again, I really like these. These are black and white
images and with various, I find that they really
lovely combination of it looking almost like a negative but not being negative. And I find that these
work really well. Let's have a look at
another couple of these. And also because
these images are all, what are all the same size? In the book, I could create
four slides that are the same size and I can then have them altogether
on the wall, which brings me to a suggestion. You can use these clips, e.g. you just attach them at the top and then you can
just hang them on the wall. And also depending on
what color your wall is, all the background
that you have. You can see that if you've got it behind something
that is lighter, you can see them better. So you can play around with
that as well and create even look slightly
different ways of displaying your slides. Also, you could
have them hanging up on your window or near
light or in front of lights. Are there lots of
things you can do here? Obviously, these are
just some samples of how I'm using the slides. Basically, all I wanted to do is give you an idea of how you can of what else you can do with your packing
tape transfers. I would really love to see your ideas on maybe
using frames and maybe these frames GAVI
ideas of trying something else with your packing
tape transfers.
20. Class Project: Hello, Here we are again
at the end of the class. I really hope that you enjoyed my packing tape transfer
class and I really, really hope that it has
inspired you to start your own packing tape
transfers a bit, just creating some
simple stickers or turning the sticker into
a mixed media project. You might have a go at
the furlough Royds, or even at the slides, you might have
your own ideas and projects that he would
like to try out. And please, if you do, try something that we haven't
covered in the class, if you have any
additional ideas, please do share them
with us because we're here a creative community. And it is so nice to inspire each ELA as if we were
in a real classroom. Then that brings us to the
topic of your project. And I would really love
to see your projects or you upload your projects. Eight will help other
students to see what they can achieve
in this class. Make sure that you tag
me on social media. If, if you were to post photographs of your
project on social media, it's difficult in bookshop
girl on Instagram. Or to see if this is
your first class, you might like to have a look
at the other classes that I teach here on Skillshare. And also make sure to follow me here on
Skillshare because that means that you will
be notified every time I publish a new class. And as I said that
this is the first in a whole series of image
transfer classes. The next one is
probably going to be image transfer using
acrylic paint. But back to the project. Basically just choose any of the projects or come up
with your own idea of how you would like to use a
package shape tones first and just upload
it to Skillshare. I'm going to create a quick video just to show
you how you can very easily upload and create projects here on Skillshare in case
you haven't done this before. I also really enjoy
connecting with all of you because we
can't meet in real life. I would like to make sure that, you know, they can always
get in touch with me. The easiest would
be either to leave a comment and one of the videos. And I'll get back to you
as quickly as I can. Also, I will look at each and every project and give you
some feedback on that. You can definitely always
get in touch with me either via Instagram or Facebook or
you can send me an email. And again, I'll try
and get back to you as quickly as possible because I feel it's
really important to be able to ask questions, share your ideas,
and just try and get in touch and get a
communication going. Then. Yeah, I'm really looking forward to seeing
all your projects. Thanks again for
taking this class. I've got a few bonus videos
in the making, so keep tuned. They're going to be
a few more videos that are going to be
added to this class. Thank you very much, and I can't wait to see your project.
 Nina Vangerow, Artist & creative Coach