Transcripts
1. Introduction: Creating designs
from scratch can be time-consuming
and challenging. Also, finding the
best graphics for your design is
always a headache, especially if you're looking for something new or copyright-free. With the help of
artificial intelligence, you can now create
amazing designs that are unique while saving
you a lot of time. In this class, I'm going
to show you how to use artificial intelligence
to generate images that are unique, different styles and to use
for your t-shirt designs. We will explore the
different steps in the design process from
generating the correct prompt, creating images using
artificial intelligence tools and eventually turning them into eye-catching
t-shirt designs. We will also go over the best
prompts that can generate the style of image that we can use effectively for designing. I'm also going to share with
you my book of prompts, which has over 20
tested prompts that I am using to create amazing
and beautiful T-shirts. By the end of this class, you will have a
basic understanding of the different techniques of Adobe Illustrator
that you can use to convert your images too
attractive designs. You will also complete to design projects throughout the course using images that were generated by artificial
intelligence tools. I'm wide Morgan, a content
creator and graphic designer with over four years of experience in Merge designed. So if you are
willing to dive into the world of AI generated
t-shirt design. Join me in this class. Now, let's get started.
2. Benefits of Designing With A.I: Hello everyone, and welcome to the first lesson of this class. As you know, this class is
dedicated to teach you how to design T-shirts using
artificial intelligence tools. And it will show you the techniques that you
can use to generate unique images and
eye-catching designs with artificial intelligence
tools like mid journey, playground and other tools that are available
in the market. The main purpose of
this class is to help you by using
Adobe Illustrator to create the design
you want with the images that
you have generated with the artificial
intelligence tools. So first let's talk
about the benefits of designing with
artificial intelligence. There are a couple
of benefits when it comes to designing with
artificial intelligence. The first point is
getting unique designs. When you use artificial
intelligence to generate images
for your designs, these images are totally unique. It's not possible that any, anybody else has the same
graphics are the same images that you have generated with the artificial
intelligence tool. So you will have your
own unique designs that are not available anywhere
around the world. It also saves time. The generated images can be created in a matter of
seconds or minutes. So this saves a lot
of time that you would have been spent
on manual designing. It also enables
designers to create multiple designs in a
short amount of time, as we are going to see
throughout this class. Third, it's cost-effective. Ai generated images
can save costs associated with traditional
graphic design. If you don't know how
to draw yourself, you might go to a
graphic designer or someone who can do
the drawing for you. Or you might need to pay some fees to buy a
license for an image. So using AI generated images
can save you lots of costs. Customization I
generated images can be customized to fit
individual preferences. And this is what we are going to see throughout this class. We can generate
different styles using AI generated images based on the prompt that
we are going to use. And based on the prompt
that we are going to learn how to write it correctly. Scalability, they are
generated images can be easily scaled to fit
different sizes of T-shirts. And also we will see the different skills
that you can use or input and your AI tools
to get the best result. And finally, copyright-free. Day I generated images are copyright-free because
they are unique, near created only for you. So you have the rights
to use it anywhere. Nobody else has the rights to use your own
copyright-free images. So the process that
we are going to follow throughout this class is to write the correct prompt
and generate the image. Then download the image
that we have created, and then upscaling the image. And finally converting the
image to a t-shirt design. And in this class we're
going to do two projects, two different designs using
two different images. But first, what is a prompt? The prompt is the text
that you use and enter in DJI image generation tool to create the image or the style
of image that you would. It is the text that
you use and enter in the image generation tool to create an image that eventually you're going to
use to create your design. So the prompt is the most
important thing when it comes to AI generations. So how to write a perfect
prompt for t-shirts? So the formula that I used
to create the perfect prompt consists of
five main elements. Description, the style, colors, the background, and keyword. And we're going to talk about
each part individually. But mainly the description
is the part where you describe what you would like
to have your image about. So e.g. if you say, if you want to create a
design about the cat, the description
could be acute cat. The style is how you would like the style of the
image to look like. E.g. people can
enter pop art style, vector art style, drawing,
sketch book style. So it's important to have a specific style and
enter it in the AI tool. Otherwise, you will get
a random style of image. If you do not enter your own
preferred style, the colors, it's very obvious
this is when it comes to your preferred
colors, the background, it means, what do
you like to have in the background of
your generated image? You'd maybe we can
say white background. You can say a red background, or you can write the
sunset background. So you have to have a
description of your background. And finally, the keyword. This is the most
important part when it comes to generating prompts. The art specifically dedicated to create our images
for t-shirts. And by keywords, I have listed some keywords
in front of you, like vector, vector art, illustration, t-shirt design, vector core, digital drawing. These keywords, whenever it exists or whenever
you use any of them, were a couple of them together and you enter
them in your prompt, most likely you'll
get a result that creates a style that is
suitable for t-shirt design. And also what one of the
keywords that people use is to enter a
name of an artist. So if you write e.g. acute cat in the
style of Van Gough. So you will get the style of the generated image similar
to Van Gogh's style. So this also, we can add
that adding the name of the artist if you have a preferred artist is
also one of the keywords.
3. Prompts for T-Shirts: So let's now let's take
an example of a prompt. So motorbikes,
silhouette, t-shirt design featuring a
detailed illustration of a vintage motorcycle with a sunset background set against the backdrop
of a city skyline. The motorcycle is
front-facing and it's front-wheel is lifted in the air as if
performing a wheelie. This is a very long prompt. And I have it as an example to show you how the
structure is made. So if we color it, Our prompt according to the
structure that they have, you will see that motorbike is the description silhouette. This style T-shirt
design is a keyword, is one of the keywords that
we have mentioned earlier, featuring a detailed
illustration of a vintage motorcycle. This is all part of
the description. Sunset background
is a background is explaining the
background of the design set against the backdrop
of a city skyline. This is also a
description and part of the city skyline is can
be considered colors. The motorcycle is
front-facing and it describes how the motorcycle
should look like. So it's part of the description. Shades of orange and yellow. This is our colors, shades gray and black. These are colors. That
design has a retro vibe. This is considered the
style of the prompt. And the image that is
below the prompt is one of the generated images based on
the prompt in front of you. Many AI tools, they generate four or more than one image it for whenever you
enter a prompt. And this image was one of the generated images
based on the prompt, the prompt in front of you. Another example of a prompt
is pop art deco, sunset, Zuma Beach, Volkswagen Beetle, surfboard, palm
trees, beach surfers. So the rest of the prompt
is in front of you. And also if we
divide the prompt, the pop art Deco is the
style sunset Zuma Beach. Still description, but
since it also can be considered a background
Volkswagen Beetle, this is the description, it's called surf board. This is also the description, palm trees, the
whitewater ocean clouds. These are colors and this prompt does not
have a specific keyword. Some other sample prompts
or the one in front of you. The vector core. Vector core itself is one of the keywords that I prefer to use when using some of the
Artificial Intelligence tools. Cactus with sunglasses,
drinking lemonade. This is the description. Splash. This is the style
sunburst graphic, also style T-shirt
design vector. This is a keyword,
another keyword, another sample of the prompts
is this one, pop art deco. This is the problem that
we have mentioned before. Art Deco, sunset Zuma
Beach works wagon beetle, surf board, palm trees, speech, surfers,
waves, whitewater. And this is the image that were generated based on the prompt. These prompts and similar
styles we're going to test in this class to create some of the
designs on t-shirts. The next prompt,
looks really cool. Giraffe, nickel art,
graffiti style, Marvel comic book style,
vector illustration. There are a couple
of styles mentioned together in this sample prompt. Decal art, graffiti style, the Marvel comic book style. All these are styles and
also vector illustration. This is a style and at the same time it's one of the keywords that
I've mentioned. And it created this
cool looking giraffe. Another one is vector core
fat American truck driver with american
aviator sunglasses, splash, sunburst graphic,
t-shirt design vector. So fat American truck driver, this is the description with
american aviator sunglasses. Splash. This is all for. This is a style sunburst. This is a style graphics
style T-shirt design. Vector is one of the
keywords that I've mentioned and the vector core as well. Another prompt is
t-shirt vector and in geographic detailed
design pixels, retro reflective style. So the t-shirt vector is the keyword in geographic
is description. Detailed is also, you
can consider it part of the description Pixar retro
reflective on styles. That was it for this lesson. See you in the next lesson.
4. Aspect Rations of A.I Images: So when it comes to
the aspect ratio, there are different
aspect ratios according to the tool
that you're going to use. And we will, and we will
talk about the AI tools that are available in use right
now as, as examples. But anyway, these are
90% of the issues that the AI tools allow you to have. So the one by one ratio creates
like a square image type, similar to the one with the
monkey, the green monkey. The nine over the nine
to 16 is a vertical one. The two to three is
vertical one bus but wider. The four to five is also
vertical one but more white. The three to two is is a more of a horizontal thumbnail
style image. And the 16th tonight, if you asked me which one to
use for designing t-shirts, I usually prefer
the vertical one, the three in the middle, the nine to 16 to two to three, and the four to five. However, sometimes it depends on your description
of the image. Like the image of the
monkey, the green monkey, the angry green monkey in front of you that
whose one-to-one. And it can easily be customized to fit on a
t-shirt so he can play with your artificial
intelligence tool to try different aspect ratios
as per your style, and to see how it goes.
5. A.I Platforms: So in this lesson we're
going to talk about the artificial intelligence
platforms that are available. Enough about theories and talk. And let's get into the actual testing and the
actual work of the class. From this lesson onwards, we will start practicing everything that we have
talked about and we will start checking
the AI platforms and start generating
images and designs. So I've listed a couple of artificial intelligence tools
that are famous these days. Most of the Bronx that I have listed in the previous lessons
were tested on my journey. But you can still play with the, with the words and add keywords to get similar styles
to the one that you saw. So the most famous ones, the most famous AI platforms
are my journey, Play, background, Leonardo do a
creative fabric as pork, blue willow, lexica, and Delhi. And we're going to check
these platforms right now. So the first one we
have is the dull ache. So these are some
generated images that were generated
by the people. And when we hover over one
of the images that you will see that the prompt used to
create the image is appears. So each photo is
created with a prompt. This is what we have
been talking about. And each Ai generation
tool has an area where you can enter your prompt according to the formulas
that we have talked about. So e.g. let's try to test the data ie tool and add a prompt baby dog detail
to wearing sunglasses. Just e.g. just for an example, 3's background, vector,
art, illustration. And click Generate. We are going to it for
a couple of seconds and that he is going to provide
us with four images. As you can see, these
are the four images that were generated based on the
prompt that I have entered? Me are they are they don't
look much as expected. It's more of an
amateur drawing style. So you can play with the keywords to try to get different styles
when you work on, they'll eat when it
comes to meet journey, the prompts that we
have that I have listed are going to
work exactly the same. So now this is the
majority platform. In my opinion, that's the
best platform available now, when it comes to AR generation,
when it comes to hear I, image generation,
the styles that are provided are amazing. And also these are
images that were created by the
community, by people. And any style of
image that you like. When you click on it, it will open the prompt that was used to generate the
image like this one. Topical punk skiing. So this will also
give you an idea of the prompts to use if you
like, a specific style. If you open the image, the whole prompt is
going to be visible. And you can copy it and change the description to
get similar images. So that's the major
new platform. Of course. Each, each platform, each platform has
different interface and has different tools to use. So you need to get used to the AI platform that you're
using, to know the rules, to know to change the settings
and play with it until you master the platform so that you can get
the best out of it. But in the coming lesson
where we are going to start creating or
generating prompts, I'm going to use
the My Journey plot for another platform is the
creative fabric a spark? It's a totally
different platform than the ones that you've seen. It also generates
very nice images. But the problem was the
creative fabric as parkour, the negative issue is that they allow creators to
hide the prompts. So many of these prompts, you cannot see what
people entered it, like. They are hidden. However, it still provides
very nice results. The following platform
is the playground. And the playground AI platform is also creates amazing results. And the advantage of
this one, as we speak, it provides one South
and three images daily. Not all the platforms provide
free generation images. So and you can also click on any image that you like
to save it to the bookmark. And also all the prompts
that were used to generate the image can be seen when you
click on the image itself. This one here. You can
copy the prompt used. It can re-mix it to change
a part of it or edit it and get similar results while using a
different description. And the playground platform, it enables you to classify the images based on
categories like vehicles, science-fiction,
landscapes, food fashion. And you can search
accordingly and check the generated
prompts. Again. Again, copying any
of these prompts and changing the
description will get you similar style of image with the corruption and the new description
that you've entered. And other platform is
the lexica platform. This is one of the
three platforms that enable you to
generate three images. And it also has amazing
results with different styles. And again, if you
click on the image, you can see the whole prompt
and you can copy the prompt and will open an editor and change it and generate
different images. So this is, this is a nice
sticker of a dog, e.g. if we click on it and copy the prompt and use
it in the generate, books. Plays the prompt. And we can change the Q tapping
German, too, cute, happy. Shin, cat, e.g. was a long tongue with
a with long hair. Die cut sticker. Let's change black and white, too colorful. And no background. And click Generate. And let's see what's
what we are getting. We got different photos. I like the one on the right. It can be used in designing. And also a few don't
like the results. It can click on Generate again. And the AI tool will generate
another four images. Or if you like one
of the images, you can open it out, printed or upscale it, download it, and start
working with it. As we are going to see
in the upcoming lessons. Here you can see that the ratio of the image can be
changed through this pore. This is a vertical ratio similar
to the ones that we had. And this is this is more of a thumbnail
ratio of the image. That was it for this lesson. See you there.
6. Midjourney On Focus: In this lesson, we are
going to understand how to create prompts that are
suitable for t-shirt designs. And these prompts are mainly
focused on how to get a vector style or
illustration style images that you can use later. In this lesson, I'm going to use the major new platform and
show you the different ways to create this type of images that are suitable
for t-shirt designs. So if you go to my journey
platform on sign-in, you will be directed
to a discord server. As we speak. And at the time of
recording this class, the journey is using the Discord server to
generate the images. So this is still the website
of the month journey. This is you would have a
home screen where you have all the generated
images that you have done by yourself previous,
previously stored. So all these images
are styles that you will be provided in
the course section, in the download section, that are collected and
generated by myself to enable you to create similar styles that can be
used for t-shirt designs. Anyway, I forgot to
explore is hard. The community feet section where all people have created
different kinds of prompts. And you can bookmark
the one that you like and see how the
prompt is described. And you can also use it for
creating similar images. So if you go to
the Discord server and go to my journey server, I'll show you how
to create prompts. So the old, these are images
that are created by me. And we're going to go over the descriptions of these
prompts later in this lesson. If you're not aware of
discord is not a problem. You can follow along this
lesson and you will understand everything sorted to
generate a prompt. You, on my journey, you will have to start by
typing slash and imagined. And then you start
writing what you would like your image to be. So let's for testing. I'm going to write cute
cat playing with a ball. And without adding any
style or any more details. And let's see what the
image is gonna look like. So as we can see, the
medullary created for images, which are really
nice, but they're not suitable for
t-shirt designs. So if we try to add a more specific type of
description in our prompt. So let's say imagine cute
cat playing with a ball. And this time I'm
going to add vector. Let's see what will happen. And this time we can see that the pictures are more
of a vector style. I started to look in the style, in the direction of the studies
that we're looking for. We can use, we can
definitely use some of these images to
create t-shirt designs. So let's try to, to write something different. Cute cat playing with a ball. Vector vector code. This time I'm using the
vector called keywords and detailed white background. I'm adding a
detailed background. If you remember the
structure of the prompt, the ideal structure
of the prompt that I've mentioned in the
previous lessons. And I'm going to
add red and white, Let's red and black. Let's focus on these
colors and white. And I'm going to add
the illustration. Yeah. So I forgot to enter the imagine
at the beginning. So I'm going to copy and paste the prompt
again after adding the imagine mark and
the generated images. They even look much better. One at the top right corner, and I like it so much. If you see the buttons
beneath the images, they knew it means upscale. So you can upscale the image to download it and use
it for your design. And each number refers to
one of the generated images. So the one refers to the, the top left image, that two refers to
the top right image. Three refers to
the down the left, the left bottom image. And the four refers to
the to bottom image. So they knew this refers to upscaling and the V
refers to variation. So it means you can
create variations of the image that you like. I like the number two, I'm going to create variation
of the second image. And let's see what happens. The majority platform started to create variations of the
image that I choose. And now we have four images
for variations of the image. These variations, we can see
that the tail is different. The rules are different
from each other in each image and also the eyes of the kit or relative
with different. So I'm going to upscale number three
and then download it. So this is mainly how
the process goes. This is the process of
creating prompt on my journey. So now this is the image that I have asked to be up-scaled. You can open in browser. And now the image can
be downloaded either by right-clicking on
it and Save Image As. And it will be saved
in a PNG format. In the coming lessons,
we will see how to use downloaded images
to create our designs. But for this class,
for this lesson, we are concentrating on how
you can create the images. So the first way to create images in the
stars that we want is to use a style of an artist. And what I mean by that is two, if you like, one of the generated images
by a community, e.g. or by someone that has the name of the artist
mentioned at the end. And you like the style. And you think it can be used
to create your t-shirt. You can copy the name of the artist and add it
to your prompt. So e.g. let's open this one. It says that in the style
of met grinning at the end, this is the name of the artist. So we can simply add the name of the artist to our prompt to see something
similar and met groaning, Of course he's famous
was the Simpsons. So we will try to
create a cute cat. And the style of the
mat grinning style. So I added his name at the end. We can delete this part.
We don't need this. So cute cat playing with a ball in the style
of met grading. And let's see what's
going to happen. I'll also add white background. And this is what we got. So we've got these
four cute cats in the style of Matt granting. And if you Google it, you'll see that he's
famous for the Simpsons. So I am not an
artist specialist, but of course you can Google and check the artist names and the styles that you would
like and add edit at the end. And there is another example. This is and that
meant an artist. Of course, this style is not the one that
I'm looking for, but this is for
testing purposes only. I'm going to copy her name
and also add it to the image. And also we're going to use
the same prompt that to have been using. Cute cat. Playing with a
ball by an Lipman. And let's see what,
what's going to happen. So the degenerate and images, they look really nice in the
same style of detriment. Of course, these are not the
best for t-shirt designs, but I'm showing you how you can choose your prompt and create the one based on
status of the artist. So the second way, that was the first way
of creating prompts. The second way is to use images. I have an image that I have
copied from the Internet. It's an illustration style
of a skeleton smoking. I'm going to add
it to the Discord. By clicking on the plus sign. I'm going to add
it to the discord, upload it to the
discord to create similar images in
this seminar style. By pressing enter
the image is added. Then right-click on the image. Copy image address, and I'm going to use
it as a reference. So in my prompt, I just need to enter, imagine, and paste the link of
the image, which I'm, which is this one which I'm
going to use as a reference. And I'm going to add
cat smoking cigar to create a similar image using the one that
I have uploaded. So the images that are
generated by the mid journey, they used the image that I have uploaded to create
similar style. But the new description,
which is cat. So cat smoking cigar using the same style of the image that I have used as a reference. So this is the second way
of creating the images that you want is to upload the reference and ask
them a journey server to create similar
styles in the same way. So that's our second way
of creating prompts. And of course, if it can always click on the regenerate button, if you don't like the images
that we're generating. You can always click on the
regenerate button to create other variations or
different variations. If you don't like
the results and you can keep doing that until you find an image that you like. That was our second way
of generating images. The third way is to follow exact prompts that
have been tested before. And this is what I'm
going to show you.
7. Book Of T-Shirt Design Prompts: In this lesson, I'm
going to show you all my already tested
and created prompts. And this is the third way of generating t-shirt
designs using prompts, which is by following the
already tested prompts and just changing parts of it
to generate similar styles. So we're going to go over some prompts
that I have created. Her in my book of prompts. And this book of prompts,
you will find it in your Downloads section
of your class and you can try all of
these prompts yourself. All these prompts were mainly tested on my journey
and they will create exactly similar style when
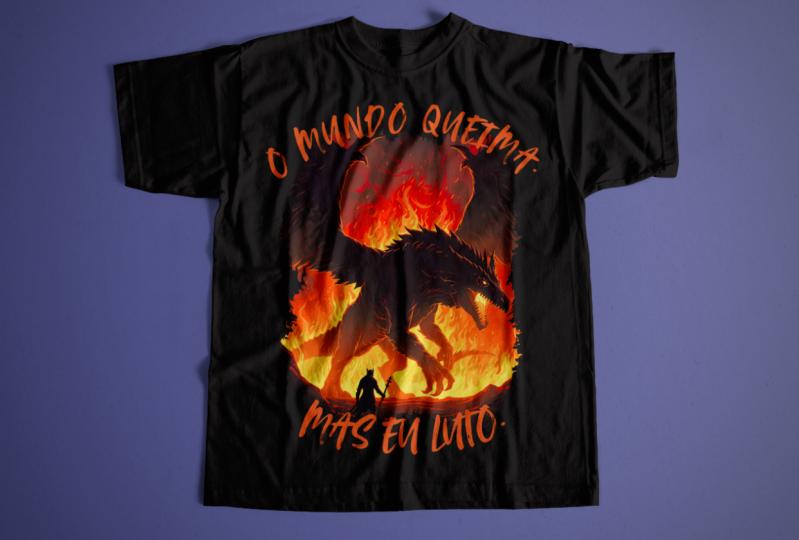
you follow the description. First prompt is the dark
shadow fighting female ninja, blonde hair on a red background. You can keep the
dark shadow as is. You can change the feet, are fighting female ninja, blonde hair to
something else and keep everything to generate
seminar results. So e.g. you can write
a black fighter or a white Asian fighter was white hair on a red background and you
wouldn't have the same style. The second prompt is
the one that we're going to use next
lesson for designing. It, generates to, it
regenerates very nice designs, logos, glasses, playing guitar. This is the only part that
she can actually change. We should keep all
the rest as is the cartoon style vector or
the front view line drawing. You can keep the rest of it and changed a
dog with glasses. To example, the cat
were playing was about the third one,
t-shirt vector. The only part that you can
change is the new geographic. He can change anything, e.g. so-called fee soccer
player, whatever. The fourth prompt. Also, you should keep it as is. You should change the Ford
Mustang to any type of car. And you will have
similar results. You will have same
atmosphere but with a different type of
car or type of vehicle. This is a very nice splash
design effect. Vector core. You can change the black girl
and the American flag while keeping all the rest
of the prompt has is to generate similar design. This is also one of
my favorite prompts. Man, driving a motorcycle. This is the only
part that you can change the description mainly. And you keep looking,
keep the rest of the prompt S is to
generate similar results. So instead of man
driving a motor cycle, you can write a man
driving a truck, e.g. and it generates
very nice a prompt. This is a long one. You
can replace them OK, motorbike will silhouette
with something else. And keep the rest of
the prompt is vintage. Keep it as is the motorcycle
from the description, you can also change and keep the rest of the prompt
if you'd like to have similar results for maybe change the colors of the orange and
yellow that are mentioned. Two other colors to have
different color effect. So this is how the
book of prompts work. You just need to
change the description of the prompt while
leaving everything else, the style, the colors,
the background. So these are some
of the prompts that you will find in the
book of prompts. And you can play with them
and change them as you like. And in the coming lessons, you will see how you
can generate this. How you can use these images to create t-shirt designs and
export it for printing. This is also one of the,
my favorite prompts. Grumpy dock,
drinking whiskey can change this to grumpy
look to anything else. And also the drinking whiskey
like acute-care playing with the bulb and leave the
rest of the pompe disease.
8. Upscaling A.I Images: In this lesson, we're
going to use one of the generated images to
create our first design. So I'm using the dog with
glasses, playing guitar prompt. This is one of the
prompts that I have tested it and it generates very nice and wide vector
stone prompt or image. And this is what we are going to use for
our first design. You can always change
the dog with glasses to anything that
you would like to have and keep the rest
of the prompt as is. And even if you change the white background
to other colors, that will give you the effect, the same effect but
different colors. This prompt mentioned
vector graphics and SVG. And these are the
images that I got. So I'm going to use
the upper right image to create the first
design in this class. But to do that, you need
to upscale the image. We need to upscale the image. And to do that, I'm going to copy my image and use a website
called replicate. We just need to
upload the image and scale it in order to
use it for our design. Sometimes the image generated by my journey or other
AI platforms may be low resolution or blurry due to the limitations of the tool or the complexity of the prompt. So to improve the
quality of the images, you may need to upskill them. You will be using
another tool that can enlarge and enhance the image. This is before starting your designing or using
them for your design. Some of the free tools
that are available is upscaled media, footer. Let's enhance replicate. And the one I'm using
now is replicate. So you just, you simply
need to upload your image. Choose the upscale percentage that you would like to have. Maybe two times, three
times, or 200%, 300%. It's according to the
upscale tool that you're using and then download the up-scaled image
and using for design. So this is an
eighth scale image. And I'm downloading the image now in a much better quality. And there are many platforms
to upskill your image. There are AI upscaling, there are the replicate. And even if you search
on Google for obscura, you will find many
platforms that will help you
upskill your image.
9. Retouching Our A.I Image: So now when we go to
Adobe Illustrator, we will have to enter the dimensions of force
around 500 by 5,400 pixels. These are the dimensions that I always used to create
a printer friend on-demand t-shirts with
high resolution RGB color. So if you're not familiar
with Adobe Illustrator, you can follow
along in the class to understand the
steps that I'm doing. You can change your work
place from the window tab, which will change the
layout of the workspace. There are many default play
out in Adobe Illustrator. And also the window tab enables you to find
any missing panel. These are all patterns that
you can use while designing. So the workspace from changing
to Essentials Classic, which gives you a totally
different work space with different panels. And if you go again
to the workspace and click on automation, e.g. that will show you
a different layout. So let's try the topography. Also different layout
and different panels. And again, all these panels can be moved and clipped
anywhere else. So now the painting
also gives you different paths to work with. And all these panels also can be found
under the Window tab. If any panelist missing. And you need to add
it to your workspace, you can find it
under the window. Tap here. So e.g. let's find the character panel and click on it and clip
it for our board. So this is how you can add any missing panel
to your workspace. And you can save
your workspace by clicking on New Workspace and
give it any name pan click, Okay to save your new workspace after changing its layout. Now, let's go to file. Before that. The
on your left side, these are the toolbar. Your work toolbars can expand it and now go to file and place to get the image
that you have downloaded. You will find a dog image
in your class downloads. Just select it and place it
on your art board like that. Remember the images in a PNG
format and we cannot work on with PNG images on
Adobe Illustrator. We have to convert it to vector to keep its
resolution. To convert it. To work, you don't have to
use the Image Trace option. If you cannot find it visible. You also can, you will
find it under Window tab. So select your image. Press on the Image Trace button
to convert it to vector. The image has a
white background. As you can see, the
Image Trace option will convert the image
to a vector format. We can expand the
image trace menu to play with the options and little bit to see how
it affects our image. So the image trace and there are many options under Image, Image Trace, we are using
the black and white logo. If you have colored image, like you will see
in the next class, you can choose the
high fidelity photo, but for now we're not going
to do anything with it. The threshold bar, it plays with the shortness of the lines. Can see that when you move it to the
right or to the left, you can just are your
image accordingly. And the noise also decreases. The extra ports are the extra noise that
you have in your image. And you can, I'm
going to press on the Ignore White
option to remove any white colors from my image. So if I click and drag
my image to the right, you will see that it has no
white background anymore. It's just black color. And the word that you
are seeing now is from the background
of the art board. So once we're satisfied
with our image, we can press the Expand button. And now our image is
in vector format. If we upscale it
or downscale it, it keeps its resolution. This is the important, this is the importance of converting the image
to have a vector. Now, our image is
ready to be worked on. We need to do some
adjustments to fix the image. There are some problems. The first thing is I'm going to create a brush tool to draw
the missing parts of damage. To do that, I'm going to create a shape
using the ellipse tool. And we're going to use the brush tool panel
to create a brush. If you cannot see
the brush panel, just go to your Window tab and click on the brush and it will appear on
your art board. So click on the ellipse and click on the art
brush. Click Okay. And now, Okay, again, to create new brush with the
shape that you have used. Keep everything as, as, keep the settings
as is. Press Okay. And now your brush appears in the brush pen up when
your right side. So click on it. And once you start
drawing with the brush, it will draw with the same
shape that you have created. The brush that you
have used anymore. And now we're going
to use the brush tool to draw some missing lines. As you can see, the head
has some missing parts. So we're going to draw
and complete the hat. I think the stroke is
a little bit strong, so I'm going to
decrease. The stroke. Can do that by using the stroke option
from the upper menu. I'm going to start adding some hair lines and
the missing parts. So now the stroke
sizes fits better. And I'm going to close any
missing parts from the outline of the head or the body because we are
going to color it later. So also, the hand needs
to be fixed and narrow. Some ports that
needs to be filled. Here under. We just need to draw some similar lines like so I'm using my mouse, by the way, I'm not
using any tablet. If you have your
own graphic tablet, you can use it to draw
the missing line lines. With my eraser tool. I'm going to delete any
parts that I don't like. This isn't an AI
generated image, so it's not 100% perfect. That's why this stage we need to fix any problems with the
image before using it. So I'm going to keep
adding lines in the missing parts of my image and make sure that
the outline is all closed. Outer outline of the
dock. Every word. Again, I'm using the
brush that I have created with my ellipse tool. Just keep adding lines. And the exact same
image of the dog that I'm using will be available in your Download section
for practicing. So now. I need to fix the hand. I'm going to delete
some parts to make the fingers look more realistic. So just deleting some ports to create the shape
of the finger. Like so. Now, it looks much better. Also the guitar itself, the courts of the guitar. They needs to be fixed. This area is not 100% perfect. So I'm going to
use my eraser tool to delete this area and creating
new lines or new chords. And by the way, all the images are different from each other. So you might get an
image that has no flows. But this is the way to fix
the image that you have. So we need to create a perfect
design and we don't want, want our image to
have these problems. So and we have an extra
eyes generated by the mid journey over
the eyeglasses. We don't need them. I'm
going to delete them with the eraser to have a more
realistic look off and the dog. And of course, it
happens that you might get images that has some
extra parts here and there. Now, I'm going to
select everything, the image and the drone
ports and Expand Appearance. This will convert the
strokes that I have done, that I have created two shapes. And then using the Pathfinder, I'm going to click
on the merge button. Merge all the lines
that I have drawn with the original image so that
they are all one part, as you can see when I move them, the image and the drone
ports are connected. So this is the layers panel. This is where you
can see your layers. I'm going to change the Layers option too large to see each
layer that I'm using. More clearly they appear
larger on the panel. Now, I'm going to draw some
ellipses on the guitar hand. Also to fix this area. I'm going to play with
the shape a little bit, can using the direct
selection tool to stretch it. Like so. And I'm going to replace
the handles of the Guitar. Who's the one that
I have created? Let's delete the old ones
first using the eraser tool. And some forests that
needs to be removed. And I'm going to place the one that I've created
and using the Alt button, I'm going to duplicate it. If you, just, while
pressing the Alt button, move the shape to have
to create a copy of it. So I created a couple of
copies and also again, rests on it while
you are pressing on Alt and move it to create. A new copy of it.
So now the handle of the guitar looks
much realistic. And this is the way you, for how you should
fix your image by simply drawing or deleting
any unnecessary reports. So now I'm going to use my
tool to draw lines or quotes. And this area, just
creating straight lines. Without a stroke,
without a fill. Sorry. If we, if we select it, we can increase its stroke size. Like so. And we can duplicate this line by
pressing on the Alt and moving the shape down
to make another copy. And if we could
click on Control D, it will duplicate
the last process and create other lines. So now also our guitar started
to look more realistic after fixing the courts
and this worked. So I'm going to group all
these slides together. I'm going to select
each one of them and pressing the control
G to group them together. Now they are grouped. Using the eraser tool. I'm also going to fix this
core part of the guitar. There are many
problems in this area. So using the eraser tool, I'm going to delete these extra lines to
make it more clear here. You don't have to create a
perfect image by the way, but at least try to fix
it as much as possible. For your final design. As we will see this in
a couple of lessons, how this image will be turned into a cool looking
t-shirt design. Again, using the pen tool, I'm going to draw a black shape on this area because I
don't like how it looks. I have Hi, Did the quotes
that I have drawn before. Also. I'm going to
create some lines, some white lines here,
but before that, let's draw you back shape to hide this
area completely. Like so. I just
add that shape on it to hide the original image. And I'm going to use
the rectangle tool to create some thick lines like so. Change its color to
white and rotate it. And then add it on the
previously drawn lines, the ones that are the
ones that have problems. While pressing the Alt key. I create copies of
it by moving it. And I'm going to place
different ones here to fill this area was new lines. And I'm going to use
my pen tool to draw. To draw a new black area on the top area to make
them look symmetrical. And the borders of the
guitar have some problems. So I'm gonna base, I'm going to draw
a new shape here, changing its color to white. And the borders. The bottom here, the black
border needs to be fixed. So I'm going to
draw a black shape. Changes color to black. Now. The border
looks much better. And it all looks much better. I'm going to select everything. Unhide the quotes that
I have drawn before, and move the layer to the top
so that they appear on my, on top of my guitar. Now, I think my image
looks much better. I'm going to delete the lower part of the
Black Codes that I have drawn the so that they don't interfere with my
core of the guitar. And I'm going to add the
line on this area was a black stroke around the core circle of my getter. Now. Yeah. Okay, and I'm going to to add also quotes on the core of
the guitar, like so. And using the Control D to duplicate the last task which
is moving the cooled down. And it will duplicate
records that I have created. Like so. I think the image now it looks
perfect and complete. How would you just need to select everything and
expanded similar to the previous time to convert
our strokes to two shapes. And then we can merge everything again so that
our image is now one shape. So that's it for this lesson. In the next lesson, we're
going to add color, white color to the
inside of our design.
10. Coloring With Shape builder: In this lesson, we are going
to add a white color to our dog image so
that we can place it on a black t-shirt or
any coloured t-shirt. As you know, the, our image
is transparent, transparent. For now it's only black color. To do that, I'll start
by selecting everything, all the parts that I have
added with the brush. So I'm selecting everything
together and expanded to convert the brush strokes
that I have added two shapes. Now I was my rectangle tool. I'm going to place a rectangle, move it to the
back of my design. And I'm going to select both my image and my rectangle
using the shape builder. Pressing Alt and clicking on the white area to cut it
with the Shape Builder. To work effectively, you have to select both everything
on your screen. And the Alt removes the
ports that are outside. So as you can see, the image, the white
background, it's smashed. The dog, but not everywhere. So the head and the tail,
There's still empty. So this means that he had in detail there are still some parts that
are not covered. They are open. That's why the shape builder did
not recognize that. The head is a closed shape. That's why this effect happened. So we need to make sure that the head and the
tail and the left leg, of course, these
are closed areas. Before using the shape
builder so that we can get the correct
effect and get the white color field everywhere
inside our Docker image. So we will have
to again continue adding some strokes or some brushes to close the
open areas. So let's check. Here. We can see that
this area is still open. But the stroke, Let's decrease the stroke size a little
bit. This is too much. This audio at the left
side is also still open. So let's work on
the tail and close these open areas from
the outline of the tail. And again, the reason
behind that is to close our outline from everywhere so that the shape
builder understands that the dog is all one shape
and the outline is closed. And when we start adding the using the shape builder
to apply the color effect, it will cut the
white-collar from outside our outline
as one shape. So again, selecting
everything together, expanding the strokes, adding the white rectangle. Let's do another test and see
if we missed a part or not. So the Shape Builder, pressing Alt to delete and selecting the white
area outside or duck. And now we can see
that it worked. It worked fine. Now we have added the white
color to our dog. So I'm going to select
everything together, please. Our dog to the board. And that's it for this lesson. See you in the next lesson.
11. Designing 1st T-Shirt : In this lesson,
we're going to use our Docker image to create our design that we are going
to use for our t-shirt. So first thing to do
is I'm going to go to font space and download
a couple of fonts. So I have filtered
by commercial use, and I'm going to
download this font. All the fonts that I'm
going to use in this class, you will find it in
your Downloads section. So as you can see,
it's 100% free. So I've added a
black background to the design to my board
and I have locked it, as you can see from the
layers panel on the right. Then I'm going to use my
brush to add some hair lines. This is an extra step. You don't need to do that. But I think we give a
nice look to the image. So let's play with the
strokes and make it smaller and add lines, hair lines to the head. Like so. We can continue
adding some lines to give the image more details. So I'm going to add some
lines to the cheeks. Of course, you can always
press Control Z to undo what you've done and redo it. I think the image now looks much better with more details. So I'm going to
select everything and using the object panel,
expand the appearance, and merge all the items, all the shapes using
the Pathfinder. There's indeed Text
tool. I'm going to place my text to the board. I'm going to change the
size of the font to 300. And my text line is
living the life. I'll choose the font that
I have downloaded and place it beneath the dog image and adjust it to the art board. As you know, the order
board that I'm using is the one that I've
created before. No, for solving for
funded by 5,400. And I've changed the
background to white color. So this is a simple design, but this is not
our final design. I'm going to go to Pixabay, which is a free site. And I'm going to
download some bricks, images of bricks to add to
the background of the design. So I'm going to search
for something nice. Also laid down the bricks file will be available on your
download section of the class. This one looks nice. Gong to download the
vector file of this one. And using the File menu, I'm going to place
it to the board. Like so. This is the file. And I'm going to move its
layer to the back of my dog. Now the design started
to look even nicer. So my next step is to make a
copy of the whole design and the art board and
create a variation of this design for a black
t-shirt with more details. So I'm going to click on the art board icon or tool
from the left menu and Paul, pressing the Alt button. Let's undo this. So I
click on the artboard and move it to the right while pressing the Alt to create
a copy of your book. Now I'm going to
change the text and the font to this hot ink font, which looks really cool. I'm going to delete the spaces between the
text a little bit. Also. I will do download the different brick
file from Pixabay. This one looks more transparent. I choose vector graphics
so that it can be easily, it can be editable. Let's place it to their board. Again, similar to the last time. And expanded a little bit. Move it, move its
layer to the back, neck, so makeover the duck. So the left part is not similar to the right
part, which I don't like. I'm going to use my eraser tool, pressing Alt to create a racing box and
delete the left port and copy the right port and reflected to
match the right one. And I'm going to
select both ports, the left hand, right,
and group them together. Now the brick wall looks better. I'm going to change
its color to red. And I'm going to create, convert my text to outline. It can do that by
pressing the neurite, the right-click mouse on the text and choosing
Create Outline. This wound will convert
your text to shapes. I've made another
copy of the bricks and please sit and placed it to the little bit down to fill the bottom area
of the design, like so. Now I will choose the color
of the text to yellow. And using the Pathfinder, I'm going to create an offset
path of my debt myText. So this off Offset Path. When you give another layer, I can change its color to black. And this will create this
outline around the text, which looks really
nice and gives an effect between the
dog and the text itself. So now I'm going to make another copy of
the dog I want to take to extract the sunglasses out of this second
copy of the dog, I'm going to ungroup
the dog and delete everything but the sunglasses. So just ungroup it. Delete the parser need. And with the eraser tool, you can delete the
connected parts of the sunglass
sunglasses with the flying off the duck so
that it's being separated. And now we can take
the sunglasses out and delete and change
its color to red. And you can delete
the copy of the dock. We don't need it anymore. Now we can place the sunglass, the sunglasses to the
top of the dog to create this cool, nice effect. And I placed it over
the black one to create a shadow of
the glasses. Like so. I'm going to lock my background, copy my design was the
text and group it. Again. Going to Pixabay, I'm going to download
music shapes, music elements to
place it on the board. So one connected file, I'm going to change its
color to yellow to white. And look my background. Ungroup the music elements
and please them randomly on the board to fill the
background of the design. And I'm going to do the
same with the left design, the one on a white background. And now we have
our design ready.
12. Designing 2nd T-Shirt: In this lesson, in this
lesson we're going to create another design
using this prompt. This is one of the prompts
that you will find in your prompt book and
you'll download section. It really gives a very
nice colorful designs. And I have generated these
four motors, motorbike images. And I'm going to use this
one to create the design. So I have upscaled it. And I'm going to open in browser and save image as to download it and
use it for designing. So we have to upscale it similar to the one that we
have done before. But this one has a
black background and has a complicated shape. The image is background. It's not clear. And we have to cut the
background from the black color. So to do that, I'm using Pixlr, a free online editor to
remove the background. And I'm going to show you
step-by-step how to do that. Of course, if you know
how to use Photoshop, you can do that using Photoshop, but I'm trying to
simplify things here. I'm using the Pixlr, ie. It's a free online tool. So go to the pixlr.com website, click on Open Image and open the downloaded
image of the motorbike. Let's do one. Click on
full HD and click Apply. Now using the magic
wand tool from the left menu and changing
its tolerance to six. And pressing on the
black background. This will highlight all the black
color from the background. And the tolerance is, this is the sensitivity
of the magic one tool. It means if you
increase the tolerance, it will pick other, other black color
from your image. And we don't want that. We want you want to pick the black color from the
background to delete it. So you just need to make sure that the
thalamus is very low. You can have it on
six like I'm doing. And make sure to have the
anti alias and continuous on and click on the black
part of the background. Once it's highlighted like that, press the Delete button and it will be deleted
from your image. And you can press Control
D to de-select everything. Now you have the image
without the black background. And we can use it for designing. So we need to save it first. So you have to go
to click on File, save as PNG, and click on
the transparent option. And Save As, and save it
on your, on your computer. Now we're going to have another art board with the same dimensions
on Adobe Illustrator, the 4755 by five
solvent for 100, similar to the previous one. And place the image, the PNG motorbike that
we have downloaded. Again, it's in PNG format
and we need to convert it to vector and delete these extra
parts on the left side. So again, using the
Image Trace button. This time, I'm going to choose the high fidelity
option because this is a colorful image and we
need to keep the colors as is. So choose the high fidelity
from your image trace will keep the colors
and convert it to a vector and press Expand. Now we have our image
as a vector file. So I'm going to place a rectangle at the background
to see how it looks. Changes scholar
to Blake and move it to the back of the image. As we can see, there's
a white board that is generated because we converted the image to image trace.
That's always the case. We have to remove
the white port. So first we have to
click on the image. Who's the right-click
and ungroup it. Now, the image is, it has, is. Now we can delete the
white ports, like so. And all these extra
parts as well. But we can see that
we still have E, borders, not, not
clear and there are this gray color
around the borders. We don't need, it.
Doesn't look nice. So I'm going to pick
the magic one tool. Also, pressing Enter to play
with different tolerance. Again, similar to the Pixlr, are going to decrease the
tolerance to four and pick the gray color at the
borders and delete it. So I'm going also to pick the
white color or the borders. And this will highlight
all the white color. And you just need to press, Delete and decreasing
the tolerance. Again. We'll give you
the option to only select the exact
color that you're selecting and keep this the similar colors
from inside the image. So now we have a
much better image. So what we're going to do now is merge our image together
using the path finder. And and with the pencil tool. I'm going to draw
a white area to cover the transparent
areas that were raised by the magic one tool and make the free white and
move it to the back. When you move it to
the bucket will fill the empty white places. And this, when we
turn it on and off, you will see the difference. Nice full white areas were erased accidentally
by the magic one tool. And by doing so, we
have covered it, we have filled it back. Now. We're going to expand everything and merged both the white layer that
we have created and D, original text, the
original image together to be one shape. So now they're merged together. What we need to do now as
change the background color to white and gray is
the extra parts of the borders is extra dots. And fix the waters a little bit. Because we want nice. So by using the eraser, we can fix all nice extra
items and delete it. I'm going to make a copy of
my motorbike just in case. So now I'm going to change the background
to black locket. And I'll start adding some lines to the main image of the motorbike to
sharpen the edges. So using the end, of course, I'm going to use the pencil
tool to cover some of the parts that need to be fixed. Like this area here. And this area here. Just picking the
color picker end, change its color similar
to the background. Now using the brush, I'm going to add some lines to the outline to create
some sharp lines. I'm going to also similar
to the last time. I'm going to create a brush. This time it's a
little bit thinner. Create an art brush. Tenths. This time of
choosing the tenths option. This will allow me to. Change the color of the
strokes of the brush. Now I'll start heading brush
strokes to the main image. So let's add some stroke lines
to the motorbike. Orange ones to sharpened
the wheel, the tire. Like that. Just creating some
outlines to give some sharp edges
to my main image. And I'm going to
do the same around the biker by creating
lines at the borders. And also the other
port at the other arm, the other side
near white flames. I'm going to also to
draw a black outline. This just sharpens my image and compensate on any
details that I've lost when the image is
converted to a vector. And we can add also one final outline to the
black type, the back tire. So there is also a white port
at the bottom of the tire. I'm going to use
my pencil tool to draw a black shape to cover it. And also pick the same color
of the tire to cover it. Like so. And now I'm going to pick the brush and create a stroke using the blue, the wild loop color and
change the stroke size. Let's do it again. Now,
my image looks finished. There's nothing else
you needed to be done here. It looks really nice. So I'm going to select
everything, Object, Expand Appearance to
convert the strokes to shapes and Pathfinder and merge everything so that my image with the drone shapes
become one port. So now I just need to add text. So I'll change my background to black and start adding text. This time I'm using
a script text. And also I have
downloaded the font that I'm going to use
from a font space. And now I'll start
hurting my text. I'm using this yeah, Keen font. It's a very nice script font. Adding it to a design. Now my text is gasoline banded. Making a copy of the
text can change, changing the second
word to bend it. And now I'm going to change its color to orange and change the color of
the mandatory to orange. And we almost have
our design predict. So let's expand and
merge the text. Hunger are going to create
an opposite pass of the reward gasoline and
make its color black. Now, you can see
that the G letter has a black area around it, which creates select a layer between the text and the image. And I'm going to do the
same with the banded word. I'm going to create
an offset path. Changes the color to black. And now we have
our design ready. The next lesson I'm going
to show you how to export your design and use it for
printing. See you there.
13. Exporting The Designs: In this lesson, we
are going to export our designs to be
ready for printing. So what we need to do is mainly make sure to have
everything grouped. All of our elements of the design elements grouped
together on the whiteboard. And you can group them by
pressing the Control G and then Object Expand to
make sure to convert everything to shapes and all
the strokes, two shapes. You can do this a couple of times to make sure
that nothing is left. And then what you
need to do is to select the design File,
Export Selection. Wind. While the
file is selected, you procure download folder and make sure to have it in
PNG and resolution 300, the best resolution
for printing. You can also add another, another option,
another PDF file. I also like to export
it in SVG file as well. And another PNG file, four to 100 for 150
ppi resolution. This is also a
high-quality file, but sometimes the
print-on-demand platforms don't accept the 300s PPIs who? I make an extra copy of 150, which is still okay for printing and keeps
the hardest solution. And then you press Export. In your download folder, you will find all
the four files. After being exported. Can also add another resolution, another PNG file with a lower resolution
resolution of the first 72. And you can use this file for placing your
design on a mockup. You don't need a
higher resolution file for mockup placement. So you can also export it. 72 resolution, which works
fine afforded or mock-ups.
14. Additional Midjourney Tips: This is an extra bonus lesson that I have added
recently to the, to the class to talk about the, some of the tips
that you can use in my journey that will make you save lots of hours in
creating and generating images. And at the same time, it's important to
know since there are lots of updates that come very quickly to the
majeure new platform that you need to be aware of. So the first thing
is when you are at your journey discord server, if you type dash settings, enter, this will
open your settings, your mic journey settings. And the important part
that you need to know is there are now a new
version of my journey, which is version five. And these versions, they simply create better designs and
better quality images. So the version four is
the one that I have been using in the class
and it's still super. So you can play with your
major new versions and try the prompt and
to see the results, how the results come differently when you use
a different version. I usually switch between
vision for an version five, I don't switch, don't use the previous three
versions often. So e.g. if you, Let's try one of the prompts. Imagine. I'll make
it very simple. I will use this prompt, line, vector, line, T-shirt, design vector. Let's try it on both vision for envisioned five
and see the results. Now, let's switch to
vision for right. I'll use the same prompt
again, t-shirt design vector. So the second result is, is using the version for the medullary version four and
the first is version five. And you can see there
are 23 different worth. Really look very good. But they are different results. So the same prompt
that you have, you can try to switch between, between the versions
to see the results. So this one looks great. Different pose. This
one looks very good. So when you don't know what the prompts book that you have in the download section
of the class try to switch between the
versions of the major. And the second tip
I have for you is when you type
backslash and described. This is an update in my journey. It allows you to upload an image directly to get the
style of the image. To get the prompt, the image to understand how this image was generated
in terms of text. So that you can either
use the same prompt to generate similar images
using this prompt, or to simply create different
variations of this image, even if it is not your image. So e.g. let's try to upload one of the images
that I have on my computer. I'm going to use this one here. So it gives you four prompts. And of course these prompts, each one, you can try to
see which one fits better. And you can see that the
journey is using some of the artists names to create the style or to
understand this image. You can use these prompts
again to get similar images. So e.g. if you press on one, you are going to use
the same prompt here. So let's try number one. And it offers you the option to either change some parts of
the prompt or use it as is. So the prompt says black
tea, Australian shepherd. In the start-up,
then one-fourth. So let's try this prompt as is. And we can also try wide
waiting the second prompt, a black dog with a blue bandana. So let's try option prompt to, to see the results. Let's try all prompts. Actually. I'm still on version
four by the way. So the results that are good
are related to reinforce. So let's try version four
and then let's try version five and see which
ones are accurate. We're going to try
all the prompts. This one is really nice. And again, I'm, I'm on
version four of majority. This one also looks
really great. This one looks really beautiful, but it's not similar to
the one that we have. This one also looks really good. So I think the closest one
is the first prompt here. Very close to the image style. So now let's change
our settings to me, journey version five and see what's, what's
going to happen. Now, let's press on
the prompts again. While we're waiting. I will also explain some
of these settings for you quickly to understand
the settings. So these are the major
meat journey versions and as we talked before, version for inversion
and five for the most updated versions, which creates
high-quality edges. These are also some other
versions of my journey, but you don't need that. And here are the
quality of the images. Usually you are on
the base quality. If you switch to
the high-quality, you are going to get high,
higher-quality images, but it will cost you more of your credits depending on
your subscription plan. And also you can
change the style. So this is medium style. You can also switch to hide to match the style that is
written in the prompt. And these are also modes that you don't need to
use much all change much. We just discussed the
most important items for settings in the majority. So now let's check the
images that were generated. This one looks really
close to our image. This one is nice, but it's not similar to the main
image that we have. It's far from a similar. This one also looks nice, but totally different
than the image. And I think I have not
pressed default style. So let's check that. So that's why it's important
to switch between vision, foreign vision for F
to check the results. Because until now
I think this is the most accurate or close
result to what we have. This one also following
the other results. Although they are
very good results, but they're far
from what we have. Yeah, nice results,
but it's old. It's also not accurate
to the image. It is not describing the
image that we have uploaded. Anyway, these are two
important settings that you shouldn't be aware of for using while
using the journey. See you in the next lesson.
15. ChatGPT Workshop: To a fine and vector star and tissue design in a
matter of seconds. So let's jump in. Are now inside our
HGPT platform. Before we test the GPT features, I'm going to show you
something interesting here. Press on the SOA icon, and this will take you
to sa.com platform. Even if you don't have it, just assign tosora.com using your HGPT account and
you will login for free. This is one of the greatest image generation
platforms that can really restyle or create images using the restyle
feature amazingly. If we are now on the image
tab on the horror platform, as you can see on the left, and there are amazing stars
and amazing recreations of images using different styles and
different characters. This, for example, is a funny image that is taken
from Titanic and this is the prom that is
used extremely hard when wing on the faces
and wide open mouth. This is one of the amazing platforms and we're going to use this
to our advantage by finding a couple of funny or interesting
images that we can convert tissues that
are going to sell. This image, for example, here, this puppies subway
commute image. This is a really funny image. This is really
interesting and can be used for a teacher design. I'm going to press
on it and press on the remix button and
I'm going to convert to vector style suitable for
merge play Amazon T shirts and add a funny text on it
and then press on the remix. This will add it to the u. The issue is that the platform takes a couple of minutes
to convert images. So and here are the results. Two perfect designs that
can really fit on tissues. And the funny thing
is that it added its own text rough days
and work like a dog. And the style is perfect. Amazing vector style with clean lines suitable
for tissues for sure. And later on, I'm going to
show you how you can clean it up using Adobe
street and re correct. Let's jump back and try to find some other interesting
elements or interesting photos
for our designs. What we can do here is
to find something funny. This one is a
really funny image. I don't understand the
Ponti because it's written in Japanese probably, but still we can still remix this image by pressing
on the remix button. And add the same prompt
that we added before, convert to vector style suitable former by Amazon
T shirts and add a funny text that
matches the image. Of course, you can create
similar real images using any prompt that
is suitable for you. You can change the
settings from here, but I prefer to
have everything as and then press on the remix
button and as you can see, it's added to the cue
and let's wait for it. But while we're waiting, let's find another
image and like this image of a cat
playing the guitar, we can change the
aspect ratio from here and then add also
the same prompt that we have been using and then
press on the remix button. Again, it will add
it to the cue. Let's check the results of our previous image and we
have two grade results. It has converted the image to a great t shirt design that is really funny with nice text. This is amazing. The design is great. The text is perfect and you can just clean it
or convert it to vector and update the settings or the dimensions and
upload to your t shirt. This is what we're going
to do later in this video. But as you can see, the restyle feature of
the hept and you use. The so platform is perfect. This is the results. These are the results of the cat image that
we have also used. Al great results. Let's do one more thing, one more design using
this funny dog image. Again, using the Amex button, I'm going to convert
to a tissue design. And again, I get the
amazing results and even if the text is not matching the design like this one here called
me old fashioned. I can easily change the
text on any other platform. Now let's go to re craft AI
to convert our images to vector because the
images that are being generated on SA are in PNG, head to re craft AI
and sign up for free. You have daily free accounts. You have daily free
credits that you can use. So simply press on a new project, import
downloaded images. So once the image is uploaded, just press on the
vectorized button and this will convert
the image to vector. This is by the way, one of the best vectorizers
that I have ever seen. So once the image is vectorized, you can see on the left side that the number of
colors that it has, you can reduce these
colors or increase it as like if you
like your results, just press on the Export button
and export your desktop. I'm going to export it
in an SVG format so that I would be able to edit
it on Adobstror later on. Yeah, there are a
couple of features of the E Craft platform but this is a subject of another video. Let's import the
other image of one of our designs that we have
downloaded, let's use this one. Again, press on the
vectorized button and this will convert to vector. So this image has six
colors, as you can see here. If you play with the
number of colors, you can reduce the
colors of the designs, but I leave it as is. Again, I'm going to export
it to an SVG format. Now, let me show you
how you can do it from inside your JGBT
platform as well. Once you are inside, ha GBT 40, press on the view tools and choose the create image option, and here you can either write any prom to create a new
image or simply press on the upload button to upload
an image to use it or to convert it to a design similar to what we have
been doing on Sora. So I'm going to use this
funny monkey image. You can use any image, by the way, to convert
it to a design. And so I'm going to
upload this image, and I'm going to use the same
prom that I have been using on Sra to convert
to a tissue design. While we're waiting, let me
show you what I was able to do on CADGPTPlatform itself. This space monkey image, I was able to convert
it to this design using the same prompt and this is the image of the monkey
that I have showed you, and this is the prompt
that I'm using. I'm just asking it
to convert it to vector style suitable for
mesh parmes and T shirts. This is the design that got. But this time, the great
thing is that it converted it to a transparent design, PNG because I added
part of the prompt, I added a transparent
background. This is another also example. I uploaded this design
and I asked it to create a similar variation
of this t shirt design for the band Multi crew, using the exact style, but with a different image and using the exact text fonten, this is the result that I
got pretty close design. Great graphics and
the exact font, and this is really amazing. This is how you can get
amazing results using the new JGBTimage
generation and SRA as well. Now let's head to our
Dilltrator and upload the vector or vectorized designs that we have it using re craft. So once the design is uploaded, simply I'm going to select
it and using the pad, I pressing on the trim button
to simply separate or trim the vector lines so
that I can easily cut or remove any color
on the background. So I'm going then to ungroup it and remove the
background easily. I can also remove any of the black colors within
the letters and I can still move all the
black from this design or just keep the
eyes in black color. But this design anyway, will take the color
of the background of the t shirt as the main color. This is one way of doing it. If I place a black background that resembles my t shirt color, the design shows that the design is being
perfect, as you can see. Now let's import
this other design. Again, I'm going to delete
the background and to remove these small pieces or parts between the words
or between the letters, I'm going to trim a design, and then now if I
double click on it, it can be removed
easily, like so. The amazing thing
is that you have your own you have created
your own designs that does not match any other
design on the Internet using AI generated images
or any real image. Pure genuine designs
out of real images. Of course, to
export your design, just make sure that you
export it in PN Gib format, 300 DPI to keep the resolution high and you can choose
the folder that you want. Or you can also change
the colors of the design. Let's, for example,
place the background in white color to see
how the design is going to look like
on a white t shirt. I'm also going to show you how to change the colors or part of the colors or one
of the colors of your design easily
using Adobe restrator. This is how the design is going to look like
on a white tissue. Awesome. Great. And you can see it also on
a black tissut. Let's remove this
in here, this part. If you decide to
change, for example, the color of the suit of
the dog, just press on it, isolated and press on
the magic one tool, select the color that you want, while color is selected, change it from the
color swatch, like so. Or you can use the
color picker to pick any part or any area
and change its color. Of course, make sure that
your design is trimmed, similar to what we
did before so that all the pieces are separated
or trimmed separately, and this gives you the option or the ability to
change every port, the color of every
port separately. Here I have mockup of a T shirt. Simply drag your design and place it on the mockup to see how it is going
to look like. Even if you have a
complex t shirt mockup, you can use the mockup tool, the new mockup tool, in Adobe Illustrator to place
the design on the mockup. To do that, press on select both the design and the mockup and press
on the mockup tool and press on the create
mockup and Adobe Illustrator will automatically place
your design on the mockup. It understands that there is a mockup and there's
a design and it automatically combines them and places the design on the mockup. So so even if you
move the design, it won't go outside the Mockup
because of the mockup tool inside Adobe illustrator. I
16. Final Words: Well congratulations, you have finished our class
and now you are ready to start creating amazing and beautiful
t-shirt designs. I hope you have learned a lot, and mostly I hope
you keep practicing. And if you have made it so far, and then I would
say, don't stop. Now, this is just the beginning
of your artistic life. And I cannot wait to
see what you do next. Take care everyone. Bye.
 Wael Morgan, Passionate T-Shirt Graphic Designer