Transcripts
1. Intro: adult coloring books have taken over the world, so it wasn't surprising when adult adult coloring books appeared on the scene. Let's take a look at Amazon and you'll see what I mean. Here are just a few of the adult coloring books that you'll find on Amazon. Illustrations are actually quite nice. Something I wanted you to take a look at is the number of books that they had right here in Amazon. There's only 807. So if you really wanted to get into the coloring book market, maybe this is a niche that you should consider because watch what happens when I say Go swear words. Now we're looking at over 130,000 coloring books that are on the market in Amazon. This is one of the covers of my 2015 greeting card line. I made consistent sales, but orders exploded when I added a second line in this class to learn how to design your own swear word illustration that you can use in a coloring book. Greeting cards, stationery, calendars. In less than one, you'll learn how to set up your workspace and art board on Adobe Illustrator, a lesson to you'll be writing your believing. Swear word in less than three will be creating the F in background. And then we have a bonus lesson where we're going to do a little bit of coloring on Adobe Illustrator. If you don't already have Adobe Illustrator, you could download a free trial on adobe dot com or get Adobe Illustrator CS two for free. There's a link to instructions in the class project on how to do this. Your class project is to create your own swear word coloring page on. Share it in the project gallery. Please join me in class. I really look forward to seeing your work.
2. Lesson 1: Set up workspace + artboard: Hello and welcome to class. In this lesson, we're going to set up our workspace with an art board so we can build our swear e word coloring page. I'm just going to go to file. New find is gonna call it swear e word. The size will be letter size in inches 8.5 by 11. That's a good size to start with. You can make it larger, smaller as you need it. And OK, we won't be using a color palette because it's a coloring page. So we can just use black for the stroke. And I like to make those nice, curvy lines for the ends. I'm gonna leave the fill white, but there might be times that I will take out the Phil. Okay, this is basically your starting point. We will be using the pen tool will be using the pencil tool will be using the selection tool and the direct selection tool. We'll be using type, and I always like using the free transform tool to move things around and the hand tool. Great. I'll see in the next lesson
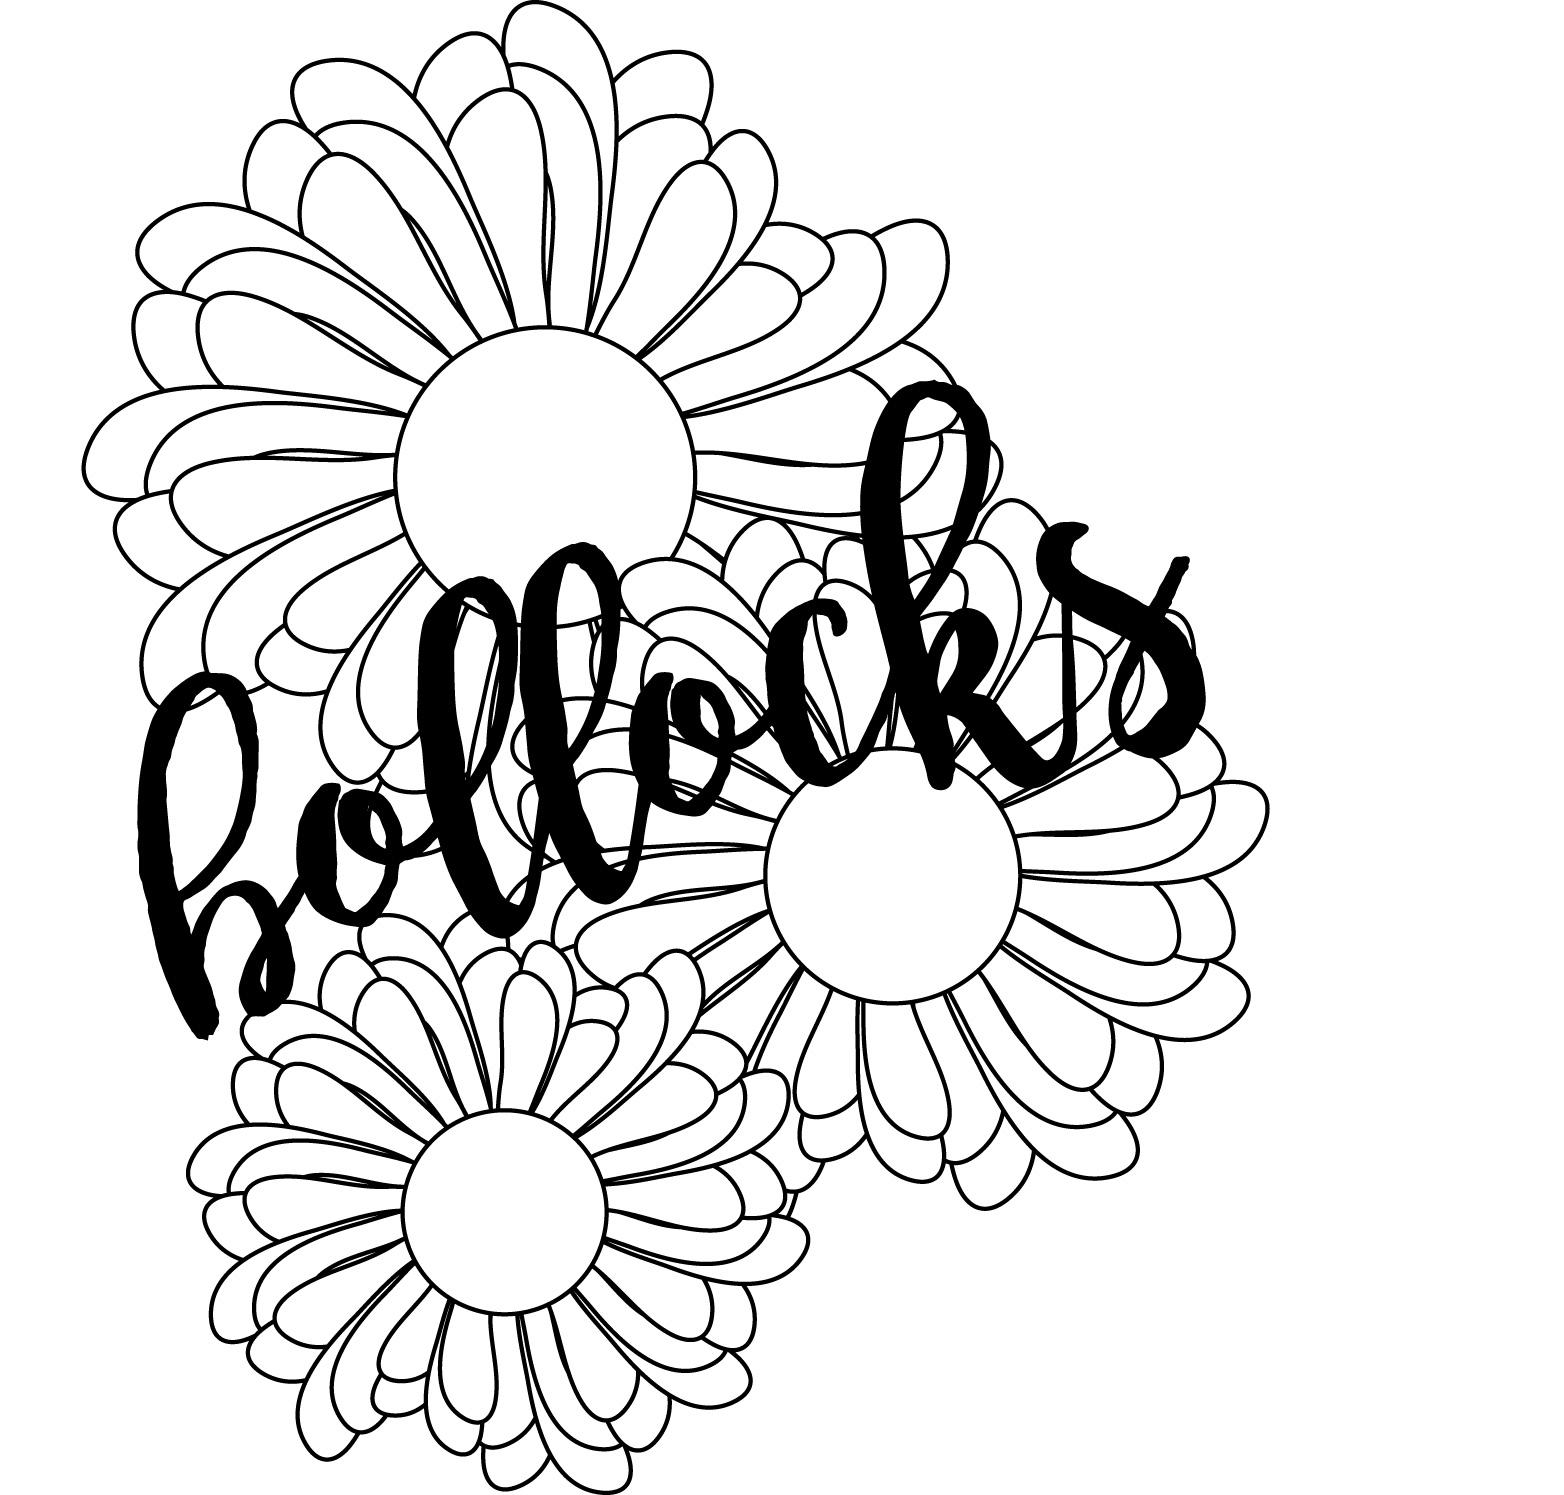
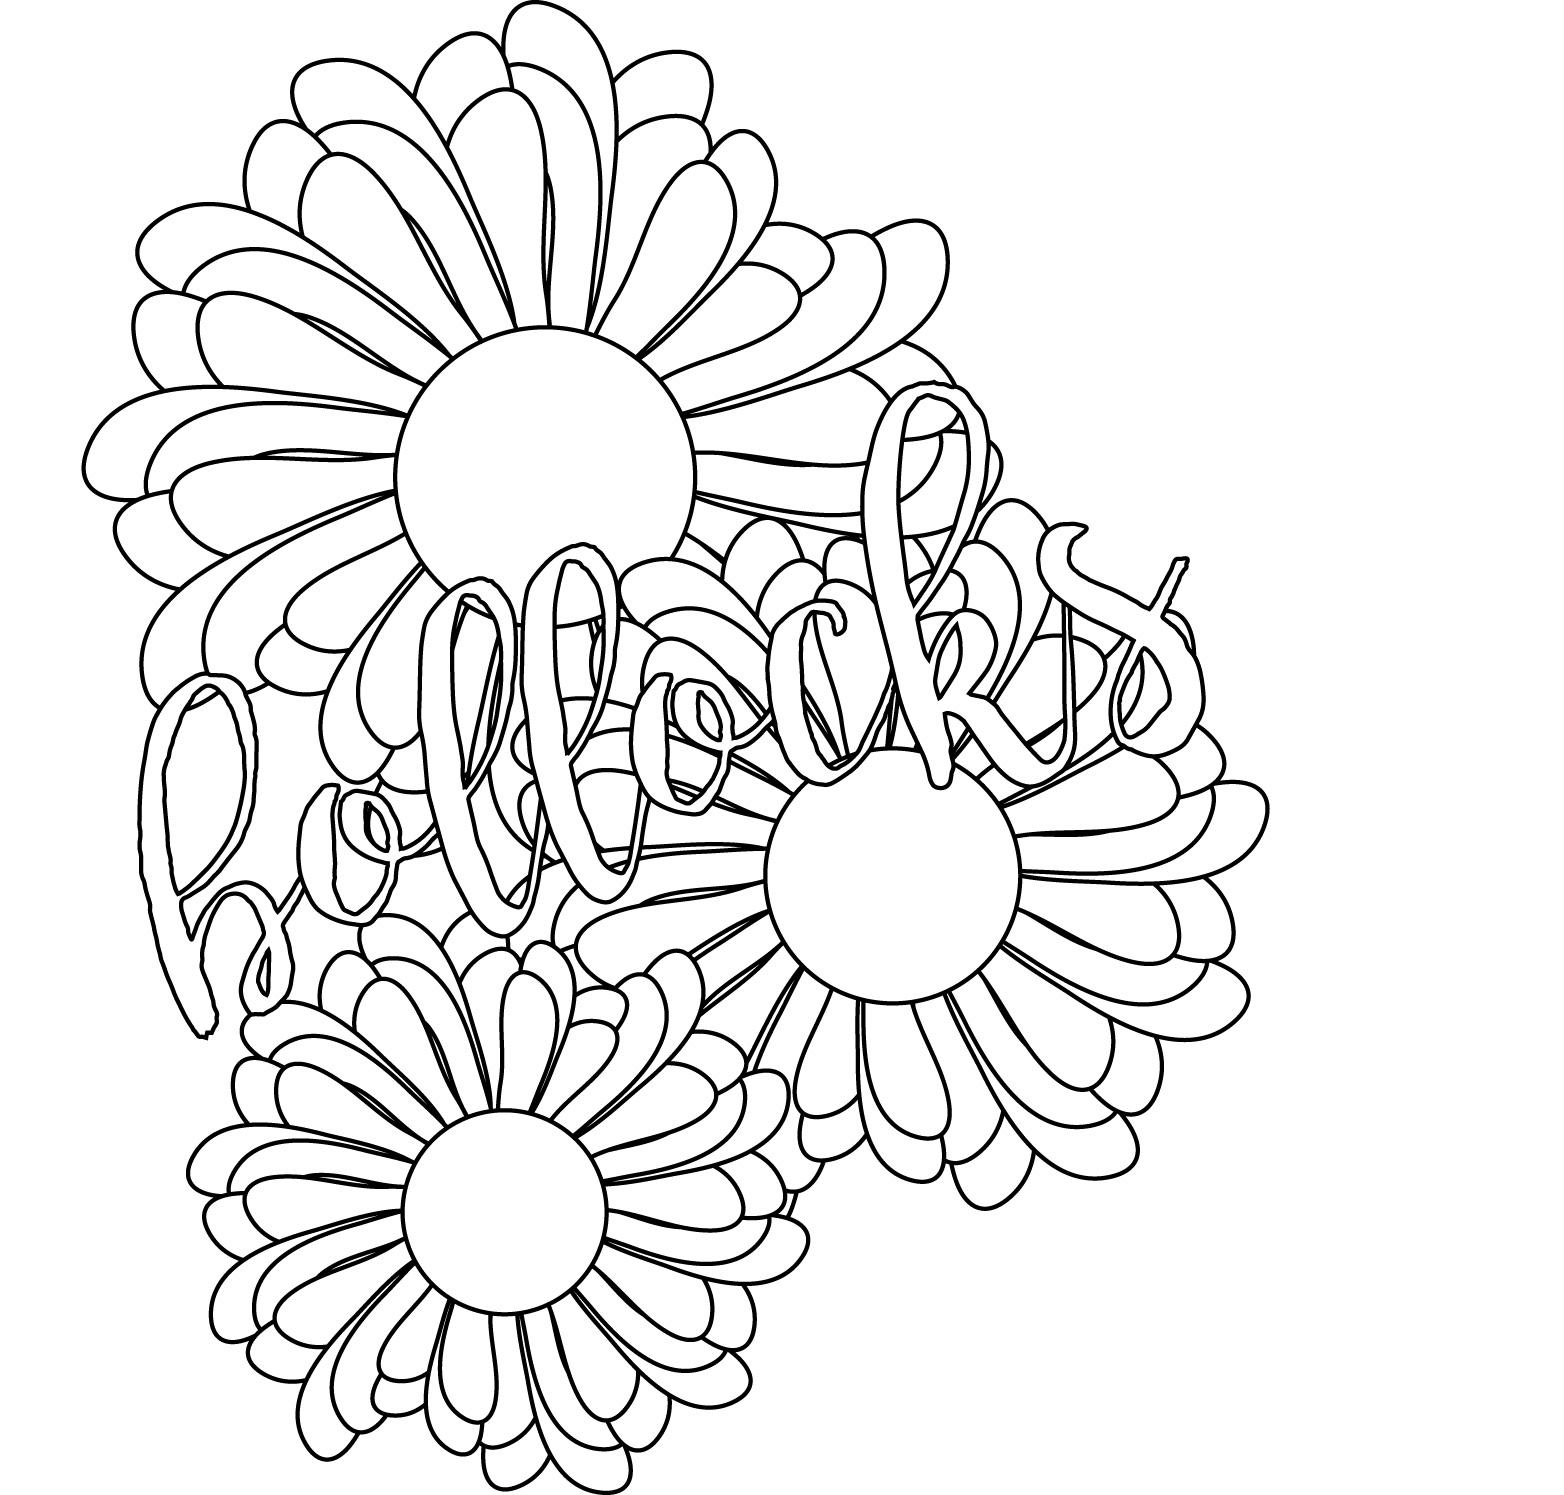
3. Lesson 2: Writing your swear word: hello and welcome to class. In this lesson, we are going to place our swear word on our art board. Now there's a couple of different things that you can do. You can just come up to your type tool and click anywhere on your art board. I've already selected my font. It's the Romelo, and I know that I wanted bake. So I made 200 points and my word is bollocks. When I was growing up, that was a very bad word. Now I could type it just the way that I did straight line, or I can type along a path. So just come to type on a path, click there, select the pen tool starting point does click for an anchor and then I'm gonna make it on an angle. Select my type tool. I'm gonna come close to the beginning of my line and then I can type my word again so you can decide if you want your words straight. How big you want it? What type you want it for fonts. I go to default to dot com. In this case, I just typed in calligraphy. You can type in anything you like like brush lettering or hand lettering and select a fault that you really like. Okay, I think I'm going to stay with my angled font. So I'm just going to select the 1st 1 and delete it by back spacing. I'm going to select my angled font. I'm gonna put it on my page. I think I am going to make it a little bit smaller. Yeah, I'm going to make it a little bit smaller, so I'm gonna come up to my size and see what 100 and 50 does. Okay, that's not bad. So while I haven't selected with the free form free transform tool, I can turn it a little bit, See where my angle is going to be okay. Very good. I'm going to come closer now and select everything. Yeah, because this is gonna be a coloring page. I don't want my inside of my font to be black. I want to make it white. So my Phil is going to be white and so disappears because there is no stroke, But I'm gonna make my stroke black. So now we have a word that we can use as a coloring page If you want. If you find these lines are a little thin, you can select it and make them a little larger. Let's see what to does. He to makes it a little bit bigger. Try for I think it gets so it's up to you. I'm gonna leave it to actually, I quite like to. Okay, so here we are. We've now placed our word on the art board, and then we're going to just add some effects behind it, and then you'll have finished coloring page, see in the next lesson.
4. Lesson 3: Create a f***ing amazing background: Hello and welcome to class. And this lesson. We're going to create a very pretty background because ball ICS is a unpretty word. I think that it's funny to do something opposite. So a nice floral botanical background makes it funny. Okay, I'm gonna grab the word and just move it off to the workspace so we can work on our flower . I'm gonna do control. Plus, just so I can come a little closer and I'm gonna start building a flower and come over to our shapes. Tool slick the circle. Click anywhere on the board. Let's make a circle. Let's make it two inches by two inches. There we go. It's still two points are Phyllis White. Our stroke is black. I might want to change that later, depending on where the lines go. OK, okay for this. I think I want to use a hand drawn pedal and just repeat it and size it just because I thought find that that hand drawn look, it's a little more natural. A little more organic than if I stayed with the pen tool and made very precise. So I'm gonna grab my pencil tool if you have a drawing tablet. You can draw it with a tablet. If you have the most, you can drop with the mouse. I just use the most that's built right into my laptop. So I'm going to start and make a pedal. I'm gonna come in nice and close just to make sure that my pedal connects so I can close it up. Want to check first? I could see that my strokes is very blunt, very abrupt. So I know that it's not on the rounded edges. So what I'm gonna do is just select it and just make my stroke a little rounder just so that the ends, they look prettier when they're that way, I'm gonna go to my direct select tool. I'm gonna pick up one of the anchors, and I just want to move it off, and then I'm gonna move it back on to make sure that my anchor connects. And the reason why I did that is because I do want the inside the Phil to be white so I can overlap if I don't overlap. So here there's no Phil, so that means insides transparent. It looks the same as the art board. I'm gonna show you what happens if I just copy and paste. You see the behind line right through it. But if I'm going to select both of them, if I change the filter white, then the second pedal that I made overlaps the first pedal and that's what I want. That's the That's the look that I'm going for. So I'll leave that. They're kind of like the way this is looking right now, So I'm going to select that and I'm gonna reflect it. So I want to take these two pedals and give it a mirrored image. So while I haven't selected, I'm gonna right click on the mouse, come down to transform, Reflect if I just hit, okay, the selected image will reflect. But if I hit copy the select image stays the way it is, and I make a reflecting copy. There it is. Now I do want to move it off and just move it in a little bit. I don't want it to look with really perfect. I wanted to look a little bit more organic like you would find in a garden. Okay, so I like this group of pedals. Now I'm going to select the whole thing and I'm going to copy and paste and then just move it off. And now I'm going to right click. And I want to make this a little smaller, so I'm moving to transform down to scale. I'm gonna make this 80% smaller now. Here. If I wanted to keep this one, I would just hit Copy. But I'm okay to hit, OK? Because I do want this one to be smaller now, going to take it and move it over. I like this layered Look, I don't want them to too close together because it's going to be a coloring page. There we go. Okay. I think I like this now. I'm going to do control minus two. Move out a little bit. I'm going to select everything and because I in case I make a mistake later and end up pulling some of these pedals apart, I want to make all these pedals together into one group. So I'm going to go toe object and group. So now what happens is I can't accidentally just take a pedal away. Once I click anywhere on the image, it acts as one entire image. So Now, I just want to straighten that out just little bit. I'm going to move it over to our circle. The circle is going to be the center of the flower. And now I'm going to copy and paste it because I have free transform selected. I can do anything with a selected items, so I'm just gonna turn it around. I don't want it to be perfect. Perfect. Perfect. Mm. Close to directly below, but not identical. Very good. And it's OK that this guys in the back will fix her up. Leader. I'm just going to select the top group holding down my shift key and then select my bottom group and with everything Select it right, click, transform. And now I want to rotate these around so it's gonna give It is really great. Fluffy pedal Look. So I'm gonna click rotate. I'm gonna rotate it 30 degrees and you'll see what happens when I start hitting. Copy. So I'm gonna hit copy. So it's taken that image and moved it 30 degrees. I can continue that or just hit control D, And that will repeat the last thing that I did. And there we go. So there's our flower. I like that. It's very organic looking and now I'm just selecting our circle That's in the middle, right Click a range bring to front. So now I've brought that circle right to the front. I don't mind this circle looking perfect and the pedals looking organic. I think that's kind of nifty looking. Okay, when a control minus So I can move out a little bit and see my entire page. I can already see by looking at the flower compared to the word that I'm going toe like the balance of the word in the flower. Let's make a couple of copies of this flowers going to select everything and I'm gonna object and group it all again. So now it's one item selecting my flower. I'm gonna leave the largest one wallet selected, So I put it there. I'm gonna do three. There's that rule of odds. So threes, five sevens nines. Groups like that. It's really pleasing for the I because you do have a middle number to go force. If you have three, always look kind of where that middle section ist While it's all selected, I'm gonna do control, see copy paste. So I've made a 2nd 1 going to move that up. I want to make the smaller and then rotated a little bit so it doesn't look identical to the first flower. So I'm gonna right click, and I'm going to make it smaller, So I want to go to transform scale to resize it. I think I'm gonna make this one 85%. I don't have to copy because I've already got my new and selected soldiers hit. Okay, Free transform is still selected so I can just move around my flower. Good. I like that. Let's take a look out. That looks good. Now I'll make a smaller flower right down here, and then we'll add our word in, so selected it again. Control C control V to copy. Move it down towards the bottom. Right. Click transform scale. I'm gonna make this one, actually 80% and just enter. Good. I think I'm gonna like that. Turn it around a little bit. Good. Let's see how that looks. Okay. I'm gonna select everything. It's not exactly where I want to be, so I'm gonna just move that more center ish. Let's take a look. I'm much like that better. Okay, now I'm going to grab my word and bring it over. And as you could see, it's gone behind. So while it's still select it, I want to bring that to the front. So I'm going to right click, bring the word to the front. And there it is. I think I actually want this word a little bit bigger. So while again, it's still select it. I'm going to make it 180. Yeah, that's much better. Is it okay where it is? Let me take a look. I love it. Okay. It's going a little bit more So there you are. We now have a swear e page. I will see you in the next lesson.
5. BONUS Coloring your swear word on Abode Illustrator: hello and welcome to class. In this lesson, it's actually a bonus lesson, and what we're going to do here is just play with some color on the coloring page. So I'm gonna go upto window on and put our little color and let's see if there's any colors that we want to play with in the Swatch library. Let's go for hot. Let's see what hot us. Uh, let me try a different one. Let's do garden. It's obvious. But let's Dugard Okay, Yeah, that's nice. Our first thing I'm going to do is select everything, an ungroomed it. So now everything's acting on its own, so each pedal is different and the reason why I'm doing that, I'm just gonna take it. The word. The reason why I'm doing that is so we can color each pedal individually, so I'm gonna select everything and let's see. First thing I'm gonna do is just pick one color and then I'm going to go into tweak it a little bit. So I'm going to go with this really nice. Oh, that went on stroke. Well, that's nice. Let's keep it on stroke on now. Let's put it, Phil, I'm going to change the stroke. The black. Okay, so here we have everything in one color. So now what I'm gonna do is with my shift key down. Just select a few pedals as I go around. But I'm just trying to go around and not have too many pedals touching each other. They're now I'm gonna go to the next flower, but almost done. Let's pick this one here. And a few here. And then what I'm gonna do with these selected ones is just changed the color. Not too much different. Let's just go to the one deciding Is that like a peach color? Okay, now, then a click and then hold down my shift key and start clicking a few of the other darker colors again and go to the second flower and the third and I'm gonna go to the color beside it. I like that. I'm going to change the inside color. So I clicked on the first circle, hold my shift down, click on the second hold my ship down still and click on the third This weights elects all these three things so I don't have to go in and keep selecting. Let me try this color. We try this color. Go here. No, I want to stay in these collars. Okay, That's good. Now have left this stroke as black, but I think I want to play with that a little bit. I'm gonna choose a brown because this is a bit in the brown type of family. Kind of that Brown and red. You know what? Let me go. This one. I do like that Brown. Okay, now I'm going to click on my word. Bring their Let's go, Brown on this one. Let's take a look and see what it looks like. White. That's also bad. That's actually not so bad. OK, but I'm gonna click on it and go for Dark Brown. Let's put the inside Philip Tan. Hey, that's not so bad. There you go. You could see how we could play with color. And the use of this exercise is if you wanted to create a greeting card or some post its or some stationery and you want to color it in Adobe Illustrator, this is how you would do it. I really hope that you enjoyed this class. I enjoyed making it and I hope to see you in other classes. If you liked it, please give me a thumbs up and join the community so we can stay in touch.
 Sandra Clarke, Zero-Waste Craftivist