Transcripts
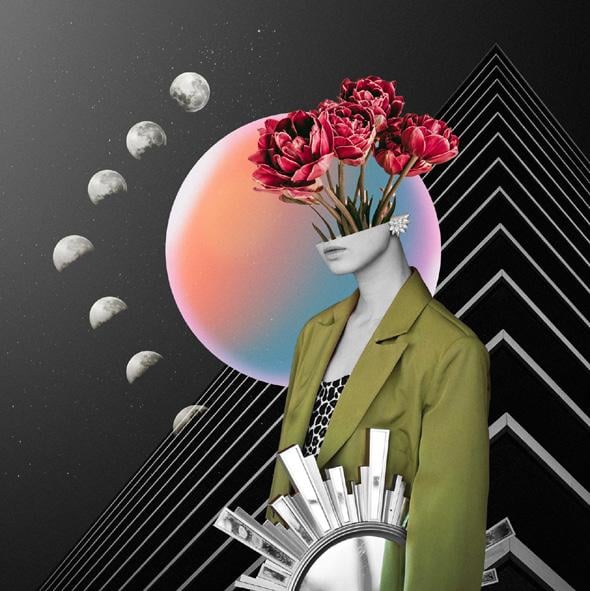
1. Let's Collage!: If you've long admired surreal, abstract and imaginative
collages like these, but you weren't sure how to go about making
one of your own, this course is for you. Together, we'll walk
through the step by step process for
creating not one or two, but three different
portrait collages. You'll learn how
to combine images, textures and shapes to create surreal portrait
collages that are as fun to make as they are
beautiful to look at. My name is Cara Pltinich and
I've been a photographer, designer, and serial crafter
for more than 20 years. I've written books,
taught hands on classes, and in person workshops
around the globe. From professional photography
and graphic design to crochet and papercraft and
everything in between. I relish being a
creative chameleon, experimenting with new things
and sharing what I learn. Your challenge and project
for this course will be to work your way through
the practice exercises, yes. But then, to use what
you've learned to build a one of a kind collage
that's all your own. You can use some of the source files that I've
pulled together and prepped in the included
collage starter kit or curate your own that you
download or create yourself. This class is for everyone, and I will walk you
through it step by step. But it might be helpful to have at least some very
basic experience with Photoshop ahead of time, or at least be a very
adventurous beginner. If you've never opened
the software before, check out my Photoshop
for beginners course here on Skillshare
to get your bearings, and then come back to
hit the ground running. Whether you're looking
to sell prints, offer a unique product to
your portrait clients, or you just want to create some cool art for your
walls, I'm here for you. By the end of this class,
you'll know where to find legally usable
source materials, how to combine them in
interesting and novel ways, and you'll have the confidence
to keep moving forward. Collage art is so dang cool. I'm glad you're here
to share it with me, and I can't wait to
see what you create. So if you are ready to begin, join me in the next video, and we'll get this
party started.
2. Course Files & Resources: To get the most out
of this course, be sure to download the
included course files so you can follow along with our
three practice collage Builds. You'll find the links
below this video under the Projects
and Resources tab. After completing those step by step examples and getting
a feel for how it works, your project for this
course is to try your hand at making
your own compositions. Super easy way to get started is to use the included collage kit, which includes a
curated collection of fun collage elements with the backgrounds already removed. So you can start
designing and composing freely without worrying
about making selections. To take things to
the next level, you'll want to either
use images that you've captured yourself or that you've licensed and
downloaded from stock sites like Adobe
Stock and Unsplash. Both have thousands, maybe even millions of images that you can download
and use for free. And it's easy to set filters
on both of those sites, so you can just
browse free images and license and download
them with abandon. Whatever you do, just
don't grab images off random web pages
or Google, et cetera. Stick to images that you
have legal rights to use, and don't forget that you
can always create your own. So now that you
know where to find source material in
the next video, we'll talk more
about the process.
3. But HOW? Process Walk Through: Okay. So let's talk about the process because
it is a process. I can easily spend 8 hours
or more on a single collage. And when I start, I have no clue what I'm
going to be making, and that's part of the fun. So because my collages
always include portraits, that's always where I start. So typically, I'll
pull up splash or Adobe stock and start searching
for images with people. And because the images are free, I will license and
download pretty much anything that I
think is interesting. So I'm mostly paying
attention to the pose of the subject or the
feel of a portrait. I'm looking for anything
that sparks an idea. That spark could be for another object that I
might want to include, or it could be for
an overall mood. So as I'm looking around, drinking a beverage and
downloading and licensing images, I'll usually download maybe 30, even 50 images or more. So yes, my hard drive is always running into
issues with space, but that's another
topic for another time. So from there, I'll
look through what I've downloaded and usually
at that point, there's some images that I might have been
initially interested in, but I'm realizing that
they're not gonna work. So I'll delete them
to free up space. But sometimes, if I
really like them, then I'll put them in a
folder and hang onto them because they may
be useful later. So I'll kind of
keep them in mind, and then some of
those have ended up being used in really cool
collages at a later point. So you just never know. Once I choose a portrait
that I want to start with, I will bring it into Photoshop
and remove the background. Then I'm looking at
the portrait and I'm thinking about the shape, the lines that might be created by the pose
of the subject, or if there's a
particular feeling or an expression or look
on the subject's face. Then those ideas
usually lead me back to the stock sites with new ideas and new
search terms in mind. And the process just
goes like that, repeating back and forth and continuing to fill
up my hard drive. So I'll search for things, download a bunch, bring them into Photoshop
and test them out. Um, and I'll be
combining things, and I just keep what works
and toss out what doesn't. It's like a rinse lather and repeat situation
over and over. And sometimes over and over
and over and over again, sometimes I'll
find that flipping an image around or
adding a texture, maybe changing a color can suddenly pull a
composition together. So, unfortunately, I
am yet to discover a cheat code for time
and experimentation. That's just really what you need is to take time and experiment. And the more that you do that, the better your final
result will be. And it's also the
same thing when it comes to knowing when to stop. So I'll often pile things
and in and in in Photoshop, and I'll move them around. I'll hide the layer and
try something else. Sometimes I might even
start over entirely. And then as things
start to congeal, I'll look at what I've built, and I'll start seeing if I
can take anything out, right? And sometimes I can.
Sometimes I think, Oh, I really love this piece, this plant or this statue
or building or whatever. But I don't know why
it's here anymore. So I'll take those things out, and then eventually
I'll be left with a finished piece that has not too much and not too little, and it just kind of
feels like it's done. And then, suddenly, I
know that it's complete. So, what exactly do
you search for, right? Well, you can start by searching terms like
vintage portrait, which is going to
give you all kinds of interesting images of people,
especially on Unsplash. There's just a lot of kind
of avant garde stuff, especially in the
vintage collections. If you search, like, the
New York Public Library and entities like that, they have a lot of really
cool historical images that are fascinating. That's like a whole
rabbit hole unto itself. But when you find something
that inspires you, let your mind wander and
just see what pops up. So like, maybe a
portrait that you find makes you think
of other objects. Maybe something vintage
makes you think of roller skates or type
writers or a disco ball. So then search for those things. And while you're looking
at those things, you might find an image that also includes a really
interesting plant, and that might lead you
to search for more plants or buildings or
statues or animals. Whatever it is, the idea is to just follow your imagination. So one image or pose or color or texture might lead you to think
of something else, and it just kind of
links on like that. So the idea is to just
follow your imagination. And this process can
be time consuming, but it is super fun. And so when you're
ready to give it a try, just settle in and plan
to spend some time browsing and letting your
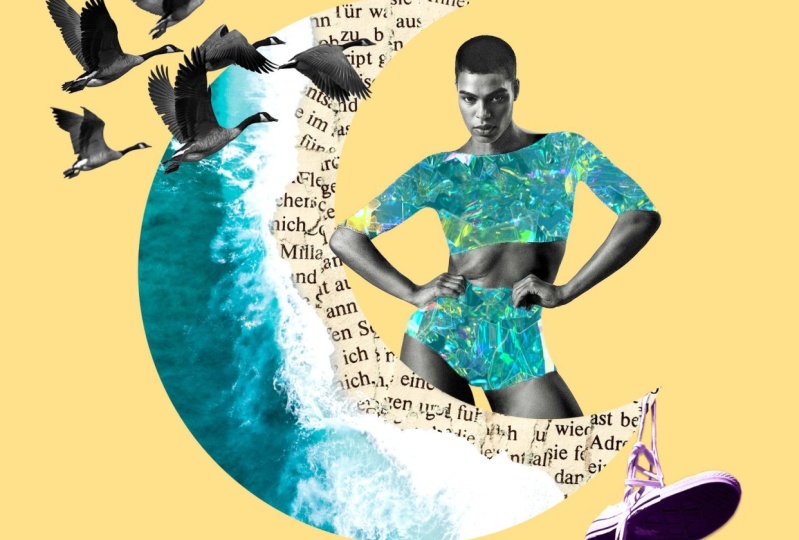
imagination roam freely. So for example,
when I was creating the course collage
with the moon image, I got to a point where I had pretty much
everything in place, except the birds and the
shoes hanging from the tip. And while I was working
on it, suddenly, the idea of something
dangling popped into my head. And I think in my mind, I might have been
thinking of, like, a mobile or, like, a window charm or
something like that. And I think I was thinking
about beads hanging from this. But I went back to Unsplash and I searched
for the word dangle, which led to the picture of the shoes dangling on the wire. And I thought, I
think that's it. So that's how it works. It's just intuition and
imagination and time. When you are searching
for images to use, you want to think about pose, line, and shape to
build your composition. Don't worry so much
about things like color because obviously that's
very easy to change. But you definitely do
want to think about how easy an object will
be to select if you want to remove it
from the background and pay attention to
horizon lines and vanishing points so
that you can either match perspective
in the scene that you're building or that you can knowledgeably and
intentionally mismatch. While you're at it,
it's also worth searching for some
textures and backgrounds and things like
handwriting or newsprint to add depth and warmth
to your finished collage. Sometimes I will even search for words like surreal or odd or even weird because it leads to all kinds of unusual imagery that can be a lot of
fun to play with. So as you work through the
practice collages with me, it will hopefully
feel very quick and easy, which is awesome. But of course, I've already
chosen the images and designed the composition and figured it all out
ahead of time. So don't be discouraged when you go to make
your own and it feels like it is taking
considerably more time. That is normal. You're just not seeing
that whole process because you'd be
watching for hours. So try to look at the whole
process as part of the fun. And for what it's worth, I create a lot of ugly,
non working collages, and it's only by
continuing to explore and experiment that I ultimately land on something that
I'm really excited about. So remember this truth
and hang onto it with both hands when you are trying this and it feels
like nothing is working. That could be a
sign to just take a break and come back to
it when you're ready to keep going because the
only way out is through. So knowing all of that, it's time to roll up your
sleeves and get started. In the next video, we are
going to dive into Photoshop and put theory into practice
with collage number one.
4. Moonshine: Working with Shapes: Alright, so we're going
to get started by creating this moonshine image. The first thing that
we're going to do is create our document. So we're going to be
building this from scratch. So we're going to want to
choose File new and over here, we're going to make sure
we're working with pixels, and I'm just going to make the size something
easy to manage. But obviously, if you wanted to make something
large and print, like, a huge poster of this, you would want to work with a
larger size here. But just for this project, I'm going to choose
a size of 1,500 pixels by 1,500 pixels that
will give us a nice square, and that would be enough to make a small print if we wanted to put this on a card or
something like that. We'll set the color to RGB. The background can be white, and we'll go ahead
and click Create. Next, let's take a
moment to open up all of the other images
that we'll be using. So we'll go to File Open, and you can navigate to the moonshine folder in
the course downloads, and we want to open up all
of the JPEGs and click open. So you'll see that all
the images are here now running across our screen
in tabs across the top. And you'll notice
that because they all have really long names, we're not able to see the blank document that we created that's
currently untitled. So to get back to that, we can either come to Window, and down at the very bottom, you'll see Untitled listed here, so we can click that or another option if you see this little double carat,
if we click on that, that lists all of
our open images, and then we can click Untitled, which will bring
us way back over here to our blank document. So the first thing
we're going to do is create that moon
shape that's going to be sort of the anchor
piece that holds this whole composite together. To draw that, we're going
to take advantage of one of photoshops built
in custom shapes. Which we will get from
the Shapes panel. Let's choose Window shapes and your panel may look
different than mine. I have a folder down here
called Legacy Shapes and More, and I believe that is where
the moon shape lives. If you don't see that, all
you need to do is go to the shape panel menu and click Legacy Shapes and
Moore. See, now I have two. I'm going to get rid of
one and just delete it. So rather than digging
in here and going through all the shapes to
try and find what we want, we can come up to the search
bar here and just type moon. And this is the one we want, and adding it to our
document is as simple as clicking, dragging
and dropping. We'll see that it lands here. It's got a fill color.
Yours might be different. That's okay. It's going to land here and it's
got this box around it. So the box is going to
allow us to size it up, and I do want to make
it quite a bit bigger. Now, you may or may not have
to hold the shift key while you size this up or down in order to keep it from
getting squished like this. It will just depend
on your preferences and how you have things set up. Just make sure you're
not squishing your moon. Now, when you're
happy with the size, before we commit
this transformation and get rid of the bounding box, we want to flip the moon
the other direction. One way to do that with
the bounding box on is to right click and
choose flip horizontal. Another option if you have
your contextual task bar open, you'll see that there's
a little button here to flip horizontally. If you don't see your
contextual task bar, you can find it by choosing
Window and way down here, mine is great out
because it's already on my screen and I'm
in a transform box. But right here is
contextual taskbar. So once we're happy with
the size, we can commit it. And, of course, this is
just a vector shape, so we can change the size
again later if we need to. From here, we can see in both the contextual task
bar and in the properties panel that we can adjust the fill color of the
shape or the stroke. We're going to be putting
a photo in here anyway, so the fill doesn't matter as long as you
can see the shape. We do not want a stroke, so I've got that set to none. And I think that's it. We are ready. Our
document is set up. We've got all of our images open along the top
of our workspace, and we are ready to start adding the imagery
in the next video.
5. Moonshine: Adding and Blending Images: Alright, so first thing
we want to do is add the ocean image on
top of our moon. So to get to it, we can click
through the images here. I don't remember which
one it is, this one here. So once we find the
image that we want, we're going to select the whole thing by pressing
Command or Control A. So we see marching ants
all the way around. Now we're going to copy
it by pressing Command or Control C. And now we'll click back over to our untitled document and press Command or
Control V to paste. You're going to see that
it comes in really large, and it's covering
our whole document. So to make this image show up only where
the crescent moon is, we need to clip this
image to the moon. And we do that by
simply holding down the option key or Alt
on a PC, Alt or option. And you'll notice that as
I'm holding that key down, if I hover my cursor
between layer one, which is the image of the ocean and the crescent moon shape, do you see this little
Gonzo cursor in between, when we see that
cursor and we click, that is how we clip
one layer to another. So that means that this image now is sort of wrapped around. I like to think of it like
being shrink wrapped or something to this
moon layer below. And the cool thing is now we can use the move tool and we can move this image around you
can see if I go too far, now I'm revealing
the moon by itself. So now our moon is naked. But if I drag this image
around on top of it, I can position it
wherever I want to. So if we want to scale this
or rotate this or anything, the easiest way to do that
is to press command or control T to bring
up free trans form. Now, this image is so large that I'm not even
seeing the box around it. So when we press
Command or Control it puts the bounding
box around the image. And that way, we can scale it, we can flip it, we can rotate
it, all of those things. But in order to do that,
we need to be able to see the corners so we can just
see what we're working with. So once we've got this
transform box active, which we know is happening because I can see the
little controls right here. Then if I want to scoop back
so I can see everything, I'm going to press Command or Control and the number zero. And now we can see what
we're working with. So here is our image, and here are the
control handles. So if we wanted to
scale this down, we can drag inwards from
one of the corners. And again, you may or
may not need to hold the shift key in order to maintain proportions
while you do that. So I'm going to just drag
that down a little bit. And then I also want
to flip this over. So again, with a
transform box active, we can right click and
choose flip horizontal, or if you have your
contextual task bar open, you can just click right there. So what I'm looking for is I want to see part of the beach, and then I want the water
coming kind of from the bottom left corner ish. So at this point, I want
to rotate the image. So if I hover my cursor
outside one of these corners, it's going to become a
double headed arrow. And then I can click and drag to spin that image
around a little bit. So I want it
something like this. You can also use your arrow keys to nudge it a little bit. So kind of something like this so that it's kind
of wrapping around, and then we have the
beach part right here. And when we're happy
with everything, you can press Enter or Return on your keyboard or come up and click the checkmark to
set that transformation. And then to put our image back
so it fits on our screen, we'll press command or control, and again, the number zero. Let's take a moment to name our layers in the layers panel. I'm going to double click
where it says layer one, and let's call this
beach and press Enter. And here is our moon. That's looking pretty
great. The next thing we're going to do is add the printed type overlay that
goes on top of the beach. I just love that for texture. I'm going to find that by
clicking back through here. Here it is. So I'm going
to do the same thing. Command or Control A
to select everything, command or control C to copy. Then we'll go back to
our untitled image and command or
Control V to paste. Again, it's huge and large and covering everything,
believe it or not, we can also clip this layer so that it also
is clipped to the moon. So again, we're
going to hold Alt or Option and hover till you see the Gonzo cursor and
then click to clip it. And again, we're going to scale this so that it fits nicely. So we'll press Command or Control T to bring up
that free transform box. And then to fit the
image on the screen, including the enormous image
that we just pasted in, we'll press Command
or Control zero. And drag in. Again, you might need to hold Shift till we have
something that is fitting and covering
the moon like so. We'll press Enter or Return
to set the transformation, and then to fit
the image back on our screen without
the big control box, we'll press Command
or Control Zero. Next, we're going to
blend this image into the other by taking advantage of something
called Blend I. So here in the Layers panel, let's rename our
we'll call it text. Alright, so we've
got our text layer. So we want to blend this
layer into this one. We can change the blending
modes, of course, and we get some cool
effects by doing that. But what I really want is
for the text to disappear from the water parts and
just show up on the sand. So to do that, we're
going to use blend I. So in this empty area
of this type layer, we're going to double click, and that brings up our
layer style dialogue. So here you may be familiar with all the different styles
and effects we could add. But one area that often is overlooked is this area
here called Blend If, and we have two
ways of blending. We can blend based on
the current layer, in this case, the text
or the underlying layer. And in this case, what
we want to do is blend based on the properties
of this underlying layer. So for example, if we take the shadow sliders of this underlying layer and we drag it inward, look at that. The water starts to
creep back through. But if we go too far, we
also get the beach back, and we're missing the actual
white parts of the water. So we don't want
to blend too far. So maybe just till about right before we start
seeing the sand show up. So I'm looking at
a value of 158. But now we also want to blend the image in the areas
where the water is white. So we're also going to grab
this slider here and drag this one to the left
if we go too far, again, we are going to start
seeing the sand creep back. We'll position this
at about a value of 220 or so and we'll click Okay. We have a rough look here, but it helped us see where
the edges are and then we can easily just add a mask to blend this
a little bit more. So with that type layer
or text layer selected, let's come down here and
click to add a mask. And a mask is going to allow us, just like on Halloween, you might wear a mask
to hide your face. Here, we're going to
use a mask to hide parts of this type layer from the areas where we
don't want to see it. And the way we do that
is with the paint brush. So I'm going to
press B for brush. And here's my brush right here. Now, we can change the size and hardness of our brush
using our keyboard. But if this is new to you, you might also just come up here and if you click this
little drop down, you get a slider to adjust
the size and the hardness. So in this case, I
want a soft brush. I'm going to drag the
hardness to zero, and the size can be
68 pixels, whatever. And I want to make sure
I'm painting with black. And then look what
happens when we paint over these areas were
painting with black. So that's kind of like
putting on a Halloween mask, and then it just hides
those parts of the image. Now, if you go too far, if
you do something like that, all you need to do is switch to painting
with white paint. So you can click
this little button here or you can press the
letter X on your keyboard, and then you just
paint back over that. So I like to think of
it as painting with black is like turning the lights off on whatever layer you're on. So if we don't want
to see this layer, we paint with black,
and it goes away. If we do want to see the layer, we turn the lights
on and we paint with white, and it comes back. So this is what we call masking, and it makes it really
easy to blend images together in lots of different ways. This is
looking great so far. Join me in the next video, and we'll add our main subject.
6. Moonshine: Arranging Our Subject: Alright, so next we're going
to go find our main subject, and we can actually close the images that
we are done with. So that would be
this text image, so we can press
Command or Control W, and that will close
those images. Makes it a little easier
to manage all this. And here is our beautiful
portrait subject. The first step is to
make a selection. If you have your
contextual task bar open, you can just click
Select Subject. Or what I typically end
up doing is I press W for any of the wizard
like selection tools, and then we'll see a
button that shows up in the Options bar up here
that says select subject. There's a little
drop down here where you can tell Photoshop
if you want it to process that selection in
the Cloud or on your device, the Cloud is going to give
you the best results. So if you have an Internet connection
while you're doing this, I recommend processing
it in the Cloud. Then you just click Select Subject and Photoshop nails it. Now we're ready to copy
Command or Control C, and come back over
to our image here and command or
Control V to paste. So I can see that
she's landed in our image because I can see
her in my layers panel, but we don't see
her in the image, and that's because
she came in so large and kind of off to the
side that we don't see her. So before we scale her down, let's convert her to
a smart object in case we end up wanting to
change the size later. So that is as simple as
right clicking somewhere in the empty area of her layer and then choosing
Convert to Smart Object. What that does is
it takes all of her pixel data and it stores it in this little
suitcase right here. And that way, we can scale her down and we can
scale her back up, and we won't lose the pixels that would otherwise
be thrown away. So that is one of the
advantages of Smart Object. Now that she's a smart object, let's press Command or Control and we don't see a
lot happening yet, but we do see the
top left corner of a giant bounding box. To see the whole
thing, let's fit it on our screen by pressing
command or controls zero. And now we can see
why we weren't seeing her because she is
large and in charge, and we're going to
scale her down. And again, you may or may not
need to hold the shift key while you drag in order
to maintain proportion. In some cases, holding shift will actually distort the image. So if you are using
the current version of Photoshop with no modifications, you shouldn't need to
hold shift in this case. Alright. So something
about like this, of course, I can't see now because I've
zoomed back so far. So to fit it back on my screen, now that we have a
smaller bounding box, we'll press Command or
Control Zero again. Alright. So I want
something about like this. So things that I'm looking
for are I want to make sure that she's at least reaching to this
curve of the moon. So we're going to put her
behind there in a minute. I also want her elbow to overlap just ever so
slightly right here. And then I would
scale up as needed. So maybe something
about like that. That looks good,
I think. So when we're happy with that size, we'll either press Enter
or return on the keyboard, or you can click right here to commit that
transformation. Now, putting her
behind the moon could be as simple as dragging
her like this behind it. But if we want this
elbow in front, we're going to either
need to mask the moon or to mask her while
she's in front. So I'm going to leave her
here on top of the moon, but we are going to add a mask to hide her
legs down here, so it looks like she's coming
out from behind the moon. So to do that,
we're going to add that layer mask by clicking down here at the bottom
of the layers panel. This little button
here adds a mask. Now, right now,
the mask is blank. So if we want to draw
a perfect moon shape, then we're going to load
the moon as a selection for our blank mask by
holding down command or control and clicking on
the thumbnail of the moon. So we're still on her mask, which is currently blank. But we've basically loaded
the moon shape as a stencil. Okay. Now we're going to go grab our paint
brush, B for brush, and we want black paint because we're going
to turn the lights off on this part of her layer. We're on her layer,
but we're not on her. We're on the mask. We've got
a selection around the moon. We've got our paint
brush with black paint, and now we can just paint
right like this and it's perfect and we don't have to try and perfectly
draw a line there. And that's it. Now
we can get rid of our selection by
pressing command or control D to deselect.
Isn't that awesome? I just love it. Let's do a simple
levels adjustment. So we want to move from the layer mask to the actual layer by
clicking on her thumbnail. And let's just brighten
her up just a smidge by pressing command or Control
L to bring up levels. And because she's
a smart object, this will actually get
applied as a smart filter. So we don't have to worry
about any destructive editing. I'm just going to grab this midtone slider and pull
it to the left a little bit and the highlights slider and drag both of
those in just a bit, just to get a little
contrast boost here, and then we'll go
ahead and click Okay. I think that looks
great as it is, but I do like to add some
sparkle to my images. So here's what
we're going to do. We are going to use the
Quick Selection brush. So that is over here
in the W family. Whichever tool is active here. You want to click
and hold on it, and then release on
Quick Selection Tool. The keyword shortcut is W. So if you ever can't find what
we're looking for here, just press W, and then
whatever tool you see, click and hold on it, and release on the Quick
Selection tool. Now, we're going to
select her outfit. So it's hard to see
my brush is so tiny. So I'm going to make my brush
bigger using my keyboard. To make it bigger, I'm going to press that right bracket key. Next to the letter P,
there's two brackets. The left one makes the brush smaller and the right
one makes it bigger. So with an appropriately
sized quick selection brush, I can just paint over her shirt, and then making sure I have this add option selected
in the options bar. Then I can come over and paint
over her bottoms, as well. Now, we can see that I got
a little too much here. We got her arm and her hand. So to subtract that, I'm going to hold down
the Alt or option key, and you'll notice that the plus inside of the brush
cursor, the circle, the plus turns into a minus, and then I can minus the
areas that I don't want. Now I do want this area, so I'm going to try to paint that in a little more carefully. So it's a little bit
of a dance, right? You're like, adding and
then you're subtracting, and then you're adding, and
then you're subtracting. But it only takes seconds. And it doesn't have
to be perfect. So I think that is going
to be good enough. Alright, so we have
an active selection. Now we're going to go get the sparkly image
to paste into this. So that is this one right here. So we're going to
select all Commander Control A, copy it, Commander Control C, come
back to our untitled image. And rather than just paste it, we're going to do
a special paste. So we're going to choose
edit, paste special. Paste into and check this out. Now, it pastes our image in, so it selected that whole
image and put it in here, but it came with a mask. And you can see that the mask is based on
the selection we drew, and the mask is hiding. So all of these black areas, the lights are out,
hiding this image, and the lights are on just in this area covering her outfit. And these things are not linked. We can see that down below on our layer with
her and her mask, there's a link between them, which we can toggle on or off. But this one by default
does not have a link, and what's great about
that is we can now scale this image within the mask so we can scale them separately. So with this selected,
not the mask. I want to make sure this white outlines around this layer here. We're going to press
Command or Control T, followed by Command
or Control zero, and now we can see everything, and we're going to
scale this I like so. And then you can,
you know, position it in a place where you like how it looks and then
press Enter to commit it, and I'll put this
back on my screen by pressing Command
or Control Zero. That is looking awesome. And if we want to
add a little bit of blue color overlay to this, let's come down to
the effects option at the bottom of
our Layers panel, and we're going to
choose color overlay. Let's set the blend
mode to hard light. And this color swatch here, if you click on it, you'll
get a color picker pop up, but also your cursor will
turn into an eyedropper, and then you can eye drop, you know, a color
from the image. So I'm just sampling
something from the water, and I've got the blend
mode here set to hard light and the
opacity set to 50%. So you can play with this. First, we'll have to
dismiss the color picker. And then if you want to play with these settings, you can. You don't have to
use a hard light. That's just what
mine was set to, and I think it looks good. Oh, but linear
light is also good. So whatever you like. Play around here to choose a combination of blend modes and opacity for the color that you chose until you're happy with
it, and then click Okay. At this point, we should
make sure we save our work. So let's go to File
and choose Save As, and we'll call it
moonshine collage. We want to choose Photoshop for the format and
then click Save. Oh, that looks so good. In the next video, we'll finish this up by adding some birds, a pair of shoes, and
a background color.
7. Moonshine: Adding Final Details: Alright, so let's add
some shoes to this. I don't know why I
liked this so much, but, um, I do. I like how it turned out. So we're going to go
over here to this image with these shoes
dangling on a wire, and we'll again press W for any of our wizard
like selection tools. And then we'll choose,
again, select subject. And Photoshop will do
a pretty good job. You'll notice it
included the wire, which is nice, but
we don't want it. So because I've got my
quick selection tool, I can make my brush bigger
using that right bracket key. And I'll just hold down Alt or Option and brush over the wire. To get rid of it. Make sure I didn't
miss any spots. Okay, we can see that the
selection may not be perfect. So to clean it up just a little in the easiest
way possible, let's come up here
to our family. So you can press L
on your keyboard. And if we click and
hold on the L family, we'll notice there's one tool here called the
selection Brush Tool. So the difference between
the selection brush and the quick selection
brush is that the quick selection brush is kind of a wizard
like tool, right? That's why it's
with the W family. So it's kind of automated
and it kind of figures out what you're trying to select based on contrast and color
and things like that. But sometimes we want to be able to just paint
our selection, and that's when we want to reach for the selection brush tool. So here we can see
the areas that we've selected are filled
with this pink overlay. It's a ruby lith overlay. So if there is pink in any areas we don't want or
there's not enough pink, like, right here, we
can just paint it in. So because this is a brush, we can make the brush
bigger or smaller using the left bracket keys and the right bracket key next to the letter P
on your keyboard. So I'm going to make
my brush little, and I'm just going to paint. And you'll see there's
no wizardry about it. Like, in this case, it is just painting. So we want to paint
in that area, and I can see these areas
need to be removed. So in that case,
I will hold down Alt or option and then
make my brush tinier, hold down Alt or option, and then I'm just
going to paint out the areas where there
shouldn't be a selection. And it doesn't have
to be perfect. This is just a
learning exercise. But this is how we
would go about it. So just moving around, using a combination of just painting or alt option painting, just going to kind
of clean this up. Really, I'm not gonna
lose sleep over it. So I'm zooming in by pressing Command or Control and plus key. That'll zoom you in, and then Command or Control minus
will zoom you out. And once you're zoomed in, you can pan around by holding the space
bar while you drag. So it's an easy way to zip
around your image and just clean up any selection
bits that you need to. Okay. So I think this is good enough. I'm not gonna lose
sleep over it. I just mostly didn't
want a bunch of sky coming along for the
ride from this area. So once we're happy with it, if you want to see it
as a selection again, you can just switch back to
one of the other tools like the Wizard family by pressing W. There we can
see our selection. We're going to copy it by
pressing Command or Control C, and we'll come back over here and paste Command or Control V. We can see it's rather large. So let's make it a smart object by right clicking and choosing convert
Smart Object. That way it packs
up all the pixels into the little
suitcase right here, and now we'll scale it
by pressing Command or Control And if you can't see the corners
of the bounding box, you can press Command
or Control Zero. I'm just going to
scale that down. Going to position it A here. So when we're happy
with it, we'll go ahead and commit it. And you can play with
the positioning. Like, maybe you want to
hang it right on the tip, but I kind of liked
it being here. And then what I did,
I'm going to zoom in. So in this case, I'm holding Command or
Control Space Bar, which you'll see that
toggles to the Zoom tool. And then we can click and drag across to Zoom
in right here. And what I did was I drew a little like a
nail type shape here. So if you would like to do
that, it's very simple. I'm going to press D so that I have black as
my foreground color. And I'm going to press P for
the Pen tool, don't panic. It's okay. And up here, we want to set this
drop down to shape. The fill should be
this black color. If not, you can change it, and we don't want a stroke. And then all I'm going
to do is come back here. So I'm imagining the nails here and it's kind of
going down this way. So I'm just following this
line, and I'm going to click, and I'm going to come here like that and like this
and like that. So I just drew
like a kite shape. And as long as you come back and click at your original point, when you come here, you'll
see it's really hard to see. But to the right of my pen
tool is a little circle. So that indicates that
I'm about to close my path by clicking on the
original starting point. And that will close the shape. And then I can just drag
it behind the shoe layer. And if I switch to my
move tool and click away, now there's, like, a
little nail there. So really simple stuff. I'm going to rename this
nail and press Enter. We'll rename this
shoes, press Enter. Alright. That looks great. Let's add our birds. Here we have a whole
flock of birds, and let's just press W
for the Wizard family, and then we can click
Select Subject. Photoshop's gonna get all
the birds. Pretty well. I might use my Quick Selection
tool only because I just noticed that it didn't get some of these
little tail bits. But I'm not worried.
Some of the wings aren't perfect, but that's okay. If you're losing sleep over it, this is the one that
seems to be trouble. So I'll just hold down
Alt or option and make my brush super
tiny and get in there so we don't have webbed wings. Okay. Oh, boy. See, now I've opened
a can of worms. Oh, I didn't I didn't want to get that
caught up about it. Okay. Now we'll copy Command
or Control C. Come over here and choose Command
or Control V to paste. Let's make these guys black
and white by pressing Command or Control Shift and to automatically
desaturate them. We can make them a smart
object too by right clicking in the open area here
on the Layers panel and choosing Convert to
Smart Object and pressing Command or
Control T to bring up free transform followed by Command or Control Zero to
scooch out so we can see. And then we'll drag it inwards till we have
something like so. Oh, love it. Press Enter to commit. The things that I look
for when I'm placing this stuff is I'm watching so I like the curve of the moon coming behind
this bird somewhere. I like the wings crossing
the front of the moon there. So something like this, I think, is good, a good position. That looks awesome.
And then let's add a background fill
behind all of this. So down at the very bottom, I'm going to click on
what says background. And let's just add
a solid fill color. So I'm going to click the adjustment layer button at the bottom of
the layers panel. That's the one that looks
like an Oreo dunked in milk. So it's the one
right in the middle. And we're going to
choose solid color. And I'm going to just sample
something from the moon. So with the color picker open, if you hover over the document, you can suck up colors. And so I've got this
kind of newsprint color, and then I'm just going to maybe click a little bit darker so that we have greater contrast between the background
and the moon. So whatever color you
think looks good, when you're happy with
it, you click Okay. And then because we've
already saved this once, all we have to do
is press Command or Control S to update
our saved image. And let's save a copy as a JPEG, so you can post on social or send it to
print or what have you. So we'll choose
File, Save a copy. And this time, insta of
Photoshop, we'll choose JPEG. Choose where you want
to save it, hit save, and in the options
that pop up next, we will leave it set to
the highest quality JPEG, so that will have
a quality setting of 12 and then click Okay. Wow, that looks good. Pat yourself on the
back and then join me in the next video
for collage Number two.
8. Carhop: Grounding Our Base: Alright, so next up, let's create another new
blank document by pressing File New or Command
Control N. And again, I'm just going to make this
1,500 by 1,500 pixels, RGB color, white
background, create. And then we'll go to File open. And let's go to
our car hop image. And we'll open up
all of these JPEGs. So we have everything ready. And yes, we have the
same image again. So one of the things I thought
would be fun would be to include a few things the
same in every image, which is birds and also this
paper type texture layer. So you'll see that in
all three folders. So we're going to start this image with the picture
of this car right here. So let's navigate over to this, and we'll press W for
the Wizard family, and then we can choose Select
Subject and Photoshops. G to do a pretty perfect job. Bang and job. Awesome
photoshops. So let's copy it. Command or Control C, and let's go back to
our untitled image, which I can't see because
Oh, so many tabs. Alright, so I'm going to
click this little arrow here, and then we can go to Untitled and paste Command or Control V. Let's make this a
smart object by right clicking on it and choosing Convert
to Smart Object. And now we can scale it down by pressing Command
or Control T. And I'm going to scale from this top left corner while
also holding Alt or option, and that will scale it
from four sides at once. And it just makes
it a little easier. Okay, so scale this and
position it maybe about here. When we're happy
with it, we'll press Enter to confirm it. All right, so this image is going to have the woman coming
out from behind the car. It's going to have a big
sunset circle behind her, palm tree in the corner,
birds, of course. And then the car is kind of like the base
of the whole image, but it would be weird to
have the car just like this. So we need to give some
grounding to the car. We're going to do
that by using one of the shape tools to just
draw a smashed circle. An oval. We're going to come down to the
shape tools here. You can press U
on your keyboard. And there's a bunch of them. The one that we want,
if you click and hold on whichever family
member is active, you're going to release
on the Ellipse tool. And up here, we want
to make sure this is set to shape
for a fill color. I'm going to click here, and then that's going
to pop this open. And then we can
click right here. That will pop open
our color picker. And then I'm going to
select this dark blue or aqua from the inside
roof of the car. It's this really dark color right here, and then
I'll click Okay. That's the color that I want. Then I'm simply going
to click and drag to put a little
circle like this. It's not technically a
circle, it's an oval. But I'm still holding
my mouse down, and then if I decide I want
to scoot it up a little bit, I'm going to keep
holding my mouse, and I'm going to also
add the space bar. And now I can reposition it. So I just I want it to
basically be right here. So I want it to fully cover the areas where
the wheels are. And let's see. In
our layers panel, we'll need to drag this
below so we can see. If I zoom in, you can see that the wheels are included
in this circle. But also the circle is not so short that it's just like this. We want it to be about here. It's for the whole car. This is basically a cheat for a drop shadow or a
cast shadow from the car. All right, so we'll
leave this here. Let's rename this layer car. Oops. Spell it
right. There we go. And this one we can call shadow. All right, and then we can
press V for the move tool, and then if we click away
in the layers panel, we just click off that layer, then we won't have to
look at the outline. So see when the layers active, we see this blue outline, and I know it makes a
lot of people bonkers, so just click away and
then that will go away. But doesn't that look great? So that is how we
one way that we can ground things in our
images, and it's nice. It really helps a lot. While we have the Ellipse tool, let's go ahead and draw where we're going
to put the sunset. I'm going to make sure I have that ellipse tool active and the fill color
doesn't matter anymore, so whatever color is fine. And this time, I'm going
to hold Shift while drawing to create a
big circle like this. Now remember that you
want to keep holding your mouse down basically
until the very end. So I'm still holding my mouse. But if I want to
resize the image, I can just click and
drag holding my mouse. But if I want to pick
it up and move it, then I'm going to
hold the space bar, and that lets me reposition
it rather than resize it. So you can switch
between resizing and repositioning by just
adding the space bar. So I'm going to position
this about here. So it's going to be like
slightly to the left. And then when I let go,
it's going to fill in, and we want to also put this
behind the car like Again, I'm going to click away from it so that we don't have to
look at that blue outline. Now, let's go get our sunset
image to put in there. That is this image right here. So I'm going to select all of it by pressing Command
or Control A, copy it, Command or Control C, and then come back over here, and I'm going to click on top of the ellipse layer
to just select it. And yes, it's going to pop up
all the stuff. That's okay. But with this layer active, we can now paste the sun in, and because this
layer was active, when we did so, it will paste the sunset into a new
layer directly above it, which makes it easy
to Gonzo clip it. So we're going to press
or in hold Alt or option. Hover till you see
Gonzo's big old nose, and then click to link
those two things together. And, of course, now we can use the move tool
to reposition this. I don't even have to
really resize it. I think something like that is actually just about perfect. How cool is it? Oh,
I love it so much. Okay, so let's rename
this our Sunset layer. And that's fine. We can leave that as Ellipse. Wow, this one is
shaping up fast, isn't it? Let's save our work. Before moving on,
we'll choose File, Save As, and we'll
call it car hop. Oh, I should probably
just call it Joy Ride. Looks like a joy ride. Anyway, car hop collage. We want to make sure we choose Photoshop for the
format and hit Save. Perfect. Join me
in the next video, and we'll add our
portrait subject.
9. Carhop: Adding Texture to Our Subject: Come back. Next, we are going to add our portrait subject. And she is somewhere. She is here. So we're going
to go over to this image, press W for our Wizard
family of tools, and then click Select Subject. And Photoshop nailed it. So we'll copy Command
or Control C, and we'll come
back over here and Command or Control V to paste. Let's make her a smart
object by right clicking in this empty area of her layer and choosing Convert
to Smart Object. We'll give her a
name like portrait. Portrait subject. Alright. And let's scale her down by pressing Command
or Control T, and we can alt or option
drag from a corner. If you need to scooch back
so you can see everything, just remember that
you can press Command or Control and the number zero. All right, so we're
going to be having her pop out from behind the car. Oh, I love it so much. I want to have this elbow inside the circle and then this arm is going to
break the circle, and that's about perfect. Just like she's on the passenger side of
the car a little bit, and we'll go ahead
and click to Commit. That actually looks
really great. And of course, I
wanted to add in our text newsprint collage
paper texture layer. So let's yet again, we're going to select her turtleneck sweater
that she's wearing. So for that, I'm going to use
the Quick Selection tool. It's a member of the W family. And we'll make sure we're
on the right layer, and then I'm just going to
draw over her turtle neck. And it looks crazy,
but when we let go, it kind of sorts itself out. But I don't want her wrist, so I'm gonna hold alt or option
to subtract all of this. I don't want her face
and her neck and all of so it takes just a second. And there we go. And it
might not be perfect. We can always fine tune it by brushing it
later if we want. Okay, so now we're going
to go get the text. I'm gonna close
that. Here we are. We'll select all
Commander Control A, copy Commander Control
C and come back over here where we will
paste special again. So because we have
this active selection, we can choose edit, paste
special, paste into, and that's going to paste
in the layer and generate a mask that will turn the lights out everywhere
except our selected area. And it will not
automatically be linked, so we can scale and adjust
each one independently. So I'm going to press
Commander Control T, followed by Commander
Control zero, and then I'm going to scale this in and fit it back on my screen. So that it looks
something like this. Love it, and then
we'll commit it. And then we can play
with blend modes here. So I'm going to play with maybe multiply
blend mode is good. That will bring back some of the shading from her
underlying sweater. Also, linear burn is a good one. Maybe you like this
look. You pick whichever one you think
you want to go with. I'm going to go with, I think I'm going to
choose linear burn, and then instead of
reducing the opacity, I'm going to reduce the fill. Just ever so slightly
to, like, 76%. What? Are you kidding me?
This looks so awesome. Okay, let's go get a palm
tree. Palm tree palm tree. We can close this
image two of the car. Here is our palm tree. So, same thing. We'll press W for the Wizard family and
then select subject. Now I can tell you
that photoshops gonna not degrade on this one. So before we move on with
our active selection, we're going to click
here to select and mask. And that is going to bring
us to this workspace, and yours may look a little bit different, so
let's talk about it. Over here in the properties
for this workspace, we can view our selection
in different ways. So right now, I'm viewing the selection
on a black background. It doesn't look super black because the opacity is only 50%. So you can see if
I drag this up. Now we can tell what
we're looking at. So this is helpful to view
your selection different ways, depending on your image, so you can just really see what a bad job is going on here. Okay, so that's great. We can now see it. And now we're going
to come down here and bump our edge detection
radius up a little bit, and now we're going to
clean up these edges. So I'm going to hold Command or Control Space Bar so I can just zoom in and then
Spacebar drag up. And what we're going
to do is come over here to the second
tool on the left. So this is the
refine edge brush. And now I'm just going
to paint. Look at that. I'm just going to paint
over one leaf at a time. And then when I let go,
it kind of bakes in. See that? And then
I'll do this one. And this is just
saying, Hey, Photoshop, you need to have another look here 'cause this is not good. So Photoshop's
gonna recalculate. Look how much better that is. So I'm so easy, right? The reason I'm not doing
the whole thing at once is I just think it kind of
processes better that way. So I'm just working
my way around. And this is a brush
like any other, so you can adjust
the size using the left and right bracket
keys next to the letter P. Just 11 thing at a time. A, how good is that? Down here, we're going to
tell it to output two, and we can choose a
number of things. I just want a selection.
So we'll click Okay. Now we have a better selection, and now we'll copy it by
pressing Command or Control C, and we'll come over
here and Command or Control V to paste it in. Well, right click, convert
it to a Smart Object, rename it palm tree. Press Enter, and let's scale it down by pressing
Commander Control T, followed by Commander Control zero so we can see what
the heck we're doing. And I'm going to scale it down. Oh, I love it so much. I want it off to the side. I don't want it to look
like it's in the car, so I'm putting it off. I like to see the trunk of the tree separated from
the circle a little bit. A here. I think that's perfect. Then I like this palm coming
over the circle like that. Now I can see, I think
a piece of it is sticking out down here at
the bottom below the car. So I'm just gonna add a mask and grab a brush with black
paint and get rid of it. Looking good. In the next video, we'll add the birds and the final
background color.
10. Carhop: Finishing Touches: Alright. Next up,
we have our birds. So I'm going to just again press W for my
wizard like tools, which gives us access to
the select subject button. We can see that
they are selected. I'm going to copy
Command or Control C, pop back over here
and Command or Control V to paste them
in. They are huge. Let's make them a smart object. And Command or Control T. Can only even see one
bird. And look at this. They just kind of fit in here. I did not plan that. It just worked out
that they fit, like, around her and her
hand and everything. It's just awesome. So once we are happy
with this arrangement, and scale and everything,
we can commit it. Oh, my gosh. Now, I'm
realizing that I kind of set everything a little bit
high in the document, so I want to take everything
and move it down. So to do that, before
we do all that, I want to look through here
and make sure that I link up any masks that are unlinked. So, like, when we
pasted this in here, because we had an
active selection, it automatically did
not link the mask. But now that means
if I try and move this I'm moving this
but without the mask. So we want them
to move together. So I'm going to click
to put a link there, and then I'm going
to click the top layer being in the car, and I'm going to shift
click the shadow layer. So everything is selected. All the masks are linked, and then I can use
my move tool to just reposition everything a
little bit lower, like that. Okay, and then let's click
the background layer. And again, we'll click
the adjustment layer here to add a solid color. And I'm going to sample the yellow this really pale yellow from inside
the sunset and click. Okay. I love it. I think I might grab
the sunset layer, and I'm going to press
Commander Control T and Commander Control zero and
just scale it a little bit because I want the sunset
kind of right in here. That's perfect. Like,
between her and the tree. Right about here. So it's like midway and her neck and the sun. It's right there. And that wave is a little bit above
this branch on the tree. Oh, my gosh, you guys.
Which one is your favorite? It's so hard to choose.
I love them all. Let's make sure we save
our work by choosing File, Save to update the PSD. And of course, we want
to export a JPEG, so we'll choose
File, Save a copy, and choose JPEG, save
quality of 12 and Okay. All right, two down,
one more to go. I'll meet you in the next video
for collage number three.
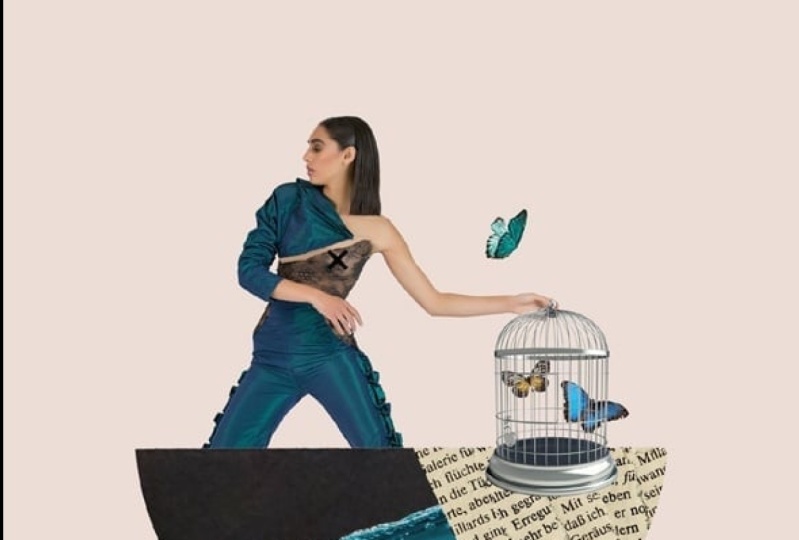
11. Birdcage: Creating Our Focal Point: Friends, collage number
three, coming up. We're going to once
again go to File New. Enter your desired size. I'm going to use 1,500
by 1,500 pixels, RGB color, white
background, click Create. Then we'll open
up the images for our birdcage collage
by choosing File Open, navigate to the course files to the birdcage folder and
open up all those JPEGs. All right. All right. This time, we're going to start our build with the picture of the flower. This right here. Per usual, I'm going
to press W for my Wizard tools and then
choose Select Subject. You can also just click
right here. Select Subject. If you like your contextual
task bar, go for it. The results should be the same, which is going to be
this great selection. And the only thing it's
missing is right in here. I'm going to use my
quick selection tool to Alt or Option, click to get in here
and clean this up. That looks good. We'll
copy Command or Control C, go back over to our
untitled document and Command or
Control V to paste. Right click and make
this a Smart Object. Let's rename it flour
Command or Control T and scale it down. If I am looking up
in my Control panel, I have scaled this to about
24% of its original size. And because it's a smart object, we can always adjust that later. So I'm going to go
ahead and commit it. All right. Next, let's
go get our subject. So she is. Well, first, I'm going to go
in and close this picture. So I'll press
Commander Control W to wave goodbye and close it. I always hesitate
to do that right away because sometimes
I think I've copied it, and for whatever reason, it didn't take, and then I have to go open
the image again. So I like to actually
get it in there, and then we can
close that image. Alright, so next, we're going to navigate over here
to this portrait, and again, I'll press W for my wizard tools and
then select subject. And again, copy
Commander Control C, and we'll go back to our image and Command or Control
V to paste it in. Right click, Convert
to Smart Object, rename portrait subject, and Command or Control
T, scale it down. And before we commit it, we want to flip her
around the other way. So here's that
contextual task bar that I love to not love, but I do appreciate
now and then. So we'll click right
here to flip her around and drag her behind so we can see where
she's shaping up here. I think this is good. So what I'm looking for is
that she is behind the flower. Um, and that looks great. So we can just mask off. Whoops, we can mask
off all of this. So on her layer, we're going to add the mask, press B for the brush
tool, black paint. I've got a soft brush, so I'm going to change
that so that it's hard edged and it can
be a little bigger. And then I'm just
going to paint paint away everything beyond
the flower here. So she's kind of coming out. And now I'm realizing I want
to move everything down. We see a link here already,
so I don't have to worry. So I'm just going to shift click the flower layer so that
they're both selected. I'll press V for the move
tool and then pull her down. So she's more like here ish. So a little bit to the
left and about like so. Bravo. So before we move on, let's put in that text again. So we can close this file. So Command or Control
W to wave it goodbye. And Hey, let's go get
this image one more time. Commander Control A
to select everything. Commander Control C to copy
it and come back over here. Before we paste it in, though, let's click on her, not her mask, but
her to select her. And then I'm going to press W for my Quick Selection tool, make my brush a little bigger, and I just want to select, like, the top or dress
that she's wearing. It's going to be all kinds of confused over here by her arm. So that's okay. We'll just
have a rough selection, and we can paint it in more
if we need to in a minute. But with this selection active, I'm now going to choose
Edit, not paste, but paste special, paste into. That again, adds the image in here with an
unlinked layer mask, and now we can press
Commander Control T and scale this all kinds of down so that the text is small
enough that we can see it in such a tiny area and commit. That's looking pretty
good. We're going to clean up this mask in a minute. But let's take this flower, and I think I want to actually
move it down a little bit and maybe make
it a little bigger. There we go. Alright, so that's
a little better. Now I'm going to
target this mask here, and I'm going to zoom in. So that's Command or
Control Space Bar, and then you hold
those two while you click and drag to the
right with your mouse. And I'm just going to
use my brush tool, making it smaller using my left bracket key
next to the letter P, and I'm going to
turn the lights back on on a little bit
more of it here. So I'm just painting around
where I want this to go. And then I wanted to change
the blend mode of this layer. So I'm going to come up here to where the blend modes are, and I'm going to choose Divide. And so in that way, we're going to still
be using this image to help connect all of
our series of images. But it's going to look
a little bit different. In this version, it's
going to be reversed. So it's going to appear to have white type on a
black background, and I just think it
looks really classy with this whole thing
that we're building. Alright, we're off
to a great start. Join me in the next
video, and we're going to add in not one, not two, but three cool, funky shapes to provide the bulk of the rest
of this composition.
12. Birdcage: Adding Shapes & Patterns: Okay, so let's go back
to our Ellipse tool, and we want to make sure that
we've got it set to shape. We want some kind of fill
that we can actually see. So I'm going to
just choose black. And I'm going to hold Shift
and then click and drag out a circle that's like
something like this. And we'll drag it behind
our portrait subject. And because it is vector, we can fine tune that as
much as we want later. So let's go get the image that we're going to put in here, which is this picture of
the palm and the sky. So we'll select all
Command or Control A, copy Command or Control C, come back over and
Command or Control V. So in this case, we're not pasting
it into the shape. I mean, we could have just drawn a circular selection and
then pasted into it, but I don't know, when I'm
working with stuff like this, I like to have the shape
and the image separate. I don't know why. It just
is how I like to work. But you could have
done it that way. Alright, we're
going to clip this. Remember our friend Gonzo will hold down Alt or Option till we see Gonzo's little face and then click to connect
those two things. I'll switch to the move
tool by pressing V, as in move Viva. And then we can drag
this into place, and I'm going to scale it
because that's too big. So I'll press Command
or Control T, followed by Command
or Control Zero. And then I'm going to
hold Alt or Option to scale from all corners at once and then
put this in place. About like so, something like
that, and then press Enter. That is looking good. Now, to add some fun color to really saturate this
and give it some pop, I'm going to add a color
overlay to this photo layer. So I'll choose Effex and let's actually do
a gradient overlay, and I'm going to set the
blend mode to color. My opacity is set to 76, but, you know, play choose your settings that
you like here. And then for my gradient, I'm going to click
this dropdown, and you'll see that Photoshop comes with a bunch
of preset gradients, and I'm going to look down
here under the orange section, and I'm just going
to click through and see which ones I like. Ooh. I mean, it's tough. They're all really great. I think I'm going to go
with this one and yeah, maybe just tone
it down a little. Maybe I'll drop the
opacity to, like, 62%. You do whatever you
think looks good. You can also adjust the
scale of the gradient. So it's hard to see
what's happening, but over here in this preview, basically, when we
drop the scale down, we're dropping the blend between the two colors so we can see we're getting one color up here, and then the split
is happening here. So I'll smooth that
out a little bit. Oh, I think that looks great. And we can go ahead and click. Okay. Next, we're going
to add two more shapes. The next one is a triangle. So there is a shape
tool for that. So again, we'll click that, and I'm just going
to click and drag. I'm going to hold Shift so that I don't get this
kind of triangle. I just want an isosse triangle. And then we'll go get another
image to paste in there. And the one that I found again, on Unsplash is this fun,
iridescent glittery texture. Before we do that, let's do a levels adjustment on this and see if we can give
it a little more pop. I'm going to press Command
or Control L for levels, and I might bring the
right slider in and the left slider in just
just a bit like that. We'll click Okay. Now we'll select all
Command or Control A, Command or Control C to copy, and we'll come back over here and command or
Control V to paste, and then we'll gonzo it again by holding Option or Alt and hovering in the space between the glitter
layer and the triangle. And then I'm going to press
Command or Control T, followed by Command
or Control zero, so we can scale this
so we can get some of that color in there.
See this gradient. So there's a bit of a
rainbow happening here, and I want to be able
to include that. And then I'll press Return. And finally, there is another really fun
squeggle shape that I thought would
work nicely here. So when I was composing this, one of the things I was looking at when I did this is I
started with the flower. That was the first thing.
Just like in this exercise, that was the first
thing we put in here. And that was the first
thing that I put in before I knew what I
was going to build. And then I added her, but I hadn't yet flipped her around. So I was kind of thinking that I would create something
where she was looking away, which is kind of unusual. But I was kind of liking it. So the flowers kind of
looking this direction, and I wanted her looking away. And it looked
really good until I got to the part where
I put the birdcage in. And then I was
like, She's got to face the rest of
the composition. So I flipped her
around, and I like it. Another thing that I like is
all these organic curves, like in the flower petals
are nice and rounded. We have this nice round shape. We have, of course,
the round shape within the round shape. But we also have these
like V shapes here. And so I wanted to
contrast all of these round shapes and
echo the V shapes here, which is why I put
in the triangle. And then I just thought,
we need one more thing, and I felt like
waves would be good. So let's go to our
shapes panel once again. If you don't have
it on your screen, you can find it by choosing
window and shapes. And then this time, this is also part of the
legacy shapes and more. So if you missed
that part earlier, you've got to load
this folder from the shape panel menu by clicking the panel menu and then choosing
legacy shapes and more. This time, we're going
to just search wave, and we'll get this guy. So we'll just click and drag
this onto our document, and I'm going to
position it about like, so and click to set it. And I want to drag it on top of the triangle and
maybe on top of her. Now we're going to add
a pattern in this. And in order for the
pattern to show up, we do want to change the
fill color to white. So with that shape
layer selected, either in your properties panel or in your contextual task bar, we want to change
the fill to white. And then in the bottom
of the Layers panel, we're going to click
Effects and we'll choose I don't know if everyone
has this in by default. Let's, cancel. Let's cancel that
because I don't remember if this
is there for not. So let's go to Window, and we'll choose patterns. And just like we
did with shapes, we're going to come to
the pattern panel menu and choose legacy
patterns and more. Once we do that,
now these patterns, the legacy patterns
and more will be accessible from the
layer style menu. So with this waves
shape layer active, now we can come down to effects, and we can choose
pattern overlay. And now you'll be able to click here where
it says pattern. And now we'll be able to
drill all the way down. There's no search here.
So check this out. You got to click in
this little drop down, and then you want to open that legacy patterns
and more folder. And you'll see two folders. We want to open the
legacy patterns folder, and then there's a
bunch of folders, including something
called web patterns. And within the web patterns are all these little tiny
little snippets. And so these are going
to create these stripes. And what we need
to do is pick one. I can't tell what's happening. And when we click out of there, we'll see the scale slider here. So I'm going to set that
to 100% and that way, you have a better idea
what you're clicking on. So I'm just going
to pick this one. So this is called
diagonal line two. And then we want to
make sure that we are in multiply blend mode. And now I might scale
this up a little higher. You don't want to go too high because these are
low res patterns. They're intended for the web, so it will start looking gross. But we can get away with
like 120 or something. Scale. Just so we have a little stripes to kind of be a
little funky there. Alright, so the shape
fill color was white. The blend mode for
the pattern overlay is multiply 100% opacity. And if you want to choose a
different pattern, go ahead. I mean, choose
whatever you like. It doesn't have to even
come from this collection. You can choose something from any pattern or no
pattern. It's up to you. But I am going to put
this to, like, 180. Whoo. Actually 200. You'll notice that
at some percentages, you get sharper a sharper
image than with others. So I'm going to stick to 200
and then we'll click. Okay. And finally, I'm going
to just click away in the Layers panel
so I don't have to look at the blue outline. This is looking so great. Join me in the next video where
we will add our bird with a bird cage to this image and a fabulous background color.
13. Birdcage: Working with Blend If: Before we go any further, we should make sure we save
our work by choosing file, save as, and we'll call
it bird cage, collage. We want to choose photoshop
for the file format and save. Okay, that way, we'll have
all of our layers and everything waiting for us if we need to walk away
and come back to this. Next, let's go get our birdcage. We can close this image. So I'm just pressing Command or Control W to close images
that we are done with. And here we have our birdcage. So once again, I'm
going to press W for the Wizard family of tools
and then select subject, and it's going to
select the birdcage and the little hole here. So using my quick
selection tool, I will hold down
Alt or Option and just brush over
that little hole, and then we'll copy this
Command or Control C, and we'll come over here and Command or Control V to paste. Let's desaturate this by
holding Command or Control, Shift and pressing the letter U. And then we'll turn it
into a Smart Object by right clicking and choosing
Convert to Smart Object. Now, you're going to notice if I press V for my move
tool and I move this, you're going to notice that it did not do a great selection. All of these little
holes are still filled. So if this was
properly selected, we would see through all
the little chain link here and we would see the
background, but it did not do. But we are not going to mess with it because
we're going to use blend I to fix it really
quickly and easily. But before we do that, let's
just scale this by pressing Command or Control T
and scaling this down. And we're going to have it,
so it's kind of hanging here off the top
of the document. All right, then we'll commit it. Once we're happy with the placement and the size and positioning and everything, now we're going to
use Blend If to fix that by double clicking on the open area of the birdcage layer to
bring up our layer styles. And this time, we want to blend the current layer if
where the highlights. That means we can drag
this highlight slider, and we can bring it
inwards like this, and look how it just opens
up all those highlights. Now, if we go too
far, it's going to obviously eat up
the whole image. So we don't want to go too far, but we can go to a decent space, maybe around, like, 1180 or so. And then to really
get the finesse of a really smooth, clean blend, we're going to split this little handle by holding Alt or option
and clicking on the left half of this little slider and then
dragging that one in further. And you see how we were
able to open this up, and now we can see
through the mesh. And it looks amazing.
We'll click. Okay. Oh, my goodness. Love it. Next, we're going to
add in a background color. So let's go all the way to
the bottom of our document. We'll click the
background layer, and we'll add in a
solid color fill. And let's see. I think I'm going
to choose, like, I'm just hovering my
cursor over this flour to get sort of this yellowy color, but I think I want
something a little more mustardy I don't know why I'm liking mustard
for this so much. Kind of like this.
This color here, C, D as in dog, B as in boy, six, six, eight. So if you want this exact color, you can punch in those letters and those numbers right
here and then click. Okay. And let's update our saved work by
pressing Command or Control S to update
our saved PSD file. And, of course, we
want to export this to share on social or
send out for print. So let's choose
File, Save a copy. And this time we'll select JPEG, hit Save, choose a quality
of 12 and hit Okay. Oh, my gosh, I just love
all three of these so much, and I hope you are proud of all this hard
work you've done.
14. Your Project & Next Steps: You did it. Thanks
for being here and pushing through what I hope
was a really fun challenge. Now you're ready to create a
collage that's all your own. Just remember that
it's a process. And like it or not,
processes take time. So be patient with yourself. Follow your intuition. And please, please, please post your finished projects down below so we can all be inspired. I can't wait to see
what you create and how this class
helped you grow. And now that we're
friends, please feel free to reach out anytime. You can find me online at cara pletnch.com and on
social as app K Pltnich. If you're up for additional
creative adventures, check out my other courses here on Skill Share and beyond. I can't wait to create
with you again. Until next time
Happy Photoshopping.