Transcripts
1. Welcome: Hi, my name's Chris, and I'm a surface
pattern designer. In today's short
pocket-sized class, we are going to look
at using Pixelmator Pro to design a simple
striped pattern. We are going to take this pattern to the
point where it is ready to upload
into Spoonflower. And because this
is a short class, let's get stuck
straight into it.
2. Creata a Canvas: Here we have Pixelmator Pro, and I already have
a canvas open. The canvas is 3,600
pixels by 3,600 pixels. So how did I
determine that size? Or how did I create
the file that size? Basically, go to file and then down to New. That will
give you this window, which allows you to either pick an existing template or
create one for yourself. We're going to create one and we are going to create it at 3,600 by 3,600 pixels. The first thing to do is to make sure you have pixels selected. Then in the width
field, type 360, and in the height field 360. We'll leave the
resolution at 300. It may be something
different on your screen. It doesn't really
matter at this stage. The important thing is
the size of the canvas. Let's click Create, and I've got a new version of this file open. As you can see, I
already had one. I only need one, so I'll just delete that first file.
There we have it. We've got our Canvas 3,600
pixels by 3,600 pixels. What we're going to do is create a stripe pattern and then export that to PNG ready for
importing into Spoonflower. See you in the next lesson.
3. About the Canvas: So we're back to our canvas and you're probably
wondering why I chose those specific dimensions for the canvas. There is a reason. The reason is
because this pattern is going to be imported
into Spoonflower, and Spoonflower tends to work in inches, as in pixels per inch. If you're used to
metric like me, I find it actually easier when designing patterns
for Spoonflower, just to put the metric system aside and just work or
think in terms of inches. So this is where it's at. All paper on spoon flour
is 24 " wide. At 3,600 pixels wide and 150 pixels
per inch or dots per inch, that will equal 24 ", which is the full
width of the paper. Now, in all probability
for this pattern, I will probably go for 300 DPI, which means the stripes when printed will
be half as wide. It's really up to
what you want to do. So for the purpose
also of keeping this class or course
nice and simple, we're just going to go
with 3,600 pixels by 3,600 pixels. See you
in the next lesson.
4. Creating Stripes with the Stripe Generator: It's time now to
create some stripes. Now, the traditional method
in terms of doing this, or the most common
method in terms of doing this is probably just to create a rectangle and
then copy and paste it. So that's copy and paste and then do that again
and create stripes that way. Now the stripes have
to be pixel perfect. All these rectangles have
to be pixel perfect. The distance between them
has to be exactly the same, and that's all
possible and feasible, but this is quite a slow
way of creating stripes. So we're not going to do it that way. Now, what am I doing? I just grabbed the background. I want to grab these and delete. Okay, so how do we create stripes easily
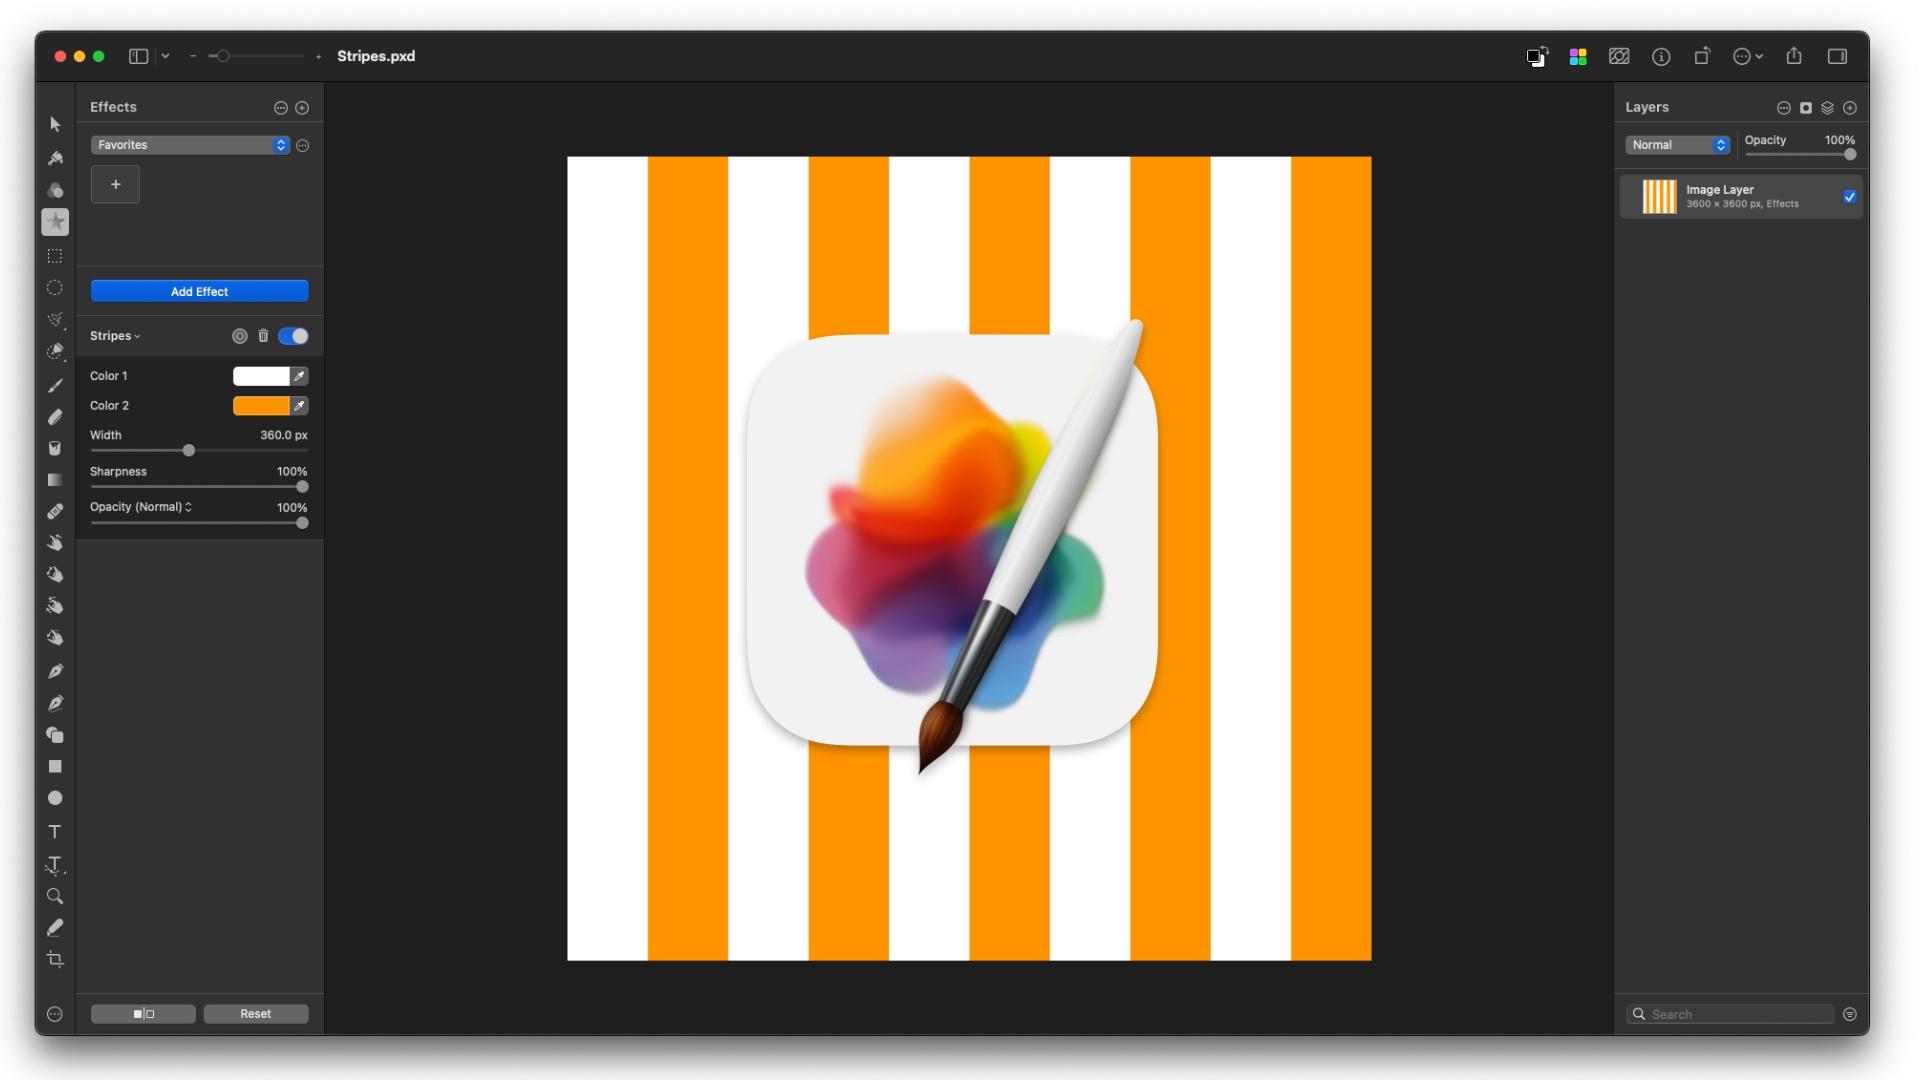
within Pixelmator? Let's go to effects, add Effect, down to Generator, and then press Stripes. There we have our stripes. Now, these stripes can be
any width at the moment they are set to 80 pixels wide. Just a reminder that our
canvas is 3,600 pixels wide. If I want stripes that
are one tenth that width, then I need a width
of 360 pixels. Let's put that into
this field here, 360 Enter (or Return), and I've
got my stripes. Now, these stripes have a
tendency to disappear into the background because they're black and the background
is black as well. I just want to reduce this down so we can see things
more clearly. And here we will
just apply a color, and for today, let's
go for orange, nice bright color,
and there we have it. Let's have a look
at these stripes. What we have at one
end is a white stripe and what we have at the other
end is an orange stripe. What we have got is a pattern
that will repeat perfectly because it'll put
that white stripe to the right of
the orange stripe. That is, this white
stripe will end up over here and we end up with a nice repetition of stripes. And that's pretty much
all there is to it. As you can see, it's a
pretty easy process. So let's move on to
the next lesson.
5. Exporting Your Stripes for Spoonflower: Now it's time to
export the file in a format that is ready for
importing into Spoonflower. To do this, we'll
go to File > Export, and we'll just give this a name, so we'll call it Orange. Stripes. Not very
inspiring, but it'll do. The format we want is PNG. The color profile will remain as sRGB because that is what
Spoonflower requires, and we want to keep
the original size. Here we go. Export. And now I have that exported
to my desktop. And that's it. Pixelmator is
actually very easy to use. A little bit different
to Affinity Designer and Affinity Photo and
Adobe products. It can take a while
to get used to, but as you've seen, each of these lessons is
incredibly short. There's really not a lot to it. See you in the next lesson.
6. Bonus Lesson - Upload You Stripes to Spoonflower: Now it's time to see what it
looks like on Spoonflower, let's go ahead and
upload that file. I've got Spoonflower open, all I need to do is go up to here and down to
upload your design. Choose files. We'll select our new file and
then click Upload. Agree and Continue, and
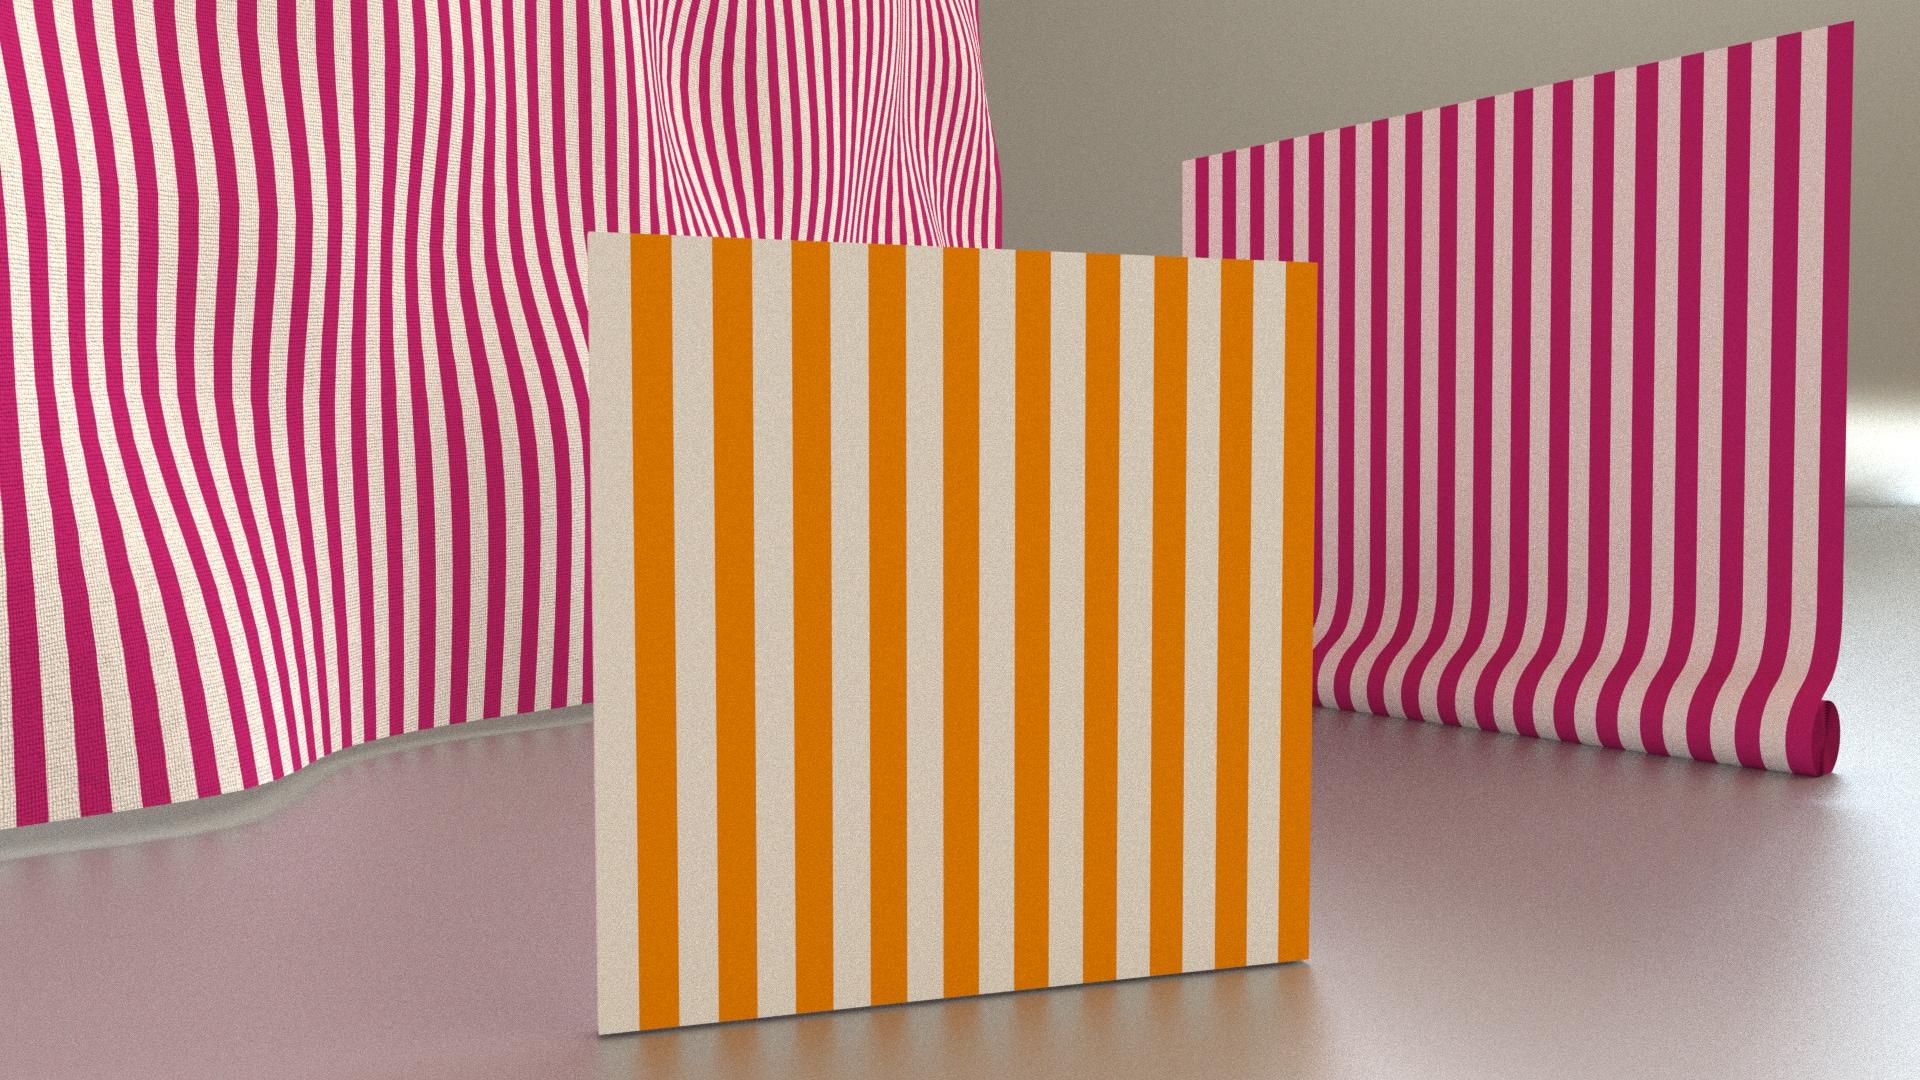
now it has uploaded, and already, we can see what
it's going to look like. It's quite a bold stripe,
quite a bold color. Of course, you could
pick any color you like. It doesn't have to be orange and it doesn't have to
be bold and bright. You could actually do
this with pastels. So what you can see here is spoonflower turns your pattern
or takes your pattern and creates a lot of
different mock up scenarios so you can see
what your pattern looks like as tablecloths or table runners or
bedspreads or cushions, pillow shams, whatever,
it's all there, and people can order your
pattern as a product.
7. Bonus Lesson - Scaling Your Pattern in Spoonflower: In an earlier video, I
talked about actually making this pattern into
a finer stripe. That is, I wanted
to take that 3,600 pixel canvas and instead of spreading it over the
width of the wallpaper, I actually wanted to
spread over half the width of the wallpaper. So what happens when you import a pattern into Spoonflower.
By default, it aims to display that
pattern at 150 DPI. By halfing the width of that
pattern, in other words, reducing it from 150 to 300 DPI, and I know that sounds weird. What you're actually doing is reducing the size
of that pattern, and you're printing two of those pattern
units side by side. So I hope that makes sense. Maybe it'll make more sense
as I work through it. So what we have here is our
uploads and our mockups. Now, you can change things in the fabric and
the wallpaper mockup, and you can rotate a tea towel, but you can't do any
other changes on any of the other mockups because
they're all based on these three mock ups here. So as you can see, I've got a 24 inch
by 24 inch unit. So my 3,600 pixel wide
pattern is spread over 24 ", and that is at 150 dpi. So I want to half that to 12, which is going to increase
the resolution to 300 dpi. So this is how you do it. You just click Edit. And in here, we can just click to the side
here and see what happens. It's reduced to 12, which is exactly what I wanted. And then I can click Save. And it may take a while one to 3 minutes to
update the images. We can see that the wallpaper
is updated already. The fabrics obviously haven't because I haven't
edited that one yet. Again the fabric, we've got a 24 inch wide unit or pattern, which is your 3,600
pixels spread over 24 inches. I want to reduce
that to 12 inches and go from 150 dpi down to 300 dpi. So I'm going to click Edit, and what I'm going
to do here is, let's have a look what
happens if we scale it. We can actually have
anything we like. But I want to make sure
that it scales properly. So I'm going to go
50% then press return. Actually, instead of pressing return, I'll click in here and that
resets those fields to 12 inches. And what we end up
with is a finer print. Now I can save that and
wait for it to update, and it's updated pretty quickly. You could see that now we've got a finer print (stripe) on our cushions, and all the other mockups have updated accordingly as
well, which is really good. The other thing which
I haven't done, which yeah should I cover it? I might as well cover it here. Let's just go to
proofing the design. What we want to see
is because, I mean, this is actually the first time I've used Pixelmator to create a pattern to directly
upload into Spoonflower. Normally, I take it from Pixelmator to
Affinity Designer, export it from there, and
then upload to Spoonflower. So let's go and click 'Not Proofed'. And it's verifying the
design. And here we go. We can see our
3,600 pixel square, that's bounded by
that pink line. I'm going to click Start. It's going to zoom in, and I can see that
it's nice and perfect, at least it's pixel perfect
and perfectly aligned. So that's what I'm looking for. I want to just zoom out, and I like to check
in the middle just to make sure that everything
is perfectly aligned. It needs to be pixel perfect. And I can see that is the case, and I'll just have another look in here and that's all fine. And it looks good. So I'll click 'Looks Good'. And now this pattern
is ready to publish. Well, at least the design
is ready to publish. I'm not going to go into editing
the title in the search. That can be for another
short lesson, another day. But for now, I
think we've covered essentially all that I intended
to cover in this class. So onto the next lesson or at least what your project is
going to be for this class.
8. Your Project: Hey, I really hope you
enjoyed this class, and I'm looking forward
to seeing your stripes. So please upload your stripes
to the project area below. So what else is there?
Pixelmator. If you are new to Pixelmator, or you haven't
heard of it before, you can go to the Mac App
store and buy it from there. There's a bit more
information there. There is also the Pixelmator
website where you can check out what you
can do with Pixelmator. Now I use Pixelmator in conjunction with the
Affinity products. It does some things
better and faster than the equivalent
functionality in the Affinity Products. What about Spoonflower? Chances are if you're a
surface pattern designer, you probably have
Spoonflower up and running already and that
you're selling your patterns. If that's the case,
I would love to see your mockups featured in the
projects area below as well. If you haven't used
Spoonflower before, it's a straightforward process of signing up for Spoonflower. Once you've done that,
you can start uploading patterns and looking
at the mockups. Where are we at? I think
we're pretty much done. I've covered everything
I wanted to cover. Please again remember to post your projects in
the projects area, and I look forward to seeing
you in the next class. Bye.
 Chris Heath, The Geometrical Design Guy