Transcripts
1. Introduction: Hi, I'm Catt Small and I'm a product designer. Before I did product design, I was actually a graphic and web designer. At some point I realized that I really wanted to know more about my customers because I would create things for them and then it would turn out that they weren't actually helpful. I would see that in reviews online and I started to feel very frustrated. I started looking into user experience design because I realized that there had to be a way to actually get feedback from people before I was putting my work out there and that's what I do now. I'm a product designer, I do user experience and I focus a lot on balancing the needs of the customers that I have with the needs of the businesses that I'm working for. What I strive to do is create incremental value for my customers and for their end users with the work that I'm actually creating and at the same time, I'm trying to balance the needs of the business and make sure that the things that I'm creating are actually aligned with their brands. Throughout the process of creating the products that I work on these days, I am actually making sure a 100 percent that everything I do is communicating the right thing and that's what I'm going to teach you how to do in this course. What we're going to be doing is learning how to actually design things in a more user-centric way that highlights problems early. Catches the problems that I learned super late before they actually impact the success of your project long-term. What we're going to be doing is making sure that we're building the right things at the right time and that's different than a lot of the way that things used to be. One thing I also want to know is that a lot of people, when they hear the word design, they think of aesthetics, but it's actually a major part of the digital services industry. If you think about Instagram or Facebook or any of these major companies, they're actually using user experience design to understand how their customers think and feel so that they can remove friction that causes people to be frustrated. All of our favorite services actually are relying on designers like myself to make sure that they're doing the right thing to differentiate themselves basically. Instead of making mistakes when it's too late, what they're actually doing is making sure that they fail early, that they fail quickly. They are doing lots of customer research. They're really trying to understand the people that they're designing for so that they can help them. The best way to do that is by having a design team or a team of designers who can help you out. We're going to be doing a lot of what I do on a daily basis throughout this entire class and hopefully you'll learn by the end how to get insights early and then actually focus your energy where it matters most. Whether you're a design professional, someone who's maybe doing graphic design and you're looking to switch into user experience design, or you are already a user experience or a product designer and you're looking to maybe up your product strategy skills, there's going to be something for everyone in this class. This class is going to help you understand how your design skills that you may be have right now can actually serve you a bit better by being a bit more customer centric and really making sure that you're digging into insights early. One other thing that we're going to be thinking a lot about is how the things that you learn in this class can actually apply to collaborations that you do with other people. Because product designers actually also collaborate with a ton of people. We don't just work in a corner. We actually make sure that we're involving people with different skill sets. Everything that I talk about in this class is going to actually be applicable to sessions of learning that you can do with lots of other people. For example, I make sure that I'm involving engineers as often as possible in my work and I also involve my product manager. That's because I want to make sure that I'm getting lots of feedback from a diverse set of individuals, that I includes on the inside of the projects that I'm working on. Not just the research, but also the ideas that I'm getting. I want to make sure that I'm creating lots of cool ideas because hopefully the solutions that we create together will actually be more interesting to our customers. By involving a diverse set of people, even at the beginning, through research, but also through collaboration, you're coming up with lots of more cool ideas. Make sure that as much as you can, you actually involve other people in the work that you do, but you can also totally do the solo. One of the things that we're actually going to be doing is going through this process and you're going to have a project that you do, of course. What we're going to do is create design artifacts, things that will help you understand your customer and actually help inspire you to create solutions that may live and hopefully helps them. Throughout this process, you'll have lots of pieces of paper and like sketches and other things that you're coming up with and I hope that you can actually share and upload some of those things to this site so that we can see them and comment on them. I'd love to see the ideas that you come up with. Make sure that you upload anything that you feel comfortable with and I hope overall that you have fun and learn something in this class. Thank you.
2. User Research: The first step to creating valuable useful design is research. Being user experience designer means that you're advocating for your customers, as I said. That means that before you actually get into a design, you need to understand who it's for. People using the services that we are creating actually have their own goals. You need to make sure that you're understanding the people that you're creating for it because they have their own goals and you're going to need to create something that meets their needs. The nice thing about research is that there are multiple Heinz. For example, you can go look at research that exist out there. Nielsen Norman Group has a ton of user experience research. I've also learned through my time at Etsy that Baymard, has a lot of research that you can actually go off of. In addition to that, you can also look at competitors and see what they're doing really well, what they could be doing better. The best kind of research that we're actually going to talk about today, is the kind that you do for yourself. That's called user research. We're talking specifically about interviews that are usually one-to-one and with one person at a time and usually they're about an hour long. The nice thing is that you start to really gain empathy for the people that you're creating for, even if they're creating something that's more stodgy for like lawyers or something, you actually learn that lawyers are cool interesting people, throughout this process. It'll really make you feel more engaged in the things that you're creating. What you want to do, is you want to make sure that you sit down with people as I said, one-to-one ideally, and you sit down for maybe an hour in total and then you talk to them and just ask them about the things that they do, what their goals are, etc. You want to take as many, many notes as possible because you're going to learn a lot of random stuff and then you'll be able to actually comes through that information later. Maybe you're not working at a company and you have no way to actually reach people. You're probably wondering, well, how do I do this for myself? One thing I found super useful is to, you could go to coffee shops. You could ask family if they know people who fit into your target audience. Or you can actually go to the Internet and we conduct surveys or research that way. For example, you can do something as small as a Twitter poll or you can make a Google form. Either way, what you're really trying to do is get feedback from people in a way that's convenient for them. I do have some tips in case you're curious about the best ways to get the most out of your research. Firstly, you want to make sure that you're really asking them open questions, no, yes, or, no. I'm really just trying to understand that they're like how they think and how they feel. You want to make sure that you're really speaking to them in a way that they can understand and reaching them where they are, not trying to ask things in a way that's confusing for them. Make sure that you're speaking their language and letting them speak to you in a natural way so that they can really get into what you're trying to say to them. Number three, you want to make sure that you avoid asking them leading questions. What that means is, we're all guilty of this thing that's called confirmation bias. That means it's a tendency to actually interpret information based on your existing beliefs. You're job as a designer is to really combat that bias by understanding your customers. This is the whole point behind research. Make sure that you don't ask questions that are influencing their answers. Instead of saying, do you like this thing, try asking them, how do you feel about this? You'll see that the responses that you get are often different from what you expected. Number four, you want to make sure that you consider what's not being said. In addition to preventing yourself from leading people on, you really want to make sure that you're observing body language. If you're doing something online, you observe the sentiment that's being shared through their words. The way that someone's responding to something, whether it's in person or being written down, you can start to understand how they feel and that's what's really important as well. I ask a question about something, I make sure to see if someone like grimaces or has like a surprise look. Then I ask them about that as well. Then number five, the customer's always right. As you can see, we're trying to get feedback from people which you really want to make sure that you're also doing is not putting words into their mouth. Make sure that the feedback that you're getting, that you're letting them say it even if you've heard it a couple of times at this point. Hopefully this can help you get started in your own practice. I would love if you had a couple of a little bit of time on your hand, if you could go out there and try to do some research. It's not required for this class, for the project, but it is really nice when you're designing something, you can actually get feedback from people. But you obviously don't want to get carried away with the research that you do. It's very easily to do dozens and dozens of hours of research because people are so interesting. But, at some point you do have to stop because you need to go on to the next part of the process, which is actually moving from the research into creating a strategy that's centered around the people you're designing for. Let's do that.
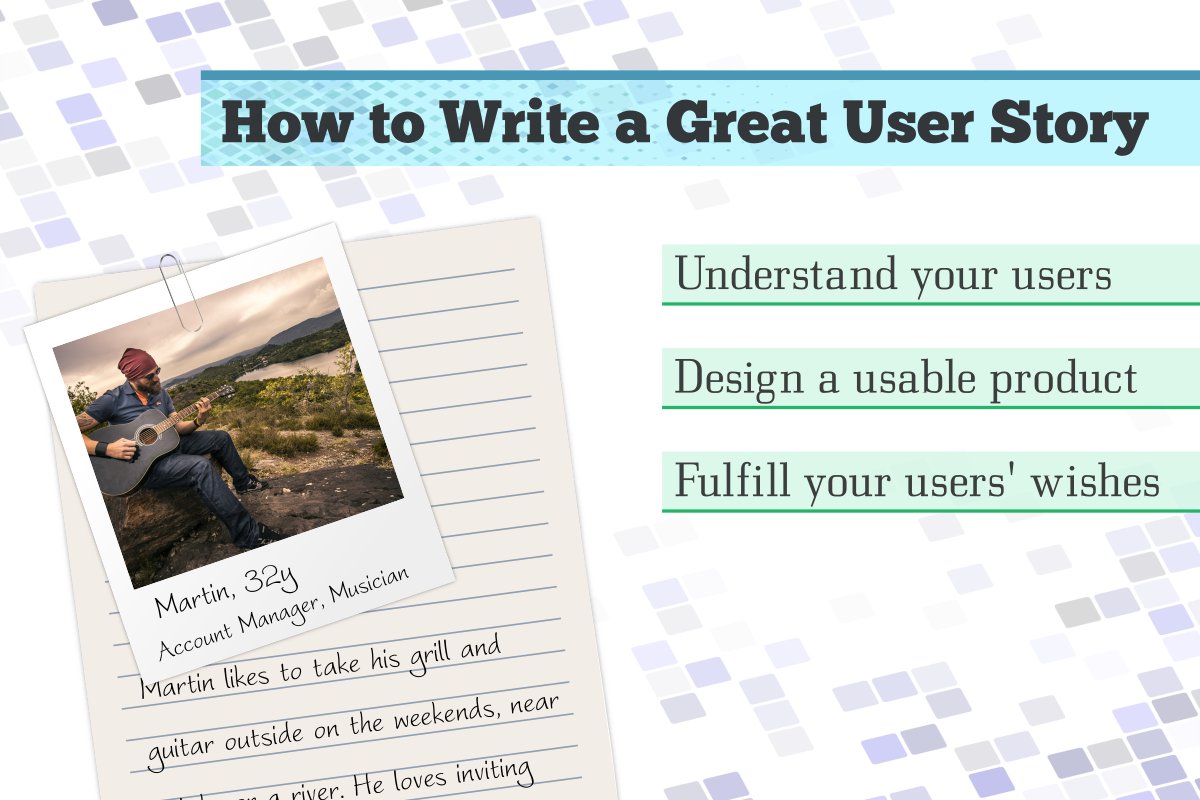
3. Personas and Mapping: Once you've completed user research, it's time to actually start summarizing the information that you've learned into something that you can use. So there are many ways that you can summarize user research, but I found that my favorite is definitely making persona's. That's because it's centered again around human beings. So persona's are models of the people that are going to have the problems that you're going to be solving. So they're not real human beings, but they are common behaviors that are amongst the people in your target audience. So they're based on real people, but they combine those behaviors and those tendencies and those motivations together into one person that you can reference. If you're designing products for a user base that you're not familiar with. Personas are especially crucial because they help you to better empathize with the people that you're creating for. They also help you to come up with better ideas that'll be more likely to actually provide value to them. To make a persona using research, you need to look over all the research that you've done and start summarizing your notes so that you can understand and identify trends amongst the people that you talk to. In this case, I found success using spreadsheets they are really convenient for summarizing data and comparing and contrasting information. But posting notes also work super well for this process. So what you want to do is get all the information that you can kind of merged and start comparing and contrasting. Sometimes you're going to notice that there are several different tendencies across different groups of users. In that case, you're going to need to focus on one or two in total and you may have to also define anti personas, which are people that you're not surveying or not focusing on. You can either use research for persona's or choose to not use research for persona's. In those cases it's called assumption persona's and they're less helpful, but they can still provide value to you in the process of empathizing with people. Regardless of what you choose, you're going to need to create a persona that has a name and it'll have a photo or an image, it can be drawing. You need to have information about their behavioral tendencies, for example, their sentiments, how much they use competitors and you'll also need to have motivations such as their goals, wants, and needs. Once you have that information, what you can start to do is do what's called journey mapping and empathy mapping. So journey mapping is the process of listing out the steps that someone's going to take to actually accomplish a goal that they have and then during those steps, you actually list out the highs and lows in terms of what they're feeling, the experiences that they're having. It'll help you actually notice the opportunities to improve their experience. So for example, if someone writes an email or needs to write an email, then they'll open the mail provider. They'll compose an email. They will type that email and they'll send the email. So during those different steps, you would actually write out what they're feeling and thinking during each step and you can see if there are positive, negative, neutral, and the opportunities to improve. On top of doing journey mapping, I usually really enjoy the process of empathy mapping because it doesn't just highlight what they're thinking and feeling, it also adds in what they're saying and it layers really nicely on top of journey mapping. So in journey mapping, you're pretty much already doing a lot of the process of empathy mapping, but then you really start to dig into how people are feeling more in depth. So you can start writing down their thoughts, those things that they might be saying out loud, their feelings. Both of these things together actually help you to identify major opportunity areas. So things that you can do to actually improve customer's experiences. You can do this whether you're creating a new product or you are improving an existing one. Regardless, you'll have a lot of opportunity areas probably for each step. What you need to do is actually start reviewing those opportunity areas and kind of combing through all of them together. Once you've completed the empathy and journey mapping process, you can start to create what are called user goal statements. So user goals are statements that help designers align their thinking around actual customers motivation. So if I wanted to send an email, for example, when I was a user, that goal might be I want to confidently send the message to my intended audience. When you create user goals, it really, as I said, helps you to make sure that you're designing the right thing for the right people. So definitely make sure that you can create one of those. Y'all, so now it's project time. What I would love to see from you is whether or not you decided to actually do some customer research beforehand or not. I would love it if you could actually make a persona. I linked the template in the project information. So go check that out, see if you can create a persona of your own. Then, I would love for you to, if you have time, go through the process of doing the empathy and journey mapping. But if you don't at least write one user goal for this persona that you have because it'll actually help you during the next stages of the project that you're creating. So upload all of that stuff. Take a picture of your persona, talk about what went into its creation, and then share it with us so that we can actually start to comment on it and see what you've got. I find that personas really benefit from critique. They don't just happen all in one day. They actually take a little bit of back and forth usually between project collaborators. So definitely go through that process. Then in the next lesson I'm going to talk about experience principles which will help you to become an even better, more strategic designer.
4. Experience Principles: At this point, you have thoroughly considered your target users. You know who they are and what motivates them. What we're going to do now is create what are called Experienced principles. Experience principles are user-centered statements that help us to define boundaries for our work. What they do is, they build on our personas by actually narrowing the scope of potential ideas. That therefore helps us to make decision making easier. Each principle actually expresses an idea and those ideas should be communicated through the experience itself. Experience principles are very hard to misinterpret. For example, I made several principles for an event that I'm helping to organize and I'm going to read them out for you. Firstly, clear, not complex. Second is collected, not stressed. The third it is direct, not roundabout. The fourth is radical, not profane. The fifth is positive, not cynical, and the sixth and final is mature, not childish. It's hard to misunderstand these principles, but they're also super flexible so that you can actually make ideas up and not feel too restricted. To create your own experience principles, you're going to need to do a couple of word generation exercises. Firstly, you'll ask yourself what word summarize the experience I'm designing? Secondly, what should people feel while using your product? Finally, what are some antonyms or opposite words that don't describe your product experience? I specifically say antonyms because I really find that having words to contrast actually helps people understand boundaries more. For example, positive not cynical. Those are not exact synonyms and antonyms, but they give you some idea of what you're looking into. I'd love to see you actually do your own word generation exercise. By the end of it, you'll have a bunch of words and you can turn those into about four to six principles using sentences or bullet points. Add the experience principles that you create to your project and describe what led you to pick them based on the persona that you created. We know that we've been focused on strategy for a little bit. What we're going to do in the next lesson is actually go through ways to come up with ideas for designs based on all your strategic thinking.
5. Hypothesis Generation: To recap your progress so far, you've learned about research. You've learned how to turn that research into persona's and experience principles as well. But what do you actually do with that stuff? Well, you actually start coming up with ideas? In an earlier video, I talked about during the mapping and during the journey mapping process, I talked about listing out opportunities to actually improve customer's experiences. The reason it's so crucial to actually think about opportunities is because those are what inspire our design ideas. Hopefully you've gotten the chance to do that for yourself. If you don't, I hope that you'll try it yourself in your own time or with a group. One of my favorite ideation exercises is called an HMW session. During that you actually create what are called HMW's or " how might we" statements. So for example, if you're thinking about the process of improving email, and HMW might be, how might we make senders feel more confident that they're going to reach the right people with their message. HMW should be broad enough to spawn multiple solutions, but they should also be specific enough that the ideas don't get too out of hand. You really want to narrow the scope of ideas down. Ideally, by the end of your process of generating ideas, you'll have at least ten to work on. If you're working with more people then you'll group more ideas by themes. For example I've done ideation with like maybe ten people. While we did have a lot more ideas, they all came around to about the same number of themes. Definitely go through that process. You can do it by yourself. It's better if you do it with more people, as I've said, for all this stuff, once you further explored opportunity areas using HMW's. What I like to do next is actually start generating feature ideas. If HMW's are questions, then feature ideas are the hypotheses that actually might answer them. There's going to be a huge number of ideas by the end of an idea generation sessions. You're going to have to prioritize all of them. You can do that by looking over the research that you've done in the past, the experience principles you created and of course your persona because they are going to really guide you forward. I am a fan, for example, of assessing the priority of everything by using a spreadsheet because I love spreadsheets. What I usually do is put everything down and then I assign numbers for both priority and then is to build. For example, if I've got an idea that's like super hard to build, but high priority then I have to figure out where that fits within everything else. You're going to have to actually start balancing everything out because you don't have endless resources. You really need to make sure that you are creating things that are high priority for people, but also don't take all of your time. Everything else that's lower in priority can actually go in and backlog that you then continue to re-prioritize later. That's how you continuously have that cycle going. Now, that I've showed you a little bit more about how to actually generate ideas. I really want to see you try it for yourself, of course. Based on your user goals, create at least five HMW's, and then generate at least five feature ideas, which are the hypotheses that might answer your HMW's, and then add all of those things to your project and actually discuss how the work that you did before impacted the ideas that you came up with. Now, that we've done this, we're going to be going on to the next part which is sketching. I know that some people are like sketching. What does I mean? This is not going to be about making artistic masterpieces were actually going to be coming up with visual representations of our ideas. They are definitely not going to be pretty.
6. Sketching: While I enjoy all parts of design, my absolute favorite part of the design process is definitely sketching. I love turning my ideas into reality. At this point, we've done a lot of work to get to this point as a designer and our ideas are most likely going to help people fingers crossed. But before we actually go digital and make refined prototypes, we're going to need to make sure that our hypotheses are correct. That is where sketching in low-fidelity, digital or sketching design comes in handy. You can either do wire frames or sketches. I prefer to do stuff on paper. When people hear the word sketching they're either usually like, "Oh my God, I am terrible at art." or they're like, "Let me get my tiny adorable pencils out because I'm going to get so fancy with my art" Honestly, regardless of which of those ideas you're going with, neither of them are exactly how you need to feel in this case. Sketching is not serious art, it's really about getting your ideas out. You only need to actually be able to draw three shapes. Three shapes in total, a circle, a square and a triangle, and honestly I'm a pretty good artists if I do say so myself, but that's not the point of sketching. You really are just going to get a bunch of scribbles out, and so honestly, I usually use a pen because I don't actually care about making mistakes in this case. The point of sketching is to prevent people from getting attached to their work. It's really about throwing out as many ideas as possible. Sketching is usually done as a part of a limited time design exercise. One example of a popular sketching exercise is called Crazy 8s. Usually in that session, people draw eight versions of an idea or eight completely different ideas, and they have eight minutes to do that in total. I personally prefer the less able list, but equally useful design studio, which is very similar in technique, but instead also includes time for critique. For example, you do 10 minutes of sketching, 20 minutes of critique, 10 more minutes of sketching. You really get that feedback in, which is awesome because you want to make sure that you're really sharing ideas with each other. Either way, whichever you decide to do, the core actions that are necessary here are to draw, for a limited amount of time. There are a lot of resources that you can use to make sketching even easier. For example, there are principal templates that prevent you from even needing to fold paper, like you would for Crazy 8s, or drawing the rectangles that are involved. You can print out lots of templates, I've linked some below, and I want to see you actually draw for 10 minutes. Try sketching out, for your own project and take the ideas that you prioritized and sketch at least one example on paper. As a reminder, sketches don't need to look pretty. They need to express an idea that can be tested. I'm going to talk about how to easily test your ideas in the next lesson.
7. Hypothesis Validation: Hypotheses are made to be proven, and similarly, feature ideas have to be validated. In the past, feature ideas for user experiences usually weren't tested until around the time that they were going to be released. That's what we usually call usability testing. Now, product teams also test ideas as soon as they come up with them, so that they can understand if those ideas deserve the investment of time, energy, and money. User research helps them understand how much they should invest in an idea. Unlike the previous research that we've talked about, which is more open-ended, this kind of research is very narrow in scope and is specifically centered around assessing the actual value of each feature idea you've come up with. What you're trying to understand is if it's actually useful for the intended audience, notice that I didn't ask if it was something that they've used or not. Because if your audience finds it useful, they're going to use your product. While ideas were prioritized based on personas and research, as we've already talked about, there are a lot of ways that you can bring an idea to life. Similar to user interviews, hypothesis validation can be done online, it can be done in person. It doesn't really matter which way you do it as long as possible for you. Either way, here are some tips to get the most out of your tests. Firstly, make sure that you actually design your test. Use a discussion guide to write down your questions in advance and describe each idea clearly in a way that makes sense to your audience. Think about what you're hoping to learn from each topic. You don't have to tell this to your users, but at the very least, you want to make sure that you have a clear picture of your goals as the tester. Run through their guide multiple times as well because if you're going to be running this test in person, then you don't want to sound like a scripted robot. You really want to come off as natural. If you're running a survey, then you need to make sure that you are catching mistakes in advance, because you're not going to be there to actually provide further guidance for your testers. Secondly, keep it brief. You should take less than 20 minutes in total to validate your ideas in person, and less than 10 minutes online. You're not actually doing any in-depth testing at this point, so you really want to make sure that you move through quickly. You don't need a lot of time to actually get feedback. Number 3, remember your basics. No binary or leading questions and remember to read between the lines when you're getting feedback so that you can ask follow-up questions if you have them. For example, notice their body language and see if you need to follow up on that. Of course, as I said, communicate in a way that really is catered to your audience because they may be confused if you use words that are not familiar to them. If you'd like to try this out for yourself, try running 20-minute tests with five users and let them rate each of your ideas from 1, which is least useful, to 5 which is most useful. Constructive criticism can be hard to get used to, but it's not impossible. It's important to become better at receiving it. You don't want to become discouraged or defensive, but really instead, reflect on the criticism that you receive because that is what grows you as a designer. It's also incredibly valuable for the next step, which we're going to be doing, which is high-fidelity designing and prototyping.
8. Prototyping: Congratulations, you're at the prototyping part of the process, which means you've refined your ideas and you know that your work is going to be valuable. Now you can concentrate on making your ideas look beautiful and feel good. Turning your sketches into mock-ups, also known as high-fidelity designs, is a process that requires a lot of time as much or maybe even more than the previous steps combined. If you're transitioning from graphic design to product design, then this is going to be the point at which your skill set really shines because it's all about the visual and all about the feeling that people get from what they're seeing on screen. Most companies, when you get to the stage, will actually give you a color palette and instead of fonts to work with. But if you're making your own project then this is the point at which you're going to need to turn the experienced principles that you created a while ago into colors and topography. At this point, you're going to be considering how colors can actually help communicate your projects, the message that it has. So you're going to be thinking about, should I use blue, for example, to convey things like safety? Or should I use orange to convey energy? Should I use red, because in some cultures, red means money and luck? If you do decide to use red, use it sparingly because it does in some cultures also represented danger. But overall, the audience that you have, is going to affect the color choices that you make. There are many resources available for generating color palettes and picking fonts as well. One of my favorites is definitely Adobe Kuler which lets you pick complimentary colors, it helps you generate pallets, it's super awesome and useful and free. For fonts, you can use something like Adobe Typekit, which is a paid service that is available with their subscription. But you can also use things like Google fonts, which is free and has a lot of fonts that you should pick from. Usually as a note two fonts are enough, you want to use maybe a San serif and a serif together, those usually work very well, but you can also go wild with it and see what it's like. In addition to high fidelity designs, benefiting from fonts and colors, you're also going to need to create a design system which is a predefined kit of parts, that is very helpful for quickly creating user experiences. What that means is that you have a bunch of elements that you've designed already and then you can drag and drop them or copy and paste them from the main page to actually all of the designs that you're creating. Usually design systems are a big hit within companies, but they're also very useful for smaller projects because the more work you do up front, the easier it is later on when you realize that you have a lot of files to work from. Many companies don't have design systems, but several do. For example, when I worked at Etsy and SoundCloud, they both had design systems that I could use, but some companies don't have them, so you may have to actually make your own. How I do that is firstly, I look through all of my sketches, I see which elements are repeated constantly and then I go into my favorite design program and I start making High Fidelity versions of those patterns. Then once I've got everything on either a single art board or a page with a bunch of art boards, then I go through and actually start making the high-fidelity versions of my sketches and as I'm doing those designs, I see if there are any other elements that popup that need to be copied back over to the design system master file. Once you've actually started doing your mock-ups and you feel like you're at a good place with those, what you want to do next is actually turn those into prototypes. You're going need to make sure that you consider all of the in-between states that maybe weren't immediately obvious through your sketches. For example, if you're making a form, then you need to not just have the actual static form, but also what happens when someone clicks into a form field or what happens when someone's password, if you're making a password form or a new user form is not correct. Think about how the system is going to react in most if not all cases, because as a designer that is your responsibility. Once you've created all of the mock-ups that you need for a prototype, you can start stringing those together in your favorite prototyping tool and make sure that you use animation when you're transitioning between screens so that things don't feel static. If you do use animation, this is also going to be an area in which you're experienced principles can shine because you want to make sure that your animations don't feel out of place. If you had fun sketching and you want to turn your work into high-fidelity prototypes, then I'd love to see what you've come up with. Definitely, turn the highest rated sketch if you did some research and testing into a visual design, including a mock-up for each step of the process, so make sure you cover the transitions as well. Then using your favorite prototyping program, for example, Adobe XD, or there are many other ones out there to, string the mock-ups together to create a clickable prototype. You can then share as much as you feel comfortable with on your project so that other people can see what you've done and constructively critique your work. In the next lesson, we're actually going to talk about how usability feedback makes your designs even better.
9. Usability Testing: At this point, you're almost done learning about the entire user-centered product design process. You now know that the process is not complete without another round of testing, so, of course, we're going to do more research. This research is very different from the previous two types of research that I've talked about. Unlike interviews, this research is focused and goal-oriented, and unlike hypothesis validation, this is all about the look and feel of the experience. When you're conducting what we're calling usability tests in this case, you're asking, is my design working the way that it should? Your focus on communicating ideas and really understanding if people are finding the things in the places that they expect them to be. If ideas are successful, then you'll know that you've put things in the right place. Usually, users are assigned tasks related to your designs during a usability test, and if they can complete the assigned task, then the designs are successful. If they find things on the places where they're supposed to be, the design is working. If they don't, then the designs need to be redesigned, evaluated again, and tested further. As many times as possible. Watching people use your product idea as many times as possible can make your product idea as valuable as possible. So make sure you test as much as you can. Very much like the previous forms of research, you can also do these IRL or you can do them on the internet. It doesn't really matter which way you do them as long as you do them. There are a lot of resources that you can use for online testing. I've listed a couple below and similar to previous research, usability tests very strongly benefit from a discussion guide. Make sure that you are really planning out your test in advance and making sure that you also ask open-ended questions. Also, make sure that you note that the main difference was usability tests is that participants should be told to think out loud, so make sure that you tell them in advance, hey, you're going to be seeing a lot of interesting things. Definitely, say everything that you see out loud because people won't say things sometimes without prompting. While you can endlessly test these things with as many people as possible, you really only need five participants to find out the major usability issues. After that, you're going to hear a lot of overlap. But you may also learn some interesting, very niche problems. Make sure to test as many of your designs as you can before you actually put them out into the world, because the more feedback you get, the more valuable your work is going to become. Great designers accept discomfort because they are in search of the greater reward which is helping people. That means getting out of your comfort zone and asking people questions that maybe are hard to hear the answers too. If you are feeling super extra hyper ambitious, I would love to see you conduct some usability tests of your own. So have five people play with your prototype and give you feedback, and then share your test results here in your project. Tell us what worked well and what do we have to work on more. Talk about what surprised you, because I'm sure something definitely that you thought was going to work maybe didn't work so well or something that you weren't sure about was actually surprisingly good or even something completely different from that. Participants regularly surprise me and I love testing because I learned so much about other people.
10. Conclusion: You know what that means? You're finished with the class. Maybe you didn't actually know what that means, but that's how I end things. So congratulations, you did it. You've learned how to conduct customer research, start a customer specific product strategy using personas and journey maps. You've created experienced principles. You've generated sketches and validated future ideas, aka hypotheses. You've marked up prototype and usability, tested the validate solutions. Hopefully this has been a lot of new content and really interesting stuff for you. This process should neatly fit into Agile product development processes because after all, you're going to be working with a team of people. You're really going to need to make sure that you as a designer you're integrated into how they're working. What happens after this is you actually go back to ideating, validating hypotheses constantly, because the cycle actually never ends in product designing. Your goal is going to become getting enough feedback to figure out what your next focus is. You're going to understand your priorities so that you can figure out when and how to make updates, and the only way you can do that is by getting feedback from people. So your goal is to not just concentrate on the backlog by the way, it's really to make sure that you are both balancing maintenance and improvements to what exists with the new feature ideas that you come up with. There are lots of ways that you can get post-launch feedback. For example, surveys are very quick and easy way to get user feedback, and you can use that feedback to inspire your research to adjust the personas because sometimes you figured out some new stuff, and it'll also help you add new hypotheses to the backlog and then also go through and re-prioritized things. You're going to need to make sure that you are constantly checking to see if you're working on the right thing at the right time, because sometimes customer feedback comes in and says that you need to do something else. I've left a lot of resources in the class description. Definitely check those out and also please show me your homework. I really want to see what you've come up with. I want to make sure that you find this stuff useful. Definitely also add a review. Please give me feedback. I'd really want to hear it because this is my first Skillshare class. Thank you for having me and I wish you luck out there designed patron's. Thank you so much and enjoy. I hope you really grow from your design process and have fun with it.
 Catt Small, Senior Product Designer