Transcripts
1. Course Intro: Welcome to the world of
stop-motion animation, where all you need
is your imagination, a cell phone, a free app, and some way to keep
your phone stable, which we'll cover
in this course. My name is Lucas Ridley. I've been a professional
animator for over ten years using stop motion for toy companies and even dog food companies, you can really animate anything you can find
around your house. That's what we'll
do in this course. You don't need any
special skills. You don't need any
special equipment other than your phone
and this free app. And we can get started
together learning about the animation principles and
using stop-motion to do it. So I hope you're excited to start learning stop-motion
animation with me. Whether you want to animate
your toys around your house, some food in your refrigerator, or make the next viral video, stop motion is right for you and it's fun to
do right at home. Just everything you can
find around the house. Thanks for watching and I look forward to seeing
you in the course.
2. What Is Stop Motion?: What is stop-motion animation? In it's simplest form. It's taking one picture
after another of a subject that we move
in-between each picture. So it appears that
the subject is alive. It's kind of like being
a mad scientist in a lab where we're breathing life
into inanimate objects. And we're making
them appear alive. Kind of like a magic trick. Stop-motion animation is one of the earliest forms of animation. It was used in older
films where they couldn't create
computer-generated graphics yet. And so they had to create actual physical
models and move them frame-by-frame and picture by picture to make it appear alive. But stop-motion
animation isn't just known for its history
in animation. It's also used in many viral videos because its effects are
always appealing to our eye because it's creating this magical motion
that we don't expect. Take this example of a simple piece of fruit
just being sliced up very thinly and each image shows a slice being taken away. It's very mesmerizing
to watch and it gets many views on social media
creating a viral sensation. So when you do stop
motion animation, you're not just an animator, you're a director, you're
a cinematographer. You're the writer or the actor, You are the animator. And you do all of these things
as a stop-motion animator. The great thing
is you don't need any fancy equipment
to get started. All you need is your phone, which has a camera on it. And the best camera you have is the one you have with you, which is usually your phone. And you don't need any of these fancy models
to get started. You can create
animation just from inanimate objects that are
lying around your house, like coins, or even go outside and find some
rocks like we're gonna do. So finally, let's take a look at three different
examples of animation. And let's see if
you can pick out which one is stop
motion animation based on what you've
now learned about what it takes to create
stop-motion animation. So let's look at example a. Now let's look at
Example B. Example C. Now, which one of these
is stop motion animation? Think about the principle of stop motion
animation is you take an image and you move the object in-between
the next image, you're going to take a new, compile all those images
together to make a video. And it makes it look like
that object is moving. Which one of these is
stop motion animation? A, B, or C. Go ahead and grab your phone
right now, pause the video, take an image of
the answer a, B, or C, and then upload it to the challenge so that I can
see what your answer is. If you answered C, you
answered correctly. That is stop motion animation. A is computer-generated
animation, and B is 2D animation
created through drawings. Thanks for watching this lesson. Hopefully now you
know what stop-motion animation is and how it's made. So in the next lesson, we're going to download the
app to our phone that we need to create the
stop motion animation. It's a free app. So go ahead and
grab your phone so you can download
the next lesson. And then the one after that, we'll go ahead and start making your own animations right at
home. Thanks for watching.
3. Getting Started: So now we're ready to
download the app and install it on our
phone or our tablet. So I'm going to grab my
tablet and get started. So you can do this on your
phone or your tablet. And I'm gonna do it on the
tablet just because it's a bigger screen for you to see. So I'm going to go down to the search icon
and then type in. Stop Motion. Studio is one of the
first options here, Stop Motion Studio
is the app we want, and it's right here, Stop
Motion Studio, and it's free. There's also a paid version, but in this course we're gonna
be using the free version. So I'm gonna hit Open. And
now I have the interface. So this is a pretty
straightforward interface. If we want to create
our first project, all we have to do is click
the plus icon on new movie. I'm going to tap that right now and it's going to
open up a new project. Now it has access to the camera. You may get a notification
to allow that access. Just hit Okay. So that it can use the camera on your tablet or your phone. So what we're looking at is
essentially on the bottom, we have our timeline. And there's only a one out of one because we haven't
taken any pictures yet. The button on the right
side is the record button. So if we just tap that one
time, it'll take an image. And now you can see the
timeline at the bottom has now gone to the second frame. So every time we take an image, it's going to add
it to the timeline. And that is how we
can create the stop motion animation
by simply moving whatever the subject is in our frame every time
we take an image. So I can just hold my
hand here, for example. I can just slide it down every
time I take an image and then I can hit Play that is right below the
Record button here. And you can see that I have made my first little stop
motion animation. Well, we're gonna
make is also going to be a little more
involved than that, but that's how the
features of this work. Now one of the very
useful features is what's called an onion skin. Onion skin means it shows the layers of photos
you've taken. So what we can do on the left
side of the screen is slide down this slider so that we can see the last
image we took. And if I wanted to add
another image here, I could put my hand right
back there and have another image with a reference
of my previous photo. I can tell where I'm coming from every time I take an image, this feature is
incredibly useful and you're going to want to turn
that on and use the slider, you can turn it all the
way on or all the way off. I like to keep it on about halfway because that
way you can see the current image
you're working on and the previous image you took. So you can see where you came from and where
you're going. So those are the most
basic features of the app to get up and
running right now. For this challenge,
I want to see you just animate your
hand in front of your phone just to show that you can operate the app and
upload your challenge. Now if I wanted to delete this because it was just a test, all I have to do is go back, which is this little button
down here at the bottom left. And it'll take me
back to the projects. Now, all I have to do is press and hold on this and I
get all of these options. And one of them at the very bottom allows me to delete it, which I'm gonna do because
we were just doing a test. So I'm going to click Delete
and it will get rid of that project and confirm
that I want to delete it. Thanks for watching this lesson. Now you know how to
download the app, create your first project, and create your first animation, as well as the most
important feature we've just discovered
is the onion skin, so we can see where we came
from and where we're going. Thanks for watching and I'll see you in the next
lesson where we're going to create our first
animation together.
4. Our First Animation: Welcome to this lesson
where we're going to create our first
animation together. So what we're going
to need is of course our phone or a tablet which
now has the app on it. And we need to go and find
something to animate. In this animation, what I
would like to do is to create little pieces of something that combined together into a
larger version of itself. So in this example, I think coins could be useful where smaller
denomination coins, like pennies, could combine into
something like a quarter. Or you could go outside
like I did and go and find tiny little rocks that could
combine into a bigger rock. And so we're going
to animate these in a way that makes it look
like it's a magic trick. Basically, we are combining these little pieces into the
larger version of itself. And of course, you could
use something like food, even like an almond or a peanut. And as long as you
have two of them, you could break one down into tiny pieces of itself and then keep one hole so that you can use that to
replace at the end. I'll show you how to
do all this right now. So first we need to find
somewhere to set up our camera. And the easiest way to do it
is to film it on the ground. So all the animation is going
to take place on the floor. So our camera needs to be
pointing down on the floor. And the easiest way
to do that is to be pointing your camera down on the floor by holding it over the edge of a
desk or a table. Now, in this example, you can see that the desk is
actually still in the frame. So I want to move
somewhere else so that I don't get the desk
in the frame as well. I only want to be seeing
the floor down below. You can also use something
like a bench or even open up a kitchen cabinet that's near the floor and use one
of the lower shelves. Now if you need to secure
your phone or tablet, you can also use some tape to secure it to make sure it
doesn't tip over the edge. To make mine look a
little bit more colorful, I'm going to take some
colored construction paper and use that as my background. Now as you can
see, the benches a little too far away
from the floor. And so I had to
use some boxes to stack on top of each other to bring our subject closer to the camera to fill
the entire frame. Now, the other thing
that's important here is I needed to tape down the construction paper because I didn't want it to be sliding around as I'm moving
the rocks around. So I want to make sure
it's all stable before I begin by taping down
the paper to the boxes, now that our camera is taped down and the construction
paper is taped down, we can begin animating. So the first thing
we wanna do is arrange them in a circle. We'll take the small pieces and arrange those in a circle. We'll use the whole
piece later on. So keep that out
of frame for now. We're going to
arrange them all in a circle and then
take a picture. And we're gonna take
a couple of pictures because sometimes it takes a moment for the viewer to
see what they're viewing. And we want to give
them a few frames of nothing happening yet. So take four images of nothing changing
between each frame. Make sure you have
onion skin enabled by sliding the slider down halfway. Now, slowly move each piece a little bit away
from the center. Now take an image. Let's do this at least
four more times. So the little pieces are
getting further and further away from the center
just by a little bit. So once we've taken at least
four images like this, we want to start going back in the other direction and
go towards the center. And so we're going to create at least four images
of this happening. So it will appear that
they're going faster inward than they had
just gone outward. So let's go really fast in. And the way to make it look
fast is to have fewer images. So we're going to use
the same amount of frames to cover a
larger distance. So as the small pieces
approach the center, we want to remove them from the frame and replace them with the one single piece that would be the center of
where that circle is. So it's easier to replace
it in the center first, before we remove
the small pieces, we make sure that we're putting
it in the center of where those small pieces we're headed that direction
they were headed into. So now when we swap it
out over this one frame, it's going to look like that. These small pieces
all combined to join and create this one piece
and to sell this idea, what we could do is take an extra couple of photos
after we've replaced it with either the large coin or the rock or whatever
you've chosen. And with that one
single piece now, we can actually just
shake it a little bit between each
frame and slowly shake it less and
less to make it feel like it combined
very quickly. And now it's settling
and coming to a stop. Once we finished with that, we also want to take a couple
of still photos so that our eyes have a moment to rest at the end
of the animation. Now to play back our movie, we can tap on the
little left arrow with the line and it will jump to the first frame
of our animation. And we can press play to
watch it in its entirety. If it's playing back to slowly, you can click this little icon here to change the frame rate. And choosing a higher frame rate will make it playback faster. If you want to loop
the animation, all you have to do is
tap on the last frame. And it will bring up a menu
or we can choose, Select, then swipe to select all of
the images in our timeline, tap one more time to get
to copy and then go to the very end of the timeline by swiping and then tap again, and we can paste all of
those frames in there. Now we want to select again from that moment where we pasted and we want to select all of those frames that
we just paste it in. So from that point
towards the end, and then we can tap one more
time to select reverse. And now we've created
a looping animation. So we've copied the entire
animation to the end, and we've reversed it so that
it will loop seamlessly. If we like what we
see and we want to export it as its own movie, we can jump back to the menu and then tap and
hold on our project until we get the menu that pops up that says Export
Movie at the top. Now we can export the
movie and then save it as a video to our photo library. So I'm going to
click Save Video, and now we have it in
our photo library. I hope you've enjoyed
this first animation. Now, the rest of
the course is gonna be about learning
how we can make something like this look even
better in all the tips and tricks to take you to the next level as a
stop-motion animator. Thanks for watching.
5. The Camera: Welcome to this lesson
where we're going to learn all about the camera and going deeper in the app to understand advanced
features related to the camera so that we
can make our stop motion animations that much
more appealing. So let's jump into the app and
get into a project so that we can access the advanced
features in the camera. So I'm going to tap on the three lines down here on the bottom right of the view. And by tapping that, I get to access the camera
features and settings. Now I can choose the
front or rear camera. What we're most
interested in is going to the m, which means mode. And the mode that we
want to use is manual. We don't want the
camera deciding for us all the settings that it's
going to use for each image. And it changes those
settings between each image, which can create
some flickering, which means the
color could change the image or the
brightness of the image. And if that's
happening, every image, it can appear like
it's flickering. So what we can do is hit
the button over here. And now we have manual exposure, so we can tap on the a and W, and that means auto white
balance or white balance. What we wanna do is
choose our white balance. White balance
basically means, is, is this a cool temperature
or a warm temperature? And that warm and
cool is related to the color orange
and the color blue. So we can cycle through all
of these white balances and decide which one
looks the most natural. Now, I think I'm going to choose this one here,
which is Sunrise. Now that we've chosen it, it will be set for every picture that we take
now and this project. Now the other thing that can
happen is you get flickering because of the frequency
of the lights. Now, the human eye isn't good enough to see the
flickering that's occurring. But sometimes when
you take pictures on your camera at the
wrong shutter speed, it can pick up the flickering
that's actually occurring in lights around you that
the human eye can't see. For example, here's a
still image of a light, and here is what that
light looks like. Through the app. If we choose the
wrong shutter speed, you can see the
obvious flickering happening that isn't
visible to our eye, but visible to the camera if we choose the
wrong shutter speed. So if we jump over to
the shutter speed, which is this circle
looking icon here, we can see that
it's right now set to 1 100th of a second. So that means it
will open and close the shutter and 1
100th of a second, which is very fast. And what you can do before
you even start creating your own work is actually
test out the shutter speed. So I could take a
bunch of images here. So I'll hit Done and come
back to the project. And I can take several
images here of just this object and then play them back to see
if it's flickering. So I'll jump to the
beginning by hitting the left arrow here and
then I'll hit Play. I can see right now
it looks like none of the lights in the scene are
causing this to flicker. If they had, I would jump
back into the settings here, and I'd go to the shutter speed and I would play
with these settings. And you can see as I
roll the shutter speed, There's some flickering
happening on my screen already. So if I jumped a
150th of a second, I can see there's no
flickering there. But if I'm on 160th, you can see there's
already flickering in the image without even
taking a picture. So we know this is
going to be trouble. So I can jump over to 150th and we can see
that it stopped. So that's the
importance of setting your shutter speed
manually so we can control for the flickering
of the brightness of the lights that we have in the room that we're
shooting him. Now in this image
we can see because we changed it to 150th, it actually made the
image a lot brighter. So if we want to
compensate for that, we can actually jump over
to the ISO settings. And that basically
just means how sensitive the
sensor is to light. And it seems very sensitive to light right now because the image is so bright, we can actually turn down the ISO so the image
is not so bright. So if you were to adjust
your shutter speed, you may need to go in and also adjust your ISO to compensate for how bright the image is to get it back
into normal range, we can also choose
the focus distance. And you'd wanna do this
if in-between each image, your cameras having a hard time deciding what to keep in focus. And if we want to keep
this same thing and focus through each image, we can set the focus
distance by clicking this little icon here and
then choosing what we want to focus on in
our image so that it doesn't change
between each image and it stays consistent. So those are the most
important manual settings for our camera and the app
that we want to make sure that we're taking control
of so that we can create the highest quality image
verse stop motion animation. Thanks for watching, and I'll
see you in the next lesson.
6. Tripod Setups: Welcome to this lesson. Now, the next most
important thing besides the camera
is your tripod or however you're
setting up to shoot your stop-motion
animation images. Because stability is the
key and we want to make sure that our camera isn't moving when we don't want it to. So we have many different
options to choose from. And a lot of them you can use just with what you
find around the house. When we're choosing to
shoot our animation, we basically have two options. One, we've already discovered which is shooting straight down, the other is shooting
straight ahead. So we can create different
setups to accommodate those two different
scenarios that are the most common and filming and shooting
stop-motion animation. Let's take a look at some of
the options available to us, like a traditional tripod. Now let's tripod is
great because you can adjust the legs and go
to different heights. You can also shoot sideways, but it's difficult
to shoot straight down with just a
traditional tripod. However, you can
use the struts in the center of a tripod to balance your phone and
shoot straight down. This is a great way to
be able to move around and not be constrained by
the edge of a desk or bench, like we saw in the
first animation we made together with
the coins and rocks. There's also a bendy
version of this tripod, which is called a gorilla pod. And it goes by some other names, but essentially has legs. You can adjust and bend to grab onto different objects
like the limit of a tree, or you can manipulate
them so that you can get into unusual places. Something you might be able
to find around the house, or some small potato chip clips so that you can actually clip the side of your
phone and then use that to stabilize the camera. If you're using a
tablet for your camera, you might have a case that already acts as a stand as well. Now we've already
covered one method in our first animation
of shooting straight down by going to the edge of a desk or a bench or a chair, and using the edge to lay down the phone or the tablet
and scooter to the edge of the support so it can look over the edge and down
onto the ground. It's also important
to know that we may have to tape this down. It's always good to use
tape that doesn't damage the furniture or whatever
you're taping down to. I like to use what's called masking tape or painter's tape. It kind of feels
like a fabric and it doesn't damage
paint or furniture. Now something that we can
make together and you could make it home with
just a few Lego blocks, is a camera stand like
this for your phone. So what I like to do is create a couple of towers
of blocks like this. And then I can place those
at the edge of a plate. And then I can take this red
brick here and use it to stop the phone from sliding backwards once it's
placed onto the stand. So I can use it vertically
and pointing the camera down. Or I can turn it horizontally
and place it this way. Now if it's pointing
to far down, what I can do is actually
move this red brick closer to the tower so that the
phone points more forward. So now it's not
pointing down so much. I can also use this in the
vertical orientation as well. So that's a simple camera stand you can actually make
with a few legos. Now that we've looked at a few examples of
what works well, let's take a look at something
that doesn't work well. So I have this bendy
arm that clamps to a table and at the end
is a clamp for the phone. We can attach our phone here, but you can already imagine how difficult it is to
keep this stable, which is the big important
thing about using a tripod or however you set
up your camera to shoot your
stop-motion animation. So every time that
I touch the phone, you can see that it's wobbling and that makes it very unstable. So this is not a good
example of how you would want to set up a stop
motion animation camera, Bu, because it's moving every time I touch it
to take a picture. For this lesson's challenge, I want you to take at
least 20 photographs from your camera
that's set up to be stable so that you can
demonstrate that your camera is stable every time that you
touch it, It's not moving. So by taking at least
20 photographs, you can demonstrate in a movie
that your camera and never moved when you touched it
20 times to take a picture. So that's what I
would like to see. A video of your
camera not moving. It might not look very exciting, but we'll demonstrate that
your camera stable and it's ready to perform some
stop motion animation. Thanks for watching this lesson. And let's finish with
the dynode telling us what's the most important
thing for our camera setup. That's right, stability. Thanks for watching. I'll see you in the next lesson.
7. Lighting: Lighting is
incredibly important. Hang on 1 second. Like I was saying, lighting
is incredibly important. Lighting is how we see
what's in the frame. Without lighting, we wouldn't
be able to see what we're animating and the audience wouldn't be able
to see it either. So it's incredibly important to consider how your lighting your scene so that you can most effectively convey what the
action is and the mood. So typically, I like to have
more light than I think I need because it's
easier to take it away then to continually add it. And so you can actually block
light out either through blinds or from a cardboard box. You could take a piece of
cardboard and block sunlight, like I've done actually
with this light in the back here because
it's too bright. So you can actually take away light by blocking it
from the scene as well. One quality of light
that's important to understand is whether
it's hard or soft light. Hard light creates hard shadows, which means the shadow
has a sharp edge to it. And soft light creates a nice soft edged shadow
around the subject. Now whether it's
hard or soft light, that depends on the source. Whether or not you're
getting direct light from a light bulb or the sun. And whether or not it's
getting diffused through clouds or a diffusion
that you put up yourself. Now, common diffusions that
you can find around the house or something like a plastic
bag or a bed sheet, or even some baking sheet. You can roll out like
parchment paper. And you can take these
things and you can put them over direct
sources of light, like lamps that don't
have a lamp shade. And you can create a
diffusion so that it spreads the light out and that
creates a softer light. Now another way to
get soft shadows and have soft light is actually bounced a direct light off of a wall or a piece of cardboard. And it can actually affect
that quality of light by what the color of what
you're bouncing off of is. If you want to change the color
of light from the bounce, you can put up some colored
construction paper and it can affect the bounce light
that's coming off of it. And it makes it more
soft because it's diffusing that direct light
over a larger surface. Now the other
advantage of having more light in your scene is that you've reduced
the chance of having noise in your image. Noise in an image
comes about when you don't have enough
light in your scene. And it's going to be most
noticeable in the shadows. When you don't
have enough light, there's more shadows and there's slight color variations
and each pixel between each frame that
creates this kind of jittering color effect that we don't ideally want in our scene. So the remedy for that is to increase the amount of light. The other thing we
could look at is the color temperature of the bulbs that are
illuminating your scene. You can have warm or cool
temperature light bulbs. And you have a third factor which we've already looked at, which is the camera
white balance. And so you can
create contrast in your image with a warm
color and a cool color, even like you see on
my hair right here, there's a cool color here, but there's a warmer
color in the background. And that's intentional
because it creates some visual interests to have some slight
color variations. So be aware of the
color temperature in the light bulbs
that you're using. Now, one other consideration in regards to bounce
light as the fact that the light can bounce off of you and onto your
stop-motion animation. And that's why I like to wear a dark colored shirt
so that the light won't bounce off of me and
then onto the stop motion, which depending on my
distance to the stop motion, every time I take a frame, it could actually create
some more Flickr, meaning a brightness and
darkness and our brightness and darkness between
each image now, but wearing a darker
colored shirt, it won't actually
reflect much off of it because there's
nothing to reflect. It's a dark color. If I was wearing white, then it would actually be
emitting a bounce light off of me from the
current lights in the scene and onto the desk. So if I was doing stop
motion animation right here, you might actually get some
bounce light off of me. And that's something
to avoid because you can actually change the
distance to your subject. And that could create flickering when you're shooting your
stop-motion animation. So it's a good idea to
wear something dark. One thing to look out for
with the lights here using, is to try to avoid using direct light from
a window because that light can quickly
change over a period of time as the sun
moves through the sky, or clouds, block the sunlight. And if you get that
in your image, in your stop-motion animation, that can also create
flickering because there'll, there'll be a change
of brightness every time a cloud gets
in front of the sun. And then the next image,
the clouds can be gone. And then that image
is bright and then the clouds come back in,
the image is dark again. So we want to avoid using Windows when we do
stop motion animation. Use lights that have a
consistent intensity that we can control. So we want to choose a
consistent source of light, which are light bulbs and things that we can find indoors. And we want to close the window shades
wherever possible so that we can reduce the amount of light changing over time. As we create our
stop-motion animation, we want the light
to be consistent so we can avoid that kind of flickering or darkening as we go through the stop
motion animation. Now we've already touched
on this advanced topic about shutter speed in
the camera settings. But it's worth
mentioning again that depending on the light
bulb that you're using, it could create a jittering and frequency effect in
the image itself. And so it's good to choose
a shutter speed that works with the light
bulbs that you have. And you can simply
test that out by changing the shutter speed
and seeing whether it's flickering and where
there's not an stay on a shutter speed setting
where there is no flickering. One other way to change
the color of light is to purchase some gels. These are colored
gels and you can place them in front of
your light source and it will change the color of the light itself emitting
on your subject. This is a great way to
add additional mood and visual interest to your
stop motion animations. One of the most common
lighting techniques is called the three-point
lighting system. I'm actually using it in
this scene right here. So I have my key light, which is the brightest light
in the scene on my face. And then I have a
fill light over here which is a bit softer. And then I have a
rim light behind me, which is the blue light
on the back of my head to kinda help separate my
head from the background. So that's one technique you can use to light your subjects. It's also worth noting that when you're
lighting your subjects, don't ignore your background
in the environment. When you're shooting
small miniatures, you can actually
grab an LED strip to fit lights into small spaces. The effect of a
background light can even be seen in this scene right now. This is a background
light that helps create and frame the
plant behind me. If I were to turn
that light off, you can't really see the
silhouette of the leaves anymore and it creates this
dark spot in the frame. So it's always good to
take into consideration the lighting of the environment
as well as your subject. So the challenge
for this lesson is not to make an animation, is to create two
different images. One I'd like to see a
warm and happy image, and then the second one, a cool and sad or
even scary image. You can shoot the same
subject and create two different moods just
by changing the lighting. So I'd love to see the
two different moods you create with the new knowledge
you have about lighting. Thanks for watching this lesson.
8. Composition: Welcome to this lesson. Besides the lighting, another
element that we can take into consideration
is composition, and that will help us improve our shots when we
do it deliberately. And by composition, I mean the arrangement of
elements in the frame. And the frame, like
what you're watching is this rectangle right here. So how are these
elements arranged? And there's some
considerations we can make and rules that we can use and also a
break to our advantage. One of the most common rules of composition is called
the rule of thirds. And that's where the
frame is divided up into three equal rectangles. And I'm currently sitting in
one of those rule of thirds. And so what it helps to do is offset everything
from being very symmetrical and the
frame and helps weight one side of the
image or the other. And you can do that vertically
as well as horizontally. So sometimes it's useful to use the rule of thirds in case you're not sure about where to place your
subject in the frame. Now, breaking this rule, you could use symmetry
on the other hand, and place it directly
in the center. When I'm shooting top-down, I tend to shoot things
right in the center of frame and create the frame and composition to be symmetrical. That's breaking the
rule of thirds. Now besides using the
rule of thirds or symmetry to determine where we're going to place our
subject in the frame. We can also use
the horizon line. The horizon line is basically the imaginary line of where the horizon would be
if we can't see it. And it's basically
where the sun sets and whenever you've seen the
sunset, That's the horizon. And so we can use this
and where we place it in the scene to create
a different feeling. Whether we're shooting
high up and pointing down or were shooting from a
low angle and pointing up. So I'm going to use that in my example this week
for this challenge. One other consideration
when you're creating your composition
is the foreground, the mid ground, and
the background. And that basically
just refers to objects relative to the
distance of the camera. So where they're placed as
it close to the camera, is it a middle distance
to the camera, or is it far away and
in the background? So we can use these
three kind of general planes away
from the camera to place varying objects to create visual depth in the image and create an
interesting composition. Finally, something
else that's useful to consider is varying your shots. So if we're having multiple shots stacked
one after the other, we should probably be varying up the types of shots
that there are. So the three most common
types are a wide shot, a medium shot, and a close-up. Wide shots get more in-frame
and typically involve shooting the entire body of the subject from the
feet to the head. A medium shot actually
crops off part of the body, typically around the legs. And so we're only seeing
the torso and the head. Close-ups typically shoot from about the shoulder
height up to the head. And sometimes if you're
shooting on a macro level, which means small objects, if you're filming and
shooting small objects, sometimes you can't get the
camera close enough because it can't focus on objects that are very
close to the lens. So if you find that limitation and the camera won't focus on your subject because it's so small and it's so
close to the lens, what you can do is
actually backoff the camera and then use
the zoom feature to zoom in and crop out the character in a way that
creates a close-up shot. We also have these wide medium and close-up shots that we can use as tools in our tool belt to create interesting
compositions. For this lesson's challenge, what I would like to see is two images of different
compositions. You can shoot the same
subject and just change the camera angle with
the knowledge that we have of the rule of
thirds symmetry, the horizon line and its
position in the frame, whether it's low or high. And then wide, medium
and close-up shots. So use all of these
tools now to create two distinct images
of the same subject. If you need some inspiration
for your challenge, take a look at my example. I have placed the dinosaur in a menacing position over
this lego figurine. And I've chosen two distinct
shots to convey this moment. One is a low angle shot, looking up at the dinosaur from the perspective
of the lego figurine, with a lego figurine in the foreground and the
dinosaur and the background. The second shot is
the reverse angle, and we're looking down
on the lego figurine, which brings the horizon
line higher in the frame. And we are looking down on this wide shot of
the lego figurine. Thanks for watching this lesson.
See you in the next one.
9. Timing & Spacing: Let's learn about
timing and spacing. It's some of the most important animation principles
that you need to know to make very interesting
and accurate animations. And so we're going to
start with timing. Timing, and stop
motion animation is how many pictures you take. So if I were to only take one picture of this
Harry Potter night bus, Lego bus, and take
one picture here. And then take one
picture over here, is going to not be enough time for it to
travel that distance. Now, if I start here and
take one picture here, and then one picture here, and the one picture here, and then another picture here. Now we have enough time
and so that's timing. That is how many pictures were taking in our stop
motion animation. Typically, it's much easier to take too many photos
and delete them later than to not have enough
to describe the action. If you don't have enough photos, things are going to move very quickly and you can control how fast something is moving by how many pictures you
take of it moving. Now the other part
of this is spacing. Now, in that same example, if I take one picture here and one picture all
the way over here, That's a large space that is being covered in
those two images. Now, if I take two images again, and I just take one image
here and one image here. The spacing is much closer together and so it conveys
a different speed. And that's why I wanted
to discuss timing and spacing together because
they're interrelated. So in this lesson, I want
to demonstrate how to animate this night bus moving
in two different shots. The first shot, it's going
to accelerate off of screen. And then then the second shot, we're going to place the
camera right in front of the bus and it's going
to come to a stop. So we're going to animate
two different shots. We're gonna do it using
timing and spacing. And one thing we need
to know about are 0s, 1s, and 0s outs. And that's related
to the spacing. So when it comes to
ease in and ease out, we want to slowly ease out of the position it's in and
increase the spacing gradually, more and more with
each frame that we take that will make it look
like it is accelerating. So we can accelerate out of the first shot and
then the second shot, we're going to slowly come
to a stop so we can ease in. So when we ease in, we take each frame closer
and closer together, the spacing that
the bus is moving. Let's take a look
at me animating it. So this makes a bit more sense. So here I've set up my Lego
support to hold my camera. And then I've placed in compose the image so
we can see the bus. And the first images I take
are very close spacing. Each space is very
close to the last one. But as I take each
successive photo, the spacing gets greater
and greater apart. So it looks like the bus
is accelerating away. Now, if you have a dog
toy around the house and you have a dog that likes to
pull the cotton out of it. You can also add the cotton
into the animation to make it look like there's smoke coming off of the tires as
it accelerates away. Luckily, for me, I have
a dog that is very good at chewing dog toys up, and I have some cotton here
that I'm going to use. Then in the second shot, we're going to start
with really big spacing to show that the bus is
moving at a faster rate. And then with each photo, we're going to collapse
the spacing down between the buses positions
so that by the end, we are slowing down right
in front of the camera. And before we start this shot, what we can do is
actually work backwards. We can set where
the bus needs to be for the focus distance
of the camera, set the focus distance, and then we could
work backwards. And then inside the app, we can just select all
of those frames and then tap reverse so that we have
it in the right order. So that is timing spacing, ease in and ease out. And we've actually created
two shots together. So I hope you've learned a
lot in this lesson and you do your own challenge to
create this same effect. Even if you don't
have a bus like this, you can take anything you have
around the house and just animated sliding across
the table or floor. And you can get the same
effect to demonstrate the same animation
principles that we've learned here.
Thanks for watching.
10. Framerates: Welcome to this lesson
about frame rates. Frame rates are what control
the playback of a video. The video you're watching
right now has a frame rate, is 24 frames per second. Every video you watch
has a frame rate, whether it's on
YouTube or on a TV. Every video has to
have a way to play back the movie or the
image that you're seeing. A video is just a combination
of still images in the frame rate tells us what rate to play
back those images. So when we're creating
stop-motion animation, we get to choose what
our frame rate is. It's common to use 12 frames per second and stop
motion animation, 12 frames per second is used because it's half the number of 2424 is the most commonly
used frame rate and a video. And as stop-motion nanometers, we don't want to have to animate every single one of
those 24 frames. That would take a lot of work. They do that in feature films, but we're working on our stuff. We want to make it a little
bit easier on ourselves. So we want to work at least
at 12 frames per second. If not lower, I recommend starting out between
810 frames per second. That way, you have a manageable amount of
frames to work with. Because if you go any
lower than eight, your animation is going to
play back slowly because you're not gonna
have enough images to describe the motion. So that's why I
recommend eight to ten because you don't have to go all the way to 12 to get
the same kind of effect. You can do less work and
have a similar effect. If you're interested in learning
more about frame rates, you can check out
my other course about the principles
of animation. So you can use the
frame rate setting to either speed up or slow
down your animation. So you don't have to choose it before you start animating. You can actually choose
it afterwards too. In case your animations playing back too
slow or too fast, you can go into
the app and change the frame rate while
you're animating. And you could do it at
the very end afterward. But I recommend starting
out between eight to ten. Typically, new
animators don't take enough images for
their animations. That means the animation
plays back very quickly because they don't have enough
images for the frame rate. It's much easier to take more images than you think
you need than it is to go back and try to reanimate
individual frames at a interval between
frames you already have. That's much more complicated
and we don't want to make things complicated
from the beginning, always trying to take a few more images
that you think you might even need and you might end up with
the right amount. And if you don't,
then you can just delete some of those frames. And that's much
easier than going back and redoing any work. So the challenge for
this lesson is to go back into one of the animations
you've already created. Open the project, change the frame rate setting and
see how you can adjust the playback by
changing the number of the frame rate.
Thanks for watching.
11. Arcs: Welcome to this lesson. Let's learn how to make
this animation arcs. It's one of the most important
animation principles to make your animation
looks smooth. Because most things
around us move in arcs. Just think about it. When I wave my hand, it's moving in an arc
because it's connected to a joint and rotating
from that pivot point. Just like these characters
and they have their limbs. They rotate from their joints that creates an
arc at their feet. So check out the foot
as I rotate this, it creates a small arc. So we need to put that kind
of stuff into our animation. Think about jumping. Think about entire object moving like throwing a
basketball into a hoop. Does it move in a straight line? Probably not. It moves in an arc because
of gravity acting on it. So it's a good question to
ask when you're animating, should this be moving in an arc? Now when we animated the bus, it didn't move in an arc, but that was because
it was connected to the ground and it was
moving in a straight line. So not everything has
to move in an arc. But if you have a character
that is locomoting, running, walking, jumping, some part of their body is
going to be moving in an arc. And if you're
throwing something, an object or you have
a bouncing ball, It's going to be
moving in an arc because of gravity's
effect on it. So let's take a look
at an animation we can make together using this animation
principle by animating a basketball being
thrown into a hoop. This basketball scene
is going to use the cutout stop motion
animation style, which means we just need
some pieces of paper, some scissors, maybe a
pencil or pen or crayons. And we can draw our own
characters on paper and slide the pieces of paper
around to actually animate. So it's really simple
and accessible. You just need some
paper scissors and something to draw with
and we can get going. So here's an example
of what not to do. The basketball goes in a
straight line to the hoop. That doesn't look
realistic and it looks like gravity
isn't acting on it. So we want to animate
it in an arc so that it looks believable and
authentic to physics. So let's start with some
cutout pieces of paper. And we can simply place
them on the floor and point our camera
down on the floor. Now that we're set up, we can
start animating the ball. So let's imagine it moving in an arc while it's on our screen. So we can visually imagine where it's going to be headed
to create that arc shape. We know where it's starting and we know where it's ending. So we just need to pick
the highest point of the arc so that we have a goal to start
animating towards. So let's imagine the ball is going to go
somewhere up here. And that is the top of the arc. So if we start to animate
in a semi-circular fashion, we can move through that top of the arc and then to
our destination, which is the basketball goal. Now we've created an arc using the animation
principle of arcs. It looks more
believable because it appears that gravity is
acting on that ball. Now we can finish this
out by having the ball fall through the hoop
and bounce on the floor. Here we can use the principles of ease in and ease out that we learned in the
timing and spacing lesson when we animated the bus, just like the bus easing out and easing in to its start and stop. So too will the ball bouncing
at the top of its arc? So it will slow in to the top and slow out as
gravity acts on it. It will slow it down and
bring it back to Earth. Using RX is a great way to make sure that your animations
playback smoothly. So keep an eye out for pieces of your animation that
should be moving and arts, and that will help
you in the future. Thanks for watching this lesson.
12. Anticipation: Here's a look at
what we're going to make together in this lesson. This lesson is about squash
and stretch anticipation. Those are two
animation principles that you need to perform a jump. So we're going to
perform a jump with empty soda cans you can
find around your house. Let's take a look at myself
trying to jump over a log to see these principles at work. So here you can see for me to be able to
jump over the log, I need to squat
down or squash and anticipate the motion in the opposite direction,
which is up. I have to go down
before I go up. I squashed down,
and then I stretch up so that I can
jump over the log. If I don't perform this
anticipation of squashing down, then I can't jump over the log. It's just physically impossible. So that's squash. Lets us spring up
our legs and charge our legs so that we
have somewhere to extend them to, to stretch them. And if we stretch
them quickly enough, we can jump over the log. So to complete this animation, I'm going to use for soda cans. One I'm not going to
touch is going to be perfectly
stretched and normal. Then another one, I'm
going to slightly bend. And the third one I'm
going to bend halfway. And then the final
one, I'm going to squash all the way
down as far as I can. So we're gonna do what's
called replacement animation. So we're only having to replace
these pieces of the can. And the other interesting kind of magic trick we're gonna do is we're going to use
a little piece of Play-Doh or clay or something else that you
find around the house. They can use to prop up the soda can to make it look
like it's jumping. So here's what that magic
trick looks like in real life. So I'm going to stand so that the camera cannot see the
toe of my right foot. So when I lift up my heels, it looks like they're both
coming off of the ground. When in reality, I'm just
pivoting off of my right toe. But because the
camera is placed in such a way that my
left foot prevents you from seeing that it makes it appear that I'm actually
levitating when I'm not. And so that's what
we're gonna do to help levitate these cans, is we're going to use a little
piece of clay or Plato. We're gonna place it
in such a way that the camera view can't see it. So the camera position is going to be incredibly
important and will want to test out the
camera position with this kind of magic trick
before we start shooting. After we make our four cans, we're ready to get
started and test out this optical illusion
so that we can make it appear that
our cans are hovering. So first, let's get the
can positioned with the playdough or clay
underneath it on one side. Then let's put the camera
on the opposite side of the can in place at high enough. So then we're looking down on the can that we can't
see the Plato there. You may have to
experiment with this and position the
camera just right. So now we can begin
our animation knowing that we can
place the playdough or the clay in such a way that
we will be able to raise and lower the cans without the play dough or clay being
visible to the camera. Let's start with the normal can. Just standing normally. Now we'll want to squash down so we could
use all four cans here so that we ease out
of the standing position. We could go through each one in the order that
we've crushed them. So we start with a normal one, then the slightly crushed, then the halfway crushed, and then we can go all
the way down if we wanted to completely
crushed can, now we can hold this
for a frame or two. So that feels like
we're really charging up the can and maybe
we could even shake the can for a few frames to make it look like it's
building up energy. Then we can start the jump. So we can use the halfway crushed can all the way
to the stretch can, we can skip the one where we
slightly crushed the can. So now we've done
the anticipation. And now we're going to
stretch into the jump after a few frames
of creating an arc. Remember the animation
principle of the arc. We want to make sure that
we're jumping in an arc. So once it comes in
contact with the ground, we can actually
use the crush cans to help cushion that
landing from a jump. Once we've cushioned than
we can stand back up, you could continue
this jump over multiple jumps and hop across
the screen if you'd like. But that is how you use
anticipation, squash and stretch. And the principle of arc that we've already
learned to create a jumping can animation using what's called
replacement animation. Thanks for watching. I hope you learned a lot
in this lesson. I want to see your animation as part of the challenge for this lesson, so please share it. Thanks for watching.
13. Claymation: Let's take a look at we're
going to mix together using claymation in this lesson. Claymation is one of my most
favorite stop-motion mediums because it's so malleable or deforming and morphing
into different things. It can be whatever
you want it to be. And you can use different
materials to create claymation. You could use playdough, you can use what's
called plasticine. And there's differences between
each of these materials. They may make them
better or worse for the needs that you have. So some of the
differences between a material like Plato versus plasticine is that Plato has a lot of water in it
and so it can dry out. So if you're using it over
a long period of time, it's volume is going to shrink, whereas plasticine
does not get hard. It does not shrink because
there's no water in it. It's slightly greasy, but
it's also much firmer. So it can be harder to work with because it's so much more firm, but it also holds its shape
better than playdough. The Plato is a
little bit easier to work with because
it's so much softer. So these are two of the options you could
use in claymation. Of course, any malleable
material that you can morph and bend easily could
be used for this purpose. But these are the two
most commonly used in hobbyists and making
some claymation at home. The one thing to be careful
with is if you place this on a surface that it can
leave a slight mark. So it's always good to place down a piece of paper
or something that could absorb the slightly
greasy material that's on the plasticine or the water that's coming out of the
playdough very slowly, but it is a water-based thing. So we'll make the paper. If you set it on paper, it will make it slightly damp. Where's this might leave
kind of a greasy spot. For the challenge
of this lesson, I would like for you to choose a material
that you can use for claymation and write out your name or the name
of your favorite pet. And what we're gonna do
is start with that name. And then we're going
to ball that name up slowly over many frames. And when we play it
back and reverse, it will look like our name is appearing out of a ball of clay. First, start by writing
out your name in the clay, the Pleistocene, the
Play-Doh, whatever you have. Once we've written out our name, you can prop up your
camera above where you've created your name out of clay. And of course, if you've
done it on a piece of paper, you can move it around. We want to tape down the paper before we get
started so it doesn't move accidentally while we're moving the clay because
we want the paper to stay in the same
spot as always when we begin a stop
motion animation, we want to start with
a few frames that are still so that the audience has a moment to register
what they're seeing. Now instead of just taking pictures of the
still Plato name, we can slightly adjust and put our fingerprints on the
playdough so that it will make it appear a bit more
alive and have a handmade feel than if we only took
static photos of the playdough. So by slightly adjusting the Play-Doh between each
one of these steel frames. It will have this
kind of wiggle effect and that will make it feel a bit more organic and alive after we've done that and we're
ready to start animating, then we can begin slowly
from the outside inward. We can start to
roll up the clay or the plasticine or the Plato that we've created our name out of. The slower we go, the more pictures we
take at the beginning, it will ease into that acceleration of
coming into a ball shape. So we can start slowly and
take a lot of pictures. And then we could
speed up and take fewer pictures in the middle. And then slow down
again at the end. Once all that clay comes together and starts
to form a ball. Now, we could roll that
ball off of screen. We could form it from
a ball into a cube. We can do all kinds of things
because claymation has so many possibilities and
that's what's so fun about it. So after you've taken all
the photos from start to finish in the app of
balling up your clay, we can reverse the
frames to make it look like our name is appearing
out of the clay. First, we need to select
one end of the timeline, either the last frame
or the first frame. And then we can choose,
select from the options. Now we just have to scroll
to the end of the timeline. And we've selected
all the frames. We can tap and then
choose reverse. So now we've reversed all
the frames that we had selected and now our name
is appearing out of clay. I hope to see the
challenge that you make. Thanks for watching this lesson.
14. Pixilation: Let's learn about
another form of stop motion animation
called pixelation. And what's cool about
this is that you don't need anything
to perform it, you just need yourself. Pixelation is a form of
stop-motion animation that uses the human
body as the puppet. So you don't need anything else to actually create
stop-motion animation. You just need yourself. And so that's what so
cool and accessible about pixelation is that as long
as you have your own body, which I hope you do, that
you can do pixelation. Of course, you could
use someone else's as well if you want
to direct them and what to do and have you behind the screen
taking the photographs. But in this lesson, what we're going to
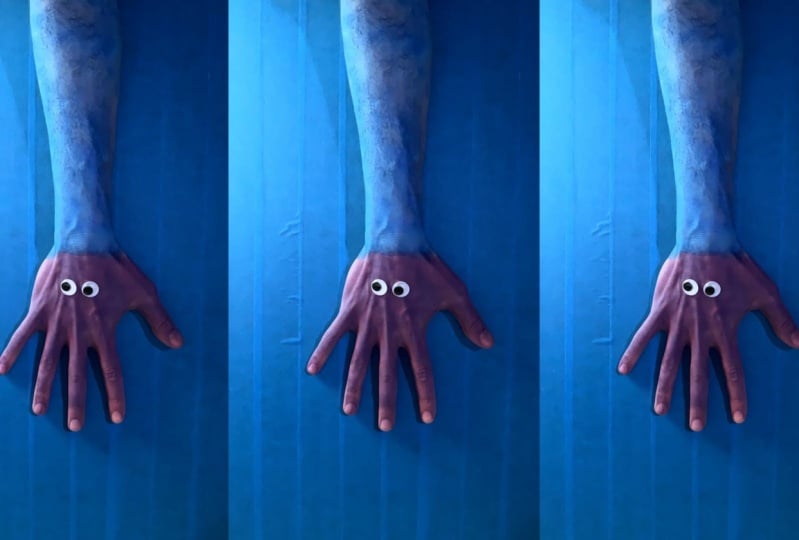
do is actually use our hand as the puppet. And we're going to animate
a octopus or a jellyfish. However you want to think
of an under sea creature using our hand. So let's take a look and
get started at that. First, I want to set the background because
we're gonna be underwater. Let's create a blue
backdrop that we can use. So there's a couple of
ways we could do this. We could use a blue bed
sheet that we can tape down. We could use a pillow case
that's blue, a blue t-shirt. We could use anything that's
blue that we can tape down to kind of stay
flat on the ground. I'm going to use some blue masking tape because I know for sure that tape is
going to stay stuck to the ground as my
hand moves over it. I'm not going to be
moving it too much. So that's the only
disadvantage of using a fabric is that
the fabric kinda move, but that might look like
it's underwater anyways. So that could work
to our advantage. Of course, you could also use blue construction paper and
tape that down as well. Now that we have our backdrop, you could color it. If you wanted to use paper. You could actually draw
on the paper and create some seaweed or
underwater sea plants. And now we have our stage and we can place our camera
over that stage, like we've done before. So how we're going to
create the illusion that our hand is an
underwater sea creature, is that we're going to spread our fingers out and place
them on the ground. And once we place
them on the ground, as we contract our
fingers together, we can pull our hand
towards us and we can pull it towards us a few inches
and then spread the fingers back out and then contract
the fingers again. And as we contract the fingers, we can pull the hand
closer towards us again. In this repeated motion, it will look like our
fingers are doing the swimming motion and it's
propelling our hand upward. You could also not just expand
and contract your fingers, but you could also
curl them up into a ball and then spread them out. You could do a lot of
varieties of things with your hands to make
it look like it's propelling your hand forward. Basically, what's going to sell this idea is how you timeout when you contract and
when you pull so that those are happening on in
conjunction with each other. So it looks like the
fact that you're contracting is actually
what's pulling. Don't do them in
separate motions. Don't contract and then pull you can already
start pulling your hand back as you're contracting your fingers together so
that by the time they're, they come all the way together, your hand has already
moved toward you. And then we can slow in to that position
because remember, we're underwater and so
things move slowly and in a fluid underwater
so we can ease in, which means we want to
take more pictures and we can slow our hand down as we
get to the resting position, as we spread our fingers back out for the next
swimming action, if you want to go the extra
mile and this challenge, you can actually paint the
back of your hand and add some googly eyes for the
eyes of the octopus. I'm painting my hand
purple and my forearm. I'm going to pick
blue so that it helps blend in with
the background. So let's take a moment to
watch me do this in real time. You'll be able to notice
that one of the challenges here is that because I'm
animating my own body, that means I can't
get really close to the camera and analyze things in a way that I would
normally do if I'm manipulating other objects
for my stop-motion animation. That's why I turned on
the time-lapse feature. You can find indicated here. This feature will
automatically take a photo, edit determined interval so
that you can work hands-free. And this is especially important
in pixelation when you yourself are the puppet and
you can't access the camera, maybe it's too far away, or you would mess up your
animation if you move too much. So use the time-lapse
feature when you're doing pixelation just to make
things easier on yourself. After a few swimming motions, the octopus has made its way
off screen and we're done. So hopefully this has made sense and you can
follow along and create your own underwater
swimming octopus with just using your hand. Thanks for watching this lesson. I look forward to
seeing your challenges.
15. Next Steps: Congratulations on
developing a brand new skill that you can use for
the rest of your life. Creating stop-motion
animation is incredibly rewarding and has so many applications
and opens up a whole new world
of possibilities using your imagination. So I hope you take
this new skill and you take your imagination
and you run with it. Create ideas, find
stuff around the house, and use it as
inspiration to create new animations and try new things that we haven't
even covered in this course. Above all, the most
important thing to do is to keep practicing. The best animators are the
ones doing it the most. So don't stop and keep trying. Use objects you find around
your house for inspiration to create new animations and
new scenes and new stories. There's always some kind of
new gear you could get to advance your kind of
technical and gear side. But don't let that stop you
creating new animation. Don't think you have to
get the next best thing. So you can keep animating. You can animate with
all the knowledge and the skills and the app
that you have right now. There is the paid version of this app that has
some new features. You can add audio to it
and things like that. There's also hardware
that you can get that helps you control
with more precision. Your animations like
this winder right here. It's kind of a cool little thing where you can wind up and down and have some precision
over your animations. Of course, there's wire that you can get and
create all kinds of armatures for wire characters and then build clothes for them. You could create
claymation characters and put the wire in the claymation to help
hold their structure more. You can use wire for
what's called gauges, where you can find the last point that you
animated from while you're moving it so you
can track positions on more complicated characters. There's so many ways that stop motion animation can
continue for you. And I just don't
want any of this to be a barrier mentally
for you to continue. You don't need any of
this extra equipment to continue your
stop-motion animation. I actually don't use these stuff that much
when I'm doing my own. The most basic stuff is
all you really need to keep going and create
new animations. The software that the pros
use is called dragon frame. It's kind of an expensive
software and you have to have a fancier camera to use it
that hooks up to a computer. But that's like the top-level. There's really nothing above
that on a technical level, but I don't really recommend it. It's kind of overkill for what I use and what I do
in my animations. And I just need my
phone typically, so I don't really recommend
it even but it is out there. If you want to go super advanced and have all
the bells and whistles, dragon frame is the
program for you. If you have the free app
and you want to add audio, there is one work-around I've
found that currently works. If you have an
Instagram account, if you've login and create a new reel with your animation, you can actually
add sound effects and voice-over as well as music. The only thing is, is
you can't download it to your phone if you have
the music because there are some copyright
issues and they don't allow the music to be
included on downloads. But you can create a stop motion animation
with sound and post. It tends to gram. So there is a work around there. The way to use it is to save your stop-motion
animation out of the app and then use it as
a real inside of Instagram. Once you're in there, tap on the musical icon and then you have the options
to add some music. You can also add sound
by going to Edit, and you can add voiceover
and sound effects. You can scroll through
the little library of sound effects and
playback your video. And when you're ready,
tap one of the icons to add that sound at that
point and the playback. Now, I recommend also
doing what's called Foley, where you basically take an
item and you record yourself, manipulating it and making
it a sound out of it. And that's what I did
with the aluminum cans. I actually just took
an aluminum can. I manipulated it at the
time when the can was bouncing to make a kind of
aluminum sound with it. And I did that through the voice-over
feature on Instagram. So you can see there
are some workarounds to add audio, your animations. Even if you only
have the free app, you can have an
Instagram account and have a work-around that way. Thanks for letting
me take you on this animation journey to learning stop-motion
for beginners. I hope you continue to
animate and keep entertaining yourself and others and tell
bigger and better stories, the more you develop as
a stop-motion animator, it's an incredibly
rewarding skill to have, and you can have it for
the rest of your life. It's an amazing thing to do
and to create artwork with. And if you want to learn
more about animation, I have a principles of animation course you
can take right here. So thanks for watching, and hopefully I'll see
you in my next course.
 Lucas Ridley, Professional Animator