Transcripts
1. Welcome to SQL 101: Databases for beginners: Welcome to SQL slash Postgres or one-to-one. In this course, we're going to jump right into database management. Will start off with the basics on a demonstration setup and practice selecting data, ordering data, inserting data, updating data and deleting data. Then we'll create our own database table from scratch and add our own data to it using the methods that we learned in the first half of this class. Lastly, we'll clean up our work by learning how to delete all the data in a table and then deleting the table itself as if we weren't never there in the first place. You don't need any special programs or software for this class. We are going to be using an online web-based tool so you can practice right from your laptop or your desktop. The only thing you need is an internet connection and hopefully a laptop or a desktop. Sorry, this is not going to be super friendly if you're using a phone. At the end of each lesson, is a task for you to get some real life practice as well. So I'm not just going to talk at you for an hour. I'm going to actually give you a task every few minutes or so. Hi, I'm Caleb, and I've been working with MySQL, SQLite, MariaDB, and Postgres since about 2006, I have extensive knowledge about databases and database design. I've created my own database schemas for large projects that have handled literally tens of millions of data points. And I was able to query that data in a matter of milliseconds. So why should you learn SQL? Or SQL is a relational database. It is the data behind every single website. So if you are using Facebook, for instance, or Instagram, you are using a database. It's how it remembers you had how it is, how it stores images that how it stores likes and comments that all goes into a database. And in this course you are going to be learning about databases and database design. I'm Caleb telling and welcome to SQL and Postgres 101.
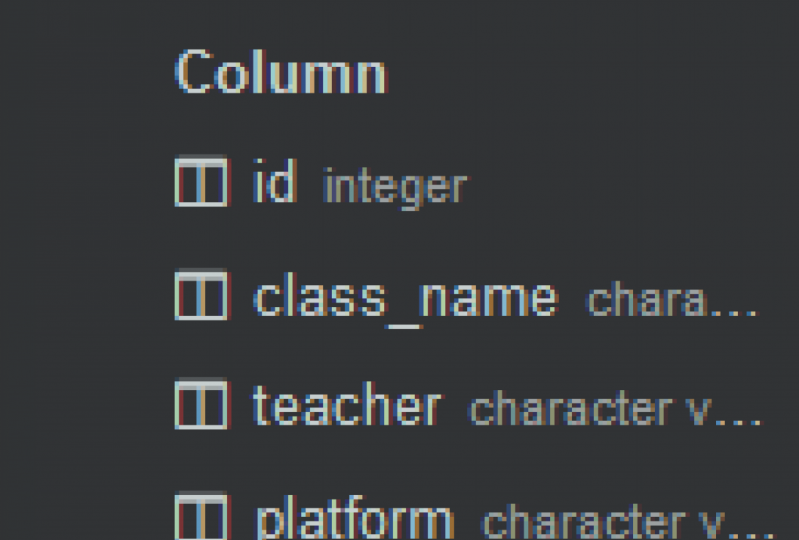
2. What is a schema?: First thing first, let's talk about what is a schema. So you have probably used Microsoft excel. You've probably used Google sheets or some form of program that looks a lot like this. And this is really all there is to a database. I'm gonna explain that in this video. So in a relational database, which is what postgres is, MariaDB is, MySQL is, and SQLite. There's a bunch of other ones as well, but those are the four most common, MariaDB and MySQL basically being the same thing. So in a relational database, we have these things called columns and rows. Just like this, we have columns and we have rows. And so the idea here, and you've probably already used a program like this. So you've pretty much already created a database before. But all it really is, is up here you have a name. So instead of column a, B, C, D, E. May able to rename that. Nope, so let's pretend the first row is going to be our column name. So in a schema we have these things called columns, rows and tables. And you know, what actually what I'm gonna do is I'm going to back that up quickly and I'm going to describe what a sheet is. So a sheet here is actually a table until we'll call it table underscore one. And underneath I can add another sheet. And this is going to be Table two in databases, we call them tables. In programs like this, we call them sheets. So I can go to table one, whatever that is, maybe that table is called users. And in my Users table, I might have a column for a unique ID. Maybe the name, the username, profession. And then, you know, maybe a hash for a password or something. So that would be my column names. So a column called ID, column called name and column called username, and a column called profession. And then underneath I would have ID. One name is Caleb, username is equal to Caleb dot Colleen, profession, teacher, and then a calvin, another one, another row of data. So idea might be to name is going to be gully, username is the cat and profession, he is a cat, and so on and so on and so on. And this can go down for millions and millions and millions of rows. Now this whole thing together, your columns, your rows, your tables, which are basically just different sheets, all belong in this thing called a schema. And this is a schema. And so what a schema is, it's not quite the database. And the database would be like postgres, it would be the actual program. A schema is simply how you set up like a little mini database inside of it, where it's going to know where all the relational data is. And so inside of the schema you can have multiple tables. And you don't have, just have to limit to two. You could have an I've done this before and I've actually built these out by hand. You can have hundreds of tables inside of a single schema. And so table number two might look a little bit different. Table number two might not be Users. Table number two might be called Course lessons. And this would be something like course for the first column. Second column could be called lesson. And there could be an ID and they're usually ideas at the very front. So can I maybe just move that over? There we go. Ids at the front, Bolden underlying, and you'd have id1 for the first row. Typically that's in there, not always, but typically it isn't their course called SQL one-to-one lesson number one, schemas. And then you could have a second one in here. And you could say, it's the same course or maybe it's a different course that says SQL tool one. And this is going to be less than number one as well, but this one's not going to be called schemas. This one's going to be called foreign keys. And so now what we have here is two different tables under the same schema. That's this whole thing here with different pieces of data. And so that's all there really is to a schema. Moving forward, we're going to be working with actual SQL in a service called SQLite online. But why is this important to know? This was really important to know because every table you work with has columns, every table you work with has rows, and you need to be able to access rose by a unique identifier. You need to be able to insert data such as the name gulley or the username, the cat. You need to be able to select a particular row based on a uniqueID such as number two here. And then you need to be able to delete it or update it. And that's what we're going to start doing right away in the next lesson.
3. Using a browser based tool for ease: All right, welcome to lesson number two. We are going to be using a program called SQLite online.com. So you can go to SQLite LIT online.com. And this is a free service. Now if for some reason the service doesn't exist while you're watching this video. And from time to time, you know, websites they go up, they go down. If this one is just down or doesn't exist for you, you can always find another one in Google. All I did was type interactive database in a web browser. And I found this one, and this one is pretty good. And so on the left here we have SQLite, MariaDB, Postgres, SQL. Ms SQL, Oracle is not currently supported at the time of recording. Docker syntax and business. So what we're going to do is we're actually in a close up SQLite and we're gonna go over to Postgres, and we're going to click connect because SQLite is a lot like postgres. Postgresql is just a lot more powerful. Now all the commands you're going to be typing in this course are the exact same for SQLite, MariaDB, and Postgres QL. Now I'm just gonna zoom in just a little bit here just so we can see a little bit better. Now with this service, if you want to, you can sign in, you can create an account. I'm not going to I'm just going to show you exactly how I do this. Just gonna wing it and show you exactly how I do this from my own personal experience. But before we get started, we have to look on the left here we selected postgresql, we connected to the database, and we have a table in here. We know about tables now called demo. And in here we have these different columns. We have an ID which is an integer, a name, and a hint. And we can actually see these laid out in front of us. We have an ID, 12345, all the way down to 20. We have different names and we have different hinting here. So we can actually perform a little bit of logic or take an action based on whatever the name is or the hint is or what the ID is. So in the next lesson, we're going to go ahead and select just certain bits of data in here.
4. Selecting data: Let's go ahead and jump right into this and select a little bit of data. So how this looks is it looks a lot like you're reading a book. So we say select, and then a column name, a column name. And we could do a second column name from the table name, which is going to be demo over here. And that's it. Now this isn't going to work because column name and column name to doesn't work. They don't exist. Not that it doesn't work well, it's not going to work because they don't exist. So if I go ahead and click Run up here and we're gonna see column name does not exist and we're gonna get this Postgres error. What we can do is, first of all, we can do an easier way. We can write select a star, so select all from demo. And as a shortcut, I wasn't hit Shift Enter in order to run this, instead of having to go up here and click run every single time. So Shift Enter and I select all from demo. Now if I only wanted to select, say like the ID and the name, and I didn't care about the hint, I could do that as well. I get select id comma name from the table called demo, and I can run that. And I'm going to get just the ID and just the name. Or if I wanted just the name, we could get just all of the names. And so that's what the syntax looks like. It says select your column name, which can be all of them from your table name. And this just happens to be called demo. We'll create a new table on our own down the road. So what I would like you to do is give this a try. Select all from demo and you should see everything. And then go ahead and just do select id from demo. And you should only see these IDs in here, one through six.
5. Ordering data: Okay, let's talk about ordering data. So sometimes we don't want everything to be in post grasses native ordering. So in here it's ordering by ID, ID 1-2-3, 4-5-6. What if we wanted to order things in alphabetical order under the name column? We could do that. We can say select all from Demo, keyword order by name, and then we could say descending or ascending. So we're going to stick with descending and go from reverse alphabetical. So Shift Enter to run this. And we get T, S l, l, l, l, l. And then it goes by the second letter. So limit, timeout, limit, overrun, limit db, so T, O, D, C. And it is now ordering in reverse alphabetical order on the column name. And he noticed the ids are different too. It goes 123645. We could also say ascending. So let's make this sort or order by the column name called name in alphabetical order. So I go ahead, hit Shift Enter. And you can see that the ideas have changed again. It's 546321 and it is in alphabetical order going from the least alphabetical, or what it thinks is the least alphabetical. Least alphabetical has a funny way of saying it. Lowest in the, in the alphabet to the highest and the alphabet. And we can do the same thing with other columns too. We could say instead of ordering by name, we could order by the hint. Let's go ahead and hit Shift Enter on that. And it orders by numbers and then letters. And if we ever wanted to do the reverse, we can always say just orderBy hint or whatever column name you want descending. Now what I would like you to do is select all from your demo orderBy your ID, makes sure that it shows up in, in reverse order and regular order. So it should say 654321. And then when you try it again in regular order, should say 123456.
6. Selecting specific data: Let's take a look at how we can select specific rows of data. Because right now we're selecting everything. We're saying, select all columns from the demo table. And we know that we can select certain columns, but what if we wanted to select certain rows? Well, what we could add here is this thing called a where clause. So we can say select all from demo where, and then you take a column name such as ID, and you say it's equal to something. And so this is a lot like standard programming at this point. And sort of this is actually quite Pythonic in the sense that we can just read through it. So select all from demo, where ID is equal to say five. And we just want to get this because there's a hint of 300, whatever that means and that's what we want. So we go ahead and hit Shift Enter. We get five. Now let's go ahead and undo that. And what I'm gonna do here moving forward is because I don't really like this late theme. I'm gonna go over here into the Settings and go into skin's going to dark. And that just seems a little easier to read, doesn't it? Now what if I wanted to grab a row? The name in here is test. What I could do is say select all from demo where name is equal to test. Now this should break for me. And it says column test doesn't exist. It doesn't know what it's looking for here. So when we wrote a number, we didn't use apostrophes around it. But when we write a string or a sentence or a word, we use an apostrophe around it. And so we've put in apostrophe test apostrophe. And that finds it for us versus what we did before where we said ID. So we could say where ID is equal to one. It doesn't need an apostrophe. Numbers don't usually need apostrophes in most programming languages. Though, is this going to work? If I put apostrophes around it, I'm gonna leave that up to you to find out on your own. So what I would like you to do is select all from your demo table where your column name is equal to some value. Or to be more specific, what I would like you to do is I want you to get row number four. So try to get it by its ID and then try to get it by its name and then try to get it by its hint. Go ahead and give that a try when you're ready. Let's move on to the next lesson, where we're going to learn how we can select multiple items in a range.
7. Selecting a range of data: Let's take a look at grabbing multiple rows from a arrange. So let's say, because in the last lesson we said where ID is equal to one, this only gives us 11 particular row. What if we wanted to have a bunch of rows? What if we wanted to say grab all the rows that are greater than the number three, We could say, select all from demo where the ID is greater than three. Go ahead and run that and it grabs ID 456. So it's grabbing anything where the ID is greater than the number three. There is another way we can grab a range of things. So let's just go ahead and show all of our items in here. Let's say we wanted to grab rho with id 135. What we could say is select all from demo, where ID is equal to one, or ID is equal to three, or ID is equal to five. Let's go ahead and run this and we're gonna see that only IDs 135, those rows are going to show up. And just like that. So what it's saying here is if the ID is one, or the ID is three, or the ID is 5n and show that data. Now if we did something weird like or ID is equal to a big number and it doesn't exist. We're still going to get the exact same results. It just doesn't give us that rho because it simply doesn't exist. So it's gonna give us everything we are looking for. And if it doesn't exist, it just doesn't give it to us because there's no data for us. Now, we're not going to get into this too much right now. But if you wanted to, you could also say, and so you could say select all from demo where the ID is one. And if there were multiple rows with the idea of one and it gives you a bunch of them. You can save the ID has to be one and the name has to be test. And if we run this, it's gonna give us this particular row. Now this is the exact same as saying where ID is equal to one only because there is only one particular row with the idea of one. But if there were numerous of the exact same pieces of data in there, we might want to filter it. And we filter it a little further by saying n. So we say where the ID is equal to one and that name is equal to test. If we said where the ID is equal to one and the name is equal to test doesn't exist and we try to run this, we get absolutely nothing. There's no data in here whatsoever. And that's because it's looking for ID1 which had found, but that name column didn't match. So what I would like you to do is first of all, don't worry too much about the end operator here. Go ahead and just play with the OR operator and try to use something like greater than or less than. So you could say select all from demo where ID is less than five. And that's going to give you 1234. In the next lesson, let's go ahead and talk about how we can order this data so that, you know, maybe our data is in alphabetical order based on the name column while we're filtering. But first of all, go ahead and give that a shot.
8. Ordering selected data: Already there's going to be a time in your life where you're going to need to get specific data in a specific order. So what we can say is select all from demo where the ID is greater than three. Now, this is going to work. If I type it right, where ID is equal to three. There we go. And it gives us id 4-5-6. Now, what if for some reason your application required you to have ID six 5-4 because you're looking at doing something in reverse. Well, what we can do, and we already learned about this. So we can say order BY Id Descending. And all we do is we take that onto the very back of our SQL query. And this whole thing is called a query. So we select all from our demo table where the ID is greater than three. And then we take all of that data and we ordered by the id in reverse ordering, and it gives us 654. Now, this isn't really useful at this point in time. You actually need an application for it to be working. So maybe just tuck this in your back pocket for now and save it for later. But I'm gonna show you one more example here. So we're gonna say where I d is greater than one, and id is less than five. So let's go ahead and see what this returns. We get 234. Then we can tag on order by. And let's say we wanted to order by the name in alphabetical order. We can order by the column name called name in alphabetical order, or a sending order. And there we go. We have ID for 3-2, which just happens to be in that order, but it's also an alphabetical order by the name column. So limit DB, limit timeout, and server. Go ahead and give this a try. I want you to use the and operator and this time, and I want you to order BY either ascending or descending. And you can order by any column name as long as it's noticeable. So if you notice that you're ordering by the Id Descending and it's the same as named descending. Try ordering by hint, descending or ascending and see what that does to your data. You should see that your data, the first row is going to be different. Second row is going to be different, third row's going to be different and they're gonna flip, flip around a little bit. So go ahead and try that out when you're ready. Let's head on over to the next lesson.
9. Limiting data: Alright, let's talk about limiting data. So let's go back here and delete all of our code or our query. And let's just show all of our data. So let's say we wanted to limit our dataset. So maybe, for instance, this wasn't six rows, maybe this was 100 thousand rows of data and we don't want to store all of that data. We don't even want to access all of that data. That's a lot of data. And there's not really a good use case for the average person to be needing a 100 thousand rows of data. So what can we do about it? We can say limit and then a number. So we can say like limit to for instance. And what this is going to do is just give us whatever they thought it was going to give us from slapped all from Demo limit to two rows. So what we could do is we can mix a lot of this together. So we could say select all from demo, where the ID is going to be greater than two and the id is less than or equal to five. We can do less than or equal to as well. Orderby ID ascending. And let's first of all take a look at what we get here. We get 3-4-5 and we only wanted the first row. If you ever wanted to get the first one in here, we could say limit one. That gives us our first row of data. Or if we just wanted the first two, we could say limit two. And that gives us the first two rows of data. And so now we're slapping on a whereClause and end operator and order BY clause. And we're limiting the number of results that the database is going to give us. What I'd like you to do for this particular lesson is select all from demo where ID is equal to something or rather or not equal to, because that's only going to give you one particular row in this instance, where ID is greater than or less than or greater than or equal to or less than or equal to some sort of value. I want you to order by another column name either ascending or descending, and then limit that value to one or two. And just take note that this is how we can make sure we only get one particular piece of data. So if we only ever wanted that first row, we can always get that first row. And what this is really good for is, for example, we can say select all from users. We don't have a users table, but if we did, we can say select from users where username is equal to Caleb, limit one. Now, ideally they would only ever be one username called Caleb. But what this is going to do is say, hey, SQL, I want you to select data from the users table where the username is Caleb. And as soon as you find that first one, just exit, exit early. So don't scan a 100 thousand rows. If it finds username is equal to Caleb on row two, is going to stop at R2. When it's doing its searched through all of its not think of it like a Google sheet. It's searching through all the different rows and once it finds its answer, it's going to stop. Go ahead and try that out and when you're ready, I'll see you in the next video.
10. Inserting data: All right, let's take a look at how we can add some data to this table because right now we're working with six rows and that's going to be kind of limiting in the future. And honestly, if you have six rows of data, you probably don't need that to be in a table in your schema. Let's go ahead and add some new data. But first let's look at the syntax. So the syntax looks like this. We say insert into demo, that's going to be our table name. And then we insert the column names here. So let's insert name and hint. And the values are going to be Caleb and I put this in a string, so it's got apostrophes around it and the hint is going to be your teacher. Now you notice I didn't put ID in here and that's because I d here. Can I inspect that? I can't really see that, but I know that this happens to be a primary key and it's auto-incrementing, which means when you set your schema up, you can actually tell your id row to always add to whatever the latest one is. So laced one is six. This is automatically going to add an ID seven for us. So let's go ahead and Insert into demo. Let's add a name column and a hint column. And then those values are going to be Caleb and your teacher. Let's go ahead and hit Shift Enter. And it looks like it did absolutely nothing. And that's just because it's looking at our queries right now, the query that we have in here, I can comment this out by using dash, dash. And you can see it changed texts there. And now I can write select all from demo. And there it is. It shows up in there. If I wanted to, I could run both of these side-by-side. All I need is that semicolon at the end. So I can insert into demo, select the name column, the hint column. These are going to be in order. This is going to be the name column and the hint column. Let's go ahead and add gully. And the hint is going to be big cat. And I can hit Shift Enter, and this is going to run both queries. It's going to run this one and then it's going to run our select all from demo. So let's go ahead and try this out. And we can see at the bottom here, number eight, gully is a big cat. That's how we insert data. And that's literally all there is to it. It's insert into your table name. Then in parentheses we use which columns we want to insert into, followed by a space. Then we say the values of those particular columns which has to match here. So we say name is going to be golly, hint is going to be big cat. And all we have to do is hit Enter or run or Shift Enter. Always have to run this code. And then after that we said select all from Demo. And that's just going to show all of our code in here. Now I can run this one's more and you're gonna see that gully shows up twice. He's got ID nine, id ten, ID 11. So there's a lot of duplicate data in here. The only thing that's not duplicate is the ID. The ID is auto-incrementing, so goes 891011. Go ahead and insert some data into your demo table. And when you're done that, let's go ahead and take a look at how we can update some of this data in here so that it's not all duplicate data.
11. Updating data: In the last lesson, we create a bunch of duplicate data. So column or row with ID of 891011. These are all the same. And so let's go ahead and update row eight. So it doesn't say Goldie and big cat. Let's update that So it says something different. So the syntax for an update clause is a little bit different, or an update query rather. And so it looks like this. We say update. The table name, which is going to be demo that matches right over here. Then we set the column name that we want. So let's say we can set the name is equal to rhubarb. And if we did this right away, this is going to change all of our data in here, which is not what you want. You don't want to overwrite that. So be careful with it. What we want to do is we want to update just ID number eight. So we get set name is equal to rhubarb, where ID is equal to eight. Just go ahead and run this. And we can see ideate, first of all got moved down to the very bottom. That's a Postgres thing. Every time you update a piece of data moves down to the very bottom. So ideate is now rhubarb and big cat. True? He's a big cat, but his name is rhubarb is not gully. What we can do here is we can say order BY ID ascending. And that puts it back in order for us. And if we wanted to, we could say update. Actually, let's comment this out. We'll get say update, demo. Set. Hint is equal to orange kids, where our name is going to be rhubarb. And so this is going to find all instances of data where the name in our name column is rhubarb, such as in IDA to row eight. It's going to find all of them. And it's going to update them to say, the hint is orange, kiddy. Let's go ahead and run this. And there it is, rhubarb, orange kitty. Let's go ahead and change gully, too big cat to a black and white cat. So we can change all of those all at the same time to we can say update demo set. Hint is equal to black and white. Cat. And let's not use quotation marks, let's use apostrophes for that. Some databases are a little bit specific about that. I think, if I remember correctly, postgres is one of those databases. So you don't want to use quotation, you want to use an apostrophe. So let's set the hint is black and white cat, where the name is going to be gully. And this is going to update all instances of gulley. Let's also do select all from demo, where the name is gully. So we're just going to get the gully information. We're not going to get test and all this other stuff in there. We just want to get gully and look at that. The name is now black and white cat for all three instances. Now if we wanted to, we could simply say select all from demo. And it's going to show you all of our data in here. And it says that the name gully, a hint of black and white cat for all three. So it did in fact do exactly what we wanted it to do. We just limited the data that we were looking for originally and then we expanded our views so that we can see all the data as a whole. So what I would like you to do for this lesson is update your demo table, set a particular name. I would advise not changing the ID if you don't have to, but change the name or the hint to be something else where that ID is equal to something. So only change one row of data. Don't change all of your data. Just change one row of data.
12. Deleting data: Let's take a look at how we can delete data. So let's say we accidently have too much duplicate data. And here we have rho with an idea of 91011. It's all the exact same. So let's go ahead and delete wrote 1011. How do we do that? First of all, let's take a look at the syntax. How this looks is we say delete from the table name happens to be called demo, where. And then some criteria. So we could say where ID is equal to ten or ID is equal to 11. And what this is going to do is it's going to behind the scenes, select 1011, then is going to delete it. And then it's going to run this query here that says Select often demo, which is gonna give us rho is one through nine. So let's go ahead and run us and watch these bottom two rows just disappear. Just like that, just gone. Now you want to be really, really careful with this because if you said delete from demo and you didn't add a where clause in here, depending on your database and the constraints on it, you might end up date and deleting all of the data. So you always want to use that where clause, just like when you're, when you're using the update syntax or the update query, you want to always have a where clause. You don't overwrite all of your data. With delete. You want to delete from your demo where specific data exists so you don't want to delete all of it and be careful. Now this is just an example website and you can always just start over File Close Postgres, and then you can open up postgres again and it'll give you rows one through six as it did at the very beginning of this course. But in real life, when you're working with a live production database, once that data is gone, it's gone forever. And that makes it really, really scary to use the Delete clause. So be careful with this one. So I want you to keep that in your mind whenever you're deleting data. Be careful. And if you're ever wondering, Oh, how do I know if I'm selecting the right data? You can always do a select clause first. So we can comment this out. And you can select all from demo where ID is greater than five, for instance. And we actually need to comment this one out as well. And what this is going to do is give us rho is 6789. That's all that exists. And you can see that this is the data you do in fact want to delete, which then you can say delete from demo, where ID is greater than five. If this is the right data you want to delete, then you can delete it. That's a good way to confirm how. Not how, but which data you want to delete.
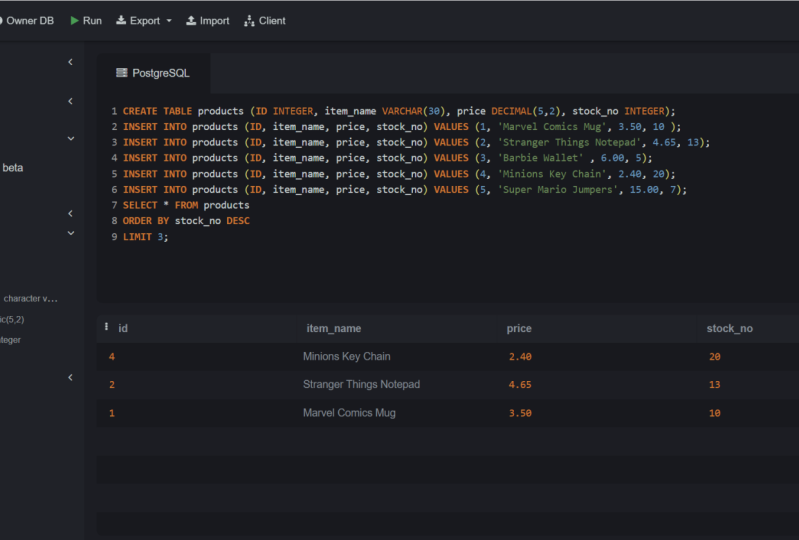
13. Creating a table: Okay, let's get into something bigger. Let's go ahead and create a new table. So right now we have a table called demo, but let's say we wanted a new table called store or my store. Maybe you wanna make an e-commerce system. Maybe you want to store users. You could create a table called Users. First of all, we have to look at this syntax. So let's go ahead and say create table, then the table name. And then we give it a column name, and then comes with its type attributes. And then a second column name. And this particular website does weird things like column name, type and attributes are all uppercase, but second column name isn't. Second column name, type, attributes. And a third 1, fourth, 1, fifth 1. And so that's really all we have to do. Now this isn't going to work because column name, type, attributes isn't the right syntax, but this is what the syntax looks like. It says Create table and then your table name, and then you set up your columns. So let's go ahead and create a new table in units, say create table. Let's call it my store. The first row is going to be an ID and it's going to be an integer. The second day, say row, I'm in column, the second column is going to be item name. And this is going to be a variable character, 30 characters. And so we're not going to get too much into Lake integers and char is and things like that. You can always Google those if you wanted to. We're just going to briefly very lightly touch the surface of creating a new table. Let's create a product price. And this is going to be a decimal with five numbers and two or two decimal points. And a notes column. And this is going to be a variable character with 255 characters in it. Items sold is going to be an integer. And let's set the default to be 0. Let's go ahead and run this. And first of all, we're going to need to see if I have any syntax errors in here. If I run this and you see an error, it's because there's probably a typo somewhere. But if this works the way I think this is going to work over here on the left is going to create a new table called my store. So let's go ahead and run this. And there it is, my store and it has an ID, itemName, price, notes, items sold. Now this isn't going to look like anything at this point in time. So if we did select all from my store, we're not going to see any data in here whatsoever. What we need to do is we need to insert some data. So we have to insert into my store. Give this product and ID, an item name, a price. Let's give it some notes and items sold. We don't want to say that any items have sold, so that's going to have a default of 0. Then we give it values and that ID is going to be, say the first idea is going to be one. That item name is going to be a fidget spinner. Do you remember those? And the what's the next one in near we have itemName. Price is going to be 199. And you notice how numbers and floats. They don't have to be in apostrophes, but strings or words have to be an apostrophes that's important to take note of. And the last one here is notes. And so that note is going to be it's bins forever. And that's it. Let's go ahead and hit enter. And then it's going to select all from our store. And it's gonna show us that we have an ID of one item, name is fidget spinner, the price is 109. Note it's been forever. Items sold 0. Now let's just go back, go back, go back. And let's take one more look at this syntax. So when you want to create a new table using just SQL, it's create table, your table name, your column name, and then what type of column it is, and then any particular attributes such as like default 0, comma, column, name, type of column. This is going to be a variable character. Takes 30 characters, and that's it. Then we have price, it's a decimal. It takes five numbers in total with two decimal points. Then we have notes, variable character 255, which I believe is the max for a variable character, although that might be different depending on certain database types. So don't take that as gospel per se. But roughly it's usually 255 is the max for a variable character. And then the item sold. We said this is going to be an integer. What kind of attributes we gave it, we said as a default of 0. And so when we added that item in there, we added a fidget spinner. We didn't tell it the number of items sold. It automatically just happened to be 0. And that's because we said the default, we're going to be 0. So that is how we create a table. No, you're not actually going to be creating tables using SQL. Most of the time, I have very rarely had to write my own SQL this way. There are better tools for this, but this is what the syntax looks like behind the scenes. So what I would like you to do is I want you to give this a shot. I want you to create a new table. And it can be super basic. It can just have an ID and maybe an item name. So calve just that part in there. Go ahead and give that a shot and create a new table and then insert some data into your new table.
14. Truncating data: Cleaning out an entire table is a little bit easier than you think it would be. So first of all, if we go back to demo in here, and let's do select all from demo. We could, if we wanted to delete every single robot, that's a very, very slow process and there is a better way for a database to handle this. So let's say we wanted to truncate all the data in here and what truncate means, and I'm saying truncate, it means clean. It means wipe it out. It means start fresh. What is going to do is get rid of all that data in here. So let's go ahead. And in the line above our select, Let's just simply type truncate and then my table name. And I'm going to truncate the demo table. That's the one that comes with SQLite online. So I'm gonna take this whole piece of data here, this, this whole dataset, and I'm just gonna get rid of it. So I'm going to truncate it. And then we select all from demo and it's gonna show up with absolutely nothing. So let's go ahead and run this. There's nothing in there. Let's go ahead and get rid of that truncate and just select all from demo. There's nothing in there. The columns still exist, the setup, the schema still exists. But there is simply no information in here. It just doesn't exist. There's no rows, there's columns, but there's no rows. And that's how we basically clear out an entire table. And so if you ever like, oh, you know, I have all this data in my sample table and I just want to get rid of it. You can always you truncate and then your table name. And simply that we'll just clear out all the data. And it's a lot faster than deleting one line at a time or one row at a time.
15. Deleting a table: Okay, last but not least, let's look at deleting a table. So select all from my store. And what I want to do here is I don't want to just delete this data. I want to delete this table so it's no longer in my database. And what I can do here is I can simply say drop table and then the table name. And that's all there is to it, drop table and then your table name and that's going to get rid of the table and all the data in it. It doesn't move the data anywhere else. It literally destroys it. And so if we run this, we can see on the left, my store is gone. There's no more data in there. And I can do is select all from my store. And relation at my store doesn't exist. We deleted it, so it is gone forever. So just be careful with that. But if you're ever creating a temporary tables to store a lot of information about a particular user or sales information or something like that. You might want to create a temporary table and then delete it later. And that is certainly one way of doing it. Now what I would like you to do for this lesson is I want you to, whatever your table was, not the demo one, the other table that you created, the new one that you created, I want you to drop at that table or so. Remember, it's dropped table. And then your table name. Go ahead and drop a table. And once that is gone, let's head on over to your final project.
16. Your project: All right, let's take a look at your final project. Your final project is step one. Create a new table. Step to insert at least five products into your table. Step three, select three out of the five of those products. Doesn't matter which three. Just make sure you select only three and there's multiple ways of doing that. I'm gonna leave that up to you how you want to do that. And step four is take a screen shot of your page and share it with class, and share it with the class. So pretty easy, I want you to create a new table, insert at least five new products into it. And while you're doing this, by the way, you'll get bonus points for me, which actually aren't worth anything. But if you wanted to go the extra mile, you can always comment out your commands to. So the first one could be create table, new table or my table, and then a bunch of stuff in here. And instead of just deleting a line where you can do is you can comment that line out and then you can do the next step and screenshot all of your SQL, all in one screenshot and share that with the class. That would be a really great way to show people that you were writing all the SQL and that you're not just writing a little bit of SQL here there in that you're doing all of it. And as a great way of showing me, your teacher that you are working on it, the way that I want you to work on it. So go ahead and give that a shot and don't forget. And don't forget if you ever get stuck or if you ever need help, you can always join the Facebook learning to code Group. Last but not least, I M Caleb Talia. They've been your teacher through SQL one-to-one. Thank you for joining me. I hope you had a little bit of fun. I hope you learned quite a bit about databases. I hope I got to show you that they're not that scary and that they're actually pretty simple. And lastly, I hope to see you around in another module or coding class of mine. Thanks for taking SQL one-to-one, and I'll see you around. Bye.
 Kalob Taulien, Web Development Teacher