Transcripts
1. Introduction: Most developers see a database as in the way, an unfortunate necessity. What they don't realize is that database design can make or break your product or feature. Hey, I'm [inaudible]. I'm a data scientist at a small startup and a Computer Science PhD student at UC Berkeley. On campus, I've taught over 5,000 students, and off campus, I've received over 50 five-star reviews for teaching people how to code to your Airbnb. By the end of this class, you'll know how to use InDesign database for your next great idea, be it an app as simple as a to-do or as complex as Airbnb. In this class, I'll show you the right way to organize your data, the pillars of database design and usage, from writing basic queries to designing an entire database. For developers, you'll get database design practice. For non-technical folks, you'll understand how to communicate requirements to developers. This class is designed for people with little to no experience. If you don't know what SQL is, if you've never used SQL, or if you've only fetched data, then this class is for you. All you need is a computer, Internet, and about an hour of time. This is a hands-on class, so you'll be coding every second of the way. You'll work through three case studies; a weather app, a to-do app, and finally, a minimum version of Airbnb. In each phase you'll design, create, query and finally optimize a database. I'll show you examples of bad design and give you tips for good design. I'm excited to give you these database design tools and I'll explain why these tools can make or break your product in the next video.
2. Project: Designing a Database: Your goal in this class is to design and use a database. Good database design is quintessential for your product, and here's why. In any application, the database provides data to the logic tier. This is where data is then processed, sorted, reanalyzed. That logic tier then provides information to your user interface. As a result, the database impacts, really, all parts of your application. Poor design choices will slow developers down, damage the user experience with poor load times, and encourage bad design choices in all parts of the code base. This is a hands-on class, so you'll be coding every step of the way. You'll work through three case studies, a weather app, a to-do app, and finally, a minimal version of Airbnb. Your class project is design, create, query, and finally, optimize the database for a case study of your choice. You'll need access to glitch.com and dbdiagram.io. You don't need to sign up to use either. However, I would suggest signing up anyways so that you can save your progress. Now, let's get started.
3. Databases 101: This lesson will serve as a primer for different database terms and concepts. You're probably wondering, what is a query? What even is a database? A database is a organized collection of data, a query is how we access and manage that organized collection of data. Finally, SQL or structured query language is a language that we use to express those queries. As a result, you'll often hear me say SQL query as these queries are how we interact with the database. A quick note on how data is organized. Think of an Excel spreadsheet, all the data is organized into tables, each table contains a type of object like user, each user has a number of different attributes, like ID and name, as you can see, each attribute is a column. Each column also has a certain type, so ID is an integer, name is text. We can populate this table with new users, like one, John Doe, and two Jane Doe, as you can see, each row is a new user. That's it for terminology. Now, let's talk about a few different tips. Here are three tips that I have for you in particular: Tip number 1, to earn the side of caution, always copy the exact code I have. Tip number 2, pause the video when needed. I'll explain each line of code I write but if you need time to type and try out code yourself, don't hesitate to pause. Tip number 3, you learn best by doing, I suggest setting up yourself for success by placing your Skillshare and Glitch windows side-by-side as shown here. That's it for general tips. In the next lesson, we'll create your first database.
4. SQL "Hello World": Let's create a database and write our very first SQL queries. In this lesson, you'll learn how to set up a database, then create, read, update, and delete data. We'll be using a database called SQLite. Why I use air to code is not super important. All you need to know is that SQLite should never be used in production. Nevertheless, all the databases that you use at work, Postgres, MongoDB, MySQL will support the same commands that we'll use in this class today. Welcome to Lesson 4. Let's go ahead and talk about what exactly we'll build. Here's a diagram. What you're looking at is a diagram that lists the name of a table users. On the left are column names. Each of these is a property of a user, the user ID, the user's name, and some information about when the user's information was created or updated. On the right, you have the column types, an int for integer. For now you can treat varchar as text, and a timestamp like a date and time. ID here in the first row in bold, is what is known as the primary key. The primary key uniquely identifies each row of our data and is a must-have for all tables. These two rows; created at, and updated at are often included and recommended. Now, let's navigate to glitch.com. Once doing so, you'll see a screen like this one. Go ahead and click on "New Project" in the top-right and select hello-webpage. You should then see a webpage like the following. Go ahead and in the bottom left, click on "Tools" and "Terminal". You'll see a page load like this one. Go ahead and then click on full-page terminal. This is now where we'll code. Let's go ahead and start off by starting up a prompt. In this terminal, go ahead and type in sqlite3.data/lesson4.db. This first piece of text is the command, sqlite3. The first argument, or the second piece of text is the name of the file that we're passing in. In this case, we're going to be storing our database in a file called.data/lesson4.db. Go ahead and hit "Enter". Now you'll be greeted with the SQLite prompt. This prompt will allow us to code in SQL. Let's go ahead and create our very first table. In this prompt, go ahead and type in create table users. This user will have an ID column that has a primary key. This user will have a name that is required. Here, not null means that the name cannot be left empty. Finally, we'll have a column for created at. This is the time that the user was added to the database. Go ahead and add a closing parenthesis and then a semicolon. Type in.tables to list the tables in this database. Here we can see that there is now a table called users, confirming that we've successfully created our table of users. Go ahead and type in.schema users to describe the user table. As you can see, this description faithfully represents what we typed in earlier. Now, let's go ahead and insert our data. Go ahead and type in, insert into, pass in the table name, which is users. Then pass in the column that we want to fill, which is name. Finally, type in the values that we want to populate it with. In this case, John. Now go ahead and repeat the same thing, but for a user named Jane. Now we can show the data that we've inserted into our table. Go ahead and type in select all from users. This asterisk here means select all columns. This will allow us to display all columns in the result. Then users is the name of the table that we want to select our data from. Go ahead and hit "Enter", and you'll see here that we have both the ID, the name, and then a created at field that we haven't populated. Now, let's go ahead and talk about a different kind of select statement. Type in select all from users where name is Jane. This is now a filtered select query. The where statement allows us to specify conditions that we want to be true for the users we select. Now, let's go ahead and update Jane's information. Type in update, set name is equal to Jane Doe. We're now giving Jane a last name, where name is equal to Jane currently. Go ahead and hit "Enter". Once again, select all from users to confirm that our users information has been updated, and we can now see that Jane is now Jane Doe. Finally, go ahead and delete the user John. Delete from users where name is equal to John. To confirm the deletion was successful, go ahead and select all from users once more. We can now see that the user John is gone. Finally, go ahead and delete the table. Drop table users. We can confirm this table was dropped by typing in.tables to list all tables. As we can see, there are no more tables remaining, and that concludes the coding portion of this lesson. Let's go ahead and jump now to the review. What have we learned in this lesson? The first takeaway, is that all tables include a primary key, and that they often include two additional columns called created at and updated at. The next takeaway is that there are several common SQL queries that we've explored; select, insert, update, and delete. We've also explored a way to filter select queries using the where clause. Let's revisit the list of concepts that we've learned this lesson. You've learned a lot in these past few minutes. We've touched on the where clause, the primary key tables, columns, queries, and many more other terms that we haven't listed here. That's it. This concludes Lesson 4.
5. Case. Study 1: Weather App: In this lesson, we'll walk through our very first case study, a weather app. You'll touch on and use a few different concepts and terms. Instead of defining them upfront, we'll be defining them as we use them. Don't worry, the next slide should look completely foreign to you, this is just to say, we'll be learning a lot in this lesson. Let's get started. In each of our case studies, we'll follow five steps: requirements, design, optimization, diagramming, and finally, code. Let's go ahead and start off with the very first step here, requirements. What are the requirements for this weather app? This weather app is going to have several entities, these entities include the user and a timezone. How are these entities related? That's part of the requirements for relationships. Each timezone potentially has many users, and each user only has one timezone. We refer to this as a one-to-many relationship; one user to many timezones, we'll discuss this more in just a second. Let's go ahead and move on to step 2, design. Here you can see you have both entities, the user and the timezone, and you can also see that there are many users for each timezone, so that's why we call this many-to-one or one-to-many, depending on your perspective. Let's talk about a bad example of implementing this requirement. Here we have a table for users, just like before. Now, let's add another table for timezones. We'll now insert a reference to the timezone. Here's the timezone id, which references the timezone for each user. Now, here's why that's a bad idea because we can do better. Let's move on to step 3, optimization. Before we do that though, here's a principle that I'd like to introduce. In databases, your goal is to use fewer tables. Tip number 1 is when you should replace a one-to-many with a different data type. In this particular example, we'll suggest using an enum, an enum you can think of as just a list of possible options. We want to replace a one-to-many table with a list of possible options when A, you have a limited number of options, and B, each option has a unique identifier. In this particular case, we'll note that the timezone satisfies both conditions. Number 1, the timezone just has a name and that name uniquely identifies a timezone. Second, we'll find that there are a limited number of timezones, so instead, we'll replace that table with an enum or a list of options. Now, the user has an attribute timezone, where the timezone is constrained to be in PDT, EDT, so on and so forth. This is what is known as an entity relationships chart, or for short, an ERC. We're going to be designing one of these diagrams in just a second. In the next step, step 4, we're going to diagram. Go ahead and navigate to dbdiagram.io in your browser. Once you've accessed the web page, go ahead and click on "Go To App" in the top right. The first thing I'll do is go ahead and create an enum, so here we'll type in enum Timezone with curly brackets, then go ahead and type in a few different timezones of your choice, in this case, we'll use PDT, EDT, and CDT. Now, we've got a list of different options for timezones, let's go ahead and type in our table. Here we'll type in Table users, just like before with curly braces. Just like before, our table of users will have an id of type integer that has a primary key. Go ahead and add another column for name, that is, of type text, and finally, add timezone with the Timezone type. These are the different values that our user has. Now, let's go ahead and add two more columns that are necessary, created_at timestamp and updated_at also with a timestamp. I'm going to go ahead and zoom out a little bit here, and here you can see our completed table off to the right. This completes our diagram, let's go ahead and go back to our slides. Now, let's go ahead and code. In order to code, go ahead and navigate back to glitch.com. At glitch.com, go ahead and access your existing project by hitting "Edit Project". If you didn't complete the last lesson, go ahead and click on "New Project" and "Hello-webpage" and that will open up a new project. Once you're on that page, go ahead and click on "Tools", "Terminal", and then "Full Page Terminal". That will then load a page like this one. We'll start off by launching the SQLite prompt, just like last time. Go ahead and type in sqlite3.data/lesson5.db. Again, this first piece of text, sqlite3, is the command, the second piece of text,.data/lesson5.db, is the file that we'll store our data in. Go and hit "Enter". Now, create your table of users, CREATE TABLE users, this table will start off with an id, that is of type INTEGER and is a PRIMARY KEY. Next, go ahead and add another column just like before, that has a name, and just like before, require that it is not empty. Add a timezone, and one small got you, is that SQLite doesn't actually have enum types, so instead, we're just going to use text, finally, add the last two columns, and created_at. Go ahead and add a closing parenthesis and a semicolon. That now creates our new table of users. Go ahead and insert a few values into this table of users. Again, specify the columns that you'd like to add values to, name, and timezone, and then finally, specify the values that you'd like to insert. Here, we'll insert a few different of these rows. We're going to have a user named John, a user named Jane, and finally a user named Jenny. Now, let's go ahead and select from this table, we'll write SELECT all FROM users, this gives us all three users that we inserted with id 1, named John, id 2, named Jenny, and id 3, named Jane. Finally, let's examine a few different queries that we'd like to run. First, we'd like to select all users for a given timezone. So here I'll write SELECT all FROM users where the timezone is equal to EDT, and as we'll see, we'll see both users that are in that timezone. Now, let's go ahead and count how many users are in that timezone, this is a new type of function that we haven't seen yet called an aggregator. Go ahead and write it in SELECT COUNT FROM users where timezone is equal to EDT, and that gives us two, just as we saw earlier. Once again, we covered five different steps: requirements, design, optimization, diagramming, and finally code. We covered a number of different topics in the last few minutes: The first is an ERC or the diagram, a one-to-many relationship, an aggregator or the count function that we used, an enum, and finally, the five-step process itself. Congrats, that's your very first database design for a real-world application. If you've got ideas for a cooler, fancier weather app, feel free to modify and spruce up the ERC that we created in this lesson and upload it to the Projects Tab on Skillshare. In the next lesson, we'll design a database for a slightly more complicated application, a Todo app.
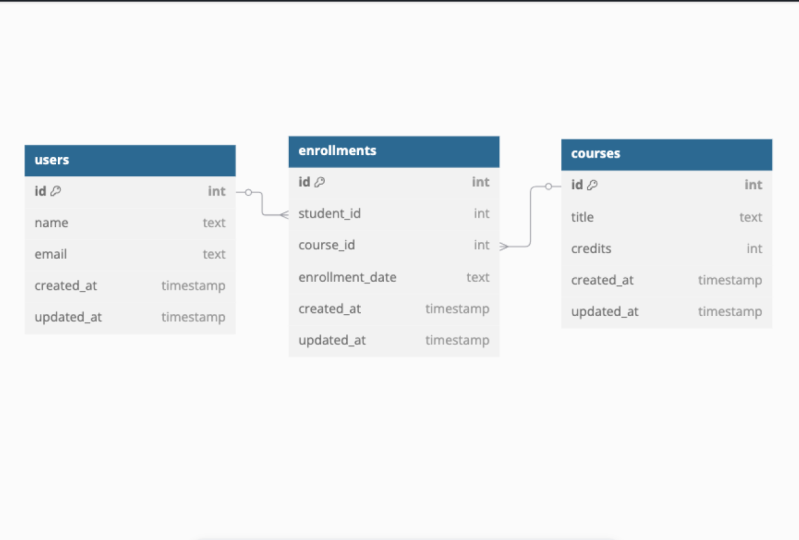
6. Case Study 2: Todo App: In this lesson, we'll walk through a second case study, a ToDo app for the first step requirements. For this ToDo app, we'll need two different entities. The first is a user, and the second is a task. The relationships between these entities, each user has many tasks. Each task also only has one user. Sounds like we just have another one-to-many relationship. Let's talk about the design. Here we have a task and a user. We have many tasks for each user. We see that this is a many-to-one or a one-to-many. Here's a bad example. We can start by attempting what we talked about last time, which is to use an enum-like field. Now we can't use an enum exactly because, a, there are many different user e-mails. There isn't a limited list that we know beforehand. Second, let's say we want to add a user name, then we would have to add that name and e-mail address for every single task that this user has. Instead, here's a good example. We're now going to split out a different table for users. This is called normalization. Here we have a user table off to the left with the name and e-mail. Now we only have to store user information once. However, now the link between the user and their tasks is broken. Here we need to add something called a foreign key. On the right hand side you have user ID, which references the user for the task. Next, let's go ahead and optimize. Tip number 2 for optimization is using indices for faster queries. Unique indices are one of the simplest ones to add. In this case, it is the e-mail address for the user. We'd expect each user to have a different and unique e-mail address. Let's go ahead and move on to the diagram before navigate to dbdiagram.io on this webpage. If you still have the original diagram open, go ahead and hover over this dropdown and click on "New Diagram". Let's start off by creating our two tables. Go ahead and type in Table users. This table will have an id of type integer that is a primary key. It will also have a name with type text, then an e-mail address also of type text that has a uniqueness constraint. Finally, let's add two more columns. Next, let's add an enum for task status. Here we'll have enum of status, and there'll be two possible statuses. Now, let's go ahead and add another table. Here we'll have a table called tasks. Give it an id with type integer of primary key, and then the foreign key that we talked about earlier. Go ahead and type in user_id of type integer, and we'll type in ref colon greater than users.id. Here users.id refers to the user's table, column id. We're going to now add a status and then we're going to add a description of type text. Finally, created at and updated at, and here are the two tables that we just created. This concludes our diagramming. Let's go ahead and move on to the code. Step 5, start off by navigating to glitch.com. Once you're there, you should see a page like this one, just like before. You can edit the existing project or you can type in new project hello-webpage. Once you do that, you'll be greeted with a page like this one. We're going to write a script that will create the database and add in a few different values for us into database. Start off by hitting New File on the top left, then type in lesson6.sql, drop table users, if it exists. Now, create a table for our users and add in the id, name, and e-mail, and we're going to add the additional constraint that this e-mail is unique. Let's go ahead and now add the two columns that we're familiar with. Let's go ahead and create the other people tasks. Type in the id. We're going to add in user_id, status TEXT, a description also of type TEXT. Finally, the two columns that we always add. Now let's add in what is called the foreign key constraint. The foreign key constraint simply ensures that anytime a task has a user id, that user id refers to an actual user in the users table. Add in this foreign key, which refers to call them user_id, which is supposed to reference the table users and column id. Go ahead and add a semicolon to complete your statement. We're going to start off by inserting some users, INSERT INTO users, and we're going to add two columns, name and e-mail, with different values, John, add a semi-colon, and now we're going to go ahead and copy and paste that line and replace these values with Jane. Now, let's add some tasks for John. INSERT INTO tasks the columns that we're going to populate, our user_id, status, and description. Now we're going to add a few different values. The first user inserted here, John, will have user_id 1. The status for this task should be TODO, and the description will be Swim. Now we're going to copy and paste and we're going to add another task for John. Now, let's go ahead and add some more tasks this time for Jane. That's it. Glitch automatically saves this file for you. Let's go ahead and now navigate to the terminal. Go to Tools, Terminal, and Full Page Terminal. You'll then see a page like this one. Go ahead and type in sqllite3.data/lesson6.db, go and hit Enter, and now you are in the SQL prompt. Let's go ahead and run the file that we just created,.read lesson6.sql. We're going to first select all tasks. SELECT asterisk FROM tasks. We're also going to select all users. This looks good. We have both of our users and the two tasks assigned to each. Let's go ahead and now instead of selecting all, we want to select specific columns. Here we're only going to select the name and e-mail columns from users. Now we only get the name and the e-mail of each user. We're now going to explore a new query called a JOIN. We're going to select both the user's name and the description of the task. We're going to SELECT FROM users, we're going to JOIN with the tasks table, and we're going to join them when the users_id is equal to the tasks user_id. Go ahead and hit Enter, and here we can see all of the users, John and Jane, and the two tasks that are assigned to each. Now, let's review this lesson. We've visited a number of different topics including denormalization, join, foreign keys, and normalization. We also covered indices and added a unique index to the e-mail column. That concludes this lesson. We've now completed a case study for the ToDo app. In the next lesson, you'll start a case study for ABMB.
7. Case Study 3: AirBnb (Design): In this lesson, we'll start our third case study, Airbnb. We'll again cover the five different steps, requirements, design, optimization, and we won't actually get to diagramming or code. Let's get started, requirements. There are several different requirements. In particular, the entities that we care about are the user, the home, and several relationships between those entities. Users will visit many homes. Homes will have many visitors and one extra requirement that we haven't seen before. Users will also be able to own homes. In other words, we have that relationships are both many-to-many. There are many users to each home, and there are many homes to each user. Users also may own homes, meaning that there are different types of relationships. You can either be an owner or you can be a visitor. Now let's talk about design. Here are the two entities; user, and home. There are many users for each home, and there are many homes for each user. This is our many-to-many relationship. However, how do we represent owners versus visitors? Here is a bad example. This is our third and final bad example. Maybe you already know the solution, in which case, great. If not, don't fret. This is a tough one. So what's the bad example? Here, we have the owners in red, and the visitors in black. We have to create one account for owning, and another account for visiting. However, Airbnb manages to avoid this. You can create one account to manage properties, and visit properties at the same time. How is that? Now, let's optimize. What we'll now do instead, is associate owner or visitor with the relationship between the user, and the home, instead of associating it with the user themselves. Here, we'll see that the red lines denote ownership relationships. The black lines represent visiting. Here, the first user in the top-left owns two homes, and they visit the third. This brings us to our tip number 3, consider adding information to relationship tables. Sometimes information doesn't belong with either entity. In this case, the relationship of owner or visitor doesn't belong with either the user or the home. Here, is the diagram. On the right-hand side we have the users, on the left-hand side, we have the homes, and in the middle, we have the relationships between users and homes. We also have references to both the home, and the user from that table in the middle. This table in the middle, users' homes, is what allows us to represent a many-to-many relationship. You'll also note, that this table in the middle has a role column. This role column is what distinguishes owners from visitors. Now, let's go ahead, and review what we talked about in this lesson. You covered a number of different steps. We covered requirements, design, and optimization. In the next lesson, we'll cover diagramming That concludes this lesson. Airbnbs, first three steps of the case study.
8. Case Study 3: AirBnb (Diagram): In this lesson, we'll now discuss the Airbnb case-study step number 4; diagramming. Here, we have already finished the three first steps; requirements, design and optimization. Here we're going to cover diagramming, and you may be wondering why half of the code is actually highlighted. Well, we're going to do a little bit of code in this lesson and then finish in the next one. Let's start off with diagramming. Just like before, navigate to dbdiagram.io. Once you're on dbdiagram.io, if you haven't already, you can select the drop-down and click "New Diagram". You'll then be greeted with an empty diagram like this one. Let's go ahead and create the three different tables that we'll need. We're going to add the users table. Just like before, we'll have the id of type integer that is a primary key. Just like before, we'll also have the name field of type text, the e-mail field of type text, and the two additional fields created_at timestamp and updated_at timestamp. Now we're going to create an enum for the different types of rules that a user could have for a home. So here we're going to have an enum role, and the role can either be an owner or a visitor. Next, we're going to create a table for our homes. Let's go ahead and create table, homes. The id is going to be in integer, that is a primary key. We're going to have an address for this home, that is of type text, a price per night, that is an integer as well, and finally, the two necessary columns created_at and updated_at. For our third and final table we'll now need to represent the many-to-many relationship between users and homes. Here we're going to have a table of users, homes, an id with an integer and a primary key. We're going to then have references to both the homes and to the users. We're going to have a home id as of type integer and this is a foreign key reference, just like we talked about before, and we're going to have a very similar reference to the user table. Next, add in the role for this relationship. Here we'll have either the owner role or the visitor role. Then we'll add the start, either the start of the homeownership or the start of the visit. Finally, the end. Then add the two necessary columns that we always add, and updated_at. This concludes our diagram. I'm going to go ahead and zoom out just like before so that you can see the entire diagram. Go ahead and click on "Auto-arrange" and there we go. We have our users, our homes, and our relationships table. Now, let's go ahead and move on to the next step. Code.
9. Case Study 3: AirBnb (Code Database): Here, we're going to actually code just the beginning, we're going to create the database. Go ahead and navigate to glitch.com, just like before, you can edit an existing project or click "New Project" and "Hello-webpage", you'll then see a page that looks like this one, go on and click on "New File" and lesson8.sql. In this file, we're going to go ahead and create the database that we've been talking about. Go ahead and, just like before, drop the tables in this script if they already exist. Here, we're going to DROP TABLE users, we're going to DROP TABLE homes and finally, we're going to DROP TABLE users_homes. Note this naming convention, the relationships table between users and homes should just be the concatenation of those two names. Now, let's go ahead and create the users table. Just like before, we're going to have the id, a PRIMARY KEY, we're going to have the name, which is going to be a TEXT that is not empty, we're going to have the email which is TEXT that is not empty and is unique, and then we're going to have the updated_at and created_at fields. However, this time our created_at field is going to self populate, go ahead and add a default value, that is, the CURRENT_TIMESTAMP. Hit "Enter", semicolon, and this default syntax will actually populate this created_at field for us anytime we insert a row, we'll see that in action in the next lesson. Let's go ahead and now create a homes table. We're going to CREATE TABLE homes, just like before, this table is going to have an ID of INTEGER, PRIMARY KEY, it's going to have an address that is of type TEXT that is not empty, a price_per_night of type integer that is also not empty, and finally, the two columns updated_at and created_at, just like before, go ahead and add a default value to created_at of CURRENT_TIMESTAMP. Finally, let's go ahead and create our third table. Here we're going to CREATE TABLE users_homes. Just like any other table, this table is going to have your INTEGER type for PRIMARY KEY, it's also going to have references to both the home and to the user. Now, go ahead and add the role for this relationship, add the start and the end, then, our favorite two columns updated_at and created_at, just like before add a default. Next, let's go ahead and insert some data into these tables. We're going to, in particular, insert some users with a name and an email address, I'm then going to copy and paste the remaining users from the previous lesson. Now, let's go ahead and insert some homes. We're going to INSERT an address and a price_per_night, here we'll have an address and a price_per_night. I'm going to click on the arrow in the top-left, that will minimize this navigation bar so you can see more of my code at once, I'm also going to copy and paste this row right here so we can modify the addresses and the prices much quicker. Finally, let's add some home ownership. Here, we're going to INSERT users_homes, we're going to add the home_id, the user_id, the role, the start, and the end; we're going to add in some values. Here we're going to add in the first home, the first user with relationship, OWNER, and we're going to add in an arbitrary start time for the beginning of home ownership, here you can use whatever format you'd like for the time, we're going to use a format that is roughly similar to something called an ISO format, however, again, it doesn't really matter what format you use. Make sure then to add a semicolon at the end of the line, and go ahead and repeat the same thing, but this time for Jane. So Jane is user_id 2 and she can't also own the first property, so we are going to have her own a different property. Now, let's go ahead and copy and paste this one more time. In this lesson, we're assuming that each home only has one owner, however, you could in theory, with the database that you've created, represent multiple owners per home. Now, let's go ahead and change this home to the third home, still using user Jane, which has user_id 2. Now, finally, the last thing that we're going to add to this script is a number of different visits. Let's go ahead and copy and paste the same line, but now we're going to change the relationship from OWNER to VISITOR, we're also going to change the home ID. So right now, John owns the first property, so we're going to have John visit the second property. Go ahead and change the dates to something reasonable, here I'm going to start on October 5th and end on October 7th. Let's now go ahead and duplicate this a few times. Now, we'll have, again, John visiting, this time he'll visit property 3, and he'll start the visit October 7th and visit until October 9th. Finally, let's go ahead and add our third and final visitor. Here we're going to have our new visitor, Bob, visit the third property right before John does. All right. That concludes our code. In the next lesson, we'll actually run this code, and then we'll do a little bit more to query this data. That concludes our lesson here. This was Airbnb's case-study step four of diagramming and a little bit of code. In the next lesson, we'll finish querying the data.
10. Case Study 3: AirBnb (Code Queries): Welcome to the ninth and final lesson of the Airbnb case study. In this case study, we will finish the code that we started last time, in particular, we'll query the database and the data that we've constructed and set up. Just like before, we are following the five-step process that we've outlined. In particular, we've covered requirements, design, optimization, diagram and finally in this step, we'll cover code. Go ahead and access glitch.com. Once on this page, you'll be able to find your existing project and hit "Edit Project." Note that unlike before, you can't start a new project, because we'll need to use the code that we wrote last time. Once you're on glitch.com, you'll see a page like this one, go ahead and hit "Tools" and "Terminal". That will then take you to a tab like this one. Go ahead and now start up the sqlite3 prompt for a new database. Here we'll have.data/lesson9.db. Now, let's go ahead and run the script that we wrote in the last lesson.read lesson8.sql. No news is good news just like before. Here we can see that there is no output however, that means that our script ran successfully. Let's go ahead and now construct a few different queries that we might care about. In particular, we'll talk through different pages of the Airbnb website that are fairly commonly used. Let's go ahead and now construct queries for the search page. Let's say that we want to list all houses under $45 per night, go ahead and type in select all from homes where price per night is less than 45. Here we only have one property that satisfies this criteria. Let's say we also want to paginate the results, in other words, show limited number of results per page. Here we're going to select all from homes and we're going to limit the number of results to two, and we're going to start from after the second result because this is maybe the second page of results. Here we can see one of the properties because the other two properties have already been listed. Finally, let's try sorting by price. Go ahead and type in, select all from homes and order by price per night. As you can see, the homes are now listed in increasing order of price. Let's now explore the host page. We want to ask questions about particular host, in this case, we'll ask how many properties does Jane have? We're going to combine the topics that we learned from previous lessons. We're going to first select, in order to count, we're going to use the aggregator count, we're going to select from users homes, the relationships table. We're going to join on the users table because we need to filter for the users with the name Jane. Like before, we need to specify how the users and the users homes tables are linked. Here we have the users ID is equal to the users homes, user ID. Finally, we want to only select users with the name Jane and maybe more importantly, we only want to select relationships of type owner. Here we can see that Jane owns two homes, just like we'd expect. Now, let's go ahead and find out how many visitors did one of the properties have. Here we're going to once again, select the count, we're going to select from the users and homes' table. We're going to join on homes. Once again, we can specify how these two tables are related and we're going to filter for only the home that we care about. In this case, we care about 345 Main Street, and we only care about visitors. Here we have the role is equal to visitor. As you expect, there are two visitors. Let's now explore a different page of Airbnb. Lets say we want to explore the visitors homepage. In this case, we want to list all the trips for a single user. So we're going to write select and we're going to select the address they visited, the start and the end dates. We're going to select from homes and we're going to join on the users homes relationships or to specify how these tables are related by their IDs and we also need to join on users. Unlike before, we need to have two join statements in this query. This is users ID. Finally, we need to filter by all users with the name John, and we're only interested in visits instead of ownerships. That's it, we can now see the addresses that John has visited and his trips. That concludes the code. Let's go ahead and navigate back to our slides. Here we are going to review different concepts that we discussed. We discussed order, group by, limit, offset and complicated joins. We used all of these to construct queries and our Airbnb case study for each different page on the Airbnb website. That concludes Lesson 9. Now, Airbnb itself is a lot fancier than the database design that we've constructed. If you've got ideas to extend this database design, go ahead and brainstorm. Add to your [inaudible] , expand on it and share in the project tabs. Congratulations on finishing this third and final case study. Watch the next video for a summary of what you've learned and next steps.
11. Next Steps: You've now built not one but three databases. You've seen three examples of what not to do, received three database design tips, and covered a large number of different database design concepts. Remember, the design of your database is paramount to the sanity of your codebase. Get this right, and the rest of development will be tons easier. Now, if you haven't already, pick your favorite app. It can be an existing idea, a revolutionary idea that only you know about, or a new feature. Draw up an entity relationships chart and show us what you've got by uploading it to the projects and resources tab. That's it, there's still loads to learn. If you'd like to take your database design knowledge to the next level, here's a list of topics to get you started; other database types, how to communicate between the logic tier and the database and finally, other database concepts. Make sure to also look out for other 101 classes on my Skillshare profile, including those in computer vision, and others in data science. Congratulations once more on making it to the very end of the course and until next time.
 Alvin Wan, Research Scientist