Transcripts
1. Bill of Materials Course Intro: welcome our Bill of Materials section. A bill of materials is usually a table that companies are drawing. This table would have information like the part ning's part numbers, quantity, off parts, materials, surface finished and any other information we might require to have. We will usually find Bill of Materials accompanying drawings for assemblies. In this section, we'll explore how to generate a standard bill of materials using solid works drone tools. Also, we will explore how to add custom property information to our belt, how to modify our built and how to add equations to come up with calculations within our bill of materials. In addition, we'll explore how we can present different configurations off parts or assemblies. In our bill of materials, we broke the topics and the section into small video lectures to make them easy to digest. By the end of the section, you will have no issues creating on adding bill of materials in tow, any solid work assembly drawing. So let's get started
2. The download section: in this video, we're going to tell you about the download section. So with every one of our classes, we have a download section which includes files for you to download. Those files will help you follow up in our lectures and help you gain hands on experience which we designed this course about. So here we are, in our first solid works class, class, war, interface and navigation. And if I go to the about section, you'll have information about the class, the learning objectives and down below them. You will have the down low section on this download section Link will basically take you to our Dropbox, where we have prepared or the downloads that goes along this class off I click on the link , open a new top and take us to our Dropbox. And here in the drop box, we have Class one interface and navigation, and they have two folders for I switched to the list display. I'm gonna have two folders as you've seen earlier. One cos lecture Fife on the other companies lecture seven on the one at the beginning. Indicates the class numbers 1.5 indicates that this is for a class number one, which is interface and navigation on a lecture number five, which is the command bar, canvas and design tree. And the easiest way to download those folders is to go to the top right corner and you'll see a download option. So if I click on that and then click on direct download, the browser will automatically download all those folders in a say file. And here they are. If I click on this, you will have to folders for lectures number five and seven, and each of those folders would have additional materials that supplement learning for that particular lecture. So that was all about download section. Now get yourself ready for the next video lecture where we would actually start presenting instructional materials.
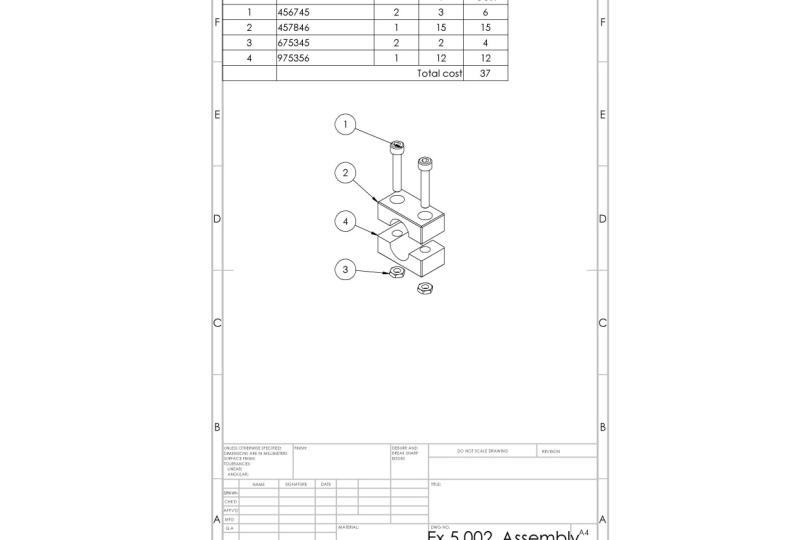
3. Creating a Bill of Material (BOM): in this lecture, we're going to discuss creating a bill off materials. A bill of material is usually an important part, often engineering drumming. A bill of material will include all the materials, parts and subassemblies required to build a specific assembly or a product to less rate, creating basic bill off materials. We will complete the following tasks. Our client just gave us this assembly and asked us to create a bell off materials for it. This assembly belongs to a cover cup for a turbine. It consists off six different parts and one sub assembly that have three different parts. You can don't know all the parts on the assembly from the download section linked to this lecture to start will open a drawing file first, so I'll go to new and select drawing, and then I'll check out my drawing views. Among the view is available. There is an isometric exploded you, so I'll go ahead and answer that To insert a bill of materials, we can go to the annotation top, expand tables and select the option for bill off materials. We'll see many options appear on the left. For now, we're only going to look at the Bill of Materials type unusually bill off materials is abbreviated as B or M or bomb. So for now, I'll keep it on top level only and press OK on by this, we have created a basic bill off material. Now let's go ahead and take another look at the other types available. So go ahead and select my table and then the options will appear again. The first type is top level only. This will basically show all the first level parts on some assembly. It will not show the parts within on existing sub assembly. If we select parts, only the table will show the list off individual parts without indicating sub assemblies. The last option is indented. This will show both the first level parts subassemblies on the parts listed within those subassemblies. So let's check this out. So now you see the sub assembly, which is called damper assembly, on the three different parts within it. Under indented, I have few options off how to show the number, so currently it is set at no number, which means the parts and the sub assembly will not be numbered. If I write and detailed number A. You'll notice the numbers for the sub assembly parts, and if I select flat numbering, I'll have Numbering goes in a sequence from 1 to 9. For our purposes, I'll keep the bomb type as indented, and I will have no number rings for the sub assembly parts. So I go ahead and click. OK, The first column shows automated numbers for the different items we have, and those are only shown on the table for now. If we want to show those numbers in the drawing as well, we can simply go to the annotation top and select all to balloon. So let's go ahead. Didn't try this out. I'll go ahead and select and then I will select the drawing I have, which is the isometric you and this will show different numbers in there on those numbers correspond to the item numbers we have on the table. So I go ahead and click OK, and now I can do some adjustment to the table to make things a bit clearer, so I'll make this column smaller so I can see all the numbers in my drawing. On by this, we conclude this lecture on how to create a basic bill off materials that contains the default information off alter number, part number, description and quantity
4. Missing Items from a Bill of Material (BOM): in this lecture, we're going to talk about missing parts from the bill off materials. Sometimes a designer will choose to not include the specific part in the build off materials. This could be because the part somehow confidential or the part is not important enough to list or it could be off any other reason. In this lecture, we will address how to find was missing parts. How to add them to our bill of materials on also how to exclude parts from the bell off materials. You can don't know the parts assembly on growing files from the download section linked to the structure. However, if you are coming from the previous lecture, you will not need to do that. There are two easy ways to find the missing parts. The 1st 1 is by looking at the photo ballooning results we have and doing that you will notice one of the parts does not have a number but having gastric instead. This means the part is not listed in the bill of material stable. The other way is to look at the design tree. So if I go to the drawing view one and expand out, I'm going to find my assembly. I can expand that as well and then make the design treat bigger. You will notice one of the parts says excluded from bomb or bill off material. This tells us that this part is again not included in our bill of material stable. To show this part in the table, I can simply right click on it from the design tree and select include in bomb. And then you will notice that a new part was added to the table and in this case, it was part number seven. Also, the ass trick was changed into a number, in case you would like to exclude apart from the Bill of Materials, here's how you can do it. You will need to do this from the assembly itself. So if I right click on this isometric view, I have the option off opening simply. So go ahead and do that. Now go to any parts I want to hide. So let's say I want to hide this part here. I can just click on it and then go to component properties and year you will find the option to exclude from bill off materials so if I have the checked, this part will be excluded from the Dell off material. Another way to show the part is to also come back here and have this unchecked. Just make sure to always say the part afterward. So now let's just go back to my drawing sheet and with this week include the structure on missing parts from the bill off materials. So while we're here, you can go ahead and experimented. It's more with excluding and including different parts to your bill off materials. Otherwise, we can print this throwing now and give it to our clients.
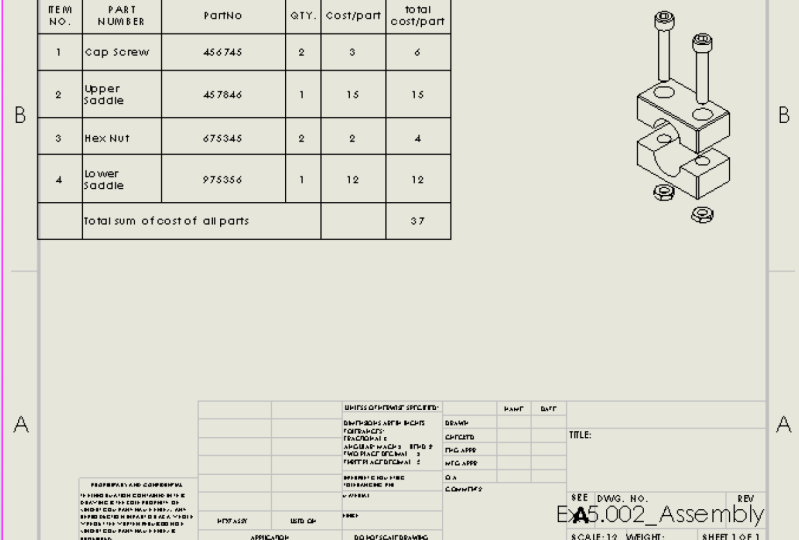
5. Custom Properties in a Bill of Materials: in this lecture, we're going to discuss adding additional information to our bill of materials by additional information. We mean anything you would like to add in the bomb, in addition to the standard information off part number description on quantity. So we already did this bill of Materials and provided it to our client. However, he takes a look at it on records. The following modifications. First, to change the title part number into part name. Second is our two more columns, one with part numbers and the other with the cost. So let's go ahead and do those tasks You can don't know the parts assembly and drawing files from the download's section linked to the structure. If you're coming from the previous lecture, you will not need to do that. Let's start with the first task to change the title off the first column from part number into partney. Changing the title is quite easy. I can simply double click on the soul on, then change it in the way I want, so I'll change the world number into the world name, and this concludes the first request we have. Second request is to add the part numbers as well as the cost, so I'll go ahead and add a new column for the part number on. I will add it next to the part Ning, so I'll highlight. Be right, click and then go to insert and select column to the right. On This adds a new column. Once you add a new column, you'll get this window popping up on this. Basically ask you to select what type of information you want displayed on this column. So under calling time, we have a number of options. It's measurement equations, item numbers and so on. If I select Custom properties, I'll get another drop down menu to select other options, and I would like to have part number, so I'll go ahead and select part number from here, and this displays all the part numbers we have. This village material is getting back, so I'll make it smaller. I'll highlight it all and then change the size. The other thing I need to add is the cost. It's Argo hadn't add another column this time at the very end. Highlight the last column. Go to insert and select column, right, and then I'll have the pop up window again. Now, if I click anywhere in my canvas, this one do will go away. If I want to bring it back, I can simply highlight this column and select column property, and this will brings it back now on the property name I can expand on. I want to select costs, so I go ahead and select that. Then I will have the cost for each parts appear. And this completes the second task we have, which is to add columns for port number and cost. Now one might ask, Where did those custom properties come from and what do they include? Custom properties as well as other information like description, come from the individual parts. So whoever created the part must have added that information. And those information could include anything the company requires or the designer wanted. For example, it could include the cost name, off, manufacturer, name, off, designer surface finish, manufacturer, date, etcetera. Before he concludes, This lecture will show you how you can change the information in an existing column, assuming our client didn't want this description listed, and instead he asked to change it to the part number to do that we can simply highlight the column. Select column property on the change description toe whatever type of information we want. So if I select part number, you'll notice descriptions will change into the part numbers. I don't really want to change. That's all. Changes back to a description, and by this we conclude this lecture on custom properties.
6. Sorting and Item Numbers : In this lecture, we will discuss sorting the bill off materials and adjusting the item numbers to illustrate those concepts. We're going to resource this bill off. Materials based on the part number will also explore different options we have with the item numbers, which are automatically generated with each bill off materials you can don't know the parts assembly on the drawing from the download section linked to this lecture to source entries in our table. We can highlight the column. We want to sort my so I will highlight the column for part number and then right click and select the option sourced. This opens a new window with different options of how we can source our table. We can set up priorities to sort it by different options, or we can simply follow the order off the parts within an assembly. In this case, I would like to sort it by part number. So our select part number here and I can change this option to any other column I have on. I want to have the sorting by a descending order, so our select descending and then I can click OK to finish the sorting before I click. OK, I draw your attention to this option, which basically says, Do not change item numbers. If I have the selected and I press okay, the item numbers which were automatically generated, will stay the same and not shuffle back with the new items with their new descending order . I don't really require this option, so I leave it unchecked and then click. OK, now you notice our table was re sorted based on the part number on a descending order. You'll also notice that the item numbers the first column changed as well to match the new orders. Now those item numbers are automatically generated with each bill of material table. However, we do have very few options of how we can adjust them. So if I highlight the table, I'll have the options pop pick up on the side. And here I have a section for item numbers. First option is to start at, and it's starting at one. If I change this into let's see four, you'll notice the number eight changes to start at four. I can also adjust the increment. So if I change the one into two, you're not as the item numbers start increasing by an increment off to below those two fields. You'll see an option to follow the assembly order. And if you try clicking on that, the table will be resource ID. To match the order we have at the assembly file. We also have a lock option. And if we have that selected, the item numbers will be locked to each part. So then, any sorting you do the item numbers will not change. So I'll keep my sourcing. However, I'll change my start number toe one and I will change my increment toe one as well. I think like OK on this. Conclude this lecture on sourcing an item numbers.
7. Equations in a BOM: in this lecture, we're going to discuss our thing equations. Our bill off materials equations will allow us to do simple calculations on you. Simple functions. You can think of our tables with equations as a very simple Excel sheet. So we're working with a client, and we provided him this drawing after looking at it, he asked Us Toe have three additional things. First is to add total costs for total number off parts. We can find us by multiplying the cost of the part by the number off parts. And then he wanted us to find the total cost for everything and also to find the most expensive total cars for an item. So let's go ahead and see how we can use equations to help us find those informations. You can don't know the parts assembly on the drawings from the download section linked to this lecture. If you came from the previous lecture to this, you might not need to do that. We'll start by adding the total cost for each part. So we insert a new column and then highlight the column and select the option equation. And then we'll have the small window popping up. What I want to do is to multiply the cost by the quantity so I can simply come to this column option, open the drop down menu and select costs and then right in gastric for multiply and then go to the columns, Trot on that you and select quantity on. Then I can click. OK, and this does it. Now I have new numbers popping up, and those numbers are multiplication. Zoff, the cost and quantity. So the cost of 30 multiplied by quantity off five equals 1 50 Now I can rename the title into total cost per part. So this is my first task. The second task is to find the total cost for all parts. And you can find this by adding all the values we have in this new columns we created. So to do this, I'm going to add a new row down at the bottom so I'll highlight the last roll right click Go to insert on insert row below. I can make this smaller a bit. Not to make this looks a bit better. I'll highlight those three cells, merge them and then right in total costs for all parts and then I can click on the cell next to it and select equations again. No, If I use the drop down menu for functions, I will see different functions that's sitting here for me. Toe addle the values in that column. I have two options. I can simply select total and then click OK and that will automatically add them. Or I can use the function some so far I select on some I can then highlight the cells I want to add and then click on OK and this will add all the cells and give me a total number . So now we can go to the third task, which is to find the cost off the most expensive part. So again I go ahead and add a new role. Again, I'll merge those three cells and type in most expensive parts. I'll select the soul, go to equations on this time I'm going to use the function marks and then highlight the cells I have and then click OK and this gives me the value off 10,000 and if I look at the total cost per part, you will find that the maximum cost is 10,000 which goes for the top cap and the plug on by this week include this lecture on equations. So when we're here, you can go ahead and experiment of its more. We're creating more equations and using other functions.
8. Configuration Groupings: in this lecture, we're going to discuss presenting different configurations in our bill of materials, just a background info with configurations. A designer is able to create different versions off a part or an assembly without having to create more than one solid work files. To illustrate how we can present different part configurations in our bill of Materials, we will examine the following assembly. This assembly consists of two different parts. One of those two parts have two different configurations. Also, the assembly itself have two different configurations. So let's go ahead and explore the different ways we can present those in a bill of materials. You can don't know the parts on the assembly files from the download section linked to this lecture. I will start by inserting isometric views for our two assembly configurations. So this is my first configuration configuration one. Then I can insert another one for configuration to to change the configuration in a drawing . I can simply click on the view and then here I can switch to configuration to only click OK . I'll go ahead and change the display style as well to make things a bit clearer, and then I will add names to them. So this is configuration one on this is configuration should on move them up a bit as well . Allow me more space for the Bill of Materials. So first I'll go had an insert, a bill of material for the assembly I have on the left. So I got tables Bill of Materials and select this assembly and click Okay, this bill of material is just like the bill of materials we are familiar with. We have names of the parts description and then quantity for each off the part because the assembly have two different configurations, you'll notice in the quantity column, it says configuration one quantity because we are looking at Configuration one off the assembly. Now let's go ahead and insert another bill of material for configuration to, So I'll go to Tables Bill of Materials and select the second configuration. Make it a bit smaller, and in the second table you will notice that one of the part is repeated twice on. This part is the sq block, and the reason it is being repeated is because we have two different configurations off this particular part. So if I change the description call him into configurations. You will notice that the first block is under configuration without fill it, which is the red block on. Then the second block is under configuration with fill it, which is the blue block. Now for this table, we can do some adjustment under part configuration groupings. So if I select the stable and go to the options I have on the left, I will see it up saying part configuration grouping and it has few options under it. Those option can be used when we have more than one configuration off the same part within one assembly. So let's go ahead and explore them a bit. The 1st 1 which is selected now, says display configurations off the same part. A separate items on this is the case. The sq block is the same part with two different configurations, and it's displayed as two separate items. The second option says this play all configurations off the same part as one item, and if I select on it, you will notice that the two sq blocks will be combined into one entry in our bill of material. The third option says display configurations with the same name as one item and this is a special condition when we have configurations off the same name, which is not the case at the moment. So for now I'll keep it with the first option. So those are basically the different options under par configuration grouping. Now, if you look at our drawing, we have two different bill of materials representing the two assembly configurations we have. What if we would like to have them both in one table? Let's see how we can do that. So I'll use the second table I inserted as a base. I'll click on it. Then on the left you will see a top stating configurations. And if I expand that you will see the two configurations. I have configuration one and configuration to currently the table only displays configuration to which is the one checked. If I want to display the other configuration, I can simply have a check as well. So if I check on configuration one, you will notice a new column appears which have configuration one. So if I click OK, you will notice my bill of materials, specify the quantities off each part under each different configuration. Now I don't really need the first table, so I'll go ahead and delete it and then bring this Wanted Middle on, expanded a bit to make it more attractive. And what this week include this lecture on configuration groupings on assembly configurations and how we can display them in a bill off materials. So why we're here, you can play around with those options.
9. Course Project : Now we are at the end of the class. It's time for us to do some project work. Check out the project work we prepared for you in the download section. They will help you reinforce the skills we learn together in this class. Just don't forget to share your work with us under your project. Also, think about creating your own product or concept using solid works. Or try modeling an object you usually find around. You just don't forget to share your work with us. We're looking forward to seeing your work.
 Tayseer Almattar, Design Innovation