Transcripts
1. Introduction: So many people set
goals to draw more, but it can be really difficult
to know what to draw, and it can be sometimes even harder to find time
to draw at all. In this class, I'll go step by step about how
to create a simple, cute, immersive
cabin sketch in ink. By the end of it, you'll
have a beautiful sketch, you can show off to
friends and family and some new drawing
techniques that you can take forward into your
artistic practice. Hey, I'm Sam. I'm a pen
and ink illustrator from Ontario, Canada. And I love drawing
landscapes, cute buildings. And I've had the
pleasure of doing that for private clients, for publishing houses, and for a skill share
community as well. I've spent so much time drawing small scenes that
blend architecture and landscape with
shading and lines and cross hatching and
all the funky things we associate with Penn Art. And doing so gives me a
bite size way to improve my art and develop a more
regular drawing practice. In this class, you'll end up
with a cute cabin sketch. Along the way, I'll focus on how I create interesting
compositions through using blocks and
pencils sketches before I turn to the
permanent medium of ink. Then we'll add to outline and some lovely landscape features that'll complement
a central cabin. This scene will
teach you skills, but I think it'll also be a
relaxing hour of your time. And you do not need to be an expert artist or
an experienced inc, sketcher to take this class. In fact, I think beginners might get the most out of this, realizing that you can
just sit down and draw a little cute cabin sketch
just like this one. The thing I love
about drawing with ink is that it's a
great time to hang out, get lost in my own thoughts, and visit cool and fantastical
and peaceful places. So let's hang out. Bring
your mug of coffee. Bring your pens,
pencil and paper, and let's craft a
beautiful little cabin sketch together. I'll
see you in class.
2. Project Video: Before we dive into this class, let's talk about what
you'll need to complete it and what we're going
to be drawing anyway. Your project for this class is a cute simple pen sketch of a cozy little cabin
nestled amongst the trees. Now I'm from Canada
where trees like this are very common and cabins like this are
pretty common too. And I find this kind of scene a very cozy and relaxing
place to inhabit. Even if I'm just
seeing it through my sketchbook. I
hope you do as well. By the end of this class,
I'd love you to post your finished sketch
in the project page. Now, maybe you'll draw
exactly what I've drawn here, or maybe you'll draw something
with your own twist. Either way, please don't
forget to post your project. It's such a cool
experience for me and the other students as
well to go through the class project
page and you see what you've drawn and hear more
about your drawing process. Next, what'll you need
to complete this class? Well, first starters,
you'll need to pen. I'm using a little
micron fine liner. Fine liners are excellent to use for pen
sketching because they lay down ink very
consistently on the page. That means that you'll
know the thickness of your line you're going
to draw before you draw it. Whereas ballpoint pens can sometimes be a little
bit unpredictable. That being said,
if you only have a ballpoint pen
handy, that's fine. All the techniques I talk about in this class
will translate to drawing with a ballpoint pen or even a pencil on that note, I'll also be using a
pencil in this class, and you should have
one handy as well. Any sort of pencil will do, even if it's the regular
old HB yellow pencil that you might have
used in school. You'll also need some paper. Any sort of paper is fine, but a nice sketchbook
like this can make your drawing process
a lot easier. Sketch books that
are made for drawing tend to have a little
bit thicker paper, and they might also lay
flat on your page as well, making it really easy to draw without having to
hold a page down. I also find I draw a lot better if I have a snack or
a beverage at hand. So the whole point of this class is drawing a cozy,
cute little cabin. And to be really cozy,
I think you need a warm drink or some sort
of snack that you enjoy. So make sure you pause this and grab that
before you dive in. Because for the next hour we're just going
to be hanging out, chilling out, while we
create some great art. So I'll see you in
the next lesson.
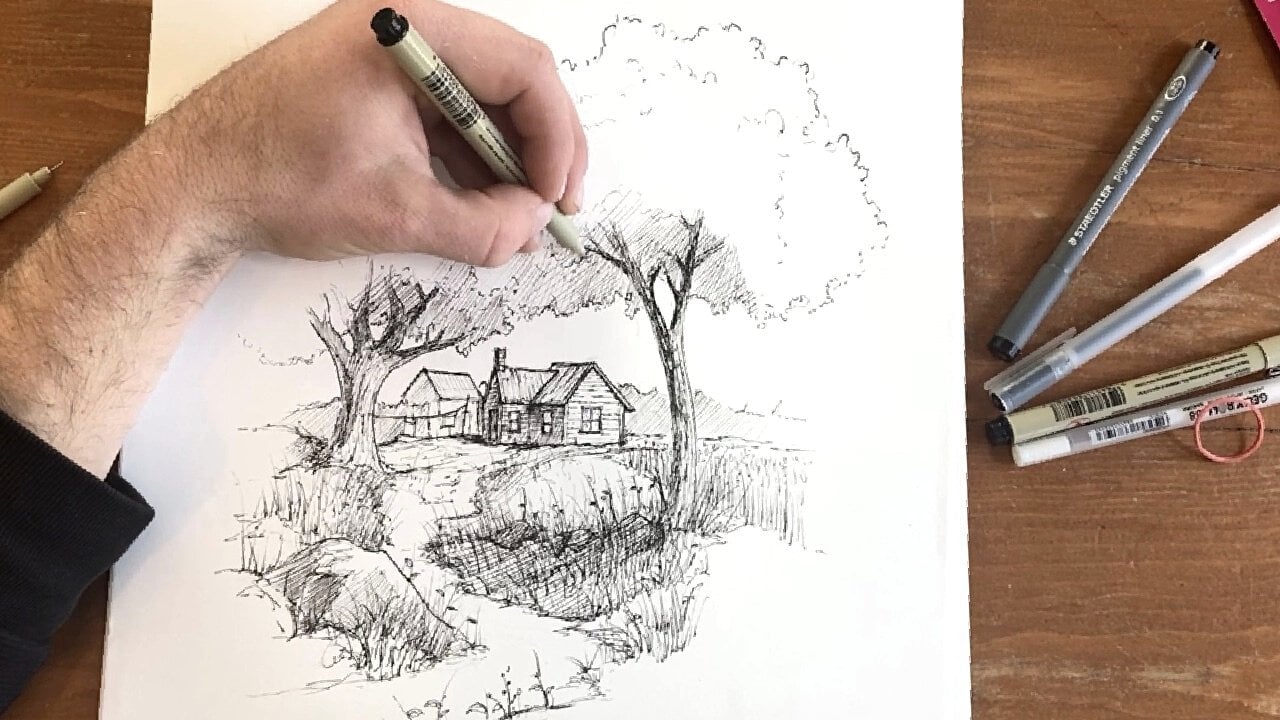
3. Sketching Techniques: Before we dive into drawing
this cute cabin scene, I'll go over some
techniques that I use with my ink pens that really help smooth the
sketching process. I want you to focus on
three core techniques. Whenever your hand in
your pen touch the page. The first is to keep
your hand on the page. Specifically,
you'll notice here, I have my palm, or the side of my palm
resting on the page. I know I'm a lefty,
so this might seem a little bit weird to all
you right handed folks, but keeping your
hand on the page I find acts as a
steadying mechanism. It adds a little
bit of stability. When I draw a line like this, I can then extend
my fingers rather than when I draw a line
without my hand on the page, it's harder to keep
it a straight line. Next, how you grip the pen
changes how you're drawing. Looks well, when you're
drawing with pencil, it's all right to
have your hands farther back on the pen. I find it really helpful if I grip farther up on
the pen like this, that even further adds more
stability to my drawing. You'll notice if I
draw a line like that, I can control the flow of the pen and the
direction a little bit more than if my hand is
farther back on the pen. Now, a lot of artists love
that more loose style. Don't take this as gospel truth, but rather try out both methods and see
what works for you. Lastly, keeping your hand in a neutral position really
helps you draw smoother lines. And also can be a great way to keep
your hand more relaxed. Specifically, you'll
notice I drew these lines in a diagonal. But I drew them with my
hand in this position here. You'll notice my hand
is resting naturally in the page and my wrist is forming a straight
line out here. If I draw the same line with
my arm and my hand curled, it's harder to draw
a straight line. Similarly, if my hand is curled around the
pen and drawing up that way in both
positions here or here, my hand is under
tension, under strain. That means my pen is
more likely to shake. I'm also more likely
to grip tightly on the pen in both cases. That can result in your
lines looking a little bit messy and can also tire
your hand out more as well. You'll notice that
all three tips hinge on being
relaxed on the page. Resting. Resting your
palm on the page, drawing in a neutral
manner and gripping the pen lightly and
up near the nib. That's because drawing
should be relaxing. And even though you
can experiment with different forms or
different styles of holding the pen, drawing lines, or moving your hand
around the page, The key here is to keep it a relaxing exercise, something
that you really enjoy. So now we're ready to dive
into sketching itself. But surprise, surprise. We are not actually going to start off with talking
about drawing in pen. You'll see why we do
this in the next lesson.
4. Sketching with Pencil : We're starting off
with pencil because we want to be able
to experiment and focus on composition
and really the skeleton of our drawing
before we dive into ink. I find starting with pencil
allows me to be more free and expressive than if I started with a permanent
medium like pen. It also allows me to
focus on composition. Let's dive into using a pencil
to sketch out a drawing. First, I'm going to show
you first how to use a block approach to sketching
in a drawing with pencil. And that means allowing yourself
to focus on composition by sketching in the objects in your drawing really
rough, just like blocks. Let's pretend that this
is going to be our cabin. We know the cabin is going to
be somewhere in this area. It's the first object or block that we'll use
to build our drawing, But we know there needs to be other objects or other
things in our scene, or else we don't really have
that cute cosy cabin scene that this class is all about. We need to decide where those other blocks
are going to be. This is where some elements
of composition come in. Just like an arrow that you
might see in real life. Arrows also work in art. An arrow that points
towards the main block. The focal point of our
drawing can be really effective in drawing the viewer's eyes towards
what's important. If I draw in a block like
this triangle that points us towards this central
block of the cabin, we know that we can
add some elements in this triangle area that point the viewer's eyes back
towards the cabin. Another element of composition
that can be really effective in a sketch
like this is framing. That means basically drawing elements around the main part of your drawing that
give it a frame, just like the name suggests. Perhaps we know that we want
to draw another object or a series of objects around
our cabin like this. Again, I'm just going
to block it in. We know that this is
going to be our central. We know that this is going
to frame in our drawing. I also know that it wants to be a cute little cabin scene
where I'm from in Canada, there is often evergreen trees. I'm going to just
little triangles to give you a sense
of evergreen trees. In the next lesson, don't worry, I'll show you how to add
a little bit more detail in pencil before we
hop over to pen. But we know that there's
going to be some evergreen trees framing the cabin. Point towards the cabin as well. Now we're going to
revisit this triangle. And we know that we want to add an element to the drawing that draws the viewer's eyes
closer to the main element, the cute little cabin
scene. What could that be? Well, it could be quite
a few different things. I invite you to experiment
on your own as well. But for the purposes
of this class, I'm going to add maybe a little staircase that
winds down some rock. Again, I'm really being
blocky right now, just adding in the bare bones of what this might look like. And maybe there's
some vegetation here in the foreground as well. But you can see
how the staircase points us back
towards the cabin. Here we have it. We have our central block,
which is the cabin, and we also use
blocks to block out a frame for that central
part of the drawing that's going to
guide the eyes of the viewer towards this main
part of our ink sketch. We also have an arrow of
stairs pointing towards the cabin that also direct us towards the most
important part of our drawing. But now that we've blocked
out these elements, we can draw them in in slightly more detail with pencil before we
head over to pen.
5. Pencil Outlines: Now that we've blocked
out our cabin scene, we can then maybe add some
rough outlines in pencil. Just like I mentioned
in the last lesson, using pencil before
you hop over to pen gives yourself a
little bit of room to make mistakes and to correct things that might be a
little bit difficult before you hit a permanent
medium like pen. First, we're going to deal
with the cabin itself. I find adding a little
bit of perspective can be a great way to give your drawing a little bit of
personality and depth. Making it appear like the object in your drawing
is three dimensional, making your drawing feel
like a three D space, makes it feel like the
viewer could explore the space and guides
them into the drawing. As opposed to a two D drawing, which really seems to be like a poster or a medium,
or a flat space. We have this front side of the cabin to make things
really easy for you. All you're going
to do is replicate this shape a little
bit farther down. What I mean by
that is start with a line that mirrors
this line here, a line that mirrors
this line here, a line that mirrors the
bottom of the cabin. You'll see we're detrawing
a mirror image of this shape a little
bit to the right. You guessed it, A
mirror image of this line. A mirror image. Then you're going to
connect the top line here in this bottom line here. You'll notice these
lines are not straight. That's for the better. I find drawing lines that are ruler straight
actually gives your drawing a little
bit of personality and really makes it appear a little bit more interesting
and less cookie cutter than maybe using a ruler
might make it appear. Feel free to pause the video
now and take some time to really work on the cabins
outline in perspective. Rewatch this video, or
check out the links below to find a
more detailed look into perspective drawing. Then in the next lesson, we'll dive into drawing
with pen, finally.
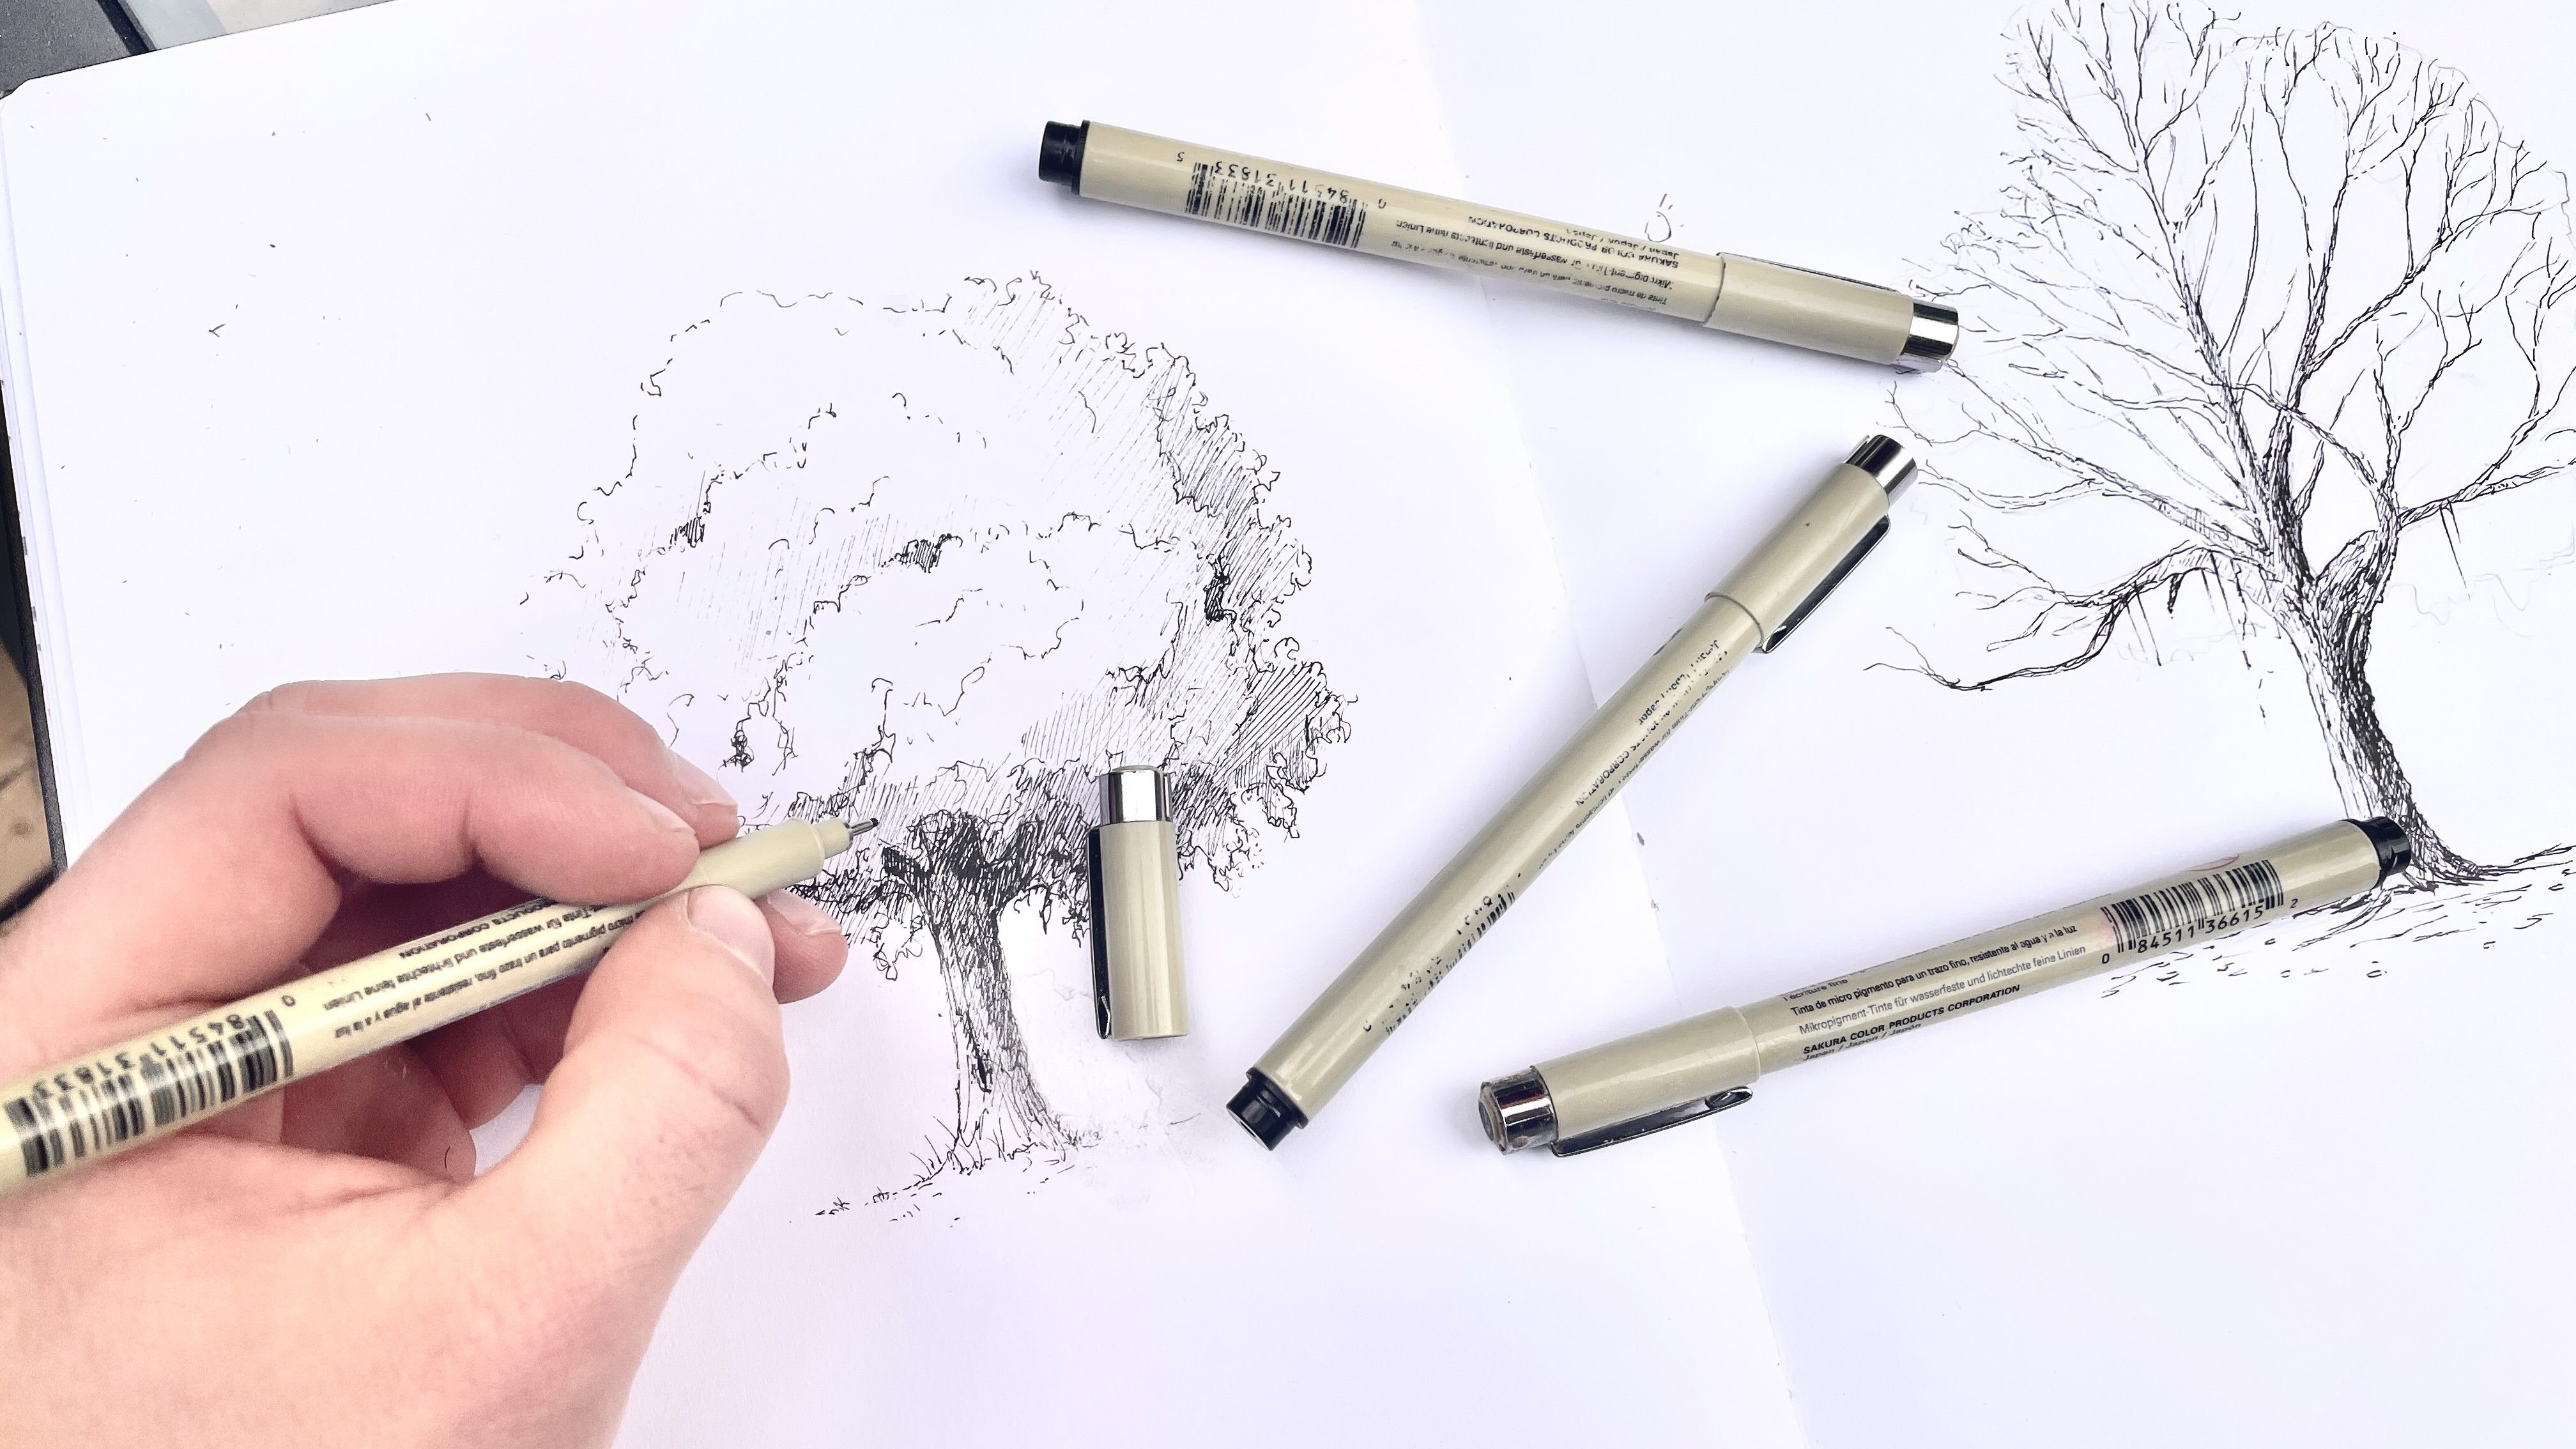
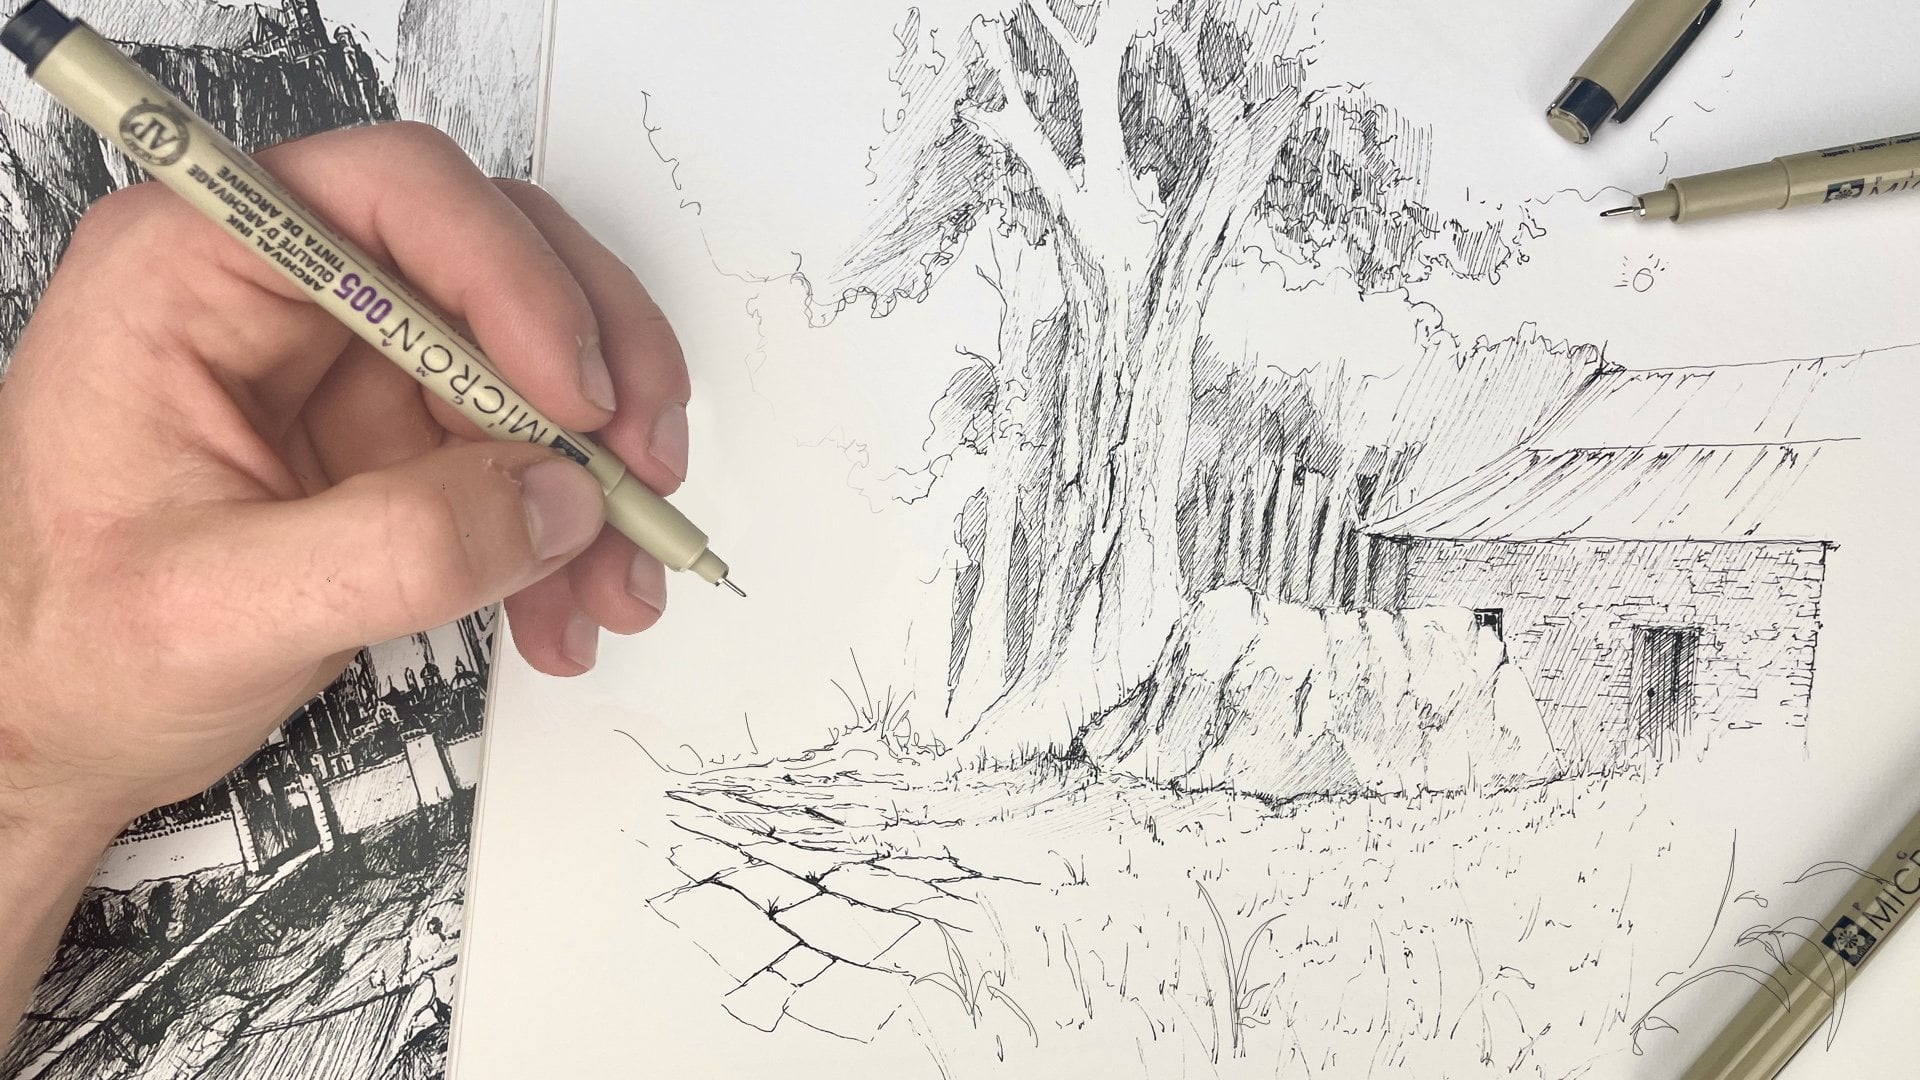
6. Pen Outlines: Now we're ready to start adding some outlines with ink pens. Now, get your pen ready. Get your piece of paper that
you've used already to go, because now we can start seeing the structure of our
ink drawing take shape. There are a couple of
main shapes that we're going to be drawing in pen that are really
important to practice aside from our main drawing. In order to gain a
little bit of confidence in the shapes and
really allow your hand to move freely without
worrying about making mistakes In
your final sketch, grab a separate
piece of paper and I'm going to show you
how to draw trees, grass, and some
texture on the cabin. A lot of people draw
evergreen trees in a little cookie cutter shape. I bet you've seen
the same one here, like a Christmas tree, all the
branches looking the same, leading up to a nice even point. Well, if you look outside, you know that trees do
not look like that, especially in the drawing
we're doing today. Instead, there's a different
method you can try. I'll go through it right now. You're going to draw two
points on your page. Maybe the same size as
that cookie cutter tree. Drawing a little bit of a narrow trunk here
and then let's dot in the rest of the
trunk lightly. You'll notice there are
hardly even dots on the page. We know that that's
the central trunk. Now we can draw in some really, really loose lines going
down the right hand side. You'll notice that my lines
don't even always connect, and it's a downward
stroke followed by some light squirly squiggly
lines on the page. Again, that's a downward
stroke to the right. And some light up and down squiggly lines to the
right of the page. Downward stroke to the right, and some really light up and down squiggly lines on the page. Again, a downward
stroke to the right and squiggly lines on the page. Now I'm doing this on the
right and left hand side now, but I'm not mirroring
the branches exactly. They should be in
different areas. They could even be
different lengths, but gradually getting longer. As you go down the tree,
you'll notice this is giving us a silhouette that appears
a little bit more lifelike. Then the tree to
your right again, that's a downward stroke
to the left on this side. Then I'm connecting it back to near the trunk with
up and down jagged, really light strokes downward to the left and then jagged up and down, really
light strokes. This is giving us a more
realistic tree shape that can be really varied when you
draw different trees. For the sake of this drawing,
we're going to replicate this shape as we
draw the trees in. Remember what I talked
about earlier in this class when I talked about
framing your drawing? Well, that's what we're going
to do with the trees here. We want to start with
the tree closest to us. It may be the tallest
here as well. Just like I showed you, I
have two points on the page. I'm rotting in a
trunk really lightly. I'm going then a really light jagged up and down line connecting back to
near the trunk. As I go down the tree, the branches get a
little bit longer. I'm repeating this till I get to near the bottom of the tree. Then I'm drawing a little trunk that goes down,
connects to the ground. We'll worry about the ground a little bit later in this class. Now I'm replicating
this shape as it goes, creating different
kinds of trees, each their own style. This is where you can
really have some fun. But you'll notice that
now the branches on the left hand side are covered
by the tree we just drew. That means that they will appear underneath
these branches, but I'm still
drawing the branches that go back to the trunk. A downward stroke to the right, and then really jagged lines
that go back to the trunk, downward stroke to the right. Jagged lines that go
back to the trunk. You get the picture now that the trees are a little
bit farther away from us. See this ones cover this one and this tree will
cover this tree. We can make them a little
bit less detailed. I'll start with the
top of the tree. I'm still going
downward to the right and lines back to the trunk. However, I'm not
really worried as much about making those
lines connect. They're still jagged, they're still getting back to the trunk. However, they're a little bit lighter and looser than before. Now, even less of the tree is visible on the
left hand side. I don't really need to worry about drawing in the left
hand side of the tree, make sure that the
trees as well get shorter as they go
back into the drawing. This gives more of a sense of space as they recede into the
drawing behind the cabin. The fact that they
get smaller behind the cabin makes it
appear the cabin is in the midground or halfway
towards the viewer. The trees in the very back here are almost just an outline, and we will add to a little
bit more detail later on, but for now I don't need to draw the branches going
back to the trunk, I'm just drawing
really loose jagged, pyramidy shapes on the far right hand
side of the drawing. As well though we're going
to add a little bit of a silhouette of the branches. And the same concept
applies downward stroke to the right and jagged lines
back towards the trunk. We don't want to take
it in too far though, because we're going to draw
the cabin on this side. The drawing next, we'll add
some texture to our drawing. I'll see you in the next lesson.
7. Adding Texture : Textures are really important. Often people have an
idea of what they think a texture might
look like in their mind. But when it comes to drawing, it ends up not really looking
like reality because it's really hard to translate what we see in the real
world onto the page. And especially if
you don't really trust that your hand
can do the job. Well, hopefully by the end
of this class you'll have a little bit more trust in
your hands, ability to draw. But in the meantime, let's dive into drawing some
textures that we're going to implement into
this finished scene. People also draw
grass and vegetation, perhaps with more detail
than they need to with pen. The thing is you
can infer a shape, having to draw the full
thing or drawing it in as much detail as you
think you might need to. Let's talk about
grass. A lot of people might draw grass
in pen like this. Spiky shapes. But you'll
see how this creates a really busy pattern that doesn't really look like grass. Even though the
individual elements of the drawing might appear
the same shape as grass. Instead, we can
focus on creating a much looser
approach to drawing grass that can still
be just as effective. What I mean by this is focusing on the outline of
the area of grass. Let's say it's below
this tree here. And drawing in that
outline first, and then worrying about the
details a little bit later. When I'm looking underneath this tree thinking about
how small grass appears, I'm drawing just really,
really light dotted lines that sometimes are
a little bit taller, sometimes a little bit shorter. I'm focusing on letting my pen dancer across the
page without pressing too hard or without letting
it create super long lines. They're almost like dots, but they come up a
little bit off the page. This can be a great thing
to practice if you're doodling just
focusing on creating those little dot and
really tall lines that really create an
outline of area of grass. If this is the outline
of the area of grass, we can then focus on adding
a few little areas of detail that really make the eye infer the
rest of the scene. Here's what I mean, I'm going to create the same
pattern we created in the background with really
tall and short lines. Every so often in this
little grassy area, they can be in a short little
line that goes up and down, creating the illusion of some depth and some
rolling areas of hills. Then as they get closer to
us, closer to the viewer, they get a little bit longer and a little bit
more consistent. You'll see we're creating
a sense of maybe a hilly, grassy hillside with
sections of grass that are definitely not mowed but
look pretty natural to me. At least as they come
closer down towards us. We can even start to maybe add some individual
strands of grass. Maybe some wild flowers in the drawing can get
a little bit busier, but you have to still focus on creating short, quick lines. Drawing quickly with
your pen is how you're creating these really
short dashed lines. Now let's use the same
approach when we're drawing in the grass in
this cozy cabin scene. We want to start with
the outline creating that triangle that guides
the eye back to the cabin. Remember what I talked about? We're creating tall
and short lines that form that grassy outline. They're leading
down towards us and they're getting a
little bit taller as they come down
towards the viewer. If that's the
outline in the back, then we can start
adding a few elements or a few areas of detail here
as they get closer to us, this tall, short areas of grass. And some taller fans of grass, or fans, I don't know
the right word is. As they come down towards us, closer to the bottom
of the drawing, we can add some leaves and some taller sections of
grass down here as well. Be confident in your drawing
and in your framing as well. We've talked about
the composition leading towards the cabin. We don't necessarily
need a hard stop. In fact, it's a lot
more effective if your grass doesn't end
all in the same place. Creating a looser boundary to
the composition really can make the drawing appear a little bit more
inviting and also a little bit more professional. If it fades into
white as opposed to having that abrupt end, We can recreate the grass on this side beside
the cabin as well. Drawing it up against the side with tall marks and tall lines and some
short ones as well. It'll be helpful as we
draw the stairs to ink in an area for the stairs
using grass as our guide. I'm following the
right hand side of the staircase down towards us. Then on this side, I'm following the left hand
side down towards us as well. You'll see we're creating a
guideway for this staircase. At this point of your drawing, you should have a
grassy outline here, back towards the trees, and areas of detail
towards the viewer. In the next lesson,
we'll work on adding some more details to the bricks and the
stonework of the steps, as well as then approaching
the cabin itself.
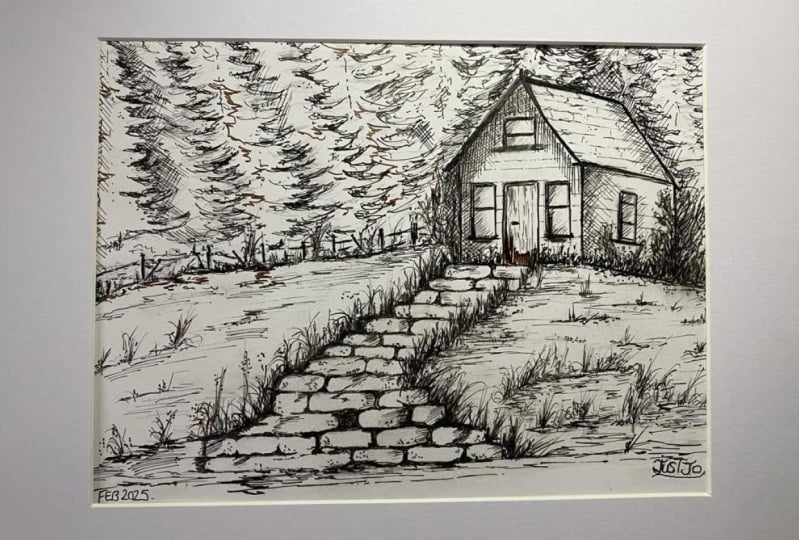
8. Drawing Details: Now, drawings need details in order to be
visually stimulating, to look at details, tell a story about the characters
within your drawing. First, let's start
with the winding steps that we drew in with
pencil a few lessons ago. When we're drawing these steps, we've drawn them in a pattern
that enforces perspective. What I mean by that is
the steps appear like they're receding away from
the viewer, away from us. That changes how we draw them. First, we're going to ink in the details that
we're confident in, which are these
horizontal lines. The great thing
about this is that these lines don't
need to be straight. In fact, it's better if
they aren't straight. We're drawing them in
very lightly here. I'm using a 02 pen and I'm just drawing in
those horizontal lines, tracing the pencil
lines we have. Now, this curving staircase can appear a little bit tricky, but interesting way of making that perspective work is how we draw the vertical lines downward on either
side of the staircase. Now stick with me
here. This might not make sense initially, but I think it will over time. We're going to start with
drawing a vertical line down from the top stair, and then a vertical line
down from the next stair, and a vertical line
down from the next. You'll notice that the
vertical line down from each ascending stair is getting closer to the end
of the line below it. That's how we'd view
these steps in real life, because they're curving
as they curve around, we see less and less
of the stair above it. The same would happen
on the right hand side when the stairs curve to the right and this step are far back from the stairs and the step
below it is a little bit closer until they switch directions and the
same happens on this side. The beauty of this is that it's supposed to be a
home rustic cabin. We're assuming that the masons
who built this staircase, we're not too
worried about having the same size of steps or
health and safety codes. We have our staircase that's twisting down from the cabin. Now we can draw in
the cabin itself. We're going to start with
the outline of the cabin. We have the outline
here in perspective, but I'm going to draw
the vertical lines in just a tad from
the pencil lines. That's to make the roof
appear a little bit more realistic and overhang
the side of the cabin. I have this outer line
here and I'm moving in just a hair tiny,
tiny little bit. And you don't really have
to measure this out, you can just guess just a
tiny little bit on each side. It doesn't have to be uniform. But then I'm drawing from that outer line that
we drew with pencil. And drawing up from that outer
line, we drew with pencil. Then following the rest
of the pencil lines, the exterior pencil lines here, this backside line
that we can see, I'm going to do the same
thing and draw it in just a hair from the line
that we drew with pencil. That's because gutters and the overhang on roofers are really important
architectural feature. Not including that might make the cabin appear a
little bit unrealistic. Connect the underside
of the cabin here. Then I'm drawing
a line up that's mirroring the curve of the
roof on the left hand side. That's because the underside of the roof is visible
from that side. When we're viewing the cabin
from our vantage point, now we have the steps going
up here to the cabin. And it wouldn't be
complete without a door right in the
middle of the cabin. I'm going to draw a tall
rectangle that goes up to about where the roof begins and follows
that same line perpendicularly to
create a rectangle. Next, I'm going to mirror
the top and the left side of that rectangle to
create a sense of depth and to create a doorway. There's the top and
there's the left side. Because we're viewing the
cabin from underneath, we see the underside of the doorway and
the left hand side. Next we're going to
add some windows. I think it'd be
nice to have a nice little cosy window up top here. The same perspective
rules apply. We're going to add the top of the underside of the window
and the left hand side, then why not some small
rectangular windows here? It doesn't matter if these
are uniform or straight. The key thing is that they follow the same line of
the top of your door. And you guessed it, the
same thing applies, drawing in the top, the
bottom of the window, and the left hand side. Now, these are very
loose perspective rules. If we're drawing a lesson
just on perspective, we dive into this in
a lot more detail. I have classes on
perspective that go in a little bit farther as far as how to draw things in perspective or sketch
them in perspective. But for the purposes
of this class, you can focus more on the shape and feel of the drawing
in the pen sketch. That's why I'm not
going into a lot of detail when it comes to
these perspective elements. Next we're going to draw
a window on the side. This is a little bit of a
trickier area of perspective. But you want to draw
two vertical lines. And the top and bottom of the window should mirror
this top line here. That means they slope
back towards the back of the cabin on the same way that at the bottom
of the roof does. Now, since this window is
to our right as the viewer, we're going to be able to see the right hand side
of the window. I'm drawing another line in on the right hand side and
another line in on the top. Now we have our cabin inked in. In the next lesson,
we're going to add some detail and shading
on the cabin and rocks before adding some
final shading and light on the trees in the
areas of detail in the front. Fun thing about
sketching is detail. Adding details really make
your scene come alive and can help you tell a story about the place that
you're drawing. Now there are some
details we need to add before we can get funky. Those are specifically some
details around the cabin. What are the doors made of? What is the roof made of? What windows are these? We want to first, maybe add some cross sections
to the windows. Just adding lines in the middle. Lines that are a little bit
thick have two sides to them. We're mirroring the angle of the top of the window that
we're drawing the line over. Next, we want to
make sure that these windows have window sills. We're going to create another
box underneath the window. You'll notice the boxes I'm drawing are definitely
not straight. That's fine. A few
things are straight. In life, the boxes that I'm drawing here really just
add to the whimsical, rickety charm of this cabin. Some of these things
might not appear obvious, but when you look
at a lot of houses, you'll notice these
are features that most houses that are well
built will have windows, windows that have
cross sections, like roofs that have a
little bit of overhand. We next want to you talk about
what this cabin might be built of because that'll determine how we
draw the side of it. I'm thinking it'll
be a wood cabin. For our purposes, we're
going to focus on drawing some boards that go
horizontal across the cabin. Now we have this line of
the windows and roof. We want to maybe start
with a line that goes on the same trajectory as that line that gives us
something to work with. I'm not a huge fan
of using rulers, but I also want to space
out these lines evenly. A good way to do that is to draw a line like we did in
the middle of our shape. And then go and go has, again, what I mean by that
is now draw a line halfway up to the
top of the roof on the same angle and a
line halfway down. You'll notice that these
are not perfectly space, but these give us a way forward that's a little
bit easier to follow. Instead of just going
up from one line, that means we can draw another line dividing that by half, and another line
dividing that by half, another line dividing
that by half. And another line dividing
that by half. You guessed it. Another line dividing
that by half, another line dividing
that by half, and so on and so on. When it comes to the side, we're going to do
the same thing, but we want to keep the angle
consistent to make it look like this cabin is
receding away from us. I'm dividing it in half
and then I'm drawing a line having the top and
a line having the bottom. I'm going to do the same thing, cutting each half in half again, to create lines that are a
little bit more consistent. I want to make sure that I'm keeping the roof
line the same here. Then to make it appear like they have a
little bit of depth, I'm adding a little bit of pat on the corners here to make it appear like
these areas of wood. Maybe it's more like
a log cabin Instead of just a wooden board cabin on the left hand
side of the cabin, I'm bulging out the sides a bit to loosely correspond
with the lines we drew. Let's do that in the back too. I'm adding a little bit
of circular shapes here. I don't know what the
right word for that is. That just bulge a tiny, tiny, tiny, little bit. To make it appear a little
bit like a wood cabin. We then want to draw a door
with a little door handle. I'm just going to do that
with a shape like that. A lot of doors will have little fancy
elements of wood here. I'm just drawing some
really loose triangles to make it appear like
there is a door there. Then let's talk about
the roof itself. We're going to use the
same method to draw shingles on this
roof by dividing this line in half,
then in half again. In half again, and
in half again. But when we have those lines, we want to make
it really, really rough and unpredictable, because shingles,
especially on an old, cute old cabin like this, are not going to be predictable. We have the horizontal lines, and now we're just sketching in really light vertical lines that give the appearance of shingles or some sort of
cladding on the roof. These don't have to
be super detailed, and in fact, it's kind of
better if they aren't. It adds to the sketchy
nature of the drawing when it comes to these
steps down here. I think we're just
going to make it look like they are made of stone. All that means here,
we're going to add some vertical lines that are
unevenly spaced across them. What I'm doing is
with my 02 pen, a vertical line downward, followed by a tiny little bit of shading in the crease
there to make it look like there's
multiple stones. That will make up
one step Again, I hope you didn't use a ruler
in this section because it really does give
us some charm to make it a little bit uneven. So we have the textures and most of the
details shaded in. Now in the next lesson, we're going to go over
adding some final details and adding some shading to
really make your drawing pop.
9. Shading : Now if we just left
our drawing like this, it might look like
a cute cabin scene, but it's losing a lot of what makes ink
drawing so special. Specifically, that's a more nuanced light and dark spectrum. Shading is a way that
we can really flesh out our drawing and make it feel
more three dimensional. Before we call our
pen drawing complete, I'm going to focus on
hatching and shading, and light and shadow.
Let's dive in. A lot of artists might
be tempted to shade haphazardly and
creating lines and areas of darkness with
overlapping lines that aren't really intentionally laid in
one direction or the other. But you notice here, this
gives us a couple of different examples of what
shading can look like over top of a pattern that is very similar to the wooden
side of the cabin, which will shade later
on in this lesson. On one side here we
have lines that run horizontal to the broad, horizontal slabs of wood. To me, those appear like
they're more adding texture to the wood as
opposed to shading, because they complement and run horizontal to those lines. However, over here you can see that I've added
lines that go almost vertical or very diagonal
to that initial pattern. I think that adds a nice sense
of contrast that actually adds a little bit more shading
and depth two texture. When I'm adding
shading to our cabin, I'm going to be focused on
shading diagonally using real quick and light lines to create a sense of darkness
over top of the texture. This leads me to my next
point about shading, which is that you can
see that you don't want the lines to overpower important directional
lines underneath them. If these lines obscure the
horizontal sections of wood, then we really lose the sense of shape that we really
want to keep intact. We want to make sure
that the shading we do doesn't overpower the
shape that we're shading on. This really comes into play in terms of shading over grass. Say if we want to add the
shade of this tree here. I'm going to focus on shading in a opposite direction as
those vertical lines. But also shading very lightly. That means using
very quick lines, but making sure that the
shading I lay down here doesn't obscure the grassy areas of verticality that
it's over top of. You'll see how my area
of shading is visible. Maybe a little bit lighter
than it would be in real life, but it doesn't obscure the
areas of texture here. Let's see how it
would look if I did go really early, really dark. To me, that distracts from
the texture of the grass. We want shading to complement what we're drawing and not to really take away
from the textures that we've drawn underneath it. When it comes to
shading the cabin, we also need to determine
where the sun is coming from. Let's say the sun is
coming from over top of us pointing down towards
the front of the cabin. That means this side of the cabin is not
getting sunlight. So we're going to use that
same really light method we just used to add diagonal lines over top
of the side of the cabin. You can layer these lines
up over time and you want to create a little
bit of a darker, darker facing side of the cabin. It doesn't have to be Ally dark, but enough that creates
a nice sense of contrast with the white
light side of the cabin. You can see up here, the
same thing applies to the underside of
this roof because this underside would not
be getting the sunlight. I'm adding some shading
underneath here and a little bit of shading
that mirrors the side of the roof underneath. We're going to do the same thing here using the hatching
method we talked about on the underside of the window and on the
left side of the window. Why not add some darker shading
over top of this window? Here too, our drawing
is almost complete now. Let's take a step back and look at what we need to change, fix, or improve on.
10. Final Adjustments : We pretty much have
our drawing done. But one thing to keep in mind whenever you're
doing a sketch, no matter how quickly
you're doing it, is to take a second
to take a step back, maybe leave your sketch while
you get a cup of coffee or a mug of tea and come back to it and see what
needs to change. One thing to keep in mind is
making sure your drawing has the full value or full range of lights and darks.
Here's what I mean. You can see in this scene
of my own desk underside the desk and towards the back of the scene there's some
extremely dark areas, but there's also some extremely
light areas as well on my keyboard or on the top of
that skill share date block. Even though contrast
is a great way to add depth and emphasis
to your drawing, you need to maintain a
sense of lights and darks, and ensuring you have
a broader range can make your drawing look
more full and alive. One area I can see
off the bat that we could add some shading to is behind this first
tree in the way. In the same way I talked about
during the lesson prior. Adding this hatching method
of long diagonal strokes can really add emphasis
to the branches in front and also create a sense of depth to
the tree itself. I'm shading in the left hand
side of this tree behind. Let's see how it looks. If I do it on the next trees as well, I'll shade in just the left
hand side of the tree behind. Again, just the left hand side, making sure that
there's some branches in front that are not in shadow. We talked about earlier
how fading out these trees can make it look like they're
receding into the distance. The same can be true when we're adding some further
shading to them. I'm shading these
first few trees, but then my shading will
get a little bit messier and lighter as it goes
back into the distance. Use this approach to analyze the rest of your
drawing as well. Do you have some
very dark sections? Do you have some
very light sections and you have
sections in between? This varied approach to adding shading can really
make your drawing pop. I think one of the most
important parts of creating art is
making it your own. Before we can call this
drawing really finished, I'd invite you to pause this class and spend
some time adding your own embellishments or
continuing on to add shading, maybe in ways I
haven't thought of, or add different shapes or different details
that really suit your own style or suit
your own interests. Then let's meet
back right here to finish up this class and
talk about what's next.
11. The End: So that's it. We've created a really funky ink drawing here, and I hope you've enjoyed the
process as much as I have. As you can tell, it doesn't take long to draw drawings like this. We've talked about shading,
we've talked about depth, we've talked about drawing
confident quick lines. And most of all, we talked
about leaving rulers behind and just focusing on having a little bit of fun
with your pens. I hope you continue drawing, and I hope you continue
to experiment with ink. But before you go,
remember to post your project in the project
page right down below. I've linked it right
here in the notes. So it's really easy to find because I want to
see what you've drawn and I'd love to hear about your drawing process.
What did you find easy? What did you find hard? And what do you think you're
going to draw next? Thank you so much for taking this class and I hope
you keep sketching.
 Sam Gillett, Pen // Pencil // Procreate