Transcripts
1. Introduction: Hello, I'm Nick. I'm an
artist and illustrator. I love taking a little
time each day to relax, unwind, and join my sketch. It's something that
most artists do. You don't need to be an
artist to enjoy doodling. You don't need to be able to draw and you don't need
any fancy equipment, just a sketch book and a pen. Stays fast-paced, digital age, it's easy to forget the
joy of using pen and paper and just letting
your imagination run wild. I often use doodles to fill in spaces amongst my other
sketchbook drawings. To inspire more
complex doodles and patterns that has a basis for finished artworks.
Doodling is fun. Let's really engage in the
flow of lines and shapes, went through a state
of relaxed focus. Stress dissipates, and
we get a sense of calm. Doodling allows us to escape
the pressures of daily life, immersing ourselves in the
therapeutic act of creation. It's a form of mindfulness
where we embrace the present moment and just enjoy the simple
act of drawing. Sketchbooks provide us
with a safe space to explore ideas and that
sharp creativity. Let me put pen to paper. The act of doodling
helps us to tap into our subconscious and
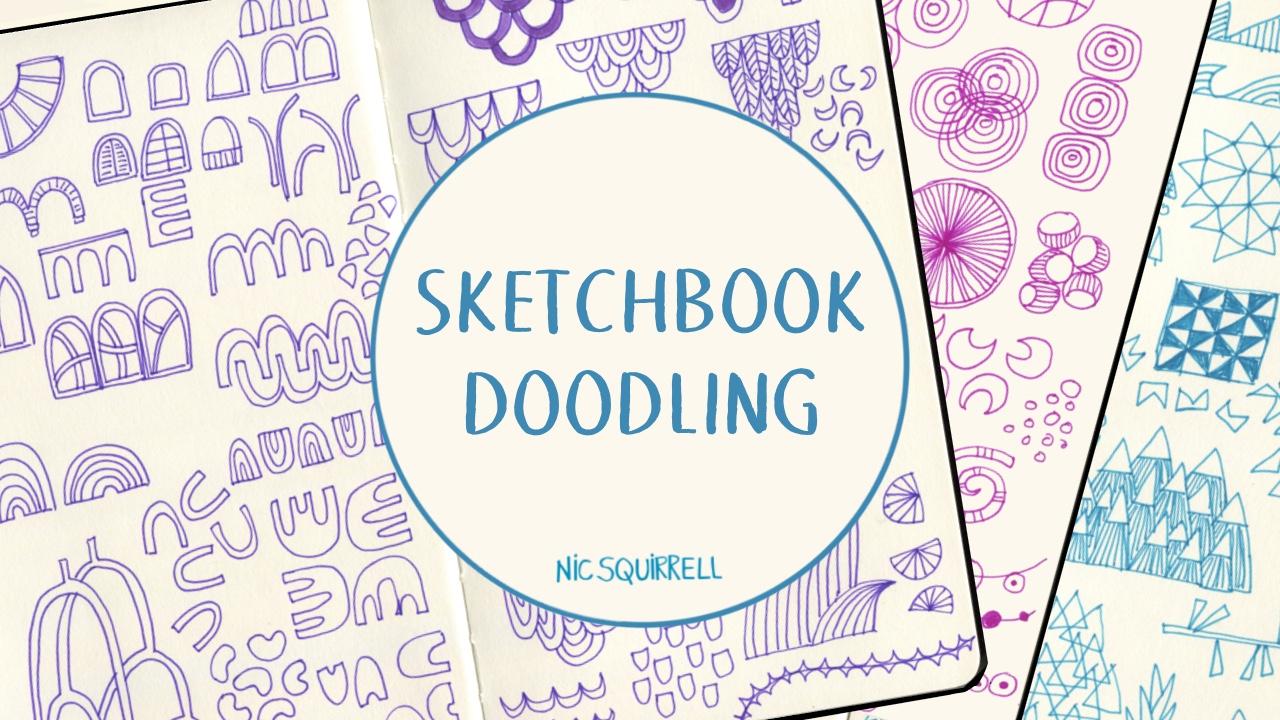
looking inspiration. In this class, we'll be filling
the sketchbook with fun doodles based on
simple geometric shapes. We'll start by
taking a walk around our local area and finding shapes and patterns
to photograph and to use as a starting
point for our doodles. Then we'll use fine
liner or felt tip pens to develop these shapes into more complex doodles
and patterns, each of which can
later be used as a starting point for larger
and more intricate designs. We'll let our imaginations run free and we'll see
where it leads. At the end of the class,
you'll have a library of ideas which can be used
to start a daily doodle, sketchbook, or as part of
your finished artwork. Grab your phone and
your sketchbook and get ready to embark on a fun
mini venture in doodling
2. Let's Go For a Walk: Geometric shapes such as
circles, squares, triangles, rectangles, and lines form the building blocks
of our visual world. A great starting point
for our doodles. We're going to begin by
going for a walk around the local area armed with
a smart phone or camera. We're looking for
shapes and patterns to photograph for inspiration. Your photos don't need to be
amazing as you'll just be using them as a spark
for doodler ideas. We're all looking for
specifically squares, rectangles, and diamonds, and arrangements of
these of course. Lines and stripes,
triangles, circles, arches and semi-circles,
and wavy and weakly lines. Don't forget to look
up and look down. You'll find lots of
geometric shapes by looking at buildings,
windows, walls, pavements or sidewalks,
manhole covers, bridges, cranes, and all
sorts of man-made structures. Some shapes are going to be
easier to find than others. You'll probably
end up with loads of squares and rectangles, plenty of stripes and lines, maybe a few triangles and
less circles, arches, and wavy lines, depending
where you live of course. It doesn't matter,
just photograph shapes you find interesting. When you get going
using this technique, you'll unlock plenty of ideas. Once you start looking
at what's all around, you'll find yourself seeing everything a little differently.
3. Squares Rectangles and Diamonds: Now we have lots of
reference this time to get the sketchbook
and pens out. We're starting with
squares, rectangles, and diamonds because you'll have found a lot at those
to photograph. I took a load of pictures on
a recent visit to London and also to Canterbury so I'm
going to work from those. I'm not going to copy
the photos exactly, they're just a way
of getting going. I'm going to show you
my method of using the photos as a starting point and then just letting the ideas flow and develop
into something else. Your ideas will be different to mine so please do
feel free to go off piste and let
your imagination take you in other directions. That's really the point
of this class after all. I'm starting with these bricks. It's not a regular
brick pattern. It's called a Flemish bond, where we have bricks
alternating between being front on and side on. We have a rectangle, then the square, and so on. The line already makes
a pass on its own, but I'm adding
more bricks to it. I'm going to match this
third row to the top one. I'll just add a few
dots for texture. Here's a classic brick
pattern with all the bricks the same size and each brick starts
halfway along the next. Maybe there are different
brick patterns where you live. I found this brick path
with really uneven bricks. I'm drawn to slightly
wonky things in general. These are a little bit random which I think makes things more interesting unless of
course you're an engineer. I'm going to take
this further with thinner rectangles
for a different look. I'm trying to make
sure the bricks don't line up horizontally. It's a good idea in creative
projects to think, what if. So what if these
bricks broke ranks and started going off in
a different direction? These bricks are escaping
from their pattern. This would be good as
a whole page doodle. There's so much here, but I'm attracted to this
area where there appears to be a general jumble
of different sized stones. There are also more even parts
like this row of squares. If I color them in, it gives
a very different look. It's worth exploring
line art and solid shapes and
combinations of both. The line art looks
light and airy compared with the
more solid blocks. You can use this to draw attention to different
parts of your art. Let's do some grids. Such a simple pattern. You can put other shapes into the squares or
between the squares. You can break these out
again like we did earlier. Checkerboards can be drawn by drawing a square and
then dividing it, and I'll color in
alternate squares. Then we can make it more
interesting one by drawing the individual squares by hand which will naturally
be a bit wonkier. Then I'll add some
more chaotic squares breaking away from the
original structure. This photo gives me an idea. I'm going to make
another grid and this time join the squares
together with lines. Then I'll put some more
squares in the gaps and join those to each other too to make a more complex pattern, we've got a grid within a grid. A diamond is a square
on its side so I'm going to make a row of
tilted squares and diamonds. We can make a grid of
diamonds by drawing a square and join the
opposite corners diagonally, add more lines halfway
along and half those again. I'm going to color
alternate diamonds in. Then I'm going to do
a freehand version. Even though diamonds are
just squares at an angle, they're harder to draw. These will have a much
more organic look. I'm going to let these
wander off course. I'm going to build on both of these and fill in the space with a mix of diamonds and rectangles
all at different angles. Then I'll do the same again with more space between them
and a bit of texture. This grill is just rectangles arranged in a different way. Let's see what else we
can do with rectangles. Just a simple line
to start with. Then I'll vary their position. This is making me think
of books on a bookshelf, all different sizes and leaning
in different directions. Diamonds can be long and
thin or short and wide. You can make them by
drawing alternate zigzags. You can divide them up. We can make a grid of
separate diamonds. I'm going to move on from
my bookshelf and stack some rectangles messily
on their sides. You can see how new ideas sprout from the seeds
of other ideas. I love these windows with the
roof structure behind them, dividing them into
interesting shapes. I'm not being accurate
to the photo, but it makes me think
of different ways and dividing shapes up. Let's leap off that and do
some divided rectangles. You could take it a
little further and use patterns or fun
color combinations. Let's try that with a grid
of squares and divide those. Now I'm going to do some
rounded squares and rectangles taking
inspiration from this idea. I'm not lining these up. Then I'm going to
add some holes. I'll just color
some of these in. You can have them all
solid or different colors , so many possibilities. Let's do something similar here, this time with concentric
rings inside them. This is making me think of
a stack of wrapped gifts. Let's do a vertical version of these with vertical divisions. You can make the same
thing with different by changing the orientation
and proportions. It looks like rectangular
sunflower seeds. This bridge caught my eye with the arch cutting
off the rectangles. We get to freestyle the shapes. Here's a square divided
in multiple directions. Now I'm going to look
at these clay tiles. There are lots of buildings here in Kent covered in these, and they all overlap each other. I'm going to start
with a square and add more tiles behind with them
all overlapping each other. I'm going to fill each one with these lines to see
how that work. A whole page of that in different
colors will be amazing. This building had these little
square pyramid details. Because of the way
the light hits them, the lower parts are in shadow and the sides were a bit
darker than the top. I'm going to draw
some more squares divided into triangles. The way these bricks have
been laid is in a grid of two horizontal bricks
and two vertical. I like that as a pattern. I'm going to put some
stripes in as well. Let's add to this and
make a stack of them. You can see diamond
shapes in there too. I'm going to make a grid of nine squares and then divide alternate squares
into nine as well. We've almost filled up the page. I often use these doodles
to fill in gaps in my sketchbook so I'll
do that here too. You can see that using really simple shapes can give you so many different results. There are endless other
ways of using squares, rectangles, and diamonds
to make doodles. Fill up your page and
see where it leads you. Here are some examples
of my art using squares and rectangles
as a starting point.
4. Lines and Stripes: Lines and stripes
are easy to find. These stripes are boundaries
between different materials. The top is divided in two. The lower boundary is more of a wiggly line and the
lower part is textured. The middle part has
these metal rivets into geometric rows. The contrast between
different materials and the straight lines with the
wavy one interested me. Differences are good. These stripes are very
evenly spaced long ovals. I'm going to break
those out and tip them. These stairs give the
feeling of perspective because the stripes get closer
together towards the top. I like these floorboards
because they're arranged in stripes and then each board has its own different
horizontal stripes, maybe caused by the way they were cut or the way
they're polished, I don't know, but I like
the stripes within stripes. The vertical lines on these escalator steps
are fun to draw. I'm going to make
a box to draw in divided into four stripes. On the lowest stripe,
I'm dividing it in half. The ends again to slip in, and then I'll divide each half
in half again, and so on. This is a good way of keeping
your stripes fairly even. I'll do the same again for
the second stripe down. These two sections are
representing the vertical parts of the escalator steps and the other two are the
horizontal treads, so they're going to
go the other way. I'm adding some extra
stripes in between too. Here are some more stripes
from different materials. Stripes on stripes, a stripe of squares, and a road marking stripe
with some texture. You could do a whole page of stripes with different
patterns in them. I love these tree trunks making their own stripe pattern,
more striped stripes. There are a few little
leaves in here too. I want to try some other ways of depicting the tree trunks. The pattern on them could
also look like this. Let's do something else based
on the escalator sketch. I'm going to make stripes with the lines going in
different directions. It gives this strange
feeling of perspective. Let's make some more
stair shapes with them getting wider and
deeper as they get lower. I'll divide each one into
the same number of stripes. I'll make a square and
divide it into four. Then I'll put in some
stripes, this angle. Each one is going to
match up to the next to give a simple
herringbone effect. Moving on from the tree trunks, I'll make these more even. Now, some even stripes,
randomly divided. Simple stripes with lines. You can fill in quite
large areas this way, that is strangely satisfying. We can make a grid by overlaying horizontal
and vertical lines. We can use lines to crosshatch bearing the direction
of the lines. This is a great way of
shading and filling in space. You can add more
lines and diagonals. Here is a train track
and some stitching. Some more stitches. It always looks very
different when you have multiple rows of something. Now, cross stitches, I'm going down a whole different
route now of embroidery. Even something as simple as
little dashes can be very effective and can be
arranged in different ways. Some random lines. Let's take this further. I'm going to draw a line
and another parallel to it. The next one can go behind
it as if it's a ribbon. You could color in
the background, that would look very effective. Here's a rope, it has diagonal stripes
where the rope twists. Let's try some zigzags. How about some trees
using lines and zigzags? Then they make me think
of telegraph poles, which look different
all over the world. Each doodle leads your
mind to the next. We've got really far away
from the original photos, but that's absolutely fine. We've free-styling our
geometric doodles. This makes me want to
try something else. I'm not sure if this will
work, but let's try. Experimenting is
part of the fun. I'll just fill in this last bit, and I'm making this
up as I go along. You don't need a plan to do it, just go where your
imagination takes you. This was my art made based
on stripes and lines.
5. Triangles: I don't have as many
photos of triangles. They're a bit harder to find. Let's start with these railings. Just really simple
triangles in a row. I'm going to take it
round the corner, make some more solid. I'm going to draw a
row of triangles, then another row below it, with the points
hitting the middle of the base of the
triangles above. I'll do another version, this time with the
points landing in between the triangles above. This would look great in a
few different turning colors. Here's another version, this
time taking their notice of the row above and making the triangles of varying widths. We've got three versions
of the same thing, just arranged
slightly differently. This scaffolding caught my eye. Because triangles
are directional, we can alternate them. Bunting flags are just
triangles on a string. The roof of the building
is full of triangles, which gives me an idea. I'm going to draw
a rough circle of dots and then join them
in various directions. There are all sorts of different triangles in the middle, like a faceted jewel. This road surface has lots of
scattered triangle shapes, which are nice for
filling in areas. Let's just play with
triangle shapes and see what happens. We can use different kind of triangles stacked
in different ways. We can divide triangles in half. I'm going to build
out these shapes. Now some divided triangles. Each doodle leads to the next, building upon everything
you've done before. Maybe some icicles
or tree branches. We're going to do another
version of those tree trunks, but this time with
triangles for the markings. Triangles with stripes following the direction of the sides. Curve triangles to make waves. Triangles striped in
three directions. A pyramid of striped triangles. Random triangles. You can make simple rules
about how you arrange shapes. Rounded triangles. Random triangles but all
in the same direction. This makes me think of trees, so I'll add trunks and the
moon for a mini forest scene. Here's a rounded
triangle making a cone. Triangles on the side of a square, that
looks Scandinavian. I'll draw a square, divide it in half
and half again. I'll put a cross
in each quarter. Then going clockwise around
each of the quarters, I'll fill in every
other triangle to make windmill shapes. I'll make another grid and this time it's a three-by-three grid. I'll put a cross
inside each box. Then color them in
and alternate between coloring the top and
bottom or the sides. A string of triangles. Triangles with one curved edge. That leads me on to arrow shapes and exaggerated versions. A row of triangles. Then more behind them. This looks like a
mountain range, so I'm going to add some snow to the peaks and a little sun. Overlapping shapes
are always good. Some boat sails. Some grass seed. Some overlapping triangles. Some more divided shapes. Squares divided into triangles. You could do a
grid of these too. Double triangles. Just filling in some gaps. See what other triangle
doodles you can think of. Here are some examples of
my triangle-based art.
6. Circles: Now we've got the circles. I've just got a few
photos to start us off and then
we can freestyle. A simple grid. I'm going
to join these together. I'll put a circle in each space, and I'll join those
to each other. We did this with squares too. Another grid, but with chunky
circles closer together. We can make those
into rings too. Let's do a line of circles
like these rivets. Here's a metal grill with
circles geometrically arranged and the next
row is shifted over. This manhole is quite complex, but we can simplify it. A grid of similar circles. Here's a photo of my coffee
and just some little stones. Lots of different size
circles together. I'm going to have some escaping too and some chains of them. Circles divided in
different ways. Rings, and striped rings, doughnut shapes with sprinkles, of course. Divided circles, cycles divided with curved
lines like pebbles or marbles. Circles with rounded stripes, rings and circles, some solid. Overlapping circles. I'm going to cover some
of the intersections. A whole page of that
would look great. You can get a similar look
with a loopy scribbles, that could make a fun border. Let's go back to circle
divided into slices. I'm going to add some rings
to my overlapping circles. Loopy scribbled circle,
some overlapping loops. Circles with circles inside, either evenly spaced or not. A circle intersected
with curved lines. Overlapping concentric
rings like ripples. Lots of great shapes at the intersections here that
would make an amazing page. A parasol. Some ovals for the few
circles in-between. Circles divided with curves. Striped rings. Looking at the divided circles, we have moon shapes. Then there's spirals and shells, berries, or maybe a
string of lights. Flowers. We mustn't forget dots which are great
for filling in spaces or adding texture. Just filling up a few gaps. What other circle base
doodles can you think of? Here's some examples
of art I've made using circles as it takes
7. Arches and Semicircles: Some places have lots
of arch windows, doomed roofs and vaults. They weren't many when I
went to take my photos, but enough to get started. Here is a semi-circle of bricks with gaps in-between
for the mortar. There are so many arches here. Some are really a square
with a semicircle on top so much shorter with a much
shallower arch on the top. Then there are the pointy ones. Some go together and
share the same surround. I draw lots of arched windows, so I'm just drawing a
few here for memory. Some have shutters, some have rectangular window
panes and just putting in the
surround and makes them look more like windows. This one with balcony. There are also some
partial arches and there's a great
chance to play with. Here we have a row of
semicircular arches with a small gap between the
sitting on a little ledge. Here's a pointed arch. There are two more
arches inside it. That's not very even
but never mind. Then we can do arches
as negative space. Let's turn this around. We've got joined arches, arches divided with curves. Split arches, maybe like some roots and this would
make an amazing page. Let's take this
idea and flip it. Let's do some loops and scallops like tiles or fish scales. Depending on which
bits you color, they look very different. Let's do another with
more lines inside. Now some more uneven ones. You can color these
too Let's do another. This was going to be like
feathers with a line down the middle and
then diagonal stripes. How about overlapping loops like festooned of things
hanging down. Some more arches with
the number of the row on top making the arches deeper each time like
terracotta roof tiles. We mustn't forget
about rainbows, tall arches, or
classic semi-circles. I don't have the right amount
of stripes. Really do? Tumbled arches,
alternating arches. An arch with arches
chopped out of it will be little fat
arches like chutes. There's some question
shapes here. Overlapping them looks
like choppy waves. More arches with
different shapes. Now some semi-circles
in a stack like bowls. I'm going to put some
liquid in the bowls. Maybe it's blackcurrant juice. Divided arches. In-between, these scallops is
a shape like this. Some arches with another
row on the other side. Let's add more behind. This will also
make a great page. Let's do something with
these partial arches. This is a shark's
fin or a weight. Let's fill the spaces in now. Even simple pattern, this
can be very effective. Is it like mushrooms? What other details
can you think of? Here's some examples of my art using arches as a
starting point.
8. Wavy Lines: This is effective some
beams on the ceiling, but I'll draw it sideways. The lines are straight on one
edge and wavy on the other. If I draw another
line alongside it, I'll get a 3D look. I'll make this one
wiggly on both sides. I'm going to put a
hole in this one. Let's do some stripes. We'll give those a
3D look too like overlapping pieces
of wood on a fence. More wavy stripes. I'll add more lines in between. For this one, I'll start with a wave and for the next line, I'll exaggerate the curves by going higher at the
top of each one. Then underneath I'll
do the opposite, going lower at the
lowest curves. Let's do another with some
random little circles. I'm going to draw straight lines and go around the circles. You could try this
with curvy lines too, there are load of ways
of burying this idea. Going back to the roof beams, I'm going to do another version. Then I'll add some horizontally. This would look great in the
layered transparent colors. It's like a wiggly tartan. Let's see what we can
do with some loops. I'll add some stripes. Another scribble, I'm
going to make this into a ribbon by drawing another
line directly below it, keeping the verticals in the
same place as the first. These loops are fun to do. I'll do another one
following the layout first, again, matching the verticals. More loops again with
the same method. This is now making me
think of knitting. I'll draw a row of loops
like joined up, let it ease. Then I'll do another
round underneath with the loops going through
the lower bits of wool. A line with a wave. The second line going further at each crest with crossing
at the same place. More wave shapes evenly spaced. The next row down
reflects the top one. This makes me think of a path, and this time I'll keep
the horizontals lined up. Here's some more wavy shapes
or wiggly shapes like coral. I just want to draw
in some curves, and take the wider
in some places. I'll do another behind it. The more I add, the more complex it gets. Let's do something else. Wavy string is getting
thicker and thinner. I'm going to fill it with arches following the contours
and the strings. This time, I'll start with a squiggle and then
add another on top. I'll fill those with lines. Let's expand on that. I'll do another line
intersecting the first. Maybe it's actually easier to start at the intersection
and work out. Then I'll fill those in like before and I'll add some more
lines on the outside too. You can just keep filling
these up as much as you like. What other doodles
can you think of. Here are some examples of
my art using wavy lines.
9. Next Steps and Project: Now you have a huge
reservoir of doodle ideas, each of which you
can develop into a more complex drawing
in your sketchbook. You can take these ideas
further in all sorts of ways. You can try experimenting
with new shapes, for example, shapes from nature or irregular
shapes would be good. Try combining shapes to create
interesting compositions. Once you have the basic
structure of your doodle, you might want to add
details and persons. Insert writing persons
within the shape or extending them
beyond the confines of the geometric forms, don't be afraid to
push boundaries, try new things and
challenge yourself. After all, it's
just a sketchbook. Remember each doodle is
a chance to learn, grow, and improve your skills, as well as being just
plain, enjoying, and more. The project for this class
is to follow along with my methods and create your
own pages of doodles. Post photos of any or all of your pages in the project
section of the class. Remember that this is for fun, so your doodles don't
have to be perfect. I always look at class projects and I can't wait to
see what you do. Just a quick reminder, post
your work on Instagram with the #NICSQUIRELLSKILLSHARE
for a chance to be featured in my
Instagram stories. Follow me on Skillshare
to be kept up to date with new classes
and discussions. If you've enjoyed the class, please could you
leave me a review. It really does help me and it helps others to find
my classes as well. Happy doodling and bye for now.
 Nic Squirrell, Artist and illustrator