Transcripts
1. Intro - Setting Up a Camera Room in Your Home, Office or Place of Business Intro: Hello, and thank you for being a part of my class. In this class, you'll learn how you can set up your very own camera room for doing things like indoor portrait, head shots, family portraits, and so on. Will cover studio lighting such as placement of light, what each light does, and settings and adjustments to help you get the most out of your equipment. Well, even talk a little bit about backgrounds. Hi, I'm 30 nu bar, and I've been a professional photographer throughout most of my adult life. And it's been one heck of a journey. And now I've come full circle. I remember starting with just simple models, lighting gear and backgrounds, and then to several homes studios where we had nice camera rooms. And then finally I moved to a commercial space with a really nice camera room. And now I'm back again to a smaller, more portable lighting setup that is easy for me to take along when doing mobile portrait assignment. We're going to be doing a traditional headshot photo shoot from the actual shooting to the complete finished edited portrait. Then we'll go through portable lightweight lighting gear that you can use for on-location portrait photography. While most of the information in this class is for intermediate to advanced photo students, the section on doing a photo shoot using an iPhone, along with portable fluorescent and LED lighting gear may be very helpful for beginning photo students. A good companion course that can help you further understand portrait photography and lighting. My scene, the light as a photographer and artist class. It doesn't matter what brand of phone you're using or whether you are going to be using a digital SLR or a mirrorless understanding and mastering light is more important than equipment. I wish something like this was available when I was first getting started. It could have saved me years and years of trial and error, frustration and experimenting. I know you want to get started, so let's get right into it and thank you very much.
2. Setting Up a Camera Room - Lights & Backgrounds - Part 1: I think you're going to find this segment really interesting on how you can put together a camera room. Whether it's in your apartment, in your home, or you have a commercial space. I'm going to show you the things that I did anyway, and it worked well for me for many years. So let me just give you a little bit of background in case this is your first course with me. But I've been in the business for a long, long time. And I started part-time like most of us do. And I built a business up. So I started from our apartment and then I went into a couple of home studios. Business got really good. So we move into a commercial space for about 20 more years. Sold that studio mood in North Carolina, open up another home studio. We just bought a nice home and we use a couple of those rooms as a Cameroon and his sales room. So that's what I'd like to share with you. So you know that I've been there, I've come pretty much full circle, started on really small as a part timer, did a lot of volume, cut it back down again because I wanted to do a lower volume operations. So a home studio, he's really good for that. So let me run through and show you all the well, I'm going to show you the setup that I used and I'll run through some of the equipment that we're going to look at. And then also keep in mind, I've known many, actually many of my friends had been photographers 30 years. I've been to their camera rooms, their studios, and it's funny how so many have just there for an operation. They use different types of equipment and that's good because this way I'm going to show you what I did. But you might want to change it. You might want to fine tune it to what you feel comfortable doing to your style or kind of operation. And then you can go from there. But let me just share with you the things that worked for me. So what we're looking at here is the camera room before and after Actually, I installed a background roller system, all my ceiling and the wall. Now the background roller system, we're gonna take a look at that in just a few minutes. But on there I had three backgrounds that I was able to raise and lower with an electronic switch. And it was really nice to use that because instead of having to prop everything up with pins and clamps, I was just able to lower and raise the background. Really great to work with. But I wanted to show you how you could set this up without doing any modification to your room or to your building. But I decided to take everything down again because we were selling this house and I wanted to make the room look usable again. So I had to do a lot of work on the dry wall and patch everything up and painting everything. But we're gonna be looking at a way that you can use simple things like light stands and setting up this room. So here we're looking at a Bogan lifespan, which on top I have mounted my hair light. And this is an alien BY I believe this as a B 800.5 for alien Bs to be a 100s and two before hundreds. But you can easily get by with four hundreds because this is way more than enough power than you need. And if you look on here, on my right side there I have a soft box. This is about a 30 by 38 and soft box in which inside I have a photogenic Power Light. So the reason I was showing you the hair light first is that we're going to add a background right in front of this hair light. And of course, as you know, the hair light is going to add more dimension to your hair is going to add a lot of high light into your subjects hair, which is going to help separate them from a background so they don't blend in together with the background. And here you can see I've added a nine foot back round on a pole with two light stands, and it rolls all the way down to the floor. And this is on canvas. This is a really beautiful backgrounds, one of my favorite ones. I had a similar one in my Pennsylvania studio, which was 12 feet. I've actually had several different Canvas backbones I used, but this was one of my favorites. I just loved this background I liked the way it turns out in black and white also. And then when you see my setup with a roller system, I had this canvas attached to the back wall. And then I also had a going all the way down to the floor and then onto the floor which we're going to point out. And I had a dolly that was painted the same color as the bottom of the background. So I was able to do full lens using this background. So next we're going to add a background light, and this is also an Alien Bee. Now one thing I want to mention, I had the background light and the hair light. I have a honeycomb grid on there. And what that grid does is just narrow the beam of light so it doesn't go spilling all over the place. It just reduces it somewhat and it keeps, it narrows, as you can see here.
3. Setting Up a Camera Room - Lights & Backgrounds - Part 2: And now we've added a, another lifespan in our right corner here, also an alien bees on this one. Then I've added a barn door because I was able to adjust the amount of light that was falling on the subject. And I use this as a kicker light. As you learn a kicker light, sometimes also known as an accent or a rim light. Just those a little bit of light around the edges giving more dimension and then separating your subject even more from the background. So this is something that I really liked using quite a bit. And in this particular studio and my other pennsylvania studio, I had a kicker light attached to a wall which I was able to swing out so I can adjust it and I can also move it up and down slightly. But here we're looking at it on a light stand. There was times also when I didn't really need a background light. And if you keep his subject far enough away from the background, you can get by without using a background light. So many times I would just shift that background light onto the left side like you see here. And I would raise it up and it would be a another kicker light coming in from the other side. So now you're looking at to kick Alawites, a hair light coming in from the top. And these are all alien bees. And of course you can also still see the soft box as my main light on our right side. So what's missing? While we still need a fill light? I like using a fill light when I'm doing portraits of people. As you can see here, the fill light is on the light stand raised up pretty high. So here you can see more of a close up to where it was aiming at the wall here and also be in bounced off the ceiling. And again, this was the light that I use that was attached to that little molding up they're aiming right at the wall. And then our fill light now is just non-directional and skimming a nice fill. As you learn, it's filling in the shadow area so we can adjust the lighting ratio by the strength of our fill light so you want to keep it so there is a separation between your main light and your fill light. You don't want to overpowered so everything looks flat, but the fill light is there to brighten up your shadow area. And along with your main light, it's going to help determine your lighting ratio. So now we're looking at the camera room and how it was when I had the background roller system mounted onto the ceiling as you can see. And please excuse the mess here. I was doing a video also as I was photographing well, I also had the hair light mounted onto the ceiling, so that was actually permanent. It wasn't stationery actually the way I've set this room up, everything, all the lighting pretty much stay the same with the exception of my main light. And of course I could adjust a kicker light so it was easy adjusting it, especially the fill and the Philae was always there. So I would just turn on the switch and everything came on. Very simple. So this is actually an evolution of many years of trial and error and experience. But I was in my Pennsylvania studio and I was still using sometimes I would use a reflector. Sometimes I will use an umbrella for fill or a large translucent panel. It just got to be in the whale at time. So I had a friend, came in, excellent photographer. He came in from California, has a beautiful studio in San Francisco there. And he said, Hey, Forty wages bounce you fill off the back wall. So I tried that and loved it and I kept that ever sense. So just by doing that saved me a lot of time and aggravation because when you're working with people and there's young children involved, you don't want to be horsing around with your gear. I went the variables to be my subjects, not the equipment. And the next section I'm going to run through the different backgrounds and how I use them.
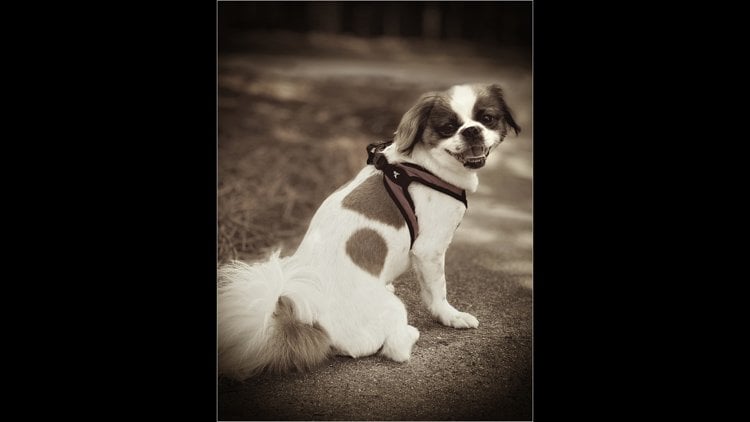
4. Setting Up a Camera Room Part 3 (Elegance in Backgrounds): It is my belief that a background can have a very important element in your photograph. I don't think it's a dominate, draw too much attention to itself. I think it should actually be used to enhance the people that you're photographing. And I know that it's going to be different. People that may have kind of a different reputation on using maybe certain looked certain backgrounds. You may be using all white or gray or any other color. But generally if he couldn't be using a background with some color in it, usually blue tones are actually used to enhance the skin tones. They work well together and maybe Earth Tones also work well together with blues. So keep that in mind. You'll also want to a void, a cheap look of a background. In other words, if you're going to be trying to say, I know that it can be nice backgrounds that may not be quite expensive, but there's also a backgrounds that look like they're not expensive and I think that kind of a background you may want to consider avoiding. Now, I'm just giving you might take on this. You might say, you know, 30 year full of beans or you're full of hot air. And that's fine. But let me just give you my opinions because they've worked for many photographers and they work for me for many years. So let's take a look at some of the backgrounds that I use. And then of course, you could also hone your own style, hone your own different backgrounds that you want to use. But let's just take a look. So looking at our background roller system here, you can see that we have black on the first roller. And black I would use many times with a colored gel, either blue or purple, yellow. And if I were to use it by itself, we get a little bit of a gray spot, like a dark gray spot. That is kind of interesting too. But here you can see we're using for lights and a background light has a blue gel on. And of course we have our fill and our main line. And again, we have our hair light and look how the hair light and in this case to the background light, give a little bit more separation from the background to the subject. Here we have more of a close-up bridal portrait with a black background. And on this one here, as we look at a portrait of blues extraordinary Mike Duggan, believe it was a blue gel on a black background here, just very subtle. And we also have, of course, our hair light coming in, lighting up his hat. And I also had a weak kicker light that was coming in from our left side as we're looking at the image. And then next color background we have unroll our system is a white background and these are all seamless paper. And the white background I use occasionally. And as long as you have enough space between the subject and the background, you're not gonna get any shadows on the background. And it also depends how much light falls on the background as to how white that background is. And in this case it's more of a gray tone because we don't have a whole lot of background. Actually, there's no background light on it. Joni light that's hitting this is from the light that's just bouncing around the room here. So we have kind of a gray here and the same thing going on here. We have two acolytes, no background light, hair light, and of course our fill and our main light and the background is more of a gray color, kind of a neutral color. So it's kinda nice yet classy looking at brings your attention onto the faces. And if you want you white background to be more of a pure white, then you have to put more light onto your background. And in this case here, we shining light from the left and the right side onto the background here. And I was photographing and this puppy. So what we're looking at here is we have several images that I superimposed onto one. And the next background is blue background and the canvas background that was painted by an artist. And it has mostly blue tones and some earth tones, all different tones. And it has more like a cloud effect. And I really liked this particular background and quite a bit. And with the blue tones, it enhances the skin tones also. And I also use this background when doing full lens. And on the background, I have a dao that's the same color as the background bottom is. So when the two meet, in most cases you don't see a scene. If you do, it just takes a second to read touched out, out. And again, this background works out very well for three-quarter length brides. And here I'm using a nice piece of furniture. Sometimes I had furniture from a prop store there, certain stores that made beautiful furniture just for photographers. In this particular case though, I bought this chair at Ethan Allen and I used it mostly for bribes and sometimes for family portraits. And I also put a vase of flowers next to it, bride here. And the same background and can be used successfully for couples. And look how nice it brings out the skin tone. And you can also use this for head shots. In this particular image, you can see that I had the background light on, and then you can see a little bit of a bright spot on here. And I probably could've done this one easily without a background light because the subject is far enough away from the background not to have a shadow fall onto the background. Another portrait headshot here using the same background. And here I'm not using a background live, but I'm using to kicker lights one on each side. And something else that I'm using on this particular image. Many times, especially with girls. If I'm doing more of a close-up headshot, I'll put a reflector on the bottom so we get a little bit more light. And many times you can see the reflection of the reflector on the bottom of the eyes. And this is what I have here. I have a posing table with a silver reflector on here. I also have a goal one which I really not use. And I also used to have one that was a very bright, almost like a, a mirror type of a mylar. Very, very shiny. And it gave a very bright look under the eyes. And this one is a little bit more subtle, not quite as bright in the eyes. Saying back RAM, we had the gentleman just resting his hands on the posing table, which has a black cover on it. And then on the next one you can see the silver reflector and the bring out the effect of that reflect a more though I will lift up the table a little bit higher, bringing that reflect or closer to the eye so we get more of a reflection in those eyes. And then you can see it here. Black and white. So using the background of this type really help bring out the skin tones. And it also helped the photograph look very elegant. And for which I was able to sell quite a few wall portraits on Canvas.
5. Setting Up a Camera Room Part 4 (Backgrounds For Full Length Portraits): Another thing that you might want to consider is having at least one background. Now you can use for a full length portrait. This might be very important for families by, I think it's going to be especially more important for things like a bridal portrait. Because brides wanna do at least a couple of their whole gown because there, they loved their gown. They want to show it off. So let's look at a few different ideas that you can do when you want to do a full length portrait. When I would set up a background that I wanted to use for a full length portrait. In this particular case here, this is the canvas painted background that I had mounted onto the wall and it came all the way down to the floor. And then the floor, of course, was a dark brown carpet. So when those two met, it was pretty much indistinguishable. You couldn't really tell where the floor met the background and that was what I was looking for. So that's the reason I chose a dark color on the bottom, actually, the background and also a dark color that was used for the flooring. And then here's a different style of background. This is also on Canvas and this I had onto a roller system also. And this was more of a past style. So this actually worked out very beautifully for doing children and of course for brides to, as you can see. And in this particular background, I would just bring this all the way down and then all the way forward so as to cover the whole floor area and the background with a bride was standing. And this type of a background, if you're going to be using something like Canvas can be rather expensive because you're going the whole length of the wall and then you coming out and another who knows 91012 feet out. So this could be a very long background making it quite expensive. Or you could also get something like this in a Muslin material which is lighter, less expensive. And yet you can still get a background that has a classy luck. And then here we had the same background where we have a little girl with her try Sigel on here. So this worked out really nice. It was very past stele, very soft, and people love that. And again, looking at a couple more full-length portraits. And then you can also see how nice of a black and white this background makes. And then here we're looking at will. There was a brilliant, great guitar player, one of the best guitar players in our area here. And here I'm using the same background and we're using to kicker lights here, one on each side in addition to the hair light and a large soft box was my main light which is about 30 by 38 inches. And the fill light bounced off the back wall. And then here you can see their results so that, so by using this technique now keep in mind, I don't have to move anything around. I can have him do several different things, different takes, he can move around and yet I don't have to change my lighting setup. That's what's really nice about having the fill being bounced off the back wall. You don't have to worry about it. And of course, the hair light stationary as well as a kicker lights. And for fun, I asked his wife to step in and you've got a couple of the two of them together. Same lighting to kick, a light's coming in. And again, a nice black and white using that same background. And here was a nine foot background that I substituted the green screen and I put on, I'm not sure if this was a heavy Muslim or a light canvas, but this was painted by a background painter that many photographers would use. Her backgrounds enabled just gorgeous, so very, very elegant and nice looking. And because this was on a roller system, like it bring it all the way down to the floor. And then I could bring it forward so I can use this as a full length, as well as coming in a little closer for a three-quarter and doing some close-up portraits and using the same lighting technique here we have our two kicker lights are hairlike coming in from the top, in addition to our main light, which is the soft box in the fill bounce off the back wall. And then here you can see the full length using this particular background. And I do like this background quite a bit, I still have it. And something that you could also do is if you have a roller system, you can actually bring one of your backgrounds down and you can attach another background to it. And then you raise it up. And there you have two backgrounds in one, so you have a background that's hanging onto a another one. And sometimes I would do that because I have I had quite a bit of backgrounds and not enough roller systems. And this particular background also made a nice black and white and brown tone, as you can see here in these photos. So what do we get these beautiful backgrounds from? Well, as I stated earlier, try to avoid using cheap backgrounds that look cheap. And for that reason, one of the background painters that has been around for quite awhile, they're still in business because many other backgrounds that I had years ago, of course they retire or their they've gone out of business, but there's a company called backgrounds Bi Mei You. And it's David and his wife Julie May you. And he started out as a photographer and I guess he would start painting his own backgrounds. This was years and years ago because I knew him for quite a long time. Really, really nice people. And I guess he just couldn't find what he was looking for. So he painted his own background. And right now, as far as I'm aware of, he makes one of the most beautiful backgrounds that are available. So check him out and look for style that's going to match the type of photography that you wanna do.
6. Camera Settings: So now that we pretty much know where to place our lights, let's take a look at our settings, all of our lights, and even the camera. And of course we're talking about using cameras like either a digital SLR or mirrorless. Or we can also set are white balance and I usually do a custom white balance. So once we had that set, you don't have to mess with that anymore unless you're making a drastic change to the studio setup here. And remember, we have our studio setup for more of a traditional style of doing portraits. First of all, we're shooting manual, which means we can manually control our aperture, which is our lens opening. And for that, in this type of a camera room, I was using anywhere from a as being the most popular and sometimes now but go up to F ten. And I'll set my shutter speed to be fast enough not to be influenced by any room light. So it could be anywhere from a 60th to 1 125th of a second. And the ISO used here was 100. And I did have my cameras set up for back button focus, which means I have a button on back that I press to set the focus point. And this way when I'm pressing the button to capture the image, it has no effect on focusing. That's just a separate button. And I do recommend setting up your camera to shooting in back button focus. And I'm using single-point focusing. Now in this type of a camera room, this is going to be a little bit different than say, you're out on location. And you want to use a really fast lens to get maximum background blur here we're concerned with getting things and focus more. Say you're doing a family group, you're going to need a little bit more depth of field. And besides, you can have your subject Foy enough away from the background. So the background still does go slightly out of focus. And also notice that on some of my lights like the hair light or a kicker light, I'll have a grid and the grid is concentrates the light more so you cannot have all kinds of spill all over. And also if you look on the side where I have one of my kicker lights, I also have a barn door on that so that lets me control the spill of white so it doesn't go into an area that's not wanted. And of course, you'll notice that my studio flashes all have Modelling lights on. And for the most part you're actually getting what you see. So this way you can find tune your adjustments so you can put the line exactly where you want it.
7. Lighting Ratios: Okay, so let's talk about lighting ratio. Your main light, which is also called a key light, is going to be your primary source of illumination and your fill light is going to fill in the shadows. As a demonstration, we're going to photograph a jug face. And instead of using a soft box or umbrellas, I'm going to be using two sets of LED lights. One is going to be our main light and the other one we're going to be using as a fill light. The way that we're going to be measuring the light that's gotta be falling onto the face here is with a light meter. And this way we're able to adjust the power setting of the LED lights so we can get the aperture that we need. And we're gonna set our main light at F8. And the way that we're metering here is one light at a time. So I'm going to start with our main light, and I haven't adjust that. So we get F eight as our aperture. And then I'm turning off the main light and just turning on our fill light. And I'm going to adjust that so we get the same reading F8 on the fill light. And this is considered a one-to-one lighting ratio. We have the same amount of light falling on the bright side of a face as we do on the other side of the face where the fill light is. So we are going to be photographing in a studio and we have it set to a one-to-one lighting ratio. It's not really the best use of lighting. It's kind of a flat book as you can see. So next we're going to adjust the setting, the fill light. We're gonna keep our main light at F8. And then I'm going to go over to the fill light and I'm going to take that down one-stop. Am I taking it down one stop now we have a two to one lighting ratio. And this type of a lighting ratio can work well if you photograph and babies and children, because it's more of a soft light, not too harsh. So we're attitudinal on lighting ratio. And if we increase it by one stop, that's gonna give us a four to one lighting ratio. That just happens the way it works in photography. It works in multiples of two. So another stop will give us that four to one lighting ratio. However, a three-to-one lighting ratio is very popular for portrait photography amongst professional photographers. It just happens to be a pleasing lighting ratio between the highlights and the shadow side of the face. So if we're gonna be using a three to one lighting ratio, our main light at F8. And we're going to adjust our fill light down. 1.5 stops, and it comes to a f 4.5. And we still have a nice ratio between the highlight side of the face and the shadow side. Now if we go to a four to one are lighting ratio, that is going to be a two stopped difference. So to stop difference is going to bring our fill light down to F4. So by going down to F4 on the fill and you can see that our shadow side is a little bit darker than it was at 3-2-1 and much darker than it was at two to one. So four to one is still a pretty popular ratio and it can help make your portrait a little bit more dramatic. So as we go down to an 8-to-1 ratio, we have a three stopped difference with our main light still at f eight, we have to adjust our fill white down to F, 0.83 stopped difference. And here you can see it's pretty dramatic. So we have a much darker shadow side of a face than we do on the highlight side. So what happens if we have no fill light? So without a fill like technically we don't have any light falling on the shadow side. However, the thing to keep in mind is that you actually could, because depending on the room, there's light bouncing all over. And if you're going to be using a very slow shutter speed, you can actually set it to use your room light as if Phil, but that's actually another topic. So just because you had no fill light, we can still get a little bit of light bounce into that darker section need pending on a room light and if you have a lot of white walls and light bounces all over. And also if we're gonna be using a softer light source like an umbrella or a soft box. That's going to be spread out even more. So if you're using a soft box or umbrella that's large enough, you could actually get by with using just one light, just something I went immensely without making it too confusing. So these are the general rules of the lighting ratios. And then you can choose the one that's going to work well with a style of portrait that you are going to be photographing. So to make these adjustments accurately, I've used a light meter. I know light meters are not that popular anymore as they were years ago, but it's gonna give you a very accurate adjustment of your lights. And if you don't have one or you don't want to get one, you're just gonna have to be more resourceful and use your eyes as judgement as to the lighting ratio that looks pleasing to you.
8. The Kicker, Background & Hair Lights: So next we'll look at what I call a kicker light, which is also called an accent light or a rim light. Now this kicker or accent light can be used to add highlights onto his subject. And it gives us subject a little bit more dimension. And it also helps separate your subject from the background. And next we have a background light where we shine a light onto the background. And S can also help you subject stand out more, given them more of a separation from the background. Now if you want to make it interesting, sometimes I'll turn the background light and I'll shine it behind them towards the camera. And it gives a nice highlight to the hair, but I just wanted to throw that in. And the light that we have above is our hair light. And this adds additional white to the hair and the hair light and the accident light, maybe a little bit stronger than the main light. So it throws off enough light to highlight the area that we have it pointed that. So by using your light meter or you can use your eye by doing testing, you can make your adjustments to where you want it to be. You may not want to use all these lights together all the time. So sometimes I may need a kicker light on the other side depending on where on facing the subject. Okay. So maybe you're wondering how do we fire all these flashes? Well, I used to use a radio control, but now I mounted a flash on top of my camera. That whether I'm shooting vertical or horizontal, I'll end the flash up towards the ceiling. I haven't set very, very low to about 128th power, which gives me just enough power to reach those sensors of these lights or the lights fire automatically because each one of these studio flashes has a sensor built into it that when the light hits it, it'll fire automatically. So you don't need any fancy Radio controls unless you want to use them. And the nice thing about having a camera room set up like this is that once you have it set up, you don't really have to move a lot of lights around. Mostly your may lie you moving it from your left side to right side depending on which way you're facing your subject. Your fill light doesn't have to get moved. Your hair light is attached. You can make adjustments to your kick allied so your accent lights if you want to. But that's about it. So this way you're able to concentrate more on the people that you're photographing rather than having to worry about too much equipment.
9. Intro to Portable Lightweight Lighting Gear for On-Location Portrait Photography: Let's say you want to put together a simple lightweight lighting system that you want to use when you do your indoor portraits on location. Things like head shots or maybe small family portraits. But yet useful when he get grey quality images out of your system. Well recently I've done just that. I got rid of using giant salt boxes on location. I'll still use him in the studio. But on-location, I switch to a very simple lighting system that I want to show you. So all I take along is my camera and I'm usually using a Nikon tripod. And I also take along a backdrop in a backdrop dot I use most of the time is this particular one here. It's about seven feet wide and about eight feet high. So on canvas. And it rolls up and down by hand. And I've mounted onto one single light Stan. And it's easy to set up and it's easy to tear down. So in addition to that, I take along a really lightweight lighting system that I want to show you. And my main light is this one here. It's the Nikon speed light, SB 800. And I had this bounce into a 44 inch silver umbrella. And that's going to be the main light. And the other light I'm using is a kicker light. And this is actually used. I mount this a little bit behind those subject and a little bit higher up and it shines down. It's a kicker light. So it's going to add a little bit light onto the hair and maybe the back of their shoulders. It's going to give a little bit more separation from the background to your subject. And what we're gonna do a couple of portraits then. So you're going to see how it gets used. And I said these two lights up to fire in the SU 4-node, which means that I have to take my camera, the built-in flash, and I have to set the camera so it fires in Commander mode, which means that my camera is going to fire. Well actually my cameras flash is going to fire these two lights. And I have these set to manual. Because shooting manual, it's actually very simple. We're gonna go through this, I'm going to show you so you can do it also. But when you shoot manual, There's no surprises. There is no variation in light subject or light background, dark background. It's always consistent. And it's just a great way to shoot. I think once you start photographing in, you're using manual settings and I think you're gonna really like it. And so let's talk about setting up your, your on-camera flash. Now, I'm an icon shooter, so my camera is a Nikon. But what happens if you don't have, say, Nikon equipment? Well, of course there's other the gear like cannon, Fuji, they also have their own system. But even using these two flashes, I can even use other cameras. Like for instance, I'm going to use, I'm going to show you how to set up a Fuji. Show. It fires these two Nikon flashes remotely using the Fuji built in flash because it has a commander mode. So what happens if the camera that you're using doesn't have a built-in flash. Well, too bad for you then. Know, actually I'm an icon shooter and Nikon as an example that the 500 doesn't have a built in flash. So you're going to have to get something to fire that. And Nikon has what's called a wireless speed allied commander, which allows you to fire external flashes remotely. However you're going to have to. It's another purchase. So I'm just going to run into a little bit more money. Better if you have a camera that has your built-in flash. But if not, there's also a couple other companies that I'm aware of, that Meg wireless flash triggers like thing. It's called young new all and Go Docs. And they also make flash units that fire remotely too so and they're a little bit less expensive than the Nikon's or the cannon flashes. Or if you want to check those out, it might be a cheaper alternative for you. But while we're gonna set up or units two because we're going to set them up so they shoot and the mode that's called S U4. And as you four, we're gonna set up our flash and the camera to fire. Just to set these units off. Not to have any effect on your, your lighting, your exposure because that's what these flashes are going to be doing. So you're going to have a main light and a kicker light. So let's go ahead and we're gonna set up these flash units. And then we're going to also set up a camera body or to, yeah, in fact, I'll set up a Nikon and then I'll set up a, another one. I'll show you by setting up a Fuji Camera that's going to fire these Nikon flashes. So let's take a look at that.
10. A Closer Look at Our Portable Lightweight Lighting Gear: So we're gonna go ahead and do a headshot. And unfortunately I'm going to be your model, so bear with me on that. And what we're going to use a two lights. We just talked about shooting a remotely. And our main light is going to be our SB 800 Nikon speed light, which I have mounted onto an umbrella holder, which we slip in a 44 inch silver umbrella, which is gonna give us a softer light source. Then if we were to just use a flash by itself, a main light is going to be about 45 degrees to the subject and about so far away, about four feet away. And we have it set to 1 eighth power, kinda be fired remotely from our Nikon. For our kicker light, I'm using the Nikon SPAP dx. You can see it up on top. I have a little bit behind the background. Sometimes I'll put it off to the side slightly. And here's what to make sure that's high enough so you can highlight a hair of your subject. And I have that set to 164th power. One thing worth pointing out regarding our kicker light is the setting. If you're photographing somebody that has really light or blonde hair, you're going to, you may not need as much power on that kicker light as you would if you were photographing somebody with very dark hair. On the same token, if someone has no hair on top, you may want to turn that way down or possibly sometimes I don't even use it at all. If that's the case because otherwise you may pick up a lot of glare on top of the head. So you'll want to keep your portrait looking just as attractive as possible. So I guess we pointed everything else out. We're going to be, our settings are gonna be ISO 200. My shutter speed is going to be about 1 125th of her second. I have it up that way just so our room light doesn't interfere with our exposure. My ISO is 200 and like I said, and we're shooting at f 5.6. So let's go ahead and set that up. We're going to be using a Nikon. I'm going to put on our Tamar on 28 to 75 millimeter lens. So let's go set that up.
11. Traditional Headshot Portraits: So if I start off with our main light towards my left, I'm going to put in a little bit above eye level. And I'm gonna put my kicker light on the opposite side. And I may start off doing a few or a couple or at least like this. And you want to make sure that you adjust your clothing and checkoff that hair, makes sure that everything looks sharp. And then I may start off like this. I made turned. They had a little bit straight towards the camera. And I may tilt ahead just a little bit or I may have the head turn a body a little more, turned ahead in certain way. And you can show more authority if you lean your subject and little bit. And then you have a high and a low shoulder and a few have that a little bit leaning forward, tilt their head a little bit towards the low shoulder. That's more of a look of authority and that's good for executive portraits. And then I'll turn their body facing a little bit towards the opposite direction. And then I may turn the head straight towards the camera and do one that way. And then I may turn their head a little bit, little bit towards the light. And then of course we have it two-thirds view where we show stray and then we show a little bit more of the face call a two-thirds view. And then again, we can lane. There had a little bit towards the low shoulder giving more of an executive look. And if we tilt the head towards the high shoulder, that's more of a feminine look. So you can try all different directions. And then after I take several portraits that way, I'll bring the main light on the opposite direction and then I'll put the kicker light on the other side. And again, a kicker light is usually I put it in the opposite direction of the main light. So I'll put the main light over here. Kicker light goes there. And then I'll do the same thing. Some Facing the main light with your body, some facing a little bit the other way, turning her head. And you just try all different things so you can give them a nice variety to choose from.
12. Traditional Headshot Portrait Results: So let's take a look at our images that we just took. And I started off using just one light or main light which I had bounced into our 44 inch silver umbrella. Just so you have an idea of the results that you can get with one light. So this is it here, one light, no kicker light. And actually you could do a portrait with using just that one light. And when we add an umbrella to our light, it just spreads the light out a little bit more and gives us a little bit more of a softer look as compared to if we were using that flash just straight to the subject. So in our next image here, I've added the kicker light, as you can see, it highlights the hair up a little bit and the back of the shoulder, as you can see, a little bit of a highlight there. And sometimes depending how you're facing, you could see a little bit of a hot spot on the top right side of my forehead here. So this could depend on your subject hairstyle. And if you're doing a woman was very long and full hair, you may not get these hotspots. So sometimes I'll keep somebody's here, but I'll solve for them down just a little bit with retouching. Now if you wanted to solve in these hotspots here, you could try adding a small soft box to your kicker light, which is going to soften the light a little bit more. Now this is the image here using our main light and we've added our kicker light. And I'm gonna do a little bit of retouching by getting rid of that hotspot and also just cleaning up the back of my hair here and also softening a few spots on my face here. So here is the same image with a little bit of retouching done. I just toned down not hotspot on top of my forehead here. I got rid of the stray hairs in back. And I also added a vignette which darkens the image around the sides and the top and bottom slightly. Now you'll notice that I took these particular portraits in a horizontal format. And if the client wants just a low res image, nothing that's going to be made into a giant sized, I may just thick with a horizontal format and just crop it into a vertical or sometimes a square. It may be a good idea to check with a client and see what kind of a format that they need for their final image. They may have to match up with other people on the, on their webpage or their business card. So it's just a good idea so you can crop it reasonably close to what they need, or you can give them an image that can be cropped a little bit more if they needed to. So here I did some cropping to this image. I got rid of the waste that background that we normally may not need. Or sometimes you can use that background if they want to add text into the final image that they're going to use. But I cropped this one more into a square. And on the next image here I made this one into a black and white. Many times black and white has a unique look and sometimes they may want to use that. So what about if you want to take your photographs vertically? Well, you could actually flip your camera into a vertical format so you can get a vertical composition. Now, I have a rotating bracket that I use, and this is made by a company called just right. And I'm gonna see if I can give you the link in the resource section in case you want to check something like this out. And you can just attach this onto your camera. And then it's really simple. You just turn your wrist and then you can flip your camera from a horizontal to a vertical format. And this is nice if you want to use the full resolution of your sensor. So what I took here was a basic, traditional headshot. You can make a little bit more fancy if you wanna do like add more glamour tool, you can use the hands used there from props. But this is mainly to give you an idea of the lighting. And also I do want to point out if you want to add a fill light which is going to brighten up the shadow side of your face. You could bring in a reflector or you could bounce a light off the ceiling, making it one or two stops weaker than your main light. The camera use was a Nikon D 7200, which is crop sensor. And I had on my tamarin 28 to 75 millimeter f 2.8 lens.
13. Post Processing - Image Retouching & Enhancement Part 1: So I did want to run through and show you some of the retouching that I might do when I do a portrait headshot. And I hope you can excuse the sound quality of this recording. I have to use a special microphone that cuts down the fan noise of my desktop computer. Years ago I had a friend make a computer for me. And he was a bit of an overachiever. And when it comes to cooling that computer, Hey, did an outstanding job. He put in heavy duty fans to cool the computer. And it worked after nine years of using this computer. Never let me down and it works as good today as it did nine years ago. So I guess there's something to keep in the computer coal, but anyway, okay, so let's get gone. And I'm using an old version of Adobe Photoshop seven here. I also do have cs phi, but I prefer this version a little better. You can get this one free. You can also use Photoshop Elements that you can purchase from Adobe. Or I do recommend though, if you're going to be doing a lot of image editing retouching enhancement that you may take a look at. Adobe Creative Cloud. That's where you sign up and you do have a monthly fee. But you get the latest version of Adobe Photoshop with all the upgrades included. And then you also get to use Lightroom. And I believe it also may come with some apps for your phone or your tablet. So let's open up an image and show you. Now this is not meant to be a full tutorial, but I do want to show you some of the possibilities that you can do when you do your enhancement. So let's go ahead and start with this image here. And as you can see, my face is a little bit dark here. It may be a little bit underexposed plus a hat are very dark tan here as well. So all went to lighten up the face just a little bit. All before I do that though, I wanted to make up a layer. So I'm going to come over here to with a layer section is, and I'm going to drag the Background layer down to here release. And that's gonna make a layer called the Background copy. So we can work with that instead of working on the original image. And then we're gonna make a layer mask. And what this allows us to do is by working on this layer here. Well, we're going to click on the image because we're going to work on the top layer, which is similar to working on a piece of acetate that you lay over your image, say your drawing or painting on that acetate. So if you make a mistake, you can go into your, your Layer Mask and you can brush, not mistake out. So that's the reason I like using layers. So let's go ahead and make this larger. And normally I would take it up to about a 100%. If you go any more than that, sometimes I do. But if you do, it's scary. You see every little imperfection here and every little mark on your face. Whatever you have, whatever defect and he kinda blemish or wrinkle. It's going to be easily noticed when you take it up to a 100% or more. So the first thing I wanna do here is get rid of the astray here. I'm going to use the clone stamp tool which is over here. And the shortcut for that, you can see there's a letter s. So if we hit S is going to bring up our clone stamp tool, I use a lot of shortcuts and actions. Now we're going to sample it from right about here. And notice that I have my opacity set not to Hide Sidebar 50%. And sometimes I'll take it up to close to a 100%, sometimes 30 or 40. But in this case it's at 50%. So we get kind of a soft, smooth transition to that area, so it's not too harsh. Alright, so we have that pretty much gone. And now I'm going to reduce this glare on here. I'm going to bring somebody's hair's over here. Now sometimes you don't have to do too much me touching. See, I'm just sampling it from areas that are right around this spot. It's matter of fact, I'm going to take this down from 50. I'm gonna go to about Stay here 36, I believe it is. So now we get convex, smooth, a softer brush. By the way, I'm using a trackball and setup a mouse. I started using this things since day one. And I've gotten to like it so much. I'd never, even though I bought a tablet once, I've never used it, I just stayed with the track ball. So that's pretty much where we like it. And I'm just going to hit a couple of these freckles here. Just a little bit. Maybe a little spot on my nose here. And just a little bit on the wrinkles here. So you can see that once you get going, how fast you can do this. Pretty simple. And we have a little bit of a longer hair hero, my beard, which I want to get rid of. A few lines here that I don't like. But we get this and it happens. All right. Okay. So we just saw from that up just a little bit, maybe a little bit more here. Now you can always do more on the final image to after you're all done. Show, let's go fullscreen. Yeah, let me go back to a 100%. And I want to get rid of this hair coming out here as well. I'm going to bring let's see, we're at 36. Well, keep it there for now because I'm working around other body parts here, my ear. And I'm going to just sample it here and take it up. And now I'm going to take it up to quite a bit higher to around 92, I believe it is. And I want to get rid of some of his hair. So at 92 we get a pretty heavy cologne here. So it clones that with just simple one or two easy steps. Where if we use a lower number, it blends it more so it's kind of a smoother transition. But in this case, we don't want to blend these. I want to get rid of these. So it's okay to go pretty high for that. In Canada it's called full. And that's how it looks. Now before I do any other retouching, I'm gonna flatten this. I have an action and have to, as you can see over here, it flattens the image. I'm going to make another layer again because I don't want to keep this just sounds it is, it's making a Layer Mask. Click on our image. This the medium rest file, I believe it's around 30. Well, let's take a look. We look at image image size. We're at about 38. Let's keep the feathering at 99 pixels.
14. Post Processing - Image Retouching & Enhancement Part 2: So I'm going to start to select my head here and I'm gonna brighten us up a little bit because this is a little bit too dark. I brought up the levels. The letter l is a shortcut and we're going to slide our center slider. If you look, we can slide that to the left. It gets light to the right, it gets darker. I'm going to take it up to about. Alright, that's good. We have it set to 11. And now I'm going to move the right slider over until we get the dark area where the dark curve starts to appear. Well, keep it right about there for now, we'll click OK. So you can see this is how it was and this is how it is now after we lighten it. Okay, so, so far we've done a little bit of enhancement here. And I'm gonna flatten our image again. Now I want to share with you a really fantastic one of my favorite filters that I have in Photoshop. And you can also use this as a stand alone version. But if we go to Filters and this is made by anthropic cs, and it's called Portrait professional or portrait pro. And this does a whole bunch of really neat steps for you automatically. You can save these. You could do it once and then you can save it, and it'll do it again on another image. You can choose female, male. Then what it does is it creates an outline that if it's not exactly right, you can adjust it. Now look what it does if you change your cheek. You can make your cheek a little bit larger and so on. And we can move this around here. So on the left is that before section on the right is little bit that it did automatically, which here isn't too much, maybe a little any eyes but wash well, we can do this. I'm going to bring up where it says show i controls. Now we can brighten up the eyes here, all different areas. We can whiten him, brighten them, brighten the Irish, sharpen the eyes. Eyebrows change the eye color, brighten the iris and the pupil. All different things. Where it says brightening area, I'm going to brighten that up just a little bit. Kind of brighten the eyes up a little bit to you don't want to do it too much because look what you get. It Just wanted to do it may be just a little bit so it looks natural. And of course, you can also go to brighten the Irish. I wanna brighten that up a little bit. So you again, you can overdo this. So let's brighten it up just a little, just so we can see the difference between the iris and the pupil. Will keep it there for now. So this is Does a soften the skin tones. You can even do so much more here. But I didn't want to show you this because this is one program that's really worth getting. And then after this, we're going to hit Next and it's going to take us back into Adobe Photoshop. So now you can see the effects of after coming out of portrait professional. This is the before version. This is after. It just soften his skin tones up slightly to, okay, so that's one thing here. Now I'm going to crop this. I want to get rid of all this dead space over here on this section on our right side as we're looking at it, I'm going to crop it. The letter C is the shortcut for the crop tool. Now what you can do is you can crop this to a certain format if you want to. But because this is my image, pretty much can crop this any way I like. But if the client needs, say, a four by six or five by seven format, you can just put in the width and the height that you want. So I'm gonna hit Clear. And that's going to make a kind of a free form crops. So let's take it crop at right about here. Maybe take it down to another button. What if I rotate this just lightly? So that's a pretty nice crop that lacks all keep it there. I'm going to enlarge it again. Take it up to a 100%. I'm going to go into a little bit in the eyes. I'm going to hit the letter O, which brings up this right here. You're burned tool and if you right-click on it, you have a choice of a Dodge Tool, Burn tool or sponge. But we're gonna go to the Dodge Tool and these other same tools that I used to use in the early days of black and white when we did our own black and white printing over the enlarger, we can hold certain areas back or we could burn is called burning. Well, we can make certain areas of the image darker or lighter. Right now we're in in Dodge Tool. And I'm going to take it up even a little bit more. And by using our bracket key, I'm going to lower this. I'm going to make our brush smaller. And you see we had the exposure set to about 28%. And just on a bottom in the eyes, I'm going to just touch it up just a little bit. So what we did here was just brightened up the bottom part of the iris here. And you can do more because sometimes I'll put in a larger catch light here, maybe a rectangular catch live here, but for now we'll just leave it go. Okay, so here's what we have, and I want to add a vignette to here. So for this, I'm going to hit the letter L, which is going to bring up our lasso tool. And we're still at 99. So let's try that 99 pixels. So I'm just going to move this around the edges here. And this is gonna give us the ability to darken the edges. Or we can lighten up what's inside the marching ants. So I want to go to the outside and the marching ants. So I'm going to inverse this control shift I. Inverses are selection control u is going to bring up our hue and saturation. And here we can adjust it. I'm gonna darken word says lightness here. You can make this like kind of a high key, or we can give it a darker vignette. So let's give it just a little bit right about there. And there it is. Okay. So this is it. So this is pretty much with a little bit or read touching done. And that could have probably done this within a couple of minutes because obviously explaining what OB is doing a took a little bit longer. You can do more corrections if he shoot raw. But I just wanted to give you a little bit of an idea of the possibilities that you can do when you do retouching on your final image.
15. Post Processing - Image Enhancement Using Smart Photo Editor: Before we close out this section on post-processing, there's one piece of valuable information, or at least I think it is that I want to give you before we go. And this is another software program that does amazing things. And this is also may by anthropic CS, which is the same company that makes portrait parole. And this is called smart photo editor. And before we get into it though, let's pick another model here. In fact, this is one of my past clients. So let's just look at some of the possibilities that we can do with smart photo editor. And right now, you're looking at a program called AC, DC, which I use as my image viewer and it also doesn't photo editor. I prefer using AC, DC over Lightroom. If we right-click this image up on top, you can see where it says External editors. And if we go into, as you can see, I have a couple of different versions of Photoshop in here. Portrait professional, smart photo editor. And we're going to open that up and it takes us right there. And besides doing some really creative and more advanced imagery, touching, or enhancement, you could do some really amazing things quite simply. As an example, let's open up the effects gallery here. And this is going to open up thousands of effects. So here's some of them. If you look on top, this is page 1656, and there's 12 images to a page in this amazing. So to give you an idea, this is just some of the things that are possible. And you can choose any one of these if you want to go more into a black and white. So you can select from anything on this page. If you click on it, it's going to make it a little bit larger. Or if we wanted to do something special that you looking for, you can just come over here like as an example, let's go ahead and color. And we're going to make a black and white out of this. And then here you can see all the different choices of black and white so that we have. And the first effect here was contributed by Tony, is called accurate black and white. And sometimes I'll use this one. This is called Black and White Hollywood glamor. That's kinda neat effect. So if we move into Vince, you can see we have even more adjustments we can make here. This gives it like a vignette or a spotlight effect. And we can move that around. We can take it up a little bit. And on the big circle here, we can change the degree of vignette or Spotlight that we have. So let's bring it back to right about there. We just made this into a black and white just by a simple click. Let's try another one to give you an idea was matter-of-fact lifts. Just keep this and let's say you want to put a border on here or at another effect. So we're going to open this back up and in here we're going to go into boarders. And here you can select from snarled different style border. Let's go to creative borders. And you can use this arrow over here to page through the whole list of thumbnails. So here we're looking at more of the creative borders. And depending on your personality, your style, you may want to go with this, but I'm going to go more. Let's look at classic borders. And when you look at these, you can see there are more standard or what they call the class act and more traditional. Now we have a black border with a white stroke on it. And this is kinda nice. So as we look at all of these, we get some nice classic borders. Something else I want to show you. Let's just get rid of this particular one. Let's go back to the beginning. Let's just get rid of this one. And this is our image that we started with. So we're gonna go back into our effects gallery. And over here, I'm going to go into Word says, detail. And if you look upon halfway down, interpersonally soften, Of course you have all these other ones. You can add all different. You can add contrast, you can sharpen that. But we're going to choose instead of sharp, Now we're going to soften it. So look at all the needs soft effects. So if you're doing glamour portraits or some high school senior and you want to make something really more, more glamorous. This'll be a good program for you to use. And this one here was called skin and hair smooth. So if you look at before, this is our before version, which is naturally sharp. And if we go into what we have now you could see it's quite a bit software. I liked that, so I'm going to apply that. And I'm going to add to it even more. So let's just say you want to add even more softness and we're gonna go back into detail. Let's go back to soften. And let's pick something really, really soft. This might be a little bit of an exaggeration, but let's just choose this. And for right now we're on this. But look, if we go over here to the left, it says, okay, mask area. And we can mass this. So we're going to bring air brush up and then we're going to adjust or opacity down to about here. And we're going to, this is similar to Adobe Photoshop layers. We're gonna paint back the sharpness of this image in certain areas. Because I don't want her whole body to be solved like this, just parts of it maybe like on the outskirts of the body and, and the background of course. So now you can see it's kind of soft around the edges and around the outside of her body lines. And then now we had that so we can save this. So let's just save this. Save it as a J peg, and then you can choose where you wanted to say that as well. Just do that. Okay, so now we have this safe. So this is a really great program that I wanted to share with you. So you have an idea of even more things that you can do if you put everything together, all these tools that we have now, it's, it's great and take advantage of them. And although some of the effects in here for certain things might be corny, but for other things they are beautiful and they are quick and they look very professional.
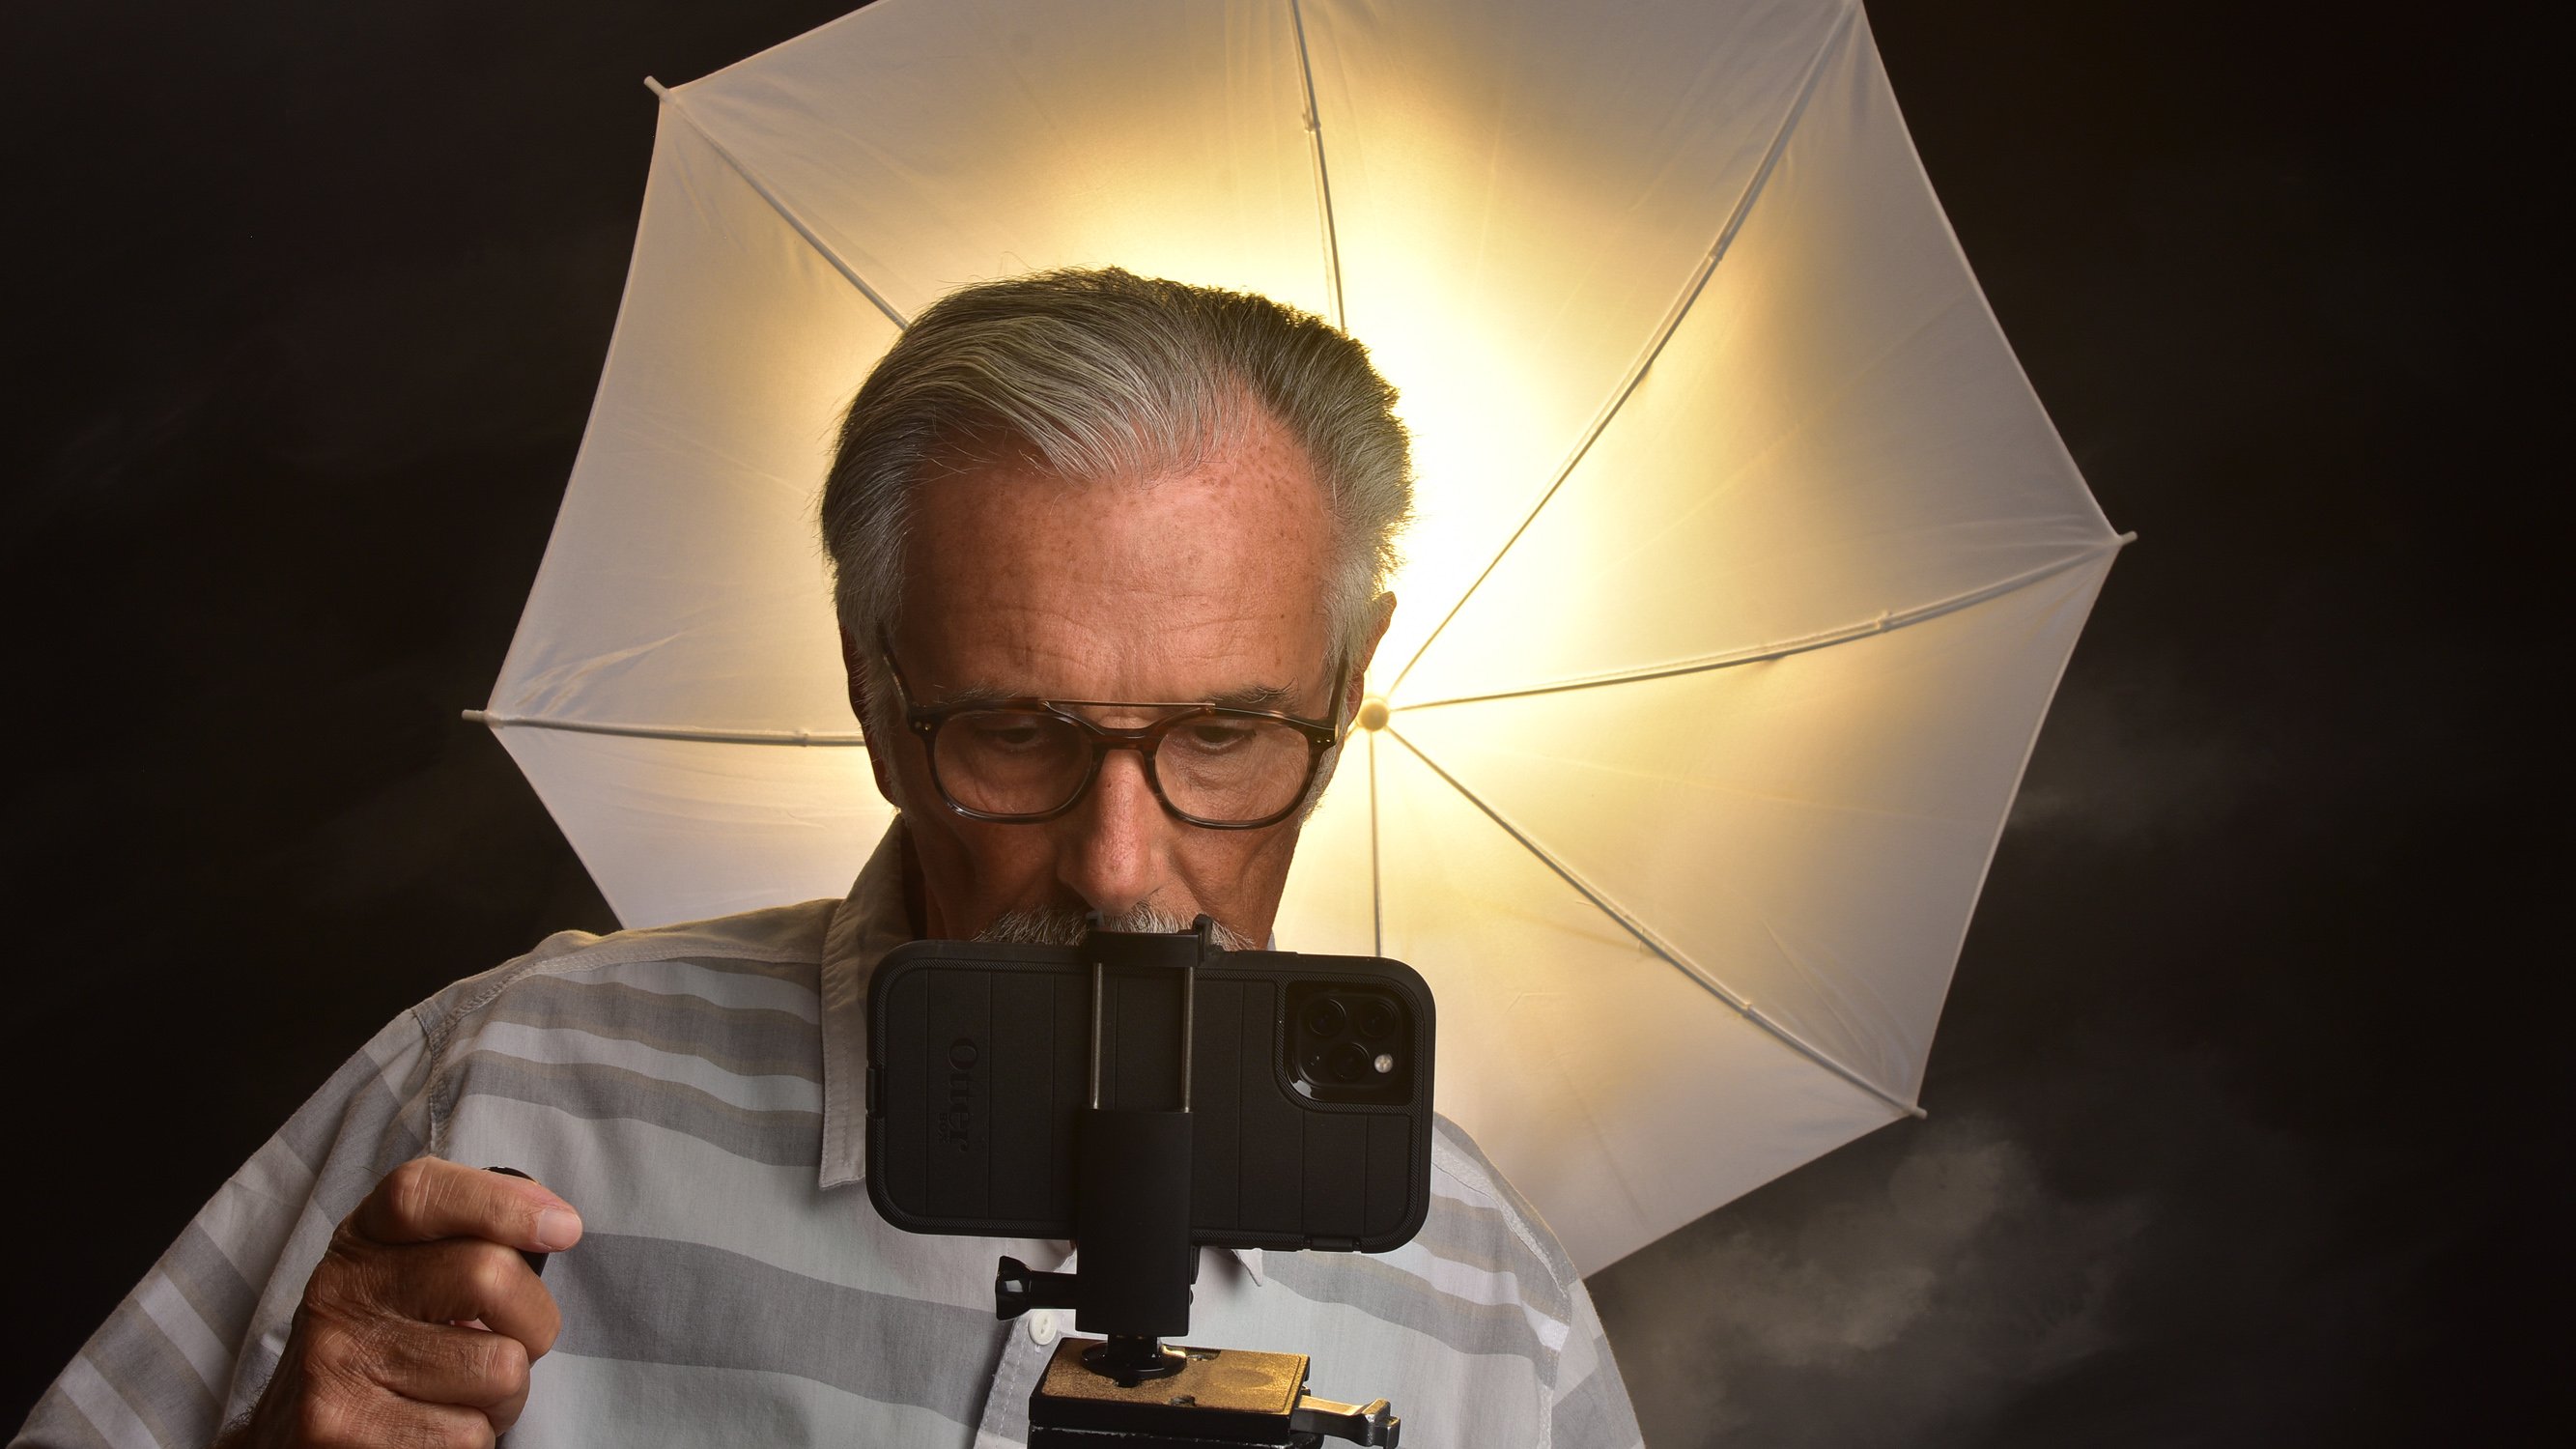
16. Fluorescent Light Portraits Using an iPhone: I know what you're wondering. Mr. 41, new file when you use LED or fluorescent light instead of flash? Well, that's a great question. In fact, we're gonna talk about that right now. So let's go walk over into the camera room and on meat you're right there. Hello and welcome to my camera roll. We're going to be doing a portrait using a continuous light source. We have three lights actually, our main line this time I'm going to be using a fluorescent, which we're going to shoot through a translucent umbrella out to get a nice soft effect. And we're going to use a kicker light again, which is on top here. And this is going to be used kind of as a hair light. And highlighting the back of your shoulder is just adding a little bit more dimension to your photograph and also help separate the subject from the background. And in this particular case, you could get by with these two lights, but I'm gonna be using a fill light. And for our fill light, I'm using a desk lamp actually that I have set on top of a shelving unit. So it matches, it's a fluorescent light, so it's going to match our main light. So very, very simple stuff. And we're going to be using because it's a continuous light source, we can easily get beautiful portraits using on iPhone. And in this particular case, I'm using an iPhone 11 pero max, but you can use any other phone or you can use any other camera, really because you can just make your adjustments and has you need to. If you don't have a fluorescent light source, I'm gonna see if I can hook up a link. Well, you can pick up a fluorescent head that you can attach to a light stand or if you want to, you can also use something like this. This is a, an LED unit that I use sometimes too. And this one here is made by a company called dad's knee, which I don't see these available anymore, Aaron off their outer stock, but there's other companies that make these. And again, I'm gonna see if I can put a link onto other companies that are similar to this. This is about a five by seven inch light panel. You can adjust the color balance, you can adjust the power and setting its unless load unit, however I prefer, or I've gotten used to using the fluorescent light. Because the setup that you're looking at now is the setup that I'm using when I'm doing all my videos will make classes mostly for my YouTube videos as well. So we're going to be bringing in a school and then we're going to set everything up to do a head shot again. And unfortunately the model is going to have to be me, so bear with me on that and using our iPhone. So let's go set that up.
17. iPhone Fluorescent Light Portraits Photoshoot: So I'm going to be taken a few portraits using our iPhone. And I have the 11 pro Max and I have it set to shoot in a portrait mode. And original I like shooting into portrait mode is because it allows me to some degree to change the blur that I want in my background. And that's nice when you doing portraits or you can isolate the people from the background a little bit easier by making her blurry. So let's go ahead and take a few photos and see what happens. And by the way, I'm using a Bluetooth remote to take the photos. So let's see what happens. I'm going to move around just a little bit, get a little different angles. And remember you can lean a little bit. Look at the camera, smile and turn this a little this way. Okay, so we got a few photographs and let's go ahead and look at them.
18. iPhone Headshot Portrait Results: So we're looking at the images now that were taken using the iPhone. And we also use a three lights system. As we're looking at the image to our right, we have a fluorescent light that I shot through a 36 inch translucent umbrella. And to our left, conveniently, I have a desk lamp, also a fluorescent light, as we'll look in that gene images to our left. And we have an LED kicker light that's coming in from our top-left that's giving some highlights to the hair and you can see it's lighting up to shoulder slightly. And our Light is a near cn 126. So after I took a few photographs, I looked at a few of them and notice that we came up with a two to one lighting ratio. After I checked it with my light meter, a two-to-one lighting ratio is going to give us a one-stop difference from the bright side of a face to the shadow side other face. So I figured I want to get a little bit more. So the way that I adjusted it was that I put a towel over the desk lamp, was brought it down and extra half stop. Now we have a three to one lighting ratio, which is a nicer lighting ratio that I like to work with, either out three-to-one or a 4-to-1 lighting ratio, which means that we have a 1.5 stopped difference now from the bride's side other face to the shadow side of the face. And as you were watching these photos being taken, you remember that we had our phone in a horizontal position. So all these photographs here, I crop into a vertical, and most of them I cropped on the iPhone. Now in a previous section and you saw how I do some image editing enhancement retouching using Adobe Photoshop. But I want to show you how you can do image editing using just your phone. So let's take a look at that.
19. iPhone Image Editing Part 1: So we're going to bring up this image here, and this is the way that it was taken right from the camera. Everything was pretty much set to Automatic. And by looking at this image now you can see that the color balance is off quite a bit. So let's go ahead and we're gonna do some image editing using the built in editing app. And one thing to know that when you do use the camera and the bill in features as DR. In a portrait mode, you can still make corrections afterwards. Now you can also make corrections as you are shooting. And this way you can see exactly what you're getting. And then you can further enhance it afterwards too. But here we're gonna go ahead and make our corrections afterwards. So let's take this image and edit. And the first thing that I want to point out is this wheel here. You can make all kinds of needle adjustments here. And I took this in the default setting here, which is the natural light. And remember you can actually set these as you're taken a photograph so you can already see what you're getting. So you have all different new things you can do. Black and whites even do change a background, make an all black, you can even make a, a white background here. So that is called back again. And we're going to go back to natural light. Okay, so let's keep it there. Now the first thing that I wanna do is I want to fix the color on this. And if we go to the right side here, second from the top, I'm going to click on that. And that gives us all kinds of options here. And if you look at the first one says ADL. And if we hit the first setting here, it's going to make an auto correction force, which we can further adjust. So I'm gonna go ahead and keep it right about there and we can make further adjustments. And next one will be exposure. This was maybe a little bit bright. I'm going to just stark in the exposure up slightly. K Right about dare looks good. We can see all the controls. Brilliance highlights. Well, we cannot just that degree of highlights like in the shoulders and the hair. So collect that would keep that pretty much normal where it was. And then you can see shadows was going to deepen your shadows just a little bit if you want to make a correction there. And then of course, contrast brightness. I can also brighten up your image in dark and your image. Or keep it about there. Black point, which is going to deepen the dark areas a little bit more. And then next we have saturation, which is going to add saturation. Or we can desaturated colors is a little bit too if we want. And next we have vibrance, get more vibrance and your color warmth. And here we can add a little bit of warmth. And our image was taken a little bit too much on a warm psi. We sort of started with an image right about there. And we ended up with here, which I like a whole lot more. And ten can also adjust some of your colors. And then sharpness. If you were a little bit soft and you're focusing, this could help make your image a little bit sharper. Definition, defining the subject a little bed, making the pixels a little bit sharper. And noise reduction in case you had to use a really high ISO and you ended up with a lot of noise in your image. This can help reduce some of that noise in your image. And next we have one of my favorites, the vignette, which I'm going to apply after I make a few more adjustments. Next thing I'm gonna do is crop. On the right side on the bottom we have a crop tool. And then here we can crop just by moving these lines free form. So if we click on the top crop icon here, we can make a selection of certain different formats. Now we can crop to you. So let's go ahead and stick with seven by five, which would be a five by seven if I want to crop this into a vertical, which is what I do. So I'm going to come over to the left. I'm going to crop on the vertical section here, will crop to a five by seven. And that looks pretty good as it is. So I'm gonna keep it there. Now we have a cropping done. We're gonna go back to the vignette tool. We move the slider up and down. We can get a choice of vignettes, either light or we can give our corners more of a dark vignette, which is what I'm gonna do right here. So now that we had that Don, we're gonna go ahead and hit done. And it'll save it with a current editing that we've done so far.
20. iPhone Image Editing Part 2: So next I'm gonna go into another app that I want to show you. And this is a great app, one of the best, I think it's called Snap seed. So we're going to open up the image that we just worked with and do just a little bit more retouching that I want to show you. And this has some really neat effects in tools that you can use. So if we tap on looks on a bottom left hand side, so we get a nice election of changes that we can do. And if I go to portrait, I tap that. You can see it gives us a little bit more of a darker vignette. And it seems to smooth the skin tones just a little bit to another useful setting here that you can use would be smooth. And this can be very useful if you're doing glamour portraits or portraits of children or babies at just gives a nice soft focus effect to the image. So I'm gonna go back and then I am going to apply the portrait effect on that. And a bottom right, we have a check and we tap that, it's going to save it. And this is what we have right now. I wanted to do one more and this is an important tool that I use quite a bit. Adobe Photoshop has a similar tool called the Healing Brush or the clone stamp tool, and this one is called healing. So if we tap that, it's going to give us the ability removing some imperfections on the skin, oh, wrinkles, lines, freckles, that type of thing that you might want to get rid of. So I am going to expand the image using my fingers per the close. And you can see as we bring this in close, this can get pretty scary. Just wanted to give you a warning. And on the bottom left we have a little rectangular box that if you put your finger in there, you can move it around to the area that you wanna do some retouching to. So just to show you all want to get rid of a few freckles here. So I'm just using my finger on here as a brush tool really. And we have a little bit more work and then knocked out we can do so we're just going to smooth out this here in the neck. You don't have to worry if you make a mistake because in the center you have a arrow that goes left, that's going to take you back once that at a time in case you're not happy with uncertain vein or you make a mistake. Do a little bit more gamma annotate that went away. I didn't like that effect too much. Okay, so we'll stop right there just to give you an idea. And this is what we've ended up with using the image editing software that's in our iPhone app. And then also using Snap seed for a little bit more of image editing and photo enhancement. And if you wanted to take this a little bit further, go into Adobe Photoshop or have similar program. And you can do even more. And I have done that in a previous section, so I don't want to repeat myself. And if I look at that segment, you can see the additional retouching and enhancement that you can do using those tools.
21. Setting up Nikon SB-800 Speedlight: So we're going to start with the SB 800 unit and we're going to turn our unit on. And then we're going to hit the SE L button in her center for a few seconds. And then we get these little squares and we're going to scroll over to the square on the top right. Press SEL once again. And now you're going to see on the right side here we have a few options, and here's where we scroll down to u4. And we're gonna press that again few seconds. And now you can see we're set to fire remotely. But we wanna make sure that we have our power setting set correctly. So we're going to go into mode. And then we're going to see our power setting here. Right now we're at full power one, and we're going to set those who fire at 1 eighth power. So we're going to scroll down and you can see that this works in increments of thirds. So right now we're at 1 eighth. We're going to hit SEL again. So now you can see that we're set to fire at 1 eighth power. And we'll press the mode button again. And now we're all set. So now we're set to fire this unit remotely at 1 eighth power.
22. Setting up Nikon SB-80DX Speedlight: So let's go ahead and set up our SP 80 DX speed light flash. We're going to turn the unit on. And inner center, we're going to hit the SCL button for a few seconds. It reads off for the remote to fire. So we're going to turn that on by using the left or right button. Now you can see that we have our squiggly arrow on the bottom left-hand side here. And then you wanna make sure that you see that. And if not, you can find out again by just going up and down and until it comes up. Now you can see we had this squiggly arrow and we have our unit turn on to fire remotely and we're going to hit the SCL button again. And there it is. So now we're set to fire remotely, but once again, we have to adjust our power settings. And to adjust our power settings, we want to make sure that we're set to em for manual and not a for automatic. So we're going to go to em. And then using our up and down buttons here, we can set our power settings here. And we're going to scroll all the way until we set this to 164th taller. And that's it. And then we're going to hit SCL. So now you can see that we're set to fire remotely and we do have it set to 164th power. And now we're just about ready to use it. But let's go ahead and set up our camera so that our built-in flash is going to fire our units remotely.
23. Setting up Nikon D7200: So let's go ahead and set up our Nikon body, which in this case we're using a Nikon D 7201st thing that we wanna do is pop open the flash here. And we're gonna go into menu. And then we're going to custom setting menu. And we're going to go down to where it says E bracketing flash hit. Okay? And here we're going to move down to y3, flash control for built-in flash. Well hit that. And here you can see that we're already set to Commander mode. And you can scroll up and down if you're not there already. Wow, okay, that And then from commander mode, host scroll over and here's where we can set our power setting of the flash. And as you could see, where I built in flash, and this is the mode. And I understand I was told by someone that if you set it on the double dashes here, it'll fire very, very weakly, just enough to fire our remote flashes. But I've been using mine on M for manual. So scrolling up and down, we can go to em TTL or those dashes again, and I'm going to go to M. So now we're going to fire a manual and I'm going over to compensation and scrolling up and down, we could find our compensation that we want. And here I'm going to the lowest, which will be 128th power. So now we're set very, very weakly. So the flash, Well, of course, depending on your ISO, but your flash should not have any effect on your exposure. And we'll hit OK. And now we're all set to go. One thing to be sure of, Make sure that your flash is popped up before making your adjustments.
24. Setting up Fuji X-M1: So now we're going to be setting up a different brand of camera than what our speed lights are. And we're setting up a Fuji Film x M1. And let's turn it on. And again, we want to make sure we pop up the flash. And there we go. Now the neat thing about this Fuji is that you can actually just hold this flash back so we can bounce the flash Now, we can bounce it off the ceiling so we can get a nice soft light if we want to. So now that we have are built in flash popped up, let's hit the menu button. And we're gonna make sure that we go to shooting menu. And we have to scroll over to where it says flash mode and will hit OK there. And we have to make sure that we go to Commander. And we'll click on Commander. And then that takes us back to the flash mode. And here we can go down where it says Flash compensation. I have, it's said to the lowest compensation that this camera allows, which is minus two. It should be enough. But if you do have a problem, we could always just take our flash and move it up so a bounces off the ceiling. And that's going to make a quieter bit weaker. So we're all minus2. We'll click OK. And now we're set up to fire our Fuji Camera remotely using our Nikon speed lights. So whatever camera you're going to be using, you should be able to set it up so you can fire it remotely. As you can see, the menu settings are very similar, so you can either try to figure it out or you can go check your manual or possibly look for a YouTube video that's going to show you how you can set up the camera that you're using to fire remotely.
25. Final Words & Thank You: So thank you for taking this class. And I'm sure by now you see the importance that lighting has over equipment. I love the sea. Some of the portraits that you come up with after taking this class. And you can start with just simple portable lighting gear and using your phone, you should be able to come up with some really nice quality portraits. Thank you very much and I wish you all the best.
 Photofonz Media Ferdy Neubauer, Sharing the Passion of Photography