Transcripts
1. Introduction: Hey everyone. My name is Jessica and I'm a certified sales
was professional with many years of experience in the
Salesforce ecosystem. And welcome to my course, Salesforce Experience,
Cloud lending, basics of community sites
and getting started on your journey to be a Salesforce
experience cloud expert. Now in this course,
we will learn about the power of Sales
Force Community Cloud, and we'll understand why
organizations actually use it. All the basic
configurations that you can do around the
community sites. As an administrator, we will start the
course by understanding what is experienced
Cloud and how you can leverage various
out-of-the-box features. We will learn how
to set up sites and various teams and
branding options that are given by Salesforce to make your site look professional
with just point-and-click. The only prerequisite of this course is that you
should know your way around Salesforce Lightning
interface and also some basic understanding of
Salesforce Objects and fields. So join me in this journey to learn sales was
experienced Cloud.
2. What is Community cloud: Now let me introduce you to the sales forces
experienced Cloud. Now Salesforce's experienced
Cloud or communities is used to create community
experience on Salesforce. Now, using community
or Experience Cloud, you can create
interactive web portals for your customers and
your partners as well. Now, this experience
cloud was created to connect organizations
with external users, like your customers,
your partners, and you can even give access to your internal
employees as well. Now, one of the
main advantages of using experienced Cloud
is that you don't need any integrations or any sync between your web portal
and your CRM data. Using Experience Cloud,
you already have access to your sales forces data and you can add that to
your site as well. For example, you can create a customer support portal where your customers can login and ask a question to
your support agents, which will translate
into a case record in Salesforce and will be assigned
to your support agents. And similarly, your customers
will be able to see their ongoing cases and the cases that they have
raised up until now. So Salesforce's data becomes a part of your sites as well. Now Experience Cloud is very user-friendly
for customization. Your administrators
can create, develop, and customize your
experience cloud website with just pointing clicks. You can create multiple
experienced cloud sites within your pills for SOC
for different purposes. For example, you could create
stimulus support site. You can create an HR portal. You can create a bottle
just for your partners who are collaborating with your sales team for
some of the deals. So as we progress
through this course, we'll see more about the capabilities of
Experience Cloud and we'll try and create a
whole new website using this experience globe.
3. Sign up: So the first step is
that we set you up with your own sales force
or where you can practice and learn sales force. So simply go to your
web browser and search for the URL
developer.salesforce.com. And at the top you'll be able to see a sign up button here. You can simply click on it. And a new form appears. Now fill up this form. So add your name, first name, and last name, your
email address, which you want to be
associated with your user that will be created for
your Salesforce org. Then you can add your
role, your company. Now add a username that will be associated for logging
to your sales force. Usually a good idea to add your username as the
sign-in email address and append that
e-mail address with a word that will generally
help you remember about this, or for example, dot dev or dot support or anything
else that will help you remember the username associated with your sales force or the Salesforce has sent an email to us for the
confirmation of this org, you can simply click on this verify account link that is appearing in your e-mail. And once you click,
you will be asked to change to set a password
for your sales force. So you can simply set a new password and click
on Change password. Now you have
successfully logged into your new Salesforce
org and by default, you will be able to
see the setup page. And from here, you will
be able to control an ad, many features in
your sales force. And at the top left-hand side, you'll be able to
see this grid-like structure if you click on it. So this is the app
launcher here, you'll be able to see
all the apps that are associated with your org. And this comes out
of the box from Salesforce when you first
sign up for any org, such as sales services, marketing, all these
apps are available. So if you click
on the sales app, you'll be able to see the
homepage of your app. Now, you can simply click on various tabs to access
various objects, data, and records if you want. So this is the user interface of the salesforce lightning, where at the top
you'll be able to see the tabs that are associated
for each objects. And if you want to go
back to your setup, simply click on the gear icon at the right-hand top side
of your Salesforce org, and click on the Setup button. And here you'll be able to
go to the setup page again. From here you can
search for anything in the QuickFind that is appearing
on the left-hand side. And you can simply go through and navigate
your sales force. All. This is the
first time that you are working on
lightning experience.
4. License: Now, before we start creating our site using
experienced Cloud, it's important to
know the type of licenses that are
required and are available by Salesforce
to create and give access to your
users for this site. So to review that, simply go to the
setup page and search for company information. Here. Do you see the user
license information? And as you can see, there are many types of
licenses that are available. And you will be able to
see the total licenses, number of users licenses, remaining licenses, and the expiration date
of each licensed type. So as you can see,
this is a list of all the licenses that
we have an instance. Now, if I just search
for customer community, you will be able
to see that there are some licenses by this name. We have customer
community login license, where the total licenses five
and remaining is also five. Similarly, we have
community Plus community plus login and customer
community as well. We're going to take a
look about each type of these licenses and
what do they signify. Similarly, you can see that their partner community
licenses as well. We have partner community
partner community login. So all of these are experienced
cloud related licenses which you can use to give
access to your users. So let's see in
detail about what these licenses are and
what do they signify. So in this diagram, you can see that they
are majorly two types of popular community that
I used by organizations. The first is customer community and the other one is
partner community. Now, in this diagram, you can see that we have a
sales force or a sales force, or can have multiple sites
or multiple communities. You can see that the first half is for customer community, where you can create
a whole community for your customers to interact with the case agents
using the k objects, you can let your customers or any guest user to have access to knowledge articles so
that your customers can help find themselves what
they're looking for. Then they can have access
to their accounts, to the contacts and videos products that are being
offered by organization. And then the second
is partner community. This has been majorly used
by your channel partners, the users from those
organizations with whom you're working together
to close a common deal. For example, you can
give your channel partners the access
to this community so that they can collaborate with your sales reps on
common opportunities. And in that case, your partner users
will be needing access to these objects
like accounts and specialty opportunities so that they can know and collaborate on common opportunities
with your sales reps. And similarly for leads
and campaigns as well. Now let's take a look at some of the license types that have
been used for communities. Now the first is external apps. Now this license type is used to engage any
external stakeholder, which includes brand engagement
and customer loyalty. Now, this license has a limited access to your
Salesforce CRM objects, and external apps license can be used with personal
accounts as well. Then we have customer community, which is perhaps the
most popular license, which is for business to
consumer experiences. With large number of
external users who need access to k subjects
or knowledge articles. Usually majority of
the organizations heavily use customer
community licenses. Then we have customer
community provides B2C experiences with
external users who need access to reports
and dashboards as well in advanced to
various CRM objects. And we have partner community, which is a B2B experience that
need access to sales data, which I previously said that you can collaborate with
your channel partners. Then we have channel account, which is a B-to-B
site and portals that calculate the usage based
on the number of partners, instead the number
of individual users. Then we have login
based licenses. Now, each community license can be either a
member base license, which we have just seen, or a login base license. Now, to use a login
base license, you first need to purchase a
specific number of logins, which needs to be
used every month. Now, instead of
user-based licenses, you can purchase
login based licenses if you know that they will be very limited number of
logins for your users. External users associated
with that license consume one login each time they log
into your community site. However, logging in multiple
times during the same day still only consumes one
login. Once logged in. Switching between sides
doesn't consume extra logins. And this type of login is referred to as
daily unique login. You can use login based licenses if you are already
aware that they will be limited activities
on your site and your users might not login
every day of the month.
5. Enabling digital experience: Now let's start creating our own site using
experience globe. So here I'm on the setup page, and from here we can simply search for
digital experience. Now communities has been renamed as digital experience
in sales force. So just make sure that you know the updated terminologies. Then here you will be
able to see this option, which is four enabled
digital experiences. Now, after you
enable this option, Salesforce will allow you to create sites using
digital experience. Once I enable this option, will have to select a domain name for our
digital experiences. So here you will be able to
see this domain name option. Here you can simply just name your domain if it's available
and is not already in use, then you will be able to
simply get that here. Once you click on
check availability. Now once done, simply
click on Save. This dialog box is
just confirming that you want to register this
particular domain name. So we're going to
just click on Okay. Here you can see that we can now create new experience
cloud sites. And all your sites that
you create and sales force will be able to
see on this page. As you can see, the
maximum number of sites that are allowed
right now is a 100, which includes active,
inactive, and preview sites. So let's go ahead and
start making our own site. So let's click on
this New button. And you'll be able
to see that we now need to select a
template for a site. Now in the next video, we're going to see what are these templates and
what do they signify? And what templates should we
use for which site portal.
6. Create site and template: So now we're going to
take some time and get ourselves familiar
with all these templates, choices that Salesforce gives us out-of-the-box when we
enable digital experience. So as you can see, the first thing
you notice is that these templates are being
categorized by sales, service, commerce,
and installed. And with each release, these options might
change as well. Each tab will have multiple
types of templates. You will be able to see this
lightening tag available. Some of these templates, that means that
these are lightning ready and our mobile
ready as well. Now, some of these will not be having these
lightning symbol, for example, this visual
force plus tabs and Aloha. These templates
will not be mobile ready and will not
be able to give the users a grid and an enhanced experience when
viewing on mobile devices. Then let's go through
some of these templates. Now the first is build your own. And here you can use this option to build
your own templates and then use your
developing skills to build a site from scratch. Now, this template
lets you develop blazing fast digital
experiences such as websites, microsites and portals using the lightening web components. Now, this is powered by lightning web runtime,
which is LWR, and this customizable
template delivers site performance and improves
developer productivity. Then we have B2C commerce. Now, using B2C
commerce template, you can create your own
e-commerce store that provides easy customization
and can use it to allow buyers to create
and manage list of products and they can access all your
products and services, right from this website. We're able to create a whole e-commerce website which allows your customers to buy directly
from your site portal. Then the next is Help Center. Now, the Help Center
template offers a public-facing
self-service portal where your users are guest
users can search your knowledge base for
articles, for answers. And they'll be able
to help themselves to acquire the answers
for the questions. It reduces the load on your customer support
staff as well and gives customers the satisfaction of finding their own solutions. Then the next is the customer
account portal template. This template just
simply improves your customer relationships and decreases your service cost. Now, this template provides
features that make it easier for your customers
to see and pay invoices, update the account information, and search again for knowledge
base for their questions. You can add visual navigation
experience, title menu. You can add dashboards
and reports and create a whole rich responsive look and feel across
multiple devices. Then the next is the
customer service template. Now this provides a rich
self-service experience for your customers with they can get answers to their
questions at anytime. On any device. With integrated knowledge,
articles and case management, customers can search and view
articles, post questions, or contact a support agent
directly from your portal. Customer service template
should be used in those cases where you are simply creating a whole customer service
experience, right? On your website. And you want your
customers to have a direct communication with your customer support
agents through this website where
they can lock cases. They can search for
answers for the equations. They can see products as well, and they can also
see reports and dashboards for
various components. Then the Partner Central
template is designed to support partner relationship
management workflows. For example, Channel
Sales Channel Marketing, Lead distribution,
deal registration, and partner recruitment
and onboarding. Now, Partner Central also
includes functionality to map the reports and dashboards for monitoring
your pipeline. Now Partner Central homepage
includes a lead in bogs, global search, navigation menu. All the components related to opportunity and
leaves and campaigns are combined to give a one-eyed view on
your website as well, where your channel
partners with whom your sales rep or trying to
close the opportunities, see the progress of
the opportunities, the products that are
being sold to the client, and all the leaves that
have been created where your sales rep and channel
partners are working together. You can create a
whole new experience for your channel partners
where they don't necessarily will then have to follow up with your sales team for the update on your
opportunities or your accounts. As your sales reps will update opportunities and leads
on your sales force, CRM. And the same will get reflected directly on the website as well. So your channel partner only
needs to login to your site and we'll be able to see the
updated information anytime. Then we have the Aloha one. Now, you can think of it as a
starting point for going to all the other websites
and applications that are within your
salesforce organization. And this is kind of like an app launcher
where you will be able to customize and have a central
point where you can go to all your apps that
are in your org. So what we're going
to do in this course is we're going to create a customer service portal organization by the
name of John Ward. Generators basically
sells generators and provide customer service
for these generators. So here we are going to enter a name for our customer service. So here I'm going to
simply name it as customer service
site and the same, I'm going to add it
to the URL as well. Then if we just click on Create, the Salesforce will take
some time and it will create this side with
this particular template. Now once done, you can
see that we have been directed to the workspace. Now, this is your
command central, where you will be able
to customize and have control over your site. As we progress in the course, we'll be able to see and know various ways in
which we are going to customize this new site. And we're going
to take a look at more of these options in depth.
7. Workspace: So the first time that
you create this site, you'll be able to
see this workspace. Now this is the place
where you will be able to manage your community sites. For example, you can see that there's several options here. We have built a moderation, content management, and
administration dashboards. And if I just scroll up and there's a button by
the name of workspace. If I click on it, you'll
see several options. We have guided setup where
it will take you through various options and how
these options are useful. So similarly, as we progress
through this course, we'll see some of
these options and what they are used for will be seeing Build Content
Management, adminstration. All of these options are
very crucial to know. If you're just starting
to build your site, then if you just click on the
sales force setup button, you'll be taken directly to your Salesforce orgs setup page. If I just scroll
down, you'll see several options as well. So you'll be able to see
all the help and training related to the community or
experienced cloud management. You'll be able to see
links here for your ease. So we're just going
to skip these. And you can then later on take a glance through all of
these articles as this will really help you
to better understand and just get yourself familiar
with the experience cloud. Then let's go ahead and
start building our site. So here I'm going to
click on the builder. Not this is the experience
builder and this page is where you will be building
and customizing your site. So this is currently a guided
setup and as you can see, there are several
components on this page. Now, this is the components tab, and this is used to
simply drag and drop the standard
lightening components onto your website page. And then you can easily
customize it as well. Then we have the
option to change team and related colors as well. Then we have paid
structure where we can see all the components on page. Because you can simply
select these components and do customizations
in a quick way. Then we have the settings in which there are
several options, general settings,
themes, languages, navigation, and et cetera. Now, this is just a
tour of the site. And just to get
yourself familiar with the user interface of expedience
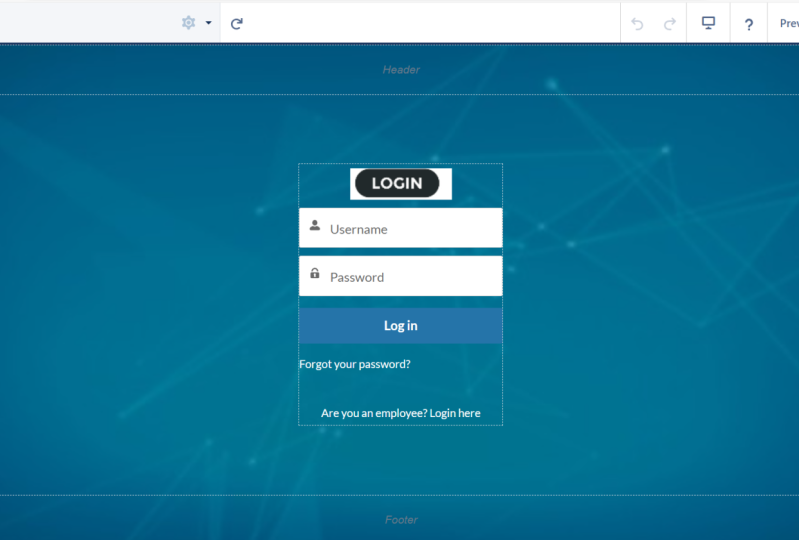
cloud and this builder. Here, if I just click
on Settings icon, you'll be able to see all
the pages that are present that we can use in our website. For example, you can see
this is the login page, and if I just click on it, you'll be taken through
this login page. And here you can customize
it further. Even. If I just click on
this login form, you can see that
this is a component, a lightening
component in itself. Upon clicking on the
right-hand side, various options are
present for you to customize simply this component. For example, you can
simply change the text that appears in all
of these labels. Then let's get back
to our homepage. This is the theme that we have selected for customer service and we're going to customize
it as per our needs. And this is the refresh button. So you can simply click on it
and the website refreshes. If in case you have just added a new component or you wanted
to just refresh the site, then we have the
view mode. Here. We can see how our website will look in the mobile
devices as well, or on the tabs. This is again a very handy
tool to just let you have more control on how your website will look
on mobile devices. And then we have this button
by the name of Publish. Now, if you click
on this button, any change that you make
on this site will be published and all
the changes you have made will be
saved to your site. And any user, any external
user, Guest user, or internal user will be able to see those changes
live on your site. Now, let's take a look to
this components option. Here, you'll be able to see various lightening
components which you can drag and drop to your site. And if you're familiar
with the AppBuilder, you'll be able to easily
relate to this option, where you can simply drag and
drop various competence to your pages and those components are available for
your users to use. For example, you can
see that there are various or components
by different types. We have companies for
analytics to add dashboards to your website too for content
to add HTML, enrich content, text and images, videos can use chatter fees as well to increase the engagement
level of your community. We have Process Automation
to add flows to your side. Then we have records
to simply show the records directly from
your sales force, CRM. And then we have some more
support related options. For example, to add
contact support forum, create forum so
that your users can create cases directly
from this side. Then we have the theme option. Here. We're going to customize
and change the colors, images, and theme for our site. Here, you can add different
themes to your site, which is related to this
customer service template. You have the option to
change the text color, detailed text color, link color. So you can customize it in very detail using
Experience Cloud. If you're familiar
with HTML and CSS, you can even develop your website using
these options as well. For example, here, if
I just drag and drop featured topics and
fees to my site. You'll see that this
component is now available. Do we viewed and to
be used by our users? And on this dialogue box, we can further customize
it as per our wish. For example, I can simply
rename this, rename this tab. I can change that label
of the discussions. My feed. I can just saw the
order for discussion feeds. I can change the
style, boarding color, everything I can control
directly from this option. Nine, if I just
click on Preview, you'll be able to preview
this side and all the changes that you
do to this side. Then if I just click
on Ask a Question. This is similar to
the chatter post, where you can create
a discussion topic. You can ask a question,
do this community, and you can simply
post it to a topic which will again see as we
progress through this course, how to create topics
on your website. Then let's get
back to a builder. Then we have the page structure. Now this is where
you'll be able to see all the peaches that are
structured on your website. For example, you can see
that this trending topic, once I delete this structure, will also remove this
from its options. Paid structure is used to simply select any
option that you want to edit further for any component that is
already on your page. And you will be able to see a
synchronous speed structure from this option. Hello, if I just delete
recommendations as well, you'll see that this is deleted from the page structure as well. Then when I click on Ask button, you'll see that we'll be
able to identify where is this used on
our current page. Similarly, if I just
click on headline, the option will appear and this headline component
will be highlighted for us to see where this component is being
used on this page. Then we have Settings. Now there are several
options here, and these are very
self-explanatory. If you just read them. For example, you can give the public access to this website. You can change the
theme further. You can configure
the themes as you have language
options, navigations, mobile publisher, and
all of these options are available for you to simply use and customize your
website even further. Then, if you want to go right
back to your workspaces, you can simply click
on this button that appears at the top left-hand
side of this page. And you'll be able to see all your options
from the workspace. You can simply access them and go directly to these options. If you want to take a tour of
this workspace and builder, you can again do
it by clicking on this question mark button and
select Take a Tour option. So this concludes
the introduction of workspaces and the experience cloud
builder in Salesforce. And as we progress
through this course, we're going to do some
basic configurations and customizations to this site that
we've just created for Jen, what customer service?
8. Homepage Configuration Using Components: So let's start with some basic configuration on this side. So the first task that
we're going to do is to just change the
headline of this side. As you can see, the headline
currently says, Welcome. And in a sub-heading it says a place where you
can easily find solutions and ask questions. This is a standard headline and we're going to change this. We're going to
change the text and the feel of this headline. So you have two options here. You can simply click on this headlight
component and you can change the text
directly from here. Or if you want to add
some more customizations. For example, if you want
to change the color of this tags or you want to add some more pictures and videos, then you can simply
drag and drop this rich content
editor to this page. And from here on, you can add any text in any color that you
want in any font. For example, here
I'm going to just arrived and what community? I'm going to just make
the text a little bigger. I can simply change
the font here as well. Then I'm going to
add a sub-heading. And let's add search, navigate and get all the
help from this community. Wants ten, let me just change
the size of our subheading. I'm going to just decrease
the size of this text. This looks fine. Now let's change the
color here as well. So I'm going to just bold it and make it innermost
silver gray color. Now, let's click on Preview
to see how this looks. And you can see this looks
much better than before. Let's get back to the builder. As this is the first thing that any user that visits
your website will see. Then on the homepage
you'll be able to see this search option here, which is also
customizable as this is a standard component
on itself as well. You can use various methods to change the experience
of this search as well. I've covered a
separate section on the search component
in this course. We're going to customize this
search competent as well. As of now. If you
want to just change the placeholder
text, you can do it. You can simply go through
these options for autocomplete search, maximum
auto-complete results, and all the objects that are allowed to be searched
from your sales force, you can add these
options as well. I've added the products to be
searchable object as well, so that the users can
simply search for all the objects that are
presented in your sales force. For example, if I
just preview this and start searching for a
gen word generator, then you can see that
all the results matching this key word will be
appearing on search. So you can use this
search component as well, so that your users
can easily search for products and services that
they are looking for.
9. Theme: In this option theme, we can customize and add
different theme colors and text colors and
images for our site. For example, you can see that there are four options coming. Colors, images, font,
and theme settings. We're going to take a
look at each one of these in the upcoming
videos as well. So let's start off
with the colors. Here you can see that
there are many options. Next, colors, detailed texts, colors, action
colors, link colors. All of these options are
available for us to choose and to just customize the
color settings of a page. For example, here in
the action color, you can see that this is a
blue color selected here. You can just change any color or any shade of color
from this option. And as you can see, when I change the settings here, the action colors such
as for search for ASCO button or the color of these buttons
are being changed. For now, I'm just going
to make it a rich blue color so that options just
stand out in a website. Then we have the link color. So any link that
appears on our site, we can change the color of that. Then we have the
detailed text color. Now as you can see, if I just change the color
setting of this option, then the text that is present on this page gets also changed. As you can see
discussions my field, all of these texts are being now changed from
dark gray to black. Then we can just change the
overlay text color as well, where you can see
that the text inside the buttons and the profile
name gets also changed. Now I'm going to just
set it as white, then we have border color. If I can just change
the color of this, you can see that the
component borders are being changed on our page. Then we have the paid
background-color. And as the name suggests, if I just change
this color to red, you can see that
the background for us site get also changed. For now I'm going
to just make it somewhat a shade of white. Maybe let's make it
as scream white. So you can just make
any combination of colors and see what works best for you and it matches the branding of your
organizations theme color. Then we have an option
for navigation. Now for the navigation
background color, you can see that the navigation
bar background color, if I can just change
the color to red, and the same is being changed in our
navigation bar as well. So you can just play around with all these options and get to know what colors theme
works best for you. For now, I'm going to
just keep it as blue. Once I scroll down,
you'll be able to see generate palette from image. Now, for the login page, you can just simply add an image from your desktop or
from your machine. And any combination
of colors from that image will be applied
to your login page as well. So with this team option, you can just customize the
colors and the images of your paid in branding of your website and for
your login page as well. In the upcoming videos, we're going to take a look at all the other options that are coming in the theme settings.
10. Branding: Now the second option in
the theme is the images. Now, using this option, you can add images
to your website. As you can see, you
can here you can add a company logo header image. And then at the bottom
you can see that there's an option for
login pages as well. Here you can upload
an image to be added as a background for
your login page as well. So here if I just go to the administration
from a workspace, you can see that there's
an option by the name of logo file under the
branding options. Here, you can just
select the logo of your organization and you
can simply save the setting. So once I add the logo in
my administration page, this logo will appear in
the login page as well. Then the company logo, I'm going to just
add the same image. And you can see that this company logo is now
added to our website as well. Then we have the header image. So if you have any
image that you want to appear header of your website, then you can add
this image as well. And it will appear right behind this search and
your company logo. So I'm going to just add
a header image here. You can see that
this green image is now appearing in the
header of our website. The similar thing you can do
for your login page as well, where you can simply add a different background
image for your login page.
11. Font: Now let's take a look at another option that is
available under Themes, which is the fonts. Now, using fonts, you
can control how you want your text present on
your website to look like. For example, you can see that there are three types of fonts, primary formed header
fonts and text case. Now, using text case, you can simply choose
if you want to capitalize your takes
on various components, or you want to short text on lowercase, uppercase,
and formatted. All of these options
are available so that when you choose that
all the components, for example, you can
see Oscar equation and search and profile. All of these options are being changed when you
change that text case. Then we have the primary form. The primary font
is the font that you will see on
majority of your page. As you can see if
I just change it, all of your text components
which are standard, apart from the header
Jen board community, which we have customized
using a rich content editor. Apart from that,
you can see all of the fonts are being changed when you change
the primary form. Then we have the header font. So all the text that is available on your
header, for example, you can see that the
user profile name has been changed when I
change the header font. Here you can see
if I just keep on changing our profile name, keeps on updating as well. Once you're satisfied
with your fonts, you can simply publish
your site to make sure that the changes are not
available for the users.
12. Theme settings: Now let's take a look at some of these additional
settings which are available in the theme options. So if I just go to the themes and click on the theme settings, then you'll be able to
see several options here. Now there is an
option at the top, it says what pages do
these settings effect. From here you can simply
see what pages will be affected by any change that
you do in the theme settings. If I just click on this option, hide the header region
and navigation, you will be able to see
that a page reloads and our navigation and
header bar is disappeared. So if you want to hide these, you can simply
enable this option. Then the second says hide
notification icon in header. This is the notification icon, and if I just select, that icon will get
hidden as well. Then you have the option to set the maximum width for your page. Now depending upon your content and the type of site
you are building. So depending on your choice, you can choose to set a maximum width for your
content on your site. For example, you can
see if I just increase my speech width,
then page refreshes. And you can see that all the components of this
site gets expanded as well. Then we have the
search component. Here we have two options. The first is for
global search box. Now, in this, you can see
that our background color of the box is the same
as that of the header. If you want to
give another loop, then you can simply
select the peer to peer. Then we have the navigation
menu here you can replace your layouts default
navigation component with another component. Here you can see by default, navigation menu is selected. If I just select the
multilevel navigation menu, you will be able to see that now our navigation
menu is changed a bit. If I just change the alignment of our menu items to center, you'll be able to see
that our navigation bar is changed as it now
embedded in the background, only depending upon your
choice and how you want to present your navigation and the total UI experience
of your site. You can just play around with the theme settings to see what
works best for your site. For now, I'm going to simply
choose the navigation menu. And depending upon your
company's preferences, you can easily change the UI and theme
settings of your site.
13. Add Product List on homepage: Now we're going to see
how to use and embed your record list in Salesforce
directly to your site. So our use case is
that we want to add the top products of our organization right
on this homepage. I want that list should get present right in the sidebar of a site to show the top products that our organization
currently has. And I want this list to
be updated dynamically. If a top product gets added
to our Salesforce CRM, then I want that seem to get reflected to
our site as well. So let's see how we
are going to do that. The easiest way to achieve this is by creating a list view. That's right. We can simply create
a list view and sales force of the
products object. And we can simply show that
list view on our site page. So our top products or
Jen, what generators? And to segregate these
general generators, I'm going to use
the product code. I'm going to create a list
view where the product code contains gc as all our
general generators. Product code starts with GC. I'm going to just add a filter where product
code contains a, G, C. And here you can see that this list view is now giving us all Jen what
generators, products. Then if you want to
show additional fields, you can simply choose
to do that as well. But for our use case, I'm going to keep it simple
and just going to let our visitors see only
the product name. So let's go to a site
and in the component, let's drag-and-drop record list. And here you can see we
have several options. The first is number of records. I'm going to just let it
has 25 than the layout. We have the option to select
full compact or standard. So depending on your use case and the type of list
that you're providing, want to show more
number of details, then you can choose the
full layout as well. And here I'm going to just
select object name as product. And filter name is top products that we
have just created. And you can see that this
is showing the list, but it's not very pretty. I want to show only the
product names of our list. So here I'm going to change
the layout to combat. This looks much
better than before. If you prefer to show
the full layout, you have additional
options which you can just toggle on and off depending
upon your use case. Example, I don't want to show any images or to
show object a name. Since the ListView is
already saying dot products. And I don't want users to
search through this list and just don't want to add any additional
buttons here as well. So as per your wish, you can just customize it and make it as per your requirement. For now, I'm going to
just select as compact. If I just preview, this
looks much better. If I just click on
this View All button, then we can go to this new page. And from here we can see all our top products that are
present in a sales force. This gives a huge
boost to your side, as you don't necessarily have to add content to your
site again and again. Whenever a change happens, you can simply add records or settings
to your sales force. Crm, SCM will get reflected
in your site as well.
14. Creating Product Catalog Page: So previously we saw how
to create a component on the homepage to show only the top products
of our organization. Here in this video,
we're going to create a new page separately. And we're going to show our visitors all the
products that we have in our sales force that is
provided by our organization. So here we're going to create
a new page and we'll show our users all the products
tend solutions available. So let's click on
this new page option. And here we have two options. First, we can create
a standard page, and second we can
create object pages. Now a standard page is
a page that's based on a layout and you can add any combination
of components. So if you want multiple
components and multiple types of
content on that page, regardless of any content type, then you can use the
standard page as it's not bound to any
object in sales force. If you want to create
a record list, list detail related list pages, and you want this page to get connected to a
Salesforce object, then you can create
object pages as well. And just note that
even in standard page, you can have your
sales force object as well as you can
simply drag and drop the record components
and you can still show object unrelated
data as well. So basically a standard page
is based on a blank layout. And then you can simply build
your own page from scratch. In object pages, you select an object that is
associated to that page, becomes a context
for that new page. And you can view all
existing object pages, can view data and you can
view records of that object. You can view list
views, you can view, record details, all that data of that object
that you select. You can simply view
that on that page. In our use case, since we want to add
product catalog. So here I'm going to use the object page and select
the product as our object. Then this page is saying
that upon creating, we'll have three new
object pages, detail, page, list, page unrelated
list of the product object. So let's click on Create. Here you can see that this
new page is now created. And in the pages option, you can simply search
for product to see what are the different pages
that we have just created. As you can see by default, this shows the list
view of the product. Here we can change our list
view as our use cases to show all the products that are currently present
in our sales force. So I'm going to just simply choose all products list view. And this is currently
showing the product name. And as per your requirement, you can add the columns as well, maybe product code
or even pricing. Then here I'm going to add a rich content competent to do. Just add a heading for this B, just so that our visitors and users will get to know
what this page is showing. Again, have several options. So here I'm going to just remove some of these buttons and
options that are appearing. I'm going to remove the
object name, list actions. I'm going to just make the
list search as active. And I'm going to just
de-select the rest, is just giving us the
basic information that a visitor would lead when they're browsing
through our products. They'll be able to
see product name, code and any description. So right now, we don't
have any means to go to this page because we have not linked to anything right now. So when you are editing, you can simply go to
the pages option and just search for this page
in the product list. As if you remember, when we created
this object page, three pages got
created detail page, list page and related list page. So as you can see,
I can simply go to the product list and even search for any specific
product that I want. Now I'm going to just customize this page and I'm going to add a support button that a visitor or a user when
visits this page. And if they have any questions
for any of these products, then they can simply
click on this button to ask any question related
to any of these products. Or if you want, you can also add a contact support
button here as well. So that if any query is there
for any of these products, then the user can
simply click on this Contact Support button and they can create a
Salesforce case record. So this is how you can create
a new page and sales force. And in this customizer, depending upon your
requirements and add multiple components to it. And in the upcoming lectures, we're going to see how we can link it to a button on our page. So that when the user
clicks this button on the homepage in
the navigation bar, then the user is taken to
this product catalog page.
15. Adding dashboard: On many sides, you
must have noticed that the organizations actually do a list of the top customers. And we're going to do similar
thing on our site as well, where we are going to show
a list of account names. Who are the organizations
top customers, based on the eyes of the opportunities that are
coming from over the years, expedience, build a site. We can embed dashboards as well. And to create a dashboard, we need to create
a report first. So here I'm going to create a new report on opportunities. And I'm going to
add some filters. So I'm want to show a
list of accounts who have given highest amount of business in the
current fiscal year. So I'm going to add the opportunity
status has closed one. And in the columns I'm only going to show
the account name. If I just save and run this. You can see that this top
Account Reports is showing all the accounts that have given a huge amount of business
to our organization. Basically, top accounts. I want this detail to get
a made it in our site. And I want this to be dynamic and not just some
rich text component. As we want this to get updated regularly on
a site automatically. And since we can embed
dashboards in our site, I'm going to create a new
dashboard and I'm going to add a table component to fetch
this data on our dashboard. I'm going to do this,
create a new dashboard. Let's select this new report that we have created.
Top accounts. Use the Table option. And you can see that even if I remove the amount
and record count, there are duplicate
account names showing here because it's simply showing us the number of opportunities which
we do not want. We only want to show a unique account names
who are our top clients. Let's revisit the report
that we have created. This issuing multiple
accounts because we have created our report
on opportunities. And one account can have
multiple opportunities. And right now, it's because of these multiple opportunities. We're getting multiple
account names as well. So to remedy this, we are going to simply create a roll-up summary
field on our account. Object to get the sum
of the amount field on the opportunities of all the
closed one opportunities. So here I'm going
to just select, summarize object
as opportunities. And we want to sum
the amount field for those opportunities where the one checkbox
is equals to true, which is a standard
checkbox which gets checked salesforce automatically
when the opportunity has been marked as close to one. So once this roll-up
summary is created, you can see that this
total one amount is automatically
showing us the worth of all the opportunities. And from here, I can
simply create an report on account as we want to show
the unique account names. So here our first
column becomes account. And here in the filters, I'm going to add that the total one amount should
be greater than 1 million. And there you go,
we have gotten as top seven accounts
and sales force. And we can now simply
create a dashboard and add this chart on our site. I'm going to just save
this report first. Now you can see that our
dashboard can easily get this report added
as a table chart. Let's save our dashboard and
let's get back to a site. And in the components, I'm gonna do this drag and drop this dashboard component
onto our homepage. And you can see that at the upper com dashboard
can now be seen here. But as you can see, it's not looking very nice. Here. We have the option to
update the height size that, but this dashboard has been
showing a bit crammed up. So I'm going to just go to our original dashboard and just, just expand the width
a bit and save. Now let's refresh our site. And you can see that now this
dashboard is now showing a perfect view with
all the accounts being shown on our
homepage itself. Now, in this use case, we simply added list
of record names. You can even show a bar graph pie chart depending
upon your requirements. Here I want to hide this
View Report option. So I'm going to just
reduce the pixel height. You can even show this
dashboard in dark mode, depending on your
preferences and control it in whatever
way you like. So this is how you can ensure dashboard components
onto your page. And you can even show
multiple dashboard competence on different pages depending
upon your requirement. And you can show pie chart, bar chart, scatter chart, all these charts
which are available in Salesforce dashboard builder.
 Yashad Tayal, Salesforce professional