Transcripts
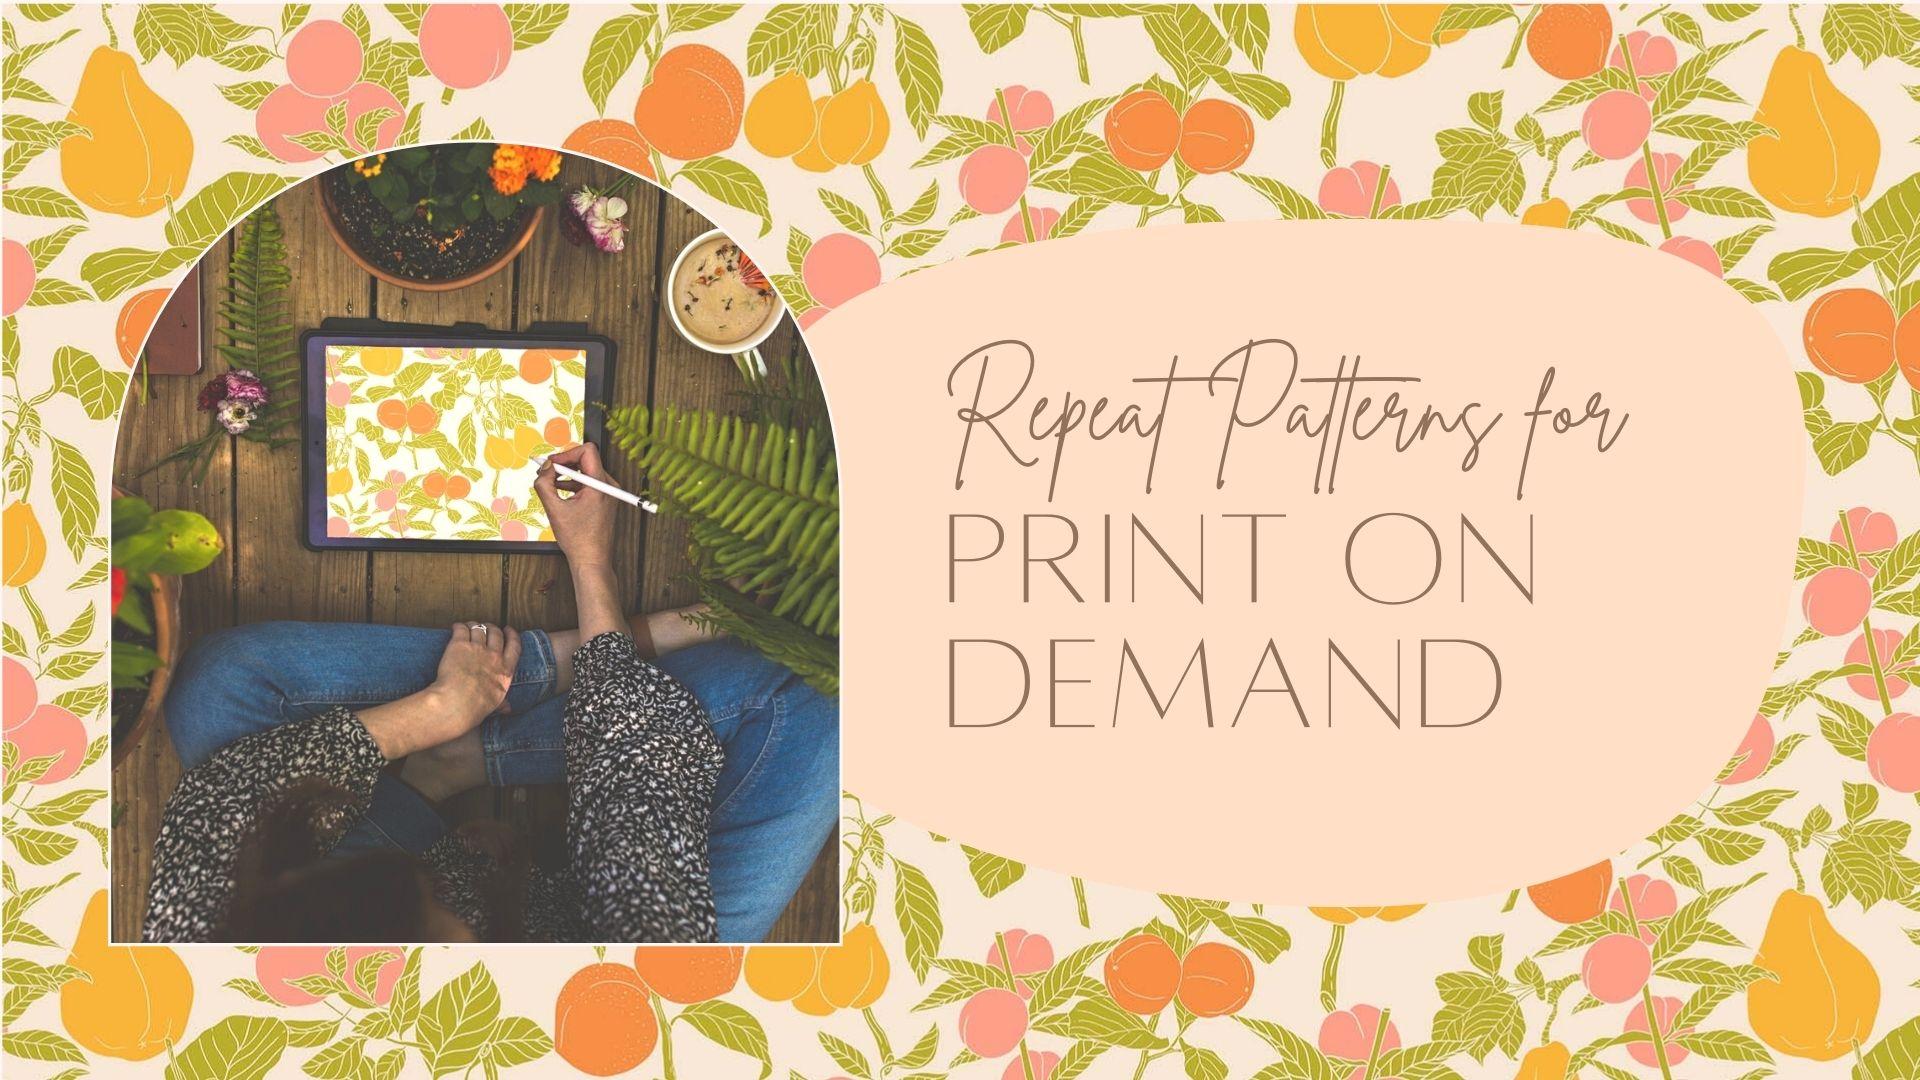
1. Repeat Patterns for Print-On-Demand: Hi everyone, I'm Liz Kohler Brown. I'm an artist, designer, and teacher. Today I want to show you my whole process for creating and listing repeat patterns on print on-demand shops. I've been selling my patterns in print-on-demand shops since 2015, and over time, my shops evolved from making a few dollars a month to making a full-time income, and attracting art licensors who license my patterns on products around the world. We're going to cover technical aspects, like what are the best image sizes and file formats to use for each print-on-demand platform and print-on-demand theory, like what patterns cell best, and where can you focus your efforts to get the best results for the least amount of work. In the class, I want to share with you all of my theories and processes for building patterns and listing them in print-on-demand shops, so you can stop worrying about whether you're doing it right, and just start creating a successful shop. When you take this class, you'll get all of the resources I use for my print-on-demand process, including my pattern organizer, where I keep track of tags, descriptions, and licensing deals for each pattern, and a workbook with suggested image sizes and my list of tags and themes that I go to when I need ideas for creating patterns. We'll be covering the whole process from start to finish, so whether you're a total beginner who hasn't even opened your print-on-demand shop yet, or someone who's been working in print-on-demand for a while and just needs to refresh your process, you will learn some great tips to have a much more efficient workflow in this class. I'll be demonstrating this whole process on my iPad, but of course you could do the same process on whatever device you like to use, and whatever apps you'd like to use to build your patterns. Let's get started.
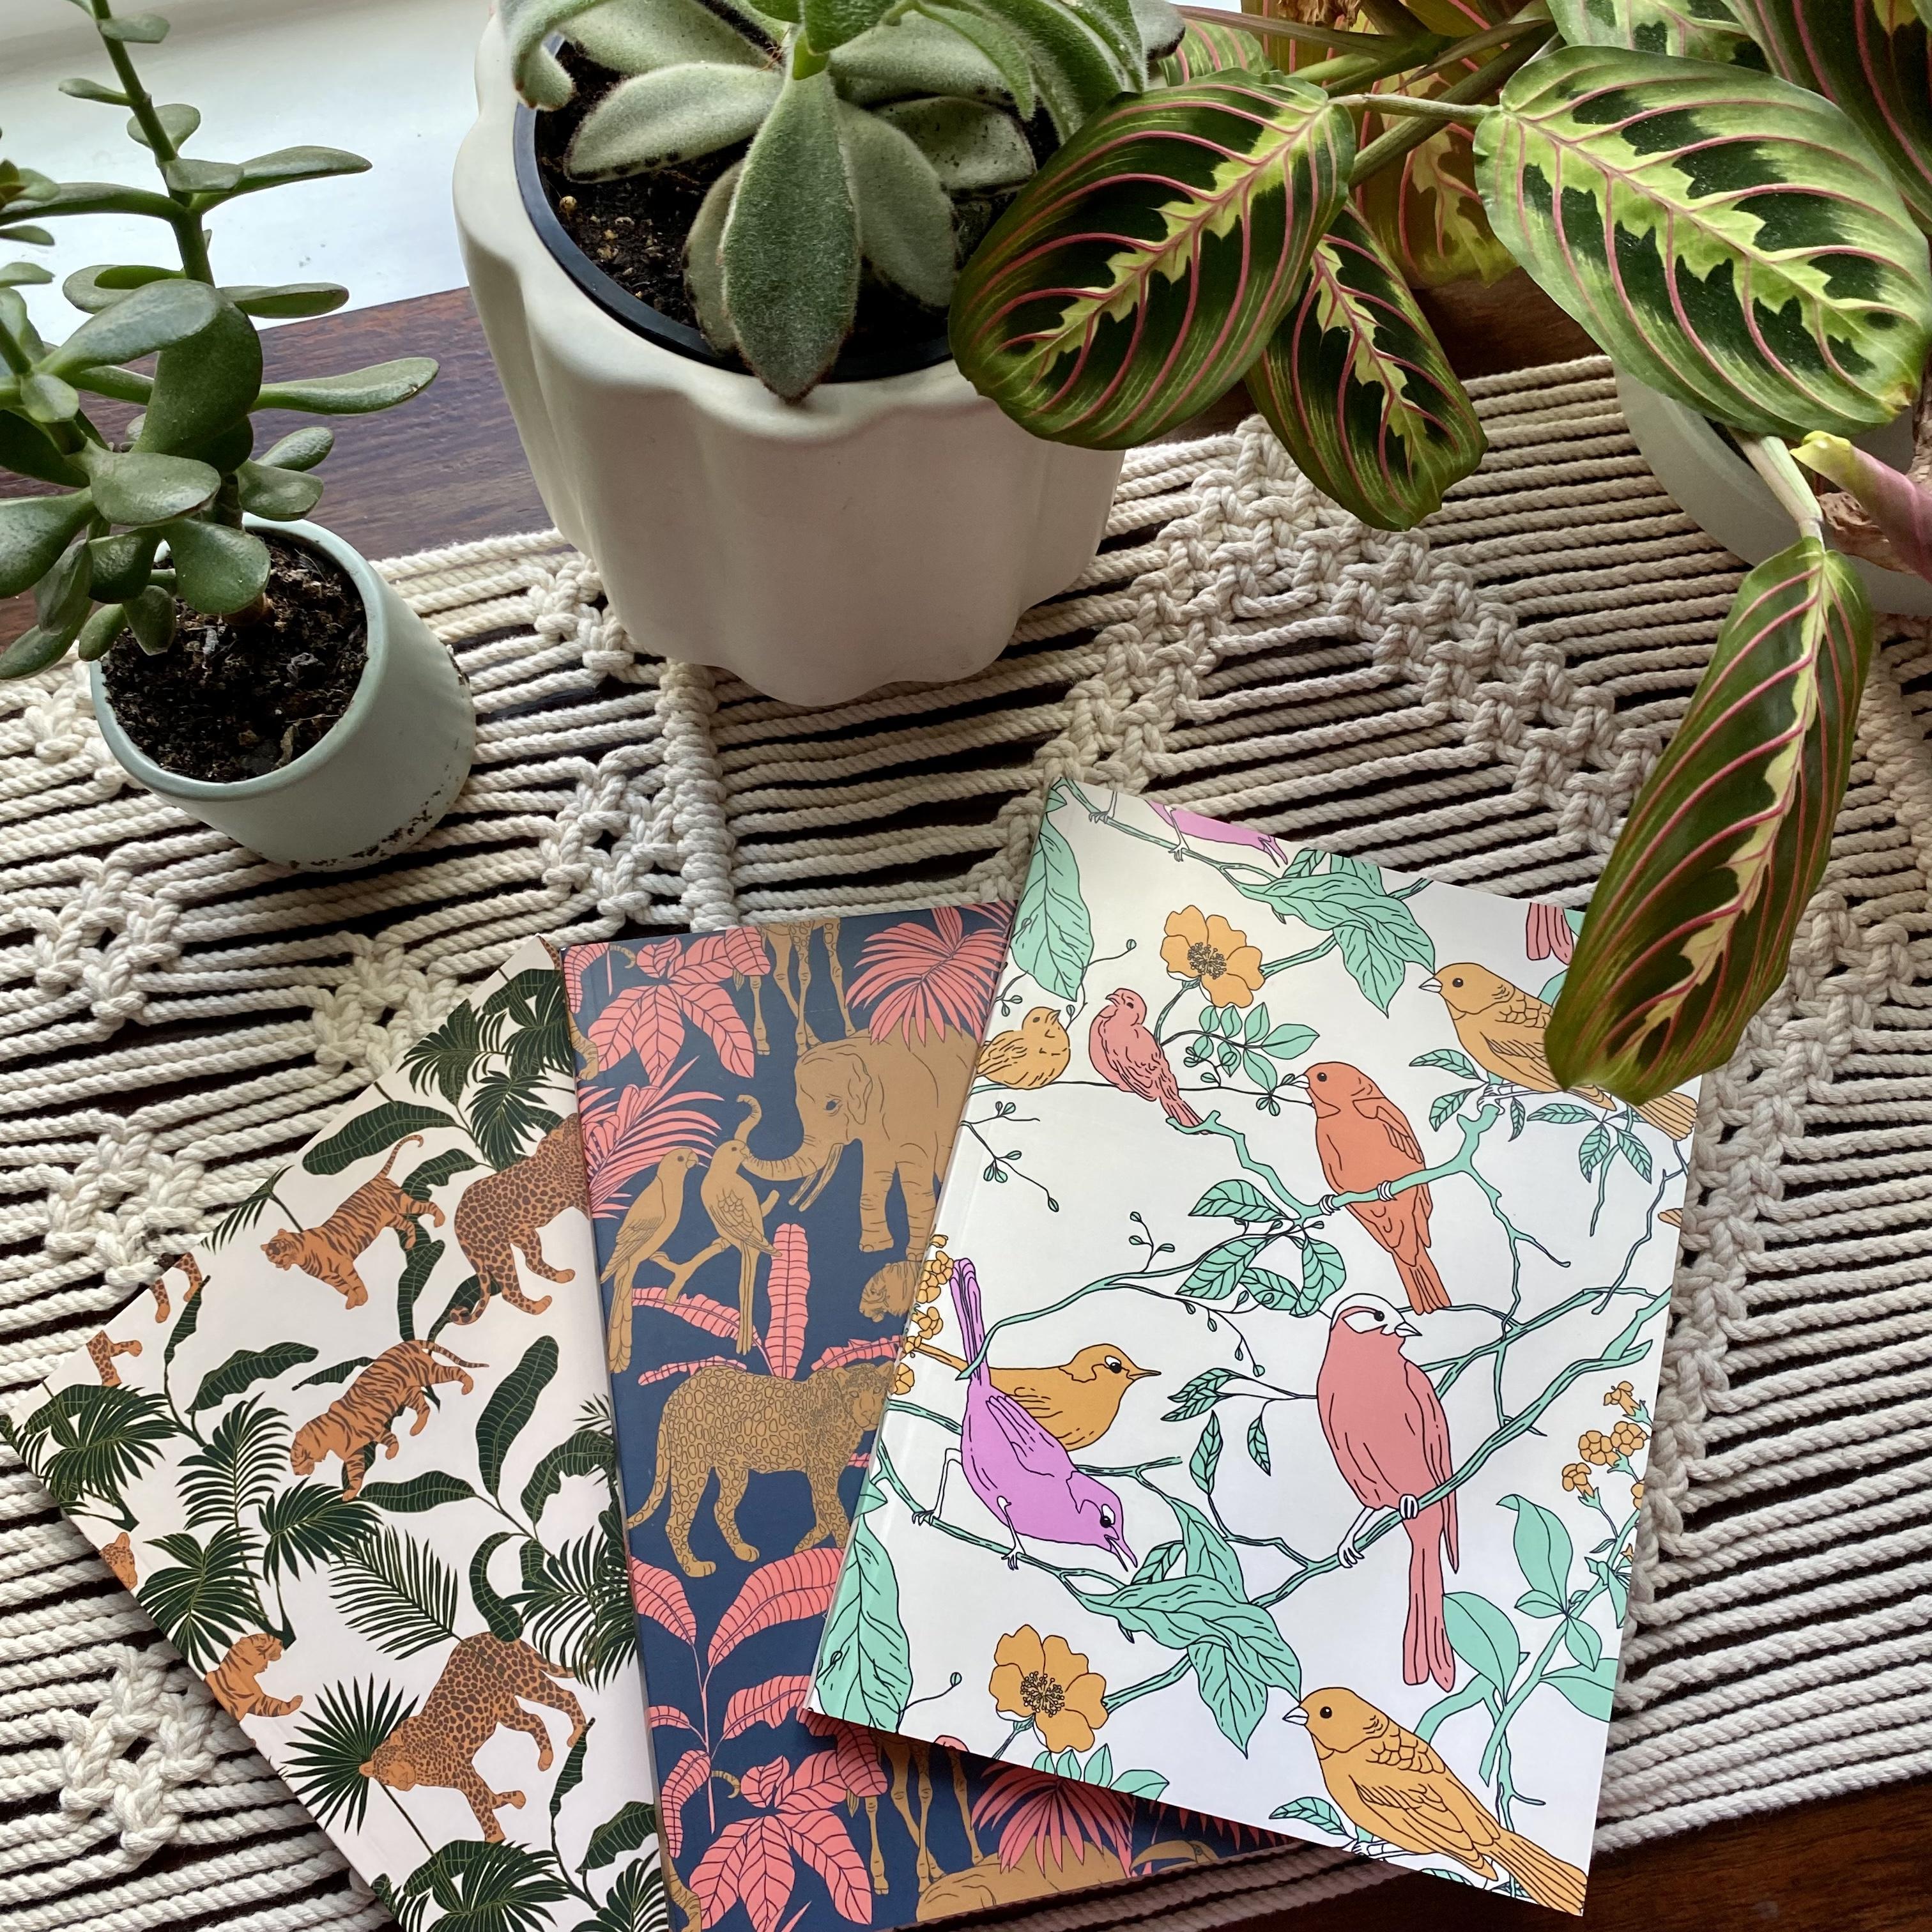
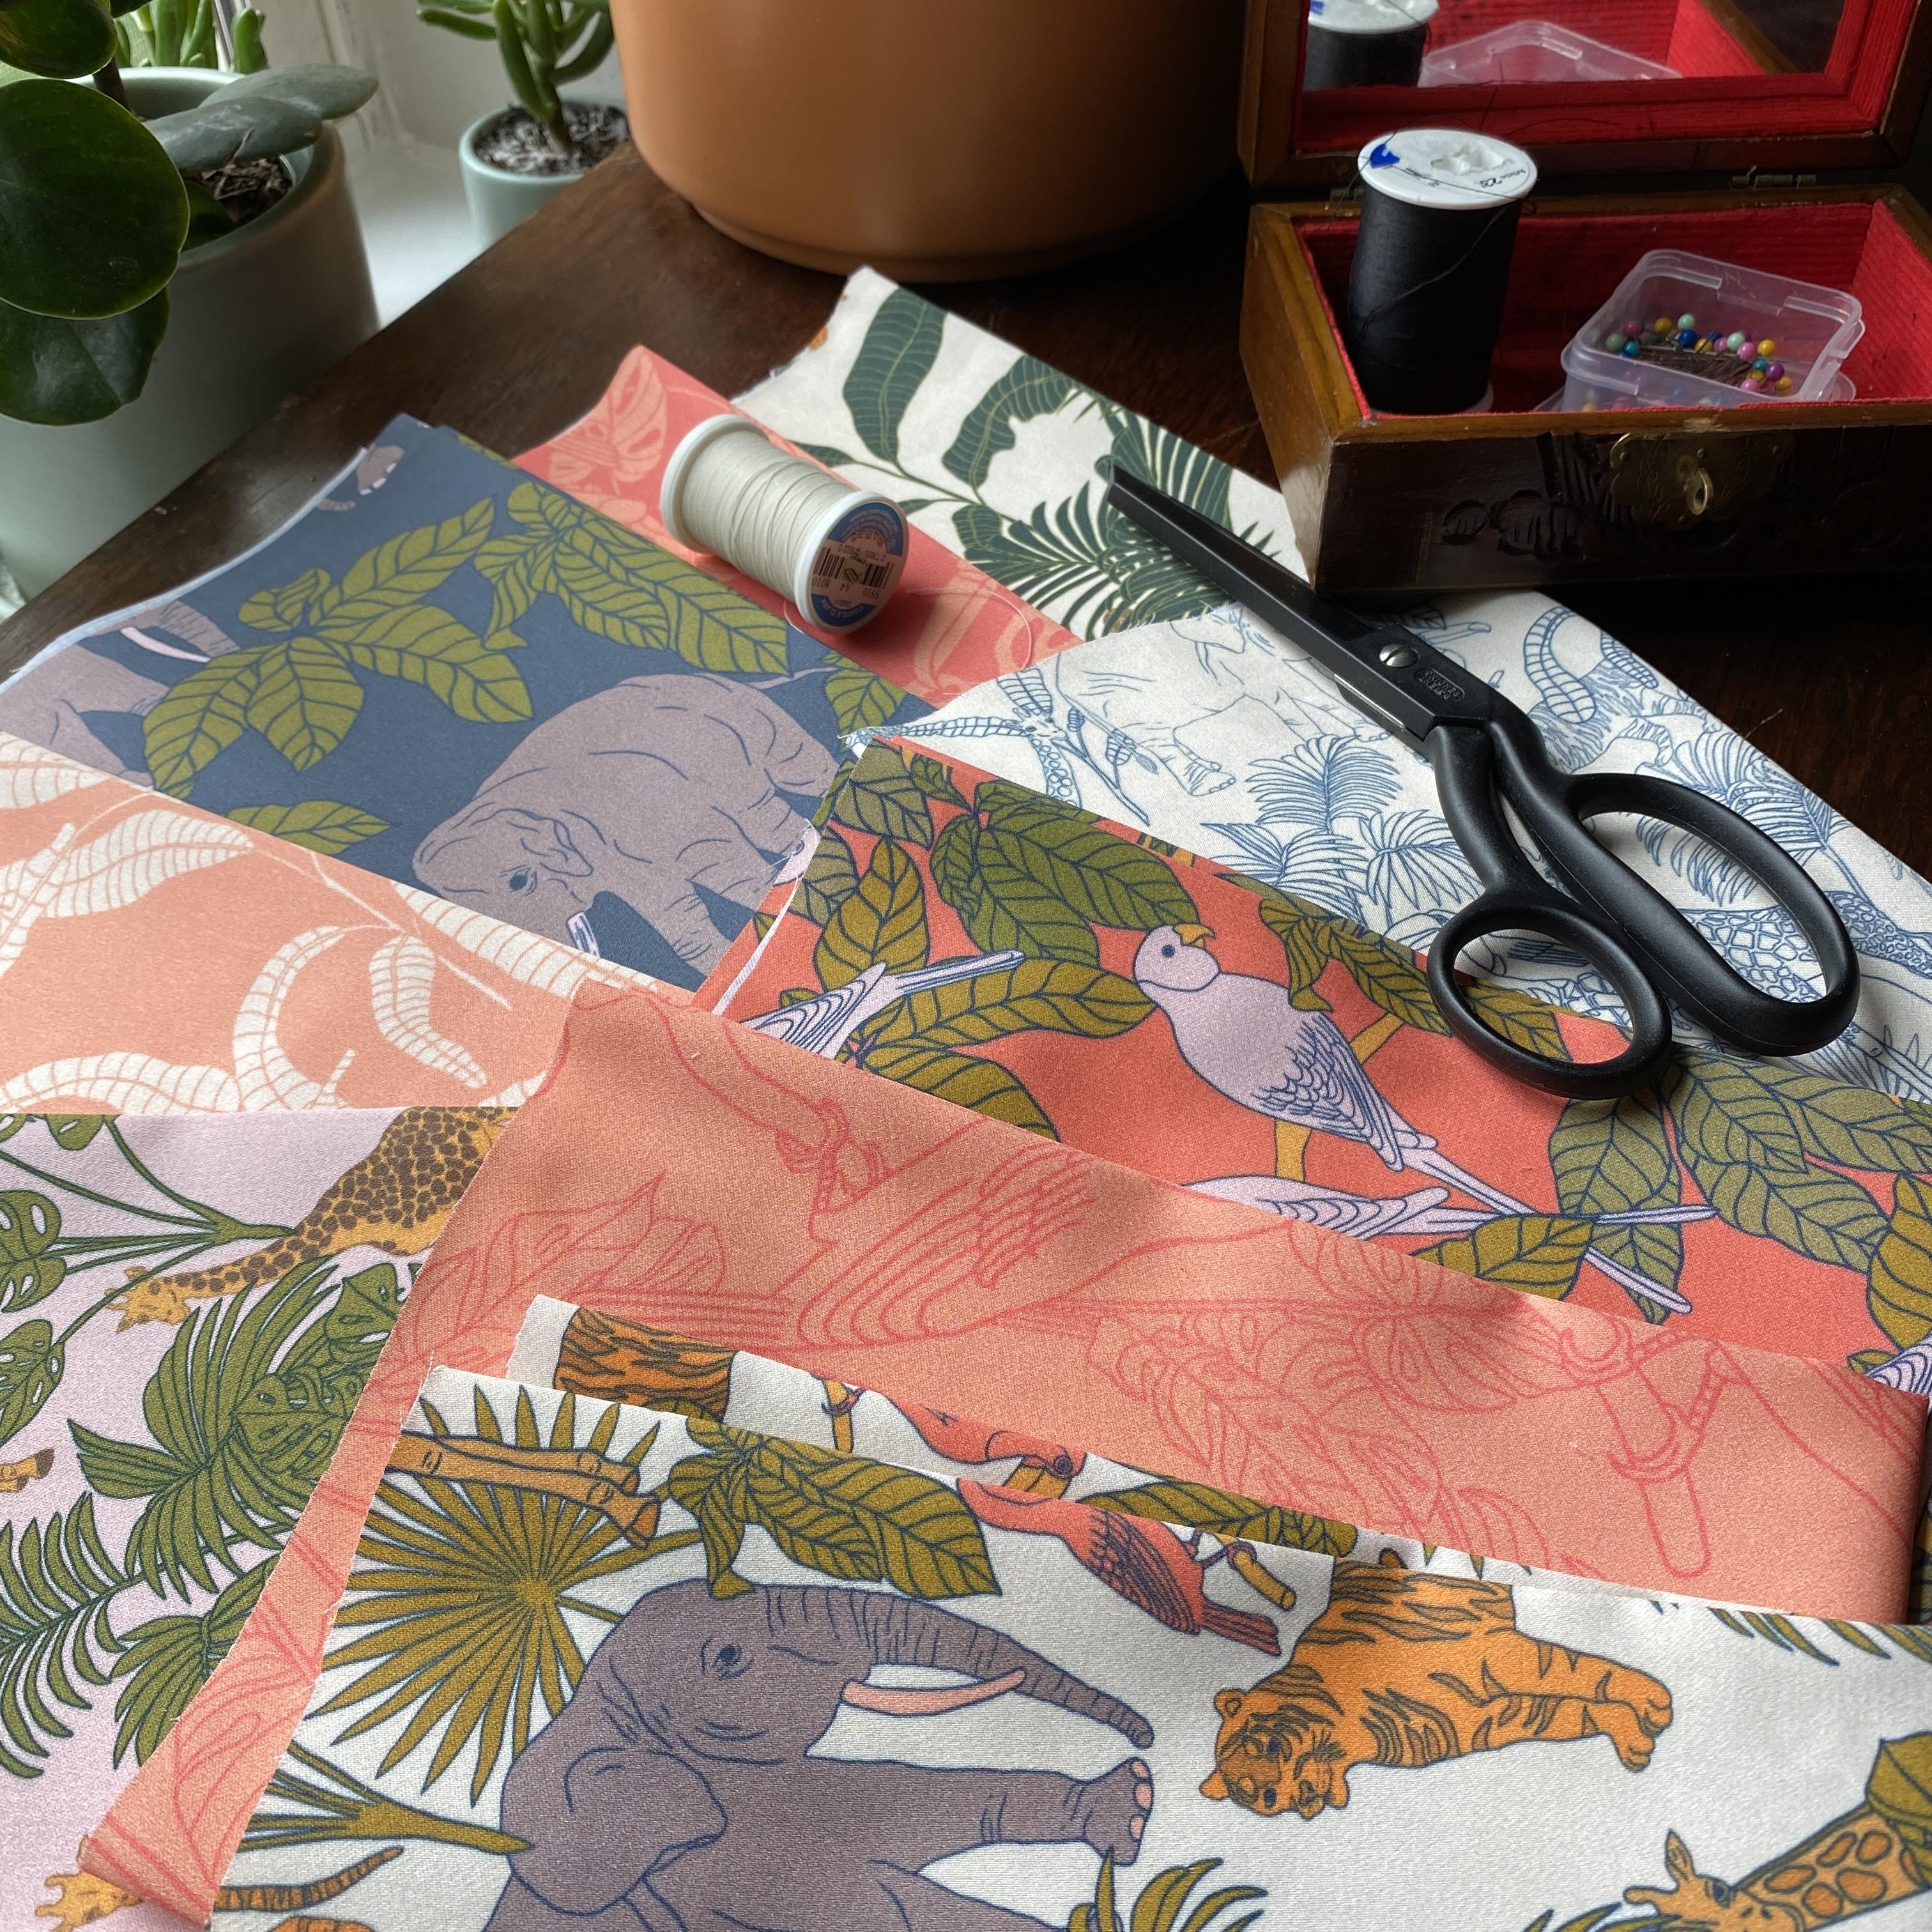
2. Benefits and Myths: We want to start by talking about why patterns are the perfect design type for print-on-demand. Number one, patterns are flexible. They can be applied to a wide variety of products in a wide variety of markets. Here I have beside me just a couple of examples. Here is a notebook from Society6. Here are some fabrics from Spoonflower. As you'll see throughout the class, there are so many other examples of beautiful high-quality products that you can apply your patterns to. Number two, patterns are reusable. They can be reused on multiple POD or print-on-demand platforms without much change in scale or orientation. That's one thing I love about patterns is that you can make one large image, and that will work well for all of the print-on-demand platforms. Number three, patterns are marketable. Companies of all sizes are looking for patterns to license and use on their products. If you create a pattern bank that you're sharing on print-on-demand, it is likely that some companies will reach out to you interested in your patterns. I think this is a great opportunity for designers, even if you haven't gotten into pattern-making yet, to start thinking about how you can make your work more marketable with patterns. Here are just a few examples of some of the products we're going to work with today. Fabric, this is wallpaper from Spoonflower. Spoonflower also has a beautiful line of home decor products like toasters, table runners, bedding. Then on Society6, you're going to see a lot of home decor, office products, clothing, almost anything you can imagine that would work well for patterns. We're going to be going through a lot of these in the class so that we can see how our patterns can be applied to an incredibly wide variety of products. I also want to talk about some of the benefits of print-on-demand. Number one, you can develop your style and portfolio by working in your print-on-demand shop. This gives you the freedom and motivation to make a lot of work and start uncovering your style. If you're someone who feels like you don't know what your style is and you don't know how to find it, making a lot of work is one of the best ways to get there. When I first started making patterns, I didn't have a style. I didn't know what I liked, I didn't know what to create, and I just kept making pattern after pattern until I started to see my style emerge. Number two, a print-on-demand shop will help you figure out what sells. Watching your sales will help you understand what trends and topics sell well. Of course, in the beginning, there may be a lot of uncertainty, you're thinking, I don't know what tags to use, I don't know what design themes to use. But as you create more and more designs, you'll start to see trends and you'll say, for example, people really like my tiger designs. Maybe I should do a whole tiger collection. That could lead to a whole animal collection and that could lead to animals in different parts of the world. You'll see that when you get to that first step on the path, it will lead you to that next step and the next one. But you have to start with that first step and you're stepping into uncertain waters, but that's what everyone goes through in the beginning. Number three, you can find companies and clients through these platforms. Many companies search POD sites for designers for both art licensing and custom work. Throughout the years, I've gotten so many inquiries from companies from tiny to large through my print on demand work not just from finding it through the platform itself, but through Google searches for that type of pattern, through scans on Pinterest because other people will be pinning your work even if you're not doing it. Putting it out there on these print-on-demand sites gets it all over the Internet and makes it much more likely that somebody's going to find you. I also want to talk about some print-on-demand myths. Because whenever I talk about print-on-demand, there will be a comment or question here and there online where people say, for example, you have to have an audience to make sales. I want to tell you the truth here. Print-on-demand relies mostly on search. That is tags and descriptions, not on traffic from artists. Unless you're someone who has tens of thousands of followers, you're probably not going to lead anyone to your print-on-demand shop. But I think the majority of print-on-demand sellers do not rely on their audience. They rely on search. That means creating great titles. Great tags and descriptions that are keyword-rich, which we're going to talk about throughout the class. That way, the search engines are helping people find you. You don't have to worry about driving traffic to the shops using your own marketing. Number two, POD sites are too saturated with great designs. Of course, yes, there are a lot of great designs out there. But companies and buyers are always looking for new designs. Nobody wants to be the company who is using the design that everyone else is using. They want to use something new, something with the modern color palettes that are popular right now. Just being a new design is already putting you ahead of the pack. Even if there are some great designs already there. Number three, you have to sell out to make any money. The truth is that you can make designs based on popular trends in your own style. It is definitely possible to put your own style on any theme or a tag. If you are just getting creative about your designs, you don't have to count on following trends exactly. You can put your own spin on, for example, giraffes, tigers, palm trees, things like that, that come in and out of style. Put them in your linework, your colors, and people will see your style in it. Next, let's talk about getting paid. There are a lot of different print-on-demand sites out there with some various payment structures. Number one, one of my favorites is Spoonflower. Artists make 10 percent commission. They are paid out every two weeks via PayPal and you get bonuses after $300 in commissions. There's a few different bonus structures based on your level of commissions. Society6, artists make about 10 percent except for art prints, which you can set the price for. Again, it's paid out monthly via PayPal. RedBubble is a little bit different because artists set the artist margin to determine the retail price. The base price that RedBubble sets plus the artists margin, which you set, equals the retail price that the customer pays. There's a monthly PayPal payment from them as well. There are a lot of other sites out there. The rules vary, but I think those are pretty good standards to start with. If you see something that's like two percent commission for artists, I would beware of that site because they're probably taking advantage of artists. I think you should get at least 10 percent on print on demand. A lot of you have probably asked yourself over the years what print-on-demand platform is best? That is such a complicated question because it really depends a lot on your work. Different markets buy from each platform. It's important to think about where your patterns would be the most marketable. For example, Society6 skews a little bit younger, high school, college-age students. If you're making designs that are trendy and bright colors, those are probably going to do well on Society6. Whereas think about, your grandma who is making a quilt with fabrics from Spoonflower. What might she be interested in? Not to say that Spoonflower doesn't have younger and all kinds of customers. But think about the main base for that type of website. What are they going to be interested in? Also, if you have the bandwidth, do multiple platforms and see how they perform over time. The truth is that it's really hard to determine just by looking at a site if your patterns are going to do well on that site. I think the most important thing is to test and see what happens. Test out all the sites that you'd like and see over time, over many months, what sites are performing best for you and which ones may be worth your time. I want to tell you about my print-on-demand timelines so that you have an idea of how long it took me to build up my print-on-demand income. I listed my first pattern in November of 2015 on Spoonflower and also made my first sale in that month. Of course, I got my first payout November 2015, and it was so exciting to get a check from one of my designs. I couldn't believe there are people out there on the Internet who were buying my artwork and didn't know me, and then a company was going to send me money. At that point, I was just opening my mind to the concept that this was even possible. I didn't do a lot of work on my print-on-demand jobs over the next couple of years. I was working full-time. I had a lot on my plate, so I really didn't put a lot of time into it. But the few designs that I did put up there continued to make sales here and there. In 2016, I really started gaining some steam. Then in 2017, I got my first bonus on Spoonflower, meaning I made over $300 in commissions in a single month. I think that moment really energized my motivation for print-on-demand because I realized that if I kept listing more and more patterns that my income would continue to go up. In January 2019, I was offered an art licensing deal. At the time, I had never heard of art licensing. I really didn't even know what this company was asking for. But I worked through it with them, provided them a file. They sent me money on PayPal. I signed a contract that I didn't understand. It was my first licensing deal without ever knowing it. Then over the next couple of years, I continue to get more and more licensing inquiries from small companies and large ones. I'll show you some examples of those coming up in a few minutes here. In October 2021, this very month, I finished a pattern collection. I send it out to a licensor that I already have worked with and said, are you interested in these patterns before I put them for sale? They said yes, sign the contract, send me the money. I can't list those in my print-on-demand shop, which is a great problem to have. At this point, many years later, I am signing my patterns over to a licensee before I even make them for sale. I want to point out though, that although this took me many years to get to this point, I didn't do a lot of work on it in the beginning. I let it go for a long time. I was busy with other things. Your life may be ebbing and flowing in terms of how much time you have to put into this. But the consistency over time will pay off.
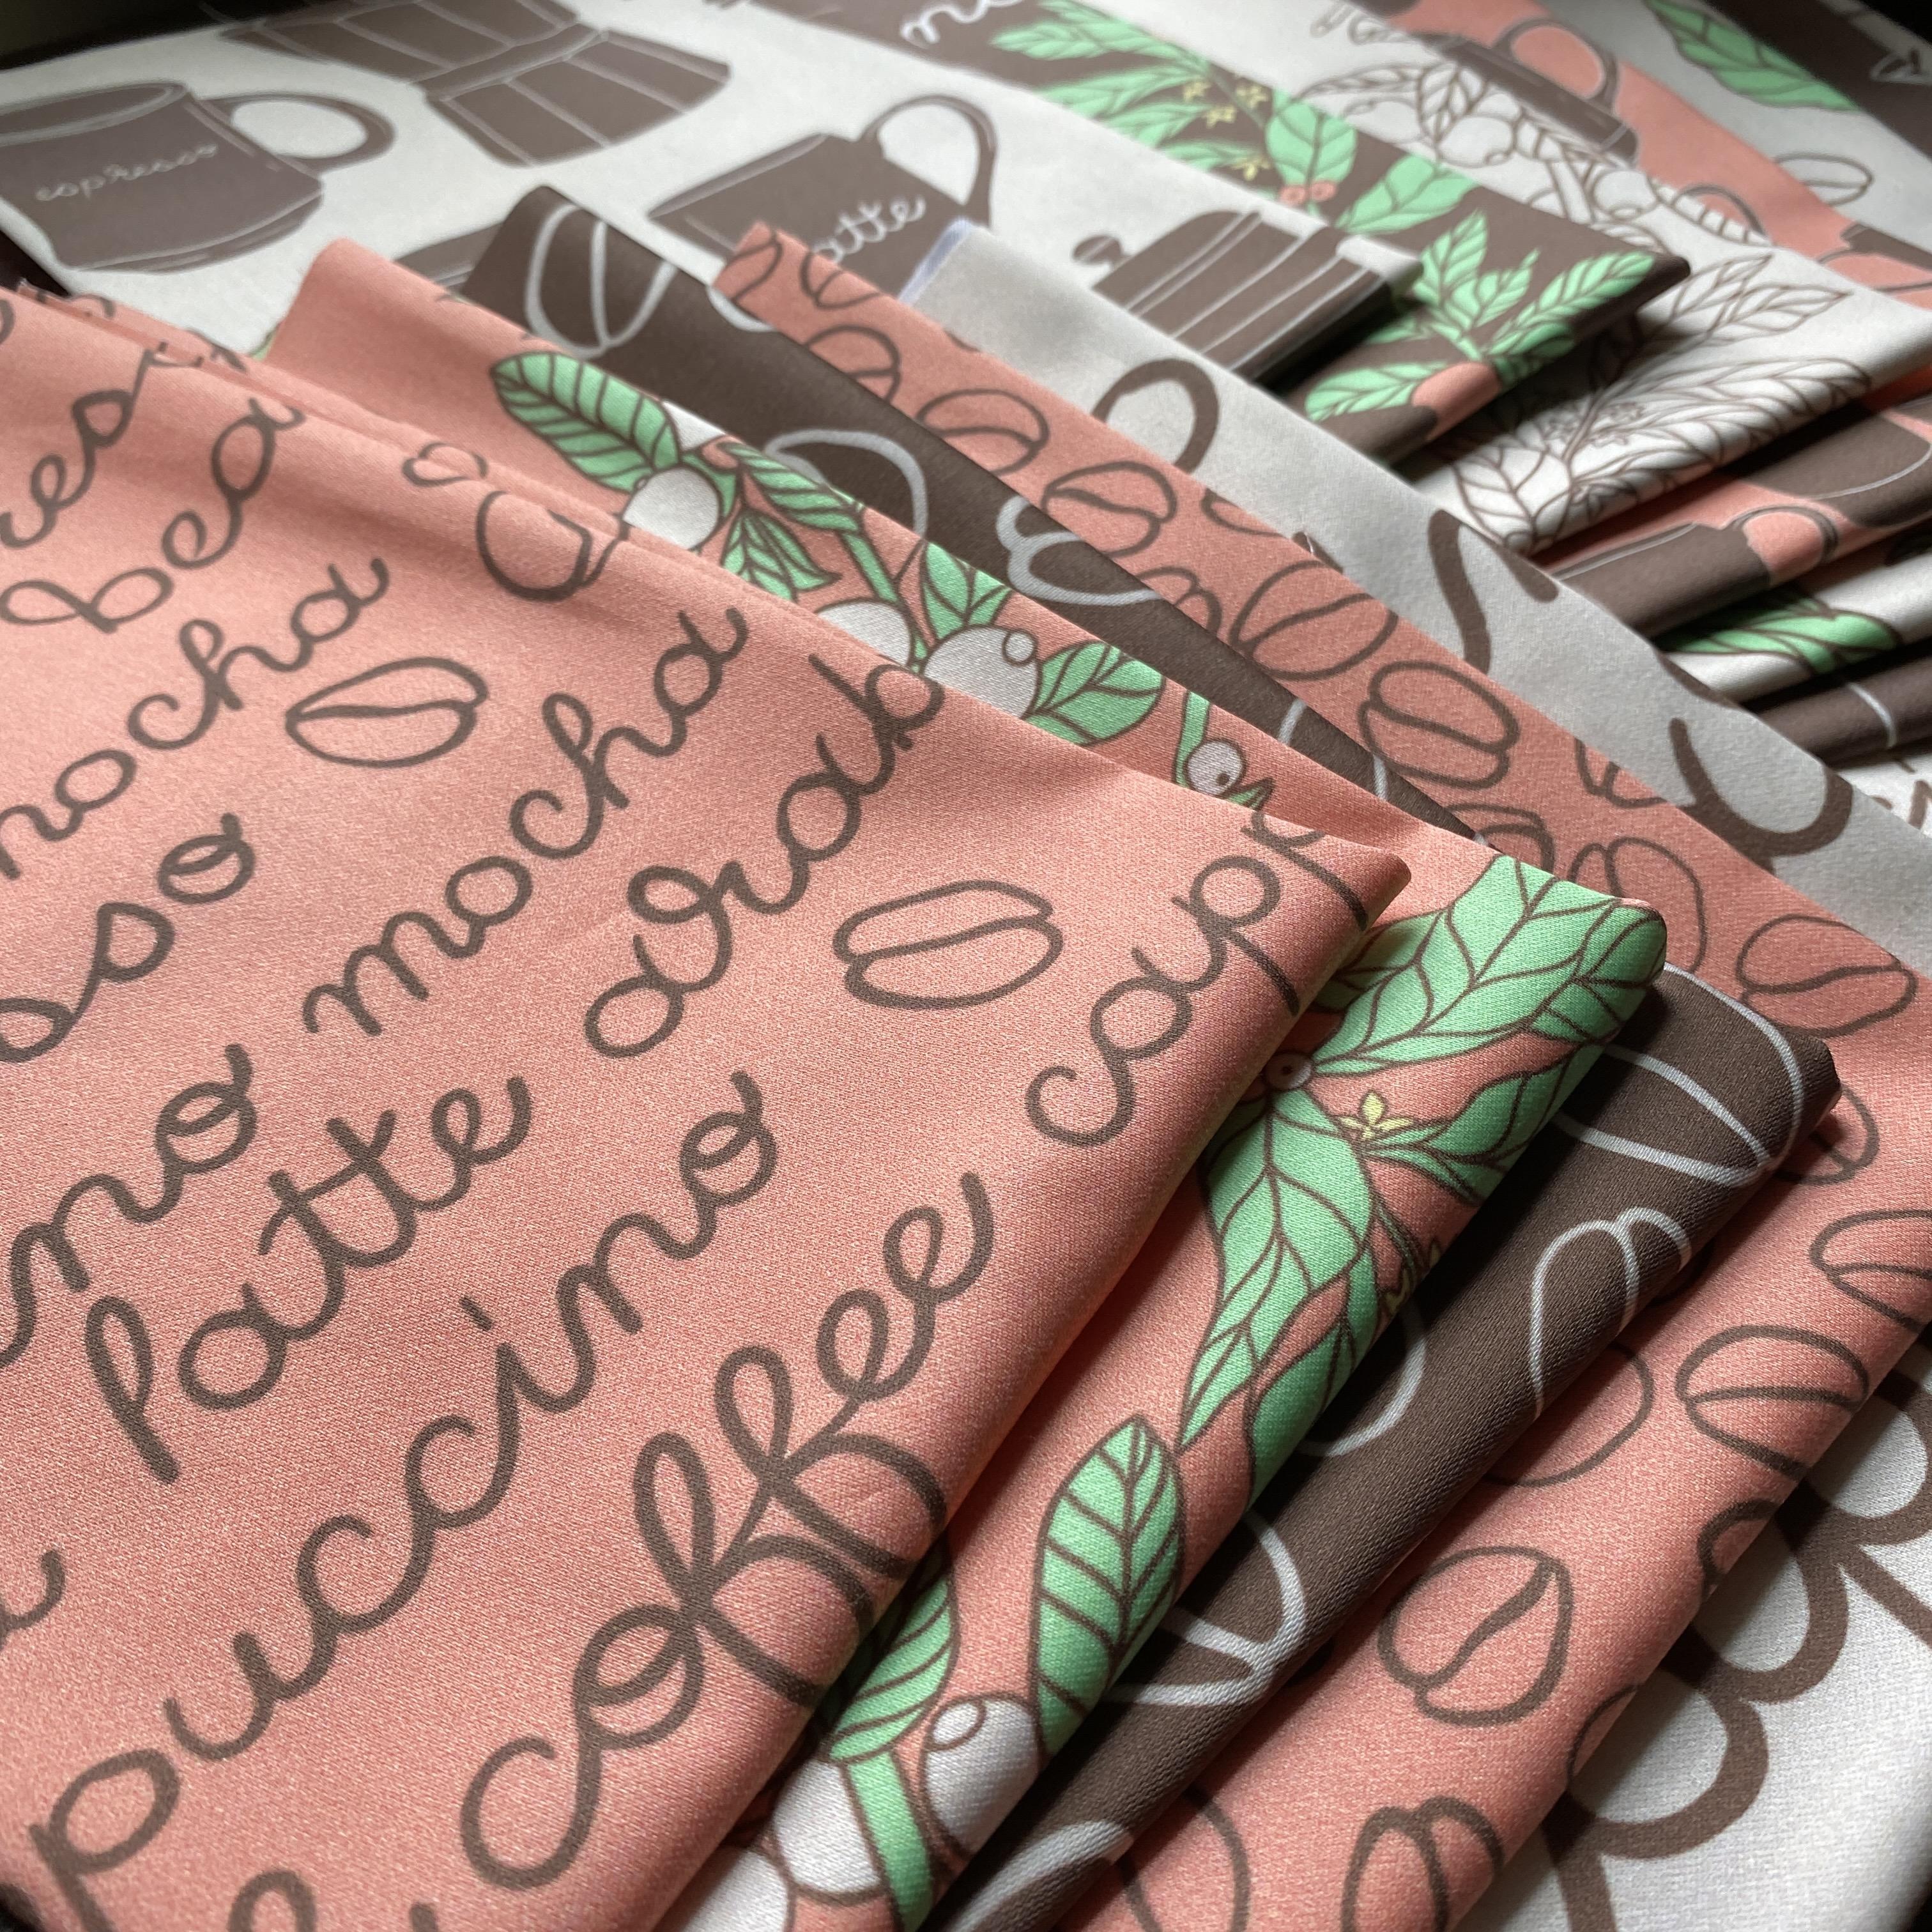
3. Shop Types: I also want to talk about shop types because I think it's important for you to start thinking about what kind of shop you want to have before you get started. I think there are two main types of shops and one I would say is a catch-all shop. These shops have no set style and touch on a variety of themes, anything goes, and this is great for finding your style. Today I'm going to show you two different shops that I've worked on and the first one is a catch-all. This is a shop where I really found my way. I made a ton of different patterns. You'll see that we have over 5,500 patterns in this shop and I just explored with anything I could think of. The next type of shop is focused. These shops have a clearly identifiable style and touch on select themes. These are great for finding art licensing deals and client work. My current shop that I use now is a focused shop. I no longer work very much on my catch-all shop because I'm really into my focus shop. You might think about where you are in your creative journey, do you need to build your style and be able to experiment and try everything right now?If that's the case, I would go with a catch-all shop. If you're ready to hone in on your style and you feel like you know a little bit about your creative style, your colors, themes that you like, then you probably want to go with a more focus shop. I want to show you these two shops so that you can get an idea of what I mean and a real example. Here's my focus shop. This is my name, so I am advertising myself as a specific artist. I have pretty much the same theme going on, on all my designs there, drawn by hand, they're bold colors. I use a lot of botanicals, a lot of leaves and flowers. Even if I do a collection for example, coffee, I've got all the coffee plants and leaves in there so people know that if they see my designs and they want to order a design from me, pretty much what they're going get. It's a specific style, it looks hand-drawn, it's bold colors, it's a pretty sure thing in terms of what kind of style they would find if they asked me to do, for example, a custom job. I think an art licensor could look at this and feel pretty good about licensing designs for me or asking me to create a specific type of design. Whereas if you look at our other shop, the shop that I created with my husband that we started in 2015. It's all over the place. You can imagine how much your design will change from 2015 to where we are now. It's incredible how much I have changed and my designs have changed. Also when you're looking at this shop, my husband did a lot of these designs. So you're going to find the style of two different people. You're going to find so many different styles and themes. So an art licensor might not look at this and say, I know exactly what I'm going to get if I ask for a custom design. I just wanted to point that out because I think if your goal is to get into art licensing and have a cohesive portfolio, this kind of catch-all shop is probably not a good idea. Here's an example of a watercolor alphabet that I did. You've got watercolor, you've got some vectors, you've got plaids, you've got holiday theme. I mean, this is all over the place, which worked well for sales, but this isn't the best kind of shop for building a professional portfolio. Whereas my new shop, I'm getting more specific art licensing requests, more professional pattern and art development type opportunities. I wanted to point that out and show you my two different types of shops so that you can start thinking about what kind of shop you want to start.
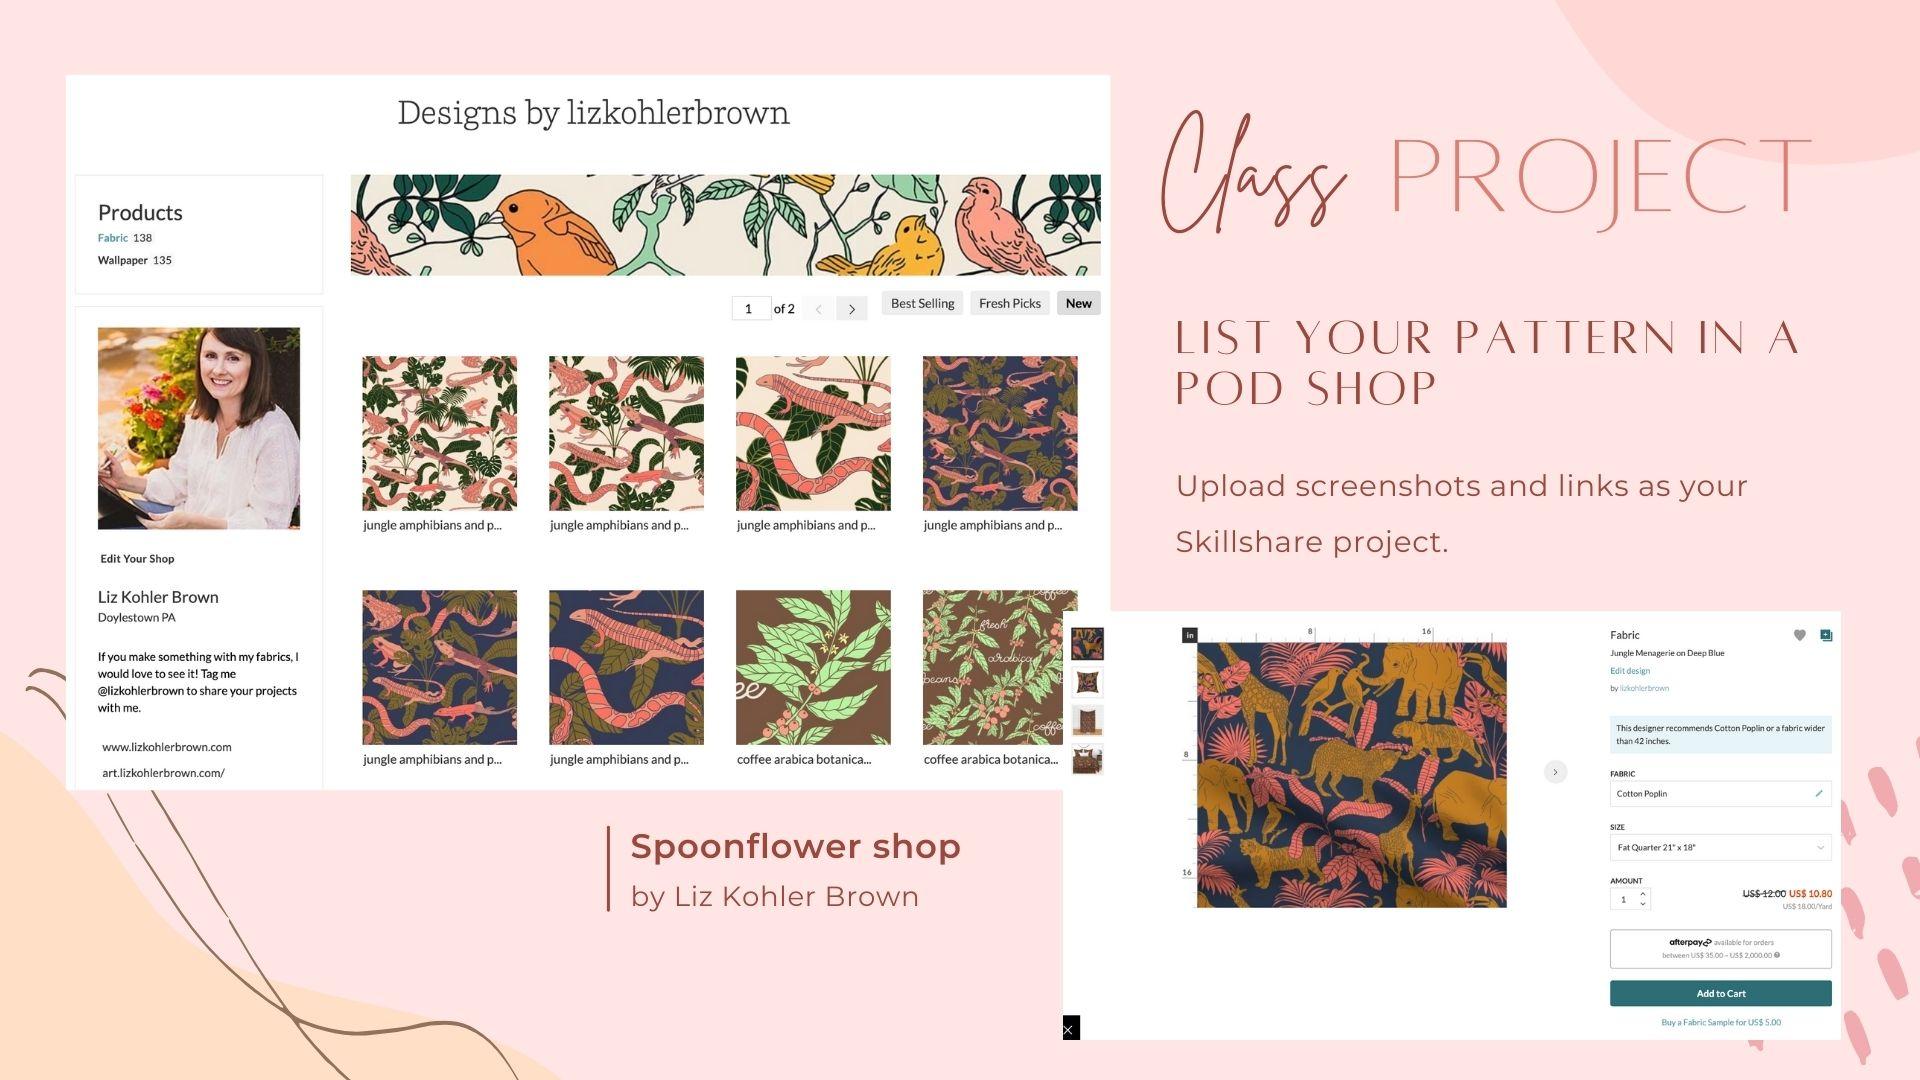
4. Licensing Opportunities: I want to show you a few of the licensing deals that we were offered over the years and talk about how some of those came about. The first one here is Princess Awesome. We created this really simple pattern. They just loved the simplicity of it. They loved the theme. They wanted to do a specific color, we sent them a vector file. They changed the color and they sent a commission per printed piece of clothing. Same idea with this butterfly pattern. They saw the pattern. They loved the layout. They just wanted to change the colors a bit and of course, apply it to their products. Here's an example of a slightly smaller company who makes cup sleeves. They were searching for the term Yoga and my yoga pattern came up. This is a really good example of how tags and descriptions are so important. This company was looking for a very specific theme and happened to find our design, because it was tagged and titled, and described with the word Yoga. Over the years, so many different small businesses found our patterns and use them on these beautiful products. I love seeing them on things like these baby clothes, leggings. This is a really simple just single motorcycle repeated. Then I want to show you the pattern on the very bottom here, because this has been one of the best sellers in our shop. These really simple arrows that we call mud cloth arrows. I sat down with some pen and paper. I drew some really simple arrows. I don't think the design itself is all that amazing, but I do think that the tags and titles, and descriptions really sold this thing. We use mud cloth, arrows, African, all of the gritty, playful feel that was a really popular at that time, that is still popular. That's one case where you can take a popular theme and make it your own and capitalize on that using titles, tags, and descriptions. One thing that I want to point out as you're looking at these art licensing opportunities is that these simple patterns are often the most marketable. Try not to delay by overcomplicating your patterns. I know as an artist and designer myself that it is tempting to keep working on a pattern over and over and fixing it and changing it and adding things. You feel like it's never done. The thing is sometimes when it comes to print-on-demand, you need to just put it out there. It doesn't have to be super complex. It doesn't have to be a really intricate pattern to get people interested in it and find you via these tags, titles, and descriptions. Before we jump into building and listing patterns. I want to tell you about the class project for this class. I would absolutely love to see your print-on-demand shop, pattern, or listing whatever you are able to finish after you do the process in this class. You could take a screenshot of your shop. You can take a screenshot of an individual listing and put a link to your shop so we can all see your single shop or multiple shops that you'd like to show.
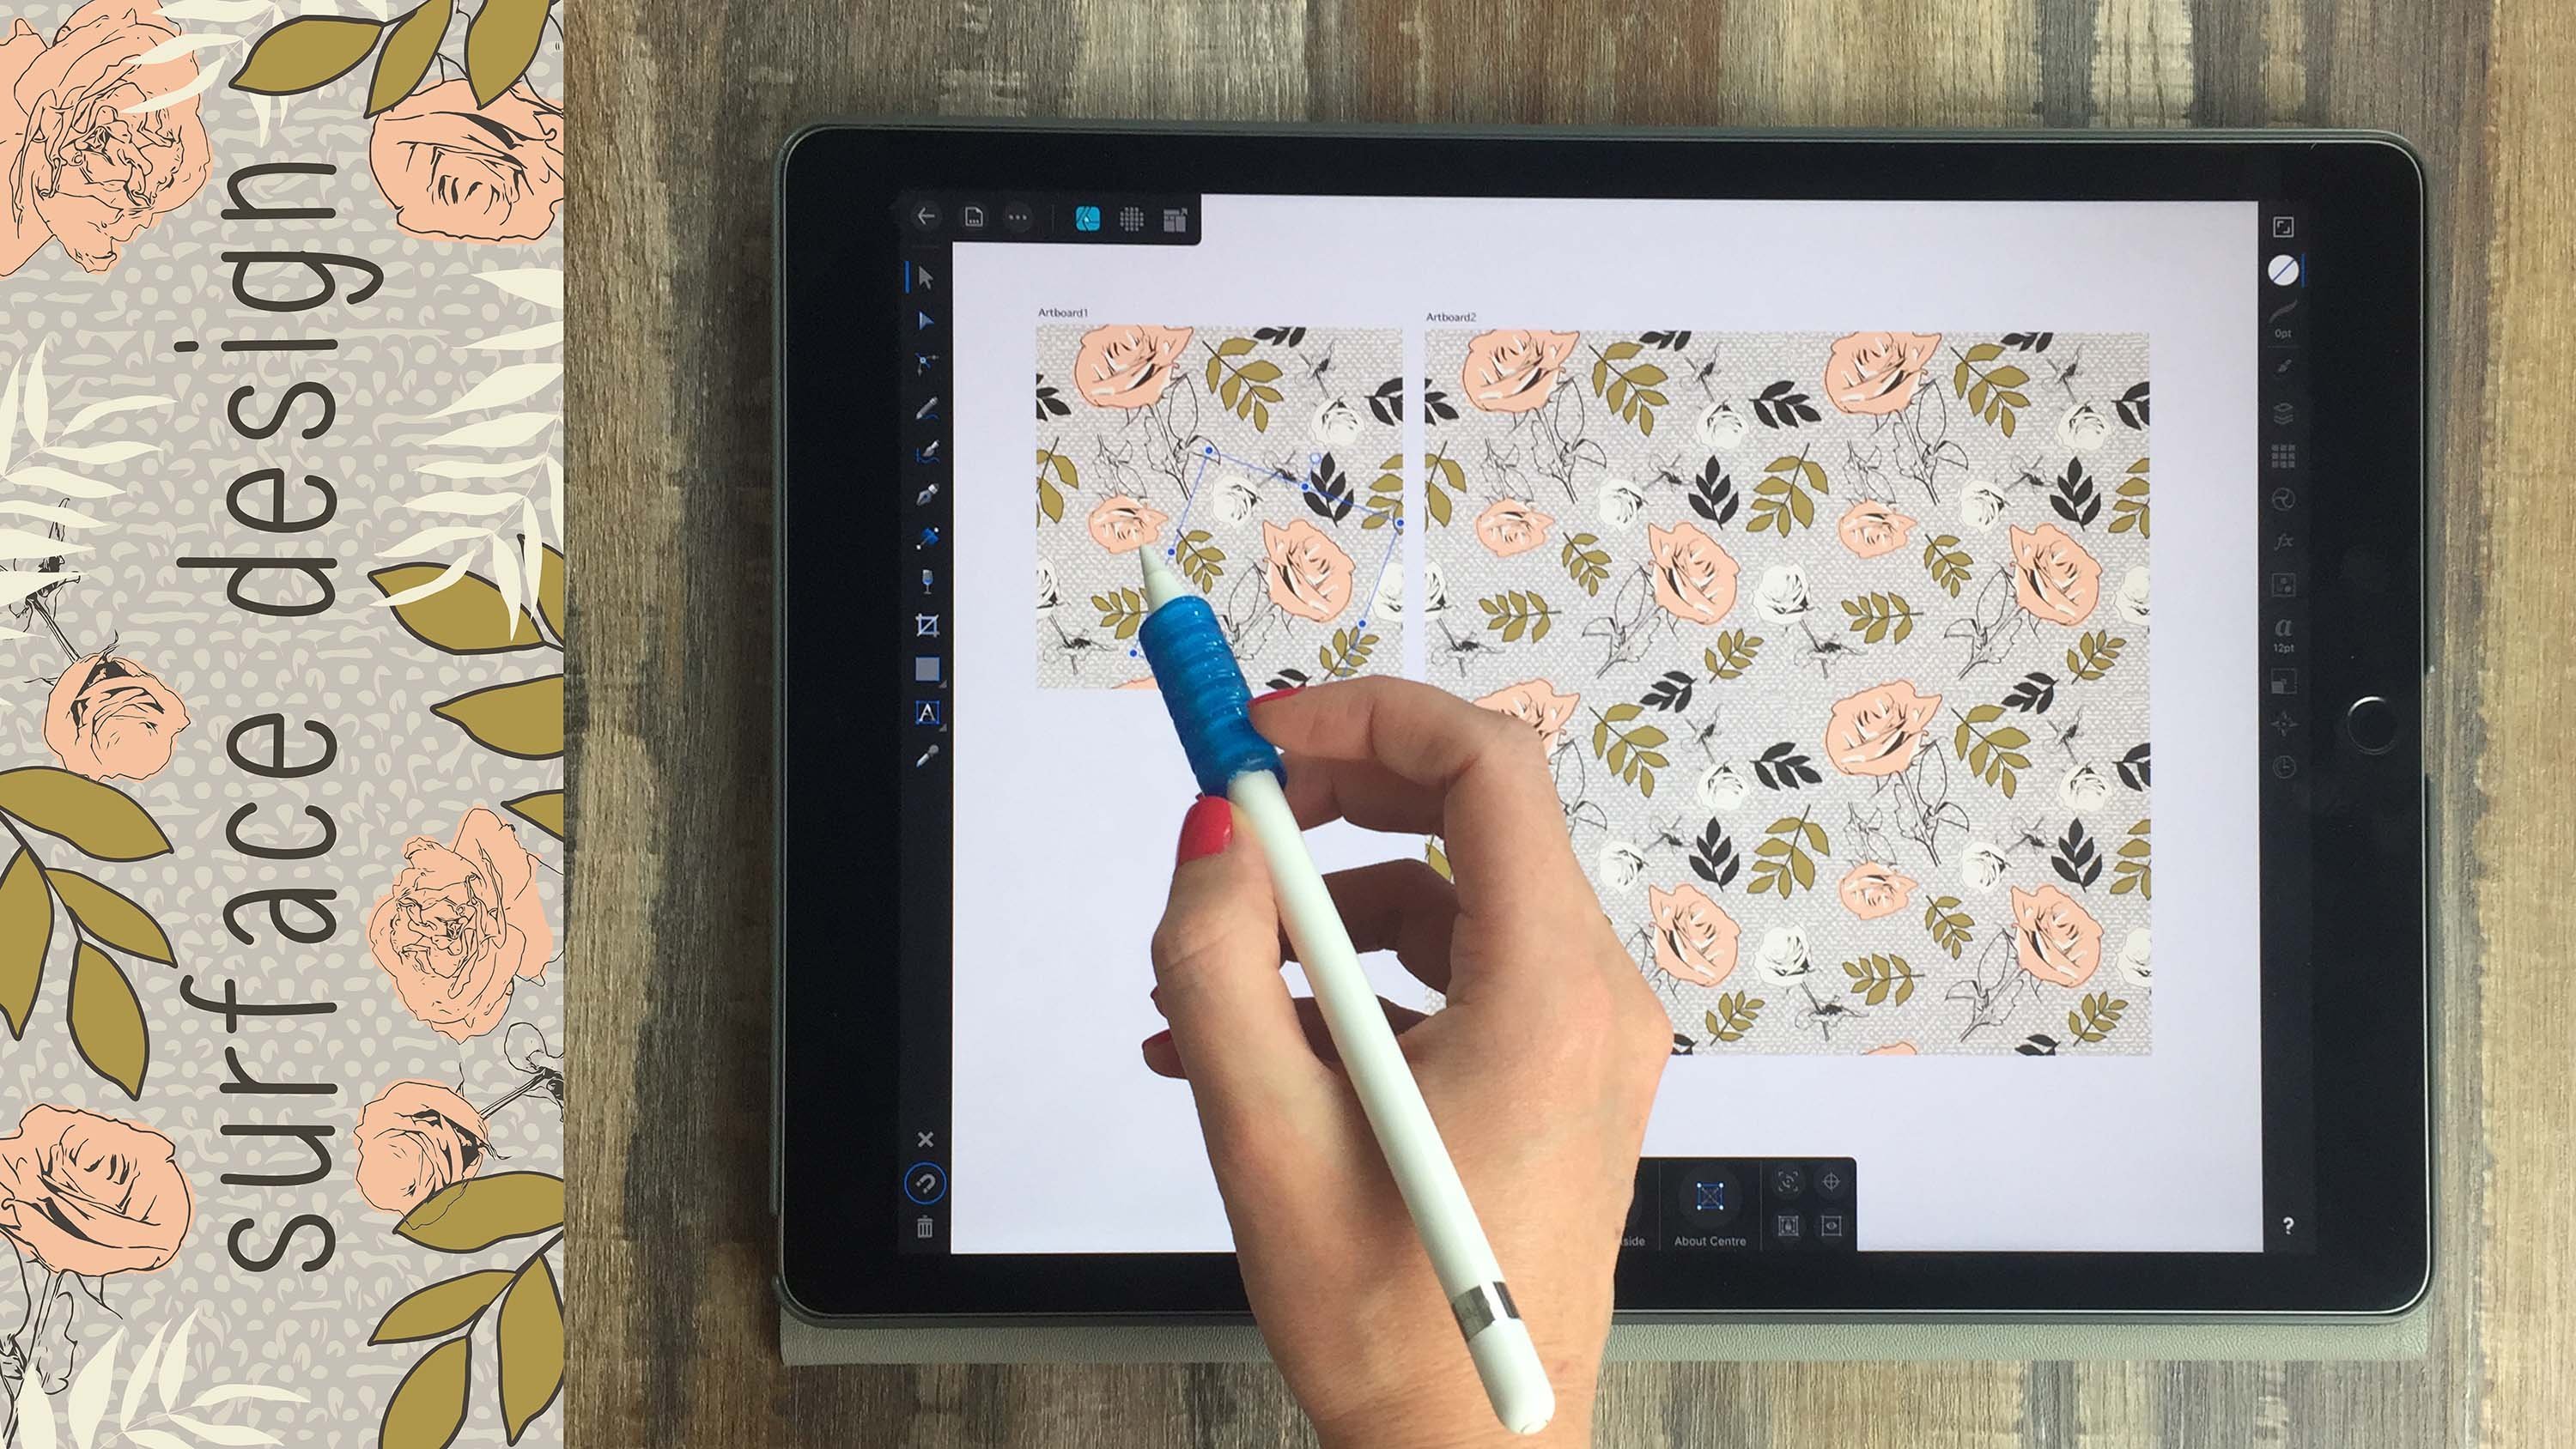
5. Building Methods: I want to talk about pattern building methods because I know a lot of you are wondering what is the best method for building a repeat pattern. The truth is there is no perfect app or perfect method for building a repeat pattern. You have to find the one that works for your budget, your devices, and your preferences. The best way to do that is watch a bunch of different classes on all the different methods and see which ones resonate with you. Some people are going to love working in Procreate. Others are going to prefer Photoshop or Illustrator or maybe Affinity Designer, which is the one that I prefer. In terms of file types for Print-On-Demand sites, typically JPEG or PNG files are fine. Vectors are helpful though if you want to be able to resize infinitely. For example, if you made your pattern at 2000 by 2000 pixels and you want to resize it to 10000 by 10000, you can easily do that if you're working in vectors. In Affinity Designer, you just go to resize, change the canvas size and you're done. Whereas if you build it in a raster format, in a program like Photoshop or Procreate, if you need to resize a pattern to a larger size, you really have to create the whole pattern which can be a huge pain. I'm going to tell you about my method, but of course, know that this is the method that I prefer and not necessarily the best method out there. What I like about this method is that it's vector-based, so vectors can be resized infinitely. Art licensors often request vector files, and so blurriness is never an issue if they want something really large or whatever size they want, you don't have to worry about blurriness. You can also create a live pattern preview. For me, I really need to see while I build my pattern. I make many adjustments as I work and seeing the big picture helps me avoid creating obvious repeats. Number 3, with this method, it's really easy to create color versions, trying color versions is super quick in Affinity. Art licensors have very often asked me for different color versions and I was so happy that I had the file and I could just go in there, quickly change all the color and send it to them, rather than spending several hours doing some color adjustments in Photoshop. One note here, you can create AI files if you need them by just making your pattern in Affinity, open it in Illustrator app and export it from there. Of course I do have classes on this method that I'm referring to. I'm going to put a link to those on the Download and Resources page. The first one is Affinity Surface Design for Beginners, where you can learn all the affinity surface design basics from drawing to a finished vector pattern. The second class is how to design a pattern collection in Affinity, which shows you how to plan and design a collection from concept to finished patterns and mock-ups. If you'd like to try my method, you can check out those classes. I'm also going to do a little preview of it in this class so you can maybe get a feel for if it's going to be right for you or not and then you can go from there or you can just build your patterns, however you like your patterns, and list them in the Print-On-Demand charts using the process in this class.
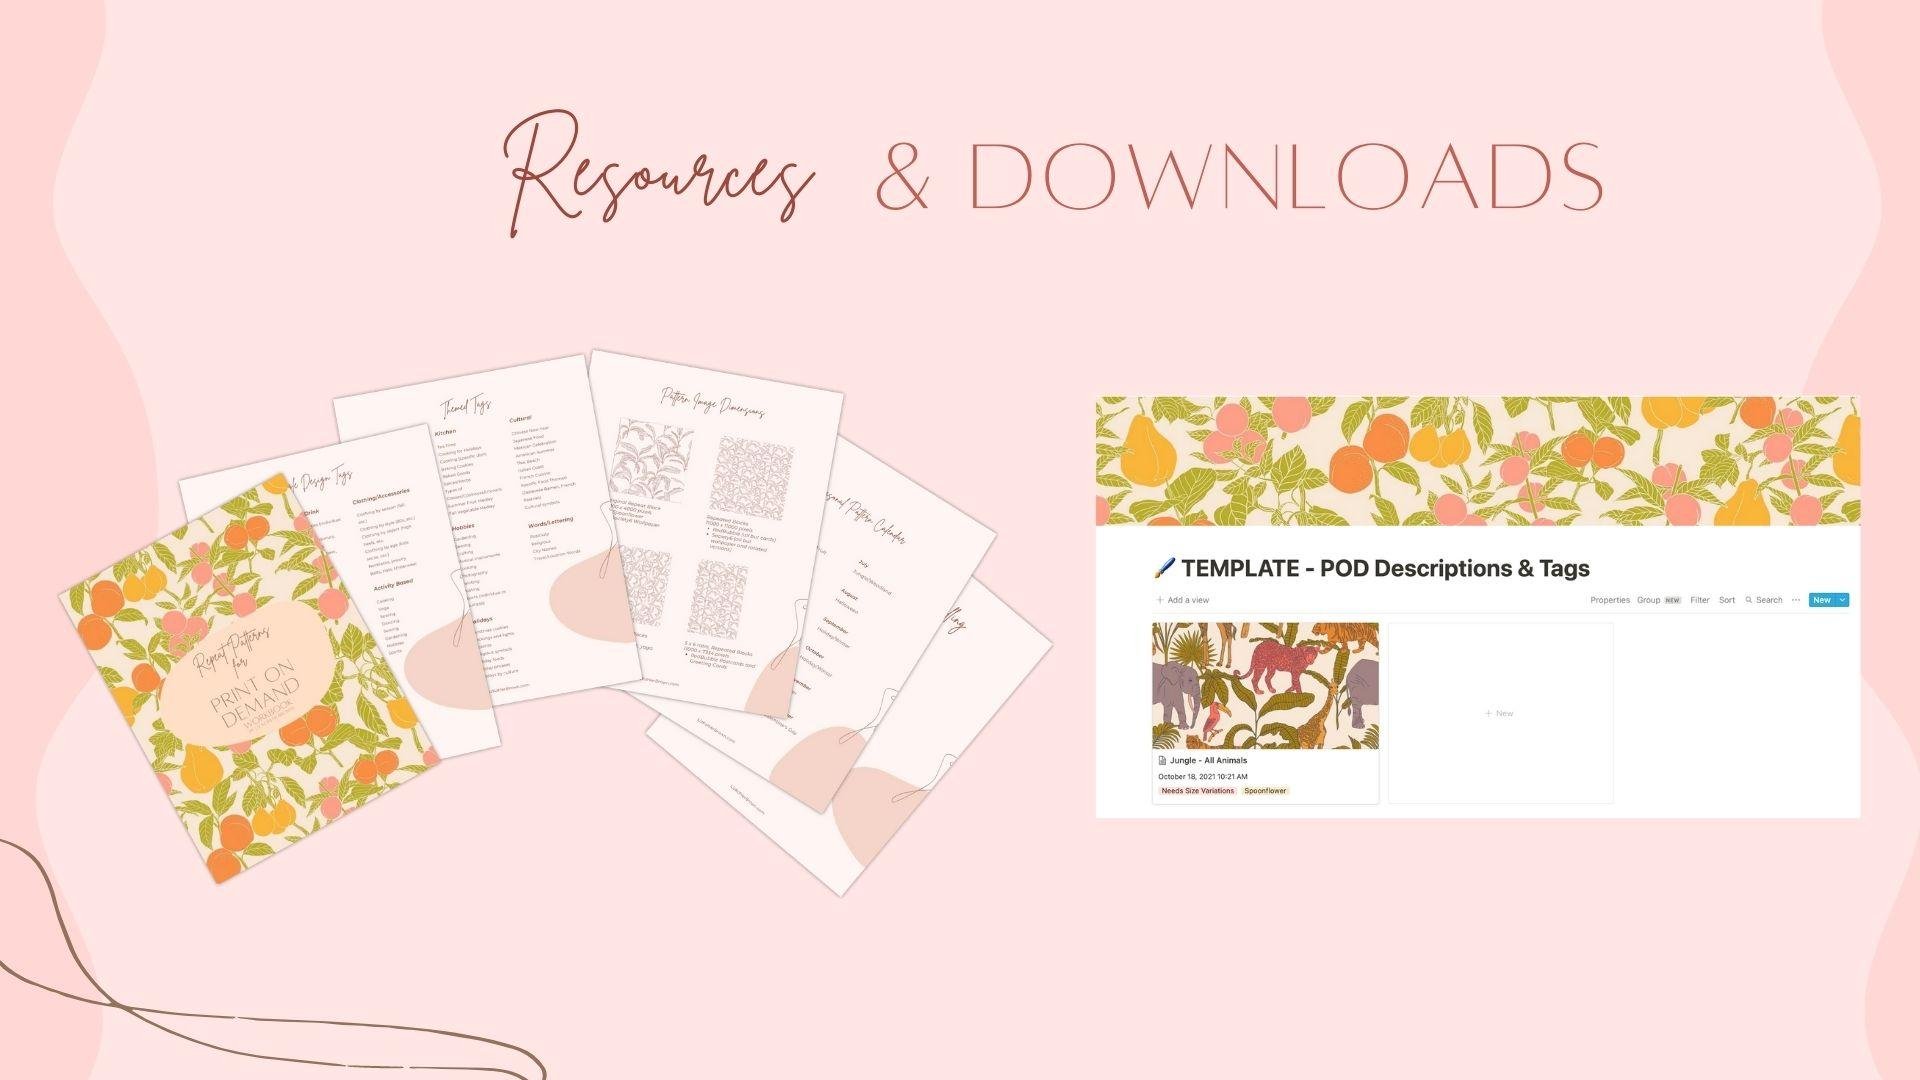
6. The Process: Next, I want to talk about how to choose topics for your patterns. I think ideally you should start with your style, your style is the most important part that needs to come out here. Next, you want to think about trending themes, and of course, your patterns should ideally be an overlap of your style and those themes so that you're not just following trends, you're really putting your own spin on it. I think that's helpful not just for creating beautiful designs, but for feeling good about your work. You don't just want to look at your shop and think, I'm just copying people, I'm just copying all the trends out there. You want to think I really created some artwork that is me, that is in my own style, and happens to use some of the themes that are popular right now, like a certain animal, or print, or stripe. When you're going to create your patterns, of course, you need some way to get inspired. For me, that usually starts on Flickr Commons, you can find royalty-free images in the Creative Commons for drawing reference and for inspiration. You can also go to print-on-demand sites to see what patterns your favorite designers are making but put them away while you create. I think it's really important to state here that we shouldn't work off of other people's patterns, other reference, of course, and I think that that's easy to do if you keep them out of your sight while you're creating. If you have them up on your screen and you're keeping them inside while you're working, it's really easy to copy even if you're not doing it on purpose, it just comes out on the page. Next, you can create a Pinterest board and save non-pattern imagery to inspire a collection. For example, for my general collection, I made a huge Pinterest board of jungle animals and plants. I actually started that board months ago. I just had the idea one day to pin a bunch of jungle-related stuff, and I created this whole board not knowing really what I would do with it. Then when I went to create the pattern, I thought, oh, I already have that jungle board, I just grabbed it and used a lot of those images as reference. Finally, I think it's really important to save sketches and not patterns. Using other patterns as inspiration can lead to copying, so instead make a sketch of what you'd like about the pattern and then put the actual pattern away. The very first thing I like to do when I'm going to create a new pattern is choose a tag. I start with a tag because I think when you start with a tag in mind, your design is already prepared to be searchable. In a few minutes, we're going to dig into the class workbook and you're going to see how I start with a tag for my designs, but I just want that to be at the top of your mind so that you're thinking of, where do I get started with this process? Should I just dive in and create a pattern, or should I have some concept in mind? For me, it always starts with a tag and I have found that makes my designs much more easy to sell. I'm going to take you through my whole process from start to finish, and I just wanted to give you an overview of what that process is going to look like. Number 1, I choose a theme. I decide on an overall topic which is ideally inspired by a tag. Number 2, I gather. I find inspiration for color and design elements, bring those all together on a canvas so that I have them in one place. Number 3, I create. I draw motifs and elements of the patterns, and I just create a bunch of canvases with drawings on them, not knowing exactly how they're going to play out in a pattern later on. Number 4, I build. I build patterns and I triple check the placement of those before I move on to the next step. Number 5, I create color versions. Sometimes that's one or two, sometimes it's three or four color versions, whatever works for your style here. Number 6, I share. I export, upload, put tags and descriptions, and do some marketing. We're going to go through all of these steps in the class, but I wanted you to have an overview and you'll notice that this list is actually in the workbook too, so that if you want to go through the same process with me, you can do that. We're about to dig into a way to stay organized with your titles, tags, and descriptions. I really just want to emphasize here that staying organized with your filenames, titles, descriptions, and tags will save you a ton of time in the long run. You may look at some people on these print-on-demand sites and think, wow, how did you do hundreds or thousands of designs with all these details, all these tags? I can guarantee that that person is organized with a hole of their filenames, all of their tags and descriptions because you have to be successful in print-on-demand. That's one important skill that you need to start nurturing, especially if you're not a person who is naturally organized. I'm going to share with you a resource to help you get organized. If you go to the project section on Skillshare, there will be a link to the class downloads and resources. I'm also going to pop it in the discussion section and the about section, so no matter where you go, you'll find this link, and that's going to send you to a place where you can get the workbook and the template for print-on-demand description and tag organizer. Let's dive into my process, I'm going to show you everything from getting inspired to listing products on print-on-demand. As I show you in this class, this is somewhat of an overview because I've shown the pattern building method in my affinity classes, I've shown some Society6 stuff in that class. I'm really giving you an overview in this class and I'm going to show you where to go if you want to dig in and get more detail. But for today, this is really just to help get you started and help you know what all is entailed with listing your patterns on a print-on-demand shop.
7. Planning a Pattern: Let's start out here on the class workbook. You'll see if you swipe through and I'm using the free app Adobe Reader here, I think this is the easiest one for viewing PDFs. If you swipe through, you'll see the process that we talked about that we're going to go through in this class. You'll also see a list of single design tags. What I mean by single design is just a standalone one repeat pattern by itself. Whereas on the next page, themed tags would be better for creating a full collection. In the beginning, you may want to start with just single design so you get really comfortable with your repeat pattern process and you just get in the groove of listing new patterns on print-on-demand shops. For example, you might find something like llamas and do a design based on llamas. Maybe you want to do a design based on sewing or roses or coffee, so you can just pick a theme from here. These are some tags that I've used, some that I am planning on using in the future. I really just scan to print-on-demand shops and a lot of different design resources to find out what are trending design themes. Of course, this isn't every theme out there, but this will help get you started and of course, if you'd rather jump in and do a full collection, the theme tags can be helpful. For example, you could do a winter collection where you could create all different winter imagery and work those into patterns. In the rest of the workbook, you'll find some pattern image dimensions that we're going to be using throughout the class. You can refer to this if you need to know those numbers offhand. I also created a seasonal pattern calendar, so for example, if you want to follow some seasonal schedule where you create things for certain holidays and certain seasons. I tried to be always two months ahead, especially with fabric, people need at least two months of lead time. For example, in August you would make things for Halloween so that by the time people want to buy their their and make something for Halloween, you have your designs ready. You might find this calendar helpful throughout the year as you're thinking about what patterns to make and then of course, a list of all of the sites that I like for listing patterns. I'm going to start out here on the single design tags and I'm just going to grab an example here, let's go with giraffes. I'm going to head to Flickr Commons, which is one of my favorites. All of these images are free for personal and commercial use. They should all be in the Creative Commons. Of course, just check the date on there and make sure they are. If you search up here, that's all of Flickr. We want to go down here to search the commons. I'm just going to type giraffe and you can see I'm getting all kinds of giraffe imagery. I'm just going to go through and save some of these images. If you're doing this in Chrome, the fastest way is to tap and hold "Open the image in a new tab", tap this little "download" button, choose "large" as the size. Tap "Open in" and then "Save Image" and that saves it to your camera roll. I would just repeat that same process with a lot of different giraffe images and for repeat patterns, I'm really thinking a lot about various poses. If I'm going to do five different giraffes, I want to make sure they're may be facing in different directions and have different head tilts so that I don't create multiple pieces that look the same. That's going to add a lot of variation to my repeat pattern to just have that little bit of difference in each of my giraffes. I think you get the idea here. I would save all of these images, I would create a new document, and procreate. Bring my photos up over here, get all my giraffes together. Because this is the process I use in a lot of my classes, I'm not going to go through this in detail today. If you want to get deeper into my drawing process, I have a lot of other classes where I do a lot of drawing and set up these canvases, so kind of flying through this today because I've done this before in several classes. Dig into those if you feel like this is going way too fast here. These are nice giraffe images that I can save and have nearby when I start drawing. I've got a few different poses, a few different angles, different positions where they're looking forward, looking to the side, sitting down. I might capture a few different angles of those giraffes and then create some drawings based on that. For this pattern, I actually only made two different giraffes, so this one is looking forward and then this one's looking the other way and bending back a little. I could keep going with this and make a lot more giraffe images but for today we're just going to go with what I have here. Here's my final image, I'm going to tap the tool symbol, "Save As" a JPEG. Then I need to turn this image into a vector, I'm going to open the app Adobe Capture. I'm going to tap the plus symbol, import image from my camera roll and she's my giraffe. You can play around with the settings here again, I go deeper into that in my affinity surface design class and then just save this to my vector library. Export as an SVG, which is a vector file, and then open this in Affinity Designer.
8. Creating Vector Assets: Now I have this nice vector image of my giraffe and you can see that it's a vector by tapping the Nodes tool and tapping on this image and then we can see all of the vector points here. Before I save this and pop it into some repeat patterns, I need to set this up so it's easy to work with in Affinity Designer. First of all, if you go to the Layers menu, you'll see that each individual spot on the giraffe is its own layer. We really need this image to all be one big thing so what I'm going to do here is highlight by just dragging across this whole giraffe. That's selecting everything. Tap the three dot menu and tap Add. Now if you look at my Layers menu, I have one layer and it's the entire giraffe. The nice thing about that is I can create a solid version of that behind it. I'm going to take that layer with that layer selected tap Duplicate. Now I've just got two identical vectors. On that top one, I'm going to just grab a bright color. On the bottom one I'm going to get a contrasting color, so it's really easy to see the difference. I've got a pink giraffe and a blue giraffe under it. On the one underneath, I'm going to tap the three dot menu and tap Divide. What that does is create solid shapes beneath the vector. If I select the shape here and tap the Node tool, you can see what this shape is. It's everything within the giraffe's head. Anything that's separate will be its own separate shape like that. I find it's easiest if I group all of those, so I've selected everything except for that pink outline of my giraffe and I tap Group. Now let me show you what two things I have here. One is a solid giraffe and one is an outline of a giraffe. The nice thing about that is it gives me a lot of freedom when I go in and do color changes. Of course, another thing you might want to have separately is these little spots. Let's get the Move tool and select that little spot. I like to go through and create a new layer that's just spots. I'll just go through and select by tapping like this and swiping on the ones that I need to select. Then I can create a group with all of my spots. I'll take just a minute to do that. Also, another easy way you can do that is hold down one finger and just tap like this. That way I'm selecting each spot. I'm going to go ahead and group what I've done so far. Because at this point if I make a mistake, it's going to be very annoying. I've grouped those. I'm going to move this group all the way to the top. Again, if you're feeling like this is way too fast, that maybe that you haven't dug into the first-class is on Affinity. For anyone who is familiar with Affinity, hopefully this will be a somewhat self-explanatory process. If you're not comfortable with Affinity, of course, dive into that class and you will see, while this seems like a lot of work now, it saves you so much time later on. I'm not going to do all this on camera because it would be very boring for you to watch me select all these spots, but let's pretend I've selected all the spots and so now I've got these nice little groups where all of my parts of my giraffe are separated. Again, I've got three different parts here. The first part is the outline of the giraffe. The second part is the solid, and the third part is the spots. I've got these three separate layers. I'm going to swipe all those layers and group them. This is one big group, but as you know, it contains three different groups. Then I'm going to tap on my Assets menu. Let's go to my jungle Assets. Tap the three dot menu and Add Asset From Selection. I do a lot deeper into assets in my full Affinity course, so not going to dive into that here, but as you can see, I've repeated that same process with all of my various animals. Let's just pop some of these animals and so you can see how these look. Here's a giraffe. Here is an elephant that came out really big here. All of these various parts that I drew in Procreate and vectorized in Adobe Capture, and then separated into layers are saved here in my Assets menu. This tiger is a lot like that giraffe where I have an outline, a solid layer, and then the dots are on their own separate layer.
9. Building Patterns: Let's dig in and quickly make a new pattern just so you can see how I would use these assets to build a pattern. I'm going to go into my jangled collection here, duplicate my master document, which I show how to make in the first-class, and let's start out by just choosing a bold background color. I'm going to go into my jungle collection here, I have my jungle colors, and I'm going to pop in my giraffes, and I like to start by sizing those before I start adding in any fillers like plants or anything else, because I just feel like the giraffes are the most important thing here, so they need to be set before anything else. I think that size works well. I want to just lay down some preliminary color because I don't want to have to color these later on. As you know, if you've watched the other class, I just swipe on these layers, and that allows me to do multiple color changes at once. I'm going to try just having this outline the same color as the background, brown spots and yellow, just go with your standard giraffe colors here. Then I'm going to grab these two giraffes by swiping both layers, tap the three dot mean, and tap Duplicate. Then I'm going to go to my transform menu and just flip those. I've got two of the same giraffes, they're just facing different directions. Now, I can scoot these around the canvas and just wiggle them around into various positions. I'll take just a minute here to put these in place and figure out how to vary these nicely. Another thing I could do to differentiate these duplicates is make one a little bit bigger, and one a little bit smaller. That will help the viewer not see these as the exact same giraffe over and over. I like how those look. I'm going to go ahead and duplicate these on my repeat block. I duplicate on the y-axis minus 4,000 because my canvas is 4,000 by 4,000 pixels, and again, with repeats that are made in vector, it doesn't really matter what size your original canvas is, because you can easily change it. I don't worry so much about what size this canvas is, but 4,000 by 4,000 works pretty well for me.I find that leads to the least amount of resizing. I drop these down onto my symbol's layer so I can see what's going on with this repeat. Then I can see there's just a couple giraffes I want to play around with here. I like how that looks, I'm ready to start popping in some plants. You can see here why it's so nice to have these as assets, because all you have to do is go to your Asset menu, grab a plant, and I reuse these in multiple images. Now, that would be different if someone had licensed the pattern, you wouldn't want to reuse the same motifs that you would used in something you licensed. But for example, if I'm doing a print on-demand collection and it's all in the same collection, I might use these Monstera leaves in two or three different patterns, and I'm totally fine with that. I don't worry about there being a little bit of overlap because I think it also adds to the cohesion of the collection. We can see these repeating elements especially if you're changing the colors in the orientation a little bit. I don't think anyone really cares that you've got similar or the same elements in various parts of your pattern. I'm just popping these around in various places, trying not to cover my giraffes. In fact, I'm just going to maybe take my plants all the way below for now, and then I might move some above, so it's interweaving later, but for now I'm just going to pop those plants in the background because they're secondary characters. I'm going to repeat this same process with a few different plants, and speed up my camera since I'm just repeating the same process over and over. As you can see, I'm just taking time to fill in some of these blank spaces. You don't have to fill in all the blank spaces, of course, it's nice to have some negative space, but I would take a lot of time here to just play around with various placements, various color options, and then settling on a final pattern. I'll go ahead and open my final pattern so you can see what I landed on. I made sure my giraffe was peeking out behind some of these leaves, I've got their faces showing completely because they're the most important part of this composition of course, but then they're interwoven with the leaves. If I look at the pattern preview and back up, I want to see a variety of negative spaces, full spaces, I want to see my color not concentrated in one area and nicely spread out. That's basically what I'm going for when I make one of these patterns.
10. Checking for Errors: The very last thing I do is check for errors. Before I start making color versions of this pattern, I am going to triple check this pattern for errors. I'll go to the Documents menu, tap "Export", export only Artboard1, tap "Share" and save image. Now I can go to my photos library and I like to just zoom in and look at this pattern, make sure nothing looks weird, double-checking that I've repeated every element on the edge of the Canvas. That's my first stage of checking this. Next, I create a new document that is double the size of this pattern. My pattern's 4,000 by 4,000 pixels. I'm going to make a document that is 8,000 by 8,000 pixels so that I can fit a full repeat pattern on this Canvas. Place image, placing my new block that I just exported and I'm going to put that in place. This is when it's time to slow down, get a cup of coffee before you make all these color versions, before you upload to any print on-demand sites because I'm telling you if you notice an error after you've put this on all of the various sites, you are going to be so mad at yourself because it's a lot of work, especially if a customer buys it and there's a problem, it's very embarrassing. People can get pretty angry about that. I think if you have repeated issues, the sites can crack down on you and maybe close up your shop. For me, this is probably the most important part of this whole process, going through making sure every little leaf is repeating correctly on the edge. Every little giraffe leg is repeating on each side. You didn't forget any little part. Once that all looks good, you can use that master document and I'll usually go through and name it, master document, and then I can start making some color versions. That's what I've done here, I've got three of the same patterns in different color versions. With this one, I just changed the background. All I did was go from dark blue to a cream and it totally changes the pattern. But I think you can see that some people are going to love that dark feel and they're going to say, that's the perfect pattern for me. Other people are going to want something light and bright, maybe for a nursery, maybe for a kitchen, so I do think it's important to offer those various background colors and then maybe also offer some other variations. Here I did some darker plants. The plants are dark, whereas they were light in the other version with a really bold background. This is probably the most risky version I did, but I like these bold combinations and then the pink, some people just really will want the pink color, so I went with one of those. I don't think you have to make multiple color versions, that's something I like to do. A lot of other designers do it, but if you are happy with the one color version you made, I would just stick with that and be confident with the color version you like. As you can see, I did this exact same process to create all these other patterns in my jungle collection and also in my fruit collection. This is the process I use for all of my different collections and again, I cover the process I use for thinking about collections and designing them in my class on creating collections in affinity.
11. Listing on Spoonflower: The very last part of this process is exporting and uploading these two on print-on-demand sites. We've checked for errors, we've created some color versions. Let's start with this first design. We'll tap the Documents menu, tap Export, choose Artboard 1. For me, I like working at 4,000 by 4,000. Of course, work at any size that works for you here but for me, I find that's the best size for Spoonflower and then for creating bigger versions for the other sites. I'll tap the Share menu and tap Save Image. That's just saving it to my camera roll. Here it is. Another thing I would do is go through and delete any earlier versions so you don't get confused. Especially if you notice some errors, you want to make sure all those older versions are gone. I'm actually going to go back and export this two more times for Spoonflower because I like to do several different size versions. I've got three of the exact same image here. The reason for doing size versions with fabric is because as you can imagine if you were making a bow tie, you would need a very different scale than you would for wallpaper or some other quilting project or whatever. I typically always offer three sizes. Let's jump over to Spoonflower and we'll put those three sizes up for sale. I'm logged into my Spoonflower account. I'm going to go to my little name here and go to Design Library then I can add a design, Choose Files and you can see you can select up to eight. If I was doing a full collection, I would just do six at a time. Three size versions of two different designs, just to stay organized. Today we're just doing those three that we just uploaded. So I'll click Add. Yes, I own the copyright for this pattern and Upload. Now you can see those three new designs in my design library. I can tap and hold to open in a new tab for each of these and that way I can work on all three at once. The reason I like to do that is because, for example, I'm going to type in a title, and then I can just paste that title and say medium version, large version. Rather than retyping that title over and over, I can just paste. That does save me a lot of time, so that's something I like to do for each design. One thing you can also note over on the side here is you can easily upload a revision. If you notice an issue in your pattern at this stage, you can tap Choose File, Photo Library, and tap to Upload a new file. That happens all the time. Of course, we don't always catch all the errors in the beginning, but that's just something to look out for. I have actually switched to upload all of these as revisions to files that I've already purchased because I want to show you the process for being able to make a pattern for sale. When you get to this part, you won't see these options available until you buy your swatches, but just wanted to let you know why this might look a little bit different than it does for you. I've just gone to my Design Library, found a design that I already purchased, and clicked Upload Revision to put this giraffe pattern in. That way you can see the whole process from start to finish. What I need to do is come up with all of these parts of my print-on-demand details. I need a collection. This is going to be, for me, my jungle life collection, which you can do by going back to your design library, tapping collections, and tapping plus to create a new collection. I've already done that because I already have my jungle life collection, but of course, you may need to do that for the first time. I'm going to input a title description and additional details, but I'm not going to type it into here because this is where I like to stay organized with all of my tags, titles, and descriptions in a template. You'll find the link to get to this template in the Downloads and Resources email that I send to you when you sign up on that page. If you've never used Notion before, it's a really great way of just keeping track of details. You can do a calendar, you can do all kinds of stuff. But for this one, what you can do is click on the link and of course, you would need to create a free Notion account. Then you'll click Duplicate up in the top right corner. It's not visible here because this is in my library, but let me show you how it will look for you. When you open the template, it will probably open a new browser like Chrome or Safari or whatever your default browser is. On desktop, you'll see the word duplicate. But on the iPad, you'll have to tap the three-dot menu and tap Duplicate page. You would have to be signed in to your free Notion account for this to work correctly and then it'll just pop this open in your Notion library. What I like to do here is insert the image of the exact pattern that I'm working on. For example, here's our giraffe. I will put the title here. You can also put the title down here, put a description, any additional details, which for me I like to say email me to get this in a different size or color and check out the whole Jungle Collection here and I put a link to my Jungle Collection and then I put all of the tags. That's something I do because I know I'm going to be listing this on multiple sites, so I need to have this info easily accessible. When I open Society6, RedBubble, whatever it is, all I have to do is come through here, copy this title. Sometimes it doesn't cooperate. There we go. Copy and then I can just go into my Spoonflower listing. Tap One time, tap Paste, and there is my title. I've done this for all of my patterns. I'll take you into my pattern tracker so you can see all my different patterns that I have all of those details saved for. I've also made some notes here for patterns that have gotten some licensing deals so that I don't forget about that and list them somewhere that I shouldn't. There's some patterns I can't do on home decor. When I licensed those on Society6, I can't put those on any home decor products. This for me is just a way to keep track of what's going on with all of my patterns so I don't get confused. I also want to point out that sometimes the collection items are so similar that you could actually just do one document and share some of these additional details. For example, here's my fruit collection. I did this all on one page. All my titles are here, all of my descriptions are here. The additional details are the same and the tags are the same for most of the designs. I did a few changes here and there. Sometimes if you do a full collection of similar designs, you might just do one page where you keep track of everything. Let's use all these details to create a new listing. What you will do is go to this existing listing, tap the three-dot menu, and tap Duplicate. Now you have the duplicate. If you go back to your template, of course, you can rename that, you can change the color to whatever you want. Now you have two of these. I'll tap on that, tap Change cover. I've got my giraffes title. Let's do a description here. I'm going to say giraffes and jungle plants on a deep blue background. Now we can go even deeper here and say a little bit more. Keep in mind that this is SEO right here. This is how people are finding your patterns, the titles and descriptions, and the tags. See you want to have keyword-rich descriptions, for example, what else is in this pattern? Palms and monstera plants. So I could say palms and monstera plants weave around playful giraffes in this fun pattern. Something like that. However, you'd like to write, of course. But make sure you get those keyword-rich words in there. Giraffes, jungle plants, blue, monstera, palms, pattern, all of these things that people would type to find this. We want that in your description. Let's get our title in there. Giraffes and jungle plants on deep blue, and then e-mail me to get this in a different size or color, Check out the whole jungle collection here. I am happy with all of that. You can see I've already written out my tags. I have jungle, jungle plants, jungle animals, monstera, African animals, African jungle, African, Africa, Brazil, palm, tigers, giraffes, and I had toucans from another pattern, but let's remove that. I'm going to say giraffes, giraffe, and of course anything else that is featured in your pattern. It's important not to abuse tags here. You don't just want to put in a tag because you think it might be a good way to get found. It really needs to be in your design. Now that I've got the list details handy, I can just copy them and go and paste them into my Spoonflower flower. Copy, paste that title, put this in my jungle collection, and I'm just repeating the same process over and over. I'm copying and pasting that title or as they called it here, Name. Now I'm going to repeat the same process with the description. You can see this is much easier than trying to type this over and over or let's say I want to go list this on Society 6 tomorrow, then I have to go back into the Spoonflower listing and find this information. When you save it all in Notion or whatever app you like to use, it's going to be so much easier to find this information. I'm just putting in the additional details as well. I always batch things like this. I really don't like having to redo things. I like just getting it all done at once. I think it makes this whole process so much easier. Something I think a lot of people don't realize about tags is that in most sites, you can input tags by just doing a list of words with commas in between, so this is just tigers, giraffes, giraffe, palm,. Then when I tap "Add Tag", it just pops all of those tags in there so you don't have to input your tags one at a time and you don't have to think of tags over and over when you list them on new sites. You can just use those same tags, and if you've written them out in paragraph form like I did in Notion, you never have to type those out again. We've got our title, description, additional details, and tags in for all three designs. Now we need to start thinking about the size. I've got a small, medium, and large. I'm going to call this one my small. I'm just going to put small in parentheses. You don't have to do that, but that's how I like to do it. My small, I'm going to do, actually, let's start with big to make this easy. Big, I'm not going to change anything. That's the size. It automatically is. You can see this is a fat quarter, so this is like 21 inches wide. That's how it's going to look. That's a big version of this pattern. Medium, I'm going to tap the smaller button twice. Small, I'm going to tap the smaller button four times. There's no science to this. What I recommend is just thinking about a few different objects. For example, a bow tie, a napkin, and a quilt. What are the three different sizes people might want for that type of product. If you want to know my exact numbers here, I've got 381 pixels for the small, I've got 223 pixels for the medium, and I've got 150 pixels for the large. Once I do that and I've put the words small and large in the title, I'm going to make sure to press "Save This Layout" on each of those designs. I think you can start seeing how batching this makes everything so much easier because I'm not having to worry about, did I do the medium and the large? I'm doing them all at once, keeping things cohesive and simple. Once that page reloads, that means we've got our design all saved. Then I can go to my wallpaper tab on all three of these. Just opening my wallpaper tab. This is the large, so I'm not going to adjust the size here. The original size is large. On medium, I'm going to press "Small" one time, "Save This Layout". "Small", I'm going to press, I bet you can guess, two times and "Save This Layout". I know that looks incredibly small for wallpaper, but I want to point out here that people use Spoonflower wallpaper for things other than actual wallpaper. They'll use it for laptop covers. Sometimes people will put it on the backsplash in their kitchen or to cover tables with it. You're not necessarily just thinking about wallpaper. There are all kinds of crafty projects that people can do with this. I'm just going to reload this page because we had a little bit of a preview issue. Now I can go back to the fabric tab. Just double-check to make sure everything looks okay. Scroll down past my tags, and descriptions, and everything. Of course, at this point, you probably haven't purchased a swatch for this design yet, so you can't make it for sale until you purchase a swatch. But let's say once you have purchased your swatch, you can go back into the design and say, I want to make this for sale on fabric and on wallpaper. Of course, this process takes a little while because you have to order your swatch first. But I want to show you one trick here for ordering your swatches because you actually can make this a lot cheaper than I think some people are paying for individual swatches. If you go to your Collections and tap on the collection, and up here where it says Fill-A-Yard, tap "Start Designing". If you choose the one yard here up to 42 designs it says, and keep the Petal Signature Cotton as your fabric and click "Design Your Project". You can tap each of your designs in the collection and then put it on this, basically a cheater quilt, and you are buying a swatch of each of your designs. This makes it a lot cheaper than buying one swatch at a time. This ends up being 36 cents per design, so it's a lot cheaper than paying the, I don't know, is it $1 or $1.50 per design. I recommend doing it this way, doing a big batch of designs and then ordering them all at once.
12. Listing on Society 6: Now I want to reuse this same pattern on some other websites. I'm going to start out here in Affinity Designer, and I'm going to go to my gallery, tap the plus symbol and create a new document in pixels that is 11,000 by 11,000 pixels. Remember that the workbook has all of these numbers on it, so you don't have to memorize this or write it down, it's all in the workbook. Now I've got this 11,000 by 11,000 pixel doc. Tap the "Documents" menu, tap "Place image", and pop that 4,000 by 4,000 pixel image in here. I can't upsize this, I would have to upsize my original vector if I wanted this to be bigger. I will show you how to do that too. But for this example, I'm just going to duplicate those. Swipe to select them all, duplicate again, and making sure your magnetics tool is on to do this. Again, I do this step-by-step slowly in my other Affinity classes, so for now I'm breezing through this a bit, but if you need this in slow mo, check out those classes. Now I have this 11,000 by 11,000 filled with 4,000 by 4,000 pixels squares. I can tap the three dots menu, tap "Export", tap the "Share" button, and "Save image". For Society6, I'm also going to need a rotated version of this, so what I like to do is just swipe all of these, group them, go to the Transform menu and Rotate. If you want to move it down to here, down to here, however you want this to look, of course you can move this around. Then Export, Share, and Save image. If I go to my Photos app now, I've got the three things that I need to upload to Society6; the whole repeat block, this is going to be for my wallpaper, the 11,000 by 11,000, this is going to be for almost everything, and the rotated version, this is going to be for yoga mats and towels. I've got everything I need. I'm going to go to Society6. I'm going to tap on "Sell" and "Add new artwork", and there, I already need my title, so I'm going to go back to notion. I'm going to grab my title. I know it doesn't seem like a big deal to type in that title for one design, but if you're doing 20 designs in a day, you're going to get really tired of trying to think of titles, trying to find all this stuff. Having it in this organizer has made my print on-demand life so much easier, so really recommend giving that a try or maybe a Google Doc or something where you keep track of all of your stuff. I'm going to go ahead and upload those three sizes. We've got the repeat block, the 11,000 by 11,000, and the rotated version. You want to make sure that regular non-rotated 11,000 version is featured. If it's not, you just click that little yellow to make it featured. Because that's what's going to input on the majority of products and that's going to lead to the least amount of work in terms of adjusting things. I'll tap "Continue". I have the copyright and I'm following the terms of use, and it does not contain mature content, so tap "Continue". Now that my images are uploaded, I need these tags and descriptions over here. As the category, I'm going to select Drawing, but of course select whatever works for your patterns. I'm going to go grab those tags. Copying that from my pattern organizer, and you can see how much time this is saving me. There's all my tags put in and my description. Paste that in and Save details. Now I can start working on my products. Over here is our prints. I don't feel that repeat patterns may particularly work well on art prints, so I just turn those off. But wall hangings, I think that looks pretty good and I think the sizing looks good as well. You can see what's going on in these little previews. But of course there are going to be some that you want to go through and adjust. I want to note here that I have a full class on Society6, so I'm not going to go into great detail about these. I do go and adjust some of these products, but of course, do whatever works for your style here. One thing we're definitely going to need though is to open the wallpaper in a new tab because we need to input that whole repeat block, so wallpaper repeats correctly. You can go through and turn on any of these and adjust any of these that you would like to use, so I'm not going to go through and show you every single product since I already go through that in my Society6 class. But as you can see, there are so many great products that you can put your stuff on. The one thing I definitely need to do is go open my yoga towel in a new tab and my beach towel in a new tab because what those need is the rotated version of my pattern. Here's the wallpaper. I'm going to go to my full repeat pattern block and make sure that is selected. Not going to mess with that sizing or it'll mess up the repeats, so I'm just going to click "Save and enable". Skip this step because they don't want to apply that design to any other products. Close that out. For my yoga towel, I need the rotated version because nobody really looks at a towel sideways. There would be from top to bottom, so I'm going to click "Save and enable", and I'm also going to apply that to the yoga mat, so "Enable 1 product". Same thing with this beach towel, doing the rotated version, "Save and Enable", skip this step. Of course at this point I would have gone through and turned on almost all of these products. Of course, your design is not going to work on every single product like Apple watch strap. I don't think my giraffe pattern works on that. It's too big. It's just not going to read well, so T-shirts square, that just looks weird, so some of these I'm not going to turn on of course, but most of them I do. Once that all looks good, I'm going to say, yes, the artwork is not copyrighted, doesn't belong to anyone else and tab "Publish artwork". Of course, I already have this in my shop, so I'm not going to do that today. But if we go to View my Shop, I can go find my giraffe pattern here. Here it is. Giraffes on Monstera on this notebook. We can also see it on a lot of other products and then they can see my other notebooks. You can see how people can find you this way. They're searching for a giraffe pattern, they find the giraffe pattern, they say, "What else will that designer make that I might like?" Then they can scroll through your shop and see all of your other products.
13. Redbubble Overview: I'm here in my Redbubble account. I'm going to tap the "Menu" over here, go to my shop name and tap, "Add new work". This is really just like we've done with the others. But one cool thing about Redbubble is that you can copy existing work. New work is honestly going to be just like we did for Society6. You upload, you put in the tags and descriptions. Pretty straightforward. But let's say you've already done that with one similar thing. For example, if I find my cream giraffe pattern, I've already put that up and on the tags, and descriptions, and sizing on all the products. Now all I have to do is tap this little gear symbol. Tap "Copy settings". Scroll down here and tap "Replace all images" and upload that new image. I might need to change the title a little, might need to change the description, but then everything else is set to the right size and the right scale. I've gone through and adjusted all these products. For that reason, I really think that Redbubble is the easiest in terms of listing new products, because once you do one at the right scale, you can just be flying through and putting up one design after another really quickly without having to list all of these other details. One thing with Redbubble that you do have to watch out for is that the cards and postcards actually need a different orientation. I'm going to go to Affinity Designer and I'm going to open up that image that had my rotated and non-rotated versions of my pattern. I will just tap the three dot menu in the Gallery and tap "Duplicate" so that I'm saving my 11,000 by 11,000 version, in case I need that later. I'm just making a new one that I'm going to crop. This cropped version needs to be a five by six ratio. That's the standard ratio for cards, of course. I'm going to first rotate it back, so it's in that regular rotated position. Then I'm going to tap the "Documents" menu "Resize". I don't want to resize the document because that will squish. I'm going to resize the Canvas and that will crop. So 11,000 is fine for the height, but for the width, I'm going to go with 7,334 pixels. That's going to make a five by six ratio. I need to make sure I turn off that little lock so that it doesn't apply that same pixel to both the width and the height. I should have a width of 7,334 and a height of 11,000. I'll tap "Apply", and then it just crops it into that five by six ratio. Now I can tap the three dot menu, tap "Export", tap, "Share", and "Save." Then on that prints and cards I'll tap "Edit" and then "Replace image", get that cropped image. Then it will just reload, and then we'll have the correct orientation for cards. If you don't do that, your shop won't have cards and postcards. That's just one little extra step that you have to do for Redbubble. Otherwise we're that 11,000 by 11,000 ratio to upload this.
14. Redbubble Deep Dive: I am going to list one item in my Redbubble Shop, I want to show this for anyone who feels they need this step-by-step. But if you feel you've pretty much got the gist of listing new things in these print-on-demand shops, you can feel free to skip this video. This is going to be really similar to what we just did in Society 6, but it's going to be the same process on Redbubble. You might like to see me go through product by product though, so feel free to keep watching if you just want to see how this all plays out. I went to My Profile, let me do that from the beginning so you can see it all. I went to My Profile, I tapped ''Add new work'', ''Upload new work'', and "Photo Library". Assuming you've saved this in your Photo Library like I did. You also, I want to point out, can save this in your Cloud storage. I like to save these things also in my Dropbox. For this example, I'll do Dropbox since we did Society 6 last time, so here it is on Dropbox. I tapped on the file, of course we need a title, tags, and descriptions, so let's go into Notion and get those. As I was inputting all of that information, this image was uploading. It's almost totally uploaded, and once that happens I can start adjusting my individual products. Now that my image has fully uploaded, I can start scrolling down and turn on or off products. My pattern as a square on a shirt, to me just does not look good, so I'm going to turn those off. I don't do a lot of clothing. You can decide here what works best for your style, but for me it just seems a little unusual. I do turn off most of the clothing. Stickers and magnets, those are pretty small and I think at this point that looks a little big, so you could upload a new design, you could turn on or off certain stickers, whatever you want to do here, but for me I typically will turn off or resize things that just look unusual. I think that phone case looks pretty good, but of course you could click ''Edit'' and you could maybe scale that up a little bit or scale it down a little bit and then tap ''Apply changes''. I think this pillow looks a little weird, so I'll tap ''Edit'', and I think the pattern can be a lot bigger on that pillow. Apply changes. Any of these products that you feel just don't look quite right. Of course I need to do my prints and cards just like we just did, Replace image. I had that in my photo library, that's my five by six ratio that we just cropped. Laptop, this is a shower curtains, duvets and comforters, mug. You can look at this overall view and see, is the scale right? Do I need to make some little mini adjustments? If you need to, just tap ''Edit'', go in, bump that up or down and Apply changes. Of course you'll see some other options like what frame color do you want, what hand color do you want on the watch, so keep an eye out for any of those little extras that it offers you. That Tote bag looks really weird to me, just a pattern square like that. I'm going to turn the mask on because I think that makes sense. I'm going to turn the bath mat on. All of these other things look pretty good to me, I'm going to leave leggings off. Backpack looks good. I need to turn on the type of media here, so I'm going to go with Design and Illustration. If you've created collections in your shop, you can go ahead and add that to your collection. Of course, this does not contain mature content. Who can do this work? Anybody. I don't mess with this default product in your shop. Then of course, I have the right to sell products with this artwork, this is my artwork. Then click ''Save''. That will publish it to your shop. I'm not going to do that because I've already done that in my shop. But of course, if I go back to my main Redbubble shop page, you can see how this will play out. I'll go to Manage Portfolio, and then you can see that pattern in my portfolio. I hope that was a nice overview for you of how to list something in your Redbubble shop. You can see if you go to My Shop how it ended up looking on all of these different products, and you can see how it's set up in this collection with my other jungle life patterns.
15. Marketing and Strategy: Now that we have listed patterns on Spoonflower, Society6, and Redbubble, it's time to start talking about marketing. One thing that I might consider is starting a portfolio. This could be a website, it could be an Instagram page, but this is a great place for potential clients and licensors to know what you offer. Of course, if you just want to sell on Print On Demand, and you don't want to go beyond that, then that's fine. You don't need a portfolio. But if you want a place, for example, to link and say, you can get my patterns on Redbubble, Society6, Spoonflower, here are my different collections, in a way that's organized, that makes sense to you, that beautifully presents your patterns, I think starting a portfolio is a great idea. Number 2, I suggest that you use mock-ups sparingly. Social accounts with repetitive mock-up posts are not followable. How many people do you follow who post a lot of mock-up photos? Probably not very many because it just doesn't look pretty. Mock-up photos can look good from time to time, but seeing them all the time, every single post, every time you talk about your products, it gets old. From time to time, I suggest that you order some real products. Photographs of real products are much more powerful than mock-ups. I just want to show you an example here. On the left is a beautiful mock-up of my notebook, and I think it's a great mock-up. However, on the right is a much more rich, and bold, and eye-catching photograph that just makes my notebooks look so much better than the mock-up. I'm not saying you should do this with every single product, and I'm not saying you do it with every pattern. I'm just saying from time to time, I think it's a good idea to buy some of your own products. If you really believe in your patterns and your products, then you'll be happy to buy some and have them in your house. Or maybe take a picture and then give it as a gift to friends. Whatever you do, I think having a few real photographs of your work just makes your whole marketing and portfolio seem so much more professional. I do think that growing a following is helpful. I don't think it's required to have a successful Print On Demand shop, but I do think you can increase your success by having some people who follow you. Of course, remember though that people love to follow artists and not salespeople. I have a PDF where I share 11 ways to share your Procreate art on Instagram. You could apply these same principles to patterns, and I'm going to put a link to that in the Downloads and Resources email that I send to you. Next, let's talk about long-term success. Of course, what we all want is long-term success, not a few sales right out of the gate, and then nothing else over the years. Number 1, the most important thing you can do is upload consistently. This helps you improve your work and it keeps it high-end search. It's no secret that search algorithms are set to give preference to new designs. So when you list a new design, it bumps it up in search, and then it slowly reduces over time if it's not getting sales. If you're uploading consistently, you're going to see more sales and it's going to lead more people to your shop than if you just upload 500 designs today and then never upload anything again. Number 2, it's important to cover new themes. Keep working on your popular themes that people are buying, but of course, don't miss the chance to discover new ones. It's a great way to just keep you pumping out new designs to stay on top of trends, see what's on the front page of all the Print On Demand sites right now. Make a list in your sketchbook. What animals are you seeing? What plants are you seeing? What themes and maybe buildings and structures? Greenhouses are really popular right now. You might make a note in your sketchbook that says greenhouses with Monstera leaves and tigers. That could be a pattern right there. Number 3, create some social channels. Sharing your customer images is a powerful marketing tool. When people make things with your products like Spoonflower fabrics or people buy your products like Society6 and share images with you, reshare those immediately. People will be so excited to see that other people are using your products. It makes you feel like, wow, this is an in-demand hot product that maybe I should go check out. Thank your buyers and connect with them on the sites that allow it, for example, Spoonflower. Your return customers are your business's biggest asset. This has been especially true for me on Spoonflower where I see the same people purchase over and over. Sometimes they'll send a message and say, "Hey, could you do this in a smaller scale?" If it's a return customer, I say, "Of course", and I do it immediately. But if it's someone I've never heard of before and I'm not sure that they're ever going to buy from me again, I don't honestly take the time to do it. For me, I give preferential treatment to my buyers. I don't answer every single email that comes in. But of course, in the beginning, maybe you want to just go for it and see if you can get sales from anyone who contacts you. Another aspect of long-term success, especially staying motivated, I think is creating assets. Assets are any little piece of a pattern that you could sketch or draw, maybe while you're sitting at a coffee shop, getting your car worked on, waiting in the dentist office. Creating assets are what leads to building patterns. You can see, for example, here, I created all these random drawings over a series of several weeks. I just kept thinking of different jungle animals that I wanted to create and then I made a bunch of plants to go with them and this popped those together into patterns. Had I never taken the time to make these assets, I never would've built the patterns. You're never going to be sitting at your desk and realize, oh, that's just the perfect pattern that I need to create. That's just not how pattern building works. It starts with the theme and then it leads to the assets and then you get the pattern last. You're never going to get a picture of the pattern in your mind and know that it's time to get started, so don't wait for that inspiration to strike. Go out there and find it and put it down on paper. Next, I recommend that you have a strategy. Number 1, set an upload schedule. You can start with an upload frequency that you know you can manage, and then slowly increase over time if you feel like you can. Number 2, as we talked about, stay organized, keep your tags, descriptions, and color versions organized to avoid wasting time. Number 3, I recommend doing a monthly evaluation. If you're aware of what designs are selling well, you can start capitalizing on those themes. As you start thinking about your upload frequency and your plan for your Print On Demand shop, I want to note that specific, defined goals have been proven to be more effective than vague ones. If you're saying to yourself, I'm going to upload to my Print On Demand shop all the time, that probably isn't going to be as successful as, I'm going to upload two designs a week and I'm going to stick to that schedule. I would recommend here making yourself stick to some kind of schedule, whatever you feel like you can manage. I really think that staying motivated comes down to setting up systems to keep you motivated. Even if sales dip, you keep building your pattern bank. I would say for me, 60 percent of my work comes from my personal goals. The patterns that I want to make a month, the community like contests, groups, sharing with other people, I would say that 25 percent comes from recognition. Those are likes, favorites, messages, comments, and then about 15 percent of that comes from profits. I wouldn't rely on profits or recognition to motivate you as much as your inner motivation to reach your goals. Here's a few example goals that you may want to use. Daily, could be do one thing each day for your Print On Demand shop. That could be anything at all. If you don't even have a shop yet, today it might be just opening an account on one of these platforms. A weekly goal could be to upload at least one pattern a week, and that could be to one platform or multiple platforms. A monthly goal might be, upload at least five patterns per month. As you get into this, you'll figure out how many patterns are going to work for you and what you can sustain. Give it a try in the beginning, see what you can sustain, and then maybe adjust your goals over time.
16. Profit Expectations: I want to talk about profit expectations because I know a lot of you are wondering, how much can you even make on print, on-demand. Of course, it depends the amount of time and effort you put in to creating and uploading patterns should pay off as long as you're creating high-quality designs and focusing on creating tag-centered designs, as we talked about throughout the class, nobody is going to find your designs if they don't have great titles, tags and descriptions, and they're not centered around a specific theme. Of course, every shop is different, but I can tell you that our thin line textile shop makes about $0.30 to a $1.60 per pattern per month. Some patterns sell weekly and other patterns have never sold. But of course, if a theme was popular, we made more designs around that theme. This is where it's really important to stay on top of your sales and know what's selling. If one specific theme was selling all the time, we would make a whole collection based on that theme and it almost always paid off. I want to show you my first month on Spoonflower so that you know, that it doesn't start out right out of the gate making tons of money. In the beginning, I was really making $1-2 every few days, and at the time, I thought that was amazing because to me it was a sign that if I kept creating more designs, more money would come with it. I also want to show you my first two years on Spoonflower here. The first year I made $56. That's not a lot of money, but I also didn't put a lot of work into it. The second year, we put a lot more work into it, my husband started helping me with creating designs as well. We work together and the second year it was $1400. As we continue to put more and more work into the shop and we're able to work a little less in our regular jobs and put more time into this print on-demand thing, it was making a lot more money. I want to show you the first three bonus structures that we hit in August 2017. We hit the $300 mark, which means you get a one percent bonus. In August of 2018, we hit the three percent bonus and then in November 2018 we hit the five percent bonus. We continued going after that because as you could imagine, this is addictive. Putting your designs up there, getting people interested in them, people sending me messages and saying, "Your designs are great on my napkins, on my couch cushions." I want to show you all this, not to brag and tell you that I've made a certain amount of money, I want to show you that it takes time, it takes effort and motivation and consistency to build up a steady income from your designs. Print on-demand is a long term passive income opportunity for artists, not a get-rich-quick scheme. As you all know, this is something that takes a lot of time and effort, but if you love creating patterns and you love sharing them with people and seeing them on products, I think that you'll love this process. Remember that the class project is to list your pattern in a print on-demand shop and upload screenshots and links as your Skillshare project. I can't wait to see your print on-demand shops. I'm looking forward to seeing what you create, so please share those with me. I hope you enjoyed the class and that you feel inspired to start filling your print on-demand shops with patterns. If you liked this class, you may like some of my other classes where I cover a lot more ways to make passive income from your creative work; like my classes on passive income for artists and designers, how to create and fill your Society6 shop and how to design fonts and procreate and sell them on Creative Market. I also share a lot of free downloads on my website. If you'd like to get more downloads like you got for this class, check out my site. As you know, I would love to see your print on-demand shop, so please share your shops with me. You can do that in the project section via screenshots on Skillshare. Or you could tag me on Facebook or Instagram. If any questions pop up as you go through the processes in this class, please feel free to reach out to me. You could create a new discussion in the discussion section below this video, or you could go to my website and use the About section to send me an email. Thanks so much for watching. I'll see you again next time. Bye bye.
 Liz Kohler Brown, artist | designer | teacher | author