Transcripts
1. Welcome!: Hi everyone, welcome to another Skillshare class. In this class we're going to talk about. Mandalas, and we're going to create very easy, simple, and beautiful mandalas with perfect symmetry on Photoshop. Even if you don't know anything about Photoshop, it's okay because I'm going to share step-by-step. It's going to be very easy, very basic. I hope you guys love this tutorial. First, I want to talk to you about what is a mandala. Mandalas are a sacred type of art, they can be found in so many different cultures throughout history. It basically represents that perfect balance and harmony that we can find in nature. We see this perfection and snowflakes, in flowers, in the air, in the trees, and the leaves. We can see them everywhere. I really believe that if we make art with intention, that art is actually going to help you manifest that intention into your life. I want to invite you to use this mandala as a portal of energy or whatever goal you have, and make this also an exercise of self-care for you to create something you really want in your life. Think about that intention while you were doing this art, this class is going to be very practical. We're going to go from opening a Photoshop file, what's the best settings, choosing a color palette that makes sense to what you're actually manifesting? We're going to talk about four different mandalas that we can make based on nature, earth, fire, air, and water. We're going to talk about how each of these elements can actually help you out in different ways. If you want to learn a little bit about the energy and the psychology behind colors, shapes, forms, and symbols, this class is going to be very helpful for you. You can use this mandala to decorate your home, to energize your manifestation boards, or you can even use it in meditation just by looking at it and letting your energy shifts. This artwork can become your lucky charm, something nice that every time you look at it, you remember of that intention you're manifesting in your life. This class is supposed to be a free flow of consciousness where you can really release your creativity with no judgment. Are you ready to make some really beautiful mandalas? Then keep tune in on the next videos, where I'm going to start the process of mandala making on Photoshop.
2. Materials For This Class: In this lesson, I'm going to share with you the materials I used for this class, and I'm also going to share with you a really awesome trick, that I think you're going to like. The only thing you're actually going to need for this class is a computer with Photoshop. But, if you perhaps have access to a pen tablet, use the pen tablet. My tablet is a Wacom Tablet, and it's very basic, very simple. I think it's for students it's not professional at all. I want to show you guys what I did with my Wacom tablet, that is actually a really awesome trick. So this is a tablet, this is it. It's actually black, but I taped this watercolor paper on top of it with artist tape, so when I use the pen, it's actually soft to touch and it feels like drawing on paper because it's not very intuitive to draw on this and then see the results on the screen. If you have a tablet, tape some paper on it, some paper you like. Choose a soft type of paper or maybe the paper that you're more used to drawing, if you're more analogical, like me, and you'll see, it's actually very nice also to keep tablet nice and neat, because before I was using it and there's a bunch of scratches on my tablet already from really pressing hard. Now that I have this paper, I don't have that problem anymore. It's pretty awesome. Basically how this works is, you have your tablet, you're going to connect this with a USB cord to your computer. You just start drawing in here and everything is going to appear on the screen. The nice thing about drawing with a tablet, which I will show you in Photoshop really soon, is that you can change the pressure, which is something that when you are doing with the mouse or with your finger on your laptop, you won't get that. You won't get the change of pressure with the brushes on Photoshop. This is a very basic and important step if you want to go into digital illustration. But that's not super necessary because in mandalas you can make something flat, and what's really amazing in a mandala is actually the symmetry and the perfection. How we do one little detail and it suddenly looks like a flower, suddenly it looks beautiful and perfect. Now let's grab our photoshops and I'm going to share with you my screen everything that I'm doing, so you can see step-by-step.
3. Photoshop Settings And Brushes: Hi everyone. In this lesson, I'm going to show you guys how to work your Photoshop. How to open a new file, all the settings you have to choose from, and how to use beautiful brushes to create textures in your mandalas. First thing, open your Photoshop and click on ''Create new'', this is to create a new file, and now you have to decide if you're going to create a file to print or to use it in the web, such as to post on your Instagram or something like that. If you're going to create artwork to print, then you should choose the exact size canvas that you're going to print on. On this upper corner, you can choose the size and the unit of the measurements of your canvas. Since I'm just doing a mandala here for you guys, I'm just going to choose a smaller size of 1000 pixels by 1000 pixels. Here in the resolution, always leave it at 300, and below here you can choose the color format of your file. Again, if you're going to leave your mandala on your computer and you're going to post it on your Instagram, you're going to send it to your friends, you're going to just keep it digital, then you should choose the RGB mode. If you're going to print, you should choose the CMYK mode that's for printing. Here you can leave eight bit and click on ''Create''. Now that you have your file open, we're going to use the brush tool to create a mandala. If your Photoshop opened up and it's not looking like mine, it's okay because you can click up there on the menu, on ''Window'' and then select ''Brushes'' so you can see all the brushes you already have, and just select the brush tool. You can either click on the little brush on the toolbox on your left or you can press ''B'' on your keyboard. If you see, I have a ton of brushes. I have so many brushes, I have never used. I don't think I have a use of like 10 percent of all the brushes I have, and I'm going to show you how to get those brushes. This Illustrator called Kyle Webster, he created a bunch of amazing brushes, and a few years ago, Adobe bought his brushes and you can download them for free if you have the license on Photoshop. Basically you go to this website, I will leave the link on the description for you guys, you log into your account and then from all of this options, you can just click ''Download'' and then you're going to get a set of brushes. Isn't that amazing? I'm just going to click on ''Download'' in one of them, I think I already have this set of brushes, but just so you guys can see. Now, you go on that little corner on those two lines and you click ''Import Brushes'', find the files, and then they will appear here. Now look, this general brushes, they come with Photoshop, so you already have them. If you don't want to go get new brushes it's fine, you can just use the brushes you already have, but I think it's really fun to play with the textures that this specific brushes can get you and also, in our mandalas we're going to talk about the energy of different elements in nature, and the brushes can help you create that. If you're doing a water mandala, then it's pretty nice to use a watercolors, don't you think? If you're creating an earth mandala, you can use something that looks like sand or soil. Now I'm going to show you guys the pressure with the pen tablet that I'm using. If I start doing a soft movement and then press hard on the tablet, you can see the difference in pressure that you won't get if you don't have a pen, but that's fine, I just want to show you guys in case you want to explore that. Here are some of my favorite and I actually changed the names of the ones I like the most, so I can just click on the search of their later and then get all my favorite brushes. There are amazing, very modern ways to organize your brushes nowadays, and I'm a little unorganized, but if you just change the names of the brushes you like, you can just go into search up there and find them easily. I find these brushes super interesting and in my opinion, this is such an amazing thing that Photoshop offers us because when you're doing a mandala by hand, you don't have all of these options available to you, and even if you do, there is not much room for error. Here in Photoshop you'll see, we're going to do trial and error, and you'll be able to create amazing things just by exploring. Here, I'm showing you guys how I choose my brushes, I usually just like start playing with them a little bit and then I just start clicking on my favorites, changing the names to favorites. I really encourage you to try, experiment, play with different brushes before you start creating your mandala, and this is how you use brushes on Photoshop. Stay tuned on the next video where I'm going to show you the quickest way to create a mandala on Photoshop. Believe me, you're going to love this.
4. Step-by-Step: Drawing a Mandala on Photoshop: Now we're finally going to start our Mandala, you are going to use the symmetry tool. The symmetry tool, is the little butterfly up there and it's only going to appear there if you have your brush selected. Press "B" on your keyboard, to open the brush tool and then the little butterfly is going to appear over there. Now if you click there, there's so many symmetry ways you can play with them later and then you just going to go to the last one and click Mandala. Then you're going to be able to choose how many segments you want on your Mandala. You can play with that, choose as many segments as you want to do different experiments. After you select your segments, press "Enter" on your keyboard. Open a new layer. You can choose one of the brushes you have, and then on the bottom left corner, you can choose the color you're going to use on your brush. You see those two little squares over there. Don't worry about the bottom square and click on the top square so you can choose a color. After you select a color you like, click "Okay" and you're ready to start drawing. Now, notice that for every new color I choose, or for every new brush I choose, I open a new layer because that gives you the opportunity to change the order of layers later. Let's say you paint something with dark green and then you paint something with blue on top of the green and then you think, Oh maybe the green would look better on top of the blue instead. You can do that by changing the position of layers. You just click on the layer and then drag to reposition. You can also edit each layer separately later. Let's say you like everything you did, but one of the layers like you really like that design, but you kind of want to try a different color with the same design. You can just change that one color of that one layer if you have it isolated in one layer, if you draw everything on the same layer, you can't change this one part of the Mandala. Make sure you're always clicking on a new layer before you start drawing. Just play with it a little bit, get used to the movement of the Mandala and remember, you can play with different brushes, different colors, different sizes of brushes and yes my friends, it's that easy. Isn't that amazing? I love Photoshop. Now that you learned how to create your easy, simple, and beautiful Mandala, let's jump on the next class where we going to finally start drawing.
5. Earth Mandala: Hi everyone. Welcome to this lesson where we're going to finally draw an Earth mandala. As you can see, I opened a new file, I clicked on the "Symmetry tool", clicked on "Mandala", and I chose 10 segments for my mandala. Now let's talk a little bit about colors. Imagine that this color wheel was divided by four. If you think about it, each quarter of this wheel gives you a completely different feeling. When you think about Earth, we're actually talking about the top half of this wheel where you get the greens and the oranges. When you mix these colors together, you're going to get Earth tones. You can get some brownish tones, some skin colors, and of course the greens. Now, I want you to think with me before we start creating this color palette. Imagine a place in nature that's super dry, where nothing grows on. It's actually dead. You're probably going to think about a place that has no green in it. You're going to think about a place that's brownish, maybe even gray. Now, if you think about a place in nature that's thriving, that's full of life, then you're probably going to think about a rainforest. Or somewhere that's completely full of life. Now, I want you to think about that goal you have. What is it that you're creating in your life and what energy are you actually needing right now? Remember, in nature, there's no right or wrong or better or worse. If you feel attracted by only brown tones, then maybe you are in this moment of actually being reborn. When you look at that super dry place where you don't see any green, that place is about to be reborn at some point, as we always see in nature. Earth helps us create all the structure we need to create the life we want. Also, I really want you to take in consideration the colors that you actually like. I really believe that when we like something, a color, a smell, a tone, a person, they probably have the vibration we are needing at that specific moment. Just go with your gut and go with the colors that you actually like keeping yourself in the top half of the color wheel. To create a color palette of your energetic mandala, I am not following any rules, okay guys, it's a free flow of consciousness. To choose your favorite colors for this Earth mandala, you're going to click on the top square, on your bottom-left, and then basically pick the pigmentation you want on your oranges and in your greens. Notice that when you go more towards the upper right corner, you're going to get a brighter mandala, you're going to get a bright, very vivid, saturated colors in your mandala, I personally prefer tones that are more in the middle. They're not that bright and they're not that pale. Doesn't matter what color I choose. I'm always going to keep myself a little bit around the middle, not so much to one corner or the other. But again, this is my preference. You can do whatever you want. After I chose my first color, I'm going to start saving them by creating shapes with that color. This PSD file with this little squares is going to be on the class materials so you can download it and do it yourself. I'm also sharing you guys my four color palettes that I'm creating throughout this whole class, so you guys can just skip this step if you want, and then use the colors I used. Now to change the colors of the squares, you basically click on them, click on the shape's icon on your toolbox, and then up there where you see Fill and Stroke, you click on "Fill" and then it can change the color. One trick I have to keep the harmony in your color palette, it's choosing one color and then going from that same color to a lighter or a darker tone. Instead of playing with this rainbow tool over here where you can change the actual color, I'm only going to change the pigmentation of that one color. My suggestion for you is to pick three colors you like, and then do variations of those three colors. Now, that you have your color palette setup, you're going to open your file where you're going to do your mandala. Keep your color palette on another tab, open, set up your mandala, and now everything is set up for you to start drawing. Now you're going to go back and forth from one tab to another. Now if you go click on the tab of your color palette, you can press the letter "I" on your keyboard to pick out the color that you already chose in your color palettes. Then you just click on the color, go back to your tab where you have your mandala set up. Remember to open a new layer, press "B" on your keyboard to open the brush tool, and start drawing. Everything in nature is balanced if you think about the big scheme of things. It's the same with mandalas. Now, go back to that one thing that you're trying to manifest in your life. Let's say you're trying to manifest new job or you're trying to be more creative in your life or you're trying to be more outgoing, well, in this case, it's a good idea to choose colors that are more towards the green. The green is going to help you connect with the feeling of health and fertility and ideas coming to life and bringing things to reality. If you are a person that thinks too much and stays a lot on your mind, maybe you're stressed, maybe you're anxious, maybe thinking too much about the future, maybe you're worrying about something. In this case, you could choose more brown tones. If you look at nature, the green movement is from inside to outside. It's plants, flowers, and trees growing. Now the sand and the soil have the opposite movement. It's a movement from outside to inside. Everything that dies in nature gets absorbed and decomposed and this creates energy. You can start growing again so that flowers and trees and plants can start growing again. Basically, the browns are going to help you go more inside of yourself to balance yourself, and the greens are going to help you put yourself out there. The Earth energy can help you ground yourself. The Earth energy is that feeling of being content in the present, that feeling of being, yeah, everything is all right, everything is fine, everything is going to be fine. If you're looking for something like that in your life, if you're looking for practicality, less worrying, more doing, then I suggest you do an Earth mandala for you. This mandala might help you bring your dreams into reality. It can be a little reminder for you that everything you have right now is the present, is the current moment and what can you do with it? What can you do in your life or how can you feel in your life right now, that can bring you closer to that goal you have? I want to teach you guys one thing. I'm always choosing a new brush and a new color and opening a new layer before drawing, and now that I have each layer separate and isolated, I can click on each layer and press on my keyboard. If you're on Mac, Command U, if you're on Windows Control U to open the hue saturation tool, and then it can basically play with the pigment of colors. If I want to make them more saturated, that's going to make them more alive, more bright. If I want them less saturated, it's going to make more like pastel tones, and you can also play with the style of your layer over there where it's written normal. If you click there, you have a bunch of options of how you want your layer to overlay and connect with the other layers. You can make them lighter, you can make them darker, you can change the color. Another suggestion about colors. If you choose darker tones, you might bring a little message of something that's a little richer or a little deeper in a way, and I find that lighter tones bring more of a feeling of clarity. The feeling of, I know everything that's in there because I can see the surface and I can see everything that's in there. Now with darker colors, I always feel like there is something more, there's something behind, hidden maybe, and it's always nice to create some contrasts. If you look at your mandala and you're like, all the tones are little too close together, then maybe you want to bring a little bit of a darker color or a little bit of a lighter color to contrast. Now that you've finished your mandala, makes sure to post as your class project. I really want to see what you guys created with this class, and I see you the next video where we're going to talk about fire mandalas and the fire energy.
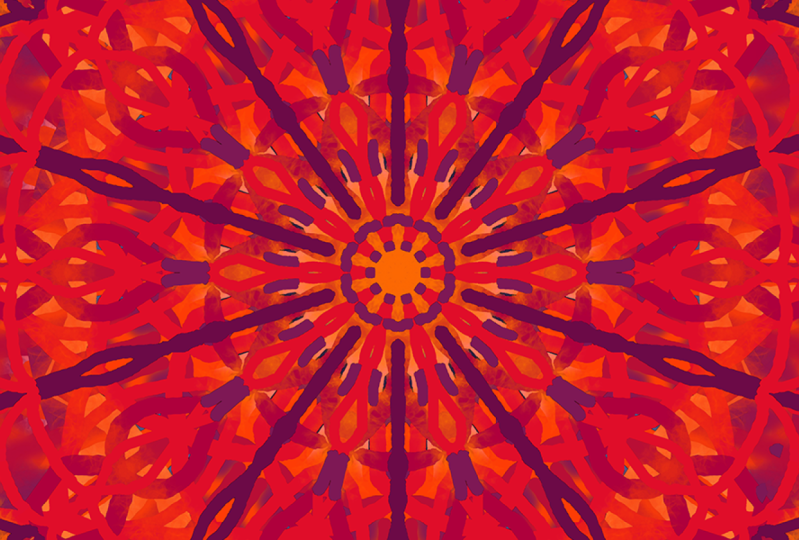
6. Fire Mandala: Hi everyone. In this video, we are going to create a fire mandala. First, we're going to create our color palette. If we divide this color wheel in two, the fire energy will be represented mostly by the right side of the circle, where we get all the warm tones from yellow to red and then some purple. Before we start choosing your colors, let's get some inspiration from nature. Fire can mean many things. From one little spark, destruction and chaos can be created, or it can die still as a spark. Fire moves fast, it's that spark of creativity, an idea you have out of nowhere. Many things can come from that idea, or it can just stay as an idea in your mind, and maybe we even forget it. Fire represents transformation. It's there when we are celebrating and moving forward in life. It's there to warm us up. it helps us nurture ourselves in warm and spicy foods. It ignites when we fall in love. It's there in the beginnings and in the ends. It's represented in the color of our blood that circulates through our bodies, keeping us alive and moving. Fire is the element of the spirit and it can help you release any blocks that are keeping you stuck and empower you to make the decisions you need to move closer to your goals. Fire also carries the energy of sports, fun, playfulness, love, joy, moving, rhythm. If you want to bring more of that into your life, think about that energy while you're creating your fire mandala. Now remember this PSD file with the squares is on the class materials, so you can just download it and then edit each square with the colors you want. To change the colors of the squares, you just click on the square, click on the shapes icon on your left, click on fill up there and change the color. Remember to choose three colors, ranging from yellow to red, and then choose some variations of these three colors. Pick a lighter color, a darker color, or more vivid color, or a more pale color. After you have your color palette ready, open a new file where you're going to do your mandala. Press B on your keyboard to open the brush tool, click on the symmetry tool, choose your segment count. Press Enter on your keyboard, and now you're ready to draw. Remember to press I on your keyboard to pick the colors on your color palette. Go back to the file where you're drawing your mandala, open a new layer, pick the brush you want to use, and let your creativity flow. Triangles represent fire, so if you draw a few straight lines in a diagonal position, you're going to get pointy shapes like that. Think how fire moves so fast, sparks fly everywhere. So when I think about fire, I think about triangles, sharp edges, and lots of tiny details to resemble sparks. Remember if you feel like your mandala is too much of one color, too orange, or too red, bring some contrast by getting a lighter tone or a darker tone. Remember, you can change the layer style. You can use the hue saturation tool to edit each layer until your fire mandala actually represents the energy you're trying to create for yourself. Notice that when you get the triangular shapes, it feels like a little bit of an explosion of energy coming from inside to outside. That's exactly what you want in a fire mandala. This mandala can help you expand. You can also create a mandala for a specific project you have. Let's say you're opening a new business or you created a YouTube channel, the fire mandala can help you expand and grow. Imagine, if fire is in the room, everyone's looking at it, its brightness, and joy. People with fire energy are usually the life of the party. It's those people that don't go unnoticed. If you're looking to catch people's attention, if you're looking for new clients, if you're looking for recognition of your work, or even if you're just taking life too seriously and you need some playfulness and fun and joy, dancing and music. The fire mandala is the perfect one for you. Now if you're happy with your mandala, make sure to share in the comments. I am really curious to see what you guys are creating and if you're liking this class. See you on the next one where we're going to create an amazing air mandala.
7. Air Mandala: Hey guys, are you ready to draw and air mandala? First, we're going to talk colors. It's a little more difficult to imagine colors for air since air is transparent, and I'll explain what that means in just a minute. But for now, keep in mind that the air colors range from blue to oranges focusing on the bottom half of our color wheel. But honestly, any color can be air if it's on the lighter spectrum. In some cultures, the air is actually represented by yellow, and I want to share a reflection on all of this to help you pick the right colors for you. Air is the element of the mind. Do you know when you are daydreaming and someone says, you have your head in the clouds and you put your feet back into ground. Well, as you can imagine, grounding has to do with the earth element. While the opposite movement, the movements of the mind, of your ideas, and your intellect has to do with the air element. This metaphor of having your head's in the clouds reminds us of those times when we're almost forget what's happening around us when we're basically zoning out and traveling in our minds. That happens when we are very focused on our thoughts or when we are meditating. Air has also a movement of expansion, the null like fire, where we expand an action, air is about the expansion of the mind, of our intellect. Like when we acquire new knowledge or see things from a different perspective, it's the lightest of all the elements and it is transparent, representing all that exists that is not visible or tangible, like words, thoughts, and ideas. It is the element of our communication with one another. In my perception, by choosing lighter colors, you create more clarity and peace of mind with your mandala. Air has a lot of power, it can be wild and destructive, or it can be gentle and light. How has your mind being moving lately? What kind of movements of the mind are you looking for? Now, let me explain to you a deeper meaning of the color blue. Just look at his images and notice how the further things are from the viewer, the more blue they are. So blue being the color of the oceans and the sky, represents that openness of space. It's you being able to see as far as the eye can see, but in your mind, it gives you a subconscious meaning of having the best point of view, seeing things from the top, which will give you more clarity in life. If you're feeling confused or you're looking for a solution for a challenge in your life, if you're stuck in old thoughts and want to refresh to new ways of thinking, or if you like your communication could be improved somehow, This mandala can help you clear your mind, express yourself better, and listen with the good ear. As you probably noticed in the colors of these videos, the more vivid the colors are, the more clear the sky is, which means the air is more transparent and you can see better. Now, when we have colors that are closer to gray and not very saturated, this usually means there is some fog, and it's a little bit more difficult to see. Imagine, if you want to bring more clarity in your mind, for example, you should go with more brighter colors instead of darker, more pale colors. Now, you will notice that this was the hardest color palette for me to make, I went with the safe choice of a light blue and tried to add some yellow to bring a little bit more warmth to my mandala. Also, white can be a good representation of air since it's a combination of all colors, and this might mean you can see everything clearly. It's just a metaphor, but I like making those connections. I hope that makes sense to you. I want this mandala to represent the fresh air in a bright day. This tone of yellow makes me feel like it's that first bright sunshine of an early morning when we arrested ready for the day with no worries in mind, just ready to allow the day to unfold. But honestly, I'm finding it really hard to like this yellow, and this might be my intuition telling me that this is not the right color for what I need. I'll try it anyway, and let's see how it goes. After you create your color palette, which you can add it later if you don't like it, let's start a new file to start drawing our mandala. As you can probably see, I am not being able to get along with this yellow, I just don't like it, and it's definitely a matter of taste, maybe you like it, and that's amazing. You can use this yellow if you want, I have nothing against this yellow personally. It's just not working for me with this mandala. Now that I'm experimenting, I find so much peace when I replaced the yellow with this darker tone of blue. For some reason, that feels better to me. I know the mandala is much colder this way and I wanted to bring a little bit of warmth, but maybe that's exactly what I need this air right now. I find that we usually relate the cold with the rational mind and the warmth with our emotions, and I am definitely a very emotional person, so it makes sense that I need some coldness in my mind to not let my emotions get in the way of my rationale decisions. So I really want you to use this as an example to allow yourself to follow your gut when choosing colors, there is really no right or wrong. If it turns out you don't like your mandala in the end, or you don't like a specific color, just go and change it. experiment with different colors and different textures and different shapes. That's the beauty of Photoshop, guys. You can really do anything you want. This exercise of letting go of control is something I really want to emphasize in this class. This class is not about improving the skill of drawing and more about improving the skill of creating, the skill of letting go of control, and letting new ideas come to life. This exercise of letting your intuition speak is very empowering in art. That's when you really allow your creativity to take it to different places. I hope you can use this class to help you unlock new areas of your creativity. As you can see, I gave up on that yellow, so I decided to actually change my color palette to share with you guys. You can find this color palette and all of the other color pallets in the class materials if you just want to use the colors I chose, and this is my final mandala. I hope you guys like it and share with me your creations. Please let me know in the comments section if you found hard to make this color palette as I did, and join me on our next video where we're going to create a water Mandala. Water is definitely my element, so I'm very excited. See you there.
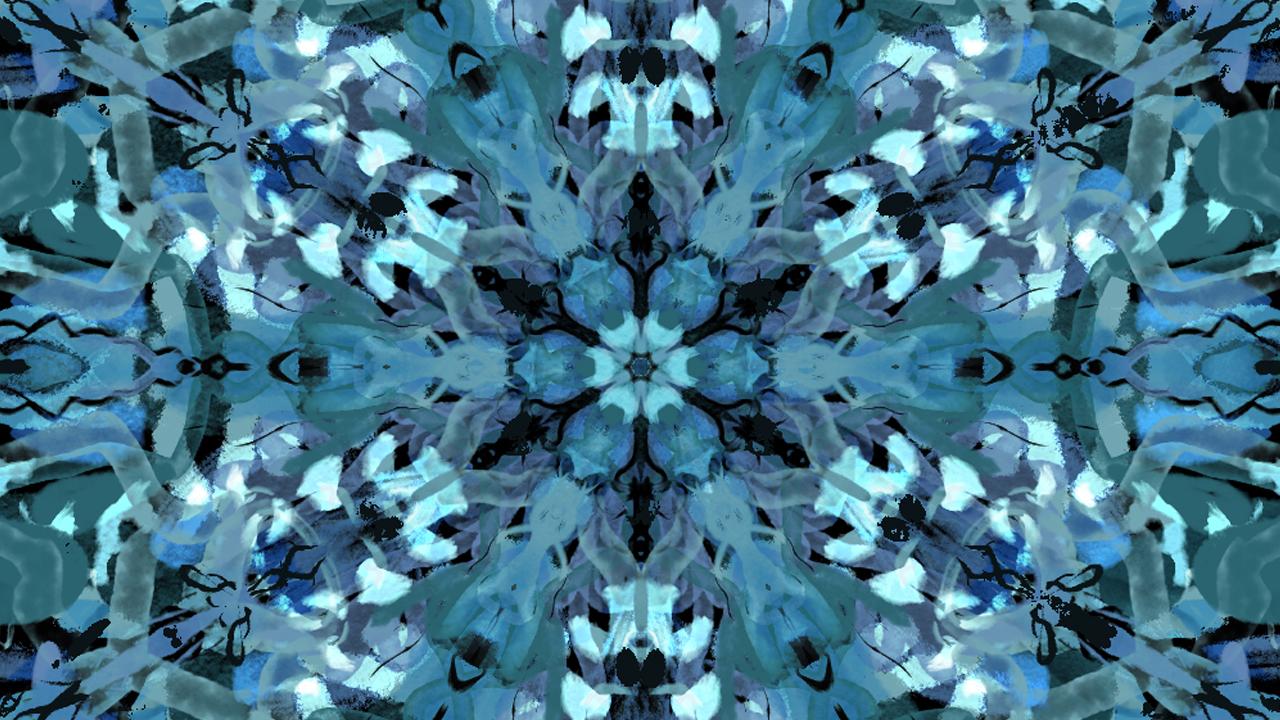
8. Water Mandala: Hi, everyone. We're going to draw our less mandala together today, and it's going to be a magical water mandala. I'm so excited because water is such a fascinating element to me. Of course, all of them are, but I'll share with you our reflection on water in a bit. Now, just keep in mind that water tones are going to be on the left half of our color wheel, going from greens to blues. Now, let me tell you about the movement of water in nature to inspire you and help you pick the right colors for your mandala. Water is very adaptable, it adapts to the environment it's in. For example, if you pour it on a glass, it will adapt to the shape of that glass, but that doesn't mean a conformance to anything around it. Water is insistent and persistent, it always finds a way to go where you wants to go, even if it takes years and years. In Portuguese, we have a saying that goes something like this. Soft water and hard rock hits so much until it breaks. That was a crazy bad translation, but you get the idea. It means that it's soft, it adapts, it's gentle, but it's strong and resilient, and never gives up. One day, because of its persistence, it will break the rock and make its way to where it wants to be. Water represents our emotions, and I believe it's a beautiful way to understand that our emotions don't go away. They never disappear. They just transform into new emotions like water can transform itself into so many forms. It can be calm, angry, peaceful, it can flow easily, or go through obstacles. It can be clean or dirty, refreshing or dangerous. Hard and cold are almost invisible. It can be deep or shallow. It can help you or threatened you. Now, I have a question for you. How are you feeling today? How would you like to feel? Let's create a beautiful mandala to help us shift your emotions in the direction we want and remind us of our power and strength. Darker tones will represent depth, while lighter tones will represent clear and nice freshwater. Also, in some cultures, the color black, which is actually the lack of light in color, also represents water. So you can really go as dark as you want here. I believe this represents the infinite depth of our emotions, and it makes me think about the oceans and how we don't even know as humans what's deep down there. It's still a mystery to us. To me, this represents our subconscious mind, memories, and feelings we carry with us without even knowing. Yes, I'm serious mandala indeed. As you can see, I chose darker tones as this reminds me of nighttime, which is the time that I personally am most creative, and I get a lot of creativity from my emotions. It just made sense to me, but feel free to choose the colors that makes sense to you, trying to remain in the green blue spectrum. After you create your color palette, let's finally start drawing. Let's talk practical things. When you start drawing your mandala, as you can imagine, water is represented by wavy curvy shapes and lines. Avoid straight lines here and try to do more flowy movements with your brushes. I also recommend using watercolor brushes if you were able to download the brushes from Kyle Webster, this can really give a water feel to your design. As you may notice in those images of water, whenever the blues are closer to purple, it resembles a more magical time of day, usually sunset or sunrise. It gives them more fantasy feel to your mandala if you wish to go in that direction. Now, just be creative and let go of control, remember to always starting the layer before drawing an experiment. If you don't like something you did, just delete that layer and start a new one. Try to think of the movement of water you're trying to create in your life. How do you really want to feel in your daily life? Are you looking for more stillness? Are you looking for more intensity? Think about the movement of water in nature and try to bring that into your mandala as this will communicate with your subconscious mind and how you perceive yourself. When you think about water that feels good to you, could be a pool, the sea, a lake, or even your shower or your bathtub. What kind of water is it that makes you feel the best version of you? Try to bring that water into your mandala. Remember, you can always edit your layers by using the Hue-Saturation tool or changing the layer style. My water has clearly a lot of information in it. This is how my intuition was telling me to go for it with this water mandala, and this is what I've created so far. I think I'm finished with my mandala. I hope you guys enjoyed it. Feel free to ask any questions and share your projects for feedback. I'll get back to you as soon as I can. Suddenly, we are almost done with this class, so stay tuned to our next and last video. Bye.
9. Thank you!: Thank you so much for joining this class. I really love sharing all this information I gather through out the years with you guys. Please leave a comment down below. I really want to know what you thought about this class, I really want to see your projects, If you have any questions please ask, I will answer as soon as possible. I hope you enjoyed it, I hope you had fun, I hope you released some creativity, and expressed yourself in your [inaudible] , and I will see you very soon in my next class. Thank you so much.
 Gio Vescovi, Visual Artist