Transcripts
1. Introduction: In the past, if you
wanted to record a song, you would have to go into
a multimillion dollar studio and have a deal with a record label so
that they could pay for your expenses in
order to record the song. But today, the barrier to
entry has never been lower. You can use a basic
laptop computer with a cheap microphone and begin recording
songs in your home. And in this course, that's exactly what I'm going
to teach you how to do. What's up, guys, My
name is mulatto and I'm a music producer
from Toronto, Canada. I've had music that I've
created featured on network television
shows and Netflix, and ad campaigns
across the world. I've been a part of a gold selling record in Korea and had some of my music playing and
heavy rotation on the radio. In this course, I'm
going to teach you how to begin recording and how to make world-class
quality recordings from the comfort of your home. So without further ado, let's get into it.
2. CLASS PROJECT: So in this course,
the class project is going to be simply
to record something, export it as an MP3 or
listenable audio file, and then upload it
to the class folder so that I can have a
listen in this course, I'm gonna be going into a
lot of different gear that you can get your hands
on to do some recording. But I'm keeping the
barrier to entry very low. So if you don't have
your hands on any gear yet and you want to
complete the class project, feel free to record it on your phone with your
voice memos app or on your computer using
your built-in computer Mike and a cheap
pair of headphones, I would recommend
that if you can get your hands on some gear, like some of the stuff that I outlined in the course that will definitely make your
recording sound better and I would recommend it. I'm excited. Let's get into it.
3. Overview of the Recording Process: Sound exists in the universe. Sound particles are
moving through the air. So how do we capture
them and get them into a computer or into a file so that we can press Play and then have that sound come out of
speakers somewhere. So the first tool we need in the recording process is
something called a microphone. Here's the one right here. They come in various
shapes and sizes. Now a microphone
has a sensor in it, and when sound oscillations
happen in the environment, they will cause the sensor
in the microphone to vibrate along with vibrations
in the environment. And the microphone has
components inside of it that turn that vibration into
an electrical signal. So it's going to send
that electrical signal, it's going to pass
it through a cable. And then that brings us
to our next component, which is called an
audio interface. So the microphone sends an electrical signal to
our audio interface, which I have one right here. For example, I'll flash some
pictures on the screen. And then our audio interface can interpret that
electrical signal. And it can then turn it from
an electrical analog signal into a digital signal that can then be interpreted
by our computer. Because computers exist in the digital domain and
understand the language of ones and zeros and not so much electrical
analog signals. So we need the
audio interface to take the electrical analog
signal from our microphone, turn it into a digital signal
using something called an analog-to-digital
converter that exists inside of our audio interface. And then it's going to send
that digital signal onward to our computer. And then our computer
can interpret that signal and it can record it and save it and do all kinds of fun stuff with that signal
once it's inside the computer. And so the third
and final stop in our signal flow is going
to be the computer. So that's something that we
need to think about it that's probably going to be the most expensive part of our setup. But these days, if
you're doing simple, basic recordings, you don't need a ton of computing power. And you could get
by with a computer that costs maybe a
thousand dollars. Back in the 90s and the 2000s, people were using computers with only 20 or 50 megabytes of RAM to actually make
their recordings. Computers are much more
powerful than that today for a lot cheaper
than those words. So you can get by with relatively a basic
computer setup and a relatively
inexpensive microphone and inexpensive audio interface, create your recording setup and you'll be right on
track to start, beginning to record things.
4. Build Your Recording Setup: So now I'm gonna go
over the gear that we're going to need
and some cheap options for you to
start considering purchasing some of these if
you don't already have them. So to get started, probably the most expensive part of our setup is gonna
be the computer, assuming that we're just getting started
recording and we're gonna be doing mostly
some basic recordings. We don't need a super strong
computer to get started. Apple is great. Macbooks, Mac mini, iMac, also PCS great as well. I don't personally use PC, but PCs can totally
get the job done. Two, you're going
to want to look for at least four gigabytes
of RAM in your computer. And you're going to need
some free storage space on your computer to get started. Audio recording doesn't take nearly as much storage
as video recording does videos super heavy and you need terabytes and terabytes of
storage and your computer. And I don't know how
those people do it. But for audio, you don't
need a ton of storage. You might want to have
a 100 free gigabytes on your computer just
to get started and have some space to fill up. But honestly, I've had periods of time in
my recording career where I only had two
gigabytes free on my computer and I made it work. I would keep deleting
old stuff just to make room for new stuff
and keep recording. That was with a computer
that was getting pretty old to the end of its life and
I was running out of space. I did what I had to do. Hopefully you have a couple of free gigabytes on your computer and you can start recording. Now, another thing to mention is that the bigger your
projects become, the more computer processing
that you're going to need to handle
all these things if you're just getting started and you're doing simple recordings with one vocal part
or one voice-over, then that's gonna
be pretty simple. You don't need a crazy
computer to do that stuff. And I think it's more
important to just get started and start to
learn how to do it. Worry about processing power
later. Use what you got. You don't have to go out
and spend a bunch of money. Most people have a
computer nowadays, so probably whatever
you have is gonna be capable of making at least
some basic recordings. Personally, I love
Apple computers. I'm a big Apple guy. Apple computers come
with GarageBand, which is a free
recording software. Apple also offers
a software that is a more professional
tier called Logic Pro, which runs about $200 once
you have an Apple computer. Both good options. I'm gonna be showing
examples in this course with GarageBand as well as some
with logic love Apple, and I definitely recommend it. So the next piece
of gear to consider is gonna be our microphone. Microphones can range from
$20 to insane prices like a $100 thousand for classic
vintage microphones and rare microphones and microphones that aren't
being made anymore. But we don't need that
super expensive stuff we can get by with a microphone. I would suggest that
runs about a $100. This was the very
first Mike I ever had audio technical AT 2020s. It's professional quality. It sounds good. A $100, and you can buy one of these at your
local music store. And that's gonna get you
cooking like hit songs. I guarantee you hit songs have been recorded on
this microphone. It's not like the most premium high-end
microphone in the world, but it's all good. Most people can't tell. The average listener
cannot tell. I've made great
sounding stuff on this microphone and so have many professionals in the world. I'll put some other good options in the lesson notes as well. Another thing to
consider is gonna be what's called
a USB microphone. So a USB microphone actually combines the microphone
part of what we need with a built-in
audio interface that exists inside
the microphone. And then instead of using a microphone cable to plug our microphone
into an interface, our microphone slash interface, all-in-one actually
just plugs into your computer with a USB cable. So this can be quite
handy and more inexpensive than buying both
of those things separately. But you're not gonna be
able to change microphones. Having a dedicated
audio interface, you could have three
different microphones and then you could
plug them all in. Maybe at the same time if
you have multiple inputs, or you could swap them
out and choose which one you want to use
at a certain time. That's handy if we
want to be using different microphones
for different things. If you have them built into one, a USB mic, you can only
use this microphone. You can't swap out
microphones and plug them into the interface
because the interface is in the microphone. So that's something to consider. If you only plan on using
one microphone right now, maybe that's a good
option for you. It's cheap, it's going
to be effective. It's got both those
things in one that could be definitely a
good consideration for you. This audio technical AT
2020s has a USB version, which I will link to
in the lesson notes. It only costs a little bit
more than this one itself. So that's a pretty
good option if you want to save as much
money as possible, and if you want to
have both those things wrapped into one. So the next piece of gear
we're going to need, like I said, is an
audio interface. Now there's also a large range of audio interfaces
that you can get. But on the cheap,
inexpensive side, we're gonna be looking
at an interface that has either one or two inputs. Now an input is the amount of microphones that
you could plug into the interface and record
into your computer at once. Most recordings are just gonna be one microphone
out of time. So we're fine to get a
one input interface. Just roll with that for now
as we're getting started, you can find single input
interfaces for around $100. I would suggest the focus
right Scarlet Solo, or the focus right,
scarlet to i2. This interface is
gonna get us started. It has pro level focus, right? Pre-amps in it going
to sound great on your mic and it's
gonna get us recording. So the next piece of gear
we're going to need in our recording setup is
gonna be headphones. Headphones are super important because when you're
recording a song, you need to hear
it and you need to hear the instrumental
that you're singing over. But you can't play it out of your speakers because
the sound from the speakers is going to go into your microphone and you're going to hear the speakers
in your recording. And you don't want to hear that. You just want to
hear your voice. You want it to be isolated
so that it's clean and crisp so that you can manipulate it when you
go to mix your song. Now there's a couple of good
options for headphones. You could even use classic, the white Apple headphones
that come with your iPhone. And you can use headphones
that are like 20 bucks, just something
that you can hear. Always nice to have some
studio quality headphones. And you can get studio
quality headphones for around a $100, even up to $200. If you want something
a little bit nicer, I use personally these audio
tech Nika ACTH headphones. These are really good. They sound good. They
have lots of base. They have a full sound
spectrum response so you can hear all your
frequencies clearly. I love them. I've used these for quite a few years and they're really good. Now something to consider when you're looking
at headphones. You need to plug your headphones into your audio interface. And the headphone
jack where you plug it in is usually of this size. Now, if you have headphones
that have this jack, the eighth of an inch jack, you're going to need
what's called an adapter, which is this. And the adapter just takes the
eighth inch size and turns it into the corridor in size so you can plug it
into your interface. You can buy this separately at your local electronic store. Our costs $1,
they're super cheap. Most studio headphones come
with his Jack anyways, this one came with
the headphones. Regarding something like
Bluetooth headphones, you probably want to stay
away from recording with Bluetooth headphones because
it tends to have a lag. So if you are listening on Bluetooth headphones and
then trying to record, there's gonna be a
delay and it's going to make it super hard to record. I've tried to do this before and did not have
success with it, almost impossible to record. So you definitely want to have
headphones that are wired. Now another piece of gear
to consider is speakers. Speakers are not going
to be 100% necessary. If our goal is to just begin recording something
on a microphone, we can just get by
with headphones alone. But having a set of
studio monitors in your home studio is always
something that's super nice. You can record your
voice and then you can crank up the
speakers and listen to it out loud and crack the base and make
your neighbors angry. And that's always a really
fun, gratifying experience. Just crank in your new song
of loud and blasting it. Speakers are not gonna
be a 100% necessary, but definitely something
that's nice to have a couple of pretty
inexpensive options for speakers, K, RK rockets. You could get a pair of
them for maybe $300. You could probably even find some cheaper ones
for around $200. Definitely something to
consider is speakers. Now the last thing
we may need to purchase for our
recording setup is gonna be our DAW or
Digital Audio Workstation. And this is gonna be
the software that we record that we use in
our computer that we hit record and it
starts recording our microphone and
then we can play it back and maybe we can
cut up our recording and do all kinds of post
editing and all this stuff. So that's our digital
audio workstation. With every Apple computer, you get GarageBand for free. Honestly, that's what
I would recommend starting on if you have
an Apple computer, download GarageBand,
if it's not already on your computer and open up
GarageBand and check it out. That's gonna be the easiest
thing to start with. If you want more
premium features and a little bit of a more
professional suite of software. The next tier up on Apple
is gonna be Logic Pro. And Logic Pro is great. I've used logic for many years and it's a fully
fledged recording software. So I also love Ableton Cubase. Lots of people use FL
Studio for making beats. If you're using a PC, there's a free software
called The Audacity. If you want the least
barrier to entry possible, you can download Audacity for
free and start recording. You can check out Cubase, you can check out Pro Tools. Definitely lots of options, but if you have an
Apple computer, I would recommend just
beginning with GarageBand, that's gonna be the easiest
thing to get you started.
5. Plugging Things In: In this lesson, I'm going
to show you how to plug all your equipment in so that
you can begin to record. So first, we're gonna
take our microphone and we're going to
take our XLR cable. And we're going to plug
it in on the side with the holes into the bottom
of the microphone. Now we're plugging in here. And then we're going to take
the other side of the cable and we're going to plug it into our audio interface, Mike Jack. So now that our microphones
plugged into the interface, we're going to plug in our
interface into our computer. We're going to take our
thunderbolt cable here. Sometimes you may need an
adapter if your interface has a different cable than what your
computer will accept, definitely research
into which interface in which computer you have. Most modern interfaces
are going to be on USB-C. At this time. We plug our interface
into our computer. If your interface
requires external power, then you're going
to have to plug in your interface also
into a power outlet. Okay, Perfect. Now we're all plugged in here.
6. Condenser Vs. Dynamic Mics: Now another important thing
to note about microphones is that there are two different
kinds of microphones. There is something called a condenser microphone
like this, 1820s. And then there's something
called a dynamic microphone like
this, Shure SM57. There's a couple of main
differences between condenser microphones
and dynamic microphones. The first difference is that condenser microphones tend
to be a lot more sensitive. So they're going to pick
up a lot more sound. If there's a dog barking in the background while
you're recording, you're probably going to hear
that dog in the background. Dynamic microphones
are less sensitive. They're going to mostly just pick up what's in front of them. And if there's something
going on in the background, they're not gonna get
too much of that. Now the second difference between condenser
and dynamic is that condenser microphones require something
called phantom power. Now, phantom power is basically just an electrical
voltage that gets sent into the microphone
via the mic cable. That voltage comes from
your audio interface. In your audio interface, you're going to have a switch or you're going to have
a button that says either phantom power
or it's going to say plus 48 volts,
something like that. You can click that on. And that's going
to turn on phantom power into your microphone. It's going to send the
power through the cable, and that's what a condenser
microphone needs in order to operate correctly and in order to start
picking up sound, a dynamic microphone does
not need phantom power. You can plug a dynamic
microphone into your interface, not turn on phantom power, and it should be working.
7. Install Your Interface Driver: Now there's a piece of software that you might need
to install onto your computer to make your computer work with
your audio interface. And this is known as a driver. Now, drivers are generally
a free piece of software. You can usually go over to your interface
manufacturer's website, like the focus right? Website, or whichever
manufacturer made your interface, you can head over
to their website and they'll have a
download section. And you'll be able to find
the piece of drivers software that you need to install to make your interface work properly.
8. Recording Test: Now let's make our
very first recording. This is just gonna be a
simple test recording just to get something, see if everything's
working properly. So first, mute my speakers. I got my headphones on. So I'm going to be listening
through my headphones. I'm going to hit mute on my
interface, cut the speakers. Now my headphone
volume is turned up. I'm going to turn
on input monitoring so that I can hear my own voice. Check, check. I can hear my own
voice now through my microphone. That's perfect. So if I'm singing a song
and be able to hear myself, aside from input monitoring, a smart thing that you can
do is just take one ear off your headphones so that
you can still hear yourself talking as
you're recording. So I'd like to do that as well. But regardless, we'll
turn on input monitoring. We're going to be
hearing ourselves, and now let's try
to do a recording. So we're going to hit
the record button. Check, check, check, check. And there you see we have
signal is coming in as I speak. You can see it's recording
what I'm saying. And the audio waveforms are appearing like
magic because we're actually recording now
and sound is being written from the real-world, from the air, is going through
a microphone and is being written into a computer program and recorded and saved forever. It is now recorded. What I'm saying, my voice, the sound of my
voice, it's amazing. It's like magic. This is how magic is made. Okay, awesome, That's perfect. So everything is working. Now comes the fun part. We can start to
actually record things and start to make
music and start to, start to get creative with it. Now that we have the
technical out of the way, we can begin to be creative.
9. Finding Instrumentals: What is up, guys, Welcome back. In this lesson,
I'm going to talk a little bit about
finding instrumentals. Where to look for them,
where to find them online, just how to get your hands on some music to start recording
on. Let's check it out. The first place where you can look to find beats
online is on YouTube. Youtube has tons of producers that are uploading
beats all the time. You can find a ton of different kinds of
beats on YouTube. You can find hip hop beats, electronic beats, pop beats, army beats, whatever
you're looking for, you're gonna be able to find
something to record on. A lot of beats are
not going to be free. A lot of producers are
going to put the word free in the title to
get you to click on it. But a lot are not going
to be offered for free. Let's just try to find
some beets right now. What are we looking
for? I don't know. Maybe Ariana Grande, a
type beats like maybe you were an artist who is trying to do an area
on the ground a thing. So Ariane, a granite type B. Let's check this one out. Okay, We can see free
anionic Ronnie type B. And so generally
the link to buying it or downloading it is
gonna be in the description. Sounds pretty cool.
It's got a vibe. Cool, like synthesisers,
nice germs. So can we download this? So there's a link to beat stars. So beat sars is a
website where you can lease and or purchase beats. It looks like. So download, we can
click Download. So I have to follow
on beat stars. So let's check that out
so I can sign in here. I have an account
already so I can sign in and give it a download. Download. Okay. Downloading. Okay. Got it. So I downloaded the file. Now I'm going to get
it. I'm going to drag it into my garage band. It's gonna make a new track. Now, this B might
have a tag on it. And what a tag is, is when the producer puts like a voice tag saying
like set it beats, so and so beats every couple
of seconds so that you can't release it without paying for
it because there's gonna be a tag on it that's gonna be
really annoying to listen to. So you're going to
have to maybe pay for it to get the version
without the tag on it. So let's see if
there's a tag here. Yeah, so there's a
tag. Some are tags. So what they do is
they're going to offer a free download. But then if you actually
want to get the version with no tags and you're going
to have to pay for a lease or buy the beat. But nonetheless, now we have something here and we
can start recording on it. So there you go. There's one place
to find some beats. So another place is
on beat stars itself. So beat stars is a
website where there's tons of producers
also uploading beats. They're uploading beats
available for Elise, beats available for
exclusive purchase. What are we looking
for? I'm not sure. Let's type in Post Malone. See what comes up. Okay,
we got tons of stuff. Post Malone and the weekend type B. Sounds pretty sick. Cool. And this one has a free
download offered as well. I'm assuming again with tags
with our email address. Oh, it's gonna go to my email. Okay, cool. Okay. Download File. Sounds good. It's going to download. I got it. There it is with jag it in. So now we can
record on this one. So boom, Perfect. We got beats. Don't meet her on the track. Now the thing to note as well as maybe we're not going
to use all these beats. What we can do is just get the free download
with the tags on it, record a song on it. And then if we end up liking
the song that we record, that we can go back and
purchase it from them, or at least the version without the tags and just drag that one in and remove the one with the tags and our song,
it's still gonna be there. If we end up hating our song, maybe we just don't least the
beat or purchase the beat. As you begin to sing
and record vocals, you're going to want
something to record on. And these are a couple of places to find
things to record on.
10. Setting The BPM: So the last little thing
that I wanted to make a note of here when we're going and we're downloading beats, we're finding beats online. A really important thing to do when you begin to
record on beats is to actually set what's
known as the tempo or the BPM of the beat
in our project, in our recording software. So what the BPM is, is basically the tempo
that the music is at. It's going to be or it can be faster. And so this is the BPM. It's that tapping that
consistent rhythm, that's called beats
per minute BPM. And that's basically just
a thing that tells you how fast the tempo of the song is when we begin to record, It's very important
that we set the tempo in our project to match
the tempo of the beat. So that all the drums
and all the sounds and rhythms of the beat
actually line up to the grid in our recording
software so that we are able to easily snap to
important parts of the beat. Everything's always
going to line up to even symmetrical places. And so the way to easily make this happen is
by setting the BPM. So the producer here
has listed the BPM. It says 130 BPM for the Post
Malone x weekend type II that we have downloaded. So we're just going
to set that here. We're just going to
type, we're just going to drag it up to 130 and it should line up. When we turn on our metronome, which is gonna be our click, that clicks at that
130 beats per minute. It should line up now.
And there you have it. In here, it's lined up.
We can go to the drums. Here the click is
going with the beat. For example, if our tempo
was set wrong to like 122, which is the wrong tempo,
it wouldn't line up. You hear that click
is not lined up. Back to 130. And it's perfectly lined up. So having that click
perfectly lined up before we start
recording is going to make so many things so much easier later in the
recording process. First of all, it's going
to make it easy to just go to where the beat drops, because it's going
to drop right on that bar where it's lined up. And then we can just
hit record right there easily start recording
when the beat drops dun, dun, dun, dun, dun. Or maybe when the
beat drops out. Yeah. Yeah. Yeah. Yeah. Now we're perfectly there. And then it's also
going to make effects that we add later lineup properly with the grid as well. Things like delay or reverb. And we're also going
to be able to take our things and move them
around if we want to. So if I record something here? Yeah. Yeah. Yeah. Yeah. Yeah.
Yeah. And say I like it. Yeah. Yeah. Yeah. Yeah. Yeah. I like that, but I
don't like where I did it and I want to move
it over somewhere else. I'm gonna be able to easily just drag it over
and it's going to snap to our grid that
you can see at the top. See how there's a grid
with numbers and lines. Now it's going to smartly snap to those lines
and it's going to stay lined up to the beat
because we've set our tempo. Yeah. Yeah. Yeah.
Yeah. Yeah. Yeah. I can put that anywhere
I want to know. Yeah. Yeah. Yeah.
Yeah. Yeah. Yeah. And it's going to
always be lined up. I can even put it
like off the grid a little like yeah, yeah. Yeah. Yeah. Yeah. Yeah. It's still lined up. The
reason it's still lined up is because we set it
properly, our tempo. And now everything is snapping
with the instrumental. Yeah, yeah, yeah. Yeah, yeah, yeah. So that's just a
really quick example of how to set the tempo, how to find the tempo. If you have a beat where the tempo is not
listed like this, there are other ways to find it. For example, you can
say you can just Google find tempo of MP3. And then there's websites
like this one gets song BPM, where you will probably have an MP3 file and then you're
going to drop it there. And then it's going to upload to this website and this
software is going to analyze it. And it's gonna
probably just spit out the same BPM, 130 BPM. Things like this aren't
always 100% perfect, but most of the time they work, you'll be able to tell though,
when you're listening, if it's set to the right tempo, when you turn on
the click, you'll be able to tell if it's off. So if it's off, then just keep trying to
figure it out. Play with it. Sometimes it'll get
close and you can move the BPM up one or down one. C it says 86 BPM here, which is actually
completely wrong. I think because it was 130. So that's completely wrong. Don't trust that
website. Apparently. Tune bat. Maybe this one works better. Bpm, BPM, bpm. Let's see. Is it going to work? 130? Perfect. So checkout, try this one. Tuned bad.com. That
seemed to work. That's if it's not listed and you can't
find it anywhere else. Checker that tune bad.com. Yeah, so that's just a little
note about setting the BPM, how to set the BPM and why
you should set the BPM.
11. Leasing Vs. Exclusive Rights: Welcome back you guys. Alright, so in this clip, I'm going to talk
a little bit about the differences
between leasing beads, buying beets, and generally about getting your hands
on some instrumentals. You may have come
across this online. You may have found
a beat somewhere, whether it'd be on YouTube or whether it'd be on
another website. You might have seen an option
to lease the beat or to purchase the beat in what's
called exclusive rights. There's a couple of
differences here. Leasing beads means that you are getting the rights to
actually record on this bead and to release a song on it
that gets a certain number of streams or views based on the agreement of the
lease that you're getting. So leasing a beat is generally
going to be a bit cheaper. You can find leases of
instrumental beats for $10.20 dollars,
twenty five dollars. And then beyond this, when you lease a beat, you are a non-exclusive
leaser of that beat. So that means that music
producer that made that beat, they can actually lease that beat to a lot
of different people. And most likely there's
other artists that are also downloading that beat and
creating songs on it as well. Those are also going
to be out there, so you're not going to have exclusive
rights to that beat. Now, beyond leasing, we have what's called purchasing
exclusive rights. So this means that you are paying the producer
a sum of money. That means you are going to be the sole recording artists
associated with that beat. And that producers
now not allowed to sell that beat
to anybody else. Now, it's yours and you're
the only person that can record on that beat and releases song on it
from there on in. If other people lease that
beat already vacated, may be still have it, but now you're securing
it for yourself. No one else is going to
lease that beat after you, you lock it down. The thing about buying
exclusive rice is it's generally quite a
bit more expensive because you're
obviously preventing that producer from
now generating more money from that beat by leasing it to
other people anymore. So now it's yours for cubes is going to cost
a bit more money, but that's another option. So those are just a
couple of differences between leasing and purchasing exclusive rights to beats online that I wanted to
talk about because I'm sure that you're going to encounter this if you're
looking for beats online and you're looking for instrumentals
to record over, you're definitely going to
have a couple of questions about that sort of thing
as you run into it. So I wanted to give a couple
of pointers about that.
12. Example Recording: What is up, guys?
So in this video, I'm going to show you me
recording myself with a little chorus
idea that I came up with on the beat that
we just downloaded. So we have our beat
loaded into GarageBand. And I'm going to sing a vocal
part into my microphone. And I'm going to record
this course that I came up with super-quick,
easy chorus. We're going to get something
down so that I can then afterwards show you how to begin processing
your recordings. So without further ado, let's do some recording. So what I've done
here is I've actually looped a little section
of the beat here. This is gonna be my chorus. And what I do is I use this, these little markers so I
can actually just click and drag on the top
here on the ruler. And this creates a loop. So when the playhead is playing, it's just going to
loop that part. It's going to keep going
around and around. And I can move this around. I can move it over here. This is the part
that I've decided I'm going to record
my course over. So what I'm gonna do here, I'm just going to record
a little idea that I had and I'm going to show you
guys a bit of the process. So you can see I've got signal here and
my track is ready. I can click this red
button to start recording, or I can click R on my keyboard. So I'm going to set my loop and I'm going to record my idea. Making music, Gail,
we do it every day. Making music. Can
we do it every day? Yeah. Yeah. That's how
we keep the pain away. Yeah. Yeah. That's how we
keep the pain away. Yeah. Perfect. So I just recorded two loops to take some of my course idea. I can use this little
icon in the corner. That means two takes. I can switch between them. Perfect. So let's give it a listen. Making Music. Gayle,
we do it every day. Making music, Gail,
we do it every day. Yeah. Yeah. This how we
keep the pain away. Yeah. Perfect. That
sounds pretty good. It sounds quite ra
hasn't been processed, but it's a good recording and it's something
that we can work with.
13. Plugins Overview: Okay guys, Now we have
our verse recorded. The problem is it sounds
very raw and unprocessed. It doesn't sound
like a finished song that you might
hear on the radio. So how do we get it from sounding like it was
just recorded and is very raw to get it sounding polished and processed so that it's more listenable as a completed song and
sounds more professional. Well, we're going to use
something called plug-ins. Now, a plugin is basically a
piece of software that you can actually apply to your
recording that does something, it changes the sound of what
you recorded in some way. There's various
different types of plug-ins that we
can use to process our sound and make them sound more polished,
completed, processed, shiny, make them sound like they're far away in
a room with reverb, make them sound
very quiet or loud, or takeoff the low-end of them
or take off the high-end, change the pitch or
apply auto tune to fix any wrong notes that you might have sang
in your recording. Their software plug-ins that
do many different things. So in this lesson, I'm going to show you
a little bit about how you can begin to use
software plugins on your recordings to get your recording sounding more
like a finished product. Okay guys, so now we're
back in our project. We have our recording here. And I'm going to show
you a little bit about how we can
begin to start using some plug-ins to process
our recorded audio. So in GarageBand here, you can see are recording
the way that we can get to see the
plug-ins that we can put on our
track is by either we can click on this
little gear icon, which brings up this bottom
window here where you can see there's kind of a
graphic here and it says compressor EQ sense. So these are some settings. And if we look on the left here, we can see this title
that says Plugins. And we can see
actually a couple of little horizontal modules that are sitting in this list here. So these little icons here, these rectangles, they actually correspond with what
we're seeing here. This is actually just a simplified graphical
representation of these. So we can see we turned it on that switch
called flicked on. We turn on Channel EQ. That switch got
flicked on over here, turn it off, turn it off. So on the left here, this is where we
can see our plugins and we can see them in a row. Now if this is closed,
you might have to open this drop-down menu and then
you'll be able to see them. The way plug-ins work, the signal flows from top
down to the next one, down to the next one,
down to the next one. So when we press Play, our audio signal that
has been recorded is going to be sent to
this chain of plugins. So here it's completely raw. Making music. Can
we do it every day? So say we want to apply
a bit of equalization. Let's go to our plugin menu, click and empty slot. Scroll down to EQ, open a channel EQ. Now we've seen this
window is opened. And when we press play, the audio is going to
now be sent through this equalizer plug-in making music. Can we do it every day and we
can actually see our audio coming into this bug
and we do it every day. Now let's start playing
around with it. That's how we keep
the pain away. Yeah. Yeah. That's how
we keep the pain away. Yeah. Making music, can we do it every day so we can hear what we're doing
here is actually, can we do it and it's actually affecting the audio
that we've recorded. We're actually
changing the sound of it using this device. So the audio is flowing from a recording and it's actually going through the channel EQ. That's just one plug-in inserted in our plugin
chain for this track, we can actually
insert many more. And so let's try
adding a compressor. So now we've added a
compressor plugin. You can see that it's
loaded up there. It's in the second
slot after the EQ. And so now the sound is going
to flow from this recording into the EQ and then from
the EQ into the compressor. So we're creating a
chain of plugins or a chain of effects on
our recorded audio now, and they are changing
the sound of the audio. So let's play with
our compressor settings a little bit and we do it every day making music. Can we do it every day? And you see when I change
this setting here, it's actually corresponding
to this graphic. But if you want
to have access to the full range of settings
on any of these plugins. You want to click right here in the middle of it and
open up this window. And that's going to
have the complete settings of that plug-in similar to the EQ
I can open up and this is has the
full EQ settings. Now, this little drop-down
menu on the right, that's going to allow you to either get rid of the plugin
by clicking know plugin, or it's going to
allow you to swap it out for a different plug-in. You can see that GarageBand
has a whole range of different menus with different types of
plugins that you can add. It's got delays,
distortion, dynamics. Dynamics are things that affect the volume of a
sound imaging which creates wideness
or puts things to the left and to
the right filter, which will remove
certain frequencies. Modulation, which is things like a chorus or a
flanger or a phasor. So the main thing is to
understand when we're using plugins is that first, the signal flows from our recording into our
chain of plug-ins here, and it flows from one
to the next in order. The next thing to understand
about plugins is that they actually consume computer
processing power. So the more plug-ins that
you load on a track, and the more tracks you have in your project with multiple
plug-ins on them, the more work that
your computer's going to have to do to process the sound of what all
those plug-ins are doing and to make that sound
come out of your speakers. So if you don't have a
very powerful computer, you might notice as you're
adding a lot of plugins, things are going to start
to slow down and it might become more
difficult to work with. If you have a more
powerful computer, you're going to be able to open a lot more plug-ins before
you start to feel the effects of limited computer power because you have a stronger
computer and it can handle more if you plan on doing really large projects
with a lot of plug-ins, you're going to need a stronger
computer to achieve this. But if you're just
recording one track or maybe two tracks and just a couple of
plug-ins on each one. You're gonna be
able to get by with a pretty average computer and it's not gonna be a problem. So it all depends on the
size and scope of what you are attempting to
do with your software. In the next couple of lessons, I'm going to go into a
little bit more detail about specific types of plugins
and what each of them do, and how you can use those to polish your recordings
a little bit.
14. EQ: The first plug-in type
that I'm gonna go over in a little bit more
depth is going to be EQ. So EQ stands for equalization. And this basically means
that EQ allows us to change the volumes of specific
frequencies within our sound. Really any frequency
between 20 hertz to 20 thousand hertz from the very low end of
hearing range of humans. And our hearing goes all the
way up to 20 thousand hertz. And an equalizer gives
us the ability to actually change the volumes
any frequency that we desire. So what I'm gonna do is
I'm going to EQ my vocal here the way that I
would normally EQ something when I'm trying to make it sound a
little bit better. And I'm going to explain to you why I'm doing certain things. Let's give it a listen. Making music. Can we do it every day? Okay, so right off the bat, I'm hearing a bit of a harsh frequency
in there somewhere. I'm thinking it's in the
mid-range somewhere. So what I can do is I
can take one of my bands and see this band here
corresponds to this one. I can turn it on and off, and I have multiple bands
to choose from that I can turn up or turn down or
do different things with. So I'm going to choose
my band here and I'm going to edit the
queue setting of it. Q is how sharp or wide
V EQ band is set to. I'm gonna make it pretty
narrow because I'm hearing a pretty narrow frequency
in there that I don't like. So I'm gonna make it
really sharp and I'm going to just sweep
it up and down across the frequency
range until I find the frequency
that I don't like. So let's hit Play and
let's start sweeping. I think it's somewhere in
here, somewhere making music. Can we do it every
day? Okay, that's it. Making music. Can we do it every day? There's this ring. That's how we keep
what I'm gonna do to compensate for that ugly
frequency in my recording, I'm actually going to
turn that frequency down. Making music. Can we do it every day? Making music? Can we do it every day? Yeah. Okay. So I've turned it down. The frequency is
right around two k, also known as 2 thousand hertz. And I'm just turning
that one down and I'm making my
band quite narrow because that frequency that's offending my ears is a
very narrow frequency, so we can make it quite narrow. Making music, can
we do it every day? Sounds a bit better. Now the next thing
I'm gonna do is just take off a bit of low end. So I'm going to use this device
on the left, turn it on. This is called Low Cut. A low cut is a part of the EQ that is just
going to cut off and remove any frequencies below the frequency that you
set your low cut too. So I can take my low cut here and I can move
it up and down. And I can cut off
the bottom end of my recording making music. Can we do see there's a bit of low end with a walk-in music. Can we do it? And you can see it
there in the analyzer. You can see that there's
a bit of low end there that we don't
actually need. It's far too low, making Iraq actually
just going to sweep up here and we're
going to remove that. Making music. Can we do it every day? Making music? Can we do it every day? Making music? Can we do it every day? Nice. Now the next thing
that I'm going to do, I'm hearing a bit of
a nasal frequency in this recording that
I want to get rid of. Now, usually nasal
frequencies are gonna be around 500 hertz. This is the key area for where you can
remove a bit of that. So once again, I'm going
to take my next band here, the one below this one. And I'm going to again make the queue a bit narrower
because this is, again, it's a pretty narrow
thing that we want to remove. And we're going to
sweep and we're going to find that frequency again. I think the nasal
area is going to be around 500 hertz making music. And we do it every day.
Yeah, right there. Making music. Can we do it every day? Yeah. We don't like that. That's how we keep
the pain away. Once again, I'm going
to remove that making music and we do it every just going to
turn it down a bit. We don't need to go
all the way like this making music because that's gonna make our
things sound weird. Making music too much. We still want a bit of that. We're just trying to level
it out a little bit so it sounds a little more even
across the board making music. Can we do it every day? So that helps a bunch. So now what we can
do is we can listen to before and after right now. So we're going to disable
our EQ, making music. Can we do it every day? And now we're going to
enable it. Making music. Can we do it every day? Sounds quite a bit cleaner. Yeah. That's how we keep
the pain away. Yeah. Yeah. It sounds good,
but I think I want a little bit more high-end in our vocals so that it just
has a little bit more sheen, a little bit more
polish making music. Can we do it every day? So we're going to grab what's
known as a high shelf, which means that the
frequencies above this frequency of the high shelf are all going to be
boosted on a curve. So as you can see, I've turned it up and everything above it is getting boosted up. So we're just going to
use our high shelf and we're just going to boost
the top end up a little bit to give our vocal
little bit more polish and stand out a little bit
more in the mix, making music. Can we do it every day? Good day. Yeah. Yeah. That's how
we keep the pain away. Yeah. Yeah. I think that's
good. Making music. Can we do it every day? Now there's another
harsh frequency that I'm hearing that I
want to get rid of as well. So let's grab our next
band here, the blue one. We haven't used this one yet. We're going to once again make
this narrower, turn it up. The higher the number
of the queue here, the narrower it is. So I think five was
what we used before. And let's find this
other frequency. I think there's one
in here that I don't like as well as making music. Can we do it every
day? It gets that. Making music. Can we do it every day? Yeah, Actually, there's
so many good music. We do it every day. I think it's not
actually making music. Can we do it every day? Yeah. Yeah. That's how we
keep the pain away. So I'm going to turn
that one down as well. Making music. Can we do it every day? Making music gal, we do it. So I'm just going to
hit play and I'm going to turn it on and off and on and off a
couple of times so you can hear the difference
of what we just did. Start with it on making music. Can we do it every day? Making music? Can we do it every day? Yeah. Yeah. That's how we keep
the pain away. Yeah. That's how we keep the
pain away. Making music. Can we do it every day? Making music? Can we do it every day? Now the difference
is pretty subtle, but the way that you're
going to come to a Polish sounding
finished product is with a lot of subtle tweaks. This is the thing about mixing
is it's a lot of subtlety. So if you find you're not really coming up
with anything or nothing you're doing here
in the EQ is satisfying. You feel free to just
go through presets. Once again, presets are
a great way to learn, a great way to
start understanding what these plugins are doing, and a great way to get a
quick start on your mics.
15. Compression: Okay, so the next
plugin type that I'm going to talk about is
called compression. Now, EQ and compression are
the two main mixing plug-ins. That's the bread and butter
of mixing EQ compression. So we've done a bit of EQ here. We're going to open
up a compressor. So you'll find compressor in the Dynamics folder and we're going to open
the compressor. Okay, perfect. As a sound is playing, it's going to have peaks
and valleys of volume. So if we can zoom in
here a little bit, you can see there's loud
parts to this sound. There's quiet parts
like that little part is pretty quiet, but then there's louder parts and there's loud
spikes right there. You can see those spikes
are actually ladder and volume than this smaller
waveform beside it. So loud spike, loud spike. So what a compressor
does is it will take the loud spikes in an audio recording and it will automatically turn
those spikes down. It will lower the volume of the loud parts of a recording, and it will lower the volume of the sound by a
certain amount. Now the amount that a
compressor lowers the volume of a loud part of a sound by is
determined by two things. It's determined by the threshold working in combination
with the ratio. So the threshold
is the volume at which a compressor will begin
to turn the sounds down. So for example, if I turn my compressor threshold
to negative ten, if a volume of a sound coming into the compressor is
below negative ten, it's just going to pass
through unaffected. It won't be turned down, say it's negative 15, which is lower
than negative ten. It's gonna be going
through and the compressor is not going to touch it because it's below the threshold. But let's say aloud part
in our sound comes up. It goes up, and it's
actually at negative five, which is higher than our
threshold of negative ten. Now that sound that comes
in at negative five, That's going to
be turned down by our compressor because now it's triggering our compressor, it's over the threshold. So now the compressor
effect is being triggered. And the amount that, that peak is going
to be turned down by is determined by the ratio. So basically, a compressor
just turns down the loud parts of a sound and makes them
quieter so that overall, your recording is going
to be played back at a more even volume compared
to if it was uncompressed, there would be loud peaks
and then it could get quiet. And it's gonna be
loud and quiet. And things that are
loud and quiet, all of a sudden are harder to hear and they're not going to stand out in a
total mix as much. For example, if your beats playing and then your
vocal is over top of it, but your vocal isn't compressed. The quiet parts of the
vocal are going to drown under the beat because they're not
going to be loud enough. So what a compressor does
is it makes your vocal a more consistent and even volume. Or whichever track the
compressor happens to be on. It could be a guitar,
it could be the vocal, it could be something else. But it makes that thing
are more consistent, even volume so that it will
stand out in the mix on its own and you'll
be able to hear it without it disappearing
in the mix. So for a vocal, it will make the vocal be a
consistent even volumes so that you can hear the vocal
over top of the beat. And so it's not
drowning in the beat. It's going to make it nice
and tight and stand out. So let's play with
our compressor settings a little bit here. Make him, I'm just going to solo this track, making music. Can we do it every day? Let's turn up our ratio music. Can we do it every day? Yeah, yeah, that's how we
keep the pain away. Yeah. That's how we keep
the pain away. Yeah. Making music. Can we do it every day? Making music? Can
we do it every day? Yeah. Yeah. That's how
we keep the pain away. Yeah. Yeah. That's how we keep
the pain away. Yeah. So that's a pretty extreme
compressor setting. But as you see what I did, I turned down the
threshold to a low volume. So that means basically
everything that's coming into our compressor is
gonna be under this volume. So it's compressing
the entire thing. And I turn the
ratio really high, which means there's a lot
of compression happening. So as you can hear it
sounds a lot more squished. Making music. Can we do it every day
before making music? Can we do it every day
after making music? And we do it every day? And if your compressor is changing the volume
of the sound a lot, you can use this setting, the gain at the end to adjust the volume so that
it's not too loud or too quiet to get it
to an even volume after your compressor has done
the work that it's doing. And the attack setting
just determines how fast the compressor
is going to take effect. So if a loud sound comes in and it's set to a
really low attack, it's going to turn that
sound down quickly. But if the attack is set
really high, for example, over here, It's going to, it's not going to turn
it down right away. It's going to let some of
those quick loud sounds through and then it's
going to start to turn it down 200 milliseconds later. For example, if you want
to preserve some of the the transients are
the peaks in your sound. You can turn down the attack to let the sound
breathe a little more. Or if you want the compression
to be fast acting, you can turn it down to a low attack setting,
making music. Can we do? So let's play this vocal
that's now been dequeued and compressed over top of our beat to hear
what it sounds like. Making music again,
we do it every day. Making music and we do
it every day. Yeah. Now I can use the volume fader here to turn it
down a little bit. It's a little bit louder
than our beat now, making music, can
we do it every day? Making music? It sounds good,
it's nice and tight and it stands out over the beat. Let's turn off these plugins just for a second so we can here without those making music
and we do it every day. Making music. Yeah, we do see it doesn't sound quite as tight over
top of the beat. It's almost sounds like a little weak or a little unpolished. Now we turn those back on
and give it another play. Making music again,
we do it every day. Making music. Can we do it every day? Yeah. Yeah. That's how we
keep the pain away. Yeah. Yeah. It sounds a lot tighter now that compression might even be
a little too much like, that's a little bit, that
sounds very squished. But experiment with this and don't be afraid to
put the settings to a pretty extreme
level because in a lot of pot mixes
and hip-hop mixes, compression is a super
important part of it. And mixers are using
a lot of compression, especially in the modern era. So don't be afraid to slam
your compressor a little bit.
16. Auto Tune: Okay guys, so the
next plugin type that I'm going to talk about, one that's super important
nowadays that everybody is using is called auto tune
or pitch correction. So I have my vocal here, but it's not pitch corrected, and I'm not the best
singer in the world. So we're going to
want to tighten that up a little
bit so it sounds a little more modern
and tight and clean. And I'm like I'm hitting
all the notes perfectly making music and we
do it every day. So the first thing
that we need to know when we're going to use some pitch correction
is we need to actually discover
the key of our song. So that's gonna be
the key that the instrumental we're using
has been written in. Now a key is a
musical thing that is a certain selection of notes. And the key is going to allow our pitch
correction plug-in or our Auto-Tune plugin
to snap our voice to the correct notes for
that key of the song. Because there are gonna be more notes than are in that key. And there's gonna be
notes that we don't want to have our voice snap too, because those are gonna be wrong notes and they're
going to sound wrong. We need to get the
right key so that our pitch correction snaps
our voice to the right notes. So how do we find out the key? Well, there's a really simple
way to find out the key. And that's by using a website that is going to tell
us what the key is. I found this website
called tuned bad. Now this website is super handy for finding the key and
the BPM of your song. So click on key and BPM Finder. So we have our B here, Post Malone x the
weekend type B. We drag and drop it
into tune bad.com. And it's gonna give us the key, so D minor, 130 BPM. So now we can take this D minor and go back to GarageBand. And click this key setting
on the top center here, we're going to set our
key to that D minor. And then we're going
to have to switch to a different window here. Then the plugin settings, we're going to have
to go to the top. And here you see the
plugin settings. We're going to have to
click on this scissors for editors. Click on that and then
turn on limit two key and turn on enable flex. And then we're going to
take our pitch correction slider here and we're
gonna put it to a 100%. And then we're going to hit play and hear what
that sounds like. Now that our key is set and
our settings are turned on. Making music again,
we do it every day. Can we do it every day? That's how we keep
the pain away. Yeah. Yeah. That's how we
keep the pain away. Yeah. I sound Pro now. I sound like Lil Wayne. Sounds perfect. Making music. Gail, we
do it every day. Now. That's a pretty strong
Auto-Tune setting. If we wanted to make it
a little less strong, we can just turn this
slider back a little bit. Let's try like 70% making music. Can we do it every day? Making music and we
do it every day, it's still a little picky. I'm gonna try 80% or 85. Making music. Can we do
it day? Making music? Can we do it every day?
So that's pretty good. That's how we keep
the pain away. Yeah. That's how we keep
the pain away. Yeah. Yeah. That sounds good.
That's perfect. What I'm gonna do is I'm
going to show you how to do this as well in logic. And I'm going to
show you with the logic pitch correction plugin because I know not everybody
is using GarageBand. And the thing about
GarageBand is it's not a full professional
suite of software like logic is GarageBand
has limited settings. And so the way that you enable the auto tune in GarageBand
is a little strange. Having to go to this menu, there's a simpler way
to do it in logic. So I'm going to show you
how to do it in logic now. So I've now opened the same
thing inside of logic. And what we're gonna
do is we can see here on the left
are plugin chain. So in GarageBand, this plugin chain is
a little bit hidden. They like to show you
the smart controls, those bigger controls because
it's a little easier. But in logic you can see your whole plugin
chain here at anytime. So we have our EQ compressor, we're going to open up the plugin called
pitch correction. So pitch folder and
then pitch correction, open it and we get
something like this. Now this is what most
Auto-Tune plugins look like. You're going to have
like a keyboard here. You're going to have
a response time. And then you're gonna
be able to set the key of the scale that you want
to snap your notes too. So same as before. We're in D minor here. So we're going to
click natural minor, which is just the same as minor. And we're going to turn our
response time down to 0. And now here with
this sounds like. So there we go. Now, if you don't know
the key of your song and you're just trying
to figure it out by ear. What you can do is
you can just choose either major scale
or natural minor. Basically, 99% of pop songs or hip hop songs are gonna be in either the major scale
or the minor scale. And you can just set it
to that and flip through the keys until it sounds
like it's in the right key. It's gonna be in one
of these keys within the minor or major scale
ninety-nine percent of the time. So if you think that
your ears good enough to hear what it sounds
like, it's in key. Most people can,
you can just set it to either minor or major. Minor and major are
technically the same scale. They're just kind of inverted a little
bit from each other, but they have the same notes
at the end of the day. So you can either
choose a minor or a major scale and then flip through the keys until it sounds like it's got your
voice in the right key. So that's a little
bit about how to set the Auto-Tune setting AND logic. Now, other Auto-Tune plug-ins like Antares Auto-Tune
for example, which is a more
professional third party Auto-Tune plugin is going
to work the same way. You're just going to set the key and then you're going to
set the response time. And the lower the response time, the more Auto-Tune
it's going to sound, the higher the response time, the less it's going
to be snapping your notes really fast, the more it's going to let them breathe and it's going to sound a little bit less
Auto-Tune that way. Now just a little side note
regarding finding the key I suggested that you use to combat and you
drop your beat in, and it's going to give you the key of D minor,
which is correct. But if you play instruments, if you play guitar or keyboard
and you have a decent ear, you can maybe just find
the key owed by yourself. You can hit play on
your beat and you can jam out on your instrument a little bit and just
listen and you can probably figure
out what the key is. If you have a bit of experience playing the keyboard
or playing the guitar, or playing another instrument. If you know a couple of scales like the major scale
or the minor scale, don't be afraid to try to find
out the key for yourself. But if you don't know
where to start or you have no training on a musical
instrument whatsoever, then a website
like tune bat with an analyzer is a good way
to get started and to find a key for your song
so that you can set your auto tune and start having your notes being snapped
into the right key.
17. Reverb and Delay: Okay, So we're back
in GarageBand here. And now I'm going to
talk a little bit about reverb and delay. So these are plugins
that allow us to give our sound or a recording
a little bit of space. Reverb is a plug-in or an effect that
simulates what it would sound like if our recording was inside of a certain
acoustic space, like a room or a gymnasium, or maybe a cave, or maybe the Taj Mahal where
you clap and then you hear the sound echo with
reverb for a minute. Or maybe you're in a tiny closet and there's just a little it sounds like you're in a closet. This is what reverb does. It simulates the sound of a room and it allows us to give
a little bit of space in our mix and allows our ear
to identify a sound kind of standing out from the rest of
the other sounds because it sounds like it's lifted
up. It's in a room. It has a bit of a
space around it. And it gives us a little
bit of a lift in the mix. So what we're gonna do is we're gonna go to our track here, and we're gonna go to
our list of plugins and we're going to
open a new one. And we're gonna go into
our menu that says reverb. And we're going to
open space designer. So Space Designer is
a reverb plug-in. Now in logic, there is a version of Space Designer that has a lot more settings available to you if you want to
upgrade to logic. But in GarageBand we have
this simplified version of spaces honor that we're going to play around
with a little bit. So once again, we can just
play with the presets. Let's go check out
mediums, spaces, rooms, a nice room. That's a great one. Let's solo our vocal here and hear
what that sounds like. Making music. Can we do it every day? Making music? Can we do it? Now you can hear that it
sounds like it's in a room. Now we have dry output. Dry means that's the
signal without the reverb. That's the signal
unaffected by the reverb. Reverb output is the
volume of the reverb. So if we turn this all
the way down the output, you're not even going to hear
the reverb making music. Can we do it every day? Now? We can slowly start to raise up our reverb output until
we have a good level of reverb that we're
happy with making music. Can we do it every day? Making music? Can we do it and it
sounds pretty good? Yeah, yeah. Maybe it's a little bit
too much reverb or too long of a reverb for our song. So we can go to the length
setting in here and actually turn down the length so that the reverb last for less time, so that it hangs in
space for less time. Maybe we only want 800
milliseconds making music. Can we do it every day? So that makes our room
sound a little bit smaller, actually making me and we
can actually turn that down. Let's turn up the reverb so we can hear this a little better. We can turn that down to like a 100 milliseconds and see
what that sounds like. Making music, can
we do it every day? So that almost sounds
like you're in a closet or something
making music. Can we do it or a small room? We can go to like
300 making music. Can we do it every day? Making music? Can we do it every day? Yeah, that sounds interesting to you can play with
these settings, play with the length and
the volume of it to put your sound into a space
that matches your song, that sounds good with
your instrumental in with the rest of your
vocals in your song. So let's turn this down. Let's make it a
little bit longer. Making music. Can we do it every just give it a little bit of light
ambient making news and I'll unmuted here and we can hear what it sounds
like over top of there be using GAN, we'd do it. So I'm going to actually
level these out a little bit. Our Beta, little too loud music. Can we do it every day? Making music? Can we do it every day? That's how we keep
the pain away. That's how the pain away. Making music, Gail,
we do it every day. Making music. Can
we do it every day? That's how we keep
the pain away. Yeah. That's how we
keep the pain away. Now without the
river making music, can we do it every day? Sounds very flat
without the reverse. Making music? Can we do it? We add it back. Making music. Can we do it every day? Gives him more of a vibe. You know, it makes it feel
like it's in a space. It gives it a vibe. It
gives you a little bit of a trail behind it and
makes it sound cool. Making music. Can we do it every day? Making music? Can we do it? That's how we keep the pain. Okay, So that's a little
bit about reverb. Feel free to experiment. Okay, Now the next plugin, which is in the same category
as reverb, is called delay. Now the reason these are in the same categories because they both provide something
called wetness to a sound, which when this basically is
just a trail or making it sound like it's
lasting longer and space reverb creates
the vibe of a room, makes it, how's
this acoustic kind of trail behind the sound? Delay actually takes the sound and we'll repeat it
after that sound occurs, also known as an echo. If you imagine you're
in a giant canyon and you say echo
across the canyon. And then you hear
after your voice comes back to you as echo. Echo, echo. That's what a delay is, or an echo is
another word for it. It's basically just a sound
repeating a few times. So what we're gonna
do is we're gonna go into our plug-ins here
and we're going to open a plugin called echo
in the delay folder here. Now we open echo and let's just hit play and
see what that sounds like. Let's solo or track. What
does this sound like? Make, make, make,
make it okay, cool. So you can hear
already it's echoing. Now that might be a little
intense for our song. So some of the settings
we can play with here, we have dry wet as usual. Dry is just the original
sound without the echo. Wet is the volume of the
echo. So let's try that. Making music. Can we do it every day? That's a little
more subtle music. Can we do it every day? Yeah. Yeah, that's how we
keep the pain away way. That's a little too
much. That's how the color is going to be. Basically how much high
frequencies and how much low frequencies are in
the sound of our echoes. So let's just turn up
the wetness a little bit and let's play
with the color knob. Making news exam. We'll do it every day because all the music camp or
echoes a lot darker now, making music, can we do it every day or can make it
brighter? Making music? Can we do it every day? Making music? Can we do it? And that's
how the pain away. Now repeat is how many times is it going to echo after
the original sound? If we turn it to a 100%, it might just echo forever.
Let's have a listen. Making music. They do it
every day. Making music. Can we do it? So I was
just going to keep going. That's very extreme. Sometimes that's
fun to play with. But for our purposes
we're probably going to have it be sad
a little bit lower. Making news exam, we'll do
it every day. Making music. That sounds pretty good. But my one thing about
that echo is that it's a little bit hyper like it's
a little bit cluttered. So what we can also do is
play with the time here. Now it's set to 1 eighth. We can set it to one-quarter. Now this is the duration of how much of a space after
the sound is there gonna be? Is the Echo are going
to appear after? So right now it's
set to 1 eighth, that means an eighth note. So let's try setting
it to one-quarter. Making music. Can we do it every day? Day? Now I like that better. That sounds more natural to
me and I would probably go for the one-quarter
setting in this song. And honestly most times when I'm setting a delay or an echo, I'm usually aiming for the
one-quarter setting that seems to be the
most common setting that I personally am using. Making music, Gail,
we do it every day. Making music and we
do it every day. Yeah. Yeah. That's how we keep
the pain away. Yeah. Yeah. So that sounds good. I like to usually keep settings
like this pretty subtle in my reverb and
delay for vocals in a mix. And I think that sounds amazing. It's giving us a
bit of ambiance, a little bit of trail
behind our vocal in it. A little bit of cool factor,
same with the reverb. It just gives it a vibe. So if we take the echo
off making music, can we do it every day? At it back? Making music? Can we do it every day? Cool, making music now
it's played in our mix. Making music. Can we do it every day? Making music? Can we do it every day? That's how we keep
the pain away. That's how the pain away. Making music. Gail, we do it every day. Making music. Can we do it every day? Awesome. So that sounds good. Now, just as an
experiment and let's try to take all the
plugins we added. There's five here.
Let's just turn them all off and hear what it sounded like before
making music. Gail, we do it every day. Making music and we
do it every day. Yeah. Yeah. That's how
we keep the pain away. So that doesn't sound
like a finished song, that sounds raw,
that sounds rough. It just doesn't sound polished. Now let's turn them all back on. Adjust our volume here. Making music. Gail, we do it every day. Making music, can we do
it that sounds polished. For some reason, we're actually
losing a bit of volume. I think it's the compressor. I had this gain turned
down quite a bit. Making Music, Gayle,
we do it every day. And then each track
is a volume knob, so we're just going to
adjust this one as well. Making music, Gail,
we do it every day. Making music. Can we do it every day? That's how we keep
the pedal way. Yeah. That's how we
keep the pain away. Making music, Gail,
we do it every day. It was like night and day music. Can we do it every day? Yeah. Yeah. That's how we
keep the pain away. That's how we keep
the pain away. So one sounded not like a finished song and then
after the plug-ins, it sounds like a finished song. I mean, maybe not 100% done. Obviously, we can add
more parts to our song, but just in terms of the
quality of the vocal recording, that sounds a lot
more polished now.
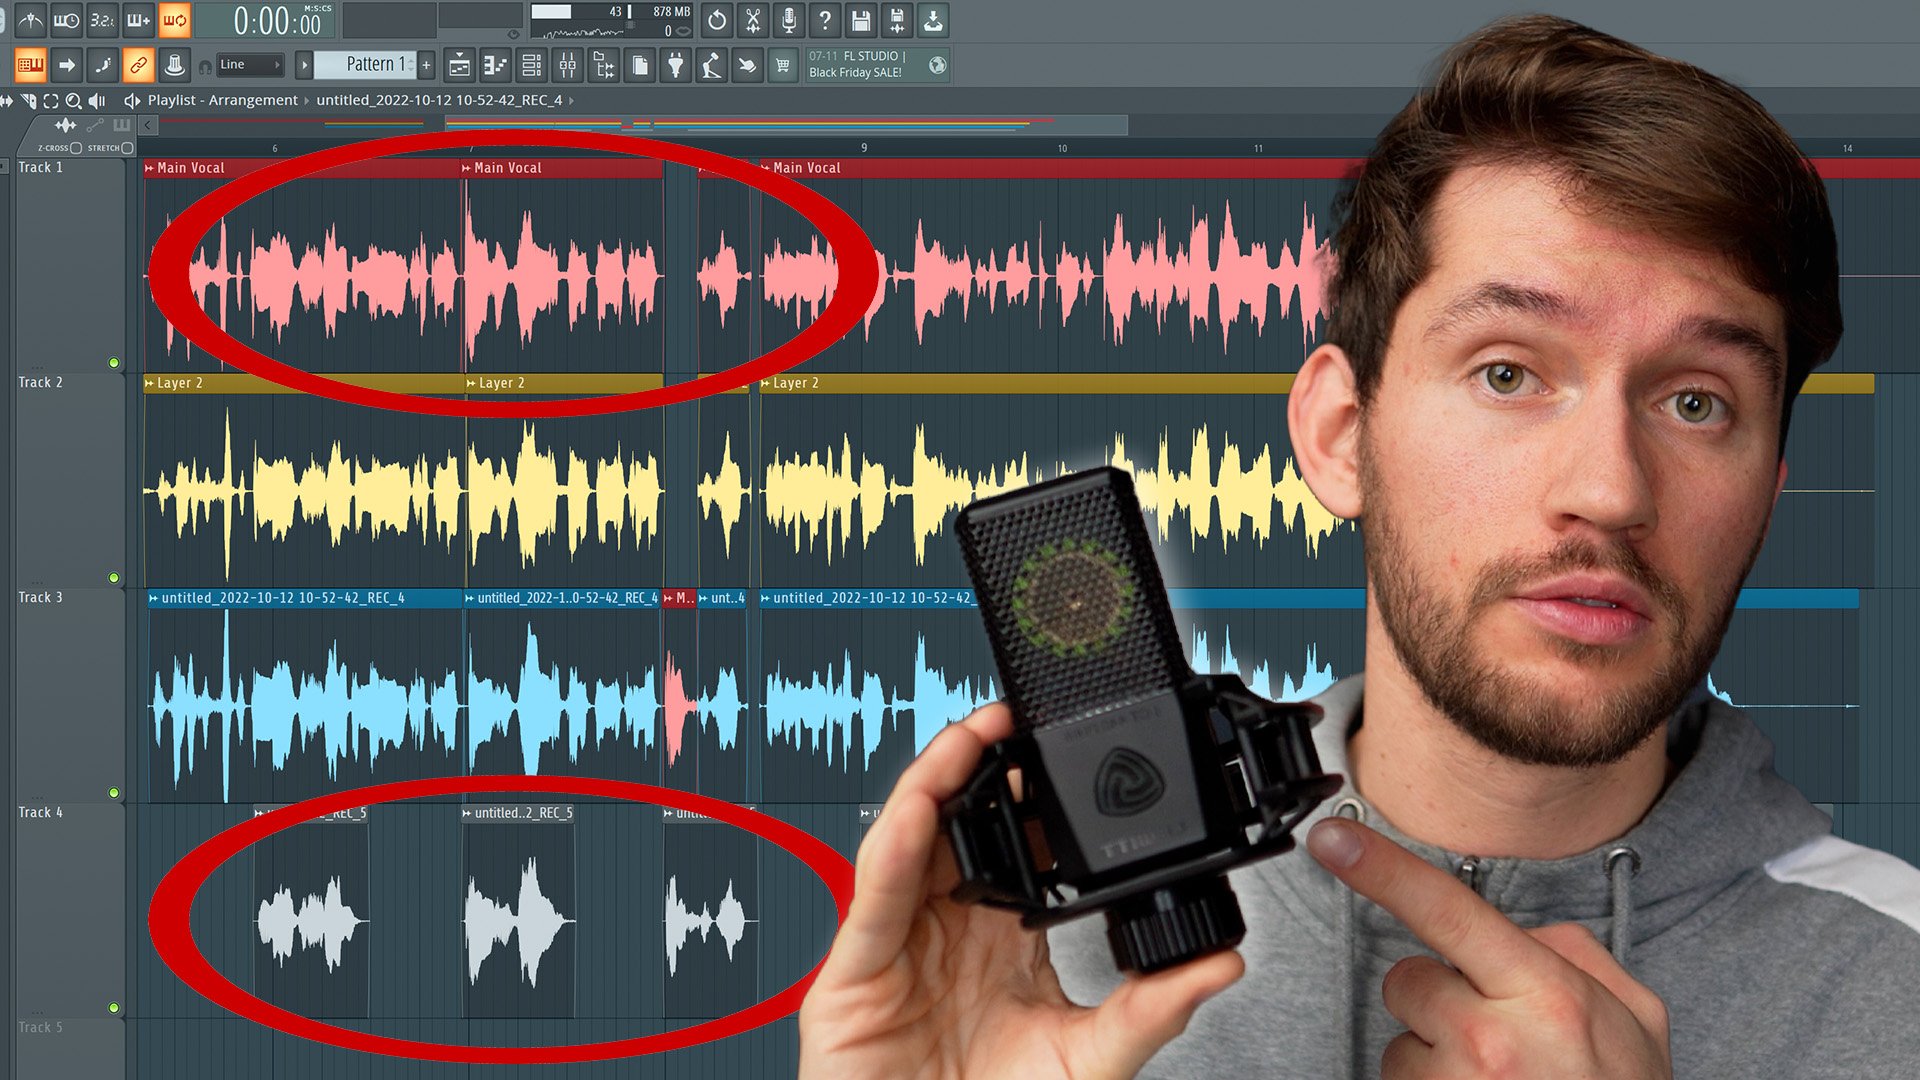
18. Layering and Vocal Production: So now that we
know a good amount about using plugins to mix our vocals and about actually
how to record those vocals. I'm going to get
into a little bit about some techniques
that we can use to make our vocal recording
sound thicker or more, even more polished. There's a couple of
techniques we can use. The first one that
I'm going to dive into is called layering. So what layering is, is we can actually take a vocal part like
what we have here. And we can record it two more
times, exactly the same. And we can take all three of those recordings and layer
them on top of each other. So what I'm gonna do
really quick is I'm actually just going to record this part again two more times. And then I'm going to show
you how to layer this vocal. So I'm going to actually
take the check that we have and I'm going to
duplicate it twice. And I'm going to record the
part again two more times, one time on each
of these tracks. Okay, so now we have two
more of the same part, except it's a
different recording. It's not going to be
exactly the same, but I said the same words with the same melody in
the same rhythms. So these are gonna be able to
layer on top of each other. Now, let's solo each
one of these and listen to how they sound
altogether making music. And we do it every day. Making music and we
do it every day. Yeah. That's how we keep
the pain away. Yeah. Yeah. Okay. So already that sounds quite a bit thicker
than it did before. If we mute these
two making music, can we do it every, Then add the other two making music and we do it every day, quite a bit larger. And then beyond just
simply layering on top, what we can do is we can
then pan these layers. Now, pan is basically
just taking a sound and deciding whether
it's gonna be exactly down the
middle of your mix, meaning it's going to be equal
volume in both headphones. So it sounds like
it's in the middle, or you can put it all
the way to the left. So it's only coming
out of your left ear, are only coming out of your left headphone going
into your left ear. And that'll make it
sound like it's fully on the left side or all
the way to the right. Let's just listen
to what panning this first layer completely
to the left sounds like. So I'm just going
to take the pan pot here and I'm going to drag
it all the way to the left, making music and we
do it every day. Now that's only in our left ear. Drag it all the
way to the right, making music and we
do it every day. So now we see what
we can do here. We can put things somewhere in our mix to the left
or to the right. Now, if I take
these layers and I put one of them all
the way to the left. And I take the other
one and I put it all the way to the right. That's going to make a very wide sounding vocal
layer, making music. Can we do it every day? So now that sounds very wide. All of a sudden make, and what I can do is
I can add back in the original vocal
right down the center, and then keep each of these to the left and to the
right respectively. And let's listen to how
that sounds making music. And we do it every day. Making music and we
do it every day. Now that sounds way bigger
than it originally sounded. Let's listen to the
original making music. Can we do it every day, straight down the middle? Let's add those in. Making music and we
do it every day. Now it sounds huge. So that's amazing. That's an amazing trick for making our chorus vocal
part, for example, sound way bigger and make it sound like a core
is like it's in your face. That's the part of the
song that you want to explode and sound big and triumphant and
in people's faces. So this is a trick that you can use to make it sound
really wide and big and really catch people's attention
with your vocal part. Now sometimes we might actually turn the volume of these down a little bit so they're not
overshadowing our main vocal. We might turn them down to like, let's try negative seven
on each of the layers and then keep the middle
one a bit louder. Making music. Can
we do it every day? Making music? Can
we do it every day? Yeah. Yeah. That's how we keep
the pain away. So let's hear that
over the beat. Making music. Can
we do it every day? Making music? Can
we do it every day? Yeah. That's how we keep
the pain away. That's how we keep
the pain away. Making music. Can
we do it every day? Making music? Can we do it? That sounds massive. So that's the first vocal
production technique that you can begin to use. That's called layering. Now the next vocal
production technique that I want to talk about. Something called ad libs. Now what we can do is
we can actually add some vocals in the background
that kind of pop in, in-between our main vocal lines. That helped to just
accents certain words or help to create even
more ambiance in our mix. So we're going to
make a new track. And I'm going to
record some ad libs. Now, ad libs can be
something where you're repeating the same word
that was in the main vocal. Or you can come up with
a new word that might be related to the lyric that you were singing in the main vocal. Or you could actually
just hum a note. You might not even
be saying a word. Or maybe you're
saying like, Oh, oh, just in the background to just kinda accent
things in adult, even a little bit more
spice to your recording. So I'm just going to do a little improvisation
here and just try to come up with some
ad libs that I think are cool in our
chorus sound here. Making music. Can we do it? Okay? Yeah, yeah, Good Music. Gayle, we do it every day. Yeah. Yeah. Yeah. That's how we keep
the pain away. Away. That's how we
keep the pain away. Thinking music. Yep. Okay, cool. So let's hear what
those sound like. Now, keeping in mind, I've, I've copied these
axioms settings from my other tracks onto
this track as well. Making music. Can
we do it every day? Every day? Making music? Can we do it every day? Every day? That's how we keep
the pain away. That's how we keep
the pain away. Yeah, we do it. So that sounds good. I like how that sounds. What I don't like those I don't like how this is cut off
at the very beginning. So what I can do is
I can actually move my play head where I
want to cut this off. And I can click edit and click
Split regions at playhead, also known as command
T for the shortcut. Click that. And now it's split my region here and I can
actually delete this. So it's not
cluttering up things. Making music. Can
we do it every day? Every day making music? Can we do it every day? Nice. And so what I might
wanna do as well is with my ad libs because
it's not the main vocal and you want it to
sound a bit different. You want it to sound like
maybe it's in the background. You don't want it to
clutter your main vocal. So I can actually tweak the settings for this
track specifically. Maybe give it a louder
reverb that's a bit longer. Making music. Can
we do it every day? Every day making music, maybe turn it down in volume
quite a bit compared to the other vocals making music. Gail, we do it every day, every day making music and maybe give it even more echo
compared to the others. Just so it seems like it's
fading into the background. Making music. Can
we do it every day? Every day. Making music? Can
we do it every day? That's how we keep
the pain away. That's how we keep
the pain away. Making music. And then what we
can even do is use something called
modulation effects to make it sound even a bit more different and put it
into its own little world. So what I like to do is use
something called chorus. One of my favorite
effects by far. Let's try to put a chorus
on top of this track. On top of all the
other effects that we already have on this track. Making music. Can
we do it every day? Making music, Gail,
we do it every day. That's how we taking here
something very wide. Keep the pain away. Making music, Gail,
we do it every day. Making music. Can
we do it every day? Yeah, that sounds,
that sounds cool. It gives you a wider effect. Turn up the intensity.
A little too much. So it's giving you
a good width to it. Then what we can even do, something I'd like
to do as well is to use an EQ and really cut a lot of the other
frequencies out specifically for these ad libs that are going to be more
in the background. You can do some pretty
extreme E queuing on them like this, for example, just cut out a lot of the
top and the bottom and put them into their own
little frequency range. So they're not interfering with your other vocal parts here. We're gonna boost
in the middle here. Let's hear it with the Mix Sway. Making music. Gail,
we do it every day. Making music, but
do it every day. That's how we keep
the pain away. That's how we keep
the pain away. Making music, Gail,
we do it every day. Making music and we do it every. So, yeah, that really
brings things up a notch. I really like how that ad lib is kinda filling out the course. Now, I'm going to talk about one final vocal production
technique here. That's called harmonies. So I really like how my
course is sounding right now, but I think it's kind of lagging a little bit
in the second half. And I wanted to do something
in the second half to bring it up a notch. I'm just going to
make a new track with the same settings
as the main vocal. And it's going to
be called Harmony. And what I'm gonna do
is I'm going to record a little harmony over the
second half of the chorus, over the ends of
the vocal lines. So what a harmony is basically, it's just taking the same notes that you're singing
in your main melody. And it's taking those
notes and raising them up a couple of notes in your key so that the notes layer
over top of each other and create
two notes out once that sound pleasing together and create a group of notes or a chord using your voice and using the vocal notes that are layered on
top of each other. So I'm going to
record a harmony. I was able to find
one just by singing. I'll kinda show you right now. That's how we keep
the pain away. That's how we keep
the paint away. The pain away. So I'm going to record that. Do it every day. That's how we keep them away. That's how keep the pain away. That's how we keep
the pain away. That's how we keep
the pain away. Yeah. Yeah. Okay. Cool. But that pan back to 0, so that's how we keep
the pain away. That's how we keep
the pain away. Yeah. Okay, Interesting. So I saying my harmony and
for some reason garage bands Auto-Tune was snapping
it to the wrong note. So what I did was I just
unchecked limit two key. And that opened up the Auto-Tune to snap it to the wrong note. I'm not sure why, because
the node that I'm singing it is actually
in the key of D minor. But for some reason, GarageBand is not wanting to snap that
node to the right note. So I unchecked limit two key and now it
seems to be working. So I'm actually going to
re-record my part now, and I'm going to just
keep limited key unchecked for the harmony
track specifically. Now you might have to play
around with this depending on whether or not the Auto-Tune is doing what you want it to do. You might have to Jimmy
with the settings. You might have to change the
pitch correction slider. You might have to
uncheck limit to key or even play with
this enabled flex, just trial and error until you get the
results that you want. But I'm going to
re-record this part now. Do it and that's how
we keep the pain away. That's how we keep the vein. That's how we keep
the pain away. Honestly, I'm just
digging the second one more. It's the same thing. So what I'm gonna do again, I'm going to split this
region using Command T. Delete the first one. And I'm going to just
copy this one into the first place as well. So I'm going to click and drag, and I'm going to click Option. And I see the plus sign show up. I'm still holding
it with my mouse. I'm going to hold Option, see the plus sign and
then let go of my mouse. And it's going to copy that. So now these are the
exact same thing. That's how we keep
the pain away. That's how we keep
the pain away. Yeah, Perfect. Making music, Gail, we do it in a volume
dominant harmony. Making music, Gail,
we do it every day. Yeah, that's how we
keep the pain away. That's how we keep
the pain away. Music, Gayle, we do it. So that just brings
the second half of our course even
up another notch. You know, that's, that's great. We're just adding all
these little things that make it more
interesting to the listener. Imagine if we were just mute all these tracks
that we added. We just had our main vocal
and we had no plug-ins on it. And this was our
solvent making music. Can we do it every day? Making music? Can
we do it every day? Yeah. Now that sounds rough. Turn the plugins back on, turn the other tracks back on. Making music. Gail,
we do it every day. Making music, can
we do it every day? That's how we keep the paint. No way. That's how we
keep the pain away. Make it sounds 20 times better, like it sounds like
a finished song. I mean, my lyrics might
be a little corny. I just did them quickly for
the sake of this lesson. But I mean night and day between adding plugins and
adding a little bit of vocal production
with a couple of layers and add lib track
and a harmony track. And it sounds 20 times better. I think it almost
sounds ready for release. It sounds amazing. Obviously, we still need to add a verse part and an intro and different
parts of the song. But just in terms of
vocal production, this is sounding quite
a bit better now.
19. Mixing: Okay guys, Now I'm going to briefly go over some
mixing techniques. We've already touched
on a bunch of them, but I'm gonna kinda
just summarize a couple main mixing techniques together for you in one video. So let's close this. So the first concept
or main tool that you can use when you're mixing
is the volume knob. So each of these tracks here you can see
we've got our song, we've got the beat, we've got the vocals, various
different vocals. Each one of them has
this volume fader. So when we go to mix our song, the first thing that we
really want to do is just listen to the volumes of
all the different tracks in our project and just adjust them so everything seems like
it's in a good spot. Now, we can just
start with our beat. We can mute everything else. We can just enable
tracks one-by-one, listened to how loud the volume is and adjust accordingly. So we'll start with
our beat here. Let's hit Play. Now let's
enable our main vocal. That's how we keep
the pain away. Yeah. Yeah. That's how we the
pain away. Yeah. Yeah. We do it every day. Making music. Can
we do it every day? Now let's turn on our layers. Making music, Gail,
we do it every day. Making music, Gail,
we do it every day. That's how we keep. This might be a touch loud. I don't like to notice
the layers to too much. So I'm going to turn
them down a touch. Making music, Gail,
we do it every day. Making music, Gail, we
do it every day. Yeah. Yeah. That's how we keep. That feels good. Now, let's
listen to the ad lib. Making music, Gail,
we do it every day. Making music, Gail,
we do it every day. That's how we keep
the pain away. That feels like a good spot. I just turned it down
a little bit there. And now let's listen
to our harmony track. Do it every day. That's how we keep
the pain away. That's how we keep
the pain away. Yeah. I think it's a touch loud, so I'm just going to turn
it down a little bit to compare it to the main vocal. I don't want it to distract
from our main vocal. I just wanted to
add to it a little bit but not be too noticeable. That's how we keep
the pain away. That's how we keep them, hey, no way, yeah, cool, making good and
we do it every day. Making music. Can
we do it every day? That's how we keep
the pain away. That's how we keep
the pain away. Yeah. Okay, That sounds great. Now the second
principle of mixing is to control the
low end in your mix. So a lot of times if we
have a ton of tracks, what can happen is we can get something called
low-end buildup, which means that there's
gonna be low frequencies in some of our recordings that
we don't actually need. But they're all
going to be built up across many tracks and
they're going to start to come together and cause a bit of a rumble or a low-end Hmm, that's going to
muddy up our mix. And it's something that
we actually don't need. What we wanna do is just
find where we need the base, which is generally going
to be in our beat. There's gonna be a, a bass
instrument in our beat. And that's what we want to
take up the base frequencies. And then we want to remove the base frequencies from
almost everything else in our mix so that there's
room for the base and the instrumental to breathe and so that we don't get
that muddy buildup. So what we wanna do is just
go into the settings and make sure that in our EQ that
we have done the low cut. So let's double-check
this. Let's solo it. Maybe we can even take off a little more low-end
making music. Can we do it every
day? Making music? Can we do it every day? Yeah. Yeah. That's how we
keep the pain away. That sounds reasonable. And then on our layers, we can probably remove even
more low end on the layers because our main vocal
is already filling out the low end of our vocal. So why do we need
even more low end in two more layers,
making music? And we do it every day so we can take a bit
off there as well. Yeah, we do it every day. Grabbed this one. That's how we keep paint away. And you hear when I
did that P sound, it pop the microphone and it
created unnecessary base. That's how we keep
the pain away. We don't need that.
We can roll that off, maybe even a little more
off the other layer. That's how we keep
the paint away. Okay. Yeah. Yeah. That's how
we keep the pain away. And then on our ad lib, I believe we already rolled out for a bunch
of the low end yes, we did on our harmony. Because there are
harmony is even higher in pitch than
our main vocal. We can probably roll off a
little more low end from here. This How we can see
it's higher salary. I'm going to roll off
like around like 300. That's how we keep
the pain away. Yeah. So if we had left his
low-end like three hundred, two hundred one hundred m below on all these vocal tracks. There you'd be hearing
like a muddy rumble that is not necessary
in our mix at all. And that we can just clean
up and get rid of by doing low cuts on the
majority of our tracks. What we don't want to do is we don't wanna do that on our beat. Because if we do
that on our beat, we're gonna get rid
of all the base and our beats not going
to sound good anymore. It's going to sound weak. You don't want a song with
no base. That's no fun. That's how we keep the
panel want to leave that and that's how we keep
those good old way. Where you can do sometimes is momentarily at certain
parts of the song, you could remove the base. That's how we keep
the pain away. And then you can
bring it back down. We keep the pain away, kinda like a DJ
cut or something. But for now, just by default, don't, don't definitely don't take out the base of your beats. If there's a certain frequency in your beats,
That's annoying you. You can EQ the B2B. That's how we keep
the pain away. Sometimes what you wanna do
on the beat is actually take out a little bit of around one or two K and
maybe like around 1.5 k, because this can actually make a bit more room for the vocal. That's how we keep
the vocals tend to mostly stick out in the EU
like one to two k range. That's where you're
hearing them the most. So if you actually
want to remove that frequency from your beats, you can leave, You can create a bit more room for your vocal. Nothing too drastic,
but just rolling off a little bit there can definitely help clean
up and mix as well. That's how we keep
the pain away. That's how we keep
them pain away. That's how we keep
the pain away. That's how we keep
the pain away. That's how we keep
the pain away. That's how we keep
the pain away. Yes. Although this beat,
I don t think has too much frequencies
building up in that range, so we don't have
to do a ton there, but that's how we
keep the pain away. That's how we keep
the pain away. That sounds good.
Okay. So that's just a couple of notes about
adjusting the volume of different tracks
and about taking a loan out of tracks that you
don't need the low end in.
20. Mastering: Okay, Now that we've
spoken a bit about mixing, what I'm going to
talk about now is something known as mastering. Now this is generally
the final step, adjusting levels and
adjusting things. When somebody mixes a song, what they do after
the mix is complete is they'll send it to
a mastering engineer. And that mastering
engineer is going to put the final polish over the mix. And so what mastering essentially
means is mastering is just one track at the end of our session that all the
other tracks feed into. So you see all our tracks. We have the track of the beat, we have our main vocal, the layers, ad lib harmony. The sound from all of
them is ultimately going into one track
known as the master. Now, we can view
the master here in GarageBand by clicking
this little button, switching the view
from track to master. So now this is
showing our master. We can have some
effects on the master. This is master reverb, but what we want to
look at is output. So now we have Settings, and you can see
the plug-ins here. Now, these are an
EQ compressor and some other things including a limiter that are on
our master channel. So our master channel being the last single-channel that all the other channels
are going into. So what we can do is we can
affect basically the sound of the entire mix
altogether at once by changing settings of the effects that are on our master channel. And so the main purposes of
mastering our number one, bring the volume of
your entire song up and make it loud enough
so that when you play it back to back
with other songs, it's sitting on a good volume and so that you don't
notice some kind of dip in volume when your song plays compared to
all other songs. It's good when you're
listening to music if all the songs are
around the same volume, because then you can hear
everything and you don't have to keep adjusting
the volume on your, on your iTunes or whatever
you're listening from. So that's the first
purpose of mastering. The second purpose
of mastering is to balance the frequencies
a little more and to reduce the dynamic
range a little bit of the song or aka compress
it a little bit. Just help squeeze
a little bit of extra volume and a little bit of extra brightness and shine
out of the ultimate mix. So what I'm gonna do is
I'm just going to turn on these plugins one-by-one and just adjust them a little bit. And so you can hear
the effects of some of these mastering effects
on top of our mix. So I'm just going to play it and I'm just going to
start adding things. Yeah. That's how we keep
the pain away. That's how we keep
the pain away. Making music. Can
we do it every day? Making music, Gail? We do it every day. That's how we keep
the pain away. Yeah. That's how we keep
the pain away. Making music. Can
we do it every day? Making music? Can
we do it every day? That's how we keep
the pain away. That's how we keep
the pain away. Making music, Gail,
we do it every day. Making music. Can
we do it every day? Yeah. That's how we keep
the pain away. That's how we keep
the pain away. Making music. Can
we do it every day? Making music? Can
we do it every day? We keep the pain away. That's how we keep
the pain away. Making music, Gail,
we do it every day. Making music. Can
we do it every day? That's how we keep
the pain away. That's how we keep
the pain away. Making music. Can
we do it every day? Making music, Gail,
we do it every day. So that sounds a lot
bigger and more powerful. Now, let's disable all
those and have a listen. Making music. Can we do it
every day? Making music? It sounds good, but it
doesn't have the same power. Now let's enable
them making music. Can we do it every day? Making music? Can
we do it every day? I might have went a little happy with a couple
of those settings. But as you can hear,
it really just brings up the volume
and makes it sound louder and more powerful as the final stage in our process. Now remember, always use your ears when you're doing this. If it sounds like
over-the-top or something, then dial it back. You don't have to go too over
the top just a little bit, goes a long way. And this is going
to help your files after you export them to be a good volume and a good
balance of frequencies. So that when you play it back
to back with other songs, it's not going to
sound like drastically quieter or anything. It's going to sound
like it matches. Now just a quick note
about what a limiter is. A limiter is always gonna
be the last thing in our master chain and is one of the most important plug-ins
when it comes to mastering. Basically what a limiter is. Just a very strong compressor. So a limiter is going to
set a ceiling of volume. And then you can
turn up the limiter, which is going to
turn up the volume of all the sound going
into the limiter. And it's going to make
everything louder. But the limiter is
going to be like a brick wall and it's going to stop any sound from
going above that level, which is generally
around 0 decibels. You don't want to
go any higher than 0 decibels or else you're
gonna be clipping. So it sets that brick wall and then you can adjust
the volume higher. But the peaks of your
sound of your song, the peaks of everything going
in to your master channel are gonna be cutoff
and stopped at that 0. So it's going to make
everything louder, it pushing it up to this wall. But the peaks are not
going to surpass that. So you're not gonna
hear clipping, but it's going to be
quite a bit louder. So limiter is always gonna be the last thing in our
chain of mastering.
21. Exporting Your Song: Okay, so now that we've
completed our mix, we've completed her Master. We've got our tracks,
we've processed them. What we wanna do
is export or song. How do we export our song
and create a file out of it so that we can
then send it to our friends or show
it to somebody, or put it on iTunes or whatever you wanna do with
it, email it to somebody. So what we're gonna do
is first we have to select the part of our project here that
we want to export. So how we do that, we're
going to use these locators. We can just create our locators. We're going to export
our chorus part here that we recorded and then a
little bit extra after bit. So this process is going to
differ a little bit from DAW to DAW in GarageBand. The way we're gonna do this is we're going to click Share. We're going to click
export song to disk. And it's going to
open this menu. We can name our export. We're going to call it making
music V1 for version one. And we're just going to
export it to our desktop. Now we have a couple of
options for settings here. So a wave file is going to be the most high-quality
file that we can export. Twenty-four bit wav file, that's going to be the
most high-quality file. And you're gonna get
all the information in our music here in that file. Now, WAV files are gonna
be generally bigger. It could be 20
megabytes, 30 megabytes, 50 megabytes, depending on
the length of your song. If we want to create a
smaller size file that's more convenient for emailing
or texting to somebody. We can choose MP3. There's different
qualities of MP3. These lower ones like
low, medium, high. With those, you're
going to actually hear an audible reduction in quality that's not
going to sound very good if you're
exporting and MP3, I would go at least
for a minimum of 256. In other DAWs like logic, you would have the
option to actually export what's called a 320, which is even a bit
higher quality than this. Garageband is only
letting US export a 256 kilobit per second file, which is okay, we
can do that for now. And so what we're gonna
do is export this, we've named it,
chosen our file type. We are going to export
to the desktop. And I've final setting
exports cycle area. So cycle is actually turned on, so I think it's going to
automatically do that anyways, but what we can do is
just click that anyways, it's going to export
between the locators that we've set here of
our cycle or loop area. So we're going to click Export. It's gonna do its
thing bouncing. Okay, it's now been exported. And so what we're
gonna do, we're gonna go to our desktop. We see our desktop folder here. We see making music. V1 is right here. And what we can do is
we can just hit Play and our song should be
in there making music. Gail, we do it every day. Making music and we
do it every day. That's how we keep
the pain away. That's how we keep the pain away. Don't meet
her on the truck. Okay. Perfect. Now, we've recorded,
we've processed, we've mixed, we've mastered, and we've exported
our very first song. And there it is. Now we can send it
to our friends. We can put it on iTunes, we can put it on Spotify. Obviously, this is a
pretty quick version. We don't have averse an intro, a whole bunch of
different vocal parts. This is simply a chorus. But that just goes to show you all the different tools
and the process of how you can get from point
a to point B in recording and being
able to now send this, share this with somebody. This came out of thin air sound. We sang sound into a
microphone and now we have a digital file
that we can e-mail to our friends or
put on the Internet. So that's a beautiful thing. And there we go. This is the first
step in a journey. So that's amazing.
Now we have our file. Now we can play it on
the big speakers, baby.
22. Conclusion: Here we are.
Congratulations you guys, because you've made it to
the very end of the course. We've gone over a
lot in this course. Everything from
getting your first equivalent to setting it up, to booting up your computer
and recording something, to beginning to process
your recordings and make them sound more
polished and professional. I know there's a lot
to understand here. So if you're still
putting the pieces together, don't worry, recording music is very
multifaceted and it's going to take you a while to
wrap your head around all the little things
that go into it. But I think the most important
thing is just to start. When you get started,
you're gonna be able to figure out things along the way and cross each
bridge as you come to it. And if you get stuck anywhere, you can go back to
some of the lessons in the course and brush
up your memory. I'm super excited to hear some of the recordings
that you guys make. I'm sure they're
gonna be amazing. And just remember that having a recording is better than
not having a recording. That's the most important
step. You never know. This could be the start of
an amazing journey for you. Remember, if you
have any questions, feel free to reach out to me, give me a follow
on Skillshare if you enjoyed the course and you can find me across social
media at music by Milano. I hope you guys
have an amazing day and happy recording piece.
 MILANO, Music Producer & Songwriter