Transcripts
1. Introduction: he sends over. This is Did you will In here says go were right. How can we create at will our without using paper and well, im appropriate. I love to tell myself so here I am sure will use that bicep. How degree? Three administration using all your Do you want to know more about that? All right, this get started.
2. What's Quilling?: first things first. For those who do not know what willingness, let's do a brief. In truth, Quillin is a technique whereby strips of paper off different colors and sizes are girl curve folded. Well, basically beautify ending glued together or onto a background surface. The process requires a lot of patient position and careful handling off the paper, since its very sit across the strips. If you are not familiar with this that make, there are a few classes here, sq shirt but great for beginners. Also, if you need inspiration, take a look at Julia Brookes Kaya Sen, Aruna or Savina Carney works. There are geniuses off paper Grafton.
3. Sketching Basic Letters: in this class we will lose thes set of brushes, these color palette on a few templates. And I did especially for this class. You can the load everything from your projects section. Remember, these section is only available on the sketcher decks topside. Okay, I always a star making a sketch. So here it is. We will use it as a reference to draw the letters of line. We will turn on drawing guy to make the lions straight without using quick line all the time we will enable assisted drawing. Now every stroke we may will be lined up with the guy islands. We can customize one off the quick many buttons to enable un disable Join us. It's super quickly if you don't have said just ill to invoke quick menu goto actions preps Just the controls on top Quick, Many I've chosen the 1st 1 So when I top on the modify button, it appears happen. Hold any of the buttons stuck customized it. Since most capital letters are symmetrical, we can turn own symmetry moat to speed up the process Just vertical to outline at a value horizontal for any or quadrant for on H this is especially useful to create intricate letters. We cannot have turned on to the great and symmetry at the same time. So set agreed size for this glass. We're going to adjust it to 190 pixels. Now we are going to take a screen Shit cropped The image. 72 photos un inserted. I've already done it on Lock the layer to avoid drawing on it accidentally. Since this classes for wickedness, we will create very simple letters. I've met this being square on a next few lines to help us out now activates symmetry. Let's change the color of the axes, increase its picnics on a pass a day and choose vertical. Let's drawn in. I suspected we cannot get a men using vertical symmetry or kill way. And the editing moved switch to rotational symmetry and moved a blue point to the center off the square. Now we've gotten in. Here's the drawing guy. Do you feel more comfortable with Let's keep going. Drawing the letters. Don't forget to turn drawing assist on if you're using to the green mode, remember to make the diagonal lines using quick line to make the ark choose the O brush and crop. The part you don't need to make the O is the same brush
4. Illustrated Letters: Once we have our letters outline, let's make some fancy designs we can draw on Lee Inside the letter Onley outside the letter are both. It is easier if we just make the whole drawing in or out, because we don't need to cut anything out or to think how the strips intersect with each other. But who's afraid of the big bad wolf it, since it's not test A was the most voted letter or instagram and Facebook. So it is the one we're going to make. The first thing we have to do is to turn on the two degree on a sketch. Our design. I'm drawing a pumpkin with just a few coils. If you feel confident drama more detail, we are the knights of the design will be. But keep in mind that each language drawer represents a strip of paper. So if we try to many, we can end up with a two intricate design on feel overwhelmed. Now decrease the layer opacity and create a new layer. Ever choose the Quillin brush? Select a color unless straight the design to place the coils exactly where we need them to be. We will use liquefy so goto adjustments top liquefy and then choose Push increases size to make it coincide with the size of our coil. I'm simply drunk. The coil under it touches the A. We will also use rural to smooth our coils just tapping. Hold on a cooler, but don't hold it too long. Did you already make a mess? Don't worry. Just stop. Freeze it! Okay, that's keep going. I've decided to use lighter colors on one side, off the bunk in Sarka on the other side, on meters for the lines in between, but feel free to change them.
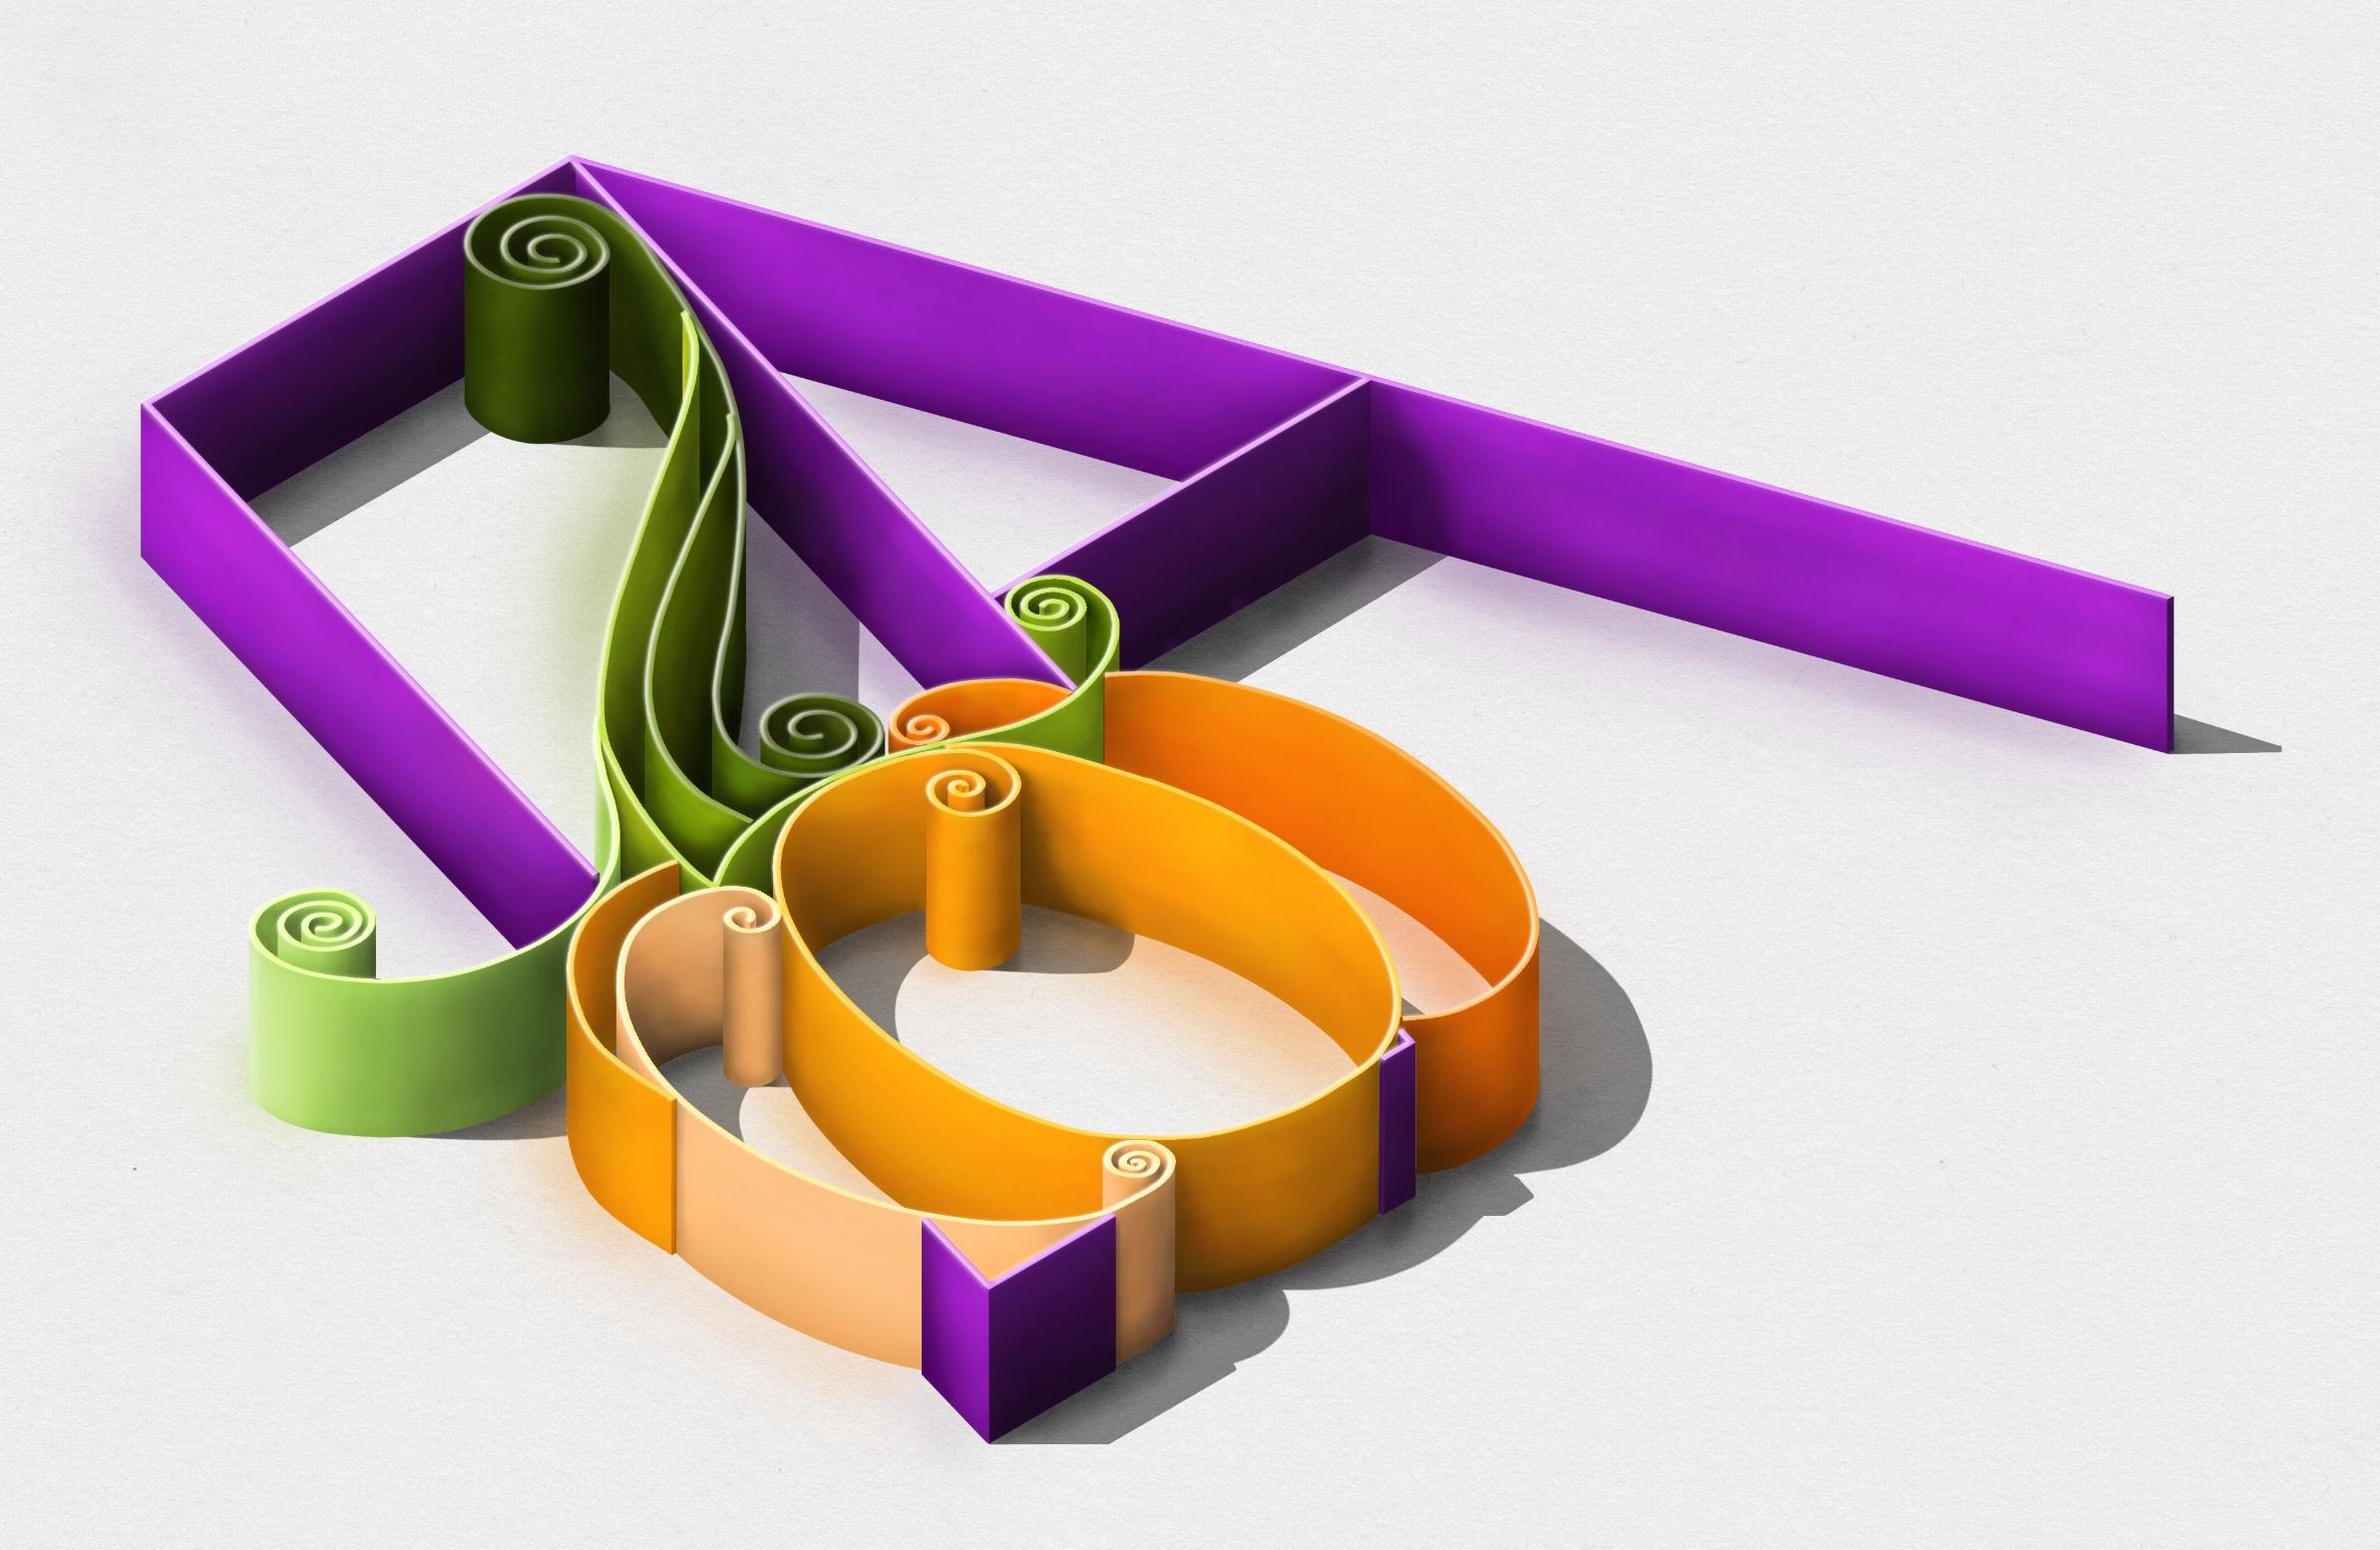
5. Intro to 3D Lettering: Do you have your templates done? Let's turn them into three letters. Enable is symmetric moon. Now our campus has turned into a mess off lines. But if we look closer, we can see lots of cubes. Activating, Join, assist. We can make that all our strokes lineup with basic islands, but we are not constrained to them. They are just to help us out. Okay, so we can draw our letters on the horizontal plane or on the vertical ones. As you saw, it's possible to draw our learners silently on this move. So why did we draw our template ing to the well? Try to make a no. It is, by formal, complicated right. It's easy to draw a straight lines. Even diagonals jets hold a still until quick line created pop ups, but it is quite lyrical to throw something more organic. Properly. To start drawing are letters we just need to decide on which pain we want to draw them or if we are going to combine them. A. O and n were the layers you liked the most on Facebook and Instagram. Thanks for your help, by the way, it was the winner. So it is the one that we will transform into three D
6. Drawing the A: turn, I say Magic Own said the greed size to 1900 pixels. I moved down the blue point. We are going to place our join on the's plane, so select a the pumpkin on the guys layers and top transform. Now let's rotate on the store. The image may coincide one corner off your template with a corner off the plane press holding drag on the blue points that are in the middle to share the image. The limits off our template must be Parlow to the chosen plane. Kip Trans woman The image until you have the pinks were perfectly fitted in the gray area. Now go to edit drawing that. We wouldn't say that with a power strips of paper. By modifying their size off the great, I will send it to 210. Duplicate the last by drugging and release them into the campus. Select the ones on the top. This will be the width of our strips, so we're going to move one off the templates to these points. And then we are going to join both templates with vertical lines to build the three. The image it looks of it messing out right, Let's clean up. Hi, the guides layers. Mm. We are going to strewed the A first so high the pumpkins to creates a new layer unturned drawing assist on Let's play connect the dots. We just need to draw vertical line guardian of each line. These way, we would join both templates and reveal our three the letter. At this point, we could already feeling our strips of paper with a base color using color drop, for example, I will keep my a color just for you to see it better. Okay, Don't painted yet. This time we want to create a more realistic illustration. So before adding color, we have to know where the light source is in order to draw the shadow and light areas properly to make these task is here we will imagine we have a diffuse light source, which means that all the lights race will be parallel. Create a new layer switch to to the green month unturned drawing and see stone. We will draw a horizontal lines at the end off the lines off the bottom letter UN inclined lines at the same points off the top letter to draw the lines with the same uncle off inclination Easily. We will rotate our great drug in the Greenpoint for more inclined. Withdraw the line. The longer will be the cast shadow. Once you are done, create a new layer on name. It cast shadows. As you can see, I've thrown green dots. Were the lines intersect? Let's play Connect the butts again. This is a shadow cast by our letter on the plane where we place it. Let's say on the floor some parts off this shadow are hidden behind the strips of paper, so we need to erase those parts. Okay, Does one more thing about cast shadows I've marked with pink dots where our shadow hits a strip of paper. At those points, the shadow will be cast on the strip instead, off on the floor, draw vertical line on, Join it with inclined. The one his way. We will be able to draw the part of the shadow that is cast on the strip. Now that we have our shadows and cash, a lose them you were, is the lines off the strips that should be hidden. As we said before, the light is coming from here. So these parts will be eliminated. And in contrast to that, these other parts will be in shadow because they don't receive dire it light. So what we are going to do is to change the color off the eliminated lines with light purple and do the same with the ones in shadow. But in that case with dark purple, duplicate the three layers and group them this way we will have a backup. Now let's merge the three less and feel all the surfaces with purple, but the ones in shadow. We will feel those with dark purple. Later on, we will add more detent to our letter, but now let's jump into the bunk in.
7. Drawing the Pumpkin: make your pumpkin less visible and switch to isometric mood. Create a new layer on Let's join both templates with vertical lines. If you are not used to doing things saying what lines belongs to the top play on which ones to the bottom can be tricky. So I recommend you to choose one off the punking layers on top on invert. Now it's easier, right? Most of the time are part of the line will be hidden behind a strip so we don't need to draw the hidden part. Okay, if you are not sure if the line will be visible or not, just throw it on the raised the hidden parts later. Once you have drawn all the vertical lines, go to the bottom punkin layer and he raised the lines that should be hidden when you finish . Invert the colors off the leg again. Now let's draw that cast shadows following the same steps that we did with the A. Such two to the agreement. Turn on drawing, assist on, draw some horizontal lines like I'm doing right now, Then rotate the great and keep drawing lines with the same uncle that we chose for the A don't forget to draw all these lines on a new layer. Okay, it's better to use a lot off last instead off drawing everything on the same way. We can always merge or you raise them later on without compromising the rest of illustration. Now, typically a one off the pumpkin. Less goto adjustments, hue, saturation and brightness. Onset saturation to zero. Move the great pumpkin and make it go inside with the points. Were the yellow lines intersect, that will be the cast shadow off our pumpkin. You raise the parts off the shadow that we cannot see because they're hidden behind the strips. Use this election to to select the shadow areas on. Fill them with great, create a group with all the layers related to the A drawing on. Hide it. See like now the pumpkins on the vertical lines. Layers duplicate them, grouped them unnamed. A group just in case or pumpkin copy or simply copy. Select. Now the top banking layer on increased its brightness. Remember that far receives Durrett light so it will be more eliminated than the rest. Merge the three less on let's start adding color to our strips, but first go to brush is a cylinder soap brush on duplicated twice. We're going to create one brush to shade dark areas and another one to eliminate their light areas off our joint. Enter on the brush Sutton's and go to general bread mood top. Enlighten on select add Changed the brass name. Do the same with the other one, but in that case, tap on difference and select. Subtract. This is something you can do with any brush on. It is super useful. Do not feel the areas off the banking in contact with others that have the same color. Let's see how it works. Choose a sub truck brush color and use a selection to in automatic moved to see. Like this part off the punk him now set the brush capacity approximately to eight. Bill sent on star shading the strip. If it is too dark, just switch to the soft brush, decrease its capacity and paint over. This is Strip has a part that will be in shadow on another one that will be eliminated for the 1st 1 We will use our subtract brush. I'm for the 2nd 1 hour. Add brush. Observe how the strict bends I'm trying to paint. Follow in that direction on. Remember, use these brushes with low opacity or you will get too dark or too bright. Results. Okay. Also, I recommend you to customize the quick, many frequently to speed up your drawing process. For example, we do not need to duplicate layers right now, so let's create a quick access to the brushes that we are using all the time in this class . Tap on cold top on select brush Quillin set and choose the ad brush. Here, the subtract brush. I'm here, the basic soft brush we can also set here the selection toe. - Once you're finished up a base color to the empty areas, UN repeated process. All the lights and shadows off our pumpkin are dumb. Good joke. Now let's add some lights and shadows to our A to But first we need to make a few changes. If we decrease the opacity off the pumpkin, you will see there are parts. Were the punking on the A overlap. We have to decide which of them should be visible in each part. On he raised the other one, so go to the a layer on top, Select now that we have only the A selected let's use the selection told to remove from this election the parts off the pumpkin that we want to keep visible now see, like the monkey layer three fingers Don't wants to activate the menu on Cut, said the layer capacity to Max and now let's at lights and shadows to our eight.
8. Finishing Touches: in this video, we will zoom in and fix a few tiny errors using this election toe under as much, too. Let's organize our layers, said the capacity of the cast shadows to Max, um, Murch. The less we have very thin lines that we need to get rid of. So select their so brush that pumpkin layer. Enter Alfa, lock on tap on this much bottom on. Let's make them disappear now see, let the cast shadows slayer, said the Brussels string line to Max on. Let's smooth our shadows outline. Guess what's missing here? Yeah, the shadow cast on the purple, stripped by the dark green. A strip. Let's troy Mm. I think it's too dark. Tap on hole on the selection battle to reload our last selection. Let's soften this shadow a little bit now it looks much better. Next step, improve our cast shadows. Choose this up. Truck brush. Turn Alfa Lock on. Begin to darken the shadow. The shallow should look darker. What? It's closer to the objects You, this case to the strips on, softer as it is, stretches away from the streets, painted us it. Where are faded reflection off the street. Next step, create a new layer unpaid. The reflected light on the floor reflected light is the light the husband reflected onto the floor by dead Jason Surfaces. You know these guys the strips, for example. Here the light will bounce off the purple strip on onto these side off the floor. The same will happen with all the surfaces that received diet light. So let's spend them all. I think this would look better if we added a paper texture to all our floor. What do you think? We cannot see the paper texture through the shadow, so we need to fix this. Go to the cast shadows, layer tap on the in, then darken just linear, burn un degrees. The layer passages duplicate the reflected light there on applying Go Schindler to the bottom one, we need to make a smoother transition. Now go to the other layer decrease. It's a passive state on top. All multiply. Doing this, we will dark in a little bit that area. Also, we will be able to see the paper texture. And finally, let's add highlights. Go to your copy groups, duplicate the pumpkin on the A layers and move them to the top. Duplicate the pumpkin wagon. Select the bottom one on, said its brightness to max. Now select the or the one on. Move it a little bit to the right and a little bit down. Then select the leg content. Go to the white punking land three fingers downwards on top. Cut Deletes the top layer. I'm repeated. Process with the A when dired like hits and up debt on that object has pretty differences. Christs or edges. Very thing lines or small. An intense spots off near white will appear on them. That's why we are drawing very thing white lines on the edges, off the streets, merch, bull flares and changed the name off the layer. Our highlights are too bright. Let's apply. Go Schindler to blend them with the rest of the drawing. Much better we have done. Remember that you can easily tinge the color off the letter topping hue, saturation and brightness. In case you don't like the one I chose. I hope you have enjoyed this class Can wait to see your class project
 Lettie Blue, Architect & Digital Illustrator