Transcripts
1. Intro - Prompt to Print: This started as a text prompt, and now it's a real
sculpture I can hold. Hi, I'm Gesa, trained goldsmith, 3D artist, and educator. I blend traditional
craft with modern tools. I help artists, hobbyists, and dreamers to
transform ideas into beautiful physical
pieces without drowning in technical
rabbit holes. Here's the journey
we'll take together. We craft crystal clear prompts that produce sleek silhouettes. Turn your favorite image
into a pretty model. Animate a smooth turntable, give it a simple but premium
lighting and materials, and prep it for a
successful 3D print all in this one class. Worried you're not
technical enough? Perfect. I designed this for beginners and curious
intermediates. You can follow with
free or low cost tools like Blender or ChatGPT. And I'll share all my
templates, checklists, and exact settings, so you
can get great results fast. So even if you
have no experience with 3D or
3D printing, you might be surprised
how far you get. By the end, you'll have
three deliverables: a crisp, final render, a five to
ten second turntable loop, and a ready to print file. If you've got a
3D printer, awesome. We slide and print together. If not, no worries, I'll share some
current favorite print on demand platforms. If you by any chance took my first and still most successful Skillshare class
"From Sketch to Model", think of this as the
2.0 edition. Back then, we sketched clean line art and built a
printable piece in Blender. Today, we honor that tradition, but we supercharge with AI
and completely streamline the path to a print ready
model. Don't worry - You don't have to have taken
that other class of mine. What I care about most is
helping you make something you're proud to show on
your shelf and online. Post your progress in
the class project. I'll be there with feedback
and ideas to push it further. Ready to turn your words into something you
can actually hold? Let's jump in. From Sketch
to Model 2.0. Prompt to Polygon to Print.
2. Give Away!: You'd like to take part in the giveaway of one free
year of Skillshare, plus either a 30 minute
critique session with me or my digital
jewelry bundle, please do the following. After watching
this class, first, post your project by going to the Project tab under the class. Second, leave a review to
let me know what you liked or maybe disliked about it
and what I can improve. Third, make sure to
follow me on Skillshare. But only if you truly want that. I would choose the winner of this giveaway at random
after the deadline. And now have fun with a
class, and good luck.
3. The Project: Our project together. You'll design a small tabletop figurine or pennant
mini sculpture based on an AI generated image or a sketch you
already have and love. We will combine working
with AI models and the open source and
three D program Blender. The deliverables will be your final render a
five second turntable, and an STL object
ready to print. I also going to show you a lot of tips and
tricks along the way and thoughts on how to get your object printed if you
don't have a three D printer. Of course, I won't leave
you alone with any of this, and you will get
lots and lots of resources and all these
little hacks that I gained through
years of experience designing for three D
printing specifically. Class is especially not aimed
at technical professionals, even though they will
probably enjoy it, too. But everyone can
join and I will try to break it down as
simple as I can. I'm going to walk you through
each of these steps in the most straightforward
fashion possible so that you can work away with your
printable object and your turntable today in
just a few hours or less. Make sure to post
your results and each milestone in
the class project. I'm going to prompt you. I give feedback and ideas to push it even further
if you'd like that.
4. Class Prep: Let's quickly prep
for the class. You will need Blender
4.5 or newer installed. You can go to blender.org
and get the recent version. It's always free. We don't need any
special settings. It should pretty much
work with the defaults. Everything else is
covered in class. Optional if you want
to print at home. A program for slicing
three D models as preparation for printing. I like Bruser slicer because
I have a Brser printer, and this program is also free. But any slicer of your
choice can do the job. And a three D printer and
some tools like pliers or files for removing
supports if necessary. The AI tools we're using
are available online, so you don't need to download any special program for this.
5. AI Image Prompt: In this chapter, we create a strong, straightforward
image prompt. We cover everything that
we need to make the AI do exactly what we want and even be open
to some surprises. We're going to imagine
something that we really want to see as a three D object and maybe even coming out into the
real world as a print. Your imagination is really the
absolute upper limit here. Of course, you can use
My Prompt. No problem. And it would be
interesting to see if the AI creates the same thing. But please go all in here
and just create something totally crazy and
imaginative because the AI is going to do most
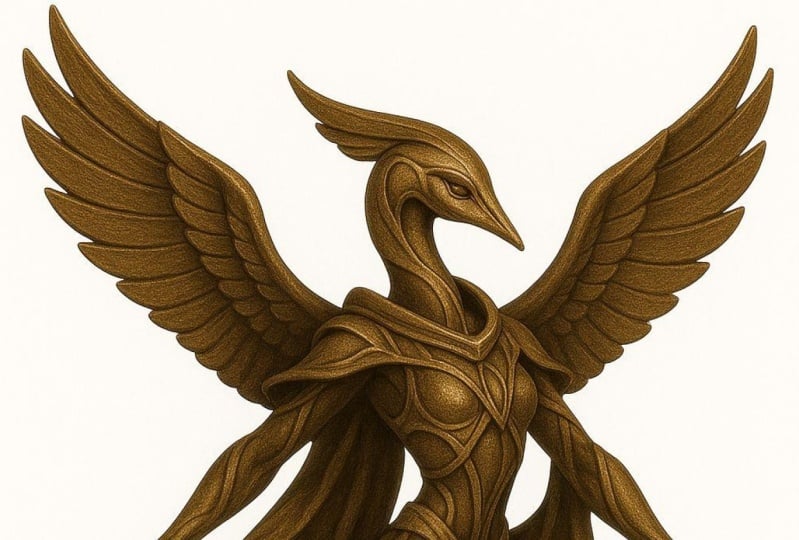
of the work for you here. Fun fact, the origin of my first name Gesa comes from a little bit more
archaic name Gertrude, which originates from
old High German. It is a combination
of the elements Ger, which means spear and Tot,
which means strength. So Gertrude could be translated as spear of strength
or strong spear. Also, I recently asked
Cha JibT to draw an image of my soul and well, it came up with a pretty
androgynous figure. And so I thought, Yeah, why not an Androgenous spear
thrower, warrior Alien. So maybe think about
something that has some personal meaning for you
when creating this prompt. So make sure that
you don't withhold your weirdness and your
creativity, of course. If you don't want
to start from zero, bring your own sketch or photo, and we can absolutely
use that too. Just make sure that it fulfills some very basic requirements, which I'm going to cover,
and you're good to go. Cooking recipe for
awesome prawns. Try this structure.
Main description, detailed with room
for surprises. Mention things like, what kind
of sculpture do we create? For example, tabletop,
figurine for jewelry, or maybe something you want
to hang onto your wall. Think of your visual
style that you want, like expressive, cute, surreal, or maybe get inspired by some artistic style
you know and like, posture, energetic,
funny, animal like, anything else you can think of. You can also ask
for specific things like holding a spear in the
process of throwing it. Features, gender and
age, then things like, is this thing cute or
chubby or graceful or scary or any other important details that you
definitely want in there. Maybe also something like
long nose or big ears. And then clothing and assissoirs like tight fit, loose flowing, has lots of jewelry, has tribal tattoos
and anything similar. Also, don't forget
materials and color. Then we have the second
part of the prompt, which are the
technical must have, something that helps
with three degeneration, things like no shadows, pure white background,
a little padding. That means it has
a little distance from the edge of the image just to make it not cropped
or anything and centered. And I think with this cooking
recipe for good prompts, you will be well equipped
for what comes next. You see me generate quite a few images and three D models
throughout this class. However, not all are equally
useful for printing. If you plan on three D
printing your model later on, it is important
that the model has a minimum material thickness. If it is full of super
thin wires, hair strands, and flimsy details, while
looking great on camera, it is very likely that printing might not work out
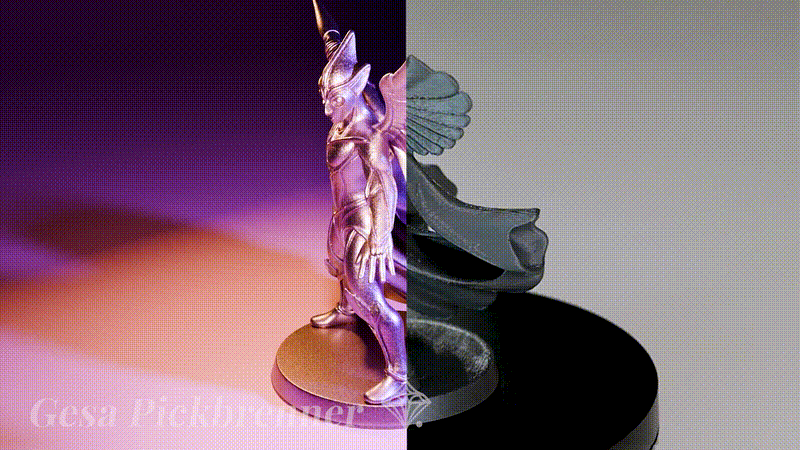
of the box as it does with my example
project model and needs some more
manual tweaking. Be sure to keep
that in mind during the whole model
generation process. And if you're unsure, of course, experimenting always
brings new insights.
6. Sora vs. ChatGPT: So let's visit chpt.com and
put your prompt in here. You can find my prompt
in the resources. So please use that
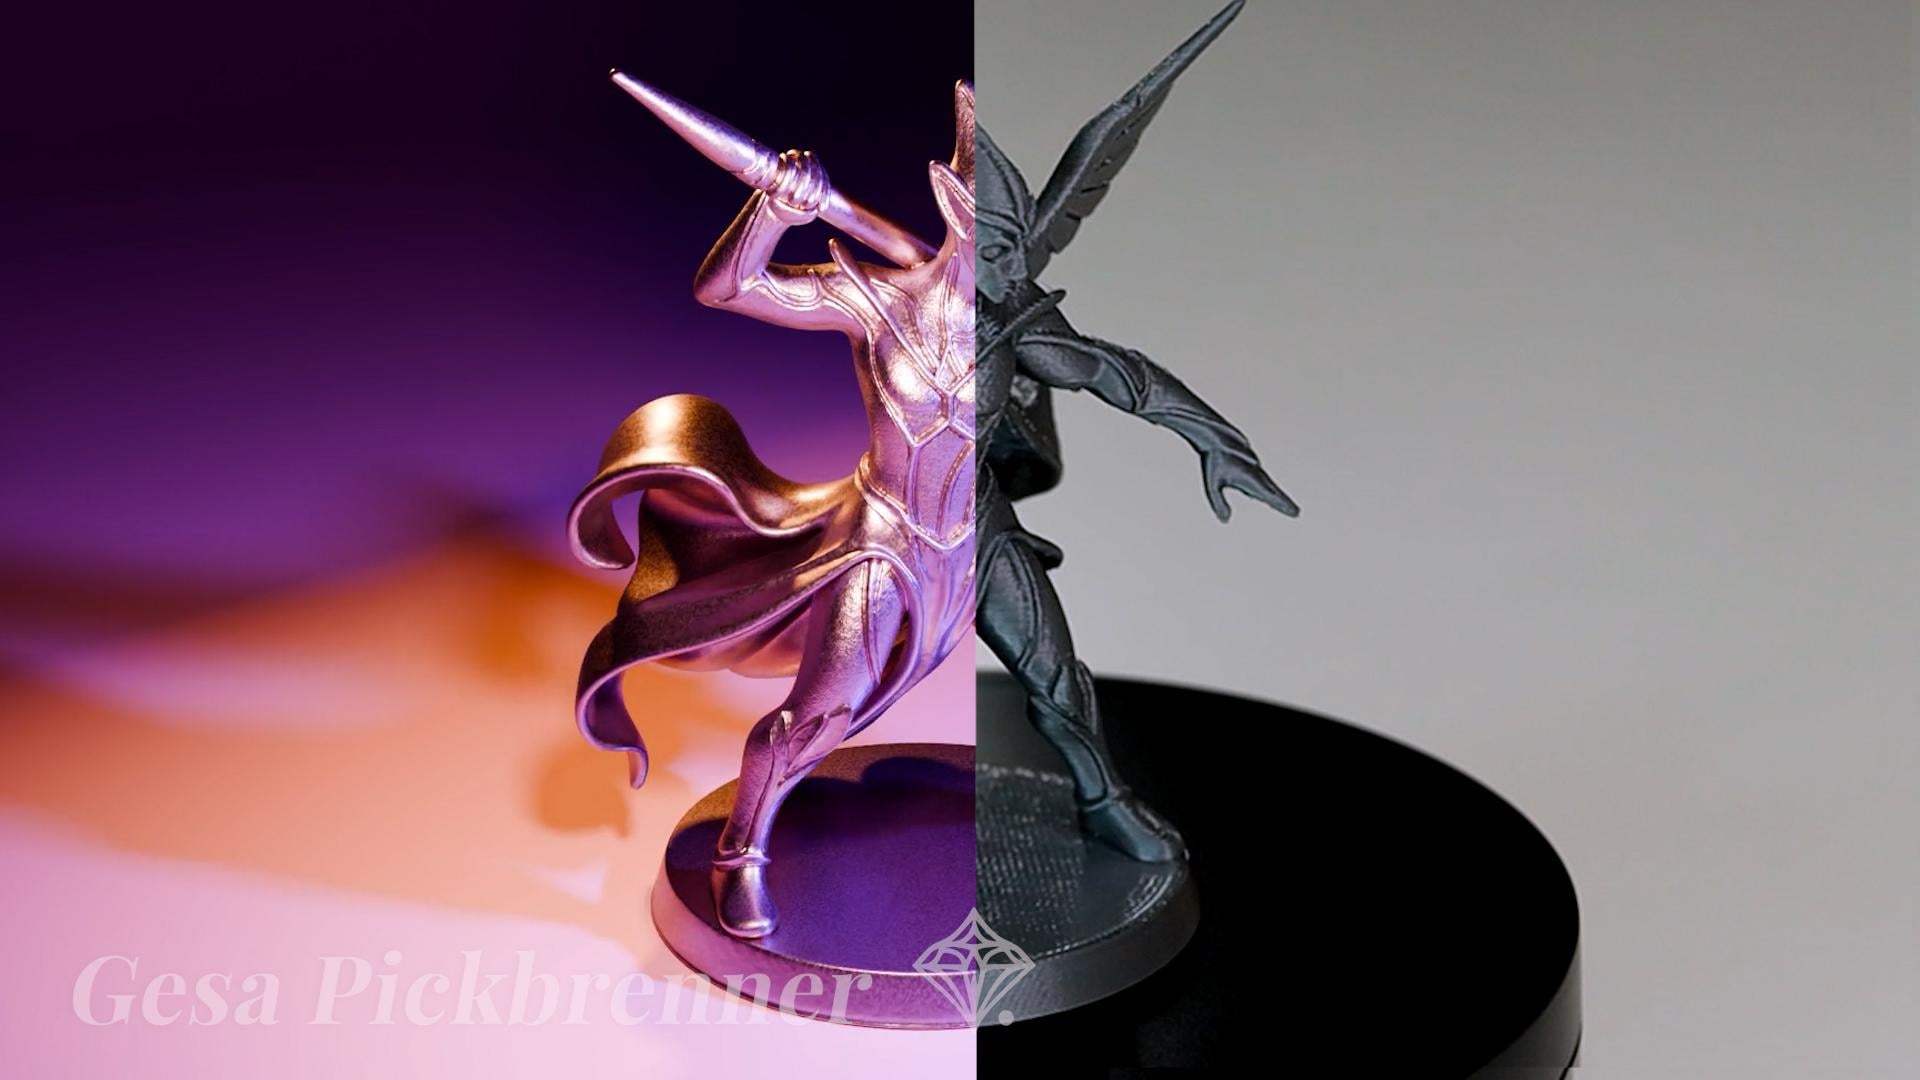
or create your own. And this was the result. And I ended up using only this
part of the image because the three D generators
had some problems with images which had
multiple perspectives. Well, it tried. Instead of asking ChatGPT, I also tried using
Zora explicitly, which is the image generation AI that is connected to ChatGPT. And I gave it the
exact same prompt. Which resulted in a
very similar image. Side by side, the
Sora varia displays a more refined anatomy and a slightly more
graceful posture. But ChatGPT has
definitely more variation in perspective as
well as posture. Apart from the first
figure generated by Sora, the other three are
basically the same. They look like three frames from an animation of the
same figure running. Both AIs have similar
difficulties with the spear and where it
should actually attach to. Sometimes it goes
through the body or simply appears from
the figure's head. Also, both seem to be
stingy with the wings, as most of these
guys only got one. Although in the end, I came
to like this design choice. In general, though,
these suggestions are still very similar.
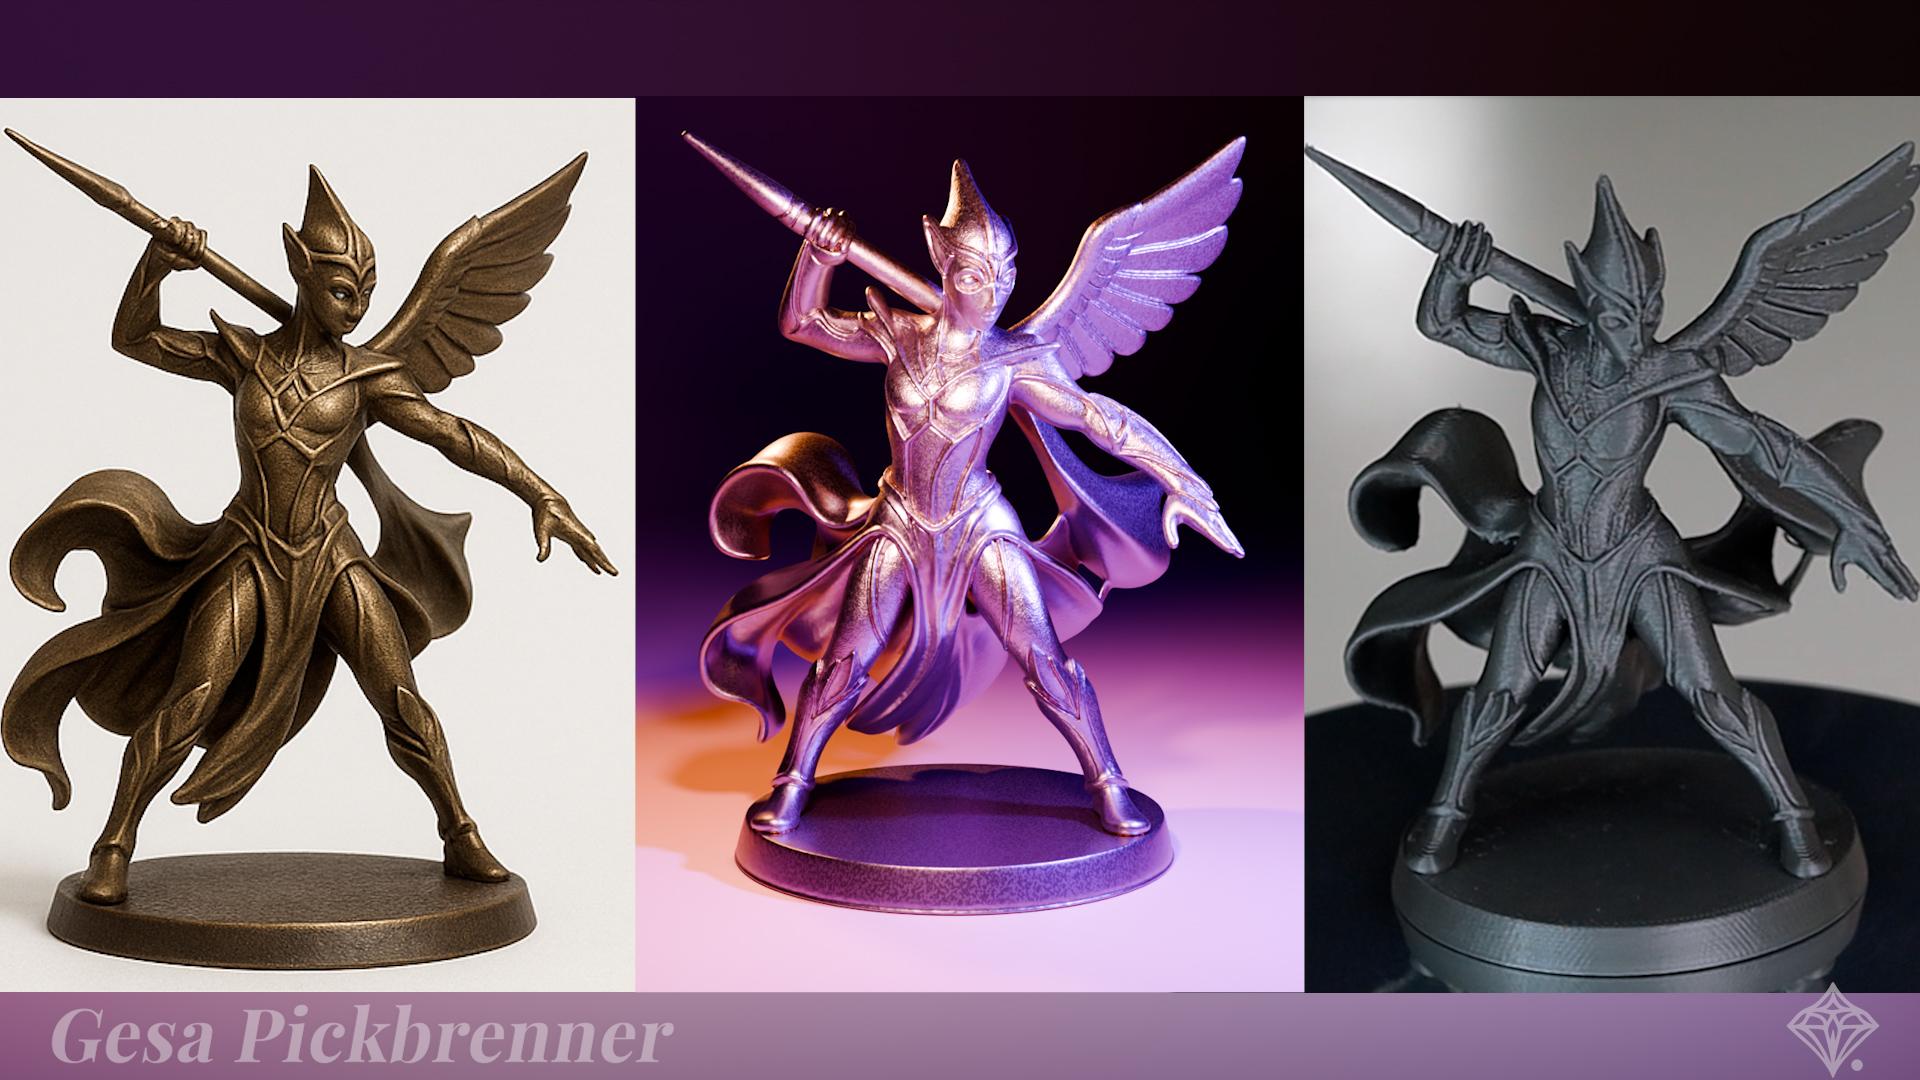
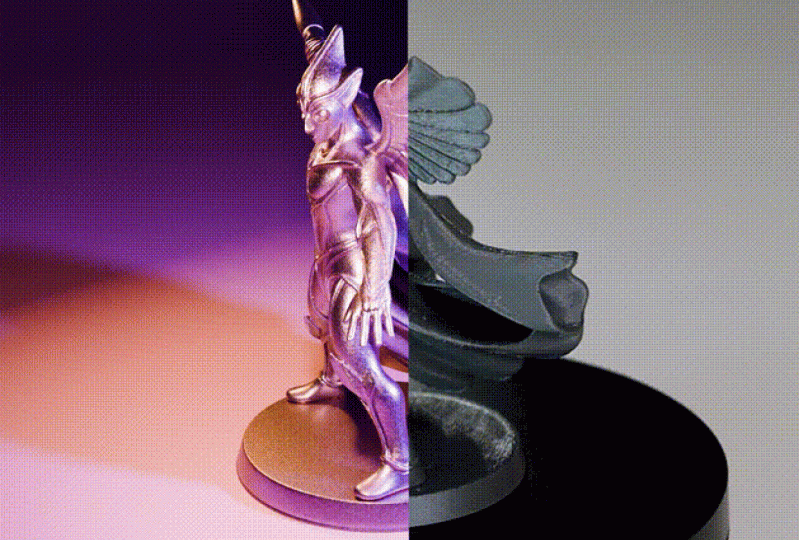
7. Midjourney: As a comparison, I also tried Midjourney AI, which is paid. And the results
were really quite different from the ones
that I got from Cha Jibt. Midjourney AI has a
fantastic Discord community, and I'm sure if I
would have spent more time on learning
about prompt design, I would have generated
even better results. Leave this to your
explorative spirit if you want to find
more about it. Since the Discord community
is open and anyone can join, you can see what other
people create and talk about all kinds of image
generation topics. If you have a paid
subscription to Midjourney, you can also directly
generate images in the Discord channel
via a special command. Although then everyone
who is a member of this community will
see your results. You also have the option to go directly to midjourney.com and create your own images or video sequences
from your proms there. But the same prompt created something completely different. Since this design looked much
more like an illustration, I adjusted the prompt
just a little bit and added style three D
model at the end. Okay, so these are insanely
detailed. Very cool. Completely different style
when compared to ChatGPT, but definitely very intricate, intriguing, and interesting.
8. 3D Object Generation: Now we're going to convert the
image into a three D mesh. And of course, AI is going to
do the work here once more. I compare a couple
of options and also show you how to
cleanly transition the result into Blender. We just need our
object and Blender so that we can then work together with the AI to create the turntable and finish
the printable file. And since Blender is a free and open source
three D program, it's really perfect for that. It's also the program I've been working with for the
last ten years or so. Blender is awesome, and I just want you to learn it if
you haven't already. But we're going to
keep it super basic. You don't have to do
any Blender magic here. AI is going to do
the heavy lifting. We just have to tweak some
things here or there so that the result is really
usable for our purposes. Very important hint in general, the world of AI
is changing fast. So if any of these tools do not work as intended or aren't
free in this way anymore, then you could do the following. You could go to irsnaifed.com. Search for the latest tools
for image generation, three D generation, or any
other thing that you need. It's really worthwhile to take a look at that site in any case. But to find the latest models and the latest creative applications people
have used them for, I can really
recommend this page. Let's now upload our image
on Spark three D. Attention. The world of AI is
evolving so fast, and at the time of
finishing the class, the developers have created
an official website. So in case that Spark
three D is down, you might want to try out item three D. I have also added a short intro at
the end of the lesson. Okay, back to the interface
of Spark three D. Let's now upload our image on Spark
three D. But beware, once you click Upload, a queue will start, and depending on traffic, you'll need to wait quite
a bit for this to finish. Your PC shouldn't
go to sleep during the generation or the
work might be lost, and the queue will reset. Best to stay at
work during this. So while this is
doing its thing, we can go to Rodini and
try the same image. Then you can compare
the results. They do also have a fun
feature where you can combine images to give them
more detail from all sides, but only for paid members. Please note that
with a free tier, you only get to keep ten images private as in August 2025. So make sure to take
that if you don't want it to appear in
the public gallery. I just use the standard
one image option and click Generate. There are all kinds of
different options here to adjust the output of
Rodnai to your liking. Many of them are paid only, so I pretty much stuck
with the default ones. There's also a rudimentary
mesh editor here, if you want to try that. But of course, for
my intricate work, I'd always recommend using
a standalone app Blender. And of course, I have
lots of courses for that. Once again, you can keep all of your models
private and out of the public galleries
until you reach the threshold of ten
models in the free tier. You can find all
of your models in the gallery a bit further
down if you click on Mine, and there you can also
see if they are private, hidden or completely visible. One cool thing you could try. If you're not happy
with the first result, you may regenerate
the three model or mesh up to ten times. You can also see a texture
and material suggestion and you may regenerate
them up to three times. When all seems cool, then just click Download and your object file should download pretty
much instantly. Rodina has some other
really interesting features like avatar generation
and image remixing. I also saw some posts where you could see
a complete anime WiFu generated with
animations and all. Crazy.
9. RodinBridge Addon: You also have an alternative. You can download a
dedicated Blender add on, which will use the
hyper three D API so that you can directly
generate models in Blender. After downloading,
don't unzip the add on, but rather add the
RodinBridge zip to a dedicated add on folder that is somewhere where
you find it easily. You can also add a shortcut
and Blender to the folder. Then you can find
it under addOs, search for it and
activate it if needed. So in this way, you have
the option to generate three D models directly in your favorite three D
program. How awesome. Open up the N menu by
pressing N. Now you can use the add on in
a similar way as the web interface of Rodin AI. However, from what I've seen
in the short time using it, the functions are a bit less restricted than on the website. For example, you can get
all quads on the page. This is a premium paid feature. Switching through the
UV editing workspace, we see that the model has indeed a quad geometry and is fully unwrapped and texturing ready for further works.
What a banger.
10. Sparc3D and Hitem3D: Back to our first
fighter and back to spark three D. The downloaded
format will be GLB. Let's rename the file so
that we know what's inside. Now, for this, we skip
the Import button and just track and drop the
generated model into Blender. No matter if you
use the GLB from Spark three D or the
file from Rodin AI, usually the defaults work great, so we can ignore all
these buttons luckily. Just click on Import
and your object should sit right in the middle
of your three D viewport. As mentioned, at the time
of finishing the class, the developers have created an official web interface for
the underlying technology. When signing up, I got some free credits and I
tried it out, of course. But Spark three D still seems to work
occasionally as well. The functionality
is still the same, so it's definitely worth
trying out both websites. One major difference between the Spark three D interface and the item three D website is, of course, the login function. So your model history is regain, and you can access them later. All of that was not possible
with a Spark three D option. Even though this site
costs money now, it has some additional
functionality, which of course makes for
a better user experience. Even the loading screen is the same as on the
Spark three D side. The major upgrade has been that the three D model
is now interactive. You see more information
about the model, and you can also
generate a texture, which is awesome and
worked really well. The result was slightly different than with
Spark three D, but I couldn't say if I liked one particularly
more than the other, because some details
were nicer on the Spark three D result and some details were nicer on
the item three D result.
11. 3DAIStudio: On theresenaIf that.com, I found yet another
three D generator, which is called
three D studio AI. It is exclusively paid. That's why I don't want to
get into it too deeply. However, I dt it both the
images from ChachiPT and Sara, as well as from Mid Journey. It was lots of fun to gather all of these guys
together, by the way. I don't want to get into it too deeply because I think
it would be nice if you have tools that
you can try out before you are required
to pay something. I also got some
free credits here, but only after I signed
up for the paid model. One very cool thing
about three D Studio AI is that it allows three D
creation also from text Prompt. So, of course, I tried using my original prompt here as well without the
image intermediate. But just as with a
real three D workflow, it seems to be helpful to work
with a three D reference. The result was
underwhelming, at least, to me, and it seemed
a bit weird overall. But maybe some people
would prefer this result. In any case, it is amazing
that you can create a real three D model with texture just from a text prompt. So if you're interested
in trying that out, of course, I highly recommend
giving this tool a try. And as always, please share
your result in the project. Be creative and see what
comes out of there, and please share all of your amazing results
in your project. One thing that we didn't really touch on here in this class is the textures that come out
of the three D generators. Please let me know
if you want me to do another class specifically
on texturing, because, of course, there's
lots and lots to discover. For now, I decided to go with the option of creating our
own specific shader, but, of course, you're always free to just use
the textures that DAI give you and work on them further or use them
in your final render. I mean, I'm just burning through my credits for you guys. I
hope you appreciate that. Alright. So, let's
generate that generate. Let's Let us let this
thing generate itself. Let's jot job little ja
bob chita but pi bob
12. Turntable Animation in Blender: Mm. Now, we will create the simple, elegant turntable
animation in Blender. Lighting, camera, motion, and
a short loop you can share. Your piece will look
like a museum object, fancy, timeless
and super premium. And you don't have to tell anyone that this was
done in 5 minutes. Attention. If you feel at
any point in time that you want a more in
depth introduction into Blender's interface, I have a beginner's
class available. Also, second, couldn't care
less about the render. Only want the three D print. Then skip ahead to Print prep. Since I already had created
the sculpture with AI, a thought came to me. Why not let ChatGPT help me
create the animation as well? I wanted to see how
far I could push this and also go with
the current flow. So I asked Chetty to help
me create a turntable. You can find the prompts
in the resources of cars. I gave my specifications, and it even asked if
it should create me a Python script that I could
load directly into Blender. I honestly have no idea
about scripting in Blender, and so I merrily said,
what could go wrong? And it delivered. AI is definitely a better
Blender coder than I am, which is easy because I'm
not a Blender coder at all. Go to File, Import and choose your desired format
like STL or GLB, and choose the file or simply drag and drop
the file into Blender. Here he is ready to
pounce and rotate. Another save just in case. Let's get our Python
script ready. Open up a new viewport
and choose text editor. Paste the goodness
in and press play. So if everything went well now, you should have some new
objects in your scene, which are called turntable
area and turntable empty. Select the camera
from the outliner and press Control Zero or Command
zero to look through it. Open up the timeline
and check if it rotates by moving
the playhead. It looks as if the camera was imported directly
inside the model. Okay, let's open up a second three D
viewport and press seven on the numpad to look at
it from directly above. We will rearrange these
things just a little bit. Press seven on the
numpad in the right hand viewport to get a bird's
eye view on the scene. Then having the turntable
camera still selected, I press G and Y to move the
camera away from the model. In the left hand viewport, we see how the camera
view moves away too. In this way, we can
control the camera from the outside and look through
it at the same time. Pressing G and Z, I move
the camera along z. Here we can observe that the AI code has set a
constraint on the camera, which makes it always look at the empty object that was created at the
base of the model. In the outliner, we see that the camera is a
child object of the empty because it is
indented under the empty. You can try moving the
empty around, for example, along z, and the camera
should move in the same way. So I adjust the
placement along z of both until I have the
object in the frame nicely. Now try pressing play in
the timeline once more. If it isn't already, you can set spacebar to
start the playback under Edit preferences Keymap
spacebar action to play. The way that this
works is that the empty has an animation
along the z axis, so that it revolves 359 degrees during the hundred 20 frames and lands on zero
or 360 degrees in the antagon completing
the turn seamlessly. Because the camera
is parented to the empty and it also is
constrained to look at it, the camera will continue
to follow this movement. In the end menu, you can see the rotation of the
empty in real time. In the timeline, the yellow
dots are key frames that ChatGPT created to set the
rotation of the empty. I
13. First Animation Render: Okay, now we should
have a nice turn table, but wait, there's more. Let's check out the shaded view. Switch from the timeline
to the shader editor. How awesome. ChaGPT also
created a sky shader. It used my favourite quicket for nice background lighting. It probably watched
my classes too. Nice, because we'll see
something lit up right away in our turntable video without having to configure
anything more for now. Let's save this masterpiece
of AI computation. If we check the render
and output settings, we see that the renderer is EV, which is super fast, and the output format
will be an Ampifour. If you rather have
an image sequence, you could choose PNG. Then you can test your
turntable by going to render and render animation
or hit Control F 12. Landa will probably zoom
through that pretty quickly. Then you'll find the
output Ampifour in the working directory. Okay.
14. Shading: AI & Blender Workflow: That's nice and all, but
it's a little colorless, and the model is just
turning in midair. Let's bring a bit
more substance to it. Let's set up a grand shader with a somewhat texturing
surface detail plus a professional lighting rig for those dramatic
contrasting highlights that draw the eye in. Of course, you can use the texture that the AI
has generated for you. And if you don't want to
create a custom shader, you can skip to the next lesson. However, this lesson
still might be very interesting to
you because I go a little bit deeper into
how we can create together with AI in
an iterative process, and it's super fun, so you
might not want to miss it. You get all my additional
tips and tricks so that your render
really looks outstanding, including some
thoughts about color, when to do what and so on. The main goal is that
your render will look awesome and professional, both in your Instagram story
as well as on a big screen. So I thought, if
we're already at it, why not ask the AI for
the shader for tutorial? And, yeah, so it did. Then it asked, wouldn't be
too auto build this no tree? And I was like, Yes, please. We're all officially going
to be replaced soon. Alright, dude, flexmor. It really hacked away at this. Back into our
trusted text editor. This is becoming my favorite
Blender editing tool. More and more. Let's give AI control over
everything because Yolo Okay, there's some bug. No problem. We have our trusted
programmer here. He's surely going
to fix it for us. Let's just give him
the error description. You can copy it
from the console. Simply pays the error
message into ChatGPT. It seems shaders are more
complex than a turntable. Ah, that's on me. How kind of you to acknowledge
this so courteously, B I've been lazing around while you were doing
all the hard work here. He even wants to create
a cycle render, too, but I feel it's better to
focus on one task at a time. Maybe it's my puny human brain,
but then it dawned on me. No, I don't need
to limit the AI. It is much, much
smarter than I am, and if it desires to
serve with quality, then let it serve. Please carry on. A you can also click down here to
copy any error messages. To copy it, just select
it and right click, giving him the error message. He's at it again, thinking. It's, yep. No, of course, my Blender bull doesn't support this
mixed RGB blend type. How could I overlook
something so obvious? So it seems we arrive at
a simple process on how to develop new assets for
Blender together with the AI. A simple algorithm. Describe what you
want to the AI. Second, try the script out
in Blender text editor. Third, copy error
message into AI. Fourth, try the new
output in Blender. Fifth, repeat three and four
until the script works. Alright, some minor tweaks here. That's the style. A
flat shade of green, a bit like a copper roof tile
with some subtle texturing, but of a rough and
bumpy surface. Let's take a look
at the note tree. Wans. There you go. All coated by thousands
of clever humans distilled into a
singular intelligence.
15. Shading: Turn the Model : Let's add backdrop. Use Shift A and
create mesh plane. Then select one edge and
added mode and extrude it along so that we have
the simple backdrop. Let's increase the
clipping distance so that our backdrop ain't
getting clipped like that. Scaling it up in added mode. Waves are dancing my heart to Caroline's Whispers tell so. Whisker splash. Let's adjust the turntable so that the figure rotates
instead of the camera. I think this gives us a
little bit more control over the light situation. It also makes for a more
consistent background. And again, my ambition to do
it myself got in the way. Of course, feel free
to ask DAI to rewrite the turntable script so that the figure turns,
if you want that. On the other hand, the
solution was really simple. Parent the figurine
to the empty by first selecting the empty
and then the figurine, and then go to object, parent, and choose Object. So that the rotation of
the empty is copied over to the figurine
instead of the camera. Avant unfolds mud Let's increase the clipping distance
for the camera as well. Now, Control two for
subdivision modifier, or click on the blue wrench
and search for subdivision. Right click two Shade Smooth. Control R to create a new edge loop to define
the shape better and decrease the curvature below our sculpture so that the
plane doesn't clip into it. Now, create a simple
material as a backdrop. It can be bright or
dark, metallic or not. Try out to see what you like. When moving, always
exclude Z with Shift Z to not accidentally clip in to the sculpture or move the
plane away from under it.
16. Shading: Color and Light: Now, let's take a
look at the shader. It is a bit more complex. The AI did a really good job. I want to change the color from green to a nice
deep bronze shade. Also, I adjust the backdrops
color accordingly. I also like to decrease
the background strength of the sky texture node to be
able to highlight the shape with additional lights so that the background
fades a little bit more into the
jark and that I can have all the focus on the model. I also tried adding
some noise texture to the background to
give it variation, but that's definitely
not a must. You can try out different
variations, of course, and give the
background a subtle, dark lilac color shade. You can also try out
changing the sun rotation in the sky texture node to make the figure
stand out even more. I we can also adjust the light position
and intensity for highlighting the object
from three sides. That is a very classic way of lighting up such a
figurine in a rendering. For arranging the lights, I like to unplug the
background sky texture from the output to focus on the ideal light
arrangement and also get a better idea on how bright
these lights actually are. I really like to
use area lights. They have a very nice way
of lighting up a scene. They're not too pointed and they act a little bit
like a soft box light. We can increase the size to make the light even more
soft and less pointed. We can also try
increasing the exposure, and we can also play
with a power output. Try not to overexpose
any parts on your model, which would mean that they are completely blown out
and completely white. Try to make the
contrast as strong as you can without
blowing out the exposure. As mentioned, I choose a three
point light arrangement. The main one, the kelte from the front right side,
one from the left, and one from the right back side to light up the shape
from behind a little bit. This will give it more
structure and more depth. This is also called a rim light. Here you can see a
simple schematic on how you could
set up your lights. So one light has to
be the brightest. This is called the key light. It is placed at 45 degree
angle from the camera. Then on the other side,
there's the fill light, which has a little bit
of a lower intensity, like half or three
quarter of the key light, and then you have
a back light which is usually of lower intensity, which gives the whole object
and a little bit more depth. It's a really easy setup, but it's really powerful and you don't need
anything more. Maybe some subtle ambient light, which we already have
through the sky texture node if you need that
additional light. Also, you can find
my whole render setup ready to go
in the resources. Now we can adjust the color
of the light as well. I tried a complimentary
monochrome setup, a lilac light plus the
slightly lilac background, and also split complimentary
lilac background, yellow stature,
and a green light. If you are not sure about
which colors you should use, you can go to Adobe Colors and get lots and lots of inspiration what colors
could work together. In general, I recommend just choosing some colors
that you find pleasant and interesting and then build it from there and maybe
get some guidance on what colors fit well together through these online tools
like the ones from Adobe. Now, once you're satisfied
with the light setup, you can render the animation. Let's try out how it looks. IV is so quick, it takes no time
at all to render the beautiful turn
table and output it as an Ampifo a movie
basically ready to be shared, uploaded, or made into a gift, which I will be also
showing you later. The output is saved in the
local directory as an Ampifoe. After exporting the turntables, I put them in a subfolder so that I can find
them later again, and I keep everything organized. And I tried out
different color schemes and rendered them as well. Nicely done. I
17. Shading: Make a Gif with AI: Okay. Project time. Let's upload your project and share it with the world and, of course, with me so that I can give feedback and
hearts and everything. Let me quickly show you a neat little trick
on how to convert your result into a
gif that you can directly upload in your
Skillshare project. You can create a
Youtube channel and upload your MP four there
and link it in the project, or why not ask JGBT to make
a gift from our turntable? I ask it to create a
gift and upload my MP four. Already done. This took not much time. And I used to create my gifts
with an online service, but that's totally obsolete
now, just like that. And then Chachi PT asked by itself if it should create
a web optimized version. Sure, please go ahead. I won't stop you. Wow. And here is the web optimized
version already. Loads much quicker and
keeps most of the quality. As ChatGPT says, Wow. It's so cool, and
it was so easy. Thanks, mighty
artificial intelligence. I very much hope you enjoyed
this process so far. Please don't forget
to now create a project on
Skillshare and upload either a link to the
API four or share the turntable as
an animated gift in the project directly. If you want a peek at how others approach the
three D design process, hop into my private Discord. Post your working process in the prompt to Print
channel and tag me. Of course, if that's all
that you wanted to create, you're totally free
to call it quits now, but please don't forget to
leave me a review first. Otherwise, we will continue now with the preparation
for the print, cleaning up the
model, slicing it, and printing it. Let's go.
18. 3D Print Prep in Blender: We've came so far, and
you're still here. That means you're not
only here for the ran up, but you want to get into the
nitty gritty of reprinting, which I find awesome because
that is really lots of fun. No matter if you have
your own printer or you're going
to use a service, before printing, we better
do some practical checks, so that all comes
together really nicely. And that is always a good idea, no matter if you're using
I generated models or your own or imported
from someone else. We check things like
scale, thickness, and mesh quality so that
the printing goes smoothly, no matter if you use
your own printer or POD, print on demand server. Is she in common pitfalls, so your first print
isn't your first fail, it will be easy as Pie really. Here, I also remind you of checking your model
for very thin strands, wires, tentacles, et cetera. What counts as too thin
is depending on material, model size, and so on. For a simple FDM print
like I am going for, one to two millimeter thickness seems like the lower
end of how thick a single sheet of
material should be without being
too brittle in PLA, the most common
printing material. Check out the lesson about print on demand where you can find a lot of suggestions for
ideal material thickness. Okay, now let's get
into the print prep. Go to File, Import and choose your desired format
like STL or GLB, and choose the file or simply drag and drop
the file into blender. Flat bottom. First of all, it's helpful when the
three D print object has a flat bottom. Make sure you see the model from the side as if it was
standing before you. You can either use the
numpad keys, one, three, or seven for those, or you can use the little widget in the upper right corner
of the viewport. So suppose we have
such a weird curve on the bottom for some reason, or we want another
part to be the bottom. Then we use this little
box cutter tool. It's the quickest way to cut
out boxes in blender. Wow. Next, we check the
size of the object. You can open the end
menu on the right side. When you click on the
model to selected, you will see the real life
size under dimensions. To scale the model, press S, and move the mouse, and these numbers should
diminish or grow. It is not important to get the final size in
Blender because we can still adjust it
in the slicer and usually also with a print
on demand services. But still, it is helpful
just for planning to have a reasonable size
right from the get go. If you need inches, you can set the units in the sittle
menu on the right. You can also use
this little tool on the left to scale
the model down. When you click on
the white circle, the model will scale
just as you do with S. The D Print check. Let's utilize a very
useful add on or rather extension that comes
with Blender natively. Let's go to Edit preferences
and get extensions. Then search for Print, and you should find the
three D Print toolbox. Click Install, and sometimes
you also have to check the little check mark box to activate it under view details. Now, you will find this add on in the end menu on
the right side. There you have a lot of different things that you
can test your model for. If you click Check A, it can take some
time to calculate. So be prepared for that. You will see lots of information about what potential problems could be there in your model. You don't have to know
everything in detail here. If you need more information, you can ask the AI or you can
book a one on one with me. But here, it's really
only important that this tool can help you fix these potential
printing problems. So let's click on Make
Manifold under cleanup. This might take some
time, but after a while, it should report what it
did on the bottom bar. Now, once that's done, we
can just choose a folder where we want the output
printable STL to land. And then we can click Export and should be ready to print.
19. Personalized Inscription: You could now export
the model as is, or if you want to
personalize it a bit more, we could put a little text
engraving on the bottom to make it clear who created
it and when or for whom. If you want to jump
right into printing, you can safely skip
the next lesson and simply export the STL. Now, open the SCL up in your preferred slicer if you want to jump
right into printing. Otherwise, let's continue in Blender for a
little while longer to create your personalized
inscription. How exciting. Let's mark this
incredible milestone in human history and never
before Corporation and fusion of AI and human
creativity and set in stone plastic for now,
whence it came from. Seven, and then nine on the numpad to look at
the model from below. Shift A and add the text object. Scale it up with S, rotate it around X 180
degrees if it is upside down. In the text object data, the green button that
looks like an A, find the settings for your text. We can find our fonts in
here. Choose one you like. But keep in mind that
blocky Saints Serif fonts, without strong changes in thickness work best
when three D printing. At least with FDM fuse
deposit modeling, which is the usual
three D printer that you got in your garage. If you have an SLA printer or plan on doing
something more fancy, you should check the
requirements of your material. I'll go with Candora bolt. I don't know this
particular font at all, but I just thought it looked
great for our purpose. Switch to dit mode and write as if you were writing
in a normal text editor. I like to change
the alignment to center for the circular shape of the figurine stand
bottom. Bikini bottom. Scale it down until it fits. I measure the thickness of the text to see if it will work. For FDM, this seems on the
lower end, but still okay. Over 1 millimeter is best
for clean legibility, but I think you can go
as slow as around 0.5, may need to experiment a bit. If you print that in SLA or with any other technique,
please let me know. I would love to see and hear
about the results, and, of course, don't
forget to upload photos of it in the
project file as well. I add the date and time
to my inscription. Of course, you could also
engrave other text numbers, symbols or images here. Okay, now we can prepare
the text and make it three D. You can go to the geometry tab and
then add some extrusion. The exact height doesn't
really matter here. We will adjust it
by moving the text. I reformat the typography a bit so that the available
space is used evenly. And it looks harmonious. I also want to add a
little ridge around the writing for the
aesthetic effect. If you want to, let's
add a mesh circle. The circle was centered
around the three dcursor, so it also helps to easily center the model if it
has a circular base. Select the circle,
tap into added mode, select all with A, and then E and S to extrude
new geometry inwardly. Select all with A, then extrude and
move along that to also give the
geometry some depth. Let's measure the depth
of the engraving. 0.5 millimeter or a
little less seems good. A multitude of layer
height is a good choice. I use 0.2 millimeter
and hence 0.4 or 0.6 millimeter would be
useful for a clean result. Since we set the
flip normals to red, we also see that
the normals have gotten flipped through
the extrusion process. And no problem, now we
know how to fix it. Select all and shift N. Give it a subdivision surface
modifier and also give the edges some crease
to make these sharp. Then add a boolean to the model to cut out the
ring we just created. Just use the Eyedropper tool from the object panel
and select the ring. Let's also change the shading a little bit so that we
see the effect better. We can move the text so that it cuts just as deep as the circle. We will now prepare
the text for bowling. Shift D to copy the text object
so that we have a backup. I a text object can't be booled. So we need to convert
the text object into a mesh with right click. We will now use the three
D print add on to check the new mesh because both for three D printing and
for booling operations, you need a watertight
mesh without any holes or flipped faces
or anything like that. So to open the end menu and go to the three
D print add on tab. As with the last time, check
all and then make manifold. This should get rid of any potential problems all at once. You can see here that there were a lot of vertices removed, and that's normal for a text object that has
been converted to a mesh. So, well then. Then add a new Bool mod to the sculpture
and add the text. Again, you can use
the Eyedropper tool. Hide the text with H and
then see the result. Turn on the shadow in
the MT cap shading. This often helps to get a
better look at flat booleans. You can click and drag on the sphere to change
the light direction. I then decided to simplify
the text a bit more. It has the added effect of
increasing the font size, making printing with
filament easier. And that's why it is
always good to keep a text object backup
because we can simply adjust that one instead
of having to go back and create a
new text object. Just like before, I
adjusted the text object, then converted it to a
mesh with right click, convert to mesh,
and then I checked the mesh quality with a
three D print add on. I once again put a
Bollin modifier on my sculpture and pointed
that to the text. Now, I'm very satisfied
with the result, and I hope you are, too. If you had any problems
with this step, please let me know
in the discussions. Now, select the
figurine, go to File, Export SDL, Toggle selection
only, and apply modifiers. Your printable file with personalized
inscription is ready.
20. Slice & 3D Print : Yeah, I hope you are
ready to print now. So let's slice the model
with basically down to earth defaults and
maybe touch on support strategy and talk
about material a little bit, if you want to use resin for
high detail, for example, or the filament for the
quick and dirty print. Even though the print that I have here is made
with filament, and I find the
result pretty great. If this was a tabletop warrior
figurine, I mean, it is. But if I was using it for, I don't know war
hammer or something, it would be perfect, and
I can show you something. This is a three D printed skull, which I then painted with white acrylic paint
and gilded with real. 24 aratGld. It was really lots of fun. If you're printing
with filament, with a standard three D printer, you can absolutely
get amazing results and paint the object, and then you can also color it or gild it or whatever
you want to do with it. If you don't have anything
else than a filament printer, and you don't really want to
do something like jewelry, which needs really
small scale, right? Then you might
think about resin. But if you actually want to do something that
is a little bit bigger, a sculpture for your home, then this is perfect. Don't get discouraged. Hey. Alright, so if
you're ready to print, then we slice, we print, and then we watch
the magic happen. So now we can simply track and drop the STL into our slicer. When you set up Pruser
slicer for the first time, you are guided through a
little setup procedure, which is pretty straightforward
and self explanatory. You just check what
your printer is about all the better if you have a proser which I can
recommend very much. And I printed the model with pretty much everything
set to the defaults. Let's quickly check
the basic functions you'll probably need
in your slicer. First, we might want to move our model around on the plate, which is the first icon
on the left hand menu. This might be different in
your slicer, but in general, it should have some buttons that indicate that you can
move your model around. It will always stay
automatically flat on the plate. Then you can scale
it up or down. And on the right hand side,
just like in blender, you can see the numbers which correspond
to the model size. Then you can rotate it and if you have rotated
your model in a weird way, use the place on face function, which is the fourth icon
on the left hand side, and you can just choose
a face on the model, which should stand flat
on the print plate. This is a very helpful function. And then there are
some others like cutting your model
and drawing supports, but we don't really need those
fancy functions right now. We want to get this thing done, and so we focus on
the essentials, just like we did all
the time in this class. Keeping it simple goes for the
printing settings as well. To test such a model, I use these pretty standard
settings as a baseline. 0.2 millimeter layer
size, generic PLA, info of 15% to save on
some of the material, and we can press slice. And right away, we can see
that Cruiser slide is showing us a little warning detected
print stability issues, and this is because we don't
have supports on this model, which would be a
bad idea because we have lots and lots of overhangs. So let's get into
the print settings, and I set my print
settings to expert mode. You can set this
on the top right. And I turn on supports. Then I turn the overhang
threshold to 65. I found that 50 is
not really necessary, and you can get away
with 65 or 70 degrees, saving some material
in the process and still get a very
high quality result. If you want even smoother
undersides of your model, then of course, set this lower. So once I slice my model again, you can see that now a lot of support
material is created, but cruiser slicer
can do better. By the way, on the lower left, you can set between
the model view where you can move
and rotate your model and the sliced view where
you can see the layers. I remember that usually the temperature sensor is thrown off when the
first layer of the model is quite centered on the temperature sensor
under the heat bed. So I move my model
aside a little bit from the center point of the
bed. Into the settings. And one thing that I really
like in the newer versions of Bruiser slice is
that you can set your supports to organic. And these not only
look pretty nice, they also save a huge amount of material compared to the
older grid versions. Slice, and by the way,
on the lower left, you can set between
the model view where you can move
and rotate your model and the sliced view where
you can see the layers. And there we have the
organic supports. They really look like trees or mushrooms or roots growing towards your model, don't they? With this little
slider on the right, you can see all the layers from top to bottom and
scroll through them. This is helpful if you suspect print stability issues or any kind of issue
with your mesh, and then you see if there are any weird geometric properties inside of the model, especially. Pay special attention
to the time it will take to
print your model. Here it says 11 hours
and 55 minutes, and this was a little bit
too much for my taste. First, I thought I would bring
down the printing time by setting the layer size
to 0.35 millimeters, but that was a little
bit too coarse, and so I did not do
that in the end. And so I scaled the model
down just a little bit, but it reduced the volume
of the model a lot, and hence the print time
came down almost 50%. I also saved the whole scene. Then you can click on Export G code down
on the lower right once you've confirmed
that you're happy with all the details
of your model. Then I just used my SD card to copy this over
to the printer, and then I printed it
in gray standard PLA. With my Prser I three MK 2.5 S, which is already
a few years old, but it's still doing
a magnificent job. If you're really printing a lot, I can really
recommend Octo Print, which is a free and
open source software, and you can use it to
communicate with your printer if you're using a little
microcontroller attached to it.
21. 3D Print Cleanup: Do Do I spent quite some time removing all the supports
with some pliers. I really like removing
supports from a three D print. If I had to do that
every day, of course, I probably would get annoyed
by it pretty quickly, but I find it has something
very meditative and calming to just clean the model more and more and make it
look more and more beautiful. With the standard settings, the support should come
off reasonably well, and you should have no
problems removing them with a little twisting and pushing and pulling
off your pliers. It also helps to have a file at hand and maybe even a
little dremel tool, which can help get
into tight crevasses. A little plastic box below
can really help catching all those little
plastic pieces that tend to fly
everywhere otherwise. And they are no fun to step on. So I recommend having
something like that around. A little bonus is
that it can double as a stowaway place for your
filament when not in use. And here's a little
close up off the print. Once I finally removed
all the supports, it went just like a finger snap. So I play around
with some prompts. I'm pretty sure
that you can create awesome results for whatever
sculpture thing you need. Even better if you
have some knowledge about through remodeling
or sculpting, which, of course,
can learn with me. And in that way, you could very easily
create yourself a great basis and inspiration for any kinds
of similar projects.
22. Print on Demand Ideas: Where to send your model
if you have no printer? A great current print on
demand side is Craft Cloud. You can order a gigantic
amount of materials there. Also, a great thing about
this platform is that it compares offers
from manufacturers from all over the world. It is a great concept, and I recently ordered something there without any problem. They offer test objects, but we don't need those. Check out some of these
special materials. Definitely some
fascinating stuff for experimenting with
all kinds of designs. You could go full
color to test print the textured version
of your models. And of course, there's all
kinds of precious metals, bronze, brass, silver,
gold, and so on. It's amazing. They
can offer so much through a gigantic
network of manufacturers. The high detail resin is
great to test small objects, figurines, and jewelry, and
it is not too expensive. I just love these
electroplated colors. Definitely let me know
if you tried those. Of course, there's other
vendors out there. There's also still Shapeways, which I also can
still recommend, but Craft Cloud just has
such a sleek interface. It has the added bonus of being able to compare a
range of prices, and I just feel this one's
a high quality choice. If you want to have
your models printed. I also recently ordered from
them in high deter resin, and everything went smoothly without any problems whatsoever.
23. Outro: Hey, er. In this class, you learned an end to end
pipeline from prompt, image, three D, render,
turntable, and print. You now have the skills to turn any idea into a physical
object real fast. So make sure to share
your project with me. I'm super excited on
what you came up with, especially because with AI, it's so easy and quick to bring our wildest
ideas into the world. I actually can't wait
to play more with it. Tag me on Instagram or on
Tiktok, share it on Youtube. Don't forget to leave this
class of review if you liked it and if it helped
you out with anything. And if you like, join my
private Discord community, where you can ask even
further questions, share with others,
get more feedback. And I also hold the
occasional giveaway or event exclusively
for members. There's much more on planning, so don't be shy and become one of the
founding artists there. I'm so happy that you
took this class with me, and I wish you a wonderful
day and a lot of creative and exciting,
fascinating printing adventures. See you around. B
 Gesa Pickbrenner, 3D Jewelry Artist & Designer