Transcripts
1. Introduction: Hi. Welcome to professional back in Web development with Pichon Flask, where you learn how to build where applications Using the amazing Python language. My name is Jorge Escobar, and I've been lucky to work in the leading tech companies for the past 15 years, and now we'll show you from scratch how to become a professional Web developer. You can find a lot of online courses that promise you how to become a Web developer. The truth is that in the professional tech industry, there's no such thing as Web developer positions. You're either a back and developer or front end developer on the skills required for each are completely. This course will show you step by step, the best practices to begin your career to become unemployable back in Web applications. Developer I will show you step by step and through the power of video on introduction toe the Python language. How to install Flask, a first look at sequel databases and then we'll build a blogging application using best development practice. At the end of the course, you will challenge to expand the application by developing a commenting system for Blawg. You will also be able to get the full court base as it looks each step of the way so you can develop your knowledge looking at how the system grows bit by bit. The course is the sign for people with little or no previous coding knowledge but are eager to learn how to build Web applications. All you need is a computer and the willingness to put your full attention toe the Metis. Listen. There are other courses that go the easy route and teach using graphical tools. I can tell you, those students would not survive a real life interview in a professional by my course now, and I will start your path to becoming a professional python backend weapon.
2. What is Backend Development?: Okay, let's take a look at what is front and back in development. Um, for that we're going to check what a Internet process looks like on a very high level. Um, let's a diagram and and understand what the steps look like when you request a page. So the first thing you need to know is that there's always a browser and a client. The browser is basically the program that you used to access the Web, the Firefox grown Internet Explorer, whatever you use, and then the server is basically a service that's out there in the Internet. Basically, um, it's a group off servers or computers that are, um, located in a specific you're out. So when you type of euro, what happens is the, um, your Internet provider will hook you up, will direct you to the appropriate server, and then that server will has a process that's a looping process that is always checking. Is there any requests there any requests? And when it received your request for a specific page, it ah basically renders or or comes up with the with the code to build the page that you're requesting, and for that it can access a database where where all this content is is located. Once that Carlton is located, it packages all that up into a webpage on B, returns it back to the browser where the browser will render it as, ah, so appropriate. So what is back end development in front of it? Development? Um, so the idea is that back in development is the processes or the software, Um, the code and the, um the different routines and algorithms that live in the server, um, and interact with the with the database, um, versus the browser code, which is the front. And development so far in development entails working with HTML, CSS and Js, which are ah, the basic, you know, languages for the basic systems that allow the browser to render the content of the server is giving back. So you can think of it as front and being, um, everything that has to do with what declines sees and then back in is all the data behind. Ah, what that page looks like. So in this course, we're gonna we're gonna focus on that on that piece, we're gonna be talking about how to code um, and Ah, and how to develop applications that are inherently listening for requests from a browser and return back ah content code, if you will, that will allow the browser to render that data that information that is stored in the Indus Server.
3. Why Python?: Okay, So one question you may ask it's y Python, where we're learning Typhon or back in development and not something else. And there's a lot of other languages that are that are suitable and have good Ah, you know, good reviews or or their talked about very well on the Internet. And I think it's a personal decision. My personal experience has been that Python has been a very, um, easy to learn, like the learning curve is not too steep. Um, but it's also a language that that it's a joy to read, um, a lot off coding when you're when you have a coating. Careers is about reading other people's code, and Tyson makes it really easy to understand. What, what the thinking waas off another quarter? Um, just by reading it without even looking at the comments, um, or documentation. I think, um, you know, Python ease is Ah, it's fast. Um, again, there are people that say that other things are are faster, but I think once you get into the, um, the real mawf Web, um, Web serving and serving times and all that I think there are many other Viable is to consider um, aside from how fast the languages. But having said that Python is Reese is pretty fast. Um, I like that. It's, ah, object oriented from the beginning. I think that we're gonna talk about a little bit. Why that that's important. But, um, s a first introduction toe. What that concept is it has to do with laying out your code in a way that's reusable and that you can leverage other people's work without having you to reinvent the wheel. Um, that's kind of like what object oriented for me is, ah, what the benefit is. It also, um, you know, building on top of that python is very extensively has a lot off, um, third party libraries that can do what I mean, there's, like, thousands off things that you can do with it from, you know, like math, um, calculations from hooking up to the most popular that air bases from, um, you know, interacting with social platforms like Facebook, Twitter and ah, you know, Ah, a lot off very, very exciting projects that, um that are across that believe across fields off different, different things, like from gaming to, like, scientific to business. So it has a lot off libraries, and the community around Python is very, um, very strong. They're very passionate about by phone, and you will hear about a little bit of the rivalries, especially with the folks that that, like Ruby on rails, which is kind of like a ah, big, um, it's a counterpart or or competition for Python. Then you know, you have to know jazz community also popping up. But it's a it's a friendly competition. I think that, um, you know, each language has he has its own strengths and its deficiencies. But I just like Python. I felt very much at home. Um, I came from, ah coding in peril and then pee. It's B and, ah, now python. I kind of like I look back and it will be very hard for me to go back to another language
4. The FromZero Approach: Hi. I wanted to talk to you a little bit about why is from zero different or better than other courses? Well, first of all, I have experience with complex projects. I've been working with both big companies and start ups, and I've completed a lot off high traffic and fast response, very complex projects that have, um, dozens off developers committing and contributing. So I know the best way to, um, approach a project and make it efficient, scalable. So I'm gonna teach you all those things that I that I know. Um and, um, one thing that I I I'm always striving to doing these courses is to guide you through the basics. Ah, or start with the basics. And then we want to advance topics in the most efficient way. I e I'm not gonna go into small details or maybe go through all the, um, all the chapters of a for example, Baekeland book. But I'm gonna go through the most efficient way so that you can get yourselves up and running and ready for development. Um, I'm also gonna be teaching this us hands on course in all the courses. That means that you're always gonna learn by doing and not just getting a lot of information off the projects or the courses or the languages before actually doing stuff. So it's gonna be very hands on, and I'm not gonna sugarcoat it. Um, it'll be I'm gonna teach you the hard way. Which means I'm not gonna teach you, for example, how to use my sequel or a database using a coolie like PHP. My admin. That's another way that professional developers do it. So I'm not gonna go ahead and just teach you something That's E. C. Because it's just easy for you to use it. You're gonna actually learn the tools the way that professional developers do it in in the leading tech startups. So I hope that you join me and that you enjoy this course on bond. I'll be there to assist to in every step of the way. Um, that's why let all the other students, But I can promise you that you're gonna learn, even though it's gonna be hard sometime, Um, you're gonna learn the proper way, and you're gonna be a professional Web developer in no time
5. Introduction to Cloud9: So now we're going to talk about what is the development environment that we're going to use. And I did some searching and I decided to finally go for Cloud nine. So Cloud nine is basically, ah, Web development environment. Think about it. I say your your server in the cloud. You can add it coding, and you can start databases and it works based on a technology every like, which is Doctor Um so I think it's It's ah, it's a great way for us to learn coding without, um, having to install things, installing python. And if you've if you've seen some of the courses I have, I always go into, like how toe set up. You know, the different environments and the databases and and all that. But I found that students, because they were just like starting to learn it, was kind of like an additional hassle for them to learn how to set up, you know, Windows, Paice, owner or Mac by phone, and then the data basis and all that. So I've decided to start using Cloud nine as the development environment for all my courses , and it's gonna be good because we're gonna be able to basically install and be able to code and work on this platform without having to install anything on our computers. And it doesn't matter what operating system you have for if it's Windows or Mac, you basically will have a lean it's machine running on, um, on the cloud, and you can edit and work on your application wherever you are. Um, the good thing is that they're they're pricing model. They have a free tier here, as you can see. And, you know, you can basically sign up, just enter your user name and password, and he has some pretty cool features like, um, collaborative coding. So, for example, you can, you know, called with another friend of yours or another student on you can we can install data basis and set of frameworks without any problems. So I think it's gonna be a good a good thing for us to use. And we're gonna go over it, um, a little bit us. We start doing the scores
6. Closer Look IDE: Okay, so let's get a little bit acquainted with different areas off cloud nine. So first you head over to see nine dot io, and you can basically just click on tried now to register, um, your new account. Um, once you click there, you can sign up with. If you have a gate, have account or a big bucket account, you can sign up with that. All the ones you can choose a user name and email and a password, and select here so that you can get, like, a capture and then create your frequent account. Like I said, they have ah free account here. They also have, like, some paid paid account ears. But for the purposes of this course, you don't need to really get into a a paying course. I mean, account. So I'm gonna log in with get hub. And when you when you sign in or you register, you get basically this area, which is the dashboard, and you have what they call workspaces and workspaces. Think of them as basically different projects and they're actually basically certain, like separate servers that you're creating with applications in it. Um, so initially you get this test workspace, and then you can create a new one, which is what we're gonna do when we start our first flask application. But let's see what happens when you when you select that existing workspace. But before we get there, if you click here on the name off the workspace, you basically have the capacity off. Like doing some editing you can have. Ah, you'll see a read me. You'll have the files that are in there. Um, so you can take, like, a quick look on. Leigh, Read me. Um is here in this in this test project, and here's a very interesting one. You have members and in members you can basically invite. If you have invited people, you can see them in there, um, to invite people, you need to be inside of the off the actual project. But you also you'll also see how much CPU using how many, how much of the ram and how much of the storage you're using. And they have. For the free tier, you can have up to one CPU 512 megs of ram and one gigabyte hard drive, which is more than then generous I find, um, but now that we know more or less, what's that about? Like I said, you click on the name itself. You'll see those those those statistics. But in order for us to actually start doing stuff, you click on this green open button. So once we click open here, well, we're gonna be taken toe the what's called the I. D or the integrated development environment. And basically, this is kind of like a code editor also has, like, a terminal here for the server. And you have a basically a file navigator, as you can like, you recognize from from similar type of applications, like coordinators Or, you know, even like, you know, work or editors. But, ah, here you can basically navigate what's in the folder. Right now, we only have this file read me MD on the side. Here we have basically, you can edit. Um, you know anything and you have an undo function as well, if you want. Um, it shares like a lot of the things that normal coordinators have, so it's It's very, very well built, Has a lot off capacity. You're not giving away a lot off, um, off power because you were using this disintegrated Ah, development environment. And here the bottom. We have the terminal, and this is something that I always kind off force students to kind of get very acquainted with because it's basically the the way that you interact more with with with systems we don't want to get used to using, like, graphical things. We want to be very comfortable with the with the terminal. If you click on this little kind of like a window function here, we will get a, uh, a standalone editor. And you can minimize again by clicking on that, um on that is likened. And 11 important one that you want to remember is control escape, which basically shows and hides that that terminal back and forth. Um, you can also, like, add tops here, for example. You can add a new like and I think when you when you've opened it for the first time, you'll see this in needed JavaScript editor. I usually close it because it's not something that we're gonna be using, uh, for this course, so you can go ahead and close it, but you can have another terminal window. Let's say from Ah, with another folder open or things that you want to do a swell. But in any case, um, it's it's ah, it's a very nicely integrated environment and what we're gonna look at next is some basic terminal function so that you guys get better acquainted with with terminal commands and how to copy and navigate directories and things like that.
7. Shell Commands: So the star playing a little bit with the terminal? Um, I have modified the callers as we can see here, Um, I going to Ah, you go here to Preferences, and then you go to, uh, terminal here. And then I put the background colder by clicking here to black so you can basically put any any combination of colors. I also increase the phone size to 18 so you guys can can see a little a little bit better. Um, and I close that and then let me put that in full screen and start, um, doing some basic a man so you can get acquainted with how, basically our linen, um, file management and and commence work. So the first thing we're gonna look is we want to know where we're at at a given time. And for that we use a chemical PWD, which is present working directory. And here it's It says that we're at home boom to work space. You see, guys understand. Home is basically usually the folder where the the accounts the user accounts are placed in . So if you had another user cold, you know Jorge, it would be slash home slash Jorge, and that's called the Home Directory for that user. And this still the basically represents that. So if you're in any that say we moved to any other folder, um, we can quickly go back by doing CD, which is change directory and putting that till they're there. It'll take us back to the to the home directory. Um, so and in cloud nine, there's a There's a workspace folder, which basically is where the projects are stored. I don't have a problem with that. I usually when I work on Lenox, I have, um, actually worked with the O. P. T directory. But workspace works finest well, so again to let us know where we're at PWD. So we're in the home Bhutto, which is the user that that Chlo nine assigns you automatically when you when you select the the bone to environment and then work space, which is a directory where, where we're at. So let's see at how we can see what the contents of the directory are. And that's basically the command ls So ls will show us what What files are in that current directory. And so, as you can see, we have read me dot MD, which is that Read me file that we saw on the editor earlier. Um, now, let's say let's say we want to create a new directory within the home. A boom to work space. The command for that It's make directory M k the I r. And let's say we create a direct trickle test. Um, Now, if we do ls you'll see that we have read me. And then we have a directory called Test. So in order for us to change the directory, get inside of that directory we used CD and then test. One trick that you guys want to know about is that you can put the first, like letters off, basically commands and directories and all that. And then if you press the tab, you'll see that it auto completes to whatever, um, the best matches on if you continue clicking tab, you continue seeing through those things. So if I If I do see the r and then click tab, you'll see that, um, it should get me toe. Since I'm not in the Marine, the workspace. So what? Basically, you will get the read me empty, but I'm going to go to the so if I do ls you'll see that? Read me there, um, on gonna change to the test directory here. So right now there's nothing in there. Um, the next thing we're gonna do is we're gonna use a common cold touch and touch is useful to create empty directories. Like, if you want to just create a quick, um, file that has nothing in it. So we can do, Let's say, test test, not txt. Um, if you do a less now, you'll see that, um, there's a test txt now in there. So that's a useful command we're gonna use it to. There's a, um there's a file name called Any P Y that we use for initializing directories as modules for python ball will get will get toe that quickly. If you want to clear the screen on, go back to the top. We used a clear command, and that puts us with a clear with a clear screen. Um, some other useful things. Let's say we have Ah, the test directory. Here. Let's create another directory called test. Um, in Let's say test in. Okay, so now we have tastic City and then another folder. We think that, um, cold test in. So let's say I want to move that folder. I mean, that filed spoon that's dot txt two. Their test in I use the M V command, which is move, and basically I'm gonna move test the txt to, ah, test in directory. So I do that. So I move. I'm saying move test txt to within the directory test in effect press enter there. Now, if I do a last, you'll see that we don't have test txt anymore, and it's in test in. But how do I checked up without having to go again? Like doing seedy testing You can actually do l s and then type the name off a directory. And if you press enter, you'll see the contents off that directory within, um, that that that folder that you have selected so you don't have to go inside of it. So that's the move, Command. Um, there's also, um, a very useful command called Cat. Let's go back to the to the home folder and then workspace. So see how I did that? Um, um, I'm now in the homeroom toe workspace, so there's a chemical cat and cat basically allows you to see the contents of a file quickly without having to, um, open theater or anything. You just want to, like, take a quick lands. So there you go. So if I do can't read me, I see the contents of the file without having to go to the to the editor. Um, if we have a long file, we can also use a command clear the screen called more. So if I do mawr and then read me, um, it basically will Pagine eight because this this file can be seen within only one page. There's not a whole a whole lot off use for it. But if you if you type more and there was more than one page, you can basically see the contents of the file in a paginated manner. Um, one more useful one is called man and man. It's like the manual so you can see the options that you have for any in UNIX or Linux commands. So let's say if I type man CP, I can see the Aled the options that I have for the for the copy command and you can press down arrow or up arrow to see them. The file. Or you can also press the space key and then paginated by page. When you want to exit, you just press the queue, the queue letter and it'll go back out. So, um and that's what basically, it's using the more command, which I was telling you earlier. Um, the last thing I want to talk about is the wild card. So if that they have, let's go to the test folder and let's say, let me create quickly, that's two dot txt and then test three dot txt. And there's something called Wild Car, which is the asterisk. Um, and it's a wanted to move quickly a bunch of files that started with test. If I do move, Test star or ASA is the T Eckstine and I want them in the test in folder, that ass teres is going to say, OK, anything that has that begins with test, no matter what, uh, letters or numbers come afterwards and then after that, a dot and txt are gonna be moved. So if I press enter there, you'll see that, um, I don't have the test. Um, you know files anymore, and they're all in the test in folder. So that's a quick look at terminal commands, and there's many, many more. And there's, like different flags that we can put, which are like parameters for those commands. But you're you learn them ass you as you use them Azaz. We go through the 30 course, but for now, that's Ah, that's a very quick introduction to the terminal commands.
8. Python Shell: So let's start playing a little bit with Python and we're gonna use the terminal again. Time will maximize this here. Um, with cloud nine, we have an option to use sports by Thorn to and buy from three by phone to is still very much in use because there's some libraries that still haven't been ported to buy from three . But I would say these days, most off the off, the useful or most common libraries and frameworks have been updated. So I'm definitely start. And I would start using python three from from this point on, Um and you know, it's it's ah, It's a good thing that we start using by from three projects to, um kind of like move our community or python community towards that, that newer version. So the way we access, if we use only python like this, we're gonna use we're gonna be basically using Python 2.7, which is the the last two version you can do dash V to see to check the version of it. So as you can see by phone, 2.6, 2.7 point six I mean, is what you get from python But we can also use Python three by just typing by from three, and then you'll see that we have 3.4, which is the latest by phone version. So that's that's good. So, um, there's there's a way to play with my iPhone and that's through the python shell. And the way you do that is you just use your state by phone or by from three and then press enter and you'll enter this Ah ah, basically, uh, terminal, where you can play with and do, like, small kind of functions and get to know by son better. So let's start doing some commands and start playing with it.
9. Arithmetic Functions: Okay, the first thing we're gonna do is, um, use by phone as a calculator. Yes. So you get an idea of what things we can do. Um, if I type through plus three, I get five. So, you know, that's that's, ah, basic stuff in there, but, yes, you get a feel for it. So three minus one is to for multiplication. Used to star three times eight for division used to slash 10 divided by two. Ah, One thing you'll notice is that in this operation we got a what's called a floating number . So it wasn't five integer body was five point. Oh, that's because my family is basically kind of like, uh, advancing or forecasting that you might get not, um, integer number. So if we do then divided by three, you'll get 3.3333 which is, you know, the floating number. Um, we can also do, um, exponential by doing two asterisks. So to the power of three is eight. Um, and you can also get the module is which is the reminder of a division. So 10 modules, three iss one because you know, 10 divided by three is three and then you get one more as the, um, seem arduous. Um, the last thing here's like we can, um, group terms together because usually divisions and modifications come before substructure in and addition, for example, if we do two plus three, uh, times five. What will see here is that the multiplication comes first, so it's 15 and then it'll add to two, which is 17. But if we wanted to do the two plus three first you put a parenthesis there and then in that in that case will get two. Plus three is five times five is 25 so that's kind of like basic arithmetic functions.
10. Variables: one key concept in by phone and in other languages is the concept of variables and viable czar basically boxes where you can store, um, some value in it. And then we can reference that value from from that boxes name, so to speak. So let's say if I have, say, a viable called X, you assign it a viable using the equal command, and then you do three. So from now on, X is equal to three. To see the value off a viable, you can use the prin command. So you do print Were you spying this season? Python three used to be print with apprentices X on python to So now we get the value of it . Um, because it's a viable we can change the value whenever we want. So now if I do X equals four and do the print of it, I'll get the do the new value. So as you can see, you can change um, the values off off a viable religiously Um, you can also a sign say we have another viable call. Why? And we can also then now a sine x equals why? And that all that will assign the value off X toe the current value of why, And we'll see why I say that. So if I do print exe now you see that I get seven. But if I change, why toe 10? What do you think? The value of excess the value of X is still the old value. Because this was passed as a value and notice of reference toe the value. So a for for me to change the value of X, I need to, like, reassign x equal. Why X equals y. And then if I do X now, get the updated value. Um, and of course I can. Some those variables, um, explosive y equals 20 um, and you know, do multiplication is and all that. Um another interesting thing is that I can also a sign, uh, strings to viable. So if I do that, say, now Z equals hello. Um, if I pray and see here Ah, you'll see that I have Hello there. And, um, if I have another one, it's a Z Z equals world. If I type c plus zzz, what happens? There is a concatenation. It's not gonna add the values of it, but it's gonna just contaminate the strings. However, notice that we have no spaces in between, which is you know what? We're basically telling it to the self. Refer us to put a space. We would have to do something I z plus quotes plus c z. And then we get the proper hello world. Um, one thing that you cannot do, it's at a a string to a number. We get a an error there because we need to, um, basically convert that one of, you know, the Z toe. Ah ah number which is not possible. But for example, if Z was one right and C c watts equals to two, if I do C plus easy, I get that era. Right? But if I do end of Z, that's basically convert see into an integer and then I do plus easy, Then I don't get the proper result. Um, so that's more or less an introduction to Virals. We're gonna use them a lot, so we're gonna get pretty acquainted with them as we move on to the course
11. Checking Types: a way to check the type off, the viable or the or the number, not the number about the, um the the term that you're you have is through the Taiko man. So, for example, if I do type off one, it says, it's ah, it's a type off integer. So basically it's, ah, it's an integer number. If I don't type 1.0, then type tells me that's a floating them. That means it has, you know, decimals in it. Um, if I do X equals five and then I do type off X, it's as it's it's an integer because it's it's assigning it to, um to an integer number. So that means the viable is inherits the type off, the off the value on If I change that to a string. Um and then I do type X again. I get, you know, the nuclear new classes. It's a string. Um, one thing that do you have noticed maybe is that I can press the type the arrow top and bottom to kind of like go through history so I don't have to, like, retired things again. Um, and once again, you know, if I do type. Hello? Which is a string I'm going to get type off strength. So that's a useful thing. Toe Know and learn. Um, when you want to, like know what? What? The type off a viable that you don't know exactly what what it is? Um, um, kind of like it's Andi. Schools celebrate as just as you see. Very. It says class, we're going to get into classes in later in this section.
12. Variable Format: one thing that you want to get used to, um or know about is something called Pep eight. So if you go to Google and just search for eight, um, and foot Python just in case you'll see this pit eight, um, guideline. And there's basically the style guy for the whole, like by phone coding. And that includes, like, you know how to use code using taps or spaces. What's the maximum lying length? And it basically goes through all the conventions for, um for those, um, you know, functions. Oh, are things that we normally do when I daily basis. So when you have a chance and you have, like, you know, you're having a long lunch and you want to get used to or get acquainted with all the recommendations for for how you know we type code in python, then you should definitely read this. Um, but in any case, um, going back to variables for valuables, we use basically numbers letters and underscores, um, so basically, you know a good noma Good. Ah, viable name is, um you know my var Sony's I use a an underscore whenever I have spaces in there, so I don't do this. My bar, um or do my capital case bar, which is something that jealous refuses. Um, so on the other thing is like try to make viable names as explained, explicit as possible. Like make them meaningful. Don't don't do like, you know, X X. Like I was doing zzz before That was, that was, that's not a good practice. If you're like writing a riel project, it's better to put, you know, you know, database, um, index value versus just like DB I, you know, try to use explicit names, things that you can. People reading the code. I can't understand what's what's going on. Um, there's also like a uh, it's not. None of this is really enforced, but it's it's again what Bebe dictates. We have a constant, which means it's a number that's never gonna change. We use all caps. So, for example, um, data bays ah, name, for example, equals test. So that's that's kind of like it's a good practice to have caps, because that means whenever the person or the developer reading the code looks at that, he knows. Oh, this is something that doesn't change throughout the code base it's it's Ah, it's a cat, it's Ah, it's capital capital life. So that means it's not gonna change, Um, but there's there's all the things that you should definitely look at and take a look at pervade when you have a chance because it's, ah, it's useful for you to get acquainted with it.
13. Strings: Let's take a look at some strength functions. And, um, and helpers. Um, strings can be expressed as quotes like X equals hello or as singles xolo. One thing to know is that strings are basically a raise, and we're going to see a raise, which in pie thunder cold lists in a little bit more detail afterwards. Spot basically think of Honore as a collection off individual characters. So what that means is that if I do, let's say X off zero. That means that I'm going to get the first character off the string. If I do X off one, I get the second. So as you can see, it's basically a collection or array off the strings. H e l l O. And that's something to remember when you you can kind of, like, get the, um, you know, sub strings off off a string by putting a range off characters. For example, if I do zero calling three, I will get the 1st 3 characters off that string, Um, the same way. If I do three through five, I get the last two characters. Um, the thing is, um, as we were seeing earlier, we can con card innate to string. So if I to why equals? Um hey, then we can do explosives. Why? And e get Hello, Paul. Um, if we want to do, like, the the space between the tool I just insert that space in there. Um, we can convert, um, a string that I mean a number toe a stream by using the str function. So, for example, if I have, it's a c equals three. Remember how we said that we cannot come cut in eight? Um, the integer and a number if you wanted to say hello, Uh, three. We would do X plus str off three off z. So str will convert the number three, which is an integer to us strength and their their works. If you wanted to the opposite, remember? Like if we wanted to have a a string that was, um, basically a number we want to get the value of it. Then we do I nt There's also some methods that we can use that are already built in on the strings. For example, if I wanted to have the hello all in uppercase, I would do x dot offer and, um off That doesn't make a lot of sense, I guess. Um, let's say why don't offer and we'll see Paul all in caps and I want to get them all to lower than we do X off lower. So there are more methods like that. But you get an idea off off some things you want to, uh you know, there there are certain my foot. So you can that you can use and one less one that you'll use often is Len, which is what's the length off a specific string. So, Len off. Why is four which is Paul? Um, so, you know, take a look at string operations. When you have a time, there's lots of them, but these are kind of like the ones that are used most after.
14. Lists, Tuples and Dictionaries: So let's take a look at three. Um, very useful types off variables when it's called lists. Um, list is basically a ah, a list of values that can be numbers or strings or both. So let's say X is one common to come on three. Um, and you close them with brackets, and that means that that's a list. So every print exe you get the whole list even to get type X, You get the type class is list, um so least are very useful if you have, ah, basically an ordered or in order kind of like least off values that are, um you need to get access to. And a lot of times, things that come from like the database are are returned as us lift. So you want, like, be able to look through them and get their their viable their their values. One thing you can you're able to do is loop through a list. Um, but that's something that we're gonna we're gonna look at a little bit later. Um, another type, um, or another, uh, yeah, kind of like different storage. Um, Function or or or class is Stupples and Topolsky is basically used with parts. So you can do you know, X equals one comma too. And that's a Topol. So if you do type off X, you get a Topol. So one thing that separates the list on the two poles is that you cannot once a to police, they find you cannot update the values. So it think of a Topol as a constant of, ah constant list or a static list that you cannot change afterwards. Um, to get both a triple and a list value at a specific position. You do basically, um, x off. Let's say the index so actually X off zero, which is this Topol? It's one x of one is is to So it's ah, it's always you always starts the next at zero something that sometimes we forget, Um and what? Basically, you can get any any of the off the values off that off that list or or to pull using that notation. So let's say that, um, we want toe. I want to show you how the we can change the value off off lease, but not of a Topol. So does the find that ex again as 123 If I do X off, one equals four now if I If I print exe, see that I just replaced That won the second value 24 But if I did this Tupelo 1 to 3 and you'll notice that I put a comma after worst, that's kind of like the the way that you work with topples, you have to kind of like ended with with the coma, even though you're not putting a value there. So if I do why off one equals four, I'll get in there because there's no item assignment on totals. Um, the last type that we're going to see is called dictionaries and dictionaries are basically key value, Um, objects. So basically, if I do, let's say, uh, first it first is Jorge and then last ISS Escobar. And then I used Carly brackets for those, so they say is a dictionary and the way you reference it instead of doing X off zero, which you would do in a list, you do X off first, and that will return Jorge. A lot of times these are called objects. Dictionaries are called objects because it's kind of like the first on the last are properties of that object. And, um, and their values are the ones that you put afterwards. Um, the last thing that that we want to see is, um, you can do a list off dictionaries, which is something that you'll see a lot when you're interacting again with with databases . So, for example, let's say we have, you know, users equals and then we have, um let's say, ah, let's to find another another user. Us, uh, why equals first Paul. Ah, and then last name is, uh, Gram. So now I can do users equals ex calmer. Why? So that's a list off users. If I print uh users. I see that I have all these objects there, and something you'll notice is that I eat set to the dictionary first equals pole and Lasses gram. But now it's printing. Last first and 1st 2nd That's something that you can not control on dictionaries. Is three ordering off the off the key? Um, off the keys. Um, and it's store basically randomly in python. Basically, there's no guarantee off that off off. Ordering off the off those keys. Um, but there are things that you can do to kind of like manage that Bought something for for you to like always. Remember
15. Date and time: Python has great control functions for dates in time. Um, again, there's a lot of information, but we'll see some, like, really simple things that you can do. So the first thing you want to do is import daytime, which is a collection off date and time, um, functions and and utilities, By the way, we haven't seen this before, so import basically means, you know, loading toe memory, this specific module. And this is a lot of how Python works. It's, um, basically, you import or you kind off ad any off the libraries or utilities that you have in your in your false system. But you don't need to, like, have them all loaded at once. So that's how you, you know, pick and choose what utilities you're gonna be using in a specific file. Um, and we'll see a lot off that asses. We get into the to the course, but now, after I presenter, I have all these daytime functions available to me. But when we're going to see is like, um, it's this called daytime, uh, daytime now, and what that means is that it's if I print that I get a the state, which is, you know, today, state and the the hour. Um, right now, off, off, off the computer. Um, so basically, since CLOUD9 operates in the cloud, I believe this is said already to, um two UTC, which is basically the the, you know, universal time or green each time as a So you have may have heard. Um and this is have very good practice. You never ever used the local time toe store as your time stamps because, um, you're gonna be basically, users are gonna be in different time zones, and you don't want to be doing conversions. Um, after the data husband stores. So remember, this is a golden rule. Always store time or dates in the database as UTC. But we'll see what? What? How we do that for now. Let's say this is the local time. So if I do now, um, it's a type off. Now you'll see that it's our off type daytime datum. Um, but now I can just things like Why don't year? Um oh, sorry. Now the year and you'll see that I get the year for that date. And I can say now that our I will tell me the hour. So, you know, I can basically, um, be able tow bars. Different difference. Different parts of that off that data. Um, you know, in order for us to start the the UTC properly, we need to import this specific, um, class or function ical daytime from daytime import datum. And now what we can do now is, um it's a time you to see, and we assign that to daytime UTC now. And that will give us, um, the UTC, uh, for for this exact moment. And as you can see, it's the same, basically the same hours as Cloud nine gave us as the local time, which is smart. I mean, they're using UTC. Yes, there as their as their time. So you don't have to do the you know, you don't have to deal with that conversion. Um, manually, but I still kind of expecting and and store things using this function You to see now versus this now function, Um, something for you to always remember
16. Conditionals Control Flow: So let's take a look at, um at two very important parts of the iPhone called conditional is and control flow. So conditional is basically you want to compare one value with another. And, um so basically, if we have X equals three and why equals four, um, a condition would be is X lower than four. And all those conditions give us a either true or false. They're basically billions. Um, billions are, like, you know, logical, true, false, kind off virals. So, um, if I do X is greater than four, then I get a false because threes is not greater than than four. Um, I can also do, um, is X greater than why? And that gives us a false a swell. Um, one thing that we can also do is X is not equal to why, and that will give us basically is eggs. And then than the value of X is not equal to the value of why um, we can also to, um X is minor or equal to its a three. That's true because even though it's not less than three, it is equal to three on the same thing. Why is greater than or equal to four. It will give us true as well. Um, so those are the basic ones? Um Then control flows is basically you can control the where the program goes by doing, if conditions. Right. So if I to If X is lower than four, then you would have a semi colon there and you press enter. You see how we have three dots there? That means that by phone is expecting you to put a kind of like the the inner peace off that conditional. So you can press one space normal you have to do for I mean, the editor, you'll see four. But in the terminal, you can do just one, and that's fine. So if if xx minor before then, then print exe is lower, then four. Okay, so then if I press enter and then print, print, enter again, then it'll execute that because X, which is three. He's lower than four. So that that does execute. But it's safe. We wanted to do if why is greater than five, which is false, right? So we can do, uh, print. Why is greater done for? What will happen here is that nothing will get printed. Why? Because you know why. It's not great and five so it escape and continue on. But there was nothing else to do there. So one thing that we could do is do an else statement. So if you do if Why, uh, these were than five, then I bring this and they put Els and also semi calling there and then put print. Why ISS say not greater than four. So if I press enter again here, you'll see that it'll it'll execute the second line. See? So that's if else, um, there's there's like you basically build all your your programs, using a lot of this like building blocks. So it's very important for you to to know them. I will get to know, um, more off them us. We continue with the course.
17. Loops: Let's look at loops. Loops are basically like the word something that cycles until something happens. And then usually they exit. Although we can have, ah, limited loop. And then, um, you can go on for ah for a long time until you basically stop the program. But let's see what that looks like. So let's say we have this list, Um, and five x 12345 We can look through all those values by using something called a four look . So what, What Four doses that basically you assign value. Let's would call that vow in X, and you put a semi colon and then you'll do something if, for every single item, it will execute that and it'll have vow as thieve value for that for that love. So let's just go ahead and praying Val in there. So if I pressed Enter, you'll see that he went through each one and they printed that that value. So that's called a for loop. You use that all the time. That's coming, kind of like one of those, you know, very useful functions. Another one we can we can use is, um, a while loop and for that. Let's try something else that say that X equals zero on the local here will be while X is lower than six. Let's say then we do print exe and then we'll do another one, since we need to, like, change the value of X because that'll be checked every time that loop ends, we need to say that X is equal to explosive one. That means now the first time it'll be zero. When he gets here, it will be at it. What? And now it's gonna be one. Any checks again. So now X, which is one is lower than sex. It's still prints that goes one of off. So X now is two checks that and so on until he gets to five. Right? And when the springs here we bring it will bring five. It'll add 1256 And when he tries to run that again because because six is not no lower than six, it'll exit and continue with whatever comments you have afterwards. So they see that inaction. And, as you can see, it'll be executed from 0 to 5. Um, the moment that it became six, um, it didn't execute anymore. Um, so these are some of the most used look bloops, but there's there some other variations, some of the things that that you'll discover as as we go alone.
18. Functions: okay, We'll take a look at functions now so we can define our own functions by using the keyword death, which is, like, define So they're fine. That's a, um, plus one. And then basically, you pass. You can have nothing here, or you can have parameters which are basically virals that are set whenever this function is called. So in this case, we're gonna pass. Ah, next. Viable. Um, so once that is is set, we can do stuff with that. Viable. So, for example, we can say, um, X equals X plus one, which that's why the function is called plus one. Um And then we can then print. Exe. Okay, now we have that that function. And if if you type pl us and then press tab, you'll see that Python order completes that because it already has that in memory. So for us to be able to see what what happens there we can past five. And when we enter that it'll return six. So what happened there? It called the function it past five us. The X basically X equals five. A merry did X equals equals X plus one, and it printed that value So if we did hear 15 we get 16. So you get the idea. That's kind of like what functions are And, um, we can we can we basically use functions all the time as well? It's very important that we understand how they work. Um, but play around a little bit with functions and see what we what you can get out of them. One important thing that I want to, um, two guys know and remember, Um, because it's a fundamental thing. There's something called scoping, and basically the variables that are defined within functions are not exposed outside. So in this case, if I print exe here, um, you'll see that I don't get anything because it's not define, even though it's their within the plus one. But that viable is called. It's called a local viable toe. That function, and that's the way that python kind off like protects the data from from the outside to within the function, Um, by using that separation. So remember that sometimes you know, students forget this, and they're like, Why? Why can't I get X if it's seen within the function? Remember that that viable is on Lee seen, and it's only apparent or usable by that function, but not outside
19. Classes and Objects: So, um, something that you may have heard is that Python is an object oriented language and, you know, object oriented programming is something that has bean, you know, being used for a long time. And there are languages are object oriented, like java by phone. But some others are not properly object oriented, like JavaScript, um, and ah ph B. Which they kind of like have bean getting towards object orientation. Um, and the main benefit off object oriented programming. And using that concept is, um is you know how to better manage data and make things were usable, um, and basically allow you to to separate, you know, logic in a in A. In a better way. It's a concept that you'll not grasp immediately. It's something that you'll kind off strong a little bit on, and you'll get to it by by practicing a lot. But think off objects as, um off, Let's say a basically a a physical object that's represented digitally with basically two things. One is properties on the other s methods. Properties are, for example, if you have a car, property could be the number of wheels right, which is, you know, for a normal like to say sedan. It's four. But if it's a truck, it's like 16 or whatever the case might be, that's a property. And a method would be, you know, start the engine. Something that its's kind of like a function off for that object and the class we call classes basically as a blueprint or the, you know, the schematics for you to produce an instance or a clone off that off that object. So let's do an example again. If you don't understand completely, there's a lot off things that you can read or even by using by phone and flash. You'll get a better understanding of what classes and objects are. But let's let's do an example. So one thing you you'll want to remember is that classes are they find with, um, basically a a Oprah case for each one of the words and no on this course within them. That's kind of like the the pep eight off them. So let's say, um, we're gonna define a class gold car, right? So the car I'm going to just have a, um, basically a property cold brand, so I'm going to define a method called. Um, you know, said Brand, and you always put self as the first parameter for these functions that are within the the class. And it's basically a way of saying this can only be called from an instance off that car and we'll put something here called Brand. So then I'm going to say the the brand of the car is whatever you passed as that brand on that function and let's let's leave it at that. So basically, now I can I can the fine copies off that class or objects or instances, basically instances of car that are basically clones of each other, and I can set a brand for each one of them. So, for example, if I say X is on instance off of a car and I put far into this year, if I put type off X, you'll see that it says it's It's a It's a type of car, right? Um, but now you know, if I print exe, um, I I won't get anything. It's just that a car object. Um, but now if I want to set the brand, I'll call that that function by doing x dot Set brand and they will put to your Okay, So now if I If I get the brand of the car, I does x that brand and I'll get Toyota. Um, so then I can do another car, which is why. And then I'll do Ah, why? Said brand. Ah, Ford. And then if I if I tried to get X to the Y brand again forward. So basically ex. And why are instances off the off the off the car class? They're basically cars, and I can set Mawr functions. Tow them, which are called methods. In this case, said Brian, it's a method. And, uh, you know, manipulator defined properties like Brand is a property, so we'll see up a bit more of that asses we go along. But that's basically very brief introduction of what glasses and objects are. A couple of things I wanted to add to our class lecture is one of them is called Ah, magic methods. Oh, are their kind of built in methods, and we're going to see one that's really important. It's called the innate function, um, which basically instructs how we initialize an instance of the class. Ah, by requiring some some Bibles to be to be passed. And the other one is, um, the notion off, um, subclass ing, um, which is basically you can take a class and then, uh, extended. And ah, that's gold in inheritance. You can hurt the older methods and all the characteristics of that class bypassing the class us the s a first parameter. But let's check out how how that works. Because we would not enter the Python interpreter again by from three. And we're gonna define a ah, again the class car and without any parameters in there. So I'm gonna define a, um, a new method, a magic method which is present in many classes. It's very often that we use this and it's called in it. So we need. What it says is that whenever you create a new instance of the car, you need Toby, you need to pass this viable that. I'm gonna be listening here. So I'm gonna do that by saying I need to be, ah, provided the brand when I create the new and the new car. Instance someone and then here again. And what that innit method does is it's gonna set the sell brand toe. Whatever you passed in, Brand here. Now I'm gonna create another one. Another method. This one is not a magic method, which is called Get brand. And what that does is it's gonna just, um, print the brand. Okay, so now, um, if we ah, execute this. So let's say we're gonna have our first car, and it's gonna be, um Let's say it's Ah, it's my car. It's called it my car, and it's gonna be a type off car. Right? Well, remember now we need to instead of putting to parents is like we did before. We need to pass this magic method in it and they need by the wedding. I don't know if I said it's too underscores in it. And then to underscores all magic methods. Have that that, um um, that protocol you need to pass to under underscores. So ah, here. We're gonna pass Toyota as the other brand. So what happened? Basically, I create a new instance off off a car class called my car, and when I initialized that I need to a needed to pass this this brand. So this this Toyota string is gonna be assigned toe that um viable that were a defining on the in it. And then it's past here to the self brand, which is the the local or the local viable brand that that car has. So now if I do my car dot get brand, it brings Toyota. So that was said properly right? It is the same thing That's just accessing the brand directly here, which is Toyota. But as you noticing that in the top one, the top example, it's not. It's not returned with quotes because it's just printing out on the screen versus this is actually the viable Toyota. So that's, Ah, magic method. There's many more one that we're gonna be using on our owner examples on the database. Um, it's ah, when called ar e pr or reproduce, I guess it's ah, it stands for and that basically will print Ah, the representation off that record off the database record on the terminal whenever you you pull it and there's their soldiers that we're gonna be looking at as well. Okay, so now let's look at our inheritance so inherent and is basically I want to create a new I knew collapse, but I don't want to like, let's say, do this all the definitions and all the things that that class already has, so I want to build on top of it. This is very common when you like. It's a working on an open source project, and some other person wrote all these Great. Um, you know, functionalities around. That's a communicating with a ah, with an Arduino um, on your, um, that you can connect your laptop, Um, and you want toe build from our toe on top off those libraries. Then you can inherit those libraries or those classes that that library defines without having to repeat all the work that that older developer did. So this is a very powerful thing that object oriented programming allows us to do in Python . So let's say that, and I want to create a new vehicle type of class called truck, But this time around, instead of leaving it empty, I'm gonna pass car asked the, um, as the parent class on there's like a it kind of like a parent, um, child, um, kind of like relationship. And there So this class truck, when I do that class truck car, it's inheriting the innit? Method and the get brand method, so I can basically it's basically the same thing. But then I'm gonna, like, defined a new kind of, like method on top, which could be, let's say, Ah so car or base or rather, this tocar so I would have a tocar method. And I'm going to say when? When? When I call that, um, it's gonna print out towing car, right? So that's it. It's a very, very simple classical truck. So now I'm gonna my I'm gonna define an instance of that. It's my truck and I'm gonna pass truck as the class. But notice that I need to pass the the brand because it's it's basically that is required when when I defined, Ah, the truck class as a subclass, um, off the of the car class. So let's say this is a four truck, right? So see that it didn't give any air or anything. It's it's It's fine if I get in my truck, um, that get brand, you'll see that even though I didn't they find that method in here, I still have it available, and it says Ford C. But my truck has a very specific thing that it can only do not. The CART cannot do that, which is a tow car. So if I do talk, are here, it's a stolen car. What do you think happens if I try to tow a car with my Toyota, which is my car? Any guesses? Well, we basically get in there because it says that that car object has no attribute. Tocar and it's it's saying, attribute. It's basically like a method, but that method it's not available. So that's that's what happens to that original class. It's not modify at all by this new, um, new method that truck is defining.
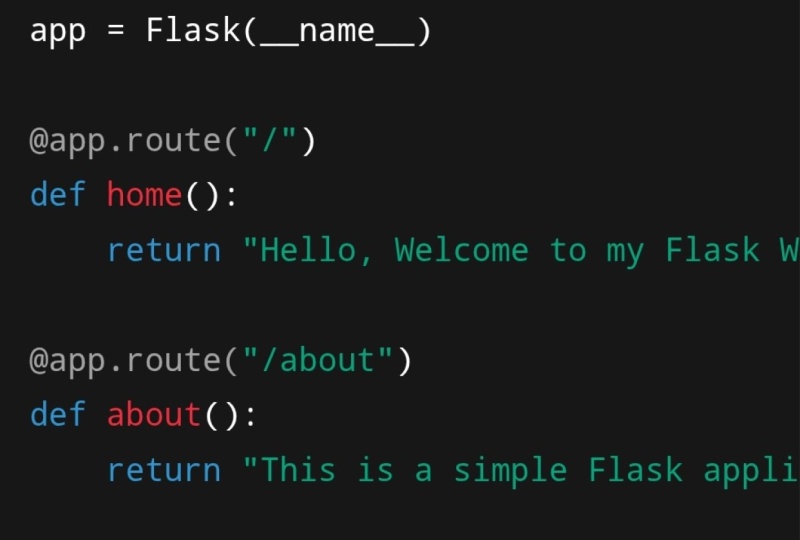
20. Modules: Okay, So, um, now we're going to see how to do this kind of operations without using the, um, the python terminal. Um, and basically, we're gonna do start creating some files. So to do that, I'm going to create a new directory. Um, so we're here in work spaces. Eso We're gonna make a directory called module tests, and, as you can see, there it created model tests. Um, and there's no files in their asses off now. So what we're gonna do is we're gonna create, um, within that. So I just control, click or out Click. And we're creating a new file here, and it's gonna be cold car, not B Y. Uh, usually you name the the files as the class they contain, but it's again. It's not a hard roll. It's not required. Bought? Um ah, we're gonna do that here. So now remember how well we're attack of before we were doing, you know, glass car. Um and then we're gonna say in it self brand, and then we're gonna do Ah, self brand equals brand, whichever you you're passing there. Um and they were gonna do another a method called get brand. I mean there were gonna print. Ah, self brand. Um, so now we save it. But when this little gray little ball there, that means that we have unsafe changes in the file. So make sure that you always you always see that little X instead of the little great ball . I don't know if you noticed. When I pressed the safe, it went from, like, yellow to green really quickly. Ah, yellow means that it's like the request is going out. And then green make make means that the server, the Cloud nine server. Actually, I was able to save the file to list right now to interact with that with that class. And so before you do anything, uh, we're not on that directory model 10. So make sure that you're going inside and you'll see why, Um, a little bit later. So another were with same module test. I'm gonna call the interpreter. Um, the terminal and we're gonna now be ableto work with that with that class. So the former for that is you usually put from file name without the P y from car import car. So I'm telling python from the car p y file import the car class so that I can do stuff with it. So as you can see here, a new directory popped up here called Pie Cash on the score, on the score, by cash on the score, the score, and within it you'll see that he has some, like strange file with That ends in P Y. C. And it's basically this is the compiled version off this file of carp. Ey off all this, and it basically allows Python to execute this files faster. So that's why by Chinese are very good language in terms off speed, because it will use this compiled versions of your foul instead off having to run the file from scratch every time. So now whenever I execute anything from Carpi, why it's gonna look first if it has a recent compile version of it, and then it'll it'll little done instead. And if he opened that foul, you'll see that it's all giver it. So it's all like machine code, so something to look for. Also, make sure that if you just get to ignore underscoring the score pie cash on the score in the score directories because there's no use for you to put this within your repository. So now I should have the car class a, um, available to me in memory. So I'm going to do the same thing I said it before. I'm gonna do an instance off the car class with the brand Toyota. Um, and now if I do my car, get brand and you'll notice here that I completely with with other, complete with tap. So say this. If a president the top here, it already knows what what methods it has available. So that's pretty musical. So if you do this, I'm going to get to Europe. So remember how I told you to going inside that directory before. So let's exit. You can do control the or type exit like this, and let's go back to the previous folder directory workspace and let's stop by from three. Right? And I'm gonna do the same thing from from car import car. I get an error. It says No module name car. So this car file it's not being able to Toby loaded on the, um on the directory from that directory mean So what's happening here? So, basically, if if where you run python from makes its a lot off. It's very important. And you're going to see no module name. Block a lot in your careers is just, you know, try to do some common sense and ask yourself, where am I running python from? Are the directories that I need? Um, for those, um, available to me. So the way that you fix this error is basically, you need to check that you have a very magic another magic, Um ah, thing here. But it's but this time it So it's a file, and it's called in it b y just like they in it on the class. Now we're gonna need to create an image file within model tests. But before I do that, let me delete this. And one thing that you'll want to always, um, do in your in your work is to be organized well organized. So when I delete the by cash file and I'm going to create, I'm gonna see the toe module test. And I want to create a director called vehicles because when I want to do is I want to put all the, um, the classes that have to do with vehicles within this folder. So I'm gonna move Car B. Why? Within vehicles? OK, so now vehicles has that and for all, still be ableto call vehicles A module. Okay. I want to create a file called in it B y. So new file. I'm just going to score in it that Ah, and it I'm just going to score p y. So it's on this going to score in it on this Going to score dot people with this file, you don't have to put anything in it, although you can. Technically, um, gonna say yes to this. No, don't. Don't keep it. That's the old carpet. Why? Okay, let me open it. Here. Here, you can put also code. And whenever you import from that module, that court is going to run. But for this this time, we're not gonna do that. Okay, so now notice that I have, um, that vehicles holding their if I see what's inside vehicles, I have to any people on the carpet wife. And I'm gonna run by fun from the top folder module tests. OK, now you're going to notice how the foreman is going to change a little bit. I'm going to say from vehicles dot car import car. So what's what's Python saying? There is that from the vehicles module And what defines that as a module? Because it has an NDP. Why fire within that folder? So it treats it fits vehicles as almost as if it was a P Y file itself. You see what? That how interesting that is. And then you're importing the car file. Ah, um, on inside that vehicles module, and then you're going to import car the car class. So now I can do the same thing. My car equals car Toyota, and then my car get brand. See, everything works perfectly fine. So I'm running by thumb from here from module tests. Um, what I importing from vehicles? Carpi? Why the car class? Okay, so that's something that it's really important for you to, um, manage and to be able to master on something that even, you know, it's us. And experience developer, this model not found. Thing is you're gonna have You're gonna have it. And you just have to, like, stop for a moment and think of yourself. Where are you going? Running python from those are called a path. So you can. You can also like the fine paths that that can be searched. So so to speak. We're going to see that through other course, but But remember to have that in it b y file on your module, so you can you can do stuff with it. Okay, One last thing that we're going to see here in this. Ah, this lecture is Let's say that I want to do by found three and then import the dual that I want to like Run is correct. That does all that for me. How should I do that? So we're gonna create a new file at the level of model tests, and it's gonna be cold. We're gonna call it wrong people. I okay. And what's wrong? P i b we're going to do You're gonna be able to basically do what we said or we did on the Python interpreter, but problematically So we're going to do the same thing that we did before from vehicles car import car. Um, and so now we're gonna do, um let's say my car equals car Toyota, and then we're gonna do my car. No, my car. Get Brent. This is something really interesting. You see how Cloud Nine's editor is Is kind of loading the models or the methods? Um, it even is gonna, you know, tells me, like, what? What parameters do I need to pass and all that? So this is pretty useful. It's kind of like already giving me hints off what methods are available. So that's that. We're going to save that. And now instead, off loading the Python terminal, we just do python three Run B Y. And there you go. You get Toyota. That's what it just ran all that. All those commands and it printed out to yoga.
21. Parameters: Okay, The last thing I want to cover here with with our fight. But python introduction is function arguments or in this case, classmethod arguments. And you'll see this a lot in working on a daily basis. So there are two types off functional arguments, um, or function arguments rather. And they're either keywords, um types or positional times. And what that means is that when you have, ah, method like get brand in this case, we don't have any arguments were no, we don't require any arguments to be passed. However, there might be an instance where you want to have, um, another function. And it's a that's great one that's called open door for our car class. And in this case, I'm gonna say, Ah, door number is a is a parameter or ah, one argument for that for that method. So what that means is that you need to pass in this case a an open door function, toe that class toe or rather that car instance, and define what door number you want to to open. So let's say it's one for the driver and two for the to the side of the driver's side and then three and four for the two in the back of the car. And, you know, I'm assuming that it's a four door car. So in this case, I'm going to just say, um, let's do a print statement and and will say Opening door and then, um will just tack on the door number and let's make this is us three str because it's ah, it's a number. And that's the way that we should be able to to go incarnate those two strings, right? So we saved that eso here. What I'm defining is that the door number is actually a positional argument because it's the 1st 1 Okay, and we'll see. We'll see a better example when I do another one, but let's some let's play with this. I'm just gonna run the terminal and, um, let's say from car from vehicles, the car import car Oh, I think I'm not in the right directory, So let's go to model tests and try that again. So there we go. So now we have you know, that's a my car, vehicles and instance of car, and I believe now we need to pass a sparkler in it. The the brand, right? So it's a Toyota. So if I do my car get brand, um, we'll get that, but notice. So I'm gonna I'm gonna try to open a door, right. So let's say what happened? The driver's door. So I say, open door. And if I don't best anything, I'll get in there because it's saying it's requiring one position argument door number. But that means is that it knows that the function requires that the first does the positional moniker here. The first argument needs to be some sort of off value that that the function needs. So I'm gonna try that again. I'm gonna say my, uh, my car, Open door one. So now I get opening door one. If I passed too, I get opening doors so you can see that that viable has been assigned here. When, when I call that function and then it's it's printing it out here, and it's kind of like available for that for that function from that from that point on. Okay, so now let's destroy another. Another method we're gonna add, which is gonna be, um, we're gonna have a ah function or a method for these class that allows me to turn on or off the, um, the blinking lights. OK, so let's say deaf, um ah, blinker control. And what we're gonna pass here is gonna be left. Ah, blinker and right blinker. So I'm gonna have to say it's either on or are off. Okay? And here I want to keep, like, the status off the blinkers in the kind of like in the class itself. So I'm going to say self left blinker equals left blinker self right. Blinker equals right blinker. And I'm going to just say, um print, uh, I want to say left. And then the status off that linker and then right, str so right to blink, Okay. And, um, close that. So what I'm gonna do is I'm gonna actually check with an if so that I can turn on and off. So if left blinker, um actually, no, that won't work. And I will tell you why in a second, So we need to pass both both of those functions. Okay, so once again, I'll do the python here, and I'm gonna import and put an instance off the car. So now I'm gonna do my car dot blinker control. But I need to pass left Linker equals, say own and right blinker equals off. So now it's saying that the left blinker is on in the right Blinker yourself, but you know, in when you're driving the car, you don't really tuggle or or passed both of those things. You either passed one or you pass the other. I either little kind of lever, right? When you put the lever toe the, you know, upright position, you're turning right. And then if we put it on down position and it's it's you're going left, so I wouldn't make the function kind of like behave a little bit like that. But the problem is that I need to pass both. So what happens if I just pass? Um, the right wing or the left blinker? Only I get another. It says missing one required positional argument, Right blinker. So you see here is like saying I need to pass the ah, the 2nd 1 And so that's kind of like annoying. Right? Um, So what do we do there? So we have the option to do something here, which is we convert this instead of being a um, a positional argument we're gonna do This s A S. Ah, it's ah, keyword argument. The way you do that is you can put you can put an equal signing here, okay? And then you can pre ah, load the the value off those off those arguments. And, um, and from that point on, it's ah, it's gonna be an optional or or or basically you can either pass it on or off. But, um, let's just start with this one with the right blinker. So you see this how this works. So I'm going to say the default value of right blinker is going to be off. Okay, so if you don't pass that it's fine. It's gonna be wife is going to say All right, wing was impasse. So that's fine. I'm just gonna Preed defaulted toe be off. So you see that in action? So we'll do this, um, important this and then I'm gonna say my car is car Toyota and now I'm going to just pass the 1st 1 which gave us a never before. So let's see what happens. See, now I can pass only the 1st 1 I mean, the left blinker one and everyone and I didn't need to pass. So that is from that point, it's It's called a, um, a keyword argument because the keyword is right blinker, and it already knows that that might be or might not be passed to the function. One golden rule that you need to know is that you always put past the positional or required parameters to the left, and then they once are optional. Um, or key were arguments to the, um so the right oh are basically trailing. So so always list the ones that required first and then the the ones that are optional. Or have a pre set value toe the toe, the trailing side. So now I can really do what I wanted to do at the beginning, which waas basically have this kind of on a total basis. So if I put both by the fault are off, I can say if left blinker equals on, then set the self lit linker to to on and then put the right blinker to off and the same thing. Um, if right linker, then that's like else. If else if right blinker is on, then you want to um, basically put the right blinker toe that value and turn off the left Linker if he was on already and take this out. So now the function is gonna be If I passed the 1st 1 us on, then the right blinker is going to be turned off. And if I passed the right blinker on, then the left thinkers gonna be off. So let's see if that works. Um running stunned, she ate the car. Perfect. So I'm gonna do my car. Ah, blinker control. And then I'm gonna plus left blinker equals on. So what? What happens here is in passing this on. So even though the, um, the right blinker value can be be on, it'll be turned off. So let's see that Words. Okay, Perfect. So now I have the left lingers on and the right one is off. So what happens if I instead buys the past the right blinker? I'm gonna turn right, Right. So now they see the life. The left one was set off, and, uh, the right one was turned up. So I know there, uh, quick thing that I want to mention is that if you can, you can also pass or make this parameters be none. And what that means is that there might not even be be passed, and they're gonna be initialized with with a non value. So that's that's the way that you do like you. No parameters that you want to be able to pass or not pass. It doesn't really matter. And you can, um and you can make, you know, check if they're sad or whatever they can be. They can be passed the last thing. And again, this is this isn't for you to remind this. Like, if this is a required one, always put it at the beginning, and then the ones that are not required to the to the end. So that's it. I think we're ready to start building our Fleiss application and, you know, play a little bit with this and and have, um, you know, make up some some fun, more features toe our car class. Um, and you know, if you have any questions, let me know
22. New Workspace Virtualenv: perfect. So we're going to start our flask, Um, adventure here, and we're gonna start by creating a new workspace and, um, basically start our first flask app. So create a new workspace. You're gonna have to define a ah project name. Uh, and we're going to call this the, uh hello? Up. Um, you can put out Trump description there. Uh, there's no need for that. You can also, um, make this private or public for for paying customers you can do. Um, I think more than one. If you're like a free customer, you can only the one private Berber account. And you can also clone from existing get, um, repository, but for us, we're going to start from scratch. Um, so there's also these templates here. You can do, you know, custom. This is Theo Bone to basically logo. A custom open to installation. You can do which they may have five. No Js. All these things were gonna just use custom here and then create war space. So now it's basically creating a new server for us. Um, and, um, it takes a little while while it's creating that container, which I, as I mentioned before it's using docker containers. So here we go. We have are our container there One thing that I will tell you right off the bat this. Hello Up here on, it's something that I'm gonna probably contact See Cloud nine to see if they can change that. It's a little bit misleading because it appears as if you were in a hello up folder. But if you see PWD, you're actually on home a boon to work space. So, um, this is referring basically to leave toe the workspace folder and not the, um the hello up There's no hello up folder there. That's something that tripped me off a little bit and it tripped. Also some, um, some of my some of my students there's also, like, navigate and commands here, but I always keep it on workspace there. So, um, let's create on actual folder for our our ah first project. So we're gonna do make the air, and we're gonna call it flask. Um, underscore in it. Always used, underscores for folders on you can use Stashes as well. The foul system will let you. But if you're doing python work on, you're gonna up half modules that, um, that you're gonna have to import it center. It's very to use on the score. So, in one in basically a golden rule that you wanna have from now is that always always have folder names with on this course and not not dashes. So that's why I recommended you put a dash in here. So you remember this is not a folder. So but hello up or, you know, whatever the words temporary by dashes until you remember. Okay, so now we're in the flask. We're gonna go in the flask, innit? Folder? And that's how are basically our home folder there. And the first thing we're gonna do is, um, we're gonna have, um we're going to create basically something called a virtual environment. What's a virtual environment? Virtual environment is, um a It separates each projects where you have you can have multiple projects. Were simply can have a flask in it. Project that you can have another like, the flats block problem that we're gonna do afterwards. Is it gonna be another folder? And then each folder it's gonna have its own set off libraries, um, version off python, and you gonna be able to run all this in the same server. So that's a pretty big deal. It's It's a great thing. And it allows you to track which which libraries? You installing that folder by using something called A requirements file. But don't worry about all that. We're going to see that through other course. For now, Um, just make sure that you created your folder, and now we're gonna create this virtual environment. So how do we create a virtual environment? It's very easy. You use virtual and which is this command that, um that is, um allows us to create this this this separated environment. And then you're gonna dio basically you put a folder here where that well, where those files, those libraries, those python versions we're gonna live in. But because we're using Python three and boom to or at least cloud nine, you can check the version here. But if you do python, that's fate. You'll see that it's by from 2.7. So we want to do a veto environment that uses by from three. So for that you do virtual and then you pass Dash B, which is python version, and you put by phone three. That's basically the execute herbal that we're going to use on. Then the name of the folders gonna be ve envy. Um, you can put any name you want in there. However, it's easier if you use it always the same the same name, because you know it's gonna be second nature for you, too, to always activate this virtual environment, and you're gonna see that in a bit. So virtual em dash be Faison, three VND. So what happens there is that it creates a new virtual em with with python three within the flask. Innit? Folder. So now, um, if we see here, see, you'll see that it has a new folder called Virtual Environment. If you're looking there, you're going to see Ben, which is the basically some commands that retirement needs to execute another. See Lib Labour's world. The virus will live and if you click here, there's python 3.4 and then side package is going to be another important one because that's where the older packages or the libraries and when stole, are going to be installed at. So, um for now, just know that we have that V and V p um folder in there. So now what? What What is it that you do? You basically need to activate this virtual environment. Activate means that from now on, all the commence for installing things and for running things are gonna be done as if it a CIF This environment was your whole server. So the way to do that issue have to memorize days, but you're you'll remember That's you Do it over and over again. You do Source V E N V. Which is the folder with it before been activated. Okay, I want you to look at him. This here. You see how now he has a parenthesis at the beginning? I ve envy. That means that the virtual environment is activated. Do not And I repeat this in like red front Bold letters. Do not do anything with your project unless this V envy thing is on the on the beginning off the of the foul, um, structure or or the prompt, because otherwise bad things will happen if you, you know, install packages and that V and there's no turn on. He's not gonna install them here on B and B. It's gonna install them side wide or server wide and a lot off things will happen. So remember, um, always have that V and be there. So let's how does the act How do you deactivate? Well, once you're activated, you just type deactivate, and you'll get out. See, now there's no being and be there. Um, but remember your you know your had your coffee, your open up your cloud nine. To start working, you go to your directory flask in it or whatever your product is working and without, don't even open the editor. Don't do anything do source than being active and press those types. You just have to play like, type like two letters your spreads tab, and it'll order complete and make sure that you have that ve and be at the beginning.
23. Pip Install Flask: Okay, so now let's install flask. So flashes a basically a collection off libraries. And, um, remember that we have the ve envy in there. That means that we're good. Okay. Do not do this with without that. Also, just to make sure that you're on the underwrite, the bright version of the iPhone, and that the virtual environment installed the right version. Just a python Dutch, be if you don't see 34 You see, you know, two point something and you don't see three point something that your you know, your put your very own environment. It's not defined, um, or activated. Or you didn't pass the dash p flag properly and he didn't find a python. Three. Execute herbal there. So hopefully that's not the case. You should have python three 0.4 or something similar in there. Okay, so we have that. So how do install packages? We use something called Pip on. That's the bike by phone package installer that allows us to easily just, you know, do pip install X, and it'll go in the, you know, the internet. Look for that package, and then if it finds it, then installs it locally and it's gonna install it again in this ve and be labor python. Three side packages. So I'm gonna leave that open, see if we can check out when flask is installed. So, like I said, you do pay ping stall, and then we just have to pass flask. And as we press enter, um, let me put this a little higher here. Um, you'll see all the packages being installed in there. Yes, so you can see here. There's now flask. Ah ah, Flex folder. There's ah ah Jean job, too. There's a markup safe on. If if you read through the funds that were being stole the same thing you you see that, um, there was a flask voreqe soy ginger to its dangerous markup safe. So those are old libraries that flashed requires for a two to work properly. But, you know, you should see something that's a successful installed flask and all these other files if you got any errors, you know, try to check if you're missing something. If you mistyped it. Ah, etcetera. You should You should be fine. Um, And that means that now flask is is available. Um, so that's it. We're gonna now in the next section, start building our application or our first flats application rather step by step and let's ah, let's go there.
24. C9 Python Path: So I wanted to do this clarification because there's something that cloud nine recently changed in terms off there. Um, linking on. Lending is kind of like a a program software that is constantly checking if you have any kind of, like mistakes or errors on the on the code that you're writing. And they recently they're being kind of like improving their by phone support for, you know, things like, uh, maybe I and, um better, better kind of like linking and support. And one thing that introduced that it's not, um, doesn't help. Uh, kind of like our The way that we've been writing the code is that, um they now you need to like, um, specifically, uh, tell them or tell the editor the path where your virtual environment libraries work, and I'm gonna show you an example. And so you have on idea of what I'm talking about. So I have this, like, test import, um, workspace, and I'm going to do a new file here, And, um, so I'm gonna tow um, actually, let me let me save it. Then we create the file from here, and you file and I'm called going. Dad. Hello? p y. So I have a visual in for Eddie that have that has flask imported, I mean, installed in it. And as you can see here, if I go to side packages, you'll see that I have. I have flask in there, right? However, um, there's a little problem now that, um if I if I go ahead and start doing my code and remember that you need to like, um um source, uh, virtual environment. Activate here. But that's even before that. Um, if you do from ah ah flask import flask. Right. And you try to, like, continue working in your code base. Um, you'll see that you eventually get, like, a little like red. Uh, sign here saying, like meaning that the court editors not finding flask. Um, sometimes it takes a little bit to appear, but, um, it's if I can open another c opened. Read me here. I'm looking at Harris This here and see. I get this, like, unable to import flask. And let's forget for about this for a moment. So what's happening here is that it's, um the editor is not able is not finding the where the what That flask libraries, and it's currently looking just at the at the current path, uh, where the python path that they have pre installed, which is the one on the, uh, on the main server. So what we need to do to have that disappear and you'll see right access for other things that are imports from your virtual environment packages. I spoke to Toe Cloud nine and they actually, like were very helpful. And try to, um, kind of like work with me this this issue But what you need to do to get the red the red Xs go away is you need to like it's explicitly tell the editor where the side packages off your virtual environment are, and the way you do that is the following you go to the re envy go lib. So open your live here and then goto bison 34 right, And then go to Sai packages and they're right clicking there and use Put something that says open terminal here. If you see that, um, it will take you to the toe, the toe, that path and then you just dopey wt which is, you know, person working directory on you get this this this this path, this is the path from the beginning. I mean, from the root off the server to your side packages off your virtual environment. So just make sure to copy their, um um command, see or control. See? And then you go to the gears here and where it says, um hints, and I mean language support. You see, there's a bison path now in there and you see this there's there's two patsy there. Those are the ones from the from the server. Make sure you go to the end of the line in there, put a semi colon and then paste the path of you. Copy it. So you see, here it's the sack package, A spice on 34 the envy live, etcetera. And, as you can see here, it has the same. My column would be before there, the one that was already there. So you press enter. You don't need to do like, say, for anything. It automatically saves that and then close and close this one as well, and you see that this is going to go away in a in a minute. Um, because now it's finding the path were for flask, so you can continue working here. Um, and it eventually goes away. See? So that's the thing. It's a little bit of, ah hassle, because before, at least from when I was working with it, they didn't have that that problem. But now you need toe do that. You need to set your python path. And at the, um, at that library, um, that side packages path on if you see any, any any little right access with any of the packages trying to import, kind of like look at where they're stored And if you don't have that kind of liking here, but it's installed somewhere else in the spice and 34 um, kind of like directories. Just go ahead and put another semi colon and at the path where the containing path or folder where that libraries. So that's the update. Hopefully, that will solve any problems. And if you have any issues, just just think me
25. Minimal App: Okay, so let's start our ah flask. Um, journey here. Um, you should have the handle app workspace ing there. Um, we're gonna go ahead and open it. Um, perfect. So now we have we have our virtual environment, uh, within the flask. Innit? Folder? So remember, Hello? Dash up. It's not a folder. It's just the name off the, um um off the server of their workspace and a flask in it is the actual folder that we've created. And then virtual environment is the virtual environment. So before we do anything, remember what we need to do here before you start coding or doing any any kind of operation . That's right. We need to activate our virtual environment. So you do sores Vande being activated. And remember, you have to be there on the flask. Innit? Folder. So if you by any chance it's ah, Control. See that, um, it's a your in your workspace here or in home. You do see the workspace flask in it, and then in their you do the source. Um, sorry. Sores. Um, van being active. Okay, Now that we have RV and be there, that means that we're good to go it's clear the screen and the Stipe start typing our first flats application. Okay, so let's create the file where we're going to start the the application. Let me close this. Read me because we don't need that. And the late the file, um, the leap. Great. And I'm gonna briefly disappear the dis terminal by doing control escape. So let's grand your file here, and it's gonna be called Hello, P, y make sure that it's on the flask innit? Folder, and it's on the same level as they ve MB. Now, let's double click there to open it. And so the first thing we're gonna do is, um we're gonna type from flask import flask as you remember this from the modules lesson that we just saw on the previous section. This is just saying from the flask file import flask. Now, if there's no flask director here, how's it finding that? Well, so the thing is that we've seen a spot of the V envy activation, um, python eyes said to look for files within this side packages a swell of other directories. So that flask, um um, file or folder? That's being, um ah, reference. There is actually this this flask here. So that's how it's ableto find it. But let's continue from flask import flask. Um, usually there's the first thing that you need to do on the flash application is to define an instance off flask class by doing this line up equals flask and then a magic meant method called name on this Going to score name on this Going to score this name or the department or that's being passed here is just to make sure that you have on unique application, um, name, um for the for the flask instance. And on this kind of score name just contains a string that, depending on where you call this file, is gonna be either underscore underscore main underscoring the score if it's called from the terminal, or it's gonna be called hello if it's called from the from the python terminal. So basically just side that is usually what you do, um, to make sure that you have a unique instance off that off that flask app. Um, the next thing is, we're gonna define ah route and around it basically, the your l that you're gonna be hitting, and then we just put it in here. So you see, um, this little funny at sign of the beginning off this, um, off this method off the app instance is called a decorator, and a decorator usually means modify the next line or the next thing that happens after this, Um, with some sort off behavior and what we decorate is these function called Hello world. Okay, now, don't don't don't worry. If there's a lot off new things happening here, you'll get the hang of it as we continue to play with this. But we're basically they're finding a function within this file called Hello World, and we're gonna return. Um, hello, world. I don't believe we've seen return, but return basically tells a function when it's completed. Um, Or when he gets to that point, just throw that whatever viable or string or, um, uh, expression you have after the return back to whoever called it. Um, and we're gonna see how that works in a second. So now we're gonna say if name, which is the same magic thing that we have here. The magic method. If name equals main, then that means that were being called from the from the from the terminal from the from the command line and not from the python. Um, terminal. Um, so then we're gonna do app that run, and we're gonna basically leave that I say us this is to print it. So what run does It's basically create a server. That's all the time waiting until somebody hits a on address off that application. And, um, and just, like, routed throughly through this routes to whatever function it matches in terms of the folder . Um, however, since we're working with with cloud nine, there's a couple of things that we need to add in here. One is, um Before I do the import there, you need to refine a host. So we're gonna do this by saying host equals, um os that get environment viable. I p comma 0000 And this is basically saying the host for that For this, for this application is gonna be either the i p that's passed by Cloud nine just like a preset environment viable. That contains the servers I P. And we also need to define a port where this is going to run. And in in this case, we're gonna have, um, convert toe into Jer the, uh, environment viable cold port or past 5000. Okay. And then we close this, okay? And now we have we passed this as host equals host, comma port, equal sport. Okay, so you see how I'm getting, um this this errors here? Um, basically, I need I need to have always available, so I'm going to tow import. Oh, as and we should be fine. Oh, this air here saying on the fine, viable name. Yeah, I'm missing another score, so see how cloud nine centers? It's telling me all the time, Like if I have errors, that's very, very useful on the heirs. Are you city? Very expressive. So, um, that is ah, pretty Brickell thing. So let's save that, um, control s or command s if you're on the Mac and we should be good there. So whats happening again? Um, we're importing the flask class and extension eating an app or application using the underscore. Underscore name. Then we're saying if anybody hits the slash, which is like the top domain then executed this function and the function is called hello world and it returns to string. Hello, world back to the person that that hit that euro. And then this is like the main kind of like a runner part of the script, which is, if name is Maine, which means that it's being run from the terminal. Then we're going to define a host, which is the Cloud nine host and the Cloud nine port, which is Ah, the I p viable if it's set. And if not, it's 0.0 point 0.0. We just an I P. That's, ah, you know, basically explosives, the application to the world and then port Is the integer off the port m environment viable or 5000? Which is the flasks? Default. If you were running this on a kind of like a Lennox machine or or Windows or Mac locally, you don't need these two things and flash, but basically run by the fault on the 5004th. But that's, um, that's all you need to have for our first application. So let's see how it runs. So do control escape again, eh? So we can bring up the terminal and remember, ve envy has to be there. It's activated, and you need to be on the flask, innit? Directory, and you need to have your hello p. Why they're your B m v. Um, so basically, we're gonna do Python. Hello p. Why OK and hit Enter Perfect. So it says now that it's running on HDP zero points Europe, once you're aboard 08 80 which which is basically like it's running for every anybody that hits the port 80 80 which is the Cloud nine's development environment. But it's not really, um, you know, it's not really the, um ah, that port on the outside, it's it's bright running, really on the port 80 which is the normal, you know, kind of like your URL for extra P services. So how do we see this like, there's no how do I kind of like, look at the running application. There's this. Previ and run bottoms do not work with those. Preview just allows you to like preview a file, annexed email or static content and run executes the file, but unfortunately it uses the python 2.7. That's not our virtual environment, and there's a way to run it, using the kind of like you can modify what python execute herbal and you could potentially define despite unexcusable here and vent. But I haven't found the time to do that yet. Maybe a student that has a little bit more time Can ah, figure that out and put a example there in the in the forms. But for now, the way we see where it's running, where you go to the share here on the top and you see that you have on enter application and preview editor is to share your your code. Um, and application is the the actual were all there we want to look at, Which is these this string? So it's basically you are work. Um um, your ah, your projects Name dash, your user name dot c nine dot io. So if I clicking there and I click open, you'll get another tap. And there you go. We have Ah, hello world, Which is Ah, basically our first flax obligation running. Congratulations.
26. Starting with Git: okay, There's our beautiful flats application running. And as you know, um, um, I'm a big, um I recommend, like, really strongly that you they learn and, ah, use Get as your version control. If you haven't heard about get or you don't know about get a lot, um, there's definitely of course I want to recommend to you, which is the are owns essential get course, which is also here in you, Timmy and basically essential get course teaches you like the basics without going into, like, you know, cause Skip gates are very complicated tool that you can do a lot off things with here. In this course, I'll teach you basically the very essential things that you need to to have as a developer to work on a daily basis like there's some other, more specialized things that you could potentially do. And you can learn after you do the course. But a taste for basics stuff and to get your your day to day operations for forget, basically recommend that you do this or, you know if you want. You can also look at other get courses in una me or on the Internet, but I went out like that. You are quickly how we would do that here. So whenever I started project, I initially, you know, from the beginning, I just start getting my my get set up. So, you know, for those for us to do that, um, you have to be on the root folder, and you do get in it. That basically creates a get, um, I get in. Ah, folder. Um And, um, we want to have a did ignore file so that we don't have, for example, those python, um, compiled directories or things that we we we usually do. So I have a, um a starter gettinit file that we can use, which is the following. So being a new top here and just go to a guest. Doug, you have that come slash from serie D you and you'll see a get ignore fouling there. This is the getting nor so you should start with this one. Um, you can put raw here, and then just copy and paste that. And so we're gonna create at the same at the ruled level. Um, new file dot Get ignored. No, I did that file and put this which is a good starting point for funds that we usually don't need to check into a repository. Perfect. So now I'm gonna do get status to see what? What? What's new have to get Get ignoring him. Hello, P. Why I at those files in there, and I'm gonna commit this with first coming perfect. And now I can basically push this to get hub again. If you don't know any of this, that's fine. And you can continue the course without it. I strongly recommend, though, that you get yourself started would get. And, um, you know, let me know if you, um you know, if if you have any questions on how to get the course with with a discount, um, but definitely will recommend you to get get a spy off your professional developer tool set .
27. Debugging: Okay, so we have our application here. Um, with the hello world Askew can see everything looks pretty much the same. If I see here, I see Hello, world. That's perfect. So I'm gonna do control escape and put the make the application run again. Um, and there's the other world. One thing that you're gonna be finding yourself doing a lot is editing code and then checking the of this. Ah, if this change looks good and nothing is breaking So let's say we want toe change world to Hello, everyone. Um, I saved the file and then go and reload the page here, but I still see Hello world. So what's happening? Well, what happens is when this page is already, um, let's say this application is already running. Um, this, ah, this code basis not being updated because remember what I told you about having the application being cashed, which means that it's it's kind of like on a static mode, and it's just retrieving the the most recent version of the code base. But it's not really, um, reflecting the changes in there. So that's that's the pain, because that means that I have to like control. See here and then put python Hello, p y again. And now if I reload the page, then I'll see my change. But I don't want to be doing that every time. Right? So again, let's save if I change this through Hello world, save it And then we know the page Nothing is there. So one way that we can go around That is, um, by passing another flag and that flag, it's called debug. So the way we do that is by doing the following, we just have to add a We referenced the app, the app instance. Which is this happing since here. And, uh, let me clear that and then you put the bug equals true. Now you don't want to do this on a on a production environment because app debug actually is lower. And you will also are us weaken. We're going to see later. It will display the errors on the page. Um, I say as they occur, and we don't want to do that for, like our public facing application. We just want to, like, display Ah, a generic, You know, 500 error or application there with some like you know, nice image instead of like, spitting out, You know, the by phone error, stock trays. So let's see how that works. So I've did active articles. True. Let me bring up the, um, the server again, and I'm gonna run this again. Python had Opie. Why? So if I refresh here, it says hello world. But notice here on the bottom as I changed this to Hello, everyone. And then save as you can see, it says detective change in this directory reloading, Restarting with that so I don't have to stop and restart the server. The changes are reflected just by pressing refree Load on the on the browser. So that's a big help. And that, um that also helps you, you know, continue working on your core base without having to like, doing control. See? And then we started again. Another cool thing that we can do here is, um, when you have Abdi particles true. Well, let me show you before without the Abdi particle structure, let me save this, um, any control, see, just in case. And so what I'm gonna do here without the active illegals? True. I'm gonna introduce in there. So one thing I'm gonna do is like, let's say I'm gonna put I equals three, and then I'm gonna put, um, you visited. I need to put dollar courts because I need to put a You have visited something I'm gonna put, um, I times. Now, if you remember, um, from the, um, viable strings section, we cannot put a plus I here because this is an integer and this is string, so that should return in error. So what happens when you don't have to? Barnicle's true, and I'm gonna reload the page. I get on internal server error, which is this like how it would look on normal size and that's preferred instead of like, showing toe the public users What happened there's, like a more, um, like, nicer communication toe. The the user saying something happened and, you know, there was something unexpected. But when we're developing, we want to probably see what's what what went wrong. So, um, again, we are gonna put the barnacles true here, and we're going to run the application again and see what what happens. So see, this is a much different error message. Now it's actually telling us where the air is, and this is called the stack Trace. As I mentioned, it basically says, you know, from from the very in in ward or internal peace, What what happened on do usually just go back and kind of like escape until you get to like the actual application. Although after you've been doing this for a while, this this, some of these things might make it might make sense, but, um so here's the air that we really are interested in. It says type air can convert int object to string implicitly. So that means that I need to put a conversion of that I toe string before I can add it to those two strings. So that helps a lot. And this is something that, um, that we can we can definitely use while we're developing, but not not for the actual like public users. So the way to fix that as you like no, is I put stir, stir I around that save, and we started automatically. And then if we reload, we see you visited three times, so that's working perfectly fine. Another cool trick that I want to show you guys is, um, something called the by Sunday bugger. And, um, I want to just do something here, E I equals I close one. And, um, just putting some extra lines of code visited equals I and then put visited here. So I'm just like, starting that with with equals three. And then I equals I plus one, which would be four. And then I just like a sign visited toe I This is all a little bit off, like nonsense, but I I just want to show you something called Dirty bugger. So on cloud nine, if you just type PDB and you see that snippet in there, you just press enter. And this is something they're gonna use a lot askew, kindof like, are trying to home for for bugs. What? What this does is it steps O. R stops the execution off the script at that point. And then after that, you can kind of, like, go forward, back forward, step by step and see what's going on. So usually you use this when you have an error and you see the line number. You put this statement maybe five lines before, or something like that, so that you can see what what what's going on Step by step on the on the application as the acid runs. So when I saved that, it already recorded this. The the change. So now when I when I load here, you're going to see something, which is the pages not loading. It says, You know, it's kind of like in, ah, in waiting for a lap to resolve. And if you see here, you'll see that now we have something strange here it says, um greater than Homo belong to. Hello, p. Y. Nine. That means that it stopped at Line a Line nine on the Hello World function and you see, there's a little arrow that's a cursor, and that's where the execution the next command is gonna happen. So it says I equals street. So if I If I can actually interact here, see you can you can do stuff in here so you can actually like Ah, you know, print I on This is gonna like not return anything because what happens is that I at that point hasn't been defined yet. But as you can see, I can interact with the program as it was like frozen in time at that at that point to advance to the next line you repressed and And what happens is now it says, you know. Hello, P Y line 10. Hello world. So that means that I equals three was already executed and this is about to be executed. So now if I do print I you'll see that I get three. So that means that this line here was was executed And, um, you know, it's assigned three toe the I. So now I click next. It says visited ical Either means that I whose I plus one we can check if I is in fact for it is that looks good. Then I press next. Now I can see what visited value is because he was already assigned to four. So, yes, you can see you can like, step by step. Look at what's happening with the application. And that way you can really hunt down any any bugs. Um, if I want to like, if I saw the air or I'm done, you compress. See which means continue and then you'll see that the, um, the program will continue even though it looks like it's executing again. So I'll do see here. And there you go. It ended the execution, and if I see here, it loaded the right page. Um, it's weird that executed two times. I'm guessing because I hate reload. Maybe, but usually that when expression, when you press, see either it goes on and executes that one time. So, uh, remember, baby, it's that really useful, really useful tool the fight on the bugger to be able to pinpoint areas that you might have .
28. Routing with Vars: Okay, let's take this line out. Um, actually, let's just think this whole thing out and we're gonna put ah, hello world again here to have it asked. We started. So now we're gonna do a little bit more off a routing and checking out how to do different routes for different things. So let's say that now, instead of having this asked the index page, I'm gonna have to use to be the hello route. So what that means is that, um, check if that reloaded, it's reloaded. Okay, Um, what this means is now that instead off off on the route, which is this, like, basically this route here now the hello worlds went up your own Hello or slash. Hello for press. Enter there. I'll see hello world there. And then we put this a little bigger. So what's happening here is that I just changed the route. This is called a route, which is the access point for that function. Um, and I can, you know, add another one here so that it responds to the home page because right now, if I go to the homepage here, it says, you know, it's a 44 not found because there's no route here in this in this in this script that responds to the to the index. So I'm gonna create another route here, AP Raut, and I'm gonna call this index, and now I'm going to return here. Index page. Okay, so that's that's that, Um, let's check out the the page. Now, let's see that control escape yet that we loaded. So if I go to the home page, I see and expect year and let's check it fellows to It works. Yeah, it works perfectly fine. One other cool thing that we can do here is we can pass virals. So the tow this routes and those rebels are gonna be passed down to the to the function. So let's see how that would work. Let's say, for example, that we have, ah, profile page off the users like, you know, Twitter does, and we're going to call that route, um slash user and then slash Let's say that that I passed likes, for example, user um Jorge, which is my my user name in this application. But I don't wanna have, you know, slash Jorge and then slash you know, Jack and all the possible routes, right? We just wanna have one route that serves the appropriate profile page for every specific user. So for that, we use this notion off virals, and we just put here slash um greater than or lower than user name greater than. And that means that now, anything that, um slash user slash something, some string or some number, it's gonna be passed down to the function. But so how does the function get that? Well, you pass it as a parameter for that. So let's say we call this show user profile, and then we put use her name here, and that user named Viable is gonna be assigned whatever. Um, number or string was passed after the the slash sign here. So and we can check that out by returning. Uh, let's put our coming here. It's good practice to always comment what the functions that also show they use her profile for Daddy User. So I'm gonna return, um, you, sir, and then plus user name. Um, we actually should put, um, string in there just in case. It's a number. Although I think that flats will make this a string event even if it's ah, it's a number, but I think it's a good practice to just wrapping string just in case. So let's see if that reloaded There it did. Um, so now I'm gonna So if I go to the index page again, it's working. Fine. So now I'm going to try you, Sir Jorge. And as you can see, it's it's spring. It's getting that viable from the euro and passing it back to the function, and it's returning it back to us. So User Hori, if I put you sir Jack here, I get user Jack. So let's read another one. But this time around, we're gonna use something, um, cold, um, casting so that we can, um, basically expect what type off virals we're gonna be passed there. So we're gonna create another one called Post, so slash post. And then instead of just putting, I'm gonna put post I d. Here, right? And that's gonna be a number. I know it's gonna be 123 a number there. So instead of just passing that, I can put I anti on front animals and it'll know that this this viable that's going to be passed here is gonna be a number. So now we're gonna put the fine show post and then passed the post I d. And now, um, we're going to return, um, post. And then what would happen if I put both Saidi here? Probably I would get I should get on air because it's ah, it's being passes an integer, but let's check it out. So now we do hear post three. That's right. So I can convert on in and tow a string. So that means that whatever we're passing here, it has to be a number and extreme, just a number here. So the way we can fix that is by putting the string around here as well. So now if I reload, I get post three. That's that's perfect. And so what would happen if I put a string in there? Let's say, Jorge, I get a 44 on this because again, Flask is expecting an integer there and not a strength so, But instead of breaking down, it's giving me a nice you know, I couldn't find that page instead off just breaking, so that works pretty well. One thing that you're gonna use, um, very often is this? Like, um, kind of like putting, adding like a string to another string and things like that, but it's not as readable. Um, And you, if you have, like many, like, like, say, if you want to put like something here else and you visited, um x times and you have to put this again X So it's is it becomes cumbersome. Right? So one thing that you can dio with by phone and exists present in other languages as well is you can do like a print four morning. So the way you do that is you basically you put where wherever that string is going to appear, you put a percent s for string. Um, and then you just ah, put up a percentage here, and then you put user name. We don't need to put the string there because this is this is going to automatically cast the whatever viable here to a string because we're saying this is going to be a strength. Um, they're saying the same thing. Um, let me put a coming here. Um, show the post with the given i d. The I d. Must be an integer. So the same thing here. But instead of putting a percent s, I can do percent d, which is digit. And, um and I can do then now percent and then post I d without anything. So let's see if that works. Um, so let's do, um you, sir or hey, Perfect. And let's put post 15 and I get that. So it's It's a much cleaner to read, and you can put like you, sir, Person s visited percent the times, right? So and then, in that case, you have to put this in parenthesis and then put, um, this this foreman So it will take like the first string is the string and the digitalis. This did it. So that works. Um um, pretty well there. Yeah. We don't want him to find Miss it. So that's that's fine. Um, so that's it for for this This Ah, this lecture. I think you've gotten a lot. You can play around, do some some custom routes and see where what you getting there. And ah, we'll talk about, um, some new stuff next
29. Url_for: Okay, so let's look at something really useful, which is called the Ural four. And euro four is is a function that allows flask to look at, um What? Ah, what the euro or what the route looks like for a specific, um, function. So what? The way that we're going to check that is the following. We're gonna let's say, let's take this one out here. And so you see how we have up up route you serves last user name here, and he returns to user, so that function is called show user profile. So what happens is flask now knows that the function show user profile is associated with this route. And there's gonna be into instances where you don't want to, like, hard coat this this route, this girl here use when I like to find the functions because you know your else can can change often. And maybe you have that girl in many, many places. Um, and and then you want to change that, that you're l You're gonna have to, like, change, especially like in templates, which we're going to see later on. So the way that we can, um, that weaken um not hard code that, but rather let flask display. That for us is through, um, dysfunction called euro for So if we do hear return euro four and then we put Ah, this basically takes at least one parameter, which is the function name. Ah, but you have to put it in in quotes. So let's say show user profile. And then, um, that would be all. But the thing is, like, this requires this specific function. Show you so far requires I use the name so we can pass that as well. So here we would pass. That's a, um, Richard. Okay, so now we saved that. Um, we have to import your for from flask. There you go. And so what happens is now when when I hit the and expect no. Is that I'm not putting you slash user slash Richard. I'm just pointing Return What? The euro is for this function with if I pass this this user name, right. So let's go to the index page here, and I'm getting an error, etc. Oh, I have to put a viable here. User name equals Yeah, So it's It's not a this. This is called a positional see here it says Takes one posters, an argument, but two were given a position. Argument means that, um, this 1st 1 is the one that that takes that position. The first position is the function. But after that, there old arguments that need to have the what the viable is for that, Um um, for that parameter that the function need. So we need to pass. User name equals rich. So let's check again. And there you go, you, sir Richard. So there's basically saying the euro for the function show user profile if the Houston in Richer is past is slash user slash richard. But what happens if we change states? Toby used her name instead of user. So imagine we had that we were referencing that in that when you have, you know, the Twitter feed has holder profiles and you want to like, have If you click on the photo, you take them to the profile. If we change user name, user to user name here in this year in this rural, we would have to change all the templates that have the that slash user to slash user name . And that would be ah, really big, painful thing. So if we used your old four, that means we just change this and it will be updated automatically. So if I press reload here, See? Now it says, use the name Richard. So remember, if you're using your elder, you're referencing a euro for anything. Don't reference, Ural. Reference the function and use you euro four. And that is going to save you a lot of headaches. And of course, you don't see that utility right now because we haven't done a lot off stuff with templates , But you're gonna see a lot off this as we continue with the course.
30. Get Method: Okay, so we're going to start looking now at, um forms and the methods that we used to interact with forms so form a form is basically something Where you feeling? Data. Um, and then you have the submit button. Um, that's a very basic functionality that any, um, web framework needs to have and and flash is no exception. So let's, um, start playing with with this a little bit. Um, So I'm gonna create, let's say, the most known or or common form is the logging for. So, um, let's see if I can create something I'm gonna like, delete this things here and let's create a brand new one. So let's say we have, um a a Prout, which is slash Logan. Okay. And here, um, we're gonna gettinto methods. So xtalpi has multiple methods to interact. Um, between the browser, the page over the former you're serving and the server that's gonna get those virals and it's ah, it's a long discussion. We're not going to get into ah, the holes expect room, but we're going to see to ones that are very important. And those are the get method and the post method for this lesson. We're going to see the get method initially. So bear with me as we go along that that route. So here I'm telling flash that I'm gonna have a logging page that expects, um, forms to submit using the get method. Um, and I explained to you what what that means. So here we have the function we're not gonna pass any viable is here in the in the actual euro, but we're gonna pass them using to get the get method. Um, so for now, I'm just gonna return a a form. Okay, I'm gonna put some uhm html here. Um, we're not going to get a lot into HTML in this course because he's more about back end, and you can read about, you know, basic HTML stuff in. Ah, another course I might do one myself. Took over all these things. So stay tuned. Um, make sure that you, you know, subscribe to the newsletter at from Zero. I o, um, or follow me on Twitter from Syria. The U to, you know, get get information about that, but ah, so we're gonna do it. Here are four. Method. Get with action, Logan. So action means where is gonna post when I press? Um, it and then my thirties get us. We were explaining earlier. So now I'm gonna I'm just gonna put all in one line. I know it looks a little bit ugly. We're gonna make it better on ah, on ah, upcoming. Um uh, lesson on templates. So I'm gonna put an import type off text and with the name user name. So that's the viable that we're gonna be passing to the, um, to the So the script. Um, I was gonna do something here, so we have done in one line. But that's what I'm just gonna do it one line, because it's it's almost done. It's going to end up toe api here to separate. And then I'm gonna do ah, button type equals submit. And then I'm going to put some meat here and button in the end form. Okay, so that's just like a long one liner that will show us user name input. And then I submit button. Um, so let's see how that looks. Let me see if I didn't break anything, So control escape, it's restarted. So that's fine. And that's to slash and log in Perfect. So now these They use the name field. So I type things here and then I can press a minute. Now what happened? See if I press omit, nothing happens. Um, like nothing that we can. We can see, however, notice on the girl. I have a question mark now and it says user name equals DF DF, which is the string that I past year. Let's put something more recognizable, like Jorge Submit. As you can see, it does something like it. It clears the field here and then it says question mark use of chemicals. Jorge. So that's what get method. Looks like meth. The get method is it's going to stuff all Divi Valls, um, on the form after a question mark and send it to that Your elder with a sign that we defined there. So basically, it's sending use of chemicals. Jorge, um told the script by putting it on the on the euro off the, um, off the form. Um, so But I don't How can I read that user name? Feel there for that. We're gonna use something called request. So we need to Let's take your all four cause we're not using it anymore and add request. So request is the way that flask handles all these requests. All this, like posts from from forms or from http actions. And what we're gonna do is, um we're gonna check basically the values that user name is gonna be within the request as a, um us on Ah, list. OK, um, we're not morally sorry as a dictionary. So I'm gonna check if there's values on the request. OK, then let's return the user name that's present in that request. So I wanted to return use her name is and then I'm gonna put request values off the use her name index. So request values is basically holding all those All those input. Ah, name with the name being the index off that off that dictionary. And then if there's no values, then we're going to return the form. So that means that the person has impressed some idiot, so we'll see if that works. Um, check that reloaded. And ah, let's try it again without anything here, Logan. Okay, so I get the form it's try with, um Ah, Sam. Some met. Awesome. So I get user name is Sam So you see the first, the first version of that page, which was this Slash Rogaine. It's checking when it hits. That are then any values on the request. And the answer is no, because we haven't sent anything. So it goes in returns that HDP um or brother html string that renders us, Ah, us A form on the browser. But as soon as I type something here and I press a mitt, it sends that back to the slash again with the question mark is the name Jorge. And then request values does have a value. So it goes into this block, which is returned user name is and request values off your surname. So that's how you interact here with, um, with that field. And we can then do stuff with that. With that, with that value.
31. Post Method: Okay, One thing that will, um, that we were gonna be talking about is, um you know, security, right? And one thing that I will tell you is that get requests are no very secure because they're sending that information on the euro itself. So basically, they the user, or even even, you know, some, um, some person that's like sniffing. Ah, in some way I went talking here like hackers and things like that, but also even, like, you know, system administrators that are checking the logs off their servers, they're gonna be able to see user name here. And if we have, like, password as well, like you, they're going to see passport equals. You know, you're very secure password in plain text. So that's not very good. That's not very secure. So we want to change that and make that a more secure Um ah, kind of like setting. But how do you pass then through the log in this use of chemicals, Jorge without displaying it there. And that's where post comes into play. So what do we need to change here? So the first thing or the only thing that we need to change in the form is that we're gonna put post for method equals supposed instead of get. That's the first change. The second changes that we need to out here. The methods to accept both get and posed. But why's that? You're thinking, like, isn't now the form ethic post here? Why do Why do we need getting there? Well, so the thing is like when you first hit the this Ural, the slash Logan, you're actually using a get request. And the reason behind that is that the most basic operation that you're doing through http is oh, get me the log in page that get me the log in page is a get request. So any time you hit a page, let's say you go to Twitter. You goto Facebook, you go to Facebook slash profile. Those are all get requests. But the moment that you then feel something out and then you post using the post method, you submit something, then the post method is being used. So, um, one way that we're gonna be able to check um, aside from the request, values is we're gonna be able to, um, check the request type on the, um underscored the function. So instead of having every quest values, we're gonna use this, which is more, um, the most often use if request method equals. Ah, post. Then you return the user name. And if you're hitting, if you're kidding it the first time, it's request method equals is gonna be get. So it's going to return this this form. So let's see if that works. Um, it's to control escape here. It looks good. So we're gonna hit the log in. We get the use her name. No, wait. There you go. And we're gonna put here. Um, let's say Robert have pressed submit use. Her name is Robert. So one thing that you'll notice here is that there's no question mark user name equals Robert. And but instead, this was fetched perfectly fine from the request values. How is that possible? Where is that reasoning equals, Robert having passed in so that it's actually done through the, um, post parameters, which is which is a header. And this is going a little bit into, you know, more technical specifications. I recommend you like if you can step, uh oh. Are set aside some time to study how it's to be works. It's a very good I learning tool. But one thing that you can do here in chrome is is you can see the the headers of things are going on. And the way you do that is, um, you go to you can view developer on then developer tools. We can also use, um, in the markets. I'll comment I orale come. And J, I usually use J because it's a jealous we're console. But if you press that, you're going to see that something like pops up underneath and here, you're gonna be able to see things like the post requests and things like that. Um, so let's try that again. Um, but this time around, we're going to see the the the information being Some made it. So let's reload here, okay? And then we're gonna put, uh, Robert here and then submit. So it seems like different types in here, um, elements, things basically like the html off the page and some other stuff that you can play around with. Um, we'll check a couple of this in here, but one thing that you'll notice is that if you click on, so if you There's a long line here of things that are being ah served over when you hit that page. But if you press if you click on logging here, which is the log in request off the page, you'll see that Now you see a header stop here and if you scroll down, you'll see there's, you know, General, that was you know, the request response Headers, which is what responded was responded back from from the page request headers, which is kind of like closer to what we're trying to get at, um, and then finally, here, at the very bottom you'll see form data. And if you see here, it says user name Robert. That's where it's it. So it's part of a It's called off the form data header. Um, the post is hitting from the your l. So that means that no person between can look at the data and still the application's gonna be able to read it. So post is the prefer method. If you're sending, you know, stuff that that needs some security and you can use get for example, if you're the Twitter user profile is slash users. That's Jorge. Um, that's a more than an okay thing to post publicly so you can use get for those requests
32. Introduction to Templates: Okay, so we're gonna look at Tempt. It's now, as you can remember, we have this, like, ugly user name submit form here, Um, and we want to make that, you know, easier to to update. And you might have a different kind of, like front and developers doing the templates versus you are they get yourself to the back and application. So templates come to rescue. And templates are part off a software, um, methodology called M V C, which is basically model view controller. Um, M v Sea separates that I base operations from presentation layer, which is like the templates from the logic or controllers. So the views in this case would be the the templates, and the and the controllers would be the the actual, you know, p Y files like this one here. So we haven't seen the models here because we don't have that I basis yet, but, um, we're going to take a look at that in the next section. So before we do anything, let's erase this. Um, and we're gonna grade at a brand new ah, routing there. So we're gonna go ahead and create a templates folder. It has to be on the root level, and it has to be called templates. Um, we can modify that through the settings, but we're not gonna do that. We're just gonna do the default, and then we're gonna create a new file. They're called hello. Html and this falls are basically ext email. But they have some viable management. They're a swell. So we're gonna save this and let's to Ah, very simple xml file again. I'm not gonna, like, describe in a lot of little what I'm doing here, because it's not a front end, Um course, But this is like, ah, very basic structure off a, um of a next email. Five, um, flat. So here, we're gonna have, uh we can do conditional in here. So, um, but let's start with something simple. So let's say just each one Hello, world. And, um, that's basically it. Um, let's say that. And now for us to render that template, we're going to create a just doing up route, um called Hello. And, um and we're gonna define hello to be a, um basically returned that template. So to do that, we use this function called render template. And, um, it's rendered render means like it's not straight up the same content. But python will actually do some some, let's say, computing on top of it or processing. So that's why it's called Render Template. But in any case, um, we're gonna pass the hello html there. Ah, and that what that is doing is gonna, like, just return this this template Ah, sa next email file. Um, one thing that we need to insert here is rendered template, which is a flask function that we need within within the script. So that's that. Let's see if the application is running. Yep. It's running fine. So let's do Hello here. And there you go. So this is actually the tempered that we have. Ah, that we have to find here. Um, and, uh, if you see the the page source, you'll see that it's the exact same content that we put on the London extremophiles. Now, we're gonna take it a little bit further, and what we're gonna do is we're gonna see how we can put viable seen there, and, um, and kind of like, modified, attempted based on ustream foot. So when you put a just gonna be able to pass. Hello. Name here. And we're gonna pass that name. Um, in here you can do. This is something that I don't think we've seen You can actually pass. The name equals none, which means that it's not required. So that was gonna allow us toe to serve? Um, hello by itself or Ah, hello. Name. And I'm going to create a new route for that first case, because otherwise it would be we would need that training slash after. Hello. So this is also something that you can have multiple routes assigned to a specific function . Um, but any case, Hello? Name equals known means that we can render hello just by itself and hello. Name. Ah, hello. Slash name. And the name is gonna be populated with whatever we pass after the hello and is ah, very important trick. You can pass here as a pair, basically the viable that we're going to get, um, assigned through the euro. So what this means is name inside the template is gonna be equal to the name that we have passed in here. Um, but just look you So for you guys, toe, see it better. That's called this name template so that you can see the difference. Um, And then what I'm gonna put in here is I'm gonna have alot and then to access that viable inside. I put too curly brackets on. I put name here. Okay, so there's a lot of stuff in there, but let's see how that how that works, we see that it's it's running fine. And so now we're gonna do hello, slash Jorge and we're not seeing the horn all I'm sorry we assigned hello. I mean, named template instead of name. So see how name is not being right here, but name template is gonna be read, So it's restarting. Let's try that again. And there you go. Hello? Or if I put Hello, Robert, I get Robert. So you see how it's not. It's not returning this exact HTML, but it's actually rendering or replacing some of the html on the fly with whatever where we're passing. So I would not really find its to name, but it's a convention that I mean, it's once you know that that that's happening, we can just use it like this. Um, and the last thing I'm gonna try here is um I'm gonna have a conditional to remember how we have Hello and hello. Name if I pass. Hello? Let's take that. He works. So, Richard, Nurse Richer. Okay, so if I pass hello alone. I see Hello. Known, which is kind of funny. It's not very nice because that's not what we want. Like when they're known in there, that makes no sense. So what we're gonna do, we're actually able to do conditional, like if statements within the template. And to do that, we do. Instead of the two brackets, curly brackets, we do curly bracket percentage. And what we're gonna do, it's like we're gonna check if name, which means if name has any value, then print this but otherwise and see how it's like it's python. If if then um then we're just going to say hello world and you need to end the ifs so we need to do. And if Here. Okay, so what's happening there is, like, if there's a named person is going to say hello name, otherwise he's gonna display Hello world. Um, so let's see if that works. Um, if I do just hello, I get Hello, world. If I do? Hello, Jorge. I get Hello, whore. So that's kind of like the very basic, but this is like, fundamentally how you do template ing on flask, and we're going to continue, um, exploring the more things that we can do with this.
33. Login Template: Okay, so now that we know how to do template ing, um, we're gonna try doing the that form that we had before on make it, uh, part of a template. So the first thing we want to do is we actually want to create a a new template. So I'm gonna just gonna delete this. Hello? Html. And I'm going to create a new template here called Logging Exstein. Well, so it is like a log in page, so let's look at that. Um, I'm gonna create, like, a boilerplate. It's the middle five page again. This is not something that you need to, um, to master for the scores. And when I said a title blogging page, and so I'm gonna do a form here. The action is gonna be, um it's a log in. Well, don't remember what we said about Europe before. This is kind of like a perfect example of where we could use euro for, and we'll get back to that in a second. So I have my form there. I'm just gonna put a, uh, use the name people type. Input type equals text, and I'm gonna call it used her name and then I'm gonna do another one here, which is fast Word. And, um, it's gonna be passed us the password viable and finally need a button to submit the form. And I'm going to call that Le Guin. Perfect. So you can see that in full screen. Um, so I have my form Action is gonna be lovin slash looking. So that means that when I hit submit it's gonna goto the slash loving page, and it's gonna pass. I use her name viable with some some string and the password viable with another string. And so let's wire that up in our application. Okay, so let's go ahead and change our hello, p. Why? Um, so I'm gonna just create a new a new function here. The upper out is gonna be, um, slash log in. And then I'm gonna allow two methods, uh, get and post and I'm going to call this function logging. So I'm gonna say like we did before eve request, uh dot method is supposed It means that the user has already pressed submit, So we're gonna just return. Uh, you, sir, percentage s, which is gonna be a string locked in. So how do we get the value off the user name? So it turns out that the, um, request has a a na object or a dictionary rather that is called request form. And in it, it will have any fields that you have sent on the request in this in this field here. So if we do request Sorry if we do request that form user name, then that will hold the value off that Houston infield. And, um otherwise, if we're not getting the post, it means that we just load in the page. Well, just to return Render template. Um, Logan HTM. So let's see what that looks like. Um, that start the application here by phone. Hello? P y. And no airs there. And let's get the application. You're all here from the share. Um, it's not found here because we, um, specified that the only of route available for this obligation is slash Logan. So we do slash looking there. There you go. So we're rendering the template as a form and we can try doing Jorge. 12345 No, again. User Jorge loaded. So it's reading properly that user name field here and So we have a pretty good initial form to work with before we move on. One thing that I want to change here is this last Logan. Remember when we talked about your l four? How we didn't That wasn't a good practice to set toe have actual in courting girls. So whenever you typed A whenever you type something that slash you know a your l off off a off kind of like your application routes, it should be a big red flag for you. So instead, what we should use here is the euro for method and rumor How we saw that earlier. So in this case, we're gonna put your four, and then we need to put the name of the function, which in this case, is the logging function. So if I put, um, if I put the oil for Le Guin here and then save, let's see if I have any heirs here. I'm getting years. So they let me reload the page and you'll see if I see the view page source that it's properly mapping that to slash Logan. So that's a big benefit off using euro four instead, off the actual slash again Because what happens is, you know, kind of like think this last. Logan is peppered through a bunch of temples like hundreds of templates. And instead we changes to, um, logging. Underscore, use or right, um, now the euro release logging user instead of log in. And if we hit that, you're all here logging user, we'll see that it loads here. But not only that, the your L four is automatically updating that. So that's the big That's a big thing. And we should always use your all four whenever you're you're referring to the Urals on your templates and even within your obligation, um, controllers as well.
34. Login Function: Okay, um, so we're gonna do a little bit more work on the application. What we want to do in this lesson is making a logging function kind of like checking of the use enemy spot on bass. Were are working fine. Although we're not gonna kind of, like, check like a real application using a database, But we're gonna kind off fake it. And the way that we're going to do that is that we're going to check if the user name and password are the same that the user can logon. It's a little bit like simple, but it'll allow us to check how how these things work. So, um, I'm gonna create a function. So in your flask app, you can define functions that are, like internal. They don't have any routes. They're just like helper functions, so to speak. And I want a great this valley log in function that, um if you pass, I use the name and password. It'll check if the user name is equal to the password. Then it returns. True to whoever called it on, otherwise it'll return falls. So it's a very simple, uh, kind of function, But imagine that this was This would be kind of like where you go to the database and fetch the use of name and passport record and check if there violet and then you return something back. So that's kind of like how how that would work. But in here we were just gonna make it that if the user name and password are the same, then then the user can love it. So, um, what we want to do is we want to check on this using the post method. If the record's method is posted, we're going to check if valid, Logan and then we have the user name. So we need to pass the request dot form, use her name as the first barometer, and then request form, uh, fast word to, um, toe take the password. So if if this two are the same because this is going to check in for their the same and it returns true, then whatever is underneath this is gonna be executed. So we're gonna say return. Welcome back. Um, and then the user, the user's name, So request that form. He used the name, but what happens if if it's not OK, So let's say we put the wrong using a passport, which means they're not going to be the same. So we have an else block, and we can set an error here, so error equals incorrect. Uh, use the name and password. Um, OK, so but what happens? Um, with this error, where is that displayed? Um, so one thing that we want to do is, um, we want to pass, and you can pass content of the templates. And you just need to assign basically the viable, like, within the template, and then what? That equals two. So in the best error equals air. Um, and then once we're on the log in page or the template, we're gonna basically check for that. However, on the first run, when you first front it, it's not gonna execute this part here. Um, and air is gonna be undefined. So we might We might get in there. So the way to avoid that is that we can set the the error from the from the get go before before we even do. Is this this part of the code? But let's check what happens if we if we do that, so Let's see if the application is running. It reloaded. That's perfect. And so we're gonna do logging user here. Uh, it's Logan. Sorry. Log in. Okay, so this is the era was talking true about so local viable error reference before assignment . So basically, by then he saying, you know, you're telling me that air equals error. I don't know what that error is, so in order to avoid that, we put error equals none at the beginning, so that, you know, the beginning is just said to none. And then if the air happens, then we will pass that error incurring isn't even passport back to the template. And you can imagine that there could be more errors. Like, you know, you didn't feel the user name or older use cases, but for now, we're gonna stick to that. So let's see that reloaded, uh, and going a reload that. So now we have the proper templates, and that's that's all fine and good. So let's try to put the like, the user name and password. They're saying letter so that that's gonna work out the same. You see, your passport means that we're going to get the valid logging returned true. And it's gonna say return, I mean, is going to say, Welcome back, uh, Jorge in this case. So let's try that yet. That works perfectly fine. If I go back and put Jorge and then put John here, then I should get in there. Oh, but where's the air that we just define in here? Um, well, the thing is that we're passing that error here, but we're not, um, putting anywhere on the template that we should explain that back to the user. So how do we do that? Um, it's pretty simple. Um, I'm gonna put a if block here if error. That means that if there's anything that viable holds anything and just so that we don't remember to close it will close it on here. And then we're gonna say, um I'm just gonna put a red color text in here, and I'm going to say, Just print out the air that the template is a setting. Um, one other little thing that I want to change here is I'm gonna set this to type password so that you cannot see what what's being tight. And it's just like a built in thing that HTML has. Um So if there's an error passed through the template, then we displayed that there. That's bean defined by the controller. The controller being Hello, P Y. So let's see. That looks OK. Um, no heirs, so Well, try one more time. So we're gonna put Jorge and then Jorge. Look at that. You find a little like dot or asterisks? Um, that's the password type. Well, again. And I was That was perfect. Um, So what happens if we put the wrong so Jorge and Ana put test Perfect. So I'm getting the air in red letters. Um, very, you know, calling my attention. And it's displaying that error that we defined in here. So we're getting closer to a good working application. Um, let's see. What what comes next.
35. Redirect After Post: Okay, The next thing we're going to see is, um, redirecting users after the logging and password have are correct. The reason for that is because when we enter our submit a form and it gets to the to the page or to the server rather that, ah, post information is still hanging around. And this is something that you'll see happen if you if you don't do a redirect. So they say, I'm I'm doing here, Jorge Jorge, which is the right Logan on a press log in I get to the to the log in page with Welcome back, Jorge. Right. But what happens if I hit? Reload? See, You see this ugly kind of like dialogue that says, you know, confirm for re submission, which is doesn't look very professional. Plus, it's, ah, it's a security issue because, you know, you could potentially have data lying around. So what we normally do after a successful Logan is we send the user to another at another page that, um, that kind of like can can, ah clear that that post information and and send you on your way. So we're gonna do that in this lesson, and that's how we do that. So the first thing we're gonna do here is we're gonna try to add, um redirect, which is a a flask utility, and that redirect will send us to any any oral that you specify. Um, so here, instead of returning, welcome back, Jorge or whatever, the Houston waas we're gonna have a redirect people and and it's it's a little bit funny because you've returned the redirect. And, um, I think part of the reason that that's the way work is because it's a there's a a an http code called three or four, which is a redirect. And I think that's what Flask does in there, but indicates you have to use return, redirect and, um, But before we do that, we're gonna, um we're gonna create a new AP route, which is gonna be a welcome landing page. So let's create that. We're gonna do up route on. We're going to call it welcome. And then we're gonna put a user naming there so that we can pass the user name on that on the euro, and then we'll do well defined this as a a function called welcome and will return that template. Render template. Um, welcome door, ext. Email. Which we haven't created yet and will pass the user name. Toe that to that. So now we can Now, um, put that return. Redirect. So we're gonna return. Redirect to that you are l four, which, as you know, during the euro for a specific function, Um, and we're gonna pass. User name equals the request form. Ah, get used. Okay. So what's happening here is that we're redirecting toe the euro. Um, four off this function. Welcome. Which is this one here. And we're passing the user name, which is the, um, this first method. It's this this user name here, which ah, turns out to be the user name. Ah, parameter for that method. So it's gonna read that in there. Um, see, we haven't air here euro 40 so we don't have euro four defined here yet. So there you go. Um, so now we have set up our return redirect, And what would happen is when the user name and password are correct, it'll return, or you'll redirect us to this page. Welcome slash. You know, user name Jorge or Jack, or whatever the use enemies and then return it a template. Um, that that will define now. So let's see what that template looks like. We're gonna do something rather simple. So we're great new file here, and we're going to call it Welcome, HTML, and we're gonna open that, and we just great a very simple HTML file. Um, will have, uh, title East. Welcome page. And we're gonna have last string that says welcome and use her name, which is the viable that were passing toe the to the temple. So that's it. Let's see if we have any errors. Looks good. So now we'll go back to logging and we're gonna try Jorge. Jorge, Uh, there you go. And now we're past two or redirected to welcome slash Jorge and you see welcome Jorge there . Now what happens if I hit reload? Nothing. But I don't see anything because it's a static page. It's already kind of like there's no post data there. So this is something that you're always gonna be dio doing in in when you do form submission is redirecting users to to let's say that the actual page where, um, where you're going to start doing any kind off like operations and stuff. So remember that it's a it's a good rule toe
36. Flash Messages: one come operation that we want to be able to do is to communicate to the user. Um, when something kind of like happened, For example, if you locked in successfully, But you want to do it on the on the next page, for example, in this case, we want to be able to when when people hit this. Welcome, girl. Imagine that. That's the home page off your application. You want to be able to pass messages and different messages depending on what the last Operation Waas and because, um, x t p is doesn't keep any kind of, like state between different pages. You need to be able to store that somewhere. Those those notification messages and flask offers a, uh, kind of like a subsystem called flash messages that allow you to do exactly that. So we're gonna do a flash measured message here so that you guys can see how how that works . So in order for us to use flash messages, we have to add flash. Here are as one of the libraries that we're gonna be importing and ah, using flash is very, very simple. Um, what we're gonna do here is that after the valid Logan method, Um, or or if conditional, we're gonna just say flash, and then we put successfully logged in. Now, what's what that is going to do is it's going at, um, store that flash messages in a on a session cookie. On the next time a page is loaded that retrieves or wants to get those messages, it will get any message, any messages that you have flashed in previous pages and it'll will return back to zero, like, reset it and you can have more than one. So if you put flash here successfully logged in, But you had a previous flash messages saying so successfully registered and you haven't landed in a page where those flash messages are retrieved, then you'll see all of them. Um, but we need to do that retrieval, um, kind of like code. And we're gonna do that here on the on the welcome page. So what I'm going to do is I'm wanted to a generic, um um, group, forgetting all the flash messages and basically put in putting them on the on the page. So we're gonna use this. Um, this method called with messages equal get flash messages and get flash messages is like the built in, um, method available in the template to get all the messages. So basically, I'm saying set messages as a viable that contains all the flash messages that that we have until here, Um and then when end with here. So that's Ah, that's basically a loop. And now I'm going to check if messages so that if there's no messages, we just keep this snippet. Um, and now I'm going to Is that an order on order list in next email? And you can look that up. Um, And then when I defined this as a class called Flashes, um, and then for each message in that message is, um, basically it's a list or a kind of like all the messages are are dumping that in the message. So for message in messages, we're going to get each message. That's that's where that list, um, and let's to an end for here so that we can not loose the structure and we're gonna dent toe on u l two and that you will on the top. And now we have our message. So we just, um, insert a new um, item in that list list item, and we print the message there. Perfect. So that should be all, um So again here, we're set. We're setting the messages viable to get all the flash messages as a list. If we have messages way have that list, then I'm going to create a new well or on order list, and then I'm gonna go for each messaging. That message is printed out. Assad, That's an individualized. So let's see if we have any errors here. Doesn't look like it. And no, we haven't saved this. Right? So now stick. Okay. Perfect. So now let's try that again. So we're gonna go to log in and when it to Jorge, Jorge and look it. But what happened here? The session is unavailable because no secret key was set. Okay, so this is something that you're gonna have to set. And I, uh I did this on purpose so that you couldn't, um, kind of like running toe this cause it's It's very common. Um, I always like, forget us. Well, so what we need to do is we need to set on the, um here on the main main. Um, the method, we're gonna have to pass a new, um viable called app secret. So let's say do this so up. Secret Key basically will encode any sessions that do you have so that users can not be able to, um, to retrieve those the the information on those sessions, and I'll show you later how to generate good secret keys. But for now, we're just gonna put some very simple, super secret key string here, and that's gonna be our super secret key. Of course, it's not very good. We should have a combination off like characters and numbers, things like that. But for now, we'll say, that's that's a secret key. So now we go back and let's try that again. Or here or here and now it's working perfectly fine. Nancy, it says, successfully logged in. Yes, a little like darting there because it's it's a list off off items. But as you can see that that message was, um, was safely retrieved from the previous logging page. Now what do you think happens if I refresh the page? Will I get that message again or not? Well, let's see if I reload. Oh, that disappeared. Well, let me reload again. Oh, I don't see it anymore. So see, that's how messages work. It's kind of like you fetch them. You're resetting that list, and now you're wrong. You don't have that message anymore, which is perfectly, you know, that's the way that it should work. Um, we should have that, um, that functionally in place. So that way you're sure that we're gonna, um we're gonna pass a message is going to be consumed by the other page. And then after that, it's Ah, it's a reset, and we don't We don't display back to the user.
37. Better HTML: Okay, We're gonna have to, um, start putting a little bit a better structure in our HTML. So if you want to skip this, um, this lesson, it's fine. Ah, I'm just gonna put a little bit for better. It's female here on our logging page, Um, so that it's more standard compliant. And, you know, it's always important to be standard compliant, um, in any code that we do. So we're gonna add when he tried it. Html, um, designator here at the beginning, and then we close that down, then usually you have a head, which is where you define the title and other, um, other kind of attributes for the page. And then we have to do body, which is where the actual a body of the page is in. And we close that, uh, and, um, and finally, I want to have a little like a title or a hair er, and I'm going to call this, you know, the act may company, um, in honor off those of those famous ah, cartoons. You know, like the road runner. Um, and I'm gonna put here logging page. The Acme company asked the US a title so OK, now we have Ah better html page. We have our HTML declaration of the beginning of the end. We have a head with the title, and then we have the body and on each one, Um, so we're gonna have we're gonna have that. Let's see if that looks good. And if we hit log in, we'll see that it looks a little bit better. But especially, it's now kind of like standard compliant. Um, but the point I'm gonna make here you still don't see is that, um you know, we would need to do this also with the welcome page, because you know, that page is exactly the same. So, you know, we need to, like, maybe copy all this and reported here. Well, the title in this case is the welcome page. So I would need to do is here. But you can see how this can be become really repetitious and not very scalable. So, for example, what happens if you want to change? You know this part here that says the Acme company for all the titles, for example, or you don't want you want to have these h one title. Maybe with the logo of the company in every single page. Like it quickly will become a mess to be able to, um, to sustain this. So what we're going to see is something that, um, that is gonna help us, um, deal with this. And that is called, um template Inheritance. So let's see what? That what that looks like.
38. Block Super: one final trigger wanna show you guys is and you're gonna see this. You're gonna find yourself, um, in this situation, I think, rather often, especially when you start doing javascript libraries and things like that. Um, remember how we said that if I had the title the block title here, without the finding the head, it would intelligently kind of like inserted here. But what happens if I want to define some other stuff that I want to insert in this in this title underneath, like, let's say, you know, javascript library or something, but from the from the template itself, um, well, one way that we could do it is we could have a you know, blockhead here. Right? And let's say we have, uh um and block, right? And then we have I'm gonna just like to a script javascript tag, but it's not going to do anything fancy. Just like just to have something that's a placeholder of our X equals one and script. Right? Um, So what happens if I do that? Well, the problem that we're going to seize that this is gonna replace their whole head, and it's not gonna leave. Um, anything for the title. Like Imagine it's doing this like it's replacing all this with this. This Ah, this jobs were likely that we're that we're putting here, so and you can see it here. Like, if I do refresh, um si, si, like hydro. I don't have the title there anymore. Um, it's it's replacing the whole head with it, So that's not very good and see, like we now have this ugly title, which is the euro. So I want to be able to insert this JavaScript thinking they're in here, but at the same time have my block title, um, in their And, um so the way you do that is you call a, uh a method called super. So if we do, um, it's kind of like it's like a viable super. Then what's gonna happen? These It's going to replace this the head with this with this stuff, But then it's gonna leave the title the title tag, um, to be a Toby kind of like, um, allowed to be modified by subsequent call. So let's see that in action received the title now now looks good. And there you go. See, Now have my title if I see the source be paid source, I have my screwed type here and then my title here. We could also do it the other way around. Um, if you wanted to title first for some reason, you can do this, right? So first we're saying, OK, the title block, replace it with this and then for the head do this insertion on the head part, but called the super, which is going to, like, insert the title back. And if we reload now here we'll see the same result. We have our right the right title. But if we see the the View page source, you'll see that Oh, the title still appears underneath. That's that's interesting. I was expecting the title Toby Toby first, but no, actually, what's what? The way that we would do the order change against would be this exactly because then supers is calling like the title piece and then its inserting the thing afterwards. So let me reload the view sores yet, and there you go, Um, and that's put a inventing there so that it looks a little a little nicer. Perfect. So see, that's how you kind of like your ableto, um, to modify attack inside a block, but also kind of like call the super method so that you can also do more stuff with it.
39. Template Inheritance: So as we saw in deep on the breeze lesson, We, um we're trying to fix, um, the pages, the log in page to be more stunning, complying than we had it. It's like required, um, tags for proper It's the male. But as we saw, it's very repetitively or on unskilled able to be doing this for every single page that we do. So the way that we, um, that we solve this problem is that we use something called Template Inheritance and Tim Blizter inheritance just means that we're gonna have a basically a we're based template that has the common things and then each each additional page Well, just like extend or add to the toe that existing kind of like base page. Still, the best way to to see or understand this is to see in action. So let's create our base html page and see what that looks like. So let's create a base html template and so new file and we're gonna we're gonna call this base html and we're going to copy and paste a bunch of the stuff that we that we did hear earlier. Um, so we're gonna have doc type we have ahead, and then I'm gonna have a body, and we're gonna have end HD. So that's like the basic, very, very basic structure. But, um, let's start doing some other more interesting stuffing here. So, for example, on the head, um, I can do something like title, right? And then I would put something like, you know, the Acme company. However, that means that the same titles going appear on every single page. But I want to be able to do this kind of things, like blogging Paige Dash and in the welcome page. Welcome page dash. Right. That and then print out the Acme company. So the way we do this with the base template is that we define areas where things can be substituted by the by the Children or by the inheriting templates and modify the temporary in those places. So the way you do that is we use this, um, this command called block, and then you put a like a name for that block. So if I do block title and then you define the end of it and block, what's gonna happen is that any time let's put a space and then the dash here. So any time now that a a page like the log in page inherits that we're gonna have replace, Um, basically, this this part that changes with that with that block tile and the rest is gonna be, um it's gonna be printed us as us is on the on the base on the base template. So, um, I'm gonna go ahead and define this whole block, um, for the head, because I I want to be able to also maybe at older attributes in here, maybe injecting JavaScript libraries, things like that. And then I'm gonna end. Look here, Um, so now on the body, I want to have that h one, which is, you know, the header for all the pages. I wanted to be the Acme company across the boards or no changes there. And I always want to have if there's any flash messages toe display them here. So I'm just going to copy and paste this part because it's it's gonna work just like it is . And I'm actually cutting it off from the welcome pigs, and I'm gonna put it here. It's, uh, invent that. Okay. And, um did I want to find an area even though it's not, you know, required. It's It's a very common pattern again, to have a Dave that holds all the kind of, like, the main content. And I'm gonna call this block uh, content. Okay. And, um, last thing I'm gonna do is I'm gonna at a food er which is a newish html, um, attributes. And I'm going to call this also blocked food or because I want to be able to maybe override it, uh, not printed at all. Or, um, or add stuff to it. But here, I'm gonna have a copyright sign and copyright 2014 by on a little hyper link there. Uh uh, you know, back May Co and, uh, the act me come perfect. So now I have my base. Html looks really good. Um, I have ahead that I can override with a title. I have a flash messages for all the pages already built in Have a Contin, airy and a footer. So let's start with the log in page. So So how do I get this basic seem ill in here? So we use a keyword cold extends, and so I'm gonna be able to basically Ah, take this all out and I'm going to say, uh, extends base html and you put it lower up. I need to put quotes. Sorry. And Flats is gonna find whatever template you have with that name Basij female. And it's gonna like, make it the apparent for this for this attempt. So for the title, um, going to to, um, block, oops, block, um, title. And then I'm gonna put, um, let's just call it log in and then end luck and look, and what's what that's gonna gonna do is like, you see how I have, um, block title logging here. It's going to go in here, but notice that I didn't have to include a blockhead and block at the beginning because that means that if I have some, some internal, um, tag like title flats will be intelligent enough to know that it's not. We don't want to replace the whole thing. We just want to replace this line here, and that's a pretty pretty useful thing. Um, for us, we don't need to head anymore because the head is being defined, you know, here. And, um, we don't need any of this And what we want to do is we're gonna have a defined this as the content, so block content who and that's gonna be printed or inserted in in this area. Here. Block content. I have the form action form action. Um, I don't need the this body or HTML anymore, and I'm gonna end a block here. Cool. So we'll deal with the welcome page a little later. We just want to see that the there were complaints is working fine. So let's see if we have any errors. Looks good. So let's reload the log in page and see what happens. Wow. Perfect. So you now have the Kobe writing there, which is coming from the from the template. I have logging dashed. The Acme company, which is the title that that I wanted to have. And, um and everything else should work. Uh, the same. So if I do Jorge Jorge, I can I can log in and I get the message. Although that message is coming from the welcome page. So that doesn't count. But let's finish it off and see how we do the work on page. Okay, so let's do now. The welcome page um, so here. I don't need this, but I need to have the extends. I'm just gonna copy that from here, and then I'm going to have a title. And when I put this us the welcome page, um and, um see, And I need I need this to be the content, right? Block content. Um, and that's it. See how simple it looks now? It's, ah, pretty much reduced. And now we have, um we have a very easy way to kind of, like, extend this. Basically, Melanie's gonna look exactly the same across different pages. So, um, let's see if we have an error and we'll do the logging again. Um, so let's to Jorge Jorge Logan. See how I always now have the H one here. The header. I have the welcome Jorge and I have my food. Or which appears in every page. If I had reload, I should get rid off the flash message. There you go. He looks it looks good.
40. Cookies: Okay, so now we're gonna try something new, which is, um, using cookies to be able to track the logging off the user. And cookies are basically small. Files are saved, Um, locally in your computer that only respond to the domain that they're associated with. So in this case, you would be with our I d or rather hello app from Syria, the u C nine dot io domain. So, um, we're gonna learn how to use cookies. Although, um, it's more secure or safe to use sessions. But it's ah, it's a good thing to learn how to use cookies anyways, because sessions are based in in on cookies. And and it's something that you should definitely have. Ah, and all its own on how to do so In order for us to use cookies with flask, we need to ah, use a A library or a function called make response. And make response allows you to modify the response, um, so that you can set, um, you know, Rex. It's well as, um, as cookies with the same kind of like on the same. It's a round trip, um, or on the same request. So let's at make response to the flask libraries here on the tops. And, um so we're gonna replace this return Resurrect? Ah, you're a four with a basically, we're gonna create a response object. So we're gonna do response equals, make response, and then the same thing Europe for welcome. Um, that that whole, that whole thing. And basically, we're doing I'm a response for the redirect part of the thing. And now we're also now we're gonna also set a cookie, and the way we're going to do that is we're gonna do response. That said cookie. And then we put the name off the cookie and a value. So in this case is request form, uh, get user name, and we close that, and then we return response. So that's the way we do. So, as you can see, you know, responsibly. First, create a make response object that has the euro four. Welcome. Which is gonna be kind of like a redirect. I know the same response. We also tag on this site. Cookie, Use the name. Um, it said so. We are also going to create a look out function that will allow us to, like, basically log out And a log out in this case would be to delete the cookie, that user name cookie in, um, in the application so discreet, that proud slash Look out and, uh, to another findings as to log out method. And we were more or less the same thing we're going to Ah, responds, um equals make response and then every direct Ah, you're old for, uh, Logan. So in this case, we're gonna send the person toe the log in page when they when they look out, and then we're gonna responds, said Cookie. And it's funny how ah, the way there you the leader cookies. You said it's, um, expiry to zero. And, um and you put the value is black. This third parameter expires allows you to set the cookies lifetime. Um and you know, you can You can basically put a cookie for, like, an hour or a day, etcetera. I believe that's ah, that's seconds. And then you return the response. Okay, um, we also need to change the, um the welcome. Um, so we're gonna be doing welcome kind of like becoming the route off the or the index off the application. We're going to find us a slash. And what we're gonna do here is we're going to get the user name from the cookie and the way to get a cookies value. You do request that. Cookie start get use the name. And if that's empty, then that means that they use her name has not been set. So we're gonna set this to if there's a user name in that cookie than we do this else. We return a redirect to the girl for look. Okay. Um okay, so let's see if we have any errors. Um, that we were fine. So now we're going to go to the root toe the home page and see how it send me back to log in because I don't have any no cookie said, um and there's a way to see the cookies. If you go to, um on chrome on the file, um, view developer, developer tools. You can open this basically these helper, and then we can go to, uh, resource is cool keys and click on your application. And that's against either. Is there, sir. There's some cookies there there would accept, but they're not really from our application. They're more like helper things from From Cloud nine. So we're gonna be able to track when the cookie said in there. Um, and it should have the name used her name. So the straight log in, um, the me me my status for a second, and then we're gonna do Jorge courting breath slogan. And there's something wrong here. See? Why is it printing user name equal sore, I guess. There redirect. Um, it's not working Well. Oh, I see you have a type of here. Um, I should do make response. Not euro four, but rather redirect. So it's make response. Redirect you, Earl for work. And I don't need to use her name here anymore because I took that out. So that's, um, see that welcome. Doesn't have that pilot anymore. So sorry about that. Um, so response. Eagles make response. Redirect to Europe for welcome. And that should be That's your working out. So let's see here again. Um, so I guess if way do see he see here that the user name was said, You see how user name? He said with Jorge. So let's delete that we can press a little X in here toe the leader session. And let's try that again. So use the name Jorge. Password Jorge. No gain. And now it's working. So I got into the to the home page and notice that we don't have any slash user name or slash. Welcome slash Jorge. This is being read from the from the cookie. And we can check here that they cook it set right here. User name and whore. Um, so that's working perfectly fine. Okay, so let's right, heading directly the log out function and that cookie should disappear, and we should be sent back to the log in page. So let's see Here, look out. So you didn't find it? See why a proud Oh, I'm missing a hampers outside. There you go. So look out. Perfect. Now, let's see, there's no user name cookie anymore. So they start another one that say, um, Robert Robert Logan yet welcome, Robert. And use her name. Is Robert here? OK, but I don't want to be writing like, you know, look out manually here, so I'd rather put it on a template. So the best way for the rest place to put that in in is on the, um on the actual welcome, um, template, which is hard like Index. And we're gonna put it on the ah, we're gonna add something here. Welcome. Used her name and then we're gonna have it's wrapped equals your URL four. Look out and we put log out. No, and perfect. So now have the euro for log out and log out linking there. And still it's trying now with Robert. Robert. So you know, I have my longer function that I can access The user name is there. Look out. No more cookies for that user, so looking really good.
41. Static Folder: So one thing I would add is a small local so that, you know, it looks a little nicer. And I found this logo on the on the Internet. It's act like a generic logo, Um, and you can access it on Ah, on my get hub account that's linked on the on this lesson. But in any case, I'm gonna save that image. And I see Were you under that stop my logo. And now I want to transfer that to the toe. The application here. So let's create for anything that static files like this image we want to create Ah, what's called a static directory and that directories automatically recognised by by flask as a, um just like the templates, like a place where you're gonna put basically files that are not python files, but images. JavaScript, files, CSS files, that kind of thing. So let's create a folder, call it static. And now we're gonna add the logo to that static file folder. And let's to that. So we need to do is drag the file and put it on the static folder, see how it it it converts that files I can to like a little Barbaro. We're basically it allows you to upload that file. So now we have the AG Melo there. If you click on it, you'll see, Like a preview here, which is pretty cool. Um, you can also recites and rotated. Um, and, um, let's say that's the local. So now we need to add it to the base template. Right? Because we went to we went it to appear everywhere. So let's go ahead and enter the base. And I'm gonna take this out and put when I call it. It's an I D. I mean, a diff I did logo. And here we're gonna put a main source, uh, equal and notice are gonna do a euro for but I'm gonna put static comma, and then file name equals. This is like a convention for for ah, flask, which allows us to load ecstatic, um, assets to the to the page religiously. And I want to say out equals Acme Corp. Which is like the like, the hint, and I'm gonna set Ah, height off. Uh, 150 pixels. That's it. So see if I have any errors. Looks good. So now what we're doing here is we're serving a static, static file. That means it's not a python file that that will be displayed on a owner page. So let's reload the page. Perfect. It's Ah, I've bean looking at this in in assumed kind of way. So if I put it on the right size, that's like the actual size. Um, it looks a little better, but just so you guys can read better when I put it there. Eso again, Jorge, Jorge, log in Perfect. Our file images continues to appear there, and that's how you do static files on flask.
42. Sessions: Okay. So, like I mentioned earlier, we usually don't use cookies. Um, for applications. Because of the problems that we described earlier, for example, were able to see, you know, the values of the cookies right here on the on on the resource is off that off that web page, Where are sessions are more secure because they're encoded. Um, it's also easier to use sessions reliever or not. Then then, Cookie. So let's list this year, we do that instead of make response, we're gonna import sessions. No, are the session library, And then we're just gonna delete these three things here, and we're gonna set session off, use her name equals, um, request the request form, get used her name, and then we're gonna return a, um, redirect for the euro for, um, Welcome. Um, and then on the log out, in order for us to to, um, total eat the cookie, we're just gonna Or in this case, the session. We just don't session pop and past their user name. Um, and, uh, and then we Mark, we best none here, and, um, finally we've returned. Redirect. Ah, you're a for logging. So that's pretty much it a So you can see it reads easier. It looks Looks better. Um, and let's give it a try. So let's look out here. Um, I actually have to, like, delete manually because that lookout functions now looking for sessions instead off instead of cookie. So let's try Jorge Jorge again and repressed. Log in. And, um, we're need We need to check something else, I believe because we're not checking the the session. We're checking the cookie. Right? So it's not now is not the fees her name is is, um, request cookies, get user name. We need to do the following. Um, man, it's with releasing. We just say, if the user name ah, string in session object, then, um, we can return. Render template. User name equals session off. Ah, use your name. That's pretty much it. So, um, let's go to the home page. And now it's It's ah, it's looking good. Welcome, Jorge. Look out. And as you can see the session here, it's, you know, it's called session, and it's just a bunch of characters that we don't really know. You know what? They're where they are. But in this encoded thing, strength. Um, It's actually the value off the horti thing. Uh, Jorge, user name. So if you log out, you'll see this session is no longer there. This try would reach hurt, and Richard and then again and successfully logged in. Welcome, Richard. Everything looks good. The session is set. And, um, if I reload the page, I should see that flash message disappear. So looking good, um, and much more secure. As I said, he's here to use, um and, uh, we're gonna take a look at one last thing, which is something I promise you, which is how to generate a good secret key. Okay, so here's a trick to generate. Ah, secure secret key. And it's really easy. There's a function that we can leverage from, um, from Python. Um, and it's called Are you random? So in order for us to do that generator key, we're gonna go to the terminal control, see to stop the server, and then we're gonna do python. And here you do the following do import os, and then you toe os you random and then 24 which is like 24 bits on. You get this, like, very strange looking. Um you know, character list. And if you if you hit it again, you'll get a different one. But in any case, this is ah, good, um, String to put us as thesis ECR it key for your python. I mean, for for your flats application. So you just copy that, um, and then based here, and that's gonna be my my new secret key. So if we save there, um, and try C o, we need to, like, put the server running back again, So I think it'll be Why? And we're gonna do again. Jorge, Jorge, No gain perfect. Works fine. And it's, ah, super secure secret key That that is very hard for for somebody to to gas. So remember that trick? Um, and, uh, now we have a more secure application.
43. Loggers: in this side lesson. I want to talk to you about lagers, which is unimportant. Um, component off any Web developers took it. And, um, it's always useful to be able to know what happens with your application in terms off. Like what's going on, especially when users are looking or seeing errors, is that we log errors and, um, any kind of like, ah, on expected situations to log files and then as, um, Assad application is life. We basically look at these lock files either on the terminal, um, our using There's a lot of good third party tools to look at that look fast as well. But here's a small introduction to, um, to logging and how you do. Um, you do logging with with your flats application. So what we're gonna do here, we're gonna log every time there's a, um on issue with, um with the wrong user name and password being entered by the by the user. So, um, we're gonna basically to do that, we're gonna import logging, which is the it's the Python logging service. And we're gonna use, um, the A handler called rotating file handler. Rotating 500 allows you to basically not fill up the space of your server completely by ah , you know, automatically generating log files that have, like, date stamps. And then once you get into a certain number off off dates, then it automatically copies that to ah ah, a new file and archives it as a as the next sequential number. And then so on so forth. And finally, the last, you know, the oldest file off loves it'll it'll delete automatically from from the server. But, um, you can read more about rotating fun handlers on the on the Web. But for now, I want to to look at you know, how we do this year. So, um, what we're gonna do is we're gonna have a, um we're gonna introduce an error, um, longer here. So we have this area glories and even password We now are gonna use, um, the the apse lager. And we do it by using a blogger. That warning. So warning. There's different levels off off the interest for the for the logs. And then you can select to, um you know what level you want to save to the to the file so you can do it from, you know, from warning to air to actual errors or from informational etcetera. So you can you can have different types of entries and enquiries, and then password is not a like a super severe air, so we're going to call it a warning. So here, we're gonna saved toe the to the file. Incorrect. Ah, use her name and password for you, sir. And then we're gonna print out the user name. So we have that on the file, and we're gonna, um, past request that form. Don't get used her name us the because that percent s, um string. Okay, that's pretty much it. Ah, so we haven't air here. Oh, it's incorrect. Oh, I, um yeah, I'm doing a double court of the beginning and one quality. And there you, um and we need to set up the logging like, set up in the name main here section. So we're gonna put it after the secret key. And let's comment that US logging so that we have a section there, so the handler is equal to rotating file handler. We're going to call the file error lug, and we're gonna put the maximum amount of bytes per file is gonna be 10,000. And we're gonna only, um, back up off toe one file. And then after that, it's kind of like deleted. So we'll keep two files at most one. That's the open fire on the back off. Um, you can you can read more about the what parameters you can put here. Um, And like I said, we're gonna do this level we're gonna put which is, like, the most basic one. So we were gonna have basically lost everything. And finally to make this enabled we to add up longer dot at handler and then handler, which is what we defining this viable area. So that's it. Um, there's gonna save on the root folder, um, on the I guess, on the flask In it level, we're going to see an error log file. Pop up and remember, Very. If you're using, get you. Should I get ignored that file because you shouldn't have that on your on your report. So country escape to see if there's any errors, there's none. So what we're gonna do here, we're gonna look out that we're gonna create an error, so we're gonna do Jorge Ah, 12345 Which is the wrong password? Logging. Okay. Incorrect. Use Ram password till looks like nothing happened. But if I see here now, I see an error log file. Pretty interesting, huh? And if I look like I say, encourages an ambassador for you, sir Jorge. So as you can see, very useful stuff like you can put like logging in different parts off your application so that your kind of like a wear off when things are breaking down. Um, and this is additional to the to the pie phone, like stack trace errors, which are the ones like the 500 errors. Which arm or seven year bought? Um, between those two, I think you can. You can have a pretty good idea of what's happening with your application.
44. User Table: perfect. So we have our user table created within the database. My flask app. So now we're gonna use, um, or insert the first row for that, um, for that table. And so I'm gonna use it with, um, with my own user name, and you can do it with yours so you can insert into yusor, which is the table that we want to insert into. And then you put values and we're gonna put each one of those values for the fields, like user I d user name and password. Because the user these are my clean incriminating. You just put quote, quote because we don't want to pass the actual number, we could pass the number, but then it would lead to like, we would need to be checking. What's the next number? All that, All that stuff. So I just put a quote quoting there, and we're gonna have ah, we're gonna put Jorge, which is the user name, right? And finally, I'm not gonna have to use Jorge Jorge as the like use women passport. So I'm gonna create a very silly and never used this password on your own applications. 12345 eso That's the user i d the user name and password. So end the parenthesis and say, Michael, press enter and it says query. Okay, one row affected. That's Ah, that's good. So how do we see if that record was stored? We just do a select statements. Elect is basically, like a like a query or a filter. Um, and you can pass the friend like conditions to it. But for now, we're just gonna, um, show all the records, which in this case, is only one. So select star from Ah, you, sir? No. And semi colon and enter. See how it looks like an excel file. So we have the user. I d see how it automatically put warning there. Ah used her name, the user name and the password. So that's perfect. We have the ah, the road there. So now we're gonna be wiring this up with our flask application. So let's x exit from my sequel. You can do ah, control the I believe or you can put exit and then parenthesis. Apprentices. Um, semicolon. So, uh, I I think you don't need to put the prentice's. There you go. Um, and let me see if I can do that with control. Dia's? Well, yeah. Controlled ive words were both python and my sequel asked the end. Okay, Perfect. So now remember how we had, um requirements Txt. And I'm gonna just cattle that you remember. So we have so far flask. And by my sequel, so two lines. Um so in order for us to install the by my sequel, we can basically install the whole file by doing the following command. Pip, install our Dutch our requirements. What that will do is it's gonna like, um, peeping, stole or package by some packaging stole all the different libraries that you have listed their in this case flask and by my sequel. But since flashes already installed, it's not gonna do anything. It's assumed, like skip it. Um, so it's gonna effectively just install by my sequel. So could still that and see what happens. Perfect. So it says, you know, requirements already satisfied for flask. And it's successfully, you know, downloaded and installed by my sequel. So now, by my sequel is basically the library that will let us speak toe the my sequel server from our flask application. Okay, so Let's, um, put this, uh, me minimum or minimize, um, the window. And, um, it's clear this here. Um, So again, if you want to see the requirements, the extreme that looks like we have flask in by my sequel there. So let's close this. Um, we're gonna just do the hello p y application now. So control escape. So we see the whole terminal eso Now we're gonna have on hello, p why? We're gonna have to import by my sequel. And we do that by doing by my sequel here on the top off. Hello, p y. And now the father we need to like Look at is the value, Logan, because that's where we're doing the checking, right? So it doesn't make any sense to check if your surname equals password. Because that's not what we're doing. We're gonna actually go to the database and see if they used her name and the password are matching. Then, um then will we'll turn that back to the to the application with a true and if it doesn't match, then we're going to return a false. So what do we do here? We're gonna take this light out and We're gonna call this if data then return true. Els Return falls. But what What is that? Data? We're gonna start doing that here. So I'm just gonna put here a commit a comment, that is that My sequel, Block. So we're gonna have to define a, um, number off Constance. The one is my sequel, that of its host. And this you're gonna have to do exactly like I'm typing here. Um, if you're doing it with your own server were your own, um, like, local installation off my sequel. These numbers might change. And you need to follow whatever tutorial or, you know, help foul you're using. I'm not gonna be able to support that, but, um, it's not that complicated. Um, and, uh, you should get this. Get some ideas from this from this videos. So the hoses that the local light be the database user is, um, in my cases from Syria to you. So remember how, when we had the terminal here that it said, um, there was a user name created this producer here that is the use or you're gonna use on this is my secret database user here. Okay, so make sure When you create a database to make note of that, then we're gonna use Ah, my sequel that have a password. And we have known because by the full club nine doesn't create a password, and you can create your own passport. But it's not really required because it's just for development purposes. So nobody else is going to be using that. They have a spot you couldn't definitely set out passport, and you can look up on the turn and how to do that. Finally, we need to pass the database the B, which is, uh, as you remember my flask up. That's what we call the database. When we did to create that, I mix here, right? Uh, and we're almost done here. So now we know we need to set up a connection to the database using those, um, those constants. So we're gonna do it by my single connect, And so we're gonna say host equals my sequel databases Host, um, you, sir, uh, equals my sequel database user. Um, password is my sequel. Database password. I know that I'm using past WD. That's how the the string is. I mean, the department or is called and then finally DV equals my sequel, that of a Stevie. Okay, so now we have to create a cursor, which is basically like a pointer that allows us to search for things and do operations with database. Okay. And we're gonna do and execute. We're gonna execute a command off, um, of my sequel by doing this, execute, um, method. And so what are we gonna execute here? We have to basically select, which remember I told you was kind of like a Fichter select star, which is select older fields for that role from you, sir, where use her name equals. And there were no bus. A string here and password equals another string. Now we're gonna best okay, And, um, so percent here so that we can do the replacements and we're going to say, uh, use her name and fast, which are the ones that are being are being passed here on the top of function that you can see using a password. It's the same ones here. So there you go. So this command is saying select a a row that, uh, from the table user, where the user name is equals to whatever Jorge and the passport is whatever I past year, you know, 12345 is a correct one. But we're gonna play with both the correct one and the inquiry one. And finally, we need to get the results back from the server to our application. And the way we do that is by saying curse or fetched one and safe. It's if we have always. We're not running to that of ways. I mean the application yet, so that's pretty much it. This looks very funny the beginning. And to be honest, it's not. It's not the way that you're gonna do the most advanced application that we're gonna start working on in the next section. But this gives you like an idea off what's on, what happens in the background. And there's always kind of like some settings, whether that a vase there, some cursor that you need to start, and then some command to fetch the information you need. So let's try this and see how it works. So let's our server, um so python Hello P y. Well, lawyers. That's good. So perfect. So let's go to the log in page. Or rather so the home page It re sends us or redirects is to log in. So now we're gonna use Jorge Jorge, which is the incorrect one. Because remember, we inserted that record with Jorge. 12345 and press Logan. Wow. Enquiries in and passport. That's awesome. That means that, um and it's funny, Like it also prints the logging here. As you can see, um, that means that it connected to the to the database and went to fetch, uh, or a search. Sorry. The the search on, um, from you, sir. Table where user name is Jorge and pass worries Jorge. And that data came blank. There was no there was no hit so that, um basically that beta was returned false. And then that went to this block. Where? Enquiries in the past. Where is set? So let's write with the right one. Jorge. 12345 And so accept. Really loved in. Awesome. This is so great. Um, so this means that we have properly set up that of Ace Server that's communicating toe a to our application and were finally coming closer to what a real application looks like, which is have a Ah, user name and password table or a user table that we can hit and get responses from and be able to see if the if it's the right user name and password. So once again, awesome job and the next section is gonna basically take this into the next level. It's going to be amazing. But for now, you know, sit back, relax and joy and, you know, party a little bit that you have gotten so far. Ah, in the course, and we're gonna see you in the next section to start our rial life blogging application.
45. Intro Mysql: So I want to congratulate you because you've gone a long way. We've seen a lot of stuff from from flask already. So, you know, you should feel proud. Um, that you've gotten to this point, we have a a pretty decent, um, logging application and, you know, logging log out. These are very fundamental. Um, blog's for building any application, so, you know, you should be Ah, definitely, um, proud of yourselves. Um, and we're ready to take the the last final step on this section. And that is to introduce finally, um, basically database. I thought I was component to our logging are logging app. So, um, one thing that we're going to require from the from the beginning is we're gonna have to install a package. Um, and that package is called by my sequel. So, um, in order for us to do that, um, we're gonna have to, you know, peeping stole a a new ah, new library. And, um, I like to keep the older basically all the libraries that you that your application requires in a follicle requirements. Txt. So let's create that file and at new file. So we're gonna call it requirements txt. And, um, it's moved. They said it'll be here and what we've installed so far, it's flash. So we should put flask in there, and, um and we're gonna have this new library called, um, by my sequel. So by my c. So let's save that. And, um, now we're gonna do some commands on the on the terminal, so let's ah, let's maximize that. And let's see what we need to do here. Okay, let's exit, um, from the, um from the server. And so the way that Cloud nine uses my sequel, it's already built in. So that's pretty good if we're If we're doing this on your own personal laptop or PC, um, you have to install my secret. At this point. I'm not going to cover that, Um, and I can't support it. So I recommend that you kind of look at some tutorials out in the Web on how to install my sequel. But in any case, ah, here in In the cloud nine. Part of the reason that I chose this environment is that it already has my sequel building , So that's a good thing. So don't worry about installing my secret. It's already here, but we need to start the server first, and the way you do that is you do my sequel, CTL, which is control Start, and you'll see that it says it's insulting my sequel. It's starting it again, checking for tables and now we have, ah, root user from Syria, the U and A database that's been created for us. So it's starting to my sequel server, and it's done perfect. That looks, everything looks, looks good. So now that we have my secret running, how do you interact with it? Well, there's two ways one is through the application and through the library that we were installing by my sequel. But, you know, you want to do some some initial set up, and the way to do that is my sequel has its own terminal. So think about it, I say, kind of like we're entering a terminal within the terminal, and that terminal is called the my sequel command line interface. And so what we're gonna do now is we're going to create our first ah database and our first table. So think of a database as a collection. Off tables and tables are basically basically rows and columns and more or less like an excel file if you don't excel, Um, where you have, like, on the columns, you have the fields, like user name password, you know, date off registration, that kind of thing. And then the roles are like the actual kind of, like data. So we're gonna create a ah, you cinnamon password table, um, called user. And we're gonna basically save our users in that in the table. So how do we get into the my sequel command line? Will you let me clear the screen? So we have a clear we do my sequel control, just like we did before. And you type c l I and we get out. You know, my sequel. Welcome. This is awesome. Um, so now we're gonna basically create our first database. So it turns out that my sequel comes already with some databases. The way you can see that is you do show data basis. And one thing that you'll notice that you're probably gonna forget because we don't use semi colons on on python. Is that every end of the command that you're typing to my sequel? You put us in my column. If you don't put that semi colon, it's gonna like you in a press entering and my secret things that you're still kind of like writing like a multi line command. So make sure you put the semicolon at the end. So if I do show that a basis, I see all the databases. And as you can see, there's a C 91 here. That's the one that cloud nine created for us. We're not going to use it, but it's just like to make things easier. Another's information schema, performance schema and my secret, which are internal bicycle databases. So you don't have to worry about those notice that I I used caps for Show that a basis because it's a good practice to differentiate between my sickle commands and variables by using, um, uh, you know, caps for the my Siegel commands and, um, and low low caps for the Bibles or table names or that kind of thing. Perfect. So let's create about the database that we're gonna use. So for that, we use the command create database, and we're gonna call it my on the score flask on the score app. And remember that say my cold. Right? Perfect. So how do I see that it was created? Um well, I can do up Arrow to go back in the previous commands, go to the show databases, and if I pressed Enter, I'll see that my flask op is now in there, so that worked really well, okay, so remember that I told you that databases are collections of table, so we cannot actually store anything on this database. We need to create a table within the database. But before we do anything with that database, it's useful to just, um, enter it looked like get into that database asked the as it elevates we're gonna use to add things to it. So for that, we used to come and use to use my flask up, um, semi colon. And now you see that it's a state of exchange. OK, now it means that my flats copies the dynamics I'm in and where I'm creating or, you know, kind of like affecting with with comments that I'm following with. So let's create the table. We're gonna just use a user name password, and we're gonna have a user. I d which is Ah often you'll see this in my sequel databases. You have a an I d that. It's a number that increments like 1234 It's basically like the row number. And my secret takes care of the increment off that number automatically for us. Um, so we're gonna We're just gonna like market as the asked the i D. But so let's see how that that's done. Toe create table. You, sir. See how it doing, user with, uh, not in caps in low caps because it's ah, it's Ah, it's a table mean, Then press parentheses and then enter. Now, notice that I'm not doing semicolon here because I'm doing a multi line command and see that little arrow there. That means that my secret is expecting more samples from us. So the first field is gonna be user. I d, um, often people and myself use if it's an idea. Just use your authority, like without the underscore. Um, but I'm gonna put it with underscore here so that you, like, you know, immediately realize that that's the use. A righty. Um, so after the field name, we need toe. Tell it. Tell my secret. What type off field. So we're going to call this an integer because it's a whole number 1234 And it can go up, um, to a very high number. So I don't think that we need to tell my secretly. So it's a not know, meaning that we can never have this field. Um, blank. It has to have a value in it. And we're gonna finally say auto increment, which means that every time I insert a record, please increase this number to the one after that. So not so my column. But coma enter. And now we're gonna put user name, which is the that the user name off the user. And this is a type field var char off 64 characters. So the user name cannot be more than than 64 characters, and it's also not know. Ah, we're also gonna have a password, which is also of our char off 64. Not know, and finally, it's always useful to have a an index for the for the table so that it's, you know, the scanning is done faster, and it's pretty often that used the primary index be the use a righty so We're gonna tell that to my C primary key. Use a writing press. Enter Sam. No, no. Semicolon or comma here and now we're gonna close. That first part is, is off the user, and then we does it say, Michael Perfect. Okay, so finally, how do we check that the table was created correctly? We have a show tables command, so show tables will show the tables on Did that I base that were personally at which, in this case, is my flesh up on their ego. Now we see the table. Yusor was created there. So the next step is gonna be create record into that table that we're gonna and use asked the user name password for the flask application.
46. Requirements: Hi, everyone. Um, this is a quick update that I need to make for everyone, even if you're, uh, starting to course, or you're a little bit ahead of the course in this introductory lesson. But there's been some problems or issues that users have had because I had not been using version ing on the requirements. Txt. So please make sure to use this versions whenever you see me doing peeping stole requirements and adding a new a new library, you will see that I only type the first piece like flask and by my sequel. But instead, um, whenever you are told to do that, just replace that with this. The whole thing with with aversion and you'll have much, much less issues. The requirements file. You can copy and paste as well from the repository, and I'll put this link on the on the lesson. So happy coding. And, uh, you know, I'm always available to help you with any questions.
47. Let's begin with our Blog: Okay, so here, we're going to start our basically new section with we're gonna build a flask blawg using a database driven application on there's gonna be, or we're going to cover a lot of concepts that are very important for you to know. They're very fundamental things that you were going to be using for a long time in your Web development career. So it's important that you really take notes and code along us as I do this these exercises , because these are things like I said that are are the bread and butter, if you will, for your web development careers, So spring exciting. We're gonna, um, build ah, fairly complex obligation here. And, you know, like everything I'm doing with these courses, it's going to be done. Ah, the professional way. The way that, um that you would do if you were working on one of the hottest, you know, start ups here in New York or in other places. So, you know, sit tight. And let's start, um, this section with our flask blawg application. So the first thing I want to um, cover here is, um, we're gonna be using something called a database or M or M stands for object relational mapper. And we're gonna be using sequel alchemy. Um, and what or M allows you to do is basically, um it enables you to communicate, talk, basically toe a database, um, using an object oriented ah, representation of the data. So, for example, if you have a let's say, a user table right on my sequel like the one we had on our previous section, you would interact with that used her table by creating instances off off a user from, ah, class, that is, that is foreign from from that user table. And then you would have things like you, sir, that name user that email. So those would be properties of that object. And you also have methods that you can access. For example, you, sir, that, you know, filter on and then you can do ah, you know, name equals Jorge. So you would get only the records that, um, off that user table, which have a name off your head. Um, so it kind of like it. It makes the interaction with that obeys really simple. But it also allows you to not deal with the lower level kind of like wearing off the database. It's ah ah. Automatically provided to you. So this is something that it sounds a little bit complicated? Don't worry. You'll get you'll get it once we start doing the exercises. But, um, but definitely you'll you will see the benefit off working with an or M versus directly acquiring like we did in the last section. Ah, a cursor. And he swing select statements and things like that. So I wanted to talk about that and kind of like introduce it to sequel alchemy, which is the I would say that one of the most popular or aims that that, um, that are out there for, for for python. So we'll take a look at that. Um ah, on this on this lesson. Okay, so why don't we start our projects? So we're gonna go here to cloud nine, And when you create a new workspace and we're going to call this, um, the flask Blawg. So let's put flask blogging here, and no need to make a description. Make sure you use custom here, um, for the template, and then create workspace, you know, creates the container, and we're ready to go. Perfect. Um, I'm gonna put some Ah, some settings here. Ah, I see. I want to put the the font a little bigger so you guys can see better user settings and 24 . That looks good. Okay. Perfect. Yeah. So this looks good. Um, so now I'm going to The first thing that we need to do is create, um, the actual directory where the the the blawg is gonna be at. So remember how I told you to not use, um, dashes for the for the name off, the off the of the project. So let's create a a folder. And for that, we're gonna do, um, make there. We're gonna call it flask on the score. Blogged. So we change directories. Um, and, um, And again, remember, the first thing that we always do when we started one of these projects or when we start working on them, is to create the virtual environment. So I'm gonna do ve envy, which is virtual environment. We need a python three execute herbal. So you do that be. And we're going to call this, um v and B. Oh, sorry. Virtual environment here via troll em. Ah, p python tree ven. So that's we think your flash block directory Perfect. So it's installing the the execute herbal for flask, and we're done. And now we need to activate. So source vamp being activate And remember, before you start quoting, you need to see that ve MB ah thing at the beginning. Otherwise, you're gonna be installing packages and doing things on the wrong in the wrong place. So I'm gonna go ahead and start, um, with the, um with the blawg and basically Ah, the first thing I wanna do it is create this requirements txt file where we're gonna be tracking the, um, the packages or the libraries that these this project needs. So let's do this. Um, I wanted to let this read me and the because I think that's from the from the default installation. And remember the package or the application is this one, not this flash plug on the top. This flashlight on the top is just like the name off the of the workspace. So I'm gonna cry, click there, and I'm gonna do new file, and I'm going to call these requirements, not txt. And then we scroll this here a little bit. Ah, so that we see more foul names. Okay, so I double click there and have requirements. So of course, the first package. We need his flask. So because we're doing this home flask and we're gonna new need by my sequel, which is the connector, the sequel connector that we were using on the last lesson. And this is the, uh, or, um that I was telling you about. And we're gonna use one called Flask Dash Sequel Alchemy. There's a sequel, Alchemy Alone, like just sequel Alchemy Library. But the flask that dash sequel alchemy is tightly integrated with flat. So we're gonna use that. And last but not least, we're gonna use something called Flat Script and I'll explain to you a little later what that does for us, but it's mainly we're not gonna be using anymore that by phone. Hello, P wire. Python. Happy. Why? Because that's not a ah, you know, very scalable way to do it. Instead, we're gonna use, um, something called Python managed B y, which allows us to do you know, start the application, do that. I base operations are another thing, so it's more flexible, but we'll see that when we start working with it. Okay? The next step we're gonna do is we're gonna create an in it p y at the very root off the application. So new file on this score on the score in it on this kind of court dot b y. And this in a p y is where we're gonna put some of the stuff that we put on the on the main application on the last section. And so let's see what that looks like we're gonna do from flask import flask, right? And then we're gonna do the same thing up Is a flask application instance with the name past, and we're gonna to, um, So one thing that we're going to start doing is setting, um, the configuration of the application from another file from a settings file. And this has to do with, like, sometimes you're gonna have different um settings for when you're like your application is running on production versus when it's running locally here or in your laptop. So it's a good it's a good thing to separate the settings in a file that you can track and modify, um, inversion for the different environments. Um, so that's almost it. One less thing. So we're gonna start, like, putting the a little structure on this. So we're going to actually create a new folder here, and that folder is gonna be called home. And that's gonna be kind of like where our home page for the, um for the block lives. And you're going to start seeing that we're gonna start, like, modular writing the different parts of the application, and that makes a lot of sense. It's it's ah, it's the best way to, um, to structure your application in different buckets so that, you know, the maintenance and the development of the obligation is easier. Um, if you had everything in one folder, like all the P Y files, it be kind of like a nightmare to maintain that application. So we're going to start separating the different components or the different. Ah, it's a verticals within your application in different folders, and those folders are gonna have templates. We're gonna have views. Um, and that way you're gonna be able to, um, to maintain your application better. So let's actually create a a view here, so I'm gonna do a new file, and it's gonna be called views B y. And, um, what we're gonna put in there, um, is the following we're gonna have, um So this is something that you're gonna have in every view that we have in this application? Yeah. And it's dislikes from flask blogger. And I noticed that this flask on the score block has to be the same name off that folded that you created there. So that's why we don't need Stashes we have to use on their scores. An app in this case is this app. So what this lining saying is from that any pre y file from flash block importante up the app, which is the flask application, And from that point on, we can, um we can point to that app as the the flats application window routes. So, in this case, when they do for the home index Ah, for the for the for the for the index or slash on. But most were gonna add indexing here, just in case. Serve these index function and we're going to return hello, world. So that we know that, um, we can check if it's working or not. So that's it. Saved the file. And we haven't saved this folly there because I see the little dotting their. So now it's saved. Okay, so now we're gonna be, um we have to import that view because that's what's gonna be, um, kind of, like run from the application. So I'm gonna have to do from home import views. Okay, So what that's doing is it's going to home, and it's going to import the views file for all the This is like the controller, all the functions for the routes for that module is going to be important here. Now, when we have a user folder here or other other types off content or modules, then we need to add them in this unit B Y.
48. The Basic Structure: Okay, so now we're going to start looking at the Settings file, and ah, it's when we have really simple, um, nothing haven't seen before. But I Like I said, we're gonna put it on this separate file and that settings files gonna have a secret key. Um, which already taught you how toe generate a new one. But for now, just to make it quick, I'll just do you will never guess. And we're gonna have a debug equals. True. So that, um we have automatic reloading, Um, and that kind of thing. So Okay, so what's next? Um, we need to, um we need to now create this file called Mannix B y. And this manage the wise What? You're gonna be actually running to, um, to start and stop the application. So let's create that folder. Managed me. Why? And the first thing we wanted to hear is we wanted to may minimize the terminal. Um, we want to basically have a pointer toe this folder, and this is something that you can look up online. It's not really. I mean, it's a little complicated line, but what it does is basically alaus python to know what the starting point off this whole thing is and be able to then find other folders, um, within the, um within the this this dis application. So basically, what this is saying is like, get me the ah, the files current location and then import or upend toe the python path, the the level above it. Um, so it's it's not really like it looks very complicated, but it's not really, um, that complex. It's just like it looks very weird. So six path upend, always path APS path and then always path. Have a joint here. Even I have trouble getting it right. So there you go. So their name off file and then four parent is it's at the end so that they match see or three? No, it's three. Okay, Perfect. Um, then we're gonna do from flask um e X t script. We're going to import the manager and server, and those manager and server are basically the ones are going to allow us to run python, manage blah, blah, blah, and and load or serve the application. So here we're gonna import the app, and that's that's the one from Unit B. Y. And we're gonna instance she ate a manager from that app. Okay, so now, um, what with the manager, What we we can do is we can import or add commands toe that manager, and there's various, um, methods that we're gonna be using. But we're gonna use this one initially, which is the, um, wrong server command. So the way we do that is we define run server, and what that does is start the server with the following, um, settings. So we're gonna go use the parkour groups, use the Parker equals true, use freeloader so that when I changed the the code, it automatically reload said the host is gonna be on this is like a specifically like we saw this in the past section. It's for cloud nine. So we're gonna define this I p and then put 000 and then the port is gonna be that I am the integer off the OS. Get E M V port and then 5000. Okay, Perfect. I'm getting an error here on the fine wearable app. Oh, from flash looking bored app, it wasn't at append. Okay, so now, in order for us to run this application um, you do this is gonna sound familiar. If name equals main, then Manager Ron, which is a little different. So this manager run, basically execute that manager, and then that manager is gonna have a command. So see, there's invalid in syntax if mean equals, double equals, Right? Cool. So we have our managed me. Why? Ready? And we're almost set to run the first tell a world. Okay, so let's try that. I I do Control escaped to bring up the terminal. And, um Oh, so the first thing before we do anything, we haven't really installed any of the requirement Txt, um, libraries. So we need to do that. And the way to do that issue do peeping stall. That's our requirements. Txt. And let me maximize that so you can see the the output. Um, and basically, it goes through the requirements file and starts downloading all the libraries that are there, Um, really quickly. So now is installing, um, flask. It installed by my sequel flask, equal alchemy, flat script and some other helper libraries that are related to that. So we should be set, um, maybe meaning my start. And so now, instead of doing Python, you know. Hello, P wire. Whatever we had. Now we have a managed B y. So we do manage me. Why? Round server Perfect. So now it looks like it's running. It says running on its to be 80 80. Now, remember, you don't click on that because that's not the rial, um, your l words running you have to go to share and then click on the on the app, um, on the on the application link, which is the 2nd 1 So if I click there open and there you go, we have hello world. So that's that's replication right there. Um and that means that it's running perfectly fine with this new kind of, like, you know, set up that we've that we've done. Now what I like about data and what you should be, you know, appreciating now is that it's very it's a very modular approach. We're gonna have home. We're gonna have you, sirs. We're gonna have, you know, posts. It's gonna be very scalable. And that's the way that professional programmers do it. Ah, you can tell a professional from a kind of like a, um you know, starting developer. If the if they don't marginal rise their stuff, he just They just throw everything in one folder. So we're gonna be keeping this this kind of structure. Remember, when we create a new a new folder with a new module, then we're gonna have to, you know, at that from home or from whatever import views. Um, but that's about it. And after that, you know, you're able to separate all your you know, you're what we call models, which is we're going to see a little bit later on, which is the older database. Scheme us for that For that, for the table or for that module, etcetera. So, um, you know, take I mean it. Toe, check this out. And, um, there's a link now, here on the, um on the resource is where you can download this whole code, Um, so that you can check if you if you were typing or if you did any any errors, you can you can know
49. The Author Model: Okay, so we're now going to start working on our model and the way that we do this is we, uh we define basically a class that would define the author object. And in this case, it's gonna be the people that, um that are gonna be able to create posts and and manage the block in general. So the way we do this is we need to import that db class. So remember, we had here the b equals sequel alchemy app. So we're gonna do that, um, by doing the following. So we do from flask, plug, import, BB. And that way we have the sequel. Alchemy. Um, basically enabled, um, to be able to do this dismantle for this author. So how do we do our model? Um, so basically, it's a class. So we're gonna have imagine h author is gonna be a, uh, an instance of this glass, and you're gonna be able to to select a specific author and then be able to see there their names or email, etcetera. So let's start doing that So you guys can see what that looks like. So have a glass. Author recalls to be model. So the first thing we're gonna set. Um, ESA Properties I D and ideas s you remember from the last section is basically an odor incriminating. Um ah. Number integer that that increases with each new record. So it's the same the same thing thing here. So we do db the column. And, ah, basically, a column is a one of those properties of that of that table and here we define what type off column, Um, in this case, it's an integer so we would be integer. And we're also gonna say that this is a the primary key for this for the stable. Next, we're gonna create a full name, um, column and this one is gonna be a string, and we can define how many characters. So let's say, uh, we're gonna pick 80 for the name, then for email. We're gonna do another column. It's also gonna be ah, that's drink. But in this case is gonna be 35. And you can also pass if the, um if that Colin is gonna be unique, and we only want one author with the same email per table, so that's gonna be enforced. We're gonna have a user name and in this case is gonna also be string off 80. And it's also unique we don't want We cannot have two different users with the same user name next password, and the password is gonna be a string of 80. And finally, we're gonna have a flag, the circle flax because they're, like, kind of like, um toggles or kind of like settings. And it's gonna be called East Author. So even though that the column or the table rather its author, we want to be able to set authors that are able to post. And, um well, they're authors. They're gonna be kind of like only, um they can only comment. So it's kind of like eyes this person enable to post to this block or not. And I decided to make that, um, a flag and flax usually are bull. Ian's brilliance means that it's either true or false. So it is. Author is gonna be set to true if this if this person is able to, um, toe post to the blogged versus just commenting or or, you know, reading it. So that's that. That's our table right there. So when sequel Akemi runs, um, Ah, in this application, it maps out these columns on the table to this properties off the off the author Arctic. And we'll see. You know, you're gonna be looking at how that works in, uh, in the application shortly. Um, so next you need to define an in it, which is basically what happens when the object is first defined. And we want to be able to basically allow the, um, you know, you need to pass certain certain columns that are required for us to create that opted. So we're gonna have Ah, we're gonna need full name, um, e mail user name password, and I'm gonna set by the fold is author is false. So unless I override that when I create the the object for the first time or any object than that it's passes us falls. So then I called self full name. So in this case, this self old name is this full name here, and I'm passing the full name. That was, um, fast. When the when the object is created. Same thing here. Self email equals email itself. User name equals user name. Self fast word equals password. And you're going to see this, um, this kind off pattern, um, regularly as, um um as you deal with secret alchemy because it's kind of like it's a good way. For example, if we had a date somewhere here, we could automatically set the day to be today state. And today's time eso that this in it kind off like function allows you to to pre populate and make sure that the objects created the right way to remember this death in it is only going to be called when you when you when you call this when you Instead, she ate this this class in a new object for the first time. Um, and there's another method called, um reproduce O R E b r which basically allows you to, um how do you want to display this when you're interacting with it on, say, the terminal? So the way we're gonna like, um, kind of like identify these records is we're gonna We're gonna just say author, um, person are, which is, um, and when they just passed the user name. So when we when we list or when we fetch objects, it's going to say, Oh, this is the record off author, You know, say poor hey or whatever the use of a miss. So that's that's pretty much the models. Um, you know, the first time you see this Cisco is kind off a little bit. Kind of like confusing because you're not like you haven't seen how we interact with with, uh, with those objects, but will will be get more familiar as we continue working with the with the class.
50. Setting Up the ORM: Okay, So, um, we're gonna have to now initialize the database so that we can start, um, creating basically, um, models for for different models. And one thing that I wanted to do A So I thought more about it was to modify this home directory and rename it Blawg. And the reason is because I'm we're gonna have to stop module for the home page. We're gonna have a module for anything that's really toe the blawg and a home function would be inside that that module. So I'm gonna move this move blawg to coming, move home to a block because you can see now we have blogging there, and we have the views, etcetera. And we need to change this from home import views. And, um and I think that said, it's Eve that runs wrong server and will reload here. Yeah, so it's working fun. Perfect. So now we need to, like, set up the database, and the first thing we need to do it is actually create a database for us. So, um, from the last section, I don't know if you remember, but, um, you know, the, um, cloud nine already has basically a built in my sequel server that weaken Just leverage. Um, and we can start, um, by using the mice Equal city L um, shortcut. So the way we started that a vase here is by using my sequel CDL start I the a type of there, so it's not nice equal, but my single, right. So remember to notice this road user, because we're gonna use it, and it's gonna be different for you. But if we do a full screen there, you'll see that it installed my sequel. Ah, it stopped and then started. Um, and then it's ah, it created at that. Every for us called c nine. Although we're not, like, technically gonna gonna use it. So, um, but my secret is already there. So what we want to do is create a database for us to to use. And we're going to call that, um, that I based the blawg the bloke database. So we just do my sequel, CTL Ah cli, which is the command line interface. Perfect. So if I do show databases in there, I see that 1/2 c nine, which is the one that was created for us. Ah, information schema my sequin performance given, which are my sequel databases. So we're gonna do create database, and then we're gonna do a blawg. Perfect. So now, um, So now we have a that sec. If it's if it's created, and yet it's it's in, it's in there, so we should be fine. So now I do control the or I type exit semi colon the first week. The 1st 1 we're gonna do is well, we need to put this on saving speak. Why? So we can access the file? Um, the database I'm sorry from from the from the application. So for that, we're gonna need to add some stuff in here. One is we have to do import OS, and then we're gonna have to following. We're gonna have, um, db use her name equals. And remember that, um, that use her name that the database set up gave us. That's the when you're in a putting their, then we need to have the be password. You're gonna leave that blank, and they're gonna have the log database. Name equals the log, which is the one we just created. And then you're gonna pass. The bee host equals o s dot Get E M V. This is for, um, Cloud nine. If you are running my sequel locally or in a linen machine or some other like if you're using docker, then this is gonna be different. Um, this one is very important to be the view or I and you're gonna do exactly this. My sequel. Plus by my sequel Say, my colon slash slash percent s and this is user name and password at the host name slash the table name? No, this is percent sorry. Percent s and percent s and then we just replace those all those things with Devi User name , um, D B password, TV host and blawg database name. Okay. And finally, we're gonna do sequel alchemy database. You're I equals Maybe you're right. So really, the one required viable is sequel alchemy That obviously all right. But I put it like things because it's and he's here to just edit. If you have a different user name or password, we're basically creating the string in a nice, like, sequential way so they can see how this looks. But you could also, like, just delete all those oldest lines here and just put sequel that a single like me that is your right equals my sequel plus Mike sequel and then all replacing all those strings with the with the different values. But I think it's nicer that way Looks better, more readable and readability is always important. Okay, so now we need to add Ah sequel Locking me to r N a p y file. And so for that we're gonna have the following from flask dot e x tedx Thought sequel, Alchemy Import sequel I'll get me okay And we're gonna add a new amuse a new flag. Here are new property that we're gonna be able to call from anywhere in the application called DB and the base just a an instance off sequel Alchemy with the APP um, passed to it. So from that point on DB, holes are our database. So now what we want to do is, um, create Let's create our first, um, right, the new application module, which is the authors module. And you know, this blood is gonna have authors that are gonna be like logging in. We're gonna have there. They're gonna have to register initially, and then they need to logging before they can post a block books. So let's go ahead and create that module. So we're going to create a new folder, and it's going to be called author. And so remember when we talked about Model View controller in the last section where you know a lot off these applications? Follow them. Model view, controller, um, pattern and it Basically the idea is that you separate in different components or indifferent files almost on the application, anything that's related to different parts of it. So model is for the database operations views are the controllers, which is kind of like a little bit, um, confusing. But views in in the, um, in flask and and also in other python templates are actually the controllers or the sea of the NBC views are actually in that NBC pattern are the templates, so it's a little bit confusing. Some people call it the empty V pattern in in flask and younger because it's model templates and views. But views are the controllers and templates are the, um, are the are the views. So in any case, the important thing to remember is that we're gonna always separate templates, which is the presentation layer or the view. The models, which are the database operations on the on a file called Models and the controllers, which are the ones that route the one that has the route, Um, which are the views? B y on flask. So let's go ahead and create a views here so that we have that and we're gonna have a now a new file called Models B Y. And now we know that views he's gonna have it's gonna be our controller models is gonna be the the database operations. And we're gonna have a templates folder here with the same structure so that we separate also like any, um, any views or any presentation layer for the application. And before we forget, let's add this to the to the NDP. Why? Rumor? Whenever we have a new module, we need to do this from author import views. Let's save that. And so now let's go to the It's going to the models. Um I mean to the author views, um, we're going to just put some some placeholder stuffing their so that we knew. We know that it's working. So from flask, blawg, import app and then we're gonna have a nap route and we'll call it log in. And ah, that's where the authors would log in. And so there, find Logan and then just return. Hello, user. Okay, um, another important thing to remember. Always when you create a new module, which is a new, like a new folder, Um, we need to add an n it p y in it so that we can imported from from other places. And actually, I just realized that we forgot to do that on Blaga. Swell. It works because we haven't imported blocked from anywhere else. But it is always a good practice, because then we can do we can see from blawg dot views. Um ah. Import something. So that's that, Um So now we're gonna have, um we're gonna define our model. And, um so let's start working on that
51. Interacting with the ORM: Okay, so let's see how we interact with the with this model. And so the way we're going to do that is, uh, remember how we had Python shell and we would be able to to do stuff with the with the application from there, Um, in this case, because we have manage B Y here, manage allows us to instantly it a shell that has the, um this application loaded in memory. So that's the way they were gonna do. Um, we're gonna play with the application by calling this python manage people I shell and you'll see here. I noticed this when I was doing this. Initially, it has this weird kind of like, ah, alert message. It's nothing kind of like, um, very urgent or or nothing to be, you know, concerned about. But I was reading about it, and it turns out that secret alchemy needs to have this setting said to true, in order for us to not see this this error message. So I'll just go ahead and at this to the, um, to the settings be why? So that I don't see this this this message here and it doesn't affect really how how the database works. So let's, uh it's to an exit here. And let me, um, maximize this and clear the screen. Uh, wait. Okay. And let's do back to manage me. Why again? And ah, now we don't have that air, But in any case, um, what you want to do the first time we we are gonna interact with it with with this with this model or with this object? Um, the tables have to be created because, as you remember, we have to block that I was created, but we don't have any tables in it. So the way you do that is, um, you know, you first, you have to, like, insert, um, or import BB from your application. So we're gonna do from flash blawg import BB, and then you have to import the models that you're gonna be using. So in this case, we're gonna do from author models. Import author. Um, you can also start if you have, like, multiple like classes in there. Um and that will import all of them. And then finally we do this. Ah, this comical devi create all and what that does is it creates all the tables for, um, the application off those models that we have imported. Um, so how can we check this? Um, it's pretty easy to check that we can. Let's open another terminal window and let's call the my sequel. Cli Ah CTL cli. Right. Um so if I show ah, they put it in caps. So we follow our standard, uh, shoulder databases. So that of aces. So if we use block here, Okay, now we do show tables. You'll see that author was created. Um, and if we do select star from author, you'll see that we don't have any record. So that's good that that means that the author table was actually created by the DB cradle . Now, remember, if we had older, um ah, other models, you would have to import them before you do that to be cradle. So if you have, let's say we had a blogger we had, um, it's a posts you would import those models for. So that sequel alchemy knows what what, be what the actual models off your applications are. Okay, So how do we now interact with with the stables? Um, so basically, you're going to create, um on author object from the model that we worked with before. So I don't know if you remember this. So it would be all these all these things and remember to initialize or to set a new object . You're gonna have to pass this this ah, part time winners here. So let's do that. We're gonna say author equals author, and you compress entering there and, uh, rumor How we said, you know, I d was greater dramatically. See how I don't have it here because it'll be created automatically for also no need to pass i d. But we're gonna dio Basically full names are full name would be or hey, Escobar. And then we're gonna have the email would be Jorge at from zero dot io and then use the name would be Jorge. And then password would be 12345 and its author because it's been said toe false by default , um, I could just not pass it like just ended here or passage us. True. So that's it. And close parenthesis. Okay, so now we have an author, and if I do author here, you'll see. Remember how we talked about the rep reproduction see how it river sense that. And it tells me author is now an instance off author with the user name passing there, so that's pretty useful. But, um, is that inner database yet? So let zoo another, select their and see what happens. No, it's not. So there are two steps actually to to be able to get that into that I base. The first thing is, we need to create a session so we do devi session odd offer, and that is that it's called a kind of like a pre commit. Basically, a session is kind of like you can do multiple things on each call to the database. So we could have you know, we could add five authors in here, and we would just like the end of those five definitions, do a commit, which is kind of like Okay, now said this is that a base and that saves us time because instead of going back and forth , we can do it just one time. In this case, we're gonna do just to one, so that's fine. We're done here. So now we do db session commit, and that's when the databases actually called and I am getting a, um, basically a record created. And how do I check this? Well, we can go here and then select Star from author. There you go. We have our first record created from the Oran. So and now if I do author, I d here, I see that I get an i d. That idea is the one that my sequel created for us. And at the same time, I can do author docked. Ah, you know, full name. And I'm gonna get my name. So see how now that records that record in the database has become kind of like an object, and I can do stuff with it. Okay. And how do we query, like, how do we do Select star from author here. Um well, let's create another user so that it's a little bit more, um, fun. So I'm gonna do you can do author again because we're not gonna reuse that. We're not. We're not gonna do anything with it, so I'll create another one years. Um, let's say John Smith, right? The email use John at example dot com they used her name is John. And the past worries went 2345 And he's also an author. Okay, so now if I pring author, I get author John Perfect. So once again, Devi session D b session uh, author and D v session comment. Now, if I see on my sequel, I have my two records in there. Perfect. So now, in order for me to see let me get me or get me all the authors in the database, I do the following I do authors equal. Ah, author. And then we're gonna have a property called Query and query allows us to filter to get objects. Ah, by different like settings. Or we can do all of them. So if I do authors query Oh, it looks like he didn't do anything. But now, if I do authors here, you'll see that I have a list off off objects. So authors, eyes or hate and John. So if I do authors authors off zero, that's the first item on the list. I'll get Jorge. And if I do authors of one, I'll get John and same thing here. You know, if I do authors one dot full name, I get the the name John Smith. Um I could also do a query filter by. So authors equal author, query field her by and then I can just pass the, uh, parameter. So that's a that's a user name equals Jorge. And, um, I could also get the instead of getting all of the records here, I just I just say first. So now authors has one record, and it's the author, Jorge. So we'll see a lot off other kind of like how we interact with the database on a later, later lessons. But this is kind of like a good start for us to visualize how we interact with with this or in Okay, So before we move on, we don't want to continue having all these, like data in, um in the tables. So we're gonna have, um we're gonna use a method that sequel alchemy uses. So the way we do that again, we have to import the, um, the db object and in fort the models here. But, um so the way you do is you do the deep recession commit just in case there's any pending operations and then you do db drop all and that erases all the tables in here. So if we do show tables, you'll see there's no tables in there, but we still have our database. So blood is there, so have that in mind. Um, remember to the deep recession commit first because there's a bug that if we call Debbie, drop all without this devastation commit, it hangs indefinitely until you like control. See, So but we're ready to start fresh, and we're gonna move on to the next ah section where we're going to start working a little bit with with forms and let's see how we do that.
52. The Base Template and Bootstrap: Okay, So, um right now we have Ah, pretty basic like, hello, world Being this way there. And as you remember, this was in in the block views. We have these return in a world, which is, of course, not very pretty to look at. So one thing that I'm gonna use here, and I'm not gonna get into a lot off details on the on the front, inside or the look and feel, but I want to create a base, um, based html template so that I can start putting some, um, some of the look and feel together for these things. Blawg on you can follow along and you'll, you know, by looking at how I do things, you might get some, like, basic ideas on how to work with bootstrap and, um and J Query, which is two of the things I'm gonna use. However, like I've been saying, other lessons probably cover front and stuff in another course, and I'll keep you guys updated. When? When that happens, may make sure to like, um, you know, follow me on Twitter on from through EU or goto from syria dot Io instructed the news later so that you can keep, you know, in touch, um, with with me in terms off, like, you know, new courses coming along. But for now, let's Ah, let's create this base HTML. And for that, we're going to create a new folder, Cold templates. And if you recall from our first from our earlier section templates is basically where we're flask expects you to store all the old attempted for the for the application. So I'm gonna do when you file here, and I'm going to call this the base HTML. Okay, so let's do basic html. Um, we're gonna set this up as a, um that's an html five kind off document and we to find the language here. Um, then we're gonna have a head. And this, by the way, is like a minimal kind off like, uh, html five templates or you're working. Welcome to kind of use it for your own projects. This sets the character according to utf eight. So weaken display properly all you know, international characters if we have any and we're gonna have a, um I edge, which is the Internet explorer setting, and we are also take into consideration for mobile applications or mobile rendering. So if somebody receipts are page from from my mobile, um, they can see the content correctly with equals device with and coma in the shell scale is one. Okay. And finally, we're gonna have a title, and that title is gonna have a block that we're gonna define within the temple that that calls this and then and block. Great. So now here, we're gonna have, um we're gonna insert bootstrap. And for that, I recommend getting bootstrapped directly from a from their city in so that we don't have to serve it ourselves. So let me get that in a second. But let me just feel this out. Perfect. And that ends our head. Now we're gonna have a body and let me clear this out here. So, um, we're gonna have ah, container class. And that's gonna be also a block that we render from the calling template. We'll call this content, okay? And finally, we're gonna have J query, which is required by by bootstrap, and we'll grow up that later. And we also have the bootstrap Js. These are comments here, Scraped sores. You cool and script. Perfect. Okay, that looks good. um, let's go and grab the bootstrap city and values to putting this in this template. Okay, so let's go and get that city in here. We can get, um, boat trip, See? Assess. So let's replace that here and the J s. And now we just need J query. See, uh, let's look for J query cdn. Okay, so we're put it here code a query 2.1 point for perfect. So that's that. So let's say that template and we should be set in here. Um, so the next thing we're gonna be doing is a, um a registration for the for the users. And for that, we're going to start using a library called flask WTF, which is, um, a set off utilities to be able to handle forms in, ah, in a very easy and scalable way. So let's ah, let's get on with that
53. Introduction to WTForms: Okay, So, um, we need to, um, get WTF forms, and that's going to be a new library. And so that needs to be added to requirements, and only two people install it. So here we add flask wtf. And like I said, WTF allows you to manage forms very easy within flask, um, somewhere between stall it. So let's go in here. And do people install requirements and that will install flex WTF notice stuff like WTF to be there for us. Now we have that enabled. So how do we build a form? So I form basically lives on the same, um, module that we're gonna be kind of like using. So let's create that. Usually we put it on a form, Dr Ey Soul. It's to new file and form dot b Y. So the first with you is we Eanes import from flask WTF import form, and we're going to import some validators and basically, by the years allow It allows us to, um validated data before he gets without a base. And we're gonna do Stringfield and Password field as well. Um, we're also gonna, um, validate the email. So that's ah separate one from the beauty of forms dot fields dot html five import email field. Perfect. So how does it work? Well, we need to create a class that, um, basically creates fields off the fields from the from that field that we're gonna be rendering. So we usually call it registered for, you know, whatever action form, register form in this case because we're going to register users with this. And it's a subclass off form, which is thief last o B to f wtf or so let's sicker model. So we have, ah, full name. So we're gonna do full name equals Stringfield. And then here we pass what we want to display on the kind of, like the description of the off that field. So in this case is full name. And we're gonna say that this is a request required field. So we do validators required here. Um, then we have a an email. So email is equal to an email field. Um, and then we put email us the description, and it's also ah, body that is required. Um, then we have a user name, which is also a Stringfield, and then we just put to use her name, and then we're gonna have multiple values here. So let's open a bracket. So validators required and validators dot length. We went toe kind of like put some restrictions. A minimum of four maximum 25. So if their field it's listen four characters, it'll be we'll get an error message. And if it's more than 1 25 the same thing and then password, we want that to be a password field on. We're going to call these new password and why new passport? Well, you know how informs we have a kind of, like repeat the password. So you have You have to put the password twice. We're going to do something similar here, and you'll see that in a little bit validators required. Um, we're gonna have that validator. It's the elevators we're gonna have an equal to and equal to means it has to be the same. Asked the, um as the second field that me confirm. And the message if this fails, is pass. Words must match, then comma, we're gonna do evaluators lot length and the same thing. At least four characters for the password and maximum off 80. And that finishes the password, and then we're gonna have a confirmed field, which is also a password field, and we're gonna call this repeat password. So, as you can see here, this confirmed is the is the field that it needs to, like, be equal to. And if it fails the message, we pass it. He is password. Most manage. Um, that's it. See, we have on air here. Uh, password field. Yes. I really like this editor from Cloud Line. I have to say, um, okay, so that's it. So we have our our form ready to go, and, uh, now, let's see how we put it on the view. Ah, So first, we're gonna have, um we're gonna at this to the to the author view here. So let's define a new up route. And that one is called register, and we're gonna have to methods. One is a get and everyone exposed. Let's remember from the last lesson, that means that we're gonna render the form here as well as get the information from it. So all we do now is past the form as to register form. But wait, where's the research form? We need to import it. Um So for here we have to do from flask. We're gonna have a templates or import render template and redirect after the user submits and from author form import register form. So now we have raced performing here, Um, and we're gonna return render template. And we haven't done this year register, ext. Email. And we passed the form to it. Okay, so let's see what that form looks like. So remember how I said that we're going to follow the same kind off like, um, module like, structure on the template. So we're gonna do that by, um, by having a template folder that, um, and within it, we're gonna have the author, the author template. So let's start doing that. So in templates. And when I had a new folder and it's called, um, So the folder is author, and we're gonna have a blawg, um ah. Folder within templates as well. And here I'm gonna do when you file, I'm going to call this register html Cool. Okay, so that is gonna be extending the base html that we the earlier right, and they want to do a block title author register. Um, then the content with what? They've class role. Which is how, um, bootstrap defines the kind of, like the rows of content here. We're gonna have a column with on off set off. Three. This is again things with, um with would strap. That is the way that the Greek system works. And, you know, you can you can read about this. Um, Then we're gonna have a title offer registration. So here, where the form method equals post an action equals and remember, we never, ever put actual your else. Here we do you, Earl, for read Easter. And the role is form. This is also required by bootstrap. Um, perfect. So how do we actually display a ah field here? So the way we do that is by passing a, um, what's called a Dave last form group? This is how bootstrap will, um, group all the field, all that fields properties. So first we have to put a field label, and that's kind of like the, um, if you see the form, it's this this part here, what the actual description of the field is, um then we have to pass also the the actual field with a, um, a filter from, um, from flask templates, which is called safe. And basically, what safe means is it's OK to render the things in this. Ah, in this part here, um, because we know that it's coming from from us, and it's not going to be something that's, Ah, that has to be escaped or anything. Um, and, uh, this will do that for now. It's kind of like the most simple part of it. But of course you know the field. It's not the It's not what we would need to bust here. It's actually there. The form dot because form is what we're passing on the interview. Uh, where's the view here? So we're passing the form and the form is the register form. So the field in this case would be the 1st 1 which is, if we check on the form, it's full name. So let's put form not full name, that label and then former doc full name that label right and then form dot fulling. And then we have to do the same for you know, the following ones. But let's just do to so you get the hang of it. And so, in this case, would be email right and then email, and that would render two of the of the form fields full name and email. But there's something that I'll show you later on how to like, not do this because it's like a little bit river dishes. And we haven't even put the the part where we need to display errors. Um, before we check that, there's one less thing that you need to pass, and you always use this. There's something called CSR F that you can look up what? You know what it is. But CSR have basically makes it hard for hackers toe display, um, or toe attack your form with data, and it renders basically a, um, a one time like hash or random strength. That's also said it's a cookie so that the server knows that the person, uh, or the system that's, um, that's sending this information is actually you and not like a script that some hacker has stopped. So for that we do this form that hidden tack. We always always use that at the beginning, off its form, just like that, and you'll be able to, you know, make sure that the form is secure
54. Form Errors: Okay, so let's see what we get here. It's Ah, it's just to control sea here and restart their server. And because we have the, um, the route When I close this the rowdies last registered, Let's see what slash raised her shows. Perfect. So we have our first form. This is This is so cool. A. So you can see it's rendering the label and then the field where you can enter the information and it's doing full name and email and let's see for one second the source so you can see what that looks like. And I'm gonna me my states a little bit, so we have more information. So, as you can see, it's requesting bootstrap, the CSS its This is older base template. We'll see how it's replacing the title with author register, which is what we had said then. On the actual container. We have the actual content here, which is it's that see authority, stray share, and we have method post a full name email all that. So that looks good. Um, I notice that there's no, uh, he didn't talk here, which is strange. I'll I'll take a look at that, but in any case, see how we have label for a full name. It's putting the label there and then the input i d. Full name, name, fulfilling type text. And here it's type email. So that's that's kind of like working perfectly fine. Um, one thing that let's see here. Um okay, so we're we're gonna send this to the register, so it's gonna There's nothing that's gonna happen here so far. So let's ah, let's try to see what happens when we when we actually send this. And, um so when we need to do is, um in order for us to check what the what the person um, sent We need to check the, um that the former submitted. And the way to do that is there stays. Let me hide the, um you check. That is, if form dot validate on submit. And what that does is that it checks that, um, the form didn't have an error. So, as you remember, there are some things that were saying here, which is like, you know, this is required. That is required. The use of Amos Toby, Minimum of four Maximov 25. It's s O. That is um oh, I had I had not saved the race to HTML. That is why they're form hidden tag wasn't showing. So let's reload that, actually, let's reload from the source. Verity. So this is this year's CSR of token that I was talking to you about. See, how is it? Renders that very random tag. And if you don't put this when your foot when you submit flashes gonna kind of like throwing their um, so there's a CSF token. Good. Um, so going back to the view, Um, if the form kind of, like passes all this validation, then it will execute the if block. Otherwise, it throws it back to the to the to the render template. And there were gonna have a, um, some errors that we're gonna be able to surrender. Um, so this is safe for now. We're going to return a redirect to, um, Euro for And let's call that a success. And we need to import that Uriel four, and we're gonna have ah, up route called success. And we're gonna define this and just return even though we're not actually doing anything. Author register. Perfect. Um, so, of course, the problem is that we're not gonna be able to, um, pass this completely because it's requiring all their fields. But, um, let's just get into how we display error. So we do that by doing the following. Um, so we're gonna put the errors here on the bottom. But let's see, Basically, what happens is there's a field errors, um, class, not class property, that's that's filled with that air. So if it's a form full name that errors and this is usually like a list, so it could be like multiple errors, you can display only one, but it's better to just display all of them. So, um, it's too. And if here to close that and then we're going to, um basically we do a list off the air. So you well, class. And when I called this text danger, which is like a rat fund that, um, bootstrap provides and we're gonna do for error in form, full name that errors. So it's a it's a four look we're gonna do and for, and we're gonna have here a l I element with the error displayed. So that's all that block. Is the errors displaying all there's that that that for my head. And I have to copy and paste all of this and put it here on the email as well. But replacing the email with ah for a rain email airs. Okay, so let's see if that works. Um, there's other errors. I mean, it's gonna have It's gonna throw on air for not having the user name, the password and the repeat password on those fields that are not even there. But let's see what happens if we reload this. But we were not running the application. So there you go. Perfect. So, as you remember, the we set that the, um the full name is required. So when there that we can have is like just passing that empty and, um or both empty so we would have errors. But let's just put a naming there and see what that looks like for just the era of the email. Um, or rather, I'll do it the other way around because he's gonna throw an error on the client side. I know I'll show you what that means, but so let's say we forgot the full name, but we have the email. If I register see, this is the errors already working. So this field is required is the standard message that that body just required sense. But you can You can also like, like here. But you know, some custom message if you wanted to. Um, and what I wanted to show you is because this is html five. There's validation for the email itself. So if I do like from zero dot io, which is not a a valid email, right and do register, say I get an error. But this area is not from flask. It's just because flask um, the template or the form He's saying this is a field email type, and if you see there, um, you see how it says type email that will validate against, um ah against html five validation layer, which is even before we even sent to the to the to the server. If we were not doing html five then that we would get like a, you know, invited email kind of message here, but so everything is working fine. Looks like we're doing great and it's such a great you know, it's it doesn't look like that bad. It's it's ah if we have to put all the age female like you see here. Um, it's kind of like a pain, because it's there's a lot off, like things that we need to like doing the server side on the flak side. And it's all automatically provided to also doing forms in flask with flagstone. WTF is is really, really simple. However, one thing that'll, um, that old programmers or professional programmers say is we need to stick to the dry um ah, paradigm or the dry um pattern and dry means. Do not repeat yourself, the R Y. And if you start seeing anywhere in when you're when you're developing that, you're repeating things over and over again, like very similar things, that should be a red flag for you guys. That means that there's a way that we can maybe do this in an easier worry. Like make it, um, more readable. And there's actually a way in that way. It's called, um, Mac Rose and we'll see Micro's in in the next lesson. So stick around
55. Macros: Okay, so we're gonna replace all days with, like, a a macro and the way macros work is they allow us to, like, basically kind off, um, make pieces off templates be its own little, like, include. And, um, But the good thing about macros is that you can pass things to it, so it can be they could be replaced dynamically. So how would that work? So what I'm gonna do is actually going to, um, replace all this with a macro, and then I'm gonna just insert one liners for each field, which is gonna be, you know, much simpler. So I'm gonna copy and paste this, um, and I'm gonna create the macro on the top level of the templates because I might be using it in different, um, in different forms. Um, across modules. So usually macros are started with another score for the name. That is a convention in general for function names or file names that the note that they shouldn't be called by themselves. They're always called from somewhere else. So we're going to follow that so form helpers html. And so how do you, Um, the final macro. So you have to put a percent micro. We're gonna call this render field, and you're gonna have multiple Micro's in one file. So that's why it's former helpers. We can put things in here. So what do you pass to a macro Render field? Well, the feel names. So you don't have to Like, um, you can You can make it dynamically render any field okay? And you end the micro with us. You might have guessed and micro perfect. So now I'm gonna faced what I did. Um, earlier. Um, although let's make this Ah, better indentation. So, um, we want to have the def class form group for each one of them. We want to have the field, our label. So instead of for me full name, we're gonna have field, I feel like and feel that's gonna have the viable of that off that form and the same thing your field. But here, I'm gonna pass something called keyword argument so that I can pass kind of like qualifiers to those to those fields and one of them that I didn't show you earlier. Um, it's like I can We should define the the fields with a certain class called um, form control. And that's something that helps, um, bootstrapped to render that field. So you're going to see that when we when we called the macro, Um, then we don't have Ah, if field errors. Right, then a plastic text danger. That's fine for error in field errors. And then I'm gonna have ah, and for you. Well, and if they've mackerel also Okay, so that's that's that's it. Were set there. So now here. I'm gonna have the, um, below the author registration. I'm gonna include the macro here in this template. So how do you do that? We have a from form helpers makes the m l import render field. So that looks a lot like the the way that you import, you know, libraries in the main python file. So that's that's pretty much it. Um Then it's gonna be very easy now to include all the fields because what we know to do is just put the the following render field, and then we pass form, use her name, right. And then this is one of the quarks. Keep the keyword arguments. Class equals form control. And that's it. That's our field, right? There isn't it. Amazing. So now, instead of having all this like crawdad in there like feel label that form user name, field corks, all that we just have to pass this one line and it takes care for everything for us. So now we can basically do form email here and former Ah, password. Well, I'm missing something. Hold on its full name first, right? Yeah. Well, name email, full name email, E mail, user name, password. And then repeat. Right. Full name email. Use the name passport, and, ah, confirm. So form comfort. So let's see that worked. Um, it's pretty exciting, you know, Errors. I see there. So now we're gonna reload this, and there you go. So see, now how it's, like, it's style, a little different. It doesn't have the label next to it. That's like a form control, um, class. And so it looks pretty good. Let's kind of, like register here. And then we put this a little smaller so that you can see better. So if I go register, See now I see, like all the fields that are, um that are required. And so let's do this form Jorge Escobar or hey, at from Syria. Dodi. Oh, use the name is Jorge Password test. And let's see if I do a password that doesn't match test too. Register. See Passport. Most match. So it's checking that the passwords are not matching on. Look at this. It's already pre feeling the other stuff out. Passports normally don't get pre field because that's a security thing. So So if I put test and test and I register perfect, I got to, um, go to So I got to success. So that means that here that, um um that for invalidating submit past and it sent us to the success page. So lots of fun stuff here. Macros are amazing. They're they're very cool feature. So and this is so readable. Like, look at that. It's so nice. You can, you know, see what's going on in there. So, you know, forms really are life saving thing, so that's pretty much it. We got a lot covering that last, you know, few lessons. So the next thing that we're gonna be covering is, um, basically creating the the models and storing some off some of that stuff in there
56. Blog Model and Form: Okay, so now that we have ah, user model or author model, um, it's time for us to start working more on the blawg model because we want to be able to, um, create a blogged whenever, um, we kind of, like start the application or the website for the first time. Um, if you guys are, um, if you guys have five worked with war press in the past, you'll know that the first time you go into their admin if there's no blawg than just like a set up, um, function cold so that you can start creating your blogged and we want to do something similar here. So, um, let's go ahead and create the block model and we're gonna do a couple off. Ah, interesting things. Um, but let's just start working on it. So let's go ahead and create a new block model file and models P y. Okay, So what do we want to do with this models? Well, the first thing we need to import is through the, um, the DB right. And we're going to find the class blawg, which is ah, subclass off the B model. So it's gonna have an i d Just like the one that we did with the with author that's gonna be are in auto increment, right? Primary key equals true. It's gonna have a name, and this is a string off 80 and it's gonna have a admin. So the admin is basically the person that creates the block and has, like, full, um, permissions to kind of like edited. So we're going to do something really interesting here, which is we're gonna make the admin a link to the ah. So the author, and the way we do that is through something called foreign Keys. And you can read more about foreign keys. Um, online in the sense off, you know, in the space off my sequel and a foreign key basically says this admin record is gonna be an I d. Off the author within the author. I d. And it's been a point to one person. Ah, and that's how my sequel's gonna know that that, um, that, um, author is basically that specific. I d is thes e is the admin off that block? Um What? We're gonna play with it so you guys can can check it out. Then we're gonna have, um, it Ah, in it, we're gonna have to pass the name and the admin, right? So self name equals name and self admin equals admin. And finally, one of the have a ah reproduce method. Reproduce. So and this is gonna return. Blawg percent are, and we're going to return the name. Perfect. So that's our blawg model. We'll have a type of here, Right? So now we're gonna do the form for this. So former B y and we're gonna to, um from flask. WTF import for. And so we were gonna have, um we're gonna do something really interesting here that, um, you'll see from WTF forms import Stringfield. So this is what happens here, um, on the form, um, on the set of form. It's called that set up for him. I want to, uh, kind of like I would have to require, like, you know, the name of the person. I mean, the full name, the email, that user name password and confirm, which is like, it's kind of like the same feels that the author has, right so and the only thing that changes is the name. So let's let's let's said set that up. So the name of the off the form, it's a string field and the field label was gonna be block name. And then it's open a key here, and it's required. Um, and let's limit the length off the named Toby maximum 80 characters. And that's it. Right. Then I would have, um no, I have to import validators here. Bali. There's right. So And the next would be like, you know, I would need the full name right for the author, right? For the admin. And then Stringfield etcetera. And then I would have a the email and they used her name. You see what I'm saying? So this is kind of like the same thing that we had on this form here. So instead, off repeating again following the dry, Um, do not repeat yourself. Then what I'm going to do is I'm gonna import from author ah form, and I'm going to import the off the ah, what's the name the razor for? And because this is a class, you know, just like any class you can extend or you can like, um, basically so classic. So instead of form here, I'm gonna do register form. And this works because razor, for missing itself. Ah, a subclass off form right here. Right. So this this class is gonna inherit all the properties off the register form, so it's gonna work exactly the same. But we just adding that additional, um, kind of like, um, additional form field, which is the the block main. And that works perfectly, Flight. So, you know, once again, kind of like, you know, little things that you can do, so you don't have to repeat a lot off the same core base. And if you wish to add, like, a new and you feel here, let's say you want ad. I don't know. Um, you know, gender or, um, some other property. You don't need to remake this. This. Ah, this block set up for him, you can It will be automatically included.
57. Blog Admin and Setup Templates: Okay, so now let's work on the on the blawg, um, presentation layer. And for that, we're gonna have to create a new template directory to remember how we are following the NBC model here. So that, um, we group all the kind of like the templates for each a module. So I'm gonna create a Blawg Templates folder, and within it, I'm gonna add a new file. And, uh, let's do the admin first. Um, And for the admin, I'm not going to do a lot, Which is gonna be, ah, enough like, uh, placeholder for now, because we're not going to really build the admin. We're gonna build the set up, but we can get this out of the way so that we have the, um, the basic structure. So first we extend basic HTML, then the title IHS going to be blawg admin, and then we're gonna have a diff class equals row, and now we're gonna have a div class, and we're gonna do a column Medium offset three and call him medium six, which means it's a It's a medium. Ah, SISE, um kind of like a desktop. Sites off six and then but with three offset on the right inside. So now here we have the block Admin title Blawg, admin. And now you know what? I'm gonna add the flash messages because we're probably gonna have a lot of messages that, um tell us what, uh, actions have been done successfully. So And you remember this from the from the first from the previous section. So if we have flash messages to display, then, uh, we're gonna do it If I d messages and then to you will class flashes andi for each message in messages, we're going to a Well, I with the message. Well, it's in that four loop and that all that you Ellis already there, And then we're gonna do an end. If and and and with Perfect. And finally we need to end the block. Great. So that looks good. That's our admin. Html. And so now let's work on the set of HTML. And it's just copy this, um, on templates on block templates, new file set up. So let's copy this first part. So it's blawg creation. And so here, we're gonna have so we're gonna have the the actual, um, form. Right. So from form helpers The text email import, render field. Um, that's toe a for method equals post action equals you are l for set up and the role equals for So the first thing is, remember, they see srf token so form that hidden tag, and then we're gonna have the the actual foreign field. So I'm gonna have, like, different headings. So I'm gonna have the blawg information first, and then I'm gonna have the render field form that name, and this is deformed the set up for him. Class, uh, form control. And then I'm gonna see at mean, user, and I'm gonna do when a copy and paste this. Actually, I can copy and paste the race story html because those are the fields for a full name email using password and confirm. And ah, well, we'll call this create look perfect. So I think that's it. Um, Now, let's go on and work on the actual views to see what that looks like. Okay, so now let's work on the views, and we don't have almost anything there. Um, So let's start by importing some of the stuff we're gonna need from flash import render, uh, template redirect flash for the flash messages and Europe for. And we're also going to import the block, form the set up form and from the flask blawg, we're gonna import the DP for the DB operations. We're gonna need to create a new author and finally block models. Great. So now let's treat the admin. So the admin it's gonna live on slash admin. And so what we're gonna do is we're gonna check how many blocks? Um, do we have? So we do a blawg query don't count, and we haven't seen count yet, but basically can do dark count with any query or any filter. And it will report the number off records that that, um, that we get so blood query quantities just like give me a count of all the blog's. If that blog's is equal to zero, then it means no block has been created. We're gonna return the redirect for the girl for set up, and otherwise we're going to return the render template off the log. Add mean html. Okay, so far, so good. Now we're gonna do the set up, and this is where the form is going to leave, so slash Set up. They're set up and we're gonna have the form is gonna be the set up form, and we're gonna return de render template off. Blawg set up html with the for mass. The context. Okay, um, so we can go ahead and try that. See, we get something, and then we can go on and doing the actual like that of its operations next. So let's see if we have any errors. Looks like everything is good. So we need to goto admin, right? And if Adminis working? Oh, so little Ah fact here we haven't created the tables for admin, and we can check that quickly. So if I use blawg, hear me used the Yeah. Sorry. So use blogged. Perfect. So now show me the tables and I don't have any tables. So that means that we need to run, um, that create all so control. See here and we'll do python manage me. Why shell? So we're gonna from Flask Blawg Import Devi and then we know toe db session comment just in case. And so now we're little db create all and let's check that, um show tables. Perfect. So I have author and Blawg one thing that I noticed there. Remember how I told you that you needed to import the models? So that's something that I had always assumed. What's the case? But it looks like sequel. Alchemy is kind of like, interestingly looking at all the models, and it's creating them perfectly fine. So no need to do those imports that that seems to work pretty well. So with that, I think we can go ahead and then run the server and at least check. So what I want to, um, see here is that if I hit slash admin that it checks how many blocks there are, How many blood records if it's zero that it returns us to the blocks set of html and that should, like, render the form properly for creating the block. So let's see if that works, so slash admin Perfect. Ah, we have an error on the template itself on the and block. So let's see here and block also, I'm missing the the content. See here this is set up html. Yeah, I'm missing the content. So block content and say that Let me check. I mean its theme l Oh, this is for message, not message for a message. And so that looks good. Let's see for have any errors? No errors. Okay, so that's he'd have mean again. And there you go. Set up. Works perfectly fine. See, I'm getting the block name here and then the admin user. And remember, we're not like putting any of this like manually. Like I said, it's automatically, um, subclass ing or just reform. And it's just inserting that name on the other form. So, um, that's working perfectly fine when we put this a little bit smaller so you can see the whole thing. So it looks good. So let's go now and do the database operations.
58. Blog Creation Database: Okay, so before we kind of, like, submit this this form, we want to be able to do the actual database operation. So its that's gonna happen in here. So we're gonna do a form dark validate on submit. Um, if that worked, then the first thing we want to do is we want to create an author from those, um, those form records. So I'm gonna do And author equals author and then for him, full name. So in order for us to access the actual data that's stored on that field, we we do form that that field name and then dot data. So this is actually the form later. And if you remember, we have to pass that full name email using human passport. And if it's an author, so form dot full name, form email, form, user name. They, uh, form password data, and then we just gonna pass. True, because this is this is definitely gonna be the admin for for this, um, then we need to do remember, from when we're playing with your, um, we need to do with Devi. Session ad off that object. And they were gonna do ah db session um Well, so before we commit, we want to be able to, um to check if that record is created properly. Because remember how we're gonna link the, um, the admin to an interview of foreign. A key author, i d. So we need to pass the i d off that record here. And instead of committing this, we could commit this, but then there would be kind of like, um not very efficient. We can do something called a flush. And this is a neat trick when usual db session flush. What? Um ah, sequel Arkham is gonna do. It's gonna try, toe mimic or simulate that the record is written, and it's when actually give give us the the I D. But it's not really going to the database to record that transaction. So we don't We can, like, just check if that transaction is gonna go well. And if not, then we can throw it back to the to the form. So after that flush, we can do if author I d So remember how we had I d when we do. When we did it, the Devi session commit. Here's the same thing, but it's not actually writing it. It's just is just like going through the valid validation peace and checking that there's there's an actual lady. So now we're gonna do If there's another i d Then let's build a blawg object, and that would just be the form name data, and then the author, I d so not know enough form here, but basically that authority that we got from the DB session flush. Um, so now we do the same thing here we d be Ah, session ID and we're gonna add the log and we will do another session flush and see if everything it looks good till that to that point. Um, if there's any errors at this point, um, then we can do a session. Roll back and roll back means that you know what? This transaction is not going to go. Well, let's just, like, undo this whole thing and I'm going to just say error creating user at this point. Um, why? Because if the authority was not, um, was not created, then we fall into this this block. So now I'm gonna check if author I d and the log I d. Then we can go ahead and and store the whole thing. Remember how I told you that commit allows you to, like, do several things at the same time? So this is what it's called a transaction. A transaction means that you need an atomic kind of like structure where you need an author and also a blawg. And then those two things are linked together, and if anything fails, you can roll back the whole thing. So you can you can when you are often required to do transactions because you're like, you want to make sure that this piece of the record oh, or that rigorous is well written and then do another another thing. So we're gonna have an else here. So if if we didn't get for some reason the authority and a blogger, I d. That means that we had a dinner creating the block. So we're gonna roll back here a swell, and we're gonna say error equals error, creating blogged, and it could be something like, there's there's I feel that is not properly set up or there's a problem connected with database. In any case, we we don't we don't tell the user or let the user think that everything is OK. So we're gonna do flash? Um Ah, blood creative. Well, actually, I want to do this. If this went well, laugh. Look, created. And then when I do a returned redirect Ah, euro for Ataman. Okay. And we're gonna have to, um, basically pass that error message here. However, we need to like, ah, initialize it as blank. So let's to air equals blank, because the first time you will run this, we're not gonna have, um we're not gonna have that error. Um, this air context created, So Okay, that looks good. So error equals blank, which we the first time it's not gonna buy lead on. Somebody's just gonna fall in here. It's gonna render the set up the next time we meet. When you submit is going to check the author. Um, I mean, create the object. Tried to add it, flush it to get the author I d. If we get the author, I d. Then we try to do the blawg and try. We get the, um, the block i d. And if there's any errors, um, we sent a back body for its OK, then we session commit with store that look created and then return to the to the euro for Attman. So that's a lot of stuff, you know, you can kind of like double check that. Make sure that if you don't understand something, you can rewind and listen to the whole thing again. But once you do it, you know, once or twice you get you get the hang of it. So let's see if we have any any errors. Looks good. So let's go ahead and try to create this. So we're gonna to slash admin to set up. So let's say my python blawg is the name. And, um, let's check if we don't put if the full name here if we get an error Jorge at from Cyril Oddo Jorge Password test. Repeat. So should get an error. Here, hold on. There you go, Jorge from Terra, you test create blogged. No, I'm not. I didn't have the Yes, I'm missing the the methods here, So methods equals Ah, get and post. Great. So let's say that's even. Here's no errors. Go back. I still have the information there. It's a list of test and test create blawg. Okay, perfect. So Now he's saying this field is required. Jorge Escobar test and text. Let's see how that works. We have on air on admin, but I feel like it's just something that's missing. But I think the the database stuff went, um, went on correctly. So let's check on the database. So if we do select star from author there you go. It says, Ah, you know, we have our Easter name past for everything is there select star from log and my python block Perfect. So see how I have admin and this is like an I. D. This is the foreign key. So this this when you have a foreign key, it means that these record needs to exist And, um and that record is basically a pointer. And once it's connected, um, you can you can basically do, uh, what's called like joins. So you can basically list select star from block, you know, and display the the admin information here. The full name password. I mean everything. So we'll check up on that a little bit later. So bad that we had on air on the on the on the set up or admin template. I think It's the same error that I had on on the set up. HTML. So it's at look Contin here and see if we have that mean here. Yep. Blood created a little bit. Ah, not the right or of things, but ah, yeah, that's the flash measures. If I if I reload, that last message message is gonna go away, and it's checking that we have, ah, block record. So everything looks good so far, Awesome job.
59. Author Login: Okay, so we have our blood admin set up. Now, I want to be able to log in tow the to the block. And the way that we're going to do that is by implementing a logging function with a form and taking on the database for the torrential. So let's check the database. Um, for one second, um, to see are, um our that our bases, um, and check that the the tables are there. So we have the blawg that a base there, we're gonna use Balog and then show tables. So we have our author and blawg. So if I do select star from author there it is. I have a user name and password that I can test with. So, um, let's, uh, in instances are our virtual environment. So I'm here in workspace change to flask blawg and do a sorry do source being activated. Perfect. So remember that we need to have these V M. V um, parents is at the beginning so that we know that we're in the right in dry place, So let's start working on on setting up a ah logging function, and of course, we're going to do that on the views here. Ah, off the of the user. And, um, we're gonna have ah, basically work on that lugging function in there. So the first thing we're gonna do is we're gonna create a form P Y um logging, logging form. Sorry on form, people. Why? So let's see how we can do that. Um, we're, um, gonna great a new class called logging form. They're in subclass forming there, and so we're gonna have basically the user name and the password. So user name is Stringfield of we're gonna ask toe under the user name, and then I'm going to, um that it's required field, and I'm gonna put the the length to be the same. Asked the as the one on the on the database. So minimum of four maximum off 25. Um, and that set for the use name and the password. We're going all to have a We're gonna have a password feel in this case so that people don't see, um what? What you're entering. And we're also gonna make this required on, and the length is equal to the one on the top. So minimum for maximum 80. Perfect. So so that's that. Let's save that. Um, And now we're gonna have the let's look at the at the views so that we can. Well, first of all, let's do the template. So we're gonna create a new one here on author. Um, but it's gonna be called logging html logging dot html. And for that one, we're gonna extend the basic HTML. And, uh, let's put a title you served log in, and then we're gonna have some content in there. So now we're gonna to a ah role. Um, and we're gonna have a class with ah, medium sized offset three and a medium sized six with column. And here we're gonna have the title user log in. Um, if we have an error, let's display on air here and display that error on this stiff. Um, and then I'm gonna have the actual form. So remember, we had the form helpers here. So from form helpers, the html No, it's on the score, um, import, render field. And, um so let's do the the actual form opening here. Method equals post, and the action is the, um, Europe for log in roll equals four. So I now put my head in Tak my Sears arrive token, hate and tag. And now I have my two fields. So render field for me. Use her name Last equals form control. And I'm going toe have the almost the same thing here. I'm gonna copy and face that putting steadied step Password. Finally, we have a button type equals submit and the class for, um bootstrap default. Ah, before and put logging in here. Perfect. So I have been form than they've close. And even then, end block. Cool. So that's our, um, logging html. And now we need to have this implemented on the author views. So let's go and do that. Okay, So here, we're gonna need to add a the author form, um, looking for so long in form in there. Um, then we're gonna also need to ah, at the author model because we're gonna check from the I'm from the database, the use of them in passport, and I think that's it. So we're gonna use sessions. So a session to store the user name. That's that was properly locked in. So here, we're gonna do, um, up route, log in and they won't have some methods. So methods is gonna be, um, get and post, um, and then log in. We're gonna take that out and let's start, um, setting up stuff. So form equals logging form. And, um oh, and I'm going to say there's nowhere for now. And, um, I have to have the reform, doc validate on submit method. And but for now, I'm just gonna pass like we're gonna do some stuff later. I just wanna check that this is working, um, otherwise return return the render template, and we're gonna use author Third Logging Extreme El, and we're gonna pass the form and the air. Okay, so we'll check if that works, and then do the have a stuff. So let me check if this is I don't think it's running because I just started a a fresh session here on this recording. So I'm gonna do python, uh, manage b y run server and I should have my stuff in here. So it's to admin. Perfect. So it's running. So now I'm gonna do logging and base is undefined. What? Its base. Uh, extends base html. See here on the templates. Extents base, html. Oh, I need to put quotes. Sorry, quotes. And, uh so let's see now. Awesome. So we have our usually name and password. If we do Jorge test, nothing happens. But it's it's working. Fine. Let's see the source just to make sure that it's going to the right place. Here's our CSR, if tough attack, and then, ah, the form is going toe slash 11 which is correct. So looks good. Um, so now let's started that I base operations in in the view. Okay, so let's start doing the database operations here. And, um, so the first thing we're gonna do is we're gonna, um, look up a an author that has the use minimum password that we, um, have on the form. So the way to do that is we do the following author equals author dark query that filter filter filter by which is basically a query. A to do a select, um where they're certain conditions. So I'm gonna do the conditions already used. Her name is equal to the form used. Her name data, and the password is the form password data. And, um, I'm gonna limit that to be one so that we only get one. So then I'm gonna check if author count. Meaning if if it's not zero right then that means that there's a record on the database with the use of them equals using him that I'm passing on the form and the password that I'm passing on the form. So, um, then I add sessions nearly a session, is there? We're gonna use sessions, and we're gonna do session. Ah. What session? Wait a minute. I'm sorry. Session off. User name, um, is gonna be the form user name data. We're gonna have the user name available in that in that session. And, um, we're gonna do return redirect. Ah, you're a four. And it's a, um were the logging success, which is another, um, function that we're gonna have for when people log in, um, properly and I think is gonna be a temporary thing. I think we're gonna have a some other functionality here, but you'll see that in a bit. So I'm just going to send them to logging success. And, um and I'm gonna put here return, uh, authored luck, then. Perfect. So, um, like Revie reviewing what? We just stay. So if the form is validated, we haven't author. Um ah. Record. Look for where the user name and the passport match those forms. If the author account is is correct, then will display the, um Well, sir, it will store the use of human decision and then return Redirect to the, um, toe the logging success function, which is just explain, uh, author logged in. And this should be logging success loving success. Perfect. So let's see if that works. So now this is don't actually, like hit the database. Um, there must have been a near there yet that was the function was the same. But now it's fine. So low gain. So let's do first. Um, I didn't check the form. Had the proper errors. It should be. So that's a forget putting the user name. I get this feeling required. So that's that's good. If I do Jorge, let's say 123 which is the wrong Ah, password. Uh, I get the field. Must be between foreign 80. So that's a let's just put some Let's just say Jorge, Jorge, see what happens. So yep, that's not going through. And, um, so now if I do the proper one, which is Jorge test, then I get to logging success and I get my author noting there, so that's that's critical
60. Login Required Decorator: perfect. So we have our logging working. And now I want to show you guys, um, something that's Ah, it's a pretty important, um, knowledge or or pattern. It's actually ah, so far pattern is called the, um, a decorator. And we've seen it before with this, um, at up route thing, which is, um, I told you that this at sign meat meant that it was, um, modifying the function that follows it. So in this case, logging has been decorated, so that slash log in with this methods falls into that function. So it's kind of like a modifier if you wanna see it that way. And one of the cool things that we can do with by phone is we can get to do our own decorators, which is pretty awesome. Um, and I think about you know, things that you want a potential route to have some sort of like pretty finding setting, and the one that we're going to see here. It's actually very common, which is I want to make sure that people are locked in before they access this route, and that's exactly what we're gonna do. We're gonna have or create our own decorator called Logging Required and Logan required means that I just I just to put a at sign long and required in front of a off any view. And, um, and it basically checks if the user is logged in. And if not, then then something else happens. And that's kind of handled by the decorator. So let's see how we can do this decorator. And in this case, I'm thinking of doing something here in the, um in the admin, which is kind of like if a, you know, put a are lugging required here in in the in the admin round. So how would that look? Um, well, basically would be something like the following I would have below the admin. We want to have the that route first because we want to be able to first the function check for the for that route and then would have something like logging required. See, So that's that's a kind of like a decorator that I'm now adding that checks if the person is no loving already, he can not getting into the into the ad mental and ah, to be ah, to be honest, I think that this Checking off the blog's I'm gonna move out off here, and I'm gonna put it on the index so that, um if you hit the like, the home page or the index page of your blawg and no blood has been created, then it kind of like gets you there, toe do the set up instead of the admit, And basically, because you might be hitting the admin and you don't have a blawg. So if Logan is acquired, where do you register to like it? It doesn't make a lot of sense. So, um so, yeah, we're gonna do this, Logan required. And let's see how we implement that Logan required decorator. So let's go ahead and create our first decorator. And we're gonna It's gonna be an author decorator because it's gonna be logging required for authors. Right? So let's at a file here, and it's gonna be called decorators. We could potentially have more than one. So we want to put them all in this file. Um, so this pattern, it's kind of like there's a lot of things that we we're going to see here that might not make a lot of sense a day beginning. So don't worry. If you don't get the whole thing, just try to get the gist of it. Um, so first we have to import a from a library called functional tools. We're gonna import this function called wraps, and it's actually a decorator. Um, funny enough, um, and we're also going to import from flask, um ah, session because we want to check if the user is logged in right request. Um, and you're going to see why in a minute I redirect because we wanna send people toe the log in page if they're not locked in and your a four to find that the log in page. So we're gonna define logging required. And that's the decorator's name. And we have two subclass it from f, which is the, um, the function. So we're gonna have this is a critical wraps if and then we're gonna just defined this decorated function, which is Thea actual meats and bones of it. Um, and if you can pass arguments to it and you can also pass key were arguments. Um, this you're going to see sometimes in pie phone. And I don't believe we have seen that this this kind of like pattern here, but basically this are loads into the are eggs, keyword ah, or parameter all the art of the positional arguments. And in these ke ke wrx cook key war arguments, all the keyword arguments that are being passed, um, and it's this pattern is is used quite often, So you should be, um should get acquainted with it. So when a check if session get, ah, user name, right, which is where we the session we set. When people log in, it's none. That means that the person is not loved in, um, we're gonna return redirect to the euro four logging. And here's something that I'm gonna add toe that function, because what happens is this logging required. The career might be called from various places. And I'm sure you've seen this on websites. When you land in the page and it sends you toe the log in page, Usually it remembers what what page it was sent from. And after you have successfully log in your sent back. So that so that, um, to that page so that we're going to call the next page and the way that we're gonna do this is We're gonna see the request. You are l which is the request. Um ah. The euro of the page where you're hitting that Logan require bait. I'm gonna shove it as a as a function. I mean, it's a parameter to the logging function, so we need to change the logging function for for that. So if they're not loved in, they're gonna be cento the log in page with this next page partner. And, um and that's pretty much it. If they're locked in, then then you can go ahead and continue. So we're going to just pass back. The arguments and key were arguments that called the function in the first place Justice. We got him. Um, and finally we have we return to Korea to function here. So now we can modify the views here for the blawg. And what we're gonna do is we're gonna have from author decorators import logging required , and that's it. Um, so now if you try to hit the the admin without being logged in, you're gonna go and be sent back to the to the log in page. But before we test that we want to modify, remember how we had to modify the log in page of that, It he can deal with the next argument. It's pretty easy. So let's do that. Um, so we're gonna say if, um and before that, I need to import request here because I need to see the request. So we're gonna say if request method is get meaning it's not a post, and request that our eggs don't get next is ah set in place? Then I'm going to set a session. I'm gonna store this in a cookie that's called next, and I'm gonna get the, um, that argument that I'm being passed from the decorator to for that session next or next session. And finally, what I want to do here is, um, if if the count, if the other coming, meaning that there's there's a person valid Logan, then I'm gonna check if next in session, If I have ah, a session called next, then instead off sending them to logging success I'm gonna do, um, gonna send them to the next ah session, which is a euro that I'm being passed. So first I get it, and I I deleted session pop and finally I return, redirect to whatever that next you're at lease and then here is else If I don't have a next , then I just I'm going to send them to logging success. Um, and they want final change. I'm gonna do the same thing here. Um, logging required because we shouldn't be landing on this on this page. Logging success unless you're logged in. Correct. Um, And for that, I need to import, um, from author. Decorators, Decorators, import logging require. Perfect. So let's see if we have any errors. Um, we're getting on air here. Oh, I got it. It's not. We don't return a the function. Um, with the partisans, we just returned the decorated function. Um, by my reference, um, so let's save that and see if that works now. Oh, there you go. So the one thing that we don't have a sign out or log out function yet, so we're gonna need to do that manually and the way that I do that, um, and you're probably going to start using this more often is using the, um, the developer tools. So if you go to your your google chrome and you can see, um, you know, view developer tools right here. I know that's outside of the window, but our you can call, um, out command. I So let me put this. Ah, here, underneath. And so basically go to resource is. And if you see in cookies, you'll see that we have the session, um, in there. So we need to delete that that cookie so that it appears like we're looking out and we're going to implement the lookout afterwards, So I've deleted that. So now if I reload this this page, you'll see that now it's it's driving me to the log in page with the next, um kind of, like, viable, filled in with the admin. But I really like, ah, like we're characters. And this is like, you are all included, basically, in order for forex tippy to render that in the euro, it replaces the you know, the semi colon slash slash with the, um, with some hexi decimal characters. But in any case, you see that how it's working, I cannot get to the admin tool, um, by itself, without being logged in. So now if I log in here Jorge test, you'll see that I now I'm sent back to the ad mental, and I'm loved in, um, which is pretty cool. And if we see the, um, the developer stool, we see the cookies. You'll see that we have our session in there, so that's working perfectly fine. Um, the same thing if we ah, if we look out, let's tryto try Log out by the Linda cookie. And let's try to go to our logging success, which is also it was decorated there. Same thing here. See, the next the next. You're always filled in and we cannot get there. But if we do Jorge test, then we are sent to luck and success and the cookie set properly. So that's the very useful thing. Um, using decorators for Logan required. And, uh, you know, we're gonna continue looking at some other cool stuff next
61. Introduction to Migrations: perfect. So, um, before I forget and move on to the next the next topic Ah, something that I wanted toe adhere that we didn't add in the less last lesson waas the error message. So if I go here, I want to be able to say if the author count waas not zero. I mean, what's not more than CEO? So he was one then. What I want to do is I want to display an error message in the template. So I'm just gonna put this as air equals Incorrect. Uh, use her name and password. So and this is this is typical. You don't want to, like, give away too much information to hackers. Um, that, you know, they're the user name was found or not found. You just you should just, like, throw on enquiries, name and password so that they don't know exactly where the error is. And, um, and if it's a legitimate user, they know that they're they made a mistake. So if I go here to the log in page, let me try to enter a wrong using a passport. I'm gonna use Jorge Jorge again. I know. I get this. Ah, this error message in there. So that's that's pretty good. So that's it. Now we're gonna move on to, um, a very important topic called Migrations and Migrations is basically the, um, the way that we handle, um, the the changes to the database. So normally you you never know when you're developing, like where the fields that you're gonna need for the database and you're gonna have to, like, basically, Are you gonna try? You're not. By for sure, you're gonna have to do changes. Database. The problem is that once you're deployed and and you're running the code in different machines, how do you like keep track of those changes? Well, you could do like a text file and annotate or, you know, I added a new column for the user, and I added a, um another blawg field cold tags and things like that. So the way you deal with that, um, in ah, in a much more scale of away issue in in, like implement something that tracks those changes for you and in flesh, we have a very good package called flats migrate. And that's where we're gonna be using here. So let's start with that. So we need to add to our requirements. Txt This new package I called a flask migrate. And of course, that needs you to people install this. So we're gonna do that. So let's control, See, and make sure that, um, you're in in the right folder and you have the virtual environment turn in before you do any peeping stall. Remember that. So let me makes maximize this and, um when it clears the screen and we do peeping stall our requirements. So it's checking all the all the requirement files and then it finally a installed flask migrate perfect. Okay, we're gonna manage migrate through the migrate command. So we need to add that to the e in it b y off the obligation. So let's go here. And what we're gonna do is we're gonna add from ah flask the txt dot migrate import migrant . And now I'm gonna add a my great um, section here, and I'm gonna have an optical migrant equals the migrate, um, function. And I passed to it the ap and the DB. So now my great can No, um, what the application is and what the database iss, um and There's another change that we need to do and manage me. Why? Because we want to be able to. Like I said, run it from there. So what I'm gonna do here is I need to also import, um, from flask flask. Txt. My great import, my great command. And so, under manager, I'm gonna add this new command called, um, we called the D B and then migrate comment and leave everything else the same. So we're getting on their here, manage. Oh, Manager. Sorry, Manager. There you. So now we'll said to start doing migrations. Okay, So the the use case we're gonna have in here or or the need for migration initially, it's gonna be the following. We want to see saw store passwords more securely. Um, so instead, off Remember how we have here the password test in there like it's you can actually see it . And what happens is when when hackers get access to your database server, um although, of course, you know you can protect them very well. And as you've seen the headlines, it's ah, it's kind of like this thesis. Hackers are very, um, insistent, and they get through a lot of the ah kind off like server secure ings and firewalls and all that, and they they can get into the database. So what we want to do is we want to encrypt this password in in using some sort off like encryption pattern so that you even if that hackers does get access to your database, he cannot just you see the passport in their like, plain text, this gold plain text like you can actually read it on the database. Instead, we want to use some sort of like encryption so that if the hacker doesn't doesn't have access to your encryption salt, which is kind of like the the random string that we used to encrypt it, he can be hard for them to check it out or or to decode it. So let's zoo that for that. We're gonna need to, um, basically clear that the tables, because from this point on, the migrate system is gonna take care of, like creating and ah, initializing the tables. So for that, we're gonna use the, um, the python shell and used this circumvent from from sequel um, Siegel Alchemy. So let's see how we do that. So Let's go ahead and call the, uh, shell by phone managed B y shell. And we're gonna to from flask glug import DB, which is the database manager, and we're gonna issue the falling DB drop ball. And be careful with this. This, like, really erases all tables forever. There's no undue here, but we want to do it, So we're gonna go ahead and do it. So now if I go into show tables here, I don't have any tables on the ideas that from this point on migrant is gonna be able to to handle this. So let's exit. And, um So now how do we do the migration process? Well, the very first time you run it after you've dropped your tables and hopefully you do this the next time from the beginning, um, issue. Do the following python manage be why, ah db in it. So in it it's one command from them migrate. Um ah, kind of like a total tool set that allows you to, um at a Migrations folder to your application. And from that point on, any changes will be tracked from from that folder. So let's see what happens here. Perfect So now if you check here, you'll see that there's some migrations. Ah, folder. It's a new folder. And that folder is gonna be you can you can check in through, get so it's actually recommended you you check through get Because then you can basically see the changes over time off your database. And here it's saying that a check Olympic I and I before proceeding. So I'm gonna check that, and it's basically, um, a list off kind of like settings. Um, usually those those are Those are good. Um, And so here, we're gonna try to now, then do the initial kind of like a snapshot. So the way you do that is on this is always where you do it every time it changes at a pace . Your first do python manage me? Why, baby migrate. And then you do manage python Maestri. Why db uh, up Great. So my great and operate, those two are the are the comments. So let's still the 1st 1 by thunder manage me. Why db my great And that's going to create a seconds here, a file with a sort of like a hash and that hashes like the diversion. So let's see here. And as you can see here, you'll see that it's kind of like a revision of what happens when, Ah, when this. This this first ah kind of files where were created So you'll see that there's two sections here. Let me put that bigger upgrade, which means what's the path forward and downgrade, which is What's the path behind behind? Because you can also do bison management. Why DB downgrade and what will happen? It's it. It'll change the database to the previous state. So it's a pretty powerful thing. So but for all great, you'll see that it's basically it's saying for the next the next session. Just create the table author with the i. D. Full name in the puzzle and see that it's keeping all the things that we had on our on our model, with the primary constrained and the unique constraint. All that and then it's also gonna create the block table. So that's pretty pretty, pretty cool stuff. Um, and now, uh, what what's going on in here? Do we have those stables in here? Let's see. No, we only have an Olympic Persian. That's very interesting. And what that Olympic version does. Is it kind of tracks on this on the elevate itself? Ah, what the what the current version is and what the diversions before, Uh, I think it's just a Korean version. Um, I may be wrong, but I think it's just a Korean version so that it stores somewhere. Not on the file system. What the what the current version is so that he can keep track and look up on the file system through this versions. What's the previous one in? What's the next one? Um, so pretty cool stuff. But as you can see, it hasn't created the table. Shit. So how do we create them with a python? Manage me? Why? DB upgrade? And remember, it's always this two things. My great is, you do the change of remodels. Um, you're ready to go. You do migrate so that he generates this. This version, this file. Once that file, you check it. It looks good. Um, then you do by phone minutes. We want to be a great and that's when the actual data base changes happen. So let's do that. Perfect. So it says it ran the upgrade. Nothing happened But now, if we see let's see what a limerick person looks like. Yep, it's three B C C C c. It's the same file here. So that's the current version on If I show the tables, you'll see that now we have author and blogger, just as we would have created it through db create all so pretty cool stuff. And, um, we're gonna be, ah, kind of like working with this to create this very kind of like more secure passwords for our for our users.
62. More Secure Password: okay for our encryption. We're gonna use a package, um, called by B crypt. And so we're gonna add this to the, um So their requirement txt save that file. And here, we're gonna to python. Um, not by phone. Sorry, Pip. Install our requirements. Txt. So now it's installing people. Pipe decrypt. So perfect. So now let's see how we need to change the, um, the models and, um and then also the registration process on the or the blood set up to, um, to make this more secure. So the first thing we're gonna two ways we're gonna go to Blawg views and let's check out how we do this. Um, we're gonna import by crypt. Here, be crypt. Sorry be crypt. And, um, so under set up, What we want to do is we're gonna have to do the following first we need to generate assault, and, um, that salt is kind of like a random, um, sort of like hash that is used to to generate the new the new password. And we're gonna store the hash password us the big crypt Hash. Peter B, which is a function that we create, has off the password data that we received from the from the form and we included with that salt that we just generated. Um, so now, instead of the foreign passport data, we're going to store this hashed password. Perfect. Um, the only thing is, like, um, we want to change the, um we want to change the ah, the password length for the for the users because it always generates a 60 character password. So let's go ahead and do that. We're going to go to the author models, and I'm gonna do P D B column TV's ah, the string. And instead, off 80 we're gonna do 60. I know this is not a huge change. I just want you guys to like getting toe the rhythm off. Um, kind of like how to change things on the database and then doing the immigrations. Although I will say, um, if you have a 20 extra characters in there in the long run, you would be using a lot more storage, so that's definitely something to to keep an eye on. But before we do the migration, there's something that I kind of like checked in online, and it seems like it's It's a bug within? Um um, the Migrate library. Although people say that it might be that the author wanted to make sure that people wanted to do this embody, In any case, um, you have to go to your, um e M v p Y file and do the following change in where it says context. Let's see context configure right here. Um, it says connection. It will connection. Target made of data. There's one that we need to add, which is compared tripe compared type equals truth. And the reason for that is that if you don't add this, um, this setting on the E M v b y changes to the columns themselves, such as a type change or a length change like we did on the on the author models here are not gonna be picked up. So that's something that I would rather like Not all e. I mean, I wouldn't want to have that all the time. So, um, make sure that you do that change on your ah, you goto migrations E M V P. Y. And around Line 75 you'll see a context dot com figure at this Compared type equals true But in any case, that should take care off off the of the check for the for the lens change. So now, um, let's go ahead and and do the migration. So, um, it's here. So by some, manage me Why? Db um migrate and to see what happens. Perfect. So now we got a new and you file and I believe it's the, um the one with a d a v e n and let's see what that looks like. So now it's saying that the, um that the password is now going to be 60 instead off aid. And, um, this is something that I also notice that it looks like a bug. It's checking, that is, author is it needs to change from bullion to tiny and and I'm not sure why, because we didn't change. The is author field. It's always been a bullion. So that's something that, um, I mean, it's no, no, it's not a big ah, a big deal. Um, but, um and it looks like so if you look, they downgrade, it says it changes from tiny and I mean to bullion two tiny. And so it's basically saying that existence, diabetes a tiny it and it's going to go toe bullion. I'm not sure um, I can leave it. Ah says, ah body for you. I mean, you're more than welcome to edit this this file, But in any case, we have our migration. Um, version. Everything looks good. Let's do the migrate. So by some manage me. Why, db uh, upgrade. And that should change the database. Perfect. Um, so since we don't have anything here, it, um we're not going to see any changes, but, um, but it looks like everything. It's working. Fine. So So this is good. So let's try this. Uhm, I'm going to do Python manage me. Why? Run server And we should have our server up and running. So now if I go to the let's tell it this cookie so that we're locked out and let's go to the home page, we should be redirected to set up. And yet that worked pretty well. Um, so let's create our blawg name. I'm gonna call it my by some blood. So my full name, email, user name and password is gonna be, uh, Jorge to make it keep it simple. Ah, and then I'm gonna do create blood. And now I'm being sent to the log in page because I'm not logged in, Which makes sense. But I want to see if a this whole like, um, set up things like with the hash password worked. So let's go here to our my sequel. And in case, um, you're catching up. You don't have this open than me exit here. You do my sequel. Um, CTL, um and then to see a lie. So then use blawg. Sorry, use Balog and then show tables to see what tables we have. There's author so now we should do select star from author and perfect. See, now I have the passport is not, you know, Jorge, which is what I entered. But it's actually like this very long, weird a hash, which makes it much more secure. So let me put this bigger. So that's that's that's much better. And if I let me check the block to see if he was created properly and yet my python block, that's what I entered. So that's working perfectly fine. There's one more thing that we need to do before. Ah, and in this Ah, this lesson and that's we don't have the checks for the log in page to use be crypt. So let's change that. So that it does. So here, um I'm going to go to the top and import decrypt, and then on the I'm gonna do the following change. I'm not gonna filter by password because the password that the user enters is not gonna be the same one that is stored in the database, because that's encrypt. So what I'm doing here is I'm gonna create on a query that gives me authors that have the user name, um, the same. And then I'm gonna check if there's account. I mean, there's there's a user that has that user name. Then I want to do the check for the for the passport. So here going to do if authors count is true, there's there's more than there's more than zero. Then I'm going to say the author is the 1st 1 off those authors off zero because this returns our list off authors, even if it's only one. And then I'm gonna do the following I need to do, um this hold look, will will be indented. So it select all that impressed. Tab on. Then I'm going to the following that I went to. All right, um, I'm going to do if be crypt. I thought Josh pw off form passport data, Um, and then also password, which is the password that I'm getting, which is that weird hash that has to be the same as the author password. And there's like, You don't have to understand all this, but it's kind of like the way that you check that it's the same passport. You pass the password that you got from the form on an encrypted using the salt off, the off the password, um, that you have on the on the database. And if that returns the same hash, asked that author passport then that means that it's the same the same password, so it's a little bit complicated, but that's the way it works in, and you'll get used to that pattern. So, um, if that's the case, then the session is the name, he said to the user name. If there's a next, then get the next from the session. The little cookie and then returned Reducto. Next, all the wise returned to logging success, which is the other one that looks that lands you. If if the logging is correct, Um, if that didn't work, all the oldest thing, like the password West incorrect or there was no other count. I'm just going to say there's an error inquiry concerning a password. Um, that's it. So, um, so, actually, this if will, um, will continue here, and he won't execute its else. So I'm probably need to do and another else identically inside. This is the solar is right. Um, you see White. Why is that? Because if if the password is incorrect But there was a user found with that user name, then it does this else, but otherwise it just falls out to here without Arab being set. So let's try that and see if that works. So let's see if I have any errors. Um, looks good. So let me try to log in, so I'm gonna toe the wrong logging Jorge. 12345 It says in Korea, using and password. See, that's that's perfect. Um, that means that the there was a check on the database and that didn't work. So I'm gonna do Jorge Jorge, which is the correct one. And yes, we got the toe. The admin, um, it says Blue created. This is a flash message from the block. Really? That we did before because he had never really landed here. But that looks good. And everything is working perfectly fine. The less we change I wanted to is on the on the template. I wanna have, um, a longer function. So let me go to the admin, and I'm gonna add the following their um, so it's, um just a paragraph were now something quick. Welcome. Um, and then I'm gonna print session. Um, you can do it dot Use her name, or you can do, um, like this. It's the same, but I like I like the dog. Um, I like kind of like notation here, and then I'm going to do a h ref equals your l for, uh, log out and I will implement a longer function because I don't want to continue, um, telling the cookies manually. So? So let's see that connection. So if I refresh here, I don't have a longer function yet, so let's dio, um, author views. And then that's to, um, log out so up. Ah, route slash Log out and I'm gonna find Look out, us the, um, session pop off user name and I'll just return. Redirect two euro for index. Okay, let's see that worked. Um, so let's go to the admin. Perfect. We'll welcome her hit. Look out, Look out! Awesome. If I go to, let's say admin, I'm asked to log in. I do, Jorge, Jorge and I'm looking again. So a lot of stuff we cover, We have a more secure password. Logging worked, and Low God works as well now, so we're ready to move to the next lesson.
63. Checking is_author: okay when I wanted to hear his now is basically I'm checking. If the if the author is, um ah, which might call it the author exist. And then I would send them back to the to the admin page. Um, but however, I want to check the, um, the east author. So remember, we have this east author flag on the, um on the on the USAir model on the author model basically eats. Author is one. The idea here was that some people that are raised her can only comment, and only the one that are authors. I either the ones that can create posts should have. This is author kind of like turned on. So, um, if its author is syrah or false, then that means that they cannot go to the ATM, and they can do They can comment. You have to register to be able to comment, but you cannot create block posts. So I want to start, like, working a little bit towards that. Um, the other thing I want to do is this, um, on the blogged. When I get the the the users, I want to, uh, make that a little better instead of having that list of users? Um, which is Ah, I meant on the logging function is arriving these authors And then if authors count authors zero, That looks a little weird. So let me let me re factor that and make make it a little better. So here, I'm gonna just get the first author by doing the following author equals author, query filter by, um, use the name is the name data and then just, um, changes to first. And first it is a command that it's available on the query. Uh, object. So he just returns the first author, and then I'm going to just say, if author then do the following season, it looks that looks so much better. Like it's it's ah, we're not We're not counting. And then doing the the authors off zero, it looks looks much better. Um, And then deal. Thing is session. And when I want I want to start. I want to start storing in a session. The East author flag. Okay. And this is author these authors. So if that flag, if that value from the model is false, then I'm going to store falls for session is author. And if it's true, then I'm gonna I'm gonna store True. So now what I want to do is I'm gonna, um, check for that only blawg admin. And the way that I am going to do that is the following. Um, I need to add, um, session here and aboard aboard. It's basically kind of like a, um, a utility to be able to return like non normal http returns. And we can return something like four or three, which is there to to be code for not not authorized. So we'll see how we implement that. Um, so here, I'm gonna do on the index. Um, no, actually, on the admin. Right on the admin that I'm gonna check, Um, if session dog get he's author, then do return the the admin HTML Otherwise, return on abort off four or three. So let's check that. So I'm gonna look out and then I'm gonna log in again. I'm gonna try to go to the admin, and then I want to do Jorge Jorge Logan. So yet that works. Ah, that means that he checked my east author, um, flagging here. And, um, and so that it's it's true. So I'm able to access the, um, the ad mental, But so how do we test for, like, if If another is registered, but there's no is author flag. Um, we could use the register function that we wrote before. Um, but, um, that basically sets. I believe the he's author to true, um, automatically. Um, so that's in here, right in models. So Oh, so its authority said to falls by the fault. Also, I guess it's It's it does it would work. Um, if we use the register. Oh, but we're not doing Yeah, we're not doing anything with the model here, so Yeah. So what we want to do is I want to set up temporarily my, um my my ice of my admin. Not not me. My east author flag to false. And check that that doesn't work and get the four or three. So I'm gonna do that through the through the shell. So I'm gonna go by for manage me. Why shell? And then I'm going to say from author models import offer, and then we have the author equals author that, um see, uh, query not filter by, and I want to use, uh, use her name equals Jorge first. It's when I have author. There it is. So if I check author is author here, I'll see that it's true, Right? So what I need to do is make that to be false. So the author East falls, and then I need to commit it. So I just need to do, um, the be odd author. Well, I need to import from last glogg import BB. So I don't think that I need to do. You don't need to do TV ad. I just need to db session commit so that that changes is stored. So come it. And if I check the the author now, yes, I see that it's zero now. He saw three Syria. So let's try to look out and I'll try toe up. I need to be running the application. Hold on. So python managed room server Perfect. Let me try to go out, Men look out and I'm gonna do Jorge Jorge, which is the correct password, and they get forbidden. Perfect. So that's checking that the East author Ah, flag is false. So that's not that's not gonna fly. It's You're not authorized to to go to the admin in at at Blood Post. But you're you would be able potentially to do comments on the posts. So let me change that really quick so that we have that functionality again. So from flask Log Import, Phoebe and then from author models import offer. And let me see if I have that in here. So author equals off our that query. Not first. That gives me the first author. So that's another way to do that. And then I'm gonna do author, the East author equals true. And then Devi session comet. So now let me check if I have that flag turn on Perfect. And I'm gonna go to the admin. I need to wrong the application, and I'm gonna go to look out Jorge, Jorge. And I'm glad backing again. So that works. Perfect. If I
64. The Post and Category Model: perfect. So let's start. Ah, working on a block post functionality. Um, because this is a block, and we haven't really done anything really? Toe. Ah, blood posts, which is the, like, central thing you want to accomplish here. But you know, you, sir, identity kind of things always take a long time. And, um but here we are. We're ready to start creating that that post block post functionality. So the first thing we're gonna do is we're gonna create a post and a category on the block models file. So let's start doing that. So we create a new class called Post, which is a an instance, off the tee me moral class. And so we're gonna have an I D. Which it's an intern. Sure. Primary key equals true. This is our primary, uh, I d feel. Then we're gonna have a blawg i d. So we want to have a relationship within the blawg and the Post. So for that, we're gonna do a foreign key just like we did earlier with the blood and the author. And that's gonna be any teacher. And it's a flooring key to the blawg I d. Next, we have the author, i d and that's also a a foreign key. So that means we're gonna have to, um, for here. It's gonna be another DB column. Ah, it's an integer as well. And in this case, the foreign key is the author idea. Um, now we have title and title is gonna be a string off 80 doctors and we have their body, and that's gonna be, um, a TV text. We haven't seen this text type earlier about Texas. Kind of like it's a big our chunk off off off characters and Texas perfect for the blood body. Um, we're gonna have something called a slug. The slug in, um, on Internet terms, he's basically all the, um, kind of like identifier for the for the girl Off that off that article and you can see let's see, weaken, See a slug. In this case, the slug would be 20 were slash blawg and in slash 2015 10 20 sequel Alchemy. All that is is a slug. So the slogans basically it usually entails having the the title off. The of the article made kind of like you're all compatible to see how dashes are replacing the spaces in here, and it's all lower caps. So there's actually a library that allows us to do this, and we'll take a look at that. But for now, uh, it's just the A TV column. Ah, off string off 256. And we're gonna make this, um that it's unique because no two different block polls should have to say mural that make sense, We're gonna do a published state. Um, so I don't know when that was published and for that, we're gonna use another type that we have a news which is daytime, and they tell me it's just a a my sequel column or not a Mexico, but a, uh, database called him that that stores, date and time information. And finally, we're gonna have a life flag. I always use this, um, when it's kind of like content related, because you usually don't delete, um, records from the database. It's not a good practice to delete things because relationships get last under loose their history. So if you want to have a a post the lead it instead of actually the leading it from the database, we're going to just set the life column toe fault. And that should, like, filter out any, um, any columns? Are any any any post that that we don't want to see? So, um, we're also gonna have a category, so it's it's post can have a kind of, like a blawg category. And, um, so we're gonna have that. So that is a column that is a DB integer. And we're gonna make that a foreign key to another table that we haven't created yet. Well, let's just put it here category that I be, um And, um, let's define the in it for this. Um, so we're gonna have blawg author title, body category. Those are all required. And then we're gonna have, um, none required slug published state and live life. It's always gonna be true. So here we have self blawg I d equals blawg. I d. And notice how I'm passing the blawg. I thought I d there because I'm gonna have actually passed the actual, um, blood object, not the i d. Um, which is a subtle difference. Like if I did blawg um blogger d like this, then I would just pass block i d because I'm expecting to toe pass the the number, the number of that block. But we shouldn't kind of like do that, because the bloody can change. And we don't want to be, like, hard coding or looking up that that i d. So instead, I'm expecting this to be passed the blogger and the author as objects. And I'm figuring out here what the idea is. Same thing with author I d So it's, um, author thought I d Because I'm gonna pass the the object there. They were gonna have the title. Um, we're gonna have the body and this log. And finally, if published state is said to none, I eat. I'm not getting past one. Then I'm gonna just time stamp with what we have, what the time right now? So the way we do that, IHS, we're gonna use daytime that UTC Now remember my conversation about they time always using the, um, the UTC or Greenidge time zone so that everything is kind of like universal. So that's that's always a good practice. Um, and otherwise just set the Polish state toe. Whatever. I was passed on my in it barometer and finally, self live equals life, which is true by the fault. I have an error here. Invalid syntax. Ah. Oh, I need a semi colon. And on the top, I need to import, um, from the time import the okay. So far, so good. Um, the last thing we want to do is to find the, uh, the representation model. Ah, method. And I'm just gonna return. Uh, post percent are with the title. Cool. So far, so good. Um, now I want to do the category. And for that, I'm gonna also do this s ah, it's an instance of DB model, and I'm gonna have, uh Well, the idea is the same as this. I'm going to just copy and paste this and the name. It's gonna be the same us the title here. Uh, but I want to make it 50 instead of 80. And so for the in it, I'm going to to itself main. And I'm going to set the name to be that name. And the representation is return category percent are self Dale. Oh, itself made right. Okay. Perfect. So that was a lot off modeling there. But we have our post and we have our category. We have a foreign key. I have a type of their category category I d It's the foreign key of the category. Thought I'd be, um oh, I'm missing category here. So self category equals category and I have flocked police state life. OK, it looks good. Um, so let's say that, um so one thing that I want to also show you guys is well, we can add something in terms off relationships on this. I don't believe they get they get store anywhere on the database himself. But it's more for, um, secret alchemy to be able to do, um, dynamic look ups between tables. So what I'm gonna do is I'm gonna set a relationship between the block and their posts and the way do that is through db dot relationship and that basically tells the blood model look. And when I have a blawg object, I can do blocked our posts and please return back the posts that are related to the toe that block. So we have to pass the the class for that. For that relationship, we have to pass a back and reference toe. That and that's basically the blawg ie from post back to blood What's the Russian ship? It's It's the block, right? And finally, there's the sitting call. Lacey equals dynamic, which means that when I do I look up. Don't necessarily, um, fetch all the posts off the blogged, unless I I kind of, like, explicitly asked for them. So it it manages that for us and makes the query for the post whenever it needs to do so. So we're gonna we're gonna play with it a little bit on the, um on the terminal to see what that looks like.
65. Post Migration and Testing: Okay, So time to do some. Um So migrations. So Oh, let's see, we haven't an error there excluding the O. J has no attribute for ing. Ah, let's see. What's this Online? 26 flooring. Ah, start a typo. Let me double check Foreign key. Uh, I'm missing the key. Their foreign key. OK, and let's say that And wrong server. Okay, now it looks good. Perfect. So it's clear the screen. And so now we're gonna do the the migrate. So let's try that, um Tyshon Ministry. Why? Actually let me put this in. So I want to see the version popping up. We have 70 d and 30 name I D 39 I d, um they be my great. So now we have this new one and let's check it out. So we have categories created without primary key constrained of I d perfect. When I have their post and I have this foreign keys to author, blogger and category Perfect. And, um, yeah. Once again, it's kind of like inserting that authorities author, It definitely looks like a ah, like an error off some sort. But I'll leave it like that. So it looks good um So let's go back to the terminal and we're gonna do by fun managed B Y they be off grade up. Great. Perfect. So it run the, um the upgrade that's here. Ah, show tables. I know we have. Ah, category imposed. Perfect. Okay, let's play a little bit with the model. So you guys get an idea Oh, file to interact with with its new models. So I'm gonna do python minutes p wash. Well, let me clear the screen first by phone. Manage me. Why Shell. Okay, so let's import models from offer. And we're going to import from blawg all the models. And so let's read a new category. So the way we create a new category is gonna be category equals category. And what else but python? That's a That's a great category. Um, so we're gonna db session at this category and come it perfect. So let's check on my sequel to see if things are looking good. So if I do select star from category There it is. We have our pie phone category there. Um Okay, so So now we're go now. Um, create up block books. So for that, we need an author. So let's just get the first author here that we can get. And that author is Of course, Jorge. And then I'm gonna have the category, which is also the first, So first he category c python Perfect. And so let's create a post we're gonna do Post equals Post. We passed the blawg. We passed the offer. So you have that e c that ace instead of doing looking at the block i d. Or it's just like it's better to just throw the object and let the model kind of, like, figure things out. Leaving what? What it needs. So that that was gonna be pi phone is cool. And the body is This is why, by phone, a school and the the category, we just throw the category and notice I'm not passing this log or the police state. Oh, named block. Oh, I didn't get fetch a block. Correct. So Blawg equals blawg query first, and we see that block. Yes, my by tha block. Okay, so let's try that again. Now it worked fine. So I'm gonna do db session ad post and D B session. Come it Awesome. So it looks like it went through. Let's check on the, uh, post table. And there it is. We have are the blood i D. Which is the blawg. Ah, the pipes. Um blood. My author i d and the title The body The sluggish null. The published state, which is today's date and time in In the Greenwich time, it's life and the cargo I d is, uh oh category the snow. So that's unexpected. Um, that's if we did things correctly here category. So we do have category. I might be missing something on the model. So let's go back to the And that's why it's important that you guys play with with your models first before putting them on the application, because you can get errors from there. So it's category O c I'm missing category I d. Here. I think I should have category I d here and, uh, we check. Oh, so I have actually two errors I have, um I defined category ideas the field, so I need to set this to category I d. And I need to put category dot i d. Here. Okay, So, um, let's go back here, so changes that you do on your models don't reflect automatically under on the terminal, you need to get out and getting again so that they're like reloaded. It's not like the auto reload functionality, so Ah, it's clear and will do by phone. Manage me? Why, um, Shell again. So let's maximize. And it was the same thing here from author models, um, and from blood models, Import star and author is the first author and bloggers the first blood and the categories . The first category and I have to supposed here, which is the second post, Um, that actually I was debunking the problem earlier, So I think that when I also wrote So I'm gonna have 1/3 block post here, and I'm going to call it. This is my third block post. And always look at I DS is the title, so that should do it. It's the how that looks on the database commit. Um, so third time is the charm. And there you go, finding we have category D here. So that did the trick Looks good. Um, I actually now want to, um, basically erased all the posts because these are like test posts and we want to have a an empty table. So you need to do is the lead from post again. There's something My sequel site. Um, you can do this also on the terminal on the python side. Oh, and, um, but this is This is faster. And of course, there's no one do for their. So be careful when you do it. So the lip from post. And now, as you can see, there's no, um, there's no posting there, so we have an empty table. So now let's go on and start working on the, um, on the views for this for this post. Um, let's just do like the skeleton. And on the on the next lesson, we're gonna do much, much more. Okay, So, um, let's exit from here and clear the screen. Um, and what we want to do now, it's on the blood views. Let's at our first route to be able to, um, to be able to, uh, generate new pope. So the route is gonna be slashed post, and we're gonna have a logging required for this. And we're going to define these, ask the post function, and for now, that's just put return block post. So we know we're on the on the right place. Well, let's say that. Let's see if we can wrong the application. And, uh, this goes slash post and their luck post. So the next section we're going to start building the front end for this. Ah, for this block post functionality.
66. Introduction to Markdown: okay. Want to do a lot in this in this lesson, So make sure you're relaxed and have had a kind of, like a little break. Um, old good stuff, but lots to go through. So let's start. Ah, the first thing I want to do is I need to extra libraries on requirements. Txt and those are gonna be ah by phone slog if I which is a library that allows me to generate slogs on the fly without having to worry about generating them on the other one is called flask marked down and mark down is a kind of like a It's almost like a Fudoh, um, formatting language. But it's not that language is kind of like a a set off ah, off rules or or utilities to make you at it and add, um, text, um, kind of like formatting in a in a very standard way. And you can look for if you do a Google on like mark down. Um ah, yeah. Teach it is, um is a good ah, good search. You're going to see how you can do headers. You see how you you do headers doing, you know, kind of like found signs. And depending on how many pounds signs you have, it will generate the different sizes, uh, lists and all that. So take a look at that. Um, make sure you get acquainted a little bit with it. I have images and all that, but it's it's a very cool, um, kind of like for mating utility language, um, for allowing people to to kind of, like, edit their their post. So let's, uh, control see from here, and we'll do a peeping stall requirements. Perfect. So now we have biting slowed if I flashed markdown installed. So let's do, um, a placeholder for that where we display the actual, like post articles. And we're gonna do that here on templates blawg. And I'm gonna create a new file called, um article dot html. And in there, I'm going to basically, um, put some marked down so that it that we test that it works fine. So I'm gonna dough, you know, extends base html, and we're gonna do a block talk entitled, which is going to be blocked post. And we're gonna have, um, block content. And so the way that we this play Orender marked down code is by using the following you use filter mark down and you do an end filter. It's kind of like block, but it's it's a custom attack for dealing with mark down. And so I'm going to just make it so that you see you I see here some marked down So the title's gonna be Ah, you're you're marked down. And then I'm gonna do, like a little list 0.1, the next one and the next one, and you'll notice that those ones get replaced with 123 So that's kind of like an easy sort off initial marked down. Um, we do need to like, include, Before we render this, we need to include mark down on the unity y so that the application knows how to deal with this this thing. So we're going to do from last dot txt Oh, no flax e x t dot marked import mark and I'm going to create an entry for marked down here mark down and I passed the up. So from that point on the application, Osada render, um, markdown contact. Um, so that's that. And let's see if we can render that article here um, So we're gonna do a quick function here called, um, article, Just like you see how that looks on and some do slash article, and then I'm gonna return. There's not gonna be Logan required. Does anyone can see the article, and then I'm going to render template slash log article. Okay, so let's see if that works. Um, it's running, so it's still slash article. We have a nearer in there bloke article. Oh, I have the wrong character there. So let's see that reloads and refreshed. Perfect. So now see how it's rendering the 123 and you're marked down. So that seems to be running. So let's now start building on the actual block post functionality. But before we do that, something I was thinking is that we need another decorator. So remember how we have the, um, logging required a greater here. So I was thinking that, you know, I could have a long and required for certain, um, for users to be able to post comments like we said. But I would like to have another decorator specifically requesting that. Ah, that enough on author. He's the one logged in, and I'm thinking about the admin, and I'm thinking about the post course. Um, you could be locked in, but if you're is author is not set, then, um then we shouldn't be able to do anything. And I think that, um, on the logging when? When you're on author, your session is set here. So let's do that decorator, and it's gonna be pretty much the same, but we're going to call it author required. And in this case, what I'm gonna do is if session get is author. Um, then if it's if session get its author is known, then I'm gonna automatically just return here on a board aboard four or three. And for that, any toe include aboard here. So it's a little bit different in the sense that if you're not another, I'm not gonna, like, send you back to the log in page nicely. You're probably doing something hacky. So I'm just gonna like returning a 43 here. So that's it for that. And so now I'm gonna have the, um, on the views here I'm gonna do instead, off Logan required. I'm gonna do author require, and I need to import that here. Perfect and the same thing with the with a post, right? You shouldn't be able to post if you're not a an author.
67. Post Form: So let's start working on the on the block form for the post. And so we have, um, pregnant called is the post form class, and it's also class of form. So we're gonna have a title, which is the title of the Post. And it's a Stringfield. I'm gonna display title on the label and then here, when a have validators required and maximum length, it's gonna be 80 and then I'm gonna have a body, which is a It's a new one. We have a news text area field, which is gonna be content, and then I'm gonna do evaluators. It's required, um, and finally have the category. So with the category would also were also you something new, which is we can make, you know, this is gonna be a select, you know, those select multiple select fields, but we want toe loaded with the contents of the categories that we have on the database. So for that, we we can use something called the Query Select Field and quite a select field means that it's gonna pull from a from basically from a table that I designate, um, the contents of that off that set, um So the way you do this issue passed a query factory, and that points to a function that I need to define here. So it's gonna be called trata Gorey's, and I'm gonna low allow blank equals. True, because, I don't know, I am not. I don't think we should be forcing the user to select the category. Um, in less what the at least if the user wants to enter a new category, I'm gonna allow for that. So I'm just gonna have another Stringfield called the new category. Okay, so let's add that, um, that factory and it's just a function of you define here categories and that returns a category. Ah, Doug query. And we need to add, um, here. Ah, from wt reforms we need at the text area field. And we also need to add from blawg models import categories so that that query can work. And finally, I'm going to Ah, the, um from w t forms that e x t dot sequel alchemy. And that feels import query Select field. Perfect. Um, so now let's go and work on the on the template for for that that was gonna render that form so Let's go to the block. Um, views and work on the post. Um, so I need to adhere to methods. Methods equals, um, get and post, and I'm gonna have author required. That's fine. And define post perfect. So let's start loading stuff in here. Um, the form is gonna be the post form, and we're gonna have a, um, return Orender template log post thought Eckstine mill. Well, we need to best it for him. And we need to include the, um see here. Ah, from book form. Ah, Post form four. Perfect. And, um, let's look at what the That block post html looks like, and then we can wire the database stuff, so we're gonna create a new template. I'm having a problem here. You file You opposed html, and that's gonna have extends. Um, basic steam. L We're gonna have a block title. Look, post they would have the block content and, um, see here, so, um, would have a beef class equals row. And then a div class equals call. And the offset three and call MT. Six, which is what we've been using for bootstrap along. And then we're gonna have the title. Uh, H three, new block post. And we don't have that helper from form helpers dot html Import render field. Um, perfect. So let's go to the form. More for method equals post and action is the, um, Euro for post and the role equals form. Perfect. And we have our, um CSR token Hayden tag. What? And so now we do render field a form title class equals form control. And so when a copy and paste that for all the other fields. So in this case, we're gonna have body. And one caveat here is because thes but is gonna be a text area. I'm actually gonna pass a second. Better measure here, which is called Rose Rose, is a number of rows that that field, not text area field is gonna have. So now here's the form category, and finally, a new category. So if the user wants to enter a new category, they can do that in there. We're almost done here. Um, button type equals submit. Class equals Bt n the fault and post perfect. So far, so good. Um, so let's see if we have any errors here. No, it looks good. So now we go to a post which should be able to see that form perfect. So we have a title here. We have the content, which with the 10 rows in here and check out the category. But that's weird. It says category Python. So what's happening here is that, um, when we do that reproduce, that's what it's passing back to the to the model, Um, sorry to the form. So when they do this category query, it selects the categories. And I haven't found a way to to make that, um, work with this or with some other like representation. So what I what I did here and and you guys can can check out if there's another way to do this is I just returned self that name instead of that reproduce. But I'd like to have the to continue having this and somehow filter that out. So if you guys find out a way to do that, let me know. But now if I reload here, you'll see that I have the correct category. So looking for looking good so far. Now, we just need to do the database piece, which we're gonna do in the, um in the following peace
68. Saving the Post to Database: So let's go ahead and see how we can create the block post. Um, so we need to, um, here in block views on the post method we're gonna do if, ah, form validate on submit. Which we we've always with. We've seen to the past. Um, so we're gonna do some checking here. The first thing I'm gonna check is if there's a form, um, new category data. That means that the user is passing a new category. So I'm going to kind of create that object on the fly on the database by setting a category , um, within with the strength that the user is passing. And then I'm gonna a session at that, uh, category. And then I want to do us a flush. So not commit yet because I'm I don't want to commit, um, Onley This thing I want to commit when I have the whole package. So But with session flush, I now have the the object creative, um, and with a potential i d. So that's that, Um, the other thing is, if remember that the user can pass a blank, um, category. But if there's a category data being pastime instead, the user did select something. Then I want to do the following. I have to look up that category. And the way to do that is by looking at the category D. And you do this by using this helper function, which is Ah, get PK And you passed the category to the toe dysfunction. But this does is that it gets the primary key SPK or the I d off that selection from the from that field. And then after that, I'm gonna look at the category by doing a look up, uh, category that query, Um, that filter by I v equals category I d that first and that that takes care of the of the category. Um, otherwise, I'm just gonna pass that the category ease none. Perfect. So, nothing, I I'm assuming that we're gonna only have one blawg per application, so I'm just gonna say blawg eagles to query first. So if there's more than one block and you want to create a system that needs more than block, then we need to, you know, figure that out here, um, and write some some other like functionality. But for this course, I'm just assuming that it's only one block that we're having here. So that that works. Unless I want us get the author. So I do the offer, the query, and I'm gonna look by the person that's logged in, right, So use her name equals session. Uh, you certainly. And then first I have my category have my blood, and I have my author. The rest is just whatever is passed by the form so form title data. Uh, and body is through the form body data. And for this log, I'm gonna use this library that installed and you just to slog if I, uh title. Um And so it's now time to create a post objects or non passing blog's author title body category and look perfect s own idol Devi, session God Post and the B session comment. And finally, I'm going to return the user to the to the admin because in the army, I'm gonna have, like, a link to create new posts eventually. So I'm just gonna do that in here, and we'll check if if everything went went well on the database side. So I have a few errors because I need to, like, add category and solidify and post. So I'm gonna go to the top and at those things in there and let's see here. So from block models for blawg Post in category and, um, from slow if I came forth slow if I perfect so I should not see any more errors in there, that looks good. Then we see if there's errors. Known wears. So let's try that out. Let's try to create our first blood post using the form. So we're in the post. Let me reload that just in case. And I'm going to say here, um, flask is really amazing for the title, then content. Um, I'm gonna say flask, it's one Awesome. Um, by phone. Were DreamWorks Really? I recommend it. Perfect. And so we're gonna try with the category first and see if that works and then going to do post Ah, object. That's much be a date. Okay, so it's the Ellie form category. Date on blob. Use lying. 72. Oh, Dada. Dada. Okay, so let's try that. We can do reload here. Um, because he's going to send the same data. And now we have local buyer character reference before assignment. See here. Oh, It's form category data here, so let's see that. That looks good. Let's go back and post again. Cool. So it looks like it went through. And let's check on the database to see if everything looks okay. So do select star from Post. Awesome. Let me maximize this and see if it looks good. So have the i d. The block I d. Authority the title. The body slug. See the slugs. Flask. Dash is dash really decimating? We have the date, and we have the life is one and carry this one Perfect. So it looks It looks really good. Um, so now we're properly setting that up. Let me do another one with a new career to see if that works. So let's say here my new category in my block, this is going to be the new category. So now I'm gonna have this is gonna be blank, and I'm gonna see this is a the flask category. So post that looks good. Now, let's do another searching here and perfect. I have a category two, which is the new category. And if I select, um, start from category now I have to one into perfect so looks really good. Congratulations. This was a lot off a lot of work, and Ah, but you're starting to see the power off using the or M and Ah, and using this. This tools like the the form, the sequel. Alchemy. All this is coming together, so looks really good. Um, now let's Ah, let's try to render this, uh, this posts on the only on the article views.
69. The Article View: So now we're going to, um, create the functionality to render on article. And the way we do that is on blood abuse. We have the article rendering function here, so let's change that so that it's it actually pulls from the database. So we're gonna do something here called slash slug. So the idea is that you look up by the way, that slug field on the database, and we passed that down to the to the function. Remember this log? It's, ah, unique. So it works perfectly fine us as an i. D. So it's really simple. We just look up the post. Um, by the by this log, um, filter by log equals slug, and there's a There's a handy function called first or 44 And what that does is if it finds that, um, that record on the database by the search that you're doing it returns it to the post viable, and if not, then it returns a for a four to the view. So that's pretty pretty handy. Um, and here So I'm gonna do ah, past the post to the to the template. And of course, we need to modify the template So let's to, um, basically have to change the following. So instead of block posts here, I'm gonna put the title off the post. Andrea, over The post is the is the object that that's fetched from the database. And ah, the other thing is, um Well, we should keep with the the class ro thing from, um, from bootstrap and that they shoot and plus content here and then also, they've, uh, class equals offset three and call in the six and that shoot. And in here. Perfect. So now, um, we're gonna have Ah, take this out. We're gonna have a title, which is the post title and the way to render the the actual post iss. We do the post body, and then we filter with mark down, so that type that pipe or line vertical line is called a pipe. And markdown is available for us since we have the library installed. So I'm gonna have a little division here, like a horse on the line, and then I'm gonna do their class equals text muted on this kind of it's gonna be like a folder. Um, posted by I'm gonna have, like, a happening to the to the author. Although that's not gonna, you know, work. Um, for real. But you could implement that. And, um And then let's put at the date on post publish. They, um And we're gonna use a function called String of Time. Let me wrap. This office is looking a little ugly. Ah, s t r f time. And that's a for murder. So we conform updates we're gonna use percent. Why? Which is the year? Percent. I m percent the and it's a little bit ugly, but we can we can work on that. Um, just that we have something in place and I'm going to do in and again another a drift that's not going to go anywhere initially. Um, and we're gonna put the category name cool. Um, so that looks good. The last thing I want to do is like, once we publish to the, um, to the block that we sent the user or the author directly to that. So let's do that change here. Um, instead of sending them to Rodman, I'm gonna do return redirect euro four, uh, article and then passed the slug. Perfect. So now when I publish, I'm gonna be taken to that. Um, so that article eso Let's see if we have any heirs. Um, looks good. So let's go. Toe post. Um, this is yet another article, and I can put some, you know, some marked down here so I can put something like, um, the initial version is the kind of like a subtitle and food here some. This is the initial version of the article it has see row and that those little stars are to make it bold. It has zero hits on the internet, and that should be fine. And we're gonna have it in the python category. That's it. So that's right. Posting built error. Also, I think it has to do with this line here. 85. Yeah. This is supposed to be just euro for article comma slug slug because they I'm passing the two the two parameters there. So let me say that. And, uh, let's create another post because we're gonna have that one already. I think that once saved properly on the database, we can check. Uh, yeah. So that's to another one. Um, see here the beauty. Oh, flask. And then I'm gonna do the same thing. Why is flask awesome? I was gonna like a subtitle. Um, and I'm gonna put flash is awesome because yeah, uh, because it has a lot. What's the Astor is a lot off features, so let's put that in flask and post perfect. So at least I'm being sent to the so the slut properly. And but it's saying blood one is supposed only has a knack tribute. Author. Oh, so it looks like we don't have a link between post and author on the model, which is pretty interesting. So the way we fix that is we go to the blood models and when it said a relationship between post and author, So, um, I don't know if I I kind of, like, spoke about his, um, in detail because it's, like, so second nature to me. But see how I'm doing past author full name, like, I'm jumping between two kind of like, database or tables, right? That's gold like linking. And it's something that you're gonna have. You always been a kind of like use. So post author, Full name is one of them and pose category name is another one. Like jumping from the post toe the category to the name and the way you do that issue to, um, these relationships that we talked about briefly with, um, with the, um, category. Remember how I have this directory post back rift Blawg dynamic, um, with the with the postal to the blawg. And I have I don't think I have a category relationship. Let me see. Yes, I have. I have the external i d. But it will have a a kind of like a relationship. So the rule of thumb there is that you always have the the this is called a one to many relationship. I eat for one, uh, post, there's a potentially they could be. I mean, there's only one category, but for each category, there could be multiple posts. So the idea is that you place the relationship on the multiple ciders that uhm basically that were the, um were the kind off like that. Unique points out to the multiples. And in this case for that, that link Toby done. It's actually for the for the author. It's actually on the author model. So you're going to see how I do that here. So I'm gonna do posts and that's gonna be like a new field, and I'm going to go. The DB relationship post is the class that I'm linking it to. And the back ref is author. And that's where what's going to give me the that relationship? And, uh so let's see what? That What that does. Um, let's look at I don't have any problems there, so let's reload. Okay? And as expected, I don't have a race issue between post and category. So again, each each, um, each category can have multiple love post. So that's where we should We should do their relationship. Um, so let's to the gotta blawg models, and I'm gonna have here have category category equals the B relationship and the classes category and the back Griff equals TV back graph posts so that the posts of the that that category has and lacy equals dynamic. Okay, so now I can go to a post and and to the back graph off the off that off what category? It points to using this this relationship. So it's the one where we load and there is. So now I have, you know, posted by Jorge Escobar in flask. So hope that makes sense. It's a little bit tricky to get those things a day beginning. Um, but you get the hang of It s so basically, remember that if you have a post and, um, you want to have a relationship with the with a category, you place the category as a field, and it's basically gonna be a field. If you if you look up a post, you can do post start category and you'll get the recovery it belongs to. But also, you can have you can look up a category and do that posts and get the post that are inside that category. Um, so some cool stuff we've we've learned here. And there you go. You can see that the post of the author and the back. Griffey's author. So that means I can do post dot author and get the relationship here. Um, so that's a pretty pretty useful functionality that you're gonna use a lot. So, um, cold things we're gonna now jump into listing the articles on the admin and homepage so that we we kind of like and can see the list off articles in one place
70. List Articles: Okay, so we're gonna, um, start displaying a list of the off the posts on the, um on the admin page as well asked the home page of the block. So to do that, we need to, um, go to the black views and, ah, instead of this. Ah, blogger Admin. Um, being just stuck checking the if the if the session get off the author, we need to do a check off the post, read the post in, um, we're gonna display them on a reverse order in terms of date and then send it to the to the template. And then we need to do some changes from templates so that there those posts are displayed in there. So before I begin doing that, I just realized that there's, ah on our author views. We need to, um when we look out, we need to also pop this session for the East author. So remember how we at a session is author to the to the system. Now we need to also pop that so that when people look out, that cookie or session is also, um, erased. So just go ahead and at that. And, um, we need to now go to the ah, blob. Use admin to start a process of getting the, um, sorry. Getting the, uh, the block posts for for the admin. So let's just say here, um, we're going to do the following. We're gonna get older posts. Um, and we need to do a query own or buy. Ah, post published date. I thought the e S C. That means descending. And we have posting here on blood once, yet we do. Perfect. So now we're gonna pass those posts toe the admin html. So post equals posts. Okay, so let's go to the templates, um, for the blood admin. And, um, so we have our, um, welcome here. I guess we can then do the following. Let's just to add a with a class off post, lest on and we're gonna do a four look. So for post in posts. And so now Post is gonna hold a viable for ah, for the post information when doing and for here and now we're going to do, um, a post item, and we're gonna have the say that title with a hyperlink for that titles. Um, for the article and notice how I'm doing the article. The euro four on this log is the posts log. So now you're noticing how easy this is Once we have the right, um, things in place, it's not a lot of extra work. So, see, I haven't now have a title with a hyperlink toe. The proper article, and that's gonna work perfectly flying. I'm missing a quoting here. Perfect. So now I'm going to do a Ah, I'm going to do a text muted, which is, like, a lighter kind of like font. This is, uh, provided by bootstrap. And I'm gonna have a little, like a by line off the of the author. This Ah, for now doesn't link anywhere. There's something that you could do. I say, like a personal challenge or exercise for you is to create like, um maybe profile pages for the for the others. And I'm gonna do on probably if date that, um a string off time. And I wouldn't make it. Ah, why? And it's really break that so that it looks nicer. So I'm gonna just put a space here, and finally I'm gonna have the category. So in, um, they draft equals and again. You can do this as a homework is to greet category pages where the the post for that category are displayed. Perfect. Okay, so let's go ahead and see if that works. So I'm going to save this file. Let's see the It's running. It's running fine. So this is on the admin. So let's go to the admin slash admin. And and if I save this file, it's me use. I didn't save the file. That's right. Okay, so now if there's any errors and it's reload here, There you go. Perfect. So now we have all the posts that we have interest of firing the blawg, and you have the posted by Jorge Escobar. This link doesn't do anything. And the category, um, which also doesn't do anything. But if you click off the, um, on an individual article, we have the article loading. So that's That's awesome. This is great. Um, so far so good. So now let's do something similar for the for the index page and let's go there. So, for the index page, I'm gonna basically do very similar stuff in here. I'm gonna have the, um, the posts here, and, um, I'm going to do the following. So if I check that the blocks is equal to zero, then I go for the set up. Otherwise, I'll, um actually, no, we don't need to do this else, because this return will Will, we'll just stop any any more execution off this. So we're gonna do the post the same thing here, and we're gonna have a, um let's see. We're gonna have the template here, but I want to do something when I have the block title somewhere in the, um in that page. So I'm gonna change this a little bit instead, Off doing the blawg quer account, I'm gonna do what I did on the other side, which is blawg equals block query first, and that will give me just a first block so that in here instead of it blocks equals here. I'm gonna do, if not log, because that means I don't have a return. Then do this. Otherwise get the post and passed the blawg as the Blawg and Post Eagle posts. Perfect. So now I'm gonna create the, um, the index html page for for this for the are actual, like, blawg index page. So let's read on your file. I'll call it Index X TML. And you know what? It's getting a little bit on rule here with the tops. I'm so sorry, guys, and usually don't do this, but, um, it's being just like building, um, slowly. There's a very cool function here that says you can do close all the types you can close all other types that are not this one or close stops the right. There's a lot of like, good fortune, is there? I'm just gonna close hold taps so that we can start from scratch. And, um, let's to this index html here. So we begin with extends, um base extreme el nous to a blood title with the blawg name and can block. And next, we're gonna do block content and I'm gonna do death class equals row. And then they've class equal call and the offset liquidated on the other ones. Call in the six. Um, so here we're gonna have the block name. That's where we wanted to have the blawg passed to the so this template and then we have a post list and, um so I'm going to do for post in posts and then and four. And, uh, let's see, We're gonna have the class equals post item and the title. Your four are too cool. Slog equals post slug, and we're gonna have the post title here. Okay, So now we have the what we had in the other one. X muted post by a draft equals ah, dummy and then opposed offer full name, and then I'm gonna do on post published date. That s steer F time percent y percent m percent, the I in a X ref and then post category may. Perfect. So that's that. And, um, let's see what else we have to do here. Um, I saved this and let me see the block views again. So, returner in template, we have the block the post. Okay, It looks good. Let me see if I have any errors. Nope. So let's go to the end expression. See what happens. Ah. En bloc. We need an end block on the templates index html. We'll have it here. So blood content, right. We need an end block safe. No errors. Reload. They perfect. Um, looks good. The the only thing is that we don't have a I guess we don't have a folder here. Um, like we have on the admin. So, in that mean, where do we have I? So we had a foot or somewhere? Um, let's see. Maybe was Oh, it was maybe in the previous lesson or section rather on the test. Yeah, I'm confused. I thought we had a foot or here. So it's at a food because that's, um that's something that every, um, block should have. So we're gonna edit the basic steam l and all destroyed. We don't have a forger. That explains that. Um, so let's to here they've class, um, equals. So I'm gonna do another call, officer three, and then call em the six. And then I'm gonna put a little like, ah, horizontal ruler here, separated, and then we'll put food er, element. And when I put, um, copy, right, 2015. And, uh, yeah, let's just keep it like that. See what that looks like Savers and years. And let's go to the home page. Yeah, that looks much better. Perfect. So that's our initial home page. Um, So let's see what else we can we can work on for for our next ah next section.
71. Logout Links Footer: Okay. So in the previous lesson, I did a kind of like a footer, but I just realized that it's not in the proper place. Um, we should put it within the container. So, um, sorry about that. I think it looks a little funky. And I think this is the reason why. So let me say that. And let's reload the page. Yeah, that looks much better. So it was kind of like outside in here was like, What is that? So yeah, this this, this looks much better if I click here, I'm getting the actual articles. This is great. Um, one thing that I wanted to add in here was a kind of like a helper. If you were locked in, um, toe allow you to, um, kind of like get ah, maybe a logging page or a logging link or look out if you were locked in. So this is how I'm gonna do it. Um, I'm gonna check that. If there's a session, I notice that we have access to the session. Object here within the template with without having to do any import or anything. So keep that in mind. So if we have an author logged in. Then we are going to say, um, a trip equals you, Earl. Four. Ah, admin so that you can you can go to the admin page if you wanted to. And then I'm gonna do an end If and similarly, I want to check if the session iss said for, um for user name. I mean, it's a logged in user. Then I can help them log out. So let me copy and paste. There's euro four. Log out and then look out in here and actually went do one else here so otherwise, if they're not user names, Sessions said, then I'm going to invite them to log in. So H ref Europe for logging and Logan. So let's see if that works. Uh, reload. Perfect. So because I my, um ah, and he's author. Then I get the admin click here link here, and if I want to low Garrick and then look out safely. And now look, it's invited me to LA again. So when I can log in here and 12345 and yeah, that's taking us to logging success when we should issue take us to the to the home page. So let's also look at that. So after people logging correctly, um, you are four Index instead of flogging, and we can go ahead, And, um I mean, we don't need that that success function anymore.
72. Pagination: Okay, so now what we're gonna do is we're gonna have a pagination function, and this is something that you'll see also often on on blogging sites. And any pitch that any when these application that has pages of content, Um, you're gonna want to do this. So the way we do that is by using a built in function from, um, from secret locking me that allows you to do a a paginated kind of like, um, um, access or query to the, um, to the site. So let's see how we can do that. So the first thing we're gonna do is we're gonna goto block views, and we're gonna set a constant here on the top, which is gonna be posts per page. Um, setting constants on the actual controller is something that's that's fine as long as it only effects that controller. Or that views be why all the people just prefer to have this on a settings file if it's gonna affect more than 11 section. But it's fine to have it here. Um, because it's just gonna be up a couple for this file in particular. So what we need to do here is we need to add a ah, basically on a page parameter on the euro themselves so that, um, sequel Alchemy can then pull the proper, um, the proper kind of, like index page. So let's see how we do that. We're gonna have We're gonna have to entry entry points now toe this controller. So dysfunction rather, which is gonna be index or index slash a number like 1234 And that's gonna be the page number. And here we're gonna have page equals one. What does that mean? It means that if indexes called without a page, like in when you when you call it by the index or just a slash then page is gonna be set automatically toe one. Otherwise, it'll take whatever number is being passed here in the on the route. Okay, Um, so the other thing we need to adhere is now a paginated function at the end of the query. And so we do the following, um, Paige and posts per page and, um, and then 1/3 parameter called faults. And what does that false meat? It means that if a page that it's past year doesn't exist, then it returns a 44 If it's set to true and if it's false, then he doesn't check for that. He just If it's the kind of like a wrong, um, kind of like page number, then it's just returns an empty list. So I rather just return them to lease and not have a 44 Um, so that's that. And now we need to pass. Um ah. So basically, now, this post, um, object has a ah, a new set off, off off or a list off off objects called items. So let's see how we can kind of like, manage that on the actual template, because there go to the index page. One thing that I want to do is I want to have an h ref for, um for the block title so that you can return to the home page ones. Um, you click on that on that name, and that would be kind of like a way to return back to the first page if we have pagination here. So OK, so that's that, um and then we're gonna have basically we need to change the, um, the posts here instead. Off post. We're gonna post, we're gonna pass items. So now this is the new kind of like it's just a list off folks that are within that that page. Okay, um and, um, let's see here. Um, we want to have a now we have We want to have a pagination kind of like, uh, kind of, like, say, my food or right, So that would be, Let's put it here on, um, near the bottom. And when I call this the post paginated and it's what it's gonna allow us to kind of, like display the previous and next pages. Um, and you can also do older other things in here, but I'm going to just stick with previous imposed. So we're gonna check if posts has previous which is this kind of like a helper function that that the pagination object has. Then, um, we're gonna have the following. Let's And if so, I'm gonna put here, um h ref equals, um, Euro four index page, and then I'm gonna pass. The page is equal to posts. Previous number prv numb. So that's automatically built into toe. Put the number off the previous page in the in the euro and then we're gonna have, um, to like, small like our arrows and hold. There you go. And then we're gonna put newer posts because this is going from from smaller, too large. Um, and, um, if we don't have, um, newer posts, that means that we're looking the first page. Then we can doing else here, right, Els and, uh, people that else here so that it looks better else. I'm just gonna display this this tex without the hyperlink. Um okay. And, um and then we put ah, little separator here, and then I'm gonna do basically the same thing. So I'm gonna just copy and paste most of this, but I'm gonna change a little bit. What viable? We checked. So now we're going to check if posts has next instead of previous. That's next. Then we're gonna display their Euro four index page, and then this is gonna be next numb, and I'm gonna put here older posts perfect. So that they care takes care that Let's see if this this already works. Let me Let's go to the admin, come into the home page and see that in action. Perfect. So now I see there's newer Post is It's not. It's not hyperlinked but older posts ISS. And if you see the your l ah, it's Index, that's too. And if I click there Wow, index touched two. That's ah slash to. Rather, that works pretty well. Um, so and now have newer post turned on and, um, and older posts turned off. That means that I only have, let's say four, right? Yeah. Four, um, articles. So yeah, this is working really well. And, uh, let's let's just the same thing for the for the admin. Okay, so, um, we're gonna have to do the same. A similar thing here. So we're gonna do the same up route. Ah, trick with admin here, and we're gonna have a page, um, equals one onda. Finally, I'm gonna Pagine eight the same thing here with the posts. And, um, that's it on the controller side. Let's see on the admin side. So we're going to do the same. Ah, maybe treff year. You're for admin, And then blow got me in here, and we're gonna have the post be the posts items, and I'm going to copy and paste the the pagination thing here. And we could petition it Half that stuff in in a in a macro. But, um yeah, for now, this is to it. Here, Um, so that looks right. Post items. Yeah. And four the Yeah, looks good. So let's try, um if we have any errors and let's go to the admin page And now we have imagination. Perfect. So that works really well. And if I click on the Oh, wait, I'm setting index here. It should be admin. I was wondering what had happened there, Um, because he was linking toe the index page instead. So let's go back. Reload. Older post admin. Perfect. Mythically here. I'm taken to the admin homepage. Awesome. That's pagination. Really? See you guys again. You have no idea how hard this is if you want to do it like manually. There's a lot of work that I that I did over the over the years to set up pagination. So you're living in a great age, Um, that things are much easier for us, and we can concentrate on on building the really important things. So that's it for for this lesson. Um, and, um, the next thing we're going to see is, um, adding photos toe these to dispose. So let's let's go there
73. Installing Flask Uploads: Okay, So now, um, in this, um, a few lessons are coming. We're gonna be adding a photo or a kind of like an image to the post. And for that, there's a pretty good library so that we don't have to reinvent the wheel or do kind of like a lot off the custom stuff that you need to do. Um, because I feel like, um, it's a problem that has been solved very well so far, so I don't feel like we should do it the manual way. However, um, if you want to explore that, um, it's always kind of a fund to try to build it yourself the whole, like image of loading process and and, you know, kind of like, um, handling the file from the form etcetera. So there's there's some some things that are are useful to learn, but, um, I don't think it's it's a It's something that should build from scratch. At this point of time, I think, um, there's ah, there's better solutions out there and ah, instead of you should, like, concentrate on, I'm building other stuff that it's not, um, you know, the image of loading piece having said that, um, usually what we use on the on the flat side for images is a baggage called flask uploads, and it's really good. We're going to see how it works. Um, the only problem was that it didn't work with Python three. And amazingly, um, the author off this package or this library has been kind of like a my A and, um, working on other stuff and just didn't have the time to continue, um, updating it. And, um, so I was like, you know, should I just, like, build it from tractor? Should I try to to still use it using python three. And so what I what I ended up doing was, um I changed the library with, basically fixed it so that he could work with by from three. And I've posted that on the, um Here's the actual changes. A small changes is really nothing major, but, you know, the author hasn't hasn't been updating it like I said, so I put it here on my my get hop. And what? We're going to do it. This is a good kind of like exercise for you guys is we're gonna actually be ableto add this library on the requirements. Txt are using a kind of like a ah, get have account. Um, that it's not the the regular people install library. So we're going to do that, Um, and I'll give you the euro for the for the library. Or you can just type it along with me. But let's let's start doing that, Okay? In order for us to do this, we're going to go to open requirements. Txt. And at the end, um, let's add the following dash e and then space get loss exit the PS, uh, get have dot com slash from zero eu slash flask uploads and then, um hashtag a EG equals flask uploads. So this tells people that you're gonna you're gonna be installing a library, that it's not on the main people. Ah, repository. But you're actually pulling it up from somewhere else. And as long as that's a get, um ah, get repo. It's totally fine. So that's when I work out. So let's ah, let's install this. So the way we do this, um, make sure you have your ve envy at the beginning enable people still Dutch, our requirements txt So it's downloading everything. And now it says it successfully installed flat uploads. So when it starts setting this up, Okay, so the next step that we need to do is money to add some constants to the to the settings three y and let's see what those are. So, ah, settings be Why? Case? We're gonna add the following, um, uploaded off loaded images destination. This is basically the the path, um, on the server where you're gonna upload the images when the user uploads them. So in this case, notice that I'm gonna use my own path. So you need to replace this with your path in your server. And it's basically, um let's see, flats blawg, uh, static images. So we need to create Ah, folder for this in the, um, in your in your path. Right. So within static. Um, let me minimize this. Um, so we're study Well, we don't have study here. Okay, so we need to create that folder. Um, So let's create ah, new folder. We're gonna do static. And then within that folder, we're going to create a new folder called Images. Okay. And as you might remember from the previous section static It's a special kind of, like directory for flask. Where where you serve? Um, kind of like, ah, static content, like javascript images, those kind of things. Now you need to check if you're on flash block, do a PWD and check that this path looks like this path. And yes, you can see here is home a boon to workspace flats, blawg. And then also check that static images exists. So you do ls static. You do a tab. So So that our fields and then images so that that is fine. That works fine. And then the other setting is uploaded the images. You're l. And in this case, it's how you serve those images. And we're just gonna call this static images. That's like the euro that should prepare end any image that we're gonna be serving. So that's that, Um, so now let's go on and start setting up the, um, the upload set on the in it. So now here in in it, um, we're gonna add some stuff in here. First is from flask, uh, uploads that uploads, import off load set, comb figure uploads and images. Okay. And, um, beneath Ah, see from flask uploads going an area off load set comma. And here we're gonna do on images section, and we're gonna do uploaded images equals off load, set off images, off type images. Eso uploaded images basically defines what type off images we're gonna be. Um, we're gonna be of loading And how tose name that set, you can have multiple sets, like, for example, images. I'm calling the post images, but you could have another one for, like, user profiles, and you could call those profiles. And this basically has to do with where, um, the system they up the flats, uploads stores that made a data about the above the image. Um, so next thing we're gonna do is configure uploads, and we have We passed the app to it and the uploaded images Ah, viable that we just created. And that's it. Um, so now the way that we're gonna, um, store that those images is gonna be on a field within the model off the post, and basically what stored is the is the path image. Um, so let's do that s so we're gonna go toe blood models. And so, first of all, we need to import DB and now uploaded images. Um, and on the, um, on the class, uh, on the post under the body we're gonna have on image field and that image is gonna be a DB column. Ah, off type string off. I'm gonna put 255 just in case we might not need as much, but that's probably doesn't make sense. And then on the in it, um, I'm going to add a property. Um, let's see here before this, um, before the and it actually so I'm gonna make it a property off the off this record. So there's a decorator Cold property and property means that it's your kind of like creating one of these, like title body image. You gonna create a new one, but that it's it's calculated, uh, depending on what record your on. So it's a It's a good way to to modify the kind of, like what? But gets returned from the object without having to, Actually, you know, doesn't need to exist where you can make it on the fly And that property we're gonna called image source. So image source is ah, it's a property off this class and what that does It returns the uploaded images. Your l off the records image. Um ah, field. That's only database. So as you can see there, um, there's, um there's gonna be some, like calculations done because it's not gonna just return the, um, just the image record, but it's gonna go through the uploaded images, which is a flask. Uploads. Okay, so that's that. So we need to now do a a migration to to put those things changes on the database. Okay, so let's open the terminal. And when I do python manage happy. Why DB migrate. And, uh, let's see what that looks like. Perfect. So we generated 9 to 7. So it's this file right here. Let's check it out. And, um, right, we're getting a post column image in here, So that's gonna be created. Um, and then post life. See, that's that's kind of like the bug that we're talking about with its author as well, which is like it always things off of bullion. It's kind of like it needs toe modify them again. But again, it's not something that will affect anything. The important thing is this one here, Which is it on image. Um, column is gonna be created, so that looks fine. It's close that, um and so we're gonna do the upgrade to the database. So by phone managed B Y d b Oh, great. Perfect. So everything looks good and Ah, so now we should be able to continue, um, our work and that's now start working on the interviews post.
74. Adding Image Blog Post: Okay, So, um, before we do that, the any view stuff, we're gonna go to the forms because we need to add this to the form. And so the way we're going to do that is the following. Um, we need to add a They line here for file field we're gonna do from flask wtf dot file import file, field and file allowed. And, um, then on the post form we're gonna add, um, before the title, we're gonna have an image which is gonna be a file field, and then it's gonna be, ah, the name of the form. The off the field is gonna be image. And then, validators, we're gonna have the following Ah, file allowed So we can actually filter what types off images we can accept. So we're gonna do J pegs and P and G's for now. Um, and then, um, the air message for for that is gonna be images only. And that's close. That perfect. So we have our post, uh, form with a new image. Um ah, kind of like, ah, field to start, um, getting our our images accepted. So now the last thing we need to do is start working on the on the block views, but let's see what that looks like on the actual form. So now we need toe modify the block form, right? So that it it in the temple actually the post. There you go. So that we kind of like add, does the new the new field for the image? However, there's a small change that we need to do in order for forms to be able to handle images. The according type has to be specified. And that looks like this. You doing encoding type, multipart form data. Now, what that means is that, um usually what HTML does or htp rather is that it? It has a separator. And it says, from this point to this point, you're gonna get, like, normal, Ah, normal fields for data like, you know, the title body category, like text fields. And then there's a separator design actual string that it looks for. And then, from that point on, it's an image, which is kind of like encoded, um so that the server can read it. So that's what that multipart does. So and now we just need to add to this field. Um we need to have a form image being there. Perfect. So let's see if we have any errors. We don't have any air, so let's reload this. And now I have an image. Uh uh, choose file. So if I choose to file here, it'll say, Oh, you know, which. Which image do you want to, like, select? And that we can select any mission there, and then, um, then it will It will be sent along with the post. So let's work on how to receive that actual image on the on the Post, and that is on the block views. So let's go there. One thing that I just realized is that we did this property for the image source, but we did not, actually, um, set up the, um, the image field for the unit for, um, whatchamacallit. They need proper list. So we need to light an image here. And so we're gonna do image equals none. That means that if if it's if I mean I mean an image is not passed. That's fine. We should still have the block post created. So it's an optional an optional thing. So, um, so then after category eso category is is is required. So after category, we're gonna do ourself. That image equals image. So that image is going to be set toe this, Um uh, so this actual, you know, property. And and it's actually this this image field in here, Okay, But when we request image source, that's gonna be the actual you uploaded images or flats Uploads are setting. So OK, now we're ready to start, um, working on the on the actual view. So let's go to the toe, the blogged views, and let's start working on that on the foreign post form. But before we do that, we need to let a couple of things on the top, um, from flask. Ah, we need to add, um, the request object here. And we also need from flats blogged, import uploaded images. Perfect. Um, so now we are going to go in the post section and he formulated on submit. Here is where we're gonna check the image. So the image is sent along with the request. So we say images request that files to get image. That image name is the same image field name that we said on the form. Um And then we're gonna say that there's a file name that it's gonna be set to none. Um, so we're gonna do a try here, so we're gonna try something, and if it doesn't work, then we do a flash message. But, um, so we do file name equals, uploaded images, that safe image. So that images, this image here and what uploaded images gonna try is saving it on the static images folder . And then if it if it if it, um if it's successful, then it'll return that to the family. And if it fails, then we're gonna say flash. Ah, the image. It was not a bloated. Okay. And, um, then finally here on the post, we're gonna pass the following after category, and Ah, so let's, um, mystic that. Okay, so the ticket there's any errors s So far, so good. It was gonna be pretty exciting if we get to get this working. Um, so let me when it was a file. So I have downloaded the flask logo here on from the web. So there you go, and then I'm gonna put the title is image flask logo test. This is our first test with an image. And, um, let me just turn on the console because I want to see if we get any in years categories. Flask, and that should be it. So let's see what happens here. Post. No. No errors were reported, and it looks like it was posted correctly. So if we see an aesthetic images Oh, look at that. We have our flask lower there. That's amazing. So now we have the flask logo on this on the on our static images folder, and I'm gonna check quickly on the database received that that actually went through. So let's see. Show. I want to see if I'm on the right place. Yeah. So Select star from post. Um, and I see already here image Fleiss, local test. And I see Fleiss. PNG. So that must be the the following. And it means that it went through correctly to the to the to the databases. Well, so great job. That's amazing. So now we need to do is we need to display this images on the on the actual articles, so that's gonna be our next, unless it
75. View Image Index Article: Okay, so let's go. And, um, that's closely stops. Uh, think we're filling again with a lot of taps. And, um so that's the first thing I want to see. If I can display is on the actual on the blood index, um, html. And the way I'm gonna do that is I'm going to try to, um, make it so that the, um on the actual post, um, I'm gonna kind of, like, separate into Dave's. One is going to be for the image on the left side and another for the image on the right side. So we're gonna do that is the following. So this stiff, See, we have Steve here, so we're gonna say, Post item and I'm going to call this a row so that, um, bootstrap knows that it's there's a subdivision happening here, so they've class equals col N d nine. So it's gonna be the larger piece of it and soil and that here, and they want to do another Dave class equals call in the three. And that adds up to 12. And I want to say if, um, they're supposed image, then doing image source equals, and here we're gonna use that, um, that image source property that we added on the, um, on the model. And I'm gonna say height equals 60 pixels. So I said they hide to a constant, and when I put it a nice class off image grounded for which is our utility from, uh, crumbled strap. And I think that's it. Perfect. So let's see if we see that, um, in there. Let's go to the toe. The index page. No. And for we, Mason and four block in sexist email. No, I didn't have the ending of the post image. Right. And if there you go, see? Looks good. Um, and the image is very small in there. See what the image source looks like. Ah, it's not printing it. Huge source equals. Let's see here. Oh, I have a type. Its image source. There you go. All right, let's try that one more time and nothing. It what you paid source. Ah, static images. Flask. Okay, so this is it Looks like I'm missing a slash after this. And that could be because of the settings B y. I'm setting the wrong. You're all here, so it looks like we need to add a euro after the this. Ah, this definition. So this time we should be good. Let's see. Reload. And there you go. Finally. Um, so that looks really nice. Um, it's actually, um that's a lot off of character to the to the to the to the home page. But now we don't have the image on the actual block post, so let's fix that. So let's go to the article, ext. Email. And we're gonna add the, um before the post title is to a check if post image and you guys. Now, I understand why I keep doing this ending close in the block because I have a lot of issues sometimes. Like ending the stuff like I forget. So I'm gonna do image source equals. Oops. Um, post image sores. And then I'm going to say height here. I'm gonna put it a little bigger. 300 pixels in class is image around it. Perfect. So that should take care of that. Let's see if we have in years no errors. So now I reload this and I'm getting an error here on the same thing. It's image source. Is it a local wrecked? That's doing that. That's weird. Well, there you go. Ah, it looks a little big. I guess it's because I'm a bigger size. I guess not. So let's put that a little smaller. That's a 150 pixels and see what that looks like. Yeah, that's a little better. You can play with it. Um, but that looks violence. And Ah, so that's it. We have our our, ah, article view with the image and, um, and looks like everything is working perfectly fine. So congratulations is this. Ah, this is a big undertaking. And, Ah, the next thing we're gonna be working on is, um, we're gonna be doing the editing the post, because sometimes you want to, like after you save a nautical, you wanna may be ableto to edit it. So let's see how we do that.
76. Deleting Article: Okay, so now we're gonna do, um, at the functionality off editing or the leading a post. Um, and we're going to see that in the article view. So let's try starting doing that. The first thing I want to go to is the article, um, template. And I'm going to add after the title, um, a little link that says if session not get the author. No, it's author. Sorry, he's offer. Then let me try and go on a trip with the girl for had it post I d equals posted the so I'm gonna pass. So this, um, route, which I haven't created yet a, um they posted the that I already have from the from the post itself. So who have edit here, and then I'm gonna have another one. Yes. Similar to this, which is, um, the league and, um, something that you guys, um, should know the in this day and age, storage is so cheap that it doesn't make sense to actually delete things. What you do is you mark them, and I think I said this in the past. You mark their life, flag or status to be false. So, um, because At the end of the day, when you when you do leave records, you can affect, um, relationships, foreign keys, things of that nature. So it's better that you build your applications. Um, based on Not that he didn't think so, but rather marking them as ah, that's not life. So let's go now and build, um, that functionality for editing, um, on the interviews. So that's what the lead one. First, Because I feel like, um, we can we can see how it's gonna work in general. And then we'll do the, um, the edit one. So for the delete, I'm gonna do the following, So I'm gonna do a nap route the elite and then a post lady and post I D. And I'm gonna have author required for this. You can even hit this if it's if you're not another. So the late is gonna have post I d. We need to have that. So it's not an optional. So what we're gonna do is we're gonna have post equals post query filter. I d equals post I d. First or 44 So if he doesn't find it, then you'll return a 44 If not then it will return the first. So I'm just gonna put post life equals false. And then I'm just gonna do a commit, so that's really simple. Um, And then I'm gonna do flash article deleted and send that back to the toe. The admin. Okay, so that was that was pretty simple. Um, one thing that I want to do before we were kind of like, um um, we can attest. This is I'm gonna, um I'm gonna add something on the admin on the html to kind of, like show the the articles that have been deleted. So, um, let's go to block at me next email. And so I'm gonna say on the list on the post title, Let me add something here that says, if not post life, then let's display in parenthesis deleted and okay, so let's try to see if we works. Um, no. Air is there, so I'm gonna I don't want to let this one causes too pretty. Let's Ah, let the 1st 1 Ah, post I d known. Oh, I got it because we don't have the edit function. Still life. Right? All right. So, um, what can we do here? Let's just take it out, and then then will we'll add it? Let's take that out safe and reload. Okay, So Ah, now we have our delete button here. So it says the lead four. So that should be the four. Now, let me go in the admin 11 2nd And actually, I'm gonna increase the number off, um, off articles because I want to see more articles on that list. So Okay, so this is the one that we're gonna delete. Flask. Really amazing. So I'm gonna go and press, delete and filter Gonna an expected argument. I d ah, Let's filter post query filter by not filter stay ago. So let's try that again. The lead. Perfect. So I get a flash message are to go the leader. And as you can see now, these this last article is being shown us the leader. Okay, So what happens when I go to the index page? Now? I still see that flattered, really amazing article there, so I need to take care of that. And the way we do that is on the index. Um, we're gonna instead off looking for all the articles. I'm just going to say, Get me, Um, get me the articles Which live equals true. Okay, so now if I reload the page, I should not see that last. And there you go. See how that works. So you can daisy change. You can see here. There's a changing first filter by then order by and then paginated. So that's called a sea change. Because it's ah, you can do dots and dots and connect different operations. So that's that's critical. Awesome. So that's working fine on the admin. I see the post and on the life site. I don't see it. So now, um, let's see how we can do the editing part, which is a little bit more work. But he shouldn't be that bad, because we're gonna add back that, um, not a thing. Me that we had here. Where is it? Yeah, here. And save that. And now I'm gonna have the views I'm gonna have edit so that he doesn't complain about it. So I'm proud at it, and then the same thing and post i d. And then also required they're edit post. I Okay, so, um, let's see. We have to We're gonna have to do uh, two methods get imposed, and this is what I'm thinking. So you guys know what? Um, kind of like getting at to edit a an article. I could, um, basically, um, if you read an article, it means that if you click here and you Oh, well, when you click there and you see the article rendered, um, if you could click at it, it should take you to a kind of like a form like this one, right? But with the values off, it filled out in here, however, I don't want it again. The dry principal, right. You don't want to be doing these two forms and creating a new post form and an edit form and maintaining those two. And then if you add a new field, then you need to add it on the to form. So that's that's kind of like not very scalable. And, um, and also not only scalable, but it's just against, like, really nice development. So what we're gonna do is that we're gonna actually use the same form that we have for for the article, this one, the post form. But we're gonna replace it with the values off the article if you're editing it and you're gonna, um, see them empty if you're creating a new a new a new article on the way they were gonna tell the system, which one of the tool use case we're gonna use is bypassing something called an action. So the action is at it, then the form kind of like renders the using the same form. It renders the content. And if not, it's gonna be action equals new. And that means that it's a brand new article. So let's do that in here. So first we need to fetch the post. So opposed query filter by. I d equals post. I d dot first or for four. Then look at this. We're gonna use the form the post form the same form. But look at this. We can do object equals. Post object is kind of like a building thing that form half. And what you're saying here is, like, just a sign. All the fields on the form toe the proper things that you're getting from the database off this post, they supposes this one here. So that's pretty useful stuff, um, and very powerful. And so there's the formal a form validate. But we're gonna skip that. So you see what that looks like? It's when it will return. Render template. Um, the log postage females Yet that we're using the same tempted there form equals form, and then post equals post. And finally, action equals at it and see how we're passing the posting there. Um, so let's let's see if that works. Let me go to the toe on Arctic article here. I see edit. Look at that. So I have preloaded the the the title, the content, the category one thing that I'm I don't remember if we need to pass the post. Um, what does that look like here? Its form image? I'm not sure. Oh, I know why we haven't seen that yet. Um, so the one thing is that you see how the image here is like, um, kind of like, renders it was a new image. But what happens when I do have an image? If I had it, see that there's no flask. All the flats logo is not there. It's kind of like, hard to tell. So what I'm actually doing, he's I'm actually gonna change the form so that the images pary rendered. So let's see what that looks like
77. Editing Articles: So let's do some changes on the, um, on the block post. Um, former, um and this is what we're gonna do. So remember, we have this action equals Neil. So I'm gonna say if action equals new, then do the following print New block post, um, bills print, um, edit Black Post. So we know for sure that's what we're doing and then and this. And, um, we also need to change where that sent. Okay. So midst copy and paste there. So if the block pose, if the action is new, then you're sending toe post. Okay, But if you're editing, I actually want you to send it back to me, to the edit and with the post ideas. So see, that's the first post data that we need to grab from from that post. That's where we're passing post. So that to that template, supposed I d equals post, I think and And Okay, and, uh, let's put this in here. Perfect. And the final thing is, well, not the final. So we have two things. One is the image, right? So we want to render the image if there's an image so that user can see So I'm gonna say if Post is being passed and post image is ex president, so why do I do post and post image versus just if post that image? Well, the thing that the problem is that if Post it's not being passed, um, poster image is gonna give me ah, it's gonna go, like not this is an error. I can't deal with this. But python has this this very interesting thing with ifs, which is that if the first, um, expression is false, then he doesn't even evaluate the rest. And you can get out of there. So that's something very useful for you guys to have. And remember that, Um, So if you want to have something that you want to see, like, oh, does this object have some property in it? But you're not sure if the if the objects gonna be available in the first place, you can do this little trick if post it's not fast and it goes out and he doesn't throwing error and then he checks. If they're supposed and he has opposed image, then let's render the image. So that's that. And so we're gonna render the image here so that the user can see what image originally it has. And if he wants to change it so image sources fuss post a merge source. I hope I spelled that one right. I've had it with that air in there. I thought it was AutoCorrect. For some reason, class equals image around it. But what? You haven't seen the image for under yet? Because we had a white background there. But it's if we can find another nicer image. Okay? Almost done. The last thing is this submit. I want toe this being a little picky, but I want to ah, say if the action is new then, um, do display the button Toby Post. And otherwise, I wanted to display at it, and some people might say that's not necessary. Um, little things go far. Okay, That's it. That's it for the form. Let's see what it looks like. So if I reload here Ah, and the friends of God equals this is one of those where you have to just look at the whole thing. Um, what's the template? Method? Post action equals. Let's see here, euro 40 I see. There you go. I was I wasn't closing that properly, so that okay, Perfect. So now I have the image, um, so that I can see what it looks like. It's a little close to the thing, but whatever we have the title, the content of category hold that works. Fine. Let's see the view source. Oh, so hold on. So added lock poster. You see how it now the title says that about bowls, and it says update instead off post. And let's see the source to see from the ideas They're Yep. So opposed eyes where it's gonna be sent with the posted the equals two A. Perfect, um, posted the equals to eight. That's interesting. I was expecting this to be, um, just, uh at it and then the post i d. But since I'm not I'm not actually like doing anything with it. I'm assuming the Europe for its He's doing it properly. What? We'll see what happens. Okay, so now let's do the actual, um, work off, um, off getting the post and, um um on editing it. Okay, so let's start the process. So, um, I'm going to say if form don't validate on submit passes, they want to say the original image is the post image. It's the is what I have on the post. Um, from the beginning, and then I'm going to say, um so I need to do this form, populate object from post. So what's What's that? Um what does that do? So basically, it loads the post This post object that we had initially there it replaces it with the contents off the form. And now post has been modified to whatever you enter on the on the form I D i e If you only change the title, for example, the new Post doc title is gonna be what every put on the form. But the rest of the information is gonna be kept the same again. One line off. Powerful stuff. You normally have to do a lot of checks. It's it's you have no idea. It's very messing, but this is super elegant. Um, so we're going to try to see if form image has filed. That means that the user did they'd sent a new image. Then I'm gonna do request that files. Uh, don't get oh, image, which is being said on the multi part. Right? And then I'm gonna try saving it. So file name You should You should have seen this before, right? Uploaded images, ah dot save image. And then if there's an exception and, uh, flash the image waas not upload, okay? And finally, if I have the full name, then post the image equals two founding. Perfect. So I need to also check, but wait. Um, so But if if the user didn't change the image, then the post image is equal to the original image. And, um, we need to do that because the ah, the post image is, um it's probably gonna be wiped since you didn't put a form image in there. And it's kind of like So what's the What's the expected thing? If you didn't choose a file image here and you update, I was thinking OK, so then it means that you wanted toe delete it, right? But I don't feel comfortable that I think that it should keep the same image. It's up to you If you want. I like, just delete it. If if the user didn't send something here, or you might also, like, have on an actual link in there or toggle like Brady about in the says the image. I don't know, Um, there's many ways to do this, But what I chose to do was, if you didn't choose a file that didn't mean that I wanted to delete that image. I just It means that to just stay with the same image. So that's what this line is. Okay, um, So I'm now going to check if if new categories there, because that means that the user wants to change the category and he wants to change it with something new, like he actually type the new one. So after the some management there, so category is formed new category data, and I'm gonna session at that, and I'm going to flush so that I get the the category object. And, um, I'm gonna set the category in the post category to the new category. Okay? And now I'm finally to send this whole thing to the database. Okay? And return. Redirect euro for article slog equals post slug. Perfect. So lots of stuff. Still not as complicated as it was before two ended something, but yeah, it's there some some checks that you need to do, especially when we have images, it gets a little more tricky. But, um so let's see, this whole thing works. And before we forget, um, we need to pass. Action equals new in this thing here because, um, we're now expecting that. So this is on the this is on the on the post on the original, like, post function. Right? So let's play with it a little bit. Let's see if that works. Um, so why don't we start by posting something new? See that that works. So we should have a post linking there. So, um, I'm not gonna stolen images. Just going to say this is, um, the article to end it. This article, it's meant to be tested with edit. Functional. It's work up. Catherine de Python posed. Okay. Perfect. So it looks good. This is a regal to read it to go to the admin. Um, it says the image was not uploaded, I guess because there was no image. That's a bug. Okay, but let's try to edit this in this article. So I go to edit, I get these there, go at it, so I'm gonna add it. What should I add it here with every functionally this worked perfectly fine. So that line I'm adding to the content. And I'm not changing the category or the title. I want to update. Okay, we did an insert. That's interesting. Um, okay, so why is it doing an insert? Center is instead of an update, I must have tied something wrong. Let's check. Okay. I seen I see what? What this waas It was because on the form for the post, it's not saying into the post, it should be sent to the air. It So that was just basically sending the whole form to the, um to the whatchamacallit, the post function. So that should fix that. So you're oh, for edit If it's, ah, if it's action equals added on the new if it's okay, so let's try that again, Actually. Have to reload this. So let's see. Edit. This should be updated. Um, and let's check the source just in case. See where it's gonna be sent. Edit nine. Perfect. Okay, so update perfect. So that worked. So this is working perfectly fine. So let's do the very hard one, which is editing the this one with a logo test. And, uh so let's just another file. So I have these, um, the spice on logo here. So it's the Lector there. Um, and let's try image five phone logs. I'm changing the image and the title. Ah, so it's gonna be it's gonna be quite a change. So let's update that. Yes, that's awesome. I wasn't expecting that. I was trying to Toby. Ah, self assured, but no, it looks it looks good. So now we have the, um, the ah, the Python local here, and, um and it changed the titles. Well, so that's working perfectly fine. And this amazing. We've done a lot. Um, and the next section is gonna be about testing, which is super important, So we'll see you there.
78. Introduction to Unit Testing: Okay, so we're here at the last ah section of the course, and it's about a very important part. Off off. Ah, your career as a Web developer is to create good tests, and testing is a kind of like the skill that you learn almost usually the last. But it's actually, um, after you learn how to test, you're probably gonna do what's called test driven development. Um, so you're gonna actually be writing tests asked. You write your code because that's how important having your your programs tested your applications test that us us to build them. So there are some basic concepts that, um, that ah, that are applicable for testing that I'm gonna share with you. But basically, there's a There's a saying, Ah, that I think it's very true, which is something that is untested is broken. So if you write code and you're you don't write a test for it, you're basically looking Oh, are setting yourself up for like, failure. Um, and it's because testing is so important. Um, some of the top concepts in testing, um, I would say the number one is don't test things that are external to your application For example, don't test the Eva session is set because that's something that you're not writing. The session setting piece of the code that's built in flask and flax flask has its own tests to test for that. So you should always concentrate on test testing things that are, um, basically that relate to the code of your writing. The second thing is, try to write tests that cover all possible uses, including edge cases. So you have to be very creative and kind of, like, come up with, you know, strange things that the user might do. How does your application react to it? So, for example, um, on the registration form sent a string that has, you know, 1500 characters for the email. Does that, um does that kind of, like break the application or not? That kind of thing? Um, the third thing is to check for the 12 and scenarios. So, for example, if you have an a p I that receives multiple entries and you test, you know, passing one item in that coal, then test with four and and then, um you know that the item the third item on that list is completely complete garbage. So try to always test with, ah, you know, kind of like setting the the scenarios where there's multiple use cases for that for that piece of the of the application. Um, so that's that's pretty much it. Um, you'll get the hang of it and you'll get better a testing. Ah, the mortar. You do it. So let's try and putting together some testing for our Fleiss block. So, um, the first thing we're gonna two ways we're gonna create a, um, a file cold tests. And this is usually, um, where you're going to write all the tests. Um, within that, um, that file. So let's create that file in the on the flash block level, and we're gonna call this tests be why? And for for testing, we usually use a python lyrical unit test. So we're gonna use that a swell, even though, like some other frameworks like, ah, Django has its own testing Sweet. But it's actually I believe it's an extension of unit tests. But for flats because he doesn't have a built in testing sweet, we're gonna use pythons, which is a really, really good library. So let's start um, setting that fell up. The first thing is, we need to set the path just as we did with the with the e nippy y. And, um, so let me see if I can actually, um Oh, it's in the mandatory. Why, correct? So I'm gonna just copy and paste this because we need the same kind of like setting the path for the, um, for this file so that it knows that its where it's at and what's the relative directory. So we're gonna import unit test. Um, we don't need to install any packages for this. We also import sequel alchemy, and, um and we're gonna import the flask sequel Alchemy. Um, library. Okay, um then from the flask blawg, we're going to import the AP and the DB so So far, so good. Um, we need to import all the models. Um, so let's do that from author models, Import star and from Blawg models, Imports star. So we're gonna, um we're gonna go and start looking at what? The The format off testing its and and usually use a class in that class. Um, it depends on what you're testing, but in this case, we're gonna do? Um, mostly, um, block testing. Ah, for the for the user side, even though we're gonna do some some blawg, uh, testing. That's well, but they just group all in one class, and you can you can do multiple classes as well. But let's do that with you, sir. Test. So we're gonna call the user test, and that has to be a an instance off test case, which is within, um, unit test. Um, the first thing we're gonna do is we're gonna have a set up and a tear down, set up and tear down our are basically, um, kind of, like, sections off the off this class that are always called at the beginning and at the end off each test, um, and basically set up will involve Rob. Kind of like creating a temporary that a vase. So we don't actually use the production that I base for the that evades the main that I based. We kind of creating a new ultra, it one so that we can, um so we can create and destroy that that I base as a test. Kind of like happens, So let's see how we do that we're gonna to, um We're going to set up the your eye for that. And, um, so I'm gonna do more or less the same thing that I did with the setting. Three. Why, Um, which is, ah, important. The user name, the password, the TV host and this string. So let's, um it's through this. So we're gonna call this the So we're gonna have, um let's call this baby. Use her name equals, and we're gonna We can read the config. This, um, this value off the B user name within the app dot com fig ah, array. So now we're who have BB. Ah, password. And we're gonna have the host. So all these three values, as you can see, are here. Ah, devious name to be password and TV host. We don't need the blawg database name because we're gonna create our own kind of, like test, um, database or blogging database. So now we're gonna pass the those fireballs in here They'd be used her name the B password and TV host. No. Okay. And we're gonna take this out, and we're actually, um, we're not gonna pass the database naming here. Okay, so now Let's set up the, um, well, we have to come fear some some settings related to testing, and one of those is called ah Testing. And we have to pass that as true. And this tells flask automatically flask and read that testing flag and and know that it's it's running under a, um, a testing mode. And that kind of like turns off some some of the checking and and you can read more about it. Um, online, But it's basically like it tells the application that it's gonna Winston she ate that It's a testing sweet and order. A real application I think we need to do is turn off CSR f for WTF because we're going to simulate kind of like it's the people's, but we don't want to check that. The that the CSR f talking is a nail because that is only enable when, when, when you're actually doing this through a browser. So we want to put that said to falls. So now let's say, Ah, we're going to call the database name to be, um, Test Blawg instead of Blawg and ah, finally, we're gonna pass that config two. The sequel Alchemy, that I base your I and that's the DVU right that we have on the top plus up config Log that obviously. Okay, so so far, so good. Now we need to create an engine, which is basically a kind of like a sequel. Alchemy instance. Now we can talk to Do you be you are I. And then we connect with that engine and we execute a commit so that if there's anything on the on the session that's kind of like Aisling, it gets cleared out, and then we're gonna do a create that a vase with that blood database name. Finally, we do a create also that it all the tables are created and we closed the connection. So that's kind of like creating the database, um, programmatically for us. And finally, he's Here's where we Instead, she did the app, and it's gonna be called us a test client, So I know it's a lot off stuff that is kind of weird, but you'll get the hang of it. This is Do you always have to do this so you can, like, copy and paste all that and use it every time without any any problems? Um, and that's always gonna be kind of like a similar pattern for for testing. Okay, so now we're gonna do the, um, the tear down, which is basically the opposite off set up. It's bringing down the database and closing the connection, and this will actually remove for the lead at that airbase completely. So at the end, it's like nothing happened. So we're going to start with Devi session, remove, and then we're gonna create an engine that we did. Uh um previously. And it's basically the same comments like this one, and so we're gonna do a connection equals engine Connect, and we're gonna execute a comment. And, uh, we're gonna drop the database, so and finally we close the connection. Perfect. So far, so good. Um, so now let's start creating the, um the actual testing and the first test we're gonna do is is creating the creating a blawg and checking that it's ah, it's created properly
79. Create Blog Test: Okay, so I'm going to, um, create a function for create blawg, and basically, I'm going to do it as a function initially or from the beginning, because I'm gonna have to in each test, I'm gonna have to create the block. Now, in every test that you run, it's going to kind of go through the set up, tear down, and basically, you're gonna kind of, like, created at a base and destroy the database every single time. Why? Because each test is basically kind of like your testing some other or a different part of the application. So you want toe start from a clean slate, um, and creating the block. It's basically like you need to do that every single time. So I'm gonna separated assess its own kind of like internal function that I can call from this different tests. So let's do that. And something that you'll see very interested in here is like we're going to simulate as if we were kind of like posting to a part of the application. And the way you do that is through the internal testing mechanism or system you can simulate, get and post http request so take it out as we write this. So we're gonna basically great block is going to return. Ah, an app post to the set up and and see here how we have set up as it's kind of like a your l um so that's actually going to, like, hit that slash set up to simulate the creation of the off the block. Now, one thing that you might ask. And I'm just fearing this out as as I'm typing this, why not use your l four? And actually, that's a very kind of, like, interesting thing. I had not thought about that. So, um, let's just do it with set up. Let's replace that with the girl for set up and see that that works. But But in any case here, then you pass us a dictionary. The things that you need to post to set up to create the database and those things are name , um, my test blawg. And then you have a full name, and I'm gonna use ah, Jorge Escobar and email. Um, use her name, password and confirm, which is the confirmation password, where we have to enter the password twice. And, um then I'm gonna pass this this flag cold. Um, fall over. Redirects equals true. Now, if if you don't pass this, then it's gonna hit that, um, basically that, um, that entry point or that your your l route, But it's not gonna follow whatever if there's a return redirect or something. So we want to actually follow those those things. So, um, so we actually want to one toe kind of, like follow, because we're gonna probably we're gonna, like, capture or or test whatever we got from from that, um, from that post. So that's that, Um so now we're gonna actually create our first our first. That's test. So let's see how we do that. Okay, so the first test is gonna be called test on the score. Create block something very important here. Tests always e start with test, underscore something, and that's the way that you're telling the unit test. Um ah. System that this is this is actually a test that you're going to be running and you'll see that all that the test that were right, um are going to start with tests on the score. As you notice. Create blood doesn't start with test. So that's not gonna be Rhone automatically by the test suite. Um, and that's why we kind of, like, create this this helper function without the test on the score of the beginning. So what we're gonna do is we're gonna capture asked the return value RV off that function self create blood, and, um, so the basis or they know the kind of like the core off each test is asserting that that you've got specific value or a specific string or a Pacific, um, data within within that that operation that you're doing. So in this case, I'm gonna assert that blawg created was returned in the A string off this RV data. So Ivory Data is gonna store the data off that extra p like result. And because we're doing follow real Rex equals true. That means that the data that that this this all this post that we're doing has blocked, created, and how do I know that are gonna have blood created in that, um, in that return? Well, if we see the views B y of the blawg on set up. So we're set up. Um, You see, the flash book created here But after the redirect, it redirects toe the admin right in the admin. There's a flash. So let's double check that. Um Ah. See, we have the flash guests get messages here that blood create is gonna be on the admin, Um, for after the blood is created. So that that's gonna work if the if the if the test runs properly. Okay. Um, So finally, before we run this, we need to sort of like, ah, manage the why or the, um, the unity. Why would that we had in the past? We need to check if name equals main, which is kind of like OK, if this is being run by the in the terminal, then run unit tests dot main, and this is basically unit. This main is going to call, um, the first test that it finds, which is gonna be create block. But before it runs, that is when I, like, created that I base the whole database, this set up thing, then it's gonna test the creation of the blawg is gonna assert that the RV data that's return on blood created is facing there, and then it's going to go through tear down which is actually the living the database. So let's see how how that works when we when we run. Okay, So we're gonna now run the taste, the test, and we're gonna do it through the terminal, so make sure they have your vehicle environment is set up and turned on. And that year in the in the root, um, off the application. Um, So let's clear the screen and ah, it's a okay. And we're gonna test this. So python tests P Y you cannot import sequel alchemy. No sequel. Very good sequel. Alchemy. That was a tough one to to catch. Okay, so let's try that again. Clear and then by phone. That's b y can not connected. Name or service? Not known. Okay, it looks like our database is not running. Ah, Control. C c No, it looks what it iss kind of. I think Serious. Serious. Here. Test blawg. I guess we're missing a uh yeah, we're missing a, uh, a slash. Okay, So let's see here self to be Oh, I'm missing a trailing, slashing their could Cool. So let's clear and run the test again that I'm a sexist. Oh, Okay. So now that that always exists. So we need to drop it before we we can do it again because it kind of like it looks like it created. So if we do show data basis, Yeah, I see tests blocking there. So let's drop the database test on the score. Blogged. Okay. And let's try one more time. Fail blood cleared it. Okay, so that's an assertion, Eri, which is good. It means that now the whole process is running. If you see that, that a basis here, you'll see that test block is not in there. That means that it was created, and then he was banished or dropped, as we have on the script. But it says that block created it's not on the on the return stream, and we need to figure that out. So one trick that I do is I actually print the RV data to see what what that looks like. And, um, and then we can kind of, like, check what the output of that function is. So let's run it again and actually gonna maximize this mixing parent up, um, using python to Okay, it is 434 billion. Uh huh. So that means that somehow we're checking that, um that the user has No, um, it's no, it's not setting the east author, um, setting. So let's see here. So if I go to admit it says author required, but when I set up, see here, blow created s so I guess I'm not logging in, So it's sending me to the admin. What? I haven't looked in yet. So this is the kind of things that you're gonna discover when you're doing your testing. Um, so let's see, how can we do this? So as I thought, more about this when I'm going to do it actually makes more sense, is after the bloggers created to send the user to the index page and then display the the user or the blood created string in there. So But in order for me to do that, um, I'm going to I'm going to need to display flashed messages in here and the other the only place where half flash messages right now is on the admin. HTML. So what I'm going to do is I'm gonna convert this to a to be a, um, a macro, and then I can start it anywhere I need to. So I'm gonna caught this and create a new, uh, new filing template, and I'm gonna call it on the score flash messages dot html and within flash messages. I'm gonna have that snippet off code. So, um, gonna save this. And then So I'm gonna in here. I'm gonna have, um, basically insert the, um, the flash messages. So percent, um, include flash messages, door html. And then when they do the same on the index page, um, that's toyed. Here. Oops. There you go. So now let's see if that also the last thing is not Then when I create the blogger, I'm not going to send them to admin. I'm going to send it to the index page, and then they'll have a logging link on that page, so that should work. So let's try one more time and run the test. Okay. Awesome. So see, and now have the This is the age steamer Let I get and I'm looking at it and it says, Ah, class messages. Blood created. This is a string that we we returned. So what? Instead of, um, I don't want to see all that old kind of like, um, html data. I'm just gonna, like, suppress this so that you see how it looks and it's clear the screen and run the test again . Perfect. So when you see a little dot, it means that that ran that test, and it says Run one test. Okay, so these are first test and it passed, so let's continue building on top of this.
80. User Tests: Okay, So now let's write our our next test. I'm gonna leave that Toby just that, that single thing and I'm going to start testing, logging and log out. So this is our next test, and I'm going to do the following first. I want to do create blawg because I need to create the block every single time. And and now I'm going to do a logging right. So I'm gonna do self log in also what I need to create this dysfunction. So I'm gonna create another function helper function, because I'm gonna have to log in pretty often and log out as well. So I'm gonna create those, like, helper functions. So let there flogging is gonna have We're gonna pass a user name and password, and I'm going to return the post off slash low again, which is a data dictionary off. Um, use her name equals user name and password equals password and then, ah, like with it before follow redirects equals true. Okay. And then the same thing. I'm gonna have a local function because I'm gonna probably be calling this a lot. And this one is just gonna have, you know, parameters and I'm just gonna return. Self. Um, I missed an app here. Self app post, actually get I can do just to get because I don't need to send any parameters. And for the redirects equals true. Perfect. So now, um, let's try self log in with, um, Jorge and test, which is the yusor that we have created here on the on the create blogged. And we're gonna assert that the string you, sir Jorge, locked in because that's what we show on the when That when that is executed. So let's try that out. Assert I'm not getting user Jorge, Look. Okay. Why? So let's see here. Um, it should be running the logging function in here. No, I'm actually not returning. I'm not doing a flash message when I when I log in Ah, to right. So let's do a flash measure when the when the user locks in properly. So I'll do that in here. Flash you, sir. Percent s locked in, and I'm gonna do that with ah, form user name. They and, um that should send this to the index space where we have the flash messages in there. So let's try that flash is not defined or we don't have flash in here. So from flask import flash. Okay, so one more time. Perfect. Tonight's it's working correctly, so you can see It's kind of like we're, um, making sure that, um that there's some sort of signal in the in the on the feedback off that off that operation. In this case, we're using flash messages, and we should we should always be testing and communicating to the user. What? What just happened? But of course, you can test all things within the RV data that allows you to, um to get the signal that that that function is working properly. So let's try another one. We're gonna test the log out, and we're gonna we just do yourself look out and we're in assert that user looked out, is in the data. And like the only India all their case, we need to send that flash message when we look out in here. So look out. Flash User looked out. So let's say this Perfect. So say it says rentals that two tests, um, basically, each each test is it's each one of these. So there's this test number one, and this test number two. It doesn't matter how much like subtypes were doing in each one of them. Um, So Okay, we're trying for the good things, like things that are gonna not fail. But let's try something that would fail. For example, um, the wrong use and even password. So let's let's see how we do that. So we're gonna do a itself looking with the user name Jorge and the wrong password. Um and then we're gonna assert that we get this string here. Ah, in cord user name and password. So let's try doing that. Perfect. So you can see we're kind of like, slowly building all the things that we kind of wrote and testing that that they work on. The beautif, they say, is that every time you continue building your application, you're gonna be building a new test for those things that you're building. And you can be sure that your application is not gonna break. And that's like a great a great feeling to have, because that means your application is strong and and you're not gonna have any any problems whatsoever.
81. Final Project: congratulations on completing the course. This is Ah, there's been quite a ride. Um, you've learned from from scratch the python language and, ah, you know, software patterns like the decorator and the NBC. Um, and you've actually built a pretty, um, complex application the way that our professional web developer would. So, you know, definitely. You should feel proud off yourselves. And it's ah, it's a great feeling to start learning about all this. And of course, this is just like the beginning. You should continue trying things, sound building applications, and I definitely feel free to share them with me. I'll Ah, look forward to your creations. Um, as a final test final project, I like to give my students, And if you don't, the other courses that I that I do I always have this final test or final project That kind of like tests your your knowledge and see how you were able to get all the, um all the learnings that that that this this curse has. And what I wanted to do is using, um, basically the for the same kind of format within, um ah, the blogged to be able to do comments on each on each block post. So remember how we had this registration function on the on the user views, Um, where we didn't really do anything with it. But I want you to be kind of like, allow a user to register and then be able to post comments on each on each block post. And, um and that would be the final project. Complete that. I want you to write tests for it as well, and then, ah, share with with all the all the course and all the students in here, um, on a git repository so that we can take a look. I'll take a look. I'll download the code and run it on my machine. And if it's good, then I'll do it. Kind of like a public recognition off that. And I'm also going to like the offering, um, very discounted coupons toe my next course, Um ah. My courses on python and other, um, another, like front end and and, uh, and other things that I have in mind. So Ah, definitely. I want you to take this challenge and show us what you can do with, uh, with what you learned so far. So awesome job. And, um, hopefully, I'll see you soon in in my next course
 Jorge Escobar, Technologist, entrepreneur and open source fanatic