Transcripts
1. Introduction: If you love illustration, travel, vintage design
and digital art, stick around because
I'm gonna be teaching you how to make super cool vintage style
postcards in procreate. In this class, we'll
be starting with the destination of your
choice and creating a one-of-a-kind illustrated
postcard complete with both 3D lettering and
as a deterrent effect. This is a great way
to pay homage to your hometown or favorite travel destination
or fictional location. You can use what you learn
to create postcards. You can mail, self or sell to local shops and create travel posters to make
announcements like a wedding, save the date, holiday
card. So much more. The application for
the skills that you learn here are near endless. Plus you can use the
techniques from this class and so many other ways
beyond postcards. I'm Lisa Bardot and illustration
artist and teacher. I've taught millions
of people around the world how to find
their creativity. You're drawing on the iPad. I love teaching people about the physical things that you
can make using digital art. I've taught people how to make
stickers, greeting cards, coloring pages, repeating patterns you
could print on fabric, goods, just to name a few. In this class, you'll
learn a lot about manipulating text and drawing and illustration in Procreate. You'll learn how to find fonts and import
them to procreate, how to warp and distort texts. And you'll also learn how to
do several texts effects, including rounded
corners, outlines, 3D block shadows,
and inner strokes. I'll walk you through
researching a location or topic. Ideation, sketching, layout, and entire illustration process from a rough sketch to
a final rendered, will discuss how to
print your artwork, including setting up
Ready procreate file and printing at home
versus their printer. You will also pick up a ton of new knowledge about
using Procreate. As I walk you through my
complete illustration process of creating this postcard design from start to finish
in real-time with plenty of procreate tips
and tricks along the way. For this class, we'll be using an iPad and the app Procreate. So it's great if you already have some knowledge about
how to use Procreate. But I will be explaining every step along the way
so that you can learn, no matter your skill level, whether you're a beginner
or an advanced artist, you'll be able to create something that you're
going to learn. As a student of this glass, you receive a resource
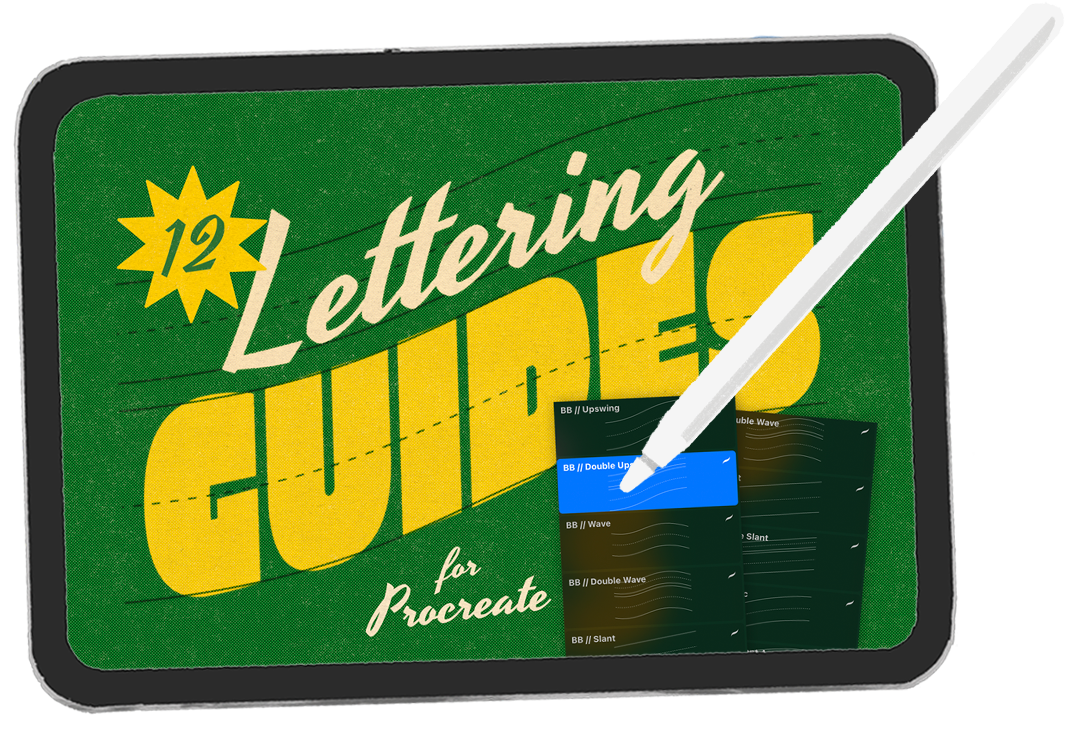
pack full of goodies I made that will help you make postcards quickly and easily. This resource pack includes
a customer procreate brush set with 12 lettering guides for postcard back designs
you can use for your finished postcard and to procreate files containing
print at home templates. So you can print your postcards
on your home printer. Plus, I'll let you
know how to get one of the premium procreate brushes that I'll be using
this off for free. So if you're ready to explore some travel destinations
while making a project, there'll be proud of your
iPad and let's begin. Postcards.
2. Class Project: Your project for this
class is going to be to create your own custom
postcard design. You'll start by choosing a
destination or location. And I will give you some ideas
for what you can choose. And then you're going
to do some research on that place and come up
with some sketches and some ideas for some of the things that you can incorporate into
the illustration. And then you're going to
create what's going to be the star of your
postcard design, which is going to be some bold lettering with
lots of fun text effects. And I'll walk you through
how to do all of that. And then you'll finish
it all up by designing a background for the
front of your postcard. So when you're all done
making your postcard design, head to the Projects tab of the Skillshare page and create a project so we can
see what you've made. Don't forget that or about
your process as well. You can talk about
the destination that you chose and
why you selected. You can share about
the research process. You could share
your sketches and just anything else
about your process that might help others learn and might help you reflect
on the experience. I cannot wait to see
your postcard design.
3. Giveaway!: To celebrate the launch of
this class on Skillshare, I'm doing a big giveaway. I'm gonna be giving
away my master bundle, which is my complete collection
of Procreate brushes. It's 332 brushes, 15 sets, and it also includes my magic
paper texture campuses. To enter the giveaway, all you have to do is posterior project
that you've made in this class to the Projects tab. By June 24th, I'll
pick one student at random and I will post you it
is in the class discussion. Good luck and thanks
for being here. I cannot wait to
see your projects.
4. Tools & Materials: Before we get started,
let's talk about some of the things that you'll need
as a student of this class. I'll talk to you about
the resource pack, how to get it, what's inside, and also talk to
you about fonts, how to find them, how to download them, and how to install them
into Procreate. Let's go for this class. We're going to be using an
iPad and the app Procreate. I am currently using
procreate 5.2.6. So if things look a little
bit different for you, you might have a
different version. And I'll also be using
an Apple pencil. The other thing
that you'll need is the resource pack
for this class. You can find a link
to download that on the project and
resources tab. Once you download the
resource pack file, you're going to find it
in your downloads folder. So if you go into your files app and go to downloads,
you'll find it here. It's called a postcard
class resources, and it's a zip file,
so you just have to tap it to decompress it. And then you can open it up. And inside we've
got a brush set. We've got a folder with
some postcard backs, which we'll talk about
a little bit later. And then we have these
print at home templates. So before we get
started in this class, you want to install the brush set and all you
have to do for that is to tap it and it's automatically going to
import into procreate. So if you go to your brushes, you can see here on the
list of brush sets, I've got one called
lettering guides. And in here I have 12 different
lettering guides with different kind of letter
lettering shapes, lots of wavy and slant, D and arc and all
that kinda stuff. And there's actually a double
version for each of them. So there's one for one
line of texts and then there's another 14 or
two lines of text. So we'll get into how to
use those in a little bit. The other thing you'll probably want is some fonts that are going to work well
with these designs. So there's places to get fonts, all of the Internet, lots of
really great free options. One resource that I like
to use is Google Fonts. And I'm actually going
to be using a couple of Google fonts in the designs
that I'm going to show you. So let me show you how to
import fonts into procreate. So here we got fonts.google.com. These are all free to
use fonts that you can download and pop into
Procreate real quick. So one of the fonts that
I know is going to work really well is called Erica. I'm just going to
search for that and it's called actually Erica one. So there is the
font that I want. I'm gonna go ahead
and tap on it. And then I'm going to
tap here where it says download family and
then choose download. And as you can see, this is where my downloads
are going to be. I'm going to open that up and I'm going to tap on Eric one. It's gonna go to my
downloads folder. I will tap it to open it up, open that new folder. And then here is the file. So you can try
tapping the font file and it might automatically
import into procreate. But if that doesn't
work, there's another way that you can do it. You're going to drag
out the font file and then go here where
it says on my iPad, you're going to find
the procreate folder and you're going to drop it
into the folder called Fonts. So if you have a lot
of fonts to import, That's a great way to kinda just drag them and install
them all at once. So here's how to find
a few more fonts that will work really well for
this type of project, we are looking for
fonts that are really big and bold and thick. So you can go here where
it says font properties. And you can check the box for
thickness and then you can pull the slider all
the way over and you can sort by thickness. So there's Erik one. I can go down a little bit
to get some other options. Another font is the limb web. I think I also
downloaded candidate, but a lot of these
fonts that are big and thick will work
really, really well. Paschen one is another one
that you can download, and then other types
of fonts that we might need for the
greetings from part or any other texts
that you might want are some like retro style
kind of script fonts. One font that works really
well is called Damien, and here's a preview of that. And another font is called yesteryear in here,
a preview of that. Okay, if you have
everything you need, let's go ahead and get started.
5. Inspiration & Examples: The design style we're
trying to create in this class is inspired by vintage travel postcards
from the 1930s, 40s and 50s. One of the main characteristics
of this style is big, bold letters that
are filled with illustrations, graphics,
or photography. The name of the destination
was usually done in a 3D block letter style. And it usually says something
like greetings from, or it had a state motto or
something about that location. And often the backgrounds were filled with
more illustration. To get you inspired,
I've created a Pinterest board full of examples of this type of
vintage style postcard design. You can find a link to
the Pinterest board on the Projects and
Resources page, you'll find lots of
examples of this style of postcard that were
popular in the 1930s, 40s and 50s, as well as some contemporary
versions of this design. So take some time
now to look through the board and get inspired. And if you're ever feeling
stuck during this process, refer back to it
to get some ideas.
6. Choosing your Destination: So before you can get
to drawing anything, you'll first need to decide what destination or location you'd like to use
for your postcard. Now, there are a
lot of different approaches that you can take when it comes to
choosing a destination. So of course, you could
go with the obvious and choose a travel destination. And some ideas for that. Our cities, states, countries, national parks, amusement parks, landmarks and other
tourist attractions, natural wonders, specific
regions, bodies of water. The possibilities are endless. There are so many different location-based options
that you could choose. In fact, if you're
going on a trip, you can make sketches of all the things that
you see along the way. And then use those
sketches to create a wonderful piece of artwork
to commemorate your trip. Another option is to create a postcard that's dedicated to your hometown or the city that you're living in currently, I think it would be such
a cool way to pay tribute to a place that
you're very familiar with and maybe share some of the lesser known features of that place by creating
a postcard of it. The destination you
choose for your postcard doesn't have to be one
that exists in real life. You could choose a fantasy
or a fictional location. So some ideas for that are the Emerald City,
Never Land, Hogwarts, Jurassic Park, Springfield
from The Simpsons, monstrous Dulles Hill Valley. You could literally just
pick your favorite movie, show or video game and it
create a postcard from that. And that'll be a
great way to create some fan art of
something you love. What have you created
a postcard that wasn't about a location at all? You could create
one that's about a state of mind or
an emotional state. Artist, Lisa Angler has a really great series of
postcards that she made. And they're all about
being an introvert and imposter syndrome and
they're really, really awesome. You can also use this project to create sort of a self portrait. You could let her
your name and then incorporate into the
illustration some of your favorite things or stuff from your life
or family members, or picture of yourself. And I think that'll
be really fun to. Another idea is to use this
technique to create sort of a family card or something
that could be a holiday card. And I actually have a lesson at the end of the course where I'll walk you through doing something like that
with photography. And then one more idea, kinda
going back to the locations is what if it wasn't like
a far-off destination, but it was something
really personal. Like it could be your
living room or your couch, or your backyard,
or just something, something on a much smaller scale that's
important to you. I think that would be
such a fun concept to explore with this idea. If you're having trouble
deciding what to do, choose a place that you love or something that you're
really familiar with. As the example that I'm gonna be teaching you in this class. I chose to do my home
state of California. It's a place that
I absolutely love. I still live here. And that's going to make
it a lot easier for me to decide what
illustrations to do. So definitely choose a
place that is really interesting to you or you think that you
know a lot about it, where it's just a
place that you love.
7. Research & Sketching: So now that you've
selected your destination, it's time to start doing a little bit of research and
thinking about what types of things you're going to be illustrating within the
letters of your location. So I'll give you
a few ideas based on what type of
destination you chose. If you're doing a
city or a state, you can think of landmarks, buildings, food items
at that place is known for mascots, insignia. So that would be like
your state bird, state flowers, date tree,
that kind of stuff. You can also think about
other attractions, things that the
location is famous for. If you're doing a
fictional location. The things that
you can research, our characters, settings, or locations within that world or that location,
fictional location. You can think of
props and objects or other things that are
found within the movie, game or TV show. If you're doing
something personal or you're doing something
about your family, you can think of
sentimental objects. You could do portraits
of your family members. You could do other things
that have happened in your life together or family symbols and things like that. So be sure to spend enough time doing
research and creating sketches so that when we get to that part of
the illustration, you'll have a lot of
things to choose from when you're laying out what you want to put within your letters. Now, I'll get started with
my California's postcard and I'll walk you
through the process of researching that. Now that I know what location I would like to do
for my postcard, I'm gonna go out and
do a little research of some landmarks and other geographical things or images that I can
include in my postcard. So I'm gonna go
ahead and just open up a procreate canvas so I can do a little
bit of sketching. I'm gonna go ahead and
tap the plus sign here. And for now, I'll just
choose screen size since this is just
gonna be some sketches. The other thing
that I'm gonna do is I'm going to bring up the split screen view
so that I can have some google images on one side and some
sketching on the other. So here I've got a
Safari window open. I'm gonna go ahead and tap these three little
dots up at the top, and then choose the one
with the two columns here. And then for the second app, I'm going to choose Procreate. And now I have a
split screen view. I like to make this a little
smaller and that side, just by dragging that
little gray handle over. Another way that
you can bring up split-screen views just
to drag this dock up from the bottom and then find the app would be
Safari in my case, and just drag it over to
the side and then you can resize it. Over here. I'm going to research some
California's things that I might include in my
postcard illustration. I'm literally just going to
type in california things. I kinda have some ideas
in mind already because I'm really familiar with
California where I live. There's a lot of really
famous stuff in California, but this also is a good
way to get some ideas. So one of the things
I knew I wanted to include was the
Golden Gate Bridge. So I'm just gonna do some
little very simple sketches. This is just kinda
get a brainstorm of stuff that I might include. So I'm gonna go up to my brushes and you can use any brush
you want to sketch with. I'm using my sketching pencil
from my pencil box set. This is the brush
set that I created. And I'm just going to
choose a dark color. And now I'm just kinda just sketch just a really
basic representation of the Golden Gate Bridge. So kinda has these
cables suspension. It's got these little
things across there. And as I, you know, when I go and I do my
final illustration, I'll research and I'll
pull it more photos. But this is just to give me an idea of something
that I could draw. I've got the Hollywood sign, which I think would be a
really cool addition to have. So I'm just going to
write that in there. So again, super-duper, basic
palm trees, absolutely. I think I'll just sketch
a little palm trees here. Just like that. Again, these are
just super simple. You, in the end, these drawings aren't
going to be super, super detailed
because they're on, they're very small
on a postcard there within the shapes of letters, so they don't have to be very detailed in
the end anyways, let's see what else we got. Something that comes
to mind for me because I just spent a lot
of time in the mountains, is a redwood trees, so I'm just going to draw
some trees like that. You can also search for other things like
California Redwoods, I'll type that in. So of course you want to be searching for the
things that have to do with the destination
that you have chosen. So let's say it's hard to get a picture
of the entire Redwoods. So we're just going
to draw some kind of little stylized redwood trees and then we can research
that more later. I really want to include
the ocean as well. So I might include like a wave. So I can just search
for wave here. No, thank you. So again, I'm just going to
do something super basic. Maybe there's a lot of foam. There's our wave. We don't need to do a lot
right now. Let's see. Oh, I know I want to include some California poppies and I've drawn a lot
of puppies before. So I'm just gonna do a
really basic sketch of those with some leaves. I know I'm going
to want to include some poppies for sure. Little bud. Let's think what other
california things can I include? I'm gonna go back to
my original search. I definitely want to
include some mountains. We have a lot of
great mountains here. There's Yosemite. I think I'm just gonna
do some like maybe just some general, basic
looking mountains. I could do like a half dome
or something like that, but I think I might
just keep it simple. And let me think if there's anything else I might
want to include. I like the plants at Joshua Tree National Park so I can't spell
it, Joshua Tree. It go to images and maybe
I'll include some of these crazy looking tree things, like spiky things at the end. I think it helps to not get caught up in the
details in these sketches. Like I said, because
you want to keep these, these drawings pretty simple when it comes to the
final art anyways, so already in this mindset of not getting too complicated
with your sketches, I think is going to
help you out a lot. Plant is down there. And all of these
elements are gonna be like overlapping
each other as well. I definitely want to
include a sudden because California is known
for being very sunny. In Sacramento where I live, It definitely is, especially in summer, gets
really, really hot. So of course you can keep going, keep researching,
drawing lots of little sketches of things
that you might include. So go ahead and spend
some time researching, sketching out some landmarks and other little illustration ideas. And then we will jump into
creating our lettering. Once you've finished
with all your sketches, we're gonna go ahead
and export this out into our camera roll so that we can use it
as a reference. Later on. I'm gonna go ahead and close my script split screen view by just dragging this little handle off to the
side like that. And then I'm gonna go here to the little wrench icon and
I'm going to choose Share. And then I'm just going
to share it as a PNG. And I'm just going
to tap Save Image. And that will save it
to my camera roll. Now that we've done that, we're ready to start
getting into our lettering.
8. Creating a Canvas: Next we're going to
talk about creating a procreate canvas and what size you should use to
create your postcard design. So now that we've
done a little bit of research and sketching, it's time to create a canvas so that we can create
our final design. So we're gonna go
up to the little plus sign here in
the upper right. And we're going to create
a new canvas template by tapping the plus
sign right here. There's a few things
you'll want to keep in mind as you're setting
up your canvas. The postcard that I'm
going to be designing is a four by six postcard. It's one of the standard
US postcard size is. So that's what I'm
gonna be using. So when you're getting
ready to set up a canvas and you
intend to print it. I usually stick to setting up in inches here
instead of pixels. So let's say we wanted to set up a six inch by four inch canvas. And at 300 DPI, that will print
great at that size. That being said, I recommend using a much higher
resolution Canvas. And one of the main
reasons for that is as you're transforming
things under Canvas, moving them around,
manipulating them. The lower resolution
cameras that you have, the more obvious
you're going to see degradation and like it might get pixelated and
start looking bad. So I tried to work as
high resolution as I can. So four by six at 300 DPI is roughly like 1800
by 1200 pixels, and that's pretty small. If I bumped the DPI up to 600. Now, if you do the
math 600 times six, we've got 3600 by 2400 pixel
canvas, which is bigger. What you really want
to pay attention to is your maximum layers. And the maximum
layers is going to depend on a couple
of different things. One is, of course, how big your canvas is, how large resolution it is. The second thing is actually
your hardware, your iPad. The more RAM your iPad has, the moral layers
you're gonna get. I'm gonna be setting
my postcard up at pretty much 6 thousand by 4 thousand pixels is very large, but that's what I wanna do, which would roughly
equate to a thousand dpi. And as you can see,
I have 74 layers, but you might not have
that many of you have. I've got an iPad Pro, it's maxed out for
hardware pretty much. You might want to do less, but I could print this as
poster if I wanted to. So that's another thing
to think about is, is if you plan on creating something and printing it
larger than a postcard, you might want to work
with a larger size. And then one more consideration
to make is bleed. If you're creating a design
that's gonna go all the way to the edge of
the piece of paper. It's gonna be printed on. It actually gets printed
larger and then trimmed down and some of the design
is going to get trimmed off. So standard practice for bleed is 1.25 inches all
the way round. So if you add a quarter-inch
to each of these dimensions, then you'll have
extra room for bleed. You just need to make sure
not to put anything too, the edge of your Canvas
because it will get cut off. So that's another
thing to keep in mind. I'm gonna go ahead and
just use this size again, adjusted DPI to be less
if you need more layers. I'm just going to call
this postcard and DPI. It's big. And then I'll click Create.
9. Placing a Lettering Guide: So I've just created
a procreate canvas. Now I'm going to teach
you about how to use the lettering guides that came
in your resource pack. If you miss how to get that, go back to the tools
and materials video, and that'll tell you how to get it and how to install that. So as I'm thinking about this
piece and I've looked at a lot of examples of
this type of postcard. I know I want to
have my text here really big in the center
and I'll probably do like greetings from over here and then maybe a
little slogan or an illustration of down here
in the lower right corner. The first thing I'm gonna do is I'm gonna use my lettering guides to place my text. So I'm gonna go up to my
brushes and I'm going to go to my lettering
guides brush set. So this is a part of
the class resources. I showed you how to install
this in an earlier video. We've got 12 different brushes or 12 different guides in here. There's six designs, and each design has a single
and a double line options. So there's the single
upswing and then this has two lines of texts and
the same for all the rest. So I think for this piece, I'm going to choose the upswing. I really liked that kinda, kinda wavy, kind
of slanted design. So I'll choose that
brush and then I'm going to choose
black for my color. And I'm going to make
sure that my brush size is all the way up. Then I'm just going to tap on my screen and stamp
the lettering guide. Now that I've done that,
I mean it's transformed, kinda move this around. So I'm gonna go over to the
arrow and choose Transform. And then I'm just
going to make it bigger and kind of move
it around like that. And if I know my
word is California, which is a lot of letters, so probably won't
stretch it this big. So I can always go here to the freeform transform
if I want to make it a little bit
shorter, like that. But then I kinda lose
some of my wave. So I can go over here to
distort and grab the edge. I can go up a little
bit more like that. So you can kinda play
around and get it to be the size and the shape that you want it to be
before you add your text.
10. Distorting Text: Now that you've got your
lettering guide setup, let's go ahead and start adding
some text to our design. And then I'll show you how to manipulate it into
our different shapes. That so it's not just like a
flat straight line of text. So we've got our
lettering guide here. We're gonna go ahead
and add our text now. So to do that, I'm gonna go
over to the Actions menu, which is the little wrench icon. And then I'm gonna go to Add. And then I'm going
to choose Add Text. And you'll see some
text will appear before we start
typing anything in, we're going to set the font. So to do that, we're gonna
go here to the lethal to little a's over on
the right-hand side. Then we've got a
list of fonts that we can choose from here. And again, we want
to choose a font that is nice and thick, not with a little thin parts, like lots of lots thick and bold so that we have lots of room
to put our illustrations. And one of the fonts
I mentioned in an earlier video is Erica, one. That's really great font. It's nice and bold and thick, and it works really
well for this. So I showed you how to find that and download it in
an earlier video. And then you can adjust
things like the size, which we don't need
to do right now, but like Kerning and tracking, spacing of letters,
all that stuff. But for now we're just going
to keep it simple as it is. And we go back to the keyboard and go ahead and start typing. So I'll just tap here with
this little keyboard icon. And I'm going to put it in caps lock because I want
it to be in all caps. And I'm going to
type California. Just like that. The next part is going
to be to distort and transform this texts so that we can fit within our
lettering guide here. So I'm gonna go to the Transform tool
here, move this here. And I'm just going
to start by making it as big as lettering guide. So now as long as that, and then I know I do
want the text to be a little bit stretched so
that it can fit in here. So I'm gonna go
over to free form. I'm just going to
drag it down and make it a little bit
taller like that. And now I need to
slant the text. So we're gonna sort of
shear it and we're gonna do that with the
distort transform. So right here we're
going to tap distort. And then to do that, you're actually going to
grab one of the edges. So one of the sides, I'll just grab that and
move it straight up. And then I'll grab this side
and move it straight down. So now our text has
that slanted effect. And then the final
transformation is we're going to use warp to create that wave. So I'm going to tap
right here where it says warp and a grid will appear and you
can actually tap and drag anywhere
within these grids, like literally any
point within this grid, and kind of move things to
where you want them to go. So for example, I'm going
to tap right here and just drag this side up to
meet up with that line. I'm going to drag right here
to make it meet down there. I'll grab the a, kind of bring it down there. And I can kinda shows this up a little bit. Same thing here. I'll move that up
a little bit that down so you kinda
just keep working with it until you get it to be the size and shape that
you want it to be. One thing to know is
when you're dragging, you want to mostly keep
dragging straight up and down. If you drag to the side, your text is gonna get a
little distorted that way. So maybe you want
that, maybe you don't. But in my case, I want everything to still have those nice verticals like that. So I'm making sure to drag
just straight up or down. Okay. And you're gonna
get a pretty close. It doesn't have to be exact, but pretty close to what you've gotten,
the lettering guide. Alright, so I think
that looks pretty good. So I'm gonna go ahead and
basically commit all of those transformations by tapping the little arrow icon again. So I'm going to tap that. And when I do that,
you'll see this red bar disappear really quickly. And that says text
layers rasterize. And all that means is that now this text is not
editable anymore. So you want to make
sure before you go through all those
transformations that you've spelled everything
correctly because at this point we can't change
what the text says. And then finally
I'm going to go up to the layers and I am going to turn off the layer
with the lettering guide. And there's my text.
11. Text Effects: Overview: Alright, we're about
to get into creating some really cool texts
effects in Procreate. Over the next few videos, I'm gonna be showing you how to add rounded
corners to letters, how to create an outline or an outer stroke
around letters. We're also going to be creating a drop shadow like a block
shadow effect with shading. And then finally we're going
to be doing an inner stroke or an inline felt like it
outlined within the letters. So let's continue
on and we'll learn how to do all those
fun texts effects. So now it's time
to add some text effects to our lettering. We're gonna be doing a few
different things here. We're going to be rounding
out these letters, making them a little
less angular. We're going to be adding an outline around
all the letters. We are going to be
creating lists like block, drop shadow effect. And we're going to also
be creating an inline, so kind of like an outline
within all the letters. And we're gonna be doing all of that using a technique that involves blur and color fill. Unfortunately, Procreate
doesn't have the ability to add a stroke around text
or around an object. So we're kind of
using a little bit of a hack to do that today.
12. Text Effects: Rounded Corners: The first thing I wanna do is round these
letters a little bit. They're very angular, which maybe you like
that, maybe you don't, but I kinda liked them
a little more rounded, like, especially in the
corners and stuff like that. So I'll show you a technique
for doing that first. I'm gonna go up to
the Adjustments menu, which is a little wrench here. And we're going to
choose Gaussian blur. So I'm going to tap that and I'm going to blur it
just a little bit, maybe like 5% or so. I've kind of already,
you can see that those corners are a
little bit more round, but everything is
soft, so we need to sharpen that up as well. So let's get out
of the blur tool and now we're going to use the selection tool to create a more kind of
sharpened version of that. So I'm gonna go over here
to my selection tool, and I'm gonna make sure I'm
choosing Automatic here. And I also want to make
sure you do not have color fill selected
because you'll have some unexpected results. We will use color fill a little bit later, just not right now. I'm going to just tap anywhere outside of the letters
and then I can slide my pencil back and
forth to adjust my selection. So I'll show you that all actually zoom in so you can
see a little bit better. So I'm going to tap and I can kind of adjust how
much I have it selected. So that's a little
hard to visualize, but I'm gonna do
about that much. And then I also need
to make sure to tap in these little spaces here. They're called counters, the little spaces
in-between letters. So this is essentially what my letters are
going to look like, but I need to I'm basically going to fill
this but on a new layer. So the first thing I need
to do is choose Invert. I'm going to tap invert. So now instead of the
background selected, I have the letters selected. And then I'm going to
go up to my layers, tap the plus sign, and I'm going to
choose Fill layer, tap that and then
choose Fill layer. And that's going to fill
that layer with black. But it was like a
rounded selection. So I can actually turn
off the previous layer. And now I have these cool like rounded letters instead
of those angular letters. So if you ever wanted to make
your letters more bubbly, this is the way that
you can do that. Then I'm going to go
into my layers and I can just delete
that blurred layer. I don't need it and just
to keep things clean, I'm just going to go
ahead and delete it.
13. Text Effects: Outlines: Now so far we've just
been using black, but now we're going to
start to have outlines and we need to see what
everything looks like. So I'm just going to introduce
a color. At this point. We haven't done any color
planning or anything like that. So I'm just going to choose any color and then we're
going to adjust it later. So I'm gonna go to my colors and I'm already in this
realm of blue-green, so I'm just going to choose a very light version
of that color. And one of my favorite ways
to change the color of an entire layer is to use Alpha Lock and then
fill it with color. So to do that, I swipe to the right with two
fingers on the layer. Or you can choose Alpha
Lock from the menu here, and you'll see there's
checkerboard pattern, so that means it's on. And then, then I would tap on the layer and
choose Fill layer. And that's going to
fill every pixel on that layer regardless of how transparent is or
whatever with that color. So this is a useful way to just make sure you change
the entire layer, sometimes color dropped
to fill in all the areas. So that's the way that
I like to do that. The next effect we're gonna
do is we're going to add an outline around the
outside of all the letters. So we're gonna go
back to our layers. We're going to
duplicate this layer. And then on the bottom
of those two layers, we're going to turn
off alpha lock so you can swipe
to the right with two fingers or you can tap
it and uncheck alpha lock. Then we're going to use
that same technique of blurring to create
this outline effect. So let's go over to
our adjustments menu and we're going to choose
Gaussian Blur again. And I'm going to blur
that to about 10%. You don't need to blur it a lot. Then I'll go over to my
selection tool just like before. Make sure I'm on
automatic selection and slide back and forth to adjust how big I
want the outline to be. I think I'll just do
it like that much. And we're going to fill this
with color on a new layer. But first, we're going
to choose Invert, just like we did before. It's going to invert
our selection. So it's just the letters,
not the background. And then we're gonna
go to our layers and then tap the plus sign. And we're going to
fill it with color, but I want a little
bit darker of a color. So I'm gonna go
over to my colors. And I'm just going
to get a little bit darker version of
that same color. These aren't my final
colors for the piece, but we're just going to
work with we have for now. Don't worry about color later. Now I'll go back to my layers. I'm going to tap the layer, this new layer created
and choose Fill layer. So in my layers, I can delete this blurry
layer that was just to kinda temporarily get us
there. So I'll delete that. And as you can see, we
have a nice outline around our letters.
14. Text Effects: Block Shadow: Now we're ready to create
the block shadow effect. So we're going to
basically kinda make this into a 3D object. So
let's do that now. The first thing I'm
gonna do is I'm going to duplicate this new
outline layer. So I'm going to swipe left
and choose Duplicate. And then I'm going to
use the bottom layer. And I'm actually going to make
this an even darker color. So I'll just go to my colors. Let's get a little bit
darker version and then I can just fill it with color. You can't really see. But if I turn that one off,
you can see it's darker. So essentially what we're gonna be doing is we're going to drag this new layer out a
little bit like this. Oops. Make sure
I'm in free form. We're going to drag it out like this and then
we're going to connect this so it
looks like a block. But I'm going to show
you a little trick to just make it a
little bit easier. If you're having a
hard time like lining up in drawing and
connecting everything. So let me undo that. So to do that, we're gonna
go over to our Actions menu. We're gonna go to Canvas and we're going to
turn on Drawing Guide. This is going to help guide
us as we're doing this. So turn on drawing
guide and then we're gonna go to Edit Drawing Guide. Then what I wanna
do is I want to grab this little green node and I'm going to rotate it so that the lines are at the
angle that I'm gonna be dragging my shadow
up to the side. So that's step one. And then I'll zoom in
a little bit because I also want to make sure
one of these lines, like this line here
is like right on the edge of this kind of
curve of this letter. I have to grab this little
blue node to move it around. I'm just going to line
that up with the edge. It's close enough. You'll see why we do
that in a minute. The other thing you
wanna do is turn on Drawing, Assist,
assisted drawing. So go ahead and
toggle that on. Okay. We're all set up. We're gonna go
ahead and tap Done. So now we're going
to make sure we have that bottom layer selected
the darker color. Go to the Transform tool. And it's easier if I zoom in, you can zoom in as long
as you don't do it on the layer within
the bounding box, you can zoom in or out here. Man, do that. I'm gonna zoom in a little bit
so it's easier to see. And essentially I'm going to do, I'm going to move the
layer down this way. I want it to line up
with this line here. You see that? So here's the little curve, and then here's the
same little curves. So I want it to line up on
this drawing guideline. Okay, so now it's
looking like that. Now all we have to do is connect these two edges on
some of these shapes. So that's what we'll do next. And the drawing assist that we turned on, it's going
to help us with that. So firstly, I need a brush. So I'm gonna go to my
brushes and we'll use one of the built-in brushes in the
calligraphy set. Calligraphy. It's called mono
line. It's great for doing stuff like this. So mono line, brush I'm using,
I still have that same. It's this dark,
darker blue color. And I'm going to go right here. And because I have
Drawing Assist on, I can only draw
lines at this angle, which is great for connecting these and making sure that
it's at the right angle. So I'll just zoom in and
kinda connect it like that. And it's the perfect angle. I don't know. Maybe
we need to connect it here a little bit. You just want to make sure
that the edge of your brush at the edge of these shapes. And I have a little, it's
probably hard to see, but I have the brush cursor turned on and you
can turn that on. But going to the Actions
menu, preference, brush cursor, and
then you get like a little outline of the
shape of your brush. So that's a little
tip you can use. So I'm just making
sure I'm right there on the edge and then
carry it all the way down like that
and then fill in the rest here to make sure
it's right on that edge. There we go. So anywhere that kinda
like sticks out like that. Maybe this one. No, I can't really
see that one at all. We know that if I didn't
have the Drawing Assist, I might try to go that way
and then it would look weird. It wouldn't be at
the right angle. I think this one probably
doesn't need it either. This one, yeah, that one does. So anywhere that
kinda like sticks out right here, specialty. And I think this
is the last one. Okay. Alright, so I've gone through
and kind of connected. This shape to the other shape and it creates
this block effect. So I'm gonna go and turn
off my drawing guides. I don't need them anymore, so I'm gonna go over
to the Actions menu, Canvas and turn off
drawing guides. And now I'm going
to add some shadow to the underside of
all these letters. So to do that, we're going
to use a blend mode and a clipping mask. I'm
gonna go to my layers. I'm going to create
a layer right above the layer with
the block shadow. I'm going to tap that layer and I'm going to choose
clipping mask. And what that does is anything
that I draw in this layer will only appear
within this shape. The shape of the
layer that it's kinda like there's a little
arrow pointing down to it. So I can only, whatever I draw here will only appear
within that shape, which is great for
what we wanna do. The other thing I'm gonna
do is I'm gonna change my blend mode to multiply. And the reason I'm doing this is because I'll
probably come back and change the color
of this later. But if I'm using a blend
mode to do my shadows, it's going to stay consistent.
It'll make more sense. We get to that stage. And I'm just going to
choose a gray for now. And any brush that's kinda soft and has some texture will be good for adding shadows. So I'm gonna go to the charcoal set and
choose six be compressed. This is another built-in
brush, Six be compressed. And the other thing I want to
do is I'm going to turn on Drawing Assist on this
because as you can see, like if I draw, I can try and get
the right angles, but I might get it wrong. So if you want to be
sure you're getting your shadows at the right angle, you can turn on Drawing Assist. So just tap it and
she's drawing assist. And just like we
did on this layer, now I can only draw
at that angle. So it's really helpful
for doing these shadows. So all I'm gonna do
is kinda like on the bottom of the lid letters. I'm just going to
add a little bit of shading. I like that. I'm just kinda
softly coming in and laying on a few strokes just
kinda like at the bottom. So there's kind of
this like little curve out and that's kinda where
I'm focusing my shadows on. I keep my shadow nice and soft along this little corner here. And in this little area as well. I don't want it to be here, so I'm actually gonna go
ahead and erase some of it. So I just tap and hold
the eraser to choose that same six be compressed
as my eraser, and then I can erase
some of that away. There we go. As you imagine, the OH
is in front of that. F will look like that. Okay, So let's add some more on these curved
shapes like the O's. I'm gonna do it darker in the center and then
do light strokes to make it like kinda
like a gradient effect. So like the shadows falling off. Then here, I forgot. I looks like I didn't connect
these and I should have. So let me actually
go back and do that. I'll go back to my
calligraphy monoline. I'll go back to this
layer, select this color. And then I'll just connect that. Go. Okay, that's better. Go back to my previous layer. And I can actually tap and hold the color picker circle and that's going to
choose my previous color. So that's helpful. And then I'll go
back to charcoals, get my six be compressed and I can shade in this letter now. So just like a lot of strokes layering on to get it as
dark as I want it to be. And also make the
edges a little soft. Okay, cool, That's
looking really awesome. Maybe I want to add
a little bit of shadow or shading in
this little nook. Might be dark in there. If there was light
coming this way, you would imagine it
was dark in there. But overall, I think this
is looking pretty good. We don't really need to
add a ton more shadows. If your shadows you feel like they're looking a
little bit dark, you can go to your layer
and tap those little m, where that's where we
chose our blend mode, but you can reduce the
opacity a little bit. So maybe I'll turn
it down to like 70%. And that's looking pretty good. Just as a side note, I noticed as I was
editing this video that I could have placed these shadows a
little bit better. So here is what I did in the
video that you just saw. And here is a little
bit better placement, as you can see. Instead of placing the shadows on the bottom of the letters, I placed them in
the little grooves inside and also on the
right-hand side of the letters. Of course, all this will
change depending on where your imaginary light
source is coming from. But let's see the
before and the after, so that you can get an
idea of where you might place the shadows instead
of what I did in the video.
15. Text Effects: Inner Stroke: So the last text effect
that we're going to add is an inline, basically an outline
within each letter. So we're going to add
just like a white inline. So to do that, we're going to use a similar
technique to what we've been using, but a
little bit different. So I'm gonna go
up to the layers. I'm going to find the
layer with this one, the one that just
has the letters. I'm going to tap it
and choose, Select. And as you can see, I
have a selection here. We're going to actually
use this feather tool to create this inline. So I actually need to
invert my selection right now to get
it so we can make, I make it an inline
and not outline. So I'm gonna go ahead
and tap Invert. Now I've got the
background selected. And then I'm gonna go right
here to choose feather. And as you can see, you can feather
your selection and you get this nice little line, which is sort of like a
preview for what you are. Inline is going to look like. I'll do that again. I'll zoom in so you
can really see it. Zoom in feather. And I don't need a lot. I just need like a little
outline like that. So now I'm at like 8%. And now we're gonna
go up to our layers. I'm going to tap the plus
sign to create a new layer. And I'm going to fill
this layer with white. So I'm gonna go to my colors, double-tap close to white, and that's going to snap
to a pure white value. So double-tap. And then
I'll go back to my layers, tap it and choose Fill layer. And this obviously this
doesn't look like much yet, but we're going to make it into a sharper outline
as we've done before. So the first thing I'm
gonna do is I'm actually going to end up using
a clipping mask to make this outline. So if I tap this new layer I made and I tap Clipping Mask. Now, It's very hard to see, but the white is only
within the letters. Now that I have this layer, I'm gonna go ahead and make a selection within
all those letters. So bear with me, this is what we're
gonna do next. We're gonna go over to
our selection tool. I'm going to make sure
we're on automatic and makes your color fill. Phil's off. And I'm
going to select inside this little letter
and I can adjust how thick I want
the outline to be. The outline is basically
what's not blue right now. So the lighter blue
that's around it. So I'm going to do probably
something like that. That's my outline. And then I can just go through and tap all
the other letters. Once I adjust to the exact
thickness I want it to be. I'll go through and adjust or go through and select. Okay. Now, we have the
letter selected and we knew on the outside of the
letters to be selected. So we're going to be
inverting it again, a lot of inverting for this one. Then we're gonna go ahead
and go to the layers, create a new layer, and then
tap it and choose Fill. And we can turn off or we can delete our blurry
later, we don't need that. And then finally,
here's the big reveal. We're going to tap
the layer that we just made and we're going
to choose clipping mask. And now those lines only appear within the shape
of these letters. So there is our
final text effect. We have an outline, we have a drop shadow
or block shadow, and we have an inline
and all we also don't forget we made all of our
letters a little round. And one of the nice things about starting off by making the
letters round is like this, creating outlines
using the blur effect. They tend to get a little soft. They're not like sharp outlines. So starting out by
creating your letters, a little rounded helps blend
of those effects together. Now there's a couple of
things that look a little weird like right
here on this end, the outline kinda does that. So we can just use the liquefy tool to make it
look a little bit better. So I'm gonna go over to
the adjustments menu, liquefied and make
sure you're on push. And you might need to play
around with the brush size, but you can just kinda drag
that down a little bit. And go look at your letters
and see if there's anywhere else where you might
want to adjust. I think maybe this
right here on this l, I can make the size
a little smaller. Kinda pull that out a
little bit right here. Now that we're really zoomed in, one side effect of doing
outlines this way is your lines. Do you get a little bit jagged? That's expected because it's
not like a true stroke tool. It's not like the
vector perfect, but we're going to add some vintage effects
to this later and that really kind of
eliminates that. So don't worry
about that for now. So here's our
complete lettering. Now it's time to
start working on doing the illustrations
inside of all the letters. But before we do that,
I'm just going to kind of adjust the placement
on my Canvas. There's a couple of ways
that you could do that. I could select all these
layers, then move it. Or I can go over to
the Actions menu here, Crop and Resize,
and then just kinda move the cropping a
little bit to center it.
16. Sketching the Layout: You've just learned how to do
bunch of fun text effects. Now it's time to get into the illustration portion
of our postcard design. So I'll be walking you
through in real time my process of creating
my California postcard. In this video, you'll see me lay out all the different
elements that I researched earlier into
a rough layout sketch. And then I'm going to create a refined sketch that I will
use to create the final art. So I actually have two
videos of this for you. The first one is
just the real-time I real-time process of
me doing all of that. And then if you wanted to kinda go through a little
bit more quickly, I've got a sped-up version
of it on the next lesson, let's go ahead and start
sketching our illustrations. Now that our lettering is all
done and looking awesome, it's time to focus on the
illustrations that are gonna be going inside of
all these letters. And if you remember back to our previous lesson
at the beginning, we spent some time
researching our location and drawing some really
rough sketches of some of the stuff that
we want to put in there. So let's go ahead and pull up those sketches and we can start figuring out what
we want to do here. So we're going to use the procreate reference
companion feature, which is really
awesome way to have just a little image that you can reference as you're working. To do that, you go to the
Actions menu and Canvas. And then here it says reference, you go and just toggle,
toggle that on. And it will show, basically, I'll start by showing you
exactly what's on your canvas. Or you can load up an image,
which is what we did. We exported our sketches out
to our camera roll earlier. So we're gonna go
here, it says image and then I'm going
to tap Import Image. And then we're going to choose the sketch from our camera roll. So we have that to look
at as we're working on. I'm laying everything
out within our letters. Okay, So I've got a few
elements to work with. I've got a bridge, mountains and hills, ocean. I think the thing that I want to start with is this
Golden Gate Bridge. So I'm going to place it. So my illustration is going to be all melded together
within these letters. So some stuff is
going to show within two letters and
that's kinda my plan. You could also draw something individual
within each letter. So you could make each letter a different picture, you
could do it that way. But I'm gonna kinda like meld everything together so you'll
see what that looks like. Okay, so we're gonna be
sketching within these letters. So I'm gonna go ahead and
switch to a sketching brush. Now, you can use any brush
that you like to sketch. I'm going to use one from my pencil box set called
Sketching Pencil. I designed it just
for sketching. And then when I go to my colors and I'm going to choose
just kind of a dark gray. And then in the layers, we're gonna be using
clipping masks, like everything
that we're gonna be illustrating is gonna be only, it's only going to appear within these letters because we're
going to use a clipping mask. So I'm going to tap on the letter with the
layer with the letters, like tongue twisters
in this class, the layer with the letters. And then I'm going
to tap the plus sign to create a layer
right above that. As you can see, it
automatically becomes a clipping mask because it's underneath another
clipping mask. So now any layers that
we put in between the outline and the letters is going to be a clipping mask. So it's nice that we
don't have to worry about setting it to
clipping mask every time. So we created a new layer so we can start working
on the sketch. Alright, so the first
thing I want to lay out is this bridge. I think that I am going to have the tall parts of this bridge on letters that are really visible. So maybe I'll start here. I'll do one side there and
then maybe one side there. Then have the leg that
part of the bridge going across like that.
Something like that. So this is just like
really, really rough. This is just for
placement so far. I'm not going to add any
details or anything like that. Let's maybe add this
Hollywood sign. I can kind of overlap. Maybe have a hill kinda going over there and
I can have, well, maybe a little taller than
that, something like that. And I can have
Hollywood right there. Again, it's just placement, so that's where
Hollywood is gonna be. So I also think that I have this wave
and I think it would be cool to do it here
in the C since they have a similar shape. So I'm going to, well, you know, since I have the bridge, maybe I can just
draw the ocean kinda coming all the way across. And then I can make
a wave like that. So I'll just kinda, again, this is just
for placement. So now I've got the ocean there. This will be in front of that. I can add these mountains, maybe on this side so I can draw some overlapping I don't know, tall mountains like one there, then maybe one behind it. I like that. I'll probably not have this continue this Hollywood Hills. There we go. Then some snow again,
just placing everything. Let's see what we've got.
We've got a palm tree, you've got some redwoods. I've got these puppies. So let's put some
poppies and I love them. So maybe we can have
the poppy is kinda over here and we put the
palm tree kinda the wave. So I'm going to draw
some big puppies. Maybe one, they're just doing some basic
shapes. Maybe one there. We can have a little bud, so something like that. And then some leaves.
So he had her puppies. Palm tree right here. Very rough. And let's see, we've
got some trees there. Maybe we can put those here. A tree there. Maybe a little one there. I don't know if that'll be
too crowded, but I'll try it. And let's see. Oh, I drew these like Joshua Tree type things
from Joshua Tree. So let me put that here. Kinda make sense to be in Southern California where the
Hollywood sign is going to. And maybe I'll do a different
kind of cactus here. I can do some of those
long skinny ones that are very long
skinny cactus. And we also have this sun, which I think would
be great right here. So I'll draw the sun. Okay? So here's our very rough sketch and layout of where
everything could be. So I think that's overall
looking pretty good. It's a good layout again,
and as you can see, I have things like kind of overlapping the
different letters. And I think it looks
pretty cool, but you could draw one thing in each
letter if you wanted.
17. Refined Sketch: So I'm going to now
make a refined sketch. So I'm gonna go
over to my layers. I'm going to tap this n and reduce the opacity
of this sketch I just made and create a new
layer right above that. And this is where I'm gonna
do my refined sketch. So now I can kind of draw
these things in more detail. I can look up some
reference photos to kinda help me with that. So I'll go ahead and
close this for now. So I'll just tap it,
close it like that. And I'm going to bring
up Safari so that I can look up some photos of what the Golden Gate Bridge actually looks like and stuff. So I'm going to drag the dock up from the bottom
and I'm going to grab Safari and I'm just
going to drag it over like that, then resize it. And let's start with
the Golden Gate Bridge. Course. Yours will be different, whatever you're deciding to
put in your, your design. So a lot of the bridges are from this
kind of angled view. And I kinda want like
a straight on view. So I'll look at this
Golden Gate Bridge. That's exactly what I want. I'm going to tap that. And I want something kinda like this. This is another illustration
where you can see the, the like, you know what the parts of the
bridge looks like. It's not like flat like that. So I'm going to do that.
So I'll just draw like to go all the way up. And then there's
kinda like for these, I'll do this one over here. So I'll just draw two lines and it kinda making these
lines parallel. This doesn't have to be perfect. It can be pretty rough still, but we just want to add a
little bit more details. We can figure out
what we're gonna do. 12341234, okay, then we
have like this part of the bridge across this one
should go to that one. This one should go to
that one. I like that. Okay. Then underneath this
one doesn't show, but they have these
little like X things, so I'll add those. Then. There's the little
cement bottoms. Okay. So there's my bridge. Let's draw the mountain and maybe a little bit more
detail. Do my mountains. I do like a ridge
down the middle. And then I'm just going
to add some texture. I'm not going to add a lot
of detail to this sketch. There's this now
is the same one. Snow or sun? Hollywood sign. Let me look that up.
Alright, Hollywood sign. This is a good This
is a good one. And it kind of like
this color too. So let me draw like that. And then the
Hollywood, I get it. It does like a little
bit of a wave. So I'm going to draw a bit of
a guide to help me do that, just like we did with
our texts earlier. The lower Hollywood. Let's draw in the ocean. And I'll probably when
I color the wave, I'll come back to a
reference photo of that. For now. I'll just kinda keep
it pretty rough. Let's do a palm tree here. Then our flowers. And to draw those with a
little bit more detail. Dr. John, California
poppies, lots of time. So I can have my little
way of doing it. They're very simplified. Leaves. Maybe another leaf over there. Okay, that's looking good. We need some trees. I'm just going to draw like the overall shape of the tree. And I'll come in and
add more detail. You know, when I'm
doing my coloring because I kind of have an idea of what I'm gonna do there. I'm Joshua Tree, I want
to look that up again. Okay, So they're so unique
looking like this picture, which all something like that. So why is out like that? Then? Has these
branches coming off? Lots of branches and
things like spiky things. Probably need to look at that again when I go to color it. Thicken that up a little bit. And then I can, I just have an idea of what I wanna
do for this cactus? I'll just draw a bunch
of these small things. And I think that's pretty much it for
this refined sketch. One more thing I might
add is some clouds. So maybe I'll draw
some clouds in here, maybe one behind the bridge. Maybe over on this side to
just kinda blogging them in. There we go. Cool. I like the way that looks. Alright, so I think
that looks pretty good for my refined sketch. I'm going to go
over to my layers. I can turn off or even
delete that rough sketch. So I'll just turn it off for now or you can delete
it if you want.
18. Speed Sketch!: The following video is
just a sped-up version of my sketching process. If you wanted to see it
a little bit faster, you can go ahead and
watch that next.
19. Make a Color Plan: Alright, so you've just finished laying out all of the elements
in your illustration. You've created a refined
sketch and you're ready to start your
final artwork. Well, before we do that,
we're actually going to take some time to create
a color plan. This is a stage in
the process where we can experiment with
colors and just kinda figure out how
we want everything to look before we do our
final illustration. Now it's time to start
thinking about colors. So before we jump
into like drawing, all these illustrations
are rendering them, we want to start
thinking about colors, but remember this blue we
kinda just used as temporary. So let's, let's start by changing the
colors of our lettering. And then we're gonna
work on making a color plan for
our illustrations. So I'll just close this for now so that we can
get nice big view. I think I want to do sort
of like maybe orange, red, orange, yellow color
scheme for my letters. Like they reminds me of yellow, the Golden State,
orange poppies, the red Golden Gate Bridge. So let's experiment
color a little bit. I'm gonna go over
to my layers and I'm going to start
with the letters. So this layer here. And actually the color
it is now isn't too bad. It's kind of a sky blue. And I can imagine like most of this is gonna
be sky up here. I just might want to change
the hue a little bit. So one way to adjust
colors is by going up to the Adjustments menu, hue,
saturation, brightness. And then you can adjust the hue I make make it
a little more cooler. I don't know if I want it
more saturated or darker. A little bit darker. I can always adjust that
color a little bit later, but I'll do that kinda
nice sky blue for now. And now I'm going to change
the color of the outline. So I kinda wanna do like
orange, orange, red. So I'm gonna go to my layers. I'm going to select this layer, which is the outline layer. Let's choose, I don't know, like a really, an orangey color. Not super saturated.
Maybe like orange red. I could just color
drop that in since it's one pretty solid shape. Maybe a little, maybe
a little darker, a little more red, kind of
play around with colors. And now I want to
change the color of this block shadow layer. And I can show you, not everything is connected
like some of these shapes. Don't touch other shapes. So color drop might not be
the best solution to do that. Instead, we're going
to use color fill. So what I'm gonna do is I'm
going to turn on Alpha lock on that layer just to two
fingers swipe to the right. And I'm going to get a darker, maybe more saturated
version of this orange. And then I'm just going to tap the layer and choose Fill layer. And that's going to
fill everything on that layer that was already
there with this color. So it's a little bit
easier than color drop. And now that I've
got those colors, you can kinda go in
and start adjusting. If you want to make things lighter and more
or less saturated, I'm gonna make that
a little lighter, will make my letters
a little darker. It's totally up to you what
colors you want to use. So I think that's good for now. I can always come back
and adjust them more. And I didn't mention this,
but we didn't have to change the color of our shadows here because
we used a blend mode. It automatically
just kind of darkens whatever color you
have underneath it. So that's pretty cool. You can of course, come in and adjust and make it
darker if you want. But I think that
looks pretty good. Alright, so now it
is time to make a color plan for the
inner illustrations. I'm going to go up to my layers. I'm going to find
my refined sketch. I'm just going to tap the
N and reduce the opacity. Then I'm going to
create a layer right below that, and this is open. This is going to be
for our color plan. You can use literally any
brush you want to do this. I'm going to use one
for my basic toolkit. It's just a thick,
smooth brush and it's great for just plopping
down some colors. But again, you can use any
brush you want for this. This is gonna be really quick. Note not a lot of detail, just kinda like figuring out
what colors we want to use. So maybe I'll, I'll start
with some of the stuff that's more in the
background, like the ocean. So I'm going to go ahead and
choose a blue like that. See how that looks. Kind of like that.
So I'm just going to just kinda lay
that in really rough. And I'll do the
Hollywood hill here, which I remember was kinda
like a yellowy yellowy brown. Maybe a little play
around with it. It's kinda lay
that in like that. I'll do my mountains and sort of a dark desaturated brown. Probably a little bit too dark. I'm just kinda like, like,
like experiments with color, just layering on more color. I'll do my son like
a bright yellow. Let's do the bridge. The bridge is kind of
like an orangey red. So I'll choose a
nice color for that. I've got our palm
tree and our puppies. So maybe I'll do
the puppies and x, I'll do like a kind
of yellowy green. Might be, I might need a
little bit darker than that. So I'm just kind
of experimenting. Seeing what colors
it might work. Well, maybe we can use the
same green and this palm tree and get a brown for
the tree trunk. Do an orangey yellow. These poppies. We have
our trees over here, so I'm going to choose
a brown for the trunks. And then instead of
like a yellow green, I'm going to go more down
here until like blue-green. For that can have a
different color tone. Let's see. We're going to have
some white snow up on. These are an Alpha
Hollywood right there. Then for these Joshua trees, I believe they were
kind of a brown color. Then. I don't know,
like a greenish. These sets are not dark enough. There we go. For these ones, I think I'm just gonna
do more blue-green. Yeah. Like Oh, that looks
and of course, look up your reference photos if you're not sure what
colors to do things, you don't have to do things
and they're realistic color. That's just kinda what
comes natural to me. And all these colors
of California and make me feel like make
you think of California. So I'm doing more of kind
of like natural colors. We're going to have our clouds here, turn it off their white. Necessarily plan for those. But we're gonna have like
the foam on our wave. And I think that's
pretty much it. So this is a very
rough color plan, but I was able to do the experimentation
now so that I can just focus on drawing and rendering when it comes down
to doing the final artwork. So just like we did
with our sketches, we're going to export this image out to her camera
roll so that we can use it as a reference as we're working on our
final illustrations. So I'm gonna go up to
the Actions menu, Share. I'm going to share
it as a PNG and then just save the image
to my camera roll. And now we're gonna go over to Canvas and we're going
to choose a reference. And then I'm going to
choose, we're already on image because we had
this up earlier. But I'm gonna go to
Import and I'm going to choose my color plan
that I just made. So now I can actually
zoom in on this. I can sample colors from it. I can just look at it to see how I decided I
wanted to do everything. So it's nice to have it there.
20. Final Illustrations: Part 1: Alright, we are at
the main event. It is time to start
creating our final artwork. We're going to be drawing
all the elements. We're going to be
rendering them and adding detail and texture
and all of that. So in this video, I
will walk you through that entire process
in real time. It's a bit long because it does take a long time to go
through everything and draw. But I also have a
sped-up version of this. If you wanted to watch that, you can find that
on the next lesson. One more thing, I just wanted
to let you know how you can get one of my procreate
brushes for free. This is a brush that I'll be
using to do the majority of the illustration in my
California postcard. And it is called painting round from my gouache paint box. It's one of my most
popular sets and it is actually included
in the Procreate all stars brush pack
is a collection of brushes by some of the top brush bankers
put out by Procreate. And you can find a link
to download that on the projects and resources tab. Alright, let's get to it. Alright, so let me go up to our layers and I am going
to turn off the color plan. So that's why it's nice to
have it there because I need it off now so
that I can work. I'm going to create a new
layer right above that. And this is where I'm
going to start drawing all the different elements
in my scene here. So I'm gonna be
working with a lot of layers as I'm doing
this illustration, basically like any
elements in my design that are on top of each other
but are different colors. I'll put on separate layers. I like to use. I like to reuse
layers when I can. So if there's elements
that aren't touching, I'll put those on the
same layer and you'll kinda get a feel
for this as I work. So again, I had just
created a new layer. There's nothing on
it yet. And I'm going to decide what
brushes I want to use. For this. I am going to use
brushes that I made myself. This is my gouache paint box. It's one of my brush
set size style. It's one of my
favorite brush sets to use and I really love it. But of course, use any brushes that you
feel comfortable using. You can illustrate literally in any style that you want with
any brushes that you wanted, any colors that you want. Make it personal, make
it you do it your way. I'll walk you through my
decision-making process as I'm working on
this illustration. Okay, so I'm going to
start by illustrating all the background
elements first. So one of the biggest elements
in my scene is the ocean. So I'm just going to start by selecting this blue
color from my reference. And the brush I'm gonna be
using is painting a round. And I'm just going
to go ahead and just start drawing that in like that. One of the things I like about
this brush is you can see the brush strokes of the
edges of the brush stroke. So it looks really
cool and water, especially when you like layer a lot of brush
strokes like that. So that's kinda what
I'm doing here. I remember from
when I was looking at the wave pictures online that there's a lot of
different shades of blue. So I'm gonna come back
and do that later. But for now I'm just kinda
laying down the base color. And it's going to end here. So I'm actually going to
erase this a little bit. Alright, so we've
got some water. I'm can do the Hollywood
hill on this same layer. So I'll just select that
color and it will zoom in, select that color
from my color plan and just kinda draw the
mountain or hill like that. I'm doing this on
the same layer as the water because they
don't touch each other. There's a space right there. The mountains gonna
be on another layer in front of the hills, but this mountain is behind
this bigger mountain. So I can actually put
that on the same layer. So I'll just grab this brown
and I'll drew this mountain. There we go. And what else? I could probably put
the sun on this layer. So I'll just go ahead and get that color from a colored plan. And I'll draw the sun in. And I can even add
some sun rays. Little thinner,
smaller brush size. Okay. They've got the sun. I think. Anything else is going to overlap something that
I've already drawn, so it's time to move
to another layer. The reason why I put things on different layers is
because I'm going to come back and add texture and details to all these things. So if I were to put
something on top of it and be really hard for me to
add texture to stuff. So I'm creating a new
layer and I can start working on some of
the elements that overlap some of what
I've already drawn. So like for example, this mountain, select
that color to use. I'm just kinda trying to
make it more detailed, hard to see right there,
but I'll color that in. Let's see. I'm going to try and do most of the bigger
elements if I can. So I think I'll do
the bridge now. Let's get the color I chose. Go if you need to
adjust it, you can. But I think that
color is pretty good. So I'm going to make
my brush size smaller. And I'm doing like a very
simplified, you know, Bridge. I'm just going to draw like
this two sides of that. If you find that you're
not able to keep drawing that line over
and over again and it's not exactly where
you want it to be. Another little tip that
I use for adjusting. So I don't have to keep
redrawing it and hoping it worked that time is
a liquefied tool. So you can go up to the
Adjustments menu, liquefy, and then you can kinda
just like adjust your brush size and then just push it to where
you want it to be. If you need to. Straighten
it out a little bit. That's a little tip
that I use a lot. There we go. So now it's just a little
bit more straight. I don't mind that it's
imperfect. I kinda like that. Let's draw this part of the bridge and try and make it pretty straight.
I think I did pretty good. Now, I will draw the
connector pieces. Space those out a
little bit more. As you can tell, I've
kind of angled my bridge. I'm trying to keep
it parallel to my letters so that this line
is parallel to this line and these lines are parallel to that line because
I think it just kinda makes it feel a
little bit more cohesive. So that's what I'm doing. And now I can draw the kind of the cables, the
suspension cables. So I'm going to connect
that one to that one. I'm going to kick the same ones, that one to that one. Then this one. That one. This one's going to
come down that way. There we go. Oh, I forgot the little
cross beams here. So I'll draw those in. And then there's the, well, actually before I do that, I'm going to add some lines like the cables that are
coming down the vertical ones. But I'm actually
going to do those on a separate layer and
I'll show you why. So let me just create a
new layer really quick. I'll reduce my brush size a bit. And I'm just going to draw them bigger than I need them to be with really fast
strokes like this. And the reason why I'm doing
it this way is because it's when I do fast strokes, it's easier to get
them straighter. They have a little bit more
texture there, thinner. If I were to try and draw them in carefully trained
to get this to that, it might be a little less
expressive, I guess, to me. So that's why I'm
doing it this way. Oops. That one in there. The reason why I put them on another layer is which
I'll show you just a second so that I can come back and actually just
erase what I don't need. So I've got my eraser. I'm just erasing away
what I don't need. So that's why I did it
on a separate layer. Then I can merge the
two layers together. So that's a little trick that you can do if you need to do
something similar to that. Okay? Alright, so that
looks pretty good. In fact, I might
actually liquefy that just a little bit because
it looks a little crooked, because it's on another layer. I can just adjust these cables without messing
up the whole bridge. So that's kinda cool
to you. Okay, so now that I've done that, I can go and just merge those
two layers together so I can tap it and then
choose Merge Down. And there's my bridge. I do also need those little
cement things at the bottom, so I'll grab a gray and
kinda do it like that. Maybe actually it should
probably be behind this. So I'm going to erase
some of this away just a little bit to
make the bottom of it. And then I can go to
this other layer, the one that's right below that. And I can just
kinda, There we go. That looks a little
bit more realistic. A little bit darker
color for the edge here. I'm not getting super detailed. I'm just like adding
a little bit and I haven't even gotten to
the detailed part yet, so I'm just just kinda laying
down all the basic forms. Alright, so the bridge
is looking good. I'm gonna go back to
that layer that I had, the bridge on this layer. And I can add a lot of things. I can add this palm tree or
actually I'll add the water. I'm gonna do the water so
I'm going to grab white. I'm going to make my
brush size really big. And then I'm in a very softly add some strokes
and that's going to, I'm really show the
texture of the brush. You know, if you have a
textured brush like this one and have these kind
of soft foamy shapes. So a lot of foam there. And I'll come back and
probably adjust that more, but I just want to
lay down the color. So I'll probably I can do the, um, the tree trunk of
the palm tree. There. I'll go ahead and select that. And I'll reduce my brush
size again and just draw, whoops, too big or too small. There you go. So I got my palm tree trunk. I could probably do now I can't do the flowers
because they overlap. I can do these elements here. So I'll do like the cactus
and the Joshua trees. I'll just kinda nice
and thick but those in and I will do the spiky
parts on another layer. But I can put these
cacti on the same layer. I'll just kinda Yeah. I can also do the
Hollywood sign, so let me get white and I
will do a small brush size. And the Hollywood sign is kinda, he's like blocky letters. I'm not gonna do it
exactly like that, but get it close. Okay. That's pretty
good. Let me see. There's anything else that
can go on this layer. I think that might
be it already to probably start another layer to add some of these
other elements. So I'm gonna go ahead and
create a new layer now. And let's just start with
this palm tree here. My little color
plan, that green. And then for the palm tree, I'm just gonna kinda
make the brush do the work and like it
looks a little bigger. Just use some like
flicking motions to make these tapered shapes like that. And a few more in than my
sketch. It looks pretty good. Let's hold to spiky. Alright, If it
looks pretty good. So I can also do the
stems of my puppies. So draw those n goes off that way
we've got some leaves. Again, you'd want to look at your reference if
you are not sure exactly how to draw
some of these things, but I kind of had my
way of doing poppies, so okay. Got my stems. What else can I
put on this layer? I can do the redwood
tree trunks. So I think color do
I have for that? Darker brown. They'll make an even logo
reader has read would. Supposedly, that's
a little too dark. So I'm doing really
light pressure at the top and then doing heavy
pressure at the bottom. So I get this nice
tapered shape. A little thinner. Okay. What's a little
crooked? That's okay. Okay. I can do the rest of
the Joshua trees. So let me go over there. Pull that green for this one. Um, let me look at my
picture real quick. Okay. So they're like bushy
and spiky even though like trunks are spiky but
like but she's spiky shapes. So I'm going to
try and draw that. I'm just going to use kinda lots of little
motions like that. Little smaller brush size. That's gonna make
my little spikes. I'm trying to make them as
philosophy as possible. Just lots of little
strokes there. And we got one right here. Then while there,
while I'm at it, I'm just going to choose a
little bit lighter version and a light or lighter
version of that color. And just add a few more strokes just to give it a little
bit of definition. These are kinda like highlights. This is kinda getting
into some of the details that, and we'll just
do it right now. Okay. So let's see what else. We can probably put the
snow on this layer. So I'm going to choose a white, but I'm actually going to choose just a little bit,
little bit gray. And then in this purple
tone for the snow, because I'm going to draw, I'm going to use a
darker color and then I'm going to add
some white on top so that way I have
some highlights. So don't start with
the brightest color because then you can't
have highlights. Look like snow.
Maybe, probably not. Okay. It's cartoons, no. Stylized. So then we can
do this one as well. And I will be coming
back and adding shading to the mountain
and stuff in this as well. But then now I can get
white and just add, actually really, really working with
the light source here, but we have our Sun, so we might as well say that's our light
source and kind of put some highlights on that
side a little bit. I don't know. It's just kinda like
add a little bit of texture so it doesn't
look so flat. And we'll come back to the
mountains and do that. Let's see me every time. I might be all we can put
on this layer so far. We still have to do the poppies, the trees, and clouds, which will be on a layer
under everything out. So I guess we'll do one last layer for the
puppies and the trees. And I will choose my
poppy color over here. Or you could just
choose a color from the color picker if you know
what color you want to use. Alright, so I'll do my puppies. Like my little way
of doing poppies. So very simplified. Doing one over here,
overlapping the bridge. Then I just realized that the
backs of the puppies will need to be on a layer
underneath this so that I can have them behind
this part of the petal. That's fine. I'll just reuse one of
my layers, a little bud. While I'm here, I'm just
going to add a little detail. The fill of redder, red, orange. I like where the
poppy petals overlap. Then I'll go to the
layer below that, which I think is one
of the stems to add. The inside at the
backside of the poppy. I'm just using a lighter
yellow for that. All right, go, go. Here's my poppies, and
let's do this tree. So I'm going back to this layer. And I remember I had like a
blue-green color for those, so I'll just select that. Then for the trees, I'm going to start off by making some really small
flicking motions are like the top of the tree, using this shape as a guide. So kinda bring it down and
then the brushes get bigger or the branches get bigger
and more textured. So as we go down, I'm just going to add some like branches that
kinda do that. And then some that go right over the middle because
those represent the branches that are facing you because they don't all
just go out to the side. So I'm just gonna kinda
keep adding all of those three different
strokes to fill this in and make it look more full. Cool. I really liked
the way that one looks. I don't know if I want
this one to be slanted. It looks like it's
dying or something, so I'm going to change it. I'll choose my freehand
selection, deselect that. And that makes me feel happier. Then I'm gonna do
the same thing. So some little branches
up at the top, then some like one's going out to the side
and over the middle. Again. We're working at such
a small size postcard that it doesn't have
to be super detailed. It's gonna be really small
like when you print it out. So don't worry about getting caught up
in too much detail. Okay, so the last
thing I want to add is my little clouds. So let me go back, see
what layer I can use. I can use the layer
with the ocean, that one to do my clouds. So for my clouds, I'm going to not choose a super bright white
because I want to have two tones in it. So I'm going to
choose a little bit in on my color wheel and
I'm gonna go to my purples, can look at purple
undertones for my clouds. I'm gonna go ahead and
just create those shapes. Yes, they look very dark
right now, but that's okay. Too dark. So I'm making a
big brush size and using small or soft kind of
circular motions to get. It's a little hard to see,
but these will give me like textured edges
on my clouds. So kinda just paint those in here. One more. Right there. Cool. I think that's
all the clouds. Floyd, they've got a little
slanted, didn't they? Not that big of a
deal, but now I'm gonna go ahead and
get a pure white. And I'm going to just add
some little bright highlights to the edges of these imaginary puffy shapes
that are in my cloud. So I'm just like adding
more white on top. And that will get my
clouds a little bit of dimension like that. Since my son is over there, I'm adding all the
highlights on this side. Not super worried
about my light source, but might as well, since we know that there is something of it there, the sun. Okay, couple more here. Now my clouds have just a
little bit of interests. They're not just
completely flat. Shapes. Cool. I think
that looks good. Okay, so I have kinda laid the groundwork for all the
elements of the scene here. So at this point, I'm gonna go ahead and turn off this little reference companions to have all the
colors that I need. And I'm gonna go
ahead into my layers and I'm going to
turn off my sketch. Now I can go in and start adding some final texture and details.
21. Final Illustrations: Part 2: All right, so I'm going
to zoom in over here. I'm going to start
with these mountains. So I'm going to find out
what layer there on, I believe, this
Mountains on this layer. So I'll just start
with that color, get a darker version of it. And I'm going to do a
line down the middle, that's the ridge
of the mountain. Get a little bit darker. Just add some, I don't know, just some texture to that. Mountains are kind
of organic shapes, so I need too much detail. I go and I'm going to do this mountain now
which is on this layer. So just to get a darker
version and Joel are ridge, make this side dark. Didn't even darker
color and just kinda that's more
a little ridges. Then on this side I'll
get this color and add some little ridges there. I don't need a lot
of detail again, I'm just kinda think
that looks pretty good. Maybe I'll even add a little bit of a lighter color and add
some little highlights. Just to add a bit
more texture and make it look more rocky. Okay, Alright, So I think that looks pretty
good for the mountains. I'm gonna do my Hollywood Hills. So I'll go to that layer. For that, I'm going to turn on Alpha Lock and add
some texture that way. I have this really great
brushes in this set called Daddy gouache green. And it has a grainy brush and it has all kinds of
really great texture, which I think will look
a lot like the hills. So I'll start by
sampling, does color. I'll get a little bit darker, just a tiny bit, and I'm just gonna
kinda go over it. You can already see a
little bit of that texture. Maybe I'll do a
little bit darker just over some parts of it. And I might actually
add some green because I remember in that
reference image I looked up, there's some bushes
and things like that. So I'm just kind of
trying to make it look sort of like that.
The impression of that. I think that looks pretty good. So a few more there. Okay. So let's see what else. Oh, the ocean, I definitely
want to work on that. I'm going to work on
this wave over here. So I'm gonna pull up
a reference for that. I'm gonna go back to Safari, pull this over, and then go back to that wave image
that I looked up earlier. I think it was this one. So I can kind of get an idea of the colors that I
might want to use. Because it kinda gets lighter here and then it's got
darker on the edge. So let's start with
the color that I have. A little bit darker. Make sure I'm on
the right layer. So I'm on the layer
with the ocean. And I'm gonna go back to my
painting, a round brush. I'm going to start by
making a bigger brush. And I'm doing this side that it's happening there. Have Alpha lock turned on and turn off the lock
off. There we go. Soldiers, you like
what's happening? And then while I
have this color, I'm actually going
to go ahead and draw some other strokes like in the water just to give it a little
bit more texture. I'm just adding few
horizontal strokes just to give the water a
little bit more texture. Okay. And I'll probably come
in with some lighter colors and do the same. And now I'm kind
of blending that. I'm gonna get a lighter, maybe a greener, blue. So I'm gonna go lighter,
a little greener. And I'm gonna do this
part of the wave, maybe a little too saturated, so I'm going to blend in some of this
lighter color as well. Just like little strokes. A few of those into my water. Waves starting to look
really good. I like it. I'm gonna get white and just
add in some little lines. So you're kinda like
highlights on the water. Sparkling and the sunshine. Cool. Okay, So the wave
looking pretty good. I think I need to put
a little bit more of the frothy *****,
like the white. So I'm going to find that layer. One, white. I'm going to make my brush really big and just
kinda paint in some more of these
blend the top, the wave splashed down here. Although I don't want it
too much because now I'm losing the side of my outline. So it may be all blend in a
darker color into my wave. There. There we go. I have a little
bit more contrast to an outline. Cool. Looks pretty good.
I might blend in one darker color to my water. Just don't need it. Okay. So I think that's
looking pretty good. The wave looks like a wave and
that's what I'm going for. So let's see what else. How about this palm tree will
then work on the palm tree. I'm just going to add a
little bit of detail to that. Maybe some little highlights. Puppies. I could add a little
bit of highlights to those. Like you could just
add a little bit. Just helps to make it look
just a little less flat. And I definitely want to add some highlights
to the bridge. So I'm gonna go to the
layer with the bridge. I'm going to select
that color and I'm gonna choose a lighter, warmer version of that color. Really tried to make
my highlights warmer. There we go. Little.
Okay, that looks good. So I'm going to
just kinda go along this edge just to kinda give this a little
bit of definition. So it doesn't blend into
the rest of the bridge. I'll do the same. This one. I'm just going to add a little
highlight to this side. Make sure I'm doing
the right one. On that side too. You know, I could also add
a little bit there too. I want to sum really like subtle definition across the top of the
bridge would be good. Okay, So that looks pretty good. It's very subtle,
but it kinda helps define what's on top of other
things. So that's good. Let's see what else
we might need. So far, so good. Then we actually might be done with everything
that we wanted to add. I think I'm going to beef up these trees a little bit out, a little bit more color to that. Since they're so
small, you know, having them a little bit more full makes them a
bit more visible. So just going to kind of add
a little bit more strokes to those little cacti right
here are think this layer. So I'm just going to
add some lines to that. A little definition. I think I might need a
little bit more definition between these two mountains. So lightened up one of them. Dark and the other one. Cool. Alright, let me go
ahead and close my little safari
reference over here. And overall, I think I'm pretty much done with
all of my rendering. So I've got my final
illustrations. Of course, you can keep going. You can add as much detail as you would like to your piece. I'm trying to keep things
a little bit simple, but overall, I like the
way this turned out.
22. Speed Paint!: This video is just
a sped-up version of my drawing process. If you wanted to see the whole
thing happen all at once, you could check out
that video next. Yes.
23. Illustrating the Background: So the next step is
going to be to add some additional text as well as an illustrated background if you prefer. Because
it looks awesome. But we want to make
an entire postcard and then also show you how to make a really cool
vintage effect. So I'll show you that as well. Alright, so now that we have finished our lettering effects, we've finished the inner
illustrations of the letters. It's time to start working
on our background. I know I want to add
my greetings from, and then maybe I'll add a
little slogan down here. So let me go up to my layers and I'm just going to group
all of these together, everything that's in
this, this element. So I'm just going to
select all these layers by swiping to the
right on all of them. Then I'm going to choose group. Then I'll just close
that. So now those are all together as one thing. And if I need to move it around, I can, it's a little bit easier. So I'm gonna go and add
some more texts now. So I'll go up here
to the Actions menu, add, then add text
before I type anything. And I'm going to set my font. And the font that I
think I'm gonna try. Let's see. I downloaded one called Damien, which is kinda like this cool, retro looking script font. So let's go ahead and try that and go back to my keyboard. And I'm gonna type greetings from I think I want the Fromm
to be on a separate lines, so I'll just do
greetings for now. I can make that bigger. We talked a little bit
about this before, but as long as I don't
do these kind of these transform tools that distorted my text is still
going to remain editable. But if I were to do this or
this or anything like that, it's going to rasterize it
and I can't edit it anymore. So keep that in mind. You might want to do distortion. I think actually that's too bad. But if you're not
quite committed to what you're reading in
there, you might want to wait. Okay, I'm going to
add some more texts. I'm gonna do from and I'm
gonna put that down there. But you can do like a uniform
resized and it's fine. Alright, and we're going to
add a little bit text here. So I'm gonna go to Actions text. Then I'm gonna do like quotes, the Golden State and whips. And then I can just drag this little note out to make it all on
one line like that. Then I can move it down here. I don't know how big all
want it to be in the end. Obviously this is very plain. So let me start thinking about what kind of elements I might
have in the background. You can add additional
illustrations. You could add a cool pattern you could do with just a
solid color if you want. You can do anything you want. So I think I might wanna do another son because I always think of the
sun in California. So maybe I'll do like a
sun here and we'll have some rays coming up and maybe some wavy
lines or something. So let's go ahead and we'll just change
the background color. We'll just start there and
kinda see what kind of colors go well with it. Maybe like a bright
yellow. It's too bright. I don't know. You can kind of
play around and see what looks good to you. Owe me. I'll just
start there for now. Let me do that.
I'm actually going to create a new layer
because I think I want to add some illustrated elements. So this new layer, I'm going to move
below all my text and I'm going to draw a sun. So I'm gonna get
a bright yellow. And I'm still using
my paint round brush. I'll go ahead and just kinda oh, you can't see that at all. That's okay. I'm going to draw
a circle there. I might not be the right
shade of yellow anyways. Okay. Let me change my
background color. Okay, that's a
little bit better. And then I'm going to add some light rays
coming out of it. So I'll do that color and
maybe like a little brighter. I'm going to put a
layer below that and we'll see how this looks. So I'm going to do like
arrays coming out. Its color is not working,
but that's okay. We can always adjust. Okay. I'm gonna go ahead and fill
these in a bigger brush size. Alright, I know I realized this is all really hard to see, but I'll adjust the
colors in a moment. I'm just filling in, in-between the two rays or two lines to make the solid re. Remember you can do your
background however, you want. Lots of great examples of these venture style
postcards and penicillin, the different things
that they put on. I already put on the state
flower in the illustrations, but I could do like
the state bird or the other state things or
other California's things. I just kinda wanted to
keep the background a little bit simple
for this one. Alright, so let's
move this down below. And I'm gonna change my
background color again. There we go. So now we can
see that a little bit better. And let's see, maybe it can play around with
that color a little bit. I can go to hue saturation, brightness and just make
it a little brighter, a little less green. Maybe. Here we go. That
looks pretty good. So now that I've done that, I can kinda change my lettering a little bit on
that little spot. So maybe I'll try doing
wait for the text. So if I want to just change
the color of the text, I can tap it at it, choose edit text from this menu. And then I can go to my colors, and I can choose white. And I'll do the
same for all these. Okay, I'm changed
those all to wait. Okay. This getting
so messy over here. You got to fill this in. And then maybe add a
little bit of a not like a not like a block
shadow but something similar. Let me see. I'll duplicate that and I will
change the color to Lego, reddish orange,
something like that. And then if I move it
below the other layer, I can just kinda skewed
it out a little bit. So that way, it kinda
like pops out, Whoops. Kinda pops out a
little bit without you could go in and connect
all these lines together, but that's too much work,
so I'm not gonna do that. I'll probably do it for this
one to the Golden State, so I'll duplicate that. On the bottom one. I'll do edit text and choose wonder if I can
just sample this color. Totally that worked. Okay. Sometimes working with text is really annoying in Procreate. It's not my favorite for laying out tech see like I
didn't even change the color. I'll just do choose it. Okay. That's good. Stop it. Okay. So far that's
looking pretty good. I don't know if I
want to add any other elements like I could, I don't know,
create a new layer. I could add some just like literally designing
decorative elements. Like I could add a
wavy line across here. I might need to move my
text over, rearrange stuff. But it's totally up to you. You could do something
like that or not. Let me just move my
text, resize that. And I probably need to move
the whole California up, so I'll grab that group. Kind of move it up a little bit. Alright, so you can keep
moving things around until you get a design that
you are happy with. But I think that
looks pretty cool. We've got, we've got
a nice background. You've got some little
design elements, and that's looking pretty good.
24. Vintage Print Effect: Now that you've completed
your entire postcard design, I want to show you a really
cool vintage print effects that you can create
in Procreate. Now I want to show
you how to create sort of a vintage print effect. And this is really fun
thing to play around with, and you can apply this
to other illustrations. I've used this a lot and in other illustrations
that I've done, but works really well for this. So what we're gonna do
is we're basically, we need a flattened version
of all of these layers. There's a really
fast way to do this. So all you're gonna do is you're going to
take three fingers, swipe down on your
screen to pull up the Copy Paste menu and
you're going to choose Copy All, Copy All. And that selects it copies
all visible layers. So anything that's visible,
it's going to copy. And then I just wanted to
make sure that I go to the very top here,
select the top layer. And then I'm in a Chou, I'm going to do the
three-finger swipe again and choose Paste. So basically it
copied everything and then it pasted it
all onto a single layer. So now I have a
flattened version of everything that
I've done so far. Because you need to
have it on one layer in order to do this effect. So to do the cool
vintage effect, we're gonna go over to
the adjustments menu. And we're going to
choose halftone. And all you do to adjust the half tone to add it is slide your pencil
across the screen. So if you went really big, you would get this really
crazy halftone effect, which is way too big
for what we need. You can't read anything anymore. So I'm gonna go down so
that it's kind of just like barely visible. Like that. I'm at 6%, I probably
get a little bit more. It's up to you how much
you wanna do this. And if I zoom in,
you can now see that it's got this cool
halftone effect. So it's up to you how
much detail you want to lose to add this effect.
So I'm at like 8%. And then there's a second
part to this effect. So after you're done doing that, you're going to go back
to the Adjustments menu and you're gonna go into
chromatic aberration. Chromatic aberration. And then you're going
to choose displace. And now we're basically
just going to like this. This kind of separates the
colors into three separations. And we're going to just
offset that a little bit. So it's easier to
see if you zoom in. See, I'm kinda, I'm
sliding it and they're getting it's getting all wonky exceeded like three
color separations. We just want to offset it just
a little bit super subtle, but this kinda gives the effect that the machine
that printed this out was a little off register
and didn't get all the, it didn't quite print all the three colors
of ink properly. So it has this
really very subtle, but like awesome vintage effect. So then you can go up to your layers and you
can turn it on and off and you kinda see
the before and after, like with and
without that effect. I think it looks pretty cool. So you can kind of play
around with that and how much of the effect
you want to add. But I think it really
adds to the whole like vintage postcard thing
that we're going for here.
25. Printing your Postcard: So now that we've got
our design all finished, let's start thinking about how we might want
to print this out. I have included
in your resources folder a couple of print
at home templates, so I'll show you how to
use one of them right now. If you want to
print this at home, we're gonna go ahead and open
up one of those templates. So I'm going to go
into my file's app. And I'm going to go into
my Downloads Folder, and I'm in the postcard
Class Resources folder. And then I'm gonna go into
print at home templates. And I have one for A4 paper
and one for us letter paper. So these are procreate file. So if we tap them,
it should just open up Brian into procreate. So I'm going to open
up the US letter file. And if I go back to
my gallery view, now you'll see that
that imported. So I'm just gonna go
ahead and open that up. And there's a couple
of things to note. We've got a few layers here. We've got these red lines
that are going to help you put your design onto the card, which you'll
see in a second. And then we've got
our cut guides which are going to show
you where to cut that. And then this layer
is where we're going to place the artwork. So I'm gonna go
back to my design and I'm actually going to
export that to my camera roll. I'm going to the
Actions menu share. And I'm going to share
it as a PNG file. And then I'm going to save
it to my camera roll. Great. Now I'm gonna go
back to my template. I'm gonna go to
the Actions menu, Add and insert a photo. And there's my design. And as you can see, it's
taking up the whole Canvas. So what we need to do is resize it down to fit
within these guides. So make sure you're
in uniform transform. And I'm just going to
make it just a little bit bigger than these red lines. The red lines are
essentially where it's going to get cut off
when you trim it. You want it to be just a
little bit bigger than that line just so you have a little leeway as
you're cutting, you can probably go a little
bit smaller if you want. This is, this is one
of the reasons why I recommend not
putting anything too close to the edge
when you're designing so you don't chop anything off. So once you've got it placed, now I'm gonna go
over to my layers. I'm going to turn off
the red guidelines. So that's the one that
says Turn off to print. And now I've got a template
that I can print out. When I cut it, I just need a cut along these little
crop lines here. And I kind of wrote that
cut along these lines. So I can share this as a PDF. So I can go to the
Actions menu share. I would share it as a PDF
just because I think it's the most printer
friendly file format. And then you can choose
the best quality. Then I can AirDrop it to my computer so I
can print it out. Alright, so let's say we didn't
want to print it at home. We actually want to
send it off to get printed from a print
house or print vendor. So in that case,
you're just going to want to export it just as a PNG or whatever
file format they accept. Png should be pretty
widely accepted. Pdfs also a good option. So you just basically
share that to your camera roll
and then you can transfer it to your computer. Do you upload to website
or something like that? And you also want to
think about what's gonna go on the back of
your postcard design. And I actually have included
in your resource pack a few different back postcard back designs that you can use. So I'll kind of show you
what those look like. So there's four
different designs. And these are all set
up for us postcard. They, they're all, everything's
in the right spot. So there's four different
designs you can choose from. And of course, you
can also design your own postcard
back if you wanted to add some little design
elements and other fun stuff, just make sure you check with
us or wherever you live. Postcard and mailing regulations so you don't put stuff
in the wrong spot. And if you are going to do
the print at home method, you could import that here, but sometimes it's hard to print double-sided and
get everything to line up on an at-home printer. So I don't know if
I'd recommend that, but you can always
experiment and play around with it
if you want to try printing on the back
of a postcard at home.
26. Photo Card: Part 1 - Text Effects: All right, So I actually
have a bonus lesson for you. I mentioned a
little bit earlier, but this technique is also a great way to
incorporate photography. It doesn't have to be
illustrations in your letter. You can also use photos. So I'm going to show you how
I created a holiday card for my family using the same
technique and some photos. So I'm gonna do it from start
to finish this first video. I'm going to take
you through the process of creating the texts, but I'm gonna do it very quickly so that you
kind of see how fast it might take in real time when I'm not
explaining every step. Then in the next video, we're going to add photos to it. So let's go ahead
and get into it. So I'm gonna do postcard
with my family. I'm going to put our
last name on there. So let's go ahead
and get into it. I'm going to switch
my color to black. And then I'm gonna go ahead
and choose a lettering guide. I think this time I'm
gonna do the double wave. I'm gonna do two lines of texts, the bar dose, that's
our last name. So I'm gonna go ahead
and select that. And then I'm just
going to tap on the screen and re-size it. Can also share this if I want to make it go up a little bit. Okay, I'm gonna go to the
Actions menu and add some text. I will change the font. I'll just use Erica won, like I was using before. And I'll type in. And that's gonna go here. Go ahead and do
my manipulations. Just kinda work this. Now I can add some more text. This is going to say our dose. So I'm just going to work
this into place now. Okay, so I've got my texts
warped and it's all rasterize. I turn off my layer
lettering guides and I'm just going to
merge these two together. So I'm going to merge down. Then I'm going to move this
a little bit. That way. I'm going to round
out my letters. I'm gonna go to Gaussian Blur, blur it a little bit. Go to my selection tool
that automatic select it. And then also select these. Invert, create a new
layer and fill it, and then delete the other one. Now I'm going to add my outline. So the first thing I'm
gonna do is just change the color of this
to something else. I'll do like a green this time. Color doesn't matter
at this point. Okay, I'm gonna duplicate that. I'm going to turn off alpha
lock on the bottom layer, go to Gaussian blur and
blur that about 10%. And then we're going to
use our selection tool again and make a selection and make a big
outline like that. Then I'm going to invert that, create a new layer and fill it with a little bit darker green. Now I'll delete
the blurred layer. So I'm going to
duplicate this layer. I'm gonna choose the bottom one. I'm actually going to choose a darker color and
just fill that. Can't really tell what
happens, but it is darker. Then I'm going to move it over. I'm just gonna do
it really quickly. So I'm not going
to use the drawing guide method this time. I'm just going to try
and do it really fast. So I'm going to calligraphy and selecting my monoline
brush and then just connecting these
little areas here. My angles might not be
perfect because I'm doing it this way,
but it's okay. Okay, and I'll do
on the top here. Alright, and I think I've
done all of the edges, so everything is connected. Now, I'm going to
add a little bit of shading using clipping mask. I'll use the charcoal
brush six be compressed. I'll turn on multiply in my blend mode and
choose like a gray. Then I'm just going to add some shading on the
bottom of these letters. I like that. I'm doing this really quickly. Definitely adhere to. End up here on the
top of these letters. Maybe like right there.
A little bit in there. Okay, that looks pretty
good for shading. Finally, I'm going
to add my inline, so I'm going to select
this top layer, the one that's just the letters. I'm going to invert it
and then I'm going to feather the selection
a little bit that. And then I'm going to create
a new layer and fill it. Let's color gray right now. I'll change it to white
and a little bit. And then I'm gonna go in and select the individual letter. Kind of adjust how big I
want the outline to be, and then select
all of my letters. And now I'm gonna invert it
again, create a new layer. This time, I'm going
to fill it with white, so double-tap close
to white and fill. Okay, and then I can delete that blurry layer and
create this in our set. This to be a clipping
mask. Now we have all the components
all finished.
27. Photo Card: Part 2 - Adding Photos: That was a very
quick run-through of creating all
those texts effects. Now I'm going to
show you how to add photos to your letters. So it's pretty easy to do. I'm gonna go ahead and go up to my Actions menu and
insert a photo. And I have a photo here of my family from one of our
family photo sessions. I'm going to enlarge
it a little bit. I go. Okay. So there's my photo. I'm just going to
turn it off and it's kinda evaluate what
I wanna do here. I have like four individuals
that I can stick into the letters and 1234567 letters. So I'll probably
going to use that. And then I have a few
individual pictures of my kids. I'll put in there as
well. So let's go to the photo, going
to select it. I'm gonna go over to
the selection tool, make sure I've free
hand selected. And I'm going to start with my son here and just draw
a selection around him. Then choose copy and
paste from down here. I'll turn off that photo layer and see now I have just him. Then I'm going to drag this down in-between my outline
layer and my letter layer. So it automatically
becomes a clipping mask. And now I can resize it. I think I'll put him
here and the letter B, the name is bear, So
that's appropriate. Then I'll erase the stuff
I don't need. There's one. And let me go back to the layer with my photo, turn it on. And now I'm going to select
the next person which is me. So then draw selection there, choose copy and paste. And I'll drag that down here. Turn off this layer
with the photo. I'm just like copying
each time so I can keep reusing
that same photo. And then I'll place me, move me one letter over. So there I am with
my little son here. And then I can erase
this stuff I don't need. There we go. Alright, now let's
get the next person. I'll go back to my
layer with the photo, get my husband little bit
more and copy and paste. Turn off that layer and
drag this one down. I think I'm going
to put him I'm like doing every other
letter for now. So I'll put him right there. Then erase what I don't need. Okay. Alright. And
my daughter is less, so I'll grab her and I'll
choose copy and paste. And move her down here into
my clipping mask stack. And she's gonna be
right there at all. Erase what I don't need. Okay. Now I'm going to import
a few other photos to kind of fill in
these other I have three spots and I
have three kids, so I'm going to fill
those in with them. So I'll go up to
the Actions menu, insert a photo, and I'll do the first one,
a little Ralphie. And this time I'll
just where's he going? We'll put them in there. That's really cute. So instead of erasing what I don't need, I'll just draw a selection
around what I want to keep. Tap that, then choose Invert. And then I can do a
three-finger scrubbing motion to clear out everything else. So that'll clear
out your selection. So I just select the
inverted and then clear. Let's add another
photo to my son beer. Making a funny face. Cute. I'll do the same thing. I'll just select around their invert it and
then clear the rest. Whoops. Here we go. One more photo. Old daughter. I mean, it would be cool to
have a photo that goes across the whole thing like that if you have
the right photo. But I like doing these
little individual letters. Her right there. Then again, I'm just going to
select Around there, tap that little gray circle, and then choose Invert. And then I can
clear. Here we go. Alright, so we've
got all the letters filled up with pictures
of my family members. I also have the which I could
choose a color to use for that or I could
just use the photo. So I have this photo still, maybe I'll drop that in and
just kinda fill it with some of the nature and then it'll look like
it fits with the rest. So I'll just erase everything that I don't need
here, which is all this. I think that looks good. Alright. So there is all my letters all filled up with pictures
of my family members. So now you can take it and create this into
whatever you want. I could create like a
little holiday cards. So maybe I'll add a background color of green and red situation
since it's the holidays. Then I could also add some text. Change my font. I can place that over
there. Right there. I can add some more
texts and maybe put the year. There we go. You can keep going with it. You can add some elements
to the backgrounds and little designing things. Maybe some, I don't know, holiday design elements
and things like that. I can show you a version of
this that I created before. So this is kind of that version. And I also added the vintage
effect that I showed you. So I did that on this one,
which looks pretty cool. So this is a different
version of that.
28. Conclusion: Congratulations on
completing the course. I hope you had a lot
of fun designing your postcard and
you're excited to create some more
postcards in this way, I think it's such a fun way to explore favorite locations,
favorite destinations, places you want to go, places you've been other things that are important to you
or things you're a fan of. There's just a lot
of possibilities here and a lot of ways
that you can also use these same the text
effects in other ways too. So I can't wait to see what other stuff you create using what
you've learned here, but please do share your
finished postcard in the project section
so that I can see it and just hit tell
us about your process. I'm really excited to
see what you've created. Up next, I have a couple more postcard designs
that I've put together. So if you want to
watch the time-lapse of me illustrating those, you can check that out next. Otherwise, I hope that
you have a lot of fun and thank you so much for
joining me in this class. And I wish you happy art-making. Buh-bye.
29. More Examples!: Good. Hello.
 Lisa Bardot, Happy Art-Making!