Transcripts
1. Introduction: Photography manipulation
is a great way for me to express my ideas, my view upon the world, and to really let my
creativity run friendly. And I really hope
that I can spark that creative freedom
in yourself too high. I'm Madeline gel, visual
artist from vigorous Romania. And in today's class, we are going to edit a boring, semi boring photo into
something very interesting, will be sketching and gathering
photos for our project. Then in Photoshop, I will
teach you how to mask, how to get your
composition right. And finally, adding mood and
atmosphere to our project. This class is great
for beginners or intermediate artists that want to get creative with
adapt Photoshop. I'm really excited about this class as I
will get to throw my full process of editing
a portrait of mine. If you want to level up your photography game or just
to have fun with Photoshop, then this class is for you. I'm excited, ready to edit, so I'll see you in my class.
2. Sketching Ideas: So first things first, before we even think
about opening Photoshop, we first need to have
an idea to work on. I know it sounds scary. Like you have this
big blank Canva that you somehow
need to feel with your most amazing idea to impress others and
impress yourself. But no, it doesn't have
to be that overwhelming. Because let me tell you. There is no such thing
as an original idea. And why is that? Well, ideas are
only elements that our minds are putting together
in one beautiful idea, a little baby, that is now your idea that you
think is original, but it is actually not. Okay. We are getting these elements from
past experiences, from songs, movies,
stories altogether, or even by objects. And actually this
is the thing that inspired me for this class. For some time now I am
doing some origami birds. And I feel like I can
play with these elements. So this is my
inspiration for today. And we can now start
sketching some, some ideas. You can use a pen. You can you can
use pen and paper. I will be using a Wacom tablet. This is a digital tablet to actually be able
to draw in Photoshop. So let's get started. Here I have Photoshop. I will explain it better
when we start the editing. But for now we're focusing
on sketching our ideas. By the way, you really don't
need to know how to draw. Okay, this is just a great
way to get these ideas out. So, you know, to maybe experiment with those
ideas and combine elements. It's a very important step. Here, e.g. I. Can have the origami bird maybe on my
hand like you just saw me. So I will have gummy bird here. And either not a
simple portrait. Yeah, I usually start with simple ideas just to get going. Nike, you don't have to come
up with the most amazing. Let me know. Just start sketching and the
workflow will get you there. This is one, maybe
origami birds. So thinking about those, I sent something light, pretty light because it's paper. So perhaps they can fly somehow. Yeah, maybe I am also
levitating with them. I don't know why, but it's an idea. So the birds are
flying, Why not? And the light as a feather. We can have also
some clouds in here. Here and there. Now it's getting more
interesting, I think. Well, okay, this is one. Yeah, we can do more
blurts here and there, but these are details, so don't stress it too much. What else? What else? Maybe we can try
something even crazier. Perhaps these birds are able to, to lift me now because
somehow they got super, super strong and
now lifting me up. Yeah, you can make it funny. Don't overthink this. Now, looking at this
with the birds flying, I think it's an idea that I can perhaps use
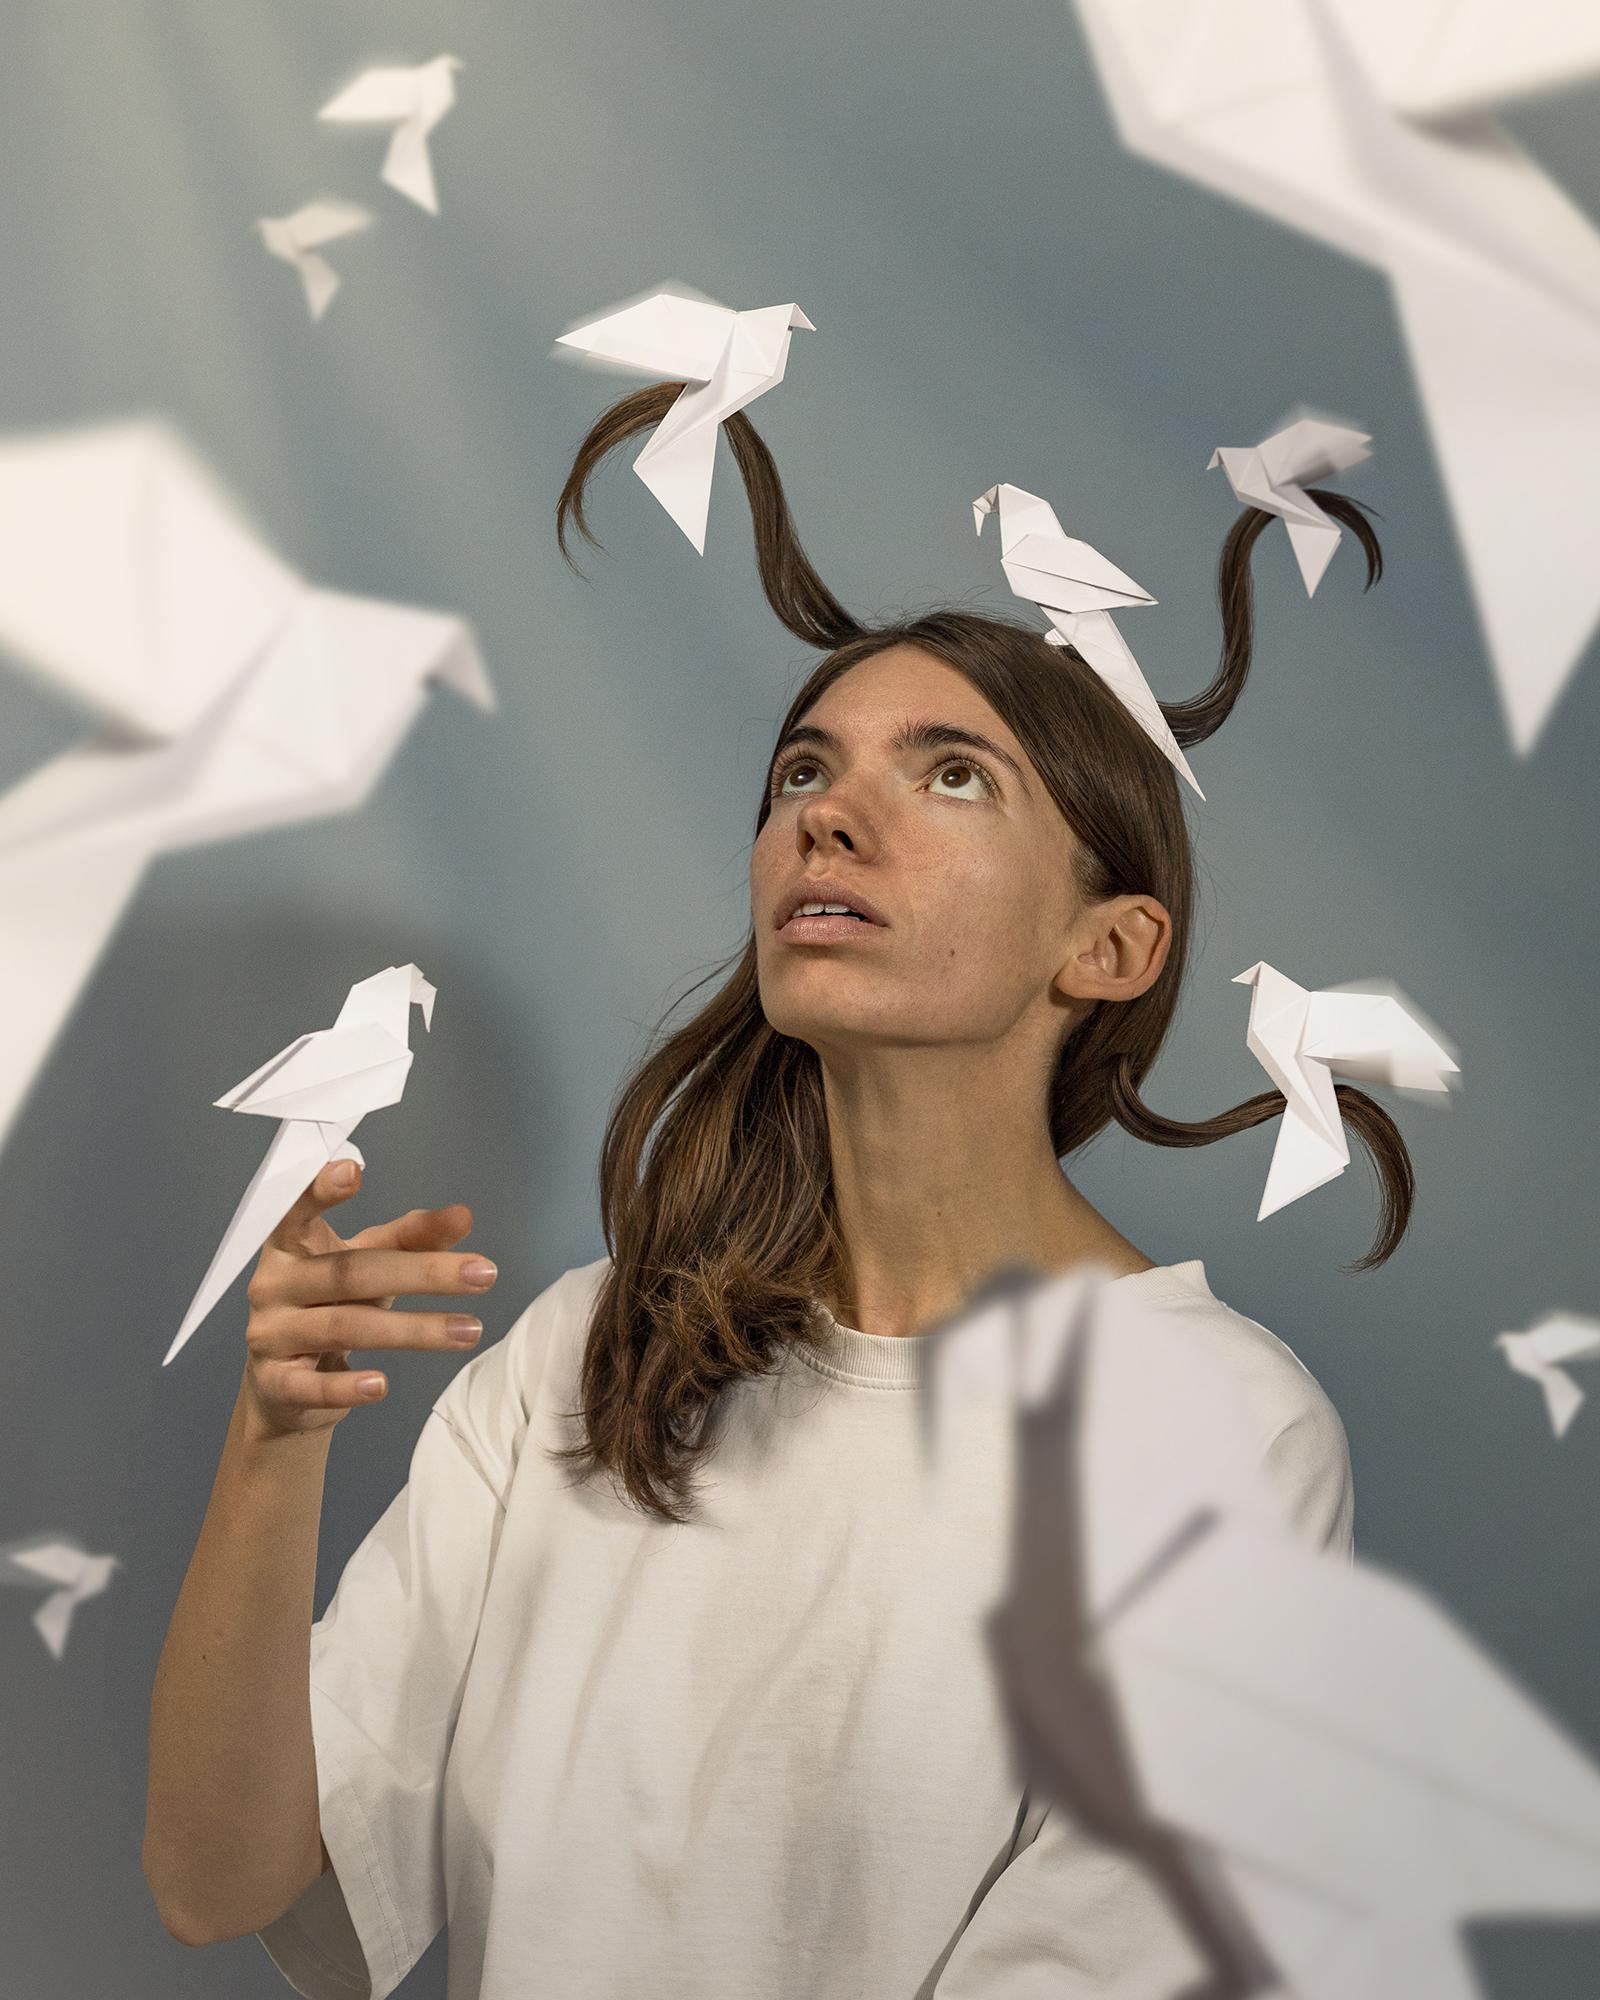
in this photo here. Perhaps the strings of hair. This is here, okay. Having this, this, I will have the
birds flying with my hair. I don't know why
they might do that, but yeah, I can I can go
and get more of this. But I think the first sketch
is actually the one that I will be making in this
course because I feel like it's also easier. So having this in mind, I will now start a short list of the elements that I need. So I first need the portrait, then I need the strings of hair. I will need three of these. And the birds flying. Another three photographs
of this bird. So this is our idea. I believe that sketching
is a great way of planning and
organizing your project. So now it's your turn. Go get inspired. Sketch some ideas, and
prepare a list with the elements that you
will need for your photo. And don't forget to
share this list with us. To the next lesson.
3. Gathering Photos: Great. Now that we have an idea, we now need to go gather the elements in order to put
that idea into practice. There are two ways
that you can do that. The first one, and I
think it's the best one that I recommend to you is
to take your own photos. This way you are able to
control the lightning and have all the elements
with the same light source, a casting shadows
in the right place. I believe that this is the
way that will give you no headaches in the
post-production process. But we don't all
have the cameras, the equipment to do that, or even the elements that you
implemented in your idea. This is taking us to the next
way of gathering photos, which is free stock photos. And here I have a few options. I have three beautiful
sites which you can try and use it
for your project. So we have unsplash, we have Paxos, and we
also have Pixabay. And it's, it's a great way
to find the resources. Let's use Unsplash. Foreign example. This is a great photo because you have the
white background, which is easier to get
rid of two in order for you to use the photo
in the composition. And you have multiple resources. If you don't find
anything in one side, you can go and check
for the other. Yeah. Okay. So this step might be a bit challenging to
be honest with you, because you really
need to put in the time to find those perfect photos that
you are searching for. But I'll share that
with enough patients. You will find a
great photos to help you put altogether these
beautiful ideas of yours. I will go take the photos. I'll have a photo
shooting session. Then we will finally
start editing them.
4. Selections & Masks: So here we are in Photoshop. I opened one photo, I took, then dropped over it. All the images, L being needing. We have the strings of hair, the birds, all of it. Let's get straight into
cutting the forest bird out. We have multiple ways to do it. I'll show you the
ones I use the most. First things first,
make sure you selected the layer you
will be working on. We'll start with something
called magnetic lasso tool. You just click and drag
your cursor around your subject until you get
to where you started from. Easy, nice and slowly. Then you click again, making your first selection. It usually does a
pretty good job, but here it did not
do it perfectly. So for this, we'll next use the Polygonal Lasso Tool
for more precise selection. You are making sure you're
adding to that selection. After you are happy
with your selection, you just go down here, click on the mask, and now the background
has disappeared, leaving us only with the
subject that we want. So in order to actually put
these parrot on my shoulder, we will be using Control
T to transform the photo. By the way here, it will see the whole
layer as we only mess, not to delete it, the rest. The photo is still there. And photoshop sees everything. Maybe it's easier to cut it, but it goes for now. There's a part that
needs to be hideout. So selecting our mask, we can take the brush and
with the color black. We can paint over the
part that we don't need. Black hides, white
reveals. That is it. Moving on to the next bird. We select the layer. Make a selection around
the bird this time. Mask it out. I'll position the bird the way it's supposed
to be on my head. Because it's basically the
same background and lightning. I will just paint over it. Having some soft edges so it can blend nicely
in the background. Yes, so far looking good. I believe we can go
to the next one. Now we're making
another selection. This time I will cut it out. We can delete the
layer beneath it and we'll just play with the
area that we actually need. Now, I will show
you something new. Going to select
Subject Photoshop does a great job at
selecting our subject. I believe it's the
greatest tool. It's very fast. Those little mistakes like the things that it
cannot see very well. I will just take the lasso
tool and at that part in, we again mask this. And here it's also easier to move the elements around
and play with it. The same I will
do for this bird. Select, delete the layer that we don't need. And select subject. Oh, maybe not working this time. Which is fine. I will go do that again. Now we have another
selection tool. This is the magic wand tool. And basically you are going to select parts of your subject, and it will select all the parts with the
same color and light. I believe this is a
great tool when you have elements on
white background. It might do a great
job here also, but not for the shadow
as the background has a similar color for it. We will go back to the Lasso
Tool, my trusting friend. Here it is. As you can see, there are multiple ways
to make a selection. Choose whatever you like best. It also depends on the subject, the background that you have. You kinda work
through all of them, finding the best solution. Now going for the
strings of hair, we are selecting,
deleting, moving around. As you can see, this
string of hair should be in the back. So I will bring the layer with the parents in front
of the string of hair. Just like that, you click
and drag wherever you want. Just because we are here and I want to be a bit organized, I will change the
color of our layers. So you just right-click
on the layer and down here you
have multiple colors. So I will choose
the yellow for now. And now, that's my string
of hair is in the back. I can see that I need to cut
the background here out. I'll try to make a
new selection of the background of the part
that I need to get rid of. Click on the mask
with the brush. I will paint with black over it. Here it goes in because I have selected also
the shadow, the Paris wing. I will paint it back
with some white. Okay. Pretty easy, right? I know there are many things
to take into consideration. But with time and practice, you will get used to
using the right tools. With everything that I've
showed you right now, I will try and select the
hair and all the elements. I will also need to
work on my base photo. The base photo will be
actually a combination of two as they had the first photo as a test and liked
how my hair look. I believe it's more clean
and pleasing to the eye. So I will go ahead and finish selecting my elements and come back to working on
our composition.
5. Composition: Great, welcome back. Now we'll be doing
some competition. But first of all, let's organize these layers. So by double-clicking
on the layer's name, you are changing the title. And you can name the
layer as you want. After this, because we will be moving elements all
around our page. We want our base
layer to stay intact. You just select and click on this little icon over
here. It's a lock. And now trying to
select the background, you are no longer
able to move it. After some time. If you want, click again the lock and
you're able to edit. Now here on the Tools menu, you will be selecting
the crop tool. And if you click on the image, you will see the grid
of rule of thirds, which is usually shown
also on the camera. It will help you to have
a better composition. So we will cut our composition. I will use a four
by five format. And moving things around, I will be searching for the composition that
I think looks best. So we need less
space to the bottom. All our action is more on
the top part of our image. Also makes sure to
have the unselected. If you have selected the
delete cropped pixels, it will delete everything
that is not inside your crop. I keep that unchecked
because I'm not always sure that this is
the final crop that I want. So it's nice to have
something to get back to. If I change my mind. Before I duplicate my bird, I will make sure that I
can easily work with it. So select the bird
layer via cut, moving the mask and the lake, the background that I want
to paint anything anymore. Now I can easily
work with this bird. Control T and scaling
the bird down. Moving things here and there. When thinking about composition, it's trial and error. But we are also thinking
things through. Okay, so I'm moving around
the strings of hair. So I'm looking above my
head but nothing is there. The bird here makes
lot more sense. But I'm not sure that I like
the composition right now. It looks pretty funny
like I have two horns. So we're trying to teach that. Let's see, yeah, triangle, all sorts of stuff. Maybe I will cut something out. I don't really need
all the elements. It's okay if I get rid
of something here. Now I think I will start
duplicating the birds. I do need more elements
in my composition. So perhaps with some of them, I will put behind me to have smaller birds in the background that I cannot select clearly. Just to make sense
of the depth of field and make things
more three-dimensional. So to show you
another trick here, I'm duplicating this bird. If I right-click on the mask, I can choose Apply Layer. And after that, I
will convert to smart object by having my
layer as smart object. I am actually preserving
my original photo. This way if I go to
Filter and want to put some Gaussian blur using a
radius solver around five. I think. I can put effects on my layer without
having it permanently. So whenever I want to
change the effect, I can just double-click and
change it or even hide it. It's not there forever. I did not ruin my
layer. It's there. I can always change it. This is what I will be doing
with the rest of the birds. So apply mask converted
into a smart object. I can just drag and drop the
effects holding the Alt key. And now if I go here
to Gaussian Blur, I double-click it and now
I can change the aspect. And in this composition, maybe my parent is
not working out. So I will bring it forward just to use it
because it's very cute. So yeah, I will have
the same process. Converting it and using
some Gaussian Blur, make it look more realistic. I want this to be even
closer to the cameras, so bring the radius to 26. Yeah, that's good. Okay. So I will fast
speed this process because from now on it's just trial and error are
moving things around, saying how well they look. Bigger and smaller birds. You can have a more
minimalistic composition. But I felt like it's
too simple for me. So I'm having now
multiple elements in order to feel like I
have a whole image. Now to make things a little more realistic on some
of these birds, I will bring the
brightness down a bit. Also the contrast. This way, the birds that will
actually pop out will be the birds that are
on my hand, my hair. But yeah, so far so good. I will change a thing
or two right now. I'm satisfied with it.
6. Motion Blur: Great, So now I want to
show you some trick, because it's very important
when you are putting all these elements in your composition to make
them look realistic. So here we have the
bird and we want to show that it flies. This way. I will be selecting the wings, copy the selection, then
applying the same mask. So I don't have
to mask it again. We apply the mask converted
to a Smart Object. And here in the Blur Gallery, you have motion blur. So by using motion blur, we are making sure that we can express the
feeling of flying. We select the angle in a
place that feels real to us. Okay, the distance, we
want it to be nice, too extreme, like
this, around 100. Safety, I think it's
okay. It's good. So I will paint over a new mask here is to
make it more believable, like it's flipping the
wings in a small area. Okay, Now, keeping it organized, I will do basically the same
process for the other bird. Of course, when you
are selecting this, makes sure that you have selected the layer
that you want to edit. So click on the
layer and now you can copy your selection. And here it goes
the same process. Again using Motion Blur. And after I am choosing
the right angle, I feel like this also
needs a little mask and we will paint
over here an angle. I believe it's too harsh, so maybe we can bring down the opacity because it
should look blurred. So that's good. That's it for now. This is just a small tip. If you're having elements
that are flying, who will go ahead and do the
same for the other birds.
7. Small Retouch: Now I am back. The birds
are looking realistically. The wings are in motion, which means they're flying. They're not actually flying. But you get the point. I also got better at
organizing stuff, holding Shift while you're
dragging over them. And you're dropping here
down to the folder icon. Now you know that you
have all the elements in a single place just to
make the process easier. So now I will show you how i2, small retouching on the skin. We want to copy the base layer to make sure that if we
don't like anything, we always can come
back to the original. So there are multiple
ways you can do this. In the Tools menu. Here we have the
Spot Healing Brush and you're using it by painting over a surface that you want to change
or to get rid of. I don't recommend
really using this tool as sometimes it doesn't
do a pretty good job. Like here you have pretty
bad texture, color changing. So the best is using
the Healing Brush tool. And if you ever use the clone stamp is
basically the same thing. You're selecting an
area where you want your information to come from in your painting
over the surface. I think this tool is
better than the other one, but the same goes for the
skin retouching using multiple tools depending on the problem that you
are trying to solve. So here we have another
one, the patch tool. This is great for bigger areas. So you're making a
bigger selection. Take the information
from where you want. So this can get a
bit time consuming. This is of course optional. You don't have to do it. We are beautiful just
the way you are. But sometimes I feel like it might distract the
viewer's attention. Anyway, doing minimal retired. I don't want it to feel fake because personally I
like the natural style. So as you can see, the Healing Brush Tool does a great job interchanging
the texture, but with the color, I believe it's better
to use the Patch Tool. So yeah, that's
some basic retouch. You can see the
before and after. Yeah, looking good. I
am satisfied for now.
8. Mood & Atmosphere: So here we are having
the last lesson. I'm happy with the
composition with how every element looks. So what's left for us to
do is to wrap things up and give the whole
image mode or a field. So if you are going down here, you have the adjustment tools. I will start by
having a gradient. So you have multiple
presets in here. You can also make
your own gradient. I'm always using the brown tones by clicking anywhere
here on the grid, you can just get another cursor and add
whatever color you want. But if you don't want any, you can also just drag and
move it out of the way. So yeah, you have
multiple presets. You can use whatever
you like best. I'll stick with my brown
and yellow gradient. So what's left for
me to do is to choose a blending mode
here near the opacity, you can see multiple
blending modes. I usually go with soft light and then bringing the opacity down to somewhere around 30 because I still like the natural look. Another trick I wanted
to show you is how to paint your own lightning. So you are making another layer and playing
with the brush tool. You really don't need to
have a digital tablet. E.g. I am now using
my mouse where bringing the opacity down the flow and we're
changing the color, we are choosing a light yellow. And by holding down
the Shift key, you are painting straight lines. And this will be
the rays of sun. You can choose multiple length. You can change the density, smaller and bigger sizes. You're playing with this. When you are done, we are
going to transform this. So Control T. And I will
be playing with this toward the top part of our lines will be
smaller and the ones down, I will make them larger. And this is basically like having a light source
coming from above. Whenever you're
satisfied, hit Enter, and now we'll be moving
around this light. Again, Control T
for transforming. We are rotating our light source wherever we feel like
It's looking realistic. I also believe that I want the big birds not in
the light source. I want them to feel
closer to the camera. Now let's play with
the blending modes. Again, the soft light is great, and now I will convert it to a Smart Object
because of course, I will be buying it. I want it to be as
soft as possible. Nothing too harsh. Looking great. This is before and the after. Let's bring the opacity down. And I feel like I
want it to fade better in the background so
I will be masking ground. Looking good for me. Great. I think
we're almost done. We can now play with the edit. We will be using the
Camera Raw Filter, but in order to put new
effect on the whole image, I will make something like a screenshot of
everything we did here. Using Control Shift, Alt. We are making a screenshot of
everything that we've been working on as a new layer. And then we can go
to Camera Roll. And here we have multiple
ways to edit our photo. In the basics we have exposure contrast,
highlights, shadows. We can play with them
however we want. I would also suggest here
not to go crazy with them. Just small tweaks
here and there. We also can play with
the temperature. I suggest you to go ahead
and play with this, see what you like best, what you don't like. And sooner or later you will have like your
own way of editing. Also the color grading. I believe it's nice. You can play with the
colors in the mid tones, the shadows or highlights. Make the colors pop
or tune-in down. Sometimes. I also come back
and change my mind. On this little icon over here. You can see the
before and after. And whenever you are
satisfied with it, you can just hit Okay. And as for the final mode, I will make another layer, fill it with the color of the light and try to mask
out everything else. I really want to have
a bit of color in the corner over here from where the light
source is coming. After I have that, I will turn this down. So you can see the
difference here, making it more dramatic. And perhaps doing the same
thing in the other corner, but this time with
a darker color. So yeah, I believe
that's all I want to do to this photograph. You go ahead, edit your photo and I cannot wait to see
what you've been working on.
9. Final Thoughts: My creative friend,
let me give you a round of applause as
they finished the course. Congratulations. Thank you for sticking
with me till the end. And I truly hope that
you found something so helpful that you enjoyed
the course altogether. Please feel free to share your progress into
the project gallery. I'm curious to see what
you've been working on. And it's a great place
for each other to give feedback and
encourage one another. By the way, I would love to hear your feedback
on this course as I'm thinking about doing
more courses in the future. Yeah, thank you so much again. See you next time and
until then, go create.
 Madeline Jo, Visual Artist