Transcripts
1. Introduction: So no matter how much we'd
love this to be the case, time is never limitless. So when you're structuring
a portrait shoot, how do you make the best of it? Because your time is valuable, your client's time is valuable, and yet still, you
want to create the widest variety
of images you can. I'm Paul Wilkinson, an
award winning photographer, judge, trainer, and author of the mastering portrait
photography book, as well as being the host of the Mastering portrait
photography podcast. And in this class, we're going to walk through
a real life shoot with a real life client and
show how you plan, how you walk through an hour and a half of your time and your client's time and create the widest variety of beautiful images that
you can so that you feel great as a creative
and your client walks away with images that
they're going to love. At the end of the
class, you, too, should have an idea of
how to shape a shoot, how to create a sense of
direction, how to sense, how to give reassurance
to your client, create the energy that's
necessary for them to enjoy the session and
consequently love their images. Really, really hope
you love this class.
2. Lesson 1 - Plan The Outfits: S Now, before our client even
steps foot in our studio, we've sent them out a
little briefing pack. And in there, we're going to
ask for some information, and we're going to give a
little bit of information. What we're going to ask for is the style of photography
they're looking for. What's the purpose
of the images? Now, I suppose, in a sense, it doesn't really matter because I am the
photographer I am. I have the style that I have. And just like you, our clients come to us because
of what we do, the way we approach each shoot. And that's absolutely correct. Every portrait
photographer should have a client base that's in
tune with their imagery. But nonetheless, if
we have a CEO of a multinational or a manager of a hedge fund looking for
LinkedIn profile shots, those images are
probably going to have ever so slightly different
messaging to someone who's come to us for images
on a dating website. So it's useful for us to know sometimes people send
us example pictures, sometimes people send
us styling guides, but more often than not, it's a description
of their job and the kind of images
they're looking for. I can't remember the
last time I didn't get asked to make the
images look authentic, friendly, approachable,
energetic, smiley, often. We always shoot both laughter, and we shoot the serious
side because we don't know how those images
are going to be used. On the flip side of that,
we also give our clients just a little bit
of guidance into what kind of clothing works. Usually, as all of you
photographers will know, we're going to try and avoid
really strong patterns, really strong colors,
anything vibrant, anything with
checks and stripes. These are not necessarily going to work as well
in our photographs. Of course, if our client specializes in pin
striped suits, they're going to
turn up in a pin striped suit, and we're going
to have to deal with it. That's absolutely
fine. But where I can, we will always sort of gently guide them
towards block colours, simple ideas, not too
busy, so that, for me, as a portrait photographer, it's going to be
about their face, their character, their
personality, their energy. It's not going to be about
the clothing they wear. Now, I have had to
photograph for instance, fashion designers or scientists, where the clothing absolutely
is part of the brief, but more often than not,
it's about the face. We very, very rarely suggest bringing props just
because it's not my bag. I don't see the need to
have children or adults holding things that are not
part of their everyday lives. However, there are, of
course, exceptions. I photograph violin makers, I photograph piano players. I photograph drummers,
keyboard players, a dulcimer player, violinist, viola players, you name
it an accordion player, and we photographed
magicians and gymnasts with Olympic medals. In these instances, of course, the props are important
though we have yet to manage a grand
piano in the studio, not because it isn't big enough, but because it's up
two flights of stairs, and frankly, none
of us fancy that. So where we can,
we'll work without props unless the props are actually part of
someone's everyday life. Now, Milli, who
we've got in today, we're going to
capture who she is. We're going to capture about her personality and
the life of her. We've worked with her quite
a bit over the years, and she's super lovely, super energetic,
super photogenic. She laughs. She just barrel
laughs in between the shoots. But the minute I
swing up a camera, dead serious and sultry, and it's great to work with. So the first thing
we do is look at the outfits that Milli
has brought with her. Now, she's brought
a fair fair range. According to Milli, it's less
than 1% of her wardrobe. I can only imagine what
her wardrobe looks like. Some of our clients turn
up with just one t shirt, other clients turn up, well, with entire wheel bags. In this instance, we've
got plenty to choose from. But we took it down to
three really quite quickly, and not least of which
is the outfit that Milli has turned up in because
frankly, why wouldn't you? She looked great
she's already in it. It saves us having
to do a change. And if you remember,
we're trying to be as efficient as possible. The other thing, of course,
we're going to look at is the weather and the
style of Milli's hair. Now, Milli has beautiful hair, and I don't think
she straightens it, but if it was really damp
outside or if it's humid, we might have to
consider starting, working indoors first
so that someone's hair that's been straightened
doesn't just go frizzy because A, the client doesn't really
like it if they've gone to the effort of straightening
their hair and B, it's a nightmare to photoshop. So I prefer to start outdoors because it's nice, it's gentle. The client will
feel more relaxed. And for that, we're
going to start with the outfit
that merely wore. Now, on this particular
day, shooting this. Of course, the weather threw us a curveball and
doesn't it always. It said it was going to be
the hottest day of the year, and so it proved to be. But what it didn't tell us in the even medium range forecast was it was just going to
tip it down with rain, which it did for
about 20 minutes and delayed the
start of everything. So we had to just change our tack a little
bit, but that's fine. We had a cup of tea,
and we chatted. But what's really apparent
now is we have three outfits, and we'll go through each of
those later in the video, and I'm beginning
to form the plan. I'm beginning to form
the direction of travel. But and this is
really important for you as a creative and for
your clients as well, is you need to allow time, you need to allow space, and you need to
allow yourself the luxury of being inspired
and being flexible. Very often, the images
that you see along the road are not the
ones you expected. They're not the
ones you planned. They're not the ones
you've ever taken before. And even during this
video, this recording, there's one image
in the entire set that I've never seen before. I've never noticed it before in spite of walking in and out of the same door over and over and over every single
day milli turned. There's an image in it, and
it's absolutely beautiful. And those moments, those are
the moments that are not only energizing for you as
a portrait photographer, but they also give your client confidence that you're working on their behalf. When you explode into
energy and say, Stop. Wait. Let me get that image. You look fantastic. How do you think your client's gonna feel? So, of course,
allow yourself the room to be the creative
portrait photographer that, of course you are. So let's crack on with
each of these segments.
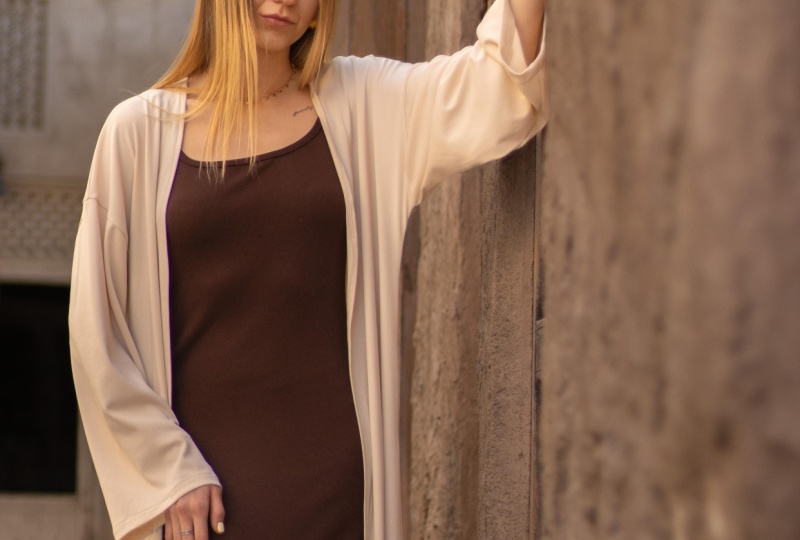
3. Lesson 2 - Outfit 1: Stunt So outfit one, outfit one, as it happens, is the outfit that
Milli turned up in. And quite often, this is
a safe bet. Not always. Sometimes our clients turn up and they've
said it's gonna be a business shoot and they're in shorts and a raggedy
old T shirt. But quite often, people will
turn up in something they really like and
certainly something that they feel comfortable in. And if it works,
well, why not use it? Because, of course, it reduces the number of outfit
changes you need to do, and you're almost
certain to have a more relaxed beginning
to your session. This particular
outfit, the shorts and the top really
suited the street. Now, it's a Monday. We film this on a Monday. We always film on a
Monday, but it's bin day. So the street is
full of wheel bins. The car park next to the studio is full of cars for some reason. I don't know why, and we're just going to have to
battle our way through it. But the thing about
the street is that the light is
pretty good down there. This is what was the
hottest day of the year, and the sun was
properly creating hot spots and light
patches and dark patches, but we have a better chance of finding good light
out in the street, as well as being able
to tell a story that suits in her Denim
and Black outfit. So when meandered our way round, it started very simply, the first thing I always
do when I step out into the street is find
a patch of shade. I know we've talked about
this on the hard light video. But finding shade
gives me options. It gives me a soft light, but I can use reflected
light and the light pinging around to create
beautiful lighting on the face and the figure. So we really are right on the
steps of our studio here. Then we've just meandered
away down the road, looking for doors,
using the pavement, even using the car park. There's a gap. There's
a really narrow gap between one of the
cars and the hedge. And I was just walking past it, and the light the light looked
to be really beautiful. So we took a few photographs in there, nice tight headshot. It doesn't have to be a
great expansive wide angle. It includes the
tailgate of everything. If you zoom right in close, of course, you've still
got a perfect shot. A couple of things that
happened during this session, and this is that process of
reacting to your client is there there's an edge to the way Milli presented herself
in this outfit, the way she put her
thumbs in her pockets, the way she sat. Even in between
two of the shots, she just sat on the floor and got her phone and checked
up on some stuff. And I thought, Do you know
what? That's probably quite a nice image. It's very much an insitu
character portrait of the person we met. So I took that
photograph as well, I got the camera onto the floor, shot along the length
of the footpath, and you get these sort of
really quite beautiful right down in with the
character sort of images. Then it's up into the studio. Like always, we dance from outdoors to indoors,
outdoors to indoors. And I've created a
variety of images here. Now, with a denim
skirt and a black top, we have quite a lot of
options open to us, but not a huge amount of time. So I've created some
very simple portraits. Now, the thought process over the three outfits
that we've chosen is that one of them is probably going to look good on
a dark background. Dark outfit with a black
skirt and a black top, that's going to look
better on black. The pink dress, the light, flowy dress is going
to look better at either hike or maybe a mid tone. But this outfit,
very versatile can shoot it on almost anything. So I've just shot some very
simple shots using the wall. The way Milli stood
her attitude, her angles, it felt like a very fashiony
edge to the image. Lent her on the wall, simple lighting.
Absolutely beautiful. Simple second shot, dark
background, sitting on a chair. Got to kind of scrunch up, so it's really tight and
compact in the frame. Now, this as a personal branding shot might not be useful. But it's a real interesting
character portrait of Milli, really, really lovely. And when we'd
finished doing all of the formal stuff with
the studio lighting, we simply opened
one of the blinds, shuffled our little shades along a little bit took an image of her sitting
next to the window. Admittedly, the light
that's coming in is pretty green because it's
coming through foliage, but we can either color
correct that out or just turn it into the most
stunning black and white. And I'm using every second we have to create beautiful images. So that's it, Outfit one done. Now let's move on to the
second of those outfits.
4. Lesson 3 - Outfit 2: Stunts. So we've
done Outfit one. Now it's time for
our second outfit, which in this instance,
is a beautiful pink, flowy dress with
some white trainers. As it happens, it was Katie that suggested this outfit
would work really well. And I'm really happy when we get a collective input into what we're shooting because
it means there's more ideas, there's more creativity, and
we'll generate energy from. It's a really, really hot day. The sun is baking down. But this outfit
with those shoes, will look great in a sort of garden setting where the sun will kind of dapple through it, and there's beautiful light, but it's still
really, really hot. So we're going to have to find some patties where light is coming in through the foliage. It's pinging around us. But if we can,
we're going to try working as much as
possible in the shade. So we started down
the far end of the garden we've used the trees. We've used little
alleyways in amongst them. Even the old dairy in this particular
garden, there's, like, a dip where it's
slightly cooler, and that used to be where
they kept milk from the cows. We've found little alleyways
and little pathways. And as Milli was walking
away in one shot, literally, the way
she walked away, way the light played on her, the way she was actually messing around and the dress flowed, it made the most
beautiful image. So, of course, we reacted
to that, turned her around, and got her to walk
to and fro from the camera a little bit
because you get a movement, and you get energy in the
images that are slightly different to when you
deliberately pose it. And it is a great tip. If you're working with
someone and you're thinking, I just don't know
quite what to get, try just taking some
pictures of them walking and see where
the energy takes you. It can be really interesting. Again, as an aside, we've
done this a few times, and I loved it,
and then later on, Sarah had videoed a section where Milli was walking
towards her camera, and it looked on the back
of her camera, brilliant. So we set it and I
started to shoot it and realized immediately that
it wasn't going to work. Never be afraid of doing
that. Never be afraid. In the same way, don't be scared of saying,
This is brilliant. I've never seen it
before. Let's try it. Equal don't be afraid
of saying, this time, that didn't quite work,
because in that context, it means that I'm trying. The whole point of
creativity is you're experimenting and the whole
point of experimenting, you don't always know
what the outcome is. In fact, if you do
know what the outcome is, you're not experimenting. So it's worth playing but
always admit defeat quickly. So you're not investing
time in a shot. It's not going to get you there. It's just absorbing time. However, always have your camera ready because you don't know when that magic moment as they come towards you
might just appear. Then we move away
around the garden, we shoot around the back
in little areas that we don't use so much because that
was in the area of shade. We've got a deep blue sky today, so we have to be very careful when we're getting a
light from the sky, not to let the images
get a little bit blue. You get a slightly
different light than when it's on a cloudy day. So we've finished
outside, we're going to head back up into the studio. Now, here with this
light colored dress, sort of it's not a mid tone it's actually slightly
lighter than that. This will look good on
a hi key background. I haven't shot
with a pure white. I've not lit the background. I'm just lighting merely
and letting some of that light flood onto my
walls here in the studio. I've sat her on a
little white stool. It's just a really
simple, elegant shot. In my head, the best
inspiration I have always are things like album
covers in Spotify, Netflix. I'm really curious
about artwork, so I'll always go
to an art gallery. Sarah and I are lucky, we've
traveled all over the world, we will always go and
find an art gallery, something interesting, and
I'm always absorbing ideas. So this feels like it could be an album cover for a singer. You know, Millie's the right
look, she's the right age. I think it might be a little bit conservative for a lot of
the stuff that's around. But with this outfit
in this setting, it looks absolutely beautiful. Having nailed that it's
onto Outfit number three.
5. Lesson 4 - Outfit 3: So now we're on to outfit three, the last of our three. And this is a very simple
black skirt and a black top. But the way Milli rocks it, it just looks really cool. And so we decided to go
back out onto the street, front side of the studio because the sun has moved around a bit. We've got a different
lighting out there. Some of the bins
have gone, so we have fewer bins to
battle it out with. But as always, there are cars parked and people
cycling through. But for me, I just like that. I like the energy of it. And the way Milli is that
sort of works for her. I slightly edgier teenage look, which I really like
to photograph. I think this age
group is really cool to work so we've used
some of the walls. I've used light
reflected off one of the buildings as a great big, soft reflector, which I always think is wonderful
as a beauty light. We've used the gate, which
is the back gate into our studio and just use it
as a frame within a frame. We've used all of these
little bits of texture and context and the way
the walls are cracked. And one of the walls, for instance, has
just been repaired, and it's created this
really interesting sort of patch of new plaster
that when merely stood, the angle of her arms
and the way she kicked her hips just felt the same
sort of angular feel to it. So it makes a shot almost like you brought
it all together. You thought of it. But, in fact, what I'm doing is
reacting to it. I'm seeing things and
piecing it together. And when we've done all that,
we head back to the studio. But of course, this
is that moment. This is what, as a
portrait photographer, I live for that split second
when you see something. We're walking along the road. I am literally, you can
see it in the video, dragging cables behind me, which I shouldn't be, but, hey, sometimes there's too much
effort to pick them up. And as Milli went ahead of me and opened the door
and turned around, just the way she
looked and the way the light struck her
and her whole attitude, the whole angle
of her figure and her outfit and the door and
the light, just there it was. There's a shot. It's
absolutely beautiful. And this is real. You can
actually see it in the video. Me simply going, Stop. Let's do that. They come back. Let's take the shot,
and, of course, Milli being Milli close the
door, just to annoy me. But it was a brilliant moment, and it illustrates really well the process of creating
photographs as you work. Once we've done that,
up into the studio, we've just taken
some simple shots on the top of our stairs, a
little bit of daylight. I love these little spots, but they don't always work, and that's a really important lesson when you're
using daylight. The reason that artists
crave north facing windows simply because the
light is much more consistent from the north
in the Northern hemisphere, anyway, than it is
from the South. And on a studio, we get quite variable
light in the studio. But at this moment, as
we walked up the stairs, the light just looked beautiful. So I took some
photographs there. I sacrificed a little bit of the time we'd spend
in the studio, the former studio, and just use the building
a little bit. Then into the studio, just a few really stunning dark background images,
picking out details. And, of course, if
we light it well, and there's tone
and shape to it, it just oozes quality.
6. Lesson 5 - Keep Your Camera Close!: So never, ever put your camera away until you're absolutely
certain it's done. And by absolutely certain, I mean your client has left
because at that point, there are no more
photographs for you to take. But merely, she went downstairs, and she changed into
her original outfit and then came back upstairs. And this isn't video. I've got through the
viewfinder footage, and I've got the final images
I took because even in the process of saying goodbye and saying thank
you for the filming, she emerged and just stood in a patch of light
in our studio, and this patch of light is
only there for probably, I don't know, ten, 15 minutes
every day at this moment. The sun is coming through this huge skylight that we have, and it struck Milli, and the background,
the way it looked, the way she looked, the outfit
all just hung together. And it created this
really stunning, unique image in the sense that you can't take it every time because you
can't predict it. But as she turned around, I came up the stairs, there it was. Of course, I grabbed my
camera and took an image. I didn't wait for
everyone to get the video cameras in
to have a look at it, because, frankly, there
just wasn't time. And I love that split second, that moment of creativity, that indefinable thing when
you see a stunning image. And that wraps up the shoot. We're taking this
beautiful final image, and then it's time to say
goodbye to your client. Now, remember, at this point, this is the moment you put into their head all of the
memories, all of the laughter. You just remind them what a
fantastic time you've had and what incredible images they have to look forward
to receiving. It's really important,
particularly in the lifestyle
end of portraiture, because you're not
sell photographs. You're selling memories. You're selling an experience. And this is that moment when you can truly
make that stick. Make sure you say
goodbye with laughter, with energy and
remind your client just how lovely that whole
experience has been.
7. Outro And Thank You!: Extent. And there we have it.
In an hour and a half, we've created a vast
variety of imagery. And the trick has
been to make a plan. Now, I haven't made a plan
a long time in advance. I haven't sat and worked
out every single image. What I've done is I've
reacted to the client. I've used them as my
inspiration, their outfits, their energy, their styling.
We've used the weather. So it gives us the
space as photographers to create within a framework
to reassure the client, but also to have
the opportunity to be inspired and be creative. During that process, I've never put the camera away,
and it's a great tip. Just keep your camera with you. That's not quite the same thing
as never putting it down. In fact, I put the camera
on the floor all the time, but it's always close by, and I'll always have it
ready to take a picture. Even when I'm walking
along or having a drink or just
meandering around, the camera is close because
who knows when that moment of someone opening the
door and simply looking sensational
might happen? And if a location doesn't
work, do not worry. Simply move on to the next one. But don't spend ages dedicating valuable time to something where your gut instinct is this just quite working because
who knows round the corner might be that incredible image that's the best thing
you've done all year. And in the studio, create
variety with your backgrounds, with your outfits,
with your posies, using chairs and
different viewpoints. But try and tie everything together so it has
a sense of purpose. It has a sense of
your style about it. Do you have locations
around you? Do you have somewhere that you can use to create
that kind of variety? How do you cope on
a hot summers day? All of these are things
we would love you to explore and share with us
in the projects down below. And if you've
enjoyed this class, please head across to mastering
portraphotography.com, which is a website
completely full of ideas. It's full of lighting
diagrams, presets, tools, everything you can imagine
dedicated to the art and the craft and the creativity
of portrait photography. As it happens, it's also the spiritual home of the mastering portrait
photography podcast. Until next time, whatever
else be kind to yourself. Thank you. I'm good. Get up and wait. Ah. Okay, so we've done
our first outfit. We've been out in the
garden. No, we haven't. We've been out in the street. Okay, so we've done Outfit two. We've played in the street. We've been for sake. Here's me doing, Millie. You know how to make
a man feel good. Why the funny face? It
was what I was born with. Stop spilling tea.
Is that still? Yeah. As always, it's
your unique talent. It's to piss tea on our floor. We're inspired by them. We looked at them. We
felt their energy. We felt their sort of No,
I'll do that all again. You don't want to be
feeling? No, I don't want to be feeling my
client. Don't feel it. Here's a lesson,
folks. Do not feel up your client.
Doesn't go down well. I've never done it, but I'm
expecting if I did a slap. Did I just get a
decent from the floor? I got a decent.
We're going, then. We're done. I've been
sitting on that step at I
 Paul Wilkinson, Portrait Photographer