Transcripts
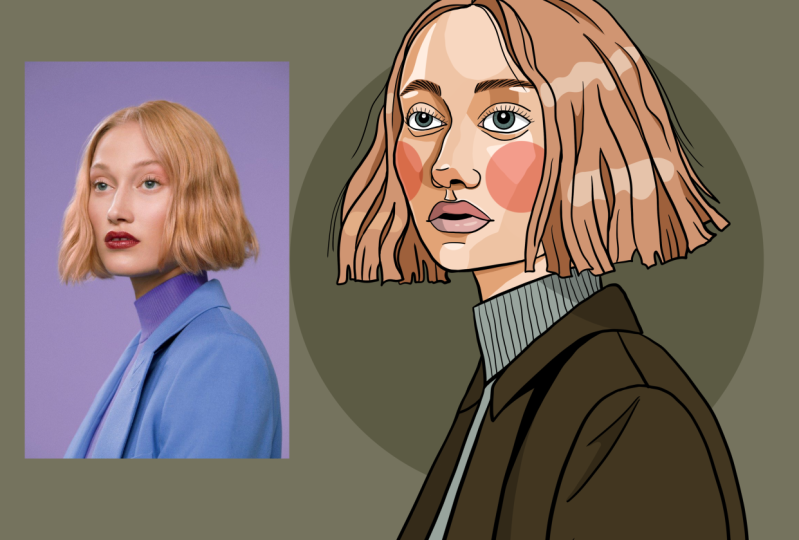
1. Portrait Drawing: a Beginner’s Guide to Drawing Faces: For years, I used the
same methods to draw faces as I used to
draw everything, and my characters just
weren't very good. Fast-forward to 2022,
I got sick and I spent my recovery time
trying some new methods. Suddenly, faces made
so much more sense and they were so
much easier to draw. In this class, you'll learn step-by-step how
to draw faces with repeatable technique for getting the proportions right
and placing features, even when the head is
turned in different angles. We'll bring their
characters to life with a clear guide to adding
shading and highlighting. We'll cover drawing
the nose, eyes, mouth, and hair in detail, and you'll learn how to
choose beautiful skin tones. By the way, hi.
I'm Brooke Glaser. I'm a professional
illustrator and a teacher. I've helped hundreds of
thousands of students to learn illustration and
level up their art careers. This class is everything I wish I'd been told about
drawing people, broken down into
fun clear lessons. I've included worksheets
and resources, as well as tips to help
you get better, faster. If you're brand new to
drawing faces, have no fear. This class is meant for you. Whether you want to create realistic or stylized
illustrations, the methods in this
class are meant to be flexible and adapt to
your own unique style. If you're ready to level up your portraits,
let's get started.
2. Class Resources & How to Use This Class: Welcome, art friend. I'm so happy that you
made it to class. I want to give you a quick breakdown of what we're going to cover and where you can
get your resources. This class is broken
into two major sections, there is a how to draw the face section and how
to paint the face section. We're going to start by learning
a method to quickly and consistently place all those
features, the eyes, nose, mouth in the right
spots on the face, and we're going to do that
in a 3/4 perspective, because that's the best way
to understand this method. After that, there is a video
on how to draw the phase in front face view
and in profile view. If you want to, you can skip those
two lessons and go straight into how to
draw the features. That's okay, you can come
back to those ones later, but you'll definitely want that first lesson on how
the method actually works. Then we will go into detail on how to draw those features, the nose, eyes, mouth pair, all that good stuff. After that, we'll pick out our color palettes, and finally, we'll go into how to
color in our portraits, which is absolutely
my favorite part. If you're feeling a
little uncomfortable like your sketch didn't turn out bad great, don't stress about it. Once you start
adding color to it, everything is going to
really come together. While I will be
demonstrating the lessons on the iPad in the app Procreate, these exercises can be done
in traditional media as well. That said, for the
drawing portion, you'll want an eraser. I would steer away from using markers or pens during
our sketch phase. But once we get into
the painting section, then you can use whatever media you're most comfortable with. Of course, you'll
need to practice all of these things
to get better. You really can't just
watch the lessons and then just mentally
understand how they work, you really got to draw them and try them out to really
help it sink in. To help with that, I've created some worksheets and color
palettes that you can use. To download the worksheets, go to
brookeglaser.com/portraits. The link is in the Projects
and Resources tab as well. Once you're there, you can type your email address and
to unlock the freebies. This will add you
to my email list, which means you'll get
my occasional tips, freebies, and
resources for artists. You can unsubscribe at anytime. Once you've done that,
it'll take you to the page where you can download
the class resources. You can download Procreate
files or printable PDFs. These worksheets
will help you follow along step-by-step
with the lessons. Especially the worksheet
for shading faces, I'm particularly excited
for you to use this one. I've also included the
skin tone palette that I use in my own
personal illustrations. It's available as a Procreate
custom palette and a JPEG, if you prefer to use
other drawing apps. Finally, there's some
premium worksheets and Procreate brushes. These are not required
for the class. They're actually extra
exercises and worksheets beyond the step-by-step lessons demonstrated in the class. You may find them helpful, but they're not required
for this class. Let's get started. I'm excited to create characters with you.
3. Plotting Out Faces: The Method for Creating Successful Sketches: I can't be the only
person who's ever drawn a beautiful set of
eyes, nose, mouth, and then tried to draw
the face around that only to find that suddenly
everything looks off. Do you struggle with getting the placement of the
features on the face correct or maybe the proportions? Anybody else end up with
melting Mr. Potato Heads? In this lesson,
we're going to learn a repeatable
step-by-step process for getting those
proportions right. Using this method has more than doubled how fast I can
get a good sketch down. Don't forget to
grab that worksheet and let's get started. First, we're going to draw a
circle to help us represent the top part of the head and that is the part
without the jaw. Then we want to draw a vertical line to split
this down the center, and we're going to do it
actually at a tilt. Why a tilt? Because this head is
actually at a tilt. If this is the first
time that you're drawing a head in this method, it might actually help you
to try drawing on top of your reference photo to help solidify some of these concepts. If I draw a line through here, I can see that the head is actually a little
bit on a tilt. So that's why I'm splitting
this at a slight tilt. I'm also going to
draw a vertical line splitting the circle
in half this way, and that tilt is going to be determined by where the
eyebrows are lined. The eyebrows are also
slightly tilted. If her head was perfectly
straight up and down, the lines would be
perfectly straight up and down, but they're not. You don't have to get
this perfectly right. We're not going for
photo-realistic reference. So if you do not
get these angles perfectly perfect,
don't worry about it. What I'm going to
do next is split this top section up
here into thirds. I'm going to make a mark
about 1/3 up and 1/3 up. It's okay, again, if you're
not perfectly perfect, but the more you
practice at this, the better you'll be
able to get at just quickly splitting
things into thirds. I'm also going to add one extra third down below the circle. Now, you're probably
wondering what these are. I promised we're going
to make sense of these lines a little bit later. The next concept here is that we're going to draw
a small circle inside of our circle to help us represent the
side of the head. Now, we're using a circle,
but none of us have perfectly round ping-pong heads. We have round heads, but
the sides are more flat. That's what we're going to
do. We're going to chop off the sides of these
balls in our drawing. Now, you're going to draw
this circle bigger or smaller depending on how far the head is
turned away from us. We are trying to think about
where you're going to draw, how wide this is, you're going to look
for this side of the eyeball all the way
to the back of the head. For the height, you're going to make it
as tall as this top third and as long as
this bottom third. It's totally okay if
this is not perfect. We're not going for
photorealism here. I'm just going to
shade in this ball. I'm just going to shade this in so that it's a little bit more obvious where the
side of the head is. Now, I'm also going
to need to chop off this side of
the ball as well. Because this is again, there's two sides of this
that needs to be chopped off. Now I'm going to make a
cross in this circle. This is going to be really
helpful because guess what? This back corner over here, that's where the
ear always lands. Now, I want to connect these
two sides of the face. I'm going to create
some curved lines at the top of the circle
going through that top line. I'm going to do it
through the center line. I'm going to do it through
the bottom line here. I'm also going to
draw a little bit of a curved one here
for this bottom one. Now, to make sure that I'm getting the perspective
of this face right, it can help to draw these as curved lines rather
than straight lines. For example, see how these curved lines make
the ball look like it's actually round rather than these straight
lines going across. Even with the dotted
line in the background, the curved lines have a
little bit more form. Why the heck are we
drawing these lines? Well, this top line right here, this is going to
be our hair line. That's actually where the hair starts growing from the head. It's not the actual top of
the head, which is up here. This center line is going to
be where our eyebrows land. Right here, that's
the brow line. This line right here, that's going to be the
bottom of the nose. This line down here, that's going to be
where the jaw falls. Now, I roughly chopped off that side of the ball over here. But when we draw in
this side of the face, this eye-to-cheek
bone connection is really fun and
important to draw. You notice that
from the eyebrow, it goes inwards and then goes
back outwards for the cheek. I'm going to draw my
eye coming inwards and then outwards
for that cheek, and then down all the
way to the jawline. Now I need to decide how wide is the bottom part of
my jaw right here. I'll probably have it come
out to about here and then this is going to connect
from the ear downwards. Now, usually, the jaw comes down a little bit and then angles
outwards from the ear. This is different for everybody. Jaws are unique, some are more angular and
some are more curved. Masculine jaws tend to be a little bit more
square and angular, and feminine jaws tend to be a little bit
smoother and rounder. Finally, from how
wide the jaw is, I'm going to connect it up into the center of the
circle up here. Again, I'm going to shade
this in so that we can see that this is the
side plane of the face. This is going to help us to find where the cheekbone is and just to see this as like a
three-dimensional head shape. Finally, I'm going to
add some lines for my neck so that my head
isn't floating in space. The neck connects to the
back over by this ear. I'll draw a curved
line right here. Then I'm just going to
draw roughly a curved line for her shoulder. Onto placing the features. I know that this is
the eyebrow line and I know that this
is the nose line, but how far over on this face am I going to
actually draw where the eyes and the nose land? In order to do that, we need to find the center of the head because this is
going to help us know exactly where to place
the nose and how far over to place
each of the eyes. Again, let's take a look at
our reference over here, and I'm going to draw on
top of it because this is a great way for you to
understand what you're drawing. I don't want you to always
trace on your reference, but at the beginning when this is really new and complicated, drawing on here can
really help you understand where to
place these lines, and with practice, you will
not have to trace over it. I can see that this is
the center of my nose, and we're going
through the center of the mouth and up and around. I'm going to draw a curved line coming through the
top of the head, and then it's going to come straight down through the chin. Now, you'll notice that
this does not split the head evenly in half, and that's because this
head is in perspective. We don't have an even amount of space for this
side of the face and this side of the face. We see much more of this side of the face than we do of that. Now we want to draw
the eye sockets. The eye socket is where
the eyebrow lies, it's also where the
eye itself lies, and some of the
lower lid in there. This eye socket is
quite a big space. I'm going to mark how far
over my eye sockets go. My eye socket is going
to go out to here, and it's going to
come about to there. Next, I'm going to draw
this little dip right here. This is where the nose
connects to the eyebrows. Then I can create an arch for the top of those two
eyes to connect them. Now I need to close
this eye socket gap. Now remember this little line
right here that we drew? This is how far down the
eye socket is going to go. Now I'm going to
draw some circles to represent the entirety of my eyeballs. Why circles? We'll dive deeper
into this later, but it's going to help
me think about how deep back someone's eyes are. It's also going
to help me create really rounded looking eyes. But if you just really hate the idea of drawing
circles for the eyes, you can also come in here and mark where you want the parts of the eyes to go and you can
draw your eyes in like that. Now I promise that I will go over how to draw the eyes later, but one thing to keep in
mind is that you want your eyes to be about
one eye width apart. If I come in here and I
take my finger like this, I can use the tip
of my pencil and my finger to mark out
how big that eyeball is. If I put it in the
center, I can see those two circles, they're
about one eye width apart. Now you might be saying, hey, why is this eyeball
bigger than that eyeball? Well, that's because
perspective. If this face was
facing frontwards, both the eyes would be
exactly the same size. But because this eye is closer to us and this
eye is further apart, you can see that this eye and this eye are very
different sizes. Now I'm going to
create a new layer and lower the opacity
of this initial sketch. Now, if you are drawing
with pencil and paper, maybe you want to do a light erasing on here
just so that it's a little bit easier
as we start to draw a couple of
these features in. On this new layer,
I'm going to draw my eyelids and eyes in. I promise we're going
to go over how to draw these in a later lesson, but I just can't stand having
just the circles in there. I'm also going to
draw my eyebrows in. Again, we'll go over this in more detail in another lesson. Now we're going to
block the nose in. Now the nose has a bunch of fiddly little bits here
and here and here. There's just so
much to the nose. It can be really difficult
and confusing to draw. But we can actually simplify this down into a
simple box shape. I'm not going to have you
draw your portraits with box noses because
that would be weird. But breaking the nose down into really simple shapes
in the sketch phase, it helps me visualize so
much more easily when I get to more advanced levels
of shading in the face. Let me just break this
down for you really fast. We're going to create
the nose as a box. The bottom of the nose is where the bottom of the nose is. Then it also is where this
little dip right here, where the ball of the nose is, it's going to be right there. Then I'm going to connect
these two like a box. Then I'm going to draw
the front part of the nose coming up like this and align for
the side of the nose. I've got the front
plane of the nose and this side of the nose. Then there's this really
special feature up here called the keystone
that everybody has. It's where your eyebrows
and your nose meet. It start a little bit wider and usually dips
down a little bit, and then you've got the side of your nose
over here as well. Let's do this on our sketch. I'm going to draw the
bottom part of my nose. By the way, this
should be happening in-between the eyes
because the nose is in-between the eyes
and usually it's about the same width as the
in-between of the eyes space. Then I'm going to draw that
little curvy bit that's right there and connect that
part of the nose. Now I'm going to come
and I'm going to draw that keystone section. It dips right here,
goes inwards. There's my keystone, and I can connect
that top plane, that's the top
plane of the nose, and then I can draw
this back here. Remember how I was saying that some people's eyes go deeper. This is something
that you're going to see is unique to everybody, and you're going to see
how this space goes downwards into the eye socket. A little bit different
for everybody in how deep their eyes go. Now I need to place
where the mouth is. If I take the bottom of
the jaw and the bottom of the nose and I split
that again into thirds, this top third, that's going to be where the
center of my mouth is. This bottom third, that's going
to be the top of my chin. I can come in here and
place the mouth in. Again, I promise
we're going to go over how to draw the eyes and the nose and the mouth
in some future lessons. How do I know how far
over to bring the mouth? The mouth usually comes to
about the center of the eyes. Usually goes from
there to there. I'm just going to
draw a curved line to indicate the chin. Also just for fun, I'm going
to follow this smile line right here just to give her a little bit of
more personality. I can also shade in the bottom
of the nose, the top lip, and actually right in here
around the eye sockets, this is also an area that
will be sinking backwards. The eye sockets are also a
little bit in shadow, too. Finally, we want to come in
here and include the hair. When we draw hair, we want
to draw this as big form. We don't want to draw
it as individual hairs. I really encourage you,
hair is really cool. It can be really fun
to come in here and trace the big sections
where the hair connects. I can see a section right there. I can see this comes
up in these little chunks and connects and down. This is a really fun line. If I follow this all the way
around and then back up, that really creates
a strong hair shape. We're just trying to
block in big shapes. You want to think
of hair as shapes. Of course, our hairline
is right here. Because of her hair style, her hair really does
sit on this hairline. One thing to keep
in mind with hair, it's actually bigger
than our skull. This original circle
that we drew, our hair has more
volume than that. When you draw your hair on, you want to make sure
that it's going above the skull line unless
it's super-duper flat, which most people's hair is not. I'm just going to retrace
the lines of the face here. If I come in and I turn
down this initial sketch or if you're drawing
with pencil, you can erase a little bit more. You can have a
really nice sketch of where all of your
features are going to lay. Now of course, you can
always come in and do a more refined sketch. One thing I might think about is that I would like that part of the forehead to go a little
bit further in my sketch. When you are
refining your sketch or when you're doing
your initial sketch. One thing that I
would not recommend doing is trying to find every single bump and
curve in the face. It's better to try and simplify it down into smooth
straight lines. Keep it as simplified
as you can. Also, you want to make
confident, smooth lines. What doesn't look
good is if you have lots of really sketchy lines, these small dashes,
while they're very helpful while you're beginning and you're starting
out your sketch, they don't make a good
looking final piece. You want to make sure
that you're confident. It's okay if you make a mistake. You can erase it,
you can redraw it. But try to draw as long and as smooth of
lines as you can. If you like the idea of
keeping your line art or you like a style that
has a lot of line work, it may help you
to make sure that you're creating a varying
amount of thickness. So darker, or thicker,
or heavier lines to emphasize important
parts of your drawing. Maybe you think her eyes are the most important
part, or her mouth. Those are the parts
that you might want to have heavier lines in. Holy cow, that was
a lot to take in. Let's do a quick
recap, shall we? When we draw the face
in three-quarters view, we draw a circle for the face. We split that circle as
best we can into halves and divide the top and
bottom half into thirds. We also add an extra
third for the jaw. We add a circle to represent
the side of the face, and then we define the
other side of the face. Once we've connected the jaw, we bring it back up to this
guy right where the ear sits. Then we find the
center of the face. We mark out where
our eye socket sit, and we even place our eyes. We also add some neck lines so our face isn't
floating in the air. If you want to get fancy, you'll draw some eyes
in before you watch the lesson on how to draw
eyes because you're fancy. You also might draw
in your eyebrows, and then we mark out our nose. We start with the bottom where we draw a trapezoid to represent the bottom
half of the nose. Then we draw our
keystone in between the eyes and connect the top plane of the nose and
the side plane of the nose. Then we mark out thirds for
our mouth and our chin. We draw the lips in, and then we mark
out our hairline. The more that you use this
method to draw faces, the more these guidelines, all of these extra lines
that I've drawn in here, the more they're going to be
something that you imagine, unless it's something
that you have to draw every single time. In fact, when I draw faces, I actually only draw the circle and then I just
draw that side circle in, and I can just imagine how
far the chin will go down. I don't draw all
of the guidelines. I did when I first started
drawing because it really helped me understand exactly
where to place everything. But now that I've done
it so many times, I don't need every single
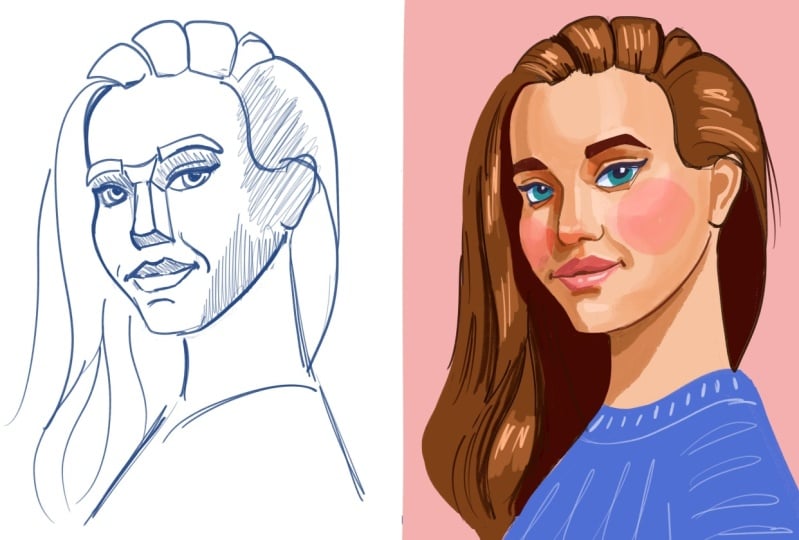
one of those lines. Also, does your sketch
look beautiful? Awesome. Does your
sketch look like ***? That's okay too. That's part of being a
beginner at something. Let me show you one
of my early pieces. That's part of being a
beginner at something. Look at this stinker. This is one of my
early drawings. I went from drawing pieces like this to this in
just a few weeks. That's because I allowed
myself to make some "bad art". Now it's your turn. Using the worksheet or
your own reference photo, draw a face in
three-quarters angle.
4. Tips for Getting Better, FASTER: Tips for getting better faster. There's an excellent book called The Talent Code
and it talks about the science behind how talent seemingly
explodes overnight. I highly recommend
giving it a read. One of my main takeaways was how to get better
at things faster. To explain that point,
the book shares an example of this experiment. I'd like to try
that with you now. Take a look at these
two sets of phrases and I want you to
pause the video and take a minute and spend an equal amount of
time on each list, column A and column B. Which of those word
pairings can you remember? My guess is that it's
easier for you to recall the phrases that had
letters that were missing. That's because you had
to concentrate a little bit to figure out what those
words were meant to be. You had to struggle
a little bit. Struggling a little bit helps our brains build pathways to
help us build new skills. The trick is the
struggle can't be too hard and it
can't be too easy. When it's too easy, when there is just
a list of words, those skills won't
stick as well. But when it's too hard, you can't improve either. What can you do
when it's too hard? The Talent Code
recommends, and so do I, that you break things down
into bite-sized chunks. For example, after you
finished drawing a portrait, take a moment and assess where the one or two areas that you struggled
the most with. Perhaps it was eye shapes or the placement
of the features. Then in your next
drawing, focus on paying lots of attention to
that specific problem. Don't just blindly draw another portrait and hope that you do better the next time. Slow it down and spend some extra time on
those trouble areas. I know that sounds obvious, but so often we just draw the next portrait and
continually struggle with the same things because we
didn't take the time to assess what did work
and what didn't. Practically, here are
five tips for you. One, give yourself
training wheels. When a kid learns
to ride a bike, they often start with
training wheels. This helps them get the confidence to
safely use the bike, how to master peddling
and breaking, before they master how to balance themselves
on two wheels. Jugglers start by using
only one or two balls. What training wheels
can we create for ourselves when we're
drawing portraits? For one, these concepts
are really difficult. If you're having a
difficult time with that, try tracing them over your reference photo to practice these concepts of proportions. Or you could draw on grid paper. Draw the same size grid on your reference photo and the page that you'll
be drawing on. If you're using Procreate, you can turn on the
drawing guides. Having a grid will
make it easier for you to see if your
measurements are accurate. Two, one thing at a time. It's important that you practice at the edge of your ability. If you're really struggling
with the techniques, simplify your drawing
sessions down to focus on one skill at a time. For example, have a
drawing session where you just draw noses
at a specific angle or you just focus on getting
the proportions right. I've created some workbooks that are fill-in-the-blank for faces. So you can focus not on
drawing the entire head, but the specific
parts of the head. To get those worksheets, check out the first
lesson on how to download the class materials. Number 3, observe other
artists and imitate them. The Talent Code talks
about the importance of observing and
imitating the masters. For example, amateur
athletes study the videos of pro athletes. They study how those masters, how they actually do
their tennis swings. In my class on how
to find your style, I have a whole lesson on
doing master studies. In the case of
drawing portraits, here is how this would work. Identify an element that
you're struggling with, say drawing eye shapes in
three-fourths perspective. Find an illustrator that
you admire that does it successfully and
copy what they do. That can mean tracing what they're doing or
just drawing it, but attempt it their way. You will learn so
much from doing this. But these master
studies are something that should be kept in your own personal
private sketchbook. They're for your eyes only. These master studies are not
something that you should share on social media
or claim as your own. This method works
really well if you know what parts you're
struggling with. But what if you
can't tell what's working or not working
with your portrait? It just feels off. Number 4, flip it. If you can't figure it out, try flipping your illustration. If you have a physical copy, try looking at it in the mirror. Flipping your drawing
is going to make the flaws way more obvious. Also, if you're like me, you're suddenly going to realize that all of your portraits are somehow slanting and
sliding to one side. Another method to help you
identify where your sketches aren't working is after
you've drawn your face, overlay your sketch on
your reference photo. Take a moment to assess where
things went right, yay, and where you were off
on your estimates. For me, I don't often
draw the hair big enough or I'll make my face
shape too small or I used to draw my nose way
longer than it should be. Overlaying my sketch on my
reference photo helped me identify where I was
getting my proportions off. You do not want to get too
perfectionistic with this. If we wanted photo realism,
we'd take a photo. We wouldn't draw
an illustration. The goal with this method is to identify the things
that are way off. You may find that parts of your drawing are
technically wrong, but you like the way they look. For example, I like to draw my eyes bigger than
my reference photo. That's part of stylizing your illustration and coming up with your own unique look. You'll need to decide for
yourself where that balance is. A bonus tip for digital users. Use the Liquify tool to
correct your mistakes. For example, when you're
using the Liquify tool, you can use the Expand
option to make eyes bigger or you can use the Pinch option
to make something smaller. You can even use the
Push option to squeeze things to the side that you
made a little bit too big. I want to reiterate
that struggles and mistakes are good things. Remember, struggle helps you build those connections
in your brain. I don't want you to feel bad if your portraits aren't
instantly incredible. That's an unrealistic
expectation and it's not very helpful. You can get better even at something that is
hard. I believe in you. When I'm observing
where I made a mistake, I'm not judging myself. I'm just saying, okay, now I know where I can make
this better next time. It's an excitement
to get better.
5. WIN A YEAR OF SKILLSHARE: Want to win the
year of Skillshare to celebrate the
launch of this class, I'm giving away a year-long
membership to Skillshare. To enter all you have to do is post a project in this class, you can post photos
of your work in progress as part
of your project, you could post your sketches, or you could post a
finished project. You could also show your
practice sketches of eyes, or noses, or whatever you like. All you have to do
is post a project. If you'd like to
double your chances, you can also leave a review of the class sharing the
favorite thing you learned. So posting a project
will count as one entry, and leaving a review
with your favorite thing you learned will
count as one entry. The deadline to enter
is November 21, 2022, 8:00 PM, Pacific
Standard Time. The winners is going to be
chosen at random and I'll announce the winner in the
discussion tab of this class. I'm excited to see your art, and best of luck.
6. Drawing the Face in Front View: The front-facing view is the easiest way to
draw because there's no perspective
shifts in the eyes, or the mouth, or the nose. So let's walk through it. First, we'll draw a
circle for the skull, and then I'll split
that in half. This reference is really
easy because her face is straight up and down
and not tilted at all. I'll also split the
top half into thirds, the bottom half into thirds, and I'll make a
line for the jaw. Help us out here, I'm going to extend the top
hairline across this circle. This is our brow line. It's already extended
across the circle, and this bottom one for our
nose line across the circle, and I'll also extend the
jaw out a little bit. Now, just like in the 3/4 view, we need to cut off the
sides of the head. On our reference photo, right here is the
side of the face. So this is the side
plane of the face. Back to our reference, I'm going to draw a circle, that is the height of
our brow and nose line, and that's going to help
me figure out where the sides of the face are. Now I'm going to
try and decide how wide I want to make her jaw. You might find it
helpful to erase the wider part of this
circle at this point. Now I'm going to just plop her ears in there because
I know her ears are in the back corner of
those half circles, and I'm going to decide
how wide is her jaw. I'll say her jaw is
about this wide. Now I'll connect the
jaw to the ears. You can see really
clearly in this photo, her jaw comes down
and then angles over. I'm going to decide
how far down. I want her jaw to come
down from the ears, and then I'll angle it over to however wide I've
decided her jaw will be. Let me erase this extra right here because that's how wide I decided her jaw
was going to be. One mistake that I used to
make was that I would make the curve of the jaw
different on each side. Can you see here that I
went a little bit further down from the ear
before I angled over? One thing that you might want
to watch is thinking like, this is about as far down
as the jaw goes there, so I'm going to make sure it
goes down that far there. Paying attention to these little measurements can really help you make sure that your
face looks correct. Now she's got a really
distinct jaw line, so I might spend a little
bit of time finessing this. There's nothing wrong with
taking a little bit of extra time to make sure that you get the
shape that you want. Now, finally, I
want to draw a line that goes from the wide part of the jaw up into
the quadrant up here, up to right above the ear. I'm going to shade this in so that you can see it
a little bit better, but that is also a side
plane of the face. Next, we'll draw in
the eye sockets. Remember, the eye socket
is the whole eyeball, the area underneath the eyeball
where there's lower lid, and the eyebrow itself. I'm going to mark out how far over the eye sockets will go, and I'm going to
pay attention to this little dip right here. Draw that in and then create that M shape of where I'm
going to lay out the eyebrows. Then I will come down to
this middle line right here to complete our eye socket. Now I'll draw some circles to represent where the eyes
are going to fit in here. This would be much easier
than trying to draw this in the 3/4 perspective because the eyes are going
to be the exact same size. If I draw a circle to
represent the eye here and a circle to
represent the eye here, they're going to be the
exact same size and the space between them
should also be the same. You can measure this by
taking your finger and the pencil to eyeball, no pun intended, how far apart those eyes are. If you're using Procreate, you can actually
grab these eyes and place them on top
of each other to make sure that they're
at the same size. You can duplicate them and drag this in the
middle to make sure like, hey, are those eyes actually perfectly
three widths apart? Back to my drawing, I'm going to get
them as close in size and distance
apart as possible. At this point, I'm going
to create a new layer. Or if you're using
pen and paper, make sure that you draw
more heavily at this point. I'm going to reduce the opacity on my initial sketch layer here. Again, if you're using
pencil and paper, you can just lightly erase. I'm going to quickly
just draw in my eyes. Again, we'll go over how to draw the features in detail
in another lesson. But it's going to drive me nuts if I don't have eyes at all. I'll draw in my eyebrows. Next, we're going to
block in our nose. If I think about that
keystone on this, that it dips down
here and I think it really stops going
inwards about here. Now we're going to
put in the bottom plane of the nose. The bottom of the nose is
just about that eye width apart and then this
is going to be the top of that bottom section. I'm going to connect
that top plane. Right here, there's where
that top box connects there, and then the side of the
nose connects right there. Let's try it on our
reference drawing. I'm going to draw the keystone, which dips down probably
until about there. Her keystone is really wide and I'm going to draw
the bottom of the nose again. It's probably going
to come out to there. Connect the top plane of her nose and then mark out
the sides of her nose. Now I'm just going to
add some shading in here to give it that 3D look. Also shade in some
of the eye sockets. Now let's mark out the
mouth and the chin. Again, so from the bottom of the nose to the
bottom of the chin, we're going to
split it in thirds, one for the center of the lips and one for
the top of the chin. I'll mark the center of
the lips and the chin. The width of the
mouth usually comes down to about the center
of where the eyes are. Now we'll draw the hair. One thing that I notice
right here is there's this really fun curve
and curve right here that really creates
a flow with her hair. With hair, you are welcome
to exaggerate and push the shapes a little bit further because hair moves so much. Easily, this could
blow in the wind, and if you think it would look really cool to have it like
sweeping around a lot, you can do that in your photo. You can do that in your drawing because this is
just the reference. We're not trying
for photorealism. Also, I noticed there's
a really fun dips along here that I'm
going to try and mimic in my hair shapes. Since this is our hairline, I know that the hair is going
to separate right here. I'm going to draw it a little
bit bigger than the skull because our hair has volume. There we have our final sketch. From here, I could come
in and refine my sketch. For example, I think
that her eyes are a lot bigger in the reference photo and I'd like to emphasize that. So if I were to come
and refine the sketch, I would make sure that I
made the eyes a little bit bigger and the lip maybe
even a little bit smaller. Our initial sketches
are just that. They're just initial. I don't want you to feel like the first lines that you
make are the perfect ones. Even I don't make my
first lines perfect. I come back and I
refine and I adjust. That is a normal process. Let's do a quick recap. When we're drawing the
face in the front view, we draw a circle for the skull
and we split it in half. We split the top into thirds, the bottom into thirds. We add one extra third
for our jawline. We add some circles on the side to represent
the sides of the face, and then we define the jawline. You can also draw your ears
and at this point, too. We'll define the eye sockets
and mark out our eyeballs, making sure that they are equal size and equal
distance apart, and correcting if they aren't. If you don't get it right on
the first try, that's okay. You can correct it. You can also add necklines. Then we'll lighten our
sketch and start adding the features with darker lines. We'll add the bottom shape of our nose and the keystone
in-between the eyes. Then we'll connect
the top plane of the nose and then
the side planes. Then we'll measure out
and place our lips, and then you can start adding
the outlines for your hair. If you want to get fancy, you can add a little
bit of shading on the underside of the nose, on the upper lip,
in the eye sockets, and even in the
side of the face. It's your turn.
Using the worksheet or your own reference photo, draw a face in front view.
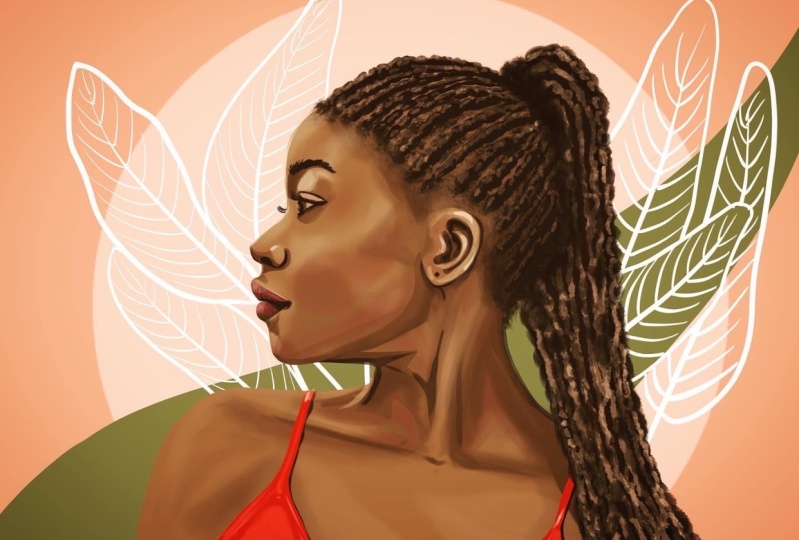
7. Drawing the Face in Profile: Now we're going to
approach our profile views a little bit
differently because everyone's profile
is really unique. I'm going to show
you some fun tips and tricks with this view. But as always, I'm
going to start by drawing a circle for the skull, and I'm going to split it in half vertically
and horizontally. Now you may notice
that this model's head is at a tilt, so I am going to slightly, slightly,
slightly tilt my version. Of course, I'll split the
top of my circle into thirds and the bottom of
my circle into thirds, and I'll add a
third for the jaw. Now I'm going to
extend the line for my hairline and this
is going to go at the same angle as my brow line. What I don't want
to see you doing is changing the angle like this, or trying to change
the angle like this, or making it straight. All of these features, all of these lines, they need to go parallel to each other. Now what about that half circle that we've been
drawing for the face? Well, on the profile view, the side of the
face is right here. That circle is going to go from our nose line to our hairline, dead in the center. Now I'm going to draw a
temporary line right here to connect the front of the
face down to the jawline. I know my ear is going
to be back here, so then I can connect
the jaw to the ear. Now let's take a look at our reference photo and
see what it looks like if we do this same thing
on our reference photo. What I want you to
notice is that when I connected from the front of
the face down to the jaw, look how much all of these
features are sticking out. Now this is what's going
to happen in every face. Our nose and our lips
are going to stick out further because our nose
sticks out, of course, but also our mouth
sticks forward. Now how far forward the
nose and mouth sticks out? This is going to be unique
to every single person. All of our faces are different. Some people have longer noses and some people have
more protruding lips, and some people have
more flat lips. When we start
approaching our faces, I really like to pay attention
to the different angles that the different features have in relationship to each other. One thing that's
going to help me make sure that I'm not
putting my features too far over is to continue defining the
side of their face. Remember, we want to create a line where the
end of the jaw is, where that flat part is, and connect it up to this
upper quadrant right up here. This is what that would look
like on our reference photo. Next, we'll start working
on placing the features. So I'm going to
create a new layer or if you're drawing
with pencil and paper, just erase really lightly or draw really heavy
with your next lines. Now, usually, we start
with placing the eyes, but in the profile view,
I find it much more easy to start working on this
connection right here, the nose and the lips first. Let's first focus on
drawing the nose. As you can imagine, this is going to be different
in the profile view. First, let's focus on
the keystone area. The keystone starts
at our eyebrow level, and it dips down and inward, and it goes back, especially from the side. Again, this is going to be
different for everybody. Some people's eyes are going
to go really deep far back in and some people's are
going to be further over. Now let's grab the
bottom of the nose. That's coming right about
at this line right here. So here is the
bottom of the nose. It tilts upward for her
and then comes back. Now, we can't really see the front plane of the
nose on the side view, we just see the
side of the nose. So I'll connect the top to that keystone and the side
to the back of the keystone. Let's try placing that on ours. We're just going to make our
best guess for that keystone. It's going to dip inwards
and back just like that, and then again, we got to make our best guess for how far out we think that the
top of the nose will go, how far back the side here,
and connect those two lines. Now we're going to
place the mouth. Again, we want to do
those split into thirds. So I know a third of the
way is going to be the lips and a third of the
way is going to be the top of the chin. This is where it
gets really fun. I really want to pay
attention to angles here. When I look at her upper lip, it really goes
outwards and makes this really cool curve
back towards the nose. I really want to emphasize that. Another cool curve is right here on the bottom
lip towards the chin. So I know the bottom lip
is going to come down and really dip back
in towards the chin, and then the chin
goes straight down. Then I can connect
that to the ear. A really useful rule of
thumb for how far out these features go is thinking
of this as a staircase. The nose goes out, and then
the lips, and then the chin. What you're seeing
right here is that the nose is the furthest out, and then the lips, and then the chin. A mistake that I
frequently used to make was I would get so focused on drawing that lower lip that it would oftentimes
go further out, and then I would end up with a chin that
would go really far out. As you can see, that
doesn't look great. Think of it as a staircase, always going downwards
and backwards. Now we can place our eye. I know that the bottom of my
eye socket is right here, so I can draw a circle
for my eye because I know my eyeball is going
to be right up here next to that keystone area, and when we draw
the eye in profile, it's more triangular shaped. Now the eyelashes are going
past the eyeball itself. Now this looks a
little bit funky because I haven't
finished the lips. But one thing that is
still true is that the lips and the eyes do
still have a relationship. Generally, the lips go about
as far back as the eyes. Now I can come in here and
I can connect these shapes, and I can just draw a little
curve, create our cheek. Now I want to place my neck
before I do my hair because there's a really
important relationship between her braids and her neck. When I think about where does the neck meet the
back of the skull, it's going to meet right back
here and this is curving, so I'm going to
draw that curving, and the front is right about there and I can even
draw the shoulder. Let me just connect my head, and then I'm going to draw
the back of her ponytail, and I'm going to mark out
how those braids fall, and then I'm going to mark
out the hairline here. Again, the hairline
starts right about there, at the hairline mark, and her braids don't go
all the way to her ears. So that's where I'm going
to draw these braid shapes. Now I'm going to come in
and refine my sketch. For example, I really
think that there is a much more curved
section right here, so I'm going to come in and really refine that connection. I'm going to make these lines
a little bit more subtle because they really
stand out in the sketch. To recap the profile view, we start with a
circle for the head, split in half according
to the tilt of the head. Split the top into thirds, the bottom into thirds, and add a third for
the bottom of the jaw. Now the side plane
is in the center when the profile is
perfectly dead profile. But if the face is
tilted a little bit, and you can see a little bit of the other eye on this
side of the nose, then sometimes this circle
will be further back. Keep an eye out for the
ear, and that will help you decide how far back
to place this circle. If the ear is closer to
the back of the head, you know that the face
is tilted a little bit. Next, I'll draw an
initial line to connect the front of
the face and the jaw, and I'll connect the
side plane there. I'll think about adding
the lines for the neck, and then I'll start
adding the features. In profile view, I usually start by placing the nose first. I want to think about
the angle of the nose, how high up or down is it pointing away from the
face and how far out. Then I'll also think about
where does that keystone, where does the nose dip inwards before it
comes back out, and how far back does
that keystone go? How far back until
the eyeball starts? Then I'll connect the
planes of the nose, and then I'll think about
where does the eye go. I know that the bottom of the
eye socket is right there, so I'll draw a
triangular shape for the eye because in profile, the eyeball is a lot
more triangular. Of course, I'll draw
an eyebrow as well. Then I'll split the
bottom into thirds. Remember, everybody's
mouth is different, so some people's
lips will project out further or less far. But remember, you'll
always want this to staircase downwards
and backwards. You don't want the draw to be
further out than the nose. We'll focus on the upper lip, and then the lower lip, and
the connection to the jaw. Then I'll start placing my hair. That is how we sketch out the proportions of the
face in profile view. Your turn. Using the worksheet or your own reference photo, draw face in profile.
8. How to Draw Eyes: Last, we left our eyes. They were these wacky
eye circles and sockets and they look like
superhero mask, don't they? With the eye, we've got
the eyeball itself, we've got the eyelids
above and below, we've got the eyebrows, and we've got this space that is between the eyelid
and the eyebrow. The reason I had you draw
these eyes as circles is that I want you to imagine
them as round shapes. The eyeball itself is round. Well, and I hope you never see an eyeball without
the eyelids on it, but the eyeball is round and the eyelids cover the eyeball helping to create
that round shape. This is much easier to see in profile than it is
in the front view. You can see that the
eyeball is right here and that these eyelids come up and around to help create that round shape
around the eyeball. It might help to
imagine the eyeball as a rubber ball with a slit
in it and the eyelids, again, help create
that roundness. There's a worksheet to
follow along with this. First let's draw the eye lids, the upper and lower eyelids. In some people it's just
a really round shape. We'll go boop,
very, very smooth, but in some people, it's a little bit more angular. Maybe the eye goes up and
then over at an angle, or maybe it goes up, over and then down. There's a million
different eye shapes and a million different
ways to draw them. I often find that
the lower lid is a little bit flatter
than the upper one. When we get into these eyes that are in the
three-quarter view, it might help to
think about, again, this eyeball shape
is really round. When I come and draw
this eyelid around it, it's going to wrap
around the eyeball, making a very round shape. In profile view, this shape
is much more triangular. Now I'm going to draw this
colored part of the eye. Depending on the
expression of your person, you want to make sure that
especially this upper part of that circle is covered
up by the eyelid. You can also draw the
black part of the eye. I'd like to leave a little
bit of a highlight, add a little spark of life. Again, depending
on the expression, more or less amounts of the colored portion of
the eye will be showing. Too little and they'll look tired and too much and
they'll look shocked, so you may need to play
around with it a little bit. Again, in the side view, it's
a totally different shape. Now we need to draw
the upper lid. Remember, this
upper lid is round. You can see on this eye how it's wrapping
around that corner. Again, this is why I
find it helpful to draw the circle because it helps me know where to
wrap the lid around. Everyone is going
to have different amounts of upper eyelid and that shape is also going to be different
from person to person. Again, some people
might have round one, some people may
have angular ones. The shape of that upper lid
is going to be all the more important when we start to add
shading to this upper lid. Generally, I'll add
some light shading on the sides of those
upper lids and keep it very light in the center or where eye peaks closest
to the light source. In the profile view, that's the front of the eye rather than
the center of the eye. Some people will not
have visible eyelids, so that's called a monolith and this is very common
in Asian eyes. Sometimes the lid is
so close to the eye that you just cannot see
it when the eye is open, and in some people it's
partially obscured. Maybe you'll see the
beginning corner of the lid, but only in the beginning
and not in the far edge. In those cases, a lot of times I will see that the upper
portion of the eye, that space that's in-between the eyebrow and
in-between the eyelid, that area has a lot of shape, and that's where
I'll add shading. Sometimes it's more
shape in the lower lid. Speaking of the lower lid, I used to skip this
because I thought oh, drawing the lower lids,
it's going to make somebody look older like they have
bags under their eyes, but actually you can
still draw it and have youthful eyes and it actually really helps to make
the eyes look round. For example, you can see
here that the lower lid is really showing the
roundness of her eyes. It doesn't necessarily add bags, but the trick is you do get
to watch how big it is, making it too large does
add age to the character, but even young people have this. Drawn correctly in connection
with the circle we originally drew and
shaded correctly, it can really help makes
the eye look round. For eyelashes, I tend to
indicate eyelashes with a really thick upper lid
and in the front view, maybe with a cat eye or maybe with some individual
lashes on the end. You can also do that on
the lower lids as well, but if you do want to
draw more eyelashes, I'd be wary of drawing them in even increments like
this because that tends to look a little
bit spider like. Now the profile
view is different. The eyelashes really tend
to sweep to the front of the eye like this, rather than the side
of the eye like that. Now when it comes to eyebrows, some people have really thick, almost straight eyebrows
and some people have much more thin and
arched eyebrows, so everybody has
a different shape but the one thing that is usually pretty
common is that it's thicker towards the
center of the face and it gets thinner as it
gets away from the face. You can just draw the eyebrows in as a solid shape, if that's
the style that you like. You could just fill it
in as a solid shape but if you want to, you can also draw in the individual hairs. Let me draw a rough shape
for these eyebrows, so they go out and
then when they get to the corner
of the eye socket, they go downwards like this. If we were to draw this side, if I could see the other
side of the face it would go down like that but
because of perspective, it turns around the corner
there and so I can't see it. If I was going to draw the individual hairs
and the eyebrows, this is the thing
to keep in mind. Towards the center of the face, the eyebrow hairs tend
to go up and down. The further out they go, they start to become
more angular until they really turn the edge and then they're almost sideways. You can really see
that in her eyebrows. They go straight up and down, they'll start to curve
around this way, and pretty soon they are
almost going sideways. I'm going to turn
off the backgrounds there and you can really start to see the
shape of the eyes here. Now it's your turn. Using the worksheet or
your own reference photos, draw several different eyes. Feel free to experiment
with what details you like including
and excluding. Play around with
different shapes.
9. How to Draw the Nose: There are a lot of different
ways to draw noses. You don't have to include
every single detail on the nose especially if you'd like to draw a stylized faces. For example, you could just
draw the bottom of the nose, or you could draw the
outline of the nose, or you could even
just draw nostrils. But for the purposes
of this class, I'm going to show you everything that I draw on the nose so that you can decide for
yourself what you want to include and
what you don't. Full disclosure,
noses are one of the biggest struggles I
have withdrawn faces. I'm going to show you
how I approach this, but I totally encourage you to check out what other
people have to say and integrate what works for
you and disregard the rest. We talked about
placing the nose in previous lessons on
drawing the face. But I just want to
reiterate that the nose is one eye width wide. It's also worth mentioning how we divided the face
up into sections, this nose line right here? Sometimes the nose actually
dips beneath that line, especially the ball of the nose. It's okay if it doesn't
fit exactly on that line. In fact, our noses and ears
continue to grow as we age. It's not surprising to sometimes see faces of people
who are older, their noses maybe a
little bit longer than the ''average young face.'' Another way to conceptualize
the nose is that there is a ball at the end and it's
attached to a cylinder. The box method, it sure taught us a lot about
the bridge of the nose, seeing the planes, the top and
the side planes, the nose. But there's a lot more happening
down here in that ball. We have the ball of the nose, but we also have the wings, the nostrils and the septum. The septum is that little
bit that dips below. This is how I envisioned the box method drawn
on these noses. This is going to
help me base where to place all of the
different parts of the nose. But I do want to
point out this nose, it goes a lot further
than that box. This nose, it dips below. This nose well, you
can't see it with the lines drawn in here. This is not straight. She's got a little bit
of a bump in her nose. The box method isn't perfect and we're going
to build off of it. I'm going to start by defining
the ball of the nose, at least the underside of
the ball of the nose here. Then I'm going to see
how this can connect to the nostril and the
wing of the nose. Nostrils are often comma-shaped. Then I'm going to
connect this up the bridge of the nose up here. This is going to help me define where the side of
her face starts. I'm going to draw the other
side of her nose right there because that also is
sticking out right here. Now I'm going to draw the
bottom of the ball of her nose because I like
to have that shaded in. I would say the bottom also circulates around the
nostrils over here. I'll also extend that out
and shade it in as well. Now when I get to
painting this face, I'm going to pay
particular attention to where the highlights
on the nose hit. But for now, I'm just going
to lightly outline that area. I may define a
little bit of where the edge of the nose turns. Let's try with this nose here. I'm going to define the ball of the nose where it
connects to the wings. I'm also going to define the
top of the nose where it separates from the eye sockets. Again, I'm really noticing a strong
highlight right here. That's something
that I would really focus on when I'm
painting the nose. But for now, I'm just going to draw a
faint line in there. I'm also going to lightly define this other side of
that top plane of the nose. Then I will create some shading on the bottom of
the ball of the nose here. You really can't
see his nostrils. His nose is so tilted down, you really can't
see it very well. There is definitely
a little bit of shape on this wing
of his nostril. It's hooks up and
around on that side. When I take the box shape away, I really start to lose
the shape of the nose. I'll probably also
create a little bit of definition where the sides of the plane of the nose end. For this nose here. I'll start by defining
the ball of the nose. On this profile, I'm going to
come and start at the wing. Then define the nostril, which again is like
a comma shape. One thing I want to point out, this wing comes in and curves
around into the nostril. The same thing, the septum
does the same thing, it curves around and
in to the nostril. That might be something
that you want to also emphasize that this
curve into the nostril. I'll connect this up to
the curve of the bridge of the nose and do some really light lines to define the top
plane of the nose. Then I'm going to come in here and I really want to emphasize the shape of the ball of
the nose and shade that in. Then also the wing of the
nose comes up and around. I'm going to shade in, well
it's a little bit deeper on this corner because this has also its own
little ball shape. I may think about where that meets the eye socket over there. Just to give it a
little bit extra shape. For this nose, I'll again start by defining the
ball of the nose. I really like to focus
on the underside of the ball and then where
it comes in the wing, and the nostril, which this nostril is a
totally different shape. It's almost like a
comma on both ends. It's a little bit wider on
this end and on this end. As I come to connect these, I want to capture that
little bump right there. I want to think about about
where does that happen, and I'll add that. I also want to add some indication for this side
of the front of the nose. Then I'll add some shading in, underneath and around the wing. Also I'm going to
add some shading on this side plane of the nose so that I can really separate
that from the front. If I turn off my boxes, you can see that a little
bit more distinctly. Now once the box has
gone, I can say, that's really intense, the bump on her nose
is really subtle. I can maybe come and add that a little bit
more gently in there. This last one, I'll start with the curve of the
ball of the nose. This one is very smooth and up and around up to the
bridge of the nose. Then I'll define the wing of the nose and add the nostril. Then I'm going to
define the front edge, top plane of the nose
which comes down and curves at the base right here. I'm going to note
that the top half of the wing is being
hit by the light. I'm not going to shade that
portion and I'm just going to shade part around it. I'm also going to
shade the side of the nose so that we can
really see this side. This one's really in shadow. I might even add
some of the black around this so we can
see it really clearly. I'm going to turn
the boxes off under there so you can see that
a little bit better. That is how I approached drawing noses. Now it's your turn. Using the worksheet or
your own reference photos, draw several different noses. Try a variety of noses, but remember you don't have
to follow the reference photo exactly if you think it would look more interesting
a different way.
10. How to Draw the Mouth: The mouth can be broken
down into several sections. We've got the cupid's
bow right here. We've got the lips themselves. We've got these
little nodes right here that help us
indicate a smile. We've also got
this overall shape that indicates that
the mouth goes forward and there's
a little bit of shading underneath of
the lips there too. Let's start with the
lips themselves. The upper lip has three parts. There's this bean-shaped
or heart-shaped center. Then it's got two rounded
triangles on the sides. The bottom is made up of these pillowy rounded
triangles as well. Lip shapes vary between
person-to-person. The reason I chose this example is because this guy's lips, this center heart part, it is extremely pronounced but in this example,
you can hardly see that there's a dip at all. I'm going to be honest, I don't usually draw these forms, I just visualize them. Now let's go over how
I actually draw these. Usually, I have done the sketch and layout proportions that we did in some of the
previous lessons. I have an idea of where the center of my lips
are going to lie and I also have a good idea of how far my lips are going to
go from side to side. In this case, I'm just
going to mark these out and I'll start
with thinking, let's take a look at this
bean shape right here. As I draw this, I'm
thinking about how wide and how deep does this
dip right here go? Also, is it sharp
or is it curved? Because that shape, it really varies from person-to-person. Then we'll connect it to
the size of the mouth. Then I'll think also about the same thing with
his lower lip. How far down does this go? Is it very curved? Some people will have
much more straight, angular lips and some people
have much more smooth lips. Then when the lips
are connected here, I'll come in and I will
connect those two. Sometimes you'll
see a little bit of a dip going this way
with that bean shape. Sometimes, people,
their lips will actually curve upwards
in that bean shape. It'll actually go
more like that. You can either make it up or draw however you
think it should look. These lips don't have a particularly pronounced dip right here like some lips do. Now once I've gotten that line down the center,
they're connected. I'll also mark out
those little nodes. This guy has got really
pronounced nodes as well, right here and right there. If I wanted them to smile, I'll get those lines
going upwards because that creates that
hint of a smile. That's trying the lips
in the front view. Then I could go in and add an indication of the
cupid's bow right there. In some folks, the
cupid's bow is extremely pronounced and you
can really strongly see it, and in other folks, you really can't see it at all. If you find yourself drawing the same face over
and over and over, there's a lot of variation in the lip features
and shapes that you can add or include or not include to come up with a
variety of different faces. Let's try an example
when we've got the face in three-quarters view. Right here, you can really see that heart shape in the center, it's really jetting out and
that corner is pushing back. That's something to visualize
when we get to shading but also this pillowy
curvy triangle, because the mouth is round, it's curving to the other side. This side looks pretty much like the same
as the front view but again, when we come
to do the lower lip, it really is curving around. Same on this side.
Let's try drawing it. We also don't have the
lips touching here, so this will be a really great
intro and how to do teeth. In theory, would be the
center of my lips is right about there and we'll just
say it's about this wide. I'm going to start not in
the center right here, but over here with
that dip in the lips. I'll curve it around and
curve it around to here. Now, I'm going to
start by filling in the top lip instead of
going to the bottom here. I can imagine that the bean heart-shaped is right there and then I'll
connect to the side. Again. I'm going to
really curve this around. Now, I'm going to come in and I'm going to draw the
bottom of the lips, and so they're going to
be right about here. They round up and they
really round outwards. Some people will have
a really big dip in the center right here. That's something you
could add if you wanted to change the shape
up a little bit. Let's talk about
adding the teeth. First of all, the teeth
end right about there. I'm going to draw in
black right there. Then I'm going to just suggest the outline shape of the teeth. What I would not suggest is drawing every line in
between the teeth because usually that'll draw far
too much attention and it's just really difficult
to do to nail it right. In general, I would
just leave a shape, like an outline of the
whole shape of the teeth. If you really want to add
the lines of separation, I would maybe suggest
adding just a small line on the bottom to indicate that rather than a solid line
through the center. Now, if somebody's teeth
are very distinctive, if they've got a gap then you
might want to include that but in general, this is a nicer, easier way to draw teeth. Let's just do an example of our original girl that we
drew in three-quarters view. Her bean shape is
actually pretty angular. I might really emphasize that. Then I'll think about this
bean-shaped being shorter, this one's longer,
this one's shorter. Then since these
lips are connected, I'll draw the line
in the center, and I will draw
the suggestion of those little beans
in the corner. Let's try our profile
portrait now. Thinking about those
three sections on the top of the lip really
helps me see that. The bean shape
would be like this. If I can see the other
side of the lip, this would probably
dip right there. Then you've got the
triangle over here but this little dip-down area, including that is
going to give your lips a lot more personality. Let's do our
front-facing girl too. I'll draw those lines for the center and how far
out this is going to go. She also has some teeth showing, so we'll work on that once more. Her curve right here
is really flat. It's definitely there,
but it's really flat, and then these lips go
super steep downwards. If this is where the center of her lips would normally lay, there is not a ton of
space between these lips, so I don't want to
add this up too high and then create this giant gap for where the teeth
are going to be. I want to be mindful
that I'm not creating a really big gap there. Then I'll draw in
those bottom lips, which again, they come out here. They're pretty steep
going inwards. Again, I'm going to fill in
the corners of the mouth so that there's just a
suggestion of her teeth because her teeth are going
backwards in space here, so her molars or wisdom
teeth would be further back. They don't go further
out into her cheeks. Then maybe just a suggestion, barely suggesting
teeth in there. When we get to the point
where we paint the face, it's important to note
that the area above and below the lips,
it's not flat. Those areas are raised up. This whole area
right here is often referred to as the muzzle
or the tooth cylinder. This is a lot easier
to see in profile. You can see here the area above the lip and below
the lip also move outward to create a
rounded shape that moves forward and
away from the face. When we get to
painting these areas, we're going to create shading
and highlighting to help indicate that shape
of roundness there. We'll also often see a shadow
underneath of the lip. This shadow often is deeper and bigger when the lip is
large and protruding. It's also going to help indicate where the chin starts to move forward and the muzzle area
stops going backwards. I can actually see this in her. I can see, this area is moving forward and the same
actually in here as well, like those areas
are moving forward but I won't usually
draw this in. Sometimes I'll draw lines
to indicate those areas, especially where
I'm going to add the shading under the lip but this is just for my
reference. So that I remember, this area is going
to be in shadow, these areas are going to be a little bit more highlighted. This is not something that I
would include in my sketch. If I wasn't trying to do
like a final line art piece, I wouldn't include these
lines because they just add age when there
isn't necessarily. You know what time it
is, it's your time. Using the worksheet or
your own reference photos, draw several different mouths.
11. How to Draw Hair: We're going to draw hair next. It's one of my favorite
things to draw. There's so much more freedom and experimentation and
how you can draw hair. There's a lot less
rules about it than the way there are about all
the features of the face, like the eyes and the nose. They have a lot of rules about. You really got to place it
right here to get it right. So I have the three-step
process for drawing hair. The first is that we're
going to block in the overall shape
of the hair and the big sections
that make it up. Second, we're going to
create the shading, the shape of those sections. Then third, we're going
to draw in the details, the highlights, the
individual hair strands. Before we get into
step-by-step examples of that, I want to point out a couple of key points about drawing hair. The first is to
create the outline, the overall shape of the hair. The first thing that
we need to know about that is drawing the hairline. If you've got the hair
pulled back really tight, it's very easy for you
to see the hairline. You can actually see
where it goes right here. That's not always the case, but what I want to point out
is that the hairline is not a perfect straight line
curved around like that. Now, if somebody
cuts the hair that way or shades it down that way, it can look that way. But when the hair is
tight to the skull, usually, you'll see some shape
right here around the eye, and sometimes people
will have sideburns, not this extreme,
usually in women, but even sometimes,
you'll see women who have hair coming down to a peak right in front of the ear and then it comes
back and around. If I were to draw that on here, I'd have it come
curving down and around and then up
around the ear. I know where on
the skull to start the hairline because we
have that initial sketch, and this line right here
is that initial sketch. It's not crucial that you
hit exactly this point, but let me show you what
happens if you don't. If you start drawing the
hairline too far back, it's going to look like
the person is balding. If you start at too far forward, that's also not going
to look very correct. So you don't have
to make it perfect, just make sure that you're not too far on either
of those extremes. The other thing that we want to consider when we're laying out the main outline of the main shape of the hair is how far up from the
skull it comes. Now, in her hair it's
really flush to the skull. But let's take a look
at another example. In this example, if we were
to draw where her skull was, it would be right about here. Her hair is coming
up and above that, and that's because our hair
often has shape and volume. I also want to point
out her hairline here is partially obscured. If I zoom in really close, her hairline is actually
coming along here, but there's wisps of
hair that come down and around and cover-up that
actual hairline right there. Let's start with a section
on drawing straight hair. We already drew out the
shapes and outlines for the big sections of
hair for this in the first lesson where
we drew the 3/4 view. What I'm going to do now
is just quickly fill in these shapes with a
little bit of base color. If you're drawing with pencil, just use a medium
pressure to fill this in. We want a mid-tone here. Now that I've got my
base color in here, I'm going to start adding
the shadow areas in big block chunky
sections where I find them. So right back here. I noticed that her
hair tucks back around and there's a front
part and a back part, and this back part right here, it's not going to
get a lot of light. So I have this really fun
trick that I like to use. Basically, I'm going
to come in here and fill in this area
with a darker color. If you're drawing
with a pencil, start pressing hard right here, and it creates this
beautiful contrast that really creates a
shape to that hair. Now, I also noticed that
there's a shadow shape like that on this side
of her face as well. This is a little bit different. Whereas this is a
back section of hair and this is a
front section of hair, this is almost a cast shadow, that she is casting that shadow onto several different
chunks of hair. You can also come
in here and just manually draw that in
because see this is, it's not covering that entire
chunk of hair right there. Although I would
argue it's probably covering that chunk right there. I'm also going to start
adding some highlights, some lighter tones
to help create the shape on some of these
other areas of hair. So if you're using a pencil, you can start using the eraser to gently erase some of this. The first section of hair
I'm going to do this on is these sections up in here. What I notice is that there is a shape like this
that is lighter, where the light is hitting
that section of hair. I'm going to come in here and
create these large shapes, create highlights to
create this idea that the hair is curving
up and around. I also notice that this
hair right here has a section of highlight
right there. I'm not drawing
individual hair strands. I'm drawing sections
of highlight. You can also make this up a
little bit, if you want to. You don't have to
stick 100 percent to the reference photo. Cannot super see a lot of curve right in this area right here. I don't see a lot of
highlights right there, but I think it would
look good in my drawing. I'm also drawing these in the direction that the hair
would actually be flowing, the hair would be going. The individual hairs would actually be moving
in this direction, and they'd be going
in this direction if I was drawing individual
hairs over here. So now that I've created
the overall shape, now I'm going to
start coming in with more details and actually
drawing individual hairs. I might come in here and
emphasize that this chunk of hair is sitting above these too by adding a little
bit of shadows around those sections to define the
different sections of hair, and these I'm drawing
with individual strands. I'm always thinking
about, am I adding too much detail or
too little detail. I don't want to draw so
much detail in my hair that it looks incredibly realistic compared to
the rest of my face. So the amount of detail that you add is going to be up to you. But now that I've
added a little bit of definition between
those shapes, I'm actually going
to come in and draw some individual hair
strands overall. I tend to draw these
in sections of two's or three's rather than just an individual strand
of hair by itself. One thing I like doing is
adding a few hairs that come off of the main shape to create
a little bit of flyways. I don't want to do a ton of
these or the hair is going to look totally frizzy and ragged, but a couple of them
add life to the hair. You can also come in here. You don't have to do this
with just darker lines. You can also do this
with really light lines, so really heavily erased areas. Especially anywhere
where the light would really strongly be hitting the hair and creating
the highlight off of it, this is a great place to put in some extra really
sharp highlights. We got this girl with braids. So let's talk about a couple of ways that you can draw braids. So first, I'm going
to draw two shapes. They don't have to be straight, they can be curved
around as well. The first way I'm going to
draw lines that intersect, so it's a Y shape almost going up and flowing
with the shape of this braid. Then instead of this being
straight on the edges, the hair would actually
curve in a line like this. So in this case, I'm
drawing digitally, so I'm going to turn off that layer underneath,
but if you have a pencil, you can just draw a
faint center line, and with the same idea there, you draw and you come up, so you're drawing it
halfway into those lines, and then you just follow
the curve of the line. That's one way. Another way is to draw a central
line, like we did there, and this time just draw teardrop shapes that
come to the center. Instead of overlapping, they're coming to the same center. If you don't want to have
to come in here and erase all of those lines because
you're not working digitally, just draw your center line and
then draw up against that. But how do you draw the start of the braids like
right over here? So if I come to look over
at my reference photo, you'll notice that at
the start of the braid, the hair is being pulled
back into the braid. Another thing I'm noticing
is that the braid shape is smaller at the tip and it gets a little bit
larger as it goes out. So that's what I'm going
to think about as I draw my braids in. When you've got a mass of braids like this, you don't have to be
totally exact and perfect. You can put little
1/2 braids in here, or a little suggestions of
braids in between the braids. So a big mass of these, you can fake some of this stuff. If you had bigger braids, you'd want to be more careful and more exact
with your shapes. I want to show you
another method here. Now, what if she had locks
or twists instead of braids? Another method we could
use is to draw in those big sections
of hair first, color them in with a mid-tone, and then we'll come in and
add those sections of shadow, so where the hair turns
to the back over here. I've got my big shapes in here. Now I'm going to create
roughly curved shadow shapes under the rows up here. These are not straight lines, they're curling up to
create that curled, or twisted, or textured shape. I'd also add these to the strands coming
from her ponytail. I'm making a base
for these first, and then coming in
with the curves. Then I could come in and start
adding the highlight side. Of course, I want to add a suggestion
of some of those curls in the backside so it doesn't
look like it's left out. Your turn. Using the worksheets or your own reference photos, draw a few different hairstyles.
12. Skin Tones and Color: Before we dive into
the coloring portion, we need to choose
our skin colors. So here's a couple
of helpful tips for choosing great colors
for your characters. Our faces are not
exclusively one color. Imagine it's winter time and you've been sweating
for a few hours, when you come back inside and check your face
in the mirror, your cheeks and nose
tip will be a lot more noticeably red than,
say, your forehead. Even when we're
not freezing cold, our cheeks and nose tend to be slightly more reddish in hue
than the rest of our face. To include that in
your illustrations can really bring some life
to your characters, not to mention, it's
really fun to draw. Also, our ears are
also usually more red. Fun fact, that's because
our skin has translucency. If you hold your hand up
to a really strong light, you can often see a red glow
around your fingertips. The same thing happens
around our ears. The technical term for this
is subsurface scattering. It happens because light rays penetrate our ears
and then get bounced back out so we can see the light reflection of the red from the inside of our ears. Now, you don't have to
understand the science though. You can just know
that your ears are a little bit more reddish in hue than the rest of our face. Also, when drawing men, it's common for stubble to show through the skin
around the beard zone. When that happens, the skin
can appear a little bit more bluish or grayish than
our natural skin color. Some people might talk
about this in zones. So we've got the normal
skin base color. We've got reddish areas across this zone of the face with the cheeks and the
nose and the ears. Then sometimes, we've got a bluish or grayish haze on
the lower part of the face. These three different
types of colors are things that
you might want to include in your portraits. In the real world, every one has different undertones
to their skin. Some people's skin will be a little bit more reddish pink, and some people will have
more of an olive undertone, and some people
will have more of a golden brown undertone. Now, you can create a unique color palette for
every character that you draw. If you do custom portraits, this might be the
approach to take. However, as an illustrator, I work in the same color palette for pretty much all of my work, whether I'm drawing
people or scenes or food. All of these characters
were created with the same color palette. Essentially, I end up just
starting on different ends of my color palette value scale. Now this is just my approach. If you do custom
portraits of real people, you may want to create a unique color palette
for each of your clients. It can be really fun to play with a whole
range of colors. But since this is my class, I can only show you
how I do things. Let's walk through how I create my color palettes
for skin tones. I have three skin tone
pallets that I use. The first one is up here
and this is my base color, that's the main color
of the face that I use. Then these second two down here, these two are my red tones. These are the ones
that we discussed having in the cheeks, the ears, the nose,
those reddish tones. I draw all my characters
with a base brownish color, so I choose a hue when
I'm working digitally and I just decide I like
this version of brown. Basically from here,
I'm going to increase the saturation and
the darkness and lightness to fill out
my color palette, I want something very
light on this end and something very
dark on this end. Every step in
between needs to be noticeably lighter and darker from the steps on
either side of it. But here is the most
important thing to consider. I am not just going lighter
and darker with my colors. Because these colors in here, if I just go lighter and darker, these colors start to turn
really grayish instead of having that really vibrant life-like color
that I really like, so I am always thinking
about the saturation. If you're working digitally, that means that I
generally start to create a palette like this, that's got a curved C-shape
and is on the edges here. But really what's
happening is I am choosing lighter colors that are
slightly more desaturated. The darker I go with my colors, the more saturated those
colors are going to be. In Procreate, going
from side-to-side here, everything on this side
is more saturated, everything on this side
is less saturated. Going up and down is your
lightness and darkness. I know that can be a lot
to wrap your brain around; I do have a color theory
class if that's helpful. What if you are working
with physical media? If you are using
with physical media, that means that you want to be really cautious about the
amount of black paint that you add to make
your skin tones darker. You may want to try playing with a little bit
of opposite colors, adding some of your
opposite colors to deepen your colors
and make them darker. Then just be really cautious
with the amount of white. What we want to avoid is getting really grayish skin tones. That really is going to depend on the media that
you're working with. To get lighter colors, remember that you can
use lighter pressure if you're using a
colored pencil; you can use more water if
you're using watercolors; and you can use more pigment, more of the actual pigment
to get darker colors. Now that you know the theory, go ahead and create
your skin tone palette. My palettes have 10 steps. You don't need 10 steps. I would say that
you really do need at least six different steps. But you can decide how big or small you
want to make yours. In the next step, we will be
using at least six colors, so do make sure that
your skin tone pallets are at least six colors. Once you've created
your skin tone palette, then you'll want to create
a pink tone palette. Just like we discussed how the cheeks and nose
and ears are more red, when I create my
skin tone pallets, my pink ones, I'm making sure that
they are very similar in value so that they can just go on top of each other
and blend really nicely. For example, the
reds in this are about the same darkness
as the browns over here. If I were to take this, I've got a mid tone pink, and then that's the one
I used right there, I'm going to go one step down, look how similar those are. It's really easy for me
to match my peach colors, my blush colors with the skin tone that
is underneath of it. It's okay if yours are
not perfectly matched. It's nice to have a
little bit of contrast, but this is just
how I like to work. For me, when I'm
working digitally, that means I can basically say in the same
color palette here, so here's my brown,
I'm tapping my brown, and I'm just moving this to
be a more reddish color. Then I can save this new
color and they should, in theory, match really closely. It doesn't always translate
perfectly that way, but that's how I
created these ones. To grab my palette, check
out the first lesson on how to download
the class materials.
13. Shading and Highlighting the Head: Now that we have our sketches, how do we go from this to this? First, I'll add my base colors, then I'll add shadows, then I'll add highlights, and finally, final details. But how on earth
do you know where to put your shadows
and highlights? You can just look at your reference photo
and draw what you see. But in general, nice brightly
lit photos like this, they don't give us very visually interesting
shadows and highlights. It's really hard to
look at this photo and know where am I
going to add my shadows, where am I going to
add my highlights. Now, you can just choose better reference
photos that have really nice strong
lighting and will make it easier to create these
compelling photos. Like it's very easy to see
where to add the shadows and where to add
highlights in this photo. But what if you want to
draw from imagination? Or what if you want to spice up your brightly lit
reference photo? That's what we're going
to learn in this lesson. In previous lessons, we learned a technique for
drawing the face, and in this lesson, we're going to learn
a technique to add shading to our faces using
the Asaro head as a model. Introducing the Asaro head, a really weird looking model. But really, this thing is great. It breaks down the
face into planes, and this is how we're going
to know where to paint highlights or
shadows on our face. Let me break this concept
down a little bit more. Let's say when
you're drawing a box and you've got a light
source that is coming from, let's say, this direction. Well, when the light source is coming from this direction, I know that this side of the
box is going to be in light, and this side of the box
is going to be in light, and I know that this side of the box is going
to be in shadow. I also know that this box is
also going to cast a shadow. I can tell from the
planes of the box that some of these
will be in light, some of them will be in shadow, and some of them
will cast shadows. Well, the face can also be broken down into
really simple planes. The Asaro head is
basically a cheat sheet showing you where those planes
usually exist on a face. Now, there's a ton of Asaro
head references out there that people have made and you can Google to find your
own, like this one. This is one of my
favorite ones that actually is broken down a little bit differently than the
traditional Asaro head, but it has a light source
that you can change to create different colors for your model
and move the head around. You can customize the
lighting and position to match your reference photo. I've created a list of my favorite Asaro head
lighting tools which you can find with
the class resources. Remember to check out the
lesson on downloading the resources for the class if you're having
trouble locating them. Again, how does this
weird-looking face help me with my
beautiful characters? Well, I compare and contrast the Asaro head with my sketches. For example, I can see
that this eye socket, it goes down and inwards. While this eye socket may
not match mine exactly, I do know that the eye socket is going to go down and inward, so that area is going
to be in shadow. A couple of notes
about the Asaro head. It has two sides. One side is more
simple and rounded. We can use this side to
focus on more simple shapes and also to imagine
a more young face. The other side has
a lot more detail and we can use this to
imagine an older face when our bones start
to show more strongly. Also, there's a lot more
detail on this face that can be really useful
even for young faces. Now, you don't have to include every single
plane on the Asaro head. Especially if you're
drawing more stylized face, you don't have to use
all of these angles. But this is an excellent
tool as a beginner and it's a fun way to explore what you'd like to include
and what you don't while exploring your own style. After you've practiced
with the Asaro head, you'll have this stuff memorized and you just won't need to use the Asaro head all of the time. Let's do a walkthrough step-by-step of the
important planes that I like to pay attention to and how I use them to shade
and highlight my faces.
14. Tutorial: Adding Shadows: Let's do a step-by-step
walk through of how to use the Asaro
head in our sketches. I provided a worksheet for
you to follow along with me. The instructions for
downloading those are in the lesson on downloading the
resources for this class. I recommend following along
with the worksheet first to help you better understand how and where to apply your shading. Then once you're familiar
with all these concepts, you can try applying them
to your own sketches. The first thing that I
want to do is choose the background color
for my character. This is especially important
if the hair doesn't frame the face, or the neck, or
the skin of your character. Because if the background color and your skin tone
are very similar, it's going to be really
hard to separate them. So it's really important that
you have enough contrast. I've also gone ahead
and filled in the hair, and the shirt, and as
well as the eyebrows, the whites of the eyes, the colors of the eyes, and the eyelashes, the
black areas of the eyes. I've done that because otherwise it's going to be distracting, so I want to make sure that
we're getting as clear as possible on how to
use this Asaro head. Once I've got my
background color, I need to choose the
base color for my skin and that is basically the
overall color that the face is. I'm going to choose a
value on my scale that's close to the overall skin
tone of my reference. If your reference photo
has a bunch of shadows, it may be difficult to tell
what the base color is. So you might find
that looking at the neck area and seeing
where the mid color is, something that's not in the shadow and not
in the highlight, that might be the
easiest for you. On my value scale, this is going to
be my base color. I'm going to fill in my entire
face with the base color. For my shadow color, I'm simply going to
choose a color that is several steps away
from my base color. This is important
because you're going to want some wiggle room
leader in our process. It's important that you have wiggle room on your
base color as well. You don't want it
to be the lightest color on your value scale, you will need some lighter
values to work with later. So that is going to
be my shadow color. Now I'm going to choose
a light direction. Since we're not using the reference photo entirely for our painting process here, I'm going to choose
my light direction. Now we're going to identify
the planes of the face and then decide if
that area is in light or in shadow, and it's just going to
be one or the other. Is it going to be the
base color or is it going to be the
form shadow color? We're going to start at
the top on the forehead. On the Asaro head, we've
got these four planes. There's the front of
the forehead and then two planes which sloped
towards the back, so making that round
forehead shape, and then there is
this side of the face right here which is
this plane over here. If you remember that circle
that we drew in our sketch, that is the side
of the face there. So these four planes look
like this on my sketch. Now with my light source coming up from the top
right-hand corner, these far three planes
are going to be in light, and the only one that's
going to be in shadow is the far one on the left. Now let's look at
the eye sockets. The eye sockets
on the Asaro head are going downwards and inwards, so they're going
to be in shadow. This is where the eye sockets
are on the Asaro head, and this is where I would
find them on my character. Now, these sockets
are going backwards, inwards, and downward, so they are going
to be in shadow. Let's take a look at
the eyelids themselves. On the Asaro head,
you can really see the planes where
these eyelids, where the center is coming forward and the sides
are going backwards. This is what it
would look like if it was drawn with an outline. This is where I would imagine those planes to be on my model. With a light coming
from this direction, I know that this part of the
eyelid will be in shadow, but not these two sections. The underside of the
eyelids will be in shadow, and on the far side, all of them will be in shadow. The area directly
beneath the eye is next, and this raises upwards. This is also part
of the cheekbone. Here is where I would
see those on my model. Now the right side is
going to be in light, but the far side is not going to be in light.
So I'll fill it in. Now we're going to get to
this side of the face, so we are going all
the way down across the cheek and across the side of the face
right over here. That's going to be
this area on my model, and we paid really close
attention to this area when we were drawing
our sketches. You might remember I shaded
in this side of the face. You might also
notice that there is barely a sliver of that
on the left-hand side. With this light source, this side of the face
is actually in light, but the far left side is not. So I'm going to shade that in. Remember, it's base color
or it's shadow color. Now I have got this area
that is closer to the nose, it's like a cheek area. This will become more important
when we start filling in the pink rosy
areas of the cheek, so this will be important. Now in my model, the right-hand
side is going to be open, but the left hand
will be filled in. Now let's look at the
mouth area on our faces. The muzzle, this is
often referred to, really is a rounded shape. So there is this cupid's
bow in the center, and then on the sides, these slope back and downwards, and something
similar is happening underneath of the lips. So the area right underneath the lip usually curves
inwards a little bit, and then these sides
are curving out. On my model, it's going
to be these areas. You'll notice that
that under area is above the mark where we
drew for the chin there. Again, with lighting,
these will be the planes that
will be in shadow. You'll notice that this
area under the lip, I can even see that that's in shadow on the reference photo. So I do know that
this dips downward. Now we're going to
look at the lips. In the Asaro model, the upper lip goes inwards and the lower lip jets outwards, and this is not
true for everybody. This is where this arrowhead
is just an example. It is not like the
end all be all. So different face types will have different lip projections. Some people's upper lip
will stick out more. But in general,
people tend to paint the upper lip a darker color and the lower lip
a lighter color. Now, on our model, I'm not going to paint the lips the same
color as the skin. But the upper lip is going to be a little bit darker
than the lower lip. For me, what I do is the
same way that I create a value scale for my skin tones. I also create a value scale
for my lips or my blush, anything that's
pink on the face. I'm taking the same steps, the same from light to dark
steps for those colors. So that's how I would
color in my lips. Another area I want
to point out is those little nodes that I had
you draw in on the mouth. That is not shown
on the Asaro head, but that's where it would
be on the reference model. Because we are drawing
in our shadows, I want to get those, too. This little crevice right here, it's going to be in shadow, almost like a dimple. Now let's look at the chin. The area under the shadow
of the lip is rounded. It goes forward and upward. Now, the Asaro head
is really jagged, if I turn the outline
off right here. It's really harsh, but
nobody's chin is like a box. The Asaro head is just
breaking this down into sharp corners, so it's very easy to see
one plane from the next. Sometimes we want
to embrace that. The lip often has a
really hard edge, and we do want it to be a
nice sharp straight line. But in cases with the chin, you probably are going
to want to be a lot more softer and gradual
with those shadows. You don't necessarily
need them to be like sharp and angular. As you can see, the way
that the shapes form on my character are quite
different from the way they shape on the Asaro head. You can see on my chin, I don't have a perfectly angular line. It's a gentle curve, but also the line work itself, the painting itself is gentle. It's not like a harsh straight from shadow color to base color. It goes gradually. Time to talk about that nose. This is where that box
method that we learned to draw the nose in is super
going to be helpful. Because what we can see
here is that there is a front plane to the nose,
an underside of the nose, the side of the nose, and there's this little section called the keystone up here. I've highlighted this in red, but you've already got this. With this light scenario, I know that the side of the nose is going
to be in light, the top of the nose is
going to be in light, the keystone is going
to be in light, and the underside of the nose
is going to be in shadow. I can also fill in the
darker areas of the ear now. We have added all of
our form shadows, that's everything that
the face is made of. But what about that cast shadow? This guy right here. We need to add our cast shadows. The first cast shadow that
I want to add is the nose. The nose is going to cast a shadow onto that
side of the face. But you can't really tell because there's already shadow
on this side of the face. In areas where there's
already some darkness, I'm going to add a darker
color for my cast shadows. So in my case, I'm going to go one step darker
to draw my cast shadows. Also, underneath of my eyes, the eyebrow is going
to cast a cast shadow. It's going to even cast it all the way down onto the face. You can see that actually in the reference
photo right here. There is some shadow
right in there. This brow also is going
to cast a shadow. Also underneath of the lip, that is also going
to cast a shadow. So the lip is casting a shadow onto the chin
underneath of it. The neck is also going
to cast a shadow, but this is not
already in the shadow. So I'm actually going to use
my regular shadow color, my form shadow color
to fill in the neck. Now my lips also are going to
have a little bit of shape. There's going to be a little
bit of shadow on them, but they, of course,
will be a darker red, not a darker brown colors
because they are the lips. Another area that cast
shadows is the eye itself. The eyelid and the eyebrow, that will also cast a shadow
over the eyeball itself. I like to add a little bit
of each of those colors. For example, a quick
technical note, if you're using Procreate, you can actually
use Multiply layers to do this in one swoop. So I use just like a darker
purple color right here, and then I tapped on the
little letter right here, and I switched it from
Normal to Multiply. So then it's just darkening all of the colors underneath
of it and I didn't have to switch from going
to a darker white color, a darker green color, a darker black color there. I just did it in one move. In fact, I often
like to play with Multiply layers just using the color that's
underneath of it. I like to add a little bit of extra darkness to
the nose itself, maybe to the cupid's bow. This Multiply layer, it just enriches the color
a little bit more. Of course, if you're
using a paint, or a pen, or anything like that, you can just make your colors a little
bit more saturated. Finally, we've got
these smile lines, and they also have
a little bit of shadow on them and they
are casting some shadows. I drew a smile line right here and I want to
add some shadow to it. I'm adding that smile
line right there. On this side, of course, it's going to be a
darker color because it's a cast shadow
on top of a shadow. I'm also filling in the
node shape right there. Now I do want to
be really careful about smile lines like this. I don't want the color to be
so, so, so much darker than the base color that it's like a black line because
making it darker makes it look like
it's very deep. That's a principle of
large areas of shadow. The deeper the crevice, the darker the shadow. So adding deep darkness to
these lines is going to add age to my character
because it's going to make the wrinkles and smile
lines look deeper. However, that actually brings us to our next level of shading, and that is ambient occlusion
because there are some areas on everybody's face where the
light just doesn't reach. So it is really dark. That is oftentimes in the
eyelids, for example. This crease right
here, it's super, super dark because the
light isn't able to penetrate in there
and brighten it up. My ambient occlusion
colors are going to be some of the darkest
colors that I use. Here are the ones that
I'm going to be using. I'll go ahead and draw in
those lines for the eyelids. You don't have to draw
the lower lid one, but I like doing that
because I think it draws a little bit more
crispness to the under eye. That's just a stylistic
choice that I make. Another area will be
the edge of the nose. This actually can expand a little bit because
light's coming this way. It really isn't getting into that dark corner up in
that edge right there. It doesn't have to just be
an outline like the eyelids. I'll also add a little
bit more definition between the neck and
the shadow there. Because as the shadow gets closer to the neck,
it does get darker. It gets a little bit deeper and a little bit more defined. I'm definitely going to
see this in the nostril. I'll also actually maybe
even see a little bit of ambient occlusion
around the corner, that wing of the nostril. I've chosen two different
colors for my occlusion, so I can go a little bit lighter that's not quite as dark
as the nostril itself. But you can see that, right? There is some real darkness
in these areas right here. It's, of course, very
dark right there. But even around the
wing of the nose, the light really can't
get quite in there, and that's also true of the
line in-between the lips. Let's turn off our
sketch for a second to see how far we've
come with this. We're really getting to a point where we don't
even need the sketch anymore to show all of
the parts of the face, how it's really starting
to come together. But I think we can make this
a little bit better still.
15. Tutorial: Adding Midtones: Let's take a look at our
SRO head over here again. So in the forehead there's
these three planes. The top plane is really bright. It's the lightest one
and the far left one, that one is the one
that's in shadow. It's darker. The one over here is somewhere
in between there. That's what we want to do here. We want to add some mid tones. Because before we just said, either it's going to
be in shadow or it's going to be the base color. But there is a little bit of leeway between
there, for example, the forehead is not this blocky like one
side to the other. There is some shape in that. There's some small progression. So I want to maybe smooth this out so it
doesn't look like that. The head dislike turns
around the corner like that. when I am choosing
my mid tone colors, they are not going to
be the same color as my shadow there
going to be lighter, but they're also not going to be as light as my base tone. That is why we left some
wiggle room in here. That's why we decided
we needed some space between our base color
and our shadow color. I'm going to use these
tones for my mid tones. Because I want to soften up
the forehead right here, I'm going to use the
color that is closest to my shadow color right
in this section. Now I've got a lot
more of a gentle curve across that forehead. Also remember that we were talking about our nose as a box. Well, with the light
coming on this side, the side of my nose is
going to be the brightest, but the top of my nose, well, that's going to be in a
little bit more shadow. Under the nose, I think is going to be a little bit more of a gentle turn because that
side of the face is in shadow, but this side is blocked by the way that the cube is
broken, pulls up there. I would also say that
this side of the cheek, it doesn't necessarily mean that the farthest either that side of the cheek is in deep shadow. But I could probably
even lighten this up a little
bit right in here. Maybe I'll add a little bit to the smile line because it's not just like
a hard line there, can let it gradually get darker and also the
side of the face, I'm going to put into a
light shadow here as well, maybe even down to the chin.. Remember the chin was
different sides like this. This is the bright
part of the chin and this is the other
sides of the chin. In fact, that plane that was underneath the eye,
this is the high point. So I'm going to add
a little bit of shadow underneath there as well. On this side of the forehead, I'm also going to color that in. Again, now the forehead
is rounding out. It's not just a one
side is in shadow, on one side isn't;
now, it's like a really nice even cast. Now, in Procreate, I use a brush that
has a little bit of opacity and pressure changes. If I want to shade more
lightly in an area, I just press more lightly. If you don't use brushes
that have pen sensitivity, like pressure sensitivity, you
can always go in there and choose colors and manually
make them lighter. If you're using a
pen or a pencil, you can just use less pressure, so you can draw more lightly.
16. Tutorial: Adding Highlights: Check it out. This is how it looks without the sketch now. Now we're still
lacking a little bit of definition like where does
the nose start and stop? Well, now we got to get into my favorite part which
are the highlights. Highlights happen
at the spot that is closest to the light source. Wherever the face is
projecting out the furthest, that's what is going
to get the most light. Also, areas that
are very shiny or reflective will also
get highlights. I actually already added a highlight in the
black of the eyes here, because that is such a dark
spot and such a shiny spot, our eyes are really wet. That is probably one of
the brightest highlights that you'll see on the face. Also, we need to choose
colors for our highlights. This is why we never want our base color to be
all the way at the end of the value scale
because then we won't have room to
add the highlights. I always like to have like two different colors
of highlights in here. One for just gentle
highlights and then one for really
extreme highlights. If you look at reference photos, you'll be able to
see where some of those really high points are. I can really see
that right above the eyebrow and in the forehead. The top edge of the
eyebrow actually very often is a little bit in highlight. I'm
going to add that. Then also the top
of the cheek here, that also is very
often in highlight. There's very often above this corner of the lip or
on the top edge of the lip. It's a really bright
spot right there, so I'll add a little bit
of highlight right there. The top foremost part of the chin will be probably in
a little bit of highlight. Also underneath of the eye, this whole eye socket is not totally in shadow, so you may, when you're doing
your highlighting or lightening process, you might decide that, hey, I actually want to add a little
bit of this back in here because it's a little bit
lighter in that area. Now the nose is where some of the most noticeable highlights
are going to happen. I think that the light
in this case is going to hit the flat part of the face more than
this side of the nose, so I'm actually going
to add a little bit of definition between there. Now I can really
see the difference, the side between
where the side of my nose is and where the
face, the cheek starts. This definition is
really important to me. Also, you'll often see a really bright highlight on the edge of the nose, and
at the ball of the nose. I'm going to draw one that
goes down the side of the nose, and then a couple
at the base of the nose. In fact, I might even go a little bit
lighter on those ones. Because I think that that
really makes a nice pop. Sometimes it's too
much and I want to go inside of there,
and maybe I'll make a little bit of
a highlight inside of the darker highlight color, maybe even smaller than that. Also, the lips are shiny and
they will get a highlight, so I'll often see this on
the bottom of the lips. Sometimes I'll
draw a little line or a little specular highlight. That's just like a dot right
there, and that really brings some roundness and
some life to the lips. I want to point one more
thing out about the eyelids. This is not technically
a highlight, but the top portion
of this eyelid. Remember we divided
it into three. This will also be a little
bit lighter than the sides. I like to come in and lighten up that middle
section right there. I do this on both eyes. That, I find that contrast really helps
the eyes look rounded, the eyelids look
rounded, and also, it just brings a lot
more visual interest when we look at the eyes. There's one more type of
light that I would like to talk about and that is
called bounce light. We do have a direct
light source, but in real life, light will hit things, and it'll bounce off out of it,
and it'll reflect. It's a really fun and easy
way to add a little bit of extra life into
your portraits if you add a little bit
of bounce light. One of my favorite
ways to do that is to add a rim light and
that is just to add a highlight along the edge of where your dark shadows
are on the edge of the face to mimic the idea of light bouncing
back on the face. I could add just a
little bit of light along the edge of
the face right here. Now that's a really subtle
example of a rim light, but here's an example that's
a little bit more extreme. You might also
notice bounce light in different areas of the face. For example, we were talking
about how this part of the eye socket is actually
not in shadow and how it reflects light, well, sometimes maybe bounce light
is going to bounce off of this really bright highlight of the cheek and bounce
up into that area, so maybe we'll lighten
some of this area up. Anywhere that's very exposed or you might think might get
a little bit of extra light, might be a nice place to add
a little bit of bounce light and there we are.
17. Tutorial: Finishing Touches: Now, the whole face isn't
just one brown color. We also have some
pink in our lips, but we also often have
pink on our cheeks. Sometimes people like
to add a little bit of pink on the nose or the ears. Now, when I am drawing these, I like to make them
very stylized. I just draw straight up circles and I use a multiply layer so that I can see that
there is this area of the cheek is going to
be a lot more light pink and this area of the cheek is
going to be a darker pink. Now you don't have to
draw a circle like this, you could extend the
pink all the way across the cheek or into the nose so that it's a little
bit more naturalistic, like in this case. I would just come in here and
erase some of these areas where the pink probably
wouldn't actually be, and make it just feel a
little bit more natural. But the important thing to remember is that
we still want to follow the planes of the
head when adding this pink. Those planes that would have highlights or mid tones would have lighter color versus the areas that would
be a little bit more in shadow would have a little
bit of a darker color. Again, it's very common to
see the ears are a little bit pinker because in the ears, the blood vessels are
closer to that skin. It's a lot more translucent. Of course, you could also add a little bit of
pink to the nose. That's a stylistic choice. Most people don't
have super red noses unless they're maybe
a little tipsy. We can apply some of
these color changes to the hair itself. If you go back to the
lesson on drawing hair, you'll know that some
of the areas of hair are going to be dark and some of them are going to be lighter, and you can just use actual colors to fill that
in and we get to this. Now, I jump around my paintings with all
of these processes. I'm showing you these in an order because it's
easier to understand and come back and reference
if you're struggling with a tricky area
on your painting. For me, I don't actually
just draw my form shadows, cast shadows, highlights
in that specific order. What I do is I start
drawing the eyes and I get super interested
in drawing the eyes. For you, I would recommend
drawing these in this order so that you can wrap your brain around all the different
lighting types, but then when you're
actually drawing portraits, go all over the place. If you get stuck in one area and you get frustrated
in one area, move on to another area. I tend to draw the
eyes and the lips and the nose as like an
entire unit all at once. I don't tend to just do the
whole face in one chunk,. You'll make more progress when you feel like
you're having fun. Focus on the parts
that you like drawing, and when you get to a block
point, move somewhere else. Let's do a quick recap.
18. Recap: We start with a sketch and then we move into
adding our base layers, so we add a background color. You'll probably want
to add a color for the hair just like a flat color, a base color for your skin, the whites of the eyes, the colors of your eyes, the black irises of your eyes. Probably you want to add
your eyebrows as well. These are all of
our base colors. From there, we will
add our form shadows. Our form shadows are these areas where the
light curves around. It's also the color
of our lips as well. From there, we add
our cast shadows. The nose casts a shadow. There's a shadow
cast underneath of the neck where the jaw
and the neck meet, the eye sockets
casts some shadows. Then we add our ambient
occlusion light, which is the edges
of our eyelids, the line between the
mouth and the lips. We also add our mid tones so we make sure that we're not
just going just shadows, we're also adding
some mid tones. From there, we add highlights. That would be the little
dots on the nose and the brighter areas
where the light is really reflecting
off of the skin. We also want to remember
to add the highlights in the lips and in the
eyelids themselves. As an extra touch, you can add a little
bit of bounce light. The more extreme this is, the more intense the light around the face
is going to look. You may want to add some
pink for your cheeks. Finally, any finalizing details; coloring in the hair, adding details to the dress, maybe jewelry, any finishing
touches to your portrait. We covered a lot of
new information. I hope you followed along with the worksheet that I provided. As you move forward, you may want to practice
with the worksheet and filling in the
shadows and highlights with a new light source. Once you've practiced
with the worksheets, you can try identifying
the planes of the face on your own sketches. In fact, using the
Asaro head may make it easier for you to understand
how to draw your sketches. I know it helped me
make better sketches.
19. Recommended Books: The methods that I
shared in this class are a mashup of the
Andrew Loomis method, Michael Hampton, and just
what makes sense to me. I built it around the questions
that I had as a beginner and expanded on what I learned
from these two methods. But you can definitely
check out more from both of these authors
if you're interested. This is the Andrew Loomis book, Drawing the Head and Hands. I'm not going to lie. This
book is from the '50s. It's dense and boring and difficult to extract
information from. So if you find that
it's expensive to buy, it might be worth
checking out at your local library
if it's available. This book by Michael
Hampton is great. It's called Figure Drawing,
Design and Invention. It's not super beginner
friendly, but it's excellent. There is great information
in here and drawing faces is really only a
small portion of the book. It's a lot about
drawing bodies as well. If you found this class helpful, I want to ask you a favor. Please leave a positive review, a comment or project. Your interaction with the
class really helps it in the Skillshare ranking so that
other people can find it. Even a simple thank you for the class in the comments really makes a big difference and
it makes me feel good. I love meeting you on Instagram. So if you're sharing
your portraits, I'd love to see your art. You can tag me
@paperplaygrounds and you can use the hashtag,
DrawWithBrooke. Thank you for spending
your time with me and I hope you've had
fun drawing faces.