Transcripts
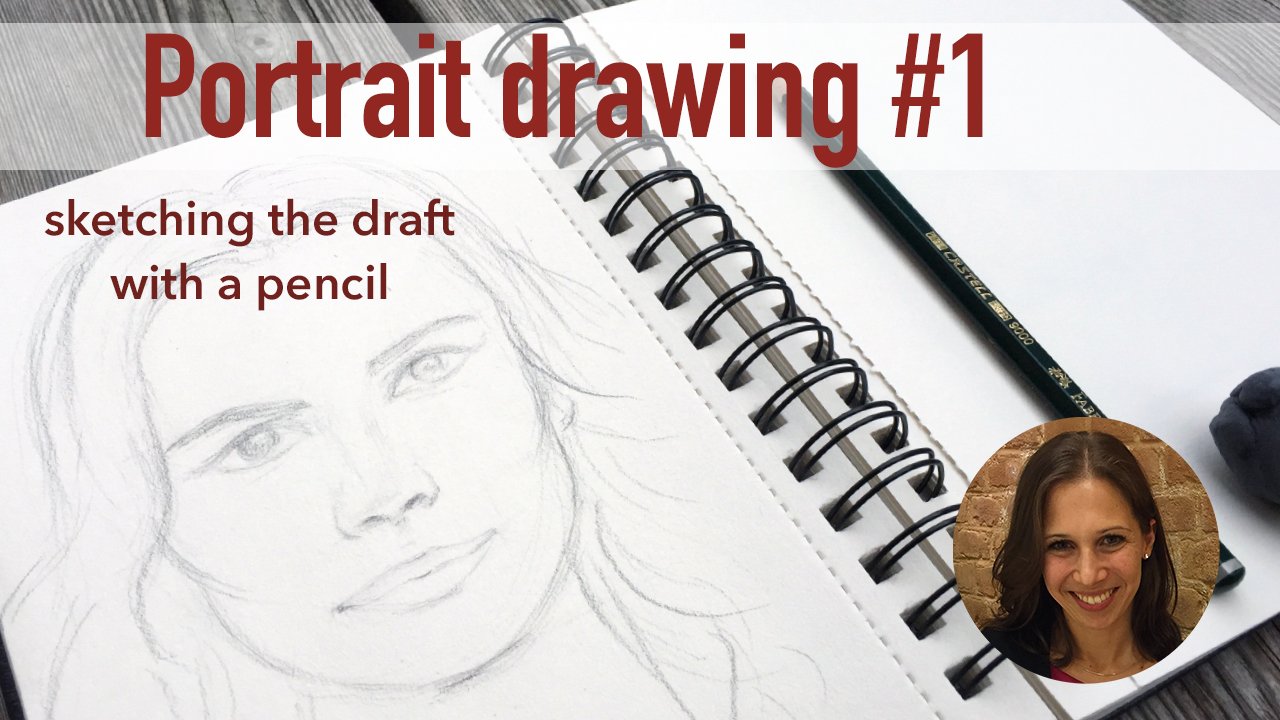
1. Introduction: Hello and welcome to my class poetry drawing to how to transform the draft into a realistic portray. This is the second part of two. The first part was about this catching the construction off the draft on the second class will be now about the shading and the adding off details in order to transform the sketch into a realistic portrait. My name is Barbara Bowman and I'm in Austin, artist and illustrator on my book illustrator, but amounts of making scientific illustrations as far less magazine illustration. I'm doing illustrative branding, which means that I'm usually on the linings to Dietrich principles off a company after basic principles learned in the first class off this poetry drawing class, like the third technique and other help for basic guidelines when are continuing with our poetry. For those who have already attended the first class, you can now take your draft and go on with this one. For those who have not yet participated at the first part of this class, no words, either you quickly make the glass here is the link, or if you already know how to make a draft, you can sketch it roughly while I'm talking about their material and the structure of this class. But you won't need any drawing experiences for this class because we will look at the details off a portrait step by step. After some basics about shading Welk, look closely on each part of the face, the nose, the mouth, the hair as well as the other characteristic elements of face, like the cheekbones and the draw step a step. We will see how to form relist, eclipse or eyes. For this drawing class, we will need a little bit more material than for the rough sketch. We will use this six p again, as we did for our draft, but we'll also take Pantsil. That is a bit harder for drawing the fine details, such as the nostrils or the texture off the iris. They do not necessarily have to be exactly six p to PHP, but it should have a pencil that it's more black and softer and want it is harder. You can take a Pantsil coated with what other one without as you prefer for the shading, a tissue or a makeup. Remove a pet would be a great help, but the most important tool for us for shading will be the planning stick. We also need a near raise and ideal and needed a razor on the sheet of paper. Medium texture has already explained in the first part of this growing for a class project , I'd like you to continue the draft writer, apply their poetry drawing techniques that I've shown you in this class. So let's continue our dress.
2. Warming up: lesson one warming up and almost doing a bit of a warming up, especially before start working on details off a portray like in this case for a need, clear lines and the good feeling for the fine texture. I lose my raised by hatching and cross hatching, and it's also a great way toe test. The material that we're using, one of our panzers is a softer panel like the six people, another one that is clearly harder hp, for example, and one in between those two. I will take it to be at the three. B, for example, would be financed. What the six p is the darkest council that I'm using here for this poetry. When we were drawing rough lines to warm up, you will see that this Pantelis very soft. You can Rover fine lines with it, and we're tack ones as well. Because its core has a higher ratio of profit. We will need this darkness for the hair on the pupils. Ondas to see is expensive soft. It is easy to remove to take some Griffith layers and toe blended races with a planning stick. The two piece clearly hard as it has a higher ratio of clay than the six people. The lines are harder and more difficult to blend, but the advantage is that it is more pointed in there for wonderful to use for the arteries . For example, the certain HP has the highest amount of plate until they're ready. When you are comparing the three traces, it is clearly not. It's black, but has McRae endurance a thinner, more constant in that size, The blending stickies here Not as helpful. It's racism difficult this much, but on the other hand, is patently is perfect for hedging as the lines are so constant and fun.
3. The draft: lesson to the draft. The draft that left on in the first class is our base for the shading in the details. If you'd like to keep your original draft of the first class it gnosis catching new one the photo off the ladies ready for downloading in the Project field. Based on the third technique in some other basic guidelines, we construct our draft. The draft is the most important part of the drawing, as we won't change the proportions anymore. But concentrate on each part of the face. And when we draw the eyes, for example, in a very detailed way, we won't verify constantly if the eyes are drawn into Coric place. But we will pay more attention in the pattern off the iris or the highlights. So it's absolutely essential that draft istan seriously, so we don't have to think about the main proportions anymore. As I said in the first part of this class, when the draft is well drawn, the main part of the drawing is already
4. Shading: Lesson three. Shading shedding helps us to grade the form of an object or in person. There are different areas of gray that we need to take into consideration when shading for getting a better feeling for the different shades of gray. I'm doing a shading scale here, reaching from very bright areas into dark rooms. They don't have to get dark. All of a sudden, it's more step a step process by adding more and more darker shapes. So I'm partly reworking the darker areas in order to get a Fullerton as the face in the hair have mainly round shapes would take the ball is an example for shading. Let's have a look on the roses of shading. The ball has three main areas that I will give numbers to make it easier to explain. The little circle has number one. It is the Hallett, the brightest part of the ball, where the light is striking directly. We will live this one white. The second area still pride you to the light. But as the ball is round this area, slightly getting darker and darker, the third part is the darkest part of the ball. No direct line is shining on it because it's on the other half off the ball. It is after the broad is portable. It is preventing the light to shine on this side this fall off a step when shading is therefore to define the light and make the first layer for the shadow and slowly adding layers to in Greece the darkness, especially in the darkest area as it is a border, no address or hard lines. So the towns are softly shading into darker towns. Too great, the core off the shadow. In a normal environment, there's not only one source of flight, but many different ones. So the ball has not only an entirely dark core off shadow but parts of historic area slightly brighter to to this reflected life. But this is not our focus here, so we'll leaves this out for a moment. Get to the softness of the six p, and it's read a high ratio of Griff. It it's possible to in Greece the contrast between Highland and the core off the shadow considerably while shaving, it is essential always to keep the round shape off the ball in mind and to follow this shape when we look in our padre lady, we realized that there's some parts off her face that we need to focus on one shading, for example, this part here or over there for around the eyes. So let's have a look in our draft to see what it means. Q. To the eyebrows, the allies are clearly in a shady area. The drop these off the nose with the nostrils is old in darker area, as well as the upper lips that was standing out of it and are therefore causing more shadows. The fact that the lips are slightly outstanding hours A makes it darker area under the lower lip, the sound below origin, meaning the throat is especially dark as there are shadows due to the hair on the head. There are a few other areas that need to be dark in the bid for trading, but not as strong as the ones I just mentioned. For example, of shadows under the cheekbones, the site of the nose of the L. A. Wings on on the forehead, the area under the hair and between the eyes
5. The eyes: blessing for the eyes. We're now starting with the details. Let's start with the eyes as they are so central in the face. If you managed to draw the as in a way, they look very similar to the photo, you have already achieved a great goal. Let's kept it roughly here to sum up some essential step. We should keep in mind on drawing the eyes in the portray the eyes a ball with a comparable shading to the one I've sketched for the shading exercise. The ice went so they are highlights on it. The iris is a circle but normally not completely visible. The upper lip throws a shed on the Khyber. This area will be doctor back to the portray. Here I take a blank sheet for Manto. What's much in the draft? But what a minute. We should talk about eyelashes before when wrong. Yeah, Alicia's don't stop them abruptly, but let him fade out a bit. Great and more natural effect. Let's make a short summer before we continue to portrait. For so far, we defined the basic shape off three eyes in our draft in the position off the iris. Then we defined this size of the pupil into position off the highlights. Next step is the first lay off the texture of the iris and the shading with the planning stick. We defined the main directions off the allergies as well as off the eyebrows and finished by drawing by adding some final details. With harder pencil, you will find this step a step guide always in the downloads. If it like you have a second Logan, it the Here the eyebrows has a certain trend. They are growing from the middle of two face out bolts. The upper half the eyebrows has additionally a slight downward direction. The lower part of the eyebrows. It's like a port growing direction. The places and directions are a bit randomly choosing in order to avoid that their two parallel the size and sickness and the way they're cuffed. Is Mariah blissful Here? We also see that there are more than one highlight and that the eyelashes are parallel either, and clearly feel fading out at the end. Going back to the portray were slightly removing a bit of CrossFit with the needed a razor , so we still have some orientation point in the draft but not too clear lines that would disrupt the fight shading. When we draw the Yaris, it's important to keep in mind that the irises round, but we do not draw the complete soul that part of the hours is hidden behind the island. If you draw the irises a complete circle without hiding the APA prod, the padre would look a bit strange. Eyes opened so wide that you can see the whole Aras is a difficult sign for few. For example, just see how this looks like. Okay, yes, the next step we already mark to have it. The high let dependent its source off the white. So we can said, Can be square on the mainland. Comes from the window, or it. It's more round when the bulk rates the hell it on. Yes, we draw the outlines after Halit already, because once we have drawn the pupil, we won't be able to create the Hallett afterwards within their razor. As the eyes with the highlights on the I are important to show the moisture there is shows a certain texture. The lines are coming from the send off the pupil until the outlines of the hours Often they are broken lines, sometimes continuous lines. Someone during the hours we already considered a direction off those lines. Drawing the hours means drawing in layers. The first indicate roughly the lines with self pencil a six speed, for example. Later we will draw another layer with a heart of pencil and working here but on the shape off the I in the eye process in order to get a feeling for the right position off the hours as left toe eyes, working with him kind of parallel because it facilitates to draw them similar. I think that's one of the biggest challenges in Padre drawing as eyes are so decisive. So I'm doing the same for the second I by constantly adjusting the shape off both for the eyelashes. It's important not to draw a straight line, but to face them out. Otherwise, they would look like they were cut with a scissors. Just write some lashes in the separate paper to get a feeling for it. The eyelashes are a bit tasseled. Just look at the eyes off this lady. The elections are slightly bended about them, not parallel to each other, to avoid drawing the lashes parallel. You can choose some lashes that are very dominant to give some directions for the luscious . The other lashes are drawn afterwards, following a bit the direction off the dominant ones. I mark this dominant luscious olds and the poetry in order with a bit of a garland for the different directions for these fine lines. We better take this toupee instead off the six p, as it is a bit harder on the typists. More pointed, this parent is all the perfect for continuing the fine pattern off the iris and toe emphasize some lines again, we kept those of the right eye for grating a small. The effect would take the blending stick, the so called stomp the texture off. This iris is smoother as far as this clearer the white parts off the I, as we have already drawn with the planning stick. We can use testicles of the softly mark the lines off the I the islands. But be careful. Wanted as much. The line this CrossFit um stick, which leaves us a trace on the paper. So use the paper beside to check the darkness off the line. The lines made by the planning stick they are. Let's make a shed only I as follows on the arrows for they I. We can use the Blanding stick to draw the shadow. The same for the cordon off the ice. For the iris, we use a very pointed pencil to draw the shadow made by the apple It as well as the doctor . Certainly wrong hours with his pants. Or we can also draw the pupil a bit darker to enhance the contrast. Be careful not to draw in the Hallett as the eyebrows are playing an important role for the mimics. We look at this shape at very tanta fee. The hair off the high prose has it's clear tendency outwards without being too Hermogenes, we use the Blanding stick for further shading off the area around the eyes so that they're more concerned with the rest of the face.
6. Shading nose and lips: Lesson five, shading nose and lips as the nose is mainly drawn by shading or work a lot with the planning. Stick for the nose wheels applied straight lines to position, and those in us catch as it consists. Basically, out of these four areas, the lower most Arian form off the trapeze is starting at the tip off the nose and includes industrials. This is the darkest part of the nose, but this part is also extremely rich in details concerning the different gates. About the nostrils, for example, is a brighter area. So when shading, the notes were also working layers, as we did for the ice, these trades are shaping the nose. The nostrils are read a black, but we never draw them. A StarKist, they appear that would be too much. The pupils are the darkest part of the face. The Noster from beer Stark. Otherwise, they would be too much, and I can't. The focus should be more on the eyes than under nostrils. The shading has I was an enormous impact on the bridge of the nose. The more shading were doing in the bridge. The slimmer their peers, the greater the distance between the shades on both sides of the bridge, the flatter than those appears the same is, well, it for the tip of sickness. The shading effects the shape of the nose fundamentally for acute button nose. The tip of the nose should be round the round of the high left off the nose. The more it becomes about knows so the recognize the polls in the way of shading is important to get the kind of knows we want the elevations of the nose up writer, because the light trying star reclaimed them as all parts of the face that connected so closely. I'm often switching between the parts off the face. That's why the shading off the nose is leading me to the lips. The Blanding stick is so smooth and lighten Slim's it is perfect for shaping the lips already a bit, and I was catch way for real trolling control the position off the lips by using more straight lines. Now we continue to shape the lips by using more curved lines. When will a close said her lips with See this ball shaped shadow that is connecting nose and lips. It is turning into a bright area as the lips have it outstanding. Satellite is directly shining on this part. Other characteristics of Phillips that there should always keep in mind are the highlights of the bottom lip on the way the lips are shaped by the lines. These curves are strongly influencing the shape off the lips. The upper lip is usually a bit in front and strokes there for a shed on the lower lip, this shadow is forming the lips considerably. The entire upper lip is much dark and in the bottom lip, so we start there. The first lady of shade, The first lady is very soft. We will need several layers to work out the lips. When you're docking the lips, we keep in mind that extra off the lips and draw those curves. Vertical lines. Some lines are drawn softer. Summer drone hard. There are soft pilots on the lips, special in the bottom lips, so we draw those or highlights already the beginning tow. Avoid darker shades and how it it's much more difficult to brighten up the darker shades to great highlights. Instead of leaving the highlights out, this is the first layer of shading the lips. Now we can compare the position and shape off the lips of the position off the nose. It is easier this way to check the proportions and to figure out if they're still in the right wreck. For the portrayed Roy for getting a better feeling for the total poetry, we do a bit of shading for a whole face because the position of the lips is closely related to the shading off the cheekbones. For example, it's very helpful to define the whole poor tree. Roughly be shading a bit in order to get a better feeling for your orientation points off the face looking. The main waves of tea here, for example, is a great orientation point for Hampton and her read a prominent lower chop. Working on the shady area off her neck helps us to define the lower choke lira, which has an enormous impact on the position of the shape off the lips. Intern shading is very decisive for the expression off the face, so it's better toe shade the face that first step and to look at the entire face regularly . So now we have a better feeling for the whole fates. Let's go on with the nose and the lips, the main shelters already drawn, it is now more about the different darker shades. - There are some helpful guidelines when drawing lips. Let's have looking them to get in a close up. We start with straight lines and defined a basic form off the lips we make the darker lay on. Their polyps are leaving out the harlot by keeping in mind, but the curved lines off the lips. The Blanding stick helps us this much these lines and to work on the texture off the lips. They're six B. With its high ratio graph, it creates a stronger contrast. We continue the shading off the cursed lines with a harder pencil but still living out the Halutz as the lips are outstanding weird shadows below and a bath for the padre drawing of our lady. This means that we continue to draw lines into ed shades to form the lips. We keep in mind that the apple ipsa, clearly darker, shaded there's a visible contrast between the upper and the lower lip. The corners of the mouth, a clearly darker than the rest of the mouth and not a dark area, is always under the bottom lip, but this one is much brighter than the edges of the mouth. We need to be careful to the shading, not too fast, as the upper lips are slightly in front. This stick out father. There's a brighter area to top off the upper lip. This area can be accentuated by light shading off the area. But the appellate this road is clearly in the dark area, which makes a gin stand out a bit more ingrates, a more three dimensional effect. To get a small surface, we can either use a pet or a tissue.
7. The hair: blessing. Six. The hair When drying the hair, it's important not to concentrate on every single hair. Just look at the hair. You see that there are some main waves when you have drawn them. You'll really have the main outlets for the him these ways important to create the volume for getting a better feeling for the flow off the hair. In the hairline, you can do the first layer with a pet. The air has different kind of shades. Regrade This trades by using different pencils. Six p for the darker areas. Toby for small, dark trades but drawing the shades. We leave out the bright the areas at the beginning of shading and focusing on the darkest lines, and I'm indicating them off for six b. Have a look at the poor tree and the flow of the here. You don't have to copy the here one by one. For sure, you can DM it can try to replicate the hair entirely. It's a great exercise to learn drawing here, but it is not essential for this portrayed drawing because it's more about getting the characteristics off this person, not the exact curse, the way they have floors is changing, but the style off the hair is still the same was the toupee in the HB. We continue adding darker lines and planning them, but you keep on to leave out the hal it's they were off, maintaining the direction off the waves. All the one blending for grating volume. Light and shadows are Santa. You can great them by adding contrast through darker, um, waves of him crossing the brighter ones. Same for the other side of the head. As the light is coming from this side, we have to leave out more space for Hal. It's pay attention to each line you're drawing that it is Contra puting to the overall flow off the hair. Don't stop all of a sudden with a line. Let it fade out is we've really done with the eyelashes and the eyebrows. The here is also grated in several layers, so just be patient and continue adding layers. Drawing here is nearly a form of meditation because it just let nature be your guide and you continue adding one layer after the other
8. Your Project: blessing. Seven. Your project for a class project. Take the draft that we've made in part one off this Padre drawing class and continue to portray by adding details and by shading. You would like to keep the original draft off the first class. You're welcome to sketching you one. And to continue with this fun, you can download this lady from the project field or you can draw Another person would like to sketch favorite actor, actress, a family member or some friends if you have any questions or if you want to share some working. But we really awesome if you applauded in the Project field so we can discuss it together and you're welcome to share it on Instagram would be great if you take me in this way so that it can give you a future in my stories. I'm really looking forward to see all your portrays. It was a pleasure to make this class with you. See a
 Barbara Baumann, Illustrator & Drawing Tutor