Transcripts
1. Welcome: One of the things I love
to draw the most of portraits in our quest to
elevate our drawing skills and knowledge of
anatomy can give us a push in the right direction
in this class when we simplify and all that
complicated stuff into bite-size pieces of info
are easy to understand. Shorthands know esoteric jargon or complicated anatomy terms, just the basics of structure to get you to
beautiful drawings. What's up, guys,
My name is booby. I'm an art teacher and
fine artists from Nigeria. This class is primarily for the intermediate
artists who already possesses some foundational
drawing skills, looking for something
a little extra to enhance the quality
of my drawings. Now I'm by no means an expert, but I'm more than happy to
share whatever you need to learn about this
topic over the years, we're going to
start by analyzing the relevance anatomical
landmarks of the nose before dissecting the nose
into its major claims are studying how it relates
to the other facial features. My goal here is to make this as enjoyable to learn
as possible and in a condensed format demonstrating how we can apply
anatomical knowledge. So I joined. Without
going overboard, I'm looking forward to
seeing your class projects or will you be able to
glean from these lessons? That's all for this one. Thanks for watching.
See you all soon.
2. Our tools: Over the next couple of minutes, I'll be going over the materials
we're going to use for this class and the
functions they will serve as it relates
to our drawings. This is what I recommend,
but if you have your current tools,
feel free to use them. The paper I'll be using for most of this class is in Bristol, vellum sheets from
massive starch. That's a great
choice, my opinion, because it allows you
to build many layers without damaging the
tooth of the paper. And it responds well to
repeat it, the ratios. The other paper I'll be using is the HP copy and
prints printer paper. It's nice and bright, affordable, and always
there when you need it. As a caveat, the printer paper, because of its lack
of tooth and texture, is really only good
for line arts. Anything involving value
will be too much for it to handle for sketching
out my drawing initially, I'll often use a mechanical
pencil for this class. That'll be 0.7 millimeter Staedtler mechanical
pencil, an HB lead. If you can get your
hands on one of these, I also recommend a 0.3
millimeter Pentel. Want a three dx? I prefer these pencils
are the starts because I don't have to
think about sharpening. And that frees up mental
space that I can channel into getting proportions
rights naturally. At some point in the
drawing process, we all make mistakes. To erase those
errors. I typically shoot first for my
kneaded eraser. Among all the erasing tools, I find this one to
be the most protein. You can shape it
however you like, and it doesn't leave behind eraser crumbs like
irregular eraser. Again, mine from generals
or fabric Estelle. And so far those brands
seem to work just fine. My backup erasers and elasto
my eraser from Tombow Mono. This is a fairly ubiquitous
eraser and for good reason, it offers the structural
integrity you can find in a larger obey Risa with a
precision of a kneaded eraser. You can also shape it
slightly with a knife. You didn't even smaller
racing points, moving on, blending stumps are great
for softening hard edges in your drawing or just covering a large area with some tone. If you don't have
one, you can also use cotton buds to derive
similar effects. Most of our drawing will
be done with a set of graphite pencils
from fabric Estelle, the one that I'm currently
using has 12 pencils in its weights to H to HB. In reality, most of
these pencils are superfluous and U12 age HB to be on for B pencil is
all you need to make. These joins happened in case you really need to
draw in the grades of pencils indicates how hard or soft and how light or dark
the pencil lead will be. So each pencil is generally
make lighter marks and having a harder lead and B
pencils make darker marks. The higher the number
next to the letter. The lights on heart of
the pencil would be with the H grades and the soft
tone darker with the bees. Graphite pencils, which
we're really looking for. The pencil you can sharpen into really good taper and one that doesn't break off into
chunks when you use it. If your pencil it takes those
boxes, you're good to go. In the mix will also be
some colored pencils. This one is optional, but if you want a bit of
calling your drawing, you're welcome to
join me and use them. I'm a bit picky with the brands with regards to color pencil, I tend to prefer more
oil-based pencils like the polychrome most
by Frederick Estelle, but have equally
heard great things about the luminance
by current dash. Darwin's called soft pencils. The task of drawing
is hard enough. The last thing I want to do
is draw a blood pencils. So to avoid this, I use my sharpening block
and exacto knife to make sure my pencil stays super
sharp for as long as possible. The sharpening block is from
neat drum and doubles as a charcoal colored pencil
and graphite sharpener. Suffice to say, I'm
very happy with its. Alternatively, you can
use some fine grit sandpaper to the
same effects before using the sharpening
block are used the exact tonight's to strip off the woods surrounding the pencil lead. Once I have anywhere
from half an inch to three-quarters of an
inch of export-led. Only then do I
introduce the block to refine the shape of a
lead to a fine point. Some of these materials would be easier to find than others. Personally, I purchased
most of mine from Amazon, **** Blick or Joe's Auto Rama. See if you have access to
those outlets, check them out. As you can see, this is a
fairly minimalist approach. You don't need any
high-tech gear or a myriad of
different equipment. Most of these materials
you probably already own. With that said, I don't
waste any more of your time. Thanks for watching. I'll see you guys
in the next one.
3. Anatomy & Structure: In this video, we're going to be looking at the anatomy of the nose and the major forms that comprise its
underlying structure. Now of course, your
artists are not surgeons, so I'm not going to be
doing is describing the minutia of each
subcutaneous elements. Instead, our focus will be
on the anatomical landmarks. Be the most relevant to
our drawing practice. To begin, I'll start
by sketching out the nose of breaking it down
into a few simple planes. I do this to minimize
complexity until I get a better grasp of the
proportions of my subjects. And my Payne's established a better define the specific
contours of the nose. Paying special attention to
the ball fridge and weighing. Those two elements
are foundational to the structure of the nose and we must understand
them fundamentally to draw them effectively. Beginning with the ball is the spherical form you have
right between the nostrils. It's made up of two pieces
of cartilage known as the greater Alar cartilage. In some noses, we
can actually see the division between
the two parts. For most people, it's barely noticeable distance that the ball or the
wings of the nose, which are made up
primarily of cartilage. It can be broken down into a larger top plane of
any smaller side plane. The form of the wings
carbon in an under, around the nostrils to
create a kinda comma-shaped. This inward curvature is
also mirrored in the septum, which is the piece of cartilage inferior to the ball and
right between the nostrils. The bridge of the nose
is the only one of the three major
points that contains bone within its anatomically, the bridge can be
broken down into the nasal bone and
lateral cartilage with the maxilla and the
side planes and the glabella bridging the gap between the nose and forehead. The nasal bone is
the bony protrusion right below the goal Bella. As you move downward, it connects to the
lateral cartilage, which is much more flexible, before connected further down
to the ball of the nose. Each one of these nose parts as they seem running
down the middle, splitting it into two equal
parts and lefts and rights, reminder of the
importance of symmetry, now joins with the
facial features. As you work your way
through these drawings, keep in mind the
faster nature of the nose and the dynamism of
the forms that comprise it. In a subsequent video lessons, we're going to see in real-time how the different
parts of the nose require different
treatments in terms of edges, value and line. That's a wrap for this video. See you guys in the next one.
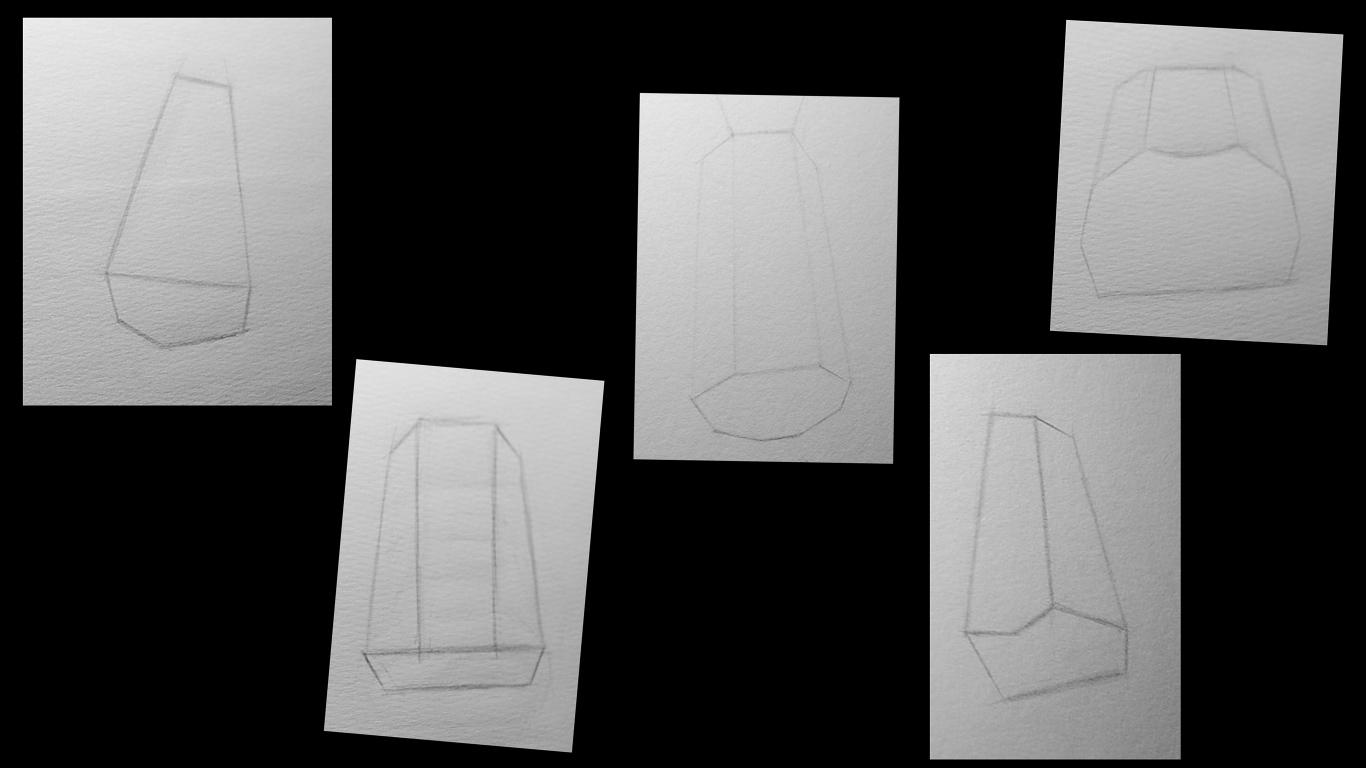
4. Major planes of the nose: The human nose can be divided
into four major planes. It top or front-facing plane, two-side planes, and
the bottom plane. Breaking things down in this
way ensures that we have good underlying structure
and avoid making perspective errors at
the start of drawing. These four major planes are clearly visible in
a frontal shot. But as we move our
head in space, more or less of
each plane remains visible. In a frontal view. All the planes are in focus and full bilateral symmetry
can be observed. You'll notice also
that in this view, the side planes and bottom
planes are partially downward facing to the top plane possessing a bit
of an upward tilt. From a three-quarter
perspective, only three of the four planes
aren't viewed with one of the side planes of the
nose completely obscured. In addition, the wing on the left-hand side
is foreshortened and the remaining side plane appears larger than it was
from the front. Conversely, in a side view, only the side plane
and bottom plane of the nose can be seen
in certain people, we can see the
transition from bone to cartilage Along the nose
bridge very clearly. And in others, it's
a lot more subtle. Also, the nostrils from this perspective appear
more streamlined, vaguely taken on the
shape of a comma. When viewed from the bottom-up, the bottom plane possesses
the greater surface area. The nostrils appear
enlargement or the side and front planes
appear foreshortened. When we look at the
nodes from top down, the tip of the nose
extends past the nostrils and the bottom plane of the nose is mostly hidden from view. The wings take on a
very prominent shape and the nostrils appear
as narrow slits. The ability to simplify
their noses we see in life into these four
planes will take some time. But I hope to the
examples on screen, you can begin to get a sense for the practicality
of these methods. Here I've deconstructed in those inside me to two basic planes, the side and the bottom one,
utilizing straight lines, I'm able to get a sense for the overall gesture of the
nose right below that, using the same basic structure, I changed up the
contours a bit and very quickly I arrived at a
decent looking knows. The idea here is to
practice drawing noses with just those four planes
and then building on that wireframe to make
something realistic. For the next one, we have a
nose in three-quarter view. I simplified it into a top
side and bottom plane, paying attention to the rhythm
of the ball of the nose, as well as the
gesture of the wings. Oftentimes there is a
conspicuous value change or highlights where the front plane transitions to the side plane. The bottom plane usually
begins the lower fifth of the bulb of the nose wraps close to midway
through the wings. Below a planar nodes are
added to that structure. The nostrils, septum and more organic shapes around the wings to make it look more convincing. The same principles
apply to this bottom-up. Do you only hear our frontline hand side
planes are foreshortened and the nostrils and wing take center stage whenever you're drawing something
organic like a nose, symmetry and proper alignments must be present in
your execution. If one nostril is 20% bigger, I want to wing has a
totally different gesture. The nose will look off. Plumb lines are useful
in situations like this, but also just keeping
an eye for the whole as you develop each part. This next one is somewhere between a three-quarter view and a side view with more of the site plan showing
compared to the front plane. Getting the rhythm of
the ball of the nose and wings is very important here in creating a useful planar nodes to then elaborate on later. You can opt to use
only straight lines, but I find that
curvilinear lines for the bottom plane make it
easier to get better gesture. Right below that, I've tweak the shapes a bit to highlight the nuances of a bridge wings involved to create a nose
that's closer to what I see, my reference when
viewed from the front, it's easy to see how
the major planes of the nose translate to a
more developed sketch. It's all about finding where in space each plane transitions to the next and connecting
them with flowing lines. The sketch below, tag
field placement of a few lines can help us describe the form without
excessive detail. A couple of lines indicate
the ball of the nose. Simple but dynamically shaped
nostrils be nosebleeds with some angle breaks a wings the floor with the
ball of the nose, and we have something
approaching reality. If we had to transform our
noses from 2D cartoon cutouts, repetition is the shortest
path to progression. I also recommend using a
photo editing app to create visual overlays
on your reference composed of these four planes, and then trying to
sketch it out with your pencil and paper. First the planar nodes, and then a more refined
version of that structure. With that said, that's gonna be it for major planes of the nose. Thanks for watching.
See you soon.
5. Relationship with the features: Given that the nose doesn't
exist in isolation, must consider its relationship
to the rest of the head. If you were to
draw it correctly. When viewed from the front, the nose sits between
the eyes and mouth with the nostrils a third of the
way down from the eyebrows. This principle of thirds
is a useful guide and getting good proportions
as it applies, not just here, but
across the entire head. The borders of the
nodes from the side usually line up with the
tear duct of the eyes. And the arrows are
both eyes connect the bulb of the eye
to form a triangle. From the side we get
a nice diagonal from the wings of the nostrils
to the eye sockets. Bridge of the nose projecting
outwards from glabella. Between the nose and the
mouth is the philtrum, depressed cylindrical groove and a useful landmark and describing
the form of the face. The outside border
of the mouth usually extends beyond the width of
the nose from the front, creating a diagonal connection
between the two features. Of course, we can
always play around with these proportions to alter
the look of our subjects. Not to mention some people
who deviate slightly from these relationships
anyway, ultimately, this is just info it's
nice to have in your head in case you get lost as you
try to develop your picture. I hope this was
useful. That's all for this one. Thanks
for watching.
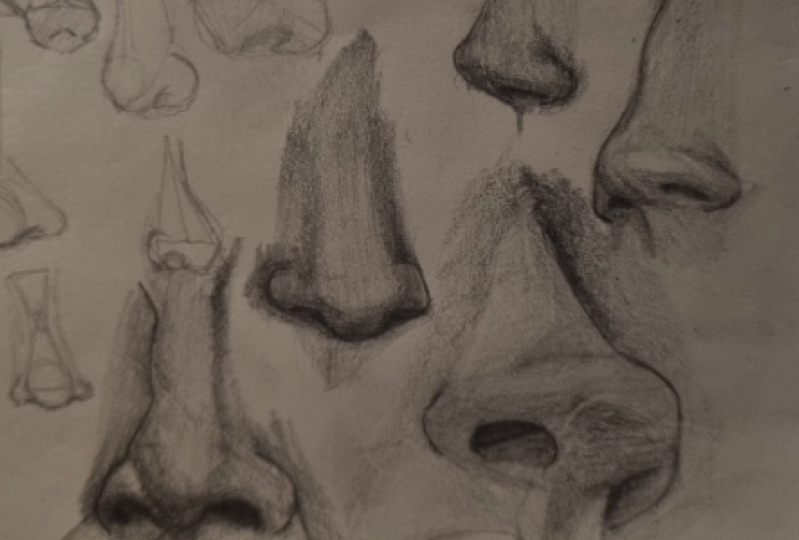
6. Common drawing mistakes: In this video, I'm going
to cover what I find to be the most common mistakes
I see in beginning of those drawings and
offer my perspective on the steps you can take
to avoid these pitfalls. For the first example, we
have a nose that I can only describe as
resembling a waveform. It's flat, wavy, and
devoid of any form. But seriously, the issue here stems from
the conception of a nose from memory as opposed to an analysis where we see nature. To correct this, we
need to break down the nose into its
major forums and approach each part of it individually before connecting
the points together. In the example below, I started by defining
the bridge of the nose, making sure to indicate
the angle break between the nasal bone
and lateral cartilage. From there, I draw the boundaries for
the ball of the nose, connected all four
lines to form a circle. Next, I drew a horizontal line running through the
bottom of the circle. I've used the endpoints to form my bottom plane of the
nose at this point, or that was left with
the wings of the nose, which were easy to indicate with all the structure laid down. In this second example, we're dealing with a similar problem. This time we don't
even have nostrils. So no overlap in the
forums is something that is level with the wings
and no courage to speak of. And we haven't knows that
only a mother could love. Fortunately for us, these
problems are easy to fix, beginning with a top plane, into a bottom plane, and finally side plane. And already we're
making progress. From these planes. We can begin to better
specify the ball, bridge and wings before
outlining the contours when we're happy with this
symmetry, alignment of things. As far as the details of
getting the proportions, I'll be talking
about that more in depth in the notes demo. Moving on, in this next example, we have the nodes
inside view and a case of exaggerated nostrils. Unless the person
you're drawing is taking a very deep breath, the nostrils won't
be that large. In addition, making the nostrils too dark in comparison to the shadow around it is also another common
beginner mistake. In the version below, you'll notice a more compact nostrils, far less contrast between it
and the surrounding shadow. The next nodes is super bubbly. I am not talking about
his personality. A typical case of too
many and organic shapes, no knows is that
spherical are composed of ROC curves and s-curves, and
that's what you have here. We have to infuse are driving more structure and we do that through straight lines
and ankle breaks. Not to mention, you're
typically not going to have a nose bridge That's
saw cylindrical. And if you do take a picture
because that's crazy. Over here, our
nose is lacking in any separation between
the major forms. Shape of the nostrils
and wings are unnatural. The bridge of the
nose is too wide. I can keep going for
really the solutions were nose like this is
the implementation of a step-by-step process using simple geometric shapes to reduce the complexity
of the nose. Like you triangles
are straight lines in general to create an
envelope shape for the nose before getting into
the more specific shapes. If you nail the structure, I guarantee you the
likeness will follow. That's gonna be it for
communist drawing mistakes. Thanks for watching. See you all soon.
7. Nose demo: Proportions & Rendering: In this video, we're
going to be drawing a nose in three-quarter view. And unlike the videos prior, our focus here will
be the rendering or form as synthesising the knowledge you've
acquired this far to create a
realistic looking knows, the first theatre consists of a linear layer and
I'm looking firstly create an envelope shape for the nose made up of
the four major planes. And using that as a guide for all my decisions going forward, based on the orientation
of the nose, I can see that the side plane on the right hand side
is foreshortened. So it'd be thinner than
starting on the left. The nose is also angled toward the rights to the line of symmetry running
down the middle, not be perfectly vertical. John, that I can't stress
enough the importance of keeping your lines lights so you can adjust them as you go. Mistakes at this point, I likely so we want to keep
our drawing open. Once I'm happy with my
planner knows I progressed to indicating the major forms
of the Windsor septum, limited myself
straight lines and using the wireframe of
our planar nodes to guide the placement of my marks are also lightly indicate
the bed bug line, as well as the location of the highlights and boundaries of the nose bridge as you
draw the settlement wings, remember that the curve
inward into the nostril to create a specific kind of rhythm between the three parts. The ships are alternate,
circular combination of streets, curves, and the
accompanying angle breaks. As you transition
from lines who value careful observation
of our reference and the light source tells
the simple story. We have four major planes. The bottom thing
is mostly shadow. The right maxilla is
our next talk is plain, followed by the left maxilla. And finally our front plane, which the light is off a bunch, if you can keep these
big value sheets and perspective will be able to
create the illusion of form, even as we add more detail. In delineating a shadow shapes, I'll start by defining
the cast shadow, leaning one consistent
shadow value and then darken the occlusion shadow in the area under the nostril. We want to keep this
shadow soft but specific to be mindful of hard edges around
the borders and where we are too much
contrast in this area. Right above the cast
shadow, we have to form shadow. On the whole. It's lighter than the
cast shadow and can be separated into a core
shadow and reflected light. My approach is to first create an average form shadow value that's a bit lighter
than the cast shadow. As I do that, I made
sure to lighten up the value slightly
as I move towards the left and preserve
the bottom of the form shadow to serve
as my reflected lights. If I find that an area
has gotten too dark, like seeing the reflected light, I license my research
and the values I see my conformity
to my reference. So just squinting your eyes and Dalton and back-and-forth
between your drawing on your reference to better see the differences
between the two. Despite the variety of values
you see in the shadows, you will find that even
the lightest parts are darker than
the darkest tones. This complete
separation of light and shadow is an axiom of realism, one that must be followed for our work to appear
three-dimensional. We're basically done with
the shadows for now, beginning in order from
darkest to lightest, we have the occlusion
shadow under the nostrils, the rest of the cast shadow, the core shadow, and
the reflected light. The extremes of our value
scale has been established. The shadows
representing one end of that spectrum and the white
of the paper the other. In modelling my halftones, I prefer to start with
the darkest ones. In this case, that'll
be the values in the rightmost side
plane of the nose. Getting an average
value of this region is my first school
and making sure that the tone is put even lighter than our light
to shadow value. After that, I'll darken
parts of that bass tone to represent this downward
facing minor plane. Enlighten the parts which are
receiving the most lights. No, no, no, no, no,
no, no, no, no, no, no, no, no, no, no, no, no, no. As I begin to model the form
the left wing of the nose, foremost in my mind
is the relationship, the values here we'll have to the rest of the half-tones
already-existing. The average value of this region is going to
be lighter than the values on the right maxilla and decrease on the left wing. The transitions
between the lightest and dark is half-tones
here must be soft and should merge optically when you
squint your eyes. The forms of the notes, for
the most part turn very slowly to outside
the nostril and a couple of spots on the
outside border of the wings. We don't want any hard edges. The left maxilla up the
nose has a local value that's a bit lighter than
that of the left wing of two, we can use the area
we just competed as a measuring stick to ensure that we don't go
off track in this region. And do my best to bridge the
gap between the two forms, utilizing the right intermediate values and paying attention to the value shapes as separate the bridge
from the maxilla. At this point, I
feel comfortable indicating the highlight
on the nose bridge, as I alluded to earlier, this plane is the lightest plane our picture and the highlights is the lightest value Beginning, be careful not to exaggerate
the scope of the highlights. It's a part of the nose
bridge, not the entire thing. In addition to the process
of creating the highlights, will necessarily create some
hard edges to remember to go back in with your pencils and soften those transitions. Before I call it quits
with this drawing, we're going to come
through each section individually and look
for shapes to improve, edges, to enhance and
values to correct. It's important to be patient and really look closely
at your reference to spot those inconsistencies in your drawing that had skipped
your attention prior. What's usually place
where you're satisfied? You can certainly add
your own artistic flare, maybe even decide
that you want to deviate from the reference
more significantly, Rome was not built in a day and good drawing does not
come to us overnight. And attitude of
continuous improvement. Asking the right questions
and a willingness to try and try again was the only
way we can make progress. My goal with this drawing was to illustrate to
you the end product we study of structure and
anatomy vis-a-vis the nose, unless I still have
a long way to go. But every bit of extra
knowledge informs our joint decisions and helps us be more competent at what we do. That's it for this one. The
next video I'll be going over the class project and the exercises that will
get you to better drawing.
8. Class project: Alright, so you've
made it this far, well done, or that is left
to do as a class project. For this one, your task
will be to draw the nose and five different
angles from the front, from the side,
three-quarter view, bottom-up and top-down. I want you to focus on creating a good planner knows
from that base, developing the contours more
specifically, by the way, I've chosen five angles
because I want you to be versatile and your
ability to execute. You can get there. I feel is by drawing the nose in
different perspectives. We show to reference the
video lessons in this class. If you find yourself stuck,
needles and guidance, I'm more than happy to
answer questions in the discussion section or when you post your
class project. Also, if you're looking for good photographs to work from, you can check out pixels or Pinterest and they've
got you covered. Part of why this project is
mostly focused on getting the proportions is because as the aspects of drawing people
find the most challenging. However, if you feeling
confidence, you join skills, you can move past the
linear and instead of tonal for these five joins, it goes without saying, but I'm definitely looking forward
to seeing what you guys create and hopefully offering some useful feedback to
speed up the learning curve. I'm sure at this point I
sound like a broken record, but I'm going to keep harping on its practice,
practice, practice. You can practice in. I mean, some of you join
us after we do a couple of times just because
you're not always going to get it right
the first time. Nonetheless, we love to
draw, so we keep going. Having said that, half of my edits either reviews
you like the class. Thanks so much for watching. Bye bye.
 Terence Zulu, Fine Artist & Teacher