Transcripts
1. Introduction: Hi. My name is Morgan Slink, and I'm an illustrator living in Richmond, Virginia. In this class, you're gonna learn different techniques and tools to use when drawing varieties of hairstyles. This class is meant to be a companion piece to my first portrait art class, Portrait art. How to draw realistic faces from photos in this class. We're gonna go more in depth into different styles of hair. That might be a little tricky. So we're gonna cover really light blond hair. We're gonna be covering men's beards and different facial scruff. And there also could be covering some braids and some natural curly, er, African American hair. I'm really excited about this class because I believe it's the next step to delve into creating lifelike portrait. It's if you haven't already taken my first port. Our class. I highly recommend going back to that class. It will have a link to below and going through that class before taking this one. This is meant to be an expansion packer. Add on to my original. So some of the techniques and tools that I am teaching in this class I won't be covering the basic techniques and tools I showed you in the first class, so that would be redundant and a waste of your time. So please go back and watch that class refute or fresher. Go check it out s O that you understand how to grid your drawing, how to put a grid on a drawing, how to do skin tone and be able to build up the layers and some of the different pencil techniques and then come back to this one and take this as an add on to that. I really think that this will be beneficial for you to grow and learning how to draw hair. And I can't wait to see your projects.
2. Supply Video: in this video. We're going to go over the supplies you need for this class. This supply list has been updated from my last class this classic in the Bristol board. I use Strathmore Bristol Board, uh, vellum surface. This is the 300 Siri's that I talked about in my last class. It's just a nice white surface, but lately I have been using the 400 Siri's. I like the paper a little bit better. It is still a vellum surface, but the quality is a little nicer. It tears from the side instead of the top. I've just found it to take the pencil a little better. You're also then need a two by 18 inch ruler to do your grid. You're gonna need a pencil sharpener. I prefer the metal pencil sharpeners. And this one is great because it comes attached to a case so that when you sharpen your pencils, all of your shavings are in a handy little receptacle. I also use a pack of non lotion on scented tissues. I like thes Kleenex travel packs. They work really well. You're also going to need a kneaded eraser. And then I also like using this, um, thin pencil style eraser has a thinner tip. It's a little bit harder, and it's really good for creating highlights and helping with hair. Specifically, I also use this pen. Tell 0.5 HB lead mechanical pencil, and then I have a variety of drawing pencils. My favorite are the Statler Mars Bloom. A graph and these are H B B two B three B and four B. I also like a four H for sketching in lighter tones and blond hair. You will also need a computer that you can grade your drawing, and these are all the supplies you're going to need for this class.
3. Blonde Hair: in this video, I'm going to be going over how to draw straight bond hair. One of the first things you know about this water is at her skin Tone is darker than her hair. It's important when you're drawing hair that you first drawn the majority of your skin tone . So what this does is it creates the contrast that you're going to need to really make the blond hair pot. So as you can see down here in the neck, I left space to then create more of the hair like strands drawing up from the skin into the hair. So what this does is create a more natural looking, hair style line. If I look at the drawing, you can see appear on her ah, forehead of of her forehead, where her part is, I'm that she has a darker line. So what I'll do is a look at the shapes of the darker lines and slowly start filling them in. The important thing with hair is that you always drop in the direction the hair is going. Hair doesn't look like hair if you're drawing it in a random pattern. So unlike skin, where you try to get its smoothest possible. Hair really needs to have the texture that you're seeing on the image. So when I start drawing, I was slowly starting from around the skin tone. So where her face is in her neck and slowly drawing out from that into her hair and picking up the different shapes that I'm seeing in the hair, I'm just slowly laying it. And I really like using my mechanical pencil for this because it keeps a nice hard line so it doesn't get too soft and fuzzy. So especially with lighter hair. The lead in this mechanical pencil is HB, and I really like that as a good tone to start working with, um, for here in general and especially doing some of the hair, especially doing blond hair. You can see him creating the contrast around with E close, as you can see when I start drawing in the clothing that it really makes her hair pop. And then I'll go back with my four h and older, slowly color in the hair that is underneath the ear on the left hand side. You know, I'm gonna go back to a mechanical pencil and again keep looking at the different shapes and shadows, so it really want here. What you need to do is draw lightly and use your eraser so I'll add shading in. And then I'll go back and all erase if I see anything that I think it looks either too dark or whether just isn't the rights looking line, the line just doesn't look natural or like it's flowing into the rest of the hair. And again, this is for H Im, using pencil to the light of the graphite, the harder the graphite is. What I'm doing is I'm using both the HB mechanical and I'm using the four H to really get a good base layer in on the hair. You could see me start toe work down the drawing, adding in shadows, going back with my erasing tools to give at the contrast and swoop. So when I, um when you're adding the hair and sometimes it's best to lightly draw it in and then go back and erase next to it, it creates a more natural style. So I'm just gonna keep doing that all the way through the drawing. The important thing with blond hair is you don't want it to end up looking to dark and muddy, so it's always best to remember to draw lightly and then you'll be able to go back in a race. Um, that's one necessary. And they've been going back and looking at the shapes, creating the difference shapes you're seeing down here. You can see I'm starting to draw into the hood, creating some of the piecing you see down at the bottom. So again, really, just look at your reference photo and then go over and create the same shapes that you're seeing. And we keep using this for H pencil, drawing again in the same direction as the hair. These could be longer lines than what we use for the skin tone, Um, just working my way up, and then I'll go back and kind, smudge it with my tissue and then go back with my eraser and erase So the smudging with the tissue helps kind of give depth to the color so doesn't look too full of lines. But then I'll go back and add some lines on top of it. So what you're trying to do is not just have a look like PC and lining, but you wanted to look like a cohesive hairstyle. So that's why I'll I'll use the Kleenex or tissue to to blend a little bit. And then I'll go back in and add some more line work just to create the depth. If you're just putting alliance together, you're not going to get the depth you want. And then if you only smudge with the tissue that promise it, it's not really going to start looking like hair and use a combination of both to get the style and looking for so really play around with adding in layers of your four H, using your tissue over it to kind of blend it in and then going back and adding more pencil lines switched over to, ah, little darker tone. This is the to be, so to be is a darker tone, and I'm going back in and creating the contrast. So one of the things that really makes blonde hair pop is that contrast in tones, Um, so I'm going back into the darkest parts where you see up on her forehead and just adding and sparingly but adding in the darker tone, it's about the needed erasers. You can kind of create this chief you want, so you can see I'm kind of like molding it to give it into a little point. And then she has some hair that's falling over her face. I'm going back with my eraser and then down here at the bottom, I'm just adding in some of the darker tones. And then it felt a little bit too PC for me. So then I went through and took out some with my eraser. So if you're having a problem creating kind of a really white looking hair like a light light hair, I would go back and revisit how what your skin tone looks like. And it's gonna look really flat. If your skin tone isn't developed enough, there isn't enough contrast there. And then you draw the blond hair. It's just gonna look super flats to make sure when you're looking at your drawing that you're getting enough of the contrast of tones, we're getting really dark darks, so that then the light that you're getting for the hair is really going to pop, and that is how you draw want hair
4. Dark Brown Curly Hair: in this video will be going over dark brown, curly hair. So to start off, I have her face mostly shaded in. Now I'm going to go through and start shading in the whole of what I've mapped out for her hair. So it's important to make sure you're outlining the whole shape of the hair when you're doing your gritting. So I had the whole outline, and then what I did was I started filling in just to create a base layer of graphite. It's important to build up the layers of graphite, especially with dark hair, so that it has the death that needs and that you can get the texture you need. So this drawing could be a little bit difficult because I don't want to draw every single strand of hair. And yet her hair is incredibly curly, and it could just end up looking really messy really quickly. So the goal of this is that you want to be ableto accurately represent her beautiful curly hair and kind of get the glint from the sun. But you don't want it to end up looking stringy by drawing each individual strand. That's just gonna end up looking incredibly messy, and it's not going to give you the result that you're looking for is just going to end up looking really confusing and stringing. So what I'm gonna do is after I lay in a layer of pencil just to get a nice base layer, what I'm going to do is I'm gonna look at the drawing and see where the dark shapes are. So we're looking at this and we're going to look at just the shapes so that I'm going to start penciling those in and giving myself kind of areas toe work in. So I penciled in the different shapes. I see where the dark areas are. You can see how he did that here and then. I really want to create a little bit more depth to the area that I did not shade in. So I want to create some a little bit darker background behind some of these girls, the areas that identity it in. So I took my Kleenex or tissue. Whatever tissue you have, that's incented and no lotion, and I smoothed over it just to give it a little bit more depth. So it didn't look so harsh. Now what I'm gonna do is I'm gonna start at the top and looking at this hair, what it's doing is it's giving this illusion of kind of it's kind of speckled looking if you just look at it as a texture on the paper. But what I'm going to do is I'm going Teoh, make it look a little bit more curly, have a little bit thicker curl shape to it. And then how I'm going to do that is I'm going to use my pencil and and I'm going to start putting his little specks in. And I'm just going to, like, speckle my drawing a little bit, as you can see up here. And then I'm just going to start creating kind of lines down. So I want it to look like it's starting at the top of her head and coming down. You don't want it just to look like there's random dots everywhere, and how I'm going to do that is I'm going to start connecting these dots and connecting these lines and kind of creating these thin tubes of curls. I'm gonna go back in with the darker pencil. Now I'm using a for B to continue to dark in the areas I blocked in in the beginning notice . I'm not drawing perpendicular lines. I'm drawing in a vertical direction, but my strokes are mimicking the sideways motion of her curls. Another note is to make sure your ends or the end of her hair hurts. The shape matches escape in the photo, So if you look at the photo, you can see how her curls are kind of ending at different lengths a little bit. It's not all just in one mass, and that could be really helpful in trying to get a certain appearance and look. So I'm gonna make sure that the outline of the hair shows the curly texture and also the ends of the hair show the curly texture that I'm seeing in the photo. This all helps. You showed the hair texture and style that you're trying to achieve. What's gonna happen is as I start adding in darker colors, it's going to keep looking muddier because graphite has a tendency to do that when you get to darker tones. So what you're going to do is you're gonna take your eraser and then you're going to go back in, Um, I'm using my both types of racers. I use my kneaded eraser and also my pencil eraser, and I'm going to go back in and create highlights where it's I feel like it's getting a little bit too dark. But what's important about making it darker and then lightning it with the eraser is that you're creating the texture that you need to create. So if I left that white and I didn't have the texture, I needed it. It would just look really blotchy, so it's really important to actually create the lines with your pencil and even smooth them out. You can spread them out a little bit with the Kleenex in creating the lines you need to and then going back in and lifting off some of that graphite with your eraser really helps keep the style and the texture of the curl. But then it allows you Teoh to create the highlights. Unity creates looks more three dimensional, so the darkest tone will definitely be a layer of two b three b four b The lighter tones like right now I'm drawing with a B pencil. You can see the different texture. I'm creating as I'm kind of doing a little hatch style texture. It's not straight up and down because that's not the shape of her hair again. You don't need to make sure your pencils are fully sharp for this. You don't need fully sharpened pencils when doing darker texture hair, and then I'm gonna go back to the other side. So in this drawing, I started with the left side so that I don't need to run my hand over the right side to draw the left side. And then I'm just gonna look at kind of shape of the curls again, see where the dark spots are and start penciling those in again. I'm not moving my pencil in an up and down straight line. I am going from top to bottom. But I am rotating the direction of where my pencil is because I don't want it to have a really straight appearance, because that's not how her hair looks, that I'm just gonna keep drawing in the different shadow areas you can see on the picture to the left, the areas that I'm drawing in that are darker, and then in the rest of this video, you'll just be able to see the time lapse of how I do the right hand side of her hair. - And there you have dark, curly hair.
5. Dark to Light Messy Ponytail: So after I have the face shaded into where I want it to be, I'm going to start going around to the outline of the drawing that I've already graft in. And I'm just going to go through and I'm going to look at the drawing and I'm going to start adding in the outline of the shapes of the darker shadows. So I'm doing this with my four H. Whenever there's a really light area, I'm trying to put the shapes in. I'll start with my four H and then I'll go back in with my HB mechanical pencil and start outing in some of those darker tones and shapes. So when doing hair, you don't always need to be exact, because sometimes being exact with hair can be really difficult. It's hard to track sometimes translate all the wisps and difference types of a hairstyle to a portrait. So what I'm doing is I'm looking kind of seeing the direction that hair is going. I'm seeing where she has darker tones, where she has lighter tones and I'm going to start mapping in those now every single place where the shadows hitting doesn't need to be at the exact point that it's hitting in the photo. So unlike facial features, where they need to be at the exact same spot, hair is a little more forgiving in that. If you're highlight is eighth of an inch off or, you know half a centimeter, sometimes with a swoop, it's not really going to be the end of the world. So that's the one really great part about hair is that it's not as exacting as the faces. So what I'm doing is especially my hair. I really like if it's, ah, light to mid tone, even into the darks. Um, straight fine hair. I really like my HB mechanical pencil because it stays sharp and I don't need to constantly sharpen it. And then I'm just going to go through. And as you see, I've been building up the layers so that the Dark is has a dept to it, and there's enough graphite on the paper that's going to end up being a nice, smooth hair style. As you can tell, I'm not really working on the wisp ease around the face that she has. I'm just putting in the bulk of the hair and you could see him starting to put in the curl down the side. But there's going to be a little bit of the ah wisps and curls that come in later. I'm just doing the bulk of the hair, so I'm going up into the ponytail as you can see where the light is hitting where it's a little bit lighter and then I'm going to go through and start adding in this pony tail shape, and what I'm doing is I'm not gonna drive. Every single piece of this ponytail is, you can tell. It's kind of, uh, she has it up in a loop. So what I'm doing is I'm looking at the shape of the loop, and then I'm recreating that. And again, I'm creating the circles. All of the hair is matching up with itself. That's an important point with hair that I'll mention several times because this is a key piece of drawing hair is that your hair strands have to match up with where they're coming out of a ponytail or they have to match up. If you're creating a loop or if you're creating a curl, can't just fall off into the distance and reappear. You have to make sure that if it's disappearing, it's disappearing behind another piece of hair and reappearing where it should. When it falls along the curve, The fastest way to get haired and not look like hair is if you're ends, don't match up or your curves don't match up. So really, you have to make sure that everything is falling and into its place that it's flowing into itself, as you can see, appear at the top. I'm making sure that all of my hair is connecting with itself, so it's creating a circular, not shape, and then the hair that's coming out. It's all falling out evenly. And when I have a highlighted pizza hair that highlighted pizza, hair is naturally flowing into the rest of the highlighted piece of hair, And whether it's falling in front of darker pieces or behind darker pieces, you really have to make sure that it's all flowing together. I really can't say that enough. What's great about really light hair is that when you're drawing the hair, and if you just want to make sure that the highlighted pieces connecting with itself is, you can just take your eraser and swoop it through. Then we have put some of the darker tones behind. Create some shadows. I'm going to use my Kleenex to kind. Smooth out my eraser, uh, to create some of the highlights. I want to go back in and put some darker tones to give it some depth in the behind in the ponytail where there's gonna be shadow. This is a little bit different than the photo to the left, but what it is is it's creating the same style. But what it's doing is it's gonna be easier to interpret visually. Now I'm going to go down and her wispy hair around her ear. I'm just gonna go in and make sure that that's popping a little bit. I'm going to make sure that what's behind the the blond wisps is as dark as it should be. It was looking a little bit stringing, so I'm gonna race a little bit. Now I'm going to do a little bit some of the wispy ease with my eraser pencil, and then I'm gonna come back in with a darker lead and add in some more texture, and then I'm going to go back in and kind of do it some more whisp ease. And then around her forehead, I'm gonna add in some more of, um, the baby hair around her head and we go back in on the ponytail and add a little bit more dimension Race a little race some of the smudges that are happening go back and make sure things are looking tight. And then I'm going to go around and make sure that the baby hair on the side looks good. And then there you go. You now have a completed dark to light ponytail.
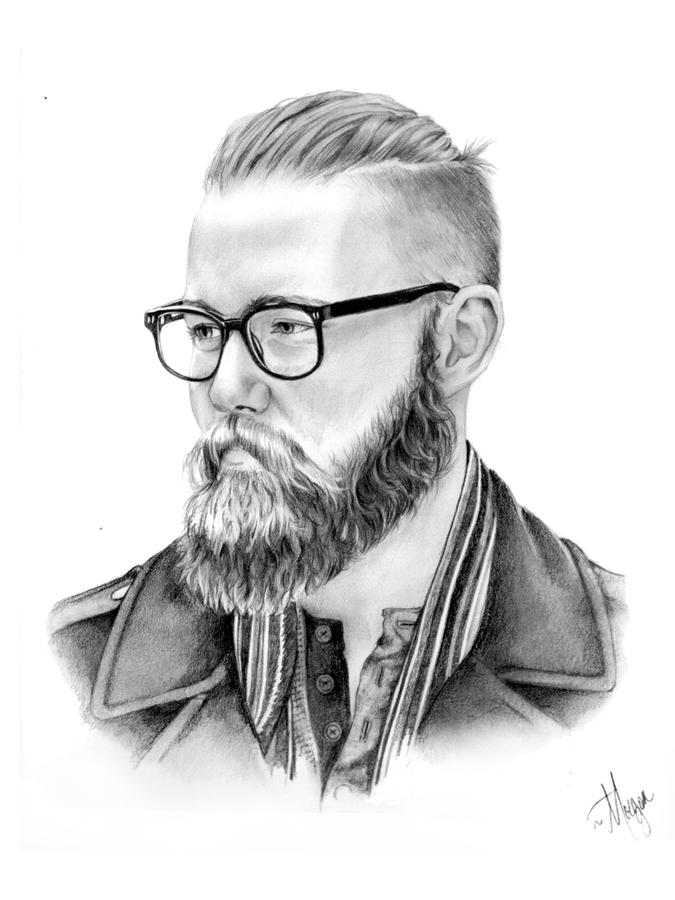
6. Men's Blond Hair & Beard: in this video will be going over mens blonde hair and beard. So in this drawing, we're gonna first are off and make sure to have the entire face shaded in. You don't need it all shaded in, but the majority of it needs to be shaded in, just like with the other drawings in this class. I'm going to start the top and I'm gonna start shading from his hairline. It's a little receded on the side and you can kind of see his skin tone underneath and then on the top, it's kind of it back in a ponytail. What I'm doing is I'm slowly just shading in this hair, similar to how we drew blonde hair. It's just gonna be a little bit darker s so there's gonna be a little bit more contrast. So I'm going to start off with my four h and I'm going to start drawing up from the skin tones. This is one of the reasons why when you're drawing the skin tone, you're gonna want to draw the skin tone a little bit farther into the edge of the hairline because you don't want the skin tone to stop, and it be a bright white line into where his hair starts. So when your shading and when you're mapping in his hairline, you're gonna want to make sure and shade a little bit farther into the hairlines that when you start adding the lines down that are acting as his hair, what it's going to do is it's going to be seamless. You don't wanna wait and add in the skin tone later. You want to add it in first and kind of overshoot a little bit so that the hair looks like it's going naturally out of the skin. And then you're gonna finish doing the top of his hair, similar to how we've drawn on the light blond hair. And as in my first class in portrait art, it's gonna be very similar to that. So follow the lines, create the shapes, start with your four H and then moved to your HB, and then you could GHB mechanical it be regular pencil, and then I move up to a B and then a to be for the really dark points. So his hair is roughly on the side of his head, about half a centimeter long. So what I'm gonna do is I'm first going to start with my four h and I'm gonna keep layering in a couple layers of skin tone after the first layer to that, I smooth out with the tissue. What I'm gonna do is and when they use my pencil line in the short strokes in the same direction his hair is going, so I'm not going to do super long strokes. I'm going to do shorter strokes that are roughly the same size of his hair. And then when I slowly add in the darker and darker layer, so we're going to start with four h, we're going to go to HB, and then we're just going to slowly added more for H and H B and then looking at his hair, seeing where it's a little bit darker, so adding more layers of it on the back side. You can kind of see that area that's darker, and then add in a few strokes intermittently on the side, where you see that it's a little bit thinner and you can see his skin tone underneath. Now what we're gonna do is we're gonna go down and start working on his beard. Now the important thing about the beard is again You're gonna want to make sure that hiss skin tone slightly overshoots into the beards that there's not gonna be any weird lines When you're working with slowly adding in the hair that's coming down from his face into the beard, you can kind of see that strip on his cheek where you can see his skin tone underneath. You're gonna want to make sure that your skin tone goes all the way down so that you're not having to try to add it in. Later, I start with a four H and I'm gonna add in some darker tones to slowly build up the shading that's necessary. So I'm gonna start with the four h. I'm gonna do a couple layers of four H, and what's important about this is I'm also drawing in the same direction as the hair. I'm adding in more of like a curl shape to it, and I'm doing it in the same length that I'm seeing. That's on his beard. So you're trying to mimic that same style and look with your pencil. I'm going to do that all the way down the front of his beard, creating that same shape. What's important to is that when you're looking at that place on his cheek, wear his beard and his skin toner overlapping instead of starting at the top and working down as the hairs coming out of his face. What I do is start in the hair and swoosh, my pencil upwards. And so what you're doing is you're not getting a really hard dot line. What you're getting is a nice light line that's going up into his face. So practice that practice doing it where the hairs coming from the face going into the hair and then practice, starting with your pencil in the hair and swishing up towards the faiths, and you'll be able to see that there's a little bit more subtlety to being able to start in the hairline moving outwards. It's supposed starting like the hair does out and moving inwards. Um, so I do is I just slowly switch up every now and then from the beer that I'm working on and what this does this it's gonna create that layered look that you're seeing that he has in his face. But it's not gonna be two distinct, and it's not going to look like a line you don't want it to look like. Oh, this is where the hair starts, and this is where the hair stops. What you want to do is you want to create dimension and shape. What you do is you want to mimic that look of hair building on itself to create this larger beard. The now the bottom. What I'm doing is again following the style of the hair, following the style and length of the beard hair. I will go in and start layering, starting with my HB, and then I will use my tissue to smooth things out a little bit and then all layer in with my H b a little bit more. So what you're doing is you're just slowly developing in building, so I'll go over it with an HB. I'll go over it again, and that's even after the two or three layers of four H that I have. What's doing is it's creating enough of a texture and depth to his beer that it doesn't look stringy. So I'm going to go in now with my B pencil and I'm going to add in the different curls and textures. I've come for a few lighter curls in and around and what this does, it's It just creates dimension. So I'm going to have a few that pop out, and I'm gonna do some darker shading so that that can create the depth that we need as well . So I'm using both my pencil eraser a little bit harder, thinner one. And I'm also using my kneaded eraser. So the pencil or the thinner eraser What I'm doing is I'm using that kind of create the curls in the beard and then my kneaded eraser I'm going through and kind of lightening up the whole, um, of either his mustache. I'm going to go back and but in a little bit of the whole beard by just kind of padding it over the top a little bit just to take up some of that I'm graphite. Then I've been using my ah pencil sharpener quite a bit because once you get to these finer hairs that you want to be darker, especially if you have finer hair. What you want is you're gonna want your pencil to be sharper than if your hair is more textured, and you can go back and add a little bit of darkness and looked a little bit off and add a little bit more and left a little bit off. And as you keep working through it, um, what you're going to do is you're gonna have this really great looking man's beard. But what you want to make sure is that you're getting an accurate contrast to the contrast on his face. So you want the hair and the face and the beard. You want it all to be on the same ingredients scale so you don't want your darks to be really dark, like on the glasses and that dark, not match the dark of the beard. So just looking at the tones and the values that that's a really important thing is that you're making sure that the skin tone in relation to his hair in relation to his beard and then with his clothes, that the darks air dart a certain layer level of dark and that the lights are a certain level of light and that those air consistent throughout the drawing. And that is how you draw men's blond hair and beard
7. Braided Dark Hair: in this class will be going over braided dark hair. So what's unique about this drawing is that not only does she have the braids, but she also has new hair that's coming, growing in in little curl sections. So what you're going to do is start laying in those curls and with dark hair, especially. You really have to be careful to not rush this process. So what you're going to do is you're going to add many different layers of pencil tone. Usually when starting out, especially with dark hair, I'll start with my mechanical pencil and I'll start laying things in the different shapes. As you can see, I started laying in the different shapes of the braids and outlining them, especially with dark hair. You can get away with putting in a pretty solid looking outline because you're definitely going to be drawing a darker color than that outlines. It's not gonna look to stringing. For instance, when we did the blonde hair, you really don't want to have too many outlined lines that are too dark, because then it's going to really look to contrast ID so it's good about dark hair is at your outline lines condemn definitely be more visible because when you late in the darker hair on top of it, those lines are going to disappear altogether. So with these braids, you really need to think of the braid as a cylinder. So, like a cylinder when you're doing basic drawing, there's going to be the size that you're gonna be a little bit darker, fading away. And then there's going to be a highlight down the center. One of the ways I started thinking of how to draw these braids was just looking at their overall shape and texture. So instead of thinking like, Okay, this is a braid. What I'm doing is, I'm like looking at what does it look like? Does it look round? Doesn't look flat? What sort of like, what sort of braiding do I see and really, to me, it just looked like a cylinder with highlights down the center. But the braiding definitely had more of a tubular rounded look, so that was a look that I wanted to want to depict with my pencil. The other important things about braids is that you want to make sure that if they are overlapping that you can see that the braid is actually substantial and full. You don't want the overlap toe look super flat. So you want to make sure that you're drawing the braid all the way to completion. You don't want it to just fade off into the middle of nowhere. You want to make sure that it's going through from the top of her head through to her ponytail, and that when braids start overlapping that you're showing the don't mention and shape of the braid. So that means that there's going to be a darker contrast. ID shadows on the lower side of the braid that are overlapping the other braids for the braids. I realized that I need to continue darkening the new hair she has on the side of her face. The small, fuzzier wisps. So what you're gonna do is you're going to go back and lay in some more, that darker tone, and you're gonna keep working. I worked in this drawing from like, top to bottom on the hair, and then I did her ponytail last. So starting from those braids, I drew around the pieces nature, I'm getting my cylinder shapes correct. And then really just looking at the picture and following the shape for the start of the braids and following the shape for her other, um, new hair that's coming in, and you want to make sure that her skin tone is also being filled in. At the same time, you don't want to have, like, really bright spots if you forgot to put in skin tone, so make sure that your skin tone is also getting to the shade that it needs to be. When you're drawing dark hair, especially when it's a little bit more textured, it's OK if your pencil isn't super sharp. So drawing these braids and drawing some of the start of the braid and around some of her curls on the side I would have of my pencil be a little bit duller because then you're going to get a little bit more of a textured feel. If I were doing fine straight hair, I don't want my pencil to be dull. I want to make sure my pencil is super sharp, but with having a little bit more texture to your hair, it's great if you have a little bit more texture to your pencil eso you don't need to sit in. Sharpen your pencil every few seconds. It's okay if you're letting your pencil to get a little bit dollar, and it's gonna work just fine with this hairstyle. And so now I'm going to start at the top of the ponytail, and what's important for me is just to make sure that I am connecting ponytail strands. I want to make sure that every strand has a start and endpoint. Whenever I'm doing braids or multiple braids for hair, or even if you're doing strands or curls, you want to make sure that they start at the top of the head and they complete all the way through to the end. You want to make sure that there's visual continuity between the start and the finish, so each of these braids I'm doing. While they might not exactly match the braids that she has, it was hard for me to see all of the different starts at endpoints. What I did was I created braids that were a similar length and with, and then I made sure to have start in endpoints and create the dimensions that she had with her hair. You can see how I did that in this video by creating these lengths and then going back in and adding in darker tones. Remember that the hair that is closest to the light source is going to be lighter and have more highlights on it in the hair that is farther away from the light source. And it's underneath the top layers of hair that is going to be darker. So that's how you're going to to create dimension and depth. Not all of the hair is gonna have the exact same highlights on it. And then I finished up this drawing by adding some shading into the beads, and there you have braided dark hair.
8. Final Comments: thank you so much for taking this class. I really hope that helped you learn how to draw different types of hairstyles. If you like the class feel for you, go and give me a review and give me a thumbs up. And if you'd like to leave a common to let me know if there's anything you want to learn in future classes from me or if there's anything specific, you want me to clarify the different teachings that I did, I'd love to hear back from you and, as always, feel free to post your projects. And I do my best to comment back on every single one to provide feedback and to let you know the things I think are really great about it. So feel free to do your project and post it, and I'll get back to you.
 Morgan Swank, Illustrator