Transcripts
1. Introduction: I checked in with. We're gonna listen up tricks that I did to achieve on. Then you paint.
2. Supplies : give me that. I'm going to just talk you through the supplies I use. Start with. This is paper. I like to use it by, I cannot say pronounced Pruitt's by, but it's hand in hand meeting you, and it's quite Trey. Um, it's 10 by 10 inches on. It comes in a block, which means it's glued glued on all sides, so the paper doesn't buckle when you're painting, it is £140 cold press paper on. If you can't get hold of this, use any £140 cold pressed paper, you would get similar results. But this is my favorite paper that I like. And also like the orientation of the square. Um, you will need a plastic pallet or a white ceramic plate or something like that, and you will need some water. You will need some brushes. I like thes use round brushes with a nice point to them. Then you can get little details is a number 12 and number two and then I've got a bigger size 18 1 Just make sure they've got a really nice point on them, and then you get the details. Like I said, these are just cheap brushes. So any nice round brush with death and you will need sand paper. You also need a couple of, um, water soluble pencils thes by coin nor Andi. They're just color pencils. You The cheap ones are the best. I've got another thesis. Just a wh Smiths watercolor pencil. And I've got red and black here. Um, you also need some paper towel and the water colors. I am using mission water colors. And I have, um, Rose Madder Crimson Lake Seth Green Permanent lows Yellow, green, olive, green, orange looks, red, violet, permanent yellow D and in together. And I might not use all these colors that these of what I will put out on the panic when we start painting. And that's all the supplies unique. 01 extra thing you might need. You might want a hair dryer. Teoh. Speed up the drying process. But that is not necessary, Onda. And sometimes it's nice just to leave the paper just to dry. Naturally
3. Look at poppies: poppies. Really? Well, you need to understand that for how they grow. So go out. Look. First piece. Take your own photos here. Some of my really look at how the flowers put together stems leaves every little detail way about your subject, Betty.
4. Loosening up exercise part 1: way inspiration about puppies and had look at their colors and how they actually are. I'm just going to show you how to loosen up a bit with your water colors. Um, get everything ready that you need your water, your palate, your paper, paper towel, sandpaper, all your supplies around you. And I'm just going to start off by adding the water colors on my palette. I sort of set them out with the reds, and then I go light and then I go into the greens and then the dark colors. But you can set your palate out however you like, um, just to scare you of it. These are pallets, my water calm pellets that I usually use a Z. You could say See, they are a mess, and a with the colors blend into each other. But that's the way I paint. And that's the way I like it to not make you so afraid, because I know it can be quite daunting when you first start painting watercolor. I have a nice, clean pad. It just make sure you got no lots of quite deep separate wells on Ben. Your colors won't all blend into one and make a big, muddy puddle which can sometimes happen when you stopped pain in water color. Now I'm just gonna fill my pellet up with my colors in on order that I quite like it is up to you how you put them in. So I've done raise matter. Red Violet, Crimson Lake. Don't be afraid to square quite a lot out. This is permanent, Mose. Sometimes I do to him one, but keep it separate for this. And I have to use two months. I haven't enough Wells. And, um, I will do that up here because I know won't use thes as much of the orange. These are quite bright, these mission water colors and permanent yellow deep. And they have quite a lot pigment in them. So you have you It gives you a nice bright painting. Um, I'm just gonna put on the green here. Yeah. Don't be afraid to square quite a lot out, because I do use quite a lot of paint, but with watercolor is once you once they've dried out and you can come back in and let them again, and they are reactivated. And olive green and India Gate it's quite dark that you So now this I don't need to be afraid. I paint in a very wet on wet, loose style. So this is just your practice warm up. It doesn't matter what it looks like. Just go with the flow. I'm gonna start off with the read my big brush and that stops stops you bean fiddly or precious. I'm just going to load the brush up with some water and I'm gonna drop it on the paper. I saw rubbing it in my brushes molting as well, rubbing it in loads of water. You'll be surprised how much waterways, and then we're just gonna test our colors drop by dropping in. Don't worry if you mix them all together. This is just, um, like a play to see what our colors do against each other. Some spread out some don't some push other colors away and just have fun with it. And, um, just lost them in use Lots of water trying dropping water in as well. This is a low those red. Have you can see how bright the pigments are in these colors. Andi, I will be mixing them together because I find them a bit too bright. And, hey, I'm just testing out some of the greens that's really bright, that one. There you can see. It makes quite a muddy, dull color when it mixes with the other colors. This is why it's get to play with the award colors before you start painting, and it makes quite a nice abstract them painting. And this is the indicator of what greening and that makes a lot of dark green. Using that quite a bit, I think plaids of water and here when you've got over like colors and you can stop playing with what we've got here. And I used the paper towel quite a lot by blotting areas that you can see. You get quite textures you could pick up, pull out quite a lot of pain, and that's good for giving you highlights. Andi, um, this nice just a block you can make like Petaling shapes with it
5. Loosen up exercise part 2: and you can draw and also dragged the paint with this. And that gives a lovely effect as well. I'm just using very loosely just having having a big play. Scribble about Paige. Andi. Then I share what I used the sandpaper for. I used the black pits. Quran, You know, if you look in the center of poppies, the after what they called Sorry, but that little around the center of the puppy there are black stay mons, I think nickel and that that hold the pollen and offers in the pollen is quite black On on if you sandpaper your crayon, it will give you a really nice effectiveness. If I zoom in for you, see, you can sandpaper and it was stick to the wet paper and give you that. Most mortally, I feel you can also do it with the ridge is well, do it any color you like, and it gives a lovely texture to your painting on. Maybe if you use a water soluble one, otherwise it won't stick to the water. And you can see the lovely effects have also you can can control where it goes. So if you want Teoh control I said, I just want a little bit. I do on this. Zoom in for you. I do it with the dry paper. Give you a small detail, so if you want a detail off that texture, it will only go flower shape. You're only go where the water is, thank you, sandpaper and then flow. And it was Stick to where you place the water, so that is a lovely effect for you to try, and you see as a tool painting dries. You get different effects as the sheen is just going off. If you look at some water color paintings, you see how they, like, spread out and you get those. Some people call them run back. Some people call them Kali Flowers because it gives you that sort of cloudy effect. You can manipulate this to use by dropping in as the sheen goes off. The watercolor paper as it's drawing depends how quickly paint dries. You can drop him water, and this will encourage the wash backs, Kali flowers, whatever you like to call them and when you're using them flower paintings. But she'll wet, wet. They give quite a lovely texture. You can just see here where drops of water in it, it will spread out, giving your lovely effect. Now quite a lot of people will want to hurry up the drying process of this. And but I find it is best just to leave it to dry naturally and let the water color spread about. The page is quite really running. Let me show you is running. I got so much paint on there on water on them in, and it's really wet. That's what's good about these blocks. It is still sort of buckling because it is so wet. But as it drives, it would pull it tight again. So we believe this to dry and come back to it. And then we'll look at all the lovely effects that we have achieved. We've just spla ging the pain onto the paper, and with the way I paint, you can let the water color sort of painted south for, and you can sort control. It does and gets really exciting. Fun, fresh, um, details that just from to look at okay, this play piece is completely dry now, and it's actually produced clips. There's a piece of wet bet right in the corner that I didn't notice is dry everywhere else except that tiny little dot and yeah, and it is created quite a nice sort of abstract painting in itself. I often do something like this before I am. Do a sort of painting. Just listen myself up and get me free. And so test the colors and see what I'd like to happen. You can see all the lovely quality flowers splash back one backs, whatever you like to call them on, where we sand papered and where we dragged pencil often down and where we let the colors just blending to each other. Look how beautiful it is, and we haven't really done this on purpose. We've just sort of left it. Let the water color paint itself. And that's how I like to paint with water color loosely and freely. And just that things happen that you're not necessarily planned. Quite happy with that. And I hope you're happy, reveals
6. Painting the poppies part 1: Okay, so we had to play on. And now we're ready to actually come in and paint the poppies. If you're, um, a bit worried you can stop off your painting by lightly drawing out how you want the poppies. Two g o with your water soluble pencil. No, I don't often draw up what I going to paint. But for this I'm just gonna show you how I would do it if I did. Um, Sogang for diagonal composition here I'm gonna do to poppies and then a sort of half opening. But here and I'm just drawing very lightly because I I do like Teoh. Just let the water color do what it wants to do without, um so off, making it do things that it doesn't want to dio. And that makes sense. I've just roughly drawn where the puppies are going to be and the stems and that certain my journey leave here on. Then I'm just going to stop painting measure. You've got some clean water now. I usually start by just washing in the paper. My water is not clean here because I've kept it a bit muddy so you can see what I'm doing and how much water I put on the page now to control wet on wet, the it will go everywhere, so to control where it goes, you just put water where you want the pain to get. So I'm going to start off with this one, and I'm skin to come in with watercolor You if you paint light and your light colors first and then gradually at darker Sorry doesn't fly. And so I'm just coming in and dropping in the color and letting it spread where it wants to , you know, And dark red, some poppies, air pinker, some orangina. Just if you've studied, then you can, like, come up the of own colors that you want to. Um, just make sure you use the mixture of colors and just dropped the colors in and let him do what they want to. You can also come in with your picked out and blot out the areas where you know, but the light catches the ends of the petals where you want it lighter. Don't worry about species and splashes, because that's the way we want the painting today, and you can also drag the paint along the page of your pencil Just at have the friendliness to the petals on the quite freely in peppery. And that gives a lovely and sort of effect. Again, I'm so using my big brush at the moment. I'm just going to drop in some indigo into the middle because you look, uh, poppies. It does depend rations. You're looking, especially the oriental poppies. They have really dark centers. So I'm just gonna drop in some of this, and then I'm going to encourage it. Fly where I wanted with my m pencil. Just drag it on the page. And then I'm going to blot out the very center. We're just gonna take off of the debate of it. Just a blend in a bit. And I'm gonna blot out the race center, Poppy, because I want that to be green. But the center seat pulled. So I'm so gonna let that a might at a bit sand papering. Let me see. I just It's a bit this at the moment we're coming induce a law that you can get carried away. Yeah. Now I'm going to work on this puppy up here. Just drop him water, then natural color. I use the paintbrush. Quite least Lee. As you see, I'm like, just holding it at the end. I'm not like green tightly trying to get like the shape is a poppy. Exactly right. I'm sort of letting the paint in the brush. If you've blotch down like this, you get nice shapes. And when we were playing, you should have, like, practiced some brushed straight. So have a look at your play work that we did and see if we can create what we did there, remembering what you did again. I'm going to add some dark down here. Just cause little petals that way. I really like the way the colors paper to encourage it to go the way you want it. See? See how much water I've got on there? Don't be afraid to put loads of water down. You can always blot it back up. You need lots of paper towel You couldn't piece. Actually, you can't see the centers as well. His, um the Pettis up that way we will make sense when I painted it. And as it's drying, I like Teoh. Come back to this one. And the clips missed that completely. I like to drop in some water as it's drying to get those nicely Bush back things happening . Don't be afraid of how wet it looks.
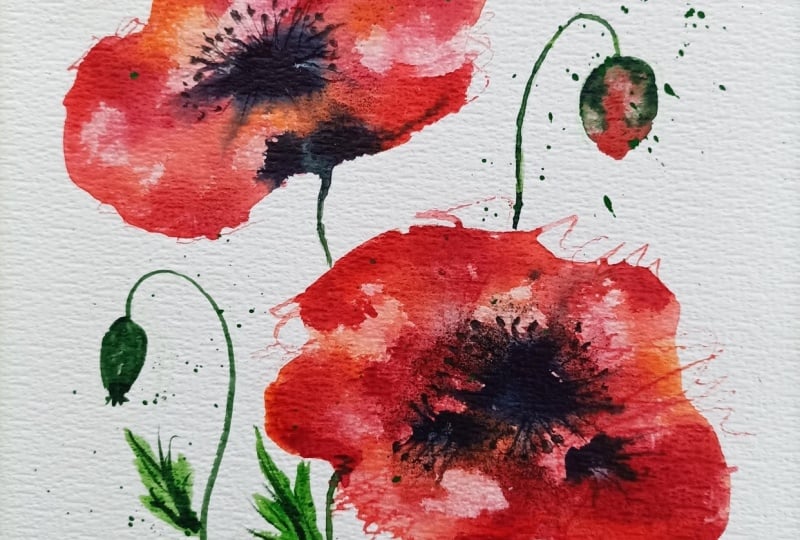
7. Painting the poppies part 2: Now I'm coming. You with my thinner brush here and I'm just going to make some once a green for this stem. But I don't want to be really bright, Onda. I'm just gonna paint from where it is wet, and I'm not gonna worry about it following where I've just painted. So it'll come down to it, but that would like we're really pretty shadow from the stem. It's gonna drop in a bit of water to encourage it to spread out a bit more and the same See , the red is flowing into the green pain, which is really just a really nice effect. It's dropping in a bit more color and now I'm just going to work on this. But I've got coming up here. Just let the paint do what it wants. Teoh. Roughly following my lines, you can see it so, like runs into each other. But that's what I like. You have you solve controlling what it's doing, but not quite. And this is like the but that's half opened and then I'm gonna drop some red right in here so it blends together live simp orange. That stuff ends. Then you can come in on. Just blot out some highlights petitions, and I just left the way and you can like tranq paint around. Let it do what it wants to Andi as the rest of its drawing. Blot out bits that you want still and drop in more water. This area is conduct pinks. I'm just gonna drop in some orangey red mixing together because it's losing its poppy color . I don't want them to be pink. Really Pink orange is quite in us effect. I'm She's in my little thin brush to him in haunts the direction off the petals that it's going in. Do a bit more blotting because we like that, and I'm going to paint the Do you have about him again, amusing in a lot of water. I'm just letting the the paint off do what it wants to drop in, and then I'm going to suggest leave. You don't have to be perfect. It doesn't have to what exactly? We're not doing a botanical painting. We're just sort of suggesting the essence of a poppy. Quite if he leaves. If he leaves, what's that roughly leaves? I like making it woods, my hopey. It's usually because I don't know what I'm talking about. This name again. He's my dog announced. Adding sand darker area is just a bit more debt. Now I'm gonna work home the center of this poppy, and they're usually quite green. Some licks of a bright green and painted in that blotted out. Just get pie light in there. It's completely green. And then I'm going to paint some dark green. Did the Chrissy Chrissy bits that government with the top? I should find out what that could, Really, I can't and I'm sort of letting it dry. And I'm just gonna drop in a bit of water over here because I want a bit more freely nous see how the texture goes is brought out and you can just see the center. Is this poppy popping over in my mind? Something that this one we're looking more down. Then I'm going to come in with my black pencil crane. I was gonna show up in it to get a nice oops point told me and and then I'm going to paint in the little, uh, stay mons seeming see what? Anything. - And then they send still a little bit to give the suggestion. That's the pollen's gone everywhere on that on this one, I'm not going to go to over the top with the center of it. I'm just going to suggest a few little stay mons here in there. Maybe because I can't resist a little bit of Sandy and then I'm just going to add a little bit more. So I've just suggested a little bit of the pull in there and just gonna work on that middle . Poppy, that middle, the middle of the center. It's a puppy. It's a bit more green. Teoh, I've got a brush. Okay? And as it's drying, you can still come in and block some areas to get a bit more texture. And I'm going to put some bit darker in here. Give it a bit moved up. I just blocked out. Poppies are quite hair. Me. You looked at them closely, and it's quite difficult to get that effect, But you can t just a few little hairs on Keep in there. Did you smoke brush? I'm just gonna come in the darker red here and give me any dog big depths as the puppy. Uh, as the painting drives each and so see where the edges of the Petruzzi using the side of the brush to drank pain that now I'm going to stop fiddling now because I think I finished . It is quite easy to get a carried away with this, and I think I'm quite happy with that. So I'm just going to leave it to Joy Onda and let the paint do what it wants to as it's drying my paintings completely dry now on and you can see all the lovely textures and things that have gone on. Whilst it's well blended together and the light of the papers showing through where we picked off with a paper towel, I really hope you enjoyed this process. It's quite a quick, simple process, but you just have to have the confidence just to let the pain do what it wants to do, and you just tease it where you want it to be, really, and you just let the paint paint itself. You get some amazing effects gun painting, more poppies and remember to share what you have done in the projects, and I'd love to see your work you create
8. Closing thoughts :): e. I really hope you enjoyed this class making your abstracting free puppies. This is your projects. If so, wished to take it. Paints and poppies. You don't have to be like my copy mining. So wish any poppies you like, But make sure it's in the nice loose sweat on weapons to color style on. Just let it paint. It sells. I really hope you enjoyed it on. And if you enjoyed this technique, I thought I'd show you a few of my paintings done in a very similar way. I hope you enjoy them and for seeing Oh , I forgot. Don't get post your budget.
 Michelle Kral, ARTIST :)