Transcripts
1. Introduction: Hey, welcome to this short
class on how to play with typography in branding and design. My name is Jeremy. I'm a brand designer
from Sydney, Australia and I've been
designing for ten years now. And I've been working with
clients, different brands. And I believe topography is a
foundation of great design. Some of the things you will
be learning in this class is how to use typography
in an identity system. So I'll show you some real
client examples of how I've picked certain fonts
and how I've laid it out designing a brand identity. I'll also share with
you my tips and thinking on how I pair fonts
for different projects. What to select, how to go about, you know, using the right
fonts in the right situation. I'll also be sharing how
to customize and choose the right font and how to manipulate that in
Adobe Illustrator. I'll be also sharing
the power of glyphs and how to customize certain fonts and letters when you're working on a
logo type design. And how to make that stand
out and be more iconic. I'll also be showing my cheat
codes and tips, shortcuts, and all those little goodies
along the way to help you as a designer grow and get better at designing
with typography. I'll also be giving you some
homework and activities that you can practice the design
in the project section, so you can do that to practice design and
upload your project. And I'll be happy to give you some feedback so you can
improve your skills. So click and roll today and get better at designing
with typography.
2. Inspiration and Finding Fonts: Over the year, I probably
accumulated over 10,000 funds. And that's because I'm just
always downloading new fonts. And each project needs
something different. And there's always new type
boundaries popping up where there's a whole
bunch of free funds out there that are
really high quality. I want to show you
some sites that will provide you some
inspiration where you can download some
commercial free fonts and you can also buy some funds. But if you do want
some more resources, I will put a link in
the project section to share my mega design
resource list. First up would be font share. Now they have 100 free
commercial free fonts. I love using font
share because it's powerful and it's got a
lot of different styles, a few script fonts. But I love it because you can actually look at
different pairs. At the top, you've got
pairs I can click on, this will actually show
me some different pairs. Font is a great one. Another one is font fabric. I've used their fonts as well. These ones are
super high quality. They've got loads of
different styles. For example, if I click on Mont, you can see it's got thin, extra light all the way up
to like heavy and black. Italic sites like this
are really good Pangram, Pangram have a starter kits, $29 where you can get a whole bunch of
fonts to trial out, and then if you like certain
ones you can buy them. These fonts are really cool, some of them
futuristic, which are like so they've got a
lot of cool stuff here. You've also got future fonts, Xyz, these are really great. They've got a wide variety here. Not just simple ones,
but display fonts, funky retro ones and interesting ones
too. Check that out. You can also go on
Creative Market. Create market does
supply fonts as well. If you click on
the font section, they've got vintage black
letter, fancy cursive graffiti. They've got heaps
of different fonts. You can type in the bar as well. You can see what it looks like. This is a great way to find
fonts really quickly as well. Another cool site is called Nick.com Brandon has
a type design studio. He designs lots of fonts here. And he also offers
these bundles, which are really
cool, where you get like 2030 fonts in there. I love his style. There's
really different there. If you ever work on like
retro vintage stuff, these ones would be great
for that type of project. There's plenty of
other fonts like font and future fonts
and stuff like that, but I tend to avoid those
really popular free font sites because they're really low
quality, especially on font. When you download a
font it's got bad ing, there's only one font weight, there's no multiple fonts. So it's not a typeface with a whole bunch of
family of fonts. That's why I try to
avoid those sites and I'll try and stick with
these sites where I either purchase or download a free one from something like Font Share, which is just so much better because the
quality is there. You can tell it's been
meticulously designed and crafted. And it comes with glyphs
and symbols as well, and variations on
different letters. That's why I prefer that, and I try to avoid things like a font. Now what if I come
across a website? One of the tools
I love to use is actually called font Ninja. You can also use something
like what font as well. It's a free Chrome extension. What I can do is go on a website and maybe I like this
font right here. All I've got to do is
click on font Inga. We'll basically scan the website and tell me what
font they're using. Right now, I can see
that using Satoshi. Now Satoshi is a free font on font share. That's
the font there. Then I can put my mouse over the font and it'll
tell me the weight, it'll tell me the leading
as well and the color. We can see that all these little details in that
little box there, you can see this
ones like 20 pixels, 15 pixels using a gray color. Really cool. Love this. You can also play around
these little settings here. You can move the font,
make it bigger so you can preview it and play
around there. I like that. You can also bookmark the fonts. If you click the bookmark in
font Inger, it'll do that. Here's another example. Maybe I like this
font right here. Try it again and see what
it will come up with. Click that and you
can see SQL Sands headline also SQL Sands
headline body text. It's both medium but
just a bigger size. You can see that body text
and headline, really cool. You can literally use
it on any website. It will just tell you what it is and it just saves
you so much time. It's okay to steal fonts.
It's okay to use funds. Some of them you'll
probably have to buy. But that's why it's always good. If you have the extra budget, ask your client if you can purchase a certain font
because you know it's going to be more unique and distinct from all the
other brands out there. For me I don't like, you're
always using Monster, At, and Poppins and Helvetica,
all the same brands. We're using the same fonts
and I don't want to do that, I want to find fonts
that are different. And that's why I'm always
on the lookout to find a particular font that matches the vibe of the
brand I'm going for.
3. Choosing Fonts: Now I always get the
question from designers. How do I choose fonts for a
brand project or for a logo? Now, I always usually
go with my intuition, my gut feeling or my instinct
when I'm looking at a font. That's why I'm
always browsing on these different font foundries and looking at the
shape of the letter, looking at how it feels
when I look at it, you know when I'm
interacting with it. Because at the end of the day, I need to convey a vibe, a feeling and
atmosphere to shake the perception of the
brand to the customers. At the end of the
day, it's all about the brand personality
and the audience. When I have my brand
discovery session with my client or a
strategy workshop, what I do is try and get those
brand keywords extracted. So then I know is our
brand going to be fun? Is it going to be very techy and minimal? Is
it going to be bold? All these questions come
into play when I'm trying to understand the brand personality
and then the audience. Are the audience like
tech enthusiasts, are they maybe
females or moms or maybe their dads or young
adults that go to the beach. There's all these
questions you want to ask that will really help you refine your search
for the right font. It's all about having those
boundaries and limitations. So then you can funnel
your vision and focus on picking a few fonts and then bringing them
into Illustrator. And working and playing
with that, or even Figma. And if you're designing
like a website, and I always tell designers, it's okay to test
multiple fonts, like chuck it on the
canvas, on your artboard. You work with it. Put it on
an image. How does it feel? Mix it with some colors. See what is it feeling in
the motion you're getting. When you're playing
with the font. I want to share with you
some types of font styles. There are, you
probably know, but there's a whole
big list of them. But I'm going to show you
some of my favorite ones. We've got things like San Serap, which are very modern,
unique, simple, and minimal. You've got serap really
classic and elegant. You've got slab seraph, it's got a feel of
the wild Wild West. Very bold, very big. You've got display fonts. Display fonts are
more like decorative. They can have texture,
they can be rough, they can have little
patterns in them. You've got handwritten which
is like for signatures, like for a postage stamp
or something like that. Script is very feminine. Bubbly, playful, monospaced
is more like digitized. Think of like binary
computers or like an AI bot. Geometric, very clean. Modern calligraphic
basically feels like someone writing
the calligraphy pen. Very old school, old style. Got grotesque and humanist. They're pretty similar.
Modern and clean letters. Not geometric, but a bit
more just simplified fonts. If you've got black
letter as well like the old medieval
style times, then pixel pixel is great
for like eight bit art. Or maybe it's a game
like stared value or something like that
made out of pixels. You can use a font like that. Here are some types
just to get you thinking like what style
you want to think. Think. It's good to know
just in case when you're presenting a moodboard and
you want to show your client, hey, this is the type
we're going to go for. And then it will
just narrow down your search when you're
searching for a font. So as I said before, when I'm picking a high quality font, I always look for
the font families. How many weights do
they have? Because it's important when I'm
working on a project. Sometimes I just want to use all the same font, but
just different weights. Like I don't have
to have 234 fonts because that's getting too many. I always try and limit it
to maybe three fonts Mac, but usually I try and get for one or two really good
fonts with good families. So you can see Mont Blanc from Font fabric has a large family, from thin all the way to black. And it's extra bold, bold, semi bold, and it's
italic for each one. Now these fonts on
the right side, they only have one font. Now font is just one
style or one weight. It's not a family,
which is a type face. You can see vo just has one
font, it's just regular. And Hand Gothic just has
a regular version as well as you can see two
different very fonts. One's a slab seraph, then this one is more
of a display font. And they look cool, but
it's very limiting. I would probably use
those fonts most likely just for headlines
and not like a body copy. To do is find websites that actually have
different filters. You can see on font share, they have filters in
the category section where I can search by style, weight width,
contrast and edges, and x height, and I can
search by personality. So this is just going to
make my search a whole lot faster when I'm looking for specific attributes, right? If you get a chance, play around with some of
those settings and it's going to make your search a lot faster when you're looking
for a particular font. So you got to know the
brand personality, so it will help you search for the right category of font.
Here's a quick example. I've got some key words
on the left that usually I'll get for a brand project
that are very different. And the font is what
I chose on the right. So first on, we've got
modern, minimal, and clean. And I think of code,
I think of code. Next, it's very geometric,
it's a clean font. It's nice, it's very legible
and readable, easy to read. Next one is vintage
rough and Masculine. When I think of those key
words, I think of SS. Nixon. Very bold, very blocky. It's a bit rough on the edges. It's got that masculine feel because of the
boldness of it. The letters are unique. Feels a bit like outdoors,
adventure, camping, spit of style, but also a bit of vintage like maybe on a whiskey bottle or
something like that. Then lastly, we're elegant,
classic and refined. I think of like something
like Baskerville. That's just a quick example
of what I would pick. It doesn't mean I will only pick those fonts
for the project, it just gives you an
idea of something. I'll select something
very similar to these styles of fonts. And that's why I always tell
people like whether you're Figma and Illustrator,
whatever app you're using, always lay out a type,
just put a bunch of fonts, narrow it down and short
list your favorite ones, like your top three or top five. And then start to play around
with them and see which one will fit the brand personality and the key words of the brand. I want to show a
quick example of. I just use the VR
headset from Meta. It's the Metaquest Three, the font we're using here
is the code next one. So you can see it's
very modern, clean, feels futuristic, feels
like a solid product. But now if we go
to the next slide, we're going to be
using the Nixon font. It feels a bit out of place. Using the right font
actually matters. I use, I think it's Nixon, six or seven for the
bottom there and the other fonts and it
feels a bit too rigid, feels a bit too like I like I space type of vibe,
even a bit gamy. Where we're not going
for that game look, we're going for like
premium product. And then you can see
on the left here, the font is Baskerville. It is an elegant font
like this might work. But you can see once
we look at the body, it feels a bit outdated, feels a bit out of place. You can look at
the pricing here. And down the bottom
here, it, I don't know, feels a bit weak, whereas
the first one it works.
4. Pairing Fonts: Now, how do I pair fonts? I feel like a lot of
designers overthink this, and they think they have to be perfect when
selecting the font. But the core principle
that I think about when I'm pairing fonts is contrast. It's all about having contrasts
between the headlines, the body copy, and having that hierarchy with
the different types of information
that you're using. For example, here's a quick
design that I whipped up. I've got three examples here. Two on the left
are not the best. I'll tell you why, because
there's a lack of contrast. Now this first one you can see
the headline is very thin. The headline should be bold. It should be easy to look
at very quickly when someone's landing on a website or landing on a page
that they're reading. This font down here
is the same as this. As you can see, I'm both using Mont Blanc for this
light and light, they're both white color. It's distracting to
the eye when you have colors that are clashing
and it's too bright, it makes them not want to read that body text. This
one doesn't work. The second one, you can
see this one is very bold. But then this has a
very wide leading. There's a lot of space
between the lines and it just feels like it's
dragging on the eye, has to bounce a lot
further and a lot longer. It causes fatigue when
you're reading it. The boldness of
the heading works. But then this is bad. You can also see this rag. Now the rag is basically the shape that the
paragraph text creates, that's why I put a line here. These two here have
a very bad rag. That's the example there. But here's the final
example that I did. You can see I'm using
Montblanc semi bold, and then Montblanc regular. For this, what I've
done is decrease the color of this
to a gray color. As you can see here, I'm
using this hex code here. Then the top one is just white. I've created contrast with the color of the
body and the header. I've also made the head
bolder then the body, and I've also
adjusted the letting, so it's a bit tighter, so you can see it's a bit
tighter than the other one. This just feels nice
to look at and read. Even though it's lower in Ipsm, it feels better, feels
cleaner, feels readable. Here's a few examples
of the types of fonts that you can
potentially pair. It's not limited
to this, but I'm just trying to give
you some ideas. Simple one would be
like a sand seraph. With the serafont, but with the seraph probably
make it lower case and the headline can be
upper case display font, Usually I like doing
that upper case. And then maybe a serf body, a headline you can do like
grotesque and a mono space. This would be form
like more futuristic, more modern type of company. And then a script with a simple san seraph.
It wouldn't be bold. It would probably
be like light or regular and be a lower case
or something like that. These are some potential
pairings that you can have. The limits are endless. Basically, it all depends on the brand and the creative
idea that you're going for. Now, I want you to remember
this when it comes to like landing on a website
or designing something. Digital headlines
are for scanability. People don't read the scan
when they're on a page, When they're reading a carousel, when they land on a website, their eyes are
going from left to right in a Z fold shape. They just scan looking
at the headlines. Also, when some people
read log reports, they're not reading
all the little texts. They're, they're scanning
the headlines first. If it's interesting,
then they'll start reading the body copy. And the body copy should always be legible or have readability. Now when I think of readability, I think of like how easy is
this to understand read, and for my brain to comprehend
the letters and the words. Now let's quickly go to a
few examples that I like. This one is Bowery.com It's
for like a eating business. They basically ship foods and they've got recipes
and stuff like that. And I just love the
boldness of this font. It's all caps in your
face, it's nice. But then they've got
a simple font here, and I'll use fontina
to quickly show you. They're using GT America and
then National to compressed. You can see this nice little, it's easy to read this body. Then you've got GT mono here. But you've also got
this big bold national, which is just stands
out. It's fine. It trying to appeal to
like a younger audience. Back to the idea of contrast. You can see we have
a bold headline, and then we have
a light readable, has a lot of white
space around it. You can see the letting is not
that tight, which is good. It's got space here, this one. You can see the letting here.
They put a lot of letting because this will
interact with this. They didn't want
the G to hit that. I totally understand
that. I love how they've used the caps here, but then here they're
using not all caps. Because when it
comes to all caps, you just want short words. It's really hard to read
when it's long sentences. That's why it's easy to read
lower case because our brain can comprehend and understand the shape of words and letters. That's how our brain
processes things. But yeah, here's just a quick
example of how it's used, contrast heavy and
light superheroes. This is like an agency website. They went for a sans bold, big font for the headlines. And then they've got also
this Serafont heat ninja. They're using gular display,
black and circular, standard bold, the P
editorial ultra light. The reason why I reckon they
picked this Serafontce. This is a condensed seraphont. Then this big headline
is very wide. That's why they went for a
condensed and a wide format. If I scroll down, you can see they wanted their
text to be really big. Having a condensed seraph makes it fit nicely in this
rectangular shape. In this layout. This lock up here,
as we can see. It's light, bold stands out, easy to read, You've got
condensed, you've got wide. So you can see this font. As
I said, it's bold and wide. And then if this
wasn't condensed, this would be going
all the way, like it would probably
be all over here. But because it's
condensed, it's sitting here and it's in this
nice little lock up. Now if you do struggle
with pairing some fonts, here are three sites that
I recommend checking out. One typeof.com they have amazing checklists
and resources, but they have a type pairing
lookbook and you can buy, this is not for free, but he's basically gone ahead and
pet some fonts for you. It's already done for
you, it's like 40 bucks. But you can see it's got
some different versions. Luxury retro warms tech. If you're into like doing
that, that's one idea. You've also got type
inspiration.com they've already combined some
different fonts together. And I think it's really
cool, got a few on here. It doesn't have thousands, but it's just got some examples
of what you could use. Think it's really nice. I can click on it and then I
can see what the font is. You can get it from Google
Fonts, which is free. I like how they
laid it out here, just with some lumps in there. Then lastly, we've
got Font share. They have a pair menu. If you go at the top,
you can click on Pairs, and then you can go down and
it's got a whole bunch of pairs using their own inbuilt fonts that
they've already designed. You can add the styles,
you can plus them. You can edit the text on
the fly and whatever. Maybe you have an
example of copy you want to use for your client. You can just chuck it in there and get a quicker idea of
how it will look like. I love it, tells you the fonts there and I can click on it
and it'll take me to it. Those are a few resources
that I do recommend you use.
5. Customising fonts and logotypes: When I found a good font that I'm going to
use for a project, it fits the personality, then what I love to do is to
customize it a little bit. You don't always
have to add lots of details to a logo type
or a logo design. Usually it's better when it's simple and you've
reduced the details, but I like adding a little
symbols or little motifs, or ideas in there
on certain letters. Or to add some ideas and add some flavor, make
it more distinct. Here are four logos designed for clients except for Sylfon
that was for a side project. These are the fonts that I pick. On the left side, you can see this one is no,
this one's outfit. This one's Nesta.
And then Calisto. That's what the font
looks like, a default. Noah, medium outfit, medium,
nist geometric black. And this is Calisto bold. That's what it looks
like with nothing added. Then here's what
it looks like when I've added some little details. Angel Hearts Healthcare's
disability service and they have other health
services in Sydney. You can see I added a
little love heart shape inside of this cross bar
in the A, which is nice. It also can look like
a book or like a bird. It's got adjusted the
kerning, for example, here you can see the R and T. There was
some issues there. Just tighten it up and
also tightened the H, made the words together
so the spacing there. And then add a little
sub line there. As you can see. Turned
out really nice. This one all I did was make
everything all caps and then aligned it nicely so you
can see it's all aligned. Then what I did is I added
a fort castle thing there because this brand is a guy who installs
security doors in homes. It's all about security.
I thought of like Castle and for I wanted to add
something a little subtle. That was that I had
a version where I had like a lock in here, like a lock thing
and then made this all like colored in or whatever. That was an idea I had, but I decided it was adding
too many details. I pulled back, made
it are simple. And you can see this little
touch Mobile Tire legends. This is what it looked
like with the font. Font is very bold and condensed. When it comes to like long
words or long brand names, it's better to stack the font. That's what I've learned, because it's just
easier to read. It's easy to Also, when it comes to scalability
and readability as well on small sizes and
websites and stuff like that, it's just better to stack. That's why I stacked
like this and added their little logan or tag
lighting on the side. What I did is tightened up
everything so it's compact. Then what I did is I added this arrow to the
top of the T bar. I did this because
I wanted to add some dynamic movement in there. I wanted to show also an arrow can represent moving forward, Helping someone
with their car so they can move forward and
drive to work or drive home. Because if you have a
flat tire, you're stuck. Right? You can see some of the ideas that I was
thinking of when I did that. And then I added this little cut here to make the arrow
stand out a bit more. You can see without
that little cut, like it's still all right, but it just feels like there's a lot of not enough
white space there. I just pulled that out to
make it breathe a little bit. To make it a bit more edgy, I aligned the arrow to the edge. It's aligned, as you can see, the added something nice. I could've brought it maybe
all the way like this, but then it's starting to
distract a little bit too much. So I'll pull it back
to the R there. I could have also done this or like this, that
could work as well. You can still see that
it's a then legends for the little of the G, I made it into like
a lightning bolt, which was fun, the
client liked it. It was something
different, mobile tired. I think of legal legends, the guy was a gamer as well. I'm like, oh, let's just
put a lightning bolt. Feels different, unique. Then lastly, Sylpi on here, we can see here's what it
looks like, the default. Then adding those little cuts makes it feel a lot
more different, makes it feel futuristic. You can see I've added
like these little cuts here and then rounded it off. This one I added this
little shape here. If I pull that out originally
that wasn't there, it was just like a
normal white space aligned everything nicely. And you can see added
little tag line there fits nicely
within this shape. You can see it fits nicely
within this little box here. Drawing is not the best you can see. There's
like a rectangle. It's aligned on
the bottom there. You get the point, but
it just feels nice. Fturisticjtdding little cuts
and then adding that tag. How I made these logos
distinct and made it feel different than just adding the
font and calling it a day. And being like, hey,
this is design. I want to try and add a bit
more details, more quality. Have that logo design touch, that designer touch in there.
That's why I did that. Now here are a few more examples of when it comes to
customizing fonts. Not in the logo sense, but
just in the generic sense. What I love to do is here are
some ways I love to do it. The first way is there's
nothing added to the text. This is just a normal
block of text. One thing you can do
is actually add color. You can see add a
blue and red here. Color works. You
can also add scale. This one I made the first part of the sentence
small, and this one bold. The reason for doing
this is I want to emphasize the word
creativity, right? It could be used for like
a marketing material, maybe it's for a
university or whatever it is. I just want
to highlight that. You can also do a high
light effect where you add like a marker
highlighting through things or some people use
like a marker and they draw a little like arrows or emojis or whatever, or icons. You can use thick and thin. Back to the whole contrast idea. One text could just be extra light and the
other one be bold. It makes these words stand
out because I want to draw the attention in
the eye to those words. We can do italic, so
that can work as well. It can be really subtle. You can do type case, maybe all caps, and then the
other one is lower case. That's another way to
make it different. You can do opacity. This one, I drop the opacity to
30% it looks gray. Obviously, I could have
changed the color to gray if I play
something behind this, you can see that
because it's opacity, it's going to seep
through and blend. But if you don't
want that to happen, just change it to
gray quick tip. Then lastly, you can
actually mask things. I've masked an image in the backyard that I can move around. That's a fun way as well, just to customize a font, make it different,
make it interesting. When I use some of
these techniques, I try and avoid adding
all of them together. I might just do one or two. I'm not going to add masking and then also lots of
color and italic. That's just too much.
It's going to distract, unless it's a really fun brand. You can maybe mix
a few of these, but try and pick one or two. It only takes one style or one
thing to emphasize a word. Then lastly, I just
play around and make this quick little web Y mock up use AI and
made this image. And then I use the pixel font
which I don't normally use. You can see I just added a little drop shadow and I added some red text
to customize it. I put it in the
corner here because it makes it feel like there's
something more down there. I can scroll down and maybe I could even add like a
little arrow or something. Then you can add the font here and what the
website could look like. I just played around
with the font, and this is a good way
to test things out. If I need to just change things, I can just literally
select it all. And then what I can do
is like change the font. Maybe I want to go with a more. Maybe I want to go
intervene and go like extra light or go bold. I can try that and see it
has a different vibe, right? But with the pixel font,
it's just different. But it's easy to change
fonts whether in Figma.
6. Typographic Systems: If you're going to design
a typographic system for a brand identity, it's basically like
having a system, or a style guide, or a design system for like
a UI website or whatever. It's all the same
thing. It's just about having set styles. Set sizes for headlines, for body copy, for buttons, for labels, for links for
a brand and a website. That's really all it is. When I think about creating
some sort of system, I always think about
like whatever H one tags H 2h3h4 because that's how Hmil is read when I'm designing webflow or whatever framer,
whatever app you're using. You need to think about how websites are built
with HML and CSS. I think of each headline tag, I think of paragraph,
I also think of links, buttons, line heights, kerning, type weight, All the key
functionalities of how a font or type will look
like in a certain space. For example, my own
personal website, this is my system
that I have gone on. For my H one, my main headline, it is 64 pixels. And you can see I'm using
sine the font, and semi bold. The H two is 25 pixels, I'm using sine and bold. And then you've got H three, The H four, and they all
look very different. And that's because
I want to have some variety with my
headlines and my text. Then you've got the body copy,
large, medium, and small. You can see the size
there, 22 pixels, 18.16 and then a button. This button looks like on
my website, 16 pixels. Then obviously there are some other buttons and
other little text spans. The potter has a
micro text as well. It's a bit more than this, but this is the general main text that I have when it comes to building a
typographic system. It can be very broad, but when it comes to a
simple website or brand, it doesn't have to
be that complicated. As long as you understand
the key headlines, the body copy and then for links and buttons and things,
then it should be fine. Great website that
I use to figure out what type of scale I'm
going to use is type Scale.com It gives me a system or a template
of different sizes. You can go major second, you can click major third. I'll just give you
some different ratios, basically that you can
use when you're building a website and even if you're
going to build a brand. But it's especially useful when you got to have a website. And you can see here,
going to change how it looks, which is cool. Basically it gives me the HM, and then it gives me the Rem. Or you can click
pixels if you want. If you want to
look at in pixels, I typically use M when
I'm building webflow. It's just better because
the text scale is better. It's more responsive and it's connected to
the inherent HTML. Instead of just giving
it a set pixel, I use this calculator heat
it's Necococ.com where I can change pixels and
then I'll give me the M. I put the M in the topography
section on Webflow, but that's going to
be Build a website. Yeah. You can pick some scales. Usually I just use major
30 is usually what I use. But you can do whatever you want, you can
break the rules. Some sites have crazy big text and that's the design
they went for. It's really up to you, but typically major third or -30
is the most common ones. And you can see what to
style your paragraph, text, your small,
et cetera. One tip. When you're designing
for a website, I make sure the
topography doesn't go below 16 pixels unless
it's like very micro. And it's not a call to action. It's just there
because if you go below 16 pixels, it
becomes unreadable. We always talk about
accessibility. Make it easier for
people who may have a disability trying to avoid
making the text too small. But you can probably
go as big as you want. You can make this bigger. You can increase
the heading size. I can click the plus
here. Yeah, this cool tool. I can
change the font. I want to go different
font weight. You got line height as well. You can change the
letter spacing. I can change the
color if I want. You really have control
of how it can look. And then you just basically copy this and you can paste
it, for example, I can paste this in, I
can paste the size in, and you can see it's
going to that size that I just selected
here, 61 pixels. Now here are some examples
that you can use to see other brands that have
a typographic system. And I like these ones
because it's really simple. We have mail, you can see us.mailchimp.com slash
pattern slash typography. This is their library or their style guide
for typography. You've got their main typeface, it's called Means,
which is cool, then graphic is their
supporting font. We can see the scale
here you can see headline 123 body
copy, bold body copy, and then buttons and met labels or whatever
your paragraphs and then example how it's used. It's good to show an example, especially if you do a style
graph for your client. Then these are the
classes, That's the CSS, how it's styled there,
which is for the web. When it comes to creating text. I used to use Laura ipsum a lot, but one way is you can use Gloom ipsum if you
don't know realoum they're actually an AI based app that you can use
to build websites. It generates four
years really great. But they have a Figma plug in where it generates text
for your landing pages. It's better than coming
up with copy yourself. For me personally, I like using Chat GPT to generate text
instead of having Lauren ipsum. Whenever I have a client
project or a side project, I can generate text
headlines, body copy, and all that stuff
because it's more realistic and you can visualize the brand better with text that you've come up with instead of just putting Lauren Ifs. It just shows you're a bit lazy. Also, unless it's like your MVP, you're just trying to get
something up, it's fine. But once you start getting into the revisions and
iterations of the design, then you want to start
using proper text. I'll just show you a
simple type system that I've created for this brand
that I've been working on. And it's pretty simple.
Nothing too complex. It's just for a small business, what I typically do is I lay out an example of what the
text would look like. I showed the name, then what would the
headline look like, the subheadings, the paragraphs, the example of how it
could be laid out. For this example, I'm
using the font outfit and then or semi bold
for the headings. Then for regular with the paragraph texts and
links and stuff like that. Here's an example of it
within all caps as well. Because at this stage it was like the round two
and I wasn't sure if I wanted to go like
all caps or lower case. It can work either way, but
I've just wanted to show a few examples to
see what it looks like to the client gets a vibe. And then what I do, obviously I put it on mock ups, how it will look like here, as you can see there
on like a car mock up, which is cool T shirt. Then what it looked like
on the landing page, this was just round one
of the landing page. Just real quick, you can see how I've laid out the
text in the buttons, the headline there,
the paragraph text. You can see what
I showed before. Basically just laying it out
and seeing how it works. That's how you can have
a simple type system. If it's a complex client, you want to have like H1h2. In this case I just
put like subheadings headlines paragraph
to make it easier to understand because your
client might not understand like development terms
or jargon and stuff. So you want to keep it simple.
7. The Power of Glyphs: The cool things in Adobe
Illustrator is that you have the power to customize glyphs. Now, glyphs are
basically symbols and other elements like ligatures or different non lining
numbers, stuff like that. When it comes to a font, usually the better quality
fonts have a lot of glyphs. What you do is just go to type and then you click on glyphs. I have mine over here
on the left hand side. You can see if I
click on this font, it will load up
all these glyphs. I'm going to put that out here. You can see all of these
different symbols. I can make it bigger by
pressing the mountain on the bottom right, so
it makes it bigger. I can change the font weight and the glyphs will change
based on that weight. Just go back to regular for now. You can also change
the font as well. Maybe I want to go Montreal
Jazz or Different one into V. As you can see, it's got lots of different ones. You can also click Show and
only show certain parts. Maybe we want to show,
maybe lining figures will show me just the
numbers or ligatures. And we've got a few
ligatures here, there's really full control. Some people I see,
they try and make a T more like a
copyright symbol, but you can just double
click and add it in. I want to show an example. I want you to guess how
many glyphs are in here. I don't know if you
get the number right, but it's actually there's
six glyphs in this design, which is pretty unexpected. But I want to show you
what I've done here. First up, we've got the, the TM trademark symbol. I'll just bring my
glyphs back up. It's so easy to add glyphs. All you've got to do is
just select a piece of anywhere along this text
line, you just double click. It literally adds
the glyph for you. We can see we can double click at as many
glyphs as we want. It's just powerful
because we can actually create better
type with this. Because sometimes people,
they just do the generic. If I just do the quote marks, sometimes it's not
genuine quote marks, it's just the apostrophe
Mar, and that's wrong. I want proper quote marks. If it's a quote, the
way you change it is going into glyphs can lose glyphs in, in
design as well. We've also got this glyph
here, which is an arrow. I love when there's like arrows and things
you can play with. You can see these arrows
here at the bottom. I can press left click
on double click. Then I'll just scale this up. As you can see, we
can just play around. We've also got this number here. That one's a glyph,
there's a glyph. This arrow here is
a glyph as well, and then the rest is just text. Now if you want to do a
ligature, you select this, go to ligatures and then
double click and join this. So cool and so powerful
play around with glyphs and you're
going to get better results when you're designing for me, I feel like glyphs is underrated. People
don't use it enough. It's great for presentations
doing different layouts, playing around with shapes
and letters and stuff. And you'll get a lot
more unique designs. But you don't always
have to use glyphs. It's up to you
really. But you have that creative power
to use that as well. You can even see this
asterisk is a glyph as well. Make sure you use
glyphs in your design. I think it's a great tool
and make sure you get those premium fonts because
they're going to have more glyphs than
those free fonts.
8. Composition and Layout: Another big factor to
creating great typography is understanding
composition and layout. Now I'm not going to go
into all the final details about how to make grids
and stuff like that. There's other courses out there. I'm just going to focus
on a few things that I'm really good at and
know how to create. For example, we
have on pentagrund, this natural history museum. They did a rebrand and you can see how they're
using type in a pattern type of way as you can see in a circular motion. I think that's really cool.
It adds dynamic movement. It makes it feel
fun, feel different. I love how they're using it on the signage and
stuff like that. If I go to Illustrator, you can see how
I've created this. It was pretty simple. Nothing
too crazy. Make it small. Now all you're going
to do to create this effect is you're
going to have a font. I'm using BBW ista for this. All I want to do now is I'm
going to change the color. We've got these three
text now one of the cool tools you can
actually use is go to object, go to Repeat, and we can
go to radial repeat. If I click that, it's going
to create this effect. Now what I can actually
do, I can make it smaller. I can drag this big white circle with arrows to
increase the amount. As you can see that if I can increase, it
looks really good. The only issue is because the M is not that condensed compared
to the other letters, it starts to overlap. And because I've selected
all the letters together, that's how it's going to work. I can increase the size of
this just to fix the spacing a little bit like that.
And then I can scale it. Now it's a bit more readable. It would need some fine tuning and all that type of stuff. But I think that is
a simple way just to create a similar effect
that a big studio is Dawn. Obviously, you can
do things manually and duplicate the letters
and make it round on a path. That's an option as
well. But this is just a quick way to
get that effect. It's an example of
my capability deck. Now when it comes to layouts, it's always good to have scale. You want to have the
key information, the main text or main
headlines, really big and bold. And then anything that is not as important can
be really small. That's how you use scale
to your advantage. Just play things big and small. What I like to do is I'd
like to add some patterns. So you can see I've
got this just very simple pattern in the back here. I can double click, I can change the color of
this pattern if I want, make it green, can lock this
by pressing control too. Then I've got a
gradient at the back. And I love using the gradient tool because
it's just fun. It's cool. You can see here I've gone
with the free form gradient, so I can move things around, I can add colors. You have full control
of what you can do. I can, I can delete ones, I can really big, it's a lot of fun to create. I'm using sine
semibold and then down the bottom I'm using general
sands for headlines, I'm using sine font,
Bottom general sands. Same as my website. You always want to have consistency there, which is basically common sense and I've got my logo
in the corner there. Basically. That's how I do that. You can see I'm using things
like lines to break up, using numbers to label things. I'm using like gray text
to make it readable, making it light, adding
little details like this. You can design
Illustrate. You can also design Figma,
the same stuff. I'm sure my logo is
there just a clean grid. It's not full gritted or
anything but it's just I'm using my optical because I typically
do optical alignment. So I don't try and
use grids all the time because I have
so much experience. I'm used to like knowing how to space things and
move things around. And then I zoom out and
see, does this feel right? That's what usually
I do. Yeah, it's just a sense that you
develop as a designer. You can see here
using little icons for lists to make it
visually appealing. Because then it just
gets really boring. Laying out images
in just through column grid, very simple stuff. Adding these little card things, and then using scale and color just to make it really
nice and neat and tidy. You can do reviews, you
can do like tiered boxes. You can do timelines, like there's a whole bunch
of stuff that you can create when it comes
to doing a layout. Typically I do create
in 1920 by ten pixels. Or you can always save
things at half size. And then when you export
it, you can double it. Really you can do 14 40 P
by 25 60 as well for two. Or you can do four
as if you want. But illustrated doesn't
have the biggest artboard. It's pretty limited in Figma, you can create as many frames as you want, or boards really. I'll show you another example
of a client presentation. Now when it comes to something
this was done in design, I usually do longer documents
in design because you might have to print it on a visual report or a
booklet or a brochure. But if it's an illustrator and I'm just sending
things digitally, I just use Illustrator or Figma. Here's an example of
a proposal I did. I won't show you
all the details, but you can see a simple two
column grid, simple layout. They already had their brand
established and the fonts. So all I had to do
was like lay out, put the content,
move things around. But clearly laid
out font here using bold for those subheadlines, then keeping the
text really clean. We've also got a gutter
space here as well. Because there's a lot of text, we have to either extend the margin on the sides
or increase the gutter. But then it increases the pages. When you're doing long documents
and you increase pages, you got to add more graphics, find more images, and it
takes longer, et cetera. But typically how I lay it out, because UTS is, is a university, it's more of a futuristic brand modern, that type of thing. For this we use a
graphical device. We call it, they have like
this lens of like two circles, which makes like an eye lens.
And that's why we use that. You can see using
simple line icons, using imagery, using
typography inside that space. This worked out perfectly. You can see this text here, You can see this
made a perfect space to put some like a little
quote there, which is nice. The text has a lot of breathing room with the white space. It's all about scale, white space, making
things visual, adding numbers, adding bold sub lines, headlines,
stuff like that. There are some examples
of how to lay out.
9. My Font Software System: Probably wondering how
I manage all my fonts, all of the 11,000 you're probably wondering
how I manage all my fonts. The software I use
is called Font base. It works for Mac,
Windows and Linux. I'm a PC guy, I'm on
PC. This is what I use. I love it because minimal,
it's black and white. Simple. And it's easy to just see all the fonts at a glance. And I can add fonts
really easily. The way I basically do this is I have a
design library folder, and in that I have a font folder and then just label by year. Each year I might
get some new fonts. And whatever, if I go to 2024, you can see I've got
a few fonts in there, 2023, I've got other fonts
as you can see and so forth. And I've obviously got more
fonts on my hard drives, but I typically just use the ones that
I'm willing to use. Once that's all neat and tidy, I can just go to font base and I can search for
fonts which is cool. I can literally press the green light button
and will deactivate that. If I don't want
this one, it will just deactivate it,
which is really cool. I can go to the bottom
and see all my folders. I can click Add, and
I can add a font, a folder, a watched
folder, or a collection. For example, if I go Add folder, I just locate that folder
that I showed you before. Maybe I'll go to lasts one. Maybe you want to
upload this one, then you just click select
and it will add it in. I've already gone
ahead. I've got into here and I've got sign. I can left click on View Family, See it says the purple text. And then I can see
each individual font. Sometimes I'll say TTF or
OTF, that's totally fine. But you can actually, I can deactivate certain weights
that I don't want. Maybe I just want
bold or medium. I can just turn it
off. It's really easy. And then when I go back into
Illustrator, it will save, and then I just have to wait like 10 seconds and
it should load in. And then I can find the
font there. I got to sign. You can see that if I turn
sign off, I'll turn this off. Now, go back to the illustrator. You can see now it's
got the Asterix, because I basically turned
it off and now it's not working as you
can see there. Then I just turn it back
on and it should work. This is how I use it.
It's nothing fancy. I just like keeping
everything organized. I can see all my active
fonts by clicking. My inactive ones are like 9,000 I've got a lot of
different fonts here, but I obviously don't use them, are only certain ones. Certain projects I can view all 11,000 and
scroll through here. I can switch colors. Maybe you want
everything to be pink or green or whatever,
it's really up to you. I can change the
background color if you want to flip it
around. That's doable. Two completely free. I can change the alignment by clicking the alignment tool. And I can also make
everything really big by dragging the
slider up as well. This is a good way to
see all my fonts at a quick glance and just love seeing that.
It's really easy. You can also add a collection, so maybe I want like
San Seraph Futuristic. I can just type in the
new collection here. So I can click on a collection, and then I can just click Add. I can add a folder. Maybe I want to add
everything in this folder. 2023, I just select it. Now all those fonts are loaded into that futuristic collection. It's just good because
then I can have all these collections
of different styles of Pontiff categories. I can just write click and also deactivate them all at once or I can just delete just like
that. It's super easy to use. I can turn it off and on as well with the little
red green button, that's font base. I
think it's a great tool. If you don't have
any management tool, then it's good to use this. Windows and Mac does
have a default system, but it's usually
clunky and bad to use. I don't like it. This is
just easy software to use.
10. Typography Musts: Being a designer, you need to apply specific
typographic rules. I believe that sometimes
you can actually break the rules when you're
designing something. It's more creative,
the brand is more fun. You don't really have grids, You're breaking the grids,
that's totally fine. And sometimes designers will
make certain decisions. But at the core, you need to have an understanding
of the fundamentals. And then once you
understand them, then you can break
away from those rules. But it's always good to go
for clarity over cleverness, especially when it
comes to design. Because when a customer lands on a website or when
they read something, they want to get the information
they need straight away. They don't want to
be overwhelmed. The information
should be able to communicate the goal or the court action or
whatever it's trying to do. The first thing I want to talk about is orphans and widows. An orphan is a word that
is stuck by itself at the bottom of a line
or a paragraph, and the widow is the opposite. It's at the start of the line
where it's only one word. I found this website
called Food Hero's, a food app where they can
order groceries and stuff. Now if I scroll down, you can see here,
what do you see? There is an orphan right
here, the word products. When you read this text, you can see you read
it, the two lines, and then it just cuts
off and it feels weird. It feels like there's all
these empty white space right here that you can see. This is an orphan when it's
just one word by itself. Now, that's no good, looks
funny, it looks weird. It also creates awkward white
space around that text. It just feels out of place. To make it look better,
you have to correct it. Either you make
the text smaller. Salt fits on two lines, or you can make
the text bigger to make some of the words
fit on three lines. Or you can actually
use line breaks. Usually pressing Shift Enter
can make a line break. What you can do is like
bring surplus, this word, and bring it here,
then it'll fit here and then helps down
to the second line. That's one way to do
it with line breaks. Then you just got to
make sure that it works in small
size and big size. I can zoom, I can
zoom in the page, and at different sizes it
might look a little different. If I zoom in, you can
see on a bigger screen, this is what it will look like. That works, that's fine. But majority of people
will have probably 1920 screens or 14, 40. Now you can see here, there's
an orphan here as well. For scroll down the word now and you can see
it's very long. And then it just like cuts off
and goes download the app. Now I would have put this line and put it
on the second line. That's what I would have done
trying to avoid orphans. It's a bit harder to find widows because you don't
see them as much. Now another thing
that I see that I hate seeing is not having sub text contrast between the
headline and the body text. Usually what people do is
they select the same color. You'll have a white headline and then a white body
or black headline. And like 100% black body, it's better to actually
have a bit more contrast and make the text a bit lighter or a bit darker so they don't look
exactly the same. It's more easier to
read if I scroll down. I'm on video, I've
got the menus there. I'm going to scroll down
and show you what I mean. You can see here, if
I zoom in number one, you can see there's a weird orchard space
here. There's like a gap. As you can see, it's
not fully aligned. I feel like that is an
error or it could be a bug. I don't know,
that's a bit weird. But I want you to pay
attention to the text. You can see this text is the
same color as this text. If I just bring
up my font ninja, you can see if my mouse
over the color code is FAD. I'm not taking a shot
at the designers who designed this. That's
not the point. The point is to understand
the principles. What I would have done is made this text a bit lighter gray. That's what I would
do off white, a bit more gray then
I would have probably made the line height
a bit more just to make it breed because it
feels like it's all tight. This section right here, this
is not a line then you've got this section is so close
to this video right here, it feels like it's a bit tight. If I scroll down, then this
text is like overlaying that it's a bit distracting
because when you're trying to see the animation
distracting from it, it just feels a bit
weird this text, it feels like a big block of white text which
is hard to read. What I'll do is
prese line height and subtext contrast improve it. It's going to make
it a lot better. Now, I want to show you an
example of something else. It's all about the max width or column width of a
body text or subtext. Now when you have something
that's really long that goes along the whole page
and it's not a headline, it's very hard to read. It's going to fatigue the
brain because the brain, your eyes have to move
from left to right. And if it's too long, it
starts becoming like, tedious and strenuous
on your brain. I want to scroll down
this section. Looks okay. I'm going to scroll down now. Once I get to here, you can see this text right
here is very long, it's almost taking
the full width of that section or the page. If I zoom in, you can see now one of the tips
that I've learned is to have a set width
usually around 600 pixels. When you have, you want to basically shorten that length
so it's easier to read. It's in a block and your eye doesn't have to travel
too far to read. I'm going to have to move my head a little
bit just to read all this. And it feels exhausting.
It feels tiring. And I'm reading this
scroll down as well. You can see this text
is very long as well. This should be shorter. What
I'll do is probably cut it off probably around
here like that. Then it will stack up maybe
four lines, but that's okay. It's better than reading
this whole thing. It's too long. You
want to have it here. Another important thing is
always have consistency. Now sometimes people might be AB testing different
landing pages. You might have different
buttons or different texts, and I totally understand that, but for the majority of sites, you want to have
consistency with the call to actions,
with the buttons, and also have alignment
as well when it comes to aligning your columns or your grids.
Aligning your text. For example, I
used to use Toggle for tracking my time.
Now I use another app. But you can see here, the Call to Action on the top
right says, Try for free. Then the bottom says,
Start tracking for free. I feel like they should just consolidate that and
have the same button. Not only that, but this
button is a different color. You can see it's like light with pink makes it a
little bit hard to read. Actually, if you have a
bright screen and this one is a pink button,
it's inconsistent. It would be a lot better if
they just had the same color. Obviously, I can tell
why they did that is because the top
part is like pink, this part, the top is pink. It's a bit distracting. I feel like having that there, like these things should probably be in the
footer somewhere, right? It should be here. Like
they've got two menu. I feel like it's too confusing, there's too many
things happening here. I'll probably get
rid of that bar, put some of that
into the menu and then change the button
so it's consistent. You're always going to
remember have consistency. It's better when a customer lands on it and they
don't get confused, they don't get annoyed, They understand what they're clicking
on, what they're doing. Here's another example,
these guys do really well. I used to use bond site long time ago for doing contracts, but they are very
consistent with the button. You can see it's start free
and also a Start Free. It's very clear it's consistent. The green button, the
text or lower case. You don't have one
button, upper case and one lower case because
that would be weird. That would look
funny. This works really well. It's
very consistent. You can see how
it's they went for the rounded look
and even this bar is rounded, it's
consistent there. I would have probably kept these instead of like
these are rounded, but it's not fully rounded. Like a pill shape, it's
more of a rectangle. I would have applied that
same thing here with these little labels that would
have been more consistent. I could tell.
Obviously, trying to make this look different
and stand out. Now, you can also
notice that this is not aligned to the navbar. If I just draw a line, you can see here, and then
we've got this navbar. Now you want to make sure that it's okay to break
the alignment sometimes, but it just feels a
bit out of place, like maybe they
should have made this bigger and bring it to the left. If I zoom in, you can
see it stays the same. It feels a little weird,
it feels a little off. Usually like you want to
try to align something. If we put the line here, just follow this
line with your eye. You can see that it's not
really lining up this navbar, this logo is not lining
up with anything, even this section here. It's up. You've got this alignment here, the middle section, It only
aligns with the footer. It would be better
if it were to align with some of these elements. Like some of these graphical
elements even card, Those are a few typographic tips when it comes to design
and hopefully improves.
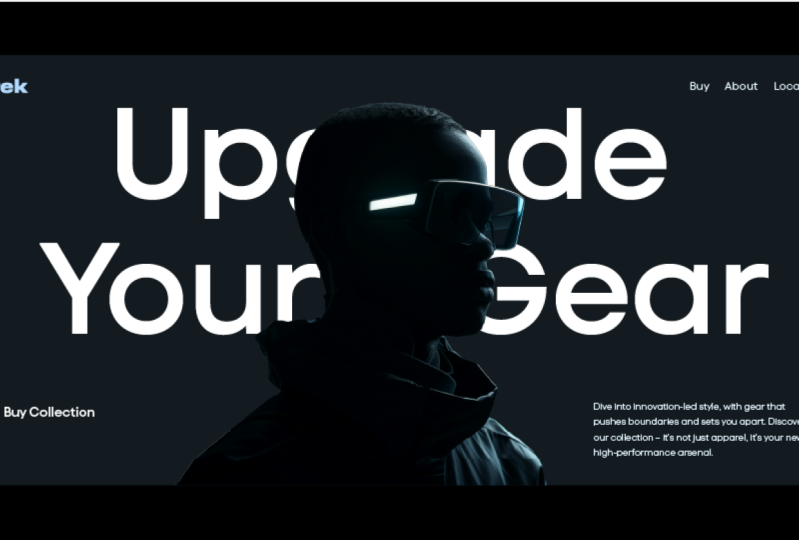
11. Thank you: Do want to practice some of
the skills we talked about, then I recommend you
taking the class projects. One is doing a hero image for our website focused
on typography, and also a logo design
that's focused on using two fonts and combining them together. Make
sure you work on those. Upload them and I'll give
you feedback the best I can. I will include some resources as well that you can click and download to find some font sites and things like that that
I've mentioned in the course. You can check that out. I'll put the links in the
project section. Thanks so much and I'll
see you in the next.
 Jeremy Mura, Brand and Web Designer