Transcripts
1. Class Trailer: Hi, I'm Christine
Nisiama, author, illustrator, and artist
at Mike Good Studios. I've taught over 25
online art classes with more than 125,000 students. Two of my earliest
skill share classes are also my most popular. Picture books one,
write your story, and picture books two
Illustrate your story. These two classes were
originally created in 2014 and taken by
over 14,000 students. They have now been
revised, updated, and combined into this class
picture book master class. Write, Illustrate and
publish your story. I wanted to remake my two most popular
online classes because I made those classes
almost ten years ago, and a lot has
changed since then. Not only is the audio
and video quality of those two classes poor
compared to today's standards, but I've also learned an
enormous amount since then. I've published eight books with four of those
published by Scholastic. This new master class has been updated and expanded with
everything I've learned, including brand new information on publishing and
self publishing. Using my picture book, we are fun guy as an example. I'll show you how to mold your story idea into a
completed picture book. Everything from writing
your story idea, refining your manuscript, designing your characters,
drawing your storyboards, crafting a book dummy, and creating the final art. From there, I'll show you
how to finish your book, whether you want to focus on traditional publishing
by submitting your book dummy to publishers or self publishing by designing, distributing and promoting
your own indie book. Plus, there's a bonus
Resources PDF download that includes all the links and digital files referenced
in this class, including the
further reading list and storyboard templates. And one last thing. The
content from this class is also available as a
printed book and eBook. You can search Mike Could Make a book on Skillshare or Amazon and find links to
both products in the class description
and Resources PDF. Either would be a
great addition to refer to as you go
through this course. By the end of this class, you'll have everything
you need to write, illustrate, and publish
your own picture book. So, come on, let's
jump right in.
2. Intro to Picture Books: Intro to picture books. What is a picture book? Let's start at the beginning
and define some terms. A picture book combines
words and pictures in a book format to tell a
story to young children. The target audience is children
from ages two to eight. Picture books versus
illustrated books. A picture book is different than an illustrated book such as
a middle grade chapter book. In a picture book, the
illustrations are vital to the story and a text cannot be fully
understood without them. In an illustrated book, the illustrations
are supplemental to a text that can
stand on its own. Wildwood by Colin Malloy and Carson Ellis is an example
of an illustrated book. It's structured like
a chapter book. The illustrations are
not necessarily on every page and are sometimes
small spot illustrations. Where the Wild Things are by Maurice Sendak is an
example of a picture book. In this book, there is less text and the illustrations
partner with the words to help tell the full story instead of
just reiterating the story. What's the purpose
of children's books? Picture books are
the first stage of learning to
read for children. They are intended to
be read together, one person who can read and
one person who cannot read. As the parent or older
reader reads the words, the younger child can read the pictures while
listening to the words, learning the meaning
of words and language. Early reader picture
books can also help a child learn to
read on their own. Picture books place value on rich storytelling and
the joy of reading. They can be fun, silly, educational, deep, and
thought provoking. What is not the purpose
of children's books? A picture book should not aim to overtly teach lessons or morals. Children understand more than adults typically give
them credit for. Rich stories inherently deal
with values and character. It isn't necessary to blatantly
state a moral at the end, and then little Johnny knew that sharing his toys was
the right thing to do. If you want to make
a picture book, your job is to be a writer and illustrator, not a teacher. Don't begin this process with the intention of
teaching a lesson. Start with the intention
of telling a good story. Quality storytelling
leaves room for readers to piece together and interpret the story's meaning themselves. Picture book audiences. Child and adult readers. Your primary picture book
audience is a child 2-8. But the person reading the book to that child could be a parent, grandparent, teacher, librarian, any adult or
older child who can read. The adults are the
ones buying your book, so it's wise to make the book
appealing to them as well. Readability. A picture book should be fairly easy
to read out loud. This doesn't necessarily
mean simple. It's more about rhythm, flow, and how the
words sound out loud. We'll cover more of this
in Module six and seven. For now, your goal should
be to write a story an adult won't mind
reading again and again. Words and pictures
working together. The most important
aspect of a picture book is how the words and
pictures work together. The example here shows
how the words and pictures can work together
to tell a complete story. In my book, We Are fungi, the written text tells
one part of the story, the scientific non fiction side, while the illustrations tell
another part of the story, a more fictional magical side. Together, the words
and pictures tell one complete story
that could not be fully understood without
both working together. This partnership allows
the adult child and book to all be active
participants in the storytelling. Types of children's books. Now that we've gone over the
basics of picture books, let's look at the
eight different types of children's books. As you read through,
think about which type of book your story may
be best suited for. Board books. The target audience
is zero to 2-years-old. An example is Mu B, la, la, la by Sandra Boyton. And the average word count
is less than 30 words. Board books are written for very young children
who can't yet read. They are made out of
thick cardboard pages to withstand the heavy handling and chewing of babies and
young toddlers. Concept books. The target audience is
ages two to 5-years-old. The average word count
is less than 300. An example is quiet loud
by Leslie Petrocelli. Concept books
introduce children to a theme such as letters,
numbers, or shapes. Sometimes they tell a
story and sometimes they simply list items
within the concept. Picture books. The target
audience are ages two to eight. Average word count is
400 to 1,000 words, and an example is Lama Lama
red pajama by Anna Dowdy. The narrative story becomes more important in picture books. A picture book combines words and pictures to
tell a story together. The pictures are necessary for the full story to be understood. A child can read the pictures as their parent teacher
reads the words, learning the meaning
of words and language. Non fiction picture books. The target audience is
three to 12-years-old. Average word count is
four to 1,000 words. And an example is the big
book of bugs by Yvel Zomer. These books introduce
children to new educational concepts in a fun and easy to
understand way. They lean towards
the informational, but also often include some sort of narrative
story as well. Wordless picture books. Target audience is
two to 12-years-old. Average word count is zero. An example is journey
by Aaron Becker. These stories are told
completely by illustrations. There are no words. The lack of written text
allows the child to expand and interpret the full story in their mind to go
along with the pictures. It also allows
children who can't yet read to read a book
entirely on their own. Early readers, target audience
is five to 8-years-old. Average word count is 2000 and an example is green eggs
and ham by doctor Seuss. Also known as easy readers
or beginner books, these books help children
learn to read on their own, growing their confidence
and abilities. These books have more text and are often longer
than picture books, but still have illustrations
on every page. Early reader graphic novels. The target audience
is five plus years. Average word count is 2000, and an example is Nar WA Unicorn of the Sea by Ben Clayton. These books are told in
comic form with pages broken up into panels and dialogue
often in speech bubbles. They help children learn
to read on their own. It's perfect for more
visual minded children and reluctant readers. And finally, we
have chapter books. Target audience is
seven to ten years. Average word count
is 4,000 to 12,000, and an example is Ivy and bean by Annie Barrows
and Sophie Blackall. Chapter books are structured in paragraphs and chapters
similar to adult novels. There are illustrations
throughout the book, though not necessarily
on every page. The illustrations
can be full page, half page, or small spots. The pictures mainly reiterate what is communicated
in the text.
3. Elements of a Picture Book: Elements of a picture book. Picture book
standards, page size. The size of a
picture book varies widely depending
on the book type, age range, and how much money you or your publisher
are willing to spend. The important thing
to consider is that if you plan on
submitting your book to publishers or self publishing
and selling your book through an online marketplace
like Amazon Ingram, you'll have to adhere to
the standards they accept. You don't have to decide on the final size of
your book until you begin making the sample
spreads covered in Module 18. For now, you can begin
thinking about whether you want your book to be
formatted as landscape, meaning horizontal, portrait,
meaning vertical or square. Start paying attention
to how existing books are oriented. Page count. A picture book is
typically 32 pages long. This is standard because
in offset printing, the pages are printed in multiples of four
called a signature, and then folded and bound
together into a book. If your books page
is not a multiple of four, meaning 28, 32, or 36, for example, blank pages are added until
it is a multiple of four. This is why you often see
blank pages in books, even adult novels, they're
filling out the signatures. This multiple afore rule
goes for all types of books, except for board books
or spiral bound books, which are not printed
in signatures. What happens if you create a book not following this rule? It's not a huge deal. You'll just have an
extra 1-3 blank pages in the front or
back of your book. Also keep in mind, especially
if self publishing, more pages means more
expensive printing. Some picture books are
longer than 32 pages, but most fit within
this guideline. Word count. Word count varies greatly depending on what type of children's
book you're making. But here are some
general guidelines. A board book is less
than 300 words. Concept books are less than 300. Picture books are 400 to 1,000. Early readers are around 2000 and chapter books
are 4,000 to 12,000. Picture book anatomy. Now let's look at the
parts of a picture book. I'm going to use a
storyboard layout so you can see all the elements of the
book in one flat image. Front Matter. First, we
have the front matter. This includes everything in the book before the
actual story starts, which is usually around
page four or six. The front matter can include
any or all of the following, full title, half title, author, illustrator, dedication,
publisher, copyright info, editor, art director,
and publication date. Pages. This is a single page. As I mentioned before, there are typically 32 pages
in a picture book. Spreads. Two pages together
form a spread as seen here. The number of spreads in a
book can vary depending on how the front matter is laid out and how many
pages are necessary. A book with 12 to 16
spreads is normal, but it can be more
or less. Gutter. The gutter is the
place in the middle of each spread where the two
pages meet the binding. When illustrating
a picture book, the gutter has to be taken
into consideration to avoid things getting clipped or lost in the gutter. Back matter. The back matter includes the author's notes
if there are any. Usually, non fiction
picture books will have an author's note to
further explain some of the material or history in the book or how the author
researched the subject. End papers. The end papers are the two pages in the
front and back of the book, usually glued to the binding. In papers can be
solid colored paper or have patterns or
illustrations printed on them. Artistic influences. All artists are influenced
by other artists. It's helpful to be aware of who or what you
are influenced by both broadly as an artist and specifically with this book that you're working
on right now. Throughout the
process when you feel stuck or lost,
which will happen. You'll have your list
of influential books and artists to return to. They'll help jog your memory of what your original idea was, spark your imagination
for what to do, and inspire new ideas
and paths forward. Not sure who or what your
artistic influences are. Think back to the books
you loved as a kid. What was your favorite
book to read as a child? What memories of
books do you have? Why do you remember
them? The illustrations, the story, the words. Revisit and read those
stories again if you can, and add them to your list. You can also find a list of
award winning and timeless picture books at the end of this course if you need
somewhere to start. This influence list
doesn't have to just include children's
picture bookmakers. I often include painters, graphic novelists, and
musicians as well. Creating a music playlist that fits the mood
I'm shooting for with a book has been especially helpful for me with
my most recent book. Listening to it while
I make the final art helps remind me of the
essence of the book. As you're making your
book, add any songs you hear that feel like
your book to this playlist. It will continue to grow and
evolve as your book does.
4. Illustration Terminology: Illustration terminology. Before we jump into
the first steps of crafting your story, there are some
illustration terms and concepts you
should know about. Decage an example is
cockatoo by Quentin Blake. Decage means the disparity
between word and image, meaning the words say one thing while the pictures say another. Here in cockatoo, a man
is looking for his birds. The words on this spread
say he climbed a ladder and flashed his torch around the attic. They weren't there. But the reader can
clearly see that there are six cockatoos
behind the suitcases. Children love to be
able to point out the difference between
reading the true story with the pictures and the false words in the story. Composition. An example is found in
Mina by Matthew Forsythe. Composition refers to how
the different elements of a picture book spread are arranged in relation
to each other. In general, the illustrations in a picture book should
lead you through the book from left to right on each spread and
from page to page. This can be done
subtly by organizing the elements in your
composition from left to right. Or it can be done more
obviously by having a character run across the page from left to
right, for example. In this spread from Mina, almost every element is composed to guide the reader's
eyes from left to right. We'll talk about how to do
that more in Module 16. Color and whitespace. An example is Belly button
Book by Sandra Boyton. Color and white space can quickly communicate
emotion and mood. Whitespace is also
a way to focus the reader's attention
on a specific element. In Belly button Book, pastel colors set a fun, light hearted mood, while
the use of white space calls out the little Hippo right when his time
to speak comes. Typography. An example is Bob the Artist by
Marian Ducharz. Because the combination
of words and pictures is the essence
of picture books, typography is a vital element of their design and can communicate a great
deal about the story. The text can be typeset in traditional stanzas like poetry, or it can be more fluidly
aligned with the illustrations, becoming part of
the picture itself. In Bob the artist, the typography is
all hand painted, integrating it into
the overall artwork and adding an extra
punch of emotion. Perspective. Example, they all saw a cat by Brendan Wenzel. The chosen perspective
or point of view of an illustration can also communicate important
pieces of the story. If the reader looks
down on a character, that character is perceived as timid, doubtful, or scared. If the reader looks
up at a character, the character is perceived as brave, excited, or determined. Cropping the artwork
to a close shot or zooming out to a wide shot
also affect the mood. The book, They All Saw
a cat is all about perspective shifts
and each spread shows the cat from a different
animal's point of view. Here in this
example, you can see an overhead shot of the cat
from a bird's perspective. Style. An example is Oh, no George by Chris Hatton. Picture books exist in
every style imaginable. The art can be
realistic or abstract, silly, or serious, and
everything in between. There is no best style
for a picture book, and I have a very
firm belief that there is no right way
to make a piece of art. It's all completely subjective, and all you can do is make the art that
feels good to you. The spread here
from Oh no George shows a bold graphic
style using bright, solid colors and strong shapes. Don't go too deep into personal artistic
style in this class. But if you find
yourself getting hung up on how to draw
in your own way, I'd recommend checking out my other skill share class,
sketchbook to style. I go much deeper there
into what makes up on an artistic style and
how to develop your own. Mediums. An example is Hank finds and egg
by Rebecca Dudley. Just like style, there is no required medium
in picture books. You can use whatever
art materials you like to create
your illustrations. Picture books commonly
use pencil, pen, ink, watercolor, oil,
acrylics, collage. Almost all picture books use digital mediums like Photoshop, whether for setting, type, art editing or painting, the whole thing digitally. There's no need to just
choose one medium. Many picture books use a combination of
different mediums. Some books really think outside the box like Hank finds an egg. In this book, the
artwork was all created by hand using felt, textiles and other
physical materials. The scene was then
photographed as flat illustrations and
printed as spreads in a book. There are no rules.
5. Plot Structure: Plot structure. The three
act plot structure. The three act plot is the most common plot structure
for any type of story, whether a book,
movie or TV show. This structure has a beginning, middle, and end called acts. In Act one, the characters
and conflict are introduced. In Act two, the action begins. The main character reaches
their low point and the action or tension
reaches its climax. Finally, in Act three, there is a resolution
where the tension is somewhat resolved and
loose ends are wrapped up. Picture book plot structures. The three act plot is commonly
used in picture books, but there are a number of other plot structures that are often used instead of
the three act plot or in combination with it. Let's look at some of those now. Classic. This is the
common three act plot with a clear beginning,
middle, and end. A very basic and common three plot picture book story
goes something like this. The story's main
character has a problem. They encounter three obstacles or attempt three times
to solve the problem. The character is demoralized
and hits their low point, which leads to one final
attempt to solve the problem. Then they successfully solve the problem and the
story resolves. The word problem here could also be replaced with desire or want. As the character strives
to fill that desire. Every character must
want something. A 32 page picture book, the story's resolution
usually happens on pages 30 through 31 with a final
wrap up on page 32. A good example of this
classic plot structure is where the wild things
are by Maurice Sendak. In Act one, Max causes
trouble at home and is sent to bed without supper.
This is the introduction. This leads to Act two
when Max's room shifts, and he is now in
the magical island of monsters called Wild Things. Soon Max becomes king, this is the rising action, lets the power go to his head and sends the wild things
to bed without supper. Max then enters his low
point and feels lonely. He decides to go home, but
the wild things won't let him go and throw tantrums.
This is the climax. In Act three, Max sails home, slips into his bedroom and finds his hot supper waiting for
him. This is the resolution. Secular. A secular
plot structure begins and ends at
the same place. This can be achieved
in many different ways and can be overt or subtle. It could be that the
story begins and ends in the same setting after
a journey in between, or a character could
look the same at the beginning and end
with changes in between, or the book could begin and
end with the same sentence. A good example of circular
plot structure is, if you give a mouse a cookie by Laura Numerov and Felicia Bond, the story begins by giving
a cookie to a mouse. The mouse asks for a glass
of milk to drink with it and then keeps requesting more and more things
as the story goes on. By the end of the story,
the mouse asks for a glass of milk and then
finally a cookie to go with it, coming full circle back to where the story began. Concept. A concept plot prioritizes the introduction of exploration of a topic or
category to children. These books can have
a narrative story or can be mostly informational. A great example of
a concept book is Shapes Trilogy by Mac
Barnett and John lassen, including triangle,
circle and square. These three books each
have a narrative story, but their focus is on
teaching young kids about concepts of
shapes, triangles, circles and squares, and
the concept of size, small, medium, and large. Cumulative. In a
cumulative plot, each time a new event occurs, the previous events in
the story are repeated. This leads to a very
predictable book, which young readers love as they can guess
what comes next. But the author usually
adds a twist at the end to break the
repetition and add surprise. A good example of a
cumulative book is the napping House by
Audrey Wood and Don Wood. The story begins with a house
where everyone is sleeping. Then a bed, a granny, a child, a dog, and on and on repeating where everyone is sleeping as
each sleeping thing, person, or animal is added. Eventually, a flea who is
not sleeping is added, breaking the pattern
and waking everyone up. The pattern then
reverses and the story takes us back through
each cumulative thing. Mirror. In a mirror plot, the second half of
the story echoes what occurred in the
first half of the story. An example of a mirror
book is a sick day for Amos Magee by Philip C
Stead and Aaron E Stead. The story details Amos
Magee's typical day working at the zoo as he
visits the elephant first, then the tortoise, the penguin, the rhino, and lastly, the owl. But one day, Amos wakes up
sick and can't go to the zoo. So the animals board the bus and visit Amos in the
same order as before. Elephant, tortoise,
penguin, rhino, and owl. Mirroring the first half
of the book, parallel. In a parallel plot, two story lines take
place at the same time. This is sometimes called
a dual narrative. Usually, the story
lines are related or similar and often come
together somehow in the end. A good example of a
parallel plot is Was Mommy by Beverly DonoFrio and
Barbara McClintock. This book follows the
two story lines of a girl and mouse searching
for their mother at bedtime. They are both in their
separate bedrooms and begin looking in corresponding
rooms for their mothers. The girl looks in the
human kitchen while the mouse looks in the
mouse kitchen and so on. The artwork shows these
story lines happen simultaneously on the
same page. Reversal. In a reversal plot, the character and or
plot is portrayed in a way that is opposite
from what you would expect. It flips some common concept on its head and considers what
the reversal would be like. A great example of
a reversal book is children make terrible
pets by Peter Bram. A normal picture book
about pets would be the story of a child having
an animal for a pet. But this book shows the reverse a story of an animal
having a child for a pet. In this case, a bear
attempts to bring a little boy home and
keep it as a pet. Experimenting with
your plot structure. Once you begin
writing your story, it can be helpful to look back at these plot structures and try reorganizing your story in different ways to
see what works best. One story can be told in any
number of plot structures, and experimenting is
the best way to find the one or combination
that fits your story. You also don't have to follow any of these plot structures, or you can follow
one very loosely. These structures don't have
to be cages for your story. You might find they offer nice, tidy scaffolds for your story. But if it's not
working, remember, you can always break free and do something completely new. But
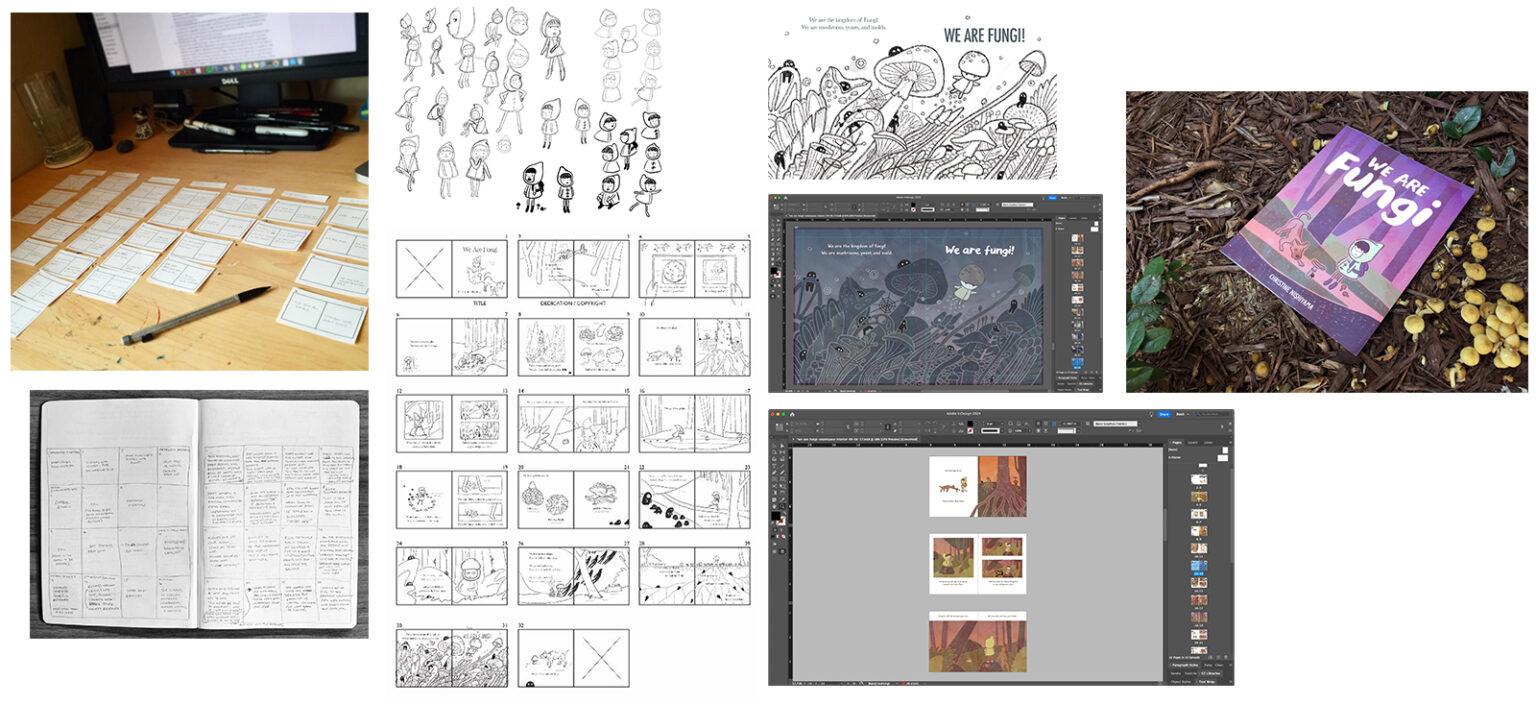
6. Storyboarding Your Plot: How to storyboard your plot? You can use a
storyboard format to help you expand your
story idea out into a full plot or test your existing plot to see if it fits in a typical
picture book format. It works best if you
work in a sketchbook, notebook, or piece of paper. First, draw a chart
with 16 squares, four across and four down,
like in this example. Each of these boxes represent
one spread in your book. Remember, 16 spreads
equals 32 pages. Now in each box, write out a simple plot point
from your story. Something short like Oni
walked to the dog park. Do this for each plot
point in your story, filling out the story to
fit in these 16 boxes. Don't expect to get this
right on the first try. It takes a lot of
experimenting and moving things around to
find the right order and paste for a story. Take your time and be patient. Make as many plot
storyboards as you need to mold your story into
the picture book format. Another helpful
exercise is to cut up your plot storyboard and move around the
spreads on your desk, allowing you to try new
arrangements and make small adjustments without
redrawing the whole storyboard. After you've gotten a grasp on the order and pace of your plot, you can begin to refine the outline by expanding
the content in each box. Take your most recent
storyboard plot and redraw it. But this time, write
a little more detail about what happens instead
of just a plot point. This is a great way to begin the actual writing process
because it helps you plan and focus on
the plot rather than on the individual
words or specifics. It also feels low
pressure and not as daunting as starting
on a blank page. Example, plot storyboard. If you're struggling
with expanding and pacing out your story, it can be helpful to look at
a typical plot outline of a picture book and think about how the pieces of your
story could fit together. I've created a sample
picture book plot storyboard below with the pieces of a classic plot structure. But please keep in mind, your story does not have to
fit into this structure. This is just an example and
is one of many, many options. These are not rules, and not every picture book will or should fit into this outline. But this is a good
place to start if it's your first time
writing a picture book. Try making a new
plot storyboard, fitting your plot points into my version of the
plot structure above. Does this help you
pace out your story? How could you rearrange or change the structure to
better work with your story? What would happen if you tried out one of the other
plot structures? If you had only one
obstacle in mind, what could two
other obstacles be? Or if you have three, what would happen if
you only had one? Experiment, experiment,
experiment. And remember, writing a story takes time. It's not going to
all fall into place without you putting in the
time and effort to get there. Enjoy the ride, be curious
and see what happens.
7. Point of View: Point of view. Point of view has a major impact on
how your story is told, and a change of point of view can drastically
change your story. As you are working on
writing your story, a good exercise is
to rewrite it in a different point of view,
just to see what changes. You might be surprised. Let's take a look at the three most common types
of point of view. Third person single
point of view. Third person single is the most common point of
view in picture books. Here, an outside narrator, meaning not a character
in the story, tells the story from one
character's perspective. The narrator only knows what that character already
knows as it happens. If we were writing a story
about a dog named One, an example of third person
single point of view could be One looked out into the
beautiful Blue Ridge Mountains. The narrator is an
outside voice and is simply describing what
Oni sees or does. Third person omniscient
point of view. I third person omniscient, an outside narrator, not a character in the
story, tells the story. But this narrator
knows the story from multiple or all
characters perspectives. Using our dog story, an example could be Oni looked out into the beautiful
Blue Ridge Mountains. His friend Lucy was
hiding behind the bushes. See how this narrator can see more than the
main character can? This narrator knows and can tell us that Lucy is
hiding in the bushes, even though Oni does not
know that she is there. The narrator can see everything
and knows everything. First person point of view. In First person, the narrator
is an active character in the story and uses the word I and we in telling the story. This allows us to write more deeply about the emotion
of the character, but also limits us
to only write about what is experienced by
that particular character. Using our dog story, an example could be, I Looked out into the beautiful
Blue Ridge Mountains. Now One is our main
character and the narrator. The story is told from Onie's perspective in his own voice. Second person point of view. Second person is the
most rare point of view. Here, the narrator addresses the reader of the
book, using the word. This draws the reader
into the story as a participant or
even a character. It can be difficult
to tell a story in second person and is almost always paired with
another point of view. But it's an interesting
experiment to try. Using our dogs story, here are a few
different examples. You looked out into the
beautiful mountains and saw One. I looked out into the beautiful
mountains and saw you. One looked out into the
beautiful mountains and saw you. One looked out into the beautiful mountains
but did not see you. Now the reader is
involved in the story and integrated into the
action and events. Experimenting with
point of view. All of those examples tell the same plot point
quite differently. Some point of views feel
factual and straightforward. So feel emotional
and individual, and some feel kind of creepy. Try rewriting your story using
a different point of view and see how it changes the way your story is told
or how it feels. Which fits your story best? You never know until you try.
8. Rhythm + Rhyme: Rhythm and rhyme. You don't have to rhyme. During lectures while attending Society of children's
book writers and Illustrators conferences, I heard over and over
from editors that they decline almost all rhyming
manuscripts they receive. They reported this
wasn't because rhyming books are
unpopular or unwanted. Everyone loves rhyming books. It's because rhyming is hard, and most people are
really bad at it. I'm still studying and learning
the elements of rhyming, so I'm not going to pretend
to be an expert on it. But these editors shared with us the big
problem with rhyme. If you haven't deeply
studied rhyme, it's easy to get caught up in finding words that
rhyme and changing your story or sentence
to fit the rhyme instead of using rhyme
to enhance your story. Then you have a
book that rhymes, but a story that is bland
or awkward to read. My suggestion if you
are new to making picture books and have not
already studied rhyming, would be to not try to write
your first book in Rhyme. Instead, you can
focus on learning all the other elements of
writing a successful story. Then once you have
a grasp on that, you can move on to studying Rhyme and work on that
with your next book. This is just my personal
suggestion, though. If you feel you can
make a rhyming book or you just want to give
it a try, then go for it. Just be sure you prioritize
telling a good story first. Either way, rhythm
is still important. Whether you're rhyming or not, you still need to think about rhythm when writing your story. Here's a tip from the
Rhythm king, doctor Seuss. Shorten paragraphs and
sentences, then shorten words. Use verbs, let the kids
fill in the adjectives. Okay. Let's go over
some of the elements of terminology of
rhythm and rhyme. Beats. As you're writing, think about the beats
of your sentences. A beat is a heavily
stressed syllable. Beats are more emphasized
and when spoken aloud, they are naturally pronounced
louder for longer. Unstressed or lightly stressed syllables fall
between the beats. Here's an example.
The heavy beats here are shown in bulb. The dog ran down the
stairs. Rhythm and mood. The number of syllables between beats is what gives a
sentence its rhythm. Different rhythms
have different moods. Shorter sentences
with fewer syllables between beats create
a quicker rhythm. This implies a fun,
energetic mood. Longer sentences
with more syllables between beats create
a slower rhythm. This implies a more
relaxed, sleepy mood. Rhythm Patterns. Let's take a quick look at the four
most common rhythm patterns, ambic, Trochi dactyl and nipest. Iambic. This rhythm pattern is a light stress followed
by a heavy stress. It sounds like da
dum da dum da dum. An example would be a
piece of cake, Trochi. This rhythm pattern is a heavy stress followed
by a light stress. It sounds like dum
da, TamdaTamda. An example would
be double trouble. Dactyl. This rhythm pattern is a heavy stress followed
by two light stresses. It sounds like dumb, data, dumb, data, dumb data. An example would
be hicory diory. And lastly, napst. This rhythm pattern is
two light stresses, followed by a heavy stress. It sounds like da da dum, da da dum, da da dum. An example is Twas the night. Poetry techniques. Writing a picture book can be
similar to writing poetry. Even if you aren't
rhyming your story, you can still utilize
poetry techniques. I'm going to go through and explain some of the
most common techniques. You probably already know
most of these but may not have thought to consciously put them
into your writing. Using these poetry
techniques can make reading more fun for both
the adult and the child. Children also enjoy
the repetition and repeating it themselves. Ana manipa a word that
represents a sound. Examples are lang, bang, swoosh, or buzz, Alliteration. The repetition of
consonant sounds at the beginning of words. The tiny turtle stared at
the terrestrial tortoise. Assonance the repetition
of vowel sounds. The cat in the hat swung a bat. Consonant. The repetition of consonant sounds in the
middle or end of words, the pitter patter of ring. Personification, giving
human characteristics and personality traits to an
animal or inanimate object. The fire alarm screamed
at my burnt cookies. Metaphor. A comparison
between two things gives a visual image. An example would be, life is a merry go round
with ups and downs. Simile, a comparison
between two things using the word like or as. An example would be
his bones rattled like a wind chime. Using
rhythm and rhyme. Try incorporating some of these poetic techniques and rhythm patterns into
your manuscript. You certainly don't have to use any of these styles of writing, but it's worth experimenting with them to see if
you enjoy writing this way or how it may improve how your
story reads out loud. If you'd like to learn
more about rhyming, I recommend reading and studying children's
poetry anthologies. You can see some examples
at the end of this course.
9. Character Design (Writing): Character design grading. Now let's focus on developing the main character
in your story. Designing a character involves
more than just choosing what type of clothing they wear or how they
style their hair. As a picture book creator, you need to develop
the character fully outside and inside. There are a few
characteristics that are present in all well
developed main characters. First, they should be relatable, meaning they have flaws
just like real people do. Readers can relate much more
easily to a flawed, I E, realistic character than
a perfect character, and this makes the character
feel more believable. So consider for all the good traits your
character may have, what flaws do they have? How do they tend to slip up
or make mistakes sometimes? For a children's picture book, the main character is most
often a child or an animal. Children can't relate as well
to an adult main character. Typically, the main
character is a tiny bit older than the
age range of the story, allowing the child
reader to look up to them while still being
able to relate to them. The main character
should also be somewhat independent and strong, although they won't
necessarily start the story that way or find it
easy to be that way. But almost all main
characters have a story arc of solving
their own problem, achieving their own desire, or coming to some important
insight on their own. This doesn't mean
they don't have help, but by declaring the
character independent, we are saying that they are
not dependent on parents, adults, or anyone else to solve the conflict
of their own story. As the main character, they are the hero and they are the
one to solve the problem. Your main character
should want something. Perhaps the most
important aspect of a main character is that
they want something. This sounds basic and simple, but it can be a vital
tool in creating an interesting character
and a story with depth. Your character's desire can also be a guiding star for your book, a phrase you can
keep in mind when making decisions about what
happens in your story. In other words, your
character's desire provides the entire basis, motivation, and
conflict of your book. So what is it that your
main character wants? Why do they want it?
What is their goal? What do they have to
overcome to get there? How would achieving
that goal change them? Thinking through and answering
these questions will help you develop a main
character that is relatable, believable, independent,
strong, and unique. It will make them
into a character that can fuel an entire book.
10. Book Title + Blurb: Book title and Blurb. Stuck and stumped.
At this point in the process of making We are
fun guy, I was frustrated. I was at that stage when you don't really know
what book you're trying to make and you're trying to
figure everything out, and you want to make the book so bad, but it just
won't come out, and either everything
you write is terrible or you can't
write anything at all. It's a terrible feeling. When I get stumped on
where a book is going, especially in the
beginning stages, I find it helpful to think
about book blurbs and titles. It forces me to distill the
book down into overarching themes and feelings instead of getting caught up in
the words and details. Thinking this way
can help reorient and guide me on where to
go with the manuscript. For me, the manuscript
and the blurb, which is like a quick
introduction to the book and title all develop together
instead of one at a time, going back and forth
between the three pieces. As a reminder, these
beginning stages of making a book are the hardest and
most frustrating parts. Get through these
first few steps of planning and writing, and then you're in
production mode. It's the creation part, the pulling something out of
nothing that is so hard. At first, you have no idea
what that something is. You just have to keep your
hands moving and keep making, and then eventually,
like a magician, something brand new will appear. Believe in yourself, your
ideas, and your book. You can do it. Elements
of a successful title. As you begin to think about
the title of your book, here are some general
guidelines to help you craft a title that captures
the essence of your book. Your book title should be relatively short or
easily shortened, so it will be easy to remember. It should also be fun to say. Try using some of the
poetry techniques, refer back to Module seven. It should be
original, as in there should not already be another
book with the same title. Try searching your title idea on the Internet to
see what comes up. It should somewhat allude to
the core idea of your book. You want it to give the reader an idea of what
the book is about. It should also set the
tone of the overall book. Is this a funny book, bedtime book, silly book? Your title should reflect that. It should be easy to pronounce. You want people,
especially a child, to be able to say it
without much trouble. It could be a line
from your book, your character's name, or a more abstract word or phrase
that represents the book. Example of a great title. One of my favorite
picture book titles is The Adventures of Beakle the Un Imaginary Friend
by Dan Santet. In conversation, most people shorten this title to
simply say Beakle. So the title is long, but it can be easily shortened. The made up word Beakle is
very original and quirky, which makes the title memorable and easily found
on the Internet. The longer title
lets us assume that the story will be about an
imaginary friend named Beakle, but makes us wonder what
an unimaginary friend is. The made up words and
the phrase Adventures of tell us this will
be a slightly silly, imaginative, upbeat
and exciting story. Writing a Blurb. A Blurb is a summary of the
book that's printed on the back cover or
inside flap and also included on the sales page wherever the book
is sold online. Writing the Burb before
the book is finished encourages you to zoom out and remember the
core of your book. It helps guide the story
and keep it on track. Here's the blurb
on the back cover of my book, We Are fungi. A picture book for kids
ages four to eight. Enter our world,
the world of fungi, the most mysterious
and misunderstood kingdom on the planet.
We are not plants. We are not animals.
So what are we? From veiled ladies
to bleeding teeth. Learn how we eat, live and control a part of the world
you rarely even notice. Peek beneath the crispy leaves, peer inside your old lunchbox and poke between
your smelly toes. We're here, we're growing. And even when you think
you can't see us, we can always see you.
11. Making a Writer's Dummy: Making a writer's dummy. What's a writers dummy? A dummy is a small mockup
book made from folded paper. Usually book dummies are
made towards the end of the bookmaking process and includes your final manuscript, sample spreads of final art, and refined sketches
of all other spreads. This is what you
submit to agents or publishers as an
author illustrator. More on all that in Module 19. But making a writers dummy
early in the process with just your written story is a fantastic exercise that can help you take your manuscript
to the next level. This is a good thing to
try after you've written at least a few versions and
revisions of your manuscript. Making the dummy won't help you write better sentences
or plot lines, but it can help you
refine the pacing and see how your page turns
work or don't. The dummy also gives you the experience of
reading your story as a book instead of just as a flat piece of paper
or computer screen. This can help you reorganize
based on how the book reads. It's different than reading a two page manuscript and often reveals if you
have too much text on each spread or
in the whole book. The point is, you should give it a try with your manuscript. How to make a writer's dummy. First, cut eight strips of paper about the size of $1 bill, fold the pieces in half
and nest them together. Now you've got a booklet with
16 spreads and 32 pages. Label your front matter on
the first couple pages, or however you've designed it. Maybe the half title,
copyright or dedication. Then print out your
manuscript teeny, tiny and cut out each paragraph, stanza, or sentence based on
what will go on each page. Lightly tape the paragraphs
onto the appropriate pages. You may need to do
some rearranging to figure out how to break
up or paste the story, and that is what
this dummy is for. Once you think it's okay,
it's time to analyze. Analyzing your writer's dummy. Read through your dummy out loud and consider the following. Do you have leftover
pages that weren't used? Maybe you need to consider
spacing out your text more. Do you have a lot of text
on each page or many pages? Maybe you need to
cut words out of your manuscript or
break up the text more. Try moving some paragraphs
or other pages. Does the reader know
what the story is about within the
first three pages, not including the front matter? You need to get to
the story quickly. The action should
begin by page three. If your book dummy
doesn't do that, try reorganizing or cutting from your manuscript and read through it again to
see how it feels. Is there tension in the story that makes you want
to turn the page? When you read the last
sentence on a page, the reader should want
to turn the page. It's overkill to have a
cliffhanger on every single page, but it's good to
have some sort of motivation or encouragement
to turn the page. How can you add more tension or curiosity at your page turns? Does your climax happen too early or too
late in the book? Notice when the peak of
your action happens. Is the resolution on the
second to last or last spread? Try rearranging the climax and resolution and see how it feels when you
read through again. And lastly, do you have a
good last line on page 32? The last line is perhaps the hardest line to write,
or is it the first? Don't worry. That's what
we're going to cover next.
12. The First Page: The first page. The
purpose of the first page. I can't decide if I
think the first page and therefore the first line of a story is the most important. Or if the last
page and therefore the last line is both
carry heavy weights. Both have near infinite
possibilities, and both are extremely
hard to write. So now that you've written lots of versions of your manuscript, you should have at least
five versions by now and have refined the order and pacing of your story with
your writer's dummy. Let's focus on writing or rewriting that
formidable first line. First page guidelines. The first page and or
the first few lines in your story should make a few
things clear immediately. Who is the main character? What do they want? I E,
what is the conflict? What is the setting? What
kind of story is this? Why should I keep reading? Example of a
successful first page. Does that sound like too much
for one page to accomplish? Well, let's look
at an example of a lovely opening
page from the book, Don't Let Pigeon Drive
the bus from Mo Willems. Hi, I'm the bus driver. Listen, I've got to leave
for a little while. So can you watch things
for me until I get back? Thanks. Oh, and remember, don't let Pigeon drive the bus. Now, let's compare
this opening page to our guidelines from above. Do we know who the
main character is? The bus driver is
the first to speak, but I'd guess that pigeon
is the main character, since the bus driver is also leaving the story
on the first page. What does the main
character want? Well, Pigeon wants to
drive the bus, of course. What is the setting? This
one is a little tricky. This book really has no setting. It's just a pigeon, a driver, and a bus on a solid
color background. In that case, it does
show us the setting, or at least tells us the setting is unimportant to the story. What kind of story
is this going to be? The casual
conversational dialogue implies a quirky, fun story. Also, it's talking
about a pigeon driving a bus right
out of the gate, so we can expect it
to be funny as well. Does it hook the reader? Yes. The thought of a pigeon
driving a bus is absurd. So why would the
driver ask us to watch his bus and then give us
such a weird warning? The first page makes
us want to find out why the pigeon
shouldn't drive the bus, if the pigeon will drive the bus and how the pigeon
will drive the bus. It makes us want
to turn the page. All in all, a highly
successful first page of a picture book,
don't you think? Mo Willems knows
what he's doing. But I'd be willing to bet he had to write lots and lots of quite terrible first
pages before he came up with this brilliant
one. So get to it.
13. The Last Page: The last page. The
purpose of the last page. So you've got a
decent first page and opening lines of
your story now, huh? Well, how does it end? How are you going to wrap
everything up in a tidy little one
liner that makes the reader immediately
smile or laugh or weep? How are you going to
write an ending that is satisfying and believable
but not predictable? Before we get into the
nitty gritty, here's a tip. Your ending does not have to wrap up every single loose end, answer every question or
resolve every plot point. It's okay to leave some mystery. In fact, your story will be more powerful and leave more of a lasting imprint on your reader if you don't
reveal everything. This goes back to our chat about the purpose
of a picture book. You don't need to spell out your message to the
reader on the last page. Eave some room for
the reader to insert themselves into the story and interpret it
in their own way. Give them the dots you
think are important, but let the reader connect them. Ending guidelines. Here
are some questions to ask yourself about the ending of your story as you
work on refining it. Depending on where
your resolution ends, these could apply
to the last page or the last two to three
pages of your story. Often the resolution
occurs on pages 30 to 31, and the wrap up is on page 32. Is your ending predictable? Does it solve the problem conflict posed in the beginning? Is the main character
the one who solved the problem or
resolved the conflict? Did your main
character go through a transformation or change
to get to this ending? Does the ending seem a
little too convenient? Was the main character
given the easy way out? Does the ending blatantly
state a message? Remember, you should
leave it up to the reader to
interpret the message. And is the reader
left with something? What does the reader
feel at the end, and do they feel
anything at all? Example of a successful ending. There's a lot of pressure on the last page of a
picture book, I know. So before you go swinging
around in the dark, let's look at an example
of a wonderful ending from the book Where The Wild
Things Are by Maurice Sendak. After visiting the
Island of Wild Things, Max said goodbye,
got in his boat, and sailed for what
felt like years. The book says and
into the night of his very own room where he found his supper
waiting for him, and it was still hot. As a note, the first
sentence of this ending and end to the night is on
the second to last page. And the last line, and it was still hot is on the
last page of this book. Now let's compare this story ending to our
guidelines from above. Is the ending predictable? No, we may have expected
Max to come home, but I don't think
many expected him to come home to his
still warm supper. Is the conflict overcome or
the problem solved? Yes. Max wants to be a wild thing, and he allows himself to feel his emotions and experience
his inner wild thing. Did the main character
solve the problem? Yes. Max came to his
realizations on his own. Is the main character
transformed? Yes. By becoming a
true wild thing, he learns how to stand up to and master his own
inner wild thing. I E, his inner turmoil. Is the ending convenient? No. He has to sail for
what feels to him like years to return to
his home and reality. Is there a blatant message? No, there definitely
is a message, but it doesn't state
on the last page. And then Max came home and was no longer
angry at his mom, and his mom was also not angry because she
is still his mom and loves him no matter what he does. Wouldn't that be boring? Wouldn't it be better
for you, the reader, to fill in the gaps with your own struggles
with emotions? Is the reader left
with something? Yes, the reader feels Max's emotions of relief,
love, and comfort. It's a tall order to create a story ending that
can do all that. Try refining your own ending with these questions
and see what happens.
14. Refining a Weak Manuscript: Refining a weak manuscript. If you've been working
on your manuscript, but it still feels
like it's not quite there or is weak
in certain parts, here are a few tips
and techniques to try. Make your main character face three obstacles
instead of just one. The repetition of three
obstacles or attempts to solve a problem is extremely common in stories, especially
picture books. If your manuscript currently has your main character facing
their conflict once or twice, try adding in another final
attempt to find the solution. Usually, the three
obstacles are related or even just variations
of the same obstacle. Experiment with breaking
your conflict out into three separate obstacles
and see how that feels. Make sure your action is
dependent on prior action. One action or plot point should
clearly lead to the next. One obstacle or attempt should build on the previous
actions and decisions. This also means you don't
want to have coincidences popping up that appear random
or too good to be true. The story should follow
cause and effect. Think it through. Why is
this plot point happening? What caused it to happen? If you can't answer
that question, you may need to add in
prior action or detail. Escalate your plot in order. Whatever number of obstacles or action plot points you have, be sure your character
tackles them in order from easiest to hardest or least
exciting to most exciting. The hardest obstacle with the most tension or drama
will then be your climax. Increase the suspense. If your manuscript feels flat, try adding extra
tension by making the reader worry if the character will
overcome the obstacles. How you break up your action and page turns can especially
help with this. You have to entice
the reader to keep reading by hooking
them into the story, which often happens
at a page turn. Try out one of
these techniques at a page turn and
see how it feels. Ask a question.
Unfinished sentence. Show extra tension. Begin a confrontation or
introduce excitement. Avoid writing visual
descriptions. Another technique that
can help strengthen your manuscript is to avoid
writing visual descriptions. As the writer, you should focus on crafting the
action and dialogue. The visual descriptions should be communicated by
the illustrator. For example, you don't need to write that your
character is wearing a red dress unless that fact is vital to the
story for some reason. Things like clothing and most
physical features will be shown in the illustrations and don't need to be
repeated in the words. If you are the writer
and the illustrator, it's still good to avoid writing
the visual descriptions. You can focus on the visuals
once you begin drawing. Let the words do what they do best and the pictures
do what they do best. If you are not the illustrator, trust in your future
Illustrator to use the creativity to best create the visual
characters and story. Making a picture book with two people is a partnership and the illustrator needs room to imagine with their
own vision too. Don't write summaries. Show, don't tell. Descriptive language is tricky. We're writing a picture book, not a novel, so we have to
be careful with word count. Another tip for strengthening
your writing is don't write a summary of
a scene, write the scene. For example, instead of
writing, Max was bored. Try writing. Max flopped down onto the couch and
stared at the ceiling. Both sentences
communicate boredom, but the second option is
stronger because it shows what the character does rather than tells a
statement of feeling. This way of writing
involves the reader and forces them to interact with and think about
the story more. The reader has to
interpret what is shown and come to their own
conclusion that Max is bored. This exchange between writer and reader makes a story
much more powerful. Both options could work
in different situations. But in general, a solid rule is writing to show, not tell. Reduce your word count. This can be one of
the quickest ways to improve your manuscript. Your manuscript should
be 0-700 words. Each writer, editor, or art director has
their own preference, but less than 700 is standard. Writing a picture book is
similar to writing poetry. You want to use just the
words you need and no more. It's natural to overwrite
your first drafts. As you refine your manuscript, you can cut out what's
unnecessary or redundant. The more you write,
the better you'll get at editing and
writing with brevity. Here are some techniques
to reduce your word count. Delete descriptions. We talked about this earlier, but deleting descriptions is a great way to lower
your word count. Remember, most descriptions will be shown in the pictures, so you don't need to waste
precious words on them. Dilly adjectives. Adjectives are words that describe the qualities of nouns. Words like big, funny,
green, or boring. Sometimes adjectives are good
and strengthen the story, but sometimes they
are unnecessary. Look at the adjectives
in your manuscript and see if there are any that do not add much value to the story. For example, instead of writing, the tall girl fed
the cat try writing. The girl fed the cat. Is the girl's height related
to the action of feeding a cat or something relevant
and important to the story? The illustrator can show
that the girl is tall, so most likely the word tall is unnecessary
in this sentence. That's one less word
in your manuscript. One word may not seem like much, but if you apply this and other techniques throughout
your manuscript, they begin to add up. Not all adjectives
should be removed, but try to think about which
ones are strengthening your writing and which may
be weakening the writing. Each word should hold value
and carry its weight. Delete adverbs. Adverbs are words that modify or describe a verb,
adjective or sentence. Adverbs often end in L Y. They include words like
badly, warmly or hastily. Instead of writing, he
ate his food quickly. Try writing, he
gobbled his food. Rather than writing a verb, ate and an adverb quickly, you can communicate the
same thing by writing a more specific verb, gobbled. This is a more specific
and stronger word and also allows you to delete another word from
your manuscript. Use the active,
not passive voice. Active and passive voice are two different
grammatical voices. In the active voice, the subject
is performing an action. In the passive
voice, the actions target is the focus
on the sentence. The subject is now being
acted on by the verb, meaning the subject is passive. This makes more sense when
we look at an example. Instead of writing, the cake
is being eaten by the boy. This is a passive example. Try writing an active version. The boy eats the cake. In the example of
active voice above, the boy who's the subject
is performing the action, who is eating on the target
of the action, the cake. In the example of
passive voice above, the target of the action, the cake is the focus
of the sentence. The subject becomes passive. Instead of acting,
the subject is now being acted
upon by the verb. Writing in this way in
the passive voice makes the sentence longer,
indirect and cumbersome. Writing in the
active voice is much more direct, clear and concise. Go through your
manuscript and see if you use the passive
voice anywhere. Try rewriting those sentences in active voice and you'll probably be able to cut out
a few more words. Delete qualifying words. Qualifying words are words
that are added to another word to its meaning either by
limiting or enhancing it. Qualifying words
affect the level of certainty in a sentence. Some qualifying words include really almost just somewhat, sometimes usually and most. Here are a few examples
of qualifying words. Instead of writing, she was
very interested in lizards. Try writing. She was
obsessed with lizards. Instead of her hair
looked very nice. Try, her hair looked exquisite. Instead of, he was
feeling sort of worried. Try, he was anxious. Sometimes qualifying
words are necessary, but often they make
the writing sound hesitant, doubtful, or lazy. Try replacing
qualifying words with more descriptive or
confident word choice. Delete extra words. There are some words
that we all use in conversation and
casual writing. But when writing a picture book, these words just take
up unnecessary space. Try deleting these words
from your manuscript. There were there was, it was. So instead of writing, there was a girl twirling
on the table. Try writing a girl
twirled on the table. He saw, he looked, he heard. Instead of Sarah heard her parents shouting
in the kitchen. Try Sarah's parents
shouted in the kitchen. Which was, which is. Instead of the plane which
was powerful took off. Try the powerful plane took off. Who was, who is? Instead of the dog
who was well trained, pointed at the cat, try the well trained dog
pointed at the cat. Lastly, skip unimportant
parts of the story. If something is
unimportant, get rid of it. For example, if it isn't important how the
student got to school, you don't have to
write about that. You only have so many words
to use, so choose wisely.
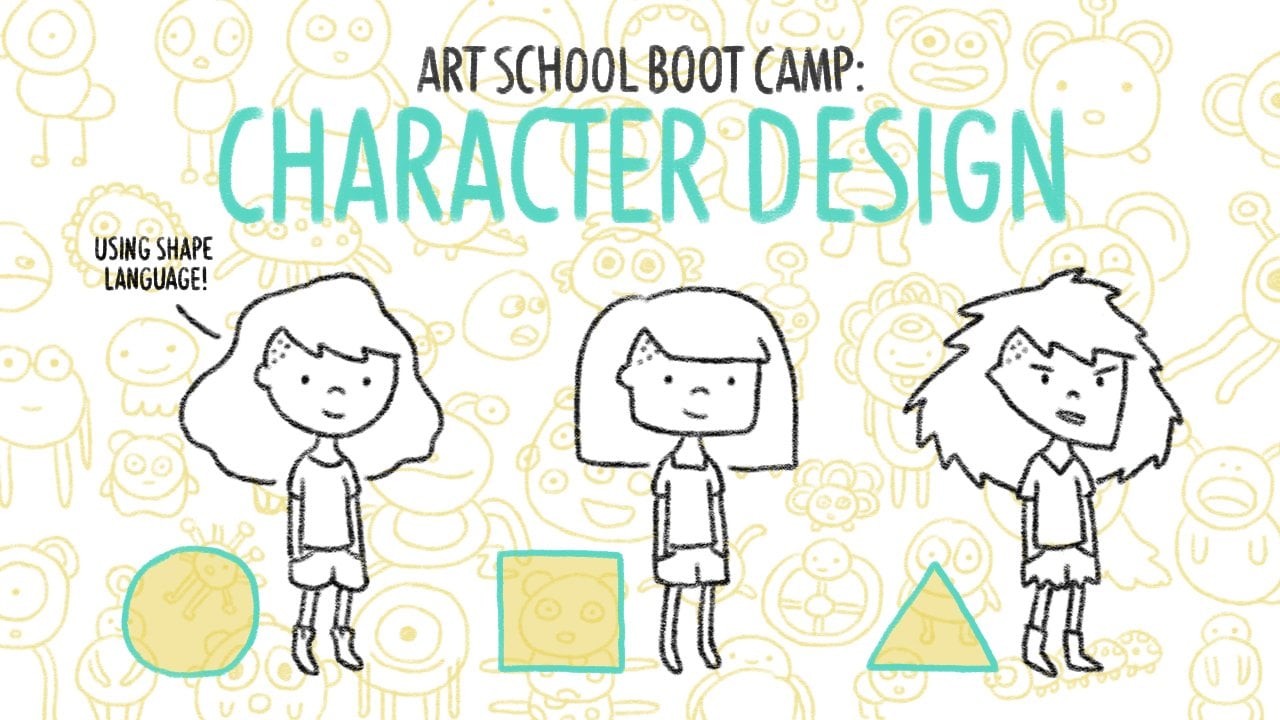
15. Character Design (Drawing): Character design drawing.
In Module eight, we talked about character design from the writing perspective. If you plan on writing and
illustrating your book, now is a good time to
start thinking about character design from the
illustration perspective. Similarly to the writing side, good character design is
all about making a unique, well rounded,
believable character. It's not just about
what color hair they have or whether they wear
it down or in braids. We're talking full
character development here. So let's look at
how to communicate a character's
personality through how you design and draw them. Three criteria for a
successful character. Particularities.
As an illustrator, you are developing a
whole little person with quirks, flaws,
and personality. You need to show their
personality by how they're drawn, what their proportions
are, what they wear, how they smile, how
they walk, everything. A good example is
to ask yourself, what makes this girl, boy, or animal different? How is this a unique
character we care about and not just another generic
girl, boy, or animal? Particularities also
make the character unique so they can be identified by the
reader immediately. This could be anything from
a hairstyle like a short bob or a particular accessory
like a red striped shirt. But your choices here
shouldn't be random. They should be
conscious decisions. What does a short bob
say about a personality? These little particularities
can be obvious like giving your
character messy hair to show their wild nature, but they can also
be more subtle, and it's often these
subtle touches that instill personality and
realism into your characters. Likely, your reader will
not consciously think. Oh, this character
has messy hair, so they must be a little wild. But our eyes are trained to
soak in details like that, and readers will absorb it even if they don't
totally realize it. So remember, don't rely on
words to say your character is timid or messy or shy
or outgoing. Show it. Possibilities. Your
character should also have many possibilities, meaning they should be able to express a variety
of emotions and poses and perform in any necessary situation
in your story. For example, you may not want your character to wear a
hat that covers their eyes. That would make their range of expressions much more limited
and difficult to show. You should also keep
in mind when designing your character that
you're going to be drawing this character
over and over. That doesn't necessarily
mean you should draw a simple character to
make life easy for you, but you do need to
be able to recreate this same character recognizably and consistently
throughout the book. For example, if your main
character is a dragon, think about how you'll
draw his scales. Is it feasible or necessary to draw every single scale
on his body every time? Maybe it is, or maybe
there's another way to visually represent the scales that would be a tad simpler. There's no right answer, and
everyone will draw a dragon in their own way with their own preferred level of detail. It's just worth keeping in
mind that you need to be able to keep the character consistent throughout the book. Appealing. A character doesn't have to be likable to
be a great character, but they do need
to be appealing. A main character can begin
the story unlikable, but they should be fairly likable by the end of the story, even if it takes
the whole story to show a transformation
that makes them likable. This way, the reader cares
about what happens in the end. Not every character has
to be likable, though. Consider Carella Devil. You aren't supposed to like her, but she's an amazing character. Appealing means your
character should be realistic, original, and flawed. No one is perfect and no one wants to read about
a perfect character. It would be boring and no one
can relate to perfection. So your character needs flaws
just like a real person. Elements of character
design, body proportions. A character's proportions can communicate a lot right
away about who they are, and certain stories call
for certain proportions. A more serious story might call for more
realistic proportions, while a quirky story can utilize more offbeat proportions like
large heads and big eyes. Younger characters
typically have larger heads and larger eyes that are lower on their face. Older characters typically have smaller heads and smaller eyes that are higher on their face. These are just generalities,
though, not rules. Forget them and ignore
them if you are. Clothing. Just like real people, how a character is
dressed can quickly communicate a lot about their
personality and identity. Clothing choice is a form of
expression from all of us, and what you wear says something about who you are or how
you're feeling that day. It's no different
for your characters. What your character
wears can easily tell the reader if your
character is messy or tidy, eccentric or trendy,
just to name a few. Expressive emotions. A character's face is often the best tool for
displaying emotion. No person or character expresses the same
emotion in the same way. When looking at your characters, think about some of these
aspects in terms of emotions. How big is their mouth? Do they have a big, toothy
smile or a small smirk? Where are their eyes?
How big are they? Do they usually keep them open
wide, curious and excited, or do they keep them
half closed, cool, and relaxed? What
about eyebrows? Poses and movement.
In a picture book, it's usually not that
imperative to draw your characters completely
anatomically correct, but you do want them to be
recognizable and believable. So try to make your poses
somewhat based on reality, even if your character
proportions are not. Focus on the gesture of the pose instead of getting all
the body parts correct. Exaggerating the pose a bit will also help to bring
more emotion and excitement into the
drawing. Sub characters. Sub characters can add
interest to your story, as well as a secondary
mini narrative that is only in the pictures
and not in the words. This also gives the child a
special narrative that they can follow on their own before
learning to read words. For example, there is
a mouse character with his own little story in every scene of the book
Good night Gorilla, but he is never mentioned
in the words of the story. My daughter loves to follow
along with the mouse's part in the story through
the pictures and point him out on every page. You can see more of my
character design drawings for We Are Fungi at the
end of this course. For more specific
drawing techniques and more on drawing in your
own artistic style, see my class sketch
book to style.
16. Types of PB Illustrations: Types of picture
book illustrations. Not every illustration in a picture book is a full
spread piece of artwork. Utilizing a variety
of sizes and types of illustrations is key to creating
a quality picture book. Mixing it up sets the
pace of your book, creates rhythm, and allows
your art and text to breathe. So let's look at
different types of illustrations commonly
used in picture books. Boxed illustrations. An example is the art
lesson by Tomi Da Palo. Boxed illustrations
have defined edges, often a border or frame and do not extend to
the edges of the page. Not all boxed illustrations are fully contained within
their borders, though. Rules can always be broken. Another example is in the Night Kitchen
by Maurice Sendak. Here you can see elements of the artwork breaking
out of the box, a foot, a hat, a spoon, a speech bubble. This is still technically a
boxed illustration because it doesn't bleed to the edge of the page and has a border. But Sendak has made the decision to cross some elements
over the border, creating more depth
and dimension. Both are successful
in their own way. Vignettes. An example is the tale of Peter Rabbit
by Beatrix Potter. Vignettes have edges that fade into the white
space of the page. There is no defined
edge or border. Beatrix Potter is a
master of vignettes and she uses their soft nature fantastically in
all of her books. Spot Illustrations. An example is the great paper caper
by Oliver Jeffers. A spot illustration is a small free floating
illustration. It differs from a vignette because it usually
has no background. Full bleed. An example is in the Night Kitchen
by Maurice Sendak. Full bleed illustrations run
off the edges of the page. These illustrations can
be full bleed across one page or across
the entire spread. Full bleed spreads are
often used to heighten drama and are frequently used
at the climax of the story. And finally, combinations. Utilizing and combining
the different types of illustrations adds interest
and rhythm to your story. Here's the full spread from the great paper caper by Oliver Jeffers that
we looked at earlier. Jeffers placed his
spot illustration opposite a full bleed
page illustration. The two work together
to move the story, time, and the
reader's eye along.
17. Drawing a Storyboard: Drawing a storyboard. What's a storyboard? A storyboard is a visual thumbnail layout of
your entire book. It's a tool to help you think
through and plan your book. Storyboarding is a process
of trial and error, and you'll need to make many different storyboards
to see what works. Creating a storyboard allows you to see how the story
will progress. See the book as a whole, create a rhythm
with your pictures, focus on overall design and composition
instead of details. Create movement from page to
page and spread to spread. Balance busy and quiet pictures, Balance types of illustrations, and see repetition
and similarities. How to storyboard your book? You can find and use my storyboard templates at
the end of this course. There are three basic
page layout options, landscape, portrait, or square. The page layout
choice is up to you, and it's worth experimenting
with different ones. You can always change this later on if you
change your mind. Step one, block off
the front matter. The first one to four pages in a picture book are usually
reserved for the front matter. This is the half
title, publisher, copyright, and dedication. So block off the first few
pages for now and begin drawing your story on
pages 3, four or five. You can always change
this in a future storyboard once you start
moving things around. Step two, lay out
the visual story. Our initial goal is to lock
in which parts of the story, go on each page and decide what to draw
and what not to draw. Don't try to draw nice, pretty pictures right now. Just sketch rough shapes and don't get bogged
down with details. Choose what to draw. On each page, what you don't draw is just as important
as what you do draw. You have to choose what
is most important. Remember, if the
picture can say at all, then no words are
needed, and vice versa. Step three, refine composition. Once you've gotten
your story broken up, you can begin to refine
your spreads. Composition. Consider how you are
using full bleed, vignettes and spot
illustrations. Do you need more
illustration types? Refer back to Module 15. Consider the text and how it is incorporated in
the composition. Rhythm. A good
exercise to refine your rhythm is to redraw your storyboard with
only the large elements. This lets you concentrate
on the overall design and composition rather than
characters and details. Rhythm and pacing is often determined by the
size of the pictures. So look at the use of vignettes, spots or full bleed illustrations
in your storyboard. Imagine each
illustration is a beat. You need to space them out so they flow together in harmony. Viewpoint. When drawing,
it can be helpful to think of each spread as a movie frame you're viewing
through camera lens. Should you be looking
down on the character? Up at them, close up, far away? Viewpoints can communicate
emotion and drama quickly. Gutter. Remember to be aware of the gutter on
each spread as you draw. You don't want to place
important elements in the gutter of
the page because a little bit of each
page will be sucked into the spine and not visible
once the book is bound. You can certainly
have full spread illustrations that
cross the gutter. Just avoid putting your
main character's face or important action in the
center. Create movement. Now focus on the movement within pages and throughout
the book as a whole. Here are some questions to ask yourself as you analyze
your storyboard. Do your storyboard compositions pull your eye through the
page from left to right? Do the spreads look somewhat unified and flow
together as a whole? Are the illustrations
dynamic or static? Movement and pacing help the story and
characters feel alive, but they also move the story along and push the reader
from page to page. Here are some ways to refine
the movement in your book. Movement in page spread. The composition of each page and spread should
create movement, pulling the reader
from left to right, through the page and
to the next page. Individual elements
in your drawing like setting or characters
can also add movement. For example, your character could be leaping into the air. A hawk could be soaring through the sky or rain could be
falling slowly to the right. All of these things
will create movement in your spread and
make it more dynamic. Think about what lines
of movement you've made. Movement in the
book, Page turns. Each spread needs to entice
the reader to turn the page. Movement through the
composition within a spread towards the
bottom right is one way to entice the reader by
leading the eye straight to the page corners where they
physically turn the page. Another way to create strong
page turns is by ending spreads with a moment of
tension or uncertainty, so the reader is tempted
to turn the page. For example, zoomed in shots are often used at moments of
high emotion or action, such as elation or fear, and distant shots are usually used during
low points of emotion, such as doubt or embarrassment. Subplots. Integrating a subplot into your book is another way to create movement
throughout your book. You can drop visual clues throughout the story to
add extra meaning to the story or even set up another visual narrative to run parallel with the main text. Clues like these
entice the reader to turn the page to
keep the story moving along and give the reader and give the child a deeper
interaction with the book, as they can read
the secondary story on their own without words. In my book We Are fungi, there is a substantial subplot of the girl being followed by little fungi creepies and the girl turning
into a mushroom. Neither of these stories
is mentioned in the words, but they pull the reader along and can be read
through the pictures. Step five, analyze
for repetition. Just like in the text
of a picture book, there should be rhythm to
your illustrations as well. Repetition of certain images or design layouts can
help emphasize rhythm. This helps the reader follow and enjoy the story and makes the moments when you break from the repetition all the more
powerful and exciting. Ask yourself these questions about repetition in
your storyboard. Is there repetition in
your page compositions? Are there too many of the
same types of illustration? Is there variety in how
your characters are posed? Is there repetition and
variety of viewpoints? Do you have a good
balance between loud, busy images and
quiet still ones? Continue drying more and more variations of
your storyboard, if you find there
are not enough or too much repetition
of any elements. Feeling stuck and confused. If you're having a hard
time with your storyboard, a helpful exercise is to storyboard an existing
picture book. Choose a book you admire and
redraw it as a storyboard. Go through it page by page, drawing a quick sketch of each spread on your
storyboard template. Don't try to recreate the
style or actual artwork. Focus on the shapes,
illustration types, text placement, and
general composition. Think through these
questions as you study the book. How many pages is it? How many words do
they put on a page? What elements are in
the front matter? On what page does
the story begin? How many spreads for the story? Do any pictures get
caught in the gutter? How do they combine
illustration types? How do they inject movement
in pages and spreads? And how are the end
papers treated? This exercise helps you see how an experienced illustrator
uses a variety of compositions and repetition to create rhythm and
pacing in their book. It's a great learning
tool and taught me a great deal about
how to storyboard, so I recommend trying it out.
18. Refining a Storyboard: Refining a storyboard. Now that you've got your
story broken up into spreads, paste well, and the
general composition and typography laid out, we can start refining
and adding details. In the next few pages, I'll
share the three steps I took to refine my storyboard
for we are fungi. To see these pages in
larger and in more color, you can visit the resources
webpage for this class. Step one, draw a more
detailed storyboard. It's time to finally
start drawing our characters in the story and fleshing out the visual details. Our goal now is to redraw the storyboard with
our character designs, drawing more refined
illustrations than our loose sketches before. At this stage, I like to draw
digitally so I can zoom in and draw more details while still using the
storyboard format. I draw on my iPad
with an Apple Pencil. If I'm just
sketching, like here, I use the Procreate app
directly on the iPad. As I get further in
this process and need more digital tools and a higher resolution
with more layers, I use Photoshop on
my computer and mirror the screen onto
my iPad using Astropad. You certainly don't have
to do any of that, though, and you can just choose
to remain on paper. It's up to you and
how you draw best. As you draw, remember that
this is still our storyboard. Try not to get to swept up in one spread and
take it too far. We want to balance working on all our spreads at
the same speed, so it all develops
as a unified book. One exception to this could be the spread you think of as
the climax of your book. It's reasonable to spend a little more time and detail getting that page
where it needs to be, as it is one of the
most important. In my storyboard here, the climax is on page 30 to 31, and you can see I drew a bit more detail there
than in the other spreads. Just like the other
storyboarding steps, you'll most likely need to make multiple storyboards
at this step until you're happy with it. Be patient and try not to
rush through this stage. It's one of the most fun. Step two, add color
to your storyboard. Once you're content with your refined sketches
and the storyboard, you can begin adding in color. I like to do this
digitally as well, so I can quickly edit and try out different color schemes. To do that, I bring
my storyboard into Photoshop or Procreate and
loosely paint in colors. Sometimes the color
palette works right away, and sometimes I need
to fiddle with it a long time to get it to feel
just how I want it to. Just as with our
composition design stage, we want to think about repetition
and balance with color, using it to lead the eye and create unity
throughout the book. That's why planning
your colors in the storyboard stage
is so helpful. It lets you quickly see how the colors are repeated
throughout the whole book, creating a consistent,
unified feel. Step three, add
any other details to finalize your storyboard. You may be done with
your storyboard after deciding on colors, or you may have other
details you want to experiment with here in the storyboard stage
before you move on. For my book We Are Fungi, I wanted the color palette to shift over the
course of the book, evoking the sun setting
and night coming on. So in my storyboard,
I played with some digital editing,
mostly hues, layer adjustments,
textures, opacities, and more of that like until I captured the mood
I was going for. The numbers written on the
storyboard are notes to myself about what opacity level I was using for the
adjustment layers. It's much easier to play with these types of things here in the storyboard than on separate spreads
and files later on. You can always come back
to the stage if necessary.
19. Creating Sample Spreads: Creating sample spreads. Taking two spreads to final lets you explore and
nail down the style of your book without having to do the book over and over as
you discover the style. Also, if you plan on submitting
your book to publishers, this is part of what
they'll want to see. That's right. You don't
have to illustrate the whole book before you
submit to publishers. Editors or agents just
want to see a couple of examples of what the final art will look
like to get the idea. If you submit an
entirely completed book, it gives the impression that
you think it's finished and perfect and that you won't
be open to revisions, which is a major
turn off for them. I'll talk more about all
of that in Module 19. When choosing two spreads,
you're going to take to final. Try to choose two that will give the best impression
of the entire book. This may mean you
choose one spread from the beginning and
one towards the end, or one spread with
spot illustrations and another with a full
spread illustration. Try to represent a range. How to create a sample spread. This process will vary wildly depending on how you plan
on illustrating your book. I'm going to show
you my process of creating a final spread
for my book We Are Fungi. But please keep in
mind that this is just an example and is only
one way of illustrating. You can and should do
this in your own way. There are endless possibilities, and the choices
are all up to you. Step one, blow up the sketch. First, I grabbed the
sketch from my storyboard, opened it up as its own document
in Procreate on my iPad, and blew it up to full size. This book was going
to be 8 " by 10 ", so I blew my sketch up
to full spread slides, adding a quarter inch bleed. That brought the document
to 16 and a quarter inches by ten and a quarter
inches at 300 DPI. Including bleed on your
final artwork means your illustration will stretch beyond the final
size of the book. When printed, the
bleed will be cut off. But this bleeding past the
edge ensures that the cut will be correct and not include any blank white
paper in your book. A quarter inch
bleed is standard. Step two, draw
linework and color. Next, I set the original
sketch to a low opacity. On a new layer on
top of the sketch, I draw out the final
linework and color. Step three, digital editing. Then I exported that
as a Photoshop file and brought it into Photoshop for further digital editing. I played around with the
color, adjustment layers, and textures until I
finally got it right. But then I realized that the all digital production was a bit flat and didn't have the depth and organic
feel that I wanted. So I decided to
pivot a bit and try creating many of the elements
by hand with pen and ink. See? This is why we create sample spreads to find
these things out early on. Step four hand drawn textures. I printed out my linework
and traced over it using a light table onto bristol board paper with
a tombow dual tip pen. Then I filled the shapes with
a loose pen texture that is a cornerstone of
my personal style and something I
really enjoy doing. Step five, final
book design file. Then I created my
design file for the whole book spread
at the final size. The final artwork was created in Adobe Photoshop and I used Adobe in Design to
lay out the book. Here are the books in
design file specifications. Number of pages, 42
at facing pages. Each page is 8 " by ten inch. The bleed is 1.25
inch on each side, which adds up to a
quarter inch total. Top, bottom, and outside
margin is 0.5 ". The inside margin is 0.375 ", and the gutter is 0.125 ". Step six, place artwork
and add typography. For this book, I used
a custom font that I made previously based
on my own handwriting. I set the main text
to a font size of 20 point over 34 point letting, but that's just what worked
for this font and this book. It's hard to say what a
common font size is for a children's book because
every font is so different. Hora, now the sample
spread is den. I hope seeing this example helps get you started on your
own sample spread. You definitely do not need to follow this as instructions. You should make your book
in whatever way suits you and your art
and your book best.
20. Submitting to Publishers: Submitting your
book to publishers. Before you even begin to think about submitting
your book to publishers, it should already have gone
through rounds and rounds of revision and be as close to
Golden as you can get it. Publishers get hundreds and
thousands of submissions, so you need to make
sure your book shines. Show your book with sample
spreads to other artists or readers and kids to
see how they respond. Consider their feedback and make any changes you think would
make your book stronger. Do the work. If you think
your book is ready, let's dive into the steps of submitting your book to
traditional publishers. Note, if you are
not interested in traditional publishing and
wish to self publish instead, you can skip this module
and move on to Module 20. Step one, make your book dummy. As I mentioned
before, you shouldn't submit a fully finalized
book to publishers. They want to see what's
called a book dummy, which is a mock up of what your final book will look like. If you are submitting to
publishers digitally, this will be a PDF file. If you are attending
a conference, you can bring your dummy
as a printed booklet. Your book dummy should include
all 32 pages of your book, including front and back matter. Two to three sample
spreads in full color showing how the final artwork
will look. Se Module 18. All other art should be drawn as refined sketches
in gray scale. You can see an example
of a refined sketch from my We are fungi
book Dummy above. How refined you make your
sketches is up to you, but you are to make
them clear enough that the publisher gets a good
feel of the artwork. The book should be full size. See Module 21 for more guidance on setting
up your book design file. The text of your story should be typeset alongside the artwork. If you're not a designer,
just do your best. Don't worry too much
about the typography. The publishers will
mostly be looking at your story, writing,
and artwork. You can see my full we are fungi book dummy at
the end of this class. Step two, research publishers. You shouldn't just blindly submit to any publisher
you can find. Each imprint has its
own preferences, and many only publish
certain types of books, IE, only novels or
only non fiction. So don't waste your
time submitting to one who doesn't publish
a book like yours. Spend some time
digging around on the Internet to find out which
publishers publish what? You can also go to the library
or bookstore and look at the publisher info for any picture books you
think are similar in age, tone, or style to yours. There are many different
types of publishers, as well, including traditional
trade, mass market, small press, and educational. You'll need to decide
which is the right type of publisher for a good
fit for your book. The so called big
five publishers are Penguin Random House, MacMillan, Harper Collins, Hachette, and Simon
and Schuster. Submissions to these publishers
are highly competitive, but there are lots of
smaller publishers, too. Step three, make your
submission list. Make a spreadsheet or list of the publishers you think would be interested in your book. When considering a publisher, be sure that they are open
to unsolicited submissions. Many publishers only
accept submissions they have requested or
submissions from agents. Most editors at the Society of Children's
Book writers and Illustrators
conferences will open up their submissions to
attendees after the event. This allows you to
submit where you wouldn't have
regularly been able to and gives you the chance
to make a face to face connection with the
editor you're submitting to. Many publishers prefer to be
submitted to exclusively, meaning you only submit to
one publisher at a time and don't submit to anyone else until you've received
a reply from them. If you decide to
submit exclusively, you should tell them so
in your cover letter. Common question, do
I need an agent? The short answer is that
you don't need one, but many authors find
it helpful to have one. An agent can submit to more places than you
as just an author can, including the major publishers. Part of their job is to make
connections with editors and art directors so they know what individual editors
and publishers like. So they can send your
manuscript to the right person. Having an agent
also makes you more reputable as their
reputation reflects on you. In exchange for all this, you will pay the agent 15%
to 20% of what you earn. However, you only pay the agent
once you get a book deal. An agent should
never ask you for money before you sign a
deal with the publisher. They don't make money
until you make money, and if they say otherwise, they are trying to take
advantage of you and are not behaving as a
professional agent should. Having an agent or not
is a personal decision. Many authors have
agents, and many don't. If you decide to
submit to agents, the process is very similar
to submitting to publishers. Research good fits,
make a spreadsheet, and start emailing
your book dummy. Step four, follow
submission guidelines. Above all else, follow the submission guidelines stated on the publisher's website. Almost all publishers accept
submissions via email. If you're emailing
your submission, you can send a PDF of your
dummy in spread format. Be sure to name the file with
your name and book title, such as Christine Nishiama
titledumi dot PDF. Typically, a query letter, which is a letter to ask an editor if you can send
them your manuscript, are generally not required
for picture books. But check the publisher's
guidelines and submit a query first if
that's what they request. A query letter is very
similar to a cover letter. Step five, write
your cover letter. Part of your submission,
most publishers expect to see a cover letter. Some people literally
send a cover letter, but most treat their email
as their cover letter. Keep your letter as brief as possible while still communicating
everything you want. Address your letter to a
specific editor's name, not to whom it may concern, and triple check that you
spell their name right. Your letter should be
professional but also friendly and should match the voice and tone
of your writing. You can organize your letter
into three paragraphs, intro, story, and bio. The intro paragraph should
explain why you are submitting to this particular
publisher or editor. Did they publish a book similar
to yours? Name that book. Did you meet this editor at
a conference? Remind them. The story paragraph should dive into describing your book. State the title of
your story and include the estimated age group
and type of picture book, board book,
nonfiction, et cetera. Explain why you're the best person to have
written this book. Then pitch the story in a
short two sentence teaser. Don't explain the entire
plot, excite them. Think of the pitch
like a movie trailer. The bio paragraph should tell the editor a
little about yourself. Keep the details professional. Don't list out
superfluous information, but do include any expertise you have that's
relevant to the topic. List any previously
published work. No big deal if you
don't have any, and include any pertinent
degrees you may have like creative writing or something related to the
subject of your book. If you don't have a relevant
degree, don't worry. A degree is definitely not
required or a deal breaker. You can also include any related professional
organizations you belong to, like SCBWI. Finally, wrap up and thank
them for their time. Step six, and then wait. Most publishers list
a response time with their submission
guidelines on their website. For example, if you don't hear back from us in six months, we have declined
your manuscript. If they don't list
a response time, the standard is to wait three
months before following up. You can then send a polite email asking about your submission. I know three months
seems like forever, and it's excruciating to wait. But that's just the way
it is, unfortunately. The publishing industry
moves very slowly, and the process of an editor
reading your manuscript, considering it, and
possibly showing it to other coworkers or the
marketing team takes time. They also get a bazillion
submissions a day, so it's a lot to handle. And that's on top of the editor working on their acquired
in progress books. So give them time and try to
be patient and optimistic. Step seven, don't
stop making books. Book publishing is
a tough business. The statistics are wild. Some claim that for every 10,000 picture book submissions,
three get published. All you can do is try to make the best books you can
and don't give up. A great piece of advice I've heard from many people
over the years. Don't spend more time
trying to get published than trying to become a
better writer or illustrator. Send out your story,
kiss it for good luck, and instead of staring at
your inbox for a year, start making your next book.
21. Creating the Final Artwork: Creating the final artwork. Working with a traditional
publisher is no longer the only option for
writers and illustrators. If you wish, you can
choose to bypass the entire process and self
publish your book yourself. That's not to say
it's any easier. In fact, I think self
publishing is harder. If you don't have an
editor, designer, or marketing team
working with you, that means you have to do
all that work yourself. Some find that liberating
and exciting while others find it unappealing or daunting. The choice is yours. If you decide to self publish, the next modules will
walk you through the remaining steps of
creating your picture book. You may have more work to
do as a self publisher, but you also have
complete control over how the book is made, as well as making
your own deadlines and working at your own pace. The first step is to create all the final artwork
for your book. This process is just like the process of creating
the sample spreads and will also vary
wildly depending on how you plan on
illustrating your book. I'll show you another
example from my book. We are fungi here. But again, this is just one way of
doing it. You do you. Step one, draw the final art. For this book, I hand drew most of the artwork
on Bristleboard, using Tom Bow dual brush pens. I blew up my refined
sketch, printed it out, and placed it on a light
pad so I could draw the finalized version
on Bristleboard on top. I drew each spread as large as possible so the detail and
texture would be rich. Each original artwork
was 11 " by 14 ". Some artists choose
to draw at full size, and some choose to draw
bigger. It's up to you. Even drawing smaller can work as long as
you're able to get it high res enough to digitally blow it up to full book size. Then I took the drawings to a local printer and scanned
them all at 600 DPI, so I had them as digital files. 300 DPI would be fine, but I figured it's
better to have 600 DPI if you have the option. Step two, open a
new Photoshop file. Next, I created a new
Photoshop file with the dimensions of the final book with a quarter inch bleed. For this book, that
ended up being 16.25 inch by 10.25 inch at 300 DPI. Step three, digital
editing in Photoshop. Then I placed my final
artwork into Photoshop. From there, it's a long
process of trial and error, fiddling around with color, adjustment layers, and textures, and sometimes redrawing
until it all feels good. This step takes the longest and is continuous
experimentation. It's fun as long as you don't rush and remain open
to the possibilities. Here is the final
artwork for this spread.
22. Creating the Book Design File: Creating the book design file. Book design file size. You'll need to
compile your book in a design program like design
or something similar. This file should be
sized for printing and include margins,
bleed, and gutter. Here are the Indesign
file specifications for my book We Are Fungi. Typography. There
aren't many standards for typography when it
comes to picture books. It's hard to say what
a common font size for a picture book is because
it depends on the font. For this book, I used
a custom font that I had previously made
based on my handwriting. I set the main text to font size 20 point over 34 point letting. Letting is the space
between the lines of text. Your type size may end
up being very different. One helpful exercise can
be to take a photo of a published book and place
that image into Photoshop. Then try to type on top of it to see what size and letting
they may have used. It's not super accurate, but it gives you a general
idea of size and spacing. You should also print
out one or more of your final spreads at full size to see how the
typography size and space between the lines looks
and reads in real life. The screen can be
deceptive. Front Matter. Half title. There are many ways to design
a half title page, and some books don't
have them at all. I like to design a
simplified version of the cover for my half title. You can see the half
title and copyright page for WAR Fungi here. Copyright. The first
or last page of your book should
include the books copyright and
publishing information. Here is a template
for copyright info that you are free to fill
in and use for yourself. The copyright info should include your name or
your business name, your address or an PO box that you use for your
business, your website, the copyrighted year, the words all rights reserved, the
edition of the book, it is ISBN number, which I'll talk about later, and some sort of description
about how the book cannot be reproduced
without your permission. Back Matter. Not every
picture book has B matter, but most nonfiction books do. We are fungi is
mostly non fiction, so I created a glossary, bibliography, about the author and a note about the group of artists that helped
give me feedback. Be sure to have
your website listed prominently so readers can find you and more of your books. You could also choose to design in papers for the
back of your book, though this is more of a
special design element and not as necessary for
printing as it used to be. It is also usually not an option if you are
doing print on demand.
23. Designing the Book Cover: Designing the book cover. Your book's cover
should give readers a good idea of what your book is all about at a quick glance. What's the mood? Who are
the main characters? What's the art style? You don't need to include everything
from your book. Think about what is
most important to your story or what makes it
different from other books. Also consider about how the
book cover will look as a small thumbnail image on a webpage or how it might
stand out on a bookshelf. Look at some of
your favorite books and see how they
design their covers. What elements did they
choose to highlight? How did they treat
the typography? Does the cover accurately
represent the mood, colors, and characters
from inside? How does the cover
entice readers to pick up and read the book? Elements on front cover. There are a few elements
that you should be sure to include on the
front cover of your book. The book title, obviously, and the subtitle,
if you have one. The author and Illustrator's or author Illustrator's name. Most covers include
the main character, though some choose not to if they have something more
important to focus on. If you are self publishing, you may also choose
to include a logo for yourself or your
business or studio. You're technically
a publisher now. Elements on Back Cover. On the B Cover, you can include more text and information
about the book. You could include
the blurb you wrote earlier that serves as a brief
description of the book. You can add your business
name and logo again, and you should also
add your website. You can look at how publishers usually do this on
their own covers. The other important thing
about the back cover is to leave a blank
space for the barcode. You'll need to look
to your printer for more details
on how to do this, as each printer will have
different specifications. They will most likely have a downloadable print templates
for different sizes of books that will show you exactly where to place
the blank barcode space. Then they will place the
actual barcode for you. Here are some examples of
book covers from my books.
24. Marketing Your Book: Marketing your book. You may think you don't need to market your book until it's published, or that if you publish with
a traditional publisher, you won't need to do
any marketing work. Neither is true. It's
smart to start promoting your book before it's even finished and definitely
before it's published. And if you're working
with a publisher, you'll still be expected
to promote your own book. The difference is when you self publish, it's all up to you. There's no marketing team. While that means
more work for you, it also means you get to decide how your
book is promoted. You don't want to advertise
on social media, then don't. You want to give away some
books for free, then do that. You're the boss. Personally, I'm an introvert and have a hard
time asking for things, so marketing does not
come easily to me. But over the years,
as an NDI artist, I've come to find my own way of doing it that
feels good to me. So don't worry if you're
starting to squirm in your seat a little thinking about asking people
to buy your book. Let's do it the non spammy way, shall we? Email newsletter. An email newsletter is
the most direct way to communicate to potential readers and build an audience
for your books. It's never too late to
start an email list, and over time, it will become
your most valuable asset. Email platforms. I started my email newsletter in 2016
and have used Mailchimp, ConvertKit, and am
now using Substack. My newsletter has shifted over the years from
monthly updates about classes and products to personal essays and
sharing my book process. Substack is an amazing new
option for email newsletters, because it has a built in
network and it's free. Other platforms
like Mailchimp and ConvertKit charge
you per subscriber. Substack has less
marketing tools like segmenting and funnels, so your choice depends on what you're trying to achieve
with your newsletter. For me, my Substack,
I could do that, is a place to share my work, connect personally with my audience, and
build my audience. I tell my newsletter subscribers first about any new books, classes, or projects.
Sharing your process. My email newsletter
is also where I share my bookmaking process, which is one of my primary
ways of promoting my book. See, promotion can be
just as simple as sharing the work as you make it and inviting others
behind the scenes. Each time you share
a process post, people are alerted and reminded that you have a
new book coming out soon. And once the book is released, they'll be all the
more interested and invested in
the final product. Start your email
newsletter now if you don't have one and
start experimenting. See the resources web page for this class if you'd like
to join my newsletter. Email launch sequence. So you have an email
newsletter and you're sharing something about
your book as you make it. But what will you say
when the book is out? How will you convince
people to give it a chance? Here's a snapshot of the emails I sent out to launch We R fungi. Email one, making of. I shared some behind the
scenes process of how the book was made and announced the release date of the book. I sent something
of this nature out about every other week through the entire time I
was making the. Email two, Book trailer. The day before book launch day when the book is
available for purchase, I sent an email with a link
to the book trailer I made. Email three, book launch. I let them know that the book was now available to purchase, linked them to my sales page, and asked them to buy,
share and review it. I also gave the
EBok away for free to people who subscribe
to my email list. Email four reviews
response so far. A week after book launch, I thanked those who
bought the book, recapped some of the
reviews that had come in, and asked again for
people to check out the book and share
it with their friends. Book sales page. If you don't already have a website, you
should make one now. It can just be one
page with a photo, bio, and contact info if
you want to keep it simple. You could also
create a portfolio page if you are an Illustrator. I'm not going to go into a
full web design tutorial here, but I use WordPress
as my CMS to build the webpages and dream
host to host my website. You can see the
current homepage of my website at Mt hyphencud.com. Once you have a website,
you can create a page on your website specifically
for your new book. As an example, you can see a screenshot of
my sales page for We AR Fungi here and the full page in the
resources page of this class. Your sales page can be as
simple or complex as you like. You can just include
the image of the cover, the title, and a link to
where they can buy the book. For my sales page, I included
the cover image, blurb, reviews, book trailer,
behind the scenes videos, and two activity sheets. Be sure to have an obvious
button or link for them to go and buy the book at the
top and bottom of the page. If you can, it's nice to include photos of the physical
book once it's printed, and that can be updated after your printed proof
comes in. Book trailer. I created a super
simple book trailer to promote my book and sent it
out to my email subscribers. I used I Movie to edit together the digital
files of my book, zooming in on the artwork. I also recorded a
friend's daughter reading the bookblur from the back cover and use that
as audio for the trailer. You can share your book
trailer everywhere where you're sharing your
other promotional items. As an example, here's my book
trailer for We Are fungi. Enter our world. The world of fungi, the most mysterious and misunderstood kingdom
on the planet. We are not plants. We're not animals. So what are we? From veiled
ladies to bleeding teeth. Learn how we eat, live, and control a part of the
world you rarely even notice. Peep beneath the crispy
leaves here inside your old lunch box and poke
between your smelly toes. We're here. We're growing. And even when you think
you can't see us, we can always see you. Activity guides.
Librarians, teachers and parents love activity
guides for children. So having one available
to download on your sales page can be a
great way to bring people in. I teamed up with a
friend of mine who was an elementary teacher to create a special fun guy related science activity
to go with the book. You can see that
activity guide here. Social media. I quit all
social media back in 2022, so I don't currently promote
my books on Instagram, Facebook, Tik Tok, or whatever else people
are using these days. I could write a whole book on how quitting social
media reoriented my art practice and my life and how it was one of the best decisions
I've made for myself. But that's not what we're
talking about here, is it? If you want to
read more about my thoughts on social media and how artists can share their art and
connect without it, you can read my
essay on my Substack called On quitting Social
Media as an artist. With that said, when I self published We AR Fungi in 2017, I was still on Instagram and shared process shots
and videos there. Some authors and
illustrators choose to do whole marketing
campaigns on social media. But my opinion is that it takes a whole lot of time for
very minimal gains. The chance that someone is
going to click on a link from your Instagram post and
buy your book is very low. These days, the chance many people see your
post at all is very low. Personally, I prefer to
focus my promotion on my email list as my email
subscribers have opted in, receive 100% of what I share
and are invested in my work, and I have a direct link to them through their email inbox. Plus, I don't have to make dumb iPhone videos.
Am I an old crank? Maybe so, but I'm a heck of a lot happier
off social media, and that's worth a few
potential lost bucks, isn't it? Amazon Author Central
and Amazon sales page. If you're publishing
through Amazon KDP, or if your book will
be sold on Amazon, it's a good idea to set up
your Amazon sales page for your book and author Central
for you as the author. Amazon gives clear instructions on how to edit your sales page through Amazon KDP and connect
it to your author's page. So I won't repeat that
information here. More on choosing where to self publish in the next module. You can find a link
to my Amazon pages in the class resource page. Good Reads author page. Similarly, you can set up an
author page on Good Reads, the book reviewing website, so that you're connected to
your books there as well. You may start to get
reviews on Good Reads, and people can find you
and your book there, too. You can also find my Good
Reads on the resources page.
25. Self-Publishing Options: Self publishing options. Distributor or no. There are tons of options for selling an
Indie book online. But the first thing you need to decide is whether you want to sell through a distributor
or go at it alone. Using a distributor. Using a distributor means
selling your book through an existing platform
like Amazon or Ingram. The benefit of using
a distributor is that they handle the
distribution of your book. When a sale is made, you
don't have to do anything. They handle the money, the
printing, and the shipping. You then get paid
based on what sales. The downside is that the distributor will
take a cut of each sale. For example, Amazon KDP pays its authors a 60%
royalty as of right now, meaning they take a 40%
cut for themselves. Not using a distributor. If you don't use a distributor, you'll have to sell
your book directly to your readers and handle
the entire sales sequence. You will be responsible
for processing payments, shipping books and any
resulting customer service. This could be done
through your website using a service like Shopify, Woo Commerce, or Gum Rob. The benefit to not using
a distributor is that you have complete control and don't have to share
cuts of the sales. Besides, small fees to the point of sale
service you choose. More control means you
can decide exactly how your book is presented,
sold, and retired. As an example, books printed through an outside
distributor and sold on Amazon are notoriously
difficult to remove from Amazon if you
ever wish to stop selling it. If you are the
distributor and seller, you can make those kinds of decisions and actions yourself without having to call or email an unresponsive
customer service. The downside to not
using a distributor is each sale means
more work for you. You have to handle the
credit card payments, get the product in the
hands of your customer, handle refunds and
returns, et cetera. There are plenty of services
to help you automate this, but there will always be some
extra tasks for you to do. You also have to bring
in all readers yourself. There is no platform discovery, like there might be on an
existing platform like Amazon. My personal preference. My personal preference
is to use a distributor. An absurd percentage of all
books are sold on Amazon, so why fight against that? I prefer not to do
heavy marketing, so I like being able
to be discovered on an existing
platform like Amazon. And I would rather
focus my time on making my next book instead of customer service and
product fulfillment. I'm willing to give
up a little control and a slice of my profit
for those benefits. You'll need to think
about it and make your own decision.
Printing options. There are two basic categories
for printing a book, digital print on demand
and offset printing. Digital print on demand. This method uses a printer similar to a home
ink jet printer, albeit a very large one, where books are only
printed as sales are made. Print on demand
allows you to upload your digital book files and
then be mostly hands off. When a sale is made, you
don't have to do anything. The distributor
handles the payment, production, and delivery. You get paid monthly royalties
based on what is sold. Examples of print on demand
printers include Amazon KDP, Lulu, and Ingram Spark. One benefit of print on demand is there's no
upfront setup cost. It's free to upload your books to a print on demand printer, and neither of you
makes any money or incurs any costs until
a book sale is made. Another benefit is there
is no minimum book order. No books are printed
until a book is sold, so you don't have
to place a large book order to get
the books printed, as is the case in offset. And with that, you
as the author, do not have to store a large book order of
300 or more books. That's a garage full of books. A drawback to print on demand is each book is more
expensive to print. This means you will
either need to raise the price of your
book to give yourself a decent royalty or be content with a
lower profit per book. Some print on demands
also print at a lower quality for
ink, color, and paper. This varies from printer to printer and is not
always a deal breaker. Print on Demand also gives less specialty printing options. You most likely won't
be able to include designed papers or spot gloss
or embossing on the cover. Offset printing.
This method uses a large printing press with printing plates to print
a bulk book order. Offset printing gives you
the highest quality book, but requires a bulk order, usually 300 or more books, and an upfront cost of
thousands of dollars. An offset printer does not
sell or distribute your books. They just print the entire
book order and ship it to you. You must then store, sell, and ship the books yourself to your readers or use an
additional service to do so. An example of an offset
printer is print Ninja, Ingram, and local printers. You'll notice that Ingram does both offset and print on Demand. One benefit of
offset printing is that they tend to produce
higher quality books. They use premium inks, colors, and paper and have more
options available for each. Because they print
hundreds of books at once, instead of just one at a time, each book typically
costs less to produce. However, that
depends on the book. You also have more printing
options with offset, including designed
papers, paper choices, cover gloss, cover
embossing, and more. A major drawback to
offset printing is the expensive upfront
cost to the author. You must place a bulk order
of 300 or more books to print your book offset and you'll pay for them all at
the time of the order, potentially before
you've sold any books. You may or may not sell
all the books you've ordered and you could
potentially lose a lot of money. You'll also receive the
entire book order at once and must have a
way to store 300 books. That takes up a lot more space
than you probably think. You could use Amazon warehouses, but that will cost you as well. Financial options
for bulk orders. Print on Demand requires
no upfront cost. You only pay per book sold. Offset printing requires a
bulk order to be placed, leaving you with an
expensive upfront cost and no guarantee that
those books were sold. So if you want to print offset, what can you do besides sink your entire savings account
into your book order? Please don't do
that. Crowd funding. Instead of emptying
your bank account, you could try crowd funding. This option allows you to
test the waters for your book and receive funding for
upfront offset printing costs. It's a way to take pre orders and guarantee you'll be able to make your money back before you pay for the bulk
order of your books. However, crowdfunding
is its own beast and can be very time
consuming and challenging. If you're not careful, you can sink more money and time into something that won't work and something that ends
up burning you out. To be honest, I've never run a successful
crowdfunding campaign, so I don't have a
ton of advice here. It is something I'm interested in experimenting
with in the future. There are lots of
guides and programs online with more guidance if you'd like to
try crowdfunding. Examples include kick
starter and IndiGo go. My personal choices. In my opinion, new authors should start with
Print on Demand. It's not smart to sink your savings into a book that
you don't know will sell. Plus, 300 books takes
up a lot of space. My advice is to publish
your first few books with Print on Demand until you have a good audience and you know
people will buy your books. Then maybe you can upgrade. As for the distributor, I've used both
Amazon KDP and Lulu, and my current preference
is Amazon KDP. Their platform is easy to use has lots of
promotional features and printing options and is continually adding new
tools for self publishers. Their customer service is also extremely prompt and helpful. In contrast, Lulu has not updated their products
significantly in years, does not have nearly as
helpful promotional tools, and their customer service is, in my experience,
extremely unresponsive.
26. Printing + Publishing Setup: Printing and publishing setup. Finalize your book files. We're in the final
countdown now. Complete one last check that everything is just how you
want it in your book file. Read through everything and get a fresh pair of eyes to take a look at it
too, if you can. By your ISBN. Wait. What's ISBN? An ISBN, international
standard book number is a number assigned to
every published book. It includes information about the book like the
title, publisher, and author and is how a
book is identified and cataloged by stores,
distributors, and libraries. Do I have to have an ISBN? You need to have an ISBN if you intend to sell
your book through any kind of book distributor like Amazon, Lulu, or Ingram. Readers will also
view your book as more professional if
you have an ISBN. If you are working
with a publisher, you don't have to
worry about this. But if you're self publishing, you are responsible
for the ISBN. If you want to go
full Indy and sell directly to your
customers with no ISBN, perhaps selling at craft
shows, local events, Gum Road or your website,
you can totally do that. Just know that without an ISBN, you won't be able to
sell your book in bookstores or through
a distributor. Personally, I highly recommend getting an ISBN for your book. It's very easy to get one. It doesn't cost a whole lot, and it gives your book more
options and professionalism. Where do I get an ISBN? Option one, use a free ISBN
from your distributor. Most self publishing
platforms like Amazon KDP and Lulu offer free ISBNs as part
of publishing with them. They will assign an ISBN to your book and place it on
the book cover for you. The upside is that it's free
or at least very cheap. But the downside
is that you will not be listed as the
publisher on your book. This means when your
book is listed on Amazon or wherever you
intend to sell it, the publisher will be listed
as Amazon KDP or Lulu, or whichever platform
you are using. That may not be a big
deal to everyone. As an author, you still own
the book and the copyright. But personally, I'd rather my books be published
under my studio's name. Also keep in mind
that your book will always be associated
with this publisher. This may matter down
the line if you intend to try to get
your books sold in bookstores that may or may not like books
published by Amazon. Or what if a smaller distributor
like Lulu closes down? What happens to your book? Option two, buy your own ISBN. The alternative is to buy your own ISBN through
an ISBN service. The only official source of ISBNs in the United
States is Boucher. You can buy one ISBN for
$125 or ten ISBNs for $295. ISBNs never expire, so if you plan on making
more books in the future, you'll save some money
by buying a book. I bought ten when
I published We Are fungi and have already
used four more. The upside to buying
your own ISBN is you will be listed
everywhere as the publisher. Your book is not affiliated with any other
publishing platform, only you and your business name. The downside is it costs money. It's up to you if
you think $125 is worth the book
being published in your name. To me, it is. If you want to know
more about ISBNs, Buker has tons of great
information on their website. You can find that link
on the resources page. Upload your files to the
publishing platform. Create and set up your account. This process will depend on
what platform you choose, but they are mostly similar, and each platform should clearly explain what
to do once you begin. You'll probably be asked
to supply title info, like the title, author name, language, and publication date. ISBN, you just type in the ISPN number and they
place the image interior PDF, upload your book file
for the inside pages. Pay attention if
the printer wants your PDF to be formatted
in pages or spreads. Cover PDF, upload
your cover design. They will most likely
want one cover image, including the front
and back together. Use the printer's
templates so the spine is the correct size based on the number of
pages in your book. A link to this calculator is also on the resources
page of this class. Set your book price
and royalty amount. When you submit your book, you'll also need
to choose a price. This will determine how much customers pay for your book and also therefore determine
how much money you make from each sale. Most distributors pay
out a royalty based on the book price after
subtracting the printing costs. Amazon KDP currently
pays a 60% royalty. So here is an example
from printing a 32 page color book at 8.5 by 11 with Amazon KDP
and a list price of 14 99. If the list price is 14 99, and the royalty rate is 60%, and the printing cost is 420, then your royalty will be $4.79. In this case, your book would
cost each customer 14 99, and you would receive
479 per book sold. The printing cost for
this book is 420. The cost is based on page count, ink type, black or color, premium or standard,
and trim size. Most distributors will
give you a calculator to determine your paperback
or hardback printing cost, minimum list price
and royalties. I've listed Amazon
KDP's calculator in the resources
page of this class. Submit your files for review. Now press that submit button. The publishing platform will review your files
for any issues or missed requirements and
most likely get back to you with your bookproof
within 24 hours. Review your book proof. The platform will require that you review a
proof of your book, and some may require that you order and review
a printed proof. It's a good idea to order
and review a printed proof, even if you don't require it to ensure everything prints out
just how you want it to. You'll just have to pay the base printing cost of
your printed proof. My proof of R fungi
just costs $3.79. Be sure to set up your files
and order your proof with plenty of time before
your launch date, if you have one in mind. It should arrive within a week, but things can go wrong. If something needs to be
fixed from your proof, you'll need to change it,
re upload the edited file, and possibly order
another proof. Approving your book proof. Once you're happy with
the proof, click Approve. The timing until your book
is available for sale will depend on the platform you choose and is a little variable. Amazon KDP says once
you approve the proof, your book will be
available for purchase on Amazon in three to five days. For we are fun guy, it was available after
one business day. They are constantly adding
new features here for authors and just released
a way for you to set a manual release date.
27. Book Launch Promotion: Book launch promotion. Photograph your book. It's important to have
professional looking photos of your book for your
website's sales page. You can do this as
soon as you get your printed proof before the book is
officially published. My go to method is to place a big white sheet of
paper on the ground outside or by a
very sunny window and photograph the cover and
interior spreads that way. Metal clamps can help you
hold open the spreads, or you can ask a friend
to hold the book. Sunlight is generally better
for product photos than artificial light unless you have fancy photographer lights. You can edit your photos in Photoshop or software
of your choice, removing the background,
adjusting the levels, et cetera. I like to have at
least two versions of the cover and each spread, one on a plain white background, and one on a more fun related to the topic background,
like mushrooms. Book Launch day tasks. Don't sleep on launch day. On the day your book goes live and is available
for purchase, you've got some work
to do, particularly if you are selling
your book on Amazon. If you have a wave of
people clicking on and looking and buying your
book in the first few days, Amazon will push it up its list and promote it to
other people as well. So we might as well
try. Sales page. Make sure the buttons on
your website sales page link to where to buy the book. Consider adding something
new to your website to alert visitors that your
book is now launched. If you have the ability to, you could choose to offer a
special deal for launch day. Email campaign. Send out your book Launch day email
you planned in Module 23. Announce that the
book is now live and include some fun
photos from the book. Link to your sales page
and or where they can buy the book and ask them to
share the link with friends. Social media. I'm not going to repeat my rent about
social media here. You can see that in Module 23. You should focus
your time online wherever you feel it
gives you the most value. And I mean that not
only in terms of sales, but also everything
else you value. In my opinion, social
media does not bring in as many sales as
some people say it does. And I also just don't like it, and I don't find value
in it. So I don't do it. When We are Fungi was published, I was on medium and Instagram. I wrote a couple essays about my bookmaking process
on medium during lunch week and
posted about once a day on Instagram for
the week of the lunch, sharing behind the scenes
tidbits about the book. For my most recent book, I am not on social media, so I focused all my promotion on my substack email newsletter. This is a platform I
like and find value in. It favors long form
writing, artistic voice, genuine connection, and has no ads, influencers
or algorithms. Advertising. Some authors choose to run online ads
for their books, but that, like crowdfunding is a whole other beast that
I don't know much about. It seems to me that
perhaps the days of running successful online
ads are also shrinking. It's possible you'll
make sales from ads, but it's also possible that you'll waste your
time and money. Personally, I believe
organic reach is more powerful than
advertising to strangers. It's the long game, but
making books is my career, not a one off, so the long
game is worth it to me. But that's just me. If you want to try ads, then go for it. Giveaways. Instead of ads, a giveaway can be an
alternative promotional tactic. It's extremely cheap
compared to ads. You just have to pay
the printing cost of each book you give away, which was $4 for We R fungi. I chose to run a giveaway for one copy of Weir Fun
Gui through Amazon. To enter the giveaway, a
person just had to follow my Amazon author page and then click the giveaway
Link provided. This promotion was awesome
because it promoted my book while also getting people to follow my author page. So the next time I
publish a book on Amazon, those people will automatically get a notification about it. While only one person received the book
from the giveaway, I got a slight uptick in book
sales during the giveaway. So I assume that many people who didn't win decided to
buy the book anyway. Amazon KDP is consistently adding more tools like
this to their platform.
28. Your Project + Resources: Whoo hoo. Congratulations.
You made a picture book. Or wait. Did you just
watch all these videos, and you haven't actually done anything towards
making your book yet? Don't worry. I get it. I went through that period
too, learning, researching and
reading everything I could about making books, but not actually making books. Well, this is it. I'm here right now to give you a
little kick in the booty. Start making your book. Today, right now, don't wait. You obviously have an
idea for a picture book or you wouldn't be reading this. What are you waiting for? More information, more instructions, more
steps to follow. You've got everything you need right here in this
class to get started. Through these videos,
I've shown you how I made my book and how a
book is generally made, but I can't tell you
how to make your book. Only you can figure that out. And the only way
you can do that is to just start making it. I believe making art is one of the best ways we
can spend our time, and there's not much better than seeing your idea come to life. So, come on. You could make
a book, your class project. Your ultimate project is to
create your own picture book. But I know that is a
little daunting and a long process that could take
you months or even years. My most recent picture book
took me 2.5 years to finish. So to jump start your project, I would love you to
share any portion of your book that you would like here in the Project Gallery. Some examples include your
story idea, your book title, an early manuscript,
an early storyboard, sketches of characters,
sketches of spreads. And I'll be sharing my process from my most recent
picture book, We Are Jelly fish in the
Project Gallery, too. So come take a look and
post something of your own. Resources PDF and books. Don't forget to check
out the Resources PDF download on
the project page, which includes all the links and digital files referenced
in this class, including the
further reading list and storyboard templates. One last thing. This class is also available in book form as a digital download E book in the Skill Share shop or a
printed book on Amazon. You can search Mike Could Make a book on Skillshare or Amazon and find links to both
those products in the class description
and Resources PDF. Thank you. Well, that's the end of my picture
book MasterClass. Thank you so much
for watching and I hope it helped you on
your bookmaking journey. I would love to connect
more with you and see any finished or in progress
books you're making. Besides sharing your work in the Skill Share Project Gallery, you can join my Substack email newsletter
at the URL here, which includes weekly essays on creativity, living as an artist, and behind the scenes
process work on my current books. Thank you. Thanks so much for
taking this class and best of luck with your book.
 Christine Nishiyama, Artist at Might Could Studios