Transcripts
1. Introduction : When you think of perspective, what comes to mind? Vanishing points, rulers, math. But when used intentionally, perspective can also
look like this. [MUSIC] Perspective can tell your viewers how to
feel about a scene. It's not just a way
to replicate reality, it's a powerful tool
for storytelling. Hey, I'm Sam. I'm an artist and illustrator
from Halliburton, Ontario. Whether I'm drawing
sweeping fantasy scenes, houses or immersive landscapes, I approach perspective with
a storyteller mindset. I determine how I want people to feel about
what I'm drawing. This changes the
angle of the scene, the size of the drawing itself, and even how I use light and
texture to set the mood. In this class, you'll learn how perspective can be used to evoke emotion by drawing one
scene three different ways. You'll see how shifting
the perspective can give a completely different
sense of the same scene. This lonely castle can all of a sudden seem ominous
or intimidating. This cabin can all of a sudden seem threatening
or suspicious. Just a shift in perspective changes how we
imagine the scene. Who lives in the cabin or whether it's safe
to approach or not. That doesn't require
rulers or boring math. This class hinges on simple ideas about
perspective that you can take into your
own art practice to better share your
own visual stories. This class is for people who have given up on perspective. Those intimidated
by their rulers or traumatized by
vanishing points. But it's also perfect for those who are new to perspective. You can start creating a
friendly relationship to it. We'll start by going
over some methods for capturing tricky
shapes and angles, and then go over the fundamental techniques
and perspective. I've even included
a quick one-to-one tutorial to get you up to speed. Next, we'll chat about
common mistakes, freehand sketching, and how shifting the
size and orientation of the main part of your drawing can change the
meaning of the scene. Then once we have our base, we'll build up the
immersiveness of the scene by incorporating
light and texture. Making our perspective
drawing feel like a real
three-dimensional space. By the end of this
class, you'll not only have three compelling
pencil drawings, but also a way to harness perspective for
storytelling moving forward when approaching
any scene in any medium. Let's get drawing. [MUSIC]
2. Project Overview : A great way to practice any element of art is to create a
reference sheet. That's a no consequences, piece of paper where you
just jot down your ideas, try out different
styles of drawing and experiment with the concepts that you're learning
and practicing. For this class, we'll be drawing three different perspective
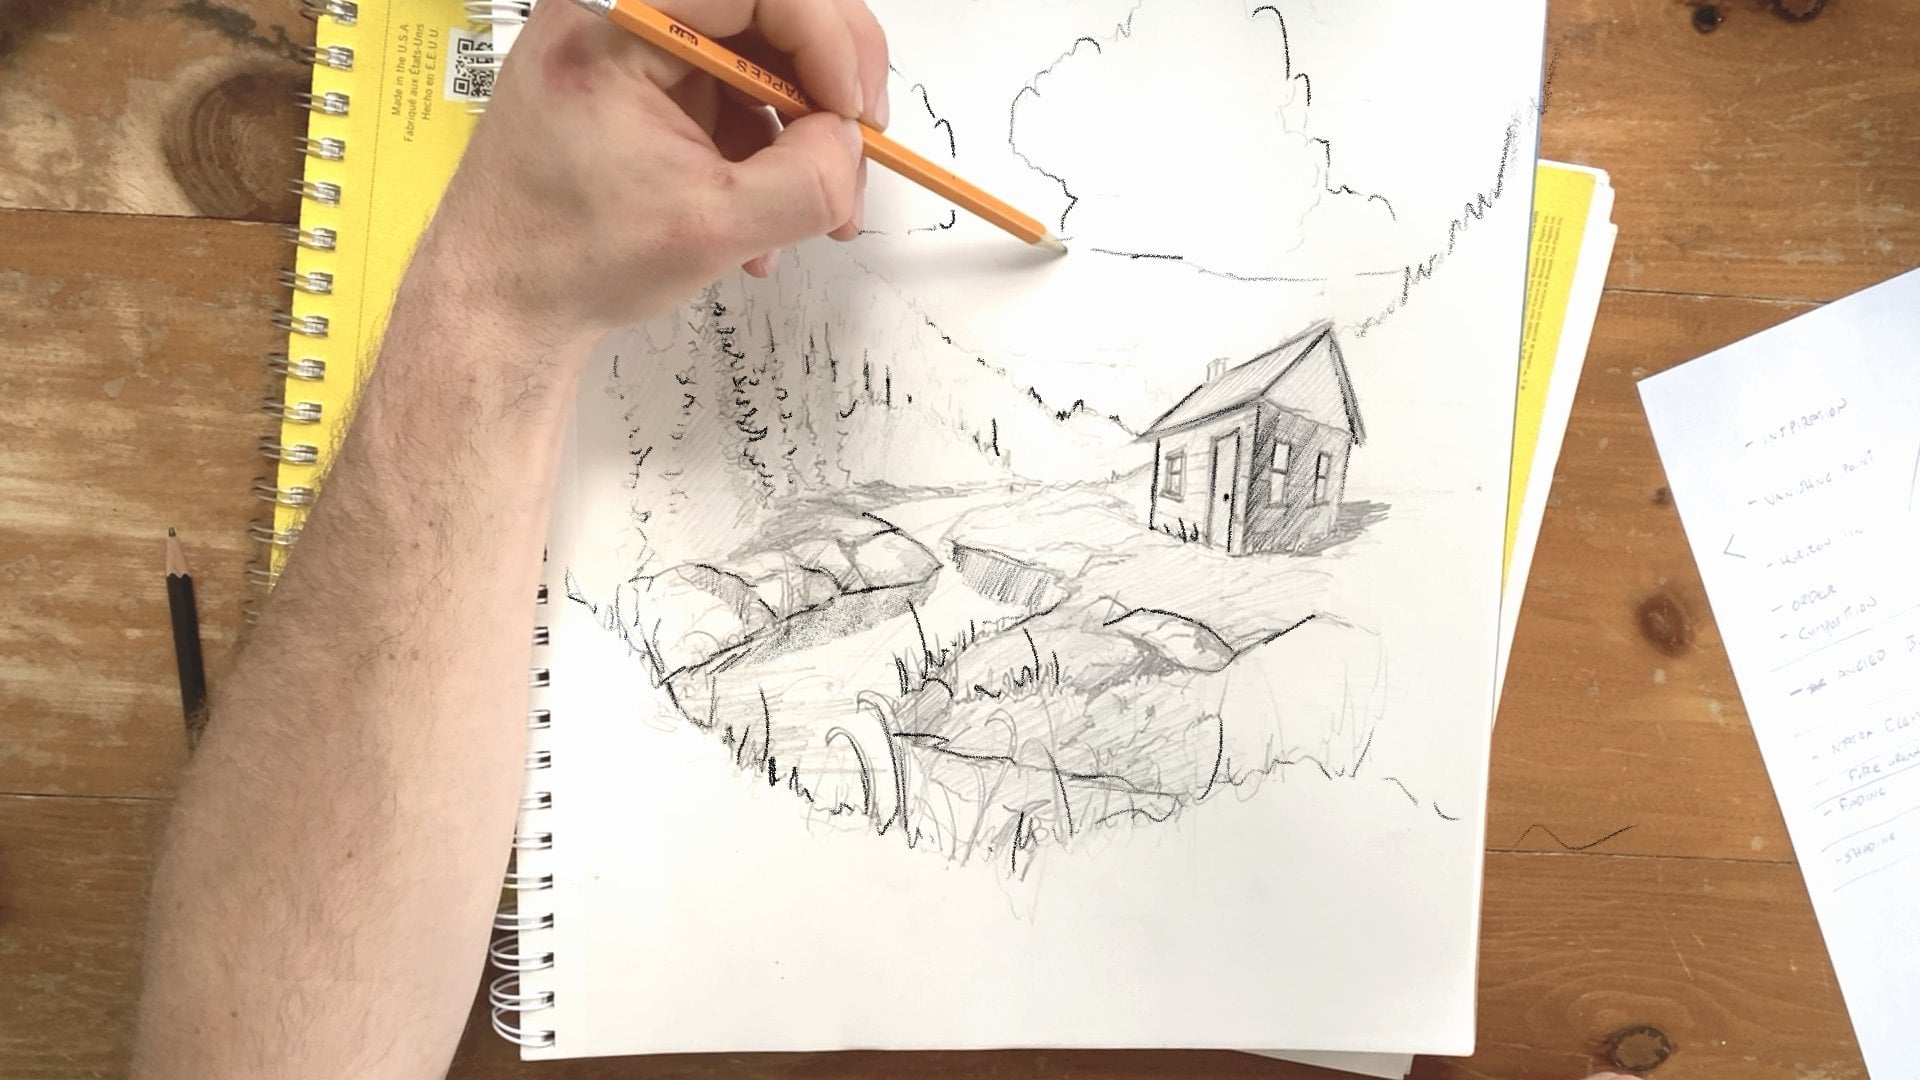
scenes with pencil. You'll need just three
sheets of paper, any quality of paper, any brand is fine. I use a thicker
Strathmore Bristol because I really like the
way it grips the pencil. For pencils, I usually just use whatever I have
laying around. Whether it's the orange pencil we all used in
elementary school, or a nicer pencil of a different weight
and lead thickness. That stuff is important, but for this class,
I'm going to focus more on the drawing
itself and so I'd suggest you check out
some other resources to help you decide which pencils
might be best for you. Before we get to those
three pencil drawings, we'll be going over some
freehand perspective drawing techniques and as well talk
about how to hold a pencil, and why even use perspective
in the first place. Then we'll move on to
those three drawings that I mentioned, before talking about
how you can use shading and light in detail to accent your perspective
sketches and really make your
scenes come alive. For this whole class,
I invite you to draw with an eraser or without, whatever you like to do. I usually draw
without an eraser, specifically when I'm
drawing in perspective. Because I find, retracing
the lines I've done wrong and having lines on the paper that don't
really quite look right, is a great learning experience, as I get my hand used to drawing these somewhat tricky
shapes and lines when viewed from a
perspective angle. If you're feeling brave today, leave your eraser behind. We're going to be using pencil, there's no such
thing as a mistake, it's all a learning experience. First, we got to talk
about perspective itself. In the next class, we're
going to be talking about Perspective 101,
the fundamentals.
3. Perspective 101: The Basics : There are rigid and
rigorous methods of creating technically
correct perspective drawings. I learned those in high school and I know some people who
find those really helpful. As in measuring the distance, measuring how
things can pack the farther away they seem, and using a ruler to create really strict and correct lines. For me personally, I prefer
a lighter freehand approach. The reason I don't use rulers
or protractors when I'm drawing is because by drawing
freehand without a ruler, I can really work on my hand-eye coordination
and developed more of a sense of the scene as well as injecting a little
bit of my own personality. Because as you'll see in the three example drawings we'll work on later in the class, perspective can be intimidating when we think we have to
get it perfectly correct. But often it's the
little mistakes or the little personality
quirks that you inject into your sketches that make them come alive and help you develop your own style as an artist and as an artist creating
perspective drawings. But first, let's define some terms before
we move forward. A key one for me
is horizon line. Horizon line is in any
perspective drawing, and that's eye level. For example, if the horizon
line is very low on the page, that can mean a
couple of things, depending on how zoomed in or the scale of the objects
within your scene, it can mean that you're
looking up and it can be setting you up for a
really nice perspective of objects above the viewer. Or perhaps if you're zoomed out and you're drawing a really far away
landscape scene, it can set the skin for
a nice per airy scene or something with a
really big emphasis on the sky or things
above the viewer. If the horizon line
is at the top, it can mean that you're
maybe looking down. This can be really helpful
when you're drawing a city scene or a
scene with lots of small details below the vantage point of the
person viewing your scene. If the horizon line is in
the middle of the page, that's a neutral perspective. and all three of those
horizon points I just talked about are where objects, if there was no
other aberration or no other bump or mountain
on the landscape, that's where they'd seem to disappear over the
curvature of the earth. That point where they disappear
is the vanishing point. That's a really key term, I'll come back to
you probably way too many times during this class. Because a vanishing
point in your drawing is a dot that you're
going to connect all the lines that recede
away from the viewer. Multiple drawings and the
ones we're going to draw have multiple vanishing points. For example, the skyscraper that I mentioned
earlier in this lesson, there's a vanishing
point above it as the vertical lines seem
to get narrow together. If you trace those lines up and continue them
up into the sky, they'd reach a vertical
vanishing point. There's also a horizontal
vanishing point, and if you trace the top
line of the skyscraper, the top of the rectangle, down towards the horizon, the point where it hits would be the vanishing point
on the horizontal plane. The bottom of the skyscraper would also meet at
that point as well. That's a really easy way of thinking about
perspective, I find. By having those points
on your drawing, you can connect them to all the elements
within your scene, and using those points
almost as an anchor, you can build your
scene outward. We're going to talk about
freehand pencil technique in a couple lessons, but first, we're going to talk
about some common mistakes that people make when they're approaching
perspective drawing.
4. Freehand Sketching Technique : [MUSIC] Now, whether you've
sketched in pencil or what, or this is your first time
sketching in pencil rather than using a ruler or a
protractor anything like that, it's important to go over
how we sketch for the end, or at least how I do it. I invite you to find your
own style over time. Don't take my word
as gospel truth. Rather, this is just what I've picked up over time
and it might help you sketch a little bit more confidently in
freehand perspective. Using these tips
we'll be able to take them into the next
lessons where we'll talk about drawing tricky shapes and drawing our 3
perspective scenes. It really translates from pencil to other mediums as well. But the reason I start with
pencil when I'm drawing freehand perspective is because there's freedom to
make those mistakes. I can erase anything
I don't like, or as I talked about earlier, I can just draw more
lines on top of it. If I move on to pen or paint, I can usually just paint
over the pencil lines without much of an impact. The most common question
I get and the thing I struggled with most is drawing straight lines without
using a ruler. In perspective, that is important because as we
talked about earlier, making sure things connect to that vanishing point
on the horizon line, is really key to
making it look like an actual object in
a physical 3D space. When I usually hold a pencil, I hold it farther back
when I'm starting out. The reason I do
that is because I find it gives me a little
bit of a better grip, and I can also use my
hand as an anchor. If I'm holding the pencil right close to the nib like this, I find it's a little
bit harder to be gentle and a little bit harder to create good lines
without pressing too far. Holding it a little
bit farther back gives me the freedom to rotate my fingers and also rotate my whole arm as I'm
drawing shapes. That's another key part
of my drawing practice, is when I'm drawing
in perspective, or when I'm trying to
draw straight lines, I try to move my arm
rather than my hand. If I move my hand
to draw this line, it gets a little
bit more tenuous figured I'm stretching
a little bit. As I'm drawing it
across the page, my drawing position changes. My position, my
hand is different here than it is at the
beginning of the line. Whereas if I grab my pencil, let it rest naturally. It's almost at a 90
degree angle to my arm. I want to keep that most
of the drawing cycle. Instead of just moving my hand when I'm drawing
a straight line, I move my whole arm. When I'm holding
the pencil farther back and I'm moving my arm, I find I can create
straighter lines. That leads me to
this next point, which is that if you see here, this is one line, it's
not completely straight, but it's made up of a
whole bunch of lines. That's because with pencil, with the opportunity to erase, oftentimes, the shapes in your perspective drawing
will not be drawn just once. For example, if I'm going
to draw a box like this, I go over multiple sides of
the box, multiple times. That's because each
time I draw the line, I can pick the medium
line. If that makes sense. By drawing it multiple times, I can get a better feel for how a straight
line should look, and I can correct the wobbly parts of the line with other lines that
link it together, creating in the end more of
a technically correct box. That links towards
our discussion of vanishing points
and horizon lines. If I put all these
tips together, if I'm drawing a shape that links towards this
vanishing point, the way that I usually
start doing that without a ruler is by creating
an imaginary line. I don't even touch the paper first but say I want to
create a box up here. I'm going to create that line, and then over time, gradually etch it in really
lightly with light lines. Then until finally,
I'm going to guess correctly that this line would actually lead towards
that vanishing point, and I can more firmly etch
in that side of the box. I'm going to do again, imaginary line and then a
little firmer over time, and then finally I
can etch in that one. I do that with the
sides as well. Really lightly etch it in over time and then firm that up. From the vantage point or
wherever straight line I do, I often do it imaginary first, going to get my
muscle memory and my hand used to that line, and then over time darken it in. That applies to
any drawing I do. I like to layer up the
drawing over time. With each consecutive
pencil line, I can go a little
bit darker to ensure that the lines I'm
drawing look correct. If I draw this lightly at first, I can take a step back and
see if it looks realistic. If it does, then I can etch it in a little bit darker and
a little bit darker still. But the whole point
of not using a ruler, as I talked about
at the beginning, is because I want
that organic feel. I, for one, like the look of the lines
that aren't exactly straight. If I generally go towards
that vanishing point, that's what we want to focus on, not having lines that
are super super-duper, straight, and perfect. You want to focus more on the horizontal lines rather
than the vertical ones. Because in our scenes, the eyes are usually
more tuned to the horizontal lines being more important than
the vertical ones. By horizontal I mean, on a horizontal plane
with the vanishing point. Actually, this line here
would be horizontal line. If these lines go towards
the vanishing point, even though they don't really,
that's what we want you to focus on more
than these lines. As you see whenever
I'm doing this, I'm moving my arm, not just the pencil. Even though for small details, I do just move the pencil itself for
perspective drawing, and for the elements of our scene and charting
out those elements, I usually move my whole hand. We're going to move on
a little bit to drawing some tricky shapes
in perspective. By learning these tricky shapes, we can then incorporate them into the scenes we're
going to draw later.
5. Common Mistakes : [MUSIC] Mistakes in art, I prefer to call these
learning experiences. That's because every
mistake you make, specifically when you're trying something new or trying
something difficult, like drawing in perspective
is a milestone on your journey to accessing and learning the thing
you're trying to do. I make mistakes in
every single drawing. That's because our eyes are really fallible and
the connection between our eyes and our hands is
often tenuous at best. It's difficult to
draw in perspective. It's far more difficult
than it should be, I think, to translate what we see in the
real-world onto the page. But there are a couple
mistakes that I made quite often along my artistic journey
and stuff I still do. I'm going to go over
those in this lesson. If you focus too much on a difficult part
of your drawing, sometimes the rest of
the drawing can suffer. You could draw the Eiffel
Tower, technically correct. It could look fantastic. But if you're trying
to draw a scene in Paris, if the
Tower looks great, everything else looks rubbish, you're not really
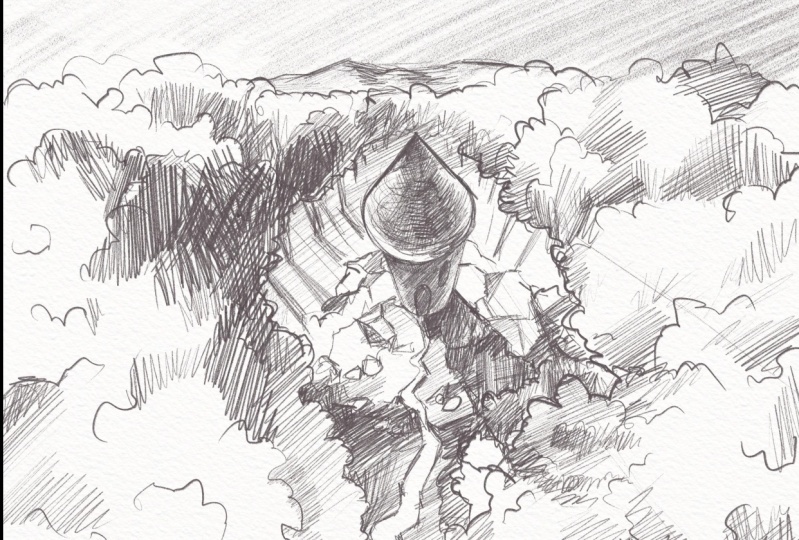
any further ahead. For example, in this
drawing I did of Hogwarts, I focus so much on
this central tower. I really neglected the
bottom of the scene and neglected to figure out the
composition, down here. If I had to spend a little
bit more time on it, I really wish I'd have tried to make it look a little
bit more like this, composed in a way
that it didn't squish the cliff side and
the water down below. I could have let it
breathe a little bit more rather than just focusing
on that central tower, which I found so difficult for some reason to draw
in perspective. Number 2, is drawing
what you think an object looks like rather than what the object
really looks like. I don't know about you, but
when I was seven or eight, the first couple drawings I did looked a little bit like this. I'd draw the sun in the corner. Then I'd draw a cabin, a picket fence and clouds. Maybe even a little
stick figure like this. For me that is a house. It looks like a house.
There's nature in there. I could even have drawn
a tree if I wanted to. But in reality, it doesn't really look like
any house I've seen and hopefully no humans
I've seen either. That's why drawing with
reference photos or, drawing what an object
actually looks like is so invigorating
for me and inspiring. Often, we trick ourselves into thinking we know what
something looks like. A city bus for example, many of us get on
them every day. We think we have a pretty
good understanding of what a bus looks like. But if I was going to
draw one in perspective, I want to have a
picture of a bus in front of me so I can
capture the reflection. I can capture the way that the wheels get smaller as they move to the back of
the bus, away from us. The way the windows
might be curved. Especially in difficult
shapes, for example, the wheels or the Windows
having a picture in front of me can help me determine how the perspective
would actually work, rather than what I think
it might look like. Because it's hard to trick
your viewers in that stuff. We might think we can draw
a bus perfectly well. But if we actually look
at what we're drawing, we realize we haven't really
captured the details. Specifically in perspective, the way the objects recede into the distance or look as
they get farther away, can be a little bit
more complicated than we first assume. The last common mistake
is making sure that each different object in the piece
of art that you're making, whether it's a box or different houses or a
different landscape, items that they have a
relationship to each other that makes sense
within the scene. Here's an example, I have a box that's
floating in the sky. It's a little bit above us because we can see
the bottom of it. As we know that the horizon
line is at eye level, so the box seems to be
a little bit above us. But, if we want to draw another box that's further away, we have to determine
the relationship to the object we've
already drawn. If it's farther away, it means that second
box on the left here would be
smaller, not bigger. Because in the scene, if the box is smaller or whatever object you sub in here, whether it's another house, a castle under the mountain, it needs to be
related to each other in the way that the viewer
experiences the scene. Any object you put in the scene, anything from a little mug that a character might
be drinking out of to, to a large spaceship has
to obey those rules. Has to obey the rules
within a scene. There can be infinite
vanishing points, which is a scary
concept to imagine. However, anything we
draw in the scene has to be consistent with
the entire scene. For example, if I am drawing the scene of a training stretching back
into the distance. But I want to draw a, let's say a tree coming
beside the train. I have to make sure that the curvature of the bark
fits, that vanishing point.
6. Subject, Perspective & Scale : [MUSIC] Three most
important themes that come out in this class are subject,
perspective, and scale. In this lesson, I'm
going to go over the three of them and
how they interplay. I think you'll see traces of all three throughout everything I really talk about in this class. You've heard me say focal point, and that's really the
subject of your drawing. The focal point is where you
want the viewers to look. For example, in the
drawing behind me, the focal point is definitely the central castle
complex in Rivendell. However, I placed the
focal point there with elements around it that
aren't the focal point, that aren't as
important but they lead our eye towards it. You can see how there's a
river here and a bridge, as well as a
outcropping of trees, and a waterfall in
the background. The peripheral elements
around your focal point or around your subject
are almost just as important as the
subject itself. They give us more clues and can situate it in a
larger environment. By making sure that these
peripheral elements complement the focal point or add to the subject
of your drawing, you're scene can
really come alive, and it can change the emotions. If I added rocky or
jagged outcroppings of rocks around here, it might make you feel
differently about where we are. You can see that here,
when I drew the City of Edoras from Lord of the Rings. I want the focus to be on this central pillar of rock
and the castle on the top. It's the subject of the drawing. Depending on what I
want to say about this castle in
Rohan, for instance, changes how I approach it or how I position the viewer
in relation to it. For example, here,
this little castle tower that we'll revisit
later on in the class, the perspective I
approached that with, lets us know a lot
about its relation to the world or where it fits
into the surroundings. By positioning certain things on the same level of the viewer, like we would see them if
our walking towards them, that can say something about
an object or a focal point. Whereas placing it far above us can say something about
our relation to it. The same with placing
it far below. Choosing a perspective that
fits the story you want to tell about the focal point or the subject in your drawing, or where the viewer is, can really add a lot
to your drawing. But that only works if you
also incorporate scale. Scale is basically the
size of the focal point or the object in relation to the scene or the
composition around it. How does your
perspective or how does your perception of
this castle change depending on its size? Here, the focus is on the door
because we're so close to this large castle that
seems so large to us, even though in reality
maybe it's the same size. By scaling the castle up, it makes us feel closer to the
object or the focal point. If, for example, in the drawing of Rohan
that I mentioned, if I had positioned us
right near the gates, peering up at the gates that
are towering over top of us with just the top of the
castle on the hill visible, would it have made you feel
differently about Rohan? Or would it have made you feel differently about what I
was trying to get across? The scale and the size of objects in our drawings
are so important. Because that's a
visual clue that lets the viewer know
their importance and how they interplay with other aspects of your drawing. By choosing a scale that fits the story you want to
tell about your subject. As well as choosing
a perspective that positions it in relation to the viewer where you
want them to be. As well, focusing in on the subject or focal
point and making sure that the composition of
your drawing points us towards what's important and
what matters to the viewer.
7. Tricky Shapes: Circles & Curves : In the real world, there's
so little that is straight. When you look around
a busy city street, there's lots of things in
that scene that are not straight lines to
be drawn that don't all lead towards one
vanishing point. For example, this mug that I tried to draw up
when I drew my scene, there's a lot of curved
lines on it, specifically, the circle of the
top and this handle. Drawing these things in
perspective, for example, above me or below me can be difficult because
they are circles, they're not straight
lines that seem to lead towards a vanishing point. In this lesson, we'll
go over some tips and tricks for drawing these
tricky organic shapes. The thing to remember
about tricky shapes is that they can all be broken down into
easier shapes to draw. The reason why I start
with rectangles, as I've shown in the
previous lessons, is because those are really easy to make sure to link up to a horizon line
and a vanishing point. I'm going to start
the vanishing point there and I'm drawing a square. I know that the vertical lines are going to lead towards
that vanishing point. Now, let's say I want
to draw a cylinder, a coffee mug, for instance. It's a difficult
shape because it's a circle on top of
another circle, but I can break that
down into squares. The vanishing points there, I want to draw it
very close to me. It's going to be a
fairly large coffee mug. I'm going to draw
another square here, with the top side going down towards
the vanishing point, and this side goes towards
the vanishing point as well. Then I'm going to link these up. Now we have a tall
rectangular cube, and then, a circle can fit
inside these squares, the bottom square
and the top square. I'm going to dot out the size of the circle and I'm going
to draw some arcs. I want to draw your
arc in a natural way. For example, from
this dot to this dot, the arc has to be a little bit more abrupt than this
dot to this dot, because these dots
are closer together. Once I have those dots, I want to connect them. Remember I talked about
earlier moving your whole arm. It can draw the circle
quite a few times. It's a little bit compacted and do the same up here and
this circle is going to be quite a lot more compacted like a very
narrow, narrow circle. Then I connect these. I'm going to correct
it down here and then I have the
base for the mug. Now, if I want to draw
the handle on that mug, I can determine where
it's going to be. I'm thinking maybe the
most difficult angle would be right here. I know generally what
shapes we can use here. We're going to start
with rectangles again. The sides of the
rectangles are going to go back towards that
vanishing point. I'm going to guesstimate
on the size. Then it's a circle too, so I'm just going to link
up the same thing here. Then I can erase these lines and I have the base of my mug. As you can see, some of the lines don't
really seem correct, maybe the bottom is a little
bit too bulgy down here. But over time, you can gradually get more proficient as you continue to practice having the thing
in front of you, having a mug in front of
you really helps as well. The next shape will
try to draw is a tree because we will draw that
a lot in today's class. If the vanishing points here, we're going to draw
the tree at eye level, the middle of the trunk here. We're going to pretend there's
another vanishing point, maybe all the way up, almost outside of our
sketch plane here. We know these two
lines have to lead towards that vanishing point. Then we're going to draw
another rectangle here leading back towards
that vanishing point. We have the base of the tree is a rough sketchy square and the sides of the
tree lead up towards a vanishing point up at
the roof of our drawing. Just like the mug over here, I dot out roughly halfway on the lines and
I'm going to connect them. I've connected them and I can
take up the harsh corners, something in this
corner and this corner and drawing it up, and it's still got a lead
towards that vanishing point. Then now that we need
to add some branches. This is where it gets
a little bit trickier. Since we're at the
vanishing point here, these branches are above it, meaning we're looking
up at the branches. We can be a little bit looser
because they're organic, and that gives us
a little bit about a license to create shapes that don't have to link
towards the vanishing point. However, by keeping the way
that the branches fan out, linking towards that point, it can really help us create
that dimension of space. The outside of the branches
are going to follow this box, which leads towards
the vanishing point. I'm going to create
that box here, and I'm going to
create it off-kilter. The reason I'm
creating it off-kilter is to give us a
little bit more of a natural look to the
box of the branches. I have this base of the box that leads towards
this vanishing point, it doesn't have to
be directly there. The top of the box will lead towards this
vanishing point up here. Now I can create the
branches within this space. The branches get a
little bit smaller as they go up to there. They don't have to lead
directly to that line, but the outside of the branches will stay within the
box that we've created. As you see, I'm not
really changing how I'm drawing the
individual branches. I'm just drawing the
branches of the tree staying within that box
so that it will look like the whole canopy leads away from us up into the sky and down towards
the vanishing point. This is why I can add in
the details of a canopy, going outside the
box a little bit, but generally following
the lines we've created. The reason I go outside
the box is because leaves don't follow
that boxy shape. Branches fall outside
those lines but by hinging them or keeping
them close towards that line, I can create a look of a
tree that is above us, but also leads down
towards a vanishing point. From there, I can add in roots, root sections, and play with
the trunk a little bit, add some maybe aberrations
and stuff like that. Now, this is by no
means a masterclass. Hopefully, that was a
little bit helpful as we move towards drawing our
three perspective drawings.
8. Learn To See: Draw Your View : We've established
some key terms, and reference points about
freehand perspective drawing. To put them to use, here
is a practice exercise of drawing what you see right
in front of you right now. Take a piece of paper, any
kind of paper will do, and a pencil, any kind
of pencil will do, and sketch out what
you see in front of you keeping in mind the
things we've talked about. First, vanishing point, second, horizon line, and third, the foreground,
midground, and background. If you look in front of you
right now, what do you see? Are you looking out
of your building? Are you looking into
your living room? Look at the top lines
of the room you're in, and where they lead
towards the distance. Look at the objects
in your scene, whether it's your coffee
mug in front of you, whether it's your sketch
pad in front of you, and draw some of those objects. You can draw the full scene with just a couple of objects
within that scene, and then post it in the
class project page. Now, the whole point of this
practice sketch is to be loose, and just get a feel for it. I'm zooming out a little bit, and I'm drawing my desk, and wall right in front of me. Using the tips I
went over earlier, I'm sketching everything
out really loosely. I'm not taking a lot
of time on this. I'm just drawing what
I see in front of me. Even my hand, I'll
draw that on here. For those details, I'm
zooming in a little bit. I'm drawing the foreground, and the background.
9. Neutral: Immersion and Comfort : [MUSIC] Now I think we're ready to start our first
perspective study sketch. The first drawing we're going to tackle is a neutral
perspective drawing. Remember when I talked
about horizon lines and I mentioned the horizon line
in the middle of the page, that's the one we're
going to focus on first. By positioning our focal point, which is the main
object in our drawing near that middle of
the road horizon line, it's on eye level with
us, with the viewer. I find placing a focal
point or placing the key object in the scene on that neutral horizon line, a great way to add some gentle
immersion to your scene. When we view certain objects
in that vantage point, there's a certain
sense of comfort there or a sense that we could partake in the scene
because it's accessible to us. Remember if the horizon
line is eye level, that means objects that are on the horizon line
are at eye level. Now, what I talked
about scale earlier, this applies here as well
because if we draw the object, the focal point of our drawing, if we draw that
to a certain saw, is that it's accessible to the viewer that's closer to us. If it's a building, for example, intent then that creates a space that we feel
like we could inhabit. With a neutral perspective, I want to draw the horizon line right through the
middle of the page because I want to have enough space above and below to create a object or a focal point in the
middle of the page. This helped us achieve that
goal of making it appear like it's on the same
plane as the viewer, or it's a place that we can
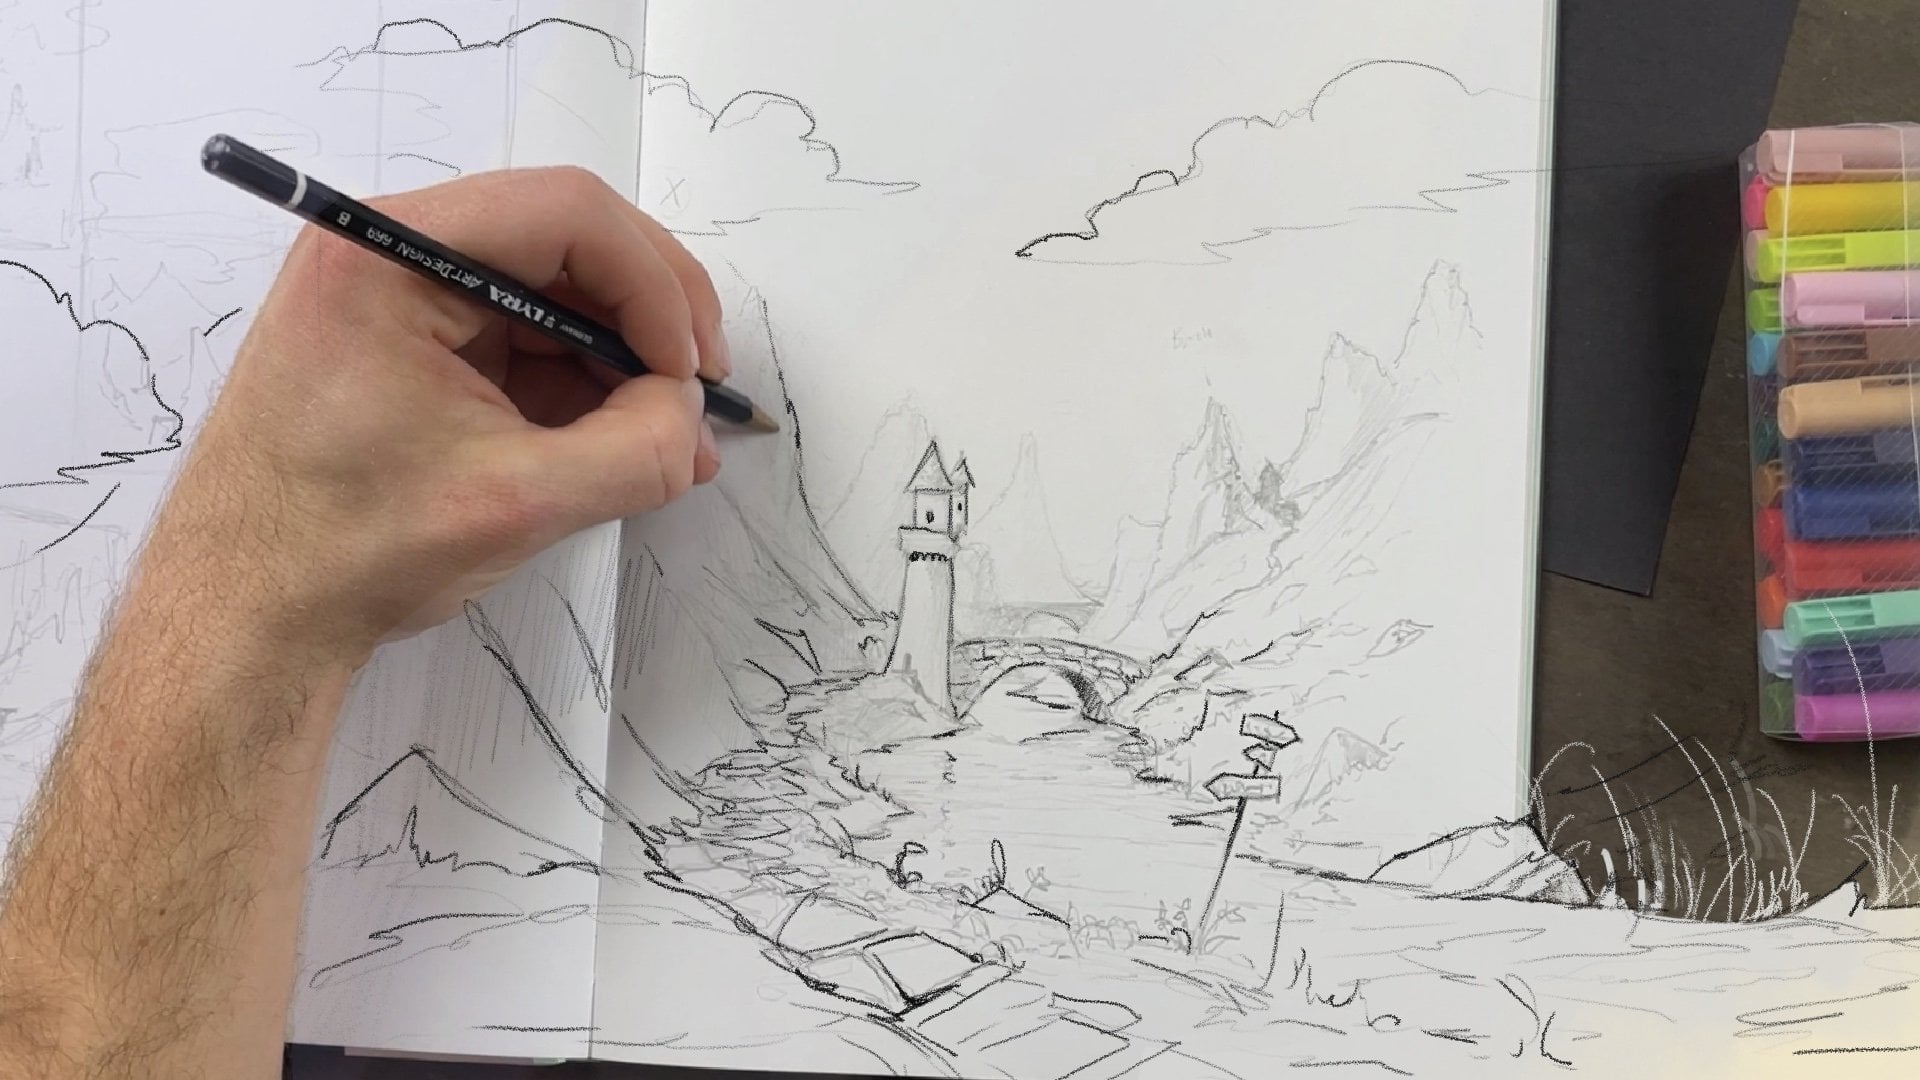
just walk into the scene. Now, I'm blocking off
the central tower, which is going to
be like a cylinder. There's a good chance for
you to practice how to draw this maybe
more tricky shape. I'm using the same method
that we talked about before, as in drawing a square
on the bottom and a square on the top that both lead back towards
that vanishing point. Then I'm just blocking it off, creating the cylinder and
creating the circles within the boundaries of the top
square and the bottom square. Then I erase views outside or exterior lines and I'm left
with just this cylinder, just this castle that we're going to draw
the roof on as well. Just a nice pointed roof and make it a little bit
magical, little bit mystical. I love pointed rooms because they just run and
you have Hogwarts and the fantasy castles
when we were younger. Now I'm drawing some
other points of interest below and
above the horizon line, keeping it neutral as if we were looking into the scene
as if it's a forest that we're walking through and that path which kind of
invites us into the scene. This is where composition and other elements of the
scene are so important as well because just as the focal point is on the neutral or through
the horizon line, we want other points of interest to lead us into the scene and frame the main
part of the drawing. When I'm finishing
off these trees, just like we talked about, I want to make it look
a little bit mystical and it is perspective, even though it's also a
composition or just details but I'm adding these small
details in the trees in the forest around
us that don't really detract from
the main castle or detract from the
neutral perspective but add a little
bit more interest, add some background and add
some depths into the scene. We want to make it seem like a three-dimensional
space and varying the size and shape of the trees is a really
key way to do this. We have the frame
of our drawing, we have the main castle tower, and we have a path
leading back towards the viewer and this
is where I add some other elements that just add a little bit
more interest as well. When you're drawing
this rock, for example, we're going to use that
same blocking method, we want to make sure
that the boundary lines of our square can
lead back towards that vanishing point and then we're going
to have complicated a little bit and add some
aberrations in the shape, make it a little more rocky. When you're drawing this scene, think about as well
ways that you could change the mood of
the perspective. For example, I'm just
adding some grass and other rocks from the castle. Would you draw a character
hanging out the window? How can you complement the perspective that
you're drawing by what you add in specifically how
you change the focal point or how you change
the characteristics of that central tower? For me, I find doors are really valuable thing to add
to perspective scenes. Specifically in this case, when I want it to seem like a immersive scene that
you could walk into by having a door there we had the sense that this
castle is accessible, but you can move into it. Make yourself at
home in the castle. Reminds me of the
Castle from Tango actually and now windows, specifically on a
circular cylinder can prove a little bit tricky. But just as I mentioned in the first couple
lessons on perspective, it's the lines leading back towards the horizon line
that are really important. As we chart out how we might add texture or how we might
add bricks to the castle, I'm almost following the top and the bottom lines of the castle itself to maybe add the rings that the
bricks would fall on. By charting this out, just like we sketched
out the rest of the drawing when we
want to add detail, when we want to add
windows is a little bit easier to do so
because then we know where the horizontal at the
top and bottom of the window would fall and how it
would look in perspective. Now this isn't an exact art, but remember as things
get farther away from us, they seem smaller. Since this window's on
the side of the castle, it's going to seem a little bit compressed or a
little bit narrower as it's facing away
from the viewer. Again, think about what
other elements you could add here to add some interest, maybe vines on the castle, maybe a character on the
roof or something like that, maybe another window
like I'm doing here. Think about how the objects, periphery or other
elements feed into the mood or the general vibe of the drawing that
you're trying to get across to the viewer. The neutral perspective
here gives you a lot of leeway to
create a scene that you want to create with the audience looking into it as a space
that we could inhabit, that we could step right into. We have this drawing of a
castle right in front of us, we got to practice drawing the cylinder of the castle's
body and how that would lead back towards the
horizon line using those elements of drawing Turkey shapes that we
practice beforehand. We also got a chance to
practice some organic shapes, the trees beside us, the path leading away from us. I feel like I can step into the scene and I hope
you do as well. Let me know what you
thought of this scene in the Class Project page. Next, we're going
to put a twist on the same scene in
these same elements, we're going to draw
this same scene from below and see
how it changes our perspective of
what we're drawing and changes the mood of
the drawing itself.
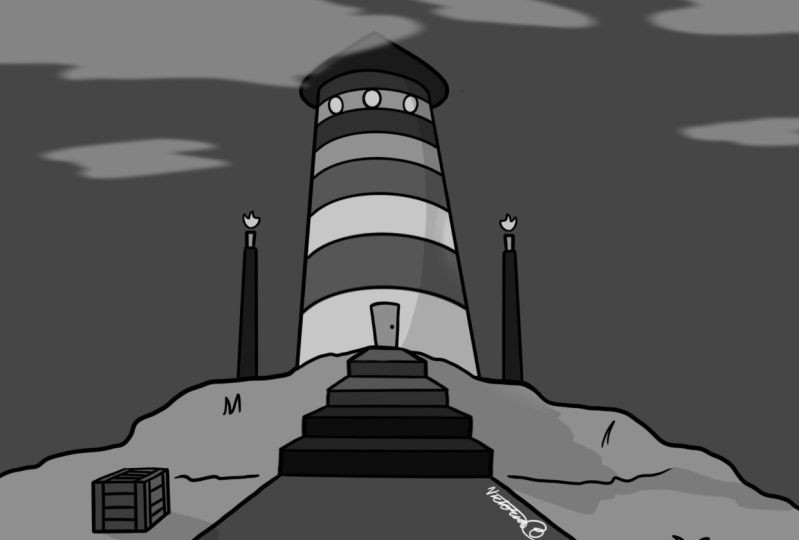
10. Lower: Intimidation & Grandeur : [MUSIC] Now imagine you're
standing below the castle. What would you see if
you looked up the steps? How would the trees
arch away from you up to the vanishing
point in the sky. How would the castle
itself, the cylinder, appear to recede back down
towards the horizon line, which is, remember,
at eye level. If the horizon line
is at eye level, that means the castle will seem like it's
towering above us, similar to a skyscraper. In this lesson we're
going to experiment and see how this
scene makes us feel, how this would change the perspective and change
the scene that we're drawing. With a lower perspective, we want more space on
the top of the page, or more space above
the horizon line, because that's where
our focal point, that's where the main objects of our scene are going to be. Horizon lines down low and
so is the vanishing point. Now I'm going to chart out where that main
focal point will be. Now, our current went up
on some rocks because I find when it's
towering above us, that's how you get more that central nude of
an imposing castle. I'm just charting it out
exactly like we did before, with the squares leading back towards the
vanishing point, the top and the bottom,
blocking it out. You can leave it as a square. But I like the challenge
of making it a cylinder. We're going to chisel away at this cylinder all the while, keeping in mind that
vanishing point. Now we have a top
vanishing point as well, which is right at
the top of the page. That's because the
parallel lines leading upwards would
converge at that point. I want to keep that in mind
as you block out this tower. We're going to add
the door here, again, leading towards that
vanishing point at the top of the page. If we keep that a square too, we can then just chisel off the squared corners
and create a door, just like we did on
the last drawing. Now, but we'll try putting a window in the same
place we did before. We want the vertical
lines leading to that top vanishing point. The horizontal lines,
we want them following the natural curvature
of the tower. You can use the same method
that I talked about before. Whereas following
the top curve and the bottom curve of the castle and sketching those
in over time. Or just experiment,
see what looks right. You can always erase or
just draw over it again. Especially if you're
drawing lightly. [MUSIC] A few in mind too how the tower is
positioned above us right now, we'd have to climb up presumably some stairs which
we can have later, or a large hill
to, to get there. It's a little bit
intimidating. I find at least. Now the thing we can
do with the trees, which I think is a
really cool effect, is make them lead up towards that vanishing point as well. Makes it seem like
the castle and the trees decided are
towering over top of us. I start out with the
basic tree trunks and then just add in some fluffy cloud-looking things for a canopy that
we can detail in later and add some branches that now see the tower above us, so more of the
branch is visible. Because we're
underneath the trees. Adding in more detail and
adding in these trees that frame the castle achieves the same effect
we got last time. Which is that the focal point of the drawing is more focused on and centralized because of
the elements surrounding it. We have the castle
right in front of us and the castle above us. I find those
different scenes add a different flair to the
perspective scene that I drew. We've got one more though,
and that's a bird's eye view. This is probably my favorite
perspective to draw from. I'll see you in the next lesson.
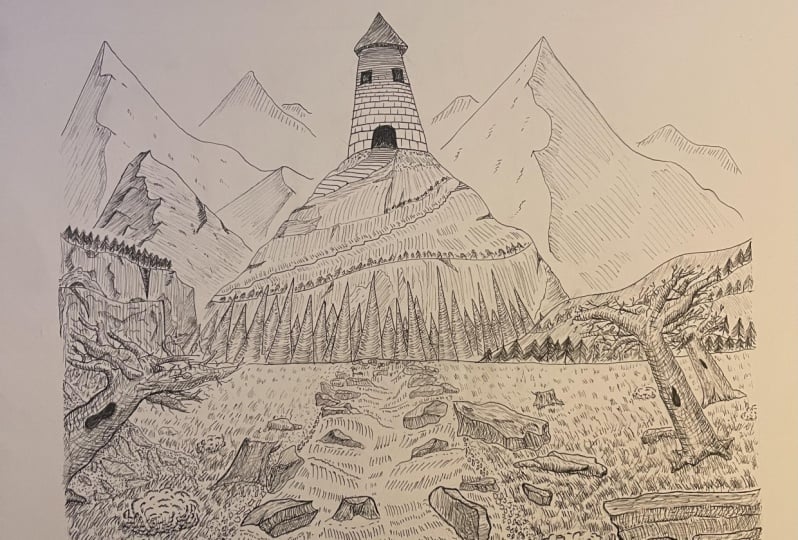
11. Bird's Eye: Scale & Power : [MUSIC] In movies and video
games, the establishing shot, the shot that tells us where
we are, what's going on, is often from a bird's eye
perspective or up in the air. It's a great way to show a
wide swath of the scene, show a huge chunk of landscape, and really establish the
viewer in where we are. It's also a challenging
scene to draw in perspective because
sometimes we're seeing things from farther away, we're seeing a wide
range of objects and we have to include the
background that's farther away, and in some cases is
a little bit more difficult to draw if we're
drawing things like rivers, streams, forests, that stuff. Because often we can't see
the bottom of the trees or we can't see the
details of the river, etc. You know what I'm going to
say now is that we're drawing the horizon line near
the top of the page. I'm going to say about a quarter or a third of
the way down the page. The reason we're
doing that is because we want the focal
point to be below it. We're going to have more
space below the horizon line with which to work and
to create a scene. I'm creating that
vanishing point in the middle of the page, and then I'm going to do our
block method that we've gone over a couple times now as
you block out the cylinder. This time where the castle base, this time keep in
mind or notice how now it's going to seem to recede towards the
bottom of the page. We're almost flipping the script or doing the exact opposite
of what we did last time. Whereas another
vanishing point will be near the bottom of this page. If you look down at your
ledger now or your phone, you notice that it seems to get smaller the further
away it is from you, exactly the same is true here. Whereas the base of the
castle now is going to be smaller than the top. Keep in mind too how now above the castle we can see
that horizon line. There's a lot more open or
negative space visible. The space around the castle that until now isn't
really filled up. But first, let's finish
off some details, so we're going to
add another door here with the vertical
lines leading towards that vanishing point
and then maybe another window off to
the side of the castle. Again, keep in mind that drawing these shapes
over and over again, or drawing them really
lightly and then taking a step back or
holding your paper at arm's length can be a
great way of making sure your lines and your
shapes look correct. Develop a critical eye and make sure you take the time to
hold things at arm's length. Now, when we're
drawing the trees, we want to keep in mind
that they're going to seem to get smaller
towards the base. Also, the nearer they are to us, the less of the trunk
is visible because it'll be covered by the canopy. We can start off
again by drawing some really rough
outlines of the canopy. More of the trunk is
visible but farther off the trees are
from us the viewer. A little bit less of the
castle is visible here, a little bit less of the
trees are visible here, and the path appears
a lot smaller, but it also gives us a little bit more power over the scene. We can see way farther
into the distance. It almost seems like it
establishes the castle within a much larger
landscape than before, or a landscape that is a
little bit more knowable. I'm going to try
to draw the same rocky outcropping here and I'm going to square it off from that vanishing point
to that horizon line. Again, it might be
a little bit of a confusing part that I draw a square and then create
an organic shape, but I find it's a really
great way to develop the parameters of the
tricky shape your drawing. Also by not using a ruler and having a
little bit of leeway, even if their perspective
lines don't directly add up, I think it adds some of your own creativity and your own flair to the
perspective drawing, which is really important when you're creating scenes
or specifically when you want to
express an emotion or express a mood in your piece. I love a mountain
background because it infers that there's
a grand distance out there and probably
other civilizations and communities and
towns in the background. That's why I want to add that, and it contributes more
towards that mood of grandeur of exploration
and adventure. Now, I'm filling out these
lines a little bit more. I talked about it a
little bit earlier, but I love to go back over
the lines already done to develop a little bit
more confidence in them, and also to give it
a critical look to make sure it
actually matches up. Again, by placing the castle in the
middle of the scene, we make it important. We make it a part
of the drawing that we ensure people will focus on. By placing it below us, it almost seems like we're
flying over top of it. Now, we have three
perspective sketches. We have one from a
neutral perspective, one from a lower perspective, and one from a bird's eye
or a above perspective. Next, we're going to talk about some other elements
you can add to your perspective
drawings that don't rely on perspective drawing. This sounds confusing,
so I will see you in the next lesson where I'll
explain exactly what I mean.
12. Light & Shading Matters: Part One: When you're drawing
a perspective, there are a couple key elements
your scene really needs, or else it's not going to
look good no matter how technically correct
your perspective is. Texture is just as
important as light when it comes to
perspective drawing. In this portion of the lesson, we're going to go over how to use texture to enhance the perspective
sketches you do and add that mystique and
drama to the scene. There's a couple basic
principles of texture. The first is that
the farther away from you within the scene, the less detailed and the smaller the
textures will become. For example, with grass
here and leaves here, I'm going to create them a
little bit larger and move them smaller back here with
a little bit less detail. A common mistake I used to make was drawing the same amount of detail farther back in the
scene as in the foreground. But that's not even
really artistic choice. It's in the real world as well. If you look into a
valley for example, farther away from you
will become more hazy, more misty, less detailed
than the things up close. That's the same with rocks or
even if we're going to add some steps to the scene, they're going to get larger up here and as they recede
into the distance, they get smaller, less detailed. Some of these things
you'll only really notice when you
finalize the drawing. For example, if we're going
to finish this in pencil, I'd maybe erase some of
the sketchy lines and add in darker lines or spend a little bit more time with each of these detail elements. The same with the trees. Now that we have the trees established in our
scene, for example, these ones that arched
up towards the distance, I'm going to draw them in. This is another spot where rulers really would
hinder us not help us, because even though
trees are vertical, they're not uniform
as in the bark and the branches and everything changes depending on the
thickness of the tree, the kind of the tree and if we measured
that with a ruler, we'd end up with a
drawing that doesn't look interesting or it
doesn't look organic. Now maybe the most
difficult part would be the stonework on this castle
because we want it to recede into each side of
the cylinder here and so the stones on
either side will get smaller as well as getting
smaller at the top. When I approach a larger area of texture in a
drawing like this, there's a couple of key
ways that I go about it. First, is I draw a line
right up the center. Next, I'm going to dot out a line a little over halfway up, because it represents
halfway up the castle even though to our
eye it's not halfway. The concept of foreshortening
that I mentioned earlier means that this line halfway up actually appears a little bit other ways
farther up the castle because the top
appears shortened than the area closer to us. Next, I'm going to add
another arc halfway up that line and a little over
halfway up this line. Then I'm going to keep
adding arcs in here, following the shape
of the top of the castle and the bottom
that we etched in. These are going to be really
light and these are the reference points for brick. I'm going to dot in
brick and here again, you can be really gentle and
not really care much about the straight shapes and
you want them to generally fall along these
arcs that we drew. As they get closer to the edge, they're going to get thinner. As they get closer
to the middle, they're gonna get
wider or thicker. I'm not even going to do
the whole castle because gesturing in the texture is
the most important thing here and even just
have a little bit of texture can really make
the scene seem alive. As you can tell, I'm not
really worrying much about that the
size of the rocks, more that they follow those
rough arcs that we created. As they get to the
top of this tower, I'm going to add a little
bit less detail and the rocks will get
smaller as well. At the bottom here they're
a little bit thicker and they appear a
little bit more detailed and I'll detail them in a little bit more further on
down the drawing journey. But as you move towards
the edge of the castle, they should get more compacted because we're
viewing them from an angle. As you can tell, a lot
of these rocks won't actually follow the
perspective lines of the horizon line that we first established but
that's not the main point. The main point is that
they get smaller towards the edge of the castle and larger towards the middle here.
13. Light & Shading Matters: Part Two: [MUSIC] In most of our drawings
of environmental scenes, specifically in perspective,
the sun is a light source. Or if it's nighttime, the moon, or even about on a cloudy day, there's usually a direction
the light is coming from. I treat it almost as a vanishing point when I'm determining where the
light's coming from. It helpful to have that visual cue on my drawing
or even off my drawing. For example, let's pretend
the light is here. I draw a little
point there really lightly to help me determine where the
shadow is going to be. That doesn't really
help us though, because the light here could be a sun in the background or it
could be a sun behind the camera or even right
here in the midground. Specifically, you know
how the sun could be shining from
behind the tower, besides the tower or
in front of the tower, or from this height. I'm going to pretend that
I know that the sun is shining from directly beside
the tower at this height. What I do then is
to determine where the shadow is going to be
as I draw straight line from the sun point to the tower. Then from there, I know that
the shadow of the tower is going to follow that straight
line down to the ground. That'll generally be
how long the shadow is. Then to find out how thick
the shadow is going to be, how thick a shadow of
the tower would cast, I'm going to do our famous old blocking square method
with a line that goes towards the
horizon line and then connecting that to the
sides of the tower. However, this side, the shadow won't be
straight because the edge of the cliff and
the trees are in the way. I'm going to draw some little aberrations
of the landscape, and likewise on this side, some little dips to emulate the way that the
landscape will change. With objects like trees, I
usually just guesstimate. I know that the sun
is beside the castle. For these trees actually, it would be directing
the shadow that way, because the trees are farther
back to the distance, than the castle is. It can help flesh out the
landscape and make it feel more three-dimensional if other areas like this rock has
shadow as well. Because I know that the sun is hitting them from right here. I'm going to draw this side of the rock in shadow and vary. When you look at shadows
in the real world, they usually contain different
density of shadow and different darkness depending
on the texture as well. The thing with shadows is
they're easy to scrub, meaning that it
doesn't really matter if the shadow is exactly
the correct length. As long as it looks
generally correct, it will trick the viewer's eyes. I measured this by generally
following the angle that's hitting the castle to this side. If the sun's up
higher, that means the shadow will
be a lot shorter. But this doesn't help us shade
in the castle because it's shading in the object that
really makes it stand out. Just like we know the sun
is beside the castle, we know that this side
is going to be darker. How we shade in these shapes is we want to shade in
the darker side here and then generally
fade to light. Because it's a circle.
There's not a hard edge. It'll be different
if it was a square, because then we'd be
shading in one face of the square dark and
one face light. But here, since it's a cylinder, the shading has to get
lighter as it curves around the spherical
face of the castle. Another element
you can add to add some realism is shading
underneath this roof. If we draw a line from
the sun to this roof, we know that there's
going to be some shadow on the roof as well, because the overhang
hides part of the castle, and on the door here. This whole window is
going to be in shadow. This side is going to
be the lightest side, because it's this
side facing the sun. But that's only one
way of using light. By studying reference photos, studying photos of
different times of the day, you can better incorporate different kinds of light
into your drawings. In the next lesson, we're going to talk about some other finishing
techniques that you can use in your sketch to
really make it come alive.
14. Next Steps in Perspective : By practicing these techniques, you'll be able to learn
better how to transport viewers into new environments
and familiar ones. But now that I've hit
you with a barrage of mumbled perspective tips, here is a couple of
things to consider and post about in
the project page. What angle did you find most
interesting in this class? What kind of perspective or what vantage point did you
find most interesting? You can pick a
castle that you drew there or pick something else
that you'd love to draw, and draw it in that perspective. Think about shading,
think about light, think about the way that
those tricky shapes might look when viewed
in perspective, and try to put that on the page. Finish off that
sketch in pencil and then post it in the
class project page. I'd love to see what you create based off what you
learn in this class.
15. The End : [MUSIC] Thanks for joining in. I hope this class
taught you a little bit more about perspective and taught you some ways
that you can really put it to use to evoke emotion throughout the angle that you choose to draw from. By keeping in mind which vantage point
you're drawing from and why as well as keeping
the focal point in mind, the vantage point,
the horizon line, the vanishing point all those
elements work together. Throwing in light and
shading and you've got a pretty good
concoction to create drawings that
transport the viewer, but I want to see
what you've created. Make sure you post in the class project page or tag me on Instagram
@samgilletteillustrations. Happy sketching and remember
practice is the key to learning these techniques
and to locking them down. Thanks for the take in my class. I'm excited to chat with you
and see what you create. [MUSIC]
 Sam Gillett, Pen // Pencil // Procreate