Transcripts
1. Introduction: My name is Amelie Mancini. I'm a Painter, Designer, and Printmaker. Went to school for painting, and that's what I did for years. I had all these other jobs on the side. I was tired of working for other people, whether it was to be an art assistant or a waitress, and I tried to figure out a way to bring my art into everyday products. I'd started looking into other techniques other than painting, and I stumbled on to printmaking. Just started making some liner cuts using some stencils in order to put my designs onto, first, paper, and then onto fabric and leather. That's how it started, and so today, I run a studio with a team of three people. We are basically printing on fabric and leather. Then, cutting it and sewing it into tea towels, napkins, pouches, and larger bags. We have managed to basically keep the whole production in-house and do everything in the studio. So, that's what I do. The idea behind this class is very, very simple. The idea is that you don't need to know how to draw to create a really cool pattern. If you know how to draw, great, good for you. You can definitely create some really cool designs with demonstrations, and things like that. But if you don't know, then this is a good way to create really cool patterns just by using a few simple geometrical shapes. The idea is to create a tile that is going to have a very simple design, and then use that tile within a grid, and rotating it and alternating the combinations to create some really cool designs. You can print it on notebooks. You can cover a book with it. You can taper your cabinet. That's the idea to be able to design something and then put it into your life, and not just frame it, and put on the wall.
2. Drawing Your Pattern: In this class, we're going to create a design for a tile that is going to be used within a larger grid. So, you don't need any fancy equipment. You basically just need a paper. I like to use a grid paper. I like Rhodia but you can use whatever gridded paper you have. We're going to use a pencil, an exact knife. Then, if your hand is not super steady or if you want something very tight, you can use a ruler and a compass to draw shapes, but you don't have to. Then, we're going to be scanning the design and xerox it. So, you just need some printing paper, maybe some vellum. Then, later on, just some glue and I choose a roller to roll up the glue. So, the grids that we're going to use, so there's basically three kinds of grids that you can use. We have the square grid, and then we have the staggered grid, and then diagonal, which is just the same thing but on inside. The tile that we're going to be designing will have to be square so that you can fit it within those grids and you can rotate it and you can alternate it in different combinations. A repeat pattern is basically one tile or several tiles that are repeated in a grid. You can use it by choosing different images that you like, and then kind of repeating them, alternating them, which is what I do with my own patterns. If you feel like you're not too sure about your drawing skills but you're really interested in creating a pattern anyway, I have a solution for you that's really easy and it's also really fun because you don't really know what you're going to get until you start printing it, which is, I think pretty fun and exciting. The idea is to create a design that just uses very simple geometrical shapes. Just to show you an example of what I'm talking about, I have this shape here, that's a square that has some diagonal stripes on it, another square, and then some other stripes on the on the sides. This is a good example of a design that will work really well as a tile but is not necessarily super interesting on its own. But when it's repeated, then you create a larger pattern. So, we have something like this where it's the square grid is just repeated, but I'm rotating the tile every time. Then, you can also get something like this and that's using the diagonal grid, using the same exact tile. Then, we also have this effect diagonally again. Then this one, where it's the square grid again, but this time, I'm rotating it differently every time. The first step is to draw your tile. So, I'm going for three by three. Then, I'm going to combine a few shapes kind of randomly. I have no idea what it's going to look like in the end, but that's part of the fun. It's better to not have something that's completely symmetrical because the idea is that you want to be able to rotate your tile and it looking different, whether it's upside down or to the left or to the right. I like the handmade quality, so I'm comfortable just drawing freehanded. But if you want something that's very clean, or you're a little shaky or whatever, you can use the ruler to draw your lines, and you can use the compass if you want to draw a circle. So, I'm going to do a semicircle at the bottom here, just going over it with the pencil. Then, I'm going to draw a line, some stripes in the middle. Once again, the whole idea is to keep it very simple. So, there's no need to do something that's already complex on your tile. The idea is that by combining those shapes, it will create a more complex and interesting design. So, if you were to do something too complex here, then it might look really busy and not work as well when you're combining the shapes. So, this is why I'm just going to keep it to circles, semicircles, lines, triangles, other squares, but just, simple is best. I mean, there are different ways of doing this. You can just improv, just fill it up with whatever shapes without thinking at all about what it's going to look like once it's next to, like within the grid, or you can kind of think ahead and plan it a little bit more. You could say, "Okay, I just want these triangles to connect with the same shape but on the other side." Once you're a little bit more used to it and you can kind of guess what it's going to look like, then you can kind of go in ahead and set things up like that to just control it a little bit more. But this is the first one, and I think the whole idea of this is to just kind of go for it and not plan too much. Just this rectangle here and I think I'll add another line just for fun. That's it. So, there's no symmetry, really. It's just a few elements and you could assign yourself shapes to use or you could say, "I want to use some circle shape or a semicircle, some triangles, or rectangle, and then some stripes." Or you could say, "I want to use only triangles or just a bunch of circles." Or you can just kind of give yourself guidelines. Once again, don't think too hard about what it's going to look like eventually. The cool thing is if it doesn't look good, then you can just start over. Once we have the shape, I'm going to transfer it on a piece of vellum because I want to scan it. I don't want to scan the lines of the paper. If you didn't use grid paper, you don't need to do this but since I did, I'm just going to basically copy it onto the vellum. Then, the next step is going to scan this, and then just print a bunch of tiles.
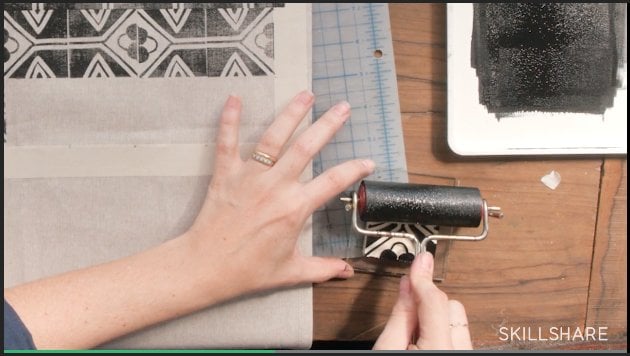
3. Transferring Your Pattern: So, I've xeroxed a bunch of copies of the tile. So now, the next step is going to be to just cut these out. So, you have to figure out how big of a surface you want to have your pattern be in the end. Here, I only printed and cut 12 tiles. That's enough to kind of show how the grid works. But if your surface is really big, then you'll have to do a lot more. Also, if you know you want to do a big area, you can make your tile way bigger, or if you're doing a smaller area, you can make your tile way smaller. Then I'm going to go back to my grids here, and I'm going to try out different combinations just to see what it looks like. So, I'm going to do, first, the simple one, the square where it's basically you have all of your tiles, they're all next to each other, and they're all facing up like this. So, you can already tell that just by putting it together like this, it's already creating some interesting shapes. So, I think that's like a really cool pattern and it's literally, I just copy them and put them next to each other. Then we can try something different. We can try a pattern of up, down, up, down, up, down. So, I'm basically turning every other tile upside-down and that's creating a totally different look like this. This is a good example of something that I had not planned at all but it worked out really well. I'm noticing these are creating kind of a stripe thingy. So, that's cool. I did not see that coming. What makes it really fun is that you're going to realize that the shapes are combining in really cool ways. So really, I mean, it's kind of limitless. You can just play with different ways of putting these down and this is just using the square grid and then you can decide that you're going to do a staggered grid. So it's the same idea but you're just going to move the second row so that it's staggered with the first, and the third row is going to be lined up with the first one, et cetera. So, you have to picture it on a larger scale and same thing, and then you can do the diagonal grid instead. So here, we would have them be like this. So, you can kind of just play with this for hours. You can just play with this until you hit a combination that you really like and you think works well for your pattern. Once you've hit something that you really like and you think is the best combination, then you can just glue it basically. So if you like this, for example, then you're going to take a bigger sheet of paper and then you're going to basically put glue on the back of your tiles. So, if you're doing a wallpaper, you would just glue it directly into your wall. If you want to paper your cabinet doors in your kitchen, for example, you can do that, or if you're doing a little notebook or something, then you would just glue it onto that surface. Just make sure you use the appropriate glue. You can use paper glue, you can use a Modge Podge, whatever is going to stick to your surface.
4. Applying Your Pattern: So, I'm going to do the square grid and I'm going to just glue it on this notebook. So, this type of glue dries clear. So, I'm generally pretty messy and it's totally fine if you get glue on the front of it, it doesn't matter because it's all going to be clear afterwards. So, yes, just apply your first tile. Start with the top left corner. You can use a little squeegee just to make sure there's no air bubbles and then you do the next one. You can use a foam roller, you can use one of those foam brushes. Whatever you're used to. So, I'm going to do up down up down. You can just smooth it out. So, I just used basic printer paper but you can definitely use paper that's in different colors and just nicer paper. This is really just a basic white paper. So, when you get to the edge, you just trim it. Or if you wanted, you could also go over all the edges and then just folded in. So, then you can just roll out a layer of glue or much forge over everything so that it's water resistant. Then let it try and because the glue makes the paper curl up, so you'll probably want to let it dry and then smooth it out a little bit so that it's little flat and nice [inaudible]
5. More Creative Classes on Skillshare:
 Amelie Mancini, Artist & Designer