Transcripts
1. Hello: Hey, I'm Leon big Berk. I'm an artist and
pattern designer based in Guelph,
Ontario in Canada. This Skillshare
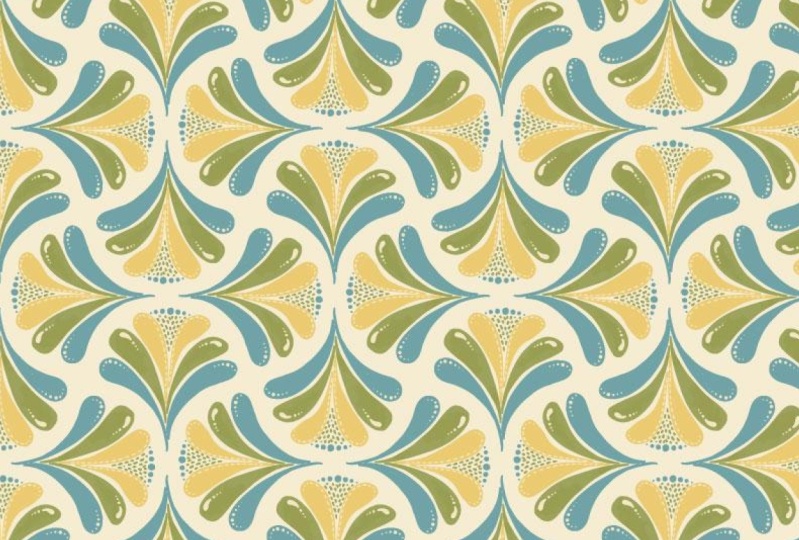
course will focus on this fun retro plurals. I'll use it as a way
to introduce you to some of the specific skills
I've gained over the years. Things I really
wish I knew when I started that have helped
me tighten my workflow, grow my portfolio and
license model works. You'll complete
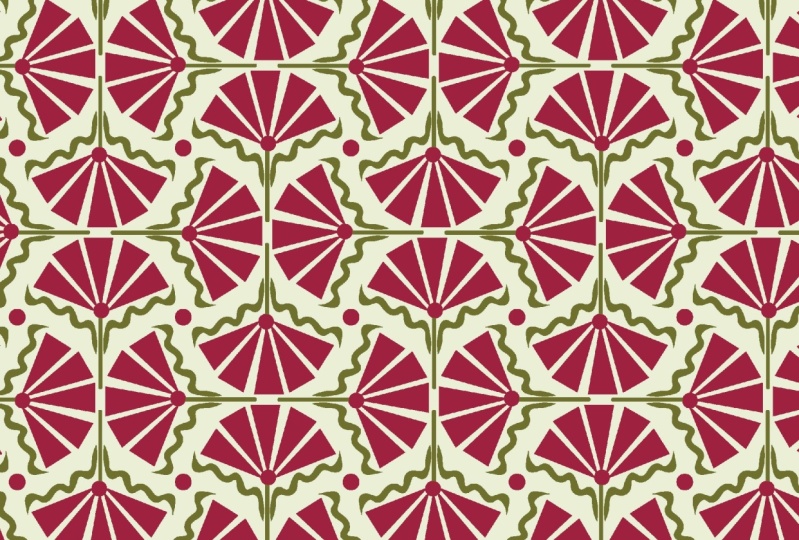
this class without leads to printable, shareable, sellable patterns that may look similar to these or may
highlight your own unique style. This way of working
allows me to streamline the tech side of pattern-making
when I wanted to. I can spend more time on the
creative aspects of design. These types of patterns can
stand alone and be used for anything from wallpaper
to art prints, greeting cards,
textiles, really, anything with this surface. Mastering this template
can also help you quickly add to
existing collections, especially when you're
under a tight deadline. So first, I'll show you how I set up my workspace
and Adobe Illustrator. Create a scallop shape with the shape builder tool and lay it out in a pattern
template using symbols. Next, you'll have the option
of creating something new. Pulling from your
own portfolio or making this simple vector flower with me in Adobe Illustrator. Then we'll plug it
into the template for the big reveal to show you how to work with symbols
to create variations, and do a quick
walk through how I use this template in other ways. Finally, we'll make a
bonus pattern in under a minute with the motif
you've already created. To take this class, you will
need Adobe Illustrator. Everything else is optional. I will be demonstrating using Adobe Illustrator
CC 2022 on a Mac. Although this is definitely
a beginner friendly course, I've included
several little gems for the more
experienced designer. This may seem like
a lot of setup, the workspace, the Scala,
the pattern template. But once the prep is complete, you get to skip
to the good part. Each and every time
you set out to make a scallop OG pattern to add to a collection
or your portfolio. Join me in the next
video to go over the class project
and class resources.
2. Project and Resources: Your project will be to share at least one of the patterns you created during this course. But feel free to share
as many as you'd like. You just might find the process
a little bit addictive. I actually can't wait
to see your patterns. It's definitely the
best part of teaching. Just click on the bright green
Create Project button on the Project and Resources
page under the video. The downloadable resource for this class includes a list
of shortcuts that I use. The color palette
for this floral and some current palettes
I'm obsessed with. I've also included a printout of the scallop shape we will
create and my contact info. Because part of my teaching goal is to tighten your workflow. I use a lot of shortcuts, will use them repetitively
throughout this class. So I think most will stick. But just in case
you might want to print out the
shortcut sheet from the download and keep it
close at hand for reference. One more note on shortcuts. As a Mac user, most of the shortcuts
include the command key. So if you're using Windows, you just replace
command with control. E.g. I. Use Command S to save. At a Windows user would use Control S to save, to
download the file. Make sure you're on the
Skill Share website and your Internet browser
and not the app. And then go to the
Downloads and Resources tab and click on the file. Join me in the next
video to set up your workspace and
Adobe Illustrator.
3. Workspace in Illustrator: Two things I want
to share with you right off the bat is how I set up my workspace and rely
on the properties panel. These two things have really
improved my workflow, but I want to share
my setup with you so that your screen
looks like my screen. That will make this class
really easy to follow. So let's get started by opening adobe Illustrator
on your computer. At the top left of your
screen, select New File. Over the right, change
your units to pixels. Double-click on the width
field, and enter 2000. Do the same for height. Select RGB color mode. Raster effects at high 300 ppi. And click Create. This may look familiar. Panels on top of panels. Some never used, somehow
losing others off the screen. And the constant
need to return to Window to search
for what you need. I worked like this for too long and wasted a
whole lot of time. I would rather spend drawing. So let's clean it up. But don't worry, I'll
show you how to save your current setup in case
you prefer it in the end. At the top of your screen, select Window, Workspace,
manage workspaces. Hit the plus sign
and name this setup. I'm going to name mine. Beautiful, chaos.
And click. Okay. Now your workspace
is saved and you can revisit it anytime you like. Head back up to Window
Workspace and check essentials. Head back to Window Workspace. Reset Essentials. Now your screen should
look like mine. Let's set it up the way you
will use it for this class. Had up to the top
to select Window. Move your cursor
down to symbols, and click to select. I personally don't use brushes. So I'm going to click
and hold the tab, drag it out, and just
click the X to remove. This will always
be under window. If I change my mind. Let's move the symbols
and Swatches over. Click to the right
of the x and hold, drag it over to the tabs. Wait for the area to
highlight and release. I'm also going to get
rid of the comments. So I'm going to click and hold, drag it out and hit the X. Now select the properties tab. Press V as in Victor on your keyboard for
the selection tool. And take a look at
the properties panel. From here, you can
edit artboards, change some documents settings, access your documents
setup and preferences. Now hit L on your keyboard. As though you are about
to draw a circle. In your Properties. You can see Transform Flip
horizontally or vertically. Fill stroke opacity. You can access your effects. As we continue on in this class, you'll see how intuitive
properties seems to be. In my old way of working, each of these tools would have required me finding an opening, another panel, eventually
just bearing my work, especially when working
on a small screen. I know it sounds like
I'm overselling it, but switching to
using properties made a really big
difference for me. I hope you'll give it a try. On to the most important step, saving this workspace. Select Window. Workspace, manage workspaces. Click on the plus sign. I'll name it pattern, template. And click. Okay. Now I'd like you to select
this workspace because we're actually in the
edited essentials. So Window Workspace and choose your newly named workspace
minus pattern template. If for some reason this gets a little bit chaotic
by adding Windows, you can always go back to window workspace and then
reset pattern template. It will return you to this
beautifully organized, easy to navigate,
custom-built, clean workspace. Join me in the next
lesson where we will create the drawing guide
and pattern layout.
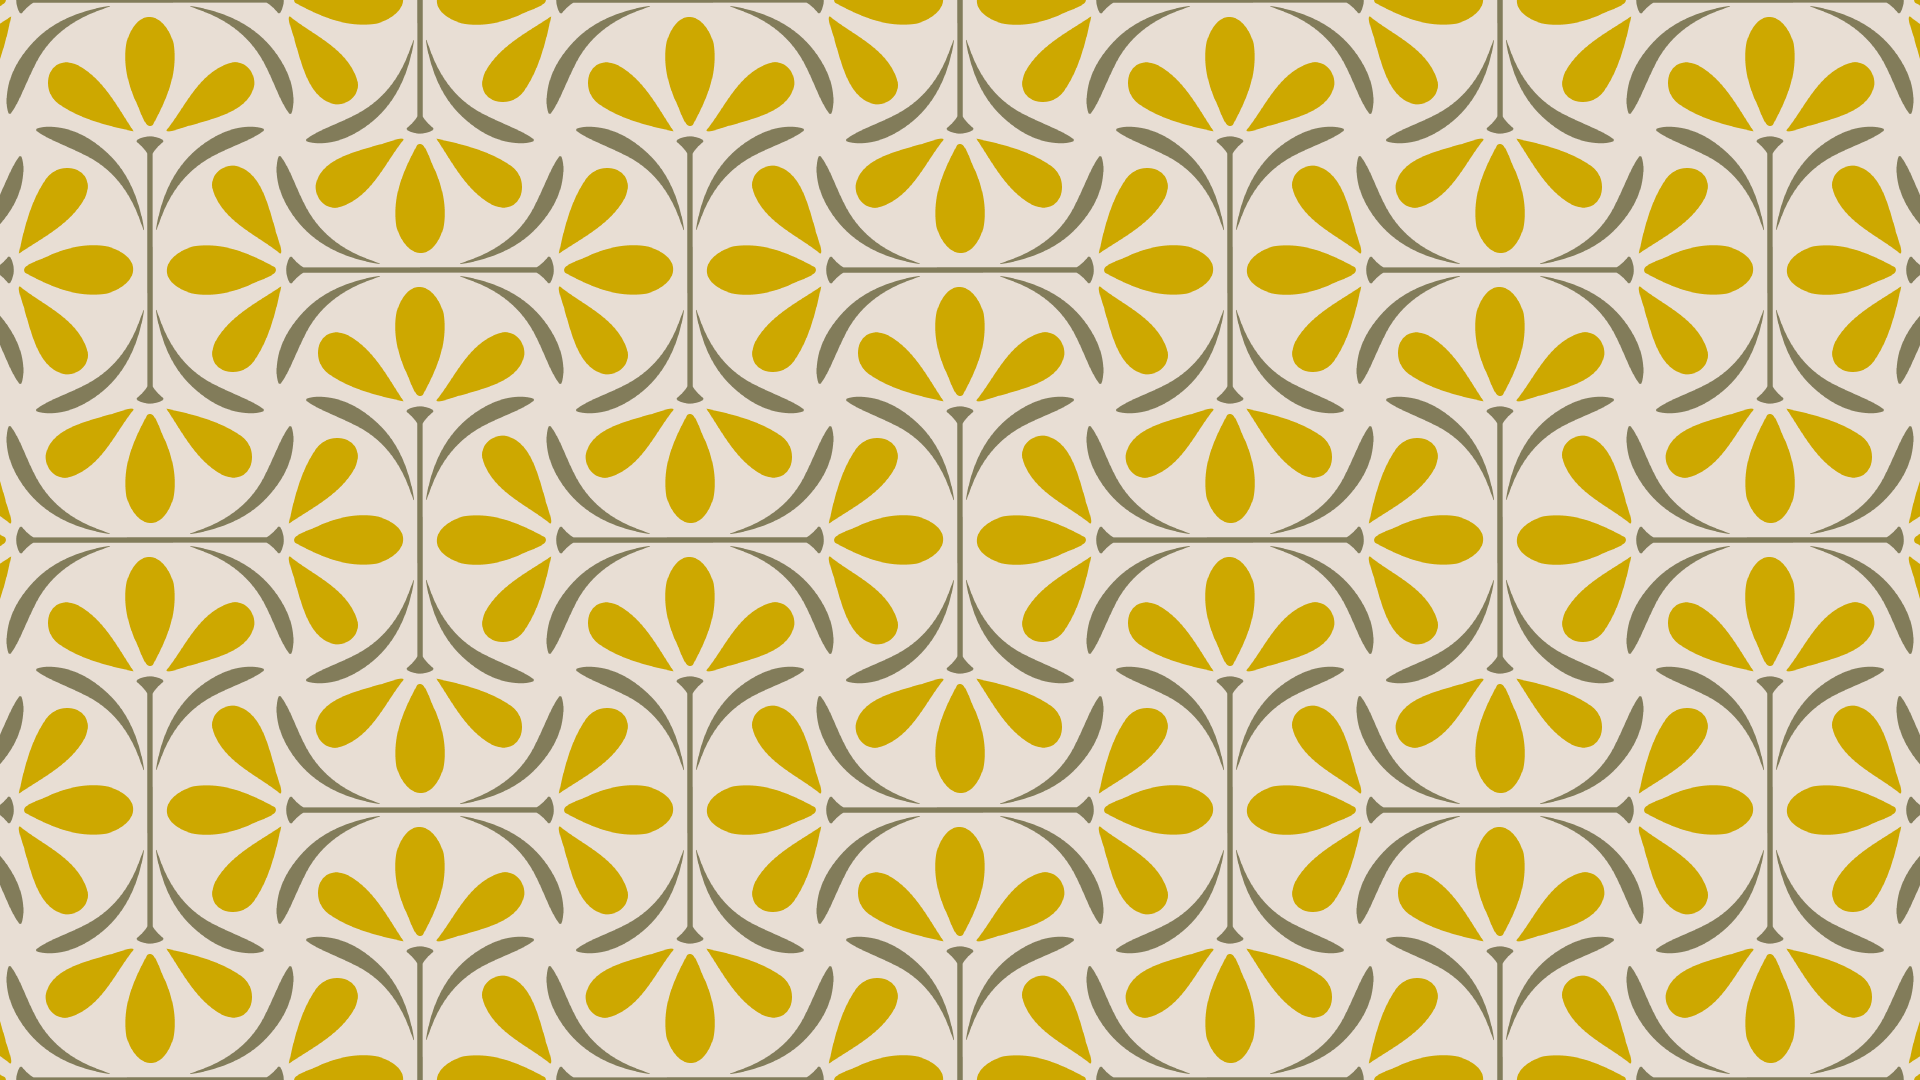
4. Drawing Guide and Pattern Layout: In this lesson, we'll create a scallop shape
drawing guide and design a reusable pattern layout using symbols in
Adobe Illustrator. Just in case he took a break. I have a 2000 by 2000
pixel art board ready? In my pattern
template workspace. Let's make a scallop shape. Select L on your keyboard
for the Ellipse Tool. Click anywhere on
your workspace. Double-click in the width field. Enter 1,000. And do the same
for height. Click Okay. I'm just going to center it
so you can see it better. Now let's take two round bites out of the bottom of the circle. Press and hold Command Shift M. For the move tool. Move it
half its width to the right, or 500 pixels, and half its
length down 500 pixels. Hit Copy. Command Shift and move it to the left by its full width, -1,000. And enter zero for vertical. Copy. Command a to select all Shift M for the
shape builder tool. Holding down the option key, click to delete the
unwanted shapes or the bottom two circles. Here's the scallop
with tail that we're going to work with
to create our pattern. Now to introduce you to
the next game changer for tightening your workflow and building out your collections. Symbols. At the top right of your
screen, click on symbols. Let's delete the default symbols by clicking on the first one. Hold down the Shift key, click on the last and release and just hit the trash
can at the bottom, delete the selected symbols. Yes. Press V on your keyboard for the selection tool
or the field arrow. Click and drag your shape right over to that Symbols
panel and release. The settings here are irrelevant
for what we're doing. I'm just going to
name this one blank. Scallop. And click Okay. With this symbol on the
art board still selected, head over to Properties and
hit Horizontal Align Center, and Vertical Align Top to bring it to the top
of your art board. Command C to copy command
F to paste in front. Select Vertical Align Bottom. Up in the Transform section of properties, rotate
2,100.80 degrees. A quick note on why I
rotate instead of flip, I often use hand-drawn motifs that are not perfectly
symmetrical. So let's say it's a
flower with leaves. And a leaf on the right
is slightly wonky. If I were to flip it, the same imperfection
would be right below it. This is a subtle thing, but when it's tiled
and zoomed out, the flip version may
draw the eye and create an unwanted
perceived vertical line. Whereas if you rotate it, the wonky leaf
will be over here. It allows the viewer's
eye to kind of go side to side as it
tracks the pattern, giving the pattern of feeling of movement and a more
handmade feel. I know this might
not make a lot of sense to you if you're
just starting out. But it is one little
trick I use to keep things more
scalable and less automated looking
even when using a super streamlined process
like this pattern layout. Back to the template with the bottom symbols
still selected. Hit Command C to
copy command F to paste aligned to the right
side of the art board. And vertical align center up to rotate and
select 90 degrees. Command C, Command F, again, aligned to the left
side of the art board and rotate 270 degrees. Command a to select all. Command G to group. I know it doesn't really
matter in the end, but to keep things simple and appease my completely
uptight brain, I'm going to adjust these
pixels up at transform to 1,000 for x, 2000 for width. And make sure it's still 2000
for height and 1,000 for y. I'm not sure why
Illustrator does this at this point in the
process and it probably, as I said, doesn't matter. I'm just changing it for simplicity sake with
the group selected. I'm just going to
hit Command day, make sure it's selected. Let's hit command shift M, horizontal -1,000 pixels, vertical -1,000
pixels, and hit Copy. Command Shift M to move again. The full width of the
art board, 2000 pixels. And zero for vertical.
And hit copy. Hold down your
shift key to select the group on the top left. So now both top
groups are selected. Hit Command Shift M, horizontal set to zero, vertical set to the full
length of the art board 2000. And hit Copy. Command
a to select all. And Command Shift G to ungroup. It's going to zoom out. So you can see. Now I'm going to select all of the
symbols that fall completely off the art board. Clicking on one, holding
down Shift to click on the rest and hit Delete. It doesn't look like
much at this point, but here is your game changing, oh gee, scarlet
pattern template. Now let's test it to make
sure it repeats properly. Hit M as in Michael on your keyboard for
the rectangle tool, click anywhere in
your workspace. Enter the dimensions
of the art board. 2000 by 2000 pixels. Click OK. Center that square
onto the art board. Change the fill to none. That first square with
the red line through it. And change your stroke to none. Hit, Arrange. Send to Back. Command a to select all. Select your swatches tab. Press V, like Victor for
your selection tool. Click and drag your pattern
into your swatches. Hit M on your keyboard
for the rectangle tool. Click somewhere off of your art board and drag
to make a rectangle. And select that new
pattern as your fill. Just make this bigger actually. So we can see the
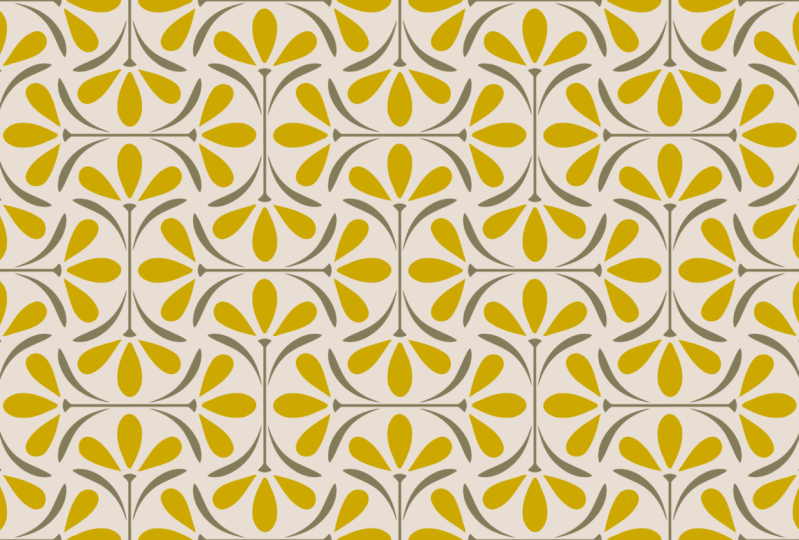
pattern bigger. An OG scallop pattern template
with symbols ready to go. But it's devoid of artwork. So let's jump right into
the next lesson and draw.
5. Create Artwork: You have a lot of choices
for this next step, you can use assets
you've already created. You can print the scallop shape right from the class download and layer it behind a piece of paper and use it as
a guide to create. Or you can import it into Procreate or affinity or
any drawing app that you use or join me in making
this simple vector flower, right in Illustrator works
really well with this layout. If you're going
offline to create, just stick with me for a few more steps and I'll cue
you in to pause the video. Now in case he took a break, I have my scarlet pattern
template file open. In my pattern
template workspace. I'm going to select
V as in Victor, select that test swatch
we just did, and delete. Select the symbols tab. Click on the symbol
if it's not selected, and click on the hamburger or the three horizontal lines at the corner and select
Duplicate symbol. This way will keep
an untouched version to revert to if needed. I'm going to rename
this symbol right away by clicking on
the hamburger again. And symbol Options. And I'm just going to rename
it with the number one. Click. Okay. Now let's delete that
transparent square we laid behind all
of our symbols. So layers. And then just click on the
little carrot right down at the bottom it says
Rectangle and delete. I'm going to hit Command a
to select all of my symbols, go to Properties and replace
symbol with my second one. Let's just save this file. If you haven't already
Command Shift s0g. So ODE is the name of this
type of pattern 0 g scallop. One. Let's save and click. Okay. You are now free to follow along as we create the
simple vector flower. Or stop the video here. Create offline and bring
it right back into that second symbol by
double-clicking on it, pasting your artwork in here. And you can join me
in the next video to continue for everyone else
creating the flower with me. Let's start the flower
right inside the symbols. So double-click on that
new symbol to open. Open properties. Hit L on your keyboard for
the ellipse, click anywhere, enter 200 for width tab, and 400 for height. Click Okay, Let's change the
fill to your petal color. I'm actually just going
to quickly delete all of these swatches by
clicking on the red one, holding down the Shift key, clicking on the very last one, and deleting the swatches. Yes. I do not want to
use this red color. So I'm going to click
on that palette. I'm from the class download. I'm going to enter
the yellow color from the retro floral palette. In case you didn't download it. It is a cda800 and hit return. I just want to add this color, make sure I add
it to my palette, back over to the left. Click and drag that
yellow square and release it into my
document palette. And I'm going to leave
my stroke color at none. Command a to select all V as in Victor on your keyboard
for the selection tool, click on the scallop
shape to make it your key object, Horizontal Align, Center, and Vertical Align Top Command Shift
D to de-select. I'm going to click on the
pedal and hold the Shift key down to move it. So it's just above
the center mark. Hit Shift C for your
anchor point tool. And click on that bottom
dot the bottom anchor. A for the direct selection
tool or the unfilled arrow. Click on the anchor
point to the left. Hold down the Shift key, and click on the one
on the right with the two anchors selected,
drag them upwards. And if you want to
keep it symmetrical, just hold down your shift key. And it'll help you
stay in the middle. And release. Now that I see it, I want to make it a little bit skinnier. So we'll hit V for
the Selection Tool. Hold down the option key
to keep it centered. And get those two little
arrows on the side and drag it in. And release. I'm just going to adjust the
height a little bit more, make it a little shorter. Command C, command F. Rotate it 45 degrees, enter 45. And hit Return, pull it
down and to the left. Command C command F
to paste in front. And now right under
height in properties, I'm going to hit the
Flip Horizontal tool. Here's a little trick in
transform in the x field. I am just going to delete that negative sign
and hit Return. Take a minute if you'd
like to play around with the placement of your petals
in relation to each other. When you're done, hit M on your keyboard for
the rectangle tool, click anywhere in
your workspace, enter 15 for wet, TAB 500 for height. And the Selection Tool. Hold down the Shift key
and select your scarlet. Click on your scale up again
so that it's the key object. Center your stem and bring
it down to the bottom. Click off the art
work to de-select. Select the stem if you would
like to change the color. I'm going to click on fill
back to that palette. And I'm going to use the green from that download
retro floral palette. It's eight to seven, Five way that you can use any
color you want and return. I'm going to make
a little shape to sit on top of the stem by starting with the ellipse
tool of L on your keyboard. And drag and make a
short and wide oval. Hit Shifts C for the anchor point tool
and click on both sides. A for the direct selection tool, select the top anchor, hold down the Shift
key to keep it symmetrical and bring
it down a little bit. V4, the black filled arrow. Click on your new shape. Hold down the Shift
key, select the stem, release, and then click on
the stem one more time. So that is your key object. Center the new shape to your stem and
vertical aligned top. Now let's click off of
it and take a look. See what we think. For me. It's too wide, so I'm going
to click on and again, hover over the side to
bring up the width arrows, bringing it in, but hold
down the Option key at the same time to
keep it symmetrical. Anymore like that. And move it up a little bit
so the stem doesn't peak out. Now we're gonna make it
a little bit shorter. I think. I'm happy with that. I'm just going to
re-center it just in case. So hold down the Shift
key, select both shapes. Release, select the stem
again as the key object, and hit Horizontal Align Center. Just going to zoom out. To take a look. I think I would like that
top petal, lower down. I'm just going to
drag it down and hold the Shift key to keep
it in the middle. And release. Take a minute
to play around with your shapes and make sure your flower looks
the way you want it to. To create the leaf, I'm going to click on the
pedal on the left command C, command F to paste. Drag it down. And in properties, I'm going
to change the fill to green. From here, click anywhere
on your workspace, then press a for the
direct selection tool. I'm just going to drag
it over and clicking on the anchors and the handles to change the shape to
something I like for leave. Yours may look very
different than mine. Once you're happy with it, hit V on your keyboard, click off of it, and
then click on it again just to make sure that
you have all the anchors. Select it. Command C, command F. Flip horizontally, go
into the x field and just delete that minus
sign, and click off of it. Feel free to move things around, make any changes at this point. And we are actually going
to pause here so that everyone who made
their own artwork can read join us in the next video, which is the big reveal.
6. The Big Reveal: This lesson is all about
one thing, the big reveal. In case you took a break, I have my OG scallop
pattern template file open in my pattern
template workspace. And I have my symbol opened
with my artwork roughly centered on the scallop and sized relative to
the drawing guide. Some of you will have
this basic flower or variation of it. And some will be working
with your own unique art, which I am so excited to see. Press V on your keyboard
for the selection tool. Select the Drawing Guide
or the scallop shape. Hit Delete on your keyboard. For the big reveal, just tap on the left arrow at the
top left of your screen. Now let's test the pattern. Hit M for the rectangle tool, click anywhere on the screen. Enter 2000 for width
and 2000 for height. And click Okay. In Properties, select no fill, no stroke, center, center. Arrange and send to back V for the selection tool
Command a to select all, open your swatches and click and drag everything
over to swatches. Zoom out M for the
rectangle tool, and draw a nice big rectangle. In properties or
in your swatches, you can select a fill for
your background color. I'm going to choose
white command C, command F, and change the fill
to your new pattern fill. If you see something
you want to change, just open the symbol
backup, adjust and retest. I guarantee that the more
you use this template, the quicker and
easier it will be. Joined me in the next
video to learn how to work with motif variations. Some tips when using
different art-making methods, and a bonus pattern that
you can quickly and easily get out of the
work you've already done.
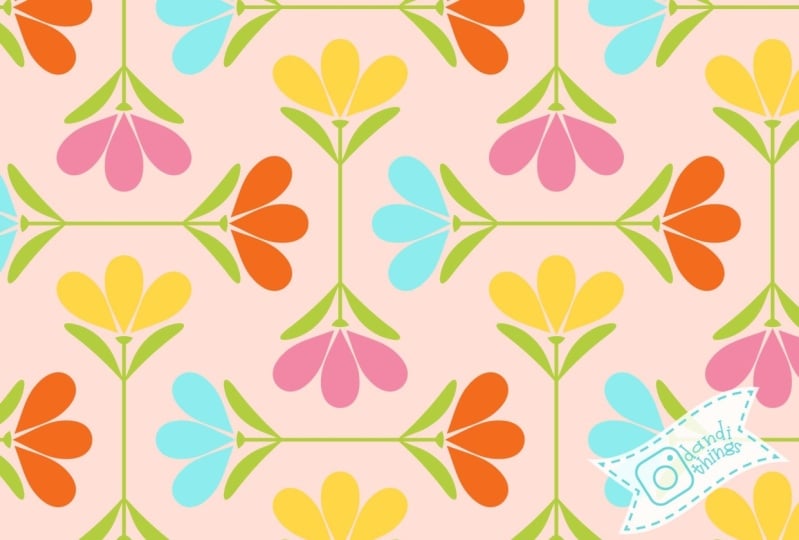
7. Variations And Bonus Pattern: In this lesson, I
will show you how to work with motif variations. Share some tips for
using the drawing guide in different ways
and demonstrate a lightening fast method to make another pattern with the
artwork you've already created. In case you took a break. I have my pattern
template file open. My pattern template workspace with the pattern I just made. Let's say you want
to further enhance the handmade field by making
the same marks again, but just in different
variations. Or maybe you're making different
bouquets of flowers or different faces or elephants or whatever you chose to create. You can still use this
pattern template by changing the symbols and keeping the pattern layout as long as your art work fits inside
the scallop shape. To demonstrate how it works, I'm just going to change the
petal color of this flower. I'll select the symbol I made. Click on the hamburger
and duplicate, making four in total. Keep the first is
the original and double-click on the second
flower symbol to open. Click and drag to select the
petals. Change the color. I'm using 017580 from the retro flower palette
from the class download. Whenever you add a color, be sure to add it
to your swatches. Double-click on the next symbol and make the changes you want. I'm changing the
petals to B as in Bob. Do you like David for c5e? Add to Swatches. And now for the last one, I'm using a C, D like David, 1c9, Add to Swatches. Click on that left arrow at
the top left of the window. Now I'm going to select all the flower symbols
that are upside down by holding the Shift key
and clicking on each one. Over the properties. Replace symbol and select
a different symbol. Now I'll select all the symbols with the flowers on the left. Replace symbol and choose. And now select the symbols
with the flower and the right. Replace open swatches. Select all drag to
swatches and release. Now click on the large rectangle and choose the new
pattern as a fill. Remember that was
just a simple example of how to change things up. But you can do the same with more complex variations or any number of different motifs. Now I'm just going to zoom
through the creation of some other patterns
using this process. Hopefully touching on some of the skills that are
relevant to you, your style, and your
preferred way of working. Yeah, thanks. Now as promised,
your bonus pattern. So here I have an earlier saved version of the pattern we've
been working on. To make the bonus pattern, I'm just going to
click on one of the instances of the symbols. Go up to object, down to Pattern and Make
tile type brick by column. Brick offset one-half, which is going to be half of the measurement of the shape
we've been working with. So for this, it's 500 pixels,
height, 1,000 pixels. And click down M on the keyboard
for the rectangle tool, drag it out here I have a
white fill from my background. Command C to copy
command F to paste in front and change the
fill to the new pattern. It's that easy. I have one more little bonus
lesson for you where I will demonstrate how I prepped
my files for submissions.
8. [OPTIONAL] File Prep for Client Submissions: The first and most important
step is to check your specs. There is no longer an industry standard
for file submission. So read the fine print. Look for details like
required file format. Dimensions including units
of measurement, resolution, which is usually listed as DPI, maximum file size, and
flexibility of layout design. E.g. I. Always prep my files to be
a minimum of 3,500 pixels. On my smallest side. I always present
the pattern tile is a full drop repeat
or a grid repeat. Even if that means it's just
a half-drop seen twice. And I'll show you what
that means in a sec. My files are always
set at 300 DPI. If you are a spoon flour or
raspberry Creek designer, make sure you're working
at 150 dpi instead. And finally, my source files are always layered in labeled. So that is what I
will show you here. You should be able to
adapt this process to your own specific
needs with ease. Here I have the two
basic patterns we have created in a saved file. Save this as a new file. Command, Shift S to save as create a new folder with the collection
name retro floral. And another sub-folder
for the first pattern 01 file name will be my name, Leanne Friedberg,
underscore, the collection name, retro
floral underscore. And the number one, delete the bonus pattern from the workspace in the swatches. Go to layers and
click on the carrot. If your layers are grouped. Select the bottom
layer, the rectangle, by clicking to the right of the open circle and
open properties. This was the no fill, no stroke rectangle we had
made to test our pattern. Change the fill to white because I'd always submit with
a background layer, even if it's white. I'm also going to add two pixels to the width
and height to help me avoid the fine white line that sometimes appears when
exporting or printing. Although the
background is white, the motifs fall
off the art board. And the artboard dimensions are whole numbers, not decimals. Still do it in case the buyer
wants to change anything. At the bottom of
the Layers panel, click on the plus sign
to add a new layer. With just the
rectangle selected, I'll click on the filled
square to the right of layer one and drag it up
to my new layer. Double-click on there too
and rename it background. Click and drag it below. So it is behind the artwork. Rename Layer one. Artwork. Select all of the symbols
by clicking to the right of the open circle next to
where it says artwork, back to properties
and click, Break, Link over to symbols
and delete symbols. Go to swatches and make sure
your colors are all there. Here, the black doesn't
belong, so I'll delete it. I'll save it one more
time. Command S. Now let's open the working file again to prep the
bonus pattern layer, we created Command Shift S
to save retro floral folder. Create a new folder. Zero to rename the file. Mine will be the end. Friedberg underscore, a
retro floral underscore, zero to double-click on the pattern swatches to
open, rename the pattern. I actually name it,
double-click to edit as a gentle
reminder for the client. So that when they're in
swatches and I hover over it, that's what they'll see. As mentioned earlier, I need
to present my patterns as full drop repeats
with a minimum of 3,500 pixels on
my smallest side. So let's look at the
pattern options. Brick by column
with the offset at one-half is referred
to as a half-drop Spoonflower and most
textile companies can accommodate to
that, but some cannot. So I just always prep as a grid. At the top. Click Done. And I'll show you
what this means by demonstrating the wrong way. First, let's delete
what's there. Go to Properties,
edit artboards, and change the board to
the minimum requirements. For me, it's 3,500
pixels by 3,500 pixels. Em for rectangle. 3,500, 3,500. Fill with pattern. If I were to submit
this pattern tile, the repeat would not work. Since the height of my
pattern is 1,000 pixels, I can only use a multiple
of that dimension. Think of it as
counting by thousands, since it must be
greater than 3,500, my next possible height
will be 4,000 pixels. You can change your preferences
so that the pattern doesn't scale or just
re-select the fill. Now if I duplicate
it and drag it down, you will see that the
pattern repeats seamlessly. The width of the
pattern is 500 pixels, which does divide evenly into
the width of the art board, which is 3,500 pixels. But as you can see,
it doesn't work. For a half drop repeat. You have to just double
the width of the repeat. In this case, that
would be 1,000. To find your dimension, just like the height
for my specs, it must be greater than 3,500. So I will bring it up to 4,000. I will cook the pattern
swatch to fill it again because it's
scaled and test it out. Now click on the workspace. Properties, Edit Artboards, open the preset drop-down
menu and select Fit to artwork bounds over two layers. Add new layer,
rename it Pattern. Select the artwork, copy
and paste in front. Select and drag one of those rectangles up
to the new layer. Rename the pattern tile edit in swatches to hint to the client where they
can edit the pattern. Rename the bottom
layer background, and change the fill to
the background color. Command a to select all add the two pixels
to the dimensions, but makes sure that your
pattern didn't scale. This is so important. So even if I think it didn't, I re-select the
pattern fill just in case Command S to save. Very sorry that the
explanation was super long, but the process is
actually really fast. Once you are familiar with
the steps, the good news, you now have at least two
shareable, printable, sellable patterns with a
re-usable method to create more. Join me in the next video
to go over next steps.
9. Next Steps: I hope you learned something
new in this course and are inspired to
use it in your work, or use it as a starting point to create
your own templates to ease workflow and grow
your portfolio after you've posted your project
here on Skillshare, you want to share it with
the rest of the world, post it to Instagram with
the hashtag pattern body. Tag me at the end. Friedberg, if you
want me to share it, if you liked this class, follow me here on Skillshare and you'll find out when
I post new classes, if there's a specific
pattern of mine, you'd like to learn how to make. Just leave me a
little note below that pattern on my
Instagram feed, and I will add it to
the class creation. Q. Thank you so much
for joining me here, and I'll see you again soon.
 Leanne Friedberg, artist | pattern designer