Transcripts
1. Introduction: All I can say is that this bread is so
good that it had all of us dive in and hopes you grab that piece before they
were completely gone. Hi, my name is Diana and I was born and raised
in Monterrey, Mexico. I love baking and eating
sweet treats and bread. This love of mine started in our traditional Mexican get
together called La Merienda. La Merienda is an afternoon get together where all of my
family including my aunts, uncles, cousins,
and grandparents, would all gather
around the table and enjoy delicious Pan
Dulce or [inaudible]. While my grandpa, the greatest storyteller
I've ever known, would have our full
attention as he made us laugh with his stories of
adventures and misadventures. Although many sweet
pieces of bread were brought in and placed in
the center of the table, there was one in particular
that would have all of us dive in and fight
for, the conchas. I wish I was kidding, but they are just that good. The word concha translates
to shell in English, which describes their
iconic shell appearance. Conchas have inspired all kinds of products from stickers, to old purses, and most recently I must say it for the other
[inaudible] was created. It was made with
over 20,000 conchas, giving shape to our
beloved Katrina. Throughout the years,
the conchas have been popularized
and mass-produced, and in doing so, they
sacrifice the quality of the ingredients which results in hard and unflavored breads. The ideal thing to do is
to either buy them at Artisan bakeries or
make your own at home. Today's class is
all about teaching you how to make this
traditional Pan Dulce. I am thrilled to share with you a piece of my culture
in food form, and teach you how
to make this sweet, fluffy and crunchy treat
for you to enjoy at home. This is a simple
recipe to follow, so even if this is your
first time making bread, I will take you
step-by-step so that by the end of this class you have a dozen of delicious
conchas to share, or to eat on your own. There's no shame in that
since I can do that, I need the batch by myself. In this class, you will learn what ingredients will
yield the best results. How to bloom the yeast, prepare the dough
and watch it rise. Make the sweet and
decorative topping, bake, and finally, eat and enjoy
your homemade conchas. The best part of this class is watching how the dough develops
in front of your eyes, and enjoying the delicious bread that comes out of the oven. I hope you join me today so
that we can bake together, let's dive into class.
2. The Baking Process: Making bread is such an exciting
and interesting process to do and watch as it
happens in front of you. There is one key element that we as bakers must bring
to the process, and that is patience. As I mentioned in
the past video, this is a very simple recipe. However, it does require
patience because we need to allow the dough to
rise two different times. The first time
that I made these, I was not very patient and I
did not allow the bread to rise as it should. In the end the conchas
turned out great in flavor, but much more
compact since I did not give it the appropriate
time to rise fully. I also started late
in the afternoon, which had me pulling out the last tray well
after midnight. I wanted to share with you an approximate snapshot of how this journey could look like from start to finish so that you can plan your baking
day accordingly. As a tip, make sure
to gather and weigh all the ingredients you need
and take out of the fridge, those that require to be at
room temperature an hour or so before so that you don't have to wait
for them to be ready. Our first step is
making the dough, which should take
around 30 minutes and then comes the first
rising of the dough. This could take up to
two hours or longer, depending on your
room's temperature. The colder it is, the longer it will take to rise. If your room is
cold, don't worry, I will share a couple
of tricks with you to accelerate this process. As we let the dough rise
during the next 30 minutes, we will make the
decorated topping and shape them into disks. Once the dough has
doubled in size, we will divide, weigh, and
shape them into balls. We will then add the
topping and cut the design. Next comes the second and
final rising, same as before. It could be two hours or longer until they
double in size. Once they are ready, baking takes around
15-20 minutes per batch. I have two batches, so it is around
30-40 minutes total. Approximately, it
will take you around 6-7 hours from start to finish. As you can see, where there is more time spent is during the rising
of the dough. With this knowledge, you can plan when to bake your conchas. Now, let's go to
our next lesson and take a look at the
ingredients. See you there.
3. Tools and Ingredients: [MUSIC] Hey, welcome to the kitchen. Let's look at the tools
and ingredients we will need to make the most
delicious conchas. While you are
following along today, just a quick reminder that
you can find and download the recipes and all of this information in our
class resources tab. Feel free to also post any questions or comments
in our discussion section. I highly suggest that you take pictures of your baking journey. I would love it if
you could share those in the project
section of our class. Let's go through
the tools first. If you already saw
the ingredients, you will notice that I will use weight measures instead
of cups and spoons. When making bread,
it is essential to have precision in
your measurements. The first tool you
will need is a scale, and I highly recommend
that you have a scale. Small bowls or containers to keep your weighted
ingredients in, a tall or clear glass container. It can be plastic too. I prefer to use
straight size because this one is what we will
use for our dough to rise. This is the one that I use. A stand mixer, a whisk, parchment paper,
or a silicon mat, oven trays, plastic wrap, one large zip-tight bag, scissors, and a flat
plate or a tray. Now, let's look at
the ingredients. For our dough, we will need 300 grams of wheat flour plus a little bit of extra to sprinkle
our surface with, 10 grams of active yeast. Be sure to check the
dates so that it is as fresh or as
new as possible. Seventy grams of sugar, 5 grams of salt, 75 grams of unsalted butter
at room temperature. Butter is a key ingredient, so make sure you use high-quality butter for an
incredible buttery taste. Eighty-five grams of eggs
at room temperature, and I usually have small eggs, so I take two, mix them a bit with a fork, and then pour the 85
grams that I need. Seventy grams of whole milk
and 1/4 of a cup of olive oil. Now, for the sweet topping, we will need 100 grams of
Crisco or vegetable shortening, 100 grams of powdered sugar, 110 grams of flour, and the following
are optional in case you want to give your
conchas a different flavor. I will use one tablespoon of cocoa powder and one
tablespoon of matcha powder. I encourage you to have
all your ingredients weighted and ready to go
before our next lesson. It will make the process much more streamlined
and enjoyable. Take a few minutes to do so and I will see you
in the next lesson, making the dough. See you there. [MUSIC]
4. Making of the Dough: [MUSIC] As mentioned before, our dough will have two moments where it will rest and rise. What causes our bread
to rise is our yeast, and we need to make sure that it is in good shape
to make that happen. The first step we will do is
the blooming of the yeast, which means checking to see if our yeast is still
alive and kicking. First, let's grab our
milk and heat it in a small bowl or a
pan for 20 seconds, until it's warm to
the touch, not hot. If it's too hot, we will kill the yeast. Once it is warm, pour your milk in a bowl, add the yeast, and from our dough ingredients, grab a tablespoon of sugar, and a tablespoon of flour. Now, grab your whisk
to mix until they are incorporated and let it sit around 5-7 minutes while
we do our next step. When we come back,
we should find it to be bubbly and foamy, meaning our yeast is alive. If after that time nothing happened and your bowl
looks exactly the same, then you know that
the yeast is dead. This is a great way to not waste all your ingredients by
first testing the yeast. If nothing happened, get
more yeast and try again. While we let the yeast rise, let's go to our stand mixer with the hook accessory to start
mixing our dry ingredients. We will add the flour, sugar, and the salt. Let's start mixing
at low velocity. A couple of minutes should
do the trick. [NOISE] Now that 5-7 minutes
have passed, let's check on our yeast. As you can see, we have
bubbles and foam showing, which means our yeast is alive
and perfect for our dough. Now we can add the
yeast to our mix, and I will up the
velocity two levels. Now grab the eggs and add them. Finally, let's add the butter. Now we will up the
velocity of our mixer to a medium-high for 20 minutes. My mixer has 10 levels, so I will bring it up
to a Level 7 or 8. Like my professional
baker friend always says, "Put it as high as your mixer will allow without breaking it." She says this because what
the hook accessory is doing is mimicking the kneading and the grabbing and the pounding
of the dough by hand. It can cause strain
on your machine, so always keep watch of it and make sure it's
handling the kneading okay. Also, as the hook kneads
and pounds the dough, it can cause the mix to
slowly move on your counter, especially halfway through to
the end of the 20 minutes, so keep an eye on it
throughout the whole time. I love watching my mixer do
this, it's almost hypnotic. Like I mentioned before, the hook is mimicking the
motion of kneading by hand. The reason we want this
movement is because we want to release the gluten
inside of the flour. When the gluten is
fully developed, it gives us an elastic dough. I will let the mixer do
its thing for 20 minutes. The 20 minutes are up, and now let's check
if our gluten has fully developed with
the windowpane test. Grab your dough and stretch it. Stretch a portion of
it with your hand. A well-developed dough
can be stretched so thin that it's translucent
like a window pane. If it breaks, it means that it needs a little bit more
time in the mixer. When it looks like this
and it does not break, it means that we now have a fully developed dough that has passed the windowpane test. We are ready for our next
step, The First Rising. [MUSIC]
5. The First Rising: Let's grab our straight
edge containers so that we can
place in our dough. Grab some olive oil and coat the bottom and the sides to
prevent it from sticking. Lightly coat your hands with olive oil and pick up
the dough from the bowl. We want to shape it like a ball, making sure to pull all the creases to the
bottom so that we're left with a smooth and
creaseless top, just like so. Once we have that, we can
place it in the container. Gently add a thin layer of oil to the dough to prevent
it from drying up. We will put plastic wrap on top to avoid the
humidity from escaping. We will let it rest
so that it can rise until it doubles its size. Why do I suggest a container that
has straight edges? The reason is so that
you can visually see where your dose
it's right now. You can easily check when
it has doubled its size. You can also mark with tape or rubber band or a marker
to know where it started. If you don't have a small or straight
container like mine, take a picture so
that you can have the visual aid as
you watch it rise. Let's talk a bit about what will happen as the bread rises. The yeast, which is a
living thing loves sugar. In a process called
fermentation, the yeast is eating on
the sugar and the dough, and in turn releasing
carbon dioxide bubbles. These bubbles are good as
a help our dough rise. That is why it is key to have a successful gluten formation so that even when it is stretch, no bubbles will be able
to escape our dough. As you may recall, this process could take
up to two hours or more. Time is relative, and it greatly depends on the
temperature of your room. The colder it is, the longer it will take. Here are a couple of
tips to help you out in case your room is
on the cooler side. Tip number 1, leave
your container next to a window so it gets direct sunlight or
warmth from the outside. Tip number 2 place it in your
oven with just the light on, do not turn on the oven. The heat the light bulb emits
is enough to warm it up. Tip number 3,
preheat your oven at 350 Fahrenheit for 2-3 minutes. Turn it off and put
your container inside. Remember to turn it off. We just want it
to be warm enough to help the
fermentation process. As we wait for our
dough to rise, let's go to our next lesson where we will make
our sweet toppings.
6. Sweet Topping Discs: Let's make the most of
our time as we wait for our dough to rise and
prepare our sweet topping. For this step, I
highly recommend using a large bowl and your
hands as the main tool. You could use your stand mixer, but if you do not
have a bowl cover, you could end up surrounded
by a cloud of powder sheerer. Plus, I always say that our
hands are our best tools. Let's grab our bowl and add 100 grams of Crisco or
vegetable shortening. Let's add 100 grams of powdered sugar and a
110 grams of flour. Let's go ahead and mix and knead with our hands until it
is fully integrated. Once you are done,
you will end up with this ball that has a
texture of a playdough. You can use this to top
off all of your contents. Or if you prefer, you can add flavors. Just cut the ball in equal
parts and integrate those. I'd like to do three
flavors total. I will divide it in three
to have the traditional, chocolate and matcha flavor. This ball weighs a
total of 310 grams. Each flavor should have
roughly a 103 grams. Now that I have them divided, I will add one tablespoon
of cocoa powder to one, and a tablespoon of
matcha to the other. Feel free to experiment
on the amounts, in case you want a softer
or a stronger flavor. We will mix each, until they are fully
integrated. Let's go do it. Let's divide them into rolls that weigh 25 grams each. We should end up with 12
in total for each flavor. Great. Let's pop them in the fridge for
around 20 minutes, so that they are easier to
handle when we form the discs. Now that our toppings are cool, let's shape them into discs. There are a few ways
that you can do this. You can either form
them using your hands, this is a traditional way. Another way to do it is
using a tortilla press. But this is not something
that is commonly found at every household. I will show you a
third way in which you can use the same concept
as the tortilla press, using a zip-tie bag and a
flat button, plate or tray. To get your back ready, cut only the sites of the bag. That way you can open it up, and generously let's sprinkle
flour on both sides. Let's grab our
ball and make sure it's as much as a
sphere as possible. We'll place it on
one side of the bag, put the other one on top. Grab your plate and press down until you have
a 3-4 inch disc. This could take a couple
of presses to achieve. Gently, remove it from the back. The flower we sprinkle should
help take it off easily. Place it on top of
parchment paper. If you want to be
on the safe side, you can also sprinkle
some flour on the paper. There you have it.
Continue to do this process until you have
all of your 12 discs ready. You can cover and
leave them there as we wait for our
dough to finish rising. Once your dough has risen
to double its size, we are ready for
the next lesson, divide, and shape.
See you there.
7. Divide and Shape: [MUSIC] Look at your
beautifully risen dough. As you can see, it has
doubled in size and it is ready to be divided
and shaped into our buns. But first, the most
satisfying part, let's punch the dough
to remove the air. This is my favorite part. Now we will divide our
dough into 50-gram pieces. You should end up with 12
pieces. Let's get to it. Now that we have
all of our pieces, let's shape them into our buns. For this step, we will need
to oil a small flat surface. It could be a large flat plate or it could be your countertop. The oil will prevent our buns from sticking
to the surface, so be sure to
re-apply as needed. Let's grab a 50-gram piece. Once again, we want to put
all the creases to the bottom and pinch them to ensure
we have a smooth top. Now place your ball
with the smooth top facing up and with a
circular movement, we will shape our bun as a ball. We are not only shaping
it but also we want to make sure that it
is not a loose ball. We want a nice
round compact ball. Grab your ball and with
the palm of your hand, we will roll it without
pushing too hard. With your fingers, you will gently push it
towards your palm. Let's see how it's
done. It's almost like you're doing a
crystal ball motion. Roll it with your palm and
push it with your fingers. You can do this
faster. I just want to capture the
movements for you. This is what we want
to end up with, a nice round and compact ball. Place it on your tray or
your parchment paper. Leave around three inches of space between them once
they're in their tray. Now let's go ahead
and do all 12. After that, I'll see you in our next lesson while we will top them off with our decorative
disks. See you there.
8. Adding the Sweet Toppings: In our previous lesson, while we let our dough rise, we created our topping discs. It's time to place them
on top of the buns. But before we can do that, we need to prep the
bun to make sure that the topping
will stick to it. Once again, grab some olive oil, put on your hands and
gently rub all of the buns. Now we can add the discs. Let's grab one and place
it on top of the bun. It is okay if the disc
is larger than the bun. Don't worry about that. I do however, like to make
sure that the disc is all the way around
nicely wrapped. Once you're done
with a gentle tap, push down and there you have it. Let's do it with
all of our buns. It's time to add
decorative cuts. We will do this by using a
knife and cutting very gently. Make sure we only
cut the topping. We do not want to cut
through the dough. The traditional
decoration is to cut it in such a way that
it looks like a shell. I will try my best attempt
and show you how it comes up. But you can do a starburst, straight lines, a
heart, anything. These are your
creations after all and you can add your
personal touch to it. Do this very gently
and just make sure to not cut through the
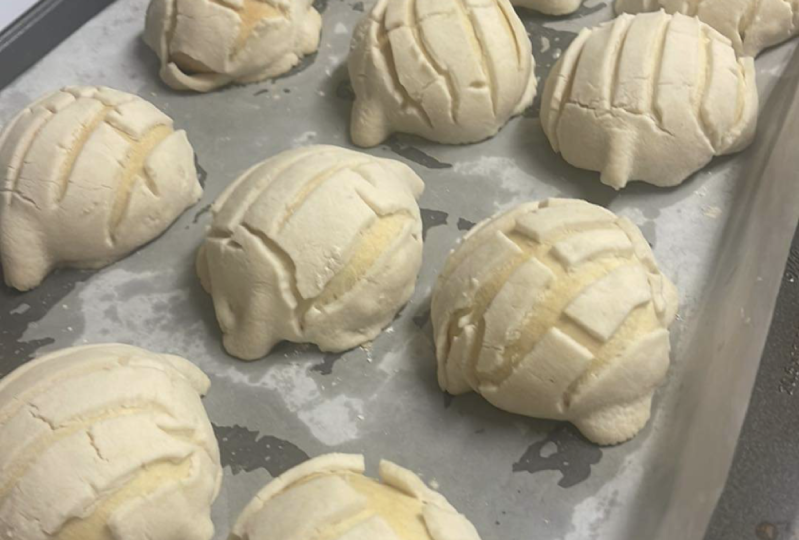
dough, just the topping. Here are a couple
of shell designs. Let's go ahead and cut all of the toppings and see
you in our next lesson, the second rise.
9. The Second Rise: Now that we have our decorative sweet toppings on our buns, it is time to let them rest so they can rise
for a second time. Again, this could take
up to two hours or more depending on your
room's temperature. The colder it is, the
longer it will take. What we want is for the
buns to double their size. Remember to use the
tips I gave you before to accelerate
the process. Remember to be patient and
give the dough time to rise. Don't accelerate the process and you will be rewarded with fluffy and airy conchas.
It'll be worth it. As they rise, you will notice that the cuts you made start to open and you will be able to appreciate the depth to them. Let's give them time
to rest and rise, double their size, and once they have done
so. I'll see you in our next lesson to get them in the oven and finally
start baking.
10. Baking the Conchas!: It's finally time. We have been patient. Our dough has risen twice, our toppings have opened, and now we bake. Go ahead and pre-heat
your oven at 350 Fahrenheit or 175 Celsius. These conchas will bake
for 15-20 minutes. That is my favorite part, that they take so
little time to bake. You will know they're ready when the bread gets a golden color. Keep an eye on them because they may not need that
full 20 minutes. Let's get to it. Happy baking. Look at these gorgeous conchas. The smell that is coming out of this oven is out of this world. I can't wait to
have them out here. Look at these beautiful conchas. They baked wonderfully. They grew a bit more
as I they baked. There is nothing like taking
a bite of a warm concha. You will be tempted, and I encourage you to do
and take a bite, but just make sure that
they are not super hot to avoid any unnecessary burns. Let me open one now
so that we can see how it looks on the inside. It's very fluffy and it has
pockets of air all around. For our final tests,
let's take a bite. [inaudible] . It tastes amazing. It's buttery, it's
sweet, and very fluffy. The topping has the
perfect crunch, and I hope that you're as happy as I'm with the result and that you enjoy the sweet taste of Mexico and share with
your friends and family. In the next lesson, I will share a few tips to extend the
life of your conchas, and also a few hacks to take them to the next
level. See you there.
11. Tips and Hacks: Hello again. I am sure
you are super proud of your conchas and you may be wondering how long
will they last? That is, if they make it after one day without being eaten. If this is a case,
I suggest that you store them in a bag or an airtight container and store it in a cool
and dry place. They should last in perfect
condition for four days. After that, they may
lose their fluffiness. You can also freeze them if
you want to preserve them longer and maintain
the same freshness as the day you bake them. To do this once they have
cooled off completely, store them in the bag, and
freeze for up to three months. When the time comes to eat them, remove them from the
freezer the night before and leave them
at room temperature. By next morning, they
will be as if they were freshly baked
and very soft. If it's very hot, a few hours might do the trick. Now for the hacks, although the conchas are
amazing on their own, you can hack your
conchas by cutting them through the middle
and stuffing them. The possibilities are endless. We use those [inaudible]
, marmalade, Nutella, whipped
cream, ice-cream. I tell you there
are so many things. My favorite is to serve them
with Nutella and ice cream. I invite you to experiment and see what will
be your favorite. I hope you share it in the discussion section
for us to try as well. The next hack is
for when you have an older concha that has lost
a bit of its fluffiness, what we do is cut it in half, spread butter on it, and put it on a warm pan until the butter melts and it
gets a little bit golden, and then you eat it. That touch of butter
and warmth are a great combination for when they are more
on the dry side. I hope you try these hacks and tips and that you find
them helpful as you continue to explore the magical world of concha baking, eating. Join me on the next lesson for some final comments.
12. 12 Final Thoughts!: Congratulations on
making it this far, and I truly hope that you
give concha baking a try. If you do, I would
love to see pictures of your journey and your
fresh leaping conchas. Please go ahead and add them to the project section
of our class. Also, if you have
any questions or suggestions for other things you would like for me to teach, please post them in the
discussion section and I will be there to
chime in or help out. This is my first baking class, so if you have any comments
or feedback for me, I would appreciate you'll
leave me a review so I can become a better teacher
for you and the community. Thanks again for joining
me and I hope you enjoyed learning how
to bake conchas. I love sharing this bit of my Mexican culture
with you today. See you next time. Adios.
 Diana Escamilla, Crafter, Maker & Teacher