Transcripts
1. Introduction: Hi, I'm Irina Trzaskos , watercolor artists and Illustrator, also I like to teach watercolor classes. In today's class, I will show you how to paint winter greenery. Winter greenery is not just about Christmas and winter holidays, you also can use it for pattern design, winter wedding stationery, and other winter projects. This is the last class of this year. Thank you for being with me and sharing your projects, votes, and comments. I appreciate it so much, and I wish you and your family a wonderful holiday season and a fabulous creative new year. If you are new to this channel, welcome and thank you for joining. Press the follow button on top and lets get started.
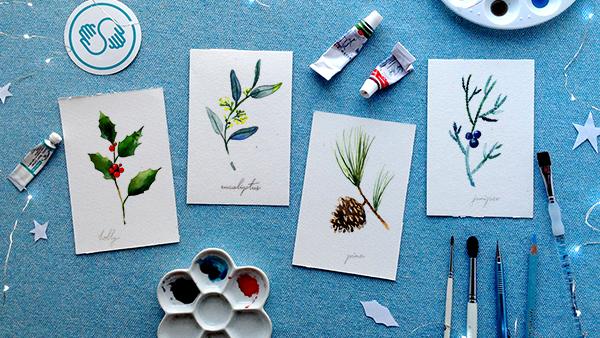
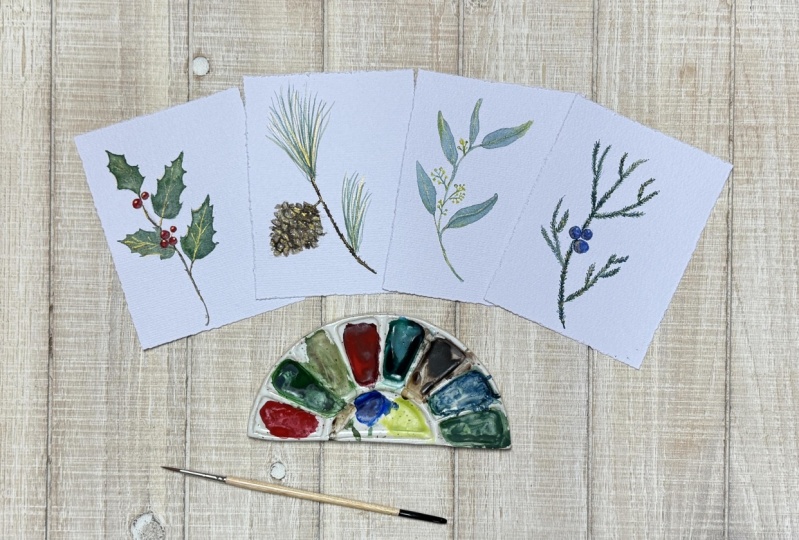
2. Project: In today's class we will be painting four types of a winter greenery and your project is to pick one type and paint it. Or you can paint all four of them.. We will be painting a whole branch of sun-berries, a junior pram branch and pine branch with a pine cone on it. An eucalyptus assiduous plant. I also want to show you how you can do as your winter greenery. You can make a pattern out of it. I made a pattern last year and it got licensed. I got samples of this mug. It comes in this kind of box and with the lid. Isn't it cool? You can use your greenery also for pottering designs.
3. Colors & Supplies: In this class, we will be using the following supplies. Watercolor paper, I'll be using compress a 140 lbs and my Canson, watercolor paint, water, paint pallet, paper towel. I will be using a pencil, eraser. Medium round watercolor brush. This is number 6, a synthetic brush, a small watercolor brush. This is number 2, synthetic brush and also a liner brush which is harder to handle but I think I will manage it. I'll be using a little bit white gel pen. You can use also whitewash or white ink, whichever you prefer. For colors we'll be using following colors. It may seem like a lot of colors, but we mostly will be using them to mix them into green and to have different greens. This is a golden orange. If you don't have a golden orange, you can mix cadmium orange with some cadmium yellow and you'll get the same color. Using cadmium orange for whole this, we'll be using cadmium red to diversify our greens, we'll be using ultramarine blue, also will use yellow green adding a lot of green and for a browns we'll be using a rosy yellow and sepia. These are all the colors will be using today and we'll be mixing them between each other.
4. Holly Branch: Now, let's draw and paint the holly branch. Let's start with the branch. Leaves have a shape, you can just draw an angulate leaf and add this spiky edges to it. If you don't know how to, draw like it right away. But they're pretty simple leaves to draw. Again, don't overthink it because there are all kind of leaves in nature, so if it doesn't look perfect, it could happen in nature. We'll have berries right here, right [inaudible] and branch going there and one more leaf. That's all the drawing I'm going to need, and next I'll take some bright green, mix it with some orange. We can start painting leaves, so on the top of the leaf there'll be a warmer shade and next we'll switch to regular green, and next we'll add to our green a little bit of ultramarine blue. On this side, I would like to add some more of this warm shade. This is good and the same thing with the berries, you can make some warmer shade, some cooler shade. Here we have yellowish green or a little bit of cadmium orange over warmest shaped and then it transitions in regular green and a green mix to some ultramarine blue. It's not that complicated, and the stem is going to be also green. You can add a little bit of [inaudible] in stem. Here we have a more of the shape is important than overshadowing. I don't want to take extra units of textures or lines. More orange and green, and we are getting this one a little warm green, beautiful. Then we'll color the berries, we'll need them ripe. Then we'll paint from after the leaves are totally dry, so the green one blend in our red. For the stem, let's take a little bit of [inaudible] and we'll add some regular green to it. We have a little stem here for the berry and the last leaf. Trying to preserve some of this water color transparency, don't put too much pigment. Make sure your paint is still flowing and it's easy to move on the paper. On this side, let's add some shadow, and the bottom of course, well here. Nice. Now I can paint the berries and make sure you're not painting the ones which are touching still wet areas on the leaves. Let's take some cadmium orange for one part and then let's take some cadmium red, a little highlight and for the shadow part we'll mix some cadmium red with green. You remember that where the light hits, the watercolor will be more watery and wherever the shadow is, the watercolor will have more pigment. We discussed the basics of watercolor techniques and I don't have to remind it. Here are two berries and the second go to the other ones. We'll start with orange with a little highlight or two. You can switch to a smaller brush for the berries [inaudible]. We shouldn't paint on this berry because it's bleeding a little bit in our leaf. I guess, it's okay. Again, cadmium red with green for our shadow. Dark cadmium orange for our warm part. You don't have to have highlights on every single berry, it's okay to skip some because the light is not really hitting uniformly on all of them, and let's add a little stem underneath. Some mess, its okay, it happens, and some more red. Now I have to let it dry and wait, especially this part so we can make more precision between these layers. Now when these berries have dried, we can mix some green with cadmium red and we add this dark brown with a lot of pigment and we can paint the space between the berries and this little branch. You also can correct the shape of the berry a little bit by painting the space between it. Also let's add a little bit of shadow on the leaf. The shadow which comes from the berries and you can soften the edge a little bit. This is our holly branch.
5. Seeded eucalyptus: Another type of trains, a Winter greenery is a seeded eucalyptus. We've painted a silver dollar eucalyptus, one-way inner leaf class. I'll leave a link somewhere. This is a different type of eucalyptus as often used in Winter compositions. The leaves look like this, and also have clusters of seeds somewhere here and here, but we'll paint some with the paint right away. Let's take some green and mix it with ultramarine blue until we get a very cold color. Hey, I made a gold hue of green, and now I have to add water to get enough water so it won't be as dark. If you want to make it even more neutral or gray, you can add a little bit of cadnium orange. We'll try it in a second. I'd like to make it a little bit warmer, so I'll take some lemon yellow until enter tried here to it. The next and edit to the wash to drink more interest to our leaves. You can see leaves are very interesting because shape more unusual for other leaves. Here we have a stance and can take a smaller brush for stem so you won't make a mistake, get told they're not as chunky and shall not leaps. Again, I'm going to add a little bit of lemon yellow somewhere, or a little bit of blue to make them a little different. It's not him complicated. Just interesting shape of the leaf and color. Lets paint some seeds, will take some lemony yellow, proceed, will paint some circles. Then with a small brush, we'll take some of our anode tip it right into the yellow and I'll drag it down, so you can see how green is mixing gold yellow. Where the green is touching yellow, they're mixing into this beautiful gland. Again, you can start with circles and you can start a little branches, somehow the circles. This little stem has to be primitive thick. A green color which is turning into yellow at some point. We see it has this shape nail on. Some are turned to us like this and shape, and connect. It's too bright for the Winter compositions to ensure. You can always add down a blue, after it's totally dry if an anti sublime, so blue seeds. Let's make another little cluster here. Circles, seeds, and connect into little stamps right here and lines on here. This is another entity.
6. Pine branch & pinecone: Now let's draw and paint a pine cone on a pine branch. To draw a pine cone, we need to draw a diamond shape with the longer part here. It's like a cone with a pointing end. Then just picture virtual cutting it here like a cone. After, we'll start its own correct irregular edges. They don't have to look in the same direction, looking at different directions. I think we need one longer here. After a while we'll erase this line. Well, we'll erase it after because I'll be just painting and we'll erase it after off-camera. Some irregular edges, some looking up and some looking down. This part will be more rounded. We have the general shape of a pine cone. I still can add some elements coming out, like this. Now, I have to show where the light spots will be. Here, all this part is going to be light. Then it will be like Plato, Plato's which are going diagonally. They are irregular too. I create on diamond shapes and the next row. There are closer to each other at the bottom. I can have one here too. They don't have to be at the same distance one from another. One can be more to the left, one can be more to the right. To answer of these edges, some of them will be light too. This doesn't look like much, but it's going to look like a pine cone, I promise. Erase this line a little bit. I'm drawing a few more elements so it doesn't look too perfectly aligned to the liner head. Here we'll have a branch. Pine branches are so easy to paint. Ours will be with longer needles. We just need to show where those needles will go, like in this shape and everything else will deal with paint. What we'll do next, we'll paint the pine cone with a lighter color so it can dry while we are working on the branch. We can go with a darker color. I'm taking some sepia with ultramarine blue and a little bit of raw sienna and dilute it with a lot of water. It's going to be grayish brown color. We'll cover the entire pine cone and we'll still be adding in this wash, some raw sienna spots here and there to add some warmth to our color and to make our watch more interesting. We could skip the drawing and just don't make a shape prior to have a brush if you're confident enough with your brush skills. Let's add some blue too. Why not? While are back on this drawing, we can paint the branch. Let's take some raw sienna. A little bit of this mix of sepia and paint our branch. Then we have a small brush. Take some picker sepia. We'll add some darker spots on our branch. We'll come outside our lines a little bit to add some texture to the branch. Painting some more on this little textures with raw sienna. Make it a little longer, like this. Next we'll have clusters of needles. Let's make some granular green with a little bit of golden orange. It'll give us this warm green shade. With confident brushstrokes just start here and paint the needles in clusters by three or five. Your hand has to be really confident otherwise your needles won't be straight. Some of mine are not. Turn the page anyway you're comfortable. Of course you can make short needles too if you want to have a different pine. I decided to show you how to make long needles because they seem more complicated, trickier. Next we'll make some green with ultramarine blue to get a golder and a darker shade of green. I'll add some more needles. Let's add some here too. Now we have to wait until our pine cone is totally dry and add some shadows between this little pine cone petals. Let's call him like that. Now when our pine cone is totally dry, we'll take some sepia. If you need darker hue or you can add a little bit of ultramarine blue tint. Starting from the top we'll start adding this dark color to the bottom on this pine cone [inaudible]. Edges will be light and inside it's going to be dark. When we get here, will be avoiding those little diamonds or irregular shapes we were drawing, and we'll be just painting around them. You can give a lighter spot here and there just a little bit but mostly it's going to be dark because the pine cones are dark inside, almost black. Right here we'll add some lines and some dots with the white on our. Our pine cone on a pine branch is ready.
7. Juniper : Now let's draw and paint a juniper branch, which is also very popular in winter fall compositions and greenery compositions. Juniper has this beautiful berries, which can be green, bluish and gray, or sometimes the different type of Juniper would have longer needles and almost red, pink berries. For variety, let's make our berries blue, and here we have three berries and I won't make my branch too complicated. I will just show you the principles, so it's looking like a little tree. Branches are like round a little bit. Very beautiful. Then along the branches it has like teeny-tiny texture. It's even hard to name needles, but it's close to needles. That type I was telling you, a pink red type is looking almost like rosemary. But today we'll be painting the one with ideally short needles. This is enough of the branch and I'm taking a small brush, yellow green paint, some ultramarine blue to it. We get this rich beautiful green color. We'll start from this branch. So we're painting the branch. We have enough paint and water in our brush. So it's like a little [inaudible] and then, we would pull this little needles out of this long puddle of water. You can do it in the direction outside the branch or to the branch. Very simple and pretty symmetrical. If you feel your paint is too uniform, you can just add some more blue here and there. The same way we are painting [inaudible] and then pulling those little teeny tiny needles which are forming with texture. I mix [inaudible] , blue which will make a variety of shades to keep our water guard wash more interesting. Next page. So don't overthink it. Just in this way you can practice your branch control too to make them as uniformly as possible. But if they're not perfect It's okay. More is repeating here, that. Let's take water blue. It's very same but it has a different texture than our winter branches and it will add variety to your green area. I think it looks good. Okay, now we have our berries, so we'll take some blue, a little bit of green. This is too much green. Need more blue. To make it a grayish, we'll add a little bit of cotton orange to it. Then we can paint on berries. You can make them green too, you can make them pink. You're making good different if you're painting a different type of Juniper. Let's add a little bit of green to this it gets more shaded. I will add water shadows when they will be a little dry because now they have a lot of water. I'm using a paper towel here and drawing brush and take out the excess of water. Meanwhile, while that dries, we can paint other branches. Turn the page in a way you are more comfortable. Now we are drawing a type of winter greenity you can add to your compositions, the grapes or stationary designs. The last one. It's very relaxing, just to repeat the same brushstrokes. I think we need a little more color. At this point you can decide if you need more branches somewhere. I can add one here, why not. Maybe one here. Add some water blue to this one, it looks a little different. I think we need a little branch here and we can add some shadows to our berries. Go inside. Some water blue. Shadow is usually colder especially if we have a sunlight as our light. Our juniper branch is ready.
8. Happy Holidays!: Thank you for watching my class. I hope you had a chance to paint with me. If you liked this class, please leave a review and upload your project to our project section of the class. If you're sharing your project on Instagram, please tag me so that I can give you my feedback. Happy holidays, and see you in my next class. Bye.
 Irina Trzaskos, Watercolor Artist & Illustrator